
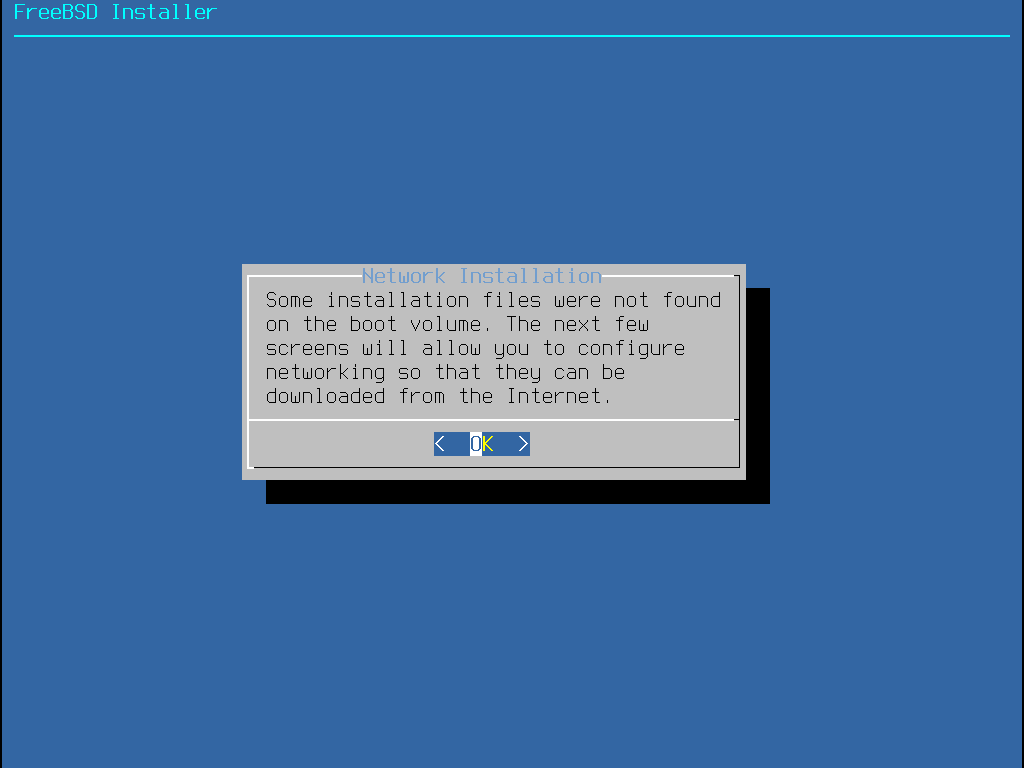
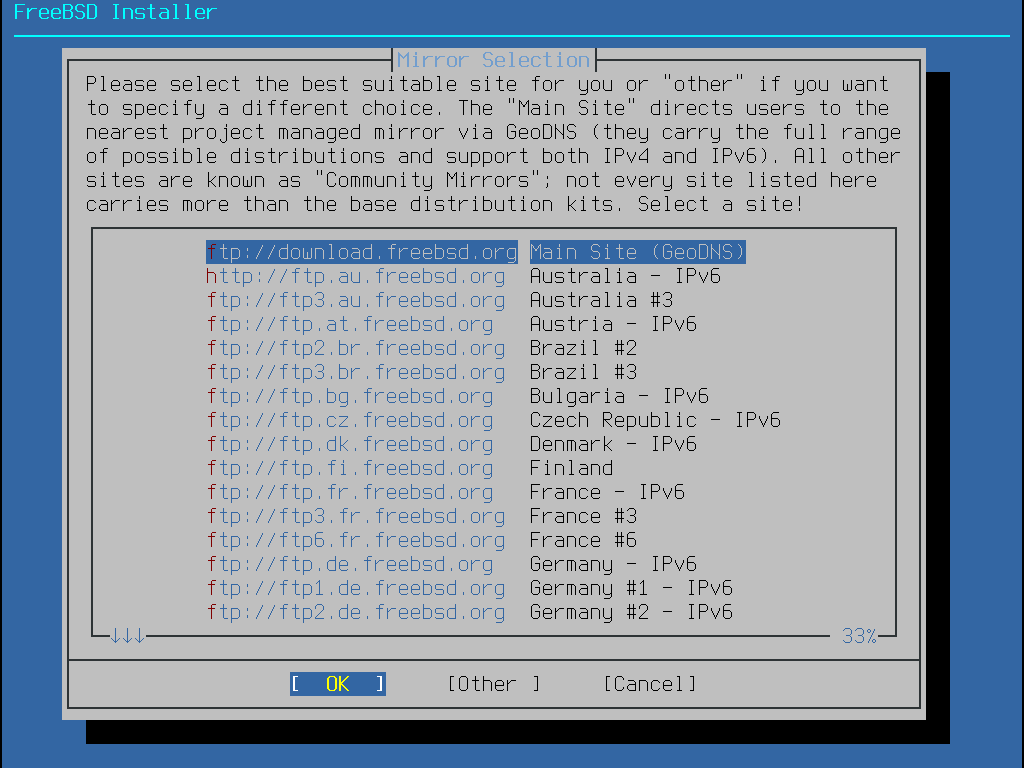
Primary Mirror Sites
E:\> tools\fdimage floppies\kern.flp A:This translation may be out of date. To help with the translations please access the FreeBSD translations instance.
FreeBSD 是 FreeBSD 基金會的註冊商標。
IBM, AIX, OS/2, PowerPC, PS/2, S/390 以及 ThinkPad 是 International Business Machines Corporation 在美國和其他國家的商標。
IEEE, POSIX 以及 802 是 Institute of Electrical and Electronics Engineers, Inc. 在美國的註冊商標。
Red Hat, RPM, 是 Red Hat, Inc. 在美國和其他國家的註冊商標。
3Com 和 HomeConnect 是 3Com Corporation 的註冊商標。
Adobe, Acrobat, Acrobat Reader, Flash 以及 PostScript 是 Adobe Systems Incorporated 在美國和/或其他國家的商標或註冊商標。
Apple, AirPort, FireWire, iMac, iPhone, iPad, Mac, Macintosh, Mac OS, Quicktime 以及 TrueType 是 Apple Inc. 在美國以及其他國家的註冊商標。
Intel, Celeron, Centrino, Core, EtherExpress, i386, i486, Itanium, Pentium 以及 Xeon 是 Intel Corporation 及其分支機構在美國和其他國家的商標或註冊商標。
Linux 是 Linus Torvalds 的註冊商標。
Microsoft, IntelliMouse, MS-DOS, Outlook, Windows, Windows Media 以及 Windows NT 是 Microsoft Corporation 在美國和/或其他國家的商標或註冊商標。
Motif, OSF/1, 和 UNIX 是 The Open Group 在美國和其他國家的註冊商標; IT DialTone 和 The Open Group 是其商標。
Sun, Sun Microsystems, Java, Java Virtual Machine, JDK, JRE, JSP, JVM, Netra, OpenJDK, Solaris, StarOffice, SunOS 以及 VirtualBox 是 Sun Microsystems, Inc. 在美國和其他國家的商標或註冊商標。
RealNetworks, RealPlayer, 和 RealAudio 是 RealNetworks, Inc. 的註冊商標。
Oracle 是 Oracle Corporation 的註冊商標。
3ware 是 3ware Inc 的註冊商標。
ARM 是 ARM Limited. 的註冊商標。
Adaptec 是 Adaptec, Inc. 的註冊商標。
Android is a trademark of Google Inc.
Heidelberg, Helvetica, Palatino 以及 Times Roman 是 Heidelberger Druckmaschinen AG 在美國以及其他國家的商標或註冊商標。
Intuit 和 Quicken 是 Intuit Inc., 或其子公司在美國和其他國家的商標或註冊商標。
LSI Logic, AcceleRAID, eXtremeRAID, MegaRAID 和 Mylex 是 LSI Logic Corp 的商標或註冊商標。
MATLAB 是 The MathWorks, Inc. 的註冊商標。
SpeedTouch 是 Thomson 的商標。
VMware 是 VMware, Inc. 的商標。
Mathematica 是 Wolfram Research, Inc 的註冊商標。
Ogg Vorbis 和 Xiph.Org 是 Xiph.Org 的商標。
XFree86 是 The XFree86 Project, Inc 的商標。.
許多製造商和經銷商使用一些稱為商標的圖案或文字設計來區別自己的產品。 本文件中出現的眾多商標,以及 FreeBSD Project 本身廣所人知的商標,後面將以 “™” 或 “®” 符號來標示。
摘要
歡迎使用 FreeBSD! 本使用手冊涵蓋範圍包括了 FreeBSD 14.0-RELEASE, 13.2-RELEASE 與 FreeBSD 12.4-RELEASE 的安裝與平日操作的說明。 這份使用手冊是很多人的集體創作,而且仍然『持續不斷』的進行中,因此部份章節可能尚未仍未完成,如果您有興趣協助本計畫的話,請寄電子郵件至 FreeBSD documentation project 郵遞論壇[FreeBSD 文件專案郵遞論壇]。
在 FreeBSD 網站 可以找到本手冊的最新版本,舊版文件可從 https://docs.FreeBSD.org/doc/ 取得。本文件也提供各種格式與不同壓縮方式的版本可自 FreeBSD 下載伺服器 或是其中一個 鏡像網站 下載。 此外,您可在 搜尋頁面 中搜尋本文件或其他文件的資料。
若您是第一次接觸 FreeBSD 的新手,可以在本書第一部分找到 FreeBSD 的安裝程序,同時會逐步介紹 UNIX™ 的基礎概念與一些常用、共通的東西。而閱讀這部分並不難,只需要您有探索的精神和接受新概念。
讀完這些之後,手冊中的第二部分花很長篇幅介紹的各種廣泛主題,相當值得系統管理者去注意。 在閱讀這些章節的內容時所需要的背景知識,都註釋在該章的大綱裡面,若不熟的話,可在閱讀前先預習一番。
延伸閱讀方面,可參閱 參考書目。
您目前看到的這本手冊代表著上百位貢獻者歷時 10 年所累積的心血之作。以下為自 2014 年發佈的兩冊第三版後所做的主要修訂:
DTrace 增加說明有關強大的 DTrace 效能分析工具的資訊。
其他檔案系統 增加有關 FreeBSD 非原生檔案系統的資訊,如:來自 Sun™ 的 ZSF。
安全事件稽查 增加的內容涵蓋 FreeBSD 的新稽查功能及其使用說明。
虛擬化 增加有關在虛擬化軟體安裝 FreeBSD 的資訊。
安裝 FreeBSD 增加的內容涵蓋使用新安裝工具 bsdinstall 來安裝 FreeBSD。
您目前看到的這本手冊第三版是 FreeBSD 文件計劃的成員歷時兩年完成的心血之作。因文件內容成長到一定大小,印刷版需要分成兩冊發佈。新版的主要修訂部分如下:
設定與調校 已針對新內容作更新,如:ACPI 電源管理、cron 以及其他更多的核心調校選項說明內容。
安全性 增加了虛擬私人網路 (VPN)、檔案系統的存取控制 (ACL),以及安全報告。
強制存取控制 (MAC) 是此版本新增的章節。該章介紹:什麼是 MAC 機制?以及如何運用它來使您的 FreeBSD 系統更安全。
儲存設備 新增了像是:USB 隨身碟、檔案系統快照 (Snapshot)、檔案系統配額 (Quota) 、檔案與網路為基礎的檔案系統、以及如何對硬碟分割區作加密等詳解。
PPP 增加了疑難排解的章節。
電子郵件 新增有關如何使用其它的傳輸代理程式、SMTP 認證、UUCP、fetchmail、procmail 的運用以及其它進階主題。
網路伺服器 是該版中全新的一章。這一章介紹了如何架設 Apache HTTP 伺服器、ftpd 以及用於支援 Microsoft™Windows™ 客戶端的 Samba。其中有些段落來自原先的 進階網路設定 。
進階網路設定 新增有關在 FreeBSD 中使用藍牙™裝置、設定無線網路以及使用非同步傳輸模式 (Asynchronous Transfer Mode, ATM) 網路的介紹。
增加詞彙表,用以說明全書中出現的術語。
重新美編書中所列的圖表。
本手冊的第二版是 FreeBSD 文件計劃的成員歷時兩年完成的心血之作。第二版包的主要變動如下:
增加完整的目錄索引。
所有的 ASCII 圖表均改成圖檔格式的圖表。
每個章節均加入概述,以便快速的瀏覽該章節內容摘要、讀者所欲了解的部分。
內容架構重新組織成三大部分:"入門"、"系統管理" 以及 "附錄"。
FreeBSD 基礎 新增了程序、Daemon 以及信號 (Signal) 的介紹。
安裝應用程式:套件與 Port 新增了介紹如何管理 Binary 套件的資訊。
X Window 系統 經過全面改寫,著重於在 XFree86™ 4.X 上的現代桌面技術,如: KDE 和 GNOME。
FreeBSD 開機程序 更新相關內容。
儲存設備 分別以兩個章節 "磁碟" 與 "備份" 來撰寫。我們認為這樣子會比單一章節來得容易瞭解。還有關於 RAID (包含硬體、軟體 RAID) 的段落也新增上去了。
序列通訊 架構重新改寫,並更新至 FreeBSD 4.X/5.X 的內容。
PPP 有相當程度的更新。
進階網路設定 加入許多新內容。
電子郵件 大量新增了設定 sendmail 的介紹。
Linux® Binary 相容性 增加許多有關安裝 Oracle™ 以及 SAP™ R/3™ 的介紹。
此外,第二版還新加章節,以介紹下列新主題:
本書主要分為五大部分,第一部份入門:介紹 FreeBSD 的安裝、基本操作。 讀者可根據自己的程度,循序或者跳過一些熟悉的主題來閱讀; 第二部分一般作業:介紹 FreeBSD 常用功能,這部分可以不按順序來讀。 每章前面都會有概述,概述會描述本章節涵蓋的內容和讀者應該已知的, 這主要是讓讀者可以挑喜歡的章節閱讀; 第三部分系統管理:介紹 FreeBSD 老手所感興趣的各種主題部分; 第四部分網路通訊:則包括網路和各式伺服器主題;而第五部分則為附錄包含各種有關 FreeBSD 的資源。
向新手介紹 FreeBSD。該篇說明了 FreeBSD 計劃的歷史、目標和開發模式。
帶領使用者走一次使用 bsdinstall 在 FreeBSD 9.x 及之後版本的完整安裝流程。
涵蓋 FreeBSD 作業系統的基礎指令及功能。若您熟悉 Linux™ 或其他類 UNIX® 系統,您則可跳過此章。
涵蓋如何使用 FreeBSD 獨創的 "Port 套件集" 與標準 Binary 套件安裝第三方軟體。
介紹 X Windows 系統概要及在 FreeBSD 上使用 X11,同時也會介紹常用的桌面環境如 KDE 與 GNOME。
列出一些常用的桌面應用程式,例如:網頁瀏覽器、辦工工具並介紹如何安裝這些應用程式到 FreeBSD。
示範如何在您的系統設定音效及影像播放支援,同時會介紹幾個代表性的音訊及視訊應用程式。
說明為何需要設定新的核心並會提供設定、編譯與安裝的詳細操作說明。
介紹如何在 FreeBSD 管理印表機,包含橫幅頁面、列印帳務以及初始設定等資訊。
介紹 FreeBSD 的 Linux™ 相容性功能,同時提供許多熱門的 Linux™ 應用程式詳細的安裝操作說明,例如 Oracle™ 及 Mathematica™。
介紹可供系統管理者用來調校 FreeBSD 系統的可用參數來最佳化效率,同時也介紹 FreeBSD 用到的各種設定檔以及到何處尋找這些設定檔。
介紹 FreeBSD 開機流程並說明如何使用設定選項控制開機流程。
介紹許多可讓您的 FreeBSD 系統更安全的各種工具,包含 Kerberos, IPsec 及 OpenSSH。
介紹 Jail Framework,以及 Jail 改進那些 FreeBSD 傳統 chroot 不足的地方。
說明什麼是強制存取控制 (Mandatory Access Control, MAC) 及這個機制如何用來確保 FreeBSD 系統的安全。
介紹什麼事 FreeBSD 事件稽查,如何安裝與設定,以及如何檢查與監控稽查線索。
介紹如何在 FreeBSD 管理儲存媒體及檔案系統,這包含了實體磁碟、RAID 陣列、光碟與磁帶媒體、記憶體為基礎的磁碟以及網路檔案系統。
介紹在 FreeBSD 中的 GEOM Framework 是什麼,以及如何設定各種支援的 RAID 階層。
查看 FreeBSD 還支援那些非原生檔案系統,如 Sun™ 的 Z 檔案系統。
介紹虛擬化系統提供了那些功能,以及如何在 FreeBSD 上使用。
介紹如何在 FreeBSD 使用非英文的語言,這涵蓋了系統及應用層的在地化。
說明 FreeBSD-STABLE、FreeBSD-CURRENT 以及 FreeBSD 發佈版之間的差異,並介紹那些使用者適何追蹤開發系統以及程序的概述,這涵蓋了使用者更新系統到最新安全性發佈版本的方法。
介紹如何在 FreeBSD 設定及使用 Sun™ 的 DTrace 工具,動態追蹤可以透過執行真實時間系統分析來協助定位效能問題。
介紹如何使用撥入及撥出連線到您的 FreeBSD 系統的終端機與數據機。
介紹如何在 FreeBSD 使用 PPP 來連線遠端的系統。
說明組成電子郵件伺服器的各種元件,並深入說明如何設定最熱門的郵件伺服器軟體:sendmail。
提供詳細的操作說明與範例設定檔,讓您可安裝您的 FreeBSD 機器為網路檔案伺服器、網域名稱伺服器、網路資訊系統伺服器或時間同步伺服器。
說明軟體為基礎的防火牆背後的理念,並提供可用於 FreeBSD 中不同的防火牆設定的詳細資訊。
介紹許多網路主題,包含在您的區域網路 (LAN) 分享網際網路連線給其他電腦、進階路由主題、無線網路、Bluetooth™、ATM、IPv6 以及更多相關主題。
列出取得 FreeBSD CDROM 或 DVD 媒體的各種來源,以及在網際網路上的各種網站,讓您可以下載並安裝 FreeBSD。
本書觸及許多不同主題,可能會讓您想更深入的了解,參考書目列出了在文中引用的許多優秀書籍。
介紹了可讓 FreeBSD 使用者提出問題以及參與有關 FreeBSD 技術會談的許多論壇。
列出了數個 FreeBSD 開發人員的 PGP 指紋。
為了提供有一致性且易於閱讀的內容,以下是一些本書所遵循的編排體裁。
斜體字用於:檔名、目錄、網址 (URL)、 強調語氣、以及第一次提及的技術詞彙。
等寬字等寬字用於: 錯誤訊息、指令、環境變數、Port 名稱、主機名稱、帳號、群組、裝置名稱、變數、程式碼等。
以粗體字表示:應用程式、指令、按鍵。
鍵盤輸入以粗體字表示,以便與一般文字做區隔。 組合鍵是指同時按下一些按鍵,我們以 + 來表示連接,像是:
Ctrl+Alt+Del
是說,一起按 Ctrl、 Alt 以及 Del 鍵。
若要逐一按鍵,那麼會以逗號 (,) 來表示,像是:
Ctrl+X, Ctrl+S
是說:先同時按下 Ctrl 與 X 鍵, 然後放開後再同時按 Ctrl 與 S 鍵。
範例以 C:\> 為開頭代表 MS-DOS™ 的指令。 若沒有特殊情況的話,這些指令應該是在 Microsoft™ Windows™ 環境的 "指令提示字元 (Command Prompt)" 視窗內執行。
E:\> tools\fdimage floppies\kern.flp A:範例以 # 為開頭代表在 FreeBSD 中以超級使用者權限來執行的指令。 你可以先以 root 登入系統並下指令,或是以你自己的帳號登入再使用 su(1) 來取得超級使用者權限。
# dd if=kern.flp of=/dev/fd0範例以 % 為開頭代表在 FreeBSD 中以一般使用者帳號執行的指令。 除非有提到其他用法,否則都是預設為 C-shell 語法,用來設定環境變數以及下其他指令的意思。
% top您所看到的這本書是經過數百個分散在世界各地的人所努力而來的結果。 無論他們只是糾正一些錯誤或提交完整的章節,所有的點滴貢獻都是非常寶貴有用的。
也有一些公司透過提供資金讓作者專注於撰稿、提供出版資金等模式來支持文件的寫作。 其中,BSDi (之後併入 Wind River Systems) 資助 FreeBSD 文件計劃成員來專職改善這本書直到 2000 年 3 月第一版的出版。(ISBN 1-57176-241-8) Wind River Systems 同時資助其他作者來對輸出架構做很多改進,以及給文章增加一些附加章節。這項工作結束於 2001 年 11 月第二版。(ISBN 1-57176-303-1) 在 2003-2004 兩年中,FreeBSD Mall, Inc 把報酬支付給改進這本手冊以使第三版印刷版本能夠出版的志工。
這部份是提供給初次使用 FreeBSD 的使用者和系統管理者。 這些章節包括:
介紹 FreeBSD 給您。
在安裝過程給您指引。
教您 UNIX™ 的基礎及原理。
展示給您看如何安裝豐富的 FreeBSD 的應用軟體。
向您介紹 X,UNIX™ 的視窗系統以及詳細的桌面環境設定,讓您更有生產力。
我們試著儘可能的讓這段文字的參考連結數目降到最低,讓您在讀使用手冊的這部份時可以不太需要常常前後翻頁。
這部份是提供給初次使用 FreeBSD 的使用者和系統管理者。 這些章節包括:
介紹 FreeBSD 給您。
在安裝過程給您指引。
教您 UNIX® 的基礎及原理。
展示給您看如何安裝豐富的 FreeBSD 的應用軟體。
向您介紹 X,UNIX® 的視窗系統以及詳細的桌面環境設定,讓您更有生產力。
我們試著儘可能的讓這段文字的參考連結數目降到最低,讓您在讀使用手冊的這部份時可以不太需要常常前後翻頁。
非常感謝您對 FreeBSD 感興趣!以下章節涵蓋 FreeBSD 計劃的各方面:比如它的歷史、目標、開發模式等等。
讀完這章,您將了解:
FreeBSD 與其他作業系統之間的關係。
FreeBSD 計劃的歷史。
FreeBSD 計劃的目標。
FreeBSD 開源開發模式的基礎概念。
當然囉,還有 "FreeBSD" 這名字的由來。
FreeBSD 是一套開源、符合標準的類 Unix 的作業系統,適用於 x86 (32 與 64 位元), ARM™, AArch64, RISC-V™, MIPS™, POWER™, PowerPC™ 以及 Sun UltraSPARC™ 的電腦。它提供了現代作業系統所應具備的所有功能,例如:先佔式多工、記憶體保護、虛擬記憶體、多使用者架構、對稱多工處理 (SMP)、各種針對不同語言和框架的開源開發工具以及以 X Window 系統、KDE 及 GNOME 為主的桌面功能,而它有以下優勢:
自由的開放原始碼授權,授予您自由修改和擴充其原始碼並將其合併到開放原始碼專案或封閉的產品中的權力,不會對 Copyleft 授權施加典型的限制,也避免了授權不相容的潛在問題。
強大的 TCP/IP 網路 - FreeBSD 以工業標準實作通訊協定並不斷改善效能與擴展性,這使得 FreeBSD 非常適合應用在伺服器、路由器/防火牆的角色 - 這也是許多公司和供應商使用它的原因。
完全整合 OpenZFS,包含 root-on-ZFS、ZFS 開機環境、故障管理、委託管理、對 Jail 的支援、FreeBSD 專屬的文件以及系統安裝程式的支援。
鉅細靡遺的安全性功能,從強制存取控制 (Mandatory Access Control, MAC) 框架到 Capsicum 功能以及沙盒機制。
超過 3 萬個預編的套件供所有支援的架構以及可簡單編譯依您的需求所客製的 Port 套件集。
說明文件 - 除了操作手冊及由許多作者著作從系統管理到核心內部主題的書籍外,也有不僅只針對 Userspace Daemon、工具及設定檔,同樣也有針對核心驅動程式 APIs (第 9 節) 及各別驅動程式 (第 4 節) 的操作說明頁 (man(1) page)。
簡單且具一致性的檔案庫架構與編譯系統 - FreeBSD 對所有的元件、核心與 Userspace 使用單一的檔案庫,加上統一、易於客製的編譯系統以及嚴謹的開發流程,讓 FreeBSD 的編譯基礎架構更容易與您產品的整合。
忠於 Unix 哲學,偏好可組合而非具寫死的 "多合一" 單一 Daemon。
Linux 執行檔 (Binary) 相容性,無需虛擬化即可執行許多 Linux 執行檔。
FreeBSD 系統是基於美國加州大學柏克萊分校的電腦系統研究組 (Computer Systems Research Group 也就是 CSRG) 所發行的 4.4BSD-Lite,繼承了 BSD 系統開發的優良傳統。 除了由 CSRG 所提供的高品質的成果外,FreeBSD 計劃也投入了上千人時在擴充及微調,來讓系統在真實情境下能達到最大的效能與可靠性。 FreeBSD 提供了其他開源與商業產品的效能及穩定性,並結合其他產品所沒有的尖端功能。
FreeBSD 能應用的情境完全限制在你的想像力上。 從軟體開發到工廠自動化,庫存管控到遠程衛星天線的方位角校正;若您的需求可以用商用的 UNIX™ 產品來達成,那麼極有可能使用 FreeBSD 也能辦到! FreeBSD 也受益於來自於全球各研究中心及大學所開發的數千個高品質的軟體 ,這些通常只需要花費很少的費用或根本就是免費的。
由於每個人都可以取得 FreeBSD 的原始程式碼, 這個系統可以被量身訂做成能執行任何原本完全無法想像的功能或計劃, 而對於從各廠商取得的作業系統通常沒有辦法這樣地被修改。 以下提供一些人們使用 FreeBSD 的例子:
網際網路服務: FreeBSD 內建強勁的網路功能使它成為網路服務 (如下例) 的理想平台:
網頁伺服器
IPv4 及 IPv6 路由
防火牆以及 NAT ("IP 偽裝") 通訊閘
檔案傳輸協定伺服器
電子郵件伺服器
還有更多…
教育:您是電腦科學相關領域的學生嗎?再也沒有比使用 FreeBSD 能學到更多作業系統、計算機結構、及網路的方法了。其中許多免費提供的 CAD,數學和圖形設計套件對於那些需要在電腦完成 其他 工作的人也非常有用!
研究:有了完整的原始程式碼,FreeBSD 是研究作業系統及電腦科學的極佳環境。 具有免費且自由取得特性的 FreeBSD 也使得一個分置兩地的合作計劃,不必擔心版權及系統開放性的問題, 而能自在的交流。
網路: 你如果需要 路由器、名稱伺服器 (DNS) 或安全的防火牆, FreeBSD 可以輕易的將你沒有用到的 386 或 486 PC 變身成為絕佳的伺服器,甚至具有過濾封包的功能。
嵌入式: FreeBSD 是一套可用來建立嵌入式系統的傑出平台。 支援 ARM™, MIPS™ 以及 PowerPC™ 平台,再加上健全的網路環境、尖端的功能以及自由的 BSD 授權條款,FreeBSD 成為用來建置嵌入式路由器、防火牆及其他裝置的絕佳基礎。
桌面: FreeBSD 同時也是低成本桌面解決方案中不錯的選擇,使用了免費的 X11 伺服器。FreeBSD 提供許多開源桌面環境可選擇,包含了標準 GNOME 及 KDE 圖型化使用者介面。FreeBSD 甚至可以透過中央伺服器做 "無磁碟" 開機,讓個人工作站變的更便宜、更易於管理。
軟體開發: 基本安裝的 FreeBSD 就包含了完整的程式開發工具,如 C/C++ 編譯器及除錯器。 透過 Port 與套件管理系統也可支援需多其他語言。
你可以經由燒錄 CD-ROM、DVD 或是從 FTP 站上抓回 FreeBSD。 詳情請參閱 取得 FreeBSD 取得 FreeBSD。
FreeBSD 以其網頁 (Web) 服務功能而聞名 - 在 FreeBSD 上運作的網站包括 Hacker News, Netcraft, NetEase, Netflix, Sina, Sony Japan, Rambler, Yahoo! 及 Yandex。
FreeBSD 先進的功能、成熟的安全性、可預測的發佈週期以及自由的授權條款,讓 FreeBSD 已經被用來做為建立許多商業、開源應用、裝置以及產品的平台,有許多世界上最大的資訊公司使用 FreeBSD:
Apache - Apache 軟體基金會中大部分面對大眾的基礎設施,包括可能是世界上最大的 SVN 檔案庫 (擁有超過 140 萬次提交) 都是在 FreeBSD 上運作。
Apple - OS X 大量借鑒 FreeBSD 的網路 Stack、虛擬檔案系統以及許多使用者空間的元件。Apple iOS 中含有從 FreeBSD 借鑒來的元素。
Cisco - IronPort 網路安全及反垃圾郵件設備是採用改良後 FreeBSD 核心來運作。
Citrix - 安全設備的 NetScaler 產品線提供的第 4-7 層的負載均衡、內容快取、應用層防火牆、安全的 VPN 以及行動雲端網路存取,皆運用了 FreeBSD Shell 強大的功能。
Dell EMC Isilon - Isilon 的企業存儲設備是以 FreeBSD 為基礎。非常自由的 FreeBSD 授權條款讓 Isilon 整合了它們的智慧財產到整個核心,並專注打造自己的產品,而不是一個作業系統。
Quest KACE - KACE 系統管理設備中運作了 FreeBSD,是因為 FreeBSD 的可靠性、可擴展性以及支持其持續發展的社群。
iXsystems - 統合存儲 (Unified Storage) 設備的 TrueNAS 產品線是以 FreeBSD 為基礎。除了該公司自己的商業產品外,iXsystems 也管理著 TrueOS 和 FreeNAS 兩個開源計劃的開發。
Juniper - JunOS 作業系統驅動了所有的 Juniper 網絡設備 (包括路由器,交換器,安全與網絡設備) 便是以 FreeBSD 為基礎。Juniper 在眾多廠商之中,展現了計劃與商業產品供應商之間的共生關係。由 Juniper 所開發的改進內容會回饋給 FreeBSD 來降低未來新功能從 FreeBSD 整合回 JunOS 的複雜性。
McAfee - SecurOS 是 McAfee 企業防火牆產品的基礎,其中包含了 Sidewinder ,也是以 FreeBSD 為基礎。
NetApp - 存儲設備中的 Data ONTAP GX 產品線是以 FreeBSD 為基礎。除此之外,NetApp 還貢獻了回 FreeBSD 許多功能,包括新 BSD 條款授權的 hypervisor, bhyve。
Netflix - Netflix 用來以串流傳送電影到客戶的 OpenConnect 設備是以 FreeBSD 為基礎。 Netflix 也做了大量貢獻到程式碼庫,並致力於維持與主線 FreeBSD 的零修正關係。Netflix 的 OpenConnect 設備負責了北美所有的網路流量 32% 以上。
Sandvine - Sandvine 使用 FreeBSD 作為它的高性能即時網路處理平台的基礎來建立它們的智慧網路策略控制產品。
Sony - PlayStation 4 遊戲主機使用了修改過的 FreeBSD 版本來運作。
Sophos - Sophos 電子郵件設備產品是以加強防護 (Hardened) 的 FreeBSD 為基礎,可掃描入站郵件中的垃圾郵件和病毒,同時也可監控出站郵件中的惡意軟體及敏感資訊。
Spectra Logic - 儲藏級儲存設備的 nTier 產品線以 FreeBSD 和 OpenZFS 來運作。
Stormshield - Stormshield 網路安全設備使用了硬體化版本的 FreeBSD 做為基礎,BSD 授權條款讓他們可將其智慧財產與系統整合並同時回饋大量有趣的發展給社群。
The Weather Channel - 被安裝在各地有線電視營運商前端,負責加入當地天氣預報到有線電視網路節目的 IntelliStar 設備便是使用 FreeBSD。
Verisign - VeriSign 主要經營 .com 與 .net 根網域名稱註冊業務以及隨附的 DNS 基礎設施運作。這些基礎設施的運作仰賴各種不同的網路作業系統包括 FreeBSD 來確保不會有單點故障的問題。
Voxer - Voxer 使用了 FreeBSD 的 ZFS 來驅動行動語音通訊平台,讓 Voxer 從 Solaris 改使用 FreeBSD 的原因是 FreeBSD 擁有詳盡的文件、更大型且活躍的社群、較便利的開發人員環境。除了提供關鍵的 ZFS 和 DTrace 功能之外 FreeBSD 的 ZFS 也支援了 TRIM。
WhatsApp - 當 WhatsApp 面臨需要一個每台伺服器能夠同時處理超過 100 萬個 TCP 連線的平台時,它們選擇了 FreeBSD。它們接著擴大規模到每台伺服器處理超過 250 萬的連線。
Wheel Systems - FUDO 安全性設備讓企業可以監控、控制、記錄以及稽查在其系統中作業的承包商與管理員。這些功能皆是以 FreeBSD 最佳的安全性功能為基礎,包括 ZFS, GELI, Capsicum, HAST 及 auditdistd。
FreeBSD 也催生了數個相關的開源計劃:
BSD Router - 以 FreeBSD 為基礎的大型企業路由器替代方案,專門設計為可在標準 PC 硬體上運作。
FreeNAS - 專為網路檔案伺服器設備使用所設計的 FreeBSD。提供了以 Python 為基礎的網頁介面來簡化 UFS 與 ZFS 檔案系統的管理,支援了 NFS、SMB/ CIFS、AFP、FTP 與 iSCSI,還有以 FreeBSD Jail 為基礎的套件系統。
GhostBSD - 採用 Gnome 桌面環境的 FreeBSD 發行版。
mfsBSD - 用來建置可完全從記憶體執行 FreeBSD 系統映像檔工具。
NAS4Free - 以 FreeBSD 及 PHP 驅動網頁介面為基礎的檔案伺服器。
OPNSense - OPNsense 是一個以 FreeBSD 為基礎的開源、易於使用及易於建置的防火牆和路由平台。OPNsense 有大多數在昂貴的商業防火牆上才有的功能。它帶來了商業產品的豐富功能集,同時擁有開放和安全的來源。
TrueOS - 訂製版本的 FreeBSD,裝備了給桌面使用者使用的圖型化工具來展示 FreeBSD 強大的功能給所有使用者,專門設計來緩解使用者在 Windows 與 OS X 間的過渡。
pfSense - 以 FreeBSD 為基礎的防火牆發行版,支援巨型陣列及大規模 IPv6。
ZRouter - 嵌入式裝置韌體的開源替代方案,以 FreeBSD 為基礎,專門設計來取代現成路由器上的專用韌體。
在 FreeBSD 基金會網站上可以找到以 FreeBSD 為基礎的產品與服務的公司的推薦 清單。 Wikipedia 也維護了一份以 FreeBSD 為基礎的產品清單。
接下來講的是 FreeBSD 計劃的背景,包含歷史、計劃目標以及開發模式。
FreeBSD 計畫起源於 1993 年初, 那是源自於維護一組『非官方 386BSD 修正工具』計劃的最後三個協調人 Nate Williams,Rod Grimes 和 Jordan Hubbard。
最初的目標是做出一份 386BSD 的中間版本的快照 (Snapshot) 來修正使用修正工具 (Patchkit) 機制無法解決的數個問題,也因此早期的計劃名稱叫做 386BSD 0.5 或 386BSD Interim 便是這個原因。
386BSD 是 Bill Jolitz 的作業系統,在當時就已經忍受了將近一年的忽視,隨著修正工具日漸龐大的令人不舒服,他們決定提供一份過渡性的 "簡潔" 快照來幫助 Bill。 然而,由於 Bill Jolitz 忽然決定取消其對該計劃的認可,且沒有明確指出未來的打算,所以該計劃便突然面臨中止。
這三人認為這個目標即始沒有 Bill 的支持仍有保留的價值,最後他們採用 David Greenman 丟銅板決定的名字,也就是 "FreeBSD"。在詢問了當時的一些使用者意見之後決定了最初的目標,隨著目標越來越明確便開始著手進行。Jordan 找了 Walnut Creek CD-ROM 商討,著眼於如何改進 FreeBSD 的發行通路,讓那些不便上網的人可簡單的取得。 Walnut Creek CD-ROM 不只贊成以 CD 來發行 FreeBSD 的想法,同時提供了一台機器以及快速的網路。 若不是 Walnut Creek CD-ROM 在那個時間上史無前例的信任,這個默默無名的計劃很可能不會成為現在的 FreeBSD 快速的成長到今日這樣的規模。
第一張以 CD-ROM (及網路) 發行的版本為 FreeBSD 1.0,是在 1993 年十二月發佈。 該版本採用了 U.C. Berkeley 以磁帶方式發行的 4.3BSD-Lite ("Net/2") 及許多來自於 386BSD 和自由軟體基金會的元件為基礎。對於第一次發行而言還算成功,我們又接著於 1994 年 5 月發行了相當成功的 FreeBSD 1.1。
然而此後不久,另一個意外的風暴在 Novell 與 U.C. Berkeley 關於 Berkeley Net/2 磁帶之法律地位的訴訟確定之後形成。 U.C. Berkeley 承認大部份的 Net/2 的程式碼都是"侵佔來的"且是屬於 Novell 的財產 — 事實上是當時不久前從 AT&T 取得的。 Berkeley 得到的是 Novell 對於 4.4BSD-Lite 的"祝福",最後當 4.4BSD-Lite 終於發行之後,便不再是侵佔行為。 而所有現有 Net/2 使用者都被強烈建議更換新版本,這包括了 FreeBSD。 於是,我們被要求於 1994 年 6 月底前停止散佈以 Net/2 為基礎的產品。在此前提之下,本計劃被允許在期限以前作最後一次發行,也就是 FreeBSD 1.1.5.1。
FreeBSD 便開始了這宛如『重新發明輪子』的艱鉅工作 — 從全新的且不完整的 4.4BSD-Lite 重新整合。 這個 "Lite" 版本是不完整的,因為 Berkeley 的 CSRG 已經刪除了大量在建立一個可以開機執行的系統所需要的程式碼 (基於若干法律上的要求),且該版本在 Intel 平台的移植是非常不完整的。 直到 1994 年 11 月本計劃才完成了這個轉移, 同時在該年 12 月底以 CD-ROM 以及網路的形式發行了 FreeBSD 2.0。 雖然該份版本在當時有點匆促粗糙,但仍是富有意義的成功。 隨之於 1995 年 6 月又發行了更容易安裝,更好的 FreeBSD 2.0.5。
自那時以來,FreeBSD 在每一次對先前版本改進穩定性、速度及功能時便會發佈一個新的發佈版本。
目前,長期的開發計畫繼續在 10.X-CURRENT (trunk) 分支中進行,而 10.X 的快照 (Snapshot) 版本可以在 快照伺服器 取得。
FreeBSD 計劃的目標在於提供可作任意用途的軟體而不附帶任何限制條文。 我們之中許多人對程式碼 (以及計畫本身) 都有非常大的投入, 因此,當然不介意偶爾有一些資金上的補償,但我們並沒打算堅決地要求得到這類資助。 我們認為我們的首要"使命"是為任何人提供程式碼, 不管他們打算用這些程式碼做什麼, 因為這樣程式碼將能夠被更廣泛地使用,從而發揮其價值。 我認為這是自由軟體最基本的,同時也是我們所倡導的一個目標。
我們程式碼樹中,有若干是以 GNU 通用公共授權條款 (GPL) 或者 GNU 較寬鬆通用公共授權條款 (LGPL) 發佈的那些程式碼帶有少許的附加限制,還好只是強制性的要求開放程式碼而不是別的。 由於使用 GPL 的軟體在商業用途上會增加若干複雜性,因此,如果可以選擇的話, 我們會比較喜歡使用限制相對更寬鬆的 BSD 版權來發佈軟體。
FreeBSD 的開發是一個非常開放且具彈性的過程,就像從 貢獻者名單 所看到的,是由全世界成千上萬的貢獻者發展起來的。 FreeBSD 的開發基礎架構允許數以百計的開發者透過網際網路協同工作。 我們也經常關注著那些對我們的計畫感興趣的新開發者和新的創意, 那些有興趣更進一步參與計劃的人只需要在 FreeBSD 技術討論郵遞論壇 連繫我們。 FreeBSD 公告郵遞論壇 對那些希望了解我們進度的人也是相當有用的。
無論是單獨開發者或者封閉式的團隊合作,多瞭解 FreeBSD 計劃和它的開發過程會是不錯的:
過去數年來 FreeBSD 的中央原始碼樹 (Source tree) 一直是以 CVS (Concurrent Versions System) 來維護的, 它是一套免費的原始碼控管工具。 從 2008 年 6 月起, FreeBSD 計劃開始改用 SVN (Subversion)。 這是一個必要的更換動作,因為隨著原始碼樹及歷史版本儲存的數量不斷快速擴張,CVS 先天的技術限制越來越明顯。 文件計劃與 Port 套件集檔案庫也同樣於 2012 年 5 月及 2012 年 7 月由 CVS 改為 SVN。請參考 同步您的原始碼樹 一節來取得有關如何取得 FreeBSD src/ 檔案庫的更多資訊,以及 使用 Port 套件集 了解如何取得 FreeBSD Port 套件集。
所謂的 提交者 (Committer) 指的是對 Subversion 原始碼樹有 寫入 權限的人, 並且被授予修改 FreeBSD 原始碼的權限。 ("committer" 一詞源自版本管理系統中的 commit 指令,該指令是用來把新的修改提交給檔案庫)。 任何人都可以回報問題到 Bug Database,在回報問題之前,可以使用 FreeBSD 郵遞清單、IRC 頻道或論壇來確認問題真的是一個錯誤 (Bug)。
如果把 FreeBSD 看成是一家公司的話, FreeBSD 核心團隊 (FreeBSD core team) 就相當於公司的董事會。 核心團隊的主要職責在於確保此計劃的整體有良好的架構,以朝著正確的方向發展。 此外,邀請敬業且負責的開發者加入提交者的行列也是核心團隊的職責之一,隨著其他新成員的加入也招募新的核心團隊成員。 目前的核心團隊是在 2018 年 7 月從提交者候選人之中選出來的,這個選舉每兩年會舉辦一次。
如同多數的開發者,核心團隊大部分成員加入 FreeBSD 開發都是志工性質而已, 並未從本計劃中獲得任何薪酬,所以這只是一個 "承諾" 不應該被誤解為 "保證支援" 才對。 前面用 "董事會" 來舉例可能不是很恰當,或許我們應該說: 他們是一群自願放棄原本的優渥生活、個人其他領域成就, 而選擇投入 FreeBSD 開發的熱血有為者才對! |
最後一點,但這點絕非最不重要的, 最大的開發者團隊就是持續為我們提供回饋以及錯誤修正的使用者自己。 與 FreeBSD 非核心開發者互動的主要方式,便是透過訂閱 FreeBSD 技術討論郵遞論壇 來進行溝通,這方面可參考,請參閱 網路資源 以瞭解各式不同的 FreeBSD 郵遞論壇。
FreeBSD 貢獻者名單 相當長且不斷成長中, 只要有貢獻就會被列入其中, 要不要立即考慮貢獻 FreeBSD 一些回饋呢?
提供原始碼並非為這個計劃做貢獻的唯一方式; 需要大家投入的完整工作清單請參閱 FreeBSD 計畫網站。
總而言之,我們的開發模式像是由鬆散的同心圓所組織。這個集中模式的設計為的是讓 FreeBSD 的使用者更便利,可以很容易的追蹤同一個中央的程式庫,避免把潛在的貢獻者排除在外!而我們的目標是提供一個穩定的作業系統,並有大量相關的 應用程式,讓使用者能夠輕鬆的安裝與使用 — 而這個開發模式對我們要完成這個目標來說運作的非常好。
我們對於那些想要加入 FreeBSD 開發者的期待是: 請保持如同前人一樣的投入,以確保繼續成功!
除了基礎發行版之外,FreeBSD 提供了擁有上千個常用的程式的移植軟體的套件集,在撰寫本文的同時,已有超過 24,000 個 Port!Port 的範圍從 HTTP 伺服器到遊戲、語系、編輯器,幾乎所有東西都在裡面。完整的 Port 套件集需要將近 500 MB。要編譯一個 Port 您只需要切換目錄到您想安裝的程式目錄,然後輸入 make install,接著系統便會處理剩下的動作。您編譯的每個 Port 完整原始發行版內容是動態下載的,所以您只需要有足夠的磁碟空間來編譯您想要的 Port。幾乎所有 Port 都提供已經預先編譯好的"套件",您可以透過簡單的指令來安裝 (pkg install),提供那些不想要自行從原始碼編譯的人使用。更多有關套件與 Port 的資訊可於 安裝應用程式:套件與 Port 取得。
所有支援的 FreeBSD 版本都會在安裝程式中提供一個選項,讓您可以在初始化系統安裝的階段安裝額外的說明文件到 /usr/local/shared/doc/freebsd。說明文件也可在往後隨時使用套件安裝,詳細說明於 自 Port 更新說明文件。您也可以使用任何支援 HTML 的瀏覽器進入下列 URL 檢視已安裝在本機的手冊:
此外,可在下列網址找到最新版 (也是更新最頻繁的版本):https://www.FreeBSD.org/。
有多種不同的方法可以執行 FreeBSD,根據所在環境,包含:
一般虛擬機映像檔,可下載並匯入到您所選擇的虛擬環境。映像檔可從 Download FreeBSD 頁面下載,KVM ("qcow2"), VMWare ("vmdk"), Hyper-V ("vhd") 及原始裝置的映像檔都支援。這些並非安裝程式的映像檔,而是已經預先設定好 ("已安裝好") 的實例,可直接使用並執行安裝後的作業。
託管服務虛擬機映像檔,可在 Amazon 的 AWS Marketplace, Microsoft Azure Marketplace 和 Google Cloud Platform 等託管服務上運行的虛擬機映像檔。有關如何在 Azure 上部署 FreeBSD 的資訊可查詢 Azure 說明文件中的相關章節。
SD 卡映像檔,供嵌入式系統,如 Raspberry Pi 或 BeagleBone Black 使用的映像檔,可從 Download FreeBSD 頁面下載,這些檔案必須先解壓縮後以原始映像檔的格式寫入 SD 卡以讓這些開發電路板能夠啟動。
安裝程式映像檔,用來安裝 FreeBSD 到硬碟,供一般的桌機、筆電或伺服器系統使用。
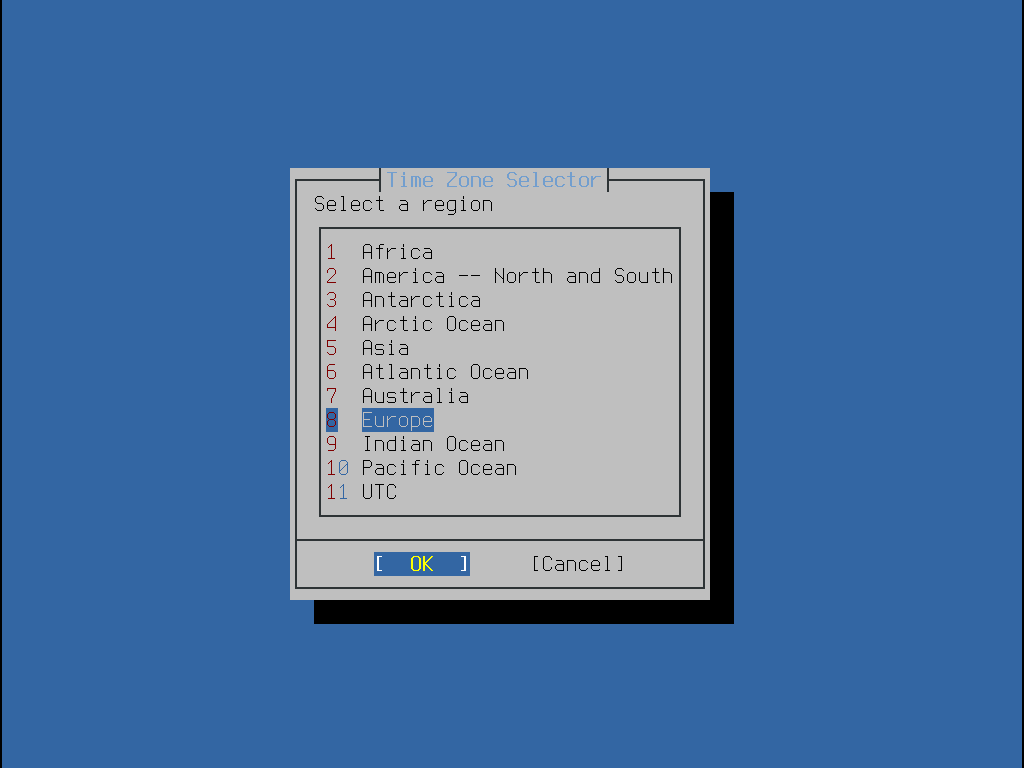
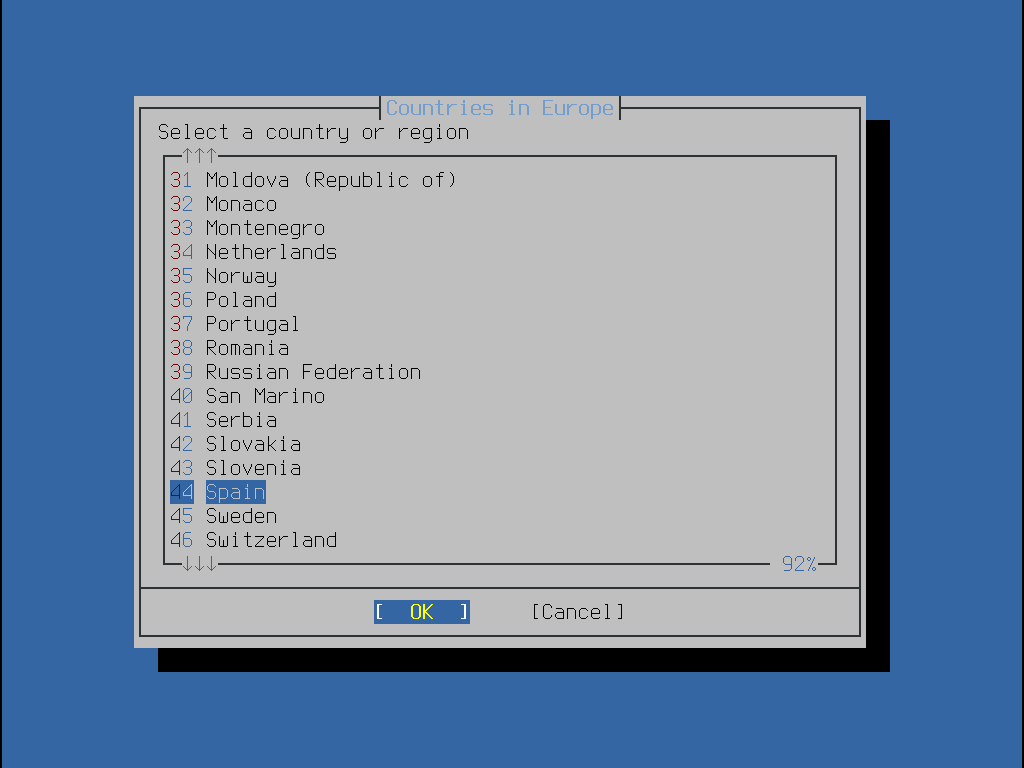
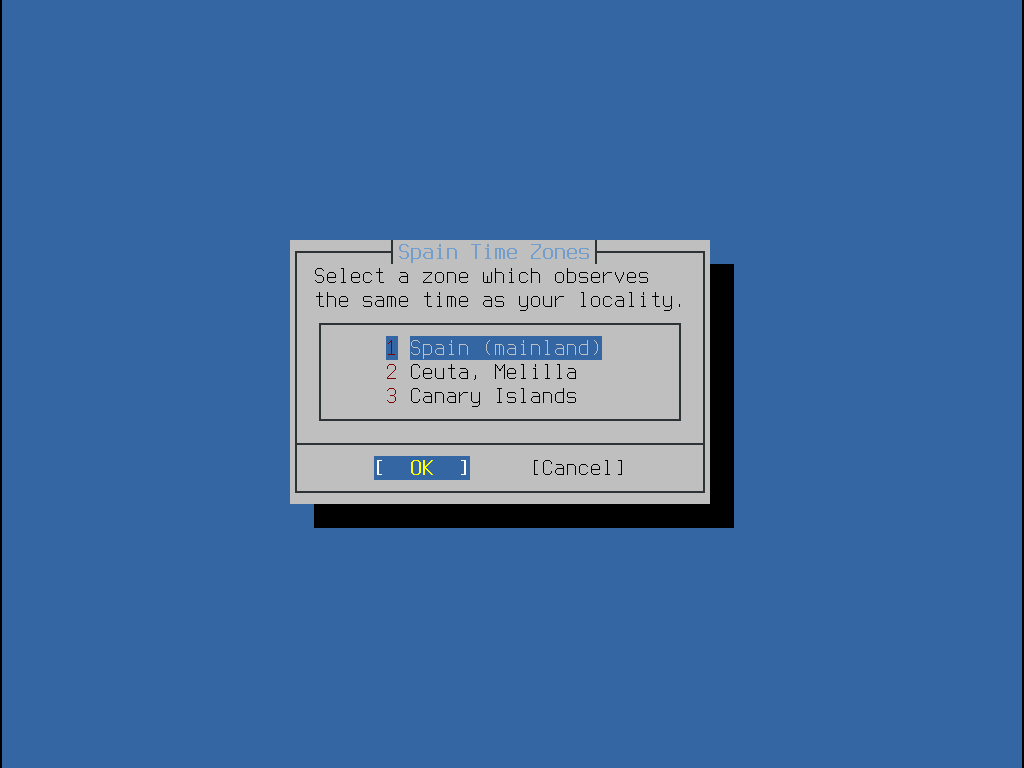
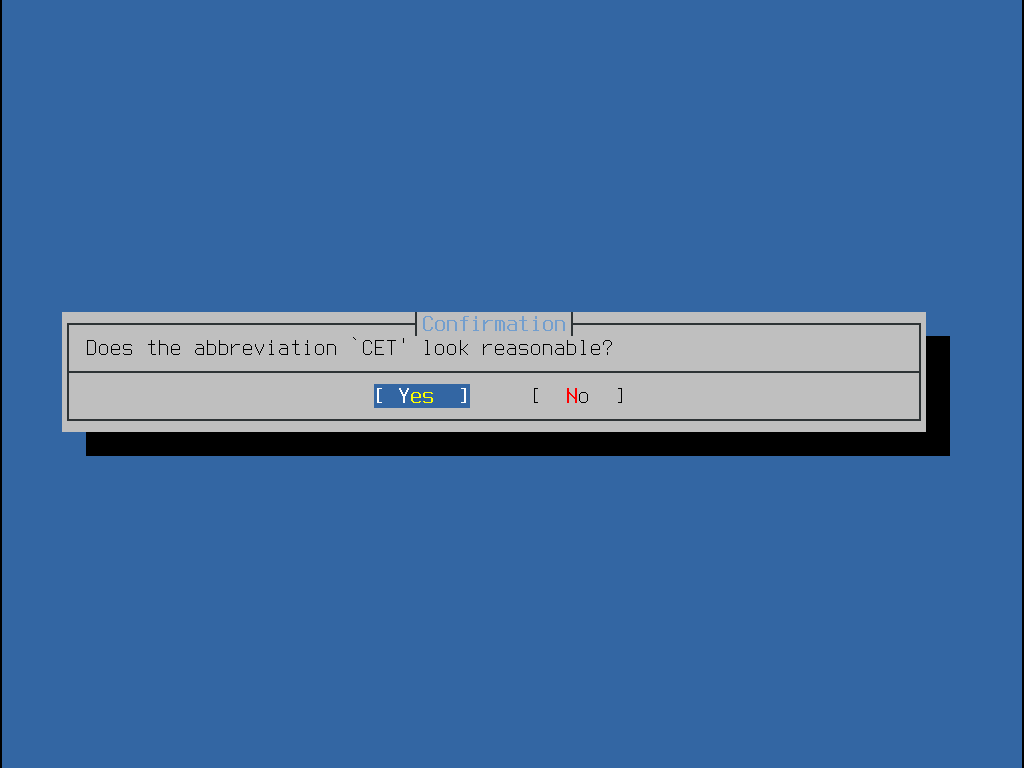
此章接下來的部份會介紹第四個案例,說明如何使用文字介面為基礎的安裝程式 bsdinstall 安裝 FreeBSD。
一般來說,本章所寫的安裝說明是針對 i386™ 和 AMD64 架構。如果可以用於其他平台,將會列表說明。 安裝程式和本章所敘述的內容可能會有些微差異,所以請將本章視為通用的指引,而不是完全照著來做。
喜歡用圖形化安裝程式安裝 FreeBSD 的使用者, 可能會對 pc-sysinstall 有興趣,這是 TrueOS 計畫所使用的。 他可以用來安裝圖形化桌面 (TrueOS) 或是指令列版本的 FreeBSD。 細節請參考 TrueOS 使用者 Handbook (https://www.trueos.org/handbook/trueos.html)。 |
讀完這章,您將了解:
最低的硬體需求和 FreeBSD 支援的架構。
如何建立 FreeBSD 的安裝媒體。
如何開始執行 bsdinstall。
bsdinstall 會詢問的問題,問題代表的意思,以及如何回答。
安裝失敗時如何做故障排除。
如何在正式安裝前使用 live 版本的 FreeBSD。
在開始閱讀這章之前,您需要:
閱讀即將安裝的 FreeBSD 版本所附帶的硬體支援清單,並核對系統的硬體是否有支援。
安裝 FreeBSD 的硬體需求隨 FreeBSD 的版本和硬體架構而不同。 FreeBSD 發行版支援的硬體架構和裝置會列在 FreeBSD 發佈資訊 頁面。FreeBSD 下載頁面 也有建議如何正確的選擇在不同架構使用的映像檔。
FreeBSD 安裝程序需要至少 96 MB 的 RAM 以及 1.5 GB 的硬碟空間。然而,如此少的記憶體及磁碟空間只適合在客製的應用上,如嵌入式設備。一般用途的桌面系統會需要更多的資源,2-4 GB RAM 與至少 8 GB 的硬碟空間是不錯的起點。
每一種架構的處理器需求概述如下:
桌面電腦與筆記型電腦最常見的處理器類型,運用在近代的系統。Intel™ 稱該類型為 Intel64,其他製造商則稱該類型為 x86-64。
與 amd64 相容的處理器範例包含:AMD Athlon™64, AMD Opteron™, 多核心 Intel™ Xeon™ 以及 Intel™ Core™ 2 與之後的處理器。
舊型的桌面電腦與筆記型電腦常使用此 32-bit, x86 架構。
幾乎所有含浮點運算單元的 i386 相容處理器都有支援。所有 Intel™ 486 或是更高階的處理器也有支援。
FreeBSD 可在有支援實體位址延伸 (Physical Address Extensions, PAE) 功能的 CPU 上運用該功能所帶來的優點。有開啟 PAE 支援的核心會偵測超過 4 GB 的記憶體,並讓這些超過的記憶體能夠被系統使用。 但使用 PAE 會限制裝置驅動程式及 FreeBSD 的其他功能,詳情請見 pae(4)。
目前支援的處理器是 Itanium™ 和 Itanium™ 2。支援的晶片組包括 HP zx1, Intel™ 460GX 和 Intel™ E8870。 單處理器 (Uniprocessor, UP) 和對稱多處理器 (Symmetric Multi-processor, SMP) 的設定都有支援。
所有內建 USB 的 New World ROMApple™Mac™ 系統都有支援。 SMP 在多 CPU 的機器都有支援。
32 位元的核心只能使用前 2 GB 的 RAM。
FreeBSD/sparc64 支援的系統列在 FreeBSD/sparc64 計劃。
所有超過一個處理器的系統都有支援 SMP。需要專用的磁碟系統,因為此時無法和其他作業系統共用磁碟。
一旦確定系統符合安裝 FreeBSD 的最低硬體需求,就可以下載安裝檔案並準備安裝的媒體。 做這些之前,先檢查以下核對清單的項目是否準備好了:
備份重要資料
安裝任何作業系統前, 總是 要先備份所有重要資料。 不要儲存備份在即將安裝的系統上,而是將資料儲存在可移除磁碟,像是 USB 隨身碟、網路上的另一個系統或是線上備份服務上。 開始安裝程序前要檢查備份,確定備份含有所有需要的檔案,一旦安裝程式格式化系統的磁碟,所有儲存在上面的資料都會遺失。
決定 FreeBSD 安裝在哪裡
如果 FreeBSD 是唯一一套要安裝到電腦的作業系統,這個步驟可以略過。 但是假如 FreeBSD 要和其他作業系統共用磁碟空間的話,就要決定 FreeBSD 要安裝在哪個磁碟或是哪個分割區 (Partition)。
在 i386 和 amd64 架構,可將磁碟分割成多個分割區,可以選擇下列兩種分割表格式 (Partitioning scheme) 的其中一種達成。 傳統的主開機紀錄 (Master Boot Record, MBR) 的一個分割區表定義最多可有四個主分割區 (Primary partition),因一些歷史淵源,FreeBSD 稱這些主分割區為 slice,其中一個主分割區可作為延伸分割區 (Extended partition),延伸分割區又可分割成多個邏輯分割區 (Logical partition)。 GUID 分割區表 (GUID Partition Table, GPT) 是較新和較簡單的分割磁碟的方法,一般 GPT 實作允許每個磁碟多達 128 個分割區,不再需要使用邏輯分割區。
一些比較舊的作業系統,像是 Windows™ XP 並不相容 GPT 分割表格式。 如果 FreeBSD 將和這類作業系統共用一個磁碟,則需要用 MBR 分割表格式。 |
FreeBSD 開機啟動程式需要主分割區或是 GPT 分割區。如果所有的主分割區或 GPT 分割區都已使用,必須釋放其中一個分割區讓 FreeBSD 使用。如果要建立一個分割區而不刪除原有的資料,可以使用磁碟重設大小的工具來縮小現有的分割區,並使用釋放出來的空間建立新分割區。
各種免費和付費的磁碟重設大小工具列於 http://en.wikipedia.org/wiki/List_of_disk_partitioning_software。GParted Live (http://gparted.sourceforge.net/livecd.php) 是內含分割區編輯程式 GParted 的免費 Live CD。 GParted 同時也被許多 Linux Live CD 發行版所收錄。
在正確使用的情況下,磁碟重設大小的工具可以安全的建立讓新的分割區使用的空間。 但因仍有可能會誤選已經存在的分割區,所以在修改磁碟分割區前, 一定要備份重要資料,並確認備份的完整性。 |
在磁碟分割區中儲存不同的作業系統讓一台電腦可以安裝多個作業系統,另一種作法是使用虛擬化技術 (虛擬化) ,可讓多個作業系統同時間執行而不需要改變任何磁碟分割區。
收集網路資訊
部份 FreeBSD 安裝方式需要網路連線來下載安裝檔,因此之後的安裝程序,安裝程式進入設定系統網路的介面。
如果網路中有 DHCP 伺服器,則可透過該伺服器自動設定網路,若無法使用 DHCP,則需要從區域網路管理者或是網際網路服務供應商 (Internet Service Provider, ISP) 取得以的網路資訊供系統使用:
IP 位址
子網路遮罩
預設通訊閘 IP 位址
網路的網域名稱
網路 DNS 伺服器 IP 位址
檢查 FreeBSD 勘誤表
儘管 FreeBSD 計劃努力確保每個 FreeBSD 發行版能夠儘可能地穩定,但臭蟲偶爾還是會悄悄出現,並有極小的可能會發生影響安裝流程的錯誤,當這些問題被發現並修正後,會被紀錄在 FreeBSD 網站的 FreeBSD 勘誤表 (https://www.freebsd.org/releases/12.0r/errata/)。 安裝前先檢查勘誤表,以確保沒有會影響到安裝的問題。
所有發行版的資訊和勘誤表可以在 FreeBSD 網站的發行資訊找到 (https://www.freebsd.org/releases/)。
FreeBSD 安裝程式並不是一個可以在其他作業系統上執行的應用程式,反而您需要下載 FreeBSD 安裝檔,燒錄安裝檔到符合其檔案類型與大小的媒體 (CD, DVD 或 USB),然後開機從插入的媒體來安裝。
FreeBSD 的安裝檔可於 www.freebsd.org/where/#download 取得。安裝檔的名稱由 FreeBSD 發佈版本、架構、以及檔案類型所組成,舉例,要從 DVD 安裝 FreeBSD 10.2 到 amd64 的系統,需下載 [.filename]#FreeBSD-10.2-RELEASE-amd64-dvd1.iso,並燒錄這個檔案到 DVD,然後使用插入 DVD 來開機。
安裝檔有許多種可用的格式,格式會依據電腦架構及媒體類型的不同而異。
還有另一種安裝檔是給使用 UEFI (Unified Extensible Firmware Interface) 開機的電腦使用,這些安裝檔的名稱會含有 uefi。
檔案類型:
-bootonly.iso:這是最精簡的安裝檔,檔案中只含安裝程式。 安裝時需要網際網路連線來下載所需的檔案以完成 FreeBSD 安裝。這個檔案應使用 CD 燒錄應用程式燒錄到 CD 使用。
-disc1.iso:這個檔案含有所有安裝 FreeBSD 所需的檔案,包含原始碼及 Port 套件集。這個檔案應使用 CD 燒錄應用程式燒錄到 CD 使用。
-dvd1.iso:這個檔案含有所有安裝 FreeBSD 所需的檔案,包含原始碼及 Port 套件集,也內含熱門的 Binary 套件可安裝視窗管理程式以及一些應用程式,如此便可從媒體安裝完整的系統,無須連線到網際網路。這個檔案應使用 DVD 燒錄應用程式燒錄到 DVD 使用。
-memstick.img:這個檔案含有所有安裝 FreeBSD 所需的檔案,包含原始碼及 Port 套件集。這個檔案應依據以下操作指示寫入到 USB 隨身碟使用。
-mini-memstick.img:類似 -bootonly.iso,但不含安裝檔 (可依所要下載),安裝時需要網際網路連線,可依 寫入映象檔到 USB 的說明將此檔案寫入至 USB 隨身碟。
映像檔下載完成之後,下載同一個目錄之中的 CHECKSUM.SHA256。FreeBSD 提供 sha256(1) 可用來計算映像檔的 校驗碼 (Checksum),使用方式為 sha256 imagefilename,其他作業系統也會有類似的程式。
比對計算後的校驗碼與 CHECKSUM.SHA256 檔案中的值,校驗碼應該要完全相符,若校驗碼不相符,則代表該映像檔是損壞的,必須再下載一次。
*.img 檔案是隨身碟的完整內容的映像檔 (image),該檔案不能直接用檔案的方式複製到目標裝置。有許多應用程式可用來寫入 *.img 到 USB 隨身碟,本節會介紹其中兩種。
在繼續之前,請先備份 USB 上的重要資料,這個程序會清除在隨身碟上既有的資料。 |
Procedure: 使用 dd 來寫入映像檔
本範例使用 /dev/da0 做為目標裝置,是映像檔將會寫入的位置。 務必十分小心確認要使用的裝置正確,因為這個指示會摧毀所有在指定目標裝置上已存在的資料。 |
dd(1) 指令列工具在 BSD, Linux™ 以及Mac OS™ 系統皆可使用。要使用 dd 燒錄映像檔需先插入 USB 隨身碟,然後確認隨身碟的裝置名稱。然後指定已下載的安裝檔名稱以及 USB 隨身碟的裝置名稱。本例示範在已有的 FreeBSD 系統燒錄 amd64 安裝映像檔到第一個 USB 裝置。
# dd if=FreeBSD-10.2-RELEASE-amd64-memstick.img of=/dev/da0 bs=1M conv=syncProcedure: 使用 Windows™ 來寫入映象檔
務必確認指定的磁碟機代號正確,因在指定磁碟機上的既有資料將會被覆蓋與摧毀。 |
取得 Image Writer Windows™ 版
Image Writer Windows™ 版 是一個免費的應用程式,可以正確地將映像檔寫入隨身碟。可從 https://sourceforge.net/projects/win32diskimager/ 下載,並解壓縮到一個資料夾。
用 Image Writer 寫入映象檔
雙擊 Win32DiskImager 圖示啟動程式。 確認 Device 顯示的磁碟機代號是隨身碟的磁碟機代號。 按下資料夾圖示選擇要寫入隨身碟的映像檔。 按下 Save 按鈕確定映像檔名。 確認所有東西都正確,隨身碟的資料夾並沒有在其他視窗開啟。 所有東西準備好後,按下 Write 將映像檔寫入隨身碟。
您現在可以開始安裝 FreeBSD 。
預設安裝程序在下列訊息顯示之前不會對磁碟做任何更動: Your changes will now be written to disk. If you have chosen to overwrite existing data, it will be PERMANENTLY ERASED. Are you sure you want to commit your changes? 在這個警告訊息之前可以隨時中止安裝,若有任何設定錯誤的疑慮,只需在此時關閉電腦,將不會對系統磁碟做任何更改。 |
本節將介紹如何使用根據 準備安裝的媒體 指示所準備的安裝媒體來開機。要使用可開機的 USB,請在開啟電腦前插入 USB 隨身碟。要使用 CD 或 DVD,則可開啟電腦後在第一時間插入媒體。如何設定系統使用插入的媒體開機依不同的系統架構會有所不同。
這兩種架構提供了 BIOS 選單可選擇開機的裝置,依據要使用的安裝媒體類型,選擇 CD/DVD 或 USB 裝置做為第一個開機裝置。大多數的系統也會提供快速鍵可在啟動時選擇開機裝置,而不需要進入BIOS,通常這個按鍵可能是 F10, F11, F12 或 Escape 其中之一。
若電腦仍載入了現有的作業系統,而不是 FreeBSD 安裝程式,原因可能為:
執行開機程序時安裝媒體插入主機的時間不夠早,請讓安裝媒體留在電腦中並重新啟動電腦。
未正確修改 BIOS 或未儲檔,請再三檢查第一個開機裝置選擇了正確的裝置。
系統太舊,無法支援使用選擇的開機媒體開機,發生這個情況可以使用 Plop Boot Manager (http://www.plop.at/en/bootmanagers.html) 來從選擇的開機媒體開機。
在大部份機型,可於開機時按住鍵盤上的 C,便可從 CD 開機。若在非 Apple™ 的鍵盤則可按住 Command+Option+O+F 或 Windows+Alt+O+F,出現 0 > 提示時,輸入
boot cd:,\ppc\loader cd:0大多數 SPARC64™ 系統會自動從磁碟開機,要從 CD 安裝 FreeBSD 需要進入 PROM。
要進入 PROM,需重新開機系統然後等候開機訊息出現。訊息會依機型而有所不同,但大致結果會如:
Sun Blade 100 (UltraSPARC-IIe), Keyboard Present
Copyright 1998-2001 Sun Microsystems, Inc.  All rights reserved.
OpenBoot 4.2, 128 MB memory installed, Serial #51090132.
Ethernet address 0:3:ba:b:92:d4, Host ID: 830b92d4.
若系統繼續從磁碟開機,此時按下鍵盤上的 L1+A 或 Stop+A 或透過序列 Console 送出 BREAK。當使用 tip 或 cu, ~# 發出一個 BREAK 後,PROM 的提示會在單 CPU 的系統出現 ok,SMP 的系統出現 ok {0},其中的數字代表啟動的 CPU 數。
此時,放入 CD 到磁碟機然後在 PROM 提示畫面輸入 boot cdrom。
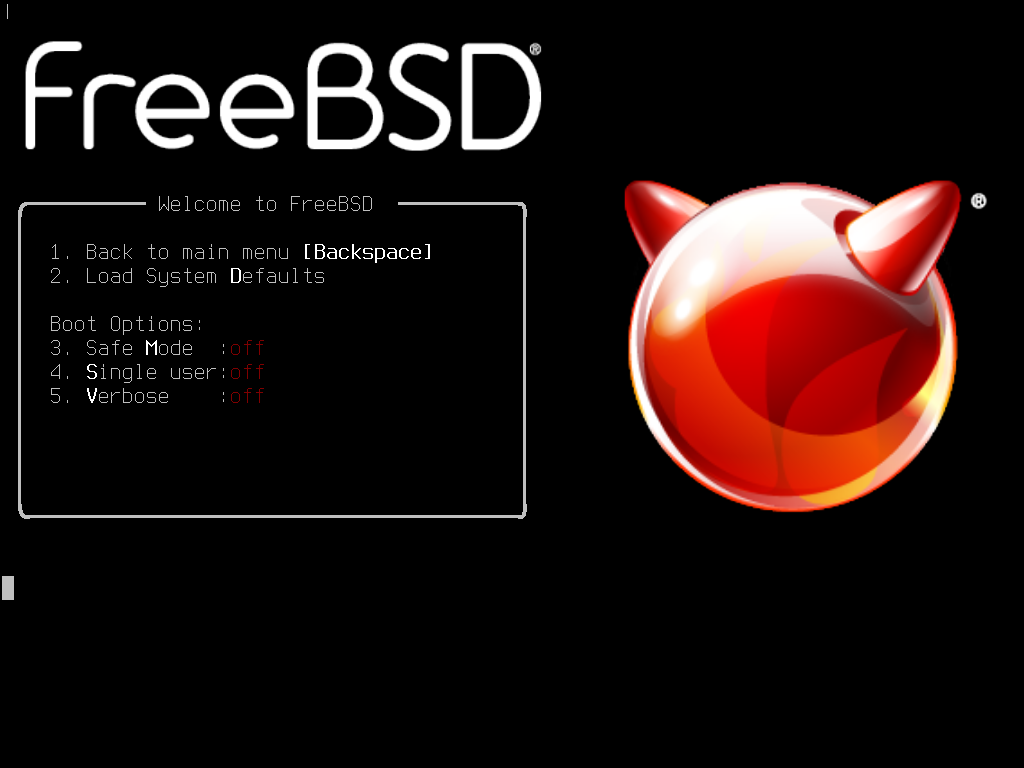
從安裝媒體開機之後,會顯示如下的選單:

預設在開機進入 FreeBSD 安裝程式前選單會等候使用者輸入 10 秒鐘,若已經安裝 FreeBSD,則會在開機進入 FreeBSD 前等候。要暫停開機計時器來仔細查看選項,請按 Space 鍵。要選擇選項,按下明顯標示的數字、字元或按鍵。選單有以下選項可選。
啟動多使用者模式 (Boot Multi User):這個選項會繼續 FreeBSD 開機程序,若開機計時器已經暫停,可按 1、大寫或小寫 B 或 Enter 鍵。
啟動單使用者模式 (Boot Single User):這個模式用來修正已安裝的 FreeBSD,如 單使用者模式 所述。可按 2、大寫或小寫 S 進入這個模式。
離開到載入程式提示 (Escape to loader prompt):這個選項會開機進入修復提示,這個模式含有有限數量的低階指令,這個模式詳細說明於 階段三。可按 3 或 Esc 進入這個提示。
重新開機 (Reboot):重新開啟系統。
設定開機選項 (Configure Boot Options):開啟內部選單,詳細說明於 FreeBSD 開機選項選單。
開機選項選單分成兩個部份。第一個部份用來返回主開機選單或重設任何已切換的選項回預設值。
第二個部份用來切換可用的選項為開 (On) 或關 (Off),透過按下選項明顯標示的編號或字元。系統將會一直使用這些選項開機,直到選項被修改。有數個選項可以在這個選單做切換:
ACPI 支援 (ACPI Support):若系統在開機時卡住,可嘗試切換這個選項為關 (Off)。
安全模式 (Safe Mode):若系統在 ACPI 支援 (ACPI Support) 設為關 (Off) 時開機時仍然會卡住,可嘗試將此選項設為開 (On)。
單使用者 (Single User):切換這個選項為開 (On) 來修正已存在的 FreeBSD 如 單使用者模式 所述,問題修正後,將其設回關 (Off)。
詳細資訊 (Verbose):切換這個選項為開 (On) 來查看開機程序中更詳細的訊息,這在診斷硬體問題時非常有用。
在做完所需的選擇後,按下 1 或 Backspace 返回主開機選單,然後按下 Enter 繼續開機進入 FreeBSD。FreeBSD 執行裝置偵測及載入安裝程式時會顯示一系列的開機訊息,開機完成之後,會顯示歡迎選單如 歡迎選單。
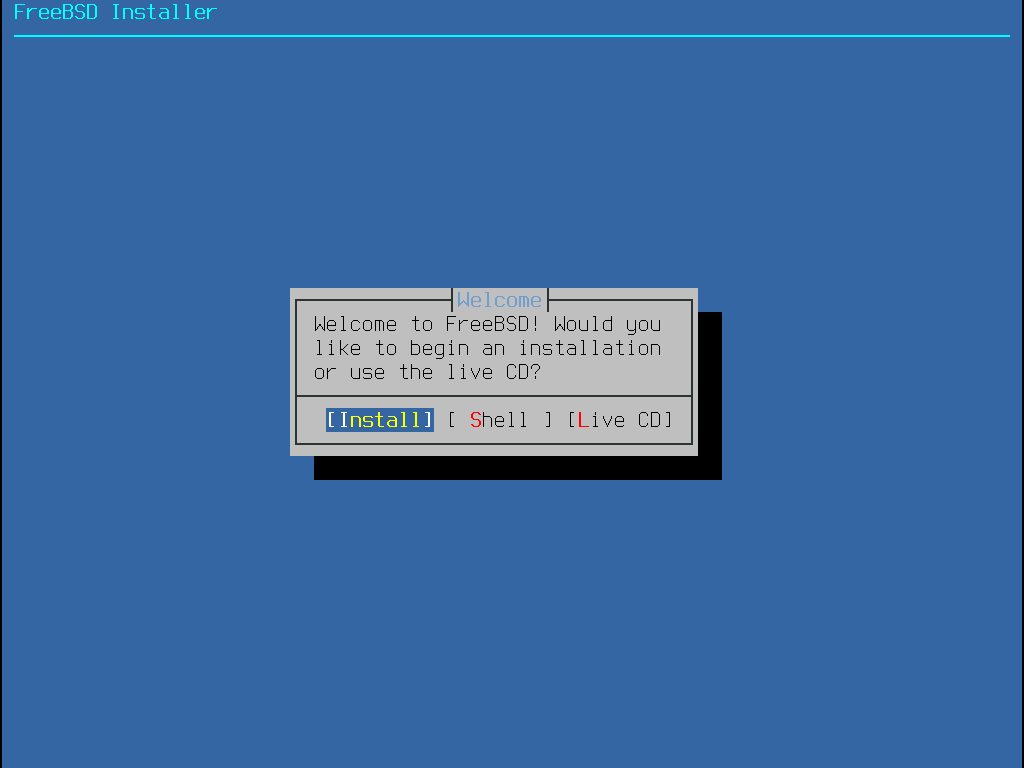
按下 Enter 選擇預設的 Install 進入安裝程式,接下來本章將介紹如何使用這個安裝程式。 若要選擇其他項目,可使用右或左方向鍵或顏色標示的字母選擇想要的選單項目。Shell 可用來進入 FreeBSD 的 Shell 使用指令列工具在安裝之前準備磁碟。Live CD 選項可用來在安裝之前試用 FreeBSD,Live 版本的詳細說明於 使用 Live CD。
要重新檢視開機訊息,包含硬體裝置偵測,請按大寫或小寫 S 然後再按 Enter 進入 Shell。在 Shell 提示之後輸入 |
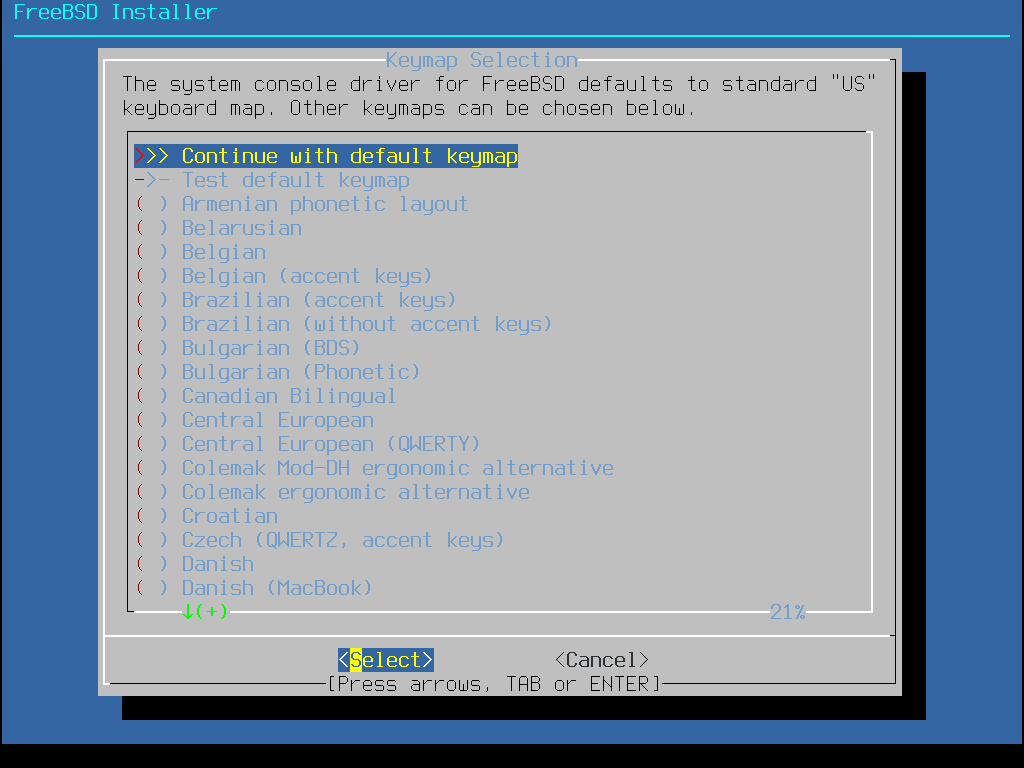
本節將告訴您在系統安裝之前 bsdinstall 選單的順序以及會詢問的資訊類型,可使用方向鍵來選擇選單的選項,然後按下 Space 選擇或取消選擇選單項目。當完成之後,按下 Enter 儲存選項然後進入下一個畫面。
依據使用的系統 Console,bsdinstall 可能一開始顯示的選單會如 鍵盤對應表選擇。

要設定鍵盤配置,請選擇 YES 按下 Enter,接著會顯示選單如 選擇鍵盤選單。若要使用預設的配置,則可使用方向鍵選擇 NO 然後按下 Enter 跳過這個選單畫面。
設定鍵盤配置時,可使用上與下方向鍵來選擇最接近已連接到系統的鍵盤的鍵盤對應表 (Keymap),然後按下 Enter 儲存選項。
按 Esc 會離開這個選單然後使用預設的鍵盤對應表,若不清楚要使用那種鍵盤對應表, 是也是保險的選項。 |
在 FreeBSD 10.0-RELEASE 以及之後的版本,已經加強了這個選單,會顯示完整的鍵盤對應表選項,並預先選擇預設值。另外,當選擇其他鍵盤對應用時,在繼續之前會顯示對話框讓使用者測試鍵盤對應表來確認。
下一個 bsdinstall 選單用來為新安裝的系統設定主機名稱。
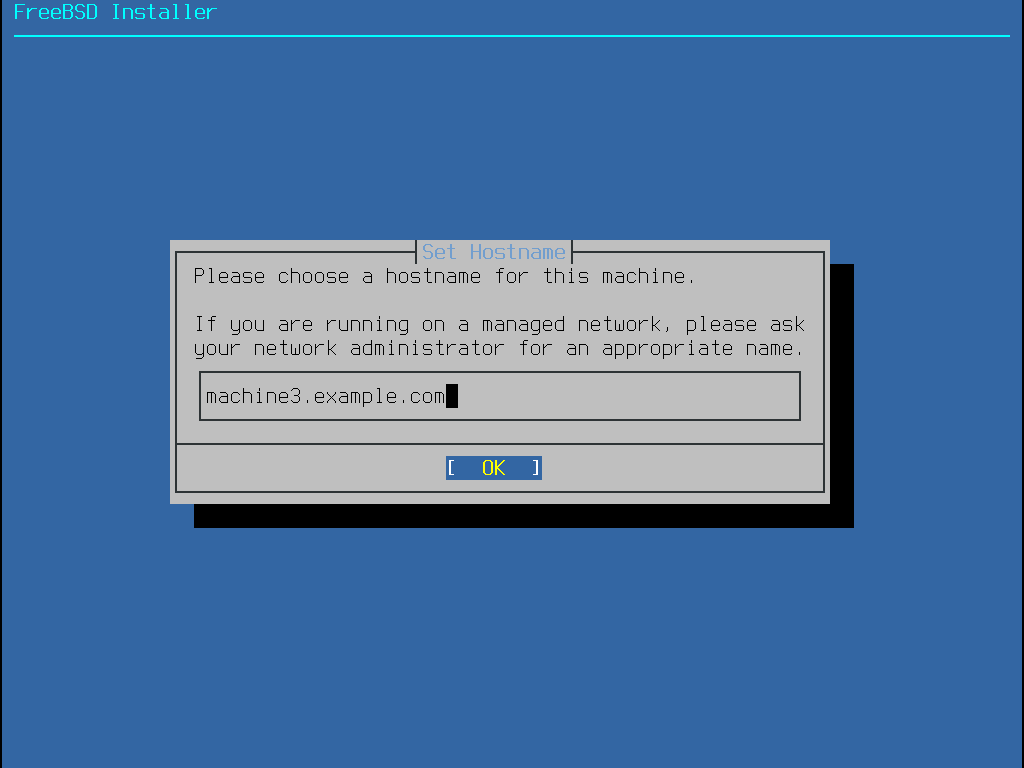
輸入在網路上獨一無二的主機名稱,主機名稱要是完整的主機名稱,如 machine3.example.com。
接下來 bsdinstall 會提示選擇要安裝的選用元件。
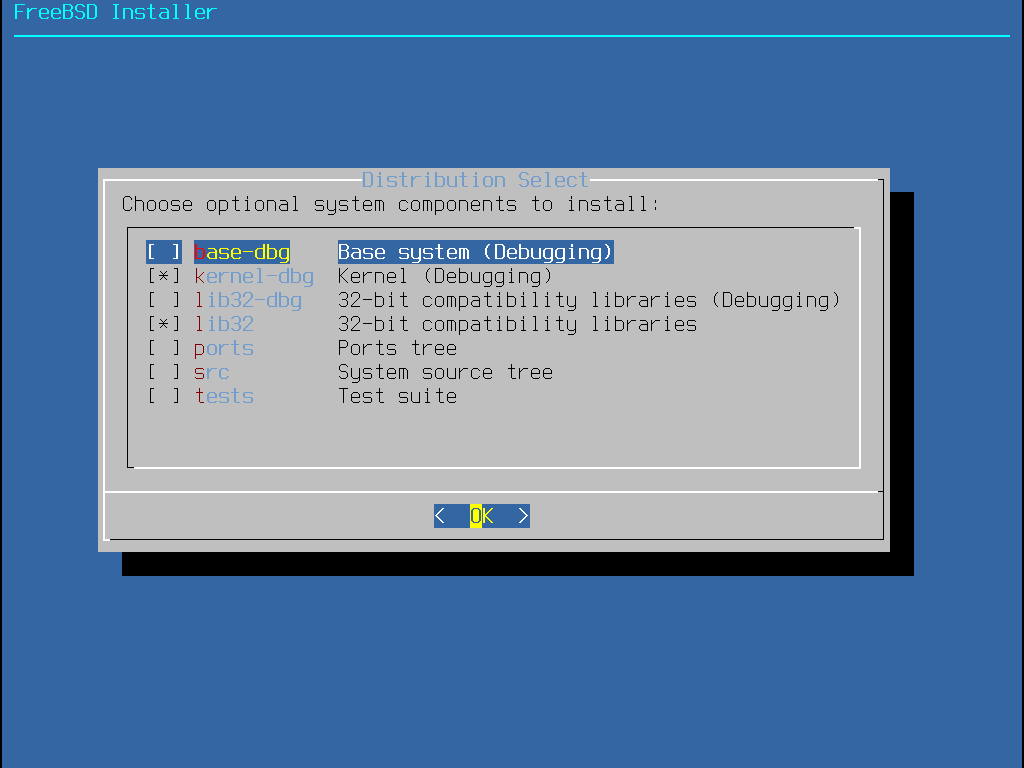
決定要安裝的元件主要會根據系統的用途以及可用的磁碟空間容量。FreeBSD 核心 (Kernel) 及 Userland 統稱為 基礎系統 (Base system),是必須安裝的部份。依據系統的架構,部份元件可能不會顯示:
doc - 額外的說明文件,大部份是經年累月的產物,會安裝到 /usr/shared/doc。由 FreeBSD 文件計劃所提供的說明文件可在之後安裝,依照 更新文件集 中的指示操作。
games - 數個傳統 BSD 遊戲,包含 fortune, rot13 以及其他。
lib32 - 在 64-bit 版本的 FreeBSD 供執行 32-bit 應用程式使用的相容性程式庫。
ports - FreeBSD Port 套件集是一套可自動下載、編譯安裝第三方軟體套件的集合,安裝應用程式:套件與 Port 中會討論到如何使用 Port 套件集。
安裝程式並不會檢查是否有充足的磁碟空間,FreeBSD Port 套件集會使用約 500 MB 的磁碟空間,只有在有足夠的磁碟空間時才選擇這個選項。 |
src - 完整的 FreeBSD 原始碼,包含核心 (Kernel) 與 Userland。雖然大多數的應用程式並不需要,但它可以編譯裝置驅動程式、核心模組或部份來自 Port 套件集的應用程式,它同時也用來做為開發 FreeBSD 本身所使用。完整的原始碼樹需要 1 GB 的磁碟空間,重新編譯整個 FreeBSD 系統需要額外再 5 GB 的空間。
接下來的選單用來決定配置磁碟空間的方式。
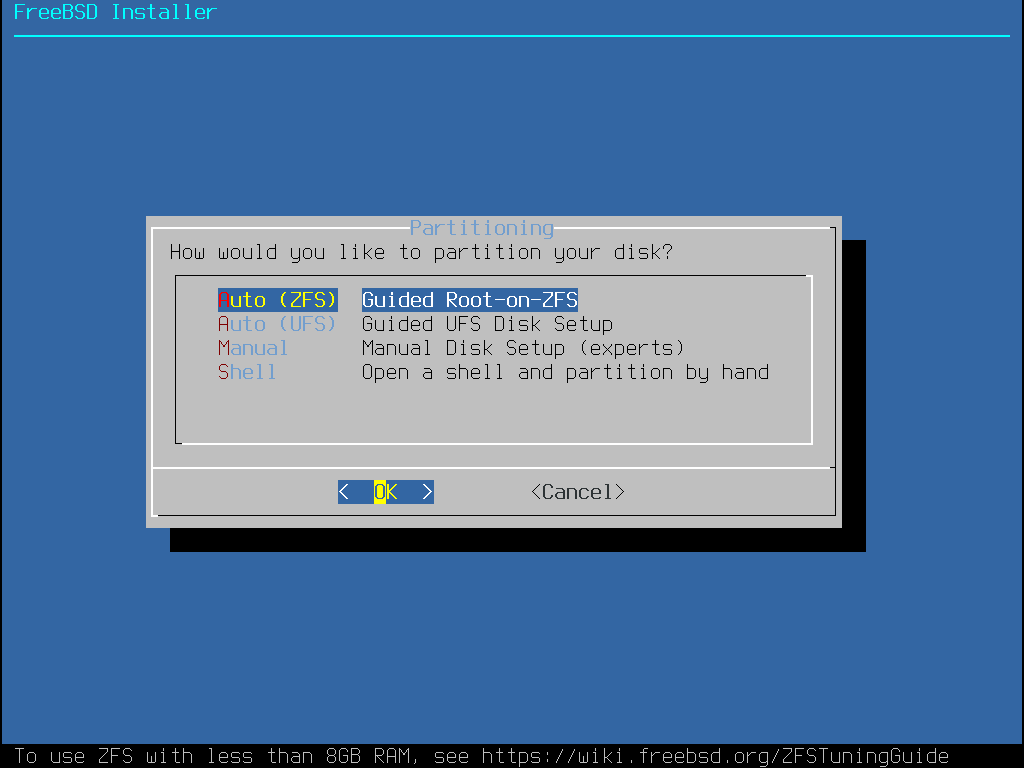
引導式 (Guided) 磁碟分割會自動設定磁碟的分割區 (Partition),手動 (Manual) 磁碟分割可讓進階的使用者使用選單項目建立自訂的分割區,而 Shell 會開啟 Shell 提示讓進階的使用者可以使用指示列工具如 gpart(8), fdisk(8) 以及 bsdlabel(8) 來建立自訂的分割區。ZFS 磁碟分割只在 FreeBSD 10 及之後的版本可以使用,可建立選擇性加密的 root-on-ZFS 系統並支援 開機環境 (Boot environment)。
本節會介紹在配置磁碟分割時需要考量那些事情,並且會示範各種磁碟分割的方式。
配置檔案系統時要記得硬碟的資料傳輸的速度外軌較內軌快,因此較小且大量存取的檔案系統應要較接近磁碟的外軌,而較大的分割區如 /usr 應放置在磁碟較內部,建議建立分割區的順序如下:/, swap, /var 然後 /usr。
機器預期的用途會反映到 /var 分割區的大小,這個分割區用來保存郵件 (Mailbox)、日誌檔 (Log file) 及印表機緩衝 (Spool)。依使用者數及保存的期間,郵件及日誌檔可能成長到無法預期的大小,一般來說大部份的使用很少會在 /var 需要超過 1 GB 的可用磁碟空間。
有時在 /var/tmp 會需要較多的空間,當新軟體安裝,套件工具會從套件中取出暫存的複本置於 /var/tmp。若在 /var/tmp 沒有足夠的空間,要安裝大型軟體套件,例如 Firefox, Apache OpenOffice 或 LibreOffice 會很困難。 |
/usr 分割區保存了許多支持系統運作的檔案,包含 FreeBSD Port 套件集以及系統原始碼,這個分割區建議至少要有 2 GB 的空間。
在規劃分割區大小時,請牢記空間需求,當因某個分割區空間不足時要改使用其他分割區時會很麻煩。
根據經驗,交換分割區應為是實體記憶體 (RAM) 的兩倍。使用最低需求的 RAM 來運作的系統會需要更多的交換空間來取得更好的表現。配置太小的交換交間可能導致 VM 分頁掃描碼效率不佳,且往後增加更多記憶體時可能會產生問題。
在有數個 SCSI 磁碟或數個 IDE 磁碟在不同控制器的大型系統建議在每個磁碟機上都設定交換空間,最多可至四個磁碟機。每個交換分割區的大小應接近相同。核心雖可以處以任意大小的交換空間,但內部資料結構擴充到 4 倍的最大交換分割區大小時,讓交換分割區擁有相同的大小可以讓核心可以最佳的方式串連各個磁碟的交換空間。規劃較大交換空間是可以的,即使沒有使用到多少交換空間,這也會讓要從失控的程式恢復運作更容易,而不需強制重新啟動系統。
正確的做磁碟分割,可以區隔頻繁寫入所產生的資料碎片與經常讀取的分割區,將寫入頻繁的分割區放在磁碟的邊緣可以增加 I/O 效率。雖然較大的分割區可能也需要增加 I/O 效率,但將這些分割區往磁碟邊緣移動所增加的效率並不會比將 /var 移到磁碟邊緣所增加的效率來的顯著。
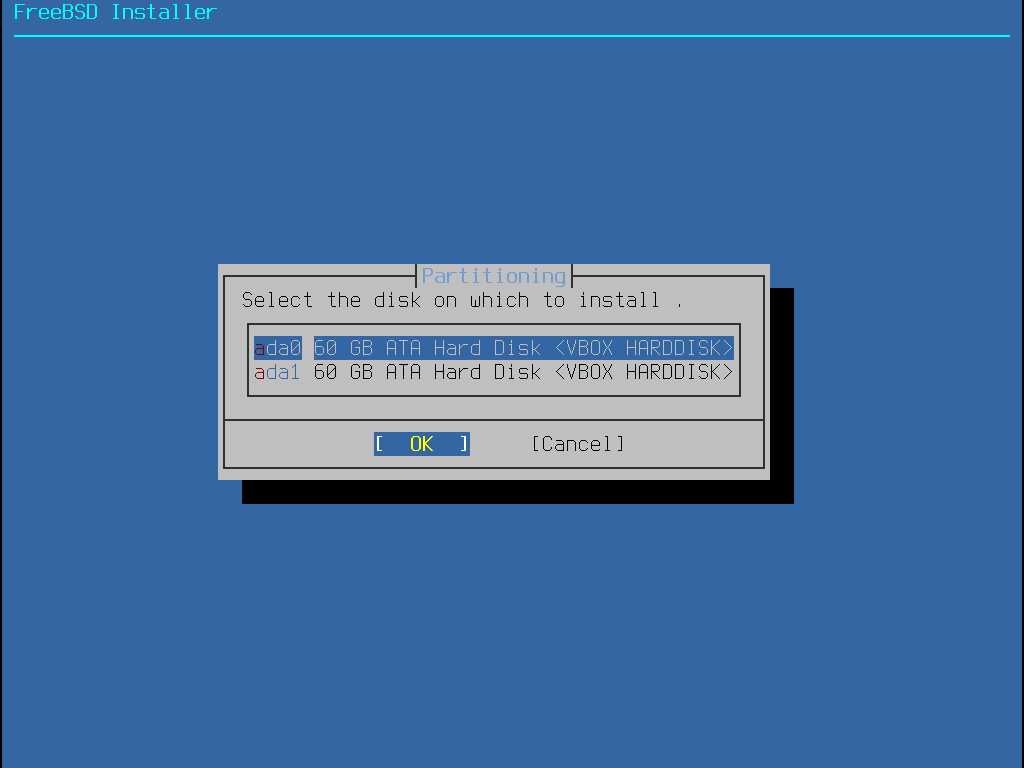
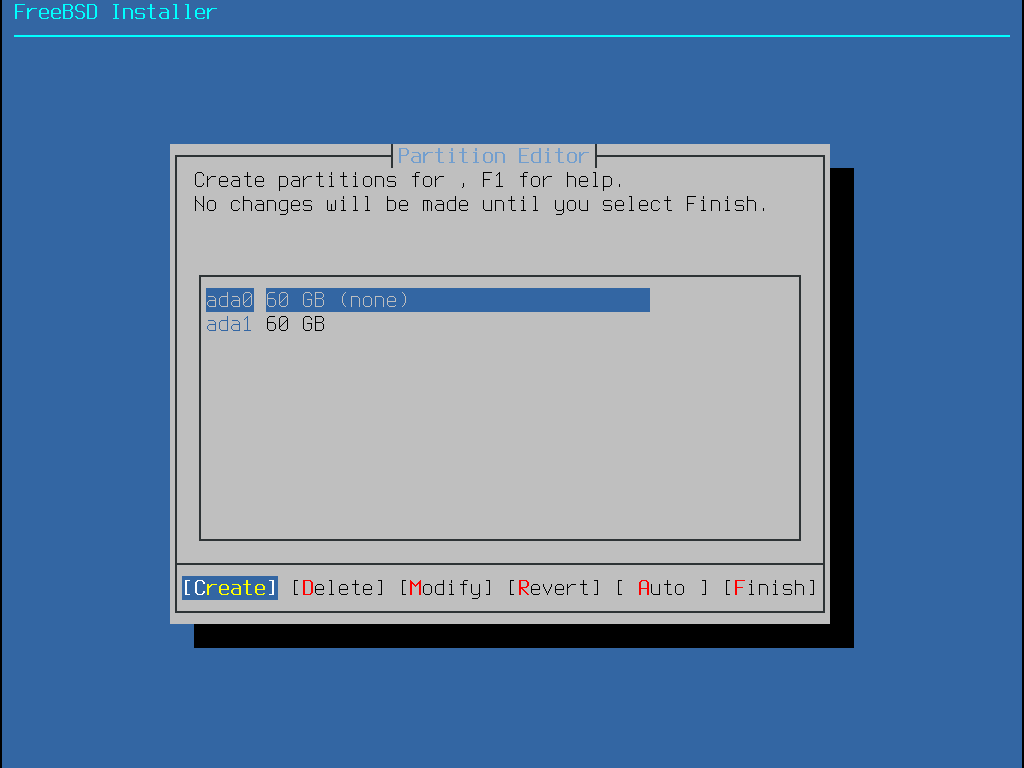
當選擇這個方法,選單上會顯示可用的磁碟,若電腦有安裝多個磁碟,則需選擇其中一個來安裝 FreeBSD。
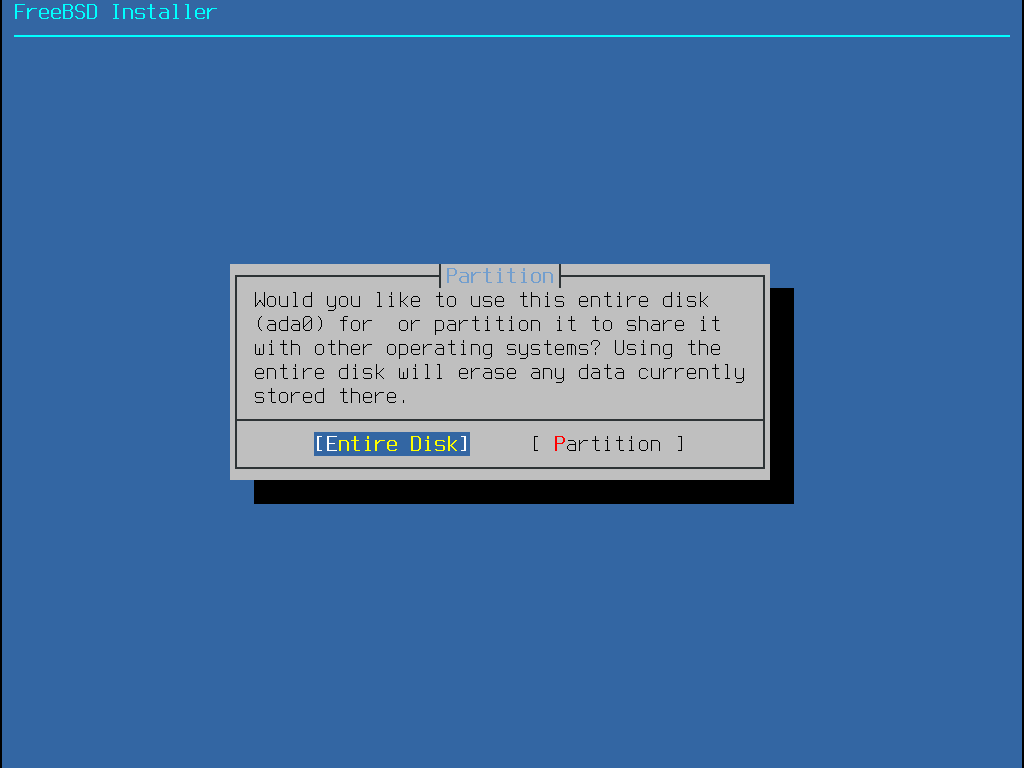
選擇磁碟之後,接下來選單會提示是否要安裝到整個磁碟或是使用剩餘的空間建立新的分割區。若選擇 Entire Disk,會自動建立通用的分割區配置來填滿整個磁碟。選擇 Partition 則會使用磁碟上未使用的空間來建立分割區配置。
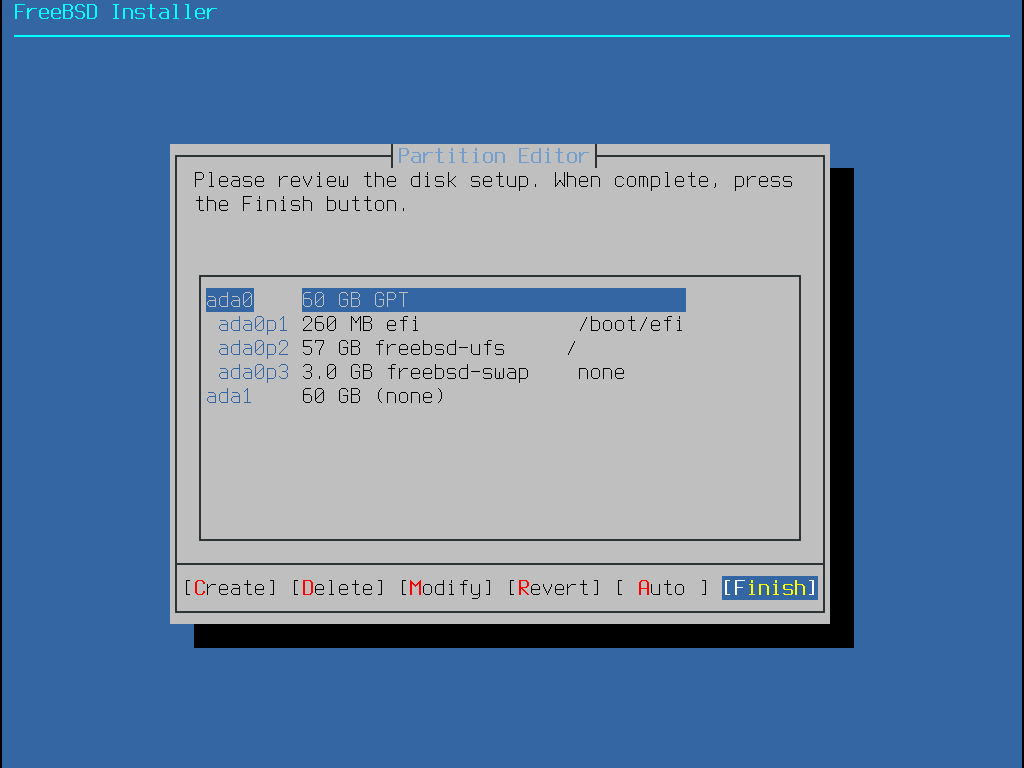
分割區配置建立完成之後,再檢查一次確定是否符合安裝的需求。選擇 Revert 會重設分割區回復為原來的設定值,選擇 Auto 會重新建立自動配置的 FreeBSD 分割區。分割區也可以手動建立、修改或刪除。當確認磁碟分割正確之後,選擇 Finish 繼續安裝。
選擇這個方法會開啟分割區編輯程式:
選擇要安裝的磁碟機 (在這個例子為 ada0) 然後選擇 Create 會以選單顯示可用的分割表格式 (Partition scheme):
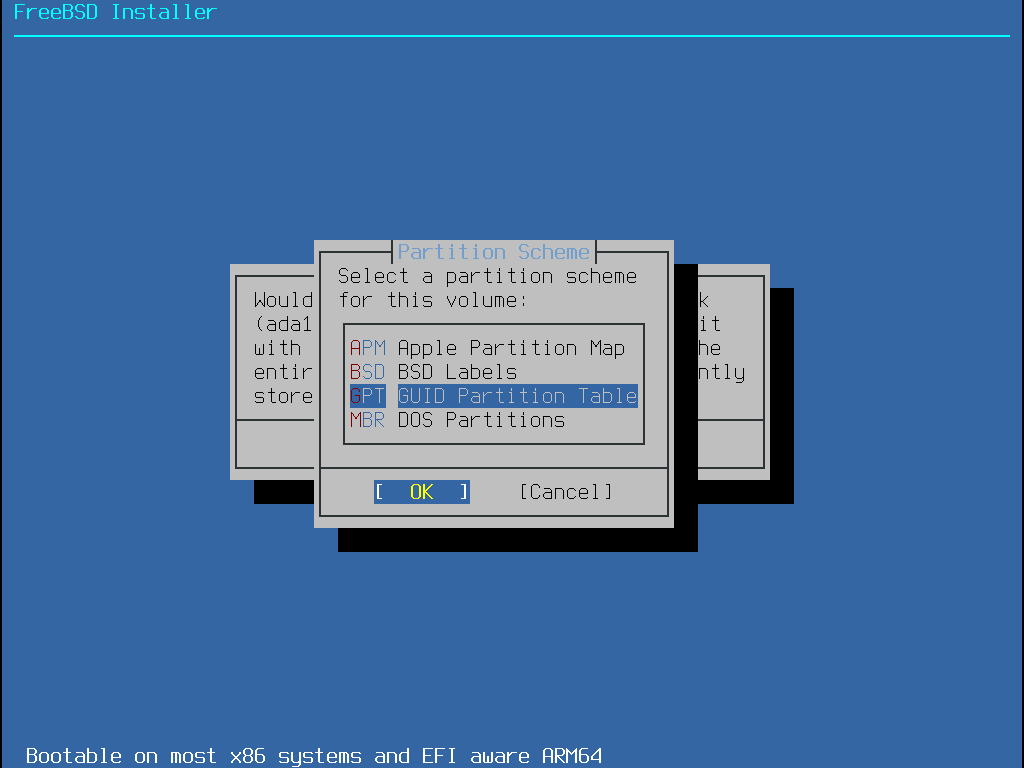
amd64 電腦最適合的選擇通常是 GPT,無法相容 GPT 的舊電腦則應使用 MBR。而其他分割表格式一般會用在那些較罕見或較舊的電腦上。
| 縮寫 | 說明 |
|---|---|
APM | Apple Partition Map,用於 PowerPC™。 |
BSD | 無 MBR 的 BSD 標籤,因非 BSD 的磁碟工具可能無法辨識該標籤,有時被稱做 危險專用模式 (Dangerously dedicated mode)。 |
GPT | GUID 分割區表 (http://en.wikipedia.org/wiki/GUID_Partition_Table)。 |
MBR | |
PC98 | 使用 MBR 改編,用於 NEC PC-98 電腦 (http://en.wikipedia.org/wiki/Pc9801)。 |
VTOC8 | Volume Table Of Contents,用於 Sun SPARC64 及 UltraSPARC 電腦。 |
選擇完分割區表格式並建立之後,再選擇 Create 一次來建立分割區。Tab 鍵可用來在欄位間移動游標。

標準的 FreeBSD GPT 安裝會使用至少三種分割區:
freebsd-boot - 儲存 FreeBSD 開機程式 (Boot code)。
freebsd-ufs - FreeBSD 的 UFS 檔案系統。
freebsd-swap - FreeBSD 交換空間。
另一個值得注意的分割區類型是 freebsd-zfs,這個分割區用來放置 FreeBSD ZFS 檔案系統 (Z 檔案系統 (ZFS))。請參考 gpart(8) 取得可用的 GPT 分割區類型說明。
檔案系統分割區可建立多個,且有部份人會偏好使用傳統的配置方式將 /, /var, /tmp 以及 /usr 分開存放在不同的分割區。請參考 建立傳統分割的檔案系統分割區 的範例。
大小 (Size) 欄位可以使用常用的縮寫來輸入:K 代表 KB, M 代表 MB, G 代表 GB。
適當的對齊磁碟扇區 (Sector) 會提供最佳的效能,而且讓分割區大小為 4 KB 的偶數倍數可協助確保對齊在磁碟機上的 512-byte 或 4K-byte 扇區。一般來說,使用分割區大小為 1M 或 1G 的偶數倍數是最簡單的方式確保每個分割區以 4K 的偶數倍數做為開始。唯一一個例外是:freebsd-boot 分割區因目前開機程式 (Boot code) 的限制,不可大於 512K。 |
若分割區內含檔案系統便會需要一個掛載點 (Mountpoint),若只要建立一個 UFS 分割區,那麼掛載點應設為 /。
標籤 (Label) 是分割區的名稱,磁碟機名稱或編號可能因為磁碟機連接到不同的控制器或連結埠而有所不同,但分割區標籤並不會改變。因此在檔案如 /etc/fstab 中參照時,使用標籤來替代磁碟機名稱與分割區編號會讓系統對硬體變更有更多的容錯空間。GPT 標籤會於磁碟連結之後出現在 /dev/gpt/。其他分割表格式的標籤格有不同功能,且標籤會在 /dev/ 中有各自的目錄。
每個分割區請使用獨一無二的標籤來避免相同名稱的衝突,標籤可以加入與電腦名稱、用途、地點有關的文字。例如,使用 |
傳統的分割區配置會將 /, /var, /tmp 以及 /usr 分別使用不同的檔案系統與分割區。先建立 GPT 分割表格式,然後依照下表所示建立分割區。下表是針對 20G 目標磁碟的分割區大小,若在目標磁碟有更多可用的空間,則可增加交換空間 (Swap) 或 /var 會比較有用。以下所示的標籤皆以 ex 為字首,代表 "example",讀者應照前面的說明使用其他獨一無二的標籤。
預設 FreeBSD 的 gptboot 會預期第一個 UFS 分割區為 / 分割區。
| 分割區類型 | 大小 | 掛載點 | 標籤 |
|---|---|---|---|
|
|
|
|
/ |
|
|
|
|
|
| |
/var |
|
|
|
/tmp |
|
| 接受預設值 (依磁碟提示) |
自訂的分割區建立完後,選擇 Finish 繼續安裝。
在 FreeBSD 10.0-RELEASE 之後支援了自動建立 root-on-ZFS 的安裝程序。這種磁碟分割模式只能使用整個磁碟,並會清除整個磁碟內的內容。安裝程式會自動建立對齊 4k 邊界的分割區然後強制 ZFS 使用 4k 扇區 (Sector)。即使在 512 位元扇區的磁碟使用也很安全,並增加了確保在 512 位元的磁碟上建立儲存池 (Pool) 也可在未來加入 4k 扇區磁碟的好處,無論是作為額外的存儲空間或作為故障磁碟的替代品。安裝程式也可選擇性採用 GELI 磁碟加密,如 使用 geli 做磁碟加密 所介紹,若開啟磁碟加密,會建立一個內含 /boot 目錄的 2 GB 未加密的開機儲存池,這個儲存池中會儲存核心及其他開機必要的檔案。然後剩餘的空用會給 ZFS 儲存池使用。
主要 ZFS 設定選單提供了數個設定選項來控制儲存池的建立。
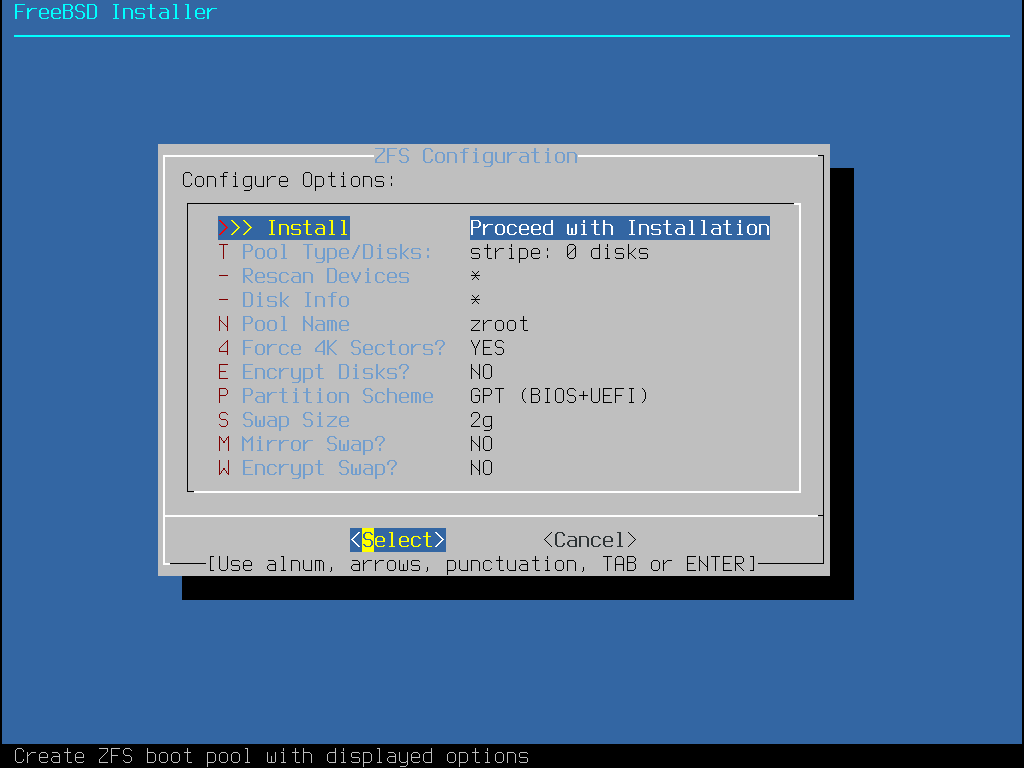
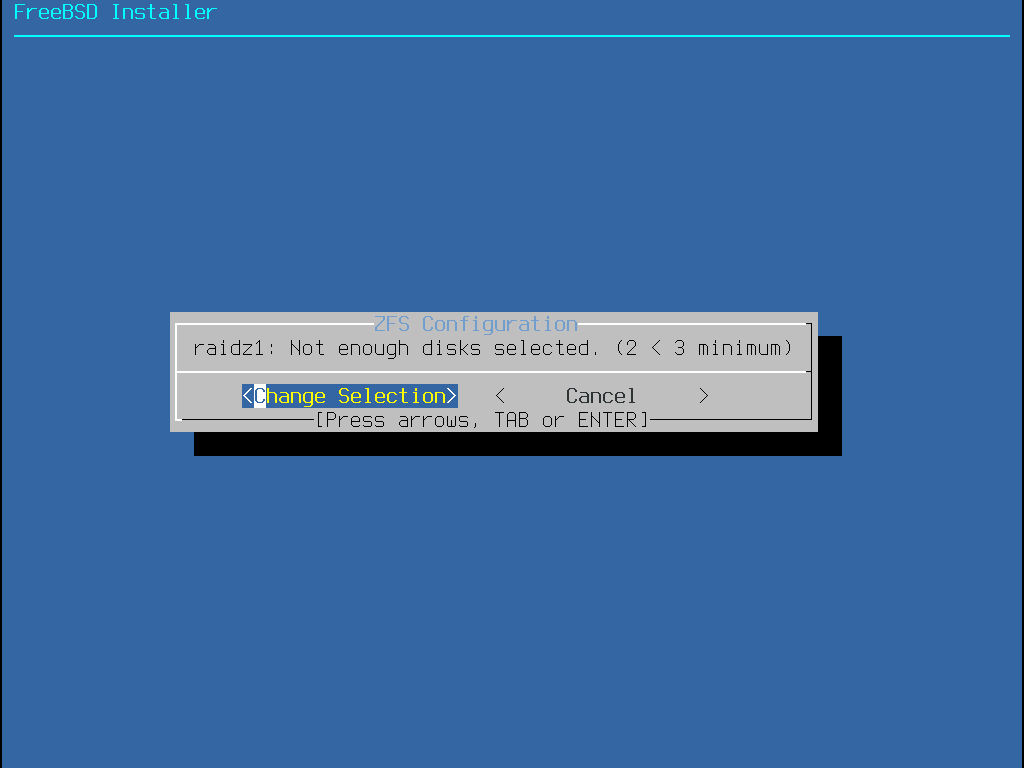
選擇 T 來設定儲存池類型 (Pool Type) 以及要組成儲存池的磁碟。自動 ZFS 安裝程式目前僅支援建立單一頂層 vdev,除了在串連 (Stripe) 模式。要建立更複雜的儲存池,需使用 Shell 模式磁碟分割 的操作來建立儲存池。安裝程式支援建立各種儲存池類型,包含串連 Stripe (不建議,沒有備援功能)、鏡像 Mirror (效能較佳,但可用空間較少) 以及 RAID-Z 1, 2, 與 3 (分別有能力承受同時 1, 2 與 3 個磁碟的損壞)。在選擇儲存池類型時會在螢幕的下方提示所需的磁碟數量,以及在使用 RAID-Z 時,每種配置最佳的磁碟數。
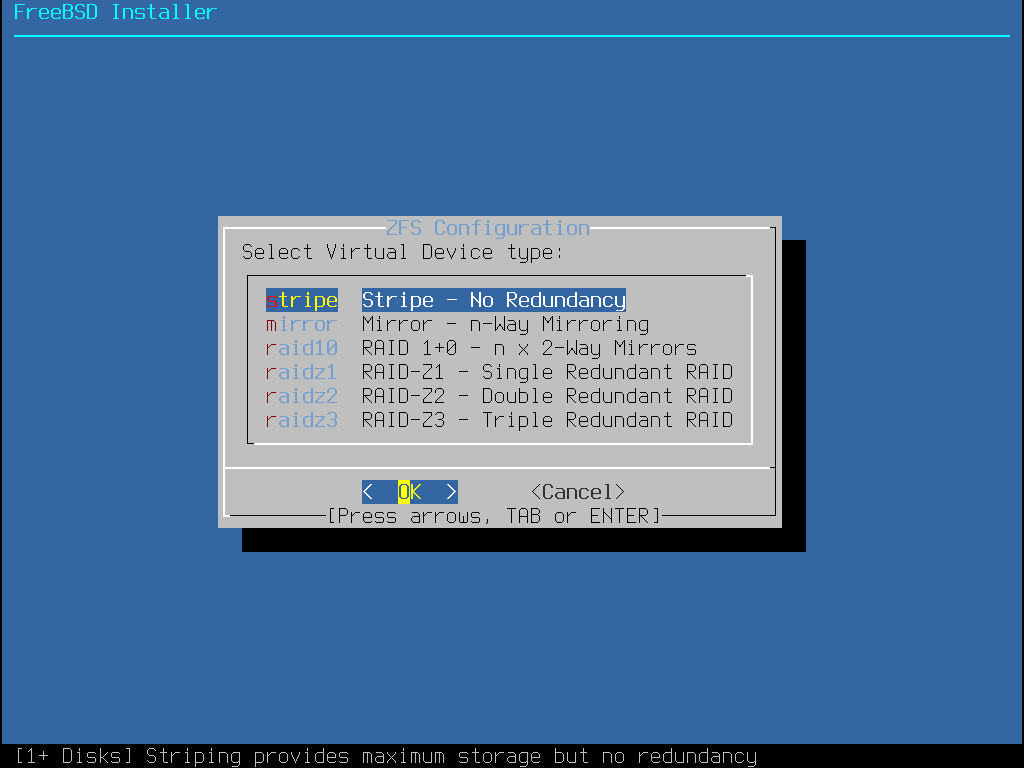
選擇儲存池 (Pool Type) 之後,會顯示可用的磁碟清單,然後會提示使用者選擇一個或多個磁碟來建立儲存池。接著會檢驗設定來確定選擇的磁碟足夠,若不足,選擇更改選項 (<Change Selection>) 來返回磁碟清單或取消 (<Cancel>) 來更改儲存池類型。
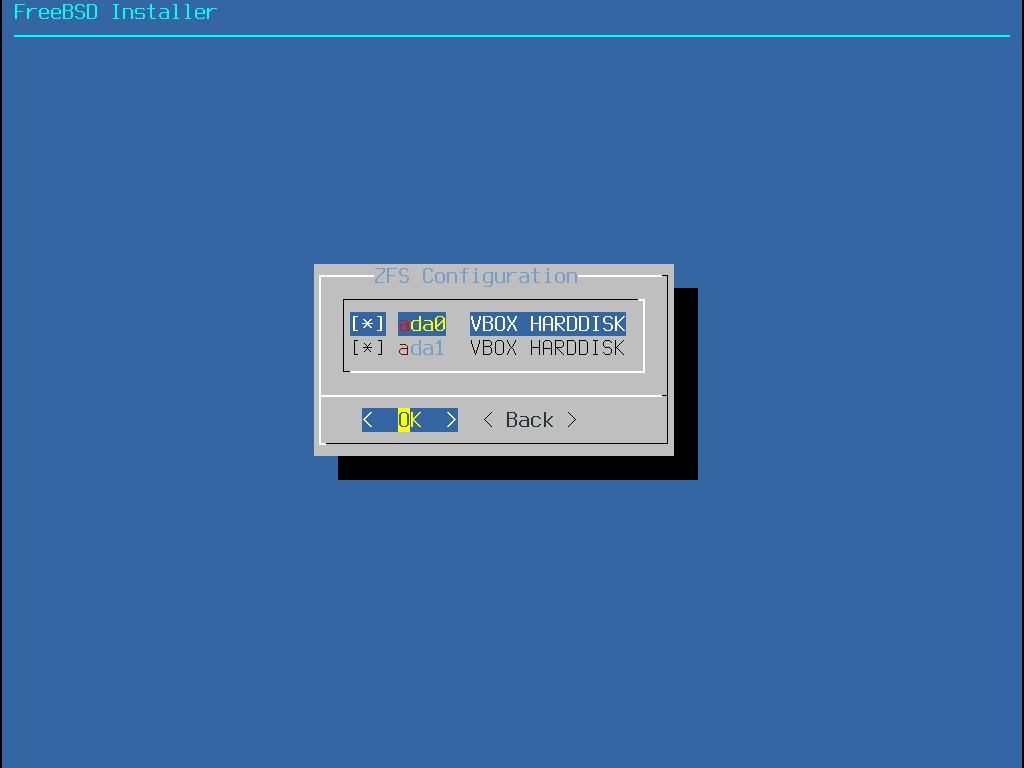
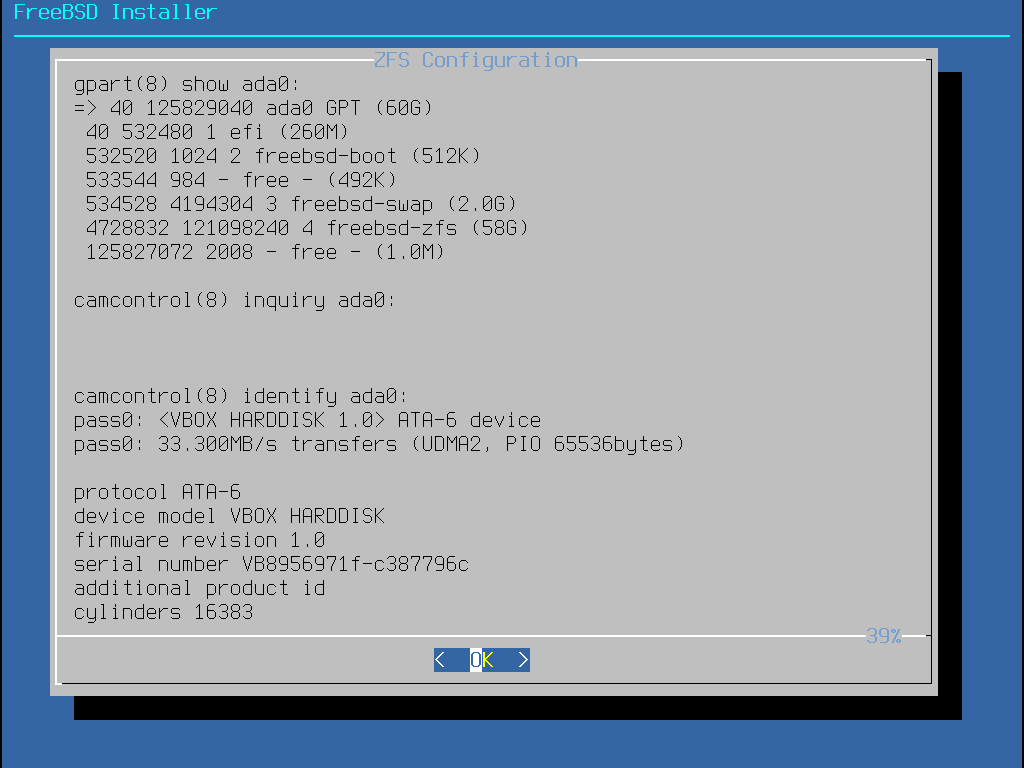
若有一個或多磁碟未出現在清單上,或在安裝程式啟動後才連接的磁碟,可選擇重新掃描裝置 (- Rescan Devices) 來更新可用磁碟的清單。要避免清除掉錯的磁碟,可用磁碟資訊 (- Disk Info) 來檢查每個磁碟,包含磁碟中的分割表以及各種其他資訊如裝置型號與序號 (若有的話)。
主 ZFS 設定選單也允許使用者輸入儲存池名稱、關閉強制 4k 扇區對齊、開啟或關閉加密、切換 GPT (建議) 與 MBR 分割表類型以及選擇交換空間容量。設定所有選項為想要的值之後,請選擇選單上方的安裝 (>>> Install) 選項。
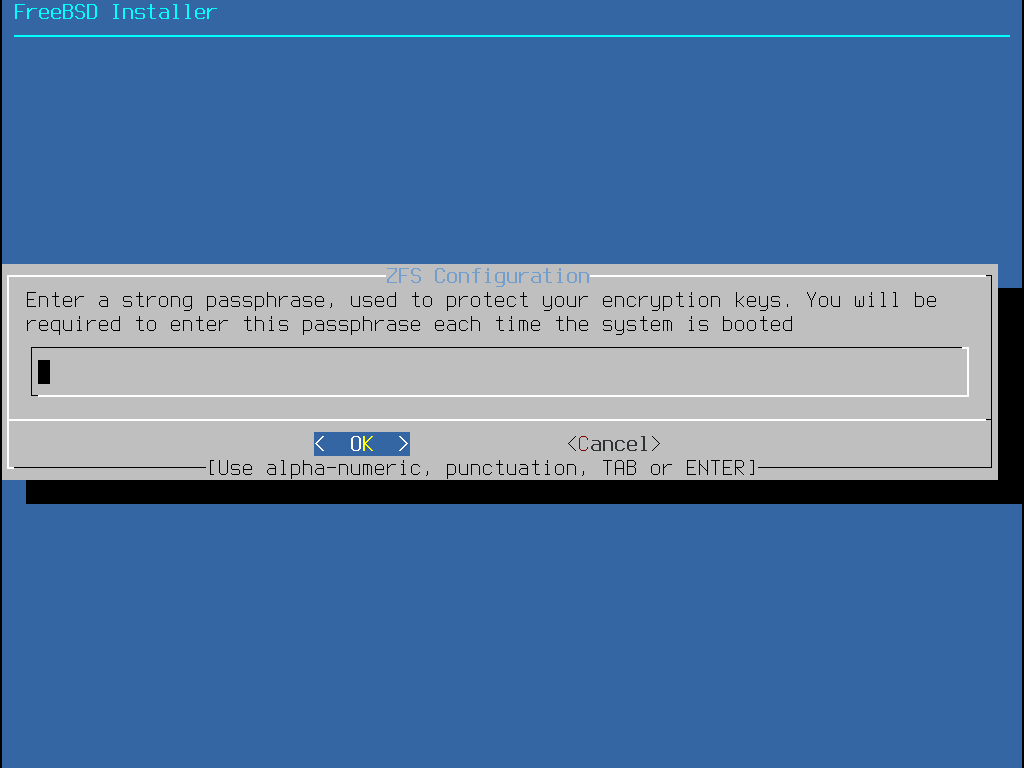
若開啟了 GELI 磁碟加密,安裝程式會提示輸入兩次用來加密磁碟的密碼。
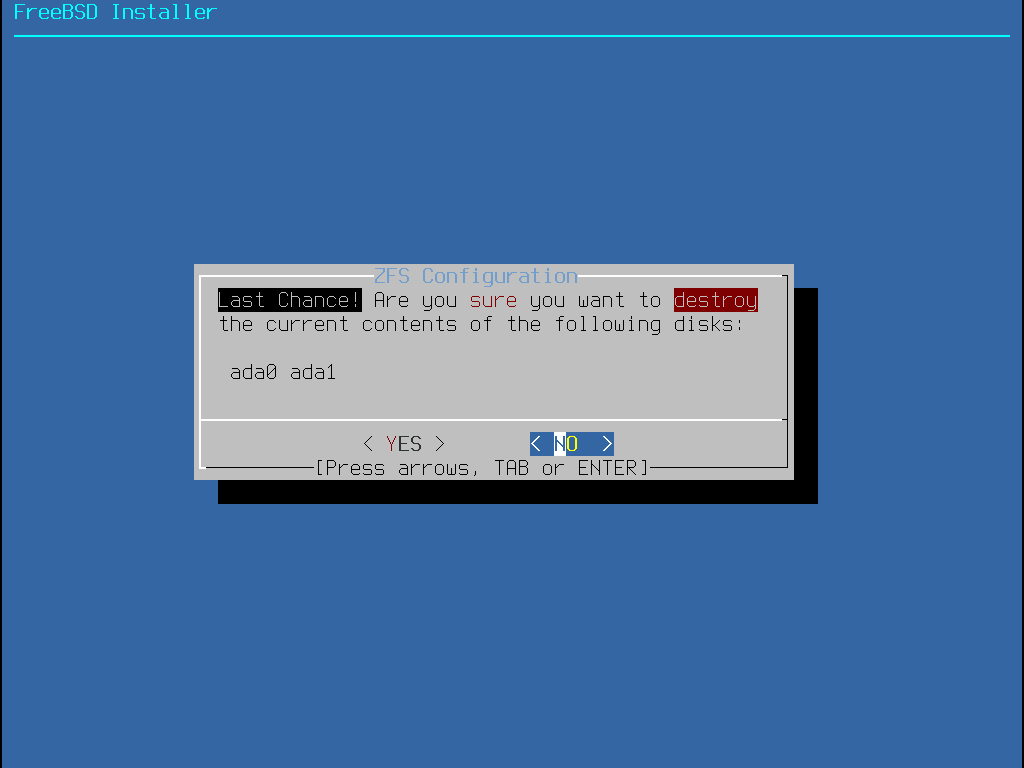
安裝程式接著會提供最後一次修改的機會可取消先前所選擇摧毀用來建立 ZFS 儲存池的磁碟機。
然後安裝程序會正常繼續。
磁碟設定完之後,接下來的選單會讓您在格式化所選的硬碟之前有最後一次機會做變更,若需要做變更,可選 Back 返回到主磁碟分割選單。Revert & Exit 則會離開安裝程式,不會對硬碟做任何變更。
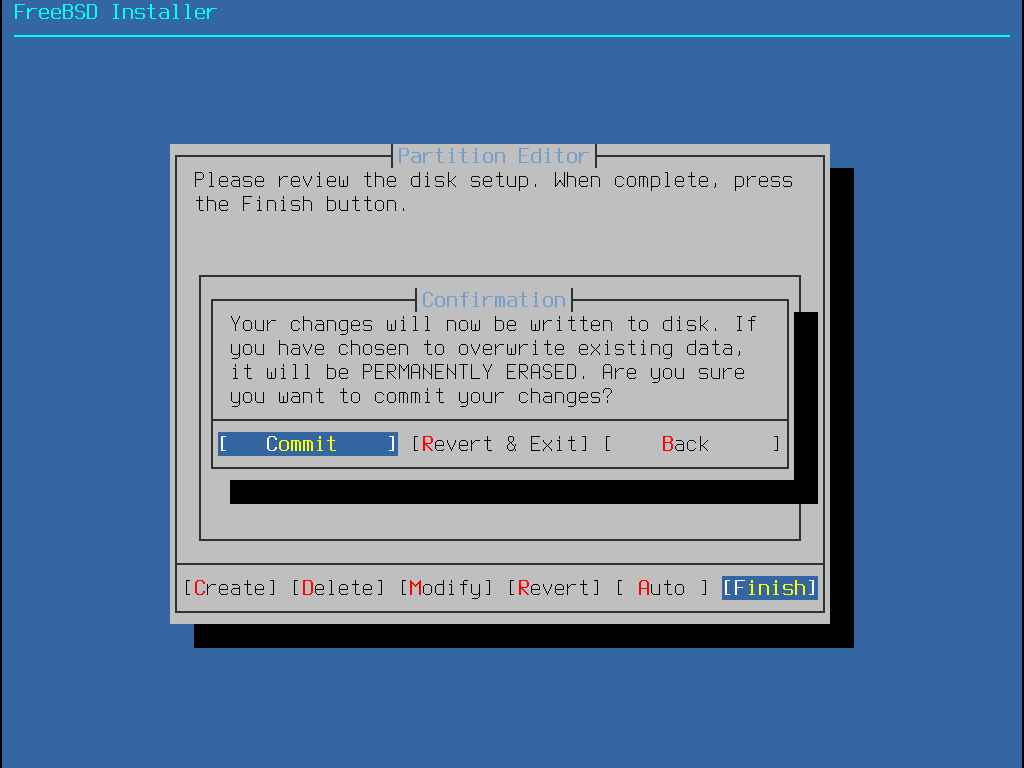
要開始實際的安裝,請選擇 Commit 然後按下 Enter。
安裝時間會依據選擇的發行版、安裝媒體、電腦的速度而有所不同,接下來會有一系列訊息會告知目前的進度。
首先,安裝程式會格式化選擇的磁碟,然後初始化分割區。然後,若使用僅可開機 (Boot only) 的媒體則會開始下載選擇的元件:
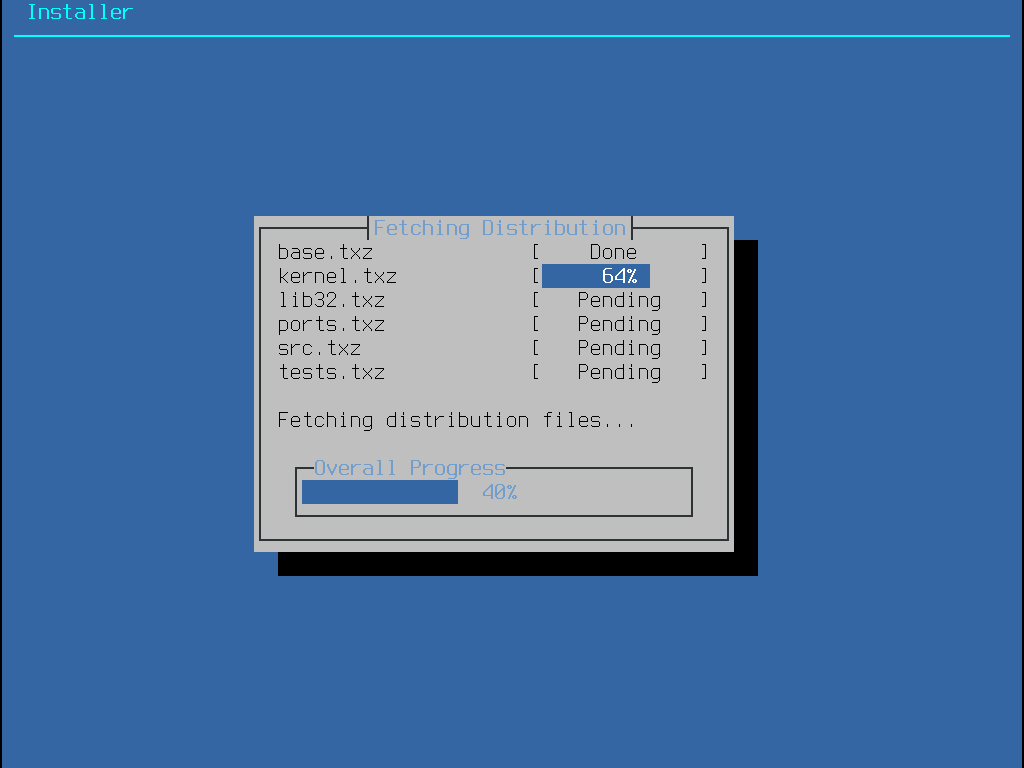
接著,會檢驗發行版的檔案完整性來確保沒有因下載過程中或安裝媒體的讀取過程中讀取錯誤造成的損壞:
最後,檢驗過的發行版檔案會被取出儲存至磁碟:
所有選擇的發行版檔案取出後,bsdinstall 會顯示第一次安裝後設定畫面,可用的安裝後設定選項會在下一節說明。
FreeBSD 安裝完之後,bsdinstall 會在開機進入新安裝的系統之前提示設定數個選項,本節將介紹這些設定選項。
系統開機之後, |
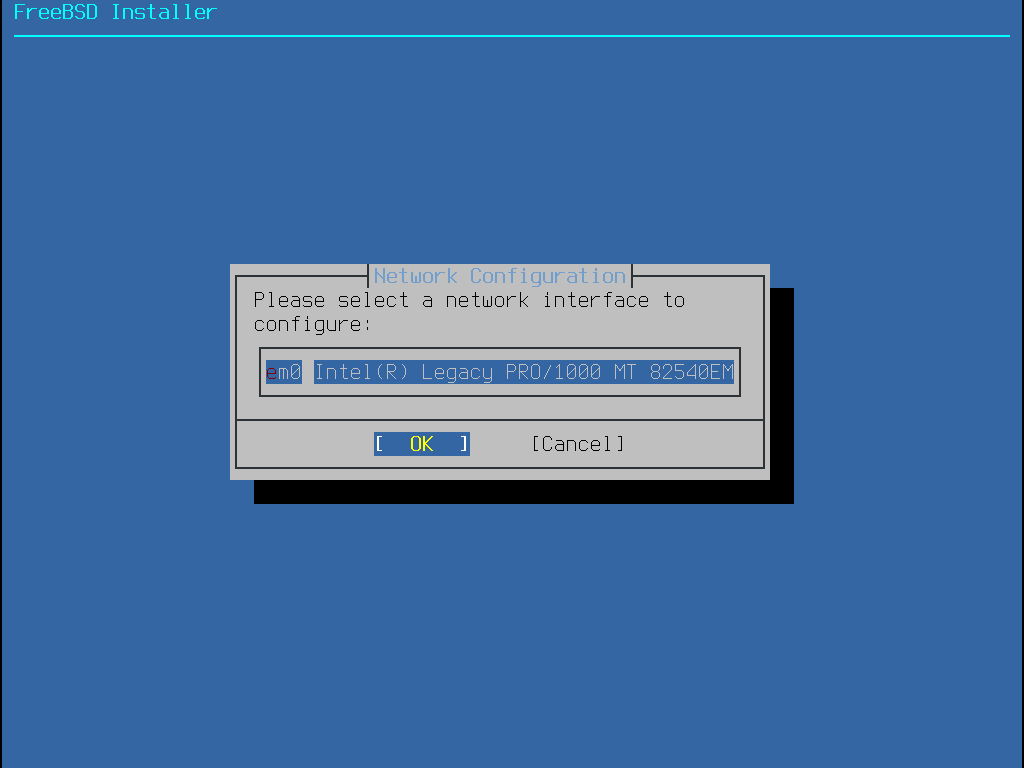
接著,會顯示在電腦上找到的網路介面卡清單。請選擇要設定的介面卡。
若使用 bootonly 的方式安裝在先前已有設定過網路,將會跳過網路設定選單。 |
若選擇的是乙太網路介面卡,安裝程式會跳過這部份直接到 選擇 IPv4 網路,若選擇的是無線網路介面卡,系統則會開始掃描無線存取點 (Wireless Access Point):
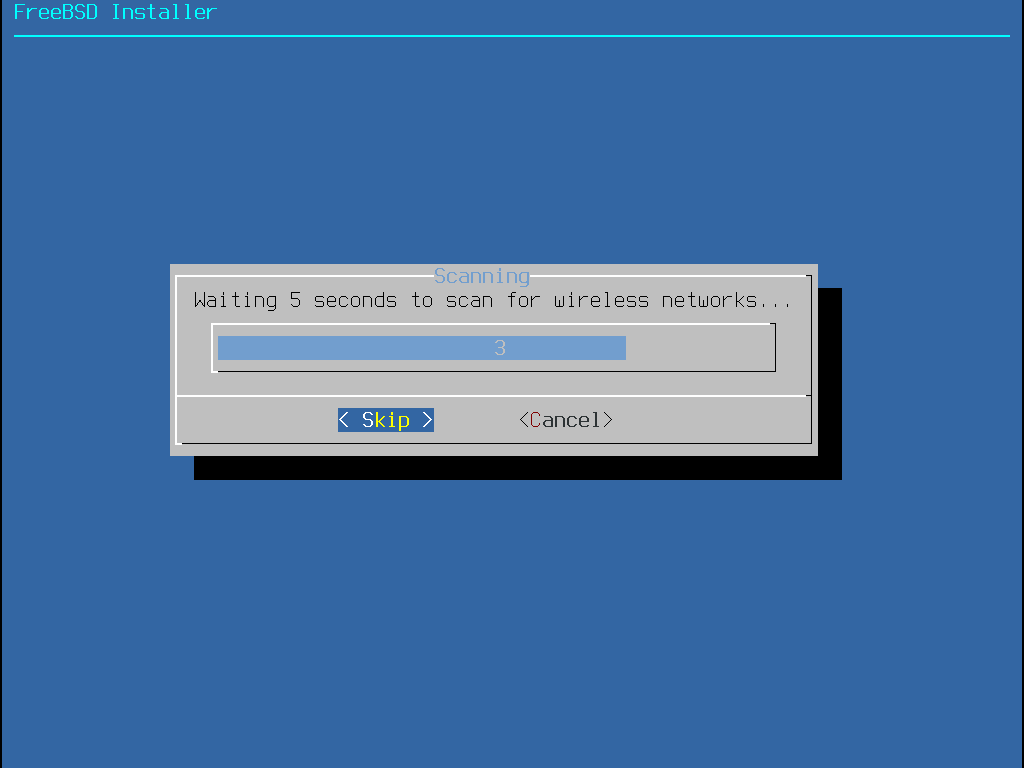
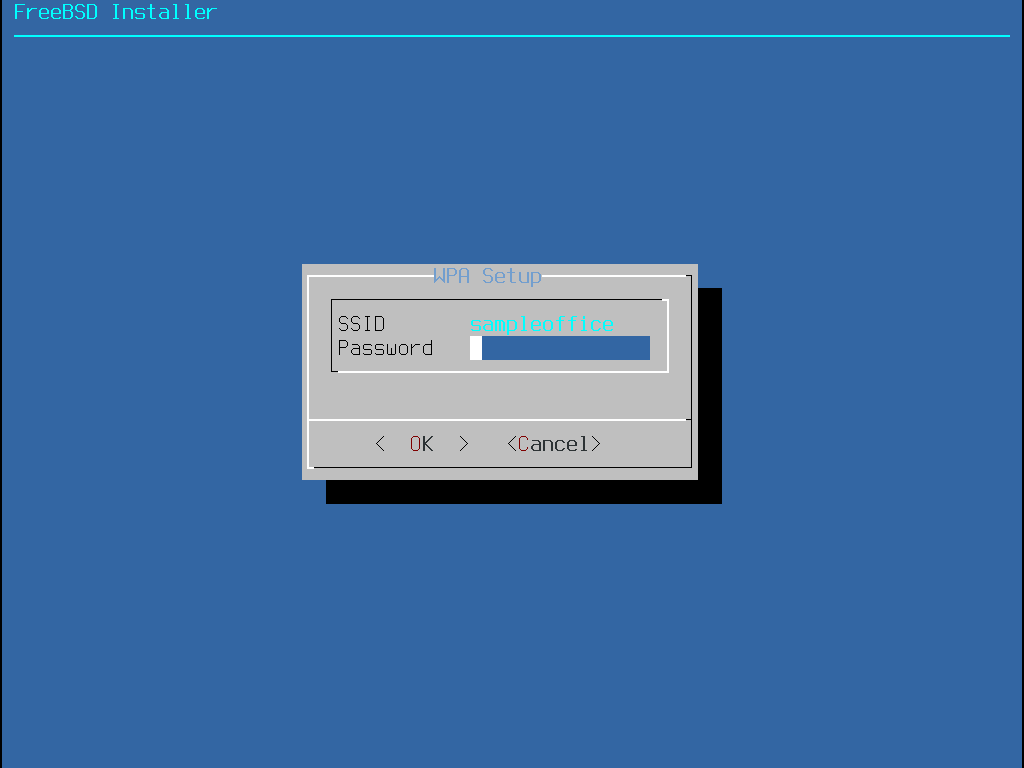
網線網路會使用 Service Set Identifier (SSID) 來辦識,SSID 是一段簡短、獨一無二的名稱,用來命名每個網路。 掃描時找到的 SSID 會列到清單,並會說明該網路可用的加密類型。 若想要連線的 SSID 並未出現在清單上,可選擇 Rescan 再掃描一次,若想要連線的網路仍然沒有出現,請檢查天線的連線是否有問題,或者嘗試將電腦移至更靠近存取點的位置,然後再掃描一次。
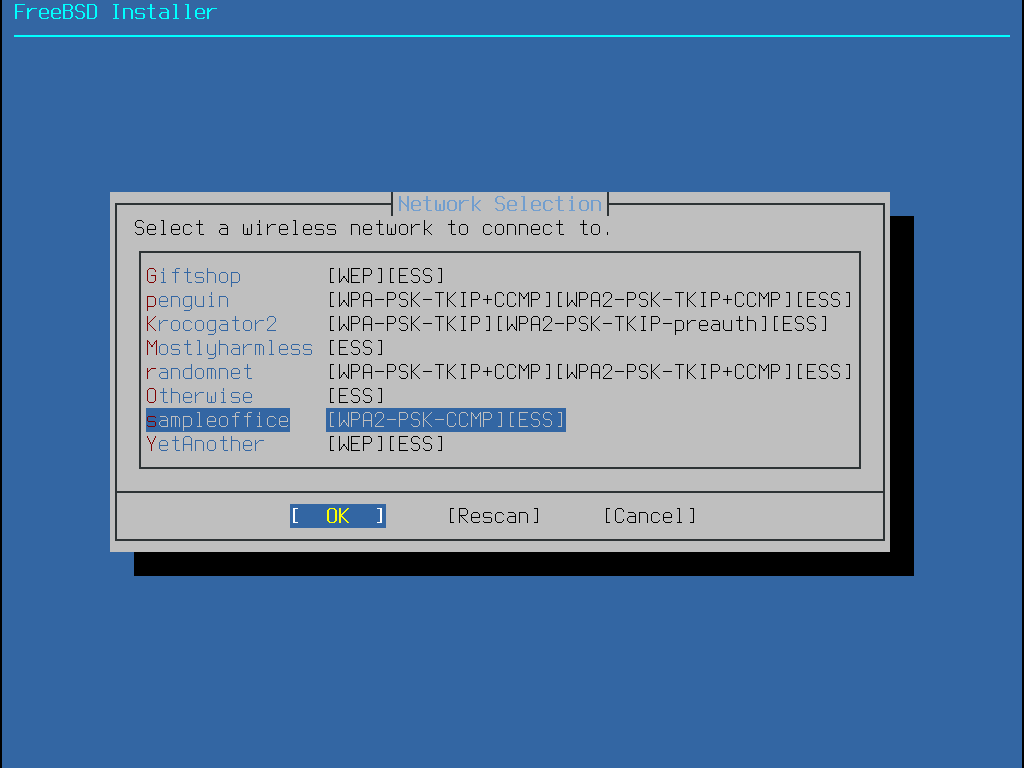
然後,輸入加密資訊來連線到選擇的無線網路。強列建議使用 WPA2 加密,因較舊的加密類型,如 WEP 僅提供微弱的安全性。若網路使用 WPA2 則需輸入密碼,也稱作 Pre-Shared Key (PSK)。考量安全性,輸入到輸入框的字元會以星號顯示。
接下來,選擇是否要設定乙太網路或無線網路介面卡的 IPv4 位址:
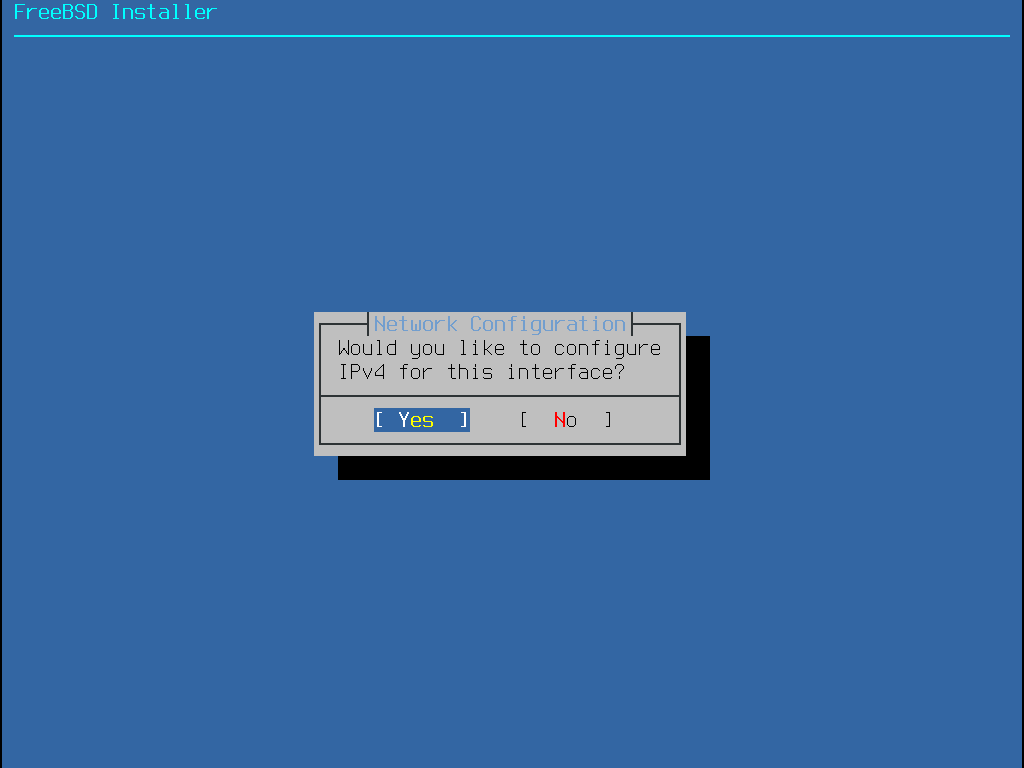
有兩種方式可以設定 IPv4。 DHCP 會自動設定網路介面卡且該網路上需有 DHCP 伺服器才可使用。否則,必須手動輸入位址的資訊來做靜態設定。
請不要隨便輸入網路資訊,因為這不管用。如果沒有可用的 DHCP 伺服器,可向網路管理者或網路服務供應商 (Internet Service Provider, ISP) 索取列於 需要的網路資訊 的資訊。 |
若有可用的 DHCP 伺服器,請在接下來的選單中選擇 Yes 則會自動設定網路介面卡。當找到 DHCP 伺服器並且取得系統的位址資訊時,安裝程式會出現一分鐘左右的停頓。

若沒有可用的 DHCP 伺服器,則選擇 No 然後在這個選單中輸入以下位址資訊:
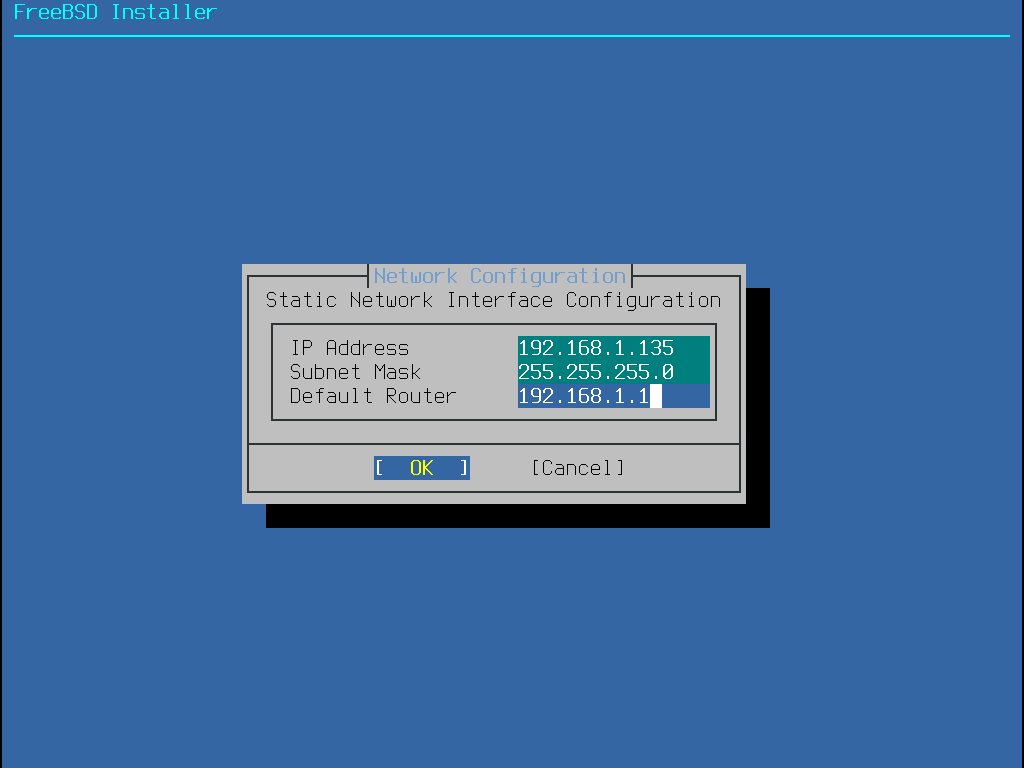
IP 位址 (IP Address) - 要分配給這台電腦的 IPv4 位址。位址必須獨一無二且不可已被其他在區域網路上的設備使用。
子網路遮罩 (Subnet Mask) - 網路的子網路遮罩。
預設路由器 (Default Router) - IP 位址所在網段的預設通訊閘。
接下來的畫面會詢問是否要設定介面卡的 IPv6 位址,若可以且想要使用 IPv6,請選擇 Yes。

同樣有兩種方式可以設定 IPv6。StateLess Address AutoConfiguration (SLAAC) 會自動向區域路由器請求取得正確的設定資訊,請參考 http://tools.ietf.org/html/rfc4862 取得進一步資訊。靜態設定則需要手動輸入網路資訊。
若有可用的 IPv6 路由器,請在接下來的選單選擇 Yes 來自動設定網路介面卡。當找到路由器並且取得系統的位址資訊時,安裝程式會出現一分鐘左右的停頓。
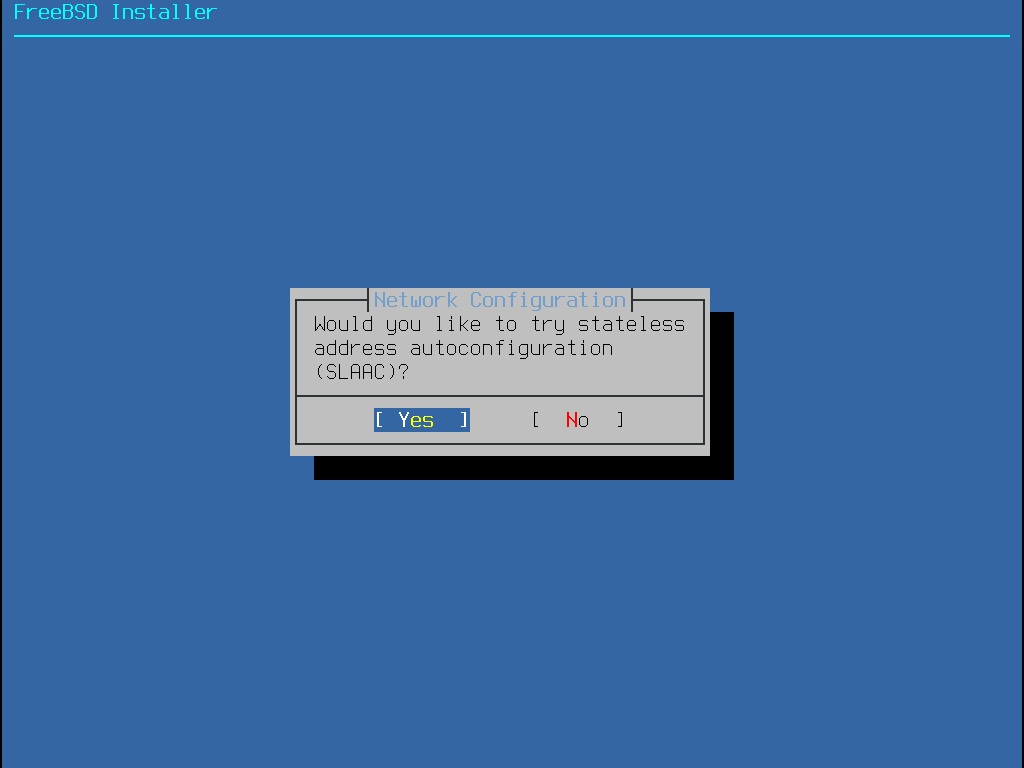
若沒有可用的 IPv6 路由器,請選擇 No 然後在這個選單中輸入以下位址資訊:
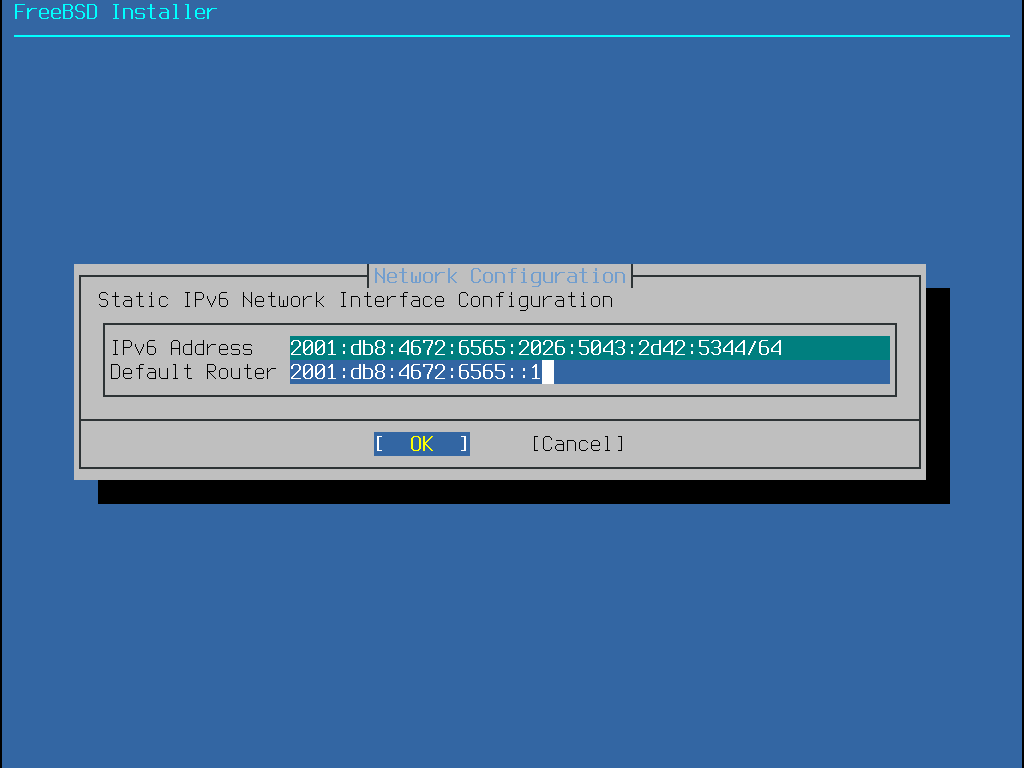
IPv6 位址 (IPv6 Address) - 要分配給這台電腦的 IPv6 位址。位址必須獨一無二且不可已被其他在區域網路上的設備使用。
預設路由器 (Default Router) - IPv6 位址所在網段的預設通訊閘。
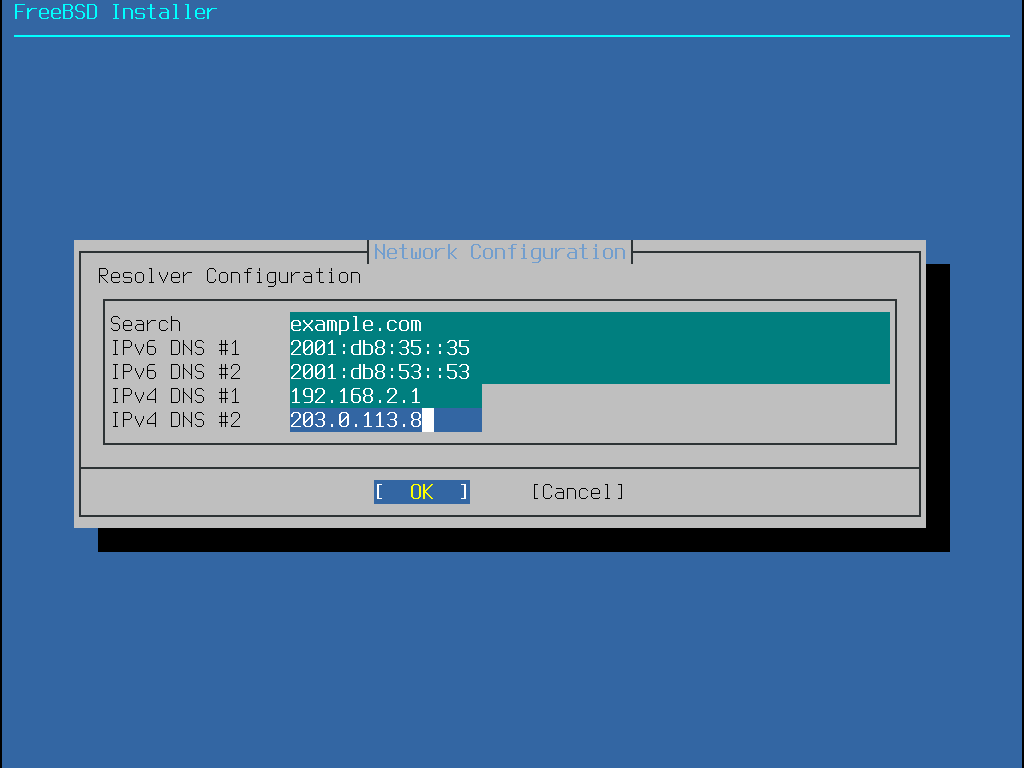
最後的網路設定選單是用來設定網域名稱系統 (Domain Name System, DNS) 的解析器,解析器會轉換主機名稱為網路位址。若已使用 DHCP 或 SLAAC 來自動設定網路介面卡,解析器設定 (Resolver Configuration) 的值可能會事先已填入,否則需輸入區域網路的網域名稱到搜尋 (Search) 欄位。 DNS #1 與 DNS #2 要填寫 DNS 伺服器的 IPv4 及/或 IPv6 位址,至少需填寫一個 DNS 伺服器。
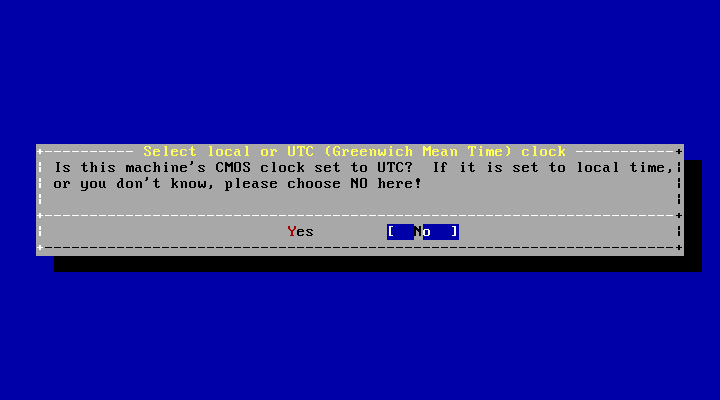
接下來的選單會詢問系統時鐘要使用 UTC 或者當地時間。 若有疑問時可選擇 No使用更常用的當地時間。
接下來一系列的選單會透過選擇地理區域、城市及時區來判斷正確的當地時間。設定時區可讓系統自動更正區域時間的更改,如日光節約時間以及正確執行其他時區相關的功能。
此處以位於美國東部時區的機器為例,選擇會依據地理位置不同改變。
使用方向鍵選擇適當的區域然後按下 Enter。
使用方向鍵選擇適當的城市然後按下 Enter。
使用方向鍵選擇適當的時區然後按下 Enter。
確認時區的縮寫是否正確,若正確,按下 Enter 繼續安裝後設定。
接下來的選單用來設定有那些系統服務要在系統啟動時執行。所有的服務為選用,只需開啟系統運作真正需要的服務。
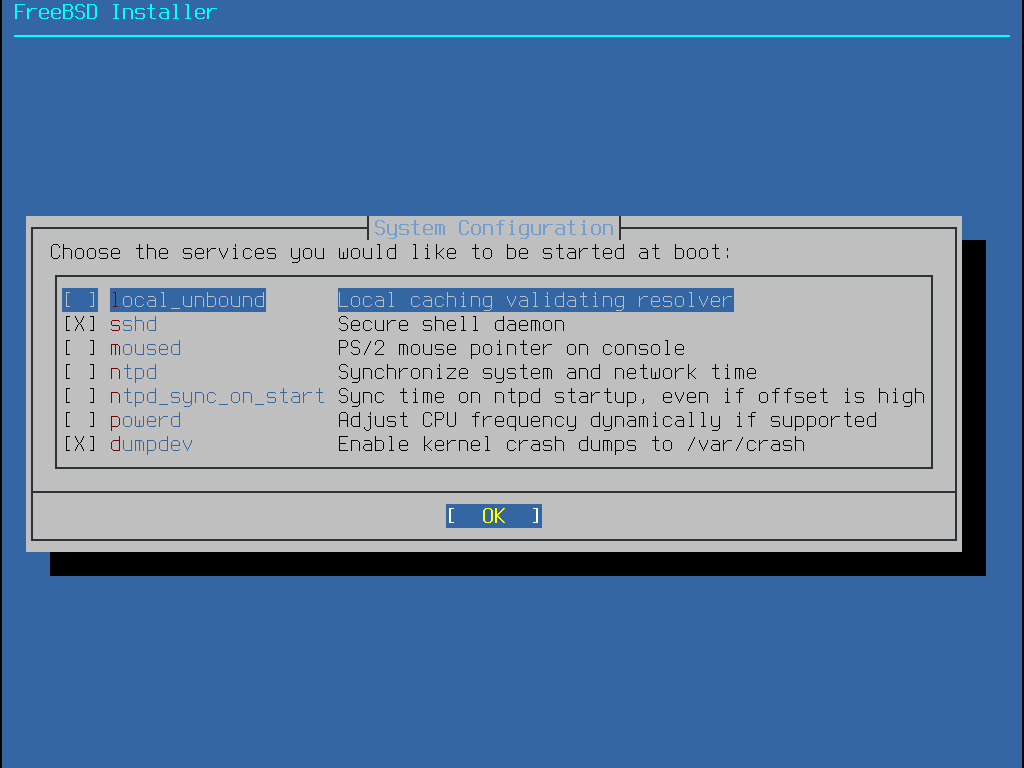
這是可以在這個選單開啟的服務摘要:
sshd - Secure Shell (SSH) Daemon 可從遠端透過加密的連線存取系統,只有在系統允許遠端登入時開啟這個服務。
moused - 若在指令列系統 Console 會使用到滑鼠時,可開啟此服務。
ntpd - 網路時間通訊協定 (Network Time Protoco, NTP) Daemon 用來自動同步時間。若在網路上有使用 Windows™, Kerberos 或 LDAP 伺服器時,可開啟此服務。
powerd - 系統電源控制工具用來做電源控制與節能。
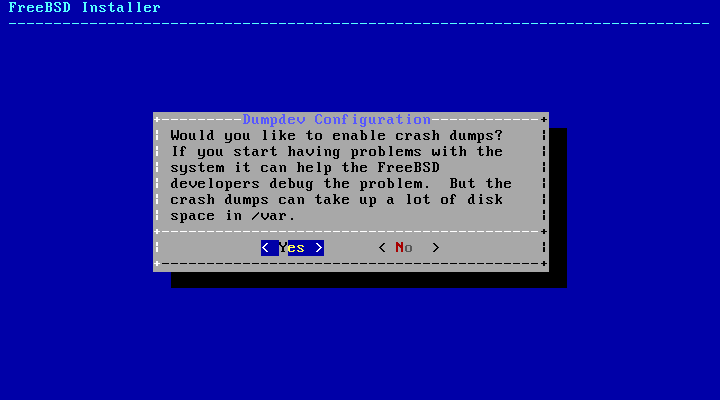
接下來的選單用來設定是否開啟當機資訊 (Crash dump),開啟當機資訊對系統除錯非常有用,因此建議使用者開啟當機資訊。
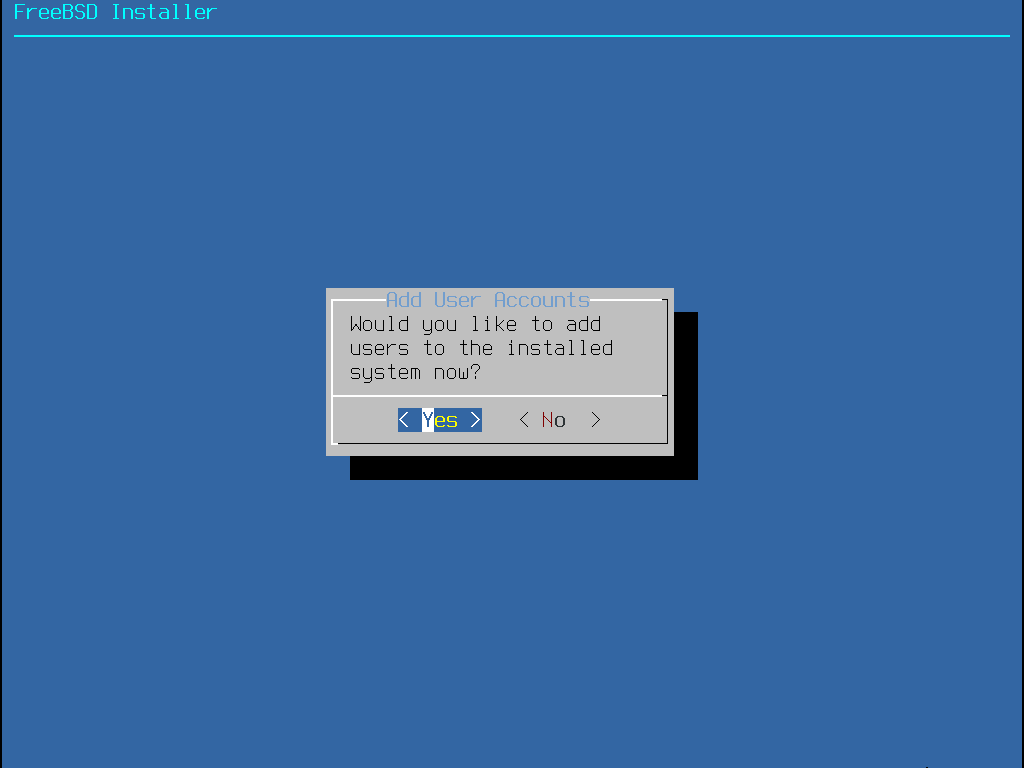
下個選單會提示建立至少一個使用者帳號。建議使用 root 以外的使用者帳號登入系統,當使用 root 登入時,基本上沒有任何的限制或保護。 使用一般使用者登入較保險且安全。
選擇 Yes 來新增新使用者。
請依照提示輸入請求的使用者帳號資訊,輸入使用者資訊 的範例示範建立 asample 使用者帳號。
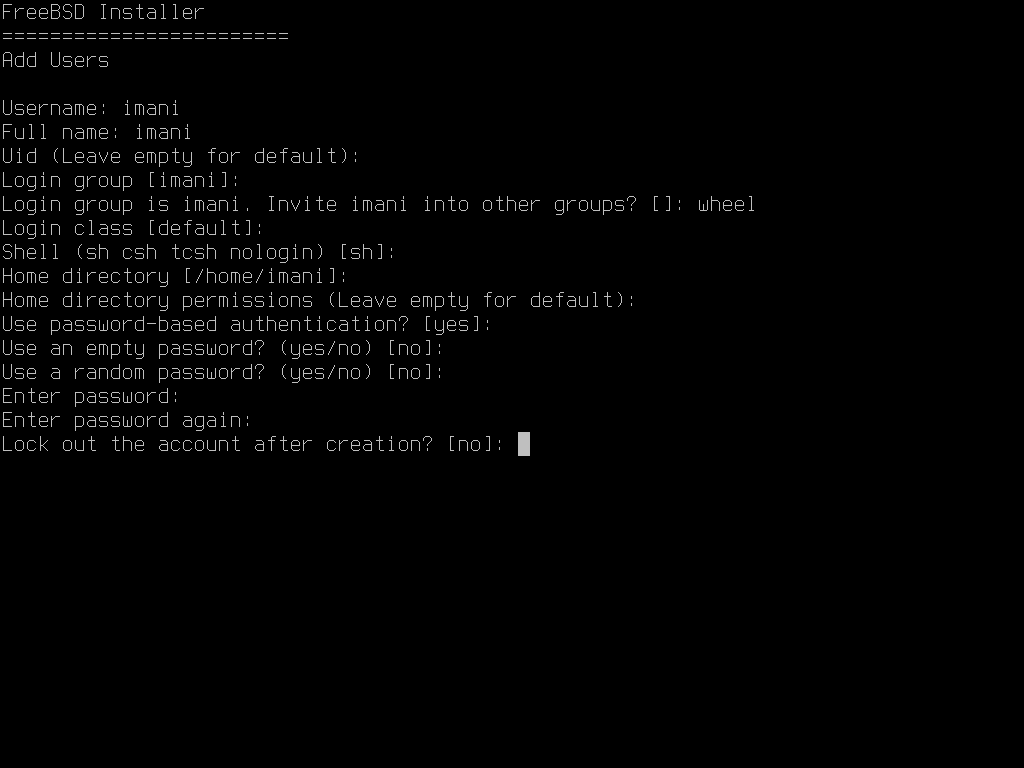
這裡是要輸入的資訊摘要:
使用者名稱 (Username) - 登入時使用者要輸入的名稱,常見的慣例是用姓的前一個字母與名結合,只要每個使用者名稱在系統唯一的皆可。使用者名稱區分大小寫且不應含有任何空白字元。
全名 (Full name) - 使用者的全名,這個欄位可使用空白並且會用來描述該使用者帳號。
Uid - 使用者 ID,通常這個欄位會留空,系統會自動分配一個值。
登入群組 (Login group) - 使用者的群組,通常這個欄位會留空來使用預設值。
邀請使用者進入其他群組? (Invite user into other groups?) - 使用者要加入成為其成員的其他群組,若該使用者需要管理權限,則在此輸入 wheel。
登入類別 (Login class) - 通常會留空來使用預設值。
Shell - 輸入清單中的其中一項來設定使用者所互動的 Shell,請參考 Shell 取得更多有關 Shell 的資訊。
家目錄 (Home directory) - 使用者的家目錄,預設值通常是沒有問題的。
家目錄權限 (Home directory permissions) - 使用者家目錄的權限,預設值通常是沒有問題的。
使用密碼為基礎的認証方式? (Use password-based authentication?) - 通常為是 (yes),使用者才可於登入時輸入密碼。
使用空白密碼? (Use an empty password?) - 通常為否 (no),因為使用空白密碼並不安全。
使用隨機密碼? (Use a random password?) - 通常為否 (no),這樣使用者接下來才可設定自己的密碼。
輸入密碼 (Enter password) - 這個使用者的密碼,輸入的字元不會顯示在畫面上。
再輸入密碼一次 (Enter password again) - 再輸入一次密碼來確認無誤。
建立後鎖定使用者帳號? (Lock out the account after creation?) - 通常為否 (no),這樣使用者才可以登入。
在輸入完全部的資料後,會顯示摘要供檢查,若發現錯誤,可輸入否 (no) 然後再輸入一次,若輸入的所有資訊皆正確,輸入是 (yes) 以後便會建立新使用者。
若還有其他要新增的使用者,則在詢問新增其他使用者? (Add another user?) 時回答是 (yes)。輸入否 (no) 來完成加入使用者然後繼續安裝。
要取得新增使用者與使用者管理的更多資訊,請參考 使用者與基礎帳號管理。
在所有東西安裝並設定完之後,會提供最後一次修改設定的機會。
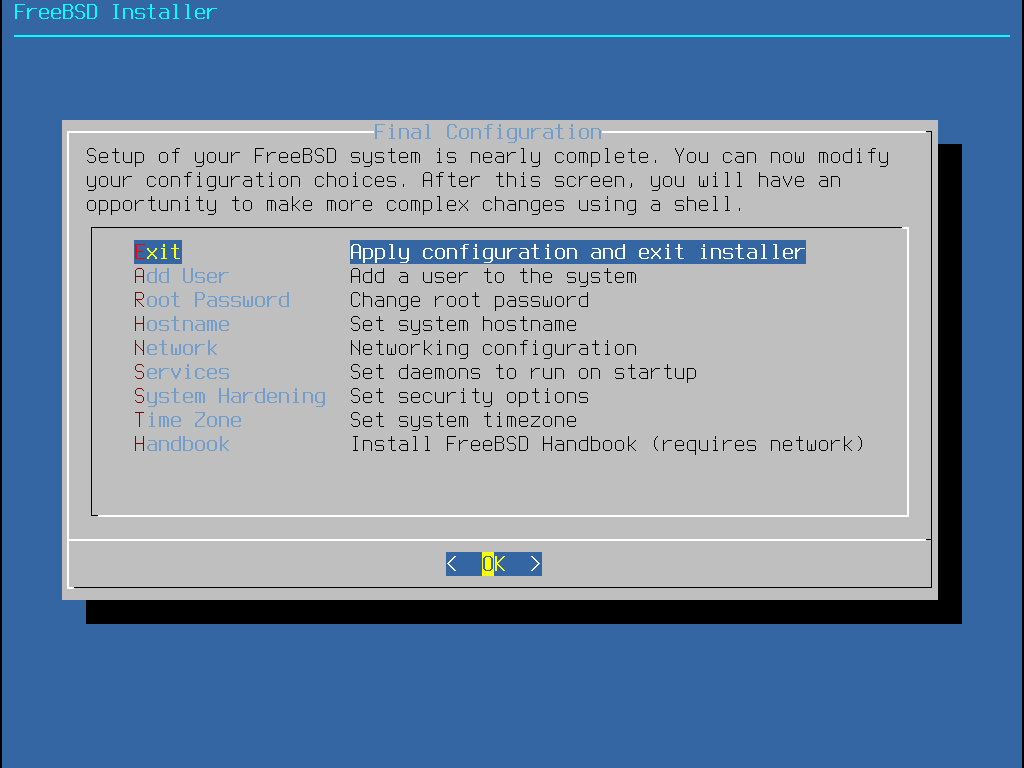
使用這個選單在完成安裝前做任何更改或做任何額外的設定。
完成最後的設定之後,選擇 Exit。
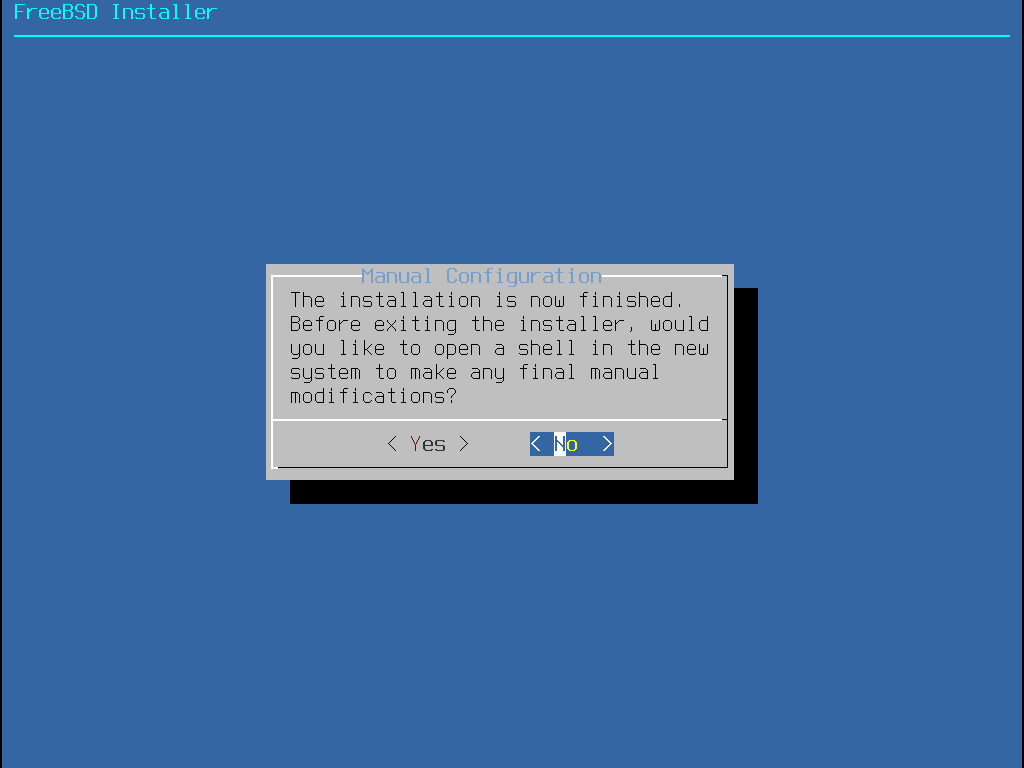
bsdinstall 會提示是否有任何額外的設定需要在重新開機進入新系統之前完成。選擇 Yes 會離開進入到新系統的 Shell 或 No 繼續最後的安裝步驟。
若有需要做進一步或特殊的設定,選擇 Live CD 會開機進入安裝媒體的 Live CD 模式。
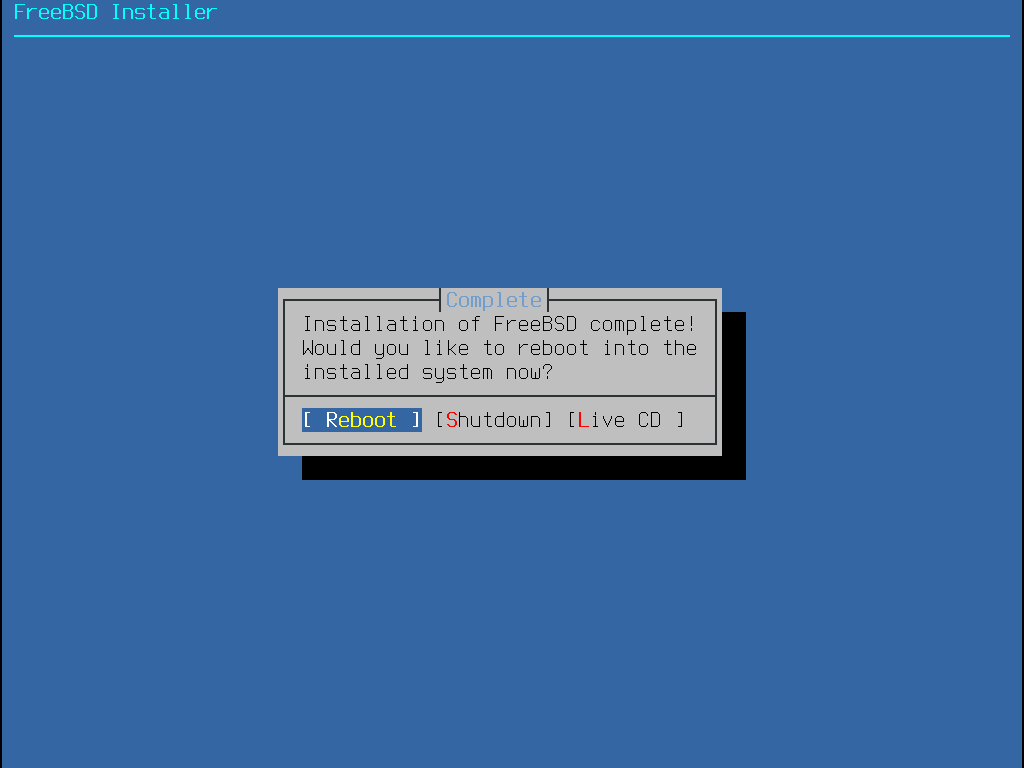
若安裝已完成,選擇 Reboot 重新開啟電腦然後啟動新的 FreeBSD 電腦。不要忘了移除 FreeBSD 安裝媒體,否則電腦會再次開機進入安裝程式。
FreeBSD 開機的過程會顯示許多可以參考的訊息,系統開機完成後,會顯示登入提示,在 login: 提示,輸入安裝時新增的使用者名稱。登入時避免直接使用 root,請參考 超級使用者帳號 來取得當需要管理權限時如何成為超級使用者的說明。
要查看開機過程顯示的訊息可按 Scroll-Lock 鍵來開啟卷軸暫存,然後可使用 PgUp, PgDn 以及方向鍵來捲動訊息。查看完成之後再按 Scroll-Lock 鍵一次來解除畫面鎖定並返回 Console。系統開機一段時間之後要查看這些訊息可在指令提示後輸入 less /var/run/dmesg.boot,查看後按下 q 鍵便可返回指令列。
若在 選擇要開啟的其他服務 有開啟 sshd,因系統會產生 RSA 及 DSA 金鑰第一次開機可能會有點慢,之後的開機便會恢復正常速度。接著會顯示金鑰的指紋 (Fingerprint),如這個範例:
Generating public/private rsa1 key pair.
Your identification has been saved in /etc/ssh/ssh_host_key.
Your public key has been saved in /etc/ssh/ssh_host_key.pub.
The key fingerprint is:
10:a0:f5:af:93:ae:a3:1a:b2:bb:3c:35:d9:5a:b3:f3 root@machine3.example.com
The key's randomart image is:
+--[RSA1 1024]----+
|    o..          |
|   o . .         |
|  .   o          |
|       o         |
|    o   S        |
|   + + o         |
|o . + *          |
|o+ ..+ .         |
|==o..o+E         |
+-----------------+
Generating public/private dsa key pair.
Your identification has been saved in /etc/ssh/ssh_host_dsa_key.
Your public key has been saved in /etc/ssh/ssh_host_dsa_key.pub.
The key fingerprint is:
7e:1c:ce:dc:8a:3a:18:13:5b:34:b5:cf:d9:d1:47:b2 root@machine3.example.com
The key's randomart image is:
+--[ DSA 1024]----+
|       ..     . .|
|      o  .   . + |
|     . ..   . E .|
|    . .  o o . . |
|     +  S = .    |
|    +  . = o     |
|     +  . * .    |
|    . .  o .     |
|      .o. .      |
+-----------------+
Starting sshd.
請參考 OpenSSH 來取得更多有關指紋與 SSH 的資訊。
FreeBSD 預設並不會安裝圖型化介面,請參考 X Window 系統 取得有關安裝與設定圖型化視窗管理程式的資訊。
正確的將 FreeBSD 電腦關機對保護資料及避免硬體損壞有幫助。在系統尚未正常關機之前請不要關閉電源! 若使用者為 wheel 群組的成員之一,可在指令列輸入 su 然後輸入 root 密碼來成為超級使用者。接著輸入 shutdown -p now 系統便會關機,若硬體支援的話,電腦會自行關閉電源。
本節涵蓋基礎的安裝疑難排解,例如一些已有人回報的常見問題。
查看該 FreeBSD 版本的 Hardware Notes (https://www.freebsd.org/releases/) 文件來確認是否支援該硬體。若確定有支援該硬體但仍然卡住或發生其他問題,請依照 設定 FreeBSD 核心 的指示編譯自訂核心來加入未在 GENERIC 核心的裝置。預設的核心會假設大部份的硬體裝置會使用原廠預設的 IRQs, I/O 位址,及 DMA 通道,若硬體已經被重新設定過,自訂的核心設定檔可以告訴 FreeBSD 到那找到這些裝置。
部份安裝問題可以透過更各種硬體元件的韌體來避免或緩解,特別是主機板。主機板的韌體通常稱為 BIOS,大部份主機板與電腦製造商會有網站可以取得升級程式與升級資訊。 製造商通常會建議若沒有特殊原因盡量避免升級主機板 BIOS,例如:重大更新,升級的程多可能會出錯,導致未更新完成的 BIOS 並讓電腦無法運作。 |
若系統在開機偵測硬體時卡住或安裝時運作異常,可能主因為 ACPI,FreeBSD 在 i386, amd64 及 ia64 平台廣泛的使用了系統 ACPI 服務來協助設定系統組態,若在開機時有偵測到該功能。不幸的是,ACPI 驅動程式與系統主機板及 BIOS 韌體之間仍存在部份問題。可於開機載入程式的第三階段設定 hint.acpi.0.disabled Hint 來關閉 ACPI:
set hint.acpi.0.disabled="1"每一次系統重開之後便會重設,因此需要在 /boot/loader.conf 檔案加入 hint.acpi.0.disabled="1"。更多有關開機載入程式的資訊可於 概述 取得。
如 歡迎選單 所示 bsdinstall 的歡迎選單提供了 Live CD 選項,這對那些對 FreeBSD 是否為正確的作業系統尚存疑慮的人非常有幫助,這可讓這些人在安裝前測試一部份功能。
在使用 Live CD 之前必須注意以下幾點事項:
若要增加存取權限,必須透過認証。使用者名稱為 root 而密碼則是空白。
系統是直接從安裝媒體上執行,比起安裝到硬碟的系統,效能可能較差。
這個選項只提供指令提示,不會有圖型化介面。
接下來的這一章將涵蓋 FreeBSD 作業系統的基本指令及功能。 大部份的內容在 UNIX™-like 作業系統中都是相通的。 如果您對這些內容熟悉的話,可以放心的跳過。 如果您剛接觸 FreeBSD,那您一定要仔細的讀完這章。
讀完這章,您將了解:
如何使用 FreeBSD 的虛擬 Console。
如何在 FreeBSD 建立與管理使用者與群組。
UNIX™ 檔案權限以及 FreeBSD 檔案標記的運作方式。
預設的 FreeBSD 檔案系統配置。
FreeBSD 的磁碟組織。
如何掛載 (Mount)、卸載 (Umount) 檔案系統。
什麼是程序、Daemon 以及信號 (Signal)。
什麼是 Shell,以及如何變更您預設的登入環境。
如何使用基本的文字編輯器。
什麼是裝置 (Device) 和裝置節點 (Device node)。
如何閱讀操作手冊以獲得更多的資訊。
如果您沒有將 FreeBSD 設定成開機時自動進入圖形化模式,系統會進入指令登入提示像是這樣的東西:
FreeBSD/amd64 (pc3.example.org) (ttyv0)

login:第一行包含了剛開機完系統的資訊,amd64 代表此範例所使用的系統是執行 64-位元版本的 FreeBSD,這台主機的名稱是 pc3.example.org,ttyv0 代表這是個 "系統 Console"。第二行則是登人的提示訊息。
FreeBSD 是一個多使用者的系統,需要一套可以分辨不同使用者的方法。因此所有的使用者在執行程式之前必須先"登入"系統以取得系統內程式的存取權限。每個使用者都有一組獨一無二的使用者名稱 ("username") 及個人密碼 ("password")。
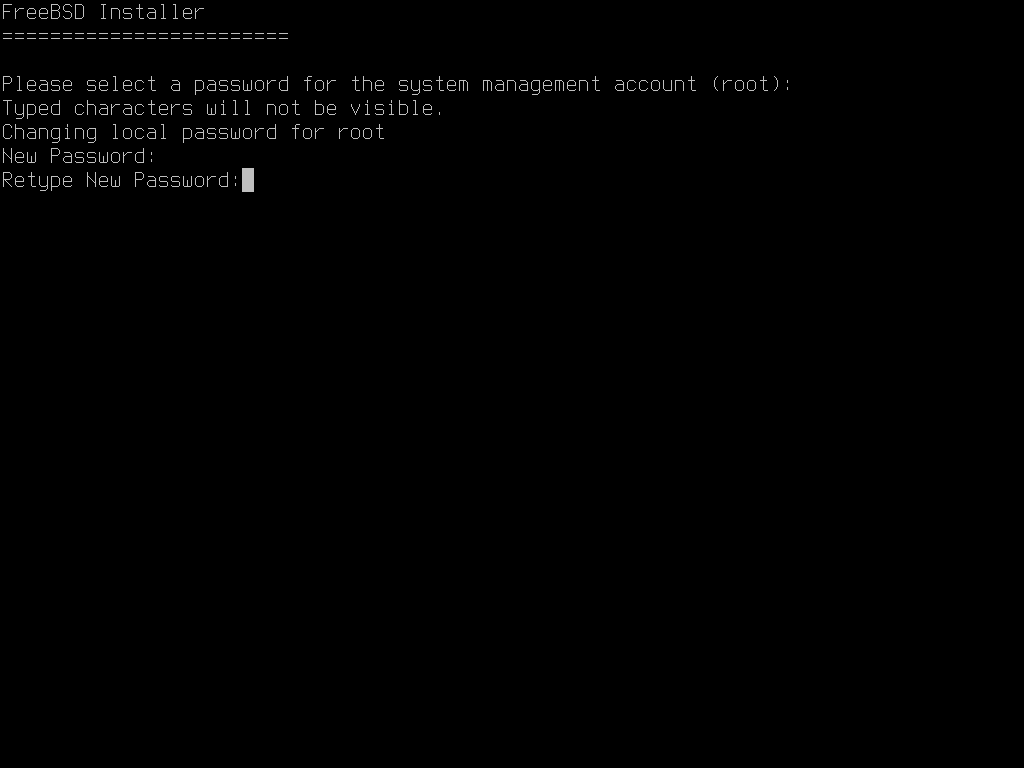
要登入系統 Console 需輸入在系統安裝時設定的使用者名稱,請參考 新增使用者,並按下 Enter。 接著輸入該使用者名稱的密碼按下 Enter。 輸入的密碼為了安全起見不會顯示在畫面上。
如果您輸入了正確的密碼,您應該會看到今日訊息 (Message of the day, MOTD),後面接著顯示指令提示字元,依使用者建立時所選擇的 Shell 會有不同的提示字元可能為 #, $ 或者 %。 看到指令提示代表使用者現在已經登入 FreeBSD 系統 Console 且已經準備好可以下指令。
雖然系統 Console 已經可以用來與系統互動,但使用鍵盤來下指令使用 FreeBSD 系統的使用者通常會使用虛擬 Console 登入。 因為系統訊息預設會顯示在系統 Console,這些訊些會在使用者作業的過程中不斷出現,讓使用者難以專心作業。
FreeBSD 預設提供多個虛擬 Console 可輸入指令,每個虛擬 Console 都有自己的登入提示及 Shell 並且可以輕易的在虛擬 Console 間切換。 這實際上讓指令輸入有了類似於圖型化環境中可以同時開啟多個視窗的功能。
組合鍵 Alt+F1 至 Alt+F8 被 FreeBSD 保留用來切換虛擬 Console,使用 Alt+F1 可切換至系統 Console (ttyv0),Alt+F2 可存取第一個虛擬 Console (ttyv1),Alt+F3 可存取第二個虛擬 Console (ttyv2),以此類推。當使用 Xorg 作為圖型化 Console 時,組合鍵則改使用 Ctrl+Alt+F1 來切換回文字介面的虛擬 Console。
當您從一個 Console 切換到下一個的時候,FreeBSD 會切換畫面顯示的內容, 這就好像有很多虛擬的螢幕和鍵盤可以讓您輸入指令到 FreeBSD 執行。 在某一個虛擬 Console 上執行的程式並不會因為使用者切到別的 Console 而停止執行。
請參考 kbdcontrol(1), vidcontrol(1), atkbd:(4), syscons(4) 以及 vt(4) 來取得更多有關 FreeBSD Console 及鍵盤驅動程式的技術說明。
FreeBSD 中虛擬 Console 的數量設定在 /etc/ttys 檔案中的下列章節:
# name    getty                         type  status comments
#
ttyv0   "/usr/libexec/getty Pc"         xterm   on  secure
# Virtual terminals
ttyv1   "/usr/libexec/getty Pc"         xterm   on  secure
ttyv2   "/usr/libexec/getty Pc"         xterm   on  secure
ttyv3   "/usr/libexec/getty Pc"         xterm   on  secure
ttyv4   "/usr/libexec/getty Pc"         xterm   on  secure
ttyv5   "/usr/libexec/getty Pc"         xterm   on  secure
ttyv6   "/usr/libexec/getty Pc"         xterm   on  secure
ttyv7   "/usr/libexec/getty Pc"         xterm   on  secure
ttyv8   "/usr/X11R6/bin/xdm -nodaemon"  xterm   off secure
要關閉虛擬 Console 只要在指定的虛擬 Console 該行設定的一開始加上註解符號 ()。 例如要將虛擬 Console 的數量由 8 個改為 4 個,則可將 加在代表虛擬 Console 的 ttyv5 到 ttyv8 的最後四行一開始。 請勿將系統 Console ttyv0 加上註解符號。 注意,若有依照 X Window 系統 安裝並設定 Xorg 時,會用到最後一個虛擬 Console (ttyv8)。
有關各欄位的設定以及其他選項,請參閱 ttys(5) 說明。
FreeBSD 開機選單會提供一個選項為 "Boot Single User",若選擇該項目,系統將會進入所謂 "單使用者模式" 的特殊模式。 此模式通常用在修復系統無法開機或重設已忘掉的 root 密碼。 在當使用者模式中無法使用網路及其他虛擬 Console,但有完整 root 對系統的存取權限,而且預設是不須要輸入 root 密碼。 也因此,要能透過實體鍵盤操作才能進入此模式,在考量 FreeBSD 系統安全時須要限制可操作實體鍵盤的人員。
有關單使用者模式的設定可在 /etc/ttys 中的以下章節中找到:
# name  getty                           type  status  comments
#
# If console is marked "insecure", then init will ask for the root password
# when going to single-user mode.
console none                            unknown  off  secure
預設狀態為安全 (secure),這代表誰能夠操作實體鍵盤不是不重要就是已受到實體安全規範管制。 若設定更該為不安全 (insecure) 則代表主機所在的環境不安全,因為任何人皆可接觸鍵盤。 當此行設定更改為不安全 (insecure) 時,當使用擇選擇單使用者模式時,FreeBSD 將會要求輸入 root 的密碼。
請審慎考慮是否要改為 |
FreeBSD Console 預設顯示大小可以調整為 1024x768、1280x1024 或其他顯示卡與螢幕有支援的解析度大小。 要使用不同的影像模式需載入 VESA 模組:
# kldload vesa要偵測硬體支援的影像模式,可使用 vidcontrol(1)。 要取得支援的影像模式清單可輸入以下指令:
# vidcontrol -i mode該指令會顯示硬體所支援的影像模式清單,要採用新的影像模式需以 root 使用者執行 vidcontrol(1) 指令:
# vidcontrol MODE_279若可接受新的影像模式,可以在 /etc/rc.conf 加入設定,讓每次重開機後會自動生效:
allscreens_flags="MODE_279"
FreeBSD 允許多使用者同時使用電腦,在一次只能有一位使用者坐在電腦螢幕前使用鍵盤操作的同時,可讓任何數量的使用者透過網路登入到系統。每一位要使用該系統的使用者應有自己的帳號。
本章介紹:
FreeBSD 系統中各種類型的使用者帳號。
如何加入、移除與修改使用者帳號。
如何設定用來控制使用者與群組允許存取的資源的限制。
如何建立群組與加入使用者作為群組成員。
由於所有對 FreeBSD 系統的存取是透過使用者帳號來達成,且所有的程序需要經由使用者來執行,因此使用者帳號管理非常重要。
有三種主要類型的帳號:系統帳號、使用者帳號以及超級使用者帳號。
系統帳號用來執行服務,例如 DNS、郵件及網頁伺服器,要這麼作是因為安全性考量,若所有的服務均以超級使用者來執行,那麼這些服務的運作將不會受到限制。
系統帳號的例子有 daemon, operator, bind, news, and www。
nobody 是通用的無權限系統帳號。雖然如此,只有要越多的服務使用 nobody,就會有更多的檔案與程式與該使用者相關聯,會讓該使用者擁有更多的權限。
使用者帳號會分配給實際人員,用來登入及使用系統。每位要存取系統的人員需要擁有一組唯一的使用者帳號,這可讓管理者辨識誰在做什麼以及避免使用者覆蓋其他使用者的設定。
每位使用者可以設定自己的環境來配合自己使用系統的習慣,透過設定預設的 Shell、編輯器、組合鍵 (Key Binding) 及語言設定。
每個在 FreeBSD 系統的使用者帳號都會有一些相關的資訊:
在 login: 提示出現時便要輸入使用者名稱,每位使用者必須要有一個唯一的使用者名稱。要建立有效的使用者名稱要遵守數條規則,在 passwd(5) 中有說明。建議使用者名稱由 8 個或更少的字母組成,全部採用小寫字元以向下相容應用程式。
每個帳號都會有密碼。
使用者 ID (User ID, UID) 是一組數字用來獨一無二的辨識 FreeBSD 系統的使用者,用到使用者名稱的指令會先將使用者名稱轉換為 UID。建議使用小於 65535 的 UID,超過這個值可能會造成部份軟體的相容性問題。
群組 ID (Group ID, GID) 是一組數字用來獨一無二的辨識使用者所屬的主要群組。群組是一個除了使用 UID 之外根據使用者的 GID 來控制資源存取權的機制。這可以顯著的降低某些設定檔的大小且可讓使用者成為一個以上群組的成員。建議使用 65535 或以下的 GID,因超過此值的 GID 可能會讓部份軟體無法運作。
登入類別 (Login class) 擴充了群組機制,當在對不同使用者客製化系統時可提供額外的彈性。在 設定登入類別 有對登入類別更進一步的討論。
預設情況下密碼並不會過期,雖然如此,密碼期限可在各別使用者上開啟,可強制部份或所有使用者在某段期間過後更改他們的密碼。
預設情況下 FreeBSD 的帳號不會有期限。當建立需要有限壽命的帳號時,例如,學校的學生帳號,可使用 pw(8) 指定帳號的到期日期。到期日期過後,便無法使用該帳號登入到系統,儘管該帳號的目錄及檔案仍存在。
使用者名稱用來獨一無二的辦識 FreeBSD 的帳號,但並不一定反映了使用者的真實姓名。類似註解,這個資訊可以含有空白、大寫字元並可超過 8 個字母的長度。
家目錄是系統中某個目錄的完整路徑,這個目錄是使用者登入後的起點目錄。習慣上會將所有使用者目錄放置在 /home/username 或 /usr/home/username。每位使用者可以儲存他們的個人檔案及子目錄於他們自己的家目錄。
Shell 提供了使用者預設的環境來與系統互動。有數種不同類型的 Shell,有經驗的使用者會有自己偏好的選擇,可儲存在自己的帳號設定。
超級使用者帳號,通常稱作 root,用來管理系統,沒有權限的限制,也因這個原因,該帳號不應該用來做每日的例行作業,如:寄信與收信、系統的一般探索或程式設計。
超級使用者並不像其他使用者帳號,可以沒有限制的操作,不正確的使用超級使用者帳號可能會造成可觀的災害。一般使用者帳號不會因為失誤而法摧毀作業系統,所以建議登入一般使用者帳號,只有在指令需要額外權限時切換為超級使用者。
使用超級使用者下指令時永遠要再三檢查,由於一個多餘的空白或缺少的字元可能意味著無法挽回的資料遺失。
有數種方法可以提升為超級使用者權限,雖然可以直接登入為 root,但強烈不建議這樣做。
改使用 su(1) 切換為超級使用者。執行此指令時若指定 - 參數,該使用者會繼承 root 的使用者環境。執行此指令的使用者必須在 wheel 群組中,否則指令會失敗。使用者也必須要知道 root 使用者帳號的密碼。
在此例當中,該使用者只在要執行 make install 時切換為超級使用者,因為這個步驟需要超級使用者權限。指令完成之後,該使用者輸入 exit 離開超級使用者帳號並返回他的使用者帳號權限。
% configure
% make
% su -
Password:
# make install
# exit
%
內建的 su(1) 框架在單人系統或只有一位系統管理者的小型網路可以運作的很好。另一種方式是安裝 security/sudo 套件或 Port。此軟體提供了活動記錄且允許管理者設定那個使用者可以用超級使用者執行那個指令。
FreeBSD 提供了各種不同指令來管理使用者帳號,最常用的指令已摘要於 管理使用者帳號的工具,接著有一些用法的範例。請參考每個工具的操作手冊來取得更多詳細的資訊與用法範例。
| 指令 | 摘要 |
|---|---|
建議用來新增新使用者的指令列應用程式。 | |
建議用來移除使用者的指令列應用程式。 | |
用來更改使用者資料庫資訊的工具。 | |
用來更改使用者密碼的指令列工具。 | |
用來修改使用者帳號各方面資訊強大且靈活的工具。 |
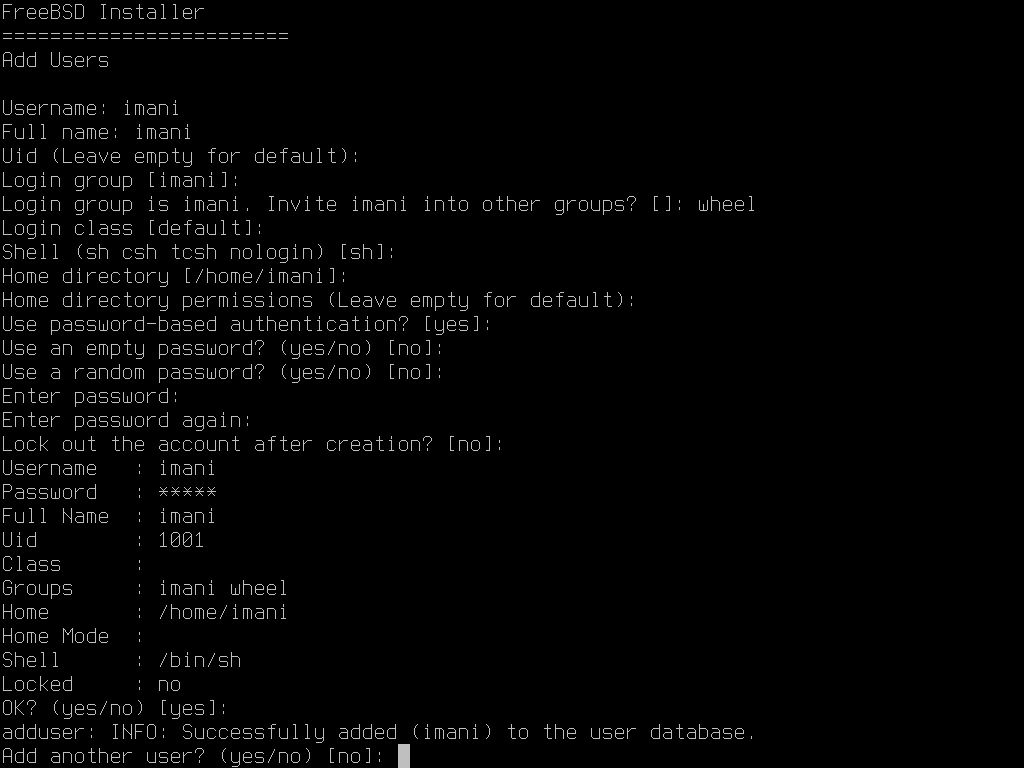
adduser建議用來新增新使用者的程式為 adduser(8)。當新使用者新增之後,此程式會自動更新 /etc/passwd 以及 /etc/group,這同時也會建立新使用者的家目錄 (複製 /usr/shared/skel 中的預設設定檔),並且可以選擇是否要寄送歡迎訊息通知新使用者。這個工具必須使用超級使用者執行。
adduser(8) 工具採用互動的方式,只需幾個步驟便可建立新使用者帳號。如 在 FreeBSD 新增使用者 所示,可輸入必填的資訊或按 Return 鍵採用方括中的預設值。在此例當中,使用者被邀請加入 wheel 群組,這讓使用者可使用 su(1) 變成超級使用者。完成之後,此工具會詢問是否要建立其他的使用者或離開。
# adduser
Username: jru
Full name: J. Random User
Uid (Leave empty for default):
Login group [jru]:
Login group is jru. Invite jru into other groups? []: wheel
Login class [default]:
Shell (sh csh tcsh zsh nologin) [sh]: zsh
Home directory [/home/jru]:
Home directory permissions (Leave empty for default):
Use password-based authentication? [yes]:
Use an empty password? (yes/no) [no]:
Use a random password? (yes/no) [no]:
Enter password:
Enter password again:
Lock out the account after creation? [no]:
Username   : jru
Password   : ****
Full Name  : J. Random User
Uid        : 1001
Class      :
Groups     : jru wheel
Home       : /home/jru
Shell      : /usr/local/bin/zsh
Locked     : no
OK? (yes/no): yes
adduser: INFO: Successfully added (jru) to the user database.
Add another user? (yes/no): no
Goodbye!
#
由於密碼在輸入時並不會顯示,在建立使用者帳號時要小心密碼不要輸入錯誤。 |
rmuser要自系統完全移除一個使用者可使用超級使用者執行 rmuser(8)。這個指令會執行以下步驟:
移除使用者的 crontab(1) 項目,若項目存在。
移除任何屬於該使用者的 at(1) 工作。
中止所有該使用者擁有的程序。
自系統本地密碼檔移除該使用者。
選擇性移除該使用者的家目錄,若使用者擁有該目錄。
自 /var/mail 移除屬於該使用者的收件郵件檔。
自暫存檔儲存區域 (如 /tmp) 移除所有使用者擁有的檔案。
最後,自 /etc/group 中該使用者所屬的所有群組移除該使用者。若群組無任何成員且群組名稱與該使用者名稱相同,則該群組也會一併移除。這是為了輔助
adduser(8) 替每位使用者建立獨一無二的群組。
rmuser(8) 無法用來移除超級使用者帳號,因為這幾乎代表著大規模破壞。
預設會使用互動式模式,如下範例所示。
rmuser 互動式帳號移除# rmuser jru
Matching password entry:
jru:*:1001:1001::0:0:J. Random User:/home/jru:/usr/local/bin/zsh
Is this the entry you wish to remove? y
Remove user's home directory (/home/jru)? y
Removing user (jru): mailspool home passwd.
#chpass任何使用者都可以使用 chpass(1) 來變更自己的預設 Shell 以及與自己的使用者帳號關聯的個人資訊。超級使用者可以使用這個工具更改任何使用者的其他帳號資訊。
除了選填的使用者名稱外,未傳入任何選項時,chpass(1) 會開啟含有使用者資訊的編輯器。當使用者自編輯器離開,便會更新新的資訊到使用者資料庫。
離開編輯器時,此工具會提示使用者輸入密碼,除非使用超級使用者執行此工具。 |
在 以超級使用者的身份使用 chpass 中,超級使用者輸入了 chpass jru 並正在檢視這個使用者可以更改的欄位。若改以 jru 執行這個指令,只會顯示最後六個欄位供編輯,如 以一般使用者的身份使用 chpass 所示。
chpass#Changing user database information for jru.
Login: jru
Password: *
Uid [#]: 1001
Gid [# or name]: 1001
Change [month day year]:
Expire [month day year]:
Class:
Home directory: /home/jru
Shell: /usr/local/bin/zsh
Full Name: J. Random User
Office Location:
Office Phone:
Home Phone:
Other information:chpass#Changing user database information for jru.
Shell: /usr/local/bin/zsh
Full Name: J. Random User
Office Location:
Office Phone:
Home Phone:
Other information:passwd任何使用者皆可簡單的使用 passwd(1) 更改自己的密碼。要避免意外或未授權的變更,這個指令在設定新密碼之前會提示使用者輸入原來的密碼:
% passwd
Changing local password for jru.
Old password:
New password:
Retype new password:
passwd: updating the database...
passwd: done
超級使用者可以更改任何使用者的密碼透過在執行 passwd(1) 時指定使用者名稱。當此工具以超級使用者執行時,將不會提示輸入使用者目前的密碼,這可在使用者忘記原來的密碼時更改密碼。
# passwd jru
Changing local password for jru.
New password:
Retype new password:
passwd: updating the database...
passwd: done
如同 chpass(1),yppasswd(1) 連結到 passwd(1),因此 NIS 在兩個指令上皆可運作。 |
群組代表一群使用者,群組可以由其群組名稱及 GID 來辨識。在 FreeBSD,核心會使用程序的 UID 以及其所屬的群組清單來決定程序可以做那些事。大多數情況使用者或程序的 GID 通常指的是清單中的第一個群組。
群組名稱與 GID 的對應表列在 /etc/group。這個純文字檔案使用了四個以冒號分隔的欄位,第一個欄位為群組名稱,第二個欄位為加密後的密碼,第二個欄位為 GID 以及第四個欄位為以逗號分隔的成員清單。要取得更完整的語法說明,請參考 group(5)。
超級使用者可以使用文字編輯器修改 /etc/group,或者可使用 pw(8) 加入與編輯群組。例如,要加入一個叫做 teamtwo 的群組然後確認該群組已新增:
# pw groupadd teamtwo
# pw groupshow teamtwo
teamtwo:*:1100:在本例中,1100 是 teamtwo 的 GID。目前 teamtwo 沒有任何成員,這個指令會加入 jru 作為 teamtwo 的成員。
# pw groupmod teamtwo -M jru
# pw groupshow teamtwo
teamtwo:*:1100:jru
給 -M 的參數是以逗號分隔的使用者清單,用來加入成員到新的 (空的) 群組或取代既有群組中的成員。對使用者來說這裡的群組成員與使用者列於密碼檔的主要群組不同 (額外的),這代表在 pw(8) 使用 groupshow 時不會顯示做為使用者主要群組的成員,但會顯示在使用 id(1) 或同類工具所查詢的資訊當中。當使用 pw(8) 來加入使用者到某個群組,該指令只會處理 /etc/group 且不會嘗試自 /etc/passwd 讀取其他的資料。
# pw groupmod teamtwo -m db
# pw groupshow teamtwo
teamtwo:*:1100:jru,db
在本例當中,給 -m 的參數是以逗號分隔的使用者清單,用來加入使用者到群組。不像前面的例子,這些使用者會加入到群組,而非取代既有群組中的使用者。
% id jru
uid=1001(jru) gid=1001(jru) groups=1001(jru), 1100(teamtwo)在本例中,jru 是群組 jru 以及 teamtwo 的成員。
在 FreeBSD 中,每個檔案與目都有相關聯的數個權限,且有許多工具可以檢視與修改這些權限。了解權限如何運作是必須的,這可確保使用者能夠存存取它們所需的檔案以及無法不正確的存取供作業系統或其他使用者擁有的檔案。
本節會探討在 FreeBSD 中所用到的傳統 UNIX™ 權限。要做檔案系統存取控制的微調,請參考 存取控制清單。
在 UNIX™,基礎權限透過三種類型的存取來分配:讀取、寫入與執行。這些存取類型用來決定檔案擁有者、群組以及其他人 (其他任何人) 的檔案存取權。讀取、寫入及執行權限可使用 r, w, and x 字母來表示。這些權限也可以使用二進位數字來表示每種權限的開或關 (0)。當以二進位數字來表示時,閱讀的順序為 rwx,其中 r 開啟的值為 4,w 開啟的值為 2 以及 x 開啟的值為 1。
表格 4.1 摘要了可用的數字及可用的字母。當閱讀 "目錄清單標示" 欄位時,- 用來代表該權限設為關閉。
| 數值 | 權限 | 目錄清單標示 |
|---|---|---|
0 | 不可讀取, 不可寫入, 不可執行 |
|
1 | 不可讀取, 不可寫入, 可執行 |
|
2 | 不可讀取, 可寫入, 不可執行 |
|
3 | 不可讀取, 可寫入, 可執行 |
|
4 | 可讀取, 不可寫入, 不可執行 |
|
5 | 可讀取, 不可寫入, 可執行 |
|
6 | 可讀取, 可寫入, 不可執行 |
|
7 | 可讀取, 可寫入, 可執行 |
|
使用 ls(1) 指令時,可以加上 -l 參數, 來檢視詳細的目錄清單。 清單中欄位的資訊包含檔案對所有者、群組及其他人的權限。 在任一個目錄底下執行 ls -l,會顯示如下的結果:
% ls -l
total 530
-rw-r--r--  1 root  wheel     512 Sep  5 12:31 myfile
-rw-r--r--  1 root  wheel     512 Sep  5 12:31 otherfile
-rw-r--r--  1 root  wheel    7680 Sep  5 12:31 email.txt
第一個 (最左邊) 的字元用來表示這個檔案的類型為何,除標準檔案以外,尚有目錄、特殊字元裝置、Socket 及其他特殊虛擬檔案裝置, 在此例當中,- 表示該檔案為一個標準的檔案。 範例中接下來的三個字元中,rw- 代表所有者對檔案擁有的權限。 再接下來的三個字元, r-- 則代表群組對檔案擁有的權限, 最後三個字元,r-- 則代表其他人對檔案擁有的權限。 破折號 (-) 表示沒有權限,範例中的這個檔案的權限, 只允許所有者讀取、寫入檔案,群組以及其他人僅能讀取檔案。 根據以上的表格,此種權限的檔案可以使用 644 來表示, 每組數字分別代表檔案的三種權限。
那系統如何控制裝置的權限? 實際上 FreeBSD 對大多的硬碟裝置就如同檔案,程式可以開啟、讀取以及寫入資料如一般檔案。 這些特殊裝置檔案都儲存於 /dev/ 目錄中。
目錄也同如檔案,擁有讀取、寫入及執行的權限, 但在執行權限上與檔案有明顯的差異。 當目錄被標示為可執行時,代表可以使用 cd(1) 指令切換進入該目錄。 也代表能夠存取在此目錄之中的已知檔名的檔案,但仍會受限於檔案本身所設定的權限。
要能夠列出目錄內容,必須擁有目錄的讀取權限。 要刪除已知檔名的檔案,必須擁有檔案所在目錄的寫入 以及 執行的權限。
還有一些權限位元,但這些權限主要在特殊情況使用,如 setuid 執行檔及 sticky 目錄。 如果您還想知道更多檔案權限的資訊及使用方法,請務必參閱 chmod(1)。
權限符號可稱做符號表示,使用字元的方式來取代使用數值來設定檔案或目錄的權限。 符號表示的格式依序為 (某人)(動作)(權限),可使用的符號如下:
| 項目 | 字母 | 代表意義 |
|---|---|---|
(某人) | u | 使用者 |
(某人) | g | 群組所有者 |
(某人) | o | 其他 |
(某人) | a | 全部 ("world") |
(動作) | + | 增加權限 |
(動作) | - | 移除權限 |
(動作) | = | 指定權限 |
(權限) | r | 讀取 |
(權限) | w | 寫入 |
(權限) | x | 執行 |
(權限) | t | Sticky 位元 |
(權限) | s | 設定 UID 或 GID |
如先前同樣使用 chmod(1) 指令來設定,但使用的參數為這些字元。 例如,您可以使用下列指令禁止其他使用者存取檔案 FILE:
% chmod go= FILE若有兩個以上的權限更改可以使用逗號 (,) 區隔。 例如,下列指令將會移除群組及全部人 ("world") 對檔案 FILE 的寫入權限, 並使全部人對該檔有執行權限:
% chmod go-w,a+x FILE除了前面提到的檔案權限外,FreeBSD 支援使用 "檔案旗標"。 這些旗標增加了檔案的安全性及管理性,但不包含目錄。有了檔案旗標可確保在某些時候 root 不會意外將檔案修改或移除。
修改的檔案 flag 僅需要使用擁有簡易的介面的 chflags(1) 工具。 例如,標示系統禁止刪除的旗標於檔案 file1,使用下列指令:
# chflags sunlink file1若要移除系統禁止刪除的旗標,只需要簡單在 sunlink 前加上 "no",例如:
# chflags nosunlink file1使用 ls(1) 及參數 -lo 可檢視檔案目前的旗標:
# ls -lo file1-rw-r--r-- 1 trhodes trhodes sunlnk 0 Mar 1 05:54 file1
多數的旗標僅能由 root 使用者來標示或移除,而部份旗標可由檔案所有者設定。 我們建議系統管理者可閱讀 chflags(1) 及 chflags(2) 說明以瞭解相關細節。
setuid 、setgid 與 sticky 權限除了已經探討過的權限外,這裡尚有另外三種特別的設定所有管理者都應該知道,這些設定為 setuid, setgid 以及 sticky 權限。
這些設定對某些一般不會授權給一般使用者的 UNIX™ 操作非常重要,它讓這些功能可運作。要了解這些權限,就必須說明真實使用者 ID (Real user ID) 與有效使用者 ID (Effective user ID) 的差異。
真實使用者 ID 即是擁有者或啟動程序者的 UID,而有效 UID 是執行程序所使用的使用者 ID。例如,passwd(1) 在使用者更改自己的密碼時會以真實使用者 ID 執行,然而,為了要更新密碼資料庫,該指令必須以 root 使用者做為有效 ID 來執行,這讓使用者可以更改自己的密碼而不會遇到權限不足 (Permission Denied) 的錯誤。
setuid 權限可以透過在權限集前加上數字 (4) 來設定,如下範例所示:
# chmod 4755 suidexample.sh現在 suidexample.sh 的權限會如下所示:
-rwsr-xr-x 1 trhodes trhodes 63 Aug 29 06:36 suidexample.sh
注意,s 現在取代了原來的執行位元成為指定檔案擁有者權限集的一部份,這會允許須要提升權限的工具,如 passwd(1) 可正常使用。
mount(8) 的 |
實際來看這個範例,先開啟兩個終端機,其中一個用一般使用者輸入 passwd。在等待輸入新密碼的同時,檢查程序表並查看 passwd(1) 程序的使用者資訊:
於終端機 A:
Changing local password for trhodes
Old Password:
於終端機 B:
# ps aux | grep passwdtrhodes 5232 0.0 0.2 3420 1608 0 R+ 2:10AM 0:00.00 grep passwd
root 5211 0.0 0.2 3620 1724 2 I+ 2:09AM 0:00.01 passwd雖然使用一般使用者來執行 passwd(1),但該程序使用了 root 的有效 UID。
setgid 權限的功能與 setuid 相似,當應用程式或工具使用此設定執行時,將會以擁有該檔案的群組來執行,而非執行行該程序的使用者。
要在檔案設定 setgid 權限,需在 chmod(1) 的參數前加上 (2):
# chmod 2755 sgidexample.sh注意以下清單中,s 現在位於指定群組權限設定的欄位:
-rwxr-sr-x 1 trhodes trhodes 44 Aug 31 01:49 sgidexample.sh在以上這些範例中,雖然在例子中的 Shell script 是可執行的檔案,但並不會以其他的 EUID 或有效使用者 ID 執行,這是因為 Shell script 並不會存取 setuid(2) 系統呼叫 (System call)。 |
setuid 及 setgid 權限位元可能會因允許提升權限而降低系統的安全性,因此有了第三個特殊的權限:sticky bit,可以加強系統的安全性。
當在目錄上設定 sticky bit,將只允許由檔案擁有者刪除檔案。這對避免公開目錄,如 /tmp 中的檔案被不擁有該檔案的人刪除非常有用。要使用這個權限,可在權限集前加上 (1):
# chmod 1777 /tmpsticky bit 權限會以 t 顯示於權限集的最後:
# ls -al / | grep tmpdrwxrwxrwt 10 root wheel 512 Aug 31 01:49 tmp認識 FreeBSD 的目錄架構,就可對系統有概略的基礎理解。 最重要的莫過於整個目錄的根目錄,就是 "/" 目錄, 該目錄會在開機時最先掛載 (mount),裡面會有開機所會用到必備檔案。 此外,根目錄還有紀錄其他檔案系統的掛載點相關設定。
「掛載點」就是讓新增的檔案系統,能接到上層的檔案系統 (通常就是「根目錄」檔案系統) 的目錄。 在 磁碟組織 這邊對此有更詳細介紹。 標準的掛載點包括了 /usr/, /var/, /tmp/, /mnt/ 以及 /cdrom/。 這些目錄通常會記錄在 /etc/fstab 設定檔內。 /etc/fstab 是記錄各檔案系統及相關掛載點的表格。 大部分在 /etc/fstab 有記錄的檔案系統,會在開機時由 rc(8) Script 來自動掛載,除非它們有設定 noauto 選項。 其中細節說明可參閱 fstab 檔。
有關檔案系統架構的完整說明可參閱 hier(7)。 現在呢,讓我們大致先一窺常見的目錄有哪些吧。
| 目錄 | 說明 |
|---|---|
/ | 檔案系統的根目錄。 |
/bin/ | 單使用者 (Single-user)、多使用者 (Multi-user) 兩種模式皆可使用的基本工具 。 |
/boot/ | 作業系統開機過程會用到的程式、設定檔。 |
/boot/defaults/ | 預設的開機啟動設定檔,詳情請參閱 loader.conf(5)。 |
/dev/ | 裝置節點 (Device node),詳情請參閱 intro(4)。 |
/etc/ | 系統設定檔及一些 Script 檔。 |
/etc/defaults/ | 預設的系統設定檔,詳情請參閱 rc(8)。 |
/etc/mail/ | 郵件傳輸代理程式,像是 sendmail(8) 的相關設定檔。 |
/etc/periodic/ | 每日、每週、每月透過 cron(8),執行的定期排程 Script,詳情請參閱 periodic(8)。 |
/etc/ppp/ | ppp(8) 設定檔。 |
/mnt/ | 系統管理者慣用充當臨時掛載點的空目錄。 |
/proc/ | 程序 (Process) 檔案系統,詳情請參閱 procfs(5) 及 mount_procfs(8)。 |
/rescue/ | 緊急救援用途的一些靜態連結 (Statically linked) 的程式,詳情請參閱 rescue(8)。 |
/root/ |
|
/sbin/ | 供單使用者 (Single-user) 及多使用者 (Multi-user) 環境使用的系統程式及管理工具 。 |
/tmp/ | 臨時檔案。 一般而言,重開機之後 /tmp 內的東西會被清除掉。 而通常會將以記憶體為基礎 (Memory-based) 的檔案系統掛載在 /tmp 上。 這些瑣事可透過 tmpmfs 相關的 rc.conf(5) 環境變數來自動完成 。(或是在 /etc/fstab 內做設定, 詳情請參閱 mdmfs(8))。 |
/usr/ | 主要是使用者所安裝的工具程式、應用程式存放處。 |
/usr/bin/ | 常用工具、開發工具、應用軟體。 |
/usr/include/ | 標準 C include 檔案。 |
/usr/lib/ | 程式庫存放處。 |
/usr/libdata/ | 其他各式工具的資料檔。 |
/usr/libexec/ | 系統 Daemon 及系統工具程式 (透過其他程式來執行)。 |
/usr/local/ | 存放一些自行安裝的執行檔、程式庫等等。 同時,也是 FreeBSD Port 架構的預設安裝目錄。 /usr/local 內的目錄架構大致與 /usr 相同,詳情請參閱 hier(7) 說明。 但 man 目錄例外,它們是直接放在 /usr/local 底下,而非 /usr/local/share,而 Port 所安裝的說明文件則在 share/doc/port。 |
/usr/obj/ | 在編譯 /usr/src 目錄時所產生的相關架構目地檔。 |
/usr/ports/ | FreeBSD Port 套件集 (選用)。 |
/usr/sbin/ | 由使用者執行的系統 Daemon 及系統工具。 |
/usr/shared/ | 各架構皆共通的檔案。 |
/usr/src/ | BSD 原始碼 (或自行新增的)。 |
/var/ | 存放各種用途的日誌 (Log) 檔、臨時或暫時存放、列印或郵件的緩衝 (Spool) 檔案。有時候,以記憶體為基礎 (Memory-based) 的檔案系統也會掛載在 /var。 這些瑣事可透過 varmfs 相關的 rc.conf(5) 環境變數來自動完成。(或是在 /etc/fstab 內做設定,相關細節請參閱 mdmfs(8))。 |
/var/log/ | 各項系統記錄的日誌 (Log) 檔。 |
/var/mail/ | 各使用者的郵件 (Mailbox) 檔案。 |
/var/spool/ | 各種印表機、郵件系統的緩衝 (Spool) 目錄。 |
/var/tmp/ | 臨時檔案。 這些檔案在重開機後通常仍會保留,除非 /var 是屬於以記憶體為基礎 (Memory-based) 的檔案系統。 |
/var/yp/ | NIS 對應表。 |
FreeBSD 用來尋找檔案的最小單位就是檔案的名稱了。 檔案的名稱有大小寫之分,所以說 readme.txt 和 README.TXT 是兩個不同的檔案。 FreeBSD 並不使用副檔名 (.txt) 來判別這是一個程式檔、文件檔或是其他類型的檔案。
檔案存在目錄裡面。 一個目錄中可能沒有任何檔案,也可能有好幾百個檔案。 目錄之中也可以包含其他的目錄; 您可以建立階層式的目錄以便資料的管理。
檔案或目錄的對應是藉由給定的檔案或目錄名稱,然後加上正斜線符號 (/);之後再視需要加上其他的目錄名稱。 如果您有一個目錄 foo ,裡面有一個目錄叫作 bar,這個目錄中又包含了一個叫 readme.txt 的檔案,那麼這個檔案的全名,或者說檔案的路徑 (Path)就是 foo/bar/readme.txt。注意這與 Windows™ 用來分隔檔案與目錄名稱所使用的 \ 不同,且 FreeBSD 在路徑上並不使用磁碟機代號或其他磁碟機名稱,意思是,在 FreeBSD 上不會有人輸入 c:\foo\bar\readme.txt 這種路徑。
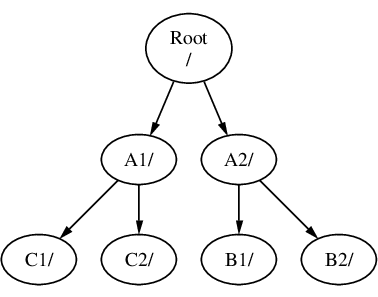
目錄及檔案儲存在檔案系統 (File system) 之中。 每個檔案系統都有唯一一個最上層的目錄,叫做根目錄 (Root directory)。 然後在這個根目錄下面才能有其他的目錄。其中一個檔案系統會被指定成為根檔案系統 (Root file system) 或 /,其他的檔案系統均會掛載 (Mount) 在該根檔案系統之下,不論在 FreeBSD 有多少個磁碟,所有目錄都會成為該磁碟的一部份。
假設您有三個檔案系統,分別叫作 A, B 及 C。 每個檔案系統都包含兩個目錄,叫做 A1, A2 (以此類推得 B1, B2 及 C1, C2)。
稱 A 為主要的檔案系統;如果您用 ls(1) 指令查看此目錄的內容,您會看到兩個子目錄: A1 及 A2,如下所示:
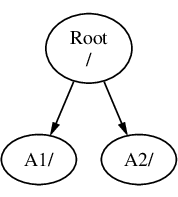
一個檔案系統必須以目錄形式掛載於另一個檔案系統上。 因此,假設您將 B 掛載於 A1 之上,則 B 的根目錄就變成了 A1,而在 B 之下的任何目錄的路徑也隨之改變:
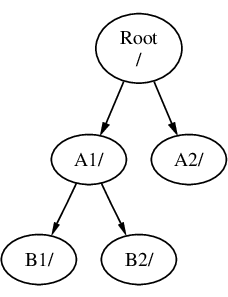
在 B1 或 B2 目錄中的任何檔案必須經由路徑 /A1/B1 或 /A1/B2 才能達到。 所有原來在 /A1 中的檔案會暫時被隱藏起來,直到 B 被卸載 (Unmount) 後才會再顯現出來。
如果 B 掛載在 A2 之上,則會變成:
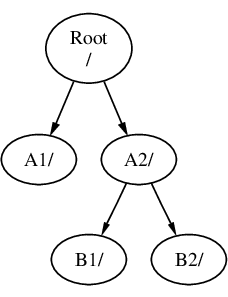
上面的路徑分別為 /A2/B1 及 /A2/B2。
檔案系統可以掛在其他檔案系統的目錄之上。 延續之前的例子,C 檔案系統可以掛在檔案系統 B 的 B1 目錄之上,如圖所示:
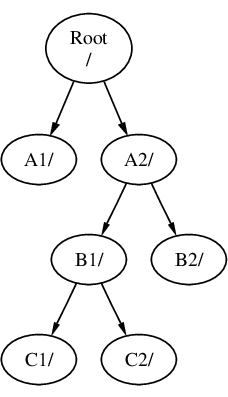
或者 C 直接掛載於 A 的 A1 目錄之上:
您可以使用單一的一個大的根檔案系統而不建立其他的檔案系統。 這樣有好處也有有壞處。
不同的檔案系統在掛上的時候可以有不同的 掛載參數 (Mount option)。 舉例來說,為求謹慎您可以將根檔案系統設成唯讀, 以避免不小心刪除或修改掉重要的檔案。 將使用者可寫入的檔案系統 (例如 /home) 獨立出來也可以讓他們用 nosuid 的參數掛載,此選項可以讓在這個檔案系統中執行檔的 suid/guid 位元失效,可讓系統更安全。
FreeBSD 會自動根據您檔案系統的使用方式來做最佳的檔案配置方式。 因此,一個有很多小檔案、 常常寫入的檔案系統跟只有幾個較大的檔案的檔案系統配置是不一樣的。 如果您只有單一個大的檔案系統,這部分就沒用了。
FreeBSD 的檔案系統在停電的時候很穩固。 然而,在某些重要的時候停電仍然會對檔案系統結構造成損害。 分割成許多個檔案系統的話在系統在停電後比較能夠正常啟動, 以便您在需要的時候將備份資料回存回來。
檔案系統的大小是固定的。 若您在當初安裝 FreeBSD 的時指定了一個大小,可是後來您想把空間加大,在沒有備份的情況下很難達成,您必須將檔案系統重新建立為您需要的大小,然後將備份回存回來。
FreeBSD 的 growfs(8) 指令可以突破此限制直接變更檔案系統的大小。 |
檔案系統放在分區 (Partition) 中。 因為 FreeBSD 承襲 UNIX™ 架構,這邊講的分區和一般提到的分割區 (例如 MS-DOS™ 分割區) 不同。每一個分區由一個代號 (字母) 表示,從 a 到 h。 每個分區只能含有一個檔案系統,因此在表示檔案系統時,除了用該檔案系統的常用的掛載點表示外,也可以使用該檔案系統所在的分區來表示。
FreeBSD 也會使用磁碟空間作為交換空間 (Swap space) 來提供虛擬記憶體 (Virtual memory)。 這讓您的電腦好像擁有比實際更多的記憶體。 當 FreeBSD 的記憶體用完的時候,它會把一些目前沒用到的資料移到交換空間,然後在用到的時候移回去 (同時移出部份沒用到的)。
有些分割區有特定的使用慣例。
| 分區 | 慣例 |
|---|---|
| 通常含有根檔案系統。 |
| 通常含有交換空間。 |
| 通常用來代表整個切割區 (Slice),因此大小會與其所在的切割區一樣。這可讓需要對整個切割區處理的工具 (例如硬碟壞軌檢查工具) 可在 |
| 分區 |
在 FreeBSD 的磁碟會分割成數個切割區 (Slice),如同 Windows™ 中由編號 1 到 4 表示的分割區。這些切割區會再分成數個分區,每個分區內含檔案系統,且會使用字母來標示。
切割區的編號在裝置名稱後面,會先以 s 為字首,然後從 1 開始編號。 因此 "da0s1" 是指第一個 SCSI 硬碟的第一個切割區。 一個磁碟上只能有四個實體切割區,但是在實體切割區中放進適當類型的邏輯切割區。這些延伸的切割區編號會從 5 開始,所以 "ada0s5" 是第一個 SATA 硬碟上的第一個延伸切割區。因此可以預期這些由檔案系統使用的裝置 (Device) 上均會各別佔據一個切割區。
切割區、"危險專用 (Dangerously dedicated)" 的實體磁碟機以及其他內含分割區 (Partition) 的磁碟都是以字母 a 到 h 來表示。 字母會接在裝置名稱的後面,因此 "da0a" 是第一顆 "dangerously dedicated" 磁碟機 da 上的 a 分割區。 而 "ada1s3e" 則是第二顆 SATA 硬碟上第三個切割區的第五個分區。
終於,我們可以辨識系統上的每個磁碟了,一個磁碟的名稱會有一個代碼來表示這個磁碟的類型,接著是一個表示這是那一個磁碟的編號。不像切割區,磁碟的編號從 0 開始。常見的代碼可以參考 磁碟裝置名稱。
當要參照一個分區的時候,需包含磁碟機名稱、s、切割區編號以及分區字母。範例可以參考 磁碟、切割區及分區命名範例。
磁碟的概念模型 示範了一個基本的磁碟配置,相信對您有些幫助。
要安裝 FreeBSD,您必須先建置磁碟的切割區,接著於切割區中建立要給 FreeBSD 用的分區。 最後在這些分區中建立檔案系統 (或交換空間) 並決定要將這些檔案系統掛載於哪裡。
| 磁碟機類型 | 磁碟機裝置稱 |
|---|---|
SATA 及 IDE 硬碟 |
|
SCSI 硬碟與 USB 儲存裝置 |
|
SATA 與 IDECD-ROM 光碟機 |
|
SCSICD-ROM 光碟機 |
|
軟碟機 |
|
各種非標準 CD-ROM 光碟機 |
|
SCSI 磁帶機 |
|
IDE 磁帶機 |
|
RAID 磁碟機 | 範例包含 |
| 名稱 | 意義 |
|---|---|
| 第一個 SATA 硬碟 ( |
| 第二個 SCSI 硬碟 ( |
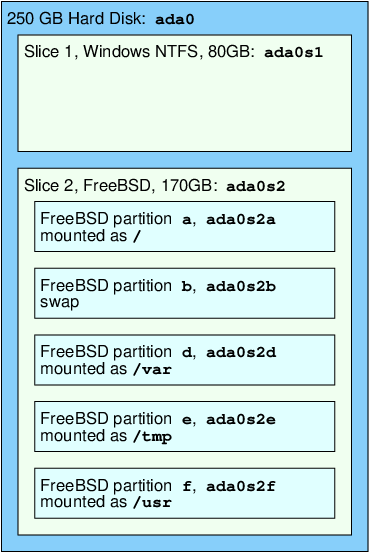
此圖顯示 FreeBSD 中連接到系統的第一個 SATA 磁碟機內部配置圖。 假設這個磁碟的容量是 250 GB,並且包含了一個 80 GB 的切割區及一個 170 GB 的切割區 (MS-DOS™ 的分割區)。 第一個切割區是 Windows™NTFS 檔案系統的 C: 磁碟機,第二個則安裝了 FreeBSD。 本範例中安裝的 FreeBSD 有四個資料分區及一個交換分區。
這四個分區中各有一個檔案系統。 分區 a 是根檔案系統、分區 d 是 /var/、分區 e 是 /tmp/,而分區 f 是 /usr/。分區字母 c 用來代表整個切割區,因此並不作為一般分區使用。
檔案系統就像一顆樹。/ 就像是樹根,而 /dev,/usr 以及其他在根目錄下的目錄就像是樹枝,而這些樹枝上面又還有分支,像是 /usr/local 等。
因為某些原因,我們會將一些目錄分別放在不同的檔案系統上。 如 /var 包含了可能會滿出來的 log/,spool/ 等目錄以及各式各樣的暫存檔。 把根檔案系統塞到滿出來顯然不是個好主意,所以我們往往會比較傾向把 /var 從 / 中拉出來。
另一個常見到把某些目錄放在不同檔案系統上的理由是: 這些檔案在不同的實體或虛擬磁碟機上。 像是網路檔案系統 (Network File System) 詳情可參考 網路檔案系統 (NFS) 或是光碟機。
在 /etc/fstab 裡面有設定的檔案系統會在開機 (FreeBSD 開機程序) 的過程中自動地被掛載 (除非該檔案系統有被加上 noauto 參數)。檔案內容的格式如下:
device /mount-point fstype options dumpfreq passno
device已存在的裝置名稱,詳情請參閱 磁碟裝置名稱。
mount-point檔案系統要掛載到的目錄 (該目錄必須存在)。
fstype檔案系統類型,這是要傳給 mount(8) 的參數。 FreeBSD 預設的檔案系統是 ufs。
options可讀可寫 (Read-Write) 的檔案系統用 rw,而唯讀 (Read-Only) 的檔案系統則是用 ro,後面視需要還可以加其他選項。 常見的選項如 noauto 是用在不要於開機過程中自動的掛載的檔案系統。 其他選項可參閱 mount(8) 說明。
dumpfreqdump(8) 由此項目決定那些檔案系統需要傾印。 如果這格空白則以零為預設值。
passno這個項目決定檔案系統檢查的順序。 對於要跳過檢查的檔案系統,它們的 passno 值要設為零。 根檔案系統的 passno 值應設為一 (因為需要比所有其他的還要先檢查),而其他的檔案系統的 passno 值應該要設得比一大。 若有多個檔案系統具有相同的 passno 值,則 fsck(8) 會試著平行地 (如果可能的話) 檢查這些檔案系統。
更多關於 /etc/fstab 檔案格式及選項的資訊請參閱 fstab(5) 說明文件。
mount(8) 指令是拿來掛載檔案系統用的。基本的操作指令格式如下:
# mount device mountpoint在 mount(8) 裡面有提到一大堆的選項,不過最常用的就是這些:
-a把 /etc/fstab 裡面所有還沒有被掛載、沒有被標記成 /etc/fstab 而且沒有用 -t 排除的檔案系統掛載起來。
-d執行所有的動作,但是不真的去呼叫掛載的系統呼叫 (System call)。 這個選項和 -v 搭配拿來推測 mount(8) 將要做什麼動作時很好用。
-f強迫掛載不乾淨的檔案系統 (危險),或是用來強制取消寫入權限 (把檔案系統的掛載狀態從可存取變成唯讀)。
-r用唯讀的方式掛載檔案系統。 這個選項和在 -o 選項中指定 ro 參數是一樣的。
-t fstype用指定的檔案系統型態來掛載指定的檔案系統,或是在有 -a 選項時只掛載指定型態的檔案系統。預設的檔案系統類型為 "ufs"。
-u更新檔案系統的掛載選項。
-v顯示詳細資訊。
-w以可讀寫的模式掛載檔案系統。
-o 選項後面會接著以逗號分隔的參數:
不解析檔案系統上的 setuid 或 setgid 旗標, 這也是一個蠻有用的安全選項。
FreeBSD 是一個多工的作業系統,也就是說在同一時間內可以跑超過一個程式。 每一個正在花時間跑的程式就叫做程序 (Process)。 您下的每個指令都至少會開啟一個新的程序, 而有些系統程序是一直在跑以維持系統正常運作的。
每一個程序都有一個獨一無二的數字叫做 程序代號 (Process ID, PID),而且就像檔案一樣,每一個程序也有擁有者及群組。 擁有者及群組的資訊是用來決定什麼檔案或裝置是這個程序可以開啟的 (前面有提到過檔案權限)。 大部份的程序都有父程序。 父程序是開啟這個程序的程序,例如:您對 Shell 輸入指令,Shell 本身就是一個程序,而您執行的指令也是程序。 每一個您用這種方式跑的程序的父程序都是 Shell。 有一個特別的程序叫做 init(8) 是個例外,在 FreeBSD 開機的時候 init 會自動地被開啟,init 永遠是第一個程序,所以他的 PID 一直都會是 1。
有些程式並不是設計成一直在接收使用者的輸入的, 而是在開始執行的時候就從中斷與終端機的連線。 例如說, 網頁伺服器整天都在回應網頁方面的要求,它通常不需要您輸入任何東西。 另外,像是把信從一個站傳送到另一個站的程式,也是這種類型的應用程式。我們把這種程式稱作 Daemon。 Daemon 一詞是來自是希臘神話中的角色:祂們既不屬於善良陣營或邪惡陣營,祂們在背地裡做一些有用的事情。這也就是為何 BSD 的吉祥物,是一隻穿著帆布鞋拿著三叉耙的快樂小惡魔的原因。
通常來說做為 Deamon 執行的程式名字後面都會加一個字母 "d"。 BIND 是 Berkeley Internet Name Domain 的縮寫,但實際上執行的程式名稱是 named、Apache 網頁伺服器的程式名稱是 httpd、行列式印表機緩衝服務 (Line Printer Spooling) Daemon 是 lpd,依此類推。 但這是習慣用法,並沒有硬性規定,例如 Sendmail 主要的寄信 Daemon 是叫做 sendmail 而不是 maild。
要看系統執行中的程序,有兩個相當有用的指令可用: ps(1) 以及 top(1)。ps(1) 指令是用來列出正在執行之程序,而且可以顯示它們的 PID、用了多少記憶體、執行的指令名稱及其後之參數是什麼等等。 top(1) 指令則是顯示所有正在執行的程序, 並且數秒鐘更新一次。因此您可以互動式的觀看您的電腦正在做什麼。
在預設的情況下,ps(1) 指令只會顯示使用者所擁有的的程序。 例如:
% ps
 PID TT  STAT    TIME COMMAND
8203  0  Ss   0:00.59 /bin/csh
8895  0  R+   0:00.00 ps
在這個範例裡可以看到 ps(1) 的輸出分成好幾個欄位。 PID 就是前面有提到的程序代號。 PID 的分配是從 1 開始一直到 99999,如果用完的話又會繞回來重頭開始分配 (若該 PID 已經在用了,則 PID 不會重新分配)。 TT 欄位是指這個程式在哪個 Console (tty) 上執行,在這裡可以先忽略不管。STAT 是程式的狀態,也可以先不要管。TIME 是這個程式在 CPU 上執行的時間—這通常不是程式總共花的時間, 因為當您開始執行程式後,大部份的程式在 CPU 上執行前會先花上不少時間等待 。 最後,COMMAND 是執行這個程式的指令。
有幾個不同的選項組合可以用來變更顯示出來的資訊,其中一個最有用的組合是 auxww。 a 可以顯示所有正在跑的程序的指令,不只是您自已的。 u 則是顯示程序的擁有者名稱以及記憶體使用情況。 x 可以把 daemon 程序顯示出來, 而 ww 可讓 ps(1) 顯示出每個程序完整的內容, 而不致因過長而被螢幕截掉了。
top(1) 也有類似的輸出。 一般的情況看像是這樣:
% top
last pid:  9609;  load averages:  0.56,  0.45,  0.36              up 0+00:20:03  10:21:46
107 processes: 2 running, 104 sleeping, 1 zombie
CPU:  6.2% user,  0.1% nice,  8.2% system,  0.4% interrupt, 85.1% idle
Mem: 541M Active, 450M Inact, 1333M Wired, 4064K Cache, 1498M Free
ARC: 992M Total, 377M MFU, 589M MRU, 250K Anon, 5280K Header, 21M Other
Swap: 2048M Total, 2048M Free

  PID USERNAME    THR PRI NICE   SIZE    RES STATE   C   TIME   WCPU COMMAND
  557 root          1 -21  r31   136M 42296K select  0   2:20  9.96% Xorg
 8198 dru           2  52    0   449M 82736K select  3   0:08  5.96% kdeinit4
 8311 dru          27  30    0  1150M   187M uwait   1   1:37  0.98% firefox
  431 root          1  20    0 14268K  1728K select  0   0:06  0.98% moused
 9551 dru           1  21    0 16600K  2660K CPU3    3   0:01  0.98% top
 2357 dru           4  37    0   718M   141M select  0   0:21  0.00% kdeinit4
 8705 dru           4  35    0   480M    98M select  2   0:20  0.00% kdeinit4
 8076 dru           6  20    0   552M   113M uwait   0   0:12  0.00% soffice.bin
 2623 root          1  30   10 12088K  1636K select  3   0:09  0.00% powerd
 2338 dru           1  20    0   440M 84532K select  1   0:06  0.00% kwin
 1427 dru           5  22    0   605M 86412K select  1   0:05  0.00% kdeinit4
輸出的資訊分成兩個部份。開頭 (前五行或六行) 顯示出最近一個程序的 PID、系統平均負載 (系統忙磁程度評估方式)、系統的開機時間 (自上次重新開機) 以及現在的時間等。 在開頭裡面的其他數字分別是在講有多少程序正在執行、有多少記憶體及交換空間被占用了,還有就是系統分別花了多少時間在不同的 CPU 狀態上。若有載入 ZFS 檔案系統模組,會有一行 ARC 標示有多少資料從磁碟改由記憶體快取中取得。
接下來的部份是由好幾個欄位所構成,和 ps(1) 輸出的資訊類似。 就如同前例,您可以看到 PID、使用者名稱、CPU 花費的時間以及正在執行的指令。 top(1) 在預設的情況下還會告訴您程序用掉了多少的記憶體空間。 在這邊會分成兩欄,一個是總用量 (Total size),另一個是實際用量 (Resident size)----總用量是指這個應用程式需要的記憶體空間,而實際用量則是指目前實際上該程式的記憶體使用量。
top(1) 每隔 2 秒鐘會自動更新顯示內容,可用 -s 選項來改變間隔的時間。
要與執行中的程序或 Daemon 溝通唯一的方法是透過 kill(1) 指令傳送信號 (Signal)。 信號有很多種,有些有特定的意義,有些則是會由應用程式來解讀,應用程式的說明文件會告訴您該程式是如何解讀信號。 使用者只能送信號給自己所擁有的程序,送信號給其他人的程序會出現權限不足的錯誤。 唯一的例外是 root使用者,他可以送信號給任何人的程序。
作業系統在某些情況也會送信號給應用程式。 假設有個應用程式寫得不好,企圖要存取它不該碰的記憶體的時候,FreeBSD 會送一個 "Segmentation Violation" 信號 (SIGSEGV) 給這個程序。 如果有一個應用程式用了 alarm(3) 的系統呼叫 (System call) 要求系統在過一段時間之後發出通知,時間到了的時候系統就會發出"通知"信號 (SIGALRM) 給該程式。
SIGTERM 與 SIGKILL 這兩個信號可以拿來終止程序。 用 SIGTERM 結束程序是比較有禮貌的方式,該程序收到信號後可以把自已所使用的日誌檔關閉及其他要在結束前要做的事完成, 然後在關掉程序之前結束掉手邊的工作。 在某些情況下程序有可能會忽略 SIGTERM,如它正在做一些不能中斷的工作的話。
SIGKILL 就沒有辦法被程序忽略。 傳送 SIGKILL 信號給程序通常會將程序直接中止。
其他常用的信號有:SIGHUP, SIGUSR1 及 SIGUSR2。 這些是通用的信號,對不同的應用程式會有不同的反應。
舉例來說,當您更動了網頁伺服器的設定檔,您想要叫網頁伺服器去重新讀取設定。 重新啟動 httpd 會造成網頁伺服器暫停服務一段時間,我們可以傳送 SIGHUP 信號來取代關掉重開。 不同的 Daemon 會有不同的行為,所以使用前請先參考 Deamon 的說明文件查看是否可以達到想要的結果。
Procedure: 送信號給程序
使用 pgrep(1) 來查詢要傳送信號的目標程序。 在這個例子中 inetd(8) 的 PID 為 198:
% pgrep -l inetd
198  inetd -wW
使用 kill(1) 來發送信號。因為 inetd(8) 是 root 所有,因此必須先用 su(1) 切換成 root 先。
% su
Password:
# /bin/kill -s HUP 198
對大多數 UNIX™ 指令來講,kill(1) 執行成功時並不會輸出任何訊息。 假設您送一個信號給某個不是使用者所擁有的程序, 那麼就會顯示這個錯誤訊息: kill: PID: Operation not permitted。 若打錯 PID 的話,那就會把信號送給錯誤的程序,並把該程序關閉,或者是把信號送給一個非使用中的 PID,那您就會看到錯誤:kill: PID: No such process。
為何要使用 /bin/kill?多數 Shell 都有提供內建的 |
要送其他的信號的話也是非常類似,就視需要把指令中的 TERM 或 KILL 替換成其他信號的名稱即可。
Shell 提供了指令列介面可用來與作業系統互動,Shell 負責從輸入的頻道接收指令並執行它們。 多數 Shell 也內建一些有助於日常工作的功能,像是檔案管理、檔案搜尋、指令列編輯、指令巨集以及環境變數等。 FreeBSD 有內附了幾個 Shell,包含 Bourne Shell (sh(1)),與改良版的 C-shell (tcsh(1))。 還有許多其他的 Shell 可以從 FreeBSD Port 套件集中取得,像是 zsh 以及 bash 等。
要用哪個 Shell 牽涉到每個人的喜好。 如果您是一個 C 程式設計師,那對於使用像是 tcsh(1) 這種 C-like 的 shell 可能會感到較容易上手。 如果是 Linux™ 的使用者,那您也許會想要用 bash。 每一個 Shell 都有自已獨特之處,至於這些特點能不能符合使用者的喜好,就是您選擇 shell 的重點了。
常見的 Shell 功能之一就是檔名自動補齊。 首先輸入指令或檔案的前幾個字母,然後按下 Tab 鍵,Shell 就會自動把指令或是檔案名稱剩餘的部份補齊。 假設您有兩個檔案分別叫作 foobar 及 football。 要刪掉 foobar,那麼可以輸入 rm foo 然後按下 Tab 來補齊檔名。
但 Shell 只顯示了 rm foo,這代表它沒有辦法完全自動補齊檔名,因為有不只一個檔名符合條件。 foobar 和 football 都是 foo 開頭的檔名。 有一些 Shell 會有嗶的音效或者顯示所有符符條件的檔名。 使用者只需要多打幾個字元來分辦想要的檔名。 輸入 t 然後再按 Tab 一次,那 Shell 就能夠替您把剩下的檔名填滿了。
Shell 的另一項特點是使用了環境變數。 環境變數是以變數與鍵值 (Variable/Key) 的對應關係儲存於 Shell 的環境,任何由該 Shell 所產生的程序都可以讀取此環境變數, 因此環境變數儲存了許多程序的設定。 常用環境變數 提供了常見的環境變數與其涵義的清單。 請注意環境變數的名稱永遠以大寫表示。
| 變數 | 說明 |
|---|---|
| 目前登入的使用者名稱。 |
| 以冒號 (:) 隔開的目錄列表,用以搜尋執行檔的路徑。 |
| 若存在這個環境變數,則代表 Xorg 顯示器的網路名稱。 |
| 目前使用的 Shell。 |
| 使用者終端機類型的名稱,用來判斷終端機有那些功能。 |
| 用來執行各種終端機功能的終端機跳脫碼 (Terminal escape code) 的資料庫項目。 |
| 作業系統的類型。 |
| 系統的 CPU 架構。 |
| 使用者偏好的文字編輯器。 |
| 使用者偏好的文字分頁檢視工具。 |
| 以冒號 (:) 隔開的目錄列表,用以搜尋使用手冊的路徑。 |
在不同的 Shell 底下設定環境變數的方式也有所不同。 在 tcsh(1) 和 csh(1),使用 setenv 來設定環境變數。 在 sh(1) 和 bash 則使用 export 來設定目前環境的變數。 以下範例將 tcsh(1) Shell 下的 EDITOR 環境變數從預設值更改為 /usr/local/bin/emacs:
% setenv EDITOR /usr/local/bin/emacs相同功能的指令在 bash 下則是:
% export EDITOR="/usr/local/bin/emacs"要展開以顯示目前環境變數中的值,只要在指令列輸入環境變數之前加上 $ 字元。 舉例來說,echo $TERM 會顯示出目前 $TERM 的設定值。
Shell 中有特殊字元用來表示特殊資料,我們將其稱作 Meta-character。 其中最常見的 Meta-character 是 * 字元,它代表了檔名中的任意字元。 Meta-character 可以用在搜尋檔名,舉例來說,輸入 echo * 會和輸入 ls 得到幾乎相同的結果,這是因為 shell 會將所有符合 * 字元的檔案由 echo 顯示出來。
為了避免 Shell 轉譯這些特殊字元,我們可以在這些特殊字元前放一個反斜線 (\) 字元使他們跳脫 (Escape) Shell 的轉譯。舉例來說,echo $TERM 會印出你目前終端機的設定, echo \$TERM 則會直接印出 $TERM 這幾個字。
永久變更 Shell 最簡單的方法就是透過 chsh 指令。 執行 chsh 將會使用環境變數中 EDITOR 指定的文字編輯器,如果沒有設定,則預設是 vi(1)。 請修改 Shell: 為新的 Shell 的完整路徑。
或者,使用 chsh -s, 來直接設定 Shell 而不開啟文字編輯器。 例如, 假設想把 Shell 更改為 bash:
% chsh -s /usr/local/bin/bash新的 Shell 必須已列於 /etc/shells 裡頭。 若是依 安裝應用程式:套件與 Port 說明由 Port 套件集來裝的 Shell, 那就會自動列入至該檔案裡。 若仍缺少,請使用以下指令加入檔案 (請將路徑替換為新的 Shell 的路徑): 然後重新執行 chsh(1)。 |
UNIX™ Shell 不只是指令的直譯器,它是一個強大的工具可讓使用者執行指令、重新導向指令的輸出、重新導向指令的輸入並將指令串連在一起來改進最終指令的輸出結果。當這個功能與內建的指令混合使用時,可提供一個可以最佳化效率的環境給使用者。
Shell 重新導向是將一個指令的輸出或輸入傳送給另一個指令或檔案。例如,要擷取 ls(1) 指令的輸出到一個檔案,可以重新導向輸出:
% ls > directory_listing.txt目錄的內容現在會列到 directory_listing.txt 中,部份指令可以讀取輸入,例如 sort(1)。要排序這個清單,可重新導向輸入:
% sort < directory_listing.txt輸入的內容會被排序後呈現在畫面上,要重新導向該輸入到另一個檔案,可以重新導向 sort(1) 的出輸:
% sort < directory_listing.txt > sorted.txt於上述所有的範例中,指令會透過檔案描述符 (File descriptor) 來執行重新導向。每個 UNIX™ 系統都有檔案描述符,其中包含了標準輸入 (stdin)、標準輸出 (stdout) 以及標準錯誤 (stderr)。每一種檔案描述符都有特定的用途,輸入可能來自鍵盤或滑鼠、任何可能提供輸入的來源,輸出則可能是螢幕或印表機中的紙張,而錯誤則為任何可能用來診斷的資訊或錯誤訊息。這三種皆被認為是以 I/O 為基礎的檔案描述符,有些也會被當做串流。
透過使用這些檔案描述符,Shell 能夠讓輸出與輸入在各種指令間傳遞與重新導向到或自檔案。另一種重新導向的方式是使用管線運算子 (Pipe operator)。
UNIX™ 的管線運算子,即 "|",可允許指令的輸出可直接傳遞或導向到另一個程式。基本上,管線運算子允許指令的標準輸出以標準輸入傳遞給另一個指令,例如:
% cat directory_listing.txt | sort | less在這個例子中,directory_listing.txt 的內容會被排序然後輸出傳遞給 less(1),這可讓使用者依自己的閱讀步調捲動輸出的結果,避免結果直接捲動出畫面。
在 FreeBSD 中有許多設定必須透過編輯文字檔完成。 因此,若能熟悉文字編輯器是再好不過的。 FreeBSD 本身就內建幾種文字編輯器, 您也可以透過 Port 套件集來安裝其他的文字編輯器。
最簡單易學的文字編輯器叫做 ee(1),意為簡易的編輯器 (Easy Editor)。 要開始使用這個編輯器, 只需輸入 ee filename,其中 filename 代表你想要編輯的檔案名稱。 在編輯器中, 所有編輯器的功能與操作都顯示在螢幕的上方。 其中的插入符號 (^) 代表鍵盤上的 Ctrl 鍵,所以 ^e 代表的是 Ctrl+e。 若要結束 ee(1),請按下 Esc 鍵,接著選擇 "leave editor" 即可。 此時如果該檔案有修改過,編輯器會提醒你是否要存檔。
FreeBSD 同時也內建功能強大的文字編輯器,像是vi(1)。 其他編輯器如 editors/emacs 及 editors/vim 則由 FreeBSD Port 套件集提供。 這些編輯器提供更強的功能,但是也比較難學習。 長期來看學習 vim 或 Emacs 會在日後為您省下更多的時間。
有許多應用程式在修改檔案或需要輸入時會自動開啟文字編輯器,要更改預設的編輯器可設定 EDITOR 環境變數如 Shell 所說明。
裝置 (Device) 一詞大多是跟硬體比較有關的術語,包括磁碟、印表機、顯示卡和鍵盤。 FreeBSD 開機過程當中,開機訊息 (Boot Message) 中主要是會列出偵測到的硬體裝置,開機訊息的複本也會存放在 /var/run/dmesg.boot。
每一個裝置都有一個裝置名稱及編號,舉例來說 ada0 是第一台 SATA 硬碟,而 kbd0 則代表鍵盤。
在 FreeBSD 中大多數的裝置必須透過裝置節點 (Device Node) 的特殊檔案來存取,這些檔案會放置在 /dev。
在 FreeBSD 中,最詳細的文件莫過於操作手冊。 幾乎在系統上所有程式都會有簡短的操作手冊來介紹該程式的基本操作以及可用的參數。 這些操作手冊可以使用 man 指令來檢視:
% man command其中 command 想要瞭解指令的名稱。 舉例,要知道 ls(1) 的詳細用法,就可以打:
% man ls操作手冊被分成很多個章節,每個章節有不同的主題。 在 FreeBSD 中操作手冊有以下章節:
使用者指令。
系統呼叫 (System call) 與錯誤編號。
C 程式庫函數。
裝置驅動程式。
檔案格式。
遊戲及其他程式。
其他資訊。
系統維護與操作指令。
系統核心介面。
有些情況會有同樣主題會同時出現在不同章節。 舉個例子,系統內會有 chmod 使用者指令,但同時也有 chmod() 系統呼叫。 在這種情況,要告訴 man(1) 要查詢的章節編號:
% man 1 chmod若不曉得操作手冊的名稱,可以使用 man -k 來以關鍵字查詢所有操作手冊的描述:
% man -k mail這個指令會顯示所有描述中有使用到關鍵字 "mail" 的指令。 這等同使用 apropos(1)。
想要閱讀所有在 /usr/bin 底下的指令說明則可輸入:
% cd /usr/bin
% man -f * | more
或
% cd /usr/bin
% whatis * |moreFreeBSD 有許多應用程式與工具來自自由軟體基金會 (Free Software Foundation, FSF)。 除了操作手冊之外,這些程式提供了另外一種更具有彈性的超文字文件叫做 info 檔。 這些檔案可以使用 info(1) 指令來閱讀,或者若有裝 editors/emacs 亦可透過 emacs 的 info 模式閱讀。
要使用 info(1) 指令,只需輸入:
% info要查詢簡單說明請按 h 鍵,若要查訊快速指令參考請按 ? 鍵。
FreeBSD 內建豐富的系統工具集,此外 FreeBSD 提供了兩種安裝第三方軟體的套件管理技術︰由原始碼安裝的 FreeBSD Port 套件集,以及由預先編譯好的 Binary 安裝的 Binary 套件集。兩種方法都可使用本地的媒體或網路來安裝軟體。
讀完這章,您將了解:
Binary 套件集與 Port 的差別。
如何找到已移植到 FreeBSD 的第三方軟體。
如何使用 pkg 管理 Binary 套件。
如何編譯來自 Port 套件集的第三方軟體原始碼。
如何找到應用程式已安裝的檔案來完成安裝後的設定。
若軟體安裝失敗要如何處理。
通常要在 UNIX™ 系統上安裝第三方軟體時,有幾個步驟要作:
找到並且下載軟體,該軟體有可能以原始碼或 Binary 格式發佈。
自發佈的格式解壓縮軟體。 發佈的格式通常為 tarball 並以程式壓縮,如 compress(1), gzip(1), bzip2(1) 或 xz(1)。
找到位於 INSTALL, README 或者 doc/ 子目錄底下的檔案閱讀如何安裝該軟體。
若軟體是以原始碼的格式發佈則需要編譯該軟體。 這可能會需要修改 Makefile 或執行 configure Script。
測試並安裝該軟體。
FreeBSD Port 是指設計用來自動化從原始碼編譯應用程式整個程序的一系列檔案,組成 Port 的檔案包含了自動下載、解壓縮、修補、編譯與安裝應用程式的必要資訊。
若軟體尚未被 FreeBSD 採用並測試,可能會需要經過一些修正才能正常安裝並執行。
雖然如此,目前已有超過 24,000 個第三方應用程式已經被移植到 FreeBSD。當可行時,這些應用程式也會做成預先編譯好的 套件 (Package) 供下載。
這些 Binary 套件可使用 FreeBSD 套件管理指令來管理。
不論是 Binary 套件或者 Port 都有相依性,若用 Binary 套件或 Port 來安裝應用程式,且該應用程式若有相依的程式庫尚未被安裝,則會自動先安裝該程式庫。
FreeBSD Binary 套件中含有一個應用程式中所有預先編譯好的指令、設定檔以及文件,Binary 套件可以使用 pkg(8) 指令來管理,如 pkg install。
雖然兩種技術非常相似,但 Binary 套件及 Port 有各自的優點。 要視您要安裝的應用程式需求來選擇。
應用程式壓縮 Binary 套件的 tarball 會比壓縮原始碼的 tarball 還要小。
安裝 Binary 套件不需要編譯的時間,對於較慢的電腦要安裝大型的應用程式如 Mozilla, KDE 或 GNOME 這點顯的相當重要。
Binary 套件不需要了解在 FreeBSD 上編譯軟體的流程。
由於 Binary 套件必須盡可能在大多數系統上執行,通常會採用較通用的編譯選項來編譯,由 Port 來編輯可更改編譯選項。
部份應用程式編譯期選項會與要安裝的功能有關,舉例來說 Apache 便有大量不同的內建選項可以設定。
在某些情況,同樣的應用程式會存在多個不同的 Binary 套件,如 Ghostscript 有 ghostscript 及 ghostscript-nox11 兩種 Binary 套件,用來區別是否有安裝 Xorg。 若應用程式有一個以上的編譯期選項便無法用這個方式來區別 Binary 套件。
部份軟體的授權條款中禁止以 Binary 格式發佈。 這種軟體必須以原始碼發佈並由終端使用者編譯。
部份人並不相信 Binary 發佈版本,寧願閱讀原始碼來查看是否潛藏的問題。
原始碼可套用自訂的修補。
要持續追蹤 Port 的更新可以訂閱 FreeBSD Port 郵遞論壇 與 FreeBSD Port 問題郵遞論壇。
在安裝任何應用程式之前,請先查看 https://vuxml.freebsd.org/ 是否有與該應用程式相關的安全性問題或輸入 |
本章接下來的部份將說明如何在 FreeBSD 使用 Binary 套件及 Port 套件安裝與管理第三方軟體。
FreeBSD 上可安裝的軟體清單不斷在增加, 有幾種方式可以來找你想安裝的軟體:
FreeBSD 網站有維護一份可搜尋的最新應用程式清單,在 https://www.FreeBSD.org/ports/。 可以依應用程式名稱或軟體分類來搜尋 Port。 *
由 Dan Langille 維護的 FreshPorts.org,提供完整的搜尋工具並且可追蹤在 Port 套件集中的應用程式變更。註冊的使用者可以建立自訂的監視清單會自動寄發電子郵件通知 Port 的更新資訊。 *
若找不到指定的應用程式,可以先到網站 SourceForge.net 或 GitHub.com 搜尋,後然再回到 FreeBSD 網站 檢查該應用程式是否已被移植。 *
要搜尋 Binary 套件檔案庫中的應用程式可:
# pkg search subversion
git-subversion-1.9.2
java-subversion-1.8.8_2
p5-subversion-1.8.8_2
py27-hgsubversion-1.6
py27-subversion-1.8.8_2
ruby-subversion-1.8.8_2
subversion-1.8.8_2
subversion-book-4515
subversion-static-1.8.8_2
subversion16-1.6.23_4
subversion17-1.7.16_2
套件名稱包含版本編號,且若 Port 使用 Python 為基礎,也會包含用來編譯該套件的 Python 版本。有些 Port 會有多個版本可使用,如 Subversion ,因編譯選項不同,有多個版本可用,這個例子中即指靜態連結版本的 Subversion。在指定要安裝的套件時,最好使用 Port 來源來指定該應用程式,Port 來源是指應用程式在 Port 樹中的路徑。再輸入一次 pkg search 並加上 -o 來列出每個套件來源:
# pkg search -o subversion
devel/git-subversion
java/java-subversion
devel/p5-subversion
devel/py-hgsubversion
devel/py-subversion
devel/ruby-subversion
devel/subversion16
devel/subversion17
devel/subversion
devel/subversion-book
devel/subversion-static
pkg search 支援使用 Shell 萬手字元 (globs)、正規表示法、描述或檔案庫中的其他其他內容。在安裝 ports-mgmt/pkg 或 ports-mgmt/pkg-devel 之後,可參考 pkg-search(8) 以取得更多詳細資訊。
若 Port 套件集已安裝,有數個方法可以查詢 Port 樹中的本地版本。要找到 Port 所在的分類,可輸入 whereis file,其中 file 是要安裝的程式:
# whereis lsof
lsof: /usr/ports/sysutils/lsof
或者,也可使用 echo(1):
# echo /usr/ports/*/*lsof*
/usr/ports/sysutils/lsof
請注意,這也會顯示已下載至 /usr/ports/distfiles 目錄中任何已符合條件的檔案。
另一個方法是使用 Port 套件集內建的搜尋機制來找軟體。要使用搜尋的功能需先 cd 到 /usr/ports 然後執行 make search name=program-name,其中 program-name 代表軟體的名稱。舉例搜尋 lsof:
# cd /usr/ports
# make search name=lsof
Port:   lsof-4.88.d,8
Path:   /usr/ports/sysutils/lsof
Info:   Lists information about open files (similar to fstat(1))
Maint:  ler@lerctr.org
Index:  sysutils
B-deps:
R-deps:
內建的搜尋機制會使用索引檔內的資訊。若出現訊息指出需要 INDEX 檔,可執行 |
"Path:" 此行代表 Port 的所在位置。
若不要接受這麼多資訊,可使用 quicksearch 功能:
# cd /usr/ports
# make quicksearch name=lsof
Port:   lsof-4.88.d,8
Path:   /usr/ports/sysutils/lsof
Info:   Lists information about open files (similar to fstat(1))
若要進行更有深度的搜尋,使用 make search key=string 或 make quicksearch key=string 其中 string 是要搜尋的文字。該文字可以是一部份的註解、描述或相依套件,當不清楚程式的名稱時可以找到與特定主題相關的 Port。
當使用 search 或 quicksearch 時,搜尋的字串不分大小寫。 搜尋 "LSOF" 會與搜尋 "lsof" 產生相同的結果。
pkg 是新一代套件管理工具用來取代舊版工具,提供許多功能讓處理 Binary 套件更快更簡單。
對於只想要使用在 FreeBSD 鏡像站上預先編譯 Binary 套件的站台,使用 pkg 管理套件便已足夠。
但是,對於那些想要從原始碼或使用自己的檔案庫編譯的站台,則會需要 Port 管理工具。
因為 pkg 僅能管理 Binary 套件,所以不能當做為替代 Port 管理工具,這些工具可用來安裝來自 Binary 與 Port 套件集的軟體,而 pkg 僅能安裝 Binary 套件。
FreeBSD 內建啟動 (Bootstrap) 工具可用來下載並安裝 pkg 及其操作手冊。這個工具是設計在 FreeBSD 版本 10.X 之後使用。
不是所有 FreeBSD 版本及架構支援此啟動程序,目前支援的清單列於 https://pkg.freebsd.org/,對不支援的版本,必須改透過 Port 套件集或者 Binary 套件來安裝 pkg。 |
要啟動 (Bootstrap) 系統請執行:
# /usr/sbin/pkg您必須有可用的網際網路連線供啟動程式使用方可成功。
否則,要安裝 Port 套件,則須執行:
# cd /usr/ports/ports-mgmt/pkg
# make
# make install clean
當升級原使用舊版 pkg_* 工具的既有系統時,必須將資料庫轉換成新的格式,如此新的工具才會知道有那些已安裝過的套件。pkg 安裝完後,必須執行以下指令將套件資料庫從舊版格式轉換到新版格式:
# pkg2ng新安裝的版本因尚未安裝任何第三方軟體因此不須做這個步驟。 |
這個步驟無法還原。一旦套件資料庫轉為成 pkg 的格式,舊版 |
套件資料庫轉換的過程可能會因內容轉換為新版本產生錯誤。通常,這些錯誤皆可安全忽略,即使如此,仍然有在執行 |
為了確保 FreeBSD Port 套件集會將新軟體的資訊註冊到 pkg 而非舊版套件資料庫,FreeBSD 版本 10.X 之前需要在 /etc/make.conf 加入此行:
WITH_PKGNG= yes
預設 pkg 會使用 FreeBSD 套件鏡像站 (Repository) 的 Binary 套件。若要取得有關編譯自訂套件檔案庫的資訊,請參考 使用 Poudriere 編譯套件。
其他 pkg 設定選項說明請參考 pkg.conf(5)。
pkg 的用法資訊可在 pkg(8) 操作手冊或不加任何參數執行 pkg 來取得。
每個 pkg 指令參數皆記庫在指令操件手冊。要閱讀 pkg install 的操作手冊,可執行以下指令:
# pkg help install# man pkg-install本章節剩餘的部份將會示範使用 pkg 執行常用的 Binary 套件管理工作。每個示範的指令皆會提供多個參數可使用,請參考指令的說明或操作手冊以取得詳細資訊或更多範例。
有關已安裝在系統的套件資訊可透過執行 pkg info 來檢視,若執行時未指定任何參數,將會列出所有已安裝或指定的套件版本。
例如,要查看已安裝的 pkg 版本可執行:
# pkg info pkg
pkg-1.1.4_1要安裝 Binary 套件可使用以下指令,其中 packagename 為要安裝的套件名稱:
# pkg install packagename這個指令會使用檔案庫的資料來決定要安裝的軟體版本以及是否有任何未安裝的相依。例如,要安裝 curl:
# pkg install curl
Updating repository catalogue
/usr/local/tmp/All/curl-7.31.0_1.txz          100% of 1181 kB 1380 kBps 00m01s

/usr/local/tmp/All/ca_root_nss-3.15.1_1.txz   100% of  288 kB 1700 kBps 00m00s

Updating repository catalogue
The following 2 packages will be installed:

        Installing ca_root_nss: 3.15.1_1
        Installing curl: 7.31.0_1

The installation will require 3 MB more space

0 B to be downloaded

Proceed with installing packages [y/N]: y
Checking integrity... done
[1/2] Installing ca_root_nss-3.15.1_1... done
[2/2] Installing curl-7.31.0_1... done
Cleaning up cache files...Done
新的套件以及任何做為相依安裝的額外套件可在已安裝的套件清單中看到:
# pkg info
ca_root_nss-3.15.1_1	The root certificate bundle from the Mozilla Project
curl-7.31.0_1	Non-interactive tool to get files from FTP, GOPHER, HTTP(S) servers
pkg-1.1.4_6	New generation package manager
不再需要的套件可以使用 pkg delete 來移除,例如:
# pkg delete curl
The following packages will be deleted:

	curl-7.31.0_1

The deletion will free 3 MB

Proceed with deleting packages [y/N]: y
[1/1] Deleting curl-7.31.0_1... done在第三方的應用程式中偶爾可能會發現軟體漏洞,要找出這些程式,可使用 pkg 內建的稽查機制。要查詢已安裝在系統上的軟體是否有任何已知的漏洞可執行:
# pkg audit -F移除一個套件可能會留下不再需要使用的相依套件。不再需要的相依套件是當初隨著其套件所安裝的套件 (枝葉套件),可以使用以下指令自動偵測並移除:
# pkg autoremove
Packages to be autoremoved:
	ca_root_nss-3.15.1_1

The autoremoval will free 723 kB

Proceed with autoremoval of packages [y/N]: y
Deinstalling ca_root_nss-3.15.1_1... done
因為相依所安裝的套件稱作 自動 (Automatic) 套件,而非自動套件即套件被安裝的原因不是因為其他套件所相依,可以使用以下方式查詢:
# pkg prime-list
nginx
openvpn
sudo
pkg prime-list 是一個別名指令,定義在 /usr/local/etc/pkg.conf,尚還有許多其他相關指令可以用來查詢系統的套件資料庫,例如,指令 pkg prime-origins 可用來取得上述清單的來源 Port 目錄:
# pkg prime-origins
www/nginx
security/openvpn
security/sudo
這份清單可以用來重新編譯所有安裝在系統中的套件,使用 ports-mgmt/poudriere 或 ports-mgmt/synth 這類的編譯工具。
要將一個安裝好的套件註記成為 "自動" 可以用:
# pkg set -A 1 devel/cmake當套件為末端套件 (Leaf Package) 且被註記為 "自動",則會被 pkg autoremove 挑選出來。
要註記一個安裝好的套件為 "非自動" 可以用:
# pkg set -A 0 devel/cmake不如傳統的套件管理系統,pkg 有自己的套件資料庫備份機制,此功能預設是開啟的。
要停止週期的 Script 備份套件資料庫可在 periodic.conf(5) 設定 |
要還原先前套件資料庫的備份,可執行以下指令並將 /path/to/pkg.sql 替換為備份的位置:
# pkg backup -r /path/to/pkg.sql若要還原有週期 Script 所產生的備份必須在還原前先解壓縮。 |
要手動備份 pkg 資料庫,可執行以下指令,並替換 /path/to/pkg.sql 為適當的檔案名稱與位置:
# pkg backup -d /path/to/pkg.sql預設 pkg 會儲存 Binary 套件在快取目錄定義在 pkg.conf(5) 中的 PKG_CACHEDIR,只會保留最後安裝的套件複本。較舊版的 pkg 會保留所有先前的套件,若要移除這些過時的 Binary 套件,可執行:
# pkg clean使用以下指令可清空全部的快取:
# pkg clean -a在 FreeBSD Port 套件集中的軟體可能會經歷主要版號的修改,要解決這個問題可使用 pkg 內建的指令來更新套件來源。這非常有用,例如 lang/php5 重新命名為 lang/php53 因此 lang/php5 從此之後代表版本 5.4。
要更改上述例子中的套件來源,可執行:
# pkg set -o lang/php5:lang/php53再一個例子,要更新 lang/ruby18 為 lang/ruby19,可執行:
# pkg set -o lang/ruby18:lang/ruby19最後一個例子,要更改 libglut 共用程式庫的來源從 graphics/libglut 改成 graphics/freeglut 可執行:
# pkg set -o graphics/libglut:graphics/freeglut在更改套件來源之後,很重要的一件事是要重新安裝套件,來讓相依的套件也同時使用修改後的來源。要強制重新安裝相依套件,可執行: |
Port 套件集是指一數個 Makefiles、修補及描述檔案,每一組這些檔案可用來編譯與安裝在 FreeBSD 上的一個應用程式,即稱為一個 Port。
預設,Port 套件集儲存在 /usr/ports 的子目錄下。
在應用程式可以使用 Port 編譯之前,必須先安裝 Port 套件集。若在安裝 FreeBSD 時沒有安裝,可以使用以下其中一種方式安裝:
Procedure: Portsnap 方法
FreeBSD 的基礎系統內含 Portsnap,這是一個可用來取得 Port 套件集簡單又快速的工具,較建議多數使用者使用這個方式。此工具會連線到 FreeBSD 的網站,驗証密鑰,然後下載 Port 套件集的新複本。該金鑰是要用來檢驗所有已下載檔案的完整性。
要下載壓縮後的 Port 套件集快照 (Snapshot) 到 /var/db/portsnap:
# portsnap fetch當第一次執行 Portsnap 時,要先解壓縮快照到 /usr/ports:
# portsnap extract在完成上述第一次使用 Portsnap 的動作之後,往後可隨需要執行以下指令來更新 /usr/ports :
# portsnap fetch
# portsnap update
當使用 fetch 時也可同時執行 extract 或 update 如:
# portsnap fetch updateProcedure: Subversion 方法
若要取得更多對 Port 樹的控制,或若有本地的變更需要維護,可以使用 Subversion 來取得 Port 套件集。請參考 Subversion Primer 來取得 Subversion 的詳細說明。
必須安裝 Subversion 才可用來取出 (Check out) Port 樹。若已存在 Port 樹的複本,可使用此方式安裝 Subversion:
# cd /usr/ports/devel/subversion
# make install clean
若尚無法使用 Port 樹,或已經使用 pkg 來管理套件,可使用套件來安裝 Subversion:
# pkg install subversion取出 Port 樹的複本:
# svn checkout https://svn.FreeBSD.org/ports/head /usr/ports若需要,在第一次 Subversion 取出後可使用以下指令更新 /usr/ports:
# svn update /usr/portsPort 套件集中含有代表不同軟體分類的目錄,每個分類底下的子目錄代表每個應用程式,每個內含數個用來告訴 FreeBSD 如何編譯與安裝該程式檔案的應用程式子目錄即稱作 Port Skeleton,每個 Port Skeleton 會含有以下檔案及目錄:
Makefile:內含用來說明應用程式要如何編譯、要安裝該程式到那的敘述句。
distinfo:內含編譯 Port 必須下載的檔案名稱以及校驗碼 (Checksum)。
files/:此目錄含有編譯與安裝程式到 FreeBSD 時所需的修補檔。此目錄也可能含有其他用來編譯 Port 的檔案。
pkg-descr:提供程式更詳細的說明。
pkg-plist:Port 安裝的所有檔案清單,也同時會告訴 Port 系統解除安裝時要移除那一些檔案。
部份 Port 含有 pkg-message 或其他檔案用來處理特殊情況。要取得有關這些檔案的詳細資訊,以及 Port 的概要可參考 FreeBSD Porter’s Handbook。
Port 中並不含實際的原始碼,即為 distfile,在編譯 Port 解壓縮時會自動下載的原始碼到 /usr/ports/distfiles。
下面我們會介紹如何使用 Port 套件集來安裝、移除軟體的基本用法。 make 可用的目標及環境變數詳細說明可參閱 ports(7)。
在編譯任何 Port 套件前,請先確認已經如前章節所敘述之方法更新 Port 套件集。安裝任何第三方軟體皆可能會導致安全性漏洞,建議在安裝前先閱讀 https://vuxml.freebsd.org/ 了解 Port 已知的安全性問題。或者在每次安裝新 Port 前執行 |
使用 Port 套件集會假設您擁有可正常連線的網路,同時也會需要超級使用者的權限。
要編譯並安裝 Port,需切換目錄到要安裝的 Port 底下,然後輸入 make install,訊息中會顯示安裝的進度:
# cd /usr/ports/sysutils/lsof
# make install
>> lsof_4.88D.freebsd.tar.gz doesn't seem to exist in /usr/ports/distfiles/.
>> Attempting to fetch from ftp://lsof.itap.purdue.edu/pub/tools/unix/lsof/.
===>  Extracting for lsof-4.88
...
[extraction output snipped]
...
>> Checksum OK for lsof_4.88D.freebsd.tar.gz.
===>  Patching for lsof-4.88.d,8
===>  Applying FreeBSD patches for lsof-4.88.d,8
===>  Configuring for lsof-4.88.d,8
...
[configure output snipped]
...
===>  Building for lsof-4.88.d,8
...
[compilation output snipped]
...

===>  Installing for lsof-4.88.d,8
...
[installation output snipped]
...
===>   Generating temporary packing list
===>   Compressing manual pages for lsof-4.88.d,8
===>   Registering installation for lsof-4.88.d,8
===>  SECURITY NOTE:
      This port has installed the following binaries which execute with
      increased privileges.
/usr/local/sbin/lsof
#
lsof 是需要進階權限才有辦法執行的程式,因此當該程式安裝完成時會顯示安全性警告。一旦安裝完成便會顯示指令提示。
有些 Shell 會將 PATH 環境變數中所列目錄中可用的指令做快取,來增加在執行指這些指令時的查詢速度。tcsh Shell 的使用者應輸入 rehash 來讓新安裝的指令不須指定完整路徑便可使用。若在 sh Shell 則使用 hash -r。請參考 Shell 的說明文件以取得更多資訊。
安裝過程中會建立工作用的子目錄用來儲存編譯時暫存的檔案。可移除此目錄來節省磁碟空間並漸少往後升級新版 Port 時造成問題:
# make clean
===>  Cleaning for lsof-88.d,8
#
若想要少做這個額外的步驟,可以編譯 Port 時使用 |
部份 Port 提供編譯選項,可用來開啟或關閉應用程式中的元件、安全選項、或其他允許自訂的項目。這類的應用程式例子包括 www/firefox, security/gpgme 以及 mail/sylpheed-claws。若 Port 相依的其他 Port 有可設定的選項時,預設的模式會提示使用者選擇選單中的選項,這可能會讓安裝的過程暫停讓使用者操作數次。要避免這個情況,可一次設定所有選項,只要在 Port skeleton 中執行 make config-recursive,然後再執行 make install [clean] 編譯與安裝該 Port。
使用 |
有許多方式可以重新進入 Port 的編譯選項清單,以便在編譯 Port 之後加入、移除或更改這些選項。方法之一是 cd 進入含有 Port 的目錄並輸入 make config。還有另一個方法是使用 make showconfig。最後一個方法是執行 make rmconfig 來移除所有曾選擇過的選項,讓您能夠重新設定。這些方法在 ports(7) 中都有詳細的說明。
Port 系統使用 fetch(1) 來下載檔案,它支援許多的環境變數可設定。若 FreeBSD 系統在防火牆或 FTP/HTTP 代理伺服器後面,可以設定 FTP_PASSIVE_MODE, FTP_PROXY 以及 FTP_PASSWORD 變數。請參考 fetch(3) 取得完整支援的變數清單。
對於那些無法一直連線到網際網路的使用者,可在 /usr/ports 下執行 make fetch 來下載所有的 distfiles,或是可在某個分類的目錄中,例如 /usr/ports/net,或指定的 Port Skeleton 中執行。要注意的是,若 Port 有任何的相依,在分類或 Port Skeleton 中執行此指令並 不會 下載相依在其他分類的 Port distfiles。可使用 make fetch-recursive 來下載所有相依 Port 的 distfiles。
在部份少數情況,例如當公司或組織有自己的本地 distfiles 檔案庫,可使用 MASTER_SITES 變數來覆蓋在 Makefile 中指定的下載位址。當要指定替代的位址時可:
# cd /usr/ports/directory
# make MASTER_SITE_OVERRIDE= \
ftp://ftp.organization.org/pub/FreeBSD/ports/distfiles/ fetch
也可使用 WRKDIRPREFIX 及 PREFIX 變數來覆蓋預設的工作及目標目錄。例如:
# make WRKDIRPREFIX=/usr/home/example/ports install會編譯在 /usr/home/example/ports 的 Port 並安裝所有東西到 /usr/local 下。
# make PREFIX=/usr/home/example/local install會編譯在 /usr/ports Port 並安裝到 /usr/home/example/local。然後:
# make WRKDIRPREFIX=../ports PREFIX=../local install來同時設定工作及目標目錄。
這些變數也可做為環境變數設定,請參考您使用的 Shell 操作手冊來取得如何設定環境變數的說明。
安裝的 Port 可以使用 pkg delete 解除安裝。 使用這個指令的範例可以在 pkg-delete(8) 操作手冊找到。
或者,可在 Port 的目錄下執行 make deinstall:
# cd /usr/ports/sysutils/lsof
make deinstall
===>  Deinstalling for sysutils/lsof
===>   Deinstalling
Deinstallation has been requested for the following 1 packages:

	lsof-4.88.d,8

The deinstallation will free 229 kB
[1/1] Deleting lsof-4.88.d,8... done
建議閱讀 Port 解除安裝後的訊息,若有任何相依該 Port 的應用程式,這些資訊會被顯示出來,但解除安裝的程序仍會繼續。在這種情況下最好重新安裝應用程式來避免破壞相依性。
隨著時間推移,Port 套件集中會有新版的軟體可用。本節將說明如何檢查是否有可以升級的軟體及如何升級。
要檢查已安裝 Port 是否有新版可用,請先確定已安裝最新版本的 Port 樹,使用 Procedure: Portsnap 方法 或 Procedure: Subversion 方法 中說明的指令來更新。在 FreeBSD 10 與更新的版本,或若套件系統已轉換為 pkg,可以使用下列指令列出已經安裝的 Port 中有那些已過時:
# pkg version -l "<"在 FreeBSD 9.X 與較舊的版本,可以使用下列指令列出已經安裝的 Port 中有那些已過時:
# pkg_version -l "<"在嘗試升級之前,請先從檔首閱讀 /usr/ports/UPDATING 來取得最近有那些 Port 已升級或系統已安裝。這個檔案中會說明各種問題及在升級 Port 時可能會需要使用者執行的額外步驟,例如檔案格式更改、設定檔位置更改、或任何與先前版本不相容的問題。留意那些與您要升級 Port 相關的指示,並依照這些指示執行升級。 |
Port 套件集含有數個工具可以進行升級,每一種工具都有其優點及缺點。
以往大多 Port 安裝會使用 Portmaster 或 Portupgrade,現在有較新的 Synth 可使用。
那一種工具對特定系統是最佳的選擇取決於系統管理員。建議在使用任何這些工具之前先備份資料。 |
ports-mgmt/portmaster 是可用來升級已安裝 Port 的小巧工具,它只使用了隨 FreeBSD 基礎系統安裝的工具,不需要相依其他 Port 或資料庫便可在 FreeBSD 使用,要使用 Port 安裝此工具可:
# cd /usr/ports/ports-mgmt/portmaster
# make install clean
Portmaster 將 Port 定義成四種類型:
根 Port:沒有相依且也不被任何其他 Port 相依。
主幹 Port:沒有相依,但被其他 Port 相依。
分支 Port:有相依,且其被其他 Port 相依。
枝 Port:有相依,但沒有被其他 Port 相依。
要列出這幾個分類並搜尋是否有新版:
# portmaster -L
===>>> Root ports (No dependencies, not depended on)
===>>> ispell-3.2.06_18
===>>> screen-4.0.3
        ===>>> New version available: screen-4.0.3_1
===>>> tcpflow-0.21_1
===>>> 7 root ports
...
===>>> Branch ports (Have dependencies, are depended on)
===>>> apache22-2.2.3
        ===>>> New version available: apache22-2.2.8
...
===>>> Leaf ports (Have dependencies, not depended on)
===>>> automake-1.9.6_2
===>>> bash-3.1.17
        ===>>> New version available: bash-3.2.33
...
===>>> 32 leaf ports

===>>> 137 total installed ports
        ===>>> 83 have new versions available
此指令用來升級所有過時的 Port:
# portmaster -a預設 Portmaster 會在刪除已存在的 Port 前備份套件,若成功安裝新版 Portmaster 會刪除該備份。使用 |
若升級的過程發生錯誤,可加入 -f 來升級並重新編譯所有 Port:
# portmaster -afPortmaster 也可用來安裝新的 Port 到系統,在編譯及安裝新 Port 前升級所有相依模組。要使用這個功能,要指定 Port 位於 Port 套件集中的位置:
# portmaster shells/bash更多有關 ports-mgmt/portmaster 的資訊可至其 pkg-descr 取得。
ports-mgmt/portupgrade 是另一個可以用來升級 Port 的工具,此工具會安裝一套可以用來管理 Port 的應用程式,它需要相依 Ruby。要安裝該 Port:
# cd /usr/ports/ports-mgmt/portupgrade
# make install clean
在執行升級之前使用此工具,建議使用 pkgdb -F 掃描已安裝的 Port 並修正該指令回報的所有資訊不一致的套件。
要升級所有安裝在系統上過時的 Port,可使用 portupgrade -a,或者加上 -i 會在每個套件升級時詢問確認:
# portupgrade -ai要升級指定的應用程式而非所有可用 Port 可使用 portupgrade pkgname,非常重要的是,要加上 -R 來先升級指定應用程式所有相依的 Port:
# portupgrade -R firefox若使用 -P,Portupgrade 會先在 PKG_PATH 清單中的本地目錄中搜尋可用的套件。若本地沒有可用的套件,則會從遠端下載。若套件無法在本地或遠端找到,Portupgrade 則會使用 Port 來安裝。要避免完全使用 Port 安裝,可使用 -PP,這個選項會告訴 Portupgrade 若沒有套件可用時放棄安裝:
# portupgrade -PP gnome3若只想要下載 Port distfiles 或套件,使用 -P 參數。若不要編譯或安裝任何東西,使用 -F。請參考 portupgrade 的操作手冊來取得所有可用選項的更多資訊。
更多有關 ports-mgmt/portupgrade 的資訊可至其 pkg-descr 取得。
使用 Port 套件集會隨著時間消耗磁碟空間。在編譯與安裝 Port 完之後,在 Port Skeleton 中執行 make clean 可清除暫存的 work 目錄。若使用 Portmaster 來安裝 Port,則會自動移除該目錄,除非使用 -K。若有安裝 Portupgrade,此指令將會移除所有在 Port 套件集的本地複本中找到的 work 目錄:
# portsclean -C除此之外,許多過時的原始碼發行檔案會儲存在 /usr/ports/distfiles。使用 Portupgrade 刪除所有不再被任何 Port 所引用的 distfiles:
# portsclean -DPortupgrade 可以移除所有未被任何安裝在系統上的 Port 所引用的 distfiles:
# portsclean -DD若有安裝 Portmaster,則可使用:
# portmaster --clean-distfiles預設,若 distfile 應要被刪除,這個指令會以互動的方式向使用者確認。
除了以上指令外,ports-mgmt/pkg_cutleaves 可自動移除不再需要使用的 Port。
Poudriere 是一個使用 BSD 授權條款用來建立與測試 FreeBSD 套件的工具。它使用 FreeBSD Jail 來建置獨立的編譯環境,這些 Jail 可以用來編譯與目前所在系統不同 FreeBSD 版本的套件,也同樣可以在主機為 amd64 的系統上編譯供 i386 使用的套件。套件編譯完成後的目錄配置會與官方鏡像站完全相同。這些套件可由 pkg(8) 及其他套件管理工具使用。
Poudriere 可使用 ports-mgmt/poudriere 套件或 Port 安裝。安裝完成後會有一個範例的設定檔 /usr/local/etc/poudriere.conf.sample。複製此檔案到 /usr/local/etc/poudriere.conf,編輯複製的檔案來配合本地的設定。
雖然在系統上執行 poudriere 並不一定要使用 ZFS,但使用了是有幫助的。當使用了 ZFS,則必須在 /usr/local/etc/poudriere.conf 指定 ZPOOL 以及 FREEBSD_HOST 應設定到一個最近的鏡像站。定義 CCACHE_DIR 可開啟使用 devel/ccache 快取的功能來快取編譯結果並減少那些需時常編譯的程式碼的編譯次數。將 poudriere 資料集放到一個獨立的目錄並掛載到 /poudriere 可能會比較方便,其他設定項目採用預設值便足夠。
偵測到的處理器數量可用來定義要同時執行多少個編譯。並給予足夠的虛擬記憶體,不論是 RAM 或交換空間,若虛擬記憶體不足,編譯 Jail 的動作將會停止並被清除,會造成奇怪的錯誤訊息。
在設定之後,初始化 poudriere 來安裝 Jail 及其所需的 FreeBSD 樹與 Port 樹。使用 -j 來指定 Jail 的名稱以及 -v 來指定 FreeBSD 的版本。在執行 FreeBSD/amd64 的系統上可使用 -a 來設定要使用的架構為 i386 或 amd64,預設會採用使用 uname 所顯示的架構。
# poudriere jail -c -j 10amd64 -v 10.0-RELEASE
====>> Creating 10amd64 fs... done
====>> Fetching base.txz for FreeBSD 10.0-RELEASE amd64
/poudriere/jails/10amd64/fromftp/base.txz      100% of   59 MB 1470 kBps 00m42s
====>> Extracting base.txz... done
====>> Fetching src.txz for FreeBSD 10.0-RELEASE amd64
/poudriere/jails/10amd64/fromftp/src.txz       100% of  107 MB 1476 kBps 01m14s
====>> Extracting src.txz... done
====>> Fetching games.txz for FreeBSD 10.0-RELEASE amd64
/poudriere/jails/10amd64/fromftp/games.txz     100% of  865 kB  734 kBps 00m01s
====>> Extracting games.txz... done
====>> Fetching lib32.txz for FreeBSD 10.0-RELEASE amd64
/poudriere/jails/10amd64/fromftp/lib32.txz     100% of   14 MB 1316 kBps 00m12s
====>> Extracting lib32.txz... done
====>> Cleaning up... done
====>> Jail 10amd64 10.0-RELEASE amd64 is ready to be used
# poudriere ports -c -p local
====>> Creating local fs... done
====>> Extracting portstree "local"...
Looking up portsnap.FreeBSD.org mirrors... 7 mirrors found.
Fetching public key from ec2-eu-west-1.portsnap.freebsd.org... done.
Fetching snapshot tag from ec2-eu-west-1.portsnap.freebsd.org... done.
Fetching snapshot metadata... done.
Fetching snapshot generated at Tue Feb 11 01:07:15 CET 2014:
94a3431f0ce567f6452ffde4fd3d7d3c6e1da143efec76100% of 69 MB 1246 kBps 00m57s
Extracting snapshot... done.
Verifying snapshot integrity... done.
Fetching snapshot tag from ec2-eu-west-1.portsnap.freebsd.org... done.
Fetching snapshot metadata... done.
Updating from Tue Feb 11 01:07:15 CET 2014 to Tue Feb 11 16:05:20 CET 2014.
Fetching 4 metadata patches... done.
Applying metadata patches... done.
Fetching 0 metadata files... done.
Fetching 48 patches.
(48/48) 100.00% done.
done.
Applying patches...
done.
Fetching 1 new ports or files... done.
/poudriere/ports/tester/CHANGES
/poudriere/ports/tester/COPYRIGHT
[...]
Building new INDEX files... done.在一台電腦,poudriere 可使用多組設定在多個 Jail 編譯來自不同 Port 樹的 Port。用來定義這些組合的自訂設定稱作 sets,可在安裝 ports-mgmt/poudriere 或 ports-mgmt/poudriere-devel 後參考 poudriere(8) 中的 CUSTOMIZATION 章節來取得詳細的資訊。
在此處示範的基本設定放了單一個 jail-, port- 以及 set- 特定的 make.conf 在 /usr/local/etc/poudriere.d。在此範例使用的檔案名稱由 Jail 名稱、Port 名稱以及 set 名稱所組成:10amd64-local-workstation-make.conf。系統 make.conf 與這個新的檔案在編譯時期會被合併為編譯 Jail 要使用的 make.conf。
要編譯的套件會輸入到 10amd64-local-workstation-pkglist:
editors/emacs
devel/git
ports-mgmt/pkg
...
可使用以下方式設定選項及相依:
# poudriere options -j 10amd64 -p local -z workstation -f 10amd64-local-workstation-pkglist最後,編譯套件並建立套件檔案庫:
# poudriere bulk -j 10amd64 -p local -z workstation -f 10amd64-local-workstation-pkglist在執行時,按下 Ctrl+t 可以顯示目前編譯的狀態,Poudriere 也會編譯在 /poudriere/logs/bulk/jailname 中的檔案,可用在網頁伺服器來顯示編譯資訊。
完成之後,新套件現在可以從 poudriere 檔案庫來安裝。
要取得更多使用 poudriere 的資訊,請參考 poudriere(8) 及主網站 https://github.com/freebsd/poudriere/wiki。
雖然可以同時使用自訂的檔案庫與官方檔案庫,但有時關閉官方檔案庫會有幫助。這可以透過建立一個設定檔覆蓋並關閉官方的設定檔來完成。建立 /usr/local/etc/pkg/repos/FreeBSD.conf 包含以下內容:
FreeBSD: {
	enabled: no
}
通常最簡單要提供 poudriere 檔案庫給客戶端的方式是透過 HTTP。安裝一個網頁伺服器來提供套件目錄,通常會像:/usr/local/poudriere/data/packages/10amd64,其中 10amd64 是編譯的名稱。
若要連往套件檔案庫的 URL 是:http://pkg.example.com/10amd64,則在 /usr/local/etc/pkg/repos/custom.conf 的檔案庫設定檔為:
custom: {
	url: "http://pkg.example.com/10amd64",
	enabled: yes,
}不論軟體是從套件或 Port 安裝,大部份的第三方應用程式安裝完後需要做某種程度的設定,下列指令與位置可以用來協助找到應用程式安裝了什麼。
大部份應用程式安裝會在 /usr/local/etc 安裝至少一個預設的設定檔,若應用程式有大量設定檔的時則會建立一個子目錄來存放這些設定檔。範例的設定檔案名稱通常使用 .sample 結尾,設定檔應要仔細查看並可能要做一些編輯讓設定檔符合系統的需求,要編輯設定檔範本前需先複製該檔案並去除 .sample 副檔名。
應用程式提供的文件會安裝到 /usr/local/shared/doc,且許多應用程式也同時會安裝操作手冊,在繼續使用應用程式前應先查看這些文件。
部份應用程式會以服務的方式執行,在啟動應用程式前前需要加入設定到 /etc/rc.conf。這些應用程式通常會安裝啟動 Script 到 /usr/local/etc/rc.d,請參考 啟動服務 來取得更多資訊。
依設計,應用程式不會在安裝時執行其啟動 Script,也不會在解除安裝或升級時執行其中止 Script,這留給各系統的管理者去做決定。 |
csh(1) 的使用者應要執行 rehash 來更新已知 Binary 清單到 Shell 的 PATH。
使用 pkg info 來了解應用程式安裝了那些檔案、操作手冊以及 Binary。
當發現某個 Port 無法順利編譯或安裝,可以嘗試以下幾種方法解決:
搜尋 問題回報資料庫 看該 Port 有沒有待審核的修正,若有的話可以使用該修正來修正問題。
尋求維護人員的協助,在 Port Skeleton 目錄中輸入 make maintainer 或閱讀 Port 的 Makefile 來取得維護人員的電子郵件位址。寄給維護人員的郵件內容請記得要包含 Port 的 Makefile 中的 $FreeBSD: 一整行及輸出的錯誤訊息。
有一些 Port 並非由個人維護,而是由 郵遞論壇 維護,有許多,但並非全部,只要郵件地址長的像 freebsd-listname@FreeBSD.org 都是,寄信時記得代入實際的論壇名稱。 尤其是由 ports@FreeBSD.org 所維護的 Port 都不是由特定個人維護,而該 Port 的修正與支援都是來自訂閱該郵遞論壇的一般社群所提供,我們隨時歡迎志工參與! |
若寄信後沒有取得任何回應,可以依照 撰寫 FreeBSD 問題回報 的說明使用 Bugzilla 提出問題回報。
自行修正看看!Porter’s Handbook 中含有 Port 基礎架構的詳細資訊,可提供資訊讓您可修正偶然損壞的 Port 或甚至您可以提交之自己的 Port!
依照 使用 pkg 管理 Binary 套件 中的說明安裝 Binary 套件,替代使用 Port 安裝。
使用 bsdinstall 安裝 FreeBSD 並不會自動安裝圖型化使用者介面。本章將說明如何安裝並設定 Xorg,該應用程式提供開放源碼的 X Window 系統來提供圖型化環境。接著會說明如何找到並安裝桌面環境或視窗管理程式。
偏好安裝時會自動設定 Xorg 並且在安裝過程提供視窗管理程式選項的使用者請參考 http://www.trueos.org/ 網站。 |
更多有關 Xorg 支援影像硬體資訊,請參考 x.org 網站。
讀完這章,您將了解:
組成 X Window 系統的各種元件以及它們是如何相互運作。
如何安裝並設定 Xorg。
如何安裝並設定各種視窗管理程式與桌面環境。
如何在 Xorg 上使用 TrueType™ 字型。
如何設定系統以使用圖形化登入 (XDM)。
在開始閱讀這章之前,您需要:
了解如何依照 安裝應用程式:套件與 Port 說明安裝其他第三方軟體。
雖然 X 各元件的所有細節及運作方式,並不是必須要知道的。 但對它們有些基本概念會更容易上手。
X 最初設計是以網路為中心,採用 "client-server" 架構。在此架構下 "X 伺服器" 在有鍵盤、螢幕、滑鼠的電腦上運作。該伺服器負責的工作包含管理顯示、處理來自鍵盤、滑鼠的輸入及來自其他設備 (如平板或或影像投影機) 的輸入或輸出。這點可能會讓人感到困惑,因為 X 使用的術語與一般的認知剛好相反。 一般認知會以為 "X 伺服器" 是要在最強悍的主機上執行,而 "X 客戶端" 才是在桌機上面執行,實際上卻是相反。
每個 X 應用程式,如 XTerm、Firefox 都是 "客戶端"。 客戶端會傳訊息到伺服器,例如:"請在這些座標畫一個視窗",接著伺服器會傳回訊息,如:"使用者剛點選了確定按鈕"。
在家庭或小型辦公室環境,通常 X 伺服器跟 X 客戶端都是在同一台電腦上執行。也可以在比較慢的電腦上執行 X 伺服器, 並在比較強、比較貴的系統上執行 X 應用程式。 在這種情景,X 客戶端與伺服器之間的溝通就需透過網路來進行。
X 並不規定螢幕上的視窗該長什麼樣、要如何移動滑鼠指標、 要用什麼鍵來在視窗切換、每個視窗的標題列長相,及是否該有關閉按鈕,等等。事實上,X 把這部分交給所謂的視窗管理程式來管理。可用的視窗管理程式有很多種,每一種視窗管理程式都提供不同的使用介面風格:有些支援虛擬桌面,有些允許自訂組合鍵來管理桌面,有些有 "開始" 鈕,有些則是可更換佈景主題,可自行安裝新的佈景主題以更換外觀。 視窗管理程式可在 Port 套件集的 x11-wm 分類找到。
每個視窗管理程式也各有其不同的設定機制,有些需要手動修改設定檔, 而有的則可透過圖型化工具來完成大部分的設定工作。
KDE 與 GNOME 會被稱作桌面環境是因為包含了完整常用桌面作業的應用程式,這些應用程式可能包含文書軟體、網頁瀏覽器及遊戲。
視窗管理程式負責滑鼠指標的聚焦政策。 聚焦政策指的是如何決定使用中及接收鍵盤輸入的視窗。
通常較為人熟悉的聚焦政策叫做 "click-to-focus",這個模式中,滑鼠點選到的視窗便會處於作用中 (Active) 的狀態。在 "focus-follows-mouse" 模式滑鼠指標所在的視窗便是作用中的視窗,只要把滑鼠移到其他視窗就可以改變作用中的視窗,若滑鼠移到根視窗 (Root Window),則會聚焦在根視窗。在 "sloppy-focus" 模式,既使滑鼠移到根視窗,仍然會聚焦在最後聚焦的視窗上,此模式只有當滑鼠進入新的視窗時才會聚焦於該視窗,而非離開目前視窗時。"click-to-focus" 模式用滑鼠點擊來決定作用中的視窗,且該視窗會被置頂到所有其他視窗之前,即使滑鼠移到其他視窗,所有的鍵盤輸入仍會由該視窗所接收。
不同的視窗管理程式支援不同的聚焦模式,全部都支援 click-to-focus 且其中大部份支援其他模式,請查看視窗管理程式的說明文件來了解可用的聚焦模式。
視窗元件指的是在所有在使用者介面上可被點選或操作的項目,這包括按鈕、核選方塊、單選按鈕、圖示及清單。 視窗元件工具包 (Widget toolkit) 是指用來建立圖型化應用程式的一系列的視窗元件。目前有數個有名的視窗元件工具包,包含 KDE 所使用的 Qt、GNOME 所使用的 GTK+。 因此應用程式會依其開發時所選用的視窗元件工具包而有不同的外觀。
在 FreeBSD,Xorg 可透過套件或 Port 來安裝。
使用 Binary 套件的安裝速度較快,但可用的自訂選項較少:
# pkg install xorg要從 Port 套件集編譯與安裝:
# cd /usr/ports/x11/xorg
# make install clean
兩種安裝方式皆可完整安裝 Xorg 系統,對大多數使用者較建議使用 Binary 套件安裝。
較精簡版本的 X 系統適合給有經驗的使用者使用,可至 x11/xorg-minimal 取得。這個版本就不會安裝大多數的文件、函數庫以及應用程式,而部份應用程式會需要這些額外的元件才能運作。
Xorg 支援大多數常見的顯示卡、鍵盤以及指標裝置。
顯示卡、顯示器以及輸入裝置會自動偵測,無須任何手動設置。除非自動設置失敗,否則請勿建立 xorg.conf 或執行 |
若 Xorg 曾經在電腦使用過,可先將現有的設定檔重新命名或移除:
# mv /etc/X11/xorg.conf ~/xorg.conf.etc
# mv /usr/local/etc/X11/xorg.conf ~/xorg.conf.localetc
加入要執行 Xorg 的使用者到 video 或 wheel 群組,以便在可用時能開啟 3D 加速。要加入使用者 jru 到任一個可用的群組:
# pw groupmod video -m jru || pw groupmod wheel -m jru預設內含 TWM 視窗管理程式,啟動 Xorg 時便會啟動該視窗管理程式:
% startx在部份較舊版的 FreeBSD,在切換回文字 Console 前系統 Console 必須設為 vt(4) 才可正常運作,請參考 核心模式設定 (Kernel Mode Setting, KMS)。
要存取 /dev/dri 需要允許顯示卡的 3D 加速功能,這通常只需要將要執行 X 的使用者加入 video 或 wheel 群組。此處使用 pw(8) 來將使用者 slurms 加入 video 群組,若沒有 video 則會加入 wheel 群組:
# pw groupmod video -m slurms || pw groupmod wheel -m slurms當電腦顯示從 Console 切換到高螢幕解析度供 X 使用時,必須設定影像輸出模式。最近版本的 Xorg 使用了核心內部的系統來讓切換模式更有效率。較舊版的 FreeBSD 使用的 sc(4) 並不知到 KMS 系統的存在,這會導致關閉 X 之後即始仍在運作但系統 Console 卻呈現空白。較新版的 vt(4) Console 可避免這個問題。
加入此行到 /boot/loader.conf 來開啟 vt(4):
kern.vty=vt
通常不需要做手動設置,除非自動設置無法運作,否則請不要手動建立設定檔。
由於最近 FreeBSD 版本所做的變更,現在可以使用由 Port 或套件所提供的繪圖驅動程式,所以使用者可以使用下列來自 graphics/drm-kmod 的驅動程式。
大多數使用 Intel KMS 驅動程式的 Intel 顯示卡支援 2D 與 3D 加速。
驅動程式名稱:i915kms
大多數使用 Radeon KMS 驅動程式的舊 AMD 顯示卡支援 2D 與 3D 加速。
驅動程式名稱:radeonkms
大多數使用 AMD KMS 驅動程式的新 AMD 顯示卡支援 2D 與 3D 加速。
驅動程式名稱:amdgpu
3D 加速在大多數 Intel™ 顯示晶片都有支援,最新到 Ivy Bridge (HD Graphics 2500, 4000, 及 P4000) 包含 Iron Lake (HD Graphics) 與 Sandy Bridge (HD Graphics 2000)。
驅動程式名稱:intel
Radeon 顯示卡支援 2D 及 3D 加速,最新到 HD6000 系列。
驅動程式名稱:radeon
有數個 NVIDIA 驅動程式可於 Port 套件集中的 x11 分類取得,請安裝其中與顯示卡相符的驅動程式。
部份筆記型電腦加入了額外繪圖處理單元到那些內建晶片組或處理。Optimus 結合了 Intel™ 及 NVIDIA 的硬體,Switchable Graphics 或 Hybrid Graphics 則是結合了 Intel™ 或 AMD™ 處理器與 AMD™ Radeon GPU。
這些混合繪圖系統的實作方式均不同,FreeBSD 的 Xorg 尚無法驅動所有的混合繪圖系統版本。
部份電腦提供了 BIOS 的選項可以關閉其中一個繪圖介面卡或選擇 discrete 模式,可用使用其中一種標準顯示卡驅動程式來驅動。例如,有時關閉 Optimus 系統中的 NVIDIA GPU 是可能讓 Intel™ 顯示晶片可用 Intel™ 驅動程式驅動。
BIOS 設定會依電腦的型號有所不同,在某些情況下,可以同時開啟兩個 GPU,而在建立的設定檔中的 Device 節只使用主要的 GPU 便能讓系統運作。
較不常見的顯示卡驅動程式可在 Port 套件集的 x11-drivers 目錄找到。
若沒有特定的驅動程式可以支援顯示卡,仍可能可用 x11-drivers/xf86-video-vesa 驅動程式來驅動。該驅動程式可使用 x11/xorg 安裝,也可使用 x11-drivers/xf86-video-vesa 手動安裝。當沒有指定驅動程式時 Xorg 會嘗試使用這個驅動程式來驅動顯示卡。
x11-drivers/xf86-video-scfb 也是不特定顯示卡的驅動程式,可在許多 UEFI 及 ARM™ 的電腦上運作。
要在設定檔設定使用 Intel™ 驅動程式:
/usr/local/etc/X11/xorg.conf.d/driver-intel.conf
Section "Device"
	Identifier "Card0"
	Driver     "intel"
	# BusID    "PCI:1:0:0"
EndSection
若有多張顯示卡,可取消註解 BusID identifier 然後設定為想要的顯示卡,顯示卡的 Bus ID 清單可以使用 pciconf -lv | grep -B3 display 取得。
要在設定檔設定使用 Radeon 驅動程式:
/usr/local/etc/X11/xorg.conf.d/driver-radeon.conf
Section "Device"
	Identifier "Card0"
	Driver     "radeon"
EndSection
要在設定檔設定使用 VESA 驅動程式:
/usr/local/etc/X11/xorg.conf.d/driver-vesa.conf
Section "Device"
	Identifier "Card0"
	Driver     "vesa"
EndSection
要設定 UEFI 或 ARM™ 電腦使用 scfb 驅動程式:
scfb 影像驅動程式/usr/local/etc/X11/xorg.conf.d/driver-scfb.conf
Section "Device"
	Identifier "Card0"
	Driver     "scfb"
EndSection
幾乎所有顯示器都支援延伸顯示辨識資料標準 (Extended Display Identification Data, EDID),Xorg 會使用 EDID 與顯示器通訊並偵測支援的解析度與更新頻率,然後選擇最適合的設定組合使用該顯示器。
其他顯示器支援的解析度可透過在設定檔中設定想要的解析度來選擇,或者在 X 伺服器啟動之後使用 xrandr(1)。
執行 xrandr(1) 不加任何參數可檢查影像輸出及已偵測到的顯示器模式清單:
% xrandr
Screen 0: minimum 320 x 200, current 3000 x 1920, maximum 8192 x 8192
DVI-0 connected primary 1920x1200+1080+0 (normal left inverted right x axis y axis) 495mm x 310mm
   1920x1200     59.95*+
   1600x1200     60.00
   1280x1024     85.02    75.02    60.02
   1280x960      60.00
   1152x864      75.00
   1024x768      85.00    75.08    70.07    60.00
   832x624       74.55
   800x600       75.00    60.32
   640x480       75.00    60.00
   720x400       70.08
DisplayPort-0 disconnected (normal left inverted right x axis y axis)
HDMI-0 disconnected (normal left inverted right x axis y axis)
這個結果顯示 DVI-0 輸出被用來顯示解析度為 1920x1200 像素於更新頻率約 60 Hz 的畫面,未有顯示器連接到 DisplayPort-0 與 HDMI-0 接頭。
可使用 xrandr(1) 來選擇任何其他的顯示模式。例如要切換為 1280x1024 於 60 Hz:
% xrandr --mode 1280x1024 --rate 60在筆記型電腦使用外部顯示輸出到投影機是常見的作業。
不同裝置間輸出接頭的類型與數量也不同,給每個輸出的名稱在不同驅動程式間也不同。在某些驅動程式稱為 HDMI-1 的輸出在其他驅動程式則可能稱為 HDMI1。因此第一個步驟是執行 xrandr(1) 列出所有可用的輸出:
% xrandr
Screen 0: minimum 320 x 200, current 1366 x 768, maximum 8192 x 8192
LVDS1 connected 1366x768+0+0 (normal left inverted right x axis y axis) 344mm x 193mm
   1366x768      60.04*+
   1024x768      60.00
   800x600       60.32    56.25
   640x480       59.94
VGA1 connected (normal left inverted right x axis y axis)
   1280x1024     60.02 +  75.02
   1280x960      60.00
   1152x864      75.00
   1024x768      75.08    70.07    60.00
   832x624       74.55
   800x600       72.19    75.00    60.32    56.25
   640x480       75.00    72.81    66.67    60.00
   720x400       70.08
HDMI1 disconnected (normal left inverted right x axis y axis)
DP1 disconnected (normal left inverted right x axis y axis)
已找到四個輸出:內建面板的 LVDS1,外接的 VGA1, HDMI1 以及 DP1 接頭。
投影機已連接至 VGA1 輸出,現在使用 xrandr(1) 來設定該輸出到投影機 (原始解析度) 並加入額外的空間到桌面的右側:
% xrandr --output VGA1 --auto --right-of LVDS1--auto 會選擇使用 EDID 偵測到的解析度與更新頻率。若未正確偵測解析度,可替換 --auto 為 --mode 然後給予固定值。例如大部份的投影機可使用 1024x768 解析度為,則可設定 --mode 1024x768。
xrandr(1) 通常會在 .xinitrc 執行以在 X 啟動時設定適合的模式。
在設定檔設定螢幕解析度為 1024x768:
/usr/local/etc/X11/xorg.conf.d/screen-resolution.conf
Section "Screen"
	Identifier "Screen0"
	Device     "Card0"
	SubSection "Display"
	Modes      "1024x768"
	EndSubSection
EndSection
少數顯示器沒有 EDID,可設定 HorizSync 及 VertRefresh 為顯示器支援的頻率範圍。
/usr/local/etc/X11/xorg.conf.d/monitor0-freq.conf
Section "Monitor"
	Identifier   "Monitor0"
	HorizSync    30-83   # kHz
	VertRefresh  50-76   # Hz
EndSection
鍵盤上標準按鍵的位置稱做 配置 (Layout)。配置與其他可調整的參數列於 xkeyboard-config(7)。
預設為 United States 配置,要選擇其他的配置可在 InputClass 設定 XkbLayout 與 XkbVariant 選項。這會套用所有符合該類別的輸入裝置。
這個例子選擇 French 鍵盤配置使用 oss 變體。
/usr/local/etc/X11/xorg.conf.d/keyboard-fr-oss.conf
Section	"InputClass"
	Identifier	"KeyboardDefaults"
	Driver		"keyboard"
	MatchIsKeyboard	"on"
	Option		"XkbLayout" "fr"
	Option		"XkbVariant" "oss"
EndSection
X 可以使用組合鍵來關閉,預設並未設定組合鍵,因為該組合鍵與部份應用程式的鍵盤指令衝突。要開啟這個選項需要更改鍵盤 InputDevice 節:
/usr/local/etc/X11/xorg.conf.d/keyboard-zap.conf
Section	"InputClass"
	Identifier	"KeyboardDefaults"
	Driver		"keyboard"
	MatchIsKeyboard	"on"
	Option		"XkbOptions" "terminate:ctrl_alt_bksp"
EndSection
有許多滑鼠參數可使用設定選項來調整,請參考 mousedrv(4) 來取得完整清單。
在某些情況 Xorg 的自動設定無法在特定硬體上運作,或需要使用不同的設定。針對這些情況會建立自訂的設定檔。
非必要請勿手動建立設定檔,非必要的手動設置會造成運作不正常。 |
設定檔可由 Xorg 根據偵測到的硬體產生,這個檔案對一開始自訂設定很有幫助。
產生 xorg.conf:
# Xorg -configure設定檔會儲存至 /root/xorg.conf.new,做任何需要的更改,然後使用以下指令測試該檔案:
# Xorg -config /root/xorg.conf.new在新設定檔調整與測試過後,便可分開成較小的檔案放置到正常的位置 /usr/local/etc/X11/xorg.conf.d/。
由於 Xorg 內建的預設字型用在典型的桌面出版應用程式並不是很理想,大字型會呈現鋸齒狀邊緣,看起來很不專業,小字型幾乎完全看不清楚。不過,這裡有幾個免費高品質的 Type1 (PostScript™) 字型可用,且能容易的在 Xorg 使用。例如,URW 字型集 (Times Roman™, Helvetica™, Palatino™ 及其他)。 Freefont 字型集 (x11-fonts/freefonts) 包含了更多的字型,但其中大部分是給圖形軟體如 GIMP 所使用的字型,並不能完全作為螢幕字型使用。此外,Xorg 可以簡單的設定使用 TrueType™ 字型。更多有關本主題的詳細資訊,請參考 X(7) 操作手冊或 TrueType™ 字型。
要由 Binary 套件安裝上述的 Type1 字型集可執行以下指令:
# pkg install urwfonts或由 Port 套件集編譯,可執行以下指令:
# cd /usr/ports/x11-fonts/urwfonts
# make install clean
同樣的安裝方式也適用 Freefont 或其他字型集。要讓 X 伺服器偵測到這些新安裝的字型,可加入適當的設定到 X 伺服器設定檔 (/etc/X11/xorg.conf),內容為:
FontPath "/usr/local/shared/fonts/urwfonts/"
或者在 X session 的指令列執行:
% xset fp+ /usr/local/shared/fonts/urwfonts
% xset fp rehash
這樣便可,但在 X session 關閉時將會失效,除非將該設定加入啟動檔 (一般的 startx session 可在 ~/.xinitrc 設定,若透過圖型化登入管理程式如 XDM 登入時則在 ~/.xsession 設定)。第三種方式是使用新 /usr/local/etc/fonts/local.conf,如 反鋸齒字型 的示範。
Xorg 內建支援繪製 TrueType™ 字型,目前有兩個模組可以支援這項功能。在本例中使用 freetype 模組,由於此模組與其他字型繪製後端較為一致。要開啟 freetype 模組只需要將下行加入到 /etc/X11/xorg.conf 中的 "Module" section。
Load "freetype"
現在要建立一個儲存 TrueType™ 字型的目錄 (例如,/usr/local/shared/fonts/TrueType) 然後複製所有 TrueType™ 字型到這個目錄。要注意 TrueType™ 字型並無法直接取自 Apple™Mac™,Xorg 使用的字型必須為 UNIX™/MS-DOS™/Windows™ 的格式。檔案複製到讓目錄之後,使用 mkfontscale 來建立 fonts.dir 來讓 X 字型繪製程式知道安裝了新的檔案。mkfontscale 可用套件的方式安裝:
# pkg install mkfontscale然後在目錄中建立 X 字型檔的索引:
# cd /usr/local/shared/fonts/TrueType
# mkfontscale
接著加入 TrueType™ 目錄到字型路徑。這個動作與 Type1 字型 中所介紹的方式相同:
% xset fp+ /usr/local/shared/fonts/TrueType
% xset fp rehash
或直接加入 FontPath 一行到 xorg.conf。
現在 Gimp, Apache OpenOffice 以及其他 X 應用程式應可以辨識到已安裝的 TrueType™ 字型。極小的字型 (以高解析度在網頁中顯示的文字) 與極大的字型 (在 StarOffice™ 中) 現在會看起來比較像樣了。
所有可在 /usr/local/shared/fonts/ 及 ~/.fonts/ 找到的 Xorg 字型均可在 Xft-aware 的應用程式使用反鋸齒的效果。大多最近的應用程式均為 Xft-aware 的,包括 KDE, GNOME 以及 Firefox。
要控制那一些字型要做反鋸齒或設定反鋸齒的屬性,需建立 /usr/local/etc/fonts/local.conf 檔案 (若檔案存在則編輯)。在這個檔案中可以調整 Xft 字型系統的數項進階功能,本章節僅介紹部份簡單的項目,要取得進一步資訊,請參考 fonts-conf(5)。
這個檔案必須使用 XML 格式,小心文字大小寫,且要確定所有標籤均有正常結尾。檔案的開頭使用常見的 XML 檔首,接著為 DOCTYPE 定義,然後是 <fontconfig> 標籤:
<?xml version="1.0"?>
      <!DOCTYPE fontconfig SYSTEM "fonts.dtd">
      <fontconfig>
如同前面所提到的,所有在 /usr/local/shared/fonts/ 與 ~/.fonts/ 的字型均可在 Xft-aware 的應用程式做反鋸齒效果,若您想要加入除了上兩者以外的目錄,可加入如下行設定到 /usr/local/etc/fonts/local.conf:
<dir>/path/to/my/fonts</dir>
加入新字型及額外的新字型目錄之後,需重新建立字型快取:
# fc-cache -f反鋸齒效果會讓文字的邊緣變模糊,這會讓非常小的文字更能閱讀且去除大型文字的 "鋸齒",但套用在一般的文字可能會造成眼睛的疲勞。要排除小於 14 點的字型大小使用反鋸齒效果,可加入這些行:
        <match target="font">
	    <test name="size" compare="less">
		<double>14</double>
	    </test>
	    <edit name="antialias" mode="assign">
		<bool>false</bool>
	    </edit>
	</match>
	<match target="font">
	    <test name="pixelsize" compare="less" qual="any">
		<double>14</double>
	    </test>
	    <edit mode="assign" name="antialias">
		<bool>false</bool>
	    </edit>
	</match>
反鋸齒所產生的間距對於部份等寬字型並不合適,尤其是在使用 KDE 時會成為一個問題。可能的修正方式是強制這類字型的間距為 100,可加入以下行:
	<match target="pattern" name="family">
	   <test qual="any" name="family">
	       <string>fixed</string>
	   </test>
	   <edit name="family" mode="assign">
	       <string>mono</string>
	   </edit>
	</match>
	<match target="pattern" name="family">
	    <test qual="any" name="family">
		<string>console</string>
	    </test>
	    <edit name="family" mode="assign">
		<string>mono</string>
	    </edit>
	</match>
(這會設定等寬字型的其他常用名稱為 "mono"),然後加入:
         <match target="pattern" name="family">
	     <test qual="any" name="family">
		 <string>mono</string>
	     </test>
	     <edit name="spacing" mode="assign">
		 <int>100</int>
	     </edit>
	 </match>
部份字型,如 Helvetica,在使用反鋸齒時可能會發生問題,通常會呈現像垂直切成兩半的字型,最差還可能會導致應用程式當掉。要避免這個問題,可考慮加入以下設定到 local.conf:
         <match target="pattern" name="family">
	     <test qual="any" name="family">
		 <string>Helvetica</string>
	     </test>
	     <edit name="family" mode="assign">
		 <string>sans-serif</string>
	     </edit>
	 </match>
編輯 local.conf 完之後,請確認有使用 </fontconfig> 標籤結尾,若沒有使用會讓所做的更改被忽略。
使用者可透過建立自己的 ~/.config/fontconfig/fonts.conf 來加入個人化的設定,此檔案使用與上述說明相同的 XML 格式。
最後一點:若有使用 LCD 螢幕,可能會想要使用子像素取樣 (Sub-pixel sampling),這基本上會分開處理 (水平分隔) 紅、綠、藍色彩組成來提高垂直解析度,結果可能是無法預料的。要開啟這個功能,加入下行到 local.conf 的任一處:
	 <match target="font">
	     <test qual="all" name="rgba">
		 <const>unknown</const>
	     </test>
	     <edit name="rgba" mode="assign">
		 <const>rgb</const>
	     </edit>
	 </match>
依據不同的顯示器類型可能會需要將 |
Xorg 提供了 X 顯示管理程式 (X Display Manager, XDM),可用來做登入階段的管理。XDM 提供了一個圖型化的介面來選擇要連結的顯示伺服器以及輸入認証資訊 (登入與密碼)。
本節將示範如何設定 FreeBSD 的 X 顯示管理程式。部份桌面環境會提供自己的圖型化登入管理程式,請參考 GNOME 取得如何設定 GNOME 顯示管理程式 (GNOME Display Manager) 的操作方式以及 KDE 取得如何設定 KDE 顯示管理程式 (KDE Display Manager) 的操作方式。
要安裝 XDM 可使用 x11/xdm 套件或 Port。安裝完成之後,可設定 XDM 在開機時執行,只需編輯 /etc/ttys 中的此項目:
ttyv8 "/usr/local/bin/xdm -nodaemon" xterm off secure更改關 (off) 為開 (on) 然後儲存編輯。在此項目中的 ttyv8 代表 XDM 會在第 9 個虛擬終端機執行。
XDM 的設定目錄位於 /usr/local/etc/X11/xdm。此目錄中包含數個可用來更改 XDM 行為與外觀的檔案以及在 XDM 執行時用來設定桌面的一些 Script 及程式,XDM 設定檔 摘要了每個檔案的功能。這些檔案正確的語法與用法在 xdm(1) 有說明。
| 檔案 | 說明 |
|---|---|
Xaccess | 連線到 XDM 所需的通訊協定稱做 X 顯示管理程式連線通訊協定 (X Display Manager Connection Protocol, XDMCP),此檔案為客戶端認証規則,用來控制來自遠端機器的 XDMCP 連線。預設此檔案並不允許任何遠端的客戶端連線。 |
Xresources | 此檔案控制 XDM 顯示選擇器及登入畫面的外觀。預設的設定簡單的矩形登入視窗,上方用較大的字型顯示機器的主機名稱,並在下方顯示 "Login:" 與 "Password:" 提示。此檔案的格式與 Xorg 說明文件中說明的 app-defaults 檔相同。 |
Xservers | 登入選擇時在選擇器上要提供的本地及遠端顯示清單。 |
Xsession | 預設的登入階段 Script,使用者登入之後由 XDM 執行。這會指向使用者自訂的登入階段 Script 於 ~/.xsession。 |
Xsetup_* | 用來在顯示選擇器與登入介面之前自動執行應用程式的 Script。每一個顯示各有一個 Script,名稱為 Xsetup_*,其中 |
xdm-config | 用來設定所有在此機器上執行的顯示的全域設定檔。 |
xdm-errors | 內含由伺服器程式產生的錯誤訊息,若 XDM 嘗試啟動的顯示沒有回應,可查看此檔案來取得錯誤訊息。以登入階段為基礎,這些訊息也同樣會寫入至使用者的 ~/.xsession-errors。 |
xdm-pid | XDM 的執行程序 ID。 |
預設只有同系統的使用者可以使用 XDM 登入。要開啟讓其他系統的使用者可連線到顯示伺服器,需編輯存取控制規則及開啟連線傾聽程式。
要設定 XDM 傾聽任何遠端的連線,在 /usr/local/etc/X11/xdm/xdm-config 中的 DisplayManager.requestPort 行前加上 ! 來註解該行:
! SECURITY: do not listen for XDMCP or Chooser requests
! Comment out this line if you want to manage X terminals with xdm
DisplayManager.requestPort:     0
儲存編輯並重新啟動 XDM,要限制遠端存取,請看 /usr/local/etc/X11/xdm/Xaccess 中的範例項目,並參考 xdm(1) 取得進一步資訊。
本節將介紹如何在 FreeBSD 系統安裝三種熱門的桌面環境。一套桌面環境的範圍可從簡單的視窗管理程式到完整的桌面應用程式集。有上百套的桌面環境可在 Port 套件集的 x11-wm 分類取得。
GNOME 是一個擁有友善使用者介面的的桌面環境,它包括用於啟動應用程式和顯示狀態的面板、一系列工具與應用程序及一套可讓應用程式更容易進行合作、相互一致的協定。更多有關 FreeBSD GNOME 的訊息可在 https://www.FreeBSD.org/gnome 取得,該網站包含了有關在 FreeBSD 安裝、設定和管理 GNOME 的額外文件。
這套桌面環境可以從套件安裝:
# pkg install gnome3也可使用以下指令從 Port 編譯 GNOME,GNOME 是一套大型的應用程式,即使在速度較快的電腦上,也會需要花費一些時間編譯。
# cd /usr/ports/x11/gnome3
# make install clean
GNOME 需要掛載 /proc。加入下行到 /etc/fstab 讓系統啟動時會自動掛載這個檔案系統:
proc /proc procfs rw 0 0
GNOME 使用了 D-Bus 以及 HAL 的 Message bus 與 Hardware abstraction。這兩個應用程式會隨著 GNOME 的相依一併自動安裝,但需要在 /etc/rc.conf 開啟,這樣在系統開機時才會啟動:
dbus_enable="YES"
hald_enable="YES"
安裝完之後,需設定讓 Xorg 啟動 GNOME。最簡單的方法是開啟 GNOME Display Manager, GDM,該程式已做為 GNOME 套件或 Port 的一部份安裝了,可加入下行到 /etc/rc.conf 來開啟:
gdm_enable="YES"
通常也會需要啟動所有的 GNOME 服務,可加入下行到 /etc/rc.conf:
gnome_enable="YES"
GDM 則會在系統開機時自動啟動。
第二種啟動 GNOME 的方法是在設定完 ~/.xinitrc 後在指令列輸入 startx。若這個檔案已經存在,替換啟動目前視窗管理程式的那一行,改為啟動 /usr/local/bin/gnome-session。若檔案不存在,則使用以下指令建立一個:
% echo "exec /usr/local/bin/gnome-session" > ~/.xinitrc第三種方法是使用 XDM 做為顯示管理程式,在這個方法需要建立一個可執行的 ~/.xsession:
% echo "exec /usr/local/bin/gnome-session" > ~/.xsessionKDE 是另一套易於使用的桌面環境。這個桌面環境提供了一致外觀的應用程式、標準化的選單和工具列、組合鍵、配色方案、國際化與集中、對話框導向的桌面設定。更多有關 KDE 可在 http://www.kde.org/ 取得。要取得 FreeBSD 特定的資訊,則可參考 http://freebsd.kde.org。
要安裝 KDE 套件,請輸入:
# pkg install x11/kde5或者要使用 KDE Port 編譯,可使用以下指令,採用 Port 方式安裝會有選單可以選擇要安裝的元件。KDE 是一個大型的應用程式,即使在較快的電腦上仍需要花費一段時間來編譯。
# cd /usr/ports/x11/kde5
# make install clean
KDE 需要掛載 /proc。加入下行到 /etc/fstab 讓系統啟動時會自動掛載這個檔案系統:
proc /proc procfs rw 0 0
KDE 使用了 D-Bus 以及 HAL 的 Message bus 與 Hardware abstraction。這兩個應用程式會隨著 KDE 的相依一併自動安裝,但需要在 /etc/rc.conf 開啟,這樣在系統開機時才會啟動:
dbus_enable="YES"
hald_enable="YES"
自 KDE Plasma 5 開始,KDE Display Manager, KDM 便停止開發,可能的替代方案為 SDDM,要安裝該套件可輸入:
# pkg install x11/sddm加入下行到 /etc/rc.conf:
sddm_enable="YES"
第二種執行 KDE 的方法是在在指令列輸入 startx。要採用這個方式,需要加入下行到 ~/.xinitrc:
exec ck-launch-session startkde
第三種啟動 KDE 的方式是透過 XDM,要使用這個方法需要建立一個可執行的 ~/.xsession 如下:
% echo "exec ck-launch-session startkde" > ~/.xsession啟動 KDE 之後,請參考內建的說明系統來取得更多有關如何使用各種選單及應用程式的資訊。
Xfce 是以 GNOME 使用的 GTK +工具包做為基礎所開發的桌面環境,但是它更輕巧且提供了一種簡單、高效、易於使用的桌面。它可完全自訂設定、附有選單、Applet 及應用程式啟動器的主面板、提供檔案管理程式和音效管理程式並且可設定主題。由於它是快速、輕巧、高效的桌面環境,因此它非常適合有記憶體限制的較舊或較慢機器。更多有關 Xfce 的資訊可至 http://www.xfce.org 取得。
要安裝 Xfce 套件:
# pkg install xfce或者使用 Port 編譯:
# cd /usr/ports/x11-wm/xfce4
# make install clean
Xfce 使用了 D-Bus 作為 Message bus,由於是 Xfce 的相依,因此會自動安裝,但仍要在 /etc/rc.conf 中開啟該程式才會在系統開機時啟動:
dbus_enable="YES"
不像 GNOME 或 KDE,Xfce 並沒有自己的登入管理程式,要能用 startx 指令列啟動 Xfce 之前需先加入其項目到 ~/.xinitrc:
% echo ". /usr/local/etc/xdg/xfce4/xinitrc" > ~/.xinitrc另一種方式是使用 XDM,要設定這個方式需建立一個可執行的 ~/.xsession:
% echo ". /usr/local/etc/xdg/xfce4/xinitrc" > ~/.xsession要令使用桌面電腦更令人愉快的方法是用炫麗的 3D 效果。
安裝 Compiz Fusion 套件非常簡單,但設定該套件需要一些未在 Port 說明文件中說明的步驟。
桌面特效需要使用相當程度的顯示卡,對於以 nVidia 為基礎的顯示卡,需要使用專用的驅動程序來取得較佳的性能。其他顯示卡的使用可以跳過這一節,並繼續 xorg.conf 設定。
要知道需要那一種 nVidia 驅動程式可以查看 FAQ 中與此主題相關的問題。
知道您的顯示卡要使用那種驅動程式才是正確的之後,接下來的安裝程序跟安裝其他套件一樣簡單。
例如,要安裝最新的驅動程式:
# pkg install x11/nvidia-driver驅動程式會建立一個需要在系統啟動時載入的核心模組,加入下行到 /boot/loader.conf:
nvidia_load="YES"
要立即載入核心模組到執行中的核心可以下 |
核心模組載入之後,您只需要更改 xorg.conf 的其中一行來開啟專用的驅動程式:
找到 /etc/X11/xorg.conf 中的下行:
Driver "nv"
然後更改該行為:
Driver "nvidia"
如往常般啟動 GUI,您應該會看到 nVidia 的啟動畫面,其他東西應如往常般運作。
要開啟 Compiz Fusion 需要修改 /etc/X11/xorg.conf:
加入以下 Section 來開啟合成特效:
Section "Extensions"
    Option         "Composite" "Enable"
EndSection
找到 "Screen" section,長的應該如下所示:
Section "Screen"
    Identifier     "Screen0"
    Device         "Card0"
    Monitor        "Monitor0"
    ...
然後加入以下兩行 (在"Monitor" 之後):
DefaultDepth    24
Option         "AddARGBGLXVisuals" "True"
找到您欲使用的螢幕解析度所在的 "Subsection",例如,您想要使用 1280x1024,則找到如下所示的 Section。若想要使用的解析度不在任何 Subsection 之中,您可以手動加入對應的項目:
SubSection     "Display"
    Viewport    0 0
    Modes      "1280x1024"
EndSubSection
桌面合成需要 24 bit 的色彩深度,更改上述 Subsection 為:
SubSection     "Display"
    Viewport    0 0
    Depth       24
    Modes      "1280x1024"
EndSubSection
最後確認在 "Module" section 中已經載入 "glx" 與 "extmod" 模組:
Section "Module"
    Load           "extmod"
    Load           "glx"
    ...
前面所述的動作可以執行 x11/nvidia-xconfig 來自動完成 (使用 root):
# nvidia-xconfig --add-argb-glx-visuals
# nvidia-xconfig --composite
# nvidia-xconfig --depth=24安裝 Compiz Fusion 如同安裝其他套件一樣簡單:
# pkg install x11-wm/compiz-fusion安裝完成之後,開啟您的圖型化桌面,然後在終端機的畫面輸入以下指令 (使用一般使用者):
% compiz --replace --sm-disable --ignore-desktop-hints ccp &
% emerald --replace &
由於您的視窗管理程式 (例如:Metacity,若您使用 GNOME) 會被替換成 Compiz Fusion,您的螢幕會閃爍幾秒。而 Emerald 會處理視窗的裝飾 (例如:關閉、最小化、最大化按鈕、標題列及其他相關)。
您或許可以將這些指令改寫成較小的 Script 然後在啟動時自動執行 (加到 GNOME 桌面的 "Sessions" 中):
#! /bin/sh
compiz --replace --sm-disable --ignore-desktop-hints ccp &
emerald --replace &
儲存這個 Script 到您的家目錄所在位置,例如 start-compiz,然後讓該檔案可以執行:
% chmod +x ~/start-compiz接著使用 GUI 將該檔案加入啟動程式 (位於 GNOME 桌面的系統 , 偏好設定 , 工作階段 )。
要選擇所想使用的特效與相關設定,可執行 (一樣使用一般使用者) Compiz Config 設定管理程式 Compiz Config Settings Manager:
% ccsm在 GNOME 中,也可在系統 , 偏好設定 選單中找到。 |
若您在編譯時選擇了 "gconf support",您便可使用 gconf-editor 在 apps/compiz 下查看設定。
若滑鼠無法使用,您將需要做第一次設定方可繼續。在最近的 Xorg 版本,使用自動偵測裝置會忽略在 xorg.conf 中的 InputDevice section。要採用舊的方式,需在此檔案加入下行到 ServerLayout 或 ServerFlags section:
Option "AutoAddDevices" "false"
輸入裝置便可如先前版本一樣設定,連同其他所需的選項 (如:切換鍵盤配置)。
如同前面有說明過,hald Daemon 預設會自動偵測您的鍵盤,因此您的鍵盤配置或型號可能不正確,桌面環境如 GNOME, KDE 或 Xfce 會提供設定鍵盤的工具。即使如此,還是有可能透過 setxkbmap(1) 工具或 hald 的設定規則的協助來直接設定鍵盤屬性。 舉例來說,若有人想要使用 PC 102 鍵的鍵盤,採用法語 (French) 配置,我們便需要建立一個給 hald 的鍵盤設定檔,名稱為 x11-input.fdi,然後儲存到 /usr/local/etc/hal/fdi/policy 目錄。這個檔案中應要有以下幾行: <?xml version="1.0" encoding="utf-8"?>
<deviceinfo version="0.2">
<device>
<match key="info.capabilities" contains="input.keyboard">
<merge key="input.x11_options.XkbModel" type="string">pc102</merge>
<merge key="input.x11_options.XkbLayout" type="string">fr</merge>
</match>
</device>
</deviceinfo>若這個檔案已經存在,只需要複製並貼上您的檔案中有關鍵盤設定的那幾行。 您會需要重新啟動您的機器來讓 hald 讀取這個檔案。 也是可以從 X 終端機或 Script 下指令來做同樣的設定: /usr/local/shared/X11/xkb/rules/base.lst 中列出了各種可用的鍵盤、配置與設定。 |
現在可以開始調整 xorg.conf.new 設定檔,在文字編輯器如 emacs(1) 或 ee(1) 開啟該設定檔。若顯示器是不支援自動偵測同步頻率 (Sync frequency) 的舊或特殊的型號,同步頻率的設定可以手動加到 xorg.conf.new 的 "Monitor" section:
Section "Monitor"
	Identifier   "Monitor0"
	VendorName   "Monitor Vendor"
	ModelName    "Monitor Model"
	HorizSync    30-107
	VertRefresh  48-120
EndSection
多數顯示器都支援自動偵測同步頻率,並不需要手動設定這些數值。對於那些不支援自動偵測的顯示器,請輸入由製造商提供的數值來避免損壞顯示器。
X 允許在支援的顯示器使用 DPMS (Energy Star) 功能,xset(1) 程式可以控制逾時並可強制待機 (Standby)、暫停 (Suspend) 或關閉 (Off) 模式。若您想要為您的顯示器開啟 DPMS 功能,您需要加入下行到顯示器 (Monitor) 的 Section:
Option "DPMS"
在編輯器還未關閉 xorg.conf.new 設定檔前,選擇想要使用的預設解析度及色彩深度。這些項目可在 "Screen" section 定義:
Section "Screen"
	Identifier "Screen0"
	Device     "Card0"
	Monitor    "Monitor0"
	DefaultDepth 24
	SubSection "Display"
		Viewport  0 0
		Depth     24
		Modes     "1024x768"
	EndSubSection
EndSection
DefaultDepth 關鍵字代表預設執行要使用的色彩深度,這個設定可以被 Xorg(1) 的指令列參數 -depth 覆蓋。Modes 關鍵字代表執行要使用的解析度,注意,只有 VESA 標準模式才支援目標系統的繪圖硬體來定義解析度。在上述的例子中,預設使用的色彩深度為每像素 24 bit,這個色彩深度可用的解析度為 1024 x 768 像素。
最後,儲存設定檔並使用測試模式來測試上述的設定。
有一個工具可以協助您診斷問題,那就是 Xorg 日誌檔。該日誌檔中記錄了 Xorg 連接的每個裝置的資訊。Xorg 記錄檔名稱的格式為 /var/log/Xorg.0.log,確切的記錄檔名會可能從 Xorg.0.log 到 Xorg.8.log 以此類推。 |
若一且運作正常,設定檔需要安裝到 Xorg(1) 會尋找的常用設定檔位置,通常是 /etc/X11/xorg.conf 或 /usr/local/etc/X11/xorg.conf。
# cp xorg.conf.new /etc/X11/xorg.confi810 繪圖晶片組要設定 Intel™ i810 整合晶片組需要使用 agpgart AGP 程式介面來控制 Xorg 驅動該顯示卡。請參考 agp(4) 驅動程式操作手冊來取得更多詳細資訊。
這也可讓您可以設定任何其他繪圖卡的硬體。注意,在未編譯 agp(4) 到核心的系統,並無法使用 kldload(8) 來載入該模組,因此驅動程式必須在開機時便在核心啟動,所以需要透過編譯或使用 /boot/loader.conf 來載入。
此章節會需要有一些進階的設定知識,若嘗試使用上述的標準設定工具仍無法產生可運作的設定,在日誌檔中應有足夠的資訊可運用來讓顯示卡運作。在此會需要使用文字編輯器。
目前使用寬螢幕 (WSXGA, WSXGA+, WUXGA, WXGA, WXGA+, et.al.) 格式支援的 16:10 及 10:9 格式或其他的寬高比可會有問題。例如一些 16:10 寬高比常見的螢幕解析度:
2560x1600
1920x1200
1680x1050
1440x900
1280x800
在某些時候,可以簡單的將這些要使用的解析度以 Mode 加入到 Section "Screen":
Section "Screen"
Identifier "Screen0"
Device     "Card0"
Monitor    "Monitor0"
DefaultDepth 24
SubSection "Display"
	Viewport  0 0
	Depth     24
	Modes     "1680x1050"
EndSubSection
EndSection
Xorg 能夠從寬螢幕設定取得解析度資訊 (透過 I2C/DDC),因此能夠知道螢幕能處理的頻率及解析度。
若驅動程式中不存在那些螢幕能處理的 ModeLines,則需要給 Xorg 一點提示。透過 /var/log/Xorg.0.log 可以取得足夠的資訊來手動建立可運作的 ModeLine。只需要在日誌檔中找到類似以下的訊息:
(II) MGA(0): Supported additional Video Mode:
(II) MGA(0): clock: 146.2 MHz   Image Size:  433 x 271 mm
(II) MGA(0): h_active: 1680  h_sync: 1784  h_sync_end 1960 h_blank_end 2240 h_border: 0
(II) MGA(0): v_active: 1050  v_sync: 1053  v_sync_end 1059 v_blanking: 1089 v_border: 0
(II) MGA(0): Ranges: V min: 48  V max: 85 Hz, H min: 30  H max: 94 kHz, PixClock max 170 MHz
這些資訊稱作 EDID 資訊,使用 EDIT 資訊建立 ModeLine 只需要將數據使用正確的順序放入:
ModeLine <name> <clock> <4 horiz. timings> <4 vert. timings>
將資訊放入之後,本例中 Section "Monitor" 中的 ModeLine 會看起來像這樣:
Section "Monitor"
Identifier      "Monitor1"
VendorName      "Bigname"
ModelName       "BestModel"
ModeLine        "1680x1050" 146.2 1680 1784 1960 2240 1050 1053 1059 1089
Option          "DPMS"
EndSection
便完成編輯的步驟,接著需要在您的寬螢幕顯示器啟動 X。
您可能忘記在 /etc/X11/xorg.conf 中的設定。請重新檢查這個檔案,特別是 DefaultDepth 及 AddARGBGLXVisuals 指令項。
若您檢查 /var/log/Xorg.0.log,您可能可以找到當 X 啟動時所發生的錯誤訊息。最常發生的錯誤會是:
(EE) NVIDIA(0):     Failed to initialize the GLX module; please check in your X
(EE) NVIDIA(0):     log file that the GLX module has been loaded in your X
(EE) NVIDIA(0):     server, and that the module is the NVIDIA GLX module.  If
(EE) NVIDIA(0):     you continue to encounter problems, Please try
(EE) NVIDIA(0):     reinstalling the NVIDIA driver.
會發生這個情形通常是因為您升級了 Xorg,您需要重新安裝 x11/nvidia-driver 套件來重新編譯 glx。
既然基礎的部分已經提過了,接下來的這個部分將會討論一些常會用到的 FreeBSD 的特色,這些章節包括:
介紹給您常見且實用的桌面應用軟體:瀏覽器、辦工工具、文件閱覽程式等。
介紹給您眾多 FreeBSD 上可用的多媒體工具。
解釋如何編譯量身訂做的 FreeBSD 核心以增加額外系統功能的流程。
詳細描述列印系統,包含桌上型印表機及網路印表機的設定。
展示給您看如何在您的 FreeBSD 系統中執行 Linux 應用軟體。
這些章節中有些需要您預先閱讀些相關文件,在各章節開頭的概要內會提及。
隨著 FreeBSD 優越的效能及穩定性越來越熱門,它同時適合作為每日使用的桌面系統。FreeBSD 套件或 Port 有超過 24,000 個可用的應用程式,可以簡單的建立一個自訂的桌面環境來執行各種不同的桌面應用程式。本章將示範如何安裝數個桌面應用程式,包含網頁瀏覽器、辦工軟體、文件閱覽程式以及財務軟體。
比起重頭設定與編譯,較偏好使用 FreeBSD 桌面環境已預先編譯好版本的使用者可參考 trueos.org 網站。 |
在閱讀這章之前,你必須了解如何:
使用套件或 Port 安裝其他軟體如 安裝應用程式:套件與 Port 所敘述。
安狀 X 與視窗管理程式如 X Window 系統 所敘述。
要取得有關如何設定多媒體環境的資訊,請參考 多媒體。
在 FreeBSD 中並未預先安裝好網頁瀏覽器。 但在 Port 套件集中的 www 分類中有許多瀏覽器可以採 Binary 套件安裝或自 Port 套件集編譯的方式安裝。
KDE 和 GNOME 桌面環境都有提供自有的 HTML 瀏覽器。請參考 桌面環境 來了解更多有關如何設定完整桌面環境的資訊。
有一些輕量化的瀏覽器可使用,包含 www/dillo2, www/links 以及 www/w3m。
本章節將示範如何安裝下列常見的網頁瀏覽器並說明該應用程式是否需要用到大量資源、花費大量時間自 Port 編譯或何主要的相依套件。
| 應用程式名稱 | 所需資源 | 自 Port 安裝時間 | 說明 |
|---|---|---|---|
Firefox | 中 | 多 | 有 FreeBSD 、 Linux™ 及在地化版本 |
Opera | 少 | 少 | 有 FreeBSD 、 Linux™ 版本 |
Konqueror | 中 | 多 | 需要 KDE 程式庫 |
Chromium | 中 | 多 | 需要 Gtk+ 程式庫 |
Firefox 是一套開放源始碼的瀏覽器,它具備符合 HTML 標準的顯示引擎、頁籤瀏覽、彈出視窗封鎖、擴充套件、強化安全性及其他更多功能。Firefox 的基礎使用了 Mozilla 的程式庫。
要安裝最新釋出版本的 Firefox 套件可輸入:
# pkg install firefox要安裝延長支援發佈 (Extended Support Release, ESR) 版本的 Firefox,可使用:
# pkg install firefox-esr在地化的版本可在 www/firefox-i18n 及 www/firefox-esr-i18n 取得。
使用 Port 套件地可以用原始碼編譯成您想要的 Firefox 版本。此範例編譯 www/firefox,其中 firefox 可替換為 ESR 或在地化版本來安裝。
# cd /usr/ports/www/firefox
# make install cleanOpera 是個具備完整功能、符合標準且輕量、執行速度快的瀏覽器。 它同時也具備了內建的郵件、新聞閱讀器、IRC 客戶端、RSS/Atom 來源閱讀器等。 可用的版本有兩種原生的 FreeBSD 版本及 Linux™ 模擬模式下執行的版本。
以下指令可安裝 FreeBSD Binary 套件版本的 Opera,替換 opera 為 linux-opera 則可改安裝 Linux™ 版本。
# pkg install opera或者,可安裝 Port 套件集中的版本,以下範例會編譯原生的版本:
# cd /usr/ports/www/opera
# make install clean
要安裝 Linux™ 則替換 opera 為 linux-opera。
要安裝 Adobe™Flash™ 附加元件,需先編譯 www/linux-flashplayer Port,因受到授權條款限制無法事先編譯為 Binary 套件。然後再安裝 www/opera-linuxplugins。以下範例示範如何編譯 Port 中的這兩個應用程式:
# cd /usr/ports/www/linux-flashplayer
# make install clean
# cd /usr/ports/www/opera-linuxplugins
# make install clean
安裝完成後,開啟瀏覽器檢查附加元件是否存在,在網址列輸入 opera:plugins 並按下 Enter 鍵,便會有清單顯示目前可用的附加元件。
若要安裝 Java™ 附加元件請接著安裝 java/icedtea-web。
Konqueror 不只是個網頁瀏覽器, 它同時也是檔案管理器和多媒體瀏覽器。它包含在 x11/kde4-baseapps 套件或 Port 中。
Konqueror 使用支援 WebKit 以及它自有的 KTHML。WebKit 是一套被許多現代瀏覽器所使用的繪圖引擎,包含 Chromium。要在 FreeBSD 的 Konqueror 使用 WebKit 需安裝 www/kwebkitpart 套件或 Port。此範例示範使用 Binary 套件安裝:
# pkg install kwebkitpart從 Port 套件集安裝:
# cd /usr/ports/www/kwebkitpart
# make install clean
要啟動 Konqueror 中的 WebKit 點選 "Settings"、"Configure Konqueror"。在 "General" 設定頁面內點選 "Default web browser engine" 旁的下拉示選單並變更 "KHTML" 為 "WebKit"。
Konqueror 也支援 Flash™,"如何"在 Konqueror 上安裝 Flash™ 的說明可參考 http://freebsd.kde.org/howtos/konqueror-flash.php。
當開始進行辦公,使用者通常會找好用的辦公軟體或是好上手的文書處理程式。 雖然有些 桌面環境 像是 KDE 已經提供了辦公軟體,但並沒有預設的辦公軟體,FreeBSD 提供多套辦公軟體以及圖型化文書處理程式,不論您用那種的視窗管理程式都能使用。
本章節元範如何安裝以下熱門的辦公軟體以及說明該應用程式所需的資源、自 Port 編譯的時間或者是否有其他主要相依套件。
| 應用程式名稱 | 所需資源 | 自 Port 安裝時間 | 主要相依套件 |
|---|---|---|---|
Calligra | 少 | 多 | KDE |
AbiWord | 少 | 少 | Gtk+ 或 GNOME |
The Gimp | 少 | 多 | Gtk+ |
Apache OpenOffice | 多 | 非常多 | JDK™ 及 Mozilla |
LibreOffice | 有點多 | 非常多 | Gtk+ 或 KDE/ GNOME 或 JDK™ |
KDE 桌面環境中內含辦公軟體可以與 KDE 分開安裝。Calligra 中也有可在其他辦公軟體中找到的標準元件,如 Words 是文件處理程式、Sheets 是試算表程式、Stage 可管理投影片以及 Karbon 用來繪製圖型文件。
在 FreeBSD 中 editors/calligra 可以使用套件或 Port 的方式安裝,要使用套件安裝:
# pkg install calligra若沒有可用的套件,可改使用 Port 套件集安裝:
# cd /usr/ports/editors/calligra
# make install cleanAbiWord 是一個免費的文件處理軟體,外觀和感覺都近似於 Microsoft™ Word。 它非常快速,包含了許多功能而且非常容易上手。
AbiWord 可以輸入或輸出許多檔案格式, 包括一些有專用的格式,例如 Microsoft™ .rtf 格式。
要安裝 AbiWord Binary 套件,可使用下列指令:
# pkg install abiword若沒有 Binary 套件版本,也可以從 Port 套件集中編譯安裝:
# cd /usr/ports/editors/abiword
# make install clean對於影像的編輯及修改來說,The GIMP 是非常精緻的影像處理軟體。 它可以當作簡單的繪圖軟體或是高品質的相片處理軟體。 它支援為數眾多的外掛程式及指令稿 (script-fu) 介面。 The GIMP 可以讀寫許多檔案格式。 它也支援掃描器和手寫板。
要安裝套件可:
# pkg install gimp或使用 Port 套件集安裝:
# cd /usr/ports/graphics/gimp
# make install clean
在 Port 套件集的 graphics 分類 (freebsd.org/ports/) 下也包含了許多 GIMP 相關的附加元件,說明檔及使用手冊。
Apache OpenOffice 是開放原始碼的辦工室軟體,由 Apache Software Foundation’s Incubator 底下的團隊所開發。 它包含了所有完整的辦公軟體組合: 文字處理器、試算表、簡報軟體還有繪圖軟體。 除了它的使用者介面非常類似其他的辦公軟體, 他還能夠輸入和輸出許多熱門的檔案格式。 它也包含了不同語言的使用者介面、拼字檢查和字典。
Apache OpenOffice 的文字處理器使用原生的 XML 檔案格式來增加移植性及彈性。 試算表程式支援巨集 (Macro) 功能而且能夠使用外來的資料庫介面。 Apache OpenOffice 已經十分穩定, 並且能夠在 Windows™, Solaris™, Linux™, FreeBSD 及 Mac OS™ X 等作業系統上面執行。 想知道更多關於 Apache OpenOffice 的資訊可以在 openoffice.org 網頁上查詢。在 FreeBSD 特定的資訊可參考 porting.openoffice.org/freebsd/。
要安裝 Apache OpenOffice 套件:
# pkg install apache-openoffice當套件安裝完成之後,只要輸入下面的指令就能執行 Apache OpenOffice:
% openoffice-X.Y.Z其中 X.Y.Z 是已安裝的 Apache OpenOffice 的版本編號。第一次執行 Apache OpenOffice 會詢問一些問題且會在使用者的家目錄建立一個 .openoffice.org 資料夾。
若無法由套件取得想要的 Apache OpenOffice,仍可選擇從 Port 編譯。 不過必須注意:編譯的過程會需要大量的磁碟空間與時間:
# cd /usr/ports/editors/openoffice-4
# make install clean
如果想要編譯在地化的版本,將前面的指令替換成為: 替換 your_language 為正確的語言 ISO 編碼。支援的語言編碼清單在 files/Makefile.localized,位於該 Port 的目錄。 |
LibreOffice 是一套自由的辦公軟體由 documentfoundation.org 所開發。它可相容其他主流的辦公軟體以及可在各種平台上使用。它是 Apache OpenOffice 品牌重塑後的分支,含有可在完整辦公生產力軟體中找到的應用程式:文件處理程式、試算表、簡報管理程式、繪圖程式、資料庫管理程式以及建立與編輯數學公式的工具。它也支援數種語言與國際化一直延伸到介面、拼字檢查程式與字典。
LibreOffice 的文件處理程式使用了原生的 XML 檔案格式來增加可攜性與彈性,試算表程式支援可與外部資料庫連接的巨集語言。LibreOffice 非常穩定且可直接在 Windows™, Linux™, FreeBSD 以及 Mac OS™ X 上執行。更多有關 LibreOffice 的資訊可在 libreoffice.org 找到。
要安裝英文版本的 LibreOffice 套件:
# pkg install libreofficePort 套件集的編輯器分類 (freebsd.org/ports/) 中含有數個 LibreOffice 的語系。安裝在地化套件時,請替換 libreoffice 為在地化套件的名稱。
套件安裝之後,輸入以下指令來執行 LibreOffice:
% libreoffice第一次啟動的過程中會詢問一些問題並在使用者的家目錄建立 .libreoffice 資料夾。
若找不到想使用的 LibreOffice 套件,也可從 Port 編譯,但這會要大量的磁碟空間及漫長的時間編譯。以下例子示範編譯英文版本:
# cd /usr/ports/editors/libreoffice
# make install clean
要編譯在地化版本,則需 |
UNIX™ 出現之後,有一些新的文件格式才越來越熱門,這些文件所需的檢視程式可能並不在基礎系統中。本節將示範如何安裝以下文件檢視程式:
| 應用程式名稱 | 所需資源 | 自 Port 安裝時間 | 主要相依套件 |
|---|---|---|---|
Xpdf | 少 | 少 | FreeType |
gv | 少 | 少 | Xaw3d |
Geeqie | 少 | 少 | Gtk+ 或 GNOME |
ePDFView | 少 | 少 | Gtk+ |
Okular | 少 | 多 | KDE |
如果你想要一個小型的 FreeBSD PDF 閱覽軟體, Xpdf 是個輕量級而且有效率的閱覽器。 它只需要非常少的資源而且十分穩定。 它只使用標準的 X 字型且不需要額外的工具包(Toolkit)。
安裝 Xpdf 套件:
# pkg install xpdf若沒有可用的套件版本,可使用 Port 套件集安裝:
# cd /usr/ports/graphics/xpdf
# make install clean
完成安裝後,執行 xpdf 並使用滑鼠右鍵開啟選單。
gv 是 PostScript™ 和 PDF 的閱覽器。 它建構於 ghostview 的基礎上,不過因為使用 Xaw3d 視窗元件工具包,所以外觀看起來比較漂亮。 gv 有許多可設定的功能,比如說紙張方向、紙張大小、縮放比例、和反鋸齒(Anti-aliasing)等。 而且幾乎所有的使用都可以從鍵盤或滑鼠來完成。
安裝 gv 套件:
# pkg install gv若沒有可用的套件版本,可使用 Port 套件集安裝:
# cd /usr/ports/print/gv
# make install cleanGeeqie 是由已經停止維護的 GQView 專案所衍伸出來的分支,並致力開發新功能並整合已有的修補。Geeqie 是一套影像管理軟體,支援單鍵閱覽檔案、啟動外部編輯器、縮圖預覽等功能。 它也有幻燈片模式及一些基本的檔案操作的功能,能輕鬆的管理大量影像並找出重複的檔案。 Geeqie 也支援使用全螢幕閱覽以及國際化。
安裝 Geeqie 套件:
# pkg install geeqie若沒有可用的套件版本,可使用 Port 套件集安裝:
# cd /usr/ports/graphics/geeqie
# make install clean如果有任何理由你想要在你的 FreeBSD 桌面環境上管理你的個人財務, 這裡有一些功能強大、使用簡單的應用程式可供安裝。 這些財務管理軟體之中有些是相容於流行的 Quicken 或 Excel 文件。
這節涵蓋了下面這些軟體:
| 應用程式名稱 | 所需資源 | 自 Port 安裝時間 | 主要相依套件 |
|---|---|---|---|
GnuCash | 少 | 多 | GNOME |
Gnumeric | 少 | 多 | GNOME |
KMyMoney | 少 | 多 | KDE |
GnuCash 是 GNOME 團隊努力成果中的一部分, GNOME 團隊主要提供親切而強大的桌面應用程式給終端使用者。使用 GnuCash 可以持續追蹤收入與花費、銀行帳戶以及股票證券等。 它的特性是介面直覺但功能仍非常專業。
GnuCash 提供了智慧的計數器、多階層帳戶系統以及快速鍵及自動完成功能。 它也能分開單一的報表至數個詳細的部份。 GnuCash 也能夠匯入及合併 Quicken QIF 檔案。 它也能處理大部分國際的日期及通用貨幣之格式。
安裝 GnuCash 套件:
# pkg install gnucash若沒有可用的套件版本,可使用 Port 套件集安裝:
# cd /usr/ports/finance/gnucash
# make install cleanFreeBSD 廣泛地支援各種音效卡, 讓使用者可以享受來自電腦上的高傳真音質(Hi-Fi), 此外還包括了錄製和播放 MPEG Audio Layer 3 (MP3)、 Waveform Audio File (WAV)、Ogg Vorbis 以及其他許多種格式聲音的能力。同時 FreeBSD Port 套件集也包含了許多可讓您可以錄音、編修音效以及控制 MIDI 配備的應用程式。
FreeBSD 也能播放一般的視訊檔和 DVD。 FreeBSD Port 套件集中含有可編碼、轉換以及播放格種影像媒體的應用程式。
本章會說明如何設定 FreeBSD 上的音效卡、影像播放器、電視卡及掃描器。同時會說明有那些應用程式可以使用這些裝置。
讀完這章,您將了解:
設定 FreeBSD 上的音效卡。
音效設定疑難排解。
播放、錄製 MP3 及其他聲音檔案格式。
FreeBSD 系統播放影像的準備工具。
播放 DVD 的 .mpg 及 .avi 檔。
擷取(Rip) CD 和 DVD的內容至檔案。
設定電視卡。
在 FreeBSD 安裝 MythTV
設定影像掃描機。
設定藍芽耳機。
在開始閱讀這章之前,您需要:
知道如何安裝應用程式如 安裝應用程式:套件與 Port 所敘述。
開始設定之前,必須先知道你的音效卡型號、晶片為何。 FreeBSD 支援許多種音效卡,請檢查支援的音效硬體表 Hardware Notes,以確認你的音效卡是否支援以及如何在 FreeBSD 上驅動。
要使用音效裝置,必須要載入正確的驅動程式才行。最簡單方式就是以 kldload(8) 來載入核心模組。以下範例示範載入 Intel 規格內建的音效晶片驅動程式:
# kldload snd_hda要開機時自動載入驅動程式,需將驅動程式加到 /boot/loader.conf 檔,以此驅動程式為例:
snd_hda_load="YES"
其他可用的音效卡模組清單列於 /boot/defaults/loader.conf。當不確認要使用何種驅動程式時,可載入 snd_driver 模組:
# kldload snd_driver它是 metadriver 會載入所有最通用的音效驅動程式並且用來加速尋找正確的驅動程式。也可以把 metadriver 加入 /boot/loader.conf 檔來載入所有音效驅動程式。
要知道載入 snd_driver metadriver 後使用了那個音效卡驅動程式,請輸入 cat /dev/sndstat。
This section is for users who prefer to statically compile in support for the sound card in a custom kernel. For more information about recompiling a kernel, refer to 設定 FreeBSD 核心.
When using a custom kernel to provide sound support, make sure that the audio framework driver exists in the custom kernel configuration file:
device sound
Next, add support for the sound card. To continue the example of the built-in audio chipset based on the Intel specification from the previous section, use the following line in the custom kernel configuration file:
device snd_hda
Be sure to read the manual page of the driver for the device name to use for the driver.
Non-PnP ISA sound cards may require the IRQ and I/O port settings of the card to be added to /boot/device.hints. During the boot process, loader(8) reads this file and passes the settings to the kernel. For example, an old Creative SoundBlaster™ 16 ISA non-PnP card will use the snd_sbc(4) driver in conjunction with snd_sb16. For this card, the following lines must be added to the kernel configuration file:
device snd_sbc
device snd_sb16
If the card uses the 0x220 I/O port and IRQ 5, these lines must also be added to /boot/device.hints:
hint.sbc.0.at="isa"
hint.sbc.0.port="0x220"
hint.sbc.0.irq="5"
hint.sbc.0.drq="1"
hint.sbc.0.flags="0x15"
The syntax used in /boot/device.hints is described in sound(4) and the manual page for the driver of the sound card.
The settings shown above are the defaults. In some cases, the IRQ or other settings may need to be changed to match the card. Refer to snd_sbc(4) for more information about this card.
After loading the required module or rebooting into the custom kernel, the sound card should be detected. To confirm, run dmesg | grep pcm. This example is from a system with a built-in Conexant CX20590 chipset:
pcm0: <NVIDIA (0x001c) (HDMI/DP 8ch)> at nid 5 on hdaa0
pcm1: <NVIDIA (0x001c) (HDMI/DP 8ch)> at nid 6 on hdaa0
pcm2: <Conexant CX20590 (Analog 2.0+HP/2.0)> at nid 31,25 and 35,27 on hdaa1
The status of the sound card may also be checked using this command:
# cat /dev/sndstat
FreeBSD Audio Driver (newpcm: 64bit 2009061500/amd64)
Installed devices:
pcm0: <NVIDIA (0x001c) (HDMI/DP 8ch)> (play)
pcm1: <NVIDIA (0x001c) (HDMI/DP 8ch)> (play)
pcm2: <Conexant CX20590 (Analog 2.0+HP/2.0)> (play/rec) default
The output will vary depending upon the sound card. If no pcm devices are listed, double-check that the correct device driver was loaded or compiled into the kernel. The next section lists some common problems and their solutions.
If all goes well, the sound card should now work in FreeBSD. If the CD or DVD drive is properly connected to the sound card, one can insert an audio CD in the drive and play it with cdcontrol(1):
% cdcontrol -f /dev/acd0 play 1Audio CDs have specialized encodings which means that they should not be mounted using mount(8). |
Various applications, such as audio/workman, provide a friendlier interface. The audio/mpg123 port can be installed to listen to MP3 audio files.
Another quick way to test the card is to send data to /dev/dsp:
% cat filename > /dev/dspwhere filename can be any type of file. This command should produce some noise, confirming that the sound card is working.
The /dev/dsp* device nodes will be created automatically as needed. When not in use, they do not exist and will not appear in the output of ls(1). |
Connecting to a Bluetooth device is out of scope for this chapter. Refer to 藍牙 for more information.
To get Bluetooth sound sink working with FreeBSD’s sound system, users have to install audio/virtual_oss first:
# pkg install virtual_ossaudio/virtual_oss requires cuse to be loaded into the kernel:
# kldload cuseTo load cuse during system startup, run this command:
# sysrc -f /boot/loader.conf cuse_load=yesTo use headphones as a sound sink with audio/virtual_oss, users need to create a virtual device after connecting to a Bluetooth audio device:
# virtual_oss -C 2 -c 2 -r 48000 -b 16 -s 768 -R /dev/null -P /dev/bluetooth/headphones -d dspheadphones in this example is a hostname from /etc/bluetooth/hosts. |
請參考 virtual_oss(8) 取得更多資訊。
常見錯誤訊息 lists some common error messages and their solutions:
| 錯誤 | 解決方式 |
|---|---|
| The I/O port is not set correctly. |
| The IRQ is set incorrectly. Make sure that the set IRQ and the sound IRQ are the same. |
| There is not enough available memory to use the device. |
| Type |
Modern graphics cards often come with their own sound driver for use with HDMI. This sound device is sometimes enumerated before the sound card meaning that the sound card will not be used as the default playback device. To check if this is the case, run dmesg and look for pcm. The output looks something like this:
...
hdac0: HDA Driver Revision: 20100226_0142
hdac1: HDA Driver Revision: 20100226_0142
hdac0: HDA Codec #0: NVidia (Unknown)
hdac0: HDA Codec #1: NVidia (Unknown)
hdac0: HDA Codec #2: NVidia (Unknown)
hdac0: HDA Codec #3: NVidia (Unknown)
pcm0: <HDA NVidia (Unknown) PCM #0 DisplayPort> at cad 0 nid 1 on hdac0
pcm1: <HDA NVidia (Unknown) PCM #0 DisplayPort> at cad 1 nid 1 on hdac0
pcm2: <HDA NVidia (Unknown) PCM #0 DisplayPort> at cad 2 nid 1 on hdac0
pcm3: <HDA NVidia (Unknown) PCM #0 DisplayPort> at cad 3 nid 1 on hdac0
hdac1: HDA Codec #2: Realtek ALC889
pcm4: <HDA Realtek ALC889 PCM #0 Analog> at cad 2 nid 1 on hdac1
pcm5: <HDA Realtek ALC889 PCM #1 Analog> at cad 2 nid 1 on hdac1
pcm6: <HDA Realtek ALC889 PCM #2 Digital> at cad 2 nid 1 on hdac1
pcm7: <HDA Realtek ALC889 PCM #3 Digital> at cad 2 nid 1 on hdac1
...
In this example, the graphics card (NVidia) has been enumerated before the sound card (Realtek ALC889). To use the sound card as the default playback device, change hw.snd.default_unit to the unit that should be used for playback:
# sysctl hw.snd.default_unit=nwhere n is the number of the sound device to use. In this example, it should be 4. Make this change permanent by adding the following line to /etc/sysctl.conf:
hw.snd.default_unit=4
It is often desirable to have multiple sources of sound that are able to play simultaneously. FreeBSD uses "Virtual Sound Channels" to multiplex the sound card’s playback by mixing sound in the kernel.
Three sysctl(8) knobs are available for configuring virtual channels:
# sysctl dev.pcm.0.play.vchans=4
# sysctl dev.pcm.0.rec.vchans=4
# sysctl hw.snd.maxautovchans=4
This example allocates four virtual channels, which is a practical number for everyday use. Both dev.pcm.0.play.vchans=4 and dev.pcm.0.rec.vchans=4 are configurable after a device has been attached and represent the number of virtual channels pcm0 has for playback and recording. Since the pcm module can be loaded independently of the hardware drivers, hw.snd.maxautovchans indicates how many virtual channels will be given to an audio device when it is attached. Refer to pcm(4) for more information.
The number of virtual channels for a device cannot be changed while it is in use. First, close any programs using the device, such as music players or sound daemons. |
The correct pcm device will automatically be allocated transparently to a program that requests /dev/dsp0.
The default values for the different mixer channels are hardcoded in the source code of the pcm(4) driver. While sound card mixer levels can be changed using mixer(8) or third-party applications and daemons, this is not a permanent solution. To instead set default mixer values at the driver level, define the appropriate values in /boot/device.hints, as seen in this example:
hint.pcm.0.vol="50"
This will set the volume channel to a default value of 50 when the pcm(4) module is loaded.
This section describes some MP3 players available for FreeBSD, how to rip audio CD tracks, and how to encode and decode MP3s.
A popular graphical MP3 player is Audacious. It supports Winamp skins and additional plugins. The interface is intuitive, with a playlist, graphic equalizer, and more. Those familiar with Winamp will find Audacious simple to use. On FreeBSD, Audacious can be installed from the multimedia/audacious port or package. Audacious is a descendant of XMMS.
The audio/mpg123 package or port provides an alternative, command-line MP3 player. Once installed, specify the MP3 file to play on the command line. If the system has multiple audio devices, the sound device can also be specified:
# mpg123 -a /dev/dsp1.0 Foobar-GreatestHits.mp3
High Performance MPEG 1.0/2.0/2.5 Audio Player for Layers 1, 2 and 3
        version 1.18.1; written and copyright by Michael Hipp and others
        free software (LGPL) without any warranty but with best wishes

Playing MPEG stream from Foobar-GreatestHits.mp3 ...
MPEG 1.0 layer III, 128 kbit/s, 44100 Hz joint-stereo
Additional MP3 players are available in the FreeBSD Ports Collection.
Before encoding a CD or CD track to MP3, the audio data on the CD must be ripped to the hard drive. This is done by copying the raw CD Digital Audio (CDDA) data to WAV files.
The cdda2wav tool, which is installed with the sysutils/cdrtools suite, can be used to rip audio information from CDs.
With the audio CD in the drive, the following command can be issued as root to rip an entire CD into individual, per track, WAV files:
# cdda2wav -D 0,1,0 -BIn this example, the -D 0,1,0 indicates the SCSI device 0,1,0 containing the CD to rip. Use cdrecord -scanbus to determine the correct device parameters for the system.
To rip individual tracks, use -t to specify the track:
# cdda2wav -D 0,1,0 -t 7To rip a range of tracks, such as track one to seven, specify a range:
# cdda2wav -D 0,1,0 -t 1+7To rip from an ATAPI (IDE) CDROM drive, specify the device name in place of the SCSI unit numbers. For example, to rip track 7 from an IDE drive:
# cdda2wav -D /dev/acd0 -t 7Alternately, dd can be used to extract audio tracks on ATAPI drives, as described in 複製音樂 CD.
Lame is a popular MP3 encoder which can be installed from the audio/lame port. Due to patent issues, a package is not available.
The following command will convert the ripped WAV file audio01.wav to audio01.mp3:
# lame -h -b 128 --tt "Foo Song Title" --ta "FooBar Artist" --tl "FooBar Album" \
--ty "2014" --tc "Ripped and encoded by Foo" --tg "Genre" audio01.wav audio01.mp3
The specified 128 kbits is a standard MP3 bitrate while the 160 and 192 bitrates provide higher quality. The higher the bitrate, the larger the size of the resulting MP3. The -h turns on the "higher quality but a little slower" mode. The options beginning with --t indicate ID3 tags, which usually contain song information, to be embedded within the MP3 file. Additional encoding options can be found in the lame manual page.
In order to burn an audio CD from MP3s, they must first be converted to a non-compressed file format. XMMS can be used to convert to the WAV format, while mpg123 can be used to convert to the raw Pulse-Code Modulation (PCM) audio data format.
To convert audio01.mp3 using mpg123, specify the name of the PCM file:
# mpg123 -s audio01.mp3 > audio01.pcmTo use XMMS to convert a MP3 to WAV format, use these steps:
Procedure: Converting to WAV Format in XMMS
. Launch XMMS.
. Right-click the window to bring up the XMMS menu.
. Select Preferences under Options.
. Change the Output Plugin to "Disk Writer Plugin".
. Press Configure.
. Enter or browse to a directory to write the uncompressed files to.
. Load the MP3 file into XMMS as usual, with volume at 100% and EQ settings turned off.
. Press Play. The XMMS will appear as if it is playing the MP3, but no music will be heard. It is actually playing the MP3 to a file.
. When finished, be sure to set the default Output Plugin back to what it was before in order to listen to MP3s again.
Both the WAV and PCM formats can be used with cdrecord. When using WAV files, there will be a small tick sound at the beginning of each track. This sound is the header of the WAV file. The audio/sox port or package can be used to remove the header:
% sox -t wav -r 44100 -s -w -c 2 track.wav track.rawRefer to 建立與使用 CD 媒體 for more information on using a CD burner in FreeBSD.
Before configuring video playback, determine the model and chipset of the video card. While Xorg supports a wide variety of video cards, not all provide good playback performance. To obtain a list of extensions supported by the Xorg server using the card, run xdpyinfo while Xorg is running.
It is a good idea to have a short MPEG test file for evaluating various players and options. Since some DVD applications look for DVD media in /dev/dvd by default, or have this device name hardcoded in them, it might be useful to make a symbolic link to the proper device:
# ln -sf /dev/cd0 /dev/dvdDue to the nature of devfs(5), manually created links will not persist after a system reboot. In order to recreate the symbolic link automatically when the system boots, add the following line to /etc/devfs.conf:
link cd0 dvd
DVD decryption invokes certain functions that require write permission to the DVD device.
To enhance the shared memory Xorg interface, it is recommended to increase the values of these sysctl(8) variables:
kern.ipc.shmmax=67108864
kern.ipc.shmall=32768
There are several possible ways to display video under Xorg and what works is largely hardware dependent. Each method described below will have varying quality across different hardware.
Common video interfaces include:
Xorg: normal output using shared memory.
XVideo: an extension to the Xorg interface which allows video to be directly displayed in drawable objects through a special acceleration. This extension provides good quality playback even on low-end machines. The next section describes how to determine if this extension is running.
SDL: the Simple Directmedia Layer is a porting layer for many operating systems, allowing cross-platform applications to be developed which make efficient use of sound and graphics. SDL provides a low-level abstraction to the hardware which can sometimes be more efficient than the Xorg interface. On FreeBSD, SDL can be installed using the devel/sdl20 package or port.
DGA: the Direct Graphics Access is an Xorg extension which allows a program to bypass the Xorg server and directly alter the framebuffer. Because it relies on a low level memory mapping, programs using it must be run as root. The DGA extension can be tested and benchmarked using dga(1). When dga is running, it changes the colors of the display whenever a key is pressed. To quit, press q.
SVGAlib: a low level console graphics layer.
To check whether this extension is running, use xvinfo:
% xvinfoXVideo is supported for the card if the result is similar to:
X-Video Extension version 2.2
  screen #0
  Adaptor #0: "Savage Streams Engine"
    number of ports: 1
    port base: 43
    operations supported: PutImage
    supported visuals:
      depth 16, visualID 0x22
      depth 16, visualID 0x23
    number of attributes: 5
      "XV_COLORKEY" (range 0 to 16777215)
              client settable attribute
              client gettable attribute (current value is 2110)
      "XV_BRIGHTNESS" (range -128 to 127)
              client settable attribute
              client gettable attribute (current value is 0)
      "XV_CONTRAST" (range 0 to 255)
              client settable attribute
              client gettable attribute (current value is 128)
      "XV_SATURATION" (range 0 to 255)
              client settable attribute
              client gettable attribute (current value is 128)
      "XV_HUE" (range -180 to 180)
              client settable attribute
              client gettable attribute (current value is 0)
    maximum XvImage size: 1024 x 1024
    Number of image formats: 7
      id: 0x32595559 (YUY2)
        guid: 59555932-0000-0010-8000-00aa00389b71
        bits per pixel: 16
        number of planes: 1
        type: YUV (packed)
      id: 0x32315659 (YV12)
        guid: 59563132-0000-0010-8000-00aa00389b71
        bits per pixel: 12
        number of planes: 3
        type: YUV (planar)
      id: 0x30323449 (I420)
        guid: 49343230-0000-0010-8000-00aa00389b71
        bits per pixel: 12
        number of planes: 3
        type: YUV (planar)
      id: 0x36315652 (RV16)
        guid: 52563135-0000-0000-0000-000000000000
        bits per pixel: 16
        number of planes: 1
        type: RGB (packed)
        depth: 0
        red, green, blue masks: 0x1f, 0x3e0, 0x7c00
      id: 0x35315652 (RV15)
        guid: 52563136-0000-0000-0000-000000000000
        bits per pixel: 16
        number of planes: 1
        type: RGB (packed)
        depth: 0
        red, green, blue masks: 0x1f, 0x7e0, 0xf800
      id: 0x31313259 (Y211)
        guid: 59323131-0000-0010-8000-00aa00389b71
        bits per pixel: 6
        number of planes: 3
        type: YUV (packed)
      id: 0x0
        guid: 00000000-0000-0000-0000-000000000000
        bits per pixel: 0
        number of planes: 0
        type: RGB (packed)
        depth: 1
        red, green, blue masks: 0x0, 0x0, 0x0
The formats listed, such as YUV2 and YUV12, are not present with every implementation of XVideo and their absence may hinder some players.
If the result instead looks like:
X-Video Extension version 2.2
screen #0
no adaptors present
XVideo is probably not supported for the card. This means that it will be more difficult for the display to meet the computational demands of rendering video, depending on the video card and processor.
This section introduces some of the software available from the FreeBSD Ports Collection which can be used for video playback.
MPlayer is a command-line video player with an optional graphical interface which aims to provide speed and flexibility. Other graphical front-ends to MPlayer are available from the FreeBSD Ports Collection.
MPlayer can be installed using the multimedia/mplayer package or port. Several compile options are available and a variety of hardware checks occur during the build process. For these reasons, some users prefer to build the port rather than install the package.
When compiling the port, the menu options should be reviewed to determine the type of support to compile into the port. If an option is not selected, MPlayer will not be able to display that type of video format. Use the arrow keys and spacebar to select the required formats. When finished, press Enter to continue the port compile and installation.
By default, the package or port will build the mplayer command line utility and the gmplayer graphical utility. To encode videos, compile the multimedia/mencoder port. Due to licensing restrictions, a package is not available for MEncoder.
The first time MPlayer is run, it will create ~/.mplayer in the user’s home directory. This subdirectory contains default versions of the user-specific configuration files.
This section describes only a few common uses. Refer to mplayer(1) for a complete description of its numerous options.
To play the file testfile.avi, specify the video interfaces with -vo, as seen in the following examples:
% mplayer -vo xv testfile.avi% mplayer -vo sdl testfile.avi% mplayer -vo x11 testfile.avi# mplayer -vo dga testfile.avi# mplayer -vo 'sdl:dga' testfile.aviIt is worth trying all of these options, as their relative performance depends on many factors and will vary significantly with hardware.
To play a DVD, replace testfile.avi with dvd://N -dvd-device DEVICE, where N is the title number to play and DEVICE is the device node for the DVD. For example, to play title 3 from /dev/dvd:
# mplayer -vo xv dvd://3 -dvd-device /dev/dvdThe default DVD device can be defined during the build of the MPlayer port by including the |
To stop, pause, advance, and so on, use a keybinding. To see the list of keybindings, run mplayer -h or read mplayer(1).
Additional playback options include -fs -zoom, which engages fullscreen mode, and -framedrop, which helps performance.
Each user can add commonly used options to their ~/.mplayer/config like so:
vo=xv
fs=yes
zoom=yes
mplayer can be used to rip a DVD title to a .vob. To dump the second title from a DVD:
# mplayer -dumpstream -dumpfile out.vob dvd://2 -dvd-device /dev/dvdThe output file, out.vob, will be in MPEG format.
Anyone wishing to obtain a high level of expertise with UNIX™ video should consult mplayerhq.hu/DOCS as it is technically informative. This documentation should be considered as required reading before submitting any bug reports.
Before using mencoder, it is a good idea to become familiar with the options described at mplayerhq.hu/DOCS/HTML/en/mencoder.html. There are innumerable ways to improve quality, lower bitrate, and change formats, and some of these options may make the difference between good or bad performance. Improper combinations of command line options can yield output files that are unplayable even by mplayer.
Here is an example of a simple copy:
% mencoder input.avi -oac copy -ovc copy -o output.aviTo rip to a file, use -dumpfile with mplayer.
To convert input.avi to the MPEG4 codec with MPEG3 audio encoding, first install the audio/lame port. Due to licensing restrictions, a package is not available. Once installed, type:
% mencoder input.avi -oac mp3lame -lameopts br=192 \
	 -ovc lavc -lavcopts vcodec=mpeg4:vhq -o output.avi
This will produce output playable by applications such as mplayer and xine.
input.avi can be replaced with dvd://1 -dvd-device /dev/dvd and run as root to re-encode a DVD title directly. Since it may take a few tries to get the desired result, it is recommended to instead dump the title to a file and to work on the file.
xine is a video player with a reusable base library and a modular executable which can be extended with plugins. It can be installed using the multimedia/xine package or port.
In practice, xine requires either a fast CPU with a fast video card, or support for the XVideo extension. The xine video player performs best on XVideo interfaces.
By default, the xine player starts a graphical user interface. The menus can then be used to open a specific file.
Alternatively, xine may be invoked from the command line by specifying the name of the file to play:
% xine -g -p mymovie.aviRefer to xine-project.org/faq for more information and troubleshooting tips.
Transcode provides a suite of tools for re-encoding video and audio files. Transcode can be used to merge video files or repair broken files using command line tools with stdin/stdout stream interfaces.
In FreeBSD, Transcode can be installed using the multimedia/transcode package or port. Many users prefer to compile the port as it provides a menu of compile options for specifying the support and codecs to compile in. If an option is not selected, Transcode will not be able to encode that format. Use the arrow keys and spacebar to select the required formats. When finished, press Enter to continue the port compile and installation.
This example demonstrates how to convert a DivX file into a PAL MPEG-1 file (PAL VCD):
% transcode -i input.avi -V --export_prof vcd-pal -o output_vcd
% mplex -f 1 -o output_vcd.mpg output_vcd.m1v output_vcd.mpa
The resulting MPEG file, output_vcd.mpg, is ready to be played with MPlayer. The file can be burned on a CD media to create a video CD using a utility such as multimedia/vcdimager or sysutils/cdrdao.
In addition to the manual page for transcode, refer to transcoding.org/cgi-bin/transcode for further information and examples.
電視卡 (TV card) 可以讓您用電腦來看無線、有線電視節目。許多卡都是透過 RCA 或 S-video 輸入端子來接收視訊,而且有些卡還可接收 FM 廣播的功能。
FreeBSD 可透過 bktr(4) 驅動程式,來支援 PCI 介面的電視卡,只要這些卡使用的是 Brooktree Bt848/849/878/879 或 Conexant CN-878/Fusion 878a 視訊擷取晶片。此外,要再確認哪些卡上所附的選台功能是否有支援,可以參考 bktr(4) 說明,以查看所支援的硬體清單。
要用電視卡的話,就要載入 bktr(4) 驅動程式,這個可以透過在 /boot/loader.conf 檔加上下面這一行就可以了:
bktr_load="YES"
或者可以將電視卡支援靜態編譯到自訂的核心當中,若要這麼做則可在自訂核心設定檔加入以下行:
device	 bktr
device	iicbus
device	iicbb
device	smbus
之所以要加上這些額外的驅動程式,是因為卡的各組成部分都是透過 I2C 匯流排而相互連接的。接下來,請編譯、安裝新的核心 。
要測試調諧器 (Tuner) 是否被正確的偵測,請先重新啟動系統。電視卡應該會出現在開機訊息檔中,如同此範例:
bktr0: <BrookTree 848A> mem 0xd7000000-0xd7000fff irq 10 at device 10.0 on pci0
iicbb0: <I2C bit-banging driver> on bti2c0
iicbus0: <Philips I2C bus> on iicbb0 master-only
iicbus1: <Philips I2C bus> on iicbb0 master-only
smbus0: <System Management Bus> on bti2c0
bktr0: Pinnacle/Miro TV, Philips SECAM tuner.
該訊息會依硬體不同而有所不同。若必要,可以使用 sysctl(8) 系統偵測的參數或者自訂核心設定選項。例如要強制使用 Philips SECAM 調諧器則可加入下列行至自訂核心設定檔:
options OVERRIDE_TUNER=6
或使用 sysctl(8):
# sysctl hw.bt848.tuner=6To use the TV card, install one of the following applications:
multimedia/fxtv provides TV-in-a-window and image/audio/video capture capabilities.
multimedia/xawtv is another TV application with similar features.
audio/xmradio provides an application for using the FM radio tuner of a TV card.
More applications are available in the FreeBSD Ports Collection.
If any problems are encountered with the TV card, check that the video capture chip and the tuner are supported by bktr(4) and that the right configuration options were used. For more support or to ask questions about supported TV cards, refer to the freebsd-multimedia mailing list.
MythTV is a popular, open source Personal Video Recorder (PVR) application. This section demonstrates how to install and setup MythTV on FreeBSD. Refer to mythtv.org/wiki for more information on how to use MythTV.
MythTV requires a frontend and a backend. These components can either be installed on the same system or on different machines.
The frontend can be installed on FreeBSD using the multimedia/mythtv-frontend package or port. Xorg must also be installed and configured as described in X Window 系統. Ideally, this system has a video card that supports X-Video Motion Compensation (XvMC) and, optionally, a Linux Infrared Remote Control (LIRC)-compatible remote.
To install both the backend and the frontend on FreeBSD, use the multimedia/mythtv package or port. A MySQL™ database server is also required and should automatically be installed as a dependency. Optionally, this system should have a tuner card and sufficient storage to hold recorded data.
MythTV uses Video for Linux (V4L) to access video input devices such as encoders and tuners. In FreeBSD, MythTV works best with USB DVB-S/C/T cards as they are well supported by the multimedia/webcamd package or port which provides a V4L userland application. Any Digital Video Broadcasting (DVB) card supported by webcamd should work with MythTV. A list of known working cards can be found at wiki.freebsd.org/WebcamCompat. Drivers are also available for Hauppauge cards in the multimedia/pvr250 and multimedia/pvrxxx ports, but they provide a non-standard driver interface that does not work with versions of MythTV greater than 0.23. Due to licensing restrictions, no packages are available and these two ports must be compiled.
The wiki.freebsd.org/HTPC page contains a list of all available DVB drivers.
要使用 Binary 套件安裝 MythTV 可:
# pkg install mythtv或從 Port 套件集安裝:
# cd /usr/ports/multimedia/mythtv
# make install
Once installed, set up the MythTV database:
# mysql -uroot -p < /usr/local/shared/mythtv/database/mc.sqlThen, configure the backend:
# mythtv-setupFinally, start the backend:
# sysrc mythbackend_enable=yes
# service mythbackend startIn FreeBSD, access to image scanners is provided by SANE (Scanner Access Now Easy), which is available in the FreeBSD Ports Collection. SANE will also use some FreeBSD device drivers to provide access to the scanner hardware.
FreeBSD supports both SCSI and USB scanners. Depending upon the scanner interface, different device drivers are required. Be sure the scanner is supported by SANE prior to performing any configuration. Refer to http://www.sane-project.org/sane-supported-devices.html for more information about supported scanners.
This chapter describes how to determine if the scanner has been detected by FreeBSD. It then provides an overview of how to configure and use SANE on a FreeBSD system.
The GENERIC kernel includes the device drivers needed to support USB scanners. Users with a custom kernel should ensure that the following lines are present in the custom kernel configuration file:
device usb
device uhci
device ohci
device ehci
To determine if the USB scanner is detected, plug it in and use dmesg to determine whether the scanner appears in the system message buffer. If it does, it should display a message similar to this:
ugen0.2: <EPSON> at usbus0In this example, an EPSON Perfection™ 1650 USB scanner was detected on /dev/ugen0.2.
If the scanner uses a SCSI interface, it is important to know which SCSI controller board it will use. Depending upon the SCSI chipset, a custom kernel configuration file may be needed. The GENERIC kernel supports the most common SCSI controllers. Refer to /usr/src/sys/conf/NOTES to determine the correct line to add to a custom kernel configuration file. In addition to the SCSI adapter driver, the following lines are needed in a custom kernel configuration file:
device scbus
device pass
Verify that the device is displayed in the system message buffer:
pass2 at aic0 bus 0 target 2 lun 0
pass2: <AGFA SNAPSCAN 600 1.10> Fixed Scanner SCSI-2 device
pass2: 3.300MB/s transfers
If the scanner was not powered-on at system boot, it is still possible to manually force detection by performing a SCSI bus scan with camcontrol:
# camcontrol rescan all
Re-scan of bus 0 was successful
Re-scan of bus 1 was successful
Re-scan of bus 2 was successful
Re-scan of bus 3 was successful
The scanner should now appear in the SCSI devices list:
# camcontrol devlist
<IBM DDRS-34560 S97B>              at scbus0 target 5 lun 0 (pass0,da0)
<IBM DDRS-34560 S97B>              at scbus0 target 6 lun 0 (pass1,da1)
<AGFA SNAPSCAN 600 1.10>           at scbus1 target 2 lun 0 (pass3)
<PHILIPS CDD3610 CD-R/RW 1.00>     at scbus2 target 0 lun 0 (pass2,cd0)
Refer to scsi(4) and camcontrol(8) for more details about SCSI devices on FreeBSD.
The SANE system is split in two parts: the backends (graphics/sane-backends) and the frontends (graphics/sane-frontends or graphics/xsane). The backends provide access to the scanner. Refer to http://www.sane-project.org/sane-supported-devices.html to determine which backend supports the scanner. The frontends provide the graphical scanning interface. graphics/sane-frontends installs xscanimage while graphics/xsane installs xsane.
要由 Binary 套件安裝這兩個部份可:
# pkg install xsane sane-frontends或由 Port 套件集安裝
# cd /usr/ports/graphics/sane-frontends
# make install clean
# cd /usr/ports/graphics/xsane
# make install clean
After installing the graphics/sane-backends port or package, use sane-find-scanner to check the scanner detection by the SANE system:
# sane-find-scanner -q
found SCSI scanner "AGFA SNAPSCAN 600 1.10" at /dev/pass3
The output should show the interface type of the scanner and the device node used to attach the scanner to the system. The vendor and the product model may or may not appear.
Some USB scanners require firmware to be loaded. Refer to sane-find-scanner(1) and sane(7) for details. |
Next, check if the scanner will be identified by a scanning frontend. The SANE backends include scanimage which can be used to list the devices and perform an image acquisition. Use -L to list the scanner devices. The first example is for a SCSI scanner and the second is for a USB scanner:
# scanimage -L
device `snapscan:/dev/pass3' is a AGFA SNAPSCAN 600 flatbed scanner
# scanimage -L
device 'epson2:libusb:/dev/usb:/dev/ugen0.2' is a Epson GT-8200 flatbed scanner
In this second example, 'epson2:libusb:/dev/usb:/dev/ugen0.2' is the backend name (epson2) and /dev/ugen0.2 is the device node used by the scanner.
If scanimage is unable to identify the scanner, this message will appear:
# scanimage -L

No scanners were identified. If you were expecting something different,
check that the scanner is plugged in, turned on and detected by the
sane-find-scanner tool (if appropriate). Please read the documentation
which came with this software (README, FAQ, manpages).
If this happens, edit the backend configuration file in /usr/local/etc/sane.d/ and define the scanner device used. For example, if the undetected scanner model is an EPSON Perfection™ 1650 and it uses the epson2 backend, edit /usr/local/etc/sane.d/epson2.conf. When editing, add a line specifying the interface and the device node used. In this case, add the following line:
usb /dev/ugen0.2
Save the edits and verify that the scanner is identified with the right backend name and the device node:
# scanimage -L
device 'epson2:libusb:/dev/usb:/dev/ugen0.2' is a Epson GT-8200 flatbed scanner
Once scanimage -L sees the scanner, the configuration is complete and the scanner is now ready to use.
While scanimage can be used to perform an image acquisition from the command line, it is often preferable to use a graphical interface to perform image scanning. The graphics/sane-frontends package or port installs a simple but efficient graphical interface, xscanimage.
Alternately, xsane, which is installed with the graphics/xsane package or port, is another popular graphical scanning frontend. It offers advanced features such as various scanning modes, color correction, and batch scans. Both of these applications are usable as a GIMP plugin.
In order to have access to the scanner, a user needs read and write permissions to the device node used by the scanner. In the previous example, the USB scanner uses the device node /dev/ugen0.2 which is really a symlink to the real device node /dev/usb/0.2.0. The symlink and the device node are owned, respectively, by the wheel and operator groups. While adding the user to these groups will allow access to the scanner, it is considered insecure to add a user to wheel. A better solution is to create a group and make the scanner device accessible to members of this group.
This example creates a group called usb:
# pw groupadd usbThen, make the /dev/ugen0.2 symlink and the /dev/usb/0.2.0 device node accessible to the usb group with write permissions of 0660 or 0664 by adding the following lines to /etc/devfs.rules:
[system=5]
add path ugen0.2 mode 0660 group usb
add path usb/0.2.0 mode 0666 group usb
Finally, add the users to usb in order to allow access to the scanner:
# pw groupmod usb -m joeFor more details refer to pw(8).
核心 (Kernel) 是 FreeBSD 作業系統最重要的部份之一。它負責記憶體管理、安全控管、網路、硬碟存取等等。 儘管目前 FreeBSD 大多可以用動態設定, 但有時仍需要設定並編譯自訂的核心。
讀完這章,您將了解:
何時需要編譯自訂核心。
如何取得硬體資訊。
如何量身訂做核心設定檔。
如何使用核心設定檔來建立並編譯新的核心。
如何安裝新的核心。
發生錯誤時如何排除問題。
所有在本章所列出的指令均應以 root 來執行。
早期的 FreeBSD 的核心 (Kernel) 被戲稱為 “巨石”。因為當時的核心是一個非常大的程式,且只支援固定的硬體裝置,如果您想改變核心的設定,就必須編譯一個新核心並重新開機,才能使用。
現今,大多數在 FreeBSD 核心的功能已採用模組 (Module) 的方式包裝,並可依需求動態從核心載入或卸載。 這使得執行中的核心能夠快速適應新硬體環境並在核心開啟新的功能,這就是所謂模組化核心 (Modular Kernel)。
儘管如此,還是有一些功能因使用到靜態的核心設定須要編譯,因為這些功能與核心緊密結合,無法將做成可動態載入的模組。且部份強調安全性的環境會盡量避免載入與卸載核心模組,且只要將需要的功能靜態的編譯到核心當中。
編譯自訂的核心幾乎是每位進階的 BSD 使用者所必須經歷的過程。儘管這項工作可能比較耗時,但在 FreeBSD 的使用上會有許多好處。 跟必須支援大多數各式硬體的 GENERIC 核心相比的話, 自訂的核心可以更『體貼』,只支援『自己硬體』的部分就好。 自訂核心有許多項優點,如:
加速開機,因為自訂的核心只需要偵測您系統上存在的硬體,所以讓啟動所花的過程更流暢快速。
減少記憶體使用,自訂的核心通常會比 GENERIC 核心使用更少的記憶體,這很重要,因為核心必須一直存放在實體記憶體內,會讓其他應用程式無法使用。因此,自訂核心對於記憶體較小的系統來說,發揮很大的作用。
支援額外的硬體,自訂的核心可以增加一些 GENERIC 核心沒有提供的硬體支援。
在編譯自訂核心之前,請思考要這麼做的原因,若是因為需要特定硬體的支援,很可能已有既有的模組可以使用。
核心模組會放在 /boot/kernel 並且可使用 kldload(8) 動態載入到執行中的核心。大部份的核心驅動程式都有可載入的模組與操作手冊。例如 ath(4) 無線乙太網路驅動程式在其操作手冊有以下資訊:
Alternatively, to load the driver as a module at boot time, place the
following line in loader.conf(5):

    if_ath_load="YES"
加入 if_ath_load="YES" 到 /boot/loader.conf 會於開機期間自動載入這個模組。
部份情況在 /boot/kernel 會沒有相關的模組,這對於某些子系統大多是真的。
在編輯核心設定檔之前,建議先調查清楚機器各項硬體資訊。在雙作業系統的環境,也可透過其他作業系統來了解目前機器上的硬體資訊。 舉例來說,Microsoft™ 的 裝置管理員 (Device Manager) 內會有目前已安裝的硬體資訊。
某些版本的 Microsoft™ Windows™ 會有系統 (System) 圖示可用來進入 裝置管理員。 |
若 FreeBSD 是唯一安裝的作業系統,則可使用 dmesg(8) 來查看開時時系統偵測到的硬體資訊 。FreeBSD 上大多硬體驅動程式都有操作手冊會列出支援的硬體。例如,以下幾行是說 psm(4) 驅動程式偵測到了一隻滑鼠:
psm0: <PS/2 Mouse> irq 12 on atkbdc0
psm0: [GIANT-LOCKED]
psm0: [ITHREAD]
psm0: model Generic PS/2 mouse, device ID 0
因為該硬體存在,此驅動程式便不應該從自訂核心設定檔中移除。
若 dmesg 輸出的結果未顯示開機偵測硬體的部份,則可改閱讀 /var/run/dmesg.boot 檔案的內容。
另外,也可以透過 pciconf(8) 工具可用來查詢硬體資訊,該工具會列出更詳細的硬體資訊如:
% pciconf -lv
ath0@pci0:3:0:0:        class=0x020000 card=0x058a1014 chip=0x1014168c rev=0x01 hdr=0x00
    vendor     = 'Atheros Communications Inc.'
    device     = 'AR5212 Atheros AR5212 802.11abg wireless'
    class      = network
    subclass   = ethernet
以上輸出資訊說明 ath 驅動程式已經找到一個無線乙太網路裝置。
在 man(1) 指令加上 -k 旗標可提供有用的資訊,例如,這可列出有包含指定裝置品牌或名稱的手冊頁面清單:
# man -k Atheros
ath(4)                   - Atheros IEEE 802.11 wireless network driver
ath_hal(4)               - Atheros Hardware Access Layer (HAL)
準備好硬體清單之後,參考該清單來確認已安裝的硬體驅動程式在編輯自訂核心設定時沒有被移除。
為了要建立自訂核心設定檔並編譯自訂核心,必須先安裝完整的 FreeBSD 原始碼樹。
若 /usr/src/ 目錄不存在或者是空的,代表尚未安裝。原始碼可以使用 Subversion 並依據 使用 Subversion 中的操作說明來安裝。
完成原始碼安裝完成後,需檢查 /usr/src/sys 內的檔案。該目錄內包含數個子目錄,這些子目錄代表著支援的硬體架構 (Architecture) 如下:amd64, i386, ia64, powerpc 以及 sparc64。在指定架構目錄中的內容只對該架構有效,其餘部份的程式碼與硬體架構無關,可通用所有平台。每個支援的硬體架構中會有 conf 子目錄,裡面含有供該架構使用的 GENERIC 核心設定檔。
請不要直接對 GENERIC 檔案做編輯。複製該檔案為另一個名稱,並對複製出來的檔案做編輯,習慣上檔名會全部使用大寫字元。當維護多台安裝不同的硬體的 FreeBSD 機器時,將檔名後方加上機器的主機名稱 (Host name) 是個不錯的方法。以下範例使用 amd64 架構的 GENERIC 設定檔建立了一個複本名稱為 MYKERNEL:
# cd /usr/src/sys/amd64/conf
# cp GENERIC MYKERNEL
現在可以使用任何 ASCII 文字編輯器來自訂 MYKERNEL。預設的編輯器為 vi,在 FreeBSD 也內建一個易於初學者使用的編輯器叫做 ee。
核心設定檔的格式很簡單,每一行會含有代表裝置 (Device) 或子系統 (Subsystem) 的關鍵字、參數以及簡短的說明。任何在 符號之後的文字會被當做註解並且略過。要移除核心對某個裝置或子系統的支援,僅需要在代表該裝置或子系統的行前加上 符號。請不要在您還不了解用途的行前加上或移除 # 符號。
移除對裝置或選項的支援很容易會造成核心損壞。例如,若從核心設定檔 ata(4) 驅動程式,那麼使用 ATA 磁碟驅動程式的系統便會無法開機。因此當您不確定時,請在核心保留該項目的支援。 |
除了在設定檔中提供的簡短說明之外,尚有其他的說明在 NOTES 檔案中,可在與該架構 GENERIC 相同的目錄底下找到。要查看所有架構通用的選項,請參考 /usr/src/sys/conf/NOTES。
當完成自訂的核心設定檔,請備份到 /usr/src 位置之外。 或者,將核心設定檔放在其他地方,然後建立一個符號連結 (Symbolic link) 至該檔案: |
設定檔中可以使用 include 指令 (Directive)。該指令可以引用其他設定檔到目前的設定檔,這讓只需根據現有檔案設定做些微調整時更簡單。若只有少量的額外選項或驅動程式需要設定,該指令可引用 GENERIC 並設定額外增加的選項,如範例所示:
include GENERIC
ident MYKERNEL

options         IPFIREWALL
options         DUMMYNET
options         IPFIREWALL_DEFAULT_TO_ACCEPT
options         IPDIVERT
使用此方法,設定檔只含有與 GENERIC 核心不同的部份。當升級有新功能加入 GENERIC 時,也可一併引用,除非特別使用 nooptions 或 nodevice 選項來排除設定。更詳細的設定檔指令及其說明可在 config(5) 找到。
要產生含有所有可用選項的設定檔,可以 |
完成自訂設定檔的編輯並儲存之後,便可依據以下步驟編譯核心的原始碼:
Procedure: 編譯核心
切換至此目錄:
# cd /usr/src指定自訂核心設定檔的名稱來編譯新的核心:
# make buildkernel KERNCONF=MYKERNEL安裝使用指定核心設定檔所編譯的新核心。此指令將會複製新核心到 /boot/kernel/kernel 並將舊核心備份到 /boot/kernel.old/kernel:
# make installkernel KERNCONF=MYKERNEL關機並重新開機載入新的核心,若發生錯誤請參考 無法使用核心開機。
預設在自訂核心編譯完成後,所有核心模組也同被重新編譯。要快速更新核心或只編譯自訂的模組,需在開始編譯之前先編輯 /etc/make.conf。
例如,使用以下變數可指定要編譯的模組清單來替代預設編譯所有模組的設定:
MODULES_OVERRIDE = linux acpi
或者,可使用以下變數來從編譯程序中排除要編譯的模組:
WITHOUT_MODULES = linux acpi sound
尚有其他可用的變數,請參考 make.conf(5) 取得詳細資訊。
當編譯自訂核心時可能發生以下四種類型的問題:
config 失敗若 config 失敗,會列出不正確的行號。使用以下訊息為例子,需要與 GENERIC 或 NOTES 比對來確認第 17 行輸入的內容正確:
config: line 17: syntax errormake 失敗若 make 失敗,通常是因為核心設定檔未提供足夠的資訊讓 config 找到問題。請仔細檢查設定檔,若仍不清楚問題,請寄發電子郵件給 FreeBSD general questions mailing list 並附上核心設定檔。
若新核心無法開機或無法辨識裝置並不要恐慌!幸好,FreeBSD 有良好的機制可以從不相容的核心復原。只需要在 FreeBSD 開機載入程式 (Boot loader) 選擇要用來開機的核心便可,當系統開機選單出現時選擇 "Escape to a loader prompt" 選項,並在指令提示後輸入 boot kernel.old 或替換為任何其他已經知道可以正常開機的核心名稱。
使用好的核心開機之後,檢查設定檔並嘗試再編譯一次。/var/log/messages 是有用的資源,它在每次成功開機時會記錄核心訊息。同樣的,dmesg(8) 也會印出自本次開機後的核心訊息。
在排除核心問題時,請確定留有 GENERIC 的複本,或者其他已知可以運作的核心,並使用不同的名稱來確保下次編譯時不會被刪除,這很重要,因此每當新的核心被安裝之後,kernel.old 都會被最後安裝的核心覆寫,有可能會無法開機。盡快,透過重新命名將可運作的核心目錄移動到目前運作的核心目錄: |
若核心版本與系統工具所編譯的版本不同,例如,有一個核心使用 -CURRENT 的原始碼編譯並安裝在 -RELEASE 的系統上,許多系統狀態指令如 ps(1) 及 vmstat(8) 將會無法運作。要修正此問題,請使用與核心相同版本的原始碼樹 (Source tree) 重新編譯並安裝 World。使用與作業系統其他部份版本不同的核心永遠不會是個好主意。
儘管很多人試圖淘汰列印功能,但列印資訊到紙上仍是一個重要的功能。列印由兩個基本元件組成,包含了資料傳送到印表機的方式以及印表機可以理解的資料形式。
基本的列印功能可以快速設定完成,列印機必須能夠列印純 ASCII 文字。若要列印其他類型的檔案,請參考 過濾器。
建立一個目錄來儲存要被列印的檔案:
# mkdir -p /var/spool/lpd/lp
# chown daemon:daemon /var/spool/lpd/lp
# chmod 770 /var/spool/lpd/lp
以 root 建立 /etc/printcap 內容如下:
lp:\
	:lp=/dev/unlpt0:\  (1)
	:sh:\
	:mx#0:\
	:sd=/var/spool/lpd/lp:\
	:lf=/var/log/lpd-errs:
| 1 | 此行是針對連接到 USB 埠的印表機。連接到並列或 "印表器 (Printer)" 埠的印表機要使用:直接連接到網路的印表機要使用:替換 network-printer-name 為網路印表機的 DNS 主機名稱。 |
編輯 /etc/rc.conf 加入下行來開啟 lpd:
lpd_enable="YES"
啟動服務:
# service lpd start
Starting lpd.
測試列印:
# printf "1. This printer can print.\n2. This is the second line.\n" | lpr若列印的兩行未從左邊界開始,而是呈現 "階梯狀 (Stairstep)",請參考 避免在純文字印表機階梯狀列印。 |
現在可以使用 lpr 來列印文字檔,只要在指令列給序檔案名稱,或者將輸出使用管線符號 (Pipe) 傳送給 lpr。
% lpr textfile.txt
% ls -lh | lpr印表機有許多方式可以連接到電腦,小型的桌面印表機會直接連接到電腦的 USB 埠,舊式的印表機會連接到並列 (Parallel) 或 "印表機 (Printer)" 埠,而有一部份印表機則是直接連接網路,讓印表機能夠給多台電腦共享使用,還有少部分印表機則是連接到較罕見的序列 (Serial) 埠。
FreeBSD 可以與這些類型的印表機溝通。
USB 印表機可以連接到電腦上任何可用的 USB 埠。
當 FreeBSD 偵測到 USB 印表機,會建立兩個裝置項目:/dev/ulpt0 以及 /dev/unlpt0,傳送到兩者任一裝置的資料都會被轉發到印表機。在每個列印工作完成後 ulpt0 便會重設 USB 埠,重設 USB 埠可能會在部份印表機造成問題,因此通常可以改使用 unlpt0 裝置。unlpt0 不會重設 USB 埠。
並列埠裝置使用 /dev/lpt0,此裝置不論印表機是否連接上都會存在,它並不會自動偵測。
供應商已不再採用這種 "舊式" 連接埠,且有許多電腦甚至已沒有這種連接埠。可以用轉接器來連接並列印表機到 USB 埠,有了轉接器,並列印表機可以被當作 USB 印表機使用。有另一種稱作 列印伺服器 (Print server) 的裝置也可用來連接並列印表機到網路。
序列埠也是另一種舊式連接埠,已很少用在印表機上,除了某些特殊的應用外,纜線、接頭與需要的佈線方式依需求變化性很大。
內建在主機板的序列埠的序列裝置名稱為 /dev/cuau0 或 /dev/cuau1。也有序列 USB 轉接器可使用,而裝置的的名稱則會是 /dev/cuaU0。
要與序列印表機通訊必須知道數個通訊參數,其中最重要的是 傳輸速率 (Baud rate) 或 BPS (Bits Per Second) 以及 同位檢查 (Parity)。數值有數種,但一般序列印表機會使用 的傳輸速率是 9600 且無同位檢查。
網路印表機可直接連接到區域網路。
若印表機透過 DHCP 分配動態位址,則必須要知道 DNS 主機名稱,DNS 應動態更新來讓主機名稱能夠對應到正確的 IP 位址。指定網路印表機一個靜態的 IP 位址可避免這個問題。
大多數網路印表機可以認得使用 LPD 通訊協定所送出的列印工作,列印佇列 (Print queue) 的名稱也會在這時指定。部份印表機會依據使用的佇列來決定處理資料的方式,例如 raw 佇列會列印原始資料,而 text 佇列則會在純文字上增加換行符號 (Carriage return)。
大部份網路印表機也可列印直接傳送到埠號 9100 的資料。
傳送給印表機的資料必須使用印表機能夠理解的語言,這些語言稱為頁面描述語言 (Page Description Languages) 或 PDL。
純 ASCII 文字是傳送資料到印表機最簡單的方式,一個字元對應一個要列印的文字:資料中的 A 會列印一個 A 在頁面。可以使用的格式非常少,沒有辦法選擇字型或者比例間距。強迫使用簡單的純 ASCII 為的是讓文字可以直接從電腦列印只需一點或甚至不需要編碼或轉譯,列印的結果可直接對應傳送的內容。
部份便宜印表機無法列印純 ASCII 文字,這讓這些印表機較難設定。
PostScript™ 與 ASCII 幾乎相反,與簡單的文字不同,PostScript™ 程式語言有一套指令可以繪出最終所要的文件,可以使用不同的字型與圖形,但是,這樣強大的功能是有代價的,繪製頁面需要搛寫程式語言,通常這個程式語言會由應用程式產生,所以使用者是看不到的。
便宜的印表機有時會移除 PostScript™ 的相容性來節省成本。
PCL 由 ASCII 延伸而來,加入了跳脫序列 (Escape sequence) 來標示格式、選擇字型以及列印圖型。大部份印表機都支援 PCL5,少數支援較新的 PCL6 或 PCLXL,這些後來的版本是 PCL5 的超集合 (Superset),並可以提供更快的列印速度。
製造商可能會使用簡單的處理器和較小的記憶體來降低印表機的成本,這些印表機無法列印純文字,相反的,文字與圖形會先在機器上的驅動程式畫完後傳送到印表機。這些稱為以主機為基礎 (Host-based) 的印表機。
驅動程式與以主機為基礎的印表機通訊通常會透過專用或無文件的通訊協定,這讓這些印表機只能在最常用的作業系統上運作。
Port 套件集與 FreeBSD 工具集有許多可以處理 PostScript™ 輸出的應用程式,此表整理出了可轉換 PostScript™ 成其他常用 PDL 的工具:
| 輸出 PDL | 產生由 | 說明 |
|---|---|---|
PCL 或 PCL5 | 單色使用 | |
PCLXL 或 PCL6 | 單色使用 | |
ESC/P2 |
| |
XQX |
要可以列印最簡單的方式就是選擇支援 PostScript™ 的印表機,再來是支援 PCL 的印表機,有了 print/ghostscript9-base 這些印表機也可像原生支援 PostScript™ 的印表機一般使用。有直接支援 PostScript™ 或 PCL 的印表機通常也會直接支援純 ASCII 文字檔案。
行列式印表機如同典型的噴墨式印表機通常不支援 PostScript™ 或 PCL,這種印表機通常可以列印純 ASCII 文字檔案。print/ghostscript9-base 支援部份這種印表機使用的 PDL,不過要在這種印表機上列印完全以圖型為基礎的頁面通常會非常緩慢,由於需要傳送大量的資料並列印。
以主機為基礎的印表機通常較難設定,有些會因為用了專用的 PDL 而無法使用,盡可能避免使用這類的印表機。
有關各種 PDL 的介紹可至 http://www.undocprint.org/formats/page_description_languages。各種型號印表機所使用的特定 PDL 可至 http://www.openprinting.org/printers 查詢。
對於偶爾列印,檔案可以直接傳送到印表機裝置,無需做任何設定。例如,要傳送一個名稱為 sample.txt 的檔案到 USB 印表機:
# cp sample.txt /dev/unlpt0要直接使用網路印表機列印需看該印表機支援的功能,但大多數會接受埠號 9100 的列印作業,可使用 nc(1) 來完成。要使用 DNS 主機名稱為 netlaser 的印表機列印與上述相同的檔案可:
# nc netlaser 9100 < sample.txt在背景列印一個檔案稱作 Spooling,緩衝程式 (Spooler) 讓使用者能夠繼續執行電腦的其他程式而不需要等候印表機緩慢的完成列印工作。
建立要用來儲存列印工作的目錄、設定擁有關係以及權限來避免其他使用者可以檢視這些檔案的內容:
# mkdir -p /var/spool/lpd/lp
# chown daemon:daemon /var/spool/lpd/lp
# chmod 770 /var/spool/lpd/lp
印表機會定義在 /etc/printcap,每台印表機項目所包含的詳細資料有名稱、連接的接頭以及各種其他設定。建立 /etc/printcap 使用以下內容:
lp:\				(1)
	:lp=/dev/unlpt0:\	(2)
	:sh:\			(3)
	:mx#0:\			(4)
	:sd=/var/spool/lpd/lp:\	(5)
	:lf=/var/log/lpd-errs:	(6)
| 1 | 印表機的名稱。 lpr(1) 會傳送列印工作到 lp 印表機,除非有使用 -P 來指定其他印表機,所以預的印表機名稱應使用 lp。 |
| 2 | 印表機所連接到裝置。替換此行為正確的連線類型,如此處所示。 |
| 3 | 在列印工作開始時不列印首頁。 |
| 4 | 不限制列印工作的最大尺寸。 |
| 5 | 此印表機的緩衝 (Spooling) 目錄路徑,每台印表機會自己使用一個獨立的緩衝 (Spooling) 目錄。 |
| 6 | 回報此印表機的錯誤的日誌檔。 |
在建立 /etc/printcap 之後,使用 chkprintcap(8) 測試印表機是否有錯誤:
# chkprintcap在繼續之前修正任何回報的問題。
開啟 /etc/rc.conf 中的 lpd(8):
lpd_enable="YES"
啟動服務:
# service lpd startDocuments are sent to the printer with lpr. A file to be printed can be named on the command line or piped into lpr. These two commands are equivalent, sending the contents of doc.txt to the default printer:
% lpr doc.txt
% cat doc.txt | lpr
Printers can be selected with -P. To print to a printer called laser:
% lpr -Plaser doc.txtThe examples shown so far have sent the contents of a text file directly to the printer. As long as the printer understands the content of those files, output will be printed correctly.
Some printers are not capable of printing plain text, and the input file might not even be plain text.
Filters allow files to be translated or processed. The typical use is to translate one type of input, like plain text, into a form that the printer can understand, like PostScript™ or PCL. Filters can also be used to provide additional features, like adding page numbers or highlighting source code to make it easier to read.
The filters discussed here are input filters or text filters. These filters convert the incoming file into different forms. Use su(1) to become root before creating the files.
Filters are specified in /etc/printcap with the if= identifier. To use /usr/local/libexec/lf2crlf as a filter, modify /etc/printcap like this:
lp:\
	:lp=/dev/unlpt0:\
	:sh:\
	:mx#0:\
	:sd=/var/spool/lpd/lp:\
	:if=/usr/local/libexec/lf2crlf:\   (1)
	:lf=/var/log/lpd-errs:
| 1 | if= identifies the input filter that will be used on incoming text. |
The backslash line continuation characters at the end of the lines in printcap entries reveal that an entry for a printer is really just one long line with entries delimited by colon characters. An earlier example can be rewritten as a single less-readable line: lp:lp=/dev/unlpt0:sh:mx#0:sd=/var/spool/lpd/lp:if=/usr/local/libexec/lf2crlf:lf=/var/log/lpd-errs: |
Typical FreeBSD text files contain only a single line feed character at the end of each line. These lines will "stairstep" on a standard printer:
A printed file looks
                    like the steps of a staircase
                                                 scattered by the wind
A filter can convert the newline characters into carriage returns and newlines. The carriage returns make the printer return to the left after each line. Create /usr/local/libexec/lf2crlf with these contents:
#!/bin/sh
CR=$'\r'
/usr/bin/sed -e "s/$/${CR}/g"
Set the permissions and make it executable:
# chmod 555 /usr/local/libexec/lf2crlfModify /etc/printcap to use the new filter:
:if=/usr/local/libexec/lf2crlf:\
Test the filter by printing the same plain text file. The carriage returns will cause each line to start at the left side of the page.
GNUEnscript converts plain text files into nicely-formatted PostScript™ for printing on PostScript™ printers. It adds page numbers, wraps long lines, and provides numerous other features to make printed text files easier to read. Depending on the local paper size, install either print/enscript-letter or print/enscript-a4 from the Ports Collection.
Create /usr/local/libexec/enscript with these contents:
#!/bin/sh
/usr/local/bin/enscript -o -
Set the permissions and make it executable:
# chmod 555 /usr/local/libexec/enscriptModify /etc/printcap to use the new filter:
:if=/usr/local/libexec/enscript:\
Test the filter by printing a plain text file.
Many programs produce PostScript™ documents. However, inexpensive printers often only understand plain text or PCL. This filter converts PostScript™ files to PCL before sending them to the printer.
由 Port 套件集安裝 Ghostscript PostScript™ 直譯器,print/ghostscript9-base。
Create /usr/local/libexec/ps2pcl with these contents:
#!/bin/sh
/usr/local/bin/gs -dSAFER -dNOPAUSE -dBATCH -q -sDEVICE=ljet4 -sOutputFile=- -
Set the permissions and make it executable:
# chmod 555 /usr/local/libexec/ps2pclPostScript™ input sent to this script will be rendered and converted to PCL before being sent on to the printer.
Modify /etc/printcap to use this new input filter:
:if=/usr/local/libexec/ps2pcl:\
Test the filter by sending a small PostScript™ program to it:
% printf "%%\!PS \n /Helvetica findfont 18 scalefont setfont \
72 432 moveto (PostScript printing successful.) show showpage \004" | lprA filter that detects the type of input and automatically converts it to the correct format for the printer can be very convenient. The first two characters of a PostScript™ file are usually %!. A filter can detect those two characters. PostScript™ files can be sent on to a PostScript™ printer unchanged. Text files can be converted to PostScript™ with Enscript as shown earlier. Create /usr/local/libexec/psif with these contents:
#!/bin/sh
#
#  psif - Print PostScript or plain text on a PostScript printer
#
IFS="" read -r first_line
first_two_chars=`expr "$first_line" : '\(..\)'`

case "$first_two_chars" in
%!)
    # %! : PostScript job, print it.
    echo "$first_line" && cat && exit 0
    exit 2
    ;;
*)
    # otherwise, format with enscript
    ( echo "$first_line"; cat ) | /usr/local/bin/enscript -o - && exit 0
    exit 2
    ;;
esac
Set the permissions and make it executable:
# chmod 555 /usr/local/libexec/psifModify /etc/printcap to use this new input filter:
:if=/usr/local/libexec/psif:\
Test the filter by printing PostScript™ and plain text files.
The entries in /etc/printcap are really definitions of queues. There can be more than one queue for a single printer. When combined with filters, multiple queues provide users more control over how their jobs are printed.
As an example, consider a networked PostScript™ laser printer in an office. Most users want to print plain text, but a few advanced users want to be able to print PostScript™ files directly. Two entries can be created for the same printer in /etc/printcap:
textprinter:\
	:lp=9100@officelaser:\
	:sh:\
	:mx#0:\
	:sd=/var/spool/lpd/textprinter:\
	:if=/usr/local/libexec/enscript:\
	:lf=/var/log/lpd-errs:

psprinter:\
	:lp=9100@officelaser:\
	:sh:\
	:mx#0:\
	:sd=/var/spool/lpd/psprinter:\
	:lf=/var/log/lpd-errs:
Documents sent to textprinter will be formatted by the /usr/local/libexec/enscript filter shown in an earlier example. Advanced users can print PostScript™ files on psprinter, where no filtering is done.
This multiple queue technique can be used to provide direct access to all kinds of printer features. A printer with a duplexer could use two queues, one for ordinary single-sided printing, and one with a filter that sends the command sequence to enable double-sided printing and then sends the incoming file.
Several utilities are available to monitor print jobs and check and control printer operation.
lpq(1) shows the status of a user’s print jobs. Print jobs from other users are not shown.
Show the current user’s pending jobs on a single printer:
% lpq -Plp
Rank   Owner      Job  Files                                 Total Size
1st    jsmith     0    (standard input)                      12792 bytes
Show the current user’s pending jobs on all printers:
% lpq -a
lp:
Rank   Owner      Job  Files                                 Total Size
1st    jsmith     1    (standard input)                      27320 bytes

laser:
Rank   Owner      Job  Files                                 Total Size
1st jsmith 287 (standard input) 22443 byteslprm(1) is used to remove print jobs. Normal users are only allowed to remove their own jobs. root can remove any or all jobs.
Remove all pending jobs from a printer:
# lprm -Plp -
dfA002smithy dequeued
cfA002smithy dequeued
dfA003smithy dequeued
cfA003smithy dequeued
dfA004smithy dequeued
cfA004smithy dequeued
Remove a single job from a printer. lpq(1) is used to find the job number.
% lpq
Rank   Owner      Job  Files                                 Total Size
1st    jsmith     5    (standard input)                      12188 bytes
% lprm -Plp 5
dfA005smithy dequeued
cfA005smithy dequeuedlpc(8) is used to check and modify printer status. lpc is followed by a command and an optional printer name. all can be used instead of a specific printer name, and the command will be applied to all printers. Normal users can view status with lpc(8). Only root can use commands which modify printer status.
Show the status of all printers:
% lpc status all
lp:
	queuing is enabled
	printing is enabled
	1 entry in spool area
	printer idle
laser:
	queuing is enabled
	printing is enabled
	1 entry in spool area
	waiting for laser to come up
Prevent a printer from accepting new jobs, then begin accepting new jobs again:
# lpc disable lp
lp:
	queuing disabled
# lpc enable lp
lp:
	queuing enabled
Stop printing, but continue to accept new jobs. Then begin printing again:
# lpc stop lp
lp:
	printing disabled
# lpc start lp
lp:
	printing enabled
	daemon started
Restart a printer after some error condition:
# lpc restart lp
lp:
	no daemon to abort
	printing enabled
	daemon restarted
Turn the print queue off and disable printing, with a message to explain the problem to users:
# lpc down lp Repair parts will arrive on Monday
lp:
	printer and queuing disabled
	status message is now: Repair parts will arrive on Monday
Re-enable a printer that is down:
# lpc up lp
lp:
	printing enabled
	daemon started
See lpc(8) for more commands and options.
Printers are often shared by multiple users in businesses and schools. Additional features are provided to make sharing printers more convenient.
The printer name is set in the first line of the entry in /etc/printcap. Additional names, or aliases, can be added after that name. Aliases are separated from the name and each other by vertical bars:
lp|repairsprinter|salesprinter:\
Aliases can be used in place of the printer name. For example, users in the Sales department print to their printer with
% lpr -Psalesprinter sales-report.txtUsers in the Repairs department print to their printer with
% lpr -Prepairsprinter repairs-report.txtAll of the documents print on that single printer. When the Sales department grows enough to need their own printer, the alias can be removed from the shared printer entry and used as the name of a new printer. Users in both departments continue to use the same commands, but the Sales documents are sent to the new printer.
It can be difficult for users to locate their documents in the stack of pages produced by a busy shared printer. Header pages were created to solve this problem. A header page with the user name and document name is printed before each print job. These pages are also sometimes called banner or separator pages.
Enabling header pages differs depending on whether the printer is connected directly to the computer with a USB, parallel, or serial cable, or is connected remotely over a network.
Header pages on directly-connected printers are enabled by removing the :sh:\ (Suppress Header) line from the entry in /etc/printcap. These header pages only use line feed characters for new lines. Some printers will need the /usr/shared/examples/printing/hpif filter to prevent stairstepped text. The filter configures PCL printers to print both carriage returns and line feeds when a line feed is received.
Header pages for network printers must be configured on the printer itself. Header page entries in /etc/printcap are ignored. Settings are usually available from the printer front panel or a configuration web page accessible with a web browser.
Several other printing systems are available in addition to the built-in lpd(8). These systems offer support for other protocols or additional features.
CUPS is a popular printing system available on many operating systems. Using CUPS on FreeBSD is documented in a separate article: CUPS
Hewlett Packard provides a printing system that supports many of their inkjet and laser printers. The port is print/hplip. The main web page is at http://hplipopensource.com/hplip-web/index.html. The port handles all the installation details on FreeBSD. Configuration information is shown at http://hplipopensource.com/hplip-web/install/manual/hp_setup.html.
LPRng was developed as an enhanced alternative to lpd(8). The port is sysutils/LPRng. For details and documentation, see http://www.lprng.com/.
FreeBSD 提供 Linux™ Binary 的相容性,允許使用者在 FreeBSD 系統上不需要修改就可以安裝和執行大部份的 Linux™ Binary。 曾經有報告指出,在某些情況下,Linux™ Binary 在 FreeBSD 的表現比在 Linux™ 好。
然而,部份特定在 Linux™ 作業系統上的功能在 FreeBSD 並沒有支援。例如,若 Linux™ Binary 過度的使用 i386™ 特定的呼叫,如啟動虛擬 8086 模式,會無法在 FreeBSD 執行。
FreeBSD 10.3 後支援 64 位元的 Linux™ Binary 相容性。 |
讀完這章,您將了解:
如何在 FreeBSD 系統啟用 Linux™ Binary 相容模式。
如何安裝其他的 Linux™ 共用程式庫。
如何在 FreeBSD 系統安裝 Linux™ 應用程式。
在 FreeBSD 中 Linux™ 相容性的實作細節。
在開始閱讀這章之前,您需要:
知道如何安裝 其他的第三方軟體。
Linux™ 程式庫預設並不會安裝,且並不會開啟 Linux™ Binary 相容性。 Linux™ 程式庫可以手動安裝或是從 FreeBSD Port 套件集安裝。
在嘗試編譯 Port 前,要載入 Linux™ 核心模組,否則編譯會失敗:
# kldload linux對 64-位元的相容性:
# kldload linux64確認模組已載入:
% kldstat
      Id Refs Address    Size     Name
      1    2 0xc0100000 16bdb8   kernel
      7    1 0xc24db000 d000     linux.ko
在 FreeBSD 安裝基本的 Linux™ 程式庫和 Binary 最簡單的方式是安裝 emulators/linux_base-c6 套件或是 Port 。要安裝 Port:
# pkg install emulators/linux_base-c6要在開機時開啟 Linux™ 相容性,可以加入這行到 /etc/rc.conf:
linux_enable="YES"
在 64-位元的機器上,/etc/rc.d/abi 會自動載入用來做 64-位元模擬的模組。
Since the Linux™ binary compatibility layer has gained support for running both 32- and 64-bit Linux™ binaries (on 64-bit x86 hosts), it is no longer possible to link the emulation functionality statically into a custom kernel.
若有 Linux™ 應用程式在設定 Linux™ Binary 相容性後出現缺少共用程式庫的情況,確認這個 Linux™ Binary 需要哪個共用程式庫並手動安裝。
在 Linux™ 系統,可使用 ldd 來找出應用程式需要哪個共用程式庫。 例如,檢查 linuxdoom 需要哪個共用程式庫,在有安裝 Doom 的 Linux™ 系統執行這個指令:
% ldd linuxdoom
libXt.so.3 (DLL Jump 3.1) => /usr/X11/lib/libXt.so.3.1.0
libX11.so.3 (DLL Jump 3.1) => /usr/X11/lib/libX11.so.3.1.0
libc.so.4 (DLL Jump 4.5pl26) => /lib/libc.so.4.6.29
然後,複製所有 Linux™ 系統輸出結果中最後一欄的檔案到 FreeBSD 系統的 /compat/linux。 複製完後,建立符號連結 (Symbolic link) 至輸出結果第一欄的名稱。以這個例子會在 FreeBSD 系統產生以下檔案:
/compat/linux/usr/X11/lib/libXt.so.3.1.0
/compat/linux/usr/X11/lib/libXt.so.3 -> libXt.so.3.1.0
/compat/linux/usr/X11/lib/libX11.so.3.1.0
/compat/linux/usr/X11/lib/libX11.so.3 -> libX11.so.3.1.0
/compat/linux/lib/libc.so.4.6.29
/compat/linux/lib/libc.so.4 -> libc.so.4.6.29
若 Linux™ 共用程式庫已經存在,並符合 ldd 輸出結果第一欄的主要修訂版號,則不需要複製該行最後一欄的檔案,使用既有的程式庫應可運作。若有較新的版本建議仍要複製共用程式庫,只要符號連結指向新版的程式庫,舊版便可移除。
例如,以下程式庫已存在 FreeBSD 系統:
/compat/linux/lib/libc.so.4.6.27
/compat/linux/lib/libc.so.4 -> libc.so.4.6.27
且 ldd 顯示 Binary 需要使用較新的版本:
libc.so.4 (DLL Jump 4.5pl26) -> libc.so.4.6.29雖然既有的程式庫只有在最後一碼過時一或兩個版本,程式應該仍可使用稍微舊的版本執行,雖然如此,保險起見還替換既有的 libc.so 為較新的版本:
/compat/linux/lib/libc.so.4.6.29
/compat/linux/lib/libc.so.4 -> libc.so.4.6.29
一般來說,只有在安裝 Linux™ 程式到 FreeBSD 完的前幾次會需要查看 Linux™ Binary 相依的共用程式庫。之後系統便有足夠的 Linux™ 共用程式庫能夠執行新安裝的 Linux™ Binary,便不再需要額外的動作。
ELF Binary 有時候需要額外的步驟。當執行無商標 (Unbranded) 的 ELF Binary,會產生錯誤訊息:
% ./my-linux-elf-binary
ELF binary type not known
Abort
要協助 FreeBSD 核心區別是 FreeBSD ELF Binary 還是 Linux™ Binary,可使用 brandelf(1):
% brandelf -t Linux my-linux-elf-binary由於 GNU 工具鏈會自動放置適當的商標資訊到 ELF Binary,通常不需要這個步驟。
要安裝 Linux™RPM 為基礎的應用程式,需先安裝 archivers/rpm4 套件或 Port。安裝完成之後,root 可以使用這個指令安裝 .rpm:
# cd /compat/linux
# rpm2cpio < /path/to/linux.archive.rpm | cpio -id
如果需要, brandelf 已安裝的 ELF Binary。注意,這將會無法乾淨地解除安裝。
如果 DNS 無法運作或出現這個錯誤:
resolv+: "bind" is an invalid keyword resolv+:
"hosts" is an invalid keyword
將 /compat/linux/etc/host.conf 設定如下:
order hosts, bind
multi on
這指定先搜尋 /etc/hosts,其次為 DNS。 當 /compat/linux/etc/host.conf 不存在, Linux™ 應用程式會使用 /etc/host.conf 並會警告不相容的 FreeBSD 語法。如果名稱伺服器未設定使用 /etc/resolv.conf 的話,則可移除 bind。
This section describes how Linux™ binary compatibility works and is based on an email written to FreeBSD chat mailing list by Terry Lambert tlambert@primenet.com (Message ID: <199906020108.SAA07001@usr09.primenet.com>).
FreeBSD has an abstraction called an "execution class loader". This is a wedge into the execve(2) system call.
Historically, the UNIX™ loader examined the magic number (generally the first 4 or 8 bytes of the file) to see if it was a binary known to the system, and if so, invoked the binary loader.
If it was not the binary type for the system, the execve(2) call returned a failure, and the shell attempted to start executing it as shell commands. The assumption was a default of "whatever the current shell is".
Later, a hack was made for sh(1) to examine the first two characters, and if they were :\n, it invoked the csh(1) shell instead.
FreeBSD has a list of loaders, instead of a single loader, with a fallback to the #! loader for running shell interpreters or shell scripts.
For the Linux™ABI support, FreeBSD sees the magic number as an ELF binary. The ELF loader looks for a specialized brand, which is a comment section in the ELF image, and which is not present on SVR4/Solaris™ ELF binaries.
For Linux™ binaries to function, they must be branded as type Linux using brandelf(1):
# brandelf -t Linux fileWhen the ELF loader sees the Linux brand, the loader replaces a pointer in the proc structure. All system calls are indexed through this pointer. In addition, the process is flagged for special handling of the trap vector for the signal trampoline code, and several other (minor) fix-ups that are handled by the Linux™ kernel module.
The Linux™ system call vector contains, among other things, a list of sysent[] entries whose addresses reside in the kernel module.
When a system call is called by the Linux™ binary, the trap code dereferences the system call function pointer off the proc structure, and gets the Linux™, not the FreeBSD, system call entry points.
Linux™ mode dynamically reroots lookups. This is, in effect, equivalent to union to file system mounts. First, an attempt is made to lookup the file in /compat/linux/original-path. If that fails, the lookup is done in /original-path. This makes sure that binaries that require other binaries can run. For example, the Linux™ toolchain can all run under Linux™ABI support. It also means that the Linux™ binaries can load and execute FreeBSD binaries, if there are no corresponding Linux™ binaries present, and that a uname(1) command can be placed in the /compat/linux directory tree to ensure that the Linux™ binaries cannot tell they are not running on Linux™.
In effect, there is a Linux™ kernel in the FreeBSD kernel. The various underlying functions that implement all of the services provided by the kernel are identical to both the FreeBSD system call table entries, and the Linux™ system call table entries: file system operations, virtual memory operations, signal delivery, and System V IPC. The only difference is that FreeBSD binaries get the FreeBSD glue functions, and Linux™ binaries get the Linux™glue functions. The FreeBSD glue functions are statically linked into the kernel, and the Linux™glue functions can be statically linked, or they can be accessed via a kernel module.
Technically, this is not really emulation, it is an ABI implementation. It is sometimes called "Linux™ emulation" because the implementation was done at a time when there was no other word to describe what was going on. Saying that FreeBSD ran Linux™ binaries was not true, since the code was not compiled in.
FreeBSD 使用手冊剩下的這些章節涵蓋了全方位的 FreeBSD 系統管理。 每個章節的開頭會先描述在該您讀完該章節後您會學到什麼,也會詳述在您在看這些資料時應該要有的一些背景知識。
這些章節是讓您在需要查資料的時候翻閱用的。 您不需要依照特定的順序來讀,也不需要將這些章節全部過讀之後才開始用 FreeBSD。
在 FreeBSD 使用過程中,相當重要的環節之一就是如何正確設定系統。 本章著重於介紹 FreeBSD 的設定流程,包括一些可以調整 FreeBSD 效能的參數設定。
讀完這章,您將了解:
rc.conf 設定的基礎概念及 /usr/local/etc/rc.d 啟動 Script。
如何設定並測試網路卡。
如何在網路裝置上設定虛擬主機。
如何使用在 /etc 中的各種設定檔。
如何使用 sysctl(8) 變數調校 FreeBSD。
如何調校磁碟效能及修改核心限制。
在開始閱讀這章之前,您需要:
了解 UNIX™ 及 FreeBSD 基礎 (FreeBSD 基礎)。
熟悉核心設定與編譯的基礎 (設定 FreeBSD 核心)。
許多使用者會使用 Port 套件集安裝第三方軟體到 FreeBSD 且需要安裝服務在系統初始化時可啟動該軟體。服務,例如 mail/postfix 或 www/apache22 僅只是在眾多需要在系統初始化時啟動的軟體之中的兩個。本章節將說明可用來啟動第三方軟體的程序。
在 FreeBSD 大多數內建的服務,例如 cron(8) 也是透過系統啟動 Script 來執行。
現在 FreeBSD 會引用 rc.d,設定應用程式啟動變的更簡單且提供更多的功能。使用於 管理 FreeBSD 中的服務 所提到的關鍵字,可以設定應用程式在其他特定服務之後啟動且可以透過 /etc/rc.conf 來傳遞額外的旗標來取代寫死在啟動 Script 中的旗標。一個基本的 Script 可能會如下例所示:
#!/bin/sh
#
# PROVIDE: utility
# REQUIRE: DAEMON
# KEYWORD: shutdown

. /etc/rc.subr

name=utility
rcvar=utility_enable

command="/usr/local/sbin/utility"

load_rc_config $name

#
# DO NOT CHANGE THESE DEFAULT VALUES HERE
# SET THEM IN THE /etc/rc.conf FILE
#
utility_enable=${utility_enable-"NO"}
pidfile=${utility_pidfile-"/var/run/utility.pid"}

run_rc_command "$1"
這個 Script 會確保要執行的 utility 會在虛構的服務 DAEMON 之後啟動,也同時提供設定與追蹤程序 ID (Process ID, PID) 的方法。
接著此應用程式便可將下行放到 /etc/rc.conf 中:
utility_enable="YES"
使用這種方式可以簡單的處理指令列參數、引用 /etc/rc.subr 所提供的預設函數、與 rcorder(8) 相容並可在 rc.conf 簡單的設定。
其他的服務可以使用 inetd(8) 來啟動,在 inetd 超級伺服器 有如何使用 inetd(8) 以及其設定的深入說明。
在某些情況更適合使用 cron(8) 來啟動系統服務,由於 cron(8) 會使用 crontab(5) 的擁有者來執行這些程序,所以這個方法有不少優點,這讓一般的使用者也可以啟動與維護自己的應用程式。
在 FreeBSD 其中最有用的其中一項工具便是 cron,這個工具會在背景執行並且定期檢查 /etc/crontab 是否有要執行的工作然後搜尋 /var/cron/tabs 是否有自訂的 crontab 檔案,這些檔案用來安排要讓 cron 在指定的時間執行的工作,crontab 中的每一個項目定義了一個要執行的工作,又稱作 cron job。
這裡使用了兩種類型的設定檔:其一是系統 crontab,系統 crontab 不應該被修改,其二為使用者 crontab,使用者 crontab 可以依需要建立與編輯。這兩種檔案的格式在 crontab(5) 有說明。系統 crontab /etc/crontab 的格式含有在使用者 crontab 所沒有的 who 欄位,在系統 crontab,cron 會依據該欄位所指定的使用者來執行指令,而在使用者 crontab,會以建立 crontab 的使用者來執行指令。
使用者 crontab 讓個別使用者可以安排自己的工作,root 使用者也可有自己的使用者 crontab 來安排不在系統 crontab 中的工作。
以下為系統 crontab /etc/crontab 的範例項目:
# /etc/crontab - root's crontab for FreeBSD
#
# $FreeBSD: head/zh_TW.UTF-8/books/handbook/book.xml 53653 2019-12-03 17:05:41Z rcyu $
#(1)
SHELL=/bin/sh
PATH=/etc:/bin:/sbin:/usr/bin:/usr/sbin (2)
#
#minute	hour	mday	month	wday	who	command (3)
#
*/5	*	*	*	*	root	/usr/libexec/atrun (4)
| 1 | 以 # 字元為首的行代表註解。可在檔案中放置註解提醒要執行什麼動作及為何要執行。註解不可與指令同行,否則會被當做指令的一部份,註解必須在新的一行,空白行則會被忽略掉。 |
| 2 | 等號 (=) 字元用來定義任何環境設定。在這個例子當中,使用了等號來定義 SHELL 及 PATH。若 SHELL 被省略,cron 則會使用預設的 Bourne shell。若 PATH 被省略,則必須指定指令或 Script 的完整路徑才能執行。 |
| 3 | 此行定義了在系統 crontab 會使用到的七個欄位:minute, hour, mday, month, wday, who 以及 command。minute 欄位是指定指令要執行的時間中的分,hour 指定指令要執行的時,mday 是月裡面的日,month 是月,以及 wday 是週裡面的日。這些欄位必須數值代表 24 小時制的時間或 \* 來代表所有可能的值。who 這個欄位只有系統 crontab 才有,用來指定要用那一個使用者來執行指令。最後一個欄位則是要執行的指令。 |
| 4 | 這個項目定義了該工作所使用的數值,*/5 後接著數個 * 字元指的是每個月的每一週的每一日的每個小時的每 5 分鐘會使用 root 執行 /usr/libexec/atrun。指令可含任何數量的參數,但若指令要使用多行則需以反斜線 "\" 連線字元換行。 |
要建立一個使用者 crontab 可使用編輯模式執行 crontab:
% crontab -e這樣會使用預設的文字編輯器來開啟使用者的 crontab,使用者第一次執行這個指令會開啟一個空的檔案,使用者建立 crontab 之後這個指令則會開啟已建立的 crontab 供編輯。
加入這些行到 crontab 檔的最上方來設定環境變數以及備忘在 crontab 中欄位的意思非常有用:
SHELL=/bin/sh
PATH=/etc:/bin:/sbin:/usr/bin:/usr/sbin
# Order of crontab fields
# minute	hour	mday	month	wday	command
然後每一個要執行的指令或 Script 加入一行,指定要執行指令的時間。這個例子會每天在下午 2 點執行指定的自訂 Bourne shell script,由於沒有在 PATH 指定 Script 的路徑,所以必須給予完整的 Script 路徑:
0 14 * * * /usr/home/dru/bin/mycustomscript.sh
在使用自訂的 Script 之前,請先確定該 Script 可以執行並且使用 cron 在有限的環境變數下測試。要複製一個用來執行上述 cron 項目的環境可以使用: env -i SHELL=/bin/sh PATH=/etc:/bin:/sbin:/usr/bin:/usr/sbin HOME=/home/dru LOGNAME=dru /usr/home/dru/bin/mycustomscript.sh 在 crontab(5) 有討論 cron 使用的環境變數,若 Script 中含有任何會使用萬用字元刪除檔案的指令,那麼檢查 Script 可正常在 cron 的環境運作非常重要。 |
編輯完成 crontab 之後儲存檔案,編輯完的 crontab 會被自動安裝且 cron 會讀取該 crontab 並在其指定的時指執行其 cron job。要列出 crontab 中有那一些 cron job 可以使用此指令:
% crontab -l
0	14	*	*	*	/usr/home/dru/bin/mycustomscript.sh
要移除使用在使用者 crontab 中的 cron job 可:
% crontab -r
remove crontab for dru? yFreeBSD 在系統初始化時使用 rc(8) 系統的啟動 Script。列於 /etc/rc.d 的 Script 提供了基本的服務可使用 service(8) 加上 start, stop 以及 restart 選項來控制。例如,使用以下指令可以重新啟動 sshd(8):
# service sshd restart這個程序可以用來在執行中的系統上啟動服務,而在 rc.conf(5) 中有指定的服務則會在開機時自動啟動。例如,要在系統啟動時開啟 natd(8),可入下行到 /etc/rc.conf:
natd_enable="YES"
若 natd_enable="NO" 行已存在,則將 NO 更改為 YES,在下次開機時 rc(8) script 便會自動載入任何相依的服務,詳細如下所述。
由於 rc(8) 系統主要用於在系統開機與關機時啟動與停止服務,只有當有服務的變數設定在 /etc/rc.conf 時 start, stop 以及 restart 才會有作用。例如 sshd restart 只會在 /etc/rc.conf 中的 sshd_enable 設為 YES 時才會運作,若要不透過 /etc/rc.conf 的設定來 start, stop 或 restart 一個服務則需要在指令前加上 "one",例如要不透過目前在 /etc/rc.conf 的設定重新啟動 sshd(8) 可執行以下指令:
# service sshd onerestart# service sshd rcvar
# sshd
#
sshd_enable="YES"
# (default: "")行 |
要判斷是一個服務是否正在執行,可使用 status,例如要確認 sshd(8) 是否正常在執行:
# service sshd status
sshd is running as pid 433.
在某些情況,也可以 reload 一個服務。這個動作會嘗試發送一個信號給指定的服務,強制服務重新載入其設定檔,在大多數的情況下,發送給服務的信號是 SIGHUP。並不是每個服務都有支援此功能。
rc(8) 系統會用在網路服務及也應用在大多數的系統初化 。例如執行 /etc/rc.d/bgfsck Script 會列印出以下訊息:
Starting background file system checks in 60 seconds.這個 Script 用來在背景做檔案系統檢查,只有在系統初始化時要執行。
許多系統服務會相依其他服務來運作,例如 yp(8) 及其他以 RPC 為基礎的服務在 rpcbind(8) 服務啟動前可能會啟動失敗。要解決這種問題,就必須在啟動 Script 上方的註解中加入相依及其他 meta-data。在系統初始化時會用 rcorder(8) 程式分析這些註解來決定要以什麼順序來執行系統服務以滿足相依。
因 rc.subr(8) 的需要,以下的關鍵字必須加入到所有的啟動 Script 方可 "enable" 啟動 Script:
PROVIDE: 設定此檔案所提供的服務。
以下關鍵字可能會在每個啟動 Script 的上方引用,雖然非必要,但是對於 rcorder(8) 是非常有用的提示:
REQUIRE: 列出此服務需要引用的服務。有使用此關鍵字的 Script 會在指定服務啟動 之後 才執行。
BEFORE: 列出相依此服務的服務。有使用此關鍵字的 Script 會在指定的服務啟動 之前 執行。
透過仔細的設定每個啟動 Script 的這些關鍵字,管理者便可對 Script 的啟動順序進行微調,而不需使用到其他 UNIX™ 作業系統所使用的 "runlevels"。
額外的資訊可在 rc(8) 以及 rc.subr(8) 中找到。請參考 此文章 來取得如何建立自訂 rc(8) Script 的操作說明。
系統設定資訊的主要位於 /etc/rc.conf,這個檔案的設定資訊範圍非常廣且會在系統啟動時讀取來設定系統,它也提供設定資訊給 rc* 檔案使用。
在 /etc/rc.conf 中的設定項目會覆蓋在 /etc/defaults/rc.conf 的預設設定,不應直接編輯該檔案中的預設設定,所有系統特定的設定應到 /etc/rc.conf 所修改。
在叢集應用時要將系統特定的設定與各站特定的設定分開,藉此減少管理成本有好幾種方法,建議的方法是將系統特定的設定放置在 /etc/rc.conf.local,例如以下將要套用到所有系統的設定項目放在 /etc/rc.conf:
sshd_enable="YES"
keyrate="fast"
defaultrouter="10.1.1.254"
而只套用到此系統的設定放在 /etc/rc.conf.local:
hostname="node1.example.org"
ifconfig_fxp0="inet 10.1.1.1/8"
使用應用程式如 rsync 或 puppet 將 /etc/rc.conf 散布到每個系統,而在各系統保留自己的 /etc/rc.conf.local。
升級系統並不會覆寫 /etc/rc.conf,所以系統設定資訊不會因此遺失。
/etc/rc.conf 以及 /etc/rc.conf.local 兩個檔案都會使用 sh(1) 解析,這讓系統操作者能夠建立較複雜的設定方案。請參考 rc.conf(5) 來取得更多有關此主題的資訊。 |
對 FreeBSD 管理者來說加入與設定網路介面卡 (Network Interface Card, NIC) 會是一件常見的工作。
首先,要先確定 NIC 的型號及其使用的晶片。FreeBSD 支援各種 NIC,可檢查該 FreeBSD 發佈版本的硬體相容性清單來查看是否有支援該 NIC。
若有支援該 NIC,接著要確定該 NIC 所要需要的 FreeBSD 驅動程式名稱。請參考 /usr/src/sys/conf/NOTES 及 /usr/src/sys/arch/conf/NOTES 來取得 NIC 驅動程式清單及其支援的晶片組相關資訊。當有疑問是,請閱讀該驅動程式的操作手冊,會有提供更多有關支援硬體及該驅動程式已知問題的資訊。
GENERIC 核心已有內含常見 NIC 的驅動程式 ,意思是在開機時應該會偵測到 NIC。可以輸入 more /var/run/dmesg.boot 來檢視系統的開機訊息並使用空白鍵捲動文字。在此例中,兩個乙太網路 NIC 使用系統已有的 dc(4) 驅動程式:
dc0: <82c169 PNIC 10/100BaseTX> port 0xa000-0xa0ff mem 0xd3800000-0xd38
000ff irq 15 at device 11.0 on pci0
miibus0: <MII bus> on dc0
bmtphy0: <BCM5201 10/100baseTX PHY> PHY 1 on miibus0
bmtphy0:  10baseT, 10baseT-FDX, 100baseTX, 100baseTX-FDX, auto
dc0: Ethernet address: 00:a0:cc:da:da:da
dc0: [ITHREAD]
dc1: <82c169 PNIC 10/100BaseTX> port 0x9800-0x98ff mem 0xd3000000-0xd30
000ff irq 11 at device 12.0 on pci0
miibus1: <MII bus> on dc1
bmtphy1: <BCM5201 10/100baseTX PHY> PHY 1 on miibus1
bmtphy1:  10baseT, 10baseT-FDX, 100baseTX, 100baseTX-FDX, auto
dc1: Ethernet address: 00:a0:cc:da:da:db
dc1: [ITHREAD]
若在 GENERIC 中沒有該 NIC 的驅動程式,但有可用的驅動程式,那麼在設定及使用 NIC 前要先載入該驅動程式,有兩種方式可以完成這件事:
最簡單的方式是使用 kldload(8) 載入 NIC 要使用的核心模組。要在開機時自動載入,可加入適當的設定到 /boot/loader.conf。不是所有 NIC 驅動程式皆可當做模組使用。
或者,靜態編譯對 NIC 的支援到自訂核心,請參考 /usr/src/sys/conf/NOTES, /usr/src/sys/arch/conf/NOTES 及驅動程式的操作手冊來了解要在自訂核心設定檔中要加入那些設定。要取得更多有關重新編譯核心的資訊可參考 設定 FreeBSD 核心。若在開機時有偵測到 NIC,就不需要再重新編譯核心。
很不幸的,仍有很多供應商並沒有提供它們驅動程式的技術文件給開源社群,因為這些文件有涉及商業機密。因此,FreeBSD 及其他作業系統的開發人員只剩下兩種方案可以選擇:透過長期與艱苦的過程做逆向工程來開發驅動程式或是使用現有供 Microsoft™ Windows™ 平台用的驅動程式 Binary。
FreeBSD 對 Network Driver Interface Specification (NDIS) 有提供 "原生" 的支援,這包含了 ndisgen(8) 可用來轉換 Windows™ XP 驅動程式成可在 FreeBSD 上使用的格式。由於 ndis(4) 驅動程式使用的是 Windows™ XP binary,所以只能在 i386™ 及 amd64 系統上執行。PCI, CardBus, PCMCIA 以及 USB 裝置也都有支援。
要使用 ndisgen(8) 需要三樣東西:
FreeBSD 核心原始碼。
一個 .SYS 附檔名的 Windows™ XP 驅動程式 Binary。
一個 .INF 附檔名的 Windows™ XP 驅動程式設定檔。
下載供指定 NIC 使用的 .SYS 及 .INF 檔。通常這些檔案可以在驅動程式 CD 或者供應商的網站上找到。以下範例會使用 W32DRIVER.SYS 及 W32DRIVER.INF。
驅動程式的位元寬度必須與 FreeBSD 的版本相符。例如 FreeBSD/i386 需要使用 Windows™ 32-bit 驅動程式,而 FreeBSD/amd64 則需要使用 Windows™ 64-bit 驅動程式。
下個步驟是編譯驅動程式 Binary 成可載入的核心模組。以 root 身份使用 ndisgen(8):
# ndisgen /path/to/W32DRIVER.INF /path/to/W32DRIVER.SYS這個指令是互動式的,會提示輸入任何所需的額外資訊,新的核心模組會被產生在目前的目錄,使用 kldload(8) 來載入新的模組:
# kldload ./W32DRIVER_SYS.ko除了產生的核心模組之外,ndis.ko 以及 if_ndis.ko 也必須載入,會在任何有相依 ndis(4) 的模組被載入時一併自動載入。若沒有自動載入,則需使用以下指令手動載入:
# kldload ndis
# kldload if_ndis
第一個指令會載入 ndis(4) miniport 驅動程式包裝程式,而第二個指令會載入產生的 NIC 驅動程式。
檢查 dmesg(8) 查看是否有任何載入錯誤,若一切正常,輸出結果應會如下所示:
ndis0: <Wireless-G PCI Adapter> mem 0xf4100000-0xf4101fff irq 3 at device 8.0 on pci1
ndis0: NDIS API version: 5.0
ndis0: Ethernet address: 0a:b1:2c:d3:4e:f5
ndis0: 11b rates: 1Mbps 2Mbps 5.5Mbps 11Mbps
ndis0: 11g rates: 6Mbps 9Mbps 12Mbps 18Mbps 36Mbps 48Mbps 54Mbps到此之後 ndis0 可以像任何其他 NIC 設定使用。
要設定系統於開機時載入 ndis(4) 模組,可複製產生的模組 W32DRIVER_SYS.ko 到 /boot/modules。然後加入下行到 /boot/loader.conf:
W32DRIVER_SYS_load="YES"
載入正確的 NIC 驅動程式之後,接著需要設定介面卡,這個動作可能在安裝時已經使用 bsdinstall(8) 設定過了。
要查看 NIC 設定可輸入以下指令:
% ifconfig
dc0: flags=8843<UP,BROADCAST,RUNNING,SIMPLEX,MULTICAST> metric 0 mtu 1500
options=80008<VLAN_MTU,LINKSTATE>
ether 00:a0:cc:da:da:da
inet 192.168.1.3 netmask 0xffffff00 broadcast 192.168.1.255
media: Ethernet autoselect (100baseTX <full-duplex>)
status: active
dc1: flags=8802<UP,BROADCAST,RUNNING,SIMPLEX,MULTICAST> metric 0 mtu 1500
options=80008<VLAN_MTU,LINKSTATE>
ether 00:a0:cc:da:da:db
inet 10.0.0.1 netmask 0xffffff00 broadcast 10.0.0.255
media: Ethernet 10baseT/UTP
status: no carrier
lo0: flags=8049<UP,LOOPBACK,RUNNING,MULTICAST> metric 0 mtu 16384
options=3<RXCSUM,TXCSUM>
inet6 fe80::1%lo0 prefixlen 64 scopeid 0x4
inet6 ::1 prefixlen 128
inet 127.0.0.1 netmask 0xff000000
nd6 options=3<PERFORMNUD,ACCEPT_RTADV>在這個例子中列出了以下裝置:
dc0: 第一個乙太網路介面。
dc1: 第二個乙太網路介面。
lo0: Loopback 裝置。
FreeBSD 會使用驅動程式名稱接著開機時所偵測到的介面卡順序來命名 NIC。例如 sis2 是指在系統上使用 sis(4) 驅動程式的第三個 NIC。
在此例中,dc0 已經上線並且執行中。主要的依據有:
UP 代表介面卡已設定好並且準備就緒。
介面卡有網際網路 (inet) 位址,192.168.1.3。
介面卡有一個有效的子網路遮罩 (netmask),其中 0xffffff00 等同於 255.255.255.0。
介面卡有一個有效的廣播位址,192.168.1.255。
介面卡 (ether) 的 MAC 位址是 00:a0:cc:da:da:da。
實體媒介選擇為自動選擇模式 (media: Ethernet autoselect (100baseTX <full-duplex>))。在本例中 dc1 被設定使用 10baseT/UTP 媒介。要取得更多有關可用的驅動程式媒介類型請參考操作手冊。
連結的狀態 (status) 為使用中 (active),代表有偵測到載波信號 (Carrier Signal)。若 dc1 所代表的介面卡未插入乙太網路線則狀態為 status: no carrier 是正常的。
若 ifconfig(8) 的輸出結果如下:
dc0: flags=8843<BROADCAST,SIMPLEX,MULTICAST> metric 0 mtu 1500
options=80008<VLAN_MTU,LINKSTATE>
ether 00:a0:cc:da:da:da
media: Ethernet autoselect (100baseTX <full-duplex>)
status: active則代表尚未設定介面卡。
介面卡必須以 root 來設定。NIC 的設定可在指令列執行 ifconfig(8) 來完成,但重新開機之後變會消失,除非將設定也加到 /etc/rc.conf。若在 LAN 中有 DHCP 伺服器,則只需加入此行:
ifconfig_dc0="DHCP"
替換 dc0 為該系統的正確值。
加入這行之後,接著依據 測試與疑難排解 指示操作。
若網路在安裝時已設定,可能會已經有 NIC 的設定項目。在加入任何設定前請再次檢查 /etc/rc.conf。 |
在這個例中,沒有 DHCP 伺服器,必須手動設定 NIC。提每一個在系統上的 NIC 加入一行設定,如此例:
ifconfig_dc0="inet 192.168.1.3 netmask 255.255.255.0" ifconfig_dc1="inet 10.0.0.1 netmask 255.255.255.0 media 10baseT/UTP"
替換 dc0 及 dc1 以及 IP 位址資訊為系統的正確值。請參考驅動程式的操作手冊、ifconfig(8) 以及 rc.conf(5) 取得更多有關可用的選項及 /etc/rc.conf 的語法。
若網路沒有使用 DNS,則編輯 /etc/hosts 加入 LAN 上主機的名稱與 IP 位址。要取得更多資訊請參考 hosts(5) 及 /usr/shared/examples/etc/hosts。
若沒有 DHCP 伺服器且需要存取網際網路,那麼需要手動設定預設閘道及名稱伺服器: |
必要的變更儲存到 /etc/rc.conf 之後,需要重新啟動系統來測試網路設定並檢查系統重新啟動是否沒有任何設定錯誤。或者使用這個指令將設定套用到網路系統:
# service netif restart若預設的通訊閘已設定於 /etc/rc.conf 也同樣要下這個指令: |
網路系統重新啟動後,便可接著測試 NIC。
% ping -c5 192.168.1.3
PING 192.168.1.3 (192.168.1.3): 56 data bytes
64 bytes from 192.168.1.3: icmp_seq=0 ttl=64 time=0.082 ms
64 bytes from 192.168.1.3: icmp_seq=1 ttl=64 time=0.074 ms
64 bytes from 192.168.1.3: icmp_seq=2 ttl=64 time=0.076 ms
64 bytes from 192.168.1.3: icmp_seq=3 ttl=64 time=0.108 ms
64 bytes from 192.168.1.3: icmp_seq=4 ttl=64 time=0.076 ms
--- 192.168.1.3 ping statistics ---
5 packets transmitted, 5 packets received, 0% packet loss
round-trip min/avg/max/stddev = 0.074/0.083/0.108/0.013 ms% ping -c5 192.168.1.2
PING 192.168.1.2 (192.168.1.2): 56 data bytes
64 bytes from 192.168.1.2: icmp_seq=0 ttl=64 time=0.726 ms
64 bytes from 192.168.1.2: icmp_seq=1 ttl=64 time=0.766 ms
64 bytes from 192.168.1.2: icmp_seq=2 ttl=64 time=0.700 ms
64 bytes from 192.168.1.2: icmp_seq=3 ttl=64 time=0.747 ms
64 bytes from 192.168.1.2: icmp_seq=4 ttl=64 time=0.704 ms
--- 192.168.1.2 ping statistics ---
5 packets transmitted, 5 packets received, 0% packet loss
round-trip min/avg/max/stddev = 0.700/0.729/0.766/0.025 ms要測試網路解析,可使用主機名稱來替代 IP 位址。若在網路上沒有 DNS 伺服器則必須先設定 /etc/hosts,若主機尚未設定到 /etc/hosts 中,則需編輯 /etc/hosts 加入 LAN 上主機的名稱及 IP 位址,要取得更多資訊請參考 hosts(5) 及 /usr/shared/examples/etc/hosts。
在排除硬體及軟體設定問題時,要先檢查幾件簡單的事。網路線插上了沒?網路的服務都正確設定了嗎?防火牆設定是否正確?FreeBSD 是否支援該 NIC?在回報問題之前,永遠要先檢查 Hardware Notes、更新 FreeBSD 到最新的 STABLE 版本、檢查郵遞論壇封存記錄以及上網查詢。
若介面卡可以運作,但是效能很差,請閱讀 tuning(7),同時也要檢查網路設定,因為不正確的網路設定會造成連線速度緩慢。
部份使用者會遇到一次或兩次 device timeout 的訊息,在對某些介面卡是正常的。若訊息持續發生或很煩的,請確認是否有與其他的裝置衝突,再次檢查網路線,或考慮使用其他介面卡。
要解決 watchdog timeout 錯誤,先檢查網路線。許多介面卡需要使用支援 Bus Mastering 的 PCI 插槽,在一些舊型的主機板,只會有一個 PCI 插槽支援,通常是插槽 0。檢查 NIC 以及主機板說明文件來確定是否為此問題。
若系統無法路由傳送封包到目標主機則會出現 No route to host 訊息,這可能是因為沒有指定預設的路由或未插上網路線。請檢查 netstat -rn 的輸出並確認有一個有效的路由可連線至主機,若沒有,請閱讀 通訊閘與路由。
造成 ping: sendto: Permission denied 錯誤訊息的原因通常是防火牆設定錯誤。若在 FreeBSD 上有開啟防火牆,但卻未定義任何的規則,預設的原則是拒絕所有傳輸,即使是用 ping(8)。請參考 防火牆 取得更多資訊。
有時介面卡的效能很差或低於平均值,在這種情況可嘗試設定媒介選擇模式由 autoselect 更改為正確的媒介選項,雖然這在大部份硬體可運作,但可能無法解決問題,同樣的,檢查所有網路設定並參考 tuning(7)。
FreeBSD 最常見的用途之一就是虛擬網站代管,即以一台伺服器在網路上扮演多台伺服器,這可以透過指定多個網路位置到一個網路介面來做到。
一個網路介面會有一個 "真實 (Real)" 位址且可以有許多個 "別名 (Alias)" 位址。一般會在 /etc/rc.conf 中放置別名項目來增加別名,如下例:
ifconfig_fxp0_alias0="inet xxx.xxx.xxx.xxx netmask xxx.xxx.xxx.xxx"
別名項目必須以 alias0 開頭,使用連續數字例如 alias0, alias1 以此類推,設定程序會在第一個遇到缺號的地方中止。
要注意別名網路遮罩 (Netmask) 的計算,使用的介面必須至少有一個正確的填寫網路遮罩的位址,而其他所有在此網路中的位址則必須使用全部 1 的網路遮罩,可用 255.255.255.255 或 0xffffffff 來表示。
舉例來說,有一個 fxp0 介面連結到兩個網路:10.1.1.0 使用網路遮罩 255.255.255.0 以及 202.0.75.16 使用網路遮罩 255.255.255.240。而系統將要設定使用範圍 10.1.1.1 到 10.1.1.5 以及 202.0.75.17 到 202.0.75.20。在指定的網路範圍中只有第一個位址應使用真實的網路遮罩,其餘 (10.1.1.2 到 10.1.1.5 及 202.0.75.18 到 202.0.75.20) 則必須設定使用 255.255.255.255 的遮罩。
在此情境下正確設定網路介面的方式如下 /etc/rc.conf 中的項目:
ifconfig_fxp0="inet 10.1.1.1 netmask 255.255.255.0" ifconfig_fxp0_alias0="inet 10.1.1.2 netmask 255.255.255.255" ifconfig_fxp0_alias1="inet 10.1.1.3 netmask 255.255.255.255" ifconfig_fxp0_alias2="inet 10.1.1.4 netmask 255.255.255.255" ifconfig_fxp0_alias3="inet 10.1.1.5 netmask 255.255.255.255" ifconfig_fxp0_alias4="inet 202.0.75.17 netmask 255.255.255.240" ifconfig_fxp0_alias5="inet 202.0.75.18 netmask 255.255.255.255" ifconfig_fxp0_alias6="inet 202.0.75.19 netmask 255.255.255.255" ifconfig_fxp0_alias7="inet 202.0.75.20 netmask 255.255.255.255"
有一種更簡單的方式可以表達這些設定,便是使用以空白分隔的 IP 位址清單。只有第一個位址會使用指定的子網路遮罩,其他的位址則會使用 255.255.255.255 的子網路遮罩。
ifconfig_fxp0_aliases="inet 10.1.1.1-5/24 inet 202.0.75.17-20/28"
產生與讀取系統日誌對系統管理來說是一件非常重要的事,在系統日誌中的資訊可以用來偵測硬體與軟體的問題,同樣也可以偵測應用程式與系統設定的錯誤。這些資訊在安全性稽查與事件回應也同樣扮演了重要的角色,大多數系統 Daemon 與應用程式都會產生日誌項目。
FreeBSD 提供了一個系統日誌程式 syslogd 用來管理日誌。預設 syslogd 會與系統開機時啟動。這可使用在 /etc/rc.conf 中的變數 syslogd_enable 來控制。而且有數個應用程式參數可在 /etc/rc.conf 使用 syslogd_flags 來設定。請參考 syslogd(8) 來取得更多可用參數的資訊。
此章節會介紹如何設定 FreeBSD 系統日誌程式來做本地與遠端日誌並且介紹如何執行日誌翻轉 (Log rotation) 與日誌管理。
設定檔 /etc/syslog.conf 控制 syslogd 收到日誌項目時要做的事情,有數個參數可以用來控制接收到事件時的處理方式。設施 (facility) 用來描述記錄產生訊息的子系統 (subsystem),如核心或者 Daemon,而 層級 (level) 用來描述所發生的事件嚴重性。也可以依據應用程式所發出的訊息及產生日誌事件機器的主機名稱來決定後續處置的動作。
此設定檔中一行代表一個動作,每一行的格式皆為一個選擇器欄位 (Selector field) 接著一個動作欄位 (Action field)。選擇器欄位的格式為 facility.level 可以用來比對來自 facility 於層級 level 或更高層的日誌訊息,也可以在層級前加入選擇性的比對旗標來更確切的指定記錄的內容。同樣一個動作可以使用多個選擇器欄位並使用分號 (;) 來分隔。用 * 可以比對任何東西。動作欄位可用來指定傳送日誌訊息的目標,如一個檔案或遠端日誌主機。範例為以下為 FreeBSD 預設的 syslog.conf:
# $FreeBSD: head/zh_TW.UTF-8/books/handbook/book.xml 53653 2019-12-03 17:05:41Z rcyu $ # # Spaces ARE valid field separators in this file. However, # other *nix-like systems still insist on using tabs as field # separators. If you are sharing this file between systems, you # may want to use only tabs as field separators here. # Consult the syslog.conf(5) manpage. *.err;kern.warning;auth.notice;mail.crit /dev/console *.notice;authpriv.none;kern.debug;lpr.info;mail.crit;news.err /var/log/messages security.* /var/log/security auth.info;authpriv.info /var/log/auth.log mail.info /var/log/maillog lpr.info /var/log/lpd-errs ftp.info /var/log/xferlog cron.* /var/log/cron !-devd *.=debug /var/log/debug.log *.emerg * # uncomment this to log all writes to /dev/console to /var/log/console.log #console.info /var/log/console.log # uncomment this to enable logging of all log messages to /var/log/all.log # touch /var/log/all.log and chmod it to mode 600 before it will work #*.* /var/log/all.log # uncomment this to enable logging to a remote loghost named loghost #*.* @loghost # uncomment these if you're running inn # news.crit /var/log/news/news.crit # news.err /var/log/news/news.err # news.notice /var/log/news/news.notice # Uncomment this if you wish to see messages produced by devd # !devd # *.>=info !ppp *.* /var/log/ppp.log !*
在這個範例中:
第 8 行會找出所有符合 err 或以上層級的訊息,還有 kern.warning, auth.notice 與 mail.crit 的訊息,然後將這些日誌訊息傳送到 Console (/dev/console)。
第 12 行會找出所有符合 mail 設施中於 info 或以上層級的訊息,並記錄訊息至 /var/log/maillog。
第 17 行使用了比較旗標 (=) 來只找出符合 debug 層級的訊息,並將訊息記錄至 /var/log/debug.log。
第 33 行是指定程式的範例用法。這可以讓在該行以下的規則只對指定的程式生效。在此例中,只有由 ppp 產生的訊息會被記錄到 /var/log/ppp.log。
所以可用層級從最嚴重到最不嚴重的順序為 emerg, alert, crit, err, warning, notice, info 以及 debug。
設施 (facility) 則無特定順序,可用的有 auth, authpriv, console, cron, daemon, ftp, kern, lpr, mail, mark, news, security, syslog, user, uucp 及 local0 到 local7。要注意在其他作業系統的設施可能會不同。
要記錄所有所有 notice 與以上層級的訊息到 /var/log/daemon.log 可加入以下項目:
daemon.notice /var/log/daemon.log
要取得更多有關不同的層級與設施的資訊請參考 syslog(3) 及 syslogd(8)。要取得更多有關 /etc/syslog.conf、語法以及更多進階用法範例的資訊請參考 syslog.conf(5)。
日誌檔案會成長的非常快速,這會消耗磁碟空間並且會更難在日誌中找到有用的資訊,日誌管理便是為了嘗試減緩這種問題。在 FreeBSD 可以使用 newsyslog 來管理日誌檔案,這個內建的程式會定期翻轉 (Rotate) 與壓縮日誌檔案,並且可選擇性的建立遺失的日誌檔案並在日誌檔案被移動位置時通知程式。日誌檔案可能會由 syslogd 產生或由其他任何會產生日誌檔案的程式。newsyslog 正常會由 cron(8) 來執行,它並非一個系統 Daemon,預設會每個小時執行一次。
newsyslog 會讀取其設定檔 /etc/newsyslog.conf 來決定其要採取的動作,每個要由 newsyslog 所管理的日誌檔案會在此設定檔中設定一行,每一行要說明檔案的擁有者、權限、何時要翻轉該檔案、選用的日誌翻轉旗標,如:壓縮,以及日誌翻轉時要通知的程式。以下為 FreeBSD 的預設設定:
# configuration file for newsyslog # $FreeBSD: head/zh_TW.UTF-8/books/handbook/book.xml 53653 2019-12-03 17:05:41Z rcyu $ # # Entries which do not specify the '/pid_file' field will cause the # syslogd process to be signalled when that log file is rotated. This # action is only appropriate for log files which are written to by the # syslogd process (ie, files listed in /etc/syslog.conf). If there # is no process which needs to be signalled when a given log file is # rotated, then the entry for that file should include the 'N' flag. # # The 'flags' field is one or more of the letters: BCDGJNUXZ or a '-'. # # Note: some sites will want to select more restrictive protections than the # defaults. In particular, it may be desirable to switch many of the 644 # entries to 640 or 600. For example, some sites will consider the # contents of maillog, messages, and lpd-errs to be confidential. In the # future, these defaults may change to more conservative ones. # # logfilename [owner:group] mode count size when flags [/pid_file] [sig_num] /var/log/all.log 600 7 * @T00 J /var/log/amd.log 644 7 100 * J /var/log/auth.log 600 7 100 @0101T JC /var/log/console.log 600 5 100 * J /var/log/cron 600 3 100 * JC /var/log/daily.log 640 7 * @T00 JN /var/log/debug.log 600 7 100 * JC /var/log/kerberos.log 600 7 100 * J /var/log/lpd-errs 644 7 100 * JC /var/log/maillog 640 7 * @T00 JC /var/log/messages 644 5 100 @0101T JC /var/log/monthly.log 640 12 * $M1D0 JN /var/log/pflog 600 3 100 * JB /var/run/pflogd.pid /var/log/ppp.log root:network 640 3 100 * JC /var/log/devd.log 644 3 100 * JC /var/log/security 600 10 100 * JC /var/log/sendmail.st 640 10 * 168 B /var/log/utx.log 644 3 * @01T05 B /var/log/weekly.log 640 5 1 $W6D0 JN /var/log/xferlog 600 7 100 * JC
每一行的開始為要翻轉的日誌名稱、接著是供翻轉與新建檔案使用的擁有者及群組 (選填)。mode 欄位可設定日誌檔案的權限,count 代表要保留多少個翻轉過的日誌檔案,而 size 與 when 欄位會告訴 newsyslog 何時要翻轉該檔案。日誌檔案會在當其檔案超過 size 欄位的大小或已超過 when 欄位指定的時間時翻轉,可使用星號 (*) 忽略該欄位。flags 欄位可以給予進階的參數,例如:如何壓縮翻轉後檔案或建立遺失的日誌檔案。最後兩個欄位皆為選填,可指定程序的程序 ID (PID) 檔名稱以及檔案翻轉後要傳送給該程序的信號 (Signal) 編號。
要取的更多有關所有欄位、可用的旗標及如何指定翻轉時間,請參考 newsyslog.conf(5)。由於 newsyslog 是由 cron(8) 執行,因此無法比其在 cron(8) 中所排定的時間間距內更頻繁的執行翻轉檔案。
Monitoring the log files of multiple hosts can become unwieldy as the number of systems increases. Configuring centralized logging can reduce some of the administrative burden of log file administration.
In FreeBSD, centralized log file aggregation, merging, and rotation can be configured using syslogd and newsyslog. This section demonstrates an example configuration, where host A, named logserv.example.com, will collect logging information for the local network. Host B, named logclient.example.com, will be configured to pass logging information to the logging server.
A log server is a system that has been configured to accept logging information from other hosts. Before configuring a log server, check the following:
If there is a firewall between the logging server and any logging clients, ensure that the firewall ruleset allows UDP port 514 for both the clients and the server.
The logging server and all client machines must have forward and reverse entries in the local DNS. If the network does not have a DNS server, create entries in each system’s /etc/hosts. Proper name resolution is required so that log entries are not rejected by the logging server.
On the log server, edit /etc/syslog.conf to specify the name of the client to receive log entries from, the logging facility to be used, and the name of the log to store the host’s log entries. This example adds the hostname of B, logs all facilities, and stores the log entries in /var/log/logclient.log.
+logclient.example.com *.* /var/log/logclient.log
When adding multiple log clients, add a similar two-line entry for each client. More information about the available facilities may be found in syslog.conf(5).
Next, configure /etc/rc.conf:
syslogd_enable="YES" syslogd_flags="-a logclient.example.com -v -v"
The first entry starts syslogd at system boot. The second entry allows log entries from the specified client. The -v -v increases the verbosity of logged messages. This is useful for tweaking facilities as administrators are able to see what type of messages are being logged under each facility.
Multiple -a options may be specified to allow logging from multiple clients. IP addresses and whole netblocks may also be specified. Refer to syslogd(8) for a full list of possible options.
Finally, create the log file:
# touch /var/log/logclient.logAt this point, syslogd should be restarted and verified:
# service syslogd restart
# pgrep syslogIf a PID is returned, the server restarted successfully, and client configuration can begin. If the server did not restart, consult /var/log/messages for the error.
A logging client sends log entries to a logging server on the network. The client also keeps a local copy of its own logs.
Once a logging server has been configured, edit /etc/rc.conf on the logging client:
syslogd_enable="YES" syslogd_flags="-s -v -v"
The first entry enables syslogd on boot up. The second entry prevents logs from being accepted by this client from other hosts (-s) and increases the verbosity of logged messages.
Next, define the logging server in the client’s /etc/syslog.conf. In this example, all logged facilities are sent to a remote system, denoted by the @ symbol, with the specified hostname:
*.* @logserv.example.com
After saving the edit, restart syslogd for the changes to take effect:
# service syslogd restartTo test that log messages are being sent across the network, use logger(1) on the client to send a message to syslogd:
# logger "Test message from logclient"This message should now exist both in /var/log/messages on the client and /var/log/logclient.log on the log server.
If no messages are being received on the log server, the cause is most likely a network connectivity issue, a hostname resolution issue, or a typo in a configuration file. To isolate the cause, ensure that both the logging server and the logging client are able to ping each other using the hostname specified in their /etc/rc.conf. If this fails, check the network cabling, the firewall ruleset, and the hostname entries in the DNS server or /etc/hosts on both the logging server and clients. Repeat until the ping is successful from both hosts.
If the ping succeeds on both hosts but log messages are still not being received, temporarily increase logging verbosity to narrow down the configuration issue. In the following example, /var/log/logclient.log on the logging server is empty and /var/log/messages on the logging client does not indicate a reason for the failure. To increase debugging output, edit the syslogd_flags entry on the logging server and issue a restart:
syslogd_flags="-d -a logclient.example.com -v -v"
# service syslogd restartDebugging data similar to the following will flash on the console immediately after the restart:
logmsg: pri 56, flags 4, from logserv.example.com, msg syslogd: restart
syslogd: restarted
logmsg: pri 6, flags 4, from logserv.example.com, msg syslogd: kernel boot file is /boot/kernel/kernel
Logging to FILE /var/log/messages
syslogd: kernel boot file is /boot/kernel/kernel
cvthname(192.168.1.10)
validate: dgram from IP 192.168.1.10, port 514, name logclient.example.com;
rejected in rule 0 due to name mismatch.In this example, the log messages are being rejected due to a typo which results in a hostname mismatch. The client’s hostname should be logclient, not logclien. Fix the typo, issue a restart, and verify the results:
# service syslogd restart
logmsg: pri 56, flags 4, from logserv.example.com, msg syslogd: restart
syslogd: restarted
logmsg: pri 6, flags 4, from logserv.example.com, msg syslogd: kernel boot file is /boot/kernel/kernel
syslogd: kernel boot file is /boot/kernel/kernel
logmsg: pri 166, flags 17, from logserv.example.com,
msg Dec 10 20:55:02 <syslog.err> logserv.example.com syslogd: exiting on signal 2
cvthname(192.168.1.10)
validate: dgram from IP 192.168.1.10, port 514, name logclient.example.com;
accepted in rule 0.
logmsg: pri 15, flags 0, from logclient.example.com, msg Dec 11 02:01:28 trhodes: Test message 2
Logging to FILE /var/log/logclient.log
Logging to FILE /var/log/messagesAt this point, the messages are being properly received and placed in the correct file.
As with any network service, security requirements should be considered before implementing a logging server. Log files may contain sensitive data about services enabled on the local host, user accounts, and configuration data. Network data sent from the client to the server will not be encrypted or password protected. If a need for encryption exists, consider using security/stunnel, which will transmit the logging data over an encrypted tunnel.
Local security is also an issue. Log files are not encrypted during use or after log rotation. Local users may access log files to gain additional insight into system configuration. Setting proper permissions on log files is critical. The built-in log rotator, newsyslog, supports setting permissions on newly created and rotated log files. Setting log files to mode 600 should prevent unwanted access by local users. Refer to newsyslog.conf(5) for additional information.
有數個目錄中儲存著設定資訊,這些目錄有:
/etc | 通用系統特定的設定資訊。 |
/etc/defaults | 系統設定檔的預設版本。 |
/etc/mail | sendmail(8) 額外的設定以及其他 MTA 設定檔。 |
/etc/ppp | user- 及 kernel-ppp 程式的設定。 |
/usr/local/etc | 已安裝應用程式的設定檔,可能會有以應用程式區分的子目錄。 |
/usr/local/etc/rc.d | 已安裝應用程式的 rc(8) Script。 |
/var/db | 自動產生的系統特定資料庫檔案,例如套件資料庫以及 locate(1) 資料庫。 |
FreeBSD 要如何存取網際網路網域名稱系統 (Internet Domain Name System, DNS) 是由 resolv.conf(5) 來控制。
/etc/resolv.conf 中最常用的項目為:
| 解析程式 (Resolver) 要查詢的名稱伺服器 IP 位置,這些伺服器會依所列的順序來查詢,最多可以有三個。 |
| 主機名稱查詢使用的搜尋清單。這通常會使用本機主機名稱所在的網域。 |
| 本地網域名稱。 |
典型的 /etc/resolv.conf 會如下:
search example.com nameserver 147.11.1.11 nameserver 147.11.100.30
|
當使用 DHCP 時,dhclient(8) 通常會使用從 DHCP 伺服器所接收到的資訊覆寫 /etc/resolv.conf。
/etc/hosts 是簡單的文字資料庫,會與 DNS 及 NIS 一併使用來提供主機名稱與 IP 位址的對應。可將透過 LAN 所連結的在地電腦項目加入到這個檔案做最簡單的命名,來替代設定一個 named(8) 伺服器。除此之外 /etc/hosts 可以用來提供本地的網際網路名稱記錄,來減少常用名稱向外部 DNS 伺服器查詢的需求。
# $FreeBSD: head/zh_TW.UTF-8/books/handbook/book.xml 53653 2019-12-03 17:05:41Z rcyu $ # # # Host Database # # This file should contain the addresses and aliases for local hosts that # share this file. Replace 'my.domain' below with the domainname of your # machine. # # In the presence of the domain name service or NIS, this file may # not be consulted at all; see /etc/nsswitch.conf for the resolution order. # # ::1 localhost localhost.my.domain 127.0.0.1 localhost localhost.my.domain # # Imaginary network. #10.0.0.2 myname.my.domain myname #10.0.0.3 myfriend.my.domain myfriend # # According to RFC 1918, you can use the following IP networks for # private nets which will never be connected to the Internet: # # 10.0.0.0 - 10.255.255.255 # 172.16.0.0 - 172.31.255.255 # 192.168.0.0 - 192.168.255.255 # # In case you want to be able to connect to the Internet, you need # real official assigned numbers. Do not try to invent your own network # numbers but instead get one from your network provider (if any) or # from your regional registry (ARIN, APNIC, LACNIC, RIPE NCC, or AfriNIC.) #
/etc/hosts 的格式如下:
[Internet address] [official hostname] [alias1] [alias2] ...
例如:
10.0.0.1 myRealHostname.example.com myRealHostname foobar1 foobar2
請參考 hosts(5) 取得更多資訊。
sysctl(8) 可用來更改執行中的 FreeBSD 系統,這包含許多 TCP/IP 堆疊及虛擬記憶體系統的進階選項,讓有經驗的系統管理者能夠簡單的提升效能。有超過五百個系統變數可以使用 sysctl(8) 來讀取與設定。
sysctl(8) 主要提供兩個功能:讀取與修改系統設定。
檢視所有可讀取的變數:
% sysctl -a要讀取特定變數只要指定其名稱:
% sysctl kern.maxproc
kern.maxproc: 1044要設定特定變數可使用 variable=value 語法:
# sysctl kern.maxfiles=5000
kern.maxfiles: 2088 -> 5000sysctl 的設定值通常為字串、數字或布林值,其中布林值的 1 代表是,0 代表否。
要在每次機器開機時自動設定一些變數可將其加入到 /etc/sysctl.conf。要取得更多的資訊請參考 sysctl.conf(5) 及 sysctl.conf。
sysctl(8) 的設定檔於 /etc/sysctl.conf,內容很像 /etc/rc.conf,設定數值使用 variable=value 格式。指定的數值會在系統進入多使用者模式時設定,但並非所有變數皆可在此模式設定。
例如,要關閉嚴重信號 (Fatal signal) 中止的記錄並避免使用者看到其他使用者所執行的程序,可加入以下設定到 /etc/sysctl.conf:
# Do not log fatal signal exits (e.g., sig 11) kern.logsigexit=0 # Prevent users from seeing information about processes that # are being run under another UID. security.bsd.see_other_uids=0
在有些情況可能會需要修改唯讀的 sysctl(8) 數值,而這會需要重新啟動系統。
例如,某些筆電型號的 cardbus(4) 裝置無法偵測到記憶體範圍而且會失效並有類似以下的錯誤:
cbb0: Could not map register memory
device_probe_and_attach: cbb0 attach returned 12這個修正需要修改唯讀的 sysctl(8) 設定。加入 hw.pci.allow_unsupported_io_range=1 到 /boot/loader.conf 然後重新啟動。現在 cardbus(4) 應可正常運作。
接下來的章節會討論在磁碟裝置上各種可調校的機制與選項。在大多數案例中,有使用機械元件的硬碟,如 SCSI 磁碟機,會成為導致整體系統效能低下的瓶頸。雖然已經有不使用機械元件的磁碟機解決方案,如,固態硬碟,但使用機械元件的磁碟機短期內並不會消失。在調校磁碟時,建議可以利用 iostat(8) 指令的功能來測試各種對系統的變更,這個指令可讓使用者取得系統 IO 相關的有用資訊。
vfs.vmiodirenableThe vfs.vmiodirenable sysctl(8) variable may be set to either 0 (off) or 1 (on). It is set to 1 by default. This variable controls how directories are cached by the system. Most directories are small, using just a single fragment (typically 1 K) in the file system and typically 512 bytes in the buffer cache. With this variable turned off, the buffer cache will only cache a fixed number of directories, even if the system has a huge amount of memory. When turned on, this sysctl(8) allows the buffer cache to use the VM page cache to cache the directories, making all the memory available for caching directories. However, the minimum in-core memory used to cache a directory is the physical page size (typically 4 K) rather than 512 bytes. Keeping this option enabled is recommended if the system is running any services which manipulate large numbers of files. Such services can include web caches, large mail systems, and news systems. Keeping this option on will generally not reduce performance, even with the wasted memory, but one should experiment to find out.
vfs.write_behindThe vfs.write_behind sysctl(8) variable defaults to 1 (on). This tells the file system to issue media writes as full clusters are collected, which typically occurs when writing large sequential files. This avoids saturating the buffer cache with dirty buffers when it would not benefit I/O performance. However, this may stall processes and under certain circumstances should be turned off.
vfs.hirunningspaceThe vfs.hirunningspace sysctl(8) variable determines how much outstanding write I/O may be queued to disk controllers system-wide at any given instance. The default is usually sufficient, but on machines with many disks, try bumping it up to four or five megabytes. Setting too high a value which exceeds the buffer cache’s write threshold can lead to bad clustering performance. Do not set this value arbitrarily high as higher write values may add latency to reads occurring at the same time.
There are various other buffer cache and VM page cache related sysctl(8) values. Modifying these values is not recommended as the VM system does a good job of automatically tuning itself.
vm.swap_idle_enabledThe vm.swap_idle_enabled sysctl(8) variable is useful in large multi-user systems with many active login users and lots of idle processes. Such systems tend to generate continuous pressure on free memory reserves. Turning this feature on and tweaking the swapout hysteresis (in idle seconds) via vm.swap_idle_threshold1 and vm.swap_idle_threshold2 depresses the priority of memory pages associated with idle processes more quickly then the normal pageout algorithm. This gives a helping hand to the pageout daemon. Only turn this option on if needed, because the tradeoff is essentially pre-page memory sooner rather than later which eats more swap and disk bandwidth. In a small system this option will have a determinable effect, but in a large system that is already doing moderate paging, this option allows the VM system to stage whole processes into and out of memory easily.
hw.ata.wcTurning off IDE write caching reduces write bandwidth to IDE disks, but may sometimes be necessary due to data consistency issues introduced by hard drive vendors. The problem is that some IDE drives lie about when a write completes. With IDE write caching turned on, IDE hard drives write data to disk out of order and will sometimes delay writing some blocks indefinitely when under heavy disk load. A crash or power failure may cause serious file system corruption. Check the default on the system by observing the hw.ata.wc sysctl(8) variable. If IDE write caching is turned off, one can set this read-only variable to 1 in /boot/loader.conf in order to enable it at boot time.
For more information, refer to ata(4).
SCSI_DELAY (kern.cam.scsi_delay)The SCSI_DELAY kernel configuration option may be used to reduce system boot times. The defaults are fairly high and can be responsible for 15 seconds of delay in the boot process. Reducing it to 5 seconds usually works with modern drives. The kern.cam.scsi_delay boot time tunable should be used. The tunable and kernel configuration option accept values in terms of milliseconds and not seconds.
To fine-tune a file system, use tunefs(8). This program has many different options. To toggle Soft Updates on and off, use:
# tunefs -n enable /filesystem
# tunefs -n disable /filesystemA file system cannot be modified with tunefs(8) while it is mounted. A good time to enable Soft Updates is before any partitions have been mounted, in single-user mode.
Soft Updates is recommended for UFS file systems as it drastically improves meta-data performance, mainly file creation and deletion, through the use of a memory cache. There are two downsides to Soft Updates to be aware of. First, Soft Updates guarantee file system consistency in the case of a crash, but could easily be several seconds or even a minute behind updating the physical disk. If the system crashes, unwritten data may be lost. Secondly, Soft Updates delay the freeing of file system blocks. If the root file system is almost full, performing a major update, such as make installworld, can cause the file system to run out of space and the update to fail.
Meta-data updates are updates to non-content data like inodes or directories. There are two traditional approaches to writing a file system’s meta-data back to disk.
Historically, the default behavior was to write out meta-data updates synchronously. If a directory changed, the system waited until the change was actually written to disk. The file data buffers (file contents) were passed through the buffer cache and backed up to disk later on asynchronously. The advantage of this implementation is that it operates safely. If there is a failure during an update, meta-data is always in a consistent state. A file is either created completely or not at all. If the data blocks of a file did not find their way out of the buffer cache onto the disk by the time of the crash, fsck(8) recognizes this and repairs the file system by setting the file length to 0. Additionally, the implementation is clear and simple. The disadvantage is that meta-data changes are slow. For example, rm -r touches all the files in a directory sequentially, but each directory change will be written synchronously to the disk. This includes updates to the directory itself, to the inode table, and possibly to indirect blocks allocated by the file. Similar considerations apply for unrolling large hierarchies using tar -x.
The second approach is to use asynchronous meta-data updates. This is the default for a UFS file system mounted with mount -o async. Since all meta-data updates are also passed through the buffer cache, they will be intermixed with the updates of the file content data. The advantage of this implementation is there is no need to wait until each meta-data update has been written to disk, so all operations which cause huge amounts of meta-data updates work much faster than in the synchronous case. This implementation is still clear and simple, so there is a low risk for bugs creeping into the code. The disadvantage is that there is no guarantee for a consistent state of the file system. If there is a failure during an operation that updated large amounts of meta-data, like a power failure or someone pressing the reset button, the file system will be left in an unpredictable state. There is no opportunity to examine the state of the file system when the system comes up again as the data blocks of a file could already have been written to the disk while the updates of the inode table or the associated directory were not. It is impossible to implement a fsck(8) which is able to clean up the resulting chaos because the necessary information is not available on the disk. If the file system has been damaged beyond repair, the only choice is to reformat it and restore from backup.
The usual solution for this problem is to implement dirty region logging, which is also referred to as journaling. Meta-data updates are still written synchronously, but only into a small region of the disk. Later on, they are moved to their proper location. Because the logging area is a small, contiguous region on the disk, there are no long distances for the disk heads to move, even during heavy operations, so these operations are quicker than synchronous updates. Additionally, the complexity of the implementation is limited, so the risk of bugs being present is low. A disadvantage is that all meta-data is written twice, once into the logging region and once to the proper location, so performance "pessimization" might result. On the other hand, in case of a crash, all pending meta-data operations can be either quickly rolled back or completed from the logging area after the system comes up again, resulting in a fast file system startup.
Kirk McKusick, the developer of Berkeley FFS, solved this problem with Soft Updates. All pending meta-data updates are kept in memory and written out to disk in a sorted sequence ("ordered meta-data updates"). This has the effect that, in case of heavy meta-data operations, later updates to an item "catch" the earlier ones which are still in memory and have not already been written to disk. All operations are generally performed in memory before the update is written to disk and the data blocks are sorted according to their position so that they will not be on the disk ahead of their meta-data. If the system crashes, an implicit "log rewind" causes all operations which were not written to the disk appear as if they never happened. A consistent file system state is maintained that appears to be the one of 30 to 60 seconds earlier. The algorithm used guarantees that all resources in use are marked as such in their blocks and inodes. After a crash, the only resource allocation error that occurs is that resources are marked as "used" which are actually "free". fsck(8) recognizes this situation, and frees the resources that are no longer used. It is safe to ignore the dirty state of the file system after a crash by forcibly mounting it with mount -f. In order to free resources that may be unused, fsck(8) needs to be run at a later time. This is the idea behind the background fsck(8): at system startup time, only a snapshot of the file system is recorded and fsck(8) is run afterwards. All file systems can then be mounted "dirty", so the system startup proceeds in multi-user mode. Then, background fsck(8) is scheduled for all file systems where this is required, to free resources that may be unused. File systems that do not use Soft Updates still need the usual foreground fsck(8).
The advantage is that meta-data operations are nearly as fast as asynchronous updates and are faster than logging, which has to write the meta-data twice. The disadvantages are the complexity of the code, a higher memory consumption, and some idiosyncrasies. After a crash, the state of the file system appears to be somewhat "older". In situations where the standard synchronous approach would have caused some zero-length files to remain after the fsck(8), these files do not exist at all with Soft Updates because neither the meta-data nor the file contents have been written to disk. Disk space is not released until the updates have been written to disk, which may take place some time after running rm(1). This may cause problems when installing large amounts of data on a file system that does not have enough free space to hold all the files twice.
kern.maxfilesThe kern.maxfiles sysctl(8) variable can be raised or lowered based upon system requirements. This variable indicates the maximum number of file descriptors on the system. When the file descriptor table is full, file: table is full will show up repeatedly in the system message buffer, which can be viewed using dmesg(8).
Each open file, socket, or fifo uses one file descriptor. A large-scale production server may easily require many thousands of file descriptors, depending on the kind and number of services running concurrently.
In older FreeBSD releases, the default value of kern.maxfiles is derived from maxusers in the kernel configuration file. kern.maxfiles grows proportionally to the value of maxusers. When compiling a custom kernel, consider setting this kernel configuration option according to the use of the system. From this number, the kernel is given most of its pre-defined limits. Even though a production machine may not have 256 concurrent users, the resources needed may be similar to a high-scale web server.
The read-only sysctl(8) variable kern.maxusers is automatically sized at boot based on the amount of memory available in the system, and may be determined at run-time by inspecting the value of kern.maxusers. Some systems require larger or smaller values of kern.maxusers and values of 64, 128, and 256 are not uncommon. Going above 256 is not recommended unless a huge number of file descriptors is needed. Many of the tunable values set to their defaults by kern.maxusers may be individually overridden at boot-time or run-time in /boot/loader.conf. Refer to loader.conf(5) and /boot/defaults/loader.conf for more details and some hints.
In older releases, the system will auto-tune maxusers if it is set to 0. . When setting this option, set maxusers to at least 4, especially if the system runs Xorg or is used to compile software. The most important table set by maxusers is the maximum number of processes, which is set to 20 + 16 * maxusers. If maxusers is set to 1, there can only be 36 simultaneous processes, including the 18 or so that the system starts up at boot time and the 15 or so used by Xorg. Even a simple task like reading a manual page will start up nine processes to filter, decompress, and view it. Setting maxusers to 64 allows up to 1044 simultaneous processes, which should be enough for nearly all uses. If, however, the error is displayed when trying to start another program, or a server is running with a large number of simultaneous users, increase the number and rebuild.
|
kern.ipc.soacceptqueueThe kern.ipc.soacceptqueue sysctl(8) variable limits the size of the listen queue for accepting new TCP connections. The default value of 128 is typically too low for robust handling of new connections on a heavily loaded web server. For such environments, it is recommended to increase this value to 1024 or higher. A service such as sendmail(8), or Apache may itself limit the listen queue size, but will often have a directive in its configuration file to adjust the queue size. Large listen queues do a better job of avoiding Denial of Service (DoS) attacks.
The NMBCLUSTERS kernel configuration option dictates the amount of network Mbufs available to the system. A heavily-trafficked server with a low number of Mbufs will hinder performance. Each cluster represents approximately 2 K of memory, so a value of 1024 represents 2 megabytes of kernel memory reserved for network buffers. A simple calculation can be done to figure out how many are needed. A web server which maxes out at 1000 simultaneous connections where each connection uses a 6 K receive and 16 K send buffer, requires approximately 32 MB worth of network buffers to cover the web server. A good rule of thumb is to multiply by 2, so 2x32 MB / 2 KB = 64 MB / 2 kB = 32768. Values between 4096 and 32768 are recommended for machines with greater amounts of memory. Never specify an arbitrarily high value for this parameter as it could lead to a boot time crash. To observe network cluster usage, use -m with netstat(1).
The kern.ipc.nmbclusters loader tunable should be used to tune this at boot time. Only older versions of FreeBSD will require the use of the NMBCLUSTERS kernel config(8) option.
For busy servers that make extensive use of the sendfile(2) system call, it may be necessary to increase the number of sendfile(2) buffers via the NSFBUFS kernel configuration option or by setting its value in /boot/loader.conf (see loader(8) for details). A common indicator that this parameter needs to be adjusted is when processes are seen in the sfbufa state. The sysctl(8) variable kern.ipc.nsfbufs is read-only. This parameter nominally scales with kern.maxusers, however it may be necessary to tune accordingly.
Even though a socket has been marked as non-blocking, calling sendfile(2) on the non-blocking socket may result in the sendfile(2) call blocking until enough |
net.inet.ip.portrange.*The net.inet.ip.portrange.* sysctl(8) variables control the port number ranges automatically bound to TCP and UDP sockets. There are three ranges: a low range, a default range, and a high range. Most network programs use the default range which is controlled by net.inet.ip.portrange.first and net.inet.ip.portrange.last, which default to 1024 and 5000, respectively. Bound port ranges are used for outgoing connections and it is possible to run the system out of ports under certain circumstances. This most commonly occurs when running a heavily loaded web proxy. The port range is not an issue when running a server which handles mainly incoming connections, such as a web server, or has a limited number of outgoing connections, such as a mail relay. For situations where there is a shortage of ports, it is recommended to increase net.inet.ip.portrange.last modestly. A value of 10000, 20000 or 30000 may be reasonable. Consider firewall effects when changing the port range. Some firewalls may block large ranges of ports, usually low-numbered ports, and expect systems to use higher ranges of ports for outgoing connections. For this reason, it is not recommended that the value of net.inet.ip.portrange.first be lowered.
TCP 頻寬延遲乘積TCP bandwidth delay product limiting can be enabled by setting the net.inet.tcp.inflight.enable sysctl(8) variable to 1. This instructs the system to attempt to calculate the bandwidth delay product for each connection and limit the amount of data queued to the network to just the amount required to maintain optimum throughput.
This feature is useful when serving data over modems, Gigabit Ethernet, high speed WAN links, or any other link with a high bandwidth delay product, especially when also using window scaling or when a large send window has been configured. When enabling this option, also set net.inet.tcp.inflight.debug to 0 to disable debugging. For production use, setting net.inet.tcp.inflight.min to at least 6144 may be beneficial. Setting high minimums may effectively disable bandwidth limiting, depending on the link. The limiting feature reduces the amount of data built up in intermediate route and switch packet queues and reduces the amount of data built up in the local host’s interface queue. With fewer queued packets, interactive connections, especially over slow modems, will operate with lower Round Trip Times. This feature only effects server side data transmission such as uploading. It has no effect on data reception or downloading.
Adjusting net.inet.tcp.inflight.stab is not recommended. This parameter defaults to 20, representing 2 maximal packets added to the bandwidth delay product window calculation. The additional window is required to stabilize the algorithm and improve responsiveness to changing conditions, but it can also result in higher ping(8) times over slow links, though still much lower than without the inflight algorithm. In such cases, try reducing this parameter to 15, 10, or 5 and reducing net.inet.tcp.inflight.min to a value such as 3500 to get the desired effect. Reducing these parameters should be done as a last resort only.
kern.maxvnodesA vnode is the internal representation of a file or directory. Increasing the number of vnodes available to the operating system reduces disk I/O. Normally, this is handled by the operating system and does not need to be changed. In some cases where disk I/O is a bottleneck and the system is running out of vnodes, this setting needs to be increased. The amount of inactive and free RAM will need to be taken into account.
To see the current number of vnodes in use:
# sysctl vfs.numvnodes
vfs.numvnodes: 91349To see the maximum vnodes:
# sysctl kern.maxvnodes
kern.maxvnodes: 100000If the current vnode usage is near the maximum, try increasing kern.maxvnodes by a value of 1000. Keep an eye on the number of vfs.numvnodes. If it climbs up to the maximum again, kern.maxvnodes will need to be increased further. Otherwise, a shift in memory usage as reported by top(1) should be visible and more memory should be active.
有時系統會需要更多的交換 (Swap) 空間,本章節會介紹兩種增加交換空間的方式:一種是在既有的分割區或新的硬碟增加交換空間,另一種則是在既有的分割區中建立一個交換檔。
要取得更多有關如何加密交換空間的資訊、有那些可用的選項以及為何要做加密,可參考 交換空間加密。
使用 swapon 來增加交換分割區到系統,例:
# swapon /dev/ada1s1b可以使用任何尚未掛載過、甚至已經有內含資料的分割區做為交換空間,但在含有資料的分割區上使用 |
要在開機時自動加入此交換分割區,可加入以下項目到 /etc/fstab:
/dev/ada1s1b none swap sw 0 0
以下例子會建立一個 64M 的交換檔於 /usr/swap0 來替代使用分割區建立交換空間。
使用交換檔開啟交換空間前需要在核心編譯或載入 md(4) 所需的模組,請參考 設定 FreeBSD 核心 了解有關編譯自訂核心的資訊。
建立交換檔 /usr/swap0:
# dd if=/dev/zero of=/usr/swap0 bs=1m count=64設定適當的權限於 /usr/swap0:
# chmod 0600 /usr/swap0在 /etc/rc.conf 開啟交換檔:
swapfile="/usr/swap0" # Set to name of swap file
交換空間會於系統啟動時增加。若要立即增加交換空間,可指定一個未使用的記憶體裝置。請參考 記憶體磁碟 取得更多有關記憶體裝置的資訊。
# mdconfig -a -t vnode -f /usr/swap0 -u 0 && swapon /dev/md0以有效率的方式運用硬體資源是很重要的,電源與資源管理讓作業系統可以監控系統的限制,並且在系統溫度意外升高時能夠發出警報。早期提供電源管理的規範是進階電源管理 (Advanced Power Management, APM),APM 可根據系統的使用狀況來來控制電源用量。然而,使用 APM 要作業系統來管理系統的電源用量和溫度屬性是困難且沒有彈性的,因為硬體是由 BIOS 所管理,使用者對電源管理設定只有有限的設定性與可見性,且 APMBIOS 是由供應商提供且特定於某些硬體平台,而作業系統中必透過 APM 驅動程式做為中介存取 APM 軟體介面才能夠管理電源等級。
在 APM 有四個主要的問題。第一,電源管理是由供應商特定的 BIOS 來完成,與作業系統是分開的。例如,使用者可在 APMBIOS 設定硬碟的閒置時間值,在超過時間時 BIOS 可在未徵得作業系統的同意下降低硬碟的轉速。第二,APM 的邏輯是內嵌在 BIOS 當中的,並且在作業系統範圍之外運作,這代表使用者只能夠透過燒錄新的韌體到 ROM 來修正 APMBIOS 中的問題,而這樣的程序是危險的,若失敗,可能會讓系統進入無法復原的狀態。第三,APM 是供應商特定的技術,這代表有許多重複的工作,在一個供應商的 BIOS 找到的問題在其他的供應商卻沒有解決。最後一點,APMBIOS 並沒有足夠的空間來實作複雜的電源管理政策或可良好適應主機用途的程式。
Plug and Play BIOS (PNPBIOS) 在很多情況下並不可靠,PNPBIOS 是 16 位元的技術,所以作業系統必須模擬 16 位元才能存取 PNPBIOS。FreeBSD 提供了一個 APM 驅動程式來做 APM,應可用在 2000 年之前所製造的系統,該驅動程式的說明於 apm(4)。
APM 的後繼者是進階設置與電源介面 (Advanced Configuration and Power Interface, ACPI)。ACPI 是一套由供應商聯盟所搛寫出的標準,提供了硬體資源與電源管理的介面,它是 作業系統直接設置與電源管理 (Operating System-directed configuration and Power Management) 關鍵的要素,提供了作業系統更多的控制方式與彈性。
本章節將示範如何在 FreeBSD 設定 ACPI,然後提供一些如何對 ACPI 除錯的提示以及如何提交包含除錯資訊的問題回報,讓開發人員能夠診斷並修正 ACPI 的問題。
在 FreeBSD acpi(4) 驅動程式預設會在系統開始時載入,且不應被編譯到核心當中。這個驅動程式在開機之後無法被卸載,因為系統匯流排會使用它做各種硬體互動。雖然如此,若系統遇到問題,ACPI 還是可以被關閉,在 /boot/loader.conf 中設定 hint.acpi.0.disabled="1" 之後重新開機或在載入程式提示時設定這個變數,如 階段三 中的說明。
ACPI 與 APM 不能同時存在且應分開使用,若有偵測到有另一個正在執行,要載入的後者將會中斷。 |
ACPI 可以用來讓系統進入睡眠模式,使用 acpiconf 與 -s 旗標再加上由 1 到 5 的數字。大多數使用者只需使用 1 (快速待命到 RAM) 或 3 (待命到 RAM),選項 5 會執行軟關機 (Soft-off),如同執行 halt -p 一樣。
其他的選項可使用 sysctl 來設定,請參考 acpi(4) 以及 acpiconf(8) 以取得更多資訊。
ACPI is present in all modern computers that conform to the ia32 (x86), ia64 (Itanium), and amd64 (AMD) architectures. The full standard has many features including CPU performance management, power planes control, thermal zones, various battery systems, embedded controllers, and bus enumeration. Most systems implement less than the full standard. For instance, a desktop system usually only implements bus enumeration while a laptop might have cooling and battery management support as well. Laptops also have suspend and resume, with their own associated complexity.
An ACPI-compliant system has various components. The BIOS and chipset vendors provide various fixed tables, such as FADT, in memory that specify things like the APIC map (used for SMP), config registers, and simple configuration values. Additionally, a bytecode table, the Differentiated System Description Table DSDT, specifies a tree-like name space of devices and methods.
The ACPI driver must parse the fixed tables, implement an interpreter for the bytecode, and modify device drivers and the kernel to accept information from the ACPI subsystem. For FreeBSD, Intel™ has provided an interpreter (ACPI-CA) that is shared with Linux™ and NetBSD. The path to the ACPI-CA source code is src/sys/contrib/dev/acpica. The glue code that allows ACPI-CA to work on FreeBSD is in src/sys/dev/acpica/Osd. Finally, drivers that implement various ACPI devices are found in src/sys/dev/acpica.
For ACPI to work correctly, all the parts have to work correctly. Here are some common problems, in order of frequency of appearance, and some possible workarounds or fixes. If a fix does not resolve the issue, refer to 取得與回報除錯資訊 for instructions on how to submit a bug report.
In some cases, resuming from a suspend operation will cause the mouse to fail. A known work around is to add hint.psm.0.flags="0x3000" to /boot/loader.conf.
ACPI has three suspend to RAM (STR) states, S1-S3, and one suspend to disk state (STD), called S4. STD can be implemented in two separate ways. The S4BIOS is a BIOS-assisted suspend to disk and S4OS is implemented entirely by the operating system. The normal state the system is in when plugged in but not powered up is "soft off" (S5).
Use sysctl hw.acpi to check for the suspend-related items. These example results are from a Thinkpad:
hw.acpi.supported_sleep_state: S3 S4 S5
hw.acpi.s4bios: 0Use acpiconf -s to test S3, S4, and S5. An s4bios of one (1) indicates S4BIOS support instead of S4 operating system support.
When testing suspend/resume, start with S1, if supported. This state is most likely to work since it does not require much driver support. No one has implemented S2, which is similar to S1. Next, try S3. This is the deepest STR state and requires a lot of driver support to properly reinitialize the hardware.
A common problem with suspend/resume is that many device drivers do not save, restore, or reinitialize their firmware, registers, or device memory properly. As a first attempt at debugging the problem, try:
# sysctl debug.bootverbose=1
# sysctl debug.acpi.suspend_bounce=1
# acpiconf -s 3This test emulates the suspend/resume cycle of all device drivers without actually going into S3 state. In some cases, problems such as losing firmware state, device watchdog time out, and retrying forever, can be captured with this method. Note that the system will not really enter S3 state, which means devices may not lose power, and many will work fine even if suspend/resume methods are totally missing, unlike real S3 state.
Harder cases require additional hardware, such as a serial port and cable for debugging through a serial console, a Firewire port and cable for using dcons(4), and kernel debugging skills.
To help isolate the problem, unload as many drivers as possible. If it works, narrow down which driver is the problem by loading drivers until it fails again. Typically, binary drivers like nvidia.ko, display drivers, and USB will have the most problems while Ethernet interfaces usually work fine. If drivers can be properly loaded and unloaded, automate this by putting the appropriate commands in /etc/rc.suspend and /etc/rc.resume. Try setting hw.acpi.reset_video to 1 if the display is messed up after resume. Try setting longer or shorter values for hw.acpi.sleep_delay to see if that helps.
Try loading a recent Linux™ distribution to see if suspend/resume works on the same hardware. If it works on Linux™, it is likely a FreeBSD driver problem. Narrowing down which driver causes the problem will assist developers in fixing the problem. Since the ACPI maintainers rarely maintain other drivers, such as sound or ATA, any driver problems should also be posted to the freebsd-current list and mailed to the driver maintainer. Advanced users can include debugging printf(3)s in a problematic driver to track down where in its resume function it hangs.
Finally, try disabling ACPI and enabling APM instead. If suspend/resume works with APM, stick with APM, especially on older hardware (pre-2000). It took vendors a while to get ACPI support correct and older hardware is more likely to have BIOS problems with ACPI.
Most system hangs are a result of lost interrupts or an interrupt storm. Chipsets may have problems based on boot, how the BIOS configures interrupts before correctness of the APIC (MADT) table, and routing of the System Control Interrupt (SCI).
Interrupt storms can be distinguished from lost interrupts by checking the output of vmstat -i and looking at the line that has acpi0. If the counter is increasing at more than a couple per second, there is an interrupt storm. If the system appears hung, try breaking to DDB (CTRL+ALT+ESC on console) and type show interrupts.
When dealing with interrupt problems, try disabling APIC support with hint.apic.0.disabled="1" in /boot/loader.conf.
Panics are relatively rare for ACPI and are the top priority to be fixed. The first step is to isolate the steps to reproduce the panic, if possible, and get a backtrace. Follow the advice for enabling options DDB and setting up a serial console in 從序列線路 (Serial Line) 進入 DDB 除錯程式 or setting up a dump partition. To get a backtrace in DDB, use tr. When handwriting the backtrace, get at least the last five and the top five lines in the trace.
Then, try to isolate the problem by booting with ACPI disabled. If that works, isolate the ACPI subsystem by using various values of debug.acpi.disable. See acpi(4) for some examples.
First, try setting hw.acpi.disable_on_poweroff="0" in /boot/loader.conf. This keeps ACPI from disabling various events during the shutdown process. Some systems need this value set to 1 (the default) for the same reason. This usually fixes the problem of a system powering up spontaneously after a suspend or poweroff.
Some BIOS vendors provide incorrect or buggy bytecode. This is usually manifested by kernel console messages like this:
ACPI-1287: *** Error: Method execution failed [\\_SB_.PCI0.LPC0.FIGD._STA] \\
(Node 0xc3f6d160), AE_NOT_FOUNDOften, these problems may be resolved by updating the BIOS to the latest revision. Most console messages are harmless, but if there are other problems, like the battery status is not working, these messages are a good place to start looking for problems.
The BIOS bytecode, known as ACPI Machine Language (AML), is compiled from a source language called ACPI Source Language (ASL). The AML is found in the table known as the Differentiated System Description Table (DSDT).
The goal of FreeBSD is for everyone to have working ACPI without any user intervention. Workarounds are still being developed for common mistakes made by BIOS vendors. The Microsoft™ interpreter (acpi.sys and acpiec.sys) does not strictly check for adherence to the standard, and thus many BIOS vendors who only test ACPI under Windows™ never fix their ASL. FreeBSD developers continue to identify and document which non-standard behavior is allowed by Microsoft™'s interpreter and replicate it so that FreeBSD can work without forcing users to fix the ASL.
To help identify buggy behavior and possibly fix it manually, a copy can be made of the system’s ASL. To copy the system’s ASL to a specified file name, use acpidump with -t, to show the contents of the fixed tables, and -d, to disassemble the AML:
# acpidump -td > my.aslSome AML versions assume the user is running Windows™. To override this, set hw.acpi.osname="Windows 2009" in /boot/loader.conf, using the most recent Windows™ version listed in the ASL.
Other workarounds may require my.asl to be customized. If this file is edited, compile the new ASL using the following command. Warnings can usually be ignored, but errors are bugs that will usually prevent ACPI from working correctly.
# iasl -f my.aslIncluding -f forces creation of the AML, even if there are errors during compilation. Some errors, such as missing return statements, are automatically worked around by the FreeBSD interpreter.
The default output filename for iasl is DSDT.aml. Load this file instead of the BIOS’s buggy copy, which is still present in flash memory, by editing /boot/loader.conf as follows:
acpi_dsdt_load="YES" acpi_dsdt_name="/boot/DSDT.aml"
Be sure to copy DSDT.aml to /boot, then reboot the system. If this fixes the problem, send a diff(1) of the old and new ASL to freebsd-acpi so that developers can work around the buggy behavior in acpica.
The ACPI driver has a flexible debugging facility. A set of subsystems and the level of verbosity can be specified. The subsystems to debug are specified as layers and are broken down into components (ACPI_ALL_COMPONENTS) and ACPI hardware support (ACPI_ALL_DRIVERS). The verbosity of debugging output is specified as the level and ranges from just report errors (ACPI_LV_ERROR) to everything (ACPI_LV_VERBOSE). The level is a bitmask so multiple options can be set at once, separated by spaces. In practice, a serial console should be used to log the output so it is not lost as the console message buffer flushes. A full list of the individual layers and levels is found in acpi(4).
Debugging output is not enabled by default. To enable it, add options ACPI_DEBUG to the custom kernel configuration file if ACPI is compiled into the kernel. Add ACPI_DEBUG=1 to /etc/make.conf to enable it globally. If a module is used instead of a custom kernel, recompile just the acpi.ko module as follows:
# cd /sys/modules/acpi/acpi && make clean && make ACPI_DEBUG=1Copy the compiled acpi.ko to /boot/kernel and add the desired level and layer to /boot/loader.conf. The entries in this example enable debug messages for all ACPI components and hardware drivers and output error messages at the least verbose level:
debug.acpi.layer="ACPI_ALL_COMPONENTS ACPI_ALL_DRIVERS" debug.acpi.level="ACPI_LV_ERROR"
If the required information is triggered by a specific event, such as a suspend and then resume, do not modify /boot/loader.conf. Instead, use sysctl to specify the layer and level after booting and preparing the system for the specific event. The variables which can be set using sysctl are named the same as the tunables in /boot/loader.conf.
Once the debugging information is gathered, it can be sent to freebsd-acpi so that it can be used by the FreeBSD ACPI maintainers to identify the root cause of the problem and to develop a solution.
Before submitting debugging information to this mailing list, ensure the latest BIOS version is installed and, if available, the embedded controller firmware version. |
When submitting a problem report, include the following information:
Description of the buggy behavior, including system type, model, and anything that causes the bug to appear. Note as accurately as possible when the bug began occurring if it is new.
The output of dmesg after running boot -v, including any error messages generated by the bug.
The dmesg output from boot -v with ACPI disabled, if disabling ACPI helps to fix the problem.
Output from sysctl hw.acpi. This lists which features the system offers.
The URL to a pasted version of the system’s ASL. Do not send the ASL directly to the list as it can be very large. Generate a copy of the ASL by running this command:
# acpidump -dt > name-system.aslSubstitute the login name for name and manufacturer/model for system. For example, use njl-FooCo6000.asl.
Most FreeBSD developers watch the FreeBSD-CURRENT mailing list, but one should submit problems to freebsd-acpi to be sure it is seen. Be patient when waiting for a response. If the bug is not immediately apparent, submit a bug report. When entering a PR, include the same information as requested above. This helps developers to track the problem and resolve it. Do not send a PR without emailing freebsd-acpi first as it is likely that the problem has been reported before.
More information about ACPI may be found in the following locations:
The FreeBSD ACPI Mailing List Archives (https://lists.freebsd.org/pipermail/freebsd-acpi/)
acpi(4), acpi_thermal(4), acpidump(8), iasl(8), and acpidb(8)
從開啟電腦到載入作業系統的這段流程稱為 "開機程序" (Bootstrap process) 或 "開機" (Booting)。FreeBSD 的開機程序提供大量的客製化彈性,包含可選擇安裝在同電腦的其他的作業系統、不同版本的作業系統或不同核心的作業系統的功能。
本章會詳細說明可以設定的選項。示範如何自訂 FreeBSD 開機流程,包含其中所有會發生的事,直到啟動 FreeBSD 核心、偵測裝置及啟動 init(8)。這些事會發生在開機訊息的文字顏色會從亮白變成灰色之間。
在閱讀本章之後,您會了解:
FreeBSD 開機系統的元件以及它們如何互動。
FreeBSD 開機程式中各元件可使用的選項,用來控制開機程序。
如何設定自訂的開機啟動畫面 (Splash screen)。
設定 Device Hints 的基礎。
如何開機進入單人及多人模式以及如何正確關閉 FreeBSD 系統。
本章僅說明 FreeBSD 在 x86 及 amd64 系統上執行的開機流程。 |
打開電腦並啟動作業系統的這個動作呈現了一個有趣的困境。照道理,電腦在啟動作業系統之前並不知道要如何做任何事情,這些事情之中包括從磁碟執行程式。如果電腦無法在沒有作業系統的情況下執行程式,而作業系統的程式本身又在磁碟上,那麼作業系統要如何啟動呢?
這個問題如同 The Adventures of Baron Munchausen 一書中的一個角色掉進了洞裡,他抓住了靴子上的拔靴帶 (Bootstrap) 才把自己拉了出來,因此在早期電腦領域用 bootstrap 一詞來指載入作業系統的機制,後來被縮短為 "booting"。
在 x86 硬體上,基本輸入/輸出系統 (Basic Input/Output System, BIOS) 負責載入作業系統。 BIOS 會找到硬碟上的主開機記錄區 (Master Boot Record, MBR),該記錄區必須位於磁碟上的特定位置。BIOS 有足夠的知識可以載入並執行這個 MBR,並且假設這個 MBR 在 BIOS 的協助下可以完成接下來載入作業系統的工作。
FreeBSD 在較舊的 MBR 標準與較新的 GUID 分割區表 (GUID Partition Table, GPT) 上都能夠開機 (Booting)。GPT 磁碟分割通常會在有支援統一可延伸韌體介面 (Unified Extensible Firmware Interface, UEFI) 的電腦上找到。不論如何,FreeBSD 即使在只有傳統 BIOS 的機器上,也可以使用 gptboot(8) 由 GPT 分割區開機。直接使用 UEFI 開機的開發工作正在進行中。 |
在 MBR 中的程式通常會稱作開機管理程式 (Boot manager),特別是那些會與使用者互動的程式。開機管理程式通常會另一部份的程式會存放於磁碟的第一個磁軌或檔案系統。開機管理程式的例子有標準 FreeBSD 開機管理程式 boot0 又稱 Boot Easy 以及 Grub 常用於各種 Linux™ 發行版。
若只有安裝一個作業系統,MBR 會搜尋磁碟上第一個可開機的 (使用中) 切割區 (Slice),然後執行在該切割區上的程式來載入剩下的作業系統。當有多個作業系統存在時,可以安裝可顯示作業系統清單的開機管理程式,以讓使用者可以選擇要啟動的作業系統。
剩餘的 FreeBSD 開機系統分成三個階段,第一個階段只知道如何讓電腦進入特定狀態並執行第二階段,第二個階段在執行第三階段之前會做的事比較多一點,第三個階段會完成載入作業系統的工作。把工作分成三個階段的原因是 MBR 有限制在階段一與階段二能夠執行程式的大小。將這些工作連結在一起讓 FreeBSD 能夠提供更有彈性的載入程式。
核心會接著開始偵測裝置並初始化這些裝置供使用。核心開機程序完成之後,核心便會傳送控制權給使用者程序 init(8),這個程序會確保磁碟在可以使用的狀態,然後啟動使用者層級的資源設置來掛載檔案系統、設定網路卡以能夠連線網路、啟動那些被設定在開機時要啟動的程序。
本章節將更詳細介紹這些階段並示範如何與 FreeBSD 開機程序互動。
有時會稱在 MBR 中的開機管理程式為開機程序的 第零階段 (Stage zero),FreeBSD 預設會使用 boot0 開機管理程式。
由 FreeBSD 安裝程式所安裝的 MBR 便是以 /boot/boot0 為基礎。boot0 的大小與容量被限制在 446 個位元組是由於切割表與 0x55AA 識別碼位於 MBR 的最末端。若安裝多個作業系統使用 boot0 ,則會在開機時顯示如下範例的訊息:
F1 Win
F2 FreeBSD
Default: F2其作他作業統若在 FreeBSD 之後才安裝則會覆蓋現有的 MBR,若這件事發生了,或者要使用 FreeBSD MBR 取代現有的 MBR 可使用以下指令:
# fdisk -B -b /boot/boot0 device其中 device 開機磁碟,例如第一個 IDE 磁碟為 ad0,第二個 IDE 控制器的第一個 IDE磁碟為 ad2,第一個 SCSI 磁碟為 da0。要建立自訂的 MBR 設定請參考 boot0cfg(8)。
概念上,第一與第二個階段均為磁碟上同一個區域上同一個程式的一部份,由於空間上的限制,它們被分成兩部份,但是會一併安裝。它們會由 FreeBSD 安裝程式或 bsdlabel 從 /boot/boot 複製而來。
這兩個階段均位於檔案系統之外,在開機切割區的第一個磁軌,從第一個磁碟扇區 (Sector) 開始,這個位置便是 boot0 或其他開機管理程式所會儲存的地方,並會尋找可以執行的程式以繼續開機程序。
第一個階段的 boot1 非常的簡單,因為它只能有 512 位元組的大小。它只能認得儲存切割區資訊的 FreeBSD bsdlabel 以及尋找並執行 boot2。
階段二 boot2 稍微複雜一點,能夠理解 FreeBSD 檔案系統來搜尋檔案。它可以提供一個簡單的介面來選擇要執行的核心或載入程式。它所執行的載入程式 (loader) 更複雜並能讀取開機設定檔。若開機程序在階段二中斷,則會顯示以下的互動畫面:
>> FreeBSD/i386 BOOT
Default: 0:ad(0,a)/boot/loader
boot:要更換已安裝的 boot1 與 boot2 可使用 bsdlabel,其中 diskslice 是要開機的磁碟與切割區,例如 ad0s1 代表第一個 IDE 磁碟的第一個切割區:
# bsdlabel -B diskslice若只使用磁碟名稱,如 ad0, |
loader 是三階段開機程多的最後一個階段,載入程式位於檔案系統之中,通常在 /boot/loader。
loader 主要目地是利用擁有更複雜指令集的強大直譯器做為基礎的內建指令集提供一個互動的方式來做設定。
在初始化的過程中,loader 會偵測 Console 與磁碟,並找出可以用來開機的磁碟。在由 Script 或互動輸入使用者指令的地方會設定相對的變數並啟動直譯器。
loader 接著會讀取 /boot/loader.rc,這個程式預設又會讀取 /boot/defaults/loader.conf 來設定合理的變數預設值以及讀取 /boot/loader.conf 來對這些變數做本地的更改。loader.rc 接著會依這些變數來運作,讀取選擇模組與核心。
最後,預設情況下 loader 會待候鍵盤輸入 10 秒鐘,若沒有被中斷的話會接著啟動核心。若被使用者中斷,則會向使用者顯示提示字元,此時使用可以使用指令集來調整變數、卸載所有模組、載入模組,然後最後開機或重新開機。載入程式內建指令 中列出了最常使用的 loader 指令。要完整了解所有可用的指令,請參考 loader(8)。
| 變數 | 說明 |
|---|---|
autoboot seconds | 若在指定時間 (秒) 內沒有中斷,會繼續啟動核心。此指令會顯示倒數,預設的時間為 10 秒鐘。 |
boot | 使用任何指定的選項或核心名稱立即啟動核心,要由指令列指定核心名稱必須先執行 |
boot-conf | 依據指定的變數及最常用的 |
help | 顯示自 /boot/loader.help 取得的說明訊息。若指定的主題為 |
include filename … | 讀取指定的檔案並直譯每一行。若有錯誤則會立即中止 |
load | 由指定的檔案名稱載入核心、核心模組或指定類型的檔案。任何於 filename 之後的參數都會被傳遞到該檔案。若 filename 不是絕對位置則會搜尋 /boot/kernel 及 /boot/modules 底下。 |
ls [-l] | 顯示指定路徑中的檔案,若未指定路徑則會顯示根目錄中的檔案。若有指定 |
lsdev [-v] | 列出所有的裝置,這些裝置可能可以用來載入模組。若有指定 |
lsmod [-v] | 顯示已載入的模組。若有指定 |
more filename | 顯示指定的檔案,並於每 |
reboot | 立即重新啟動系統。 |
set variable, set variable=value | 設定指定的環境變數。 |
unload | 移除所有已載入的模組。 |
這裡有一些 loader 用法的實務範例。要使用一般的核心開機進入單使用者模式 (Single-user mode) 可:
boot -s要卸載一般的核心與模組,然後載入先前或另一個指定的核心可:
unload
load kernel.old使用 kernel.GENERIC 來代表安裝程式使用的預設核心,或 kernel.old 來代表在系統升級之前或設定自訂核心前安裝的核心。
使用以下指令來使用另一個核心載入一般的模組:
unload
set kernel="kernel.old"
boot-conf要載入一個已自動化的核心設置 Script 可:
load -t userconfig_script /boot/kernel.conf由 loader 或由會繞開 loader 的 boot2 載入核心之後,載入程式便會檢查是不有使用任何開機旗標,並根據需要調整開機的方式。開機時核心互動參數 列出了常用的開機旗標,請參考 boot(8) 取得更多其他開機旗標的資訊。
| 項目 | 說明 |
|---|---|
| 核心初始化時,會詢問要掛載為根檔案系統的裝置。 |
| 由 CDROM 做為根檔案系統開機。 |
| 開機進入單使用者模式。 |
| 核心啟動時提供更多詳細資訊。 |
一旦核心完成開機程序後,便會傳送控制權給使用者程序 init(8),該程序位於 /sbin/init 或在 loader 中的 init_path 變數所指的程式路徑。這是開機程序的最後一個階段。
開機程序會確保系統上的檔案系統的一致性 (Consistency),若 UFS 檔案系統不一致且 fsck 無法修時,init 會讓系統進入單使用者模式,以讓系統管理者能夠直接解決問題,否則系統會開機進入多使用者模式。
使用者可以在開機時指定 -s 或在 loader 設定 boot_single 變數進入這個模式。也可以透過在多使用者模式執行 shutdown now 進入此模式。進入單使用者模式時會出現此訊息:
Enter full pathname of shell or RETURN for /bin/sh:
若使用者按下 Enter,系統便會進入預設的 Bourne shell。要指定使用其他的 Shell 則輸入該 Shell 的完整路徑。
單使用者模式通常用來修復因檔案系統不一致或開機設定檔發生錯誤造成的無法開機,也可以用來重設遺忘的 root 的密碼,因為在單使用者模式會給予對本地系統及設定檔完整的存取權。在這個模式下沒有網路功能。
雖然單使用者模式對修復系統很有幫助,但若系統放在不安全的場所便會有安全上的風險。預設,開機進入單使用者模式後,任何能夠存取實體主機的使用者便擁有系統的完整控制權。
若在 /etc/ttys 系統 console 更改為 insecure,系統便會在初始化單使用者模式前先詢問 root 的密碼。這可增加一定程度的安全性,但便無法在忘記 root 密碼時重設密碼。
# name getty type status comments # # If console is marked "insecure", then init will ask for the root password # when going to single-user mode. console none unknown off insecure
不安全 (insecure) console 代表對 Console 的實體安全性評估為不安全 (insecure),所以只有知道 root 密碼的人可以使用單使用者模式。
若 init 正常找到檔案系統或在單使用者模式的使用者完成了操作並輸入 exit 離開單使用者模式,系統便會進入多使用者模式,在這個模式便會開始系統的資源設置。
資源設置系統 (Resource configuration system) 會從 /etc/defaults/rc.conf 讀取設定預設值以及從 /etc/rc.conf 讀取系統特定的設定,接著會繼續掛載系統列於 /etc/fstab 的檔案系統,也會啟動網路服務、其他的系統 Daemon,然後執行本地已安裝套件的啟動 Script。
要了解更多有關資源設置系統,請參考 rc(8) 以及查看位於 /etc/rc.d 的 Script。
正常 FreeBSD 系統開機會在 Console 顯示以一系列訊息來表示開機進度。開機啟動畫面 (Boot splash screen) 是另一種可以把所有開機偵測與服務啟動訊息隱藏的開機畫面,但即使開啟了啟動畫面,仍有有少數的開機載入程式的訊息,如:開機選項選單以及倒數時間的提示,仍會在開機時顯示。在開機程序時可以按下鍵盤上的按鍵來關閉顯示中的啟動畫面。
FreeBSD 有兩種基本的環境可以使用,一種是預設的傳統虛擬 Console 指令列環境,在系統完成開機之後,便會顯示 Console 登入提示。另一種環境則是設定好的圖型化環境,請參考 X Window 系統 以取得更多有關如何安裝與設定圖型化顯示管理程式與圖型化登入管理程式的資訊。
系統開機之後,啟動畫面預設會作為螢幕保護程式,一段時間未使用便會顯示啟動畫面,並且會循環更改影像的亮度,從明亮到非常暗,然後再繼續循環。啟動螢幕保護程式的設定可在 /etc/rc.conf 增加一行 saver= 來更改。有許多內建的螢幕保護程式可用,在 splash(4) 中有說明。saver= 的選項只會套用至虛擬 Console,對圖型化顯示管理程式並不會有任何影響。
透過安裝 sysutils/bsd-splash-changer 套件或 Port,可在開機時顯示隨機挑選的啟動畫面。啟動畫面功能支援 256 色的點陣圖 (.bmp)、ZSoft PCX (.pcx) 或 TheDraw (.bin) 格式。.bmp, .pcx 或 .bin 圖片必須放在根分割區,例如於 /boot。啟動圖片檔必須使用 320x200 像素或更低的解析度以能夠在標準 VGA 介面卡上運作,要在預設 256 色、320x200 像素或更低的解析度設定開機啟動圖片,可加入下行到 /boot/loader.conf,並替換 splash.bmp 為實際要使用的點陣圖檔:
splash_bmp_load="YES" bitmap_load="YES" bitmap_name="/boot/splash.bmp"
要使用 PCX 檔則可替換點陣圖檔:
splash_pcx_load="YES" bitmap_load="YES" bitmap_name="/boot/splash.pcx"
若要改使用 https://en.wikipedia.org/wiki/TheDraw 格式的 ASCII 圖可:
splash_txt="YES" bitmap_load="YES" bitmap_name="/boot/splash.bin"
要使用較大的圖片來填滿整個顯示畫面支援的解析度最大可至 1024x768 像素,VESA 模組也必須在系統開機時載入。若使用自訂的核心,請確定自訂核心設定檔中有含有 VESA 核心設定選項。要載入 VESA 模組來顯示啟動畫面可在 /boot/loader.conf 上述例子中提到的三行之前加入下行:
vesa_load="YES"
其他有用的 loader.conf 選項還有:
beastie_disable="YES"這個會關閉開機選項選單的顯示,但倒數計時提示仍會在。即使關閉了開機選項選單,在倒數計時提示時輸入選擇的選項還是會啟動對應的開機選項。
loader_logo="beastie"這個選項會替換預設與上色的小惡魔圖示一起顯示於開機選項選單右側的 "FreeBSD" 文字。
要取得更多資訊,請參考 splash(4), loader.conf(5) 以及 vga(4)。
在一開始系統啟動時,開機 loader(8) 會讀取 device.hints(5),這個檔中儲存了核心開機資訊,即變數,有時我們又會稱其為 "裝置提示 (Device hints)"。這些 "裝置提示 (Device hints)" 會傳送給裝置驅動程式做裝置的設置使用。
裝置提示也可在階段 3 開機載入程式提示時指定,如 階段三 中的示範,其變數也可以使用 set 增加、使用 unset 移除、使用 show 檢視,也可覆蓋設定在 /boot/device.hints 的變數,但在開機載入程式輸入的裝置提示並不是永久有效的,在下一次重新開機久後便會失效。
一旦系統開機後,便可使用 kenv(1) 來列出所有的變數。
/boot/device.hints 的語法為一個變數一行,使用井字號 "#" 做為註解符號,每一行的結構如下:
hint.driver.unit.keyword="value"在階段 3 開機載入程式的語法則為:
set hint.driver.unit.keyword=value其中 driver 為裝置驅動程式名稱、unit 為裝置驅動程式單位編號及 keyword 為提示關鍵字,關鍵字由以下選項所組成:
at: 指定裝置所連結的匯流排 (Bus)。
port: 指定要使用的 I/O 開始位置。
irq: 指定要使用的中斷請求編號。
drq: 指定 DMA 頻道編號。
maddr: 指定裝置所使用的實體記憶體位置。
flags: 設定提供給裝置的各種旗標位元。
disabled: 若設為 1 則可關閉該裝置。
由於裝置驅動程式可能會接受或請求更多未列於此處的提示,建議先閱讀驅動程式的操作手冊。要取得更多資訊請參考 device.hints(5), kenv(1), loader.conf(5) 以及 loader(8)。
在使用 shutdown(8) 控制關閉時,init(8) 會嘗試執行 /etc/rc.shutdown Script 接著傳送 TERM 信號給所有的程序,然後傳送 KILL 信號給未在時間內中止的程序。
要在支援電源管理的架構與系統關閉 FreeBSD 主機電源,可使用 shutdown -p now 來立即關閉電源,要重新啟動 FreeBSD 系統可使用 shutdown -r now。操作人必須為 root 或為 operator 的成員才可執行 shutdown(8),擁有這些身份的人也可使用 halt(8) 與 reboot(8),參考這些指令與 shutdown(8) 的操作手冊來取得更多資訊。
要修改群組成員可參考 使用者與基礎帳號管理。
電源管理需要以載入 acpi(4) 模組或將其靜態編譯至自訂核心中。 |
不論實體或虛擬,安全性這個主題大到有整個產業圍繞著它,上百個標準案例已經被用來搛寫如何確保系統與網路的安全性。身為 FreeBSD 必須了解如何避免攻擊與入侵。
在此章會討論幾個基本原理及技術。FreeBSD 系統的安全性有許多層面,且有許多第三方工具可以用來增加安全性。
讀完這章,您將了解:
基礎 FreeBSD 系統安全概念。
FreeBSD 中的幾種加密 (Crypt) 機制。
如何設定一次性密碼認證。
如何設定 inetd(8) 中的 TCP Wrapper。
如何在 FreeBSD 設定 Kerberos。
如何設定 IPsec 並且建立 VPN。
如何在 FreeBSD 設定並使用 OpenSSH。
如何使用檔案系統 ACL。
如何使用 pkg 來稽查從 Port 套件集安裝的第三方軟體套件。
如何利用 FreeBSD 安全報告。
什麼是程序追蹤 (Process Accounting) 以及如何在 FreeBSD 開啟。
如何使用登入類別或資源限制資料庫控制使用者資源。
在開始閱讀這章之前,您需要:
了解 FreeBSD 基礎及網路概念。
其他的安全性議題會在本操作手冊的其他處說明。例如 強制存取控制 (Mandatory Access Control, MAC) 會在 強制存取控制 (MAC) 討論及網路防火牆會在 防火牆 討論。
保安是每個人的責任,任何系統中的弱點都可讓入侵者取得對關鍵資訊的存取權並導致整個網路的浩劫。資訊安全的其中一個核心原則便是 CIA 三字訣,代表著資訊系統的機密性 (Confidentiality)、完整性 (Integrity) 以及可用性 (Availability)。
CIA 三字訣是電腦安全的基石,就如同客戶與使用者期望他們的資料得到保護一樣重要。例如,一個客戶會期望他們的信用卡資訊被安全的保存 (機密性)、他們的訂單不會在私底下被竄改 (完整性) 以及他們隨時可以存取他們的訂單資訊 (可用性)。
要提供 CIA,安全專家會應用防禦深度的策略。防禦深度的概念是增加數個保全階層來避免單一階層失效便導致整個安全系統瓦解。例如,系統管理者不能直接打開防火牆與評估網路或系統的安全性,還要同時稽查帳號、檢查 Binary 的完整性與確保未被安裝惡意工具。要執行有效的保安策略,必須了解威脅以及如何抵禦威脅。
什麼威脅影響到電腦安全性? 威脅並不僅限於在遠端嘗試未經授權存取系統的遠端攻擊者,威脅也包含員工、惡意軟體、未經許可的網路裝置、天然災害、安全性漏洞甚至是公司競爭對手。
系統與網路可以被未經授權存取,有時是因為意外,或是因遠端攻擊者,或在某些案例中,是因商業間諜或者前員工。做為使用者,重要的是做好防範準備以及當有失誤造成安全漏洞能夠承認並回報可能的問題給安全團隊。做為管理者,重要的是了解威脅並準備在發生時能夠減緩威脅。
當要應用保安到系統上時,建議由基本帳號以及系統設定開始保全,接著確保網路層,使其遵守系統政策以及組織的安全程序。許多組織已經有涵蓋科技裝置設置的安全性政策,該政策應包含工作站、桌上型電腦、行動裝置、手機、上線伺服器、開發伺服器的安全設置。在大多數案例中,也都已經有標準操作程序 (SOP),當有疑慮時,請向安全團隊諮詢。
簡介接下來的部份將說明如何在 FreeBSD 系統上執行這些基礎的安全設置。本章接下來的部份將介紹在 FreeBSD 系統執行安全性政策時會用到的特定工具。
要確保一個系統的安全最好的起點便是做好帳號的稽查,確保 root 使用了一個強而有力的密碼,並這個密碼未在其他地方使用過,然後關閉任何無須登入存取權的帳號。
要防止登入存取帳號有兩種方法,第一種是鎖定帳號,以下範例會鎖定 toor 帳號:
# pw lock toor第二種防止登入存取的方式是狀 Shell 更改為 /usr/sbin/nologin,只有超級使用者可以更改其他使用者的 Shell:
# chsh -s /usr/sbin/nologin toor/usr/sbin/nologin shell 可以避免系統分配 Shell 給嘗試登入的使用者。
在有一些案例,需要與其他使用者共用系統管理權限,FreeBSD 有兩種方式可以處理這種情況。第一種,也是較不建議的方式,是與 wheel 群組的成員共用 root 的密碼,這種方式使用者可以在需要超級使用者的存取權時輸入 su 然後輸入 wheel 的密碼,在完成需要管理存取權的指令之後,使用應輸入 exit 離開。要加入使用者到這個群組,可編輯 /etc/group 然後加入該使用者到 wheel 項目的最後,使用者必須以逗號字元分隔並不可有空白。
第二種方式,也是較建議的方式,安裝 security/sudo 套件或 Port 來提升權限。這個軟體提供了額外的稽查、更細微的使用者控制,然後可以設定鎖定使用者只能執行特定需權限的指令。
在安裝之後,使用 visudo 來編輯 /usr/local/etc/sudoers。這個範例會建立新 webadmin 群組,並加入 trhodes 帳號到該群組,然後設定該群組可重新啟動 apache24 的存取權:
# pw groupadd webadmin -M trhodes -g 6000
# visudo
%webadmin ALL=(ALL) /usr/sbin/service apache24 *密碼是資訊科技的必要之惡,當必須使用密碼時,應要有複雜且強大的雜湊機制來加密儲存在密碼資料庫中的密碼。FreeBSD 支援 DES, MD5, SHA256, SHA512 以及 Blowfish 雜湊演算法於其 crypt() 程式庫。預設使用 SHA512,不建議改成更不安全的雜湊演算法,但可改成更安全的 Blowfish 演算法。
Blowfish 不是 AES 的一部份且不符合任何聯邦資訊處理標準 (Federal Information Processing Standards, FIPS),在某些環境可能不會允許使用這種加密方式。 |
要知道目前用何種雜湊演算法來加密某位使用者密碼,超級使用者可以檢視在 FreeBSD 密碼資料庫中該使用者的雜湊,每個雜湊的一開始便會以符號標示其用來加密密碼所使用的雜湊機制。若使用 DES 則開始不會有任何符號,而 MD5 的符號則是 $,SHA256 及 SHA512 的符號是 $6$,Blowfish 的符號是 $2a$。在以下例子中 dru 的密碼使以預設的 SHA512 演算法加密,因為其雜湊的開始為 $6$。注意,該加密過的雜湊,不是原來的密碼,會儲存於密碼資料庫中:
# grep dru /etc/master.passwd
dru:$6$pzIjSvCAn.PBYQBA$PXpSeWPx3g5kscj3IMiM7tUEUSPmGexxta.8Lt9TGSi2lNQqYGKszsBPuGME0:1001:1001::0:0:dru:/usr/home/dru:/bin/csh雜湊機制是設定在該使用者的登入類別 (Login class),以此為例,該使用者屬於 default 登入類別,且雜湊演算法是以下行設定在 /etc/login.conf:
:passwd_format=sha512:\
要更改演算法為 Blowfish,可修改該行如下:
:passwd_format=blf:\
然後依 設定登入類別 中所描述的方式執行 cap_mkdb /etc/login.conf。注意,這個動作不會影響任何已存在的密碼雜湊,但這代表必須要求所有使用者執行 passwd 來更改其密碼才有辦法重新加密所有密碼。
強制在本地帳號使用高強度密碼的政策是系統安全的基礎之一。在 FreeBSD 密碼長度、密碼強度以及密碼複雜性可使用內建的可插拔認証模組 (Pluggable Authentication Modules, PAM) 來執行。
本節將示範如何設定密碼長度下限與上限以及使用 pam_passwdqc.so 來強制使用混合字元的密碼,此模組可在使用者更改其密碼時強制要求。
要設定此模組,需要先成為超級使用者,然後取消註解在 /etc/pam.d/passwd 中含有 pam_passwdqc.so 的行。然後編輯該行來配合密碼政策:
password requisite pam_passwdqc.so min=disabled,disabled,disabled,12,10 similar=deny retry=3 enforce=users
這個例子會設定新密碼所需符合的需求。min 設定可以控制密碼長度下限,它有五個值因為這個模組根據密碼的複雜度定義了五種類型。而複雜度是由必須在密碼中存在的字元類型來定義,例如:文字、數字、符號以及大小寫,這些密碼類型在 pam_passwdqc(8) 有詳細的說明。在這個例子,密碼類型的前三項為關閉的,代表不會接受只滿足這些複雜度的密碼,不論長度為何。12 設定密碼政策可接受滿足三種字元類型複雜度且至少 12 個字元的密碼,10 設定密碼政策接受滿足四種字元類型複雜度且至少 10 個字元的密碼。
similar 設定則會拒絕以使用者前一次類似的密碼。retry 設定會提供使用者三次輸入新密碼的機會。
一這個檔案儲存之後,更改密碼的使用者將會看到如下的訊息:
% passwd
Changing local password for trhodes
Old Password:
You can now choose the new password.
A valid password should be a mix of upper and lower case letters,
digits and other characters. You can use a 12 character long
password with characters from at least 3 of these 4 classes, or
a 10 character long password containing characters from all the
classes. Characters that form a common pattern are discarded by
the check.
Alternatively, if no one else can see your terminal now, you can
pick this as your password: "trait-useful&knob".
Enter new password:若輸入了一個不符何密碼政策的密碼,則會被拒絕並顯示警告,然後使用者會有機會再重試,直到超過設定的允許重試次數。
大多數密碼政策會讓密碼在多日過後過期。要在 FreeBSD 設定密碼年齡日期,可在 /etc/login.conf 中該使用者的登入類別設定 passwordtime。在 default 登入類別已有設定範例:
# :passwordtime=90d:\
因此,要設定此登入類別的密碼在 90 天之後過期只需要移除註解符號 (#),然後儲存編輯結果並執行 cap_mkdb /etc/login.conf。
要在個別使用者設定期限,可將有效日期或到期的天數與使用者名稱傳給 pw:
# pw usermod -p 30-apr-2015 -n trhodes如這個例子,有效日期的格式為天、月以及年。要取得更多資訊可參考 pw(8)。
rootkit 指的是嘗試未經授權取得系統 root 存取權的軟體。一旦安裝之後,這個惡意軟體將可以光明正大的開啟給另一個給攻擊者進入的大門。現實上,一但系統已被 rootkit 滲透且執行了搜索動作之後,該系統就應該從頭重新安裝,因為即使非常謹真的資安或系統工程式也可能會遺漏攻擊者留下的動西。
rootkit 對管理者而言唯一有幫助的是:一但偵測到,便代表某處已經被滲透,但這類型的應用程式躲藏的非常好,本節將會示範一個可以用來偵測 rootkit 的工具,security/rkhunter。
安裝此套件或 Port 之後,系統便可使用以下指令檢查。該指令提供許多資訊且會需要手動按下 ENTER 確認:
# rkhunter -c該程序完成之後,目前狀態的訊息便會顯示在畫面上。這個訊息包含了已檢查過多少檔案、可疑的檔案、可能的 rootkit 以及其他更多資訊。在檢查的過程中,可能會產生一些有關隱藏檔案、OpenSSH 通訊協定選擇及已安裝軟體已知漏洞版本的通用的安全性警告、這些問題可以立即處理或在更詳細的分析之後再處理。
每位管理者應了解在系統上執行了那些程式以及這些程式的用途。第三方工具如 rkhunter 與 sysutils/lsof 以及原生指令如 netstat 與 ps 可以系統上大量的資訊,記錄下那一些是正常的,當有不適當的程式出現時提出疑問,然後找出答案。雖然理想要避免滲透,但也必須偵測是否已被滲透了。
檢驗系統檔案與 Binary 是很重要的,因為它可以提供系統管理者與資安團隊有關系統變更的資訊,能夠監視系統變更的軟體應用程式稱為入侵偵測系統 (Intrusion Detection System, IDS)。
FreeBSD 原生提供了基礎的 IDS 系統,雖然每天晚上會有安全性的信件會通知管理者相關的變更,但這些資訊是儲存在本地的,這讓惡意的使用者有機會能夠修改這些資訊來隱藏其對系統的變更。也因此,會建議建立一個獨立的 Binary 簽名並將這些簽名儲存在唯度、root 擁有的目錄或在可移除的 USB 磁碟或遠端 rsync 伺服器更好。
內建 mtree 工具可以對一個目錄中的內容產生一個規格檔,產生規格檔會用到一個種子碼 (Seed) 或常數,然後在檢查規格是否有更改過時會也會需要使用這個種子碼或常數。這讓檢查一個檔案或 Binary 是否被修改變成可能的一件事。由於攻擊者並不知道種子碼,要仿冒或檢查檔案的校驗碼 (Checksum) 數值是幾乎不可能的。以下例子會產生一組 SHA256 雜湊,每一個在 /bin 的系統 Binary 都會有一個,並姐會將這些值以隱藏黨儲存在 root 的家目錄,/root/.bin_chksum_mtree:
# mtree -s 3483151339707503 -c -K cksum,sha256digest -p /bin > /root/.bin_chksum_mtree
# mtree: /bin checksum: 34270122253483151339707503 代表種子碼,這個值應要記錄下來且不可給其它人看。
檢視 /root/.bin_cksum_mtree 應會產生類似以下的輸出結果:
# user: root
# machine: dreadnaught
# tree: /bin
# date: Mon Feb 3 10:19:53 2014
# .
/set type=file uid=0 gid=0 mode=0555 nlink=1 flags=none
. type=dir mode=0755 nlink=2 size=1024 \
time=1380277977.000000000
\133 nlink=2 size=11704 time=1380277977.000000000 \
cksum=484492447 \
sha256digest=6207490fbdb5ed1904441fbfa941279055c3e24d3a4049aeb45094596400662a
cat size=12096 time=1380277975.000000000 cksum=3909216944 \
sha256digest=65ea347b9418760b247ab10244f47a7ca2a569c9836d77f074e7a306900c1e69
chflags size=8168 time=1380277975.000000000 cksum=3949425175 \
sha256digest=c99eb6fc1c92cac335c08be004a0a5b4c24a0c0ef3712017b12c89a978b2dac3
chio size=18520 time=1380277975.000000000 cksum=2208263309 \
sha256digest=ddf7c8cb92a58750a675328345560d8cc7fe14fb3ccd3690c34954cbe69fc964
chmod size=8640 time=1380277975.000000000 cksum=2214429708 \
sha256digest=a435972263bf814ad8df082c0752aa2a7bdd8b74ff01431ccbd52ed1e490bbe7機器的主機名稱、建立規格檔的日期與時間、以及建立此規格檔的使用者名稱皆會記錄在此報告當中,報告當中還會有在目錄中每個 Binary 的校驗碼、大小、時間以及 SHA256 編碼。
要檢驗 Binary 簽名是否有被變更過,可使用先前產生的規格檔比對目前目錄的內容,然後儲存結果到檔案。這個指令需要當初產生原規格檔所使用的種子碼:
# mtree -s 3483151339707503 -p /bin < /root/.bin_chksum_mtree >> /root/.bin_chksum_output
# mtree: /bin checksum: 3427012225這個動作應會產生與上次建立 /bin 規格檔時產生的校驗碼相同,若在此目錄的 Binary 沒有被變更過,那麼 /root/.bin_chksum_output 這個輸出檔將會是空的。要模擬變更,可以使用 touch 更改 /root/.bin_chksum_output 的日期然後再執行檢驗指令一次:
# touch /bin/cat
# mtree -s 3483151339707503 -p /bin < /root/.bin_chksum_mtree >> /root/.bin_chksum_output
# more /root/.bin_chksum_output
cat changed
modification time expected Fri Sep 27 06:32:55 2013 found Mon Feb 3 10:28:43 2014建議對含有 Binary 以及設定檔的目錄建立規格檔,對含有敏感資料的目錄也是。通常會為 /bin, /sbin, /usr/bin, /usr/sbin, /usr/local/bin, /etc 及 /usr/local/etc 建立規格檔。
也有更進階的 IDS 系統,例如 security/aide。大多數情況 mtree 已可提供管理者所需的功能。將種子碼與校驗碼結果保存在惡意使用者無法存取的地方是非常重要的一件事。更多有關 mtree 的資訊可在 mtree(8) 找到。
在 FreeBSD,有許多系統功能可以使用 sysctl 調校,本節會涵蓋少數可以調校來避免阻斷服務 (Denial of Service, DoS) 攻擊的安全性功能。更多有關使用 sysctl 的資訊包含:如何暫時更改數值及如何在測試之後做永久更改可在 使用 sysctl(8) 調校 找到。
任何時間使用 使用 sysctl(8) 調校 做的設定變更都會讓造成不想要的傷害的可能性上升,影響到系統的可用性。因此應要對所有的變更做監視,若可能的話,先在測試系統上實驗,再到上線的系統上使用。 |
預設 FreeBSD 核心會使用安全性層級 -1 來開機,這又稱作"不安全模式",因為不可變 (Immutable) 檔案旗標可以被關閉且可以讀取或寫入所有的裝置。除非有使用 sysctl 或在啟動 Script 設定修改該值,否則安全性層級將會在 -1。安全性層級可以在系統啟動時透過在 /etc/rc.conf 設定 kern_securelevel_enable 為 YES 以及 設定 kern_securelevel 的值為想要的安全層級來提升。請參考 security(7) 以及 init(8) 以取得更多與這些設定及可用的安全性層級相關的資訊。
提高 |
net.inet.tcp.blackhole 以及 net.inet.udp.blackhole 設定可以用來丟棄在已關閉連接埠 (Port) 收到的 SYN 封包且不會回傳 RST 回應,預設的動作是會回傳 RST 來表示該連接埠已被關閉,更改預設的動作可對連接埠掃描 (用在查看在系統上執行的應用程式) 提供一定程度的保護,要這麼做可設定 net.inet.tcp.blackhole 為 2 及 net.inet.udp.blackhole 為 1。請參考 blackhole(4) 以取得更多有關這些設定的資訊。
net.inet.icmp.drop_redirect 以及 net.inet.ip.redirect 設定可以幫助避免 重新導向攻擊 (Redirect attacks),重新導向攻擊是 DoS 的一種,會傳送大量 ICMP 類型 5 的封包,由於這些封包並不是必要的,設定 net.inet.icmp.drop_redirect 為 1 以及設定 net.inet.ip.redirect 為 0 可丟棄這些封包。
來源路由 (Source routing) 是一種偵測與存取在內部網路中不可路由位址的方法,由於不可路由位址通常是固故讓它不可路由的,因此可以關閉這個功能。要關閉這個功能可設定 net.inet.ip.sourceroute 以及 net.inet.ip.accept_sourceroute 為 0。
當一台在網路上的機器需要傳送訊息給所有在子網路上的主機時,會發送 ICMP 回應請求訊息到廣播位址。然而,外部的主機是沒有理由可以執行這個動作的。要拒絕所有來自外部的廣播請求可設定 net.inet.icmp.bmcastecho 為 0。
還有一些額外的設定在 security(7) 有說明。
預設 FreeBSD 已內建一次性密碼 (One-time Passwords In Everything, OPIE)。OPIE 設計用來避免重送攻擊 (Replay attack),重送攻擊指的是攻擊者發現了某位使用者的密碼,然後使用該密碼來存取系統。由於在 OPIE 的環境下,一組密碼只能被使用一次,被發現的密碼對攻擊者而言便沒有什麼作用。OPIE 使用了安全的加密方式與詰問/回應系統 (Challenge/response system) 來管理密碼。FreeBSD 在實作上預設採用 MD5 加密。
OPIE 使用了三種不同類型的密碼,第一種是一般的 UNIX™ 或 Kerberos 密碼,第二種是由 opiekey 所產生的一次性密碼,第三種是用來生一次性密碼的 "秘密密碼 (Secret password)",秘密密碼與 UNIX™ 密碼無關且不應相同。
對 OPIE 來說還有另外兩個部份的資料很重要。其中一個是"種子碼 (Seed)" 或稱"金鑰 (Key)",由兩個字母與五個數字組成。另一個則是"疊代次數 (Iteration count)",是一個介於 1 到 100 間的數字。OPIE 會將種子碼與秘密密碼串連後,套用 MD5 加密數次後 (根據疊代次數),再將結果轉換成六個簡短的英文單字來產生一次性密碼。認証系統會持續追蹤最後使用的一次性密碼,若使用者提供的密碼加密後與前一次的密碼相同則可通過認証。由於採用了單向的加密方式,若使用過的密碼被成功擷取也無法拿來產生之後的一次性密碼。疊代次數會在每一次登入成功之後減少,來保持使用者與登入程式間的同步。當疊代次數減少至 1 時,OPIE 便要重新初始化。
這個整個程序會牽涉到幾個程式。傳送疊代次數、種子碼與秘密密碼來產生一組一次性密碼或數個一次性密碼的 opiekey(1)。除了初始化 OPIE 之外,用來更改密碼、疊代次數或種子碼的 opiepasswd(1)。會讀取放在 /etc/opiekeys 的相關憑証檔來列出使用者目前的疊代次數與種子碼的 opieinfo(1)。
本章節將介紹四種不同的操作,第一是如何在安全連線下做第一次的一次性密碼設定,第二是如何使用在不安全的連線下使用 opiepasswd,第三是如何在不安全的連線下登入系統,第四是如何產生數個可以被記錄或列印下來在不安全的場所使的金鑰。
第一次要初始化 OPIE,要在安全的場所執行以下指令:
% opiepasswd -c
Adding unfurl:
Only use this method from the console; NEVER from remote. If you are using
telnet, xterm, or a dial-in, type ^C now or exit with no password.
Then run opiepasswd without the -c parameter.
Using MD5 to compute responses.
Enter new secret pass phrase:
Again new secret pass phrase:
ID unfurl OTP key is 499 to4268
MOS MALL GOAT ARM AVID COED-c 會設定採用假設指令在安全場所執行的 Console 模式,如在使用者掌控之中的電腦或者透過 SSH 連線到一台在使用者掌控之中的電腦。
提示出現後,輸入用來產生一次性登入金鑰的秘密密碼,應使用一個不容易被猜出來的密碼,且應與使用者登入帳號所使用的密碼不同,密碼必須介於 10 到 127 個字元長度之間,然後請記住這個密碼。
ID 行會列出登入名稱 (unfurl)、預設的疊代次數 (499) 以及預設的種子碼 (to4268)。在進行登入時,系統會記住這些參數並且顯示出來,這也代表不需要另外記錄這些資訊。最後一行會列出根據這些參數與秘密密碼所產生出來的一次性密碼,在下一次登入時便要使用這個一次性密碼。
要在不安全的系統上初始化或更改秘密密碼會需要某個可使用安全的連線的地方執行 opiekey,這可能是在某一台信任的主機上的 Shell。初始化需要設定疊代次數,100 可能是不錯的數字,種子碼可以自行指定或隨機產生,在不安全連線下要被初始化主機須使用 opiepasswd(1):
% opiepasswd
Updating unfurl:
You need the response from an OTP generator.
Old secret pass phrase:
otp-md5 498 to4268 ext
Response: GAME GAG WELT OUT DOWN CHAT
New secret pass phrase:
otp-md5 499 to4269
Response: LINE PAP MILK NELL BUOY TROY
ID mark OTP key is 499 gr4269
LINE PAP MILK NELL BUOY TROY要採用預設的種子碼,可直接按下 Return 做初始化。接著在輸入回應之前移到安全的連線然後給予相同的加密參數產生密碼:
% opiekey 498 to4268
Using the MD5 algorithm to compute response.
Reminder: Do not use opiekey from telnet or dial-in sessions.
Enter secret pass phrase:
GAME GAG WELT OUT DOWN CHAT切換回不安全的連線,然後複製產生的一次性密碼貼上。
在初始化 OPIE 之後進行登入會顯示如下的提示訊息:
% telnet example.com
Trying 10.0.0.1...
Connected to example.com
Escape character is '^]'.
FreeBSD/i386 (example.com) (ttypa)
login: <username>
otp-md5 498 gr4269 ext
Password:OPIE 的提示提供了一個很有用的功能,若在密碼提示時按下 Return,便會開啟回應功能並顯示輸入的內容,這個功能在嘗試手工輸入列印出來的密碼時很有用。
此時,要產生一次性密碼來回應登入時的提示,這必須在受信任且可安全執行 opiekey(1) 的系統上完成。這個指令有提供 Windows™, Mac OS™ 與 FreeBSD 版本,使用時需要疊代次數與種子碼做為在指令列的參數,剪下在要登入主機在登入時所提示的訊息。
在信任的系統上執行:
% opiekey 498 to4268
Using the MD5 algorithm to compute response.
Reminder: Do not use opiekey from telnet or dial-in sessions.
Enter secret pass phrase:
GAME GAG WELT OUT DOWN CHAT在產生一次性密碼後,回到登入畫面繼續登入。
有時會無法存取信任的主機或沒有安全的連線,在這種情況下,可以使用 opiekey(1) 來預先產生多個一次性密碼,例如:
% opiekey -n 5 30 zz99999
Using the MD5 algorithm to compute response.
Reminder: Do not use opiekey from telnet or dial-in sessions.
Enter secret pass phrase: <secret password>
26: JOAN BORE FOSS DES NAY QUIT
27: LATE BIAS SLAY FOLK MUCH TRIG
28: SALT TIN ANTI LOON NEAL USE
29: RIO ODIN GO BYE FURY TIC
30: GREW JIVE SAN GIRD BOIL PHI-n 5 會請求產生連續五個金鑰,而 30 則是指定最後一個疊代的編號。注意這些列印出的結果的順序與使用的順序相反。十足的偏執狂可能會想要用手寫下結果,否則就列印出清單。每一行會同時顯示疊代次數及一次性密碼,在密碼使用過後便可劃掉。
OPIE 可以根據登入階段的 IP 位置限制使用 UNIX™ 密碼,相關的檔案為 /etc/opieaccess,這個檔案預設便存在。請參考 opieaccess(5) 來取得更多有關此檔案的資訊以及當使用時要考量的安全性問題。
這裡有一個範本 opieaccess:
permit 192.168.0.0 255.255.0.0
這一行允許來源 IP 位址 (容易受到詐騙的位址) 符合指定值與遮罩的使用者在任何時間可使用 UNIX™ 密碼登入。
若在 opieaccess 中沒有符合的規則,預設會拒絕非 OPIE 的登入。
TCP Wrapper is a host-based access control system which extends the abilities of inetd 超級伺服器. It can be configured to provide logging support, return messages, and connection restrictions for the server daemons under the control of inetd. Refer to tcpd(8) for more information about TCP Wrapper and its features.
TCP Wrapper should not be considered a replacement for a properly configured firewall. Instead, TCP Wrapper should be used in conjunction with a firewall and other security enhancements in order to provide another layer of protection in the implementation of a security policy.
To enable TCP Wrapper in FreeBSD, add the following lines to /etc/rc.conf:
inetd_enable="YES" inetd_flags="-Ww"
Then, properly configure /etc/hosts.allow.
Unlike other implementations of TCP Wrapper, the use of hosts.deny is deprecated in FreeBSD. All configuration options should be placed in /etc/hosts.allow. |
In the simplest configuration, daemon connection policies are set to either permit or block, depending on the options in /etc/hosts.allow. The default configuration in FreeBSD is to allow all connections to the daemons started with inetd.
Basic configuration usually takes the form of daemon : address : action, where daemon is the daemon which inetd started, address is a valid hostname, IP address, or an IPv6 address enclosed in brackets ([ ]), and action is either allow or deny. TCP Wrapper uses a first rule match semantic, meaning that the configuration file is scanned from the beginning for a matching rule. When a match is found, the rule is applied and the search process stops.
For example, to allow POP3 connections via the mail/qpopper daemon, the following lines should be appended to hosts.allow:
# This line is required for POP3 connections: qpopper : ALL : allow
Whenever this file is edited, restart inetd:
# service inetd restartTCP Wrapper provides advanced options to allow more control over the way connections are handled. In some cases, it may be appropriate to return a comment to certain hosts or daemon connections. In other cases, a log entry should be recorded or an email sent to the administrator. Other situations may require the use of a service for local connections only. This is all possible through the use of configuration options known as wildcards, expansion characters, and external command execution.
Suppose that a situation occurs where a connection should be denied yet a reason should be sent to the host who attempted to establish that connection. That action is possible with twist. When a connection attempt is made, twist executes a shell command or script. An example exists in hosts.allow:
# The rest of the daemons are protected. ALL : ALL \ : severity auth.info \ : twist /bin/echo "You are not welcome to use %d from %h."
In this example, the message "You are not allowed to use daemon name from hostname." will be returned for any daemon not configured in hosts.allow. This is useful for sending a reply back to the connection initiator right after the established connection is dropped. Any message returned must be wrapped in quote (") characters.
It may be possible to launch a denial of service attack on the server if an attacker floods these daemons with connection requests. |
Another possibility is to use spawn. Like twist, spawn implicitly denies the connection and may be used to run external shell commands or scripts. Unlike twist, spawn will not send a reply back to the host who established the connection. For example, consider the following configuration:
# We do not allow connections from example.com: ALL : .example.com \ : spawn (/bin/echo %a from %h attempted to access %d >> \ /var/log/connections.log) \ : deny
This will deny all connection attempts from *.example.com and log the hostname, IP address, and the daemon to which access was attempted to /var/log/connections.log. This example uses the substitution characters %a and %h. Refer to hosts_access(5) for the complete list.
To match every instance of a daemon, domain, or IP address, use ALL. Another wildcard is PARANOID which may be used to match any host which provides an IP address that may be forged because the IP address differs from its resolved hostname. In this example, all connection requests to Sendmail which have an IP address that varies from its hostname will be denied:
# Block possibly spoofed requests to sendmail: sendmail : PARANOID : deny
Using the |
To learn more about wildcards and their associated functionality, refer to hosts_access(5).
When adding new configuration lines, make sure that any unneeded entries for that daemon are commented out in hosts.allow. |
Kerberos is a network authentication protocol which was originally created by the Massachusetts Institute of Technology (MIT) as a way to securely provide authentication across a potentially hostile network. The Kerberos protocol uses strong cryptography so that both a client and server can prove their identity without sending any unencrypted secrets over the network. Kerberos can be described as an identity-verifying proxy system and as a trusted third-party authentication system. After a user authenticates with Kerberos, their communications can be encrypted to assure privacy and data integrity.
The only function of Kerberos is to provide the secure authentication of users and servers on the network. It does not provide authorization or auditing functions. It is recommended that Kerberos be used with other security methods which provide authorization and audit services.
The current version of the protocol is version 5, described in RFC 4120. Several free implementations of this protocol are available, covering a wide range of operating systems. MIT continues to develop their Kerberos package. It is commonly used in the US as a cryptography product, and has historically been subject to US export regulations. In FreeBSD, MITKerberos is available as the security/krb5 package or port. The Heimdal Kerberos implementation was explicitly developed outside of the US to avoid export regulations. The Heimdal Kerberos distribution is included in the base FreeBSD installation, and another distribution with more configurable options is available as security/heimdal in the Ports Collection.
In Kerberos users and services are identified as "principals" which are contained within an administrative grouping, called a "realm". A typical user principal would be of the form user@REALM (realms are traditionally uppercase).
This section provides a guide on how to set up Kerberos using the Heimdal distribution included in FreeBSD.
For purposes of demonstrating a Kerberos installation, the name spaces will be as follows:
The DNS domain (zone) will be example.org.
The Kerberos realm will be EXAMPLE.ORG.
Use real domain names when setting up Kerberos, even if it will run internally. This avoids DNS problems and assures inter-operation with other Kerberos realms. |
The Key Distribution Center (KDC) is the centralized authentication service that Kerberos provides, the "trusted third party" of the system. It is the computer that issues Kerberos tickets, which are used for clients to authenticate to servers. Because the KDC is considered trusted by all other computers in the Kerberos realm, it has heightened security concerns. Direct access to the KDC should be limited.
While running a KDC requires few computing resources, a dedicated machine acting only as a KDC is recommended for security reasons.
To begin setting up a KDC, add these lines to /etc/rc.conf:
kdc_enable="YES" kadmind_enable="YES"
Next, edit /etc/krb5.conf as follows:
[libdefaults]
default_realm = EXAMPLE.ORG
[realms]
EXAMPLE.ORG = {
kdc = kerberos.example.org
admin_server = kerberos.example.org
}
[domain_realm]
.example.org = EXAMPLE.ORGIn this example, the KDC will use the fully-qualified hostname kerberos.example.org. The hostname of the KDC must be resolvable in the DNS.
Kerberos can also use the DNS to locate KDCs, instead of a [realms] section in /etc/krb5.conf. For large organizations that have their own DNS servers, the above example could be trimmed to:
[libdefaults]
default_realm = EXAMPLE.ORG
[domain_realm]
.example.org = EXAMPLE.ORGWith the following lines being included in the example.org zone file:
_kerberos._udp IN SRV 01 00 88 kerberos.example.org. _kerberos._tcp IN SRV 01 00 88 kerberos.example.org. _kpasswd._udp IN SRV 01 00 464 kerberos.example.org. _kerberos-adm._tcp IN SRV 01 00 749 kerberos.example.org. _kerberos IN TXT EXAMPLE.ORG
In order for clients to be able to find the Kerberos services, they must have either a fully configured /etc/krb5.conf or a minimally configured /etc/krb5.confand a properly configured DNS server. |
Next, create the Kerberos database which contains the keys of all principals (users and hosts) encrypted with a master password. It is not required to remember this password as it will be stored in /var/heimdal/m-key; it would be reasonable to use a 45-character random password for this purpose. To create the master key, run kstash and enter a password:
# kstash
Master key: xxxxxxxxxxxxxxxxxxxxxxx
Verifying password - Master key: xxxxxxxxxxxxxxxxxxxxxxxOnce the master key has been created, the database should be initialized. The Kerberos administrative tool kadmin(8) can be used on the KDC in a mode that operates directly on the database, without using the kadmind(8) network service, as kadmin -l. This resolves the chicken-and-egg problem of trying to connect to the database before it is created. At the kadmin prompt, use init to create the realm’s initial database:
# kadmin -l
kadmin> init EXAMPLE.ORG
Realm max ticket life [unlimited]:Lastly, while still in kadmin, create the first principal using add. Stick to the default options for the principal for now, as these can be changed later with modify. Type ? at the prompt to see the available options.
kadmin> add tillman
Max ticket life [unlimited]:
Max renewable life [unlimited]:
Attributes []:
Password: xxxxxxxx
Verifying password - Password: xxxxxxxxNext, start the KDC services by running service kdc start and service kadmind start. While there will not be any kerberized daemons running at this point, it is possible to confirm that the KDC is functioning by obtaining a ticket for the principal that was just created:
% kinit tillman
tillman@EXAMPLE.ORG's Password:Confirm that a ticket was successfully obtained using klist:
% klist
Credentials cache: FILE:/tmp/krb5cc_1001
Principal: tillman@EXAMPLE.ORG
Issued Expires Principal
Aug 27 15:37:58 2013 Aug 28 01:37:58 2013 krbtgt/EXAMPLE.ORG@EXAMPLE.ORGThe temporary ticket can be destroyed when the test is finished:
% kdestroyThe first step in configuring a server to use Kerberos authentication is to ensure that it has the correct configuration in /etc/krb5.conf. The version from the KDC can be used as-is, or it can be regenerated on the new system.
Next, create /etc/krb5.keytab on the server. This is the main part of "Kerberizing" a service — it corresponds to generating a secret shared between the service and the KDC. The secret is a cryptographic key, stored in a "keytab". The keytab contains the server’s host key, which allows it and the KDC to verify each others' identity. It must be transmitted to the server in a secure fashion, as the security of the server can be broken if the key is made public. Typically, the keytab is generated on an administrator’s trusted machine using kadmin, then securely transferred to the server, e.g., with scp(1); it can also be created directly on the server if that is consistent with the desired security policy. It is very important that the keytab is transmitted to the server in a secure fashion: if the key is known by some other party, that party can impersonate any user to the server! Using kadmin on the server directly is convenient, because the entry for the host principal in the KDC database is also created using kadmin.
Of course, kadmin is a kerberized service; a Kerberos ticket is needed to authenticate to the network service, but to ensure that the user running kadmin is actually present (and their session has not been hijacked), kadmin will prompt for the password to get a fresh ticket. The principal authenticating to the kadmin service must be permitted to use the kadmin interface, as specified in kadmind.acl. See the section titled "Remote administration" in info heimdal for details on designing access control lists. Instead of enabling remote kadmin access, the administrator could securely connect to the KDC via the local console or ssh(1), and perform administration locally using kadmin -l.
After installing /etc/krb5.conf, use add --random-key in kadmin. This adds the server’s host principal to the database, but does not extract a copy of the host principal key to a keytab. To generate the keytab, use ext to extract the server’s host principal key to its own keytab:
# kadmin
kadmin> add --random-key host/myserver.example.org
Max ticket life [unlimited]:
Max renewable life [unlimited]:
Principal expiration time [never]:
Password expiration time [never]:
Attributes []:
kadmin> ext_keytab host/myserver.example.org
kadmin> exitNote that ext_keytab stores the extracted key in /etc/krb5.keytab by default. This is good when being run on the server being kerberized, but the --keytab path/to/file argument should be used when the keytab is being extracted elsewhere:
# kadmin
kadmin> ext_keytab --keytab=/tmp/example.keytab host/myserver.example.org
kadmin> exitThe keytab can then be securely copied to the server using scp(1) or a removable media. Be sure to specify a non-default keytab name to avoid inserting unneeded keys into the system’s keytab.
At this point, the server can read encrypted messages from the KDC using its shared key, stored in krb5.keytab. It is now ready for the Kerberos-using services to be enabled. One of the most common such services is sshd(8), which supports Kerberos via the GSS-API. In /etc/ssh/sshd_config, add the line:
GSSAPIAuthentication yes
做完了這個變更之後,必須重新啟動 sshd(8) 來使新的設定值生效:service sshd restart。
As it was for the server, the client requires configuration in /etc/krb5.conf. Copy the file in place (securely) or re-enter it as needed.
Test the client by using kinit, klist, and kdestroy from the client to obtain, show, and then delete a ticket for an existing principal. Kerberos applications should also be able to connect to Kerberos enabled servers. If that does not work but obtaining a ticket does, the problem is likely with the server and not with the client or the KDC. In the case of kerberized ssh(1), GSS-API is disabled by default, so test using ssh -o GSSAPIAuthentication=yes hostname.
When testing a Kerberized application, try using a packet sniffer such as tcpdump to confirm that no sensitive information is sent in the clear.
Various Kerberos client applications are available. With the advent of a bridge so that applications using SASL for authentication can use GSS-API mechanisms as well, large classes of client applications can use Kerberos for authentication, from Jabber clients to IMAP clients.
Users within a realm typically have their Kerberos principal mapped to a local user account. Occasionally, one needs to grant access to a local user account to someone who does not have a matching Kerberos principal. For example, tillman@EXAMPLE.ORG may need access to the local user account webdevelopers. Other principals may also need access to that local account.
The .k5login and .k5users files, placed in a user’s home directory, can be used to solve this problem. For example, if the following .k5login is placed in the home directory of webdevelopers, both principals listed will have access to that account without requiring a shared password:
tillman@example.org jdoe@example.org
Refer to ksu(1) for more information about .k5users.
The major difference between the MIT and Heimdal implementations is that kadmin has a different, but equivalent, set of commands and uses a different protocol. If the KDC is MIT, the Heimdal version of kadmin cannot be used to administer the KDC remotely, and vice versa.
Client applications may also use slightly different command line options to accomplish the same tasks. Following the instructions at http://web.mit.edu/Kerberos/www/ is recommended. Be careful of path issues: the MIT port installs into /usr/local/ by default, and the FreeBSD system applications run instead of the MIT versions if PATH lists the system directories first.
When using MIT Kerberos as a KDC on FreeBSD, the following edits should also be made to rc.conf:
kerberos5_server="/usr/local/sbin/krb5kdc" kadmind5_server="/usr/local/sbin/kadmind" kerberos5_server_flags="" kerberos5_server_enable="YES" kadmind5_server_enable="YES"
When configuring and troubleshooting Kerberos, keep the following points in mind:
When using either Heimdal or MITKerberos from ports, ensure that the PATH lists the port’s versions of the client applications before the system versions.
If all the computers in the realm do not have synchronized time settings, authentication may fail. NTP 時間校對 describes how to synchronize clocks using NTP.
If the hostname is changed, the host/ principal must be changed and the keytab updated. This also applies to special keytab entries like the HTTP/ principal used for Apache’s www/mod_auth_kerb.
All hosts in the realm must be both forward and reverse resolvable in DNS or, at a minimum, exist in /etc/hosts. CNAMEs will work, but the A and PTR records must be correct and in place. The error message for unresolvable hosts is not intuitive: Kerberos5 refuses authentication because Read req failed: Key table entry not found.
Some operating systems that act as clients to the KDC do not set the permissions for ksu to be setuid root. This means that ksu does not work. This is a permissions problem, not a KDC error.
With MITKerberos, to allow a principal to have a ticket life longer than the default lifetime of ten hours, use modify_principal at the kadmin(8) prompt to change the maxlife of both the principal in question and the krbtgt principal. The principal can then use kinit -l to request a ticket with a longer lifetime.
When running a packet sniffer on the KDC to aid in troubleshooting while running kinit from a workstation, the Ticket Granting Ticket (TGT) is sent immediately, even before the password is typed. This is because the Kerberos server freely transmits a TGT to any unauthorized request. However, every TGT is encrypted in a key derived from the user’s password. When a user types their password, it is not sent to the KDC, it is instead used to decrypt the TGT that kinit already obtained. If the decryption process results in a valid ticket with a valid time stamp, the user has valid Kerberos credentials. These credentials include a session key for establishing secure communications with the Kerberos server in the future, as well as the actual TGT, which is encrypted with the Kerberos server’s own key. This second layer of encryption allows the Kerberos server to verify the authenticity of each TGT.
Host principals can have a longer ticket lifetime. If the user principal has a lifetime of a week but the host being connected to has a lifetime of nine hours, the user cache will have an expired host principal and the ticket cache will not work as expected.
When setting up krb5.dict to prevent specific bad passwords from being used as described in kadmind(8), remember that it only applies to principals that have a password policy assigned to them. The format used in krb5.dict is one string per line. Creating a symbolic link to /usr/shared/dict/words might be useful.
Since Kerberos is an all or nothing approach, every service enabled on the network must either be modified to work with Kerberos or be otherwise secured against network attacks. This is to prevent user credentials from being stolen and re-used. An example is when Kerberos is enabled on all remote shells but the non-Kerberized POP3 mail server sends passwords in plain text.
The KDC is a single point of failure. By design, the KDC must be as secure as its master password database. The KDC should have absolutely no other services running on it and should be physically secure. The danger is high because Kerberos stores all passwords encrypted with the same master key which is stored as a file on the KDC.
A compromised master key is not quite as bad as one might fear. The master key is only used to encrypt the Kerberos database and as a seed for the random number generator. As long as access to the KDC is secure, an attacker cannot do much with the master key.
If the KDC is unavailable, network services are unusable as authentication cannot be performed. This can be alleviated with a single master KDC and one or more slaves, and with careful implementation of secondary or fall-back authentication using PAM.
Kerberos allows users, hosts and services to authenticate between themselves. It does not have a mechanism to authenticate the KDC to the users, hosts, or services. This means that a trojanned kinit could record all user names and passwords. File system integrity checking tools like security/tripwire can alleviate this.
OpenSSL is an open source implementation of the SSL and TLS protocols. It provides an encryption transport layer on top of the normal communications layer, allowing it to be intertwined with many network applications and services.
The version of OpenSSL included in FreeBSD supports the Secure Sockets Layer 3.0 (SSLv3) and Transport Layer Security 1.0/1.1/1.2 (TLSv1/TLSv1.1/TLSv1.2) network security protocols and can be used as a general cryptographic library. In FreeBSD 12.0-RELEASE and above, OpenSSL also supports Transport Layer Security 1.3 (TLSv1.3).
OpenSSL is often used to encrypt authentication of mail clients and to secure web based transactions such as credit card payments. Some ports, such as www/apache24 and databases/postgresql11-server, include a compile option for building with OpenSSL. If selected, the port will add support using OpenSSL from the base system. To instead have the port compile against OpenSSL from the security/openssl port, add the following to /etc/make.conf:
DEFAULT_VERSIONS+= ssl=openssl
Another common use of OpenSSL is to provide certificates for use with software applications. Certificates can be used to verify the credentials of a company or individual. If a certificate has not been signed by an external Certificate Authority (CA), such as http://www.verisign.com, the application that uses the certificate will produce a warning. There is a cost associated with obtaining a signed certificate and using a signed certificate is not mandatory as certificates can be self-signed. However, using an external authority will prevent warnings and can put users at ease.
This section demonstrates how to create and use certificates on a FreeBSD system. Refer to 設定 LDAP 伺服器 for an example of how to create a CA for signing one’s own certificates.
For more information about SSL, read the free OpenSSL Cookbook.
To generate a certificate that will be signed by an external CA, issue the following command and input the information requested at the prompts. This input information will be written to the certificate. At the Common Name prompt, input the fully qualified name for the system that will use the certificate. If this name does not match the server, the application verifying the certificate will issue a warning to the user, rendering the verification provided by the certificate as useless.
# openssl req -new -nodes -out req.pem -keyout cert.key -sha256 -newkey rsa:2048
Generating a 2048 bit RSA private key
..................+++
.............................................................+++
writing new private key to 'cert.key'
-----
You are about to be asked to enter information that will be incorporated
into your certificate request.
What you are about to enter is what is called a Distinguished Name or a DN.
There are quite a few fields but you can leave some blank
For some fields there will be a default value,
If you enter '.', the field will be left blank.
-----
Country Name (2 letter code) [AU]:US
State or Province Name (full name) [Some-State]:PA
Locality Name (eg, city) []:Pittsburgh
Organization Name (eg, company) [Internet Widgits Pty Ltd]:My Company
Organizational Unit Name (eg, section) []:Systems Administrator
Common Name (eg, YOUR name) []:localhost.example.org
Email Address []:trhodes@FreeBSD.org
Please enter the following 'extra' attributes
to be sent with your certificate request
A challenge password []:
An optional company name []:Another NameOther options, such as the expire time and alternate encryption algorithms, are available when creating a certificate. A complete list of options is described in openssl(1).
This command will create two files in the current directory. The certificate request, req.pem, can be sent to a CA who will validate the entered credentials, sign the request, and return the signed certificate. The second file, cert.key, is the private key for the certificate and should be stored in a secure location. If this falls in the hands of others, it can be used to impersonate the user or the server.
Alternately, if a signature from a CA is not required, a self-signed certificate can be created. First, generate the RSA key:
# openssl genrsa -rand -genkey -out cert.key 2048
0 semi-random bytes loaded
Generating RSA private key, 2048 bit long modulus
.............................................+++
.................................................................................................................+++
e is 65537 (0x10001)Use this key to create a self-signed certificate. Follow the usual prompts for creating a certificate:
# openssl req -new -x509 -days 365 -key cert.key -out cert.crt -sha256
You are about to be asked to enter information that will be incorporated
into your certificate request.
What you are about to enter is what is called a Distinguished Name or a DN.
There are quite a few fields but you can leave some blank
For some fields there will be a default value,
If you enter '.', the field will be left blank.
-----
Country Name (2 letter code) [AU]:US
State or Province Name (full name) [Some-State]:PA
Locality Name (eg, city) []:Pittsburgh
Organization Name (eg, company) [Internet Widgits Pty Ltd]:My Company
Organizational Unit Name (eg, section) []:Systems Administrator
Common Name (e.g. server FQDN or YOUR name) []:localhost.example.org
Email Address []:trhodes@FreeBSD.orgThis will create two new files in the current directory: a private key file cert.key, and the certificate itself, cert.crt. These should be placed in a directory, preferably under /etc/ssl/, which is readable only by root. Permissions of 0700 are appropriate for these files and can be set using chmod.
One use for a certificate is to encrypt connections to the Sendmail mail server in order to prevent the use of clear text authentication.
Some mail clients will display an error if the user has not installed a local copy of the certificate. Refer to the documentation included with the software for more information on certificate installation. |
In FreeBSD 10.0-RELEASE and above, it is possible to create a self-signed certificate for Sendmail automatically. To enable this, add the following lines to /etc/rc.conf:
sendmail_enable="YES" sendmail_cert_create="YES" sendmail_cert_cn="localhost.example.org"
This will automatically create a self-signed certificate, /etc/mail/certs/host.cert, a signing key, /etc/mail/certs/host.key, and a CA certificate, /etc/mail/certs/cacert.pem. The certificate will use the Common Name specified in sendmail_cert_cn. After saving the edits, restart Sendmail:
# service sendmail restartIf all went well, there will be no error messages in /var/log/maillog. For a simple test, connect to the mail server’s listening port using telnet:
# telnet example.com 25
Trying 192.0.34.166...
Connected to example.com.
Escape character is '^]'.
220 example.com ESMTP Sendmail 8.14.7/8.14.7; Fri, 18 Apr 2014 11:50:32 -0400 (EDT)
ehlo example.com
250-example.com Hello example.com [192.0.34.166], pleased to meet you
250-ENHANCEDSTATUSCODES
250-PIPELINING
250-8BITMIME
250-SIZE
250-DSN
250-ETRN
250-AUTH LOGIN PLAIN
250-STARTTLS
250-DELIVERBY
250 HELP
quit
221 2.0.0 example.com closing connection
Connection closed by foreign host.If the STARTTLS line appears in the output, everything is working correctly.
Internet Protocol Security (IPsec) is a set of protocols which sit on top of the Internet Protocol (IP) layer. It allows two or more hosts to communicate in a secure manner by authenticating and encrypting each IP packet of a communication session. The FreeBSD IPsec network stack is based on the http://www.kame.net/ implementation and supports both IPv4 and IPv6 sessions.
IPsec is comprised of the following sub-protocols:
Encapsulated Security Payload (ESP): this protocol protects the IP packet data from third party interference by encrypting the contents using symmetric cryptography algorithms such as Blowfish and 3DES.
Authentication Header (AH): this protocol protects the IP packet header from third party interference and spoofing by computing a cryptographic checksum and hashing the IP packet header fields with a secure hashing function. This is then followed by an additional header that contains the hash, to allow the information in the packet to be authenticated.
IP Payload Compression Protocol (IPComp): this protocol tries to increase communication performance by compressing the IP payload in order to reduce the amount of data sent.
These protocols can either be used together or separately, depending on the environment.
IPsec supports two modes of operation. The first mode, Transport Mode, protects communications between two hosts. The second mode, Tunnel Mode, is used to build virtual tunnels, commonly known as Virtual Private Networks (VPNs). Consult ipsec(4) for detailed information on the IPsec subsystem in FreeBSD.
在 FreeBSD 11 與之後的版本預設會開啟 IPsec 功能,先前版本的 FreeBSD 可在自訂核心設定檔中加入以下選項然後依 設定 FreeBSD 核心 的指示來重新編譯核心:
options IPSEC #IP security
device cryptoIf IPsec debugging support is desired, the following kernel option should also be added:
options IPSEC_DEBUG debug for IP securityThis rest of this chapter demonstrates the process of setting up an IPsecVPN between a home network and a corporate network. In the example scenario:
Both sites are connected to the Internet through a gateway that is running FreeBSD.
The gateway on each network has at least one external IP address. In this example, the corporate LAN’s external IP address is 172.16.5.4 and the home LAN’s external IP address is 192.168.1.12.
The internal addresses of the two networks can be either public or private IP addresses. However, the address space must not collide. For example, both networks cannot use 192.168.1.x. In this example, the corporate LAN’s internal IP address is 10.246.38.1 and the home LAN’s internal IP address is 10.0.0.5.
To begin, security/ipsec-tools must be installed from the Ports Collection. This software provides a number of applications which support the configuration.
The next requirement is to create two gif(4) pseudo-devices which will be used to tunnel packets and allow both networks to communicate properly. As root, run the following commands, replacing internal and external with the real IP addresses of the internal and external interfaces of the two gateways:
# ifconfig gif0 create
# ifconfig gif0 internal1 internal2
# ifconfig gif0 tunnel external1 external2Verify the setup on each gateway, using ifconfig. Here is the output from Gateway 1:
gif0: flags=8051 mtu 1280 tunnel inet 172.16.5.4 --> 192.168.1.12 inet6 fe80::2e0:81ff:fe02:5881%gif0 prefixlen 64 scopeid 0x6 inet 10.246.38.1 --> 10.0.0.5 netmask 0xffffff00
Here is the output from Gateway 2:
gif0: flags=8051 mtu 1280 tunnel inet 192.168.1.12 --> 172.16.5.4 inet 10.0.0.5 --> 10.246.38.1 netmask 0xffffff00 inet6 fe80::250:bfff:fe3a:c1f%gif0 prefixlen 64 scopeid 0x4
Once complete, both internal IP addresses should be reachable using ping(8):
priv-net# ping 10.0.0.5 PING 10.0.0.5 (10.0.0.5): 56 data bytes 64 bytes from 10.0.0.5: icmp_seq=0 ttl=64 time=42.786 ms 64 bytes from 10.0.0.5: icmp_seq=1 ttl=64 time=19.255 ms 64 bytes from 10.0.0.5: icmp_seq=2 ttl=64 time=20.440 ms 64 bytes from 10.0.0.5: icmp_seq=3 ttl=64 time=21.036 ms --- 10.0.0.5 ping statistics --- 4 packets transmitted, 4 packets received, 0% packet loss round-trip min/avg/max/stddev = 19.255/25.879/42.786/9.782 ms corp-net# ping 10.246.38.1 PING 10.246.38.1 (10.246.38.1): 56 data bytes 64 bytes from 10.246.38.1: icmp_seq=0 ttl=64 time=28.106 ms 64 bytes from 10.246.38.1: icmp_seq=1 ttl=64 time=42.917 ms 64 bytes from 10.246.38.1: icmp_seq=2 ttl=64 time=127.525 ms 64 bytes from 10.246.38.1: icmp_seq=3 ttl=64 time=119.896 ms 64 bytes from 10.246.38.1: icmp_seq=4 ttl=64 time=154.524 ms --- 10.246.38.1 ping statistics --- 5 packets transmitted, 5 packets received, 0% packet loss round-trip min/avg/max/stddev = 28.106/94.594/154.524/49.814 ms
As expected, both sides have the ability to send and receive ICMP packets from the privately configured addresses. Next, both gateways must be told how to route packets in order to correctly send traffic from either network. The following commands will achieve this goal:
corp-net# route add 10.0.0.0 10.0.0.5 255.255.255.0
corp-net# route add net 10.0.0.0: gateway 10.0.0.5
priv-net# route add 10.246.38.0 10.246.38.1 255.255.255.0
priv-net# route add host 10.246.38.0: gateway 10.246.38.1At this point, internal machines should be reachable from each gateway as well as from machines behind the gateways. Again, use ping(8) to confirm:
corp-net# ping 10.0.0.8 PING 10.0.0.8 (10.0.0.8): 56 data bytes 64 bytes from 10.0.0.8: icmp_seq=0 ttl=63 time=92.391 ms 64 bytes from 10.0.0.8: icmp_seq=1 ttl=63 time=21.870 ms 64 bytes from 10.0.0.8: icmp_seq=2 ttl=63 time=198.022 ms 64 bytes from 10.0.0.8: icmp_seq=3 ttl=63 time=22.241 ms 64 bytes from 10.0.0.8: icmp_seq=4 ttl=63 time=174.705 ms --- 10.0.0.8 ping statistics --- 5 packets transmitted, 5 packets received, 0% packet loss round-trip min/avg/max/stddev = 21.870/101.846/198.022/74.001 ms priv-net# ping 10.246.38.107 PING 10.246.38.1 (10.246.38.107): 56 data bytes 64 bytes from 10.246.38.107: icmp_seq=0 ttl=64 time=53.491 ms 64 bytes from 10.246.38.107: icmp_seq=1 ttl=64 time=23.395 ms 64 bytes from 10.246.38.107: icmp_seq=2 ttl=64 time=23.865 ms 64 bytes from 10.246.38.107: icmp_seq=3 ttl=64 time=21.145 ms 64 bytes from 10.246.38.107: icmp_seq=4 ttl=64 time=36.708 ms --- 10.246.38.107 ping statistics --- 5 packets transmitted, 5 packets received, 0% packet loss round-trip min/avg/max/stddev = 21.145/31.721/53.491/12.179 ms
Setting up the tunnels is the easy part. Configuring a secure link is a more in depth process. The following configuration uses pre-shared (PSK) RSA keys. Other than the IP addresses, the /usr/local/etc/racoon/racoon.conf on both gateways will be identical and look similar to:
path pre_shared_key "/usr/local/etc/racoon/psk.txt"; #location of pre-shared key file
log debug; #log verbosity setting: set to 'notify' when testing and debugging is complete
padding # options are not to be changed
{
maximum_length 20;
randomize off;
strict_check off;
exclusive_tail off;
}
timer # timing options. change as needed
{
counter 5;
interval 20 sec;
persend 1;
# natt_keepalive 15 sec;
phase1 30 sec;
phase2 15 sec;
}
listen # address [port] that racoon will listen on
{
isakmp 172.16.5.4 [500];
isakmp_natt 172.16.5.4 [4500];
}
remote 192.168.1.12 [500]
{
exchange_mode main,aggressive;
doi ipsec_doi;
situation identity_only;
my_identifier address 172.16.5.4;
peers_identifier address 192.168.1.12;
lifetime time 8 hour;
passive off;
proposal_check obey;
# nat_traversal off;
generate_policy off;
proposal {
encryption_algorithm blowfish;
hash_algorithm md5;
authentication_method pre_shared_key;
lifetime time 30 sec;
dh_group 1;
}
}
sainfo (address 10.246.38.0/24 any address 10.0.0.0/24 any) # address $network/$netmask $type address $network/$netmask $type ( $type being any or esp)
{ # $network must be the two internal networks you are joining.
pfs_group 1;
lifetime time 36000 sec;
encryption_algorithm blowfish,3des;
authentication_algorithm hmac_md5,hmac_sha1;
compression_algorithm deflate;
}For descriptions of each available option, refer to the manual page for racoon.conf.
The Security Policy Database (SPD) needs to be configured so that FreeBSD and racoon are able to encrypt and decrypt network traffic between the hosts.
This can be achieved with a shell script, similar to the following, on the corporate gateway. This file will be used during system initialization and should be saved as /usr/local/etc/racoon/setkey.conf.
flush; spdflush; # To the home network spdadd 10.246.38.0/24 10.0.0.0/24 any -P out ipsec esp/tunnel/172.16.5.4-192.168.1.12/use; spdadd 10.0.0.0/24 10.246.38.0/24 any -P in ipsec esp/tunnel/192.168.1.12-172.16.5.4/use;
Once in place, racoon may be started on both gateways using the following command:
# /usr/local/sbin/racoon -F -f /usr/local/etc/racoon/racoon.conf -l /var/log/racoon.logThe output should be similar to the following:
corp-net# /usr/local/sbin/racoon -F -f /usr/local/etc/racoon/racoon.conf Foreground mode. 2006-01-30 01:35:47: INFO: begin Identity Protection mode. 2006-01-30 01:35:48: INFO: received Vendor ID: KAME/racoon 2006-01-30 01:35:55: INFO: received Vendor ID: KAME/racoon 2006-01-30 01:36:04: INFO: ISAKMP-SA established 172.16.5.4[500]-192.168.1.12[500] spi:623b9b3bd2492452:7deab82d54ff704a 2006-01-30 01:36:05: INFO: initiate new phase 2 negotiation: 172.16.5.4[0]192.168.1.12[0] 2006-01-30 01:36:09: INFO: IPsec-SA established: ESP/Tunnel 192.168.1.12[0]->172.16.5.4[0] spi=28496098(0x1b2d0e2) 2006-01-30 01:36:09: INFO: IPsec-SA established: ESP/Tunnel 172.16.5.4[0]->192.168.1.12[0] spi=47784998(0x2d92426) 2006-01-30 01:36:13: INFO: respond new phase 2 negotiation: 172.16.5.4[0]192.168.1.12[0] 2006-01-30 01:36:18: INFO: IPsec-SA established: ESP/Tunnel 192.168.1.12[0]->172.16.5.4[0] spi=124397467(0x76a279b) 2006-01-30 01:36:18: INFO: IPsec-SA established: ESP/Tunnel 172.16.5.4[0]->192.168.1.12[0] spi=175852902(0xa7b4d66)
To ensure the tunnel is working properly, switch to another console and use tcpdump(1) to view network traffic using the following command. Replace em0 with the network interface card as required:
# tcpdump -i em0 host 172.16.5.4 and dst 192.168.1.12Data similar to the following should appear on the console. If not, there is an issue and debugging the returned data will be required.
01:47:32.021683 IP corporatenetwork.com > 192.168.1.12.privatenetwork.com: ESP(spi=0x02acbf9f,seq=0xa) 01:47:33.022442 IP corporatenetwork.com > 192.168.1.12.privatenetwork.com: ESP(spi=0x02acbf9f,seq=0xb) 01:47:34.024218 IP corporatenetwork.com > 192.168.1.12.privatenetwork.com: ESP(spi=0x02acbf9f,seq=0xc)
At this point, both networks should be available and seem to be part of the same network. Most likely both networks are protected by a firewall. To allow traffic to flow between them, rules need to be added to pass packets. For the ipfw(8) firewall, add the following lines to the firewall configuration file:
ipfw add 00201 allow log esp from any to any ipfw add 00202 allow log ah from any to any ipfw add 00203 allow log ipencap from any to any ipfw add 00204 allow log udp from any 500 to any
The rule numbers may need to be altered depending on the current host configuration. |
pass in quick proto esp from any to any pass in quick proto ah from any to any pass in quick proto ipencap from any to any pass in quick proto udp from any port = 500 to any port = 500 pass in quick on gif0 from any to any pass out quick proto esp from any to any pass out quick proto ah from any to any pass out quick proto ipencap from any to any pass out quick proto udp from any port = 500 to any port = 500 pass out quick on gif0 from any to any
Finally, to allow the machine to start support for the VPN during system initialization, add the following lines to /etc/rc.conf:
ipsec_enable="YES" ipsec_program="/usr/local/sbin/setkey" ipsec_file="/usr/local/etc/racoon/setkey.conf" # allows setting up spd policies on boot racoon_enable="yes"
OpenSSH 是一套網路連線工具,可安全的存取遠端的主機,此外,透過 SSH 連線可以建立 TCP/IP 連線通道或安全的轉送 TCP/IP 的封包。OpenSSH 會對所有傳輸的資料做加密,可有效的避免竊聽 (Eavesdropping)、或連線劫持 (Connection hijacking) 與其他網路層的攻擊。
OpenSSH 由 OpenBSD 專案所維護且在 FreeBSD 預設會安裝,它可同時相容 SSH 版本 1 與 2 通訊協定。
當以未加密的方式在網路上傳送資料時,任何在客戶端與伺服器之間的網路竊聽程式 (Network sniffer) 皆可竊取使用者/密碼資訊或者在連線階段傳送的資料,OpenSSH 提供了數種認証與加密方式來避免這種事情發生。更多有關 OpenSSH 的資訊可於 http://www.openssh.com/ 取得。
本節會簡單介紹如何使用內建的客戶端工具安全的存取其他系統及安全的傳輸檔案到 FreeBSD 系統,然後會說明如何設定在 FreeBSD 系統上的 SSH 伺服器。更多的資訊可於本章節所提及的操作手冊 (Man page) 取得。
要登入一台 SSH 伺服器,可使用 ssh 然後指定在伺服器上存在的使用者名稱與 IP 位址或伺服器的主機名稱。若這是第一次連線到指定的伺服器,會提示該使用者伺服器的指紋做第一次檢驗:
# ssh user@example.com
The authenticity of host 'example.com (10.0.0.1)' can't be established.
ECDSA key fingerprint is 25:cc:73:b5:b3:96:75:3d:56:19:49:d2:5c:1f:91:3b.
Are you sure you want to continue connecting (yes/no)? yes
Permanently added 'example.com' (ECDSA) to the list of known hosts.
Password for user@example.com: user_passwordSSH 會在客戶端連線時利用金鑰指紋 (Key fingerprint) 系統來驗證伺服器的真偽,當使用者在第一次連線時輸入 yes 接受了這個金鑰指紋,便會將該金鑰的複本儲存到使用者家目錄的 .ssh/known_hosts,未來嘗試登入時便會以這個存好的金鑰來驗證,若伺服器的金鑰與儲存的金鑰不同將會顯示警告訊息。若出現這個警告時,使用者應在繼續連線之前檢查金鑰變動的原因。
最近版本的 OpenSSH 預設只會接受 SSHv2 的連線。客戶端預設會盡可能使用版本 2 的通訊協定,若伺服器不支援版本 2 的通訊協定便會向下相容版本 1 的協定。要強制 ssh 只能使用指定的通訊協定,可使用 -1 或 -2,其他的選項在 ssh(1) 中有說明。
使用 scp(1) 可從遠端主機安全的複製一個檔案,以下範例會複製在遠端主機的 COPYRIGHT 到本地主機的目前目錄:
# scp user@example.com:/COPYRIGHT COPYRIGHT
Password for user@example.com: *******
COPYRIGHT 100% |*****************************| 4735
00:00
#由於這個主機的指紋已驗證過,在提示用者輸入密碼之前伺服器的金鑰已自動檢查。
傳給 scp 的參數與傳給 cp 的參數相似。第一個參數是要複製的檔案,第二個參數是目地,由於檔案是透過網路取得,檔案參數需要使用 user@host:<path_to_remote_file> 格式。注意,在 scp 要遞迴複製目錄是使用 -r,如同 cp 使用 -R。
要開啟可互動的連線來複製檔案可使用 sftp,請參考 sftp(1) 來取得在 sftp 連線時可用的指令清單。
除了使用密碼之外,客戶端可以設定成使用金鑰來連線到遠端的主機。要產生 RSA 認証金鑰可使用 ssh-keygen。要產生成對的公鑰與私鑰,可指定金鑰的類型並依提示操作。建議使用容易記住但較難猜出的密碼來保護這個金鑰。
% ssh-keygen -t rsa
Generating public/private rsa key pair.
Enter file in which to save the key (/home/user/.ssh/id_rsa):
Enter passphrase (empty for no passphrase): (1)
Enter same passphrase again: (2)
Your identification has been saved in /home/user/.ssh/id_rsa.
Your public key has been saved in /home/user/.ssh/id_rsa.pub.
The key fingerprint is:
SHA256:54Xm9Uvtv6H4NOo6yjP/YCfODryvUU7yWHzMqeXwhq8 user@host.example.com
The key's randomart image is:
+---[RSA 2048]----+
| |
| |
| |
| . o.. |
| .S*+*o |
| . O=Oo . . |
| = Oo= oo..|
| .oB.* +.oo.|
| =OE**.o..=|
+----[SHA256]-----+| 1 | 在此輸入密碼,密碼不可含有空白或符號。 |
| 2 | 再輸入一次密碼驗證。 |
私鑰會儲存於 ~/.ssh/id_rsa 而公鑰會儲存於 ~/.ssh/id_rsa.pub。公鑰必須複製到遠端主機的~/.ssh/authorized_keys 來讓以金鑰為基礎的認証可以運作。
許多使用者認為金鑰的設計是安全的並在產生金鑰時未使用密碼,這樣的行為其實很危險。管理者可以手動查看私鑰來檢查金鑰對是否受密碼保護,如果私鑰檔案中包含 |
不同版本 OpenSSH 的選項與檔案會不同,要避免發生問題請參考 ssh-keygen(1)。
若使用了密碼,在每次連線到伺服器時都會提示使用者輸入密碼。要將 SSH 金鑰載入到記憶體並讓每次連線時不必再輸入密碼,可使用 ssh-agent(1) 與 ssh-add(1)。
認証可用 ssh-agent 來管理,只要將私鑰載入,ssh-agent 可用在執行其他應用程式,如 Shell 或視窗管理程式。
要在 Shell 使用 ssh-agent,使用 Shell 做為參數來啟動 ssh-agent。執行 ssh-add 來加入識別碼,然後輸入私鑰的密碼。使用者將可使用 ssh 連線到任何有安裝對應公鑰的主機,例如:
% ssh-agent csh
% ssh-add
Enter passphrase for key '/usr/home/user/.ssh/id_rsa': (1)
Identity added: /usr/home/user/.ssh/id_rsa (/usr/home/user/.ssh/id_rsa)
%| 1 | 輸入金鑰的密碼。 |
要在 Xorg 使用 ssh-agent 可在 ~/.xinitrc 加入一個設定項目,這可讓 ssh-agent 對所有在 Xorg 中執行的程式提供服務。~/.xinitrc 範例如下:
exec ssh-agent startxfce4
這會在每次啟動 Xorg 時,反過來先執行 ssh-agent 再由執行 XFCE,一但 Xorg 被重新啟動,要讓所有變更生效需執行 ssh-add 來載入所有的 SSH 金鑰。
OpenSSH 可以建立一個通道 (Tunnel) 來封裝其他通訊協定到一個加密的連線。
以下指令會告訴 ssh 建立一個供 telnet 使用的通道:
% ssh -2 -N -f -L 5023:localhost:23 user@foo.example.com
%這個例子使用了以下選項:
-2強制 ssh 使用版本 2 的通訊協定連線到伺服器。
-N代表不需下指令、只建立通道。若省略這個選項 ssh 會初始化一個正常的連線。
-f強制 ssh 在背景執行。
-L代表這是一個本地通道,使用 localport:remotehost:remoteport 格式。
user@foo.example.com在指定的遠端 SSH 伺服器要使用的登入名稱。
SSH 通道會建立一個傾聽 localhost 指定 localport 的 Socket ,然後會透過 SSH 連線轉送任何在 localport 接收的連線。以這個例子來說在客戶端的 Port 5023 會被轉送到遠端主機的 Port 23,由於 Port 23 是由 telnet 使用,所以這會透過 SSH 通道建立一個加密的 telnet 連線。
這個方法可用來包裝許多不安全的 TCP 通訊協定,例如 SMTP, POP3 以及 FTP,如下例所示。
% ssh -2 -N -f -L 5025:localhost:25 user@mailserver.example.com
user@mailserver.example.com's password: *****
% telnet localhost 5025
Trying 127.0.0.1...
Connected to localhost.
Escape character is '^]'.
220 mailserver.example.com ESMTP這可配合 ssh-keygen 與另一個使用者帳號與來建立一個更無縫的 SSH 通道環境,可使用金鑰來代替手動輸入密碼,然後該通道便可以另一個使用者執行。
在這個例子中有一個 SSH 伺服器會接受來自外部的連線,在同個網段下有一個郵件伺服器執行 POP3 伺服器。要使用較安全的方式檢查有沒有新郵件可建立一個 SSH 連線到 SSH 伺服器然後透過通道連線到郵件伺服器:
% ssh -2 -N -f -L 2110:mail.example.com:110 user@ssh-server.example.com
user@ssh-server.example.com's password: ******一但通道啟動並執行後,指定郵件客戶端將 POP3 請求傳送到 localhost 的 Port 2110,這個連線將會被安全的透過通道轉送到 mail.example.com。
有些防火牆會同時過濾傳入與傳出的連線。例如,防火牆很可能會限制來自遠端主機只能存取 Port 22 與 80 來只讓 SSH 與網頁瀏覽器連線,這會使得 Port 使用 22 或 80 以外的服務無法存取。
這問題的解決方法是建立一個 SSH 連線到在防火牆防護之外主機然後使用該連線的通道連到想要使用的服務:
% ssh -2 -N -f -L 8888:music.example.com:8000 user@unfirewalled-system.example.org
user@unfirewalled-system.example.org's password: *******在這個例子中,串流 Ogg Vorbis 客戶端現在可以指向 localhost Port 8888,連線將會被轉送到 music.example.com 於 Port 8000,成功的跳過防火牆。
除了提供內建的 SSH 客戶端工具外,還可以設定 FreeBSD 系統為一個 SSH 伺服器,以接受來自其他 SSH 客戶端的連線。
要查看 sshd 是否正在運作,可使用 service(8) 指令:
# service sshd status若服務未執行,請加入下行到 /etc/rc.conf。
sshd_enable="YES"
這會讓下次系統開機時啟動 OpenSSH 的 Daemon 程式 sshd。若要立即啟動:
# service sshd start在 FreeBSD 系統第一次啟動 sshd 時便會自動產生系統的主機金鑰且會顯示指紋在 Console 上,這個指紋可供使用者在第一次連線到伺服器時驗證用。
請參考 sshd(8) 可取得在啟動 sshd 時可用選項的清單以及更多完整有關認証、登入程序與各種設定檔的資訊。
現在,sshd 應可供所有在系統上有使用者名稱及密碼的使用者使用。
在 FreeBSD 廣泛使用 sshd 做為遠端管理基礎設施的同時,所有暴露在公有網路上的系統也會時常受到暴力攻擊 (Brute force attack) 與路過攻擊 (Drive by attack)。在本節會介紹一些可用來避免這些攻擊的參數。
使用在 OpenSSH 伺服器設定檔的 AllowUsers 關鍵字限制可以登入到 SSH 伺服器的使用者及來源是一個不錯的方式。例如要只允許來自 192.168.1.32 的 root 登入,可加入下行到 /etc/ssh/sshd_config:
AllowUsers root@192.168.1.32
要允許來自任何地方的 admin 登入,可只列出使用者名稱,不指定 IP 位址:
AllowUsers admin
有多位使用者也應列在同一行,例如:
AllowUsers root@192.168.1.32 admin
在對 /etc/ssh/sshd_config 做完變更後,執行以下指令告訴 sshd 重新載入設定檔:
# service sshd reload在使用了這個關鍵字時,列出每一位需要登入此主機的使用者很重要,任何未被在該行指定的使用者將無法登入。同時,在 OpenSSH 伺服器設定檔使用的關鍵字是區分大小寫的,若關鍵字未正確的拼寫 (含其大小寫),則將會被忽略,永遠要記得測試對這個檔案所做的更改來確保伺服器有如預期的方式運作。請參考 sshd_config(5) 來檢查拼寫以及可用的關鍵字。 |
此外,使用者可能被強制要透過公鑰與私鑰使用雙重認證 (Two factor authentication)。當需要時,使用者可以透過使用 ssh-keygen(1) 產生一堆金鑰然後將公鑰傳送給管理者,這個金鑰檔會如以上在客戶端章節所述的被放在 authorized_keys。要強制使用者只能使用這個金鑰,可能需要設定以下選項:
AuthenticationMethods publickey
請不要將 /etc/ssh/sshd_config 以及 /etc/ssh/ssh_config 搞混 (注意在第一節檔名有多出個 |
Access Control Lists (ACLs) extend the standard UNIX™ permission model in a POSIX™.1e compatible way. This permits an administrator to take advantage of a more fine-grained permissions model.
The FreeBSD GENERIC kernel provides ACL support for UFS file systems. Users who prefer to compile a custom kernel must include the following option in their custom kernel configuration file:
options UFS_ACL
If this option is not compiled in, a warning message will be displayed when attempting to mount a file system with ACL support. ACLs rely on extended attributes which are natively supported in UFS2.
This chapter describes how to enable ACL support and provides some usage examples.
ACLs are enabled by the mount-time administrative flag, acls, which may be added to /etc/fstab. The mount-time flag can also be automatically set in a persistent manner using tunefs(8) to modify a superblock ACLs flag in the file system header. In general, it is preferred to use the superblock flag for several reasons:
The superblock flag cannot be changed by a remount using mount -u as it requires a complete umount and fresh mount. This means that ACLs cannot be enabled on the root file system after boot. It also means that ACL support on a file system cannot be changed while the system is in use.
Setting the superblock flag causes the file system to always be mounted with ACLs enabled, even if there is not an fstab entry or if the devices re-order. This prevents accidental mounting of the file system without ACL support.
It is desirable to discourage accidental mounting without ACLs enabled because nasty things can happen if ACLs are enabled, then disabled, then re-enabled without flushing the extended attributes. In general, once ACLs are enabled on a file system, they should not be disabled, as the resulting file protections may not be compatible with those intended by the users of the system, and re-enabling ACLs may re-attach the previous ACLs to files that have since had their permissions changed, resulting in unpredictable behavior. |
File systems with ACLs enabled will show a plus (+) sign in their permission settings:
drwx------ 2 robert robert 512 Dec 27 11:54 private drwxrwx---+ 2 robert robert 512 Dec 23 10:57 directory1 drwxrwx---+ 2 robert robert 512 Dec 22 10:20 directory2 drwxrwx---+ 2 robert robert 512 Dec 27 11:57 directory3 drwxr-xr-x 2 robert robert 512 Nov 10 11:54 public_html
In this example, directory1, directory2, and directory3 are all taking advantage of ACLs, whereas public_html is not.
File system ACLs can be viewed using getfacl. For instance, to view the ACL settings on test:
% getfacl test
#file:test
#owner:1001
#group:1001
user::rw-
group::r--
other::r--To change the ACL settings on this file, use setfacl. To remove all of the currently defined ACLs from a file or file system, include -k. However, the preferred method is to use -b as it leaves the basic fields required for ACLs to work.
% setfacl -k testTo modify the default ACL entries, use -m:
% setfacl -m u:trhodes:rwx,group:web:r--,o::--- testIn this example, there were no pre-defined entries, as they were removed by the previous command. This command restores the default options and assigns the options listed. If a user or group is added which does not exist on the system, an Invalid argument error will be displayed.
Refer to getfacl(1) and setfacl(1) for more information about the options available for these commands.
In recent years, the security world has made many improvements to how vulnerability assessment is handled. The threat of system intrusion increases as third party utilities are installed and configured for virtually any operating system available today.
Vulnerability assessment is a key factor in security. While FreeBSD releases advisories for the base system, doing so for every third party utility is beyond the FreeBSD Project’s capability. There is a way to mitigate third party vulnerabilities and warn administrators of known security issues. A FreeBSD add on utility known as pkg includes options explicitly for this purpose.
pkg polls a database for security issues. The database is updated and maintained by the FreeBSD Security Team and ports developers.
Please refer to instructions for installing pkg.
Installation provides periodic(8) configuration files for maintaining the pkg audit database, and provides a programmatic method of keeping it updated. This functionality is enabled if daily_status_security_pkgaudit_enable is set to YES in periodic.conf(5). Ensure that daily security run emails, which are sent to root's email account, are being read.
After installation, and to audit third party utilities as part of the Ports Collection at any time, an administrator may choose to update the database and view known vulnerabilities of installed packages by invoking:
# pkg audit -Fpkg displays messages any published vulnerabilities in installed packages:
Affected package: cups-base-1.1.22.0_1 Type of problem: cups-base -- HPGL buffer overflow vulnerability. Reference: <https://www.FreeBSD.org/ports/portaudit/40a3bca2-6809-11d9-a9e7-0001020eed82.html> 1 problem(s) in your installed packages found. You are advised to update or deinstall the affected package(s) immediately.
By pointing a web browser to the displayed URL, an administrator may obtain more information about the vulnerability. This will include the versions affected, by FreeBSD port version, along with other web sites which may contain security advisories.
pkg is a powerful utility and is extremely useful when coupled with ports-mgmt/portmaster.
Like many producers of quality operating systems, the FreeBSD Project has a security team which is responsible for determining the End-of-Life (EoL) date for each FreeBSD release and to provide security updates for supported releases which have not yet reached their EoL. More information about the FreeBSD security team and the supported releases is available on the FreeBSD security page.
One task of the security team is to respond to reported security vulnerabilities in the FreeBSD operating system. Once a vulnerability is confirmed, the security team verifies the steps necessary to fix the vulnerability and updates the source code with the fix. It then publishes the details as a "Security Advisory". Security advisories are published on the FreeBSD website and mailed to the freebsd-security-notifications, freebsd-security, and freebsd-announce mailing lists.
This section describes the format of a FreeBSD security advisory.
Here is an example of a FreeBSD security advisory:
=============================================================================
-----BEGIN PGP SIGNED MESSAGE-----
Hash: SHA512
=============================================================================
FreeBSD-SA-14:04.bind Security Advisory
The FreeBSD Project
Topic: BIND remote denial of service vulnerability
Category: contrib
Module: bind
Announced: 2014-01-14
Credits: ISC
Affects: FreeBSD 8.x and FreeBSD 9.x
Corrected: 2014-01-14 19:38:37 UTC (stable/9, 9.2-STABLE)
2014-01-14 19:42:28 UTC (releng/9.2, 9.2-RELEASE-p3)
2014-01-14 19:42:28 UTC (releng/9.1, 9.1-RELEASE-p10)
2014-01-14 19:38:37 UTC (stable/8, 8.4-STABLE)
2014-01-14 19:42:28 UTC (releng/8.4, 8.4-RELEASE-p7)
2014-01-14 19:42:28 UTC (releng/8.3, 8.3-RELEASE-p14)
CVE Name: CVE-2014-0591
For general information regarding FreeBSD Security Advisories,
including descriptions of the fields above, security branches, and the
following sections, please visit <URL:http://security.FreeBSD.org/>.
I. Background
BIND 9 is an implementation of the Domain Name System (DNS) protocols.
The named(8) daemon is an Internet Domain Name Server.
II. Problem Description
Because of a defect in handling queries for NSEC3-signed zones, BIND can
crash with an "INSIST" failure in name.c when processing queries possessing
certain properties. This issue only affects authoritative nameservers with
at least one NSEC3-signed zone. Recursive-only servers are not at risk.
III. Impact
An attacker who can send a specially crafted query could cause named(8)
to crash, resulting in a denial of service.
IV. Workaround
No workaround is available, but systems not running authoritative DNS service
with at least one NSEC3-signed zone using named(8) are not vulnerable.
V. Solution
Perform one of the following:
1) Upgrade your vulnerable system to a supported FreeBSD stable or
release / security branch (releng) dated after the correction date.
2) To update your vulnerable system via a source code patch:
The following patches have been verified to apply to the applicable
FreeBSD release branches.
a) Download the relevant patch from the location below, and verify the
detached PGP signature using your PGP utility.
[FreeBSD 8.3, 8.4, 9.1, 9.2-RELEASE and 8.4-STABLE]
# fetch http://security.FreeBSD.org/patches/SA-14:04/bind-release.patch
# fetch http://security.FreeBSD.org/patches/SA-14:04/bind-release.patch.asc
# gpg --verify bind-release.patch.asc
[FreeBSD 9.2-STABLE]
# fetch http://security.FreeBSD.org/patches/SA-14:04/bind-stable-9.patch
# fetch http://security.FreeBSD.org/patches/SA-14:04/bind-stable-9.patch.asc
# gpg --verify bind-stable-9.patch.asc
b) Execute the following commands as root:
# cd /usr/src
# patch < /path/to/patch
Recompile the operating system using buildworld and installworld as
described in <URL:https://www.FreeBSD.org/handbook/makeworld.html>.
Restart the applicable daemons, or reboot the system.
3) To update your vulnerable system via a binary patch:
Systems running a RELEASE version of FreeBSD on the i386 or amd64
platforms can be updated via the freebsd-update(8) utility:
# freebsd-update fetch
# freebsd-update install
VI. Correction details
The following list contains the correction revision numbers for each
affected branch.
Branch/path Revision
- -------------------------------------------------------------------------
stable/8/ r260646
releng/8.3/ r260647
releng/8.4/ r260647
stable/9/ r260646
releng/9.1/ r260647
releng/9.2/ r260647
- -------------------------------------------------------------------------
To see which files were modified by a particular revision, run the
following command, replacing NNNNNN with the revision number, on a
machine with Subversion installed:
# svn diff -cNNNNNN --summarize svn://svn.freebsd.org/base
Or visit the following URL, replacing NNNNNN with the revision number:
<URL:https://svnweb.freebsd.org/base?view=revision&revision=NNNNNN>
VII. References
<URL:https://kb.isc.org/article/AA-01078>
<URL:http://cve.mitre.org/cgi-bin/cvename.cgi?name=CVE-2014-0591>
The latest revision of this advisory is available at
<URL:http://security.FreeBSD.org/advisories/FreeBSD-SA-14:04.bind.asc>
-----BEGIN PGP SIGNATURE-----
iQIcBAEBCgAGBQJS1ZTYAAoJEO1n7NZdz2rnOvQP/2/68/s9Cu35PmqNtSZVVxVG
ZSQP5EGWx/lramNf9566iKxOrLRMq/h3XWcC4goVd+gZFrvITJSVOWSa7ntDQ7TO
XcinfRZ/iyiJbs/Rg2wLHc/t5oVSyeouyccqODYFbOwOlk35JjOTMUG1YcX+Zasg
ax8RV+7Zt1QSBkMlOz/myBLXUjlTZ3Xg2FXVsfFQW5/g2CjuHpRSFx1bVNX6ysoG
9DT58EQcYxIS8WfkHRbbXKh9I1nSfZ7/Hky/kTafRdRMrjAgbqFgHkYTYsBZeav5
fYWKGQRJulYfeZQ90yMTvlpF42DjCC3uJYamJnwDIu8OhS1WRBI8fQfr9DRzmRua
OK3BK9hUiScDZOJB6OqeVzUTfe7MAA4/UwrDtTYQ+PqAenv1PK8DZqwXyxA9ThHb
zKO3OwuKOVHJnKvpOcr+eNwo7jbnHlis0oBksj/mrq2P9m2ueF9gzCiq5Ri5Syag
Wssb1HUoMGwqU0roS8+pRpNC8YgsWpsttvUWSZ8u6Vj/FLeHpiV3mYXPVMaKRhVm
067BA2uj4Th1JKtGleox+Em0R7OFbCc/9aWC67wiqI6KRyit9pYiF3npph+7D5Eq
7zPsUdDd+qc+UTiLp3liCRp5w6484wWdhZO6wRtmUgxGjNkxFoNnX8CitzF8AaqO
UWWemqWuz3lAZuORQ9KX
=OQzQ
-----END PGP SIGNATURE-----Every security advisory uses the following format:
Each security advisory is signed by the PGP key of the Security Officer. The public key for the Security Officer can be verified at OpenPGP 金鑰.
The name of the security advisory always begins with FreeBSD-SA- (for FreeBSD Security Advisory), followed by the year in two digit format (14:), followed by the advisory number for that year (04.), followed by the name of the affected application or subsystem (bind). The advisory shown here is the fourth advisory for 2014 and it affects BIND.
The Topic field summarizes the vulnerability.
The Category refers to the affected part of the system which may be one of core, contrib, or ports. The core category means that the vulnerability affects a core component of the FreeBSD operating system. The contrib category means that the vulnerability affects software included with FreeBSD, such as BIND. The ports category indicates that the vulnerability affects software available through the Ports Collection.
The Module field refers to the component location. In this example, the bind module is affected; therefore, this vulnerability affects an application installed with the operating system.
The Announced field reflects the date the security advisory was published. This means that the security team has verified that the problem exists and that a patch has been committed to the FreeBSD source code repository.
The Credits field gives credit to the individual or organization who noticed the vulnerability and reported it.
The Affects field explains which releases of FreeBSD are affected by this vulnerability.
The Corrected field indicates the date, time, time offset, and releases that were corrected. The section in parentheses shows each branch for which the fix has been merged, and the version number of the corresponding release from that branch. The release identifier itself includes the version number and, if appropriate, the patch level. The patch level is the letter p followed by a number, indicating the sequence number of the patch, allowing users to track which patches have already been applied to the system.
The CVE Name field lists the advisory number, if one exists, in the public cve.mitre.org security vulnerabilities database.
The Background field provides a description of the affected module.
The Problem Description field explains the vulnerability. This can include information about the flawed code and how the utility could be maliciously used.
The Impact field describes what type of impact the problem could have on a system.
The Workaround field indicates if a workaround is available to system administrators who cannot immediately patch the system .
The Solution field provides the instructions for patching the affected system. This is a step by step tested and verified method for getting a system patched and working securely.
The Correction Details field displays each affected Subversion branch with the revision number that contains the corrected code.
The References field offers sources of additional information regarding the vulnerability.
Process accounting is a security method in which an administrator may keep track of system resources used and their allocation among users, provide for system monitoring, and minimally track a user’s commands.
Process accounting has both positive and negative points. One of the positives is that an intrusion may be narrowed down to the point of entry. A negative is the amount of logs generated by process accounting, and the disk space they may require. This section walks an administrator through the basics of process accounting.
If more fine-grained accounting is needed, refer to 安全事件稽查. |
Before using process accounting, it must be enabled using the following commands:
# sysrc accounting_enable=yes
# service accounting startThe accounting information is stored in files located in /var/account, which is automatically created, if necessary, the first time the accounting service starts. These files contain sensitive information, including all the commands issued by all users. Write access to the files is limited to root, and read access is limited to root and members of the wheel group. To also prevent members of wheel from reading the files, change the mode of the /var/account directory to allow access only by root.
Once enabled, accounting will begin to track information such as CPU statistics and executed commands. All accounting logs are in a non-human readable format which can be viewed using sa. If issued without any options, sa prints information relating to the number of per-user calls, the total elapsed time in minutes, total CPU and user time in minutes, and the average number of I/O operations. Refer to sa(8) for the list of available options which control the output.
To display the commands issued by users, use lastcomm. For example, this command prints out all usage of ls by trhodes on the ttyp1 terminal:
# lastcomm ls trhodes ttyp1Many other useful options exist and are explained in lastcomm(1), acct(5), and sa(8).
FreeBSD provides several methods for an administrator to limit the amount of system resources an individual may use. Disk quotas limit the amount of disk space available to users. Quotas are discussed in 磁碟配額.
Limits to other resources, such as CPU and memory, can be set using either a flat file or a command to configure a resource limits database. The traditional method defines login classes by editing /etc/login.conf. While this method is still supported, any changes require a multi-step process of editing this file, rebuilding the resource database, making necessary changes to /etc/master.passwd, and rebuilding the password database. This can become time consuming, depending upon the number of users to configure.
rctl can be used to provide a more fine-grained method for controlling resource limits. This command supports more than user limits as it can also be used to set resource constraints on processes and jails.
This section demonstrates both methods for controlling resources, beginning with the traditional method.
In the traditional method, login classes and the resource limits to apply to a login class are defined in /etc/login.conf. Each user account can be assigned to a login class, where default is the default login class. Each login class has a set of login capabilities associated with it. A login capability is a name=value pair, where name is a well-known identifier and value is an arbitrary string which is processed accordingly depending on the name.
Whenever /etc/login.conf is edited, the /etc/login.conf.db must be updated by executing the following command: |
Resource limits differ from the default login capabilities in two ways. First, for every limit, there is a soft and hard limit. A soft limit may be adjusted by the user or application, but may not be set higher than the hard limit. The hard limit may be lowered by the user, but can only be raised by the superuser. Second, most resource limits apply per process to a specific user.
登入類別限制資源類型 lists the most commonly used resource limits. All of the available resource limits and capabilities are described in detail in login.conf(5).
| 限制資源 | 說明 |
|---|---|
coredumpsize | The limit on the size of a core file generated by a program is subordinate to other limits on disk usage, such as |
cputime | The maximum amount of CPU time a user’s process may consume. Offending processes will be killed by the kernel. This is a limit on CPU time consumed, not the percentage of the CPU as displayed in some of the fields generated by |
filesize | The maximum size of a file the user may own. Unlike disk quotas (磁碟配額), this limit is enforced on individual files, not the set of all files a user owns. |
maxproc | The maximum number of foreground and background processes a user can run. This limit may not be larger than the system limit specified by |
memorylocked | The maximum amount of memory a process may request to be locked into main memory using mlock(2). Some system-critical programs, such as amd(8), lock into main memory so that if the system begins to swap, they do not contribute to disk thrashing. |
memoryuse | The maximum amount of memory a process may consume at any given time. It includes both core memory and swap usage. This is not a catch-all limit for restricting memory consumption, but is a good start. |
openfiles | The maximum number of files a process may have open. In FreeBSD, files are used to represent sockets and IPC channels, so be careful not to set this too low. The system-wide limit for this is defined by |
sbsize | The limit on the amount of network memory a user may consume. This can be generally used to limit network communications. |
stacksize | The maximum size of a process stack. This alone is not sufficient to limit the amount of memory a program may use, so it should be used in conjunction with other limits. |
There are a few other things to remember when setting resource limits:
Processes started at system startup by /etc/rc are assigned to the daemon login class.
Although the default /etc/login.conf is a good source of reasonable values for most limits, they may not be appropriate for every system. Setting a limit too high may open the system up to abuse, while setting it too low may put a strain on productivity.
Xorg takes a lot of resources and encourages users to run more programs simultaneously.
Many limits apply to individual processes, not the user as a whole. For example, setting openfiles to 50 means that each process the user runs may open up to 50 files. The total amount of files a user may open is the value of openfiles multiplied by the value of maxproc. This also applies to memory consumption.
For further information on resource limits and login classes and capabilities in general, refer to cap_mkdb(1), getrlimit(2), and login.conf(5).
The kern.racct.enable tunable must be set to a non-zero value. Custom kernels require specific configuration:
options RACCT options RCTL
Once the system has rebooted into the new kernel, rctl may be used to set rules for the system.
Rule syntax is controlled through the use of a subject, subject-id, resource, and action, as seen in this example rule:
user:trhodes:maxproc:deny=10/user
In this rule, the subject is user, the subject-id is trhodes, the resource, maxproc, is the maximum number of processes, and the action is deny, which blocks any new processes from being created. This means that the user, trhodes, will be constrained to no greater than 10 processes. Other possible actions include logging to the console, passing a notification to devd(8), or sending a sigterm to the process.
Some care must be taken when adding rules. Since this user is constrained to 10 processes, this example will prevent the user from performing other tasks after logging in and executing a screen session. Once a resource limit has been hit, an error will be printed, as in this example:
% man test
/usr/bin/man: Cannot fork: Resource temporarily unavailable
eval: Cannot fork: Resource temporarily unavailableAs another example, a jail can be prevented from exceeding a memory limit. This rule could be written as:
# rctl -a jail:httpd:memoryuse:deny=2G/jailRules will persist across reboots if they have been added to /etc/rctl.conf. The format is a rule, without the preceding command. For example, the previous rule could be added as:
# Block jail from using more than 2G memory: jail:httpd:memoryuse:deny=2G/jail
To remove a rule, use rctl to remove it from the list:
# rctl -r user:trhodes:maxproc:deny=10/userA method for removing all rules is documented in rctl(8). However, if removing all rules for a single user is required, this command may be issued:
# rctl -r user:trhodesMany other resources exist which can be used to exert additional control over various subjects. See rctl(8) to learn about them.
系統管理者通常會要能夠授予額外的權限給其他使用者,以讓這些使用者可以執行需權限的工作。要讓團隊成員可以存取 FreeBSD 系統來完成其特定的工作對所有管理者都會帶來挑戰,這些團隊成員通常只需要比一般使用者多出一些存取權限便可作業,但他們總是會告訴管理者若沒有超級使用者的存取權便無法完成其工作。幸好,有工具可以管理這類的需求,這樣便不需提供這麼大的權限給一般使用者。
到目前為止,安全性章節已說明了如何允許已授權的使用者存取以及嘗試防止未經授權的存取,而現在有另一個問題,是由已授權的使用者擁有權限存取系統資源造成的。在很多的情況,使用者會需要存取應用程式啟動 Script 的權限或是管理者團隊需要維護系統,以往會使用標準的使用者與群組、檔案權限、甚至是 su(1) 指令來管理存取權,但當應用程式需要更多存取權,更多使用者需要使用系統資源時,便需要更好的解決方案,目前最常用來解決此問題的應用程式便是 Sudo。
Sudo 讓管理者可以對系統指令的存取設下更嚴格的限制並提供進階的記錄功能。如同其他工具,它可自 Port 套件集取得,於其中的 security/sudo,或使用 pkg(8) 工具取得,若要使用 pkg(8) 工具可:
# pkg install sudo安裝完成之後,可用安裝的 visudo 以文字編輯器開啟設定檔,強烈建議使用 visudo 來編輯設定檔,由於它有內建的語法檢查程式可在檔案儲存之前檢驗是否有誤。
設定檔由個小節所組成,透過這些小節可做常廣泛的設定,在以下的範例中,網站應用程式維護人員 user1 需要啟動、停止與重新啟動名稱為 webservice 的網站應用程式 。要授權此使用者執行這些工作的權限,可加入此行到 /usr/local/etc/sudoers 的最後:
user1 ALL=(ALL) /usr/sbin/service webservice *
現在使用者可使用此指令來啟動 webservice:
% sudo /usr/sbin/service webservice start雖然這項設定可以讓一位使用者存取 webservice 服務,但在大部份組織中會有一整個網站小組負責管理該服務,因此也可以一行來授予整個群組存取權,以下步驟會建立一個網站群組、加入使用者到這個群組,然後讓該群組中的所有成員能夠管理服務:
# pw groupadd -g 6001 -n webteam同樣使用 pw(8) 指令來加入該使用到 webteam 群組:
# pw groupmod -m user1 -n webteam最後,在 /usr/local/etc/sudoers 中的這行設定可以讓 webteam 群組的所有成員可以管理 webservice:
%webteam ALL=(ALL) /usr/sbin/service webservice *
與 su(1) 不同的是 Sudo 只需要一般使用者的密碼,這有一個使用者不需要共用密碼的優點,在大多數安全稽查都會發現共用密碼的問題且這種情況只有壞處可言。
大多數組織已正在導入或已導入雙重認証 (Two factor authentication),在這個情境下使用者可以不用輸入密碼,Sudo 提供了 %webteam ALL=(ALL) NOPASSWD: /usr/sbin/service webservice * |
採用 Sudo 的另一個優點是能夠開啟連線階段的記錄。使用內建立記錄機制與內含的 sudoreplay 指令,所有透過 Sudo 初始化的指令會被記錄下來供往後檢驗用。要開啟這個功能要加入預設記錄目錄的項目,在以下範例中使用了使用者變數來做目錄名稱,也還有許多其他記錄檔名稱慣例,可參考 sudoreplay 的操作手冊來取得進一步資訊。
Defaults iolog_dir=/var/log/sudo-io/%{user}這個目錄會在記錄功能設定之後自動建立,最好讓系統以預設的權限來建立目錄比較保險,除此之外,這個設定項目也會記錄使用 sudoreplay 指令的管理者,要更改設定請閱讀並取消在 sudoers 中記錄選項的註解。 |
一旦這個設定加入至 sudoers 檔案之後,所有的使用者設定項目便可加上記錄存取動作的項目,在 webteam 項目加入額外設定之後的範例如下:
%webteam ALL=(ALL) NOPASSWD: LOG_INPUT: LOG_OUTPUT: /usr/sbin/service webservice *
從此之後,所有 webteam 修改 webservice 應用程式狀態的成員將會被記錄下來。要列出先前與目前連線階段的記錄可:
# sudoreplay -l在輸出結果中要重播指定連線階段的記錄可搜尋 TSID= 項目,然後傳送給 sudoreplay 且不加其他選項便可以一般速度重播連線階段,例如:
# sudoreplay user1/00/00/02雖然所有連線階段都會被記錄,但任何管理者都可以移除連線階段,使得沒人知道它們做了什麼事,所以非常值得在入侵偵測系統 (IDS) 或類似的軟體加入每日檢查,以便在有人為修改時通知其他管理人員。 |
sudoreplay 的擴充空間非常大,請參考說明文件來取得更多資訊。
由於系統管理是一項困難的工作,許多工具開發來讓系統管理者能夠更輕鬆。這些工具通常可以強化系統安裝、設定以及維護的方式。這些工具之可以用來強化 FreeBSD 系統的安全性之一的就是 Jail。Jail 早在 FreeBSD 4.X 便可使用並持續強化它的功能、效率、穩定性以及安全性。
Jail 建立在 chroot(2) 概念之上,會更改一系列程序的根目錄。這可以創造一個安全的環境,將程序與系統的其他部份分隔。在 chroot 的環境所建立的程序不能存取該環境以外的檔案或資源。也因此,滲透一個在 chroot 的環境執行的服務並不會讓整個系統被攻擊者滲透。但 chroot 有許多限制,只適合用在簡單的工作,不需要許多彈性或複雜性、進階功能的工作。隨著時間推移,許多可以逃離 chroot 的環境的方法已經被找到,讓這個方法不再是確保服務安全的理想方案。
Jail 用許多方式改進了傳統 chroot 環境的概念。在傳統 chroot 環境,程序僅限制在一部份檔案系統可存取的地方。其餘的系統資源、系統使用者、執行的程序以及網路子系統被 chroot 的程序及主機系統的程序所共享。Jail 透過虛擬化存取檔案系統、使用者及網路子系統來擴展這個模型,可使用更多細微的控制參數來調校 Jail 的環境存取方式,Jail 可算是一種作業系統層級的虛擬化。
Jail 的四個要素:
一個子樹狀目錄:進入 Jail 的起點目錄,一但在 Jail 中,程序便沒有權限離開此目錄之外。
一個主機名稱:將會由 Jail 所使用。
一個 IP 位址:用來分配給 Jail。Jail 的 IP 位址通常是現有網路介面的別名位址。
一個指令:要在 Jail 中可執行的執行檔路徑名稱。該路徑是 Jail 環境根目錄的相對路徑。
Jail 有自己使用者及自己的 root 帳號,皆受到 Jail 環境的限制。Jail 中的 root 帳號不允許對指定 Jail 環境之外的系統執行操作。
本章將提供 FreeBSD Jail 術語及管理指令的概述,Jail 對系統管理者及進階的使用者來二者來說皆是強大的工具。
讀完這章,您將了解:
Jail 是什麼及它在 FreeBSD 中提供的目的。
如何建立、啟動及停止 Jail。
Jail 管理基礎,不論從內部或外部。
Jail 是強大的工具,但它不是安全性問題的萬靈丹。雖然 Jail 的程序不可能自己獨自打破規則,但有許多方法可以讓在 Jail 之外無權限的使用者與在 Jail 之內有權限的使用者串通來取得主機環境的更高權限。 大多數這類型的攻擊者可以由確保 Jail 根目錄不會被無權限使用者存取來減少。基本上,不受信任的使用者有 Jail 的存取權限並不會讓其可存取主機環境。 |
為協助更容易理解 FreeBSD 系統有關 Jail 部份, 以及它們與 FreeBSD 其他部分的相互作用關係, 以下列出本章將使用的術語:
工具,用來使用 chroot(2) FreeBSD 系統呼叫 (System call) 來更改程予及其衍伸程序的根目錄。
指程序在 "chroot" 中執行的環境。包含的資源如:一部份可見的檔案系統、可用的使用者及群組 ID、網路介面及其他 IPC 機制等。
允許在 Jail 環境下執行程序的系統管理工具。
Jail 環境的控制系統。 主機系統可以存取所有可用的硬體資源,並能控制 Jail 環境內外的程序。主機系統與 Jail 最大的差別在於:在主機系統中的超級使用者程序並不像在 Jail 環境那樣受到限制。
存取資源受到 FreeBSD Jail 限制的託管程序、使用者或其他實體。
部份管理者將 Jail 分成兩種類型:"完整的" Jail,它像一個真正的 FreeBSD 系統以及 "服務的" Jail,專門用於某個應用程式或服務,可能使用管理權限執行。但這些只是概念上的區分,建立 Jail 的程序並不受這個概念的影響。當要建立一個 "完整的" Jail,Userland 有兩個來源選項:使用預先編譯的 Binary (如安裝媒體上提供的 Binary) 或從原始碼編譯。
要從安裝媒體安裝 Userland,需要先建立根目錄供 Jail 使用。這個動作可以透過設定 DESTDIR 來到適當的位置來完成。
啟動 Shell 並定義 DESTDIR:
# sh
# export DESTDIR=/here/is/the/jail當使用安裝 ISO 時,可依 mdconfig(8) 中的說明掛載安裝媒體:
# mount -t cd9660 /dev/`mdconfig -f cdimage.iso` /mnt
# cd /mnt/usr/freebsd-dist/或者自鏡像站下載 Tarball 壓縮檔:
# sh
# export DESTRELEASE=12.0-RELEASE
# export DESTARCH=`uname -m`
# export SOURCEURL=http://ftp.freebsd.org/pub/FreeBSD/releases/$DESTARCH/$DESTRELEASE/
# for set in base ports; do fetch $SOURCEURL/$set.txz ; done從安裝媒體上的 Tarball 中取出 Binary 並放到宣告的位置,至少需要取出 Base set 的部份,若需要也可完整安裝。
只安裝基礎系統 (Base system):
# tar -xf base.txz -C $DESTDIR安裝全部不含核心:
# for set in base ports; do tar -xf $set.txz -C $DESTDIR ; done依 jail(8) 操作手冊說明的程序建置 Jail:
# setenv D /here/is/the/jail
# mkdir -p $D (1)
# cd /usr/src
# make buildworld (2)
# make installworld DESTDIR=$D (3)
# make distribution DESTDIR=$D (4)
# mount -t devfs devfs $D/dev (5)| 1 | 選擇 Jail 的位置是建置 Jail 最好的起點,這是在 Jail 主機上儲存 Jail 的實體位置。較好的選擇是 /usr/jail/jailname,其中 jailname 是用來辦識 Jail 的主機名稱。通常在 /usr/ 會有足夠的空間供 Jail 檔案系統使用,對 "完整的" Jail 來說,便是複製 FreeBSD 基礎系統預設安裝的每一個檔案。 |
| 2 | 若您已經使用 make world 或 make buildworld 重新編譯您的 Userland,您可以跳過這個步驟並安裝您已存在的 Userland 到新的 Jail。 |
| 3 | 這個指令將會在檔案系統中 Jail 所在的實體位置產生樹狀目錄及必要的 Binary、程式庫、操作手冊與相關檔案。 |
| 4 | make 的 distribution 目標會安裝所有需要的設定檔。簡單來說,它會安裝所有 /usr/src/etc/ 中可安裝的檔案到 Jail 環境的 /etc目錄:$D/etc/。 |
| 5 | 在 Jail 中掛載 devfs(8) 檔案系統並非必要的動作。從另一個角度來說,任何或大部份的應用程式會依該程式的目的會需要存取至少一個裝置,在 Jail 中控制存取的裝置非常重要,不恰當的設定可能會讓攻擊者可以在 Jail 中做不軌的事。對 devfs(8) 的控制是透過 Ruleset,在 devfs(8) 及 devfs.conf(5) 操作手冊中有詳細說明。 |
Jail 安裝完成之後,便可使用 jail(8) 工具來啟動。jail(8) 工具需要四個必要參數,在 概述 有說明。其他參數也可能需要指定,例如要使用特定使用者的身份來執行要 Jail 的程序。command 參數依 Jail 的類型所需而定,對一個 虛擬系統 來說,/etc/rc 是不錯的選擇,因為該檔案可以模仿真實 FreeBSD 的啟動順序。對於 服務型 的 Jail 來說,則看在 Jail 中要執行的服務或應用程式來決定。
Jail 通常會需要隨著開機執行,使用 FreeBSD rc 機制可讓以簡單的達成這件事。
在 jail.conf 中設定 jail 參數:
www {
host.hostname = www.example.org; # Hostname
ip4.addr = 192.168.0.10; # IP address of the jail
path ="/usr/jail/www"; # Path to the jail
devfs_ruleset = "www_ruleset"; # devfs ruleset
mount.devfs; # Mount devfs inside the jail
exec.start = "/bin/sh /etc/rc"; # Start command
exec.stop = "/bin/sh /etc/rc.shutdown"; # Stop command
}在 rc.conf 中設定開機時啟動 Jail:
jail_enable="YES" # Set to NO to disable starting of any jails
預設要啟動的 Jail 可在 jail.conf(5) 設定,會把 Jail 當作是一個完全虛擬的系統,然後執行 Jail 中的 /etc/rc Script。針對服務型的 Jail 則需透過設定 exec.start 選項來適當更改 Jail 的預設啟動指令。
要取得完整可用選項的清單,請參考 jail.conf(5)操作手冊。 |
若 Jail 項目已經在 jail.conf 中設定好,可以手動用 service(8) 來啟動或停止某個 Jail 項目:
# service jail start www
# service jail stop www# jls
JID IP Address Hostname Path
3 192.168.0.10 www /usr/jail/www
# jexec 3 /etc/rc.shutdown更多有關 Jail 的資訊可在 jail(8) 操作手冊取得。
還有許多選項可以對所有 Jail 做設定,以及各種可讓 Jail 與主機 FreeBSD 系統結合的方法來提供更高層級的應用程式使用。 本節將介紹:
Some of the options available for tuning the behavior and security restrictions implemented by a jail installation.
Some of the high-level applications for jail management, which are available through the FreeBSD Ports Collection, and can be used to implement overall jail-based solutions.
Fine tuning of a jail’s configuration is mostly done by setting sysctl(8) variables. A special subtree of sysctl exists as a basis for organizing all the relevant options: the security.jail.* hierarchy of FreeBSD kernel options. Here is a list of the main jail-related sysctls, complete with their default value. Names should be self-explanatory, but for more information about them, please refer to the jail(8) and sysctl(8) manual pages.
security.jail.set_hostname_allowed: 1
security.jail.socket_unixiproute_only: 1
security.jail.sysvipc_allowed: 0
security.jail.enforce_statfs: 2
security.jail.allow_raw_sockets: 0
security.jail.chflags_allowed: 0
security.jail.jailed: 0
These variables can be used by the system administrator of the host system to add or remove some of the limitations imposed by default on the root user. Note that there are some limitations which cannot be removed. The root user is not allowed to mount or unmount file systems from within a jail(8). The root inside a jail may not load or unload devfs(8) rulesets, set firewall rules, or do many other administrative tasks which require modifications of in-kernel data, such as setting the securelevel of the kernel.
The base system of FreeBSD contains a basic set of tools for viewing information about the active jails, and attaching to a jail to run administrative commands. The jls(8) and jexec(8) commands are part of the base FreeBSD system, and can be used to perform the following simple tasks:
Print a list of active jails and their corresponding jail identifier (JID), IP address, hostname and path.
Attach to a running jail, from its host system, and run a command inside the jail or perform administrative tasks inside the jail itself. This is especially useful when the root user wants to cleanly shut down a jail. The jexec(8) utility can also be used to start a shell in a jail to do administration in it; for example:
# jexec 1 tcshAmong the many third-party utilities for jail administration, one of the most complete and useful is sysutils/ezjail. It is a set of scripts that contribute to jail(8) management. Please refer to the handbook section on ezjail for more information.
Jails should be kept up to date from the host operating system as attempting to patch userland from within the jail may likely fail as the default behavior in FreeBSD is to disallow the use of chflags(1) in a jail which prevents the replacement of some files. It is possible to change this behavior but it is recommended to use freebsd-update(8) to maintain jails instead. Use -b to specify the path of the jail to be updated.
# freebsd-update -b /here/is/the/jail fetch
# freebsd-update -b /here/is/the/jail installThe management of multiple jails can become problematic because every jail has to be rebuilt from scratch whenever it is upgraded. This can be time consuming and tedious if a lot of jails are created and manually updated.
This section demonstrates one method to resolve this issue by safely sharing as much as is possible between jails using read-only mount_nullfs(8) mounts, so that updating is simpler. This makes it more attractive to put single services, such as HTTP, DNS, and SMTP, into individual jails. Additionally, it provides a simple way to add, remove, and upgrade jails.
Simpler solutions exist, such as ezjail, which provides an easier method of administering FreeBSD jails but is less versatile than this setup. ezjail is covered in more detail in 使用 ezjail 管理 Jail. |
The goals of the setup described in this section are:
Create a simple and easy to understand jail structure that does not require running a full installworld on each and every jail.
Make it easy to add new jails or remove existing ones.
Make it easy to update or upgrade existing jails.
Make it possible to run a customized FreeBSD branch.
Be paranoid about security, reducing as much as possible the possibility of compromise.
Save space and inodes, as much as possible.
This design relies on a single, read-only master template which is mounted into each jail and one read-write device per jail. A device can be a separate physical disc, a partition, or a vnode backed memory device. This example uses read-write nullfs mounts.
The file system layout is as follows:
The jails are based under the /home partition.
Each jail will be mounted under the /home/j directory.
The template for each jail and the read-only partition for all of the jails is /home/j/mroot.
A blank directory will be created for each jail under the /home/j directory.
Each jail will have a /s directory that will be linked to the read-write portion of the system.
Each jail will have its own read-write system that is based upon /home/j/skel.
The read-write portion of each jail will be created in /home/js.
This section describes the steps needed to create the master template.
It is recommended to first update the host FreeBSD system to the latest -RELEASE branch using the instructions in 從原始碼更新 FreeBSD. Additionally, this template uses the sysutils/cpdup package or port and portsnap will be used to download the FreeBSD Ports Collection.
First, create a directory structure for the read-only file system which will contain the FreeBSD binaries for the jails. Then, change directory to the FreeBSD source tree and install the read-only file system to the jail template:
# mkdir /home/j /home/j/mroot
# cd /usr/src
# make installworld DESTDIR=/home/j/mrootNext, prepare a FreeBSD Ports Collection for the jails as well as a FreeBSD source tree, which is required for mergemaster:
# cd /home/j/mroot
# mkdir usr/ports
# portsnap -p /home/j/mroot/usr/ports fetch extract
# cpdup /usr/src /home/j/mroot/usr/srcCreate a skeleton for the read-write portion of the system:
# mkdir /home/j/skel /home/j/skel/home /home/j/skel/usr-X11R6 /home/j/skel/distfiles
# mv etc /home/j/skel
# mv usr/local /home/j/skel/usr-local
# mv tmp /home/j/skel
# mv var /home/j/skel
# mv root /home/j/skelUse mergemaster to install missing configuration files. Then, remove the extra directories that mergemaster creates:
# mergemaster -t /home/j/skel/var/tmp/temproot -D /home/j/skel -i
# cd /home/j/skel
# rm -R bin boot lib libexec mnt proc rescue sbin sys usr devNow, symlink the read-write file system to the read-only file system. Ensure that the symlinks are created in the correct s/ locations as the creation of directories in the wrong locations will cause the installation to fail.
# cd /home/j/mroot
# mkdir s
# ln -s s/etc etc
# ln -s s/home home
# ln -s s/root root
# ln -s ../s/usr-local usr/local
# ln -s ../s/usr-X11R6 usr/X11R6
# ln -s ../../s/distfiles usr/ports/distfiles
# ln -s s/tmp tmp
# ln -s s/var varAs a last step, create a generic /home/j/skel/etc/make.conf containing this line:
WRKDIRPREFIX?= /s/portbuild
This makes it possible to compile FreeBSD ports inside each jail. Remember that the ports directory is part of the read-only system. The custom path for WRKDIRPREFIX allows builds to be done in the read-write portion of every jail.
The jail template can now be used to setup and configure the jails in /etc/rc.conf. This example demonstrates the creation of 3 jails: NS, MAIL and WWW.
Add the following lines to /etc/fstab, so that the read-only template for the jails and the read-write space will be available in the respective jails:
/home/j/mroot /home/j/ns nullfs ro 0 0 /home/j/mroot /home/j/mail nullfs ro 0 0 /home/j/mroot /home/j/www nullfs ro 0 0 /home/js/ns /home/j/ns/s nullfs rw 0 0 /home/js/mail /home/j/mail/s nullfs rw 0 0 /home/js/www /home/j/www/s nullfs rw 0 0
To prevent fsck from checking nullfs mounts during boot and dump from backing up the read-only nullfs mounts of the jails, the last two columns are both set to 0.
Configure the jails in /etc/rc.conf:
jail_enable="YES" jail_set_hostname_allow="NO" jail_list="ns mail www" jail_ns_hostname="ns.example.org" jail_ns_ip="192.168.3.17" jail_ns_rootdir="/usr/home/j/ns" jail_ns_devfs_enable="YES" jail_mail_hostname="mail.example.org" jail_mail_ip="192.168.3.18" jail_mail_rootdir="/usr/home/j/mail" jail_mail_devfs_enable="YES" jail_www_hostname="www.example.org" jail_www_ip="62.123.43.14" jail_www_rootdir="/usr/home/j/www" jail_www_devfs_enable="YES"
The jailnamerootdir variable is set to /usr/home instead of /home because the physical path of /home on a default FreeBSD installation is /usr/home. The jailnamerootdir variable must not be set to a path which includes a symbolic link, otherwise the jails will refuse to start.
Create the required mount points for the read-only file system of each jail:
# mkdir /home/j/ns /home/j/mail /home/j/wwwInstall the read-write template into each jail using sysutils/cpdup:
# mkdir /home/js
# cpdup /home/j/skel /home/js/ns
# cpdup /home/j/skel /home/js/mail
# cpdup /home/j/skel /home/js/wwwIn this phase, the jails are built and prepared to run. First, mount the required file systems for each jail, and then start them:
# mount -a
# service jail startThe jails should be running now. To check if they have started correctly, use jls. Its output should be similar to the following:
# jls
JID IP Address Hostname Path
3 192.168.3.17 ns.example.org /home/j/ns
2 192.168.3.18 mail.example.org /home/j/mail
1 62.123.43.14 www.example.org /home/j/wwwAt this point, it should be possible to log onto each jail, add new users, or configure daemons. The JID column indicates the jail identification number of each running jail. Use the following command to perform administrative tasks in the jail whose JID is 3:
# jexec 3 tcshThe design of this setup provides an easy way to upgrade existing jails while minimizing their downtime. Also, it provides a way to roll back to the older version should a problem occur.
The first step is to upgrade the host system. Then, create a new temporary read-only template in /home/j/mroot2.
# mkdir /home/j/mroot2
# cd /usr/src
# make installworld DESTDIR=/home/j/mroot2
# cd /home/j/mroot2
# cpdup /usr/src usr/src
# mkdir sThe installworld creates a few unnecessary directories, which should be removed:
# chflags -R 0 var
# rm -R etc var root usr/local tmpRecreate the read-write symlinks for the master file system:
# ln -s s/etc etc
# ln -s s/root root
# ln -s s/home home
# ln -s ../s/usr-local usr/local
# ln -s ../s/usr-X11R6 usr/X11R6
# ln -s s/tmp tmp
# ln -s s/var varNext, stop the jails:
# service jail stopUnmount the original file systems as the read-write systems are attached to the read-only system (/s):
# umount /home/j/ns/s
# umount /home/j/ns
# umount /home/j/mail/s
# umount /home/j/mail
# umount /home/j/www/s
# umount /home/j/wwwMove the old read-only file system and replace it with the new one. This will serve as a backup and archive of the old read-only file system should something go wrong. The naming convention used here corresponds to when a new read-only file system has been created. Move the original FreeBSD Ports Collection over to the new file system to save some space and inodes:
# cd /home/j
# mv mroot mroot.20060601
# mv mroot2 mroot
# mv mroot.20060601/usr/ports mroot/usrAt this point the new read-only template is ready, so the only remaining task is to remount the file systems and start the jails:
# mount -a
# service jail startUse jls to check if the jails started correctly. Run mergemaster in each jail to update the configuration files.
Creating and managing multiple jails can quickly become tedious and error-prone. Dirk Engling’s ezjail automates and greatly simplifies many jail tasks. A basejail is created as a template. Additional jails use mount_nullfs(8) to share many of the basejail directories without using additional disk space. Each additional jail takes only a few megabytes of disk space before applications are installed. Upgrading the copy of the userland in the basejail automatically upgrades all of the other jails.
Additional benefits and features are described in detail on the ezjail web site, https://erdgeist.org/arts/software/ezjail/.
Installing ezjail consists of adding a loopback interface for use in jails, installing the port or package, and enabling the service.
To keep jail loopback traffic off the host’s loopback network interface lo0, a second loopback interface is created by adding an entry to /etc/rc.conf:
cloned_interfaces="lo1"
The second loopback interface lo1 will be created when the system starts. It can also be created manually without a restart:
# service netif cloneup
Created clone interfaces: lo1.Jails can be allowed to use aliases of this secondary loopback interface without interfering with the host.
Inside a jail, access to the loopback address 127.0.0.1 is redirected to the first IP address assigned to the jail. To make the jail loopback correspond with the new lo1 interface, that interface must be specified first in the list of interfaces and IP addresses given when creating a new jail.
Give each jail a unique loopback address in the 127.0.0.0/8 netblock.
Install sysutils/ezjail:
# cd /usr/ports/sysutils/ezjail
# make install cleanEnable ezjail by adding this line to /etc/rc.conf:
ezjail_enable="YES"
The service will automatically start on system boot. It can be started immediately for the current session:
# service ezjail startWith ezjail installed, the basejail directory structure can be created and populated. This step is only needed once on the jail host computer.
In both of these examples, -p causes the ports tree to be retrieved with portsnap(8) into the basejail. That single copy of the ports directory will be shared by all the jails. Using a separate copy of the ports directory for jails isolates them from the host. The ezjailFAQ explains in more detail: http://erdgeist.org/arts/software/ezjail/#FAQ.
To Populate the Jail with FreeBSD-RELEASE
For a basejail based on the FreeBSD RELEASE matching that of the host computer, use install. For example, on a host computer running FreeBSD 10-STABLE, the latest RELEASE version of FreeBSD -10 will be installed in the jail):
# ezjail-admin install -pTo Populate the Jail with installworld
The basejail can be installed from binaries created by buildworld on the host with ezjail-admin update.
In this example, FreeBSD 10-STABLE has been built from source. The jail directories are created. Then installworld is executed, installing the host’s /usr/obj into the basejail.
# ezjail-admin update -i -pThe host’s /usr/src is used by default. A different source directory on the host can be specified with -s and a path, or set with ezjail_sourcetree in /usr/local/etc/ezjail.conf.
The basejail’s ports tree is shared by other jails. However, downloaded distfiles are stored in the jail that downloaded them. By default, these files are stored in /var/ports/distfiles within each jail. /var/ports inside each jail is also used as a work directory when building ports. |
The FTP protocol is used by default to download packages for the installation of the basejail. Firewall or proxy configurations can prevent or interfere with FTP transfers. The HTTP protocol works differently and avoids these problems. It can be chosen by specifying a full URL for a particular download mirror in /usr/local/etc/ezjail.conf: ezjail_ftphost=http://ftp.FreeBSD.org See FTP 站 for a list of sites. |
New jails are created with ezjail-admin create. In these examples, the lo1 loopback interface is used as described above.
Procedure: Create and Start a New Jail
Create the jail, specifying a name and the loopback and network interfaces to use, along with their IP addresses. In this example, the jail is named dnsjail.
# ezjail-admin create dnsjail 'lo1|127.0.1.1,em0|192.168.1.50'Most network services run in jails without problems. A few network services, most notably ping(8), use raw network sockets. In jails, raw network sockets are disabled by default for security. Services that require them will not work. Occasionally, a jail genuinely needs raw sockets. For example, network monitoring applications often use ping(8) to check the availability of other computers. When raw network sockets are actually needed in a jail, they can be enabled by editing the ezjail configuration file for the individual jail, /usr/local/etc/ezjail/jailname. Modify the export jail_jailname_parameters="allow.raw_sockets=1" Do not enable raw network sockets unless services in the jail actually require them. |
Start the jail:
# ezjail-admin start dnsjailUse a console on the jail:
# ezjail-admin console dnsjailThe jail is operating and additional configuration can be completed. Typical settings added at this point include:
Set the root Password
Connect to the jail and set the root user’s password:
# ezjail-admin console dnsjail
# passwd
Changing local password for root
New Password:
Retype New Password:Time Zone Configuration
The jail’s time zone can be set with tzsetup(8). To avoid spurious error messages, the adjkerntz(8) entry in /etc/crontab can be commented or removed. This job attempts to update the computer’s hardware clock with time zone changes, but jails are not allowed to access that hardware.
DNS Servers
Enter domain name server lines in /etc/resolv.conf so DNS works in the jail.
Edit /etc/hosts
Change the address and add the jail name to the localhost entries in /etc/hosts.
Configure /etc/rc.conf
Enter configuration settings in /etc/rc.conf. This is much like configuring a full computer. The host name and IP address are not set here. Those values are already provided by the jail configuration.
With the jail configured, the applications for which the jail was created can be installed.
Some ports must be built with special options to be used in a jail. For example, both of the network monitoring plugin packages net-mgmt/nagios-plugins and net-mgmt/monitoring-plugins have a |
Because the basejail’s copy of the userland is shared by the other jails, updating the basejail automatically updates all of the other jails. Either source or binary updates can be used.
To build the world from source on the host, then install it in the basejail, use:
# ezjail-admin update -bIf the world has already been compiled on the host, install it in the basejail with:
# ezjail-admin update -iBinary updates use freebsd-update(8). These updates have the same limitations as if freebsd-update(8) were being run directly. The most important one is that only -RELEASE versions of FreeBSD are available with this method.
Update the basejail to the latest patched release of the version of FreeBSD on the host. For example, updating from RELEASE-p1 to RELEASE-p2.
# ezjail-admin update -uTo upgrade the basejail to a new version, first upgrade the host system as described in 執行主要及次要版號升級. Once the host has been upgraded and rebooted, the basejail can then be upgraded. freebsd-update(8) has no way of determining which version is currently installed in the basejail, so the original version must be specified. Use file(1) to determine the original version in the basejail:
# file /usr/jails/basejail/bin/sh
/usr/jails/basejail/bin/sh: ELF 64-bit LSB executable, x86-64, version 1 (FreeBSD), dynamically linked (uses shared libs), for FreeBSD 9.3, strippedNow use this information to perform the upgrade from 9.3-RELEASE to the current version of the host system:
# ezjail-admin update -U -s 9.3-RELEASEAfter updating the basejail, mergemaster(8) must be run to update each jail’s configuration files.
How to use mergemaster(8) depends on the purpose and trustworthiness of a jail. If a jail’s services or users are not trusted, then mergemaster(8) should only be run from within that jail:
Delete the link from the jail’s /usr/src into the basejail and create a new /usr/src in the jail as a mountpoint. Mount the host computer’s /usr/src read-only on the jail’s new /usr/src mountpoint:
# rm /usr/jails/jailname/usr/src
# mkdir /usr/jails/jailname/usr/src
# mount -t nullfs -o ro /usr/src /usr/jails/jailname/usr/srcGet a console in the jail:
# ezjail-admin console jailnameInside the jail, run mergemaster. Then exit the jail console:
# cd /usr/src
# mergemaster -U
# exitFinally, unmount the jail’s /usr/src:
# umount /usr/jails/jailname/usr/srcIf the users and services in a jail are trusted, mergemaster(8) can be run from the host:
# mergemaster -U -D /usr/jails/jailnameThe ports tree in the basejail is shared by the other jails. Updating that copy of the ports tree gives the other jails the updated version also.
The basejail ports tree is updated with portsnap(8):
# ezjail-admin update -Pezjail automatically starts jails when the computer is started. Jails can be manually stopped and restarted with stop and start:
# ezjail-admin stop sambajail
Stopping jails: sambajail.By default, jails are started automatically when the host computer starts. Autostarting can be disabled with config:
# ezjail-admin config -r norun seldomjailThis takes effect the next time the host computer is started. A jail that is already running will not be stopped.
Enabling autostart is very similar:
# ezjail-admin config -r run oftenjailUse archive to create a .tar.gz archive of a jail. The file name is composed from the name of the jail and the current date. Archive files are written to the archive directory, /usr/jails/ezjail_archives. A different archive directory can be chosen by setting ezjail_archivedir in the configuration file.
The archive file can be copied elsewhere as a backup, or an existing jail can be restored from it with restore. A new jail can be created from the archive, providing a convenient way to clone existing jails.
Stop and archive a jail named wwwserver:
# ezjail-admin stop wwwserver
Stopping jails: wwwserver.
# ezjail-admin archive wwwserver
# ls /usr/jails/ezjail-archives/
wwwserver-201407271153.13.tar.gzCreate a new jail named wwwserver-clone from the archive created in the previous step. Use the em1 interface and assign a new IP address to avoid conflict with the original:
# ezjail-admin create -a /usr/jails/ezjail_archives/wwwserver-201407271153.13.tar.gz wwwserver-clone 'lo1|127.0.3.1,em1|192.168.1.51'Putting the BINDDNS server in a jail improves security by isolating it. This example creates a simple caching-only name server.
The jail will be called dns1.
The jail will use IP address 192.168.1.240 on the host’s re0 interface.
The upstream ISP’s DNS servers are at 10.0.0.62 and 10.0.0.61.
The basejail has already been created and a ports tree installed as shown in 初始設定.
Create a cloned loopback interface by adding a line to /etc/rc.conf:
cloned_interfaces="lo1"
Immediately create the new loopback interface:
# service netif cloneup
Created clone interfaces: lo1.Create the jail:
# ezjail-admin create dns1 'lo1|127.0.2.1,re0|192.168.1.240'Start the jail, connect to a console running on it, and perform some basic configuration:
# ezjail-admin start dns1
# ezjail-admin console dns1
# passwd
Changing local password for root
New Password:
Retype New Password:
# tzsetup
# sed -i .bak -e '/adjkerntz/ s/^/#/' /etc/crontab
# sed -i .bak -e 's/127.0.0.1/127.0.2.1/g; s/localhost.my.domain/dns1.my.domain dns1/' /etc/hostsTemporarily set the upstream DNS servers in /etc/resolv.conf so ports can be downloaded:
nameserver 10.0.0.62 nameserver 10.0.0.61
Still using the jail console, install dns/bind99.
# make -C /usr/ports/dns/bind99 install cleanConfigure the name server by editing /usr/local/etc/namedb/named.conf.
Create an Access Control List (ACL) of addresses and networks that are permitted to send DNS queries to this name server. This section is added just before the options section already in the file:
...
// or cause huge amounts of useless Internet traffic.
acl "trusted" {
192.168.1.0/24;
localhost;
localnets;
};
options {
...Use the jail IP address in the listen-on setting to accept DNS queries from other computers on the network:
listen-on { 192.168.1.240; };A simple caching-only DNS name server is created by changing the forwarders section. The original file contains:
/*
forwarders {
127.0.0.1;
};
*/Uncomment the section by removing the / and / lines. Enter the IP addresses of the upstream DNS servers. Immediately after the forwarders section, add references to the trusted ACL defined earlier:
forwarders {
10.0.0.62;
10.0.0.61;
};
allow-query { any; };
allow-recursion { trusted; };
allow-query-cache { trusted; };Enable the service in /etc/rc.conf:
named_enable="YES"
Start and test the name server:
# service named start
wrote key file "/usr/local/etc/namedb/rndc.key"
Starting named.
# /usr/local/bin/dig @192.168.1.240 freebsd.orgA response that includes
;; Got answer;shows that the new DNS server is working. A long delay followed by a response including
;; connection timed out; no servers could be reachedshows a problem. Check the configuration settings and make sure any local firewalls allow the new DNS access to the upstream DNS servers.
The new DNS server can use itself for local name resolution, just like other local computers. Set the address of the DNS server in the client computer’s /etc/resolv.conf:
nameserver 192.168.1.240
A local DHCP server can be configured to provide this address for a local DNS server, providing automatic configuration on DHCP clients.
FreeBSD supports security extensions based on the POSIX™.1e draft. These security mechanisms include file system Access Control Lists (存取控制清單) and Mandatory Access Control (MAC). MAC allows access control modules to be loaded in order to implement security policies. Some modules provide protections for a narrow subset of the system, hardening a particular service. Others provide comprehensive labeled security across all subjects and objects. The mandatory part of the definition indicates that enforcement of controls is performed by administrators and the operating system. This is in contrast to the default security mechanism of Discretionary Access Control (DAC) where enforcement is left to the discretion of users.
This chapter focuses on the MAC framework and the set of pluggable security policy modules FreeBSD provides for enabling various security mechanisms.
讀完這章,您將了解:
The terminology associated with the MAC framework.
The capabilities of MAC security policy modules as well as the difference between a labeled and non-labeled policy.
The considerations to take into account before configuring a system to use the MAC framework.
Which MAC security policy modules are included in FreeBSD and how to configure them.
How to implement a more secure environment using the MAC framework.
How to test the MAC configuration to ensure the framework has been properly implemented.
在開始閱讀這章之前,您需要:
了解 UNIX™ 及 FreeBSD 基礎 (FreeBSD 基礎)。
Have some familiarity with security and how it pertains to FreeBSD (安全性).
Improper MAC configuration may cause loss of system access, aggravation of users, or inability to access the features provided by Xorg. More importantly, MAC should not be relied upon to completely secure a system. The MAC framework only augments an existing security policy. Without sound security practices and regular security checks, the system will never be completely secure. The examples contained within this chapter are for demonstration purposes and the example settings should not be implemented on a production system. Implementing any security policy takes a good deal of understanding, proper design, and thorough testing. |
While this chapter covers a broad range of security issues relating to the MAC framework, the development of new MAC security policy modules will not be covered. A number of security policy modules included with the MAC framework have specific characteristics which are provided for both testing and new module development. Refer to mac_test(4), mac_stub(4) and mac_none(4) for more information on these security policy modules and the various mechanisms they provide.
The following key terms are used when referring to the MAC framework:
compartment: a set of programs and data to be partitioned or separated, where users are given explicit access to specific component of a system. A compartment represents a grouping, such as a work group, department, project, or topic. Compartments make it possible to implement a need-to-know-basis security policy.
integrity: the level of trust which can be placed on data. As the integrity of the data is elevated, so does the ability to trust that data.
level: the increased or decreased setting of a security attribute. As the level increases, its security is considered to elevate as well.
label: a security attribute which can be applied to files, directories, or other items in the system. It could be considered a confidentiality stamp. When a label is placed on a file, it describes the security properties of that file and will only permit access by files, users, and resources with a similar security setting. The meaning and interpretation of label values depends on the policy configuration. Some policies treat a label as representing the integrity or secrecy of an object while other policies might use labels to hold rules for access.
multilabel: this property is a file system option which can be set in single-user mode using tunefs(8), during boot using fstab(5), or during the creation of a new file system. This option permits an administrator to apply different MAC labels on different objects. This option only applies to security policy modules which support labeling.
single label: a policy where the entire file system uses one label to enforce access control over the flow of data. Whenever multilabel is not set, all files will conform to the same label setting.
object: an entity through which information flows under the direction of a subject. This includes directories, files, fields, screens, keyboards, memory, magnetic storage, printers or any other data storage or moving device. An object is a data container or a system resource. Access to an object effectively means access to its data.
subject: any active entity that causes information to flow between objects such as a user, user process, or system process. On FreeBSD, this is almost always a thread acting in a process on behalf of a user.
policy: a collection of rules which defines how objectives are to be achieved. A policy usually documents how certain items are to be handled. This chapter considers a policy to be a collection of rules which controls the flow of data and information and defines who has access to that data and information.
high-watermark: this type of policy permits the raising of security levels for the purpose of accessing higher level information. In most cases, the original level is restored after the process is complete. Currently, the FreeBSD MAC framework does not include this type of policy.
low-watermark: this type of policy permits lowering security levels for the purpose of accessing information which is less secure. In most cases, the original security level of the user is restored after the process is complete. The only security policy module in FreeBSD to use this is mac_lomac(4).
sensitivity: usually used when discussing Multilevel Security (MLS). A sensitivity level describes how important or secret the data should be. As the sensitivity level increases, so does the importance of the secrecy, or confidentiality, of the data.
A MAC label is a security attribute which may be applied to subjects and objects throughout the system. When setting a label, the administrator must understand its implications in order to prevent unexpected or undesired behavior of the system. The attributes available on an object depend on the loaded policy module, as policy modules interpret their attributes in different ways.
The security label on an object is used as a part of a security access control decision by a policy. With some policies, the label contains all of the information necessary to make a decision. In other policies, the labels may be processed as part of a larger rule set.
There are two types of label policies: single label and multi label. By default, the system will use single label. The administrator should be aware of the pros and cons of each in order to implement policies which meet the requirements of the system’s security model.
A single label security policy only permits one label to be used for every subject or object. Since a single label policy enforces one set of access permissions across the entire system, it provides lower administration overhead, but decreases the flexibility of policies which support labeling. However, in many environments, a single label policy may be all that is required.
A single label policy is somewhat similar to DAC as root configures the policies so that users are placed in the appropriate categories and access levels. A notable difference is that many policy modules can also restrict root. Basic control over objects will then be released to the group, but root may revoke or modify the settings at any time.
When appropriate, a multi label policy can be set on a UFS file system by passing multilabel to tunefs(8). A multi label policy permits each subject or object to have its own independent MAC label. The decision to use a multi label or single label policy is only required for policies which implement the labeling feature, such as biba, lomac, and mls. Some policies, such as seeotheruids, portacl and partition, do not use labels at all.
Using a multi label policy on a partition and establishing a multi label security model can increase administrative overhead as everything in that file system has a label. This includes directories, files, and even device nodes.
The following command will set multilabel on the specified UFS file system. This may only be done in single-user mode and is not a requirement for the swap file system:
# tunefs -l enable /Some users have experienced problems with setting the |
Since the multi label policy is set on a per-file system basis, a multi label policy may not be needed if the file system layout is well designed. Consider an example security MAC model for a FreeBSD web server. This machine uses the single label, biba/high, for everything in the default file systems. If the web server needs to run at biba/low to prevent write up capabilities, it could be installed to a separate UFS /usr/local file system set at biba/low.
Virtually all aspects of label policy module configuration will be performed using the base system utilities. These commands provide a simple interface for object or subject configuration or the manipulation and verification of the configuration.
All configuration may be done using setfmac, which is used to set MAC labels on system objects, and setpmac, which is used to set the labels on system subjects. For example, to set the biba MAC label to high on test:
# setfmac biba/high testIf the configuration is successful, the prompt will be returned without error. A common error is Permission denied which usually occurs when the label is being set or modified on a restricted object. Other conditions may produce different failures. For instance, the file may not be owned by the user attempting to relabel the object, the object may not exist, or the object may be read-only. A mandatory policy will not allow the process to relabel the file, maybe because of a property of the file, a property of the process, or a property of the proposed new label value. For example, if a user running at low integrity tries to change the label of a high integrity file, or a user running at low integrity tries to change the label of a low integrity file to a high integrity label, these operations will fail.
The system administrator may use setpmac to override the policy module’s settings by assigning a different label to the invoked process:
# setfmac biba/high test
Permission denied
# setpmac biba/low setfmac biba/high test
# getfmac test
test: biba/highFor currently running processes, such as sendmail, getpmac is usually used instead. This command takes a process ID (PID) in place of a command name. If users attempt to manipulate a file not in their access, subject to the rules of the loaded policy modules, the Operation not permitted error will be displayed.
A few FreeBSD policy modules which support the labeling feature offer three predefined labels: low, equal, and high, where:
low is considered the lowest label setting an object or subject may have. Setting this on objects or subjects blocks their access to objects or subjects marked high.
equal sets the subject or object to be disabled or unaffected and should only be placed on objects considered to be exempt from the policy.
high grants an object or subject the highest setting available in the Biba and MLS policy modules.
Such policy modules include mac_biba(4), mac_mls(4) and mac_lomac(4). Each of the predefined labels establishes a different information flow directive. Refer to the manual page of the module to determine the traits of the generic label configurations.
The Biba and MLS policy modules support a numeric label which may be set to indicate the precise level of hierarchical control. This numeric level is used to partition or sort information into different groups of classification, only permitting access to that group or a higher group level. For example:
biba/10:2+3+6(5:2+3-20:2+3+4+5+6)
may be interpreted as "Biba Policy Label/Grade 10:Compartments 2, 3 and 6: (grade 5 …")
In this example, the first grade would be considered the effective grade with effective compartments, the second grade is the low grade, and the last one is the high grade. In most configurations, such fine-grained settings are not needed as they are considered to be advanced configurations.
System objects only have a current grade and compartment. System subjects reflect the range of available rights in the system, and network interfaces, where they are used for access control.
The grade and compartments in a subject and object pair are used to construct a relationship known as dominance, in which a subject dominates an object, the object dominates the subject, neither dominates the other, or both dominate each other. The "both dominate" case occurs when the two labels are equal. Due to the information flow nature of Biba, a user has rights to a set of compartments that might correspond to projects, but objects also have a set of compartments. Users may have to subset their rights using su or setpmac in order to access objects in a compartment from which they are not restricted.
Users are required to have labels so that their files and processes properly interact with the security policy defined on the system. This is configured in /etc/login.conf using login classes. Every policy module that uses labels will implement the user class setting.
To set the user class default label which will be enforced by MAC, add a label entry. An example label entry containing every policy module is displayed below. Note that in a real configuration, the administrator would never enable every policy module. It is recommended that the rest of this chapter be reviewed before any configuration is implemented.
default:\ :copyright=/etc/COPYRIGHT:\ :welcome=/etc/motd:\ :setenv=MAIL=/var/mail/$,BLOCKSIZE=K:\ :path=~/bin:/sbin:/bin:/usr/sbin:/usr/bin:/usr/local/sbin:/usr/local/bin:\ :manpath=/usr/shared/man /usr/local/man:\ :nologin=/usr/sbin/nologin:\ :cputime=1h30m:\ :datasize=8M:\ :vmemoryuse=100M:\ :stacksize=2M:\ :memorylocked=4M:\ :memoryuse=8M:\ :filesize=8M:\ :coredumpsize=8M:\ :openfiles=24:\ :maxproc=32:\ :priority=0:\ :requirehome:\ :passwordtime=91d:\ :umask=022:\ :ignoretime@:\ :label=partition/13,mls/5,biba/10(5-15),lomac/10[2]:
While users can not modify the default value, they may change their label after they login, subject to the constraints of the policy. The example above tells the Biba policy that a process’s minimum integrity is 5, its maximum is 15, and the default effective label is 10. The process will run at 10 until it chooses to change label, perhaps due to the user using setpmac, which will be constrained by Biba to the configured range.
After any change to login.conf, the login class capability database must be rebuilt using cap_mkdb.
Many sites have a large number of users requiring several different user classes. In depth planning is required as this can become difficult to manage.
Labels may be set on network interfaces to help control the flow of data across the network. Policies using network interface labels function in the same way that policies function with respect to objects. Users at high settings in Biba, for example, will not be permitted to access network interfaces with a label of low.
When setting the MAC label on network interfaces, maclabel may be passed to ifconfig:
# ifconfig bge0 maclabel biba/equalThis example will set the MAC label of biba/equal on the bge0 interface. When using a setting similar to biba/high(low-high), the entire label should be quoted to prevent an error from being returned.
Each policy module which supports labeling has a tunable which may be used to disable the MAC label on network interfaces. Setting the label to equal will have a similar effect. Review the output of sysctl, the policy manual pages, and the information in the rest of this chapter for more information on those tunables.
Before implementing any MAC policies, a planning phase is recommended. During the planning stages, an administrator should consider the implementation requirements and goals, such as:
How to classify information and resources available on the target systems.
Which information or resources to restrict access to along with the type of restrictions that should be applied.
Which MAC modules will be required to achieve this goal.
A trial run of the trusted system and its configuration should occur before a MAC implementation is used on production systems. Since different environments have different needs and requirements, establishing a complete security profile will decrease the need of changes once the system goes live.
Consider how the MAC framework augments the security of the system as a whole. The various security policy modules provided by the MAC framework could be used to protect the network and file systems or to block users from accessing certain ports and sockets. Perhaps the best use of the policy modules is to load several security policy modules at a time in order to provide a MLS environment. This approach differs from a hardening policy, which typically hardens elements of a system which are used only for specific purposes. The downside to MLS is increased administrative overhead.
The overhead is minimal when compared to the lasting effect of a framework which provides the ability to pick and choose which policies are required for a specific configuration and which keeps performance overhead down. The reduction of support for unneeded policies can increase the overall performance of the system as well as offer flexibility of choice. A good implementation would consider the overall security requirements and effectively implement the various security policy modules offered by the framework.
A system utilizing MAC guarantees that a user will not be permitted to change security attributes at will. All user utilities, programs, and scripts must work within the constraints of the access rules provided by the selected security policy modules and control of the MAC access rules is in the hands of the system administrator.
It is the duty of the system administrator to carefully select the correct security policy modules. For an environment that needs to limit access control over the network, the mac_portacl(4), mac_ifoff(4), and mac_biba(4) policy modules make good starting points. For an environment where strict confidentiality of file system objects is required, consider the mac_bsdextended(4) and mac_mls(4) policy modules.
Policy decisions could be made based on network configuration. If only certain users should be permitted access to ssh(1), the mac_portacl(4) policy module is a good choice. In the case of file systems, access to objects might be considered confidential to some users, but not to others. As an example, a large development team might be broken off into smaller projects where developers in project A might not be permitted to access objects written by developers in project B. Yet both projects might need to access objects created by developers in project C. Using the different security policy modules provided by the MAC framework, users could be divided into these groups and then given access to the appropriate objects.
Each security policy module has a unique way of dealing with the overall security of a system. Module selection should be based on a well thought out security policy which may require revision and reimplementation. Understanding the different security policy modules offered by the MAC framework will help administrators choose the best policies for their situations.
The rest of this chapter covers the available modules, describes their use and configuration, and in some cases, provides insight on applicable situations.
Implementing MAC is much like implementing a firewall since care must be taken to prevent being completely locked out of the system. The ability to revert back to a previous configuration should be considered and the implementation of MAC over a remote connection should be done with extreme caution. |
The default FreeBSD kernel includes options MAC. This means that every module included with the MAC framework can be loaded with kldload as a run-time kernel module. After testing the module, add the module name to /boot/loader.conf so that it will load during boot. Each module also provides a kernel option for those administrators who choose to compile their own custom kernel.
FreeBSD includes a group of policies that will cover most security requirements. Each policy is summarized below. The last three policies support integer settings in place of the three default labels.
Module name: mac_seeotheruids.ko
Kernel configuration line: options MAC_SEEOTHERUIDS
Boot option: mac_seeotheruids_load="YES"
The mac_seeotheruids(4) module extends the security.bsd.see_other_uids and security.bsd.see_other_gids sysctl tunables. This option does not require any labels to be set before configuration and can operate transparently with other modules.
After loading the module, the following sysctl tunables may be used to control its features:
security.mac.seeotheruids.enabled enables the module and implements the default settings which deny users the ability to view processes and sockets owned by other users.
security.mac.seeotheruids.specificgid_enabled allows specified groups to be exempt from this policy. To exempt specific groups, use the security.mac.seeotheruids.specificgid=XXX sysctl tunable, replacing XXX with the numeric group ID to be exempted.
security.mac.seeotheruids.primarygroup_enabled is used to exempt specific primary groups from this policy. When using this tunable, security.mac.seeotheruids.specificgid_enabled may not be set.
Module name: mac_bsdextended.ko
Kernel configuration line: options MAC_BSDEXTENDED
Boot option: mac_bsdextended_load="YES"
The mac_bsdextended(4) module enforces a file system firewall. It provides an extension to the standard file system permissions model, permitting an administrator to create a firewall-like ruleset to protect files, utilities, and directories in the file system hierarchy. When access to a file system object is attempted, the list of rules is iterated until either a matching rule is located or the end is reached. This behavior may be changed using security.mac.bsdextended.firstmatch_enabled. Similar to other firewall modules in FreeBSD, a file containing the access control rules can be created and read by the system at boot time using an rc.conf(5) variable.
The rule list may be entered using ugidfw(8) which has a syntax similar to ipfw(8). More tools can be written by using the functions in the libugidfw(3) library.
After the mac_bsdextended(4) module has been loaded, the following command may be used to list the current rule configuration:
# ugidfw list
0 slots, 0 rulesBy default, no rules are defined and everything is completely accessible. To create a rule which blocks all access by users but leaves root unaffected:
# ugidfw add subject not uid root new object not uid root mode nWhile this rule is simple to implement, it is a very bad idea as it blocks all users from issuing any commands. A more realistic example blocks user1 all access, including directory listings, to user2's home directory:
# ugidfw set 2 subject uid user1 object uid user2 mode n
# ugidfw set 3 subject uid user1 object gid user2 mode nInstead of user1, not uid user2 could be used in order to enforce the same access restrictions for all users. However, the root user is unaffected by these rules.
Extreme caution should be taken when working with this module as incorrect use could block access to certain parts of the file system. |
Module name: mac_ifoff.ko
Kernel configuration line: options MAC_IFOFF
Boot option: mac_ifoff_load="YES"
The mac_ifoff(4) module is used to disable network interfaces on the fly and to keep network interfaces from being brought up during system boot. It does not use labels and does not depend on any other MAC modules.
Most of this module’s control is performed through these sysctl tunables:
One of the most common uses of mac_ifoff(4) is network monitoring in an environment where network traffic should not be permitted during the boot sequence. Another use would be to write a script which uses an application such as security/aide to automatically block network traffic if it finds new or altered files in protected directories.
Module name: mac_portacl.ko
Kernel configuration line: MAC_PORTACL
Boot option: mac_portacl_load="YES"
The mac_portacl(4) module is used to limit binding to local TCP and UDP ports, making it possible to allow non-root users to bind to specified privileged ports below 1024.
Once loaded, this module enables the MAC policy on all sockets. The following tunables are available:
security.mac.portacl.enabled enables or disables the policy completely.
security.mac.portacl.port_high sets the highest port number that mac_portacl(4) protects.
security.mac.portacl.suser_exempt, when set to a non-zero value, exempts the root user from this policy.
security.mac.portacl.rules specifies the policy as a text string of the form rule[,rule,…], with as many rules as needed, and where each rule is of the form idtype:id:protocol:port. The idtype is either uid or gid. The protocol parameter can be tcp or udp. The port parameter is the port number to allow the specified user or group to bind to. Only numeric values can be used for the user ID, group ID, and port parameters.
By default, ports below 1024 can only be used by privileged processes which run as root. For mac_portacl(4) to allow non-privileged processes to bind to ports below 1024, set the following tunables as follows:
# sysctl security.mac.portacl.port_high=1023
# sysctl net.inet.ip.portrange.reservedlow=0
# sysctl net.inet.ip.portrange.reservedhigh=0To prevent the root user from being affected by this policy, set security.mac.portacl.suser_exempt to a non-zero value.
# sysctl security.mac.portacl.suser_exempt=1To allow the www user with UID 80 to bind to port 80 without ever needing root privilege:
# sysctl security.mac.portacl.rules=uid:80:tcp:80This next example permits the user with the UID of 1001 to bind to TCP ports 110 (POP3) and 995 (POP3s):
# sysctl security.mac.portacl.rules=uid:1001:tcp:110,uid:1001:tcp:995Module name: mac_partition.ko
Kernel configuration line: options MAC_PARTITION
Boot option: mac_partition_load="YES"
The mac_partition(4) policy drops processes into specific "partitions" based on their MAC label. Most configuration for this policy is done using setpmac(8). One sysctl tunable is available for this policy:
security.mac.partition.enabled enables the enforcement of MAC process partitions.
When this policy is enabled, users will only be permitted to see their processes, and any others within their partition, but will not be permitted to work with utilities outside the scope of this partition. For instance, a user in the insecure class will not be permitted to access top as well as many other commands that must spawn a process.
This example adds top to the label set on users in the insecure class. All processes spawned by users in the insecure class will stay in the partition/13 label.
# setpmac partition/13 topThis command displays the partition label and the process list:
# ps ZaxThis command displays another user’s process partition label and that user’s currently running processes:
# ps -ZU trhodesUsers can see processes in |
Module name: mac_mls.ko
Kernel configuration line: options MAC_MLS
Boot option: mac_mls_load="YES"
The mac_mls(4) policy controls access between subjects and objects in the system by enforcing a strict information flow policy.
In MLS environments, a "clearance" level is set in the label of each subject or object, along with compartments. Since these clearance levels can reach numbers greater than several thousand, it would be a daunting task to thoroughly configure every subject or object. To ease this administrative overhead, three labels are included in this policy: mls/low, mls/equal, and mls/high, where:
Anything labeled with mls/low will have a low clearance level and not be permitted to access information of a higher level. This label also prevents objects of a higher clearance level from writing or passing information to a lower level.
mls/equal should be placed on objects which should be exempt from the policy.
mls/high is the highest level of clearance possible. Objects assigned this label will hold dominance over all other objects in the system; however, they will not permit the leaking of information to objects of a lower class.
MLS provides:
A hierarchical security level with a set of non-hierarchical categories.
Fixed rules of no read up, no write down. This means that a subject can have read access to objects on its own level or below, but not above. Similarly, a subject can have write access to objects on its own level or above, but not beneath.
Secrecy, or the prevention of inappropriate disclosure of data.
A basis for the design of systems that concurrently handle data at multiple sensitivity levels without leaking information between secret and confidential.
The following sysctl tunables are available:
security.mac.mls.enabled is used to enable or disable the MLS policy.
security.mac.mls.ptys_equal labels all pty(4) devices as mls/equal during creation.
security.mac.mls.revocation_enabled revokes access to objects after their label changes to a label of a lower grade.
security.mac.mls.max_compartments sets the maximum number of compartment levels allowed on a system.
To manipulate MLS labels, use setfmac(8). To assign a label to an object:
# setfmac mls/5 testTo get the MLS label for the file test:
# getfmac testAnother approach is to create a master policy file in /etc/ which specifies the MLS policy information and to feed that file to setfmac.
When using the MLS policy module, an administrator plans to control the flow of sensitive information. The default block read up block write down sets everything to a low state. Everything is accessible and an administrator slowly augments the confidentiality of the information.
Beyond the three basic label options, an administrator may group users and groups as required to block the information flow between them. It might be easier to look at the information in clearance levels using descriptive words, such as classifications of Confidential, Secret, and Top Secret. Some administrators instead create different groups based on project levels. Regardless of the classification method, a well thought out plan must exist before implementing a restrictive policy.
Some example situations for the MLS policy module include an e-commerce web server, a file server holding critical company information, and financial institution environments.
Module name: mac_biba.ko
Kernel configuration line: options MAC_BIBA
Boot option: mac_biba_load="YES"
The mac_biba(4) module loads the MAC Biba policy. This policy is similar to the MLS policy with the exception that the rules for information flow are slightly reversed. This is to prevent the downward flow of sensitive information whereas the MLS policy prevents the upward flow of sensitive information.
In Biba environments, an "integrity" label is set on each subject or object. These labels are made up of hierarchical grades and non-hierarchical components. As a grade ascends, so does its integrity.
Supported labels are biba/low, biba/equal, and biba/high, where:
biba/low is considered the lowest integrity an object or subject may have. Setting this on objects or subjects blocks their write access to objects or subjects marked as biba/high, but will not prevent read access.
biba/equal should only be placed on objects considered to be exempt from the policy.
biba/high permits writing to objects set at a lower label, but does not permit reading that object. It is recommended that this label be placed on objects that affect the integrity of the entire system.
Biba provides:
Hierarchical integrity levels with a set of non-hierarchical integrity categories.
Fixed rules are no write up, no read down, the opposite of MLS. A subject can have write access to objects on its own level or below, but not above. Similarly, a subject can have read access to objects on its own level or above, but not below.
Integrity by preventing inappropriate modification of data.
Integrity levels instead of MLS sensitivity levels.
The following tunables can be used to manipulate the Biba policy:
security.mac.biba.enabled is used to enable or disable enforcement of the Biba policy on the target machine.
security.mac.biba.ptys_equal is used to disable the Biba policy on pty(4) devices.
security.mac.biba.revocation_enabled forces the revocation of access to objects if the label is changed to dominate the subject.
To access the Biba policy setting on system objects, use setfmac and getfmac:
# setfmac biba/low test
# getfmac test
test: biba/lowIntegrity, which is different from sensitivity, is used to guarantee that information is not manipulated by untrusted parties. This includes information passed between subjects and objects. It ensures that users will only be able to modify or access information they have been given explicit access to. The mac_biba(4) security policy module permits an administrator to configure which files and programs a user may see and invoke while assuring that the programs and files are trusted by the system for that user.
During the initial planning phase, an administrator must be prepared to partition users into grades, levels, and areas. The system will default to a high label once this policy module is enabled, and it is up to the administrator to configure the different grades and levels for users. Instead of using clearance levels, a good planning method could include topics. For instance, only allow developers modification access to the source code repository, source code compiler, and other development utilities. Other users would be grouped into other categories such as testers, designers, or end users and would only be permitted read access.
A lower integrity subject is unable to write to a higher integrity subject and a higher integrity subject cannot list or read a lower integrity object. Setting a label at the lowest possible grade could make it inaccessible to subjects. Some prospective environments for this security policy module would include a constrained web server, a development and test machine, and a source code repository. A less useful implementation would be a personal workstation, a machine used as a router, or a network firewall.
Module name: mac_lomac.ko
Kernel configuration line: options MAC_LOMAC
Boot option: mac_lomac_load="YES"
Unlike the MAC Biba policy, the mac_lomac(4) policy permits access to lower integrity objects only after decreasing the integrity level to not disrupt any integrity rules.
The Low-watermark integrity policy works almost identically to Biba, with the exception of using floating labels to support subject demotion via an auxiliary grade compartment. This secondary compartment takes the form [auxgrade]. When assigning a policy with an auxiliary grade, use the syntax lomac/10[2], where 2 is the auxiliary grade.
This policy relies on the ubiquitous labeling of all system objects with integrity labels, permitting subjects to read from low integrity objects and then downgrading the label on the subject to prevent future writes to high integrity objects using [auxgrade]. The policy may provide greater compatibility and require less initial configuration than Biba.
Like the Biba and MLS policies, setfmac and setpmac are used to place labels on system objects:
# setfmac /usr/home/trhodes lomac/high[low]
# getfmac /usr/home/trhodes lomac/high[low]The auxiliary grade low is a feature provided only by the MACLOMAC policy.
This example considers a relatively small storage system with fewer than fifty users. Users will have login capabilities and are permitted to store data and access resources.
For this scenario, the mac_bsdextended(4) and mac_seeotheruids(4) policy modules could co-exist and block access to system objects while hiding user processes.
Begin by adding the following line to /boot/loader.conf:
mac_seeotheruids_load="YES"
The mac_bsdextended(4) security policy module may be activated by adding this line to /etc/rc.conf:
ugidfw_enable="YES"
Default rules stored in /etc/rc.bsdextended will be loaded at system initialization. However, the default entries may need modification. Since this machine is expected only to service users, everything may be left commented out except the last two lines in order to force the loading of user owned system objects by default.
Add the required users to this machine and reboot. For testing purposes, try logging in as a different user across two consoles. Run ps aux to see if processes of other users are visible. Verify that running ls(1) on another user’s home directory fails.
Do not try to test with the root user unless the specific sysctl`s have been modified to block super user access.
When a new user is added, their mac_bsdextended(4) rule will not be in the ruleset list. To update the ruleset quickly, unload the security policy module and reload it again using kldunload(8) and kldload(8). |
This section demonstrates the steps that are needed to implement the Nagios network monitoring system in a MAC environment. This is meant as an example which still requires the administrator to test that the implemented policy meets the security requirements of the network before using in a production environment.
This example requires multilabel to be set on each file system. It also assumes that net-mgmt/nagios-plugins, net-mgmt/nagios, and www/apache22 are all installed, configured, and working correctly before attempting the integration into the MAC framework.
Begin the procedure by adding the following user class to /etc/login.conf:
insecure:\ :copyright=/etc/COPYRIGHT:\ :welcome=/etc/motd:\ :setenv=MAIL=/var/mail/$,BLOCKSIZE=K:\ :path=~/bin:/sbin:/bin:/usr/sbin:/usr/bin:/usr/local/sbin:/usr/local/bin :manpath=/usr/shared/man /usr/local/man:\ :nologin=/usr/sbin/nologin:\ :cputime=1h30m:\ :datasize=8M:\ :vmemoryuse=100M:\ :stacksize=2M:\ :memorylocked=4M:\ :memoryuse=8M:\ :filesize=8M:\ :coredumpsize=8M:\ :openfiles=24:\ :maxproc=32:\ :priority=0:\ :requirehome:\ :passwordtime=91d:\ :umask=022:\ :ignoretime@:\ :label=biba/10(10-10):
Then, add the following line to the default user class section:
:label=biba/high:
Save the edits and issue the following command to rebuild the database:
# cap_mkdb /etc/login.confSet the root user to the default class using:
# pw usermod root -L defaultAll user accounts that are not root will now require a login class. The login class is required, otherwise users will be refused access to common commands. The following sh script should do the trick:
# for x in `awk -F: '($3 >= 1001) && ($3 != 65534) { print $1 }' \
/etc/passwd`; do pw usermod $x -L default; done;Next, drop the nagios and www accounts into the insecure class:
# pw usermod nagios -L insecure
# pw usermod www -L insecureA contexts file should now be created as /etc/policy.contexts:
# This is the default BIBA policy for this system. # System: /var/run(/.*)? biba/equal /dev/(/.*)? biba/equal /var biba/equal /var/spool(/.*)? biba/equal /var/log(/.*)? biba/equal /tmp(/.*)? biba/equal /var/tmp(/.*)? biba/equal /var/spool/mqueue biba/equal /var/spool/clientmqueue biba/equal # For Nagios: /usr/local/etc/nagios(/.*)? biba/10 /var/spool/nagios(/.*)? biba/10 # For apache /usr/local/etc/apache(/.*)? biba/10
This policy enforces security by setting restrictions on the flow of information. In this specific configuration, users, including root, should never be allowed to access Nagios. Configuration files and processes that are a part of Nagios will be completely self contained or jailed.
This file will be read after running setfsmac on every file system. This example sets the policy on the root file system:
# setfsmac -ef /etc/policy.contexts /Next, add these edits to the main section of /etc/mac.conf:
default_labels file ?biba default_labels ifnet ?biba default_labels process ?biba default_labels socket ?biba
To finish the configuration, add the following lines to /boot/loader.conf:
mac_biba_load="YES" mac_seeotheruids_load="YES" security.mac.biba.trust_all_interfaces=1
And the following line to the network card configuration stored in /etc/rc.conf. If the primary network configuration is done via DHCP, this may need to be configured manually after every system boot:
maclabel biba/equal
First, ensure that the web server and Nagios will not be started on system initialization and reboot. Ensure that root cannot access any of the files in the Nagios configuration directory. If root can list the contents of /var/spool/nagios, something is wrong. Instead, a "permission denied" error should be returned.
If all seems well, Nagios, Apache, and Sendmail can now be started:
# cd /etc/mail && make stop && \
setpmac biba/equal make start && setpmac biba/10\(10-10\) apachectl start && \
setpmac biba/10\(10-10\) /usr/local/etc/rc.d/nagios.sh forcestartDouble check to ensure that everything is working properly. If not, check the log files for error messages. If needed, use sysctl(8) to disable the mac_biba(4) security policy module and try starting everything again as usual.
The To block this from happening, force the user into a range using login.conf(5). If setpmac(8) attempts to run a command outside of the compartment’s range, an error will be returned and the command will not be executed. In this case, set root to |
This section discusses common configuration errors and how to resolve them.
multilabel flag does not stay enabled on the root (/) partitionThe following steps may resolve this transient error:
Edit /etc/fstab and set the root partition to ro for read-only.
Reboot into single user mode.
Run tunefs -l enable on /.
Reboot the system.
Run mount -urw/ and change the ro back to rw in /etc/fstab and reboot the system again.
Double-check the output from mount to ensure that multilabel has been properly set on the root file system.
This could be caused by the MAC partition policy or by a mislabeling in one of the MAC labeling policies. To debug, try the following:
Check the error message. If the user is in the insecure class, the partition policy may be the culprit. Try setting the user’s class back to the default class and rebuild the database with cap_mkdb. If this does not alleviate the problem, go to step two.
Double-check that the label policies are set correctly for the user, Xorg, and the /dev entries.
If neither of these resolve the problem, send the error message and a description of the environment to the FreeBSD general questions mailing list.
_secure_path: unable to stat .login_conf error appearsThis error can appear when a user attempts to switch from the root user to another user in the system. This message usually occurs when the user has a higher label setting than that of the user they are attempting to become. For instance, if joe has a default label of biba/low and root has a label of biba/high, root cannot view joe's home directory. This will happen whether or not root has used su to become joe as the Biba integrity model will not permit root to view objects set at a lower integrity level.
rootWhen this occurs, whoami returns 0 and su returns who are you?.
This can happen if a labeling policy has been disabled by sysctl(8) or the policy module was unloaded. If the policy is disabled, the login capabilities database needs to be reconfigured. Double check /etc/login.conf to ensure that all label options have been removed and rebuild the database with cap_mkdb.
This may also happen if a policy restricts access to master.passwd. This is usually caused by an administrator altering the file under a label which conflicts with the general policy being used by the system. In these cases, the user information would be read by the system and access would be blocked as the file has inherited the new label. Disable the policy using sysctl(8) and everything should return to normal.
The FreeBSD operating system includes support for security event auditing. Event auditing supports reliable, fine-grained, and configurable logging of a variety of security-relevant system events, including logins, configuration changes, and file and network access. These log records can be invaluable for live system monitoring, intrusion detection, and postmortem analysis. FreeBSD implements Sun™'s published Basic Security Module (BSM) Application Programming Interface (API) and file format, and is interoperable with the Solaris™ and Mac OS™ X audit implementations.
This chapter focuses on the installation and configuration of event auditing. It explains audit policies and provides an example audit configuration.
讀完這章,您將了解:
What event auditing is and how it works.
How to configure event auditing on FreeBSD for users and processes.
How to review the audit trail using the audit reduction and review tools.
在開始閱讀這章之前,您需要:
了解 UNIX™ 及 FreeBSD 基礎 (FreeBSD 基礎)。
Be familiar with the basics of kernel configuration/compilation (設定 FreeBSD 核心).
Have some familiarity with security and how it pertains to FreeBSD (安全性).
The audit facility has some known limitations. Not all security-relevant system events are auditable and some login mechanisms, such as Xorg-based display managers and third-party daemons, do not properly configure auditing for user login sessions. The security event auditing facility is able to generate very detailed logs of system activity. On a busy system, trail file data can be very large when configured for high detail, exceeding gigabytes a week in some configurations. Administrators should take into account the disk space requirements associated with high volume audit configurations. For example, it may be desirable to dedicate a file system to /var/audit so that other file systems are not affected if the audit file system becomes full. |
The following terms are related to security event auditing:
event: an auditable event is any event that can be logged using the audit subsystem. Examples of security-relevant events include the creation of a file, the building of a network connection, or a user logging in. Events are either "attributable", meaning that they can be traced to an authenticated user, or "non-attributable". Examples of non-attributable events are any events that occur before authentication in the login process, such as bad password attempts.
class: a named set of related events which are used in selection expressions. Commonly used classes of events include "file creation" (fc), "exec" (ex), and "login_logout" (lo).
record: an audit log entry describing a security event. Records contain a record event type, information on the subject (user) performing the action, date and time information, information on any objects or arguments, and a success or failure condition.
trail: a log file consisting of a series of audit records describing security events. Trails are in roughly chronological order with respect to the time events completed. Only authorized processes are allowed to commit records to the audit trail.
selection expression: a string containing a list of prefixes and audit event class names used to match events.
preselection: the process by which the system identifies which events are of interest to the administrator. The preselection configuration uses a series of selection expressions to identify which classes of events to audit for which users, as well as global settings that apply to both authenticated and unauthenticated processes.
reduction: the process by which records from existing audit trails are selected for preservation, printing, or analysis. Likewise, the process by which undesired audit records are removed from the audit trail. Using reduction, administrators can implement policies for the preservation of audit data. For example, detailed audit trails might be kept for one month, but after that, trails might be reduced in order to preserve only login information for archival purposes.
User space support for event auditing is installed as part of the base FreeBSD operating system. Kernel support is available in the GENERIC kernel by default, and auditd(8) can be enabled by adding the following line to /etc/rc.conf:
auditd_enable="YES"
Then, start the audit daemon:
# service auditd startUsers who prefer to compile a custom kernel must include the following line in their custom kernel configuration file:
options AUDIT
Selection expressions are used in a number of places in the audit configuration to determine which events should be audited. Expressions contain a list of event classes to match. Selection expressions are evaluated from left to right, and two expressions are combined by appending one onto the other.
預設稽查事件類別 summarizes the default audit event classes:
| 類別名稱 | 說明 | 動作 |
|---|---|---|
all | all | Match all event classes. |
aa | authentication and authorization | |
ad | administrative | Administrative actions performed on the system as a whole. |
ap | application | Application defined action. |
cl | file close | Audit calls to the |
ex | exec | Audit program execution. Auditing of command line arguments and environmental variables is controlled via audit_control(5) using the |
fa | file attribute access | Audit the access of object attributes such as stat(1) and pathconf(2). |
fc | file create | Audit events where a file is created as a result. |
fd | file delete | Audit events where file deletion occurs. |
fm | file attribute modify | Audit events where file attribute modification occurs, such as by chown(8), chflags(1), and flock(2). |
fr | file read | Audit events in which data is read or files are opened for reading. |
fw | file write | Audit events in which data is written or files are written or modified. |
io | ioctl | Audit use of the |
ip | ipc | Audit various forms of Inter-Process Communication, including POSIX pipes and System V IPC operations. |
lo | login_logout | |
na | non attributable | Audit non-attributable events. |
no | invalid class | Match no audit events. |
nt | network | Audit events related to network actions such as connect(2) and accept(2). |
ot | other | Audit miscellaneous events. |
pc | process |
These audit event classes may be customized by modifying the audit_class and audit_event configuration files.
Each audit event class may be combined with a prefix indicating whether successful/failed operations are matched, and whether the entry is adding or removing matching for the class and type. 稽查事件類別字首 summarizes the available prefixes:
| 字首 | 動作 |
|---|---|
+ | Audit successful events in this class. |
- | Audit failed events in this class. |
^ | Audit neither successful nor failed events in this class. |
^+ | Do not audit successful events in this class. |
^- | Do not audit failed events in this class. |
If no prefix is present, both successful and failed instances of the event will be audited.
The following example selection string selects both successful and failed login/logout events, but only successful execution events:
lo,+ex
The following configuration files for security event auditing are found in /etc/security:
audit_class: contains the definitions of the audit classes.
audit_control: controls aspects of the audit subsystem, such as default audit classes, minimum disk space to leave on the audit log volume, and maximum audit trail size.
audit_event: textual names and descriptions of system audit events and a list of which classes each event is in.
audit_user: user-specific audit requirements to be combined with the global defaults at login.
audit_warn: a customizable shell script used by auditd(8) to generate warning messages in exceptional situations, such as when space for audit records is running low or when the audit trail file has been rotated.
Audit configuration files should be edited and maintained carefully, as errors in configuration may result in improper logging of events. |
In most cases, administrators will only need to modify audit_control and audit_user. The first file controls system-wide audit properties and policies and the second file may be used to fine-tune auditing by user.
A number of defaults for the audit subsystem are specified in audit_control:
dir:/var/audit dist:off flags:lo,aa minfree:5 naflags:lo,aa policy:cnt,argv filesz:2M expire-after:10M
The dir entry is used to set one or more directories where audit logs will be stored. If more than one directory entry appears, they will be used in order as they fill. It is common to configure audit so that audit logs are stored on a dedicated file system, in order to prevent interference between the audit subsystem and other subsystems if the file system fills.
If the dist field is set to on or yes, hard links will be created to all trail files in /var/audit/dist.
The flags field sets the system-wide default preselection mask for attributable events. In the example above, successful and failed login/logout events as well as authentication and authorization are audited for all users.
The minfree entry defines the minimum percentage of free space for the file system where the audit trail is stored.
The naflags entry specifies audit classes to be audited for non-attributed events, such as the login/logout process and authentication and authorization.
The policy entry specifies a comma-separated list of policy flags controlling various aspects of audit behavior. The cnt indicates that the system should continue running despite an auditing failure (this flag is highly recommended). The other flag, argv, causes command line arguments to the execve(2) system call to be audited as part of command execution.
The filesz entry specifies the maximum size for an audit trail before automatically terminating and rotating the trail file. A value of 0 disables automatic log rotation. If the requested file size is below the minimum of 512k, it will be ignored and a log message will be generated.
The expire-after field specifies when audit log files will expire and be removed.
The administrator can specify further audit requirements for specific users in audit_user. Each line configures auditing for a user via two fields: the alwaysaudit field specifies a set of events that should always be audited for the user, and the neveraudit field specifies a set of events that should never be audited for the user.
The following example entries audit login/logout events and successful command execution for root and file creation and successful command execution for www. If used with the default audit_control, the lo entry for root is redundant, and login/logout events will also be audited for www.
root:lo,+ex:no www:fc,+ex:no
Since audit trails are stored in the BSM binary format, several built-in tools are available to modify or convert these trails to text. To convert trail files to a simple text format, use praudit. To reduce the audit trail file for analysis, archiving, or printing purposes, use auditreduce. This utility supports a variety of selection parameters, including event type, event class, user, date or time of the event, and the file path or object acted on.
For example, to dump the entire contents of a specified audit log in plain text:
# praudit /var/audit/AUDITFILEWhere AUDITFILE is the audit log to dump.
Audit trails consist of a series of audit records made up of tokens, which praudit prints sequentially, one per line. Each token is of a specific type, such as header (an audit record header) or path (a file path from a name lookup). The following is an example of an execve event:
header,133,10,execve(2),0,Mon Sep 25 15:58:03 2006, + 384 msec exec arg,finger,doug path,/usr/bin/finger attribute,555,root,wheel,90,24918,104944 subject,robert,root,wheel,root,wheel,38439,38032,42086,128.232.9.100 return,success,0 trailer,133
This audit represents a successful execve call, in which the command finger doug has been run. The exec arg token contains the processed command line presented by the shell to the kernel. The path token holds the path to the executable as looked up by the kernel. The attribute token describes the binary and includes the file mode. The subject token stores the audit user ID, effective user ID and group ID, real user ID and group ID, process ID, session ID, port ID, and login address. Notice that the audit user ID and real user ID differ as the user robert switched to the root account before running this command, but it is audited using the original authenticated user. The return token indicates the successful execution and the trailer concludes the record.
XML output format is also supported and can be selected by including -x.
Since audit logs may be very large, a subset of records can be selected using auditreduce. This example selects all audit records produced for the user trhodes stored in AUDITFILE:
# auditreduce -u trhodes /var/audit/AUDITFILE | prauditMembers of the audit group have permission to read audit trails in /var/audit. By default, this group is empty, so only the root user can read audit trails. Users may be added to the audit group in order to delegate audit review rights. As the ability to track audit log contents provides significant insight into the behavior of users and processes, it is recommended that the delegation of audit review rights be performed with caution.
Audit pipes are cloning pseudo-devices which allow applications to tap the live audit record stream. This is primarily of interest to authors of intrusion detection and system monitoring applications. However, the audit pipe device is a convenient way for the administrator to allow live monitoring without running into problems with audit trail file ownership or log rotation interrupting the event stream. To track the live audit event stream:
# praudit /dev/auditpipeBy default, audit pipe device nodes are accessible only to the root user. To make them accessible to the members of the audit group, add a devfs rule to /etc/devfs.rules:
add path 'auditpipe*' mode 0440 group audit
See devfs.rules(5) for more information on configuring the devfs file system.
It is easy to produce audit event feedback cycles, in which the viewing of each audit event results in the generation of more audit events. For example, if all network I/O is audited, and |
Audit trails are written to by the kernel and managed by the audit daemon, auditd(8). Administrators should not attempt to use newsyslog.conf(5) or other tools to directly rotate audit logs. Instead, audit should be used to shut down auditing, reconfigure the audit system, and perform log rotation. The following command causes the audit daemon to create a new audit log and signal the kernel to switch to using the new log. The old log will be terminated and renamed, at which point it may then be manipulated by the administrator:
# audit -nIf auditd(8) is not currently running, this command will fail and an error message will be produced.
Adding the following line to /etc/crontab will schedule this rotation every twelve hours:
0 */12 * * * root /usr/sbin/audit -n
The change will take effect once /etc/crontab is saved.
Automatic rotation of the audit trail file based on file size is possible using filesz in audit_control as described in The audit_control File.
As audit trail files can become very large, it is often desirable to compress or otherwise archive trails once they have been closed by the audit daemon. The audit_warn script can be used to perform customized operations for a variety of audit-related events, including the clean termination of audit trails when they are rotated. For example, the following may be added to /etc/security/audit_warn to compress audit trails on close:
#
# Compress audit trail files on close.
#
if [ "$1" = closefile ]; then
gzip -9 $2
fiOther archiving activities might include copying trail files to a centralized server, deleting old trail files, or reducing the audit trail to remove unneeded records. This script will be run only when audit trail files are cleanly terminated, so will not be run on trails left unterminated following an improper shutdown.
本章涵蓋如何在 FreeBSD 下使用磁碟及儲存媒體,這包含 SCSI 及 IDE 磁碟、CD 及 DVD 媒體、記憶體磁碟及 USB 儲存裝置。
讀完這章,您將了解:
如何在 FreeBSD 系統加入額外的硬碟。
如何在 FreeBSD 擴增磁碟分割區的大小。
如何設定 FreeBSD 使用 USB 儲存裝置。
如何在 FreeBSD 系統使用 CD 及 DVD 媒體。
如何使用在 FreeBSD 下可用的備份程式。
如何設定記憶體磁碟。
什麼是檔案系統快照 (Snapshot) 以及如何有效使用。
如何使用配額 (Quota) 來限制磁碟空間使用量。
如何加密磁碟及交換空間來防範攻擊者。
如何設定高可用性 (Highly available) 的儲存網路。
在開始閱讀這章之前,您需要:
了解如何 設定並安裝新的 FreeBSD 核心。
本節將說明如何加入新的 SATA 磁碟到目前只有一個磁碟的機器上。 首先要關閉電腦並依照電腦、控制器及磁碟製造商的操作指南將磁碟安裝到電腦。重新啟動系統並登入 root。
查看 /var/run/dmesg.boot 來確認已經找到新的磁碟。在本例中,會以 ada1 代表新加入的 SATA 磁碟。
在本例中,會在新的磁碟上建立單一大型分割區,使用 GPT 分割表格式而非較舊與通用性較差的 MBR 結構。
若新加入的磁碟不是空白的,可以使用 |
建立完分割表格式後接著加入一個分割區,要在新的磁碟增進效能可使用較大的硬體區塊大小 (Block size),此分割區會對齊 1 MB 的邊界:
# gpart create -s GPT ada1
# gpart add -t freebsd-ufs -a 1M ada1依據使用情況,也可以使用較小的分割區。請參考 gpart(8) 來取得建立較小分割區的選項。
磁碟分割區資訊可以使用 gpart show 檢視:
% gpart show ada1
=> 34 1465146988 ada1 GPT (699G)
34 2014 - free - (1.0M)
2048 1465143296 1 freebsd-ufs (699G)
1465145344 1678 - free - (839K)在新磁碟的新分割區上建立檔案系統:
# newfs -U /dev/ada1p1建立一個空的目錄做來做為掛載點 (mountpoint),一個在原有磁碟的檔案系統上可用來掛載新磁碟的位置:
# mkdir /newdisk最後,將磁碟項目加入到 /etc/fstab,讓啟動時會自動掛載新的磁碟:
/dev/ada1p1 /newdisk ufs rw 2 2
新的磁碟也可手動掛載,無須重新啟動系統:
# mount /newdisk磁碟的容量可以增加且不需要更動任何已存在的資料。這時常會用在虛擬機器,當虛擬磁碟太小且需要增加時。有時磁碟映像檔會被寫入到 USB 隨身碟,但卻沒有使用全部的容量。此節我們將說明如合重設大小或 擴增 磁碟內容來使用增加的容量。
要取得要重設大小的磁碟的代號可以查看 /var/run/dmesg.boot。在本例中,在系統上只有一個 SATA 磁碟,該磁碟會以 ada0 表示。
列出在磁碟上的分割區來查看目前的設定:
# gpart show ada0
=> 34 83886013 ada0 GPT (48G) [CORRUPT]
34 128 1 freebsd-boot (64k)
162 79691648 2 freebsd-ufs (38G)
79691810 4194236 3 freebsd-swap (2G)
83886046 1 - free - (512B)若磁碟已使用 GPT 分割表格式做格式化,可能會顯示為 "已損壞 (corrupted)" 因為 GPT 備份分割區已不存在於磁碟結尾。 使用 |
現在在磁碟上的額外空間已經可以被新的分割區使用,或者可以拿來擴充既有的分割區:
# gpart show ada0
=> 34 102399933 ada0 GPT (48G)
34 128 1 freebsd-boot (64k)
162 79691648 2 freebsd-ufs (38G)
79691810 4194236 3 freebsd-swap (2G)
83886046 18513921 - free - (8.8G)分割區只能在連續的未使用空間上重設大小。在這個例子中,磁碟上最後的分割區為交換 (Swap) 分割區,而第二個分割區才是需要重設大小的分割區。由於交換分割區中只會有暫存的資料,所以此時可以安全的卸載、刪除,然後在重設第二個分割區大小之後再重建最後一個分割區。
停用交換分割區:
# swapoff /dev/ada0p3刪除 ada0 磁碟上的第三個分割區,可使用 -i 參數來指定分割區。
# gpart delete -i 3 ada0
ada0p3 deleted
# gpart show ada0
=> 34 102399933 ada0 GPT (48G)
34 128 1 freebsd-boot (64k)
162 79691648 2 freebsd-ufs (38G)
79691810 22708157 - free - (10G)在掛載的檔案系統上修改分割區表可能會造成資料遺失。最好的方式是在未掛載檔案系統的情況下 (使用 Live CD-ROM 或 USB 裝置) 執行以下步驟。雖然如此,若仍要這樣做的話,在關閉 GEOM 安全性功能之後可以在掛載的檔案系統上修改分割區表: |
重設分割區大小並保留要用來重建交換分割區的空間,要重設大小的分割區可以用 -i 來指定,而要重設的大小可用 -s 來指定,若要對齊分割區可以使用 -a。這個動作只會修改分割區大小,分割區中的檔案系統需在另一個步驟擴增。
# gpart resize -i 2 -s 47G -a 4k ada0
ada0p2 resized
# gpart show ada0
=> 34 102399933 ada0 GPT (48G)
34 128 1 freebsd-boot (64k)
162 98566144 2 freebsd-ufs (47G)
98566306 3833661 - free - (1.8G)重建交換分割區並且啟動,若不使用 -s 指定大小則會使用所有剩餘的空間:
# gpart add -t freebsd-swap -a 4k ada0
ada0p3 added
# gpart show ada0
=> 34 102399933 ada0 GPT (48G)
34 128 1 freebsd-boot (64k)
162 98566144 2 freebsd-ufs (47G)
98566306 3833661 3 freebsd-swap (1.8G)
# swapon /dev/ada0p3擴增 UFS 檔案系統來使用重設分割區大小之後的新容量:
# growfs /dev/ada0p2
Device is mounted read-write; resizing will result in temporary write suspension for /.
It's strongly recommended to make a backup before growing the file system.
OK to grow file system on /dev/ada0p2, mounted on /, from 38GB to 47GB? [Yes/No] Yes
super-block backups (for fsck -b #) at:
80781312, 82063552, 83345792, 84628032, 85910272, 87192512, 88474752,
89756992, 91039232, 92321472, 93603712, 94885952, 96168192, 97450432若檔案系統使用 ZFS,重設大小需執行 online 子指令並使用 -e 來觸發動作:
# zpool online -e zroot /dev/ada0p2現在分割區與檔案系統已透過重設大小來使用新增加的磁碟空間。
許多外部儲存裝置的解決方案,例如硬碟、USB 隨身碟及 CD 與 DVD 燒錄機皆使用通用序列匯流排 (Universal Serial Bus, USB),FreeBSD 提供了對 USB 1.x, 2.0 及 3.0 裝置的支援。
部份硬體尚不相容 USB 3.0,包含 Haswell (Lynx point) 晶片組,若 FreeBSD 開機出現 |
對 USB 儲存裝置的支援已內建於 GENERIC 核心,若為自訂的核心,請確定在核心設定檔中有下列幾行設定:
device scbus # SCSI bus (required for ATA/SCSI) device da # Direct Access (disks) device pass # Passthrough device (direct ATA/SCSI access) device uhci # provides USB 1.x support device ohci # provides USB 1.x support device ehci # provides USB 2.0 support device xhci # provides USB 3.0 support device usb # USB Bus (required) device umass # Disks/Mass storage - Requires scbus and da device cd # needed for CD and DVD burners
FreeBSD 使用 umass(4) 驅動程式透過 SCSI 子系統來存取 USB 儲存裝置,因此任何在系統的 USB 裝置都會以 SCSI 裝置呈現,若 USB 裝置是 CD 或 DVD 燒錄機,請不要在自訂核心設定檔中引用 device atapicam。
本節後續的部份將示範如何檢查 FreeBSD 能夠辦識 USB 儲存裝置以及如何設定該裝置。
要測試 USB 設定,請先插入 USB 裝置,然後使用 dmesg 來確認系統訊息緩衝區中有出現該磁碟機,該訊息如下:
umass0: <STECH Simple Drive, class 0/0, rev 2.00/1.04, addr 3> on usbus0
umass0: SCSI over Bulk-Only; quirks = 0x0100
umass0:4:0:-1: Attached to scbus4
da0 at umass-sim0 bus 0 scbus4 target 0 lun 0
da0: <STECH Simple Drive 1.04> Fixed Direct Access SCSI-4 device
da0: Serial Number WD-WXE508CAN263
da0: 40.000MB/s transfers
da0: 152627MB (312581808 512 byte sectors: 255H 63S/T 19457C)
da0: quirks=0x2<NO_6_BYTE>不同的裝置會有不同的廠牌、裝置節點 (da0)、速度與大小。
當 USB 裝置可以做為 SCSI 檢視時,便可使用 camcontrol 來列出連接到系統的 USB 儲存裝置:
# camcontrol devlist
<STECH Simple Drive 1.04> at scbus4 target 0 lun 0 (pass3,da0)或者,可以使用 usbconfig 來列出裝置,請參考 usbconfig(8) 來取得更多有關此指令的資訊。
# usbconfig
ugen0.3: <Simple Drive STECH> at usbus0, cfg=0 md=HOST spd=HIGH (480Mbps) pwr=ON (2mA)要允許未被信任的使用者掛載任意媒體,可開啟 |
要讓裝置可讓一般使用者掛載,其中一個解決方案便是使用 pw(8) 讓所有裝置的使用者成為 operator 群組的成員。接著,將下列幾行加入 /etc/devfs.rules 來確保 operator 能夠讀取與寫入裝置:
[localrules=5] add path 'da*' mode 0660 group operator
若系統也同時安裝了內建 SCSI 磁碟,請更改第二行如下: add path 'da[3-9]*' mode 0660 group operator 這會從 |
接著,在 /etc/rc.conf 開啟規則:
devfs_system_ruleset="localrules"
然後,加入以下行到 /etc/sysctl.conf 指示系統允許正常使用者掛載檔案系統:
vfs.usermount=1
這樣只會在下次重新開機時生效,可使用 sysctl 來立即設定這個變數:
# sysctl vfs.usermount=1
vfs.usermount: 0 -> 1最後一個步驟是建立要掛載檔案系統要的目錄,要掛載檔案系統的使用者需要擁有這個目錄。其中一個辦法是讓 root 建立由該使用者擁有的子目錄 /mnt/username。在下面的例子,將 username 替換為該使用者的登入名稱並將 usergroup 替換為該使用者的主要群組:
# mkdir /mnt/username
# chown username:usergroup /mnt/username假如已經插入 USB 隨身碟,且已出現 /dev/da0s1 裝置。若裝置使用 FAT 格式的檔案系統,則使用者可使用以下指令掛載該檔案系統:
% mount -t msdosfs -o -m=644,-M=755 /dev/da0s1 /mnt/username在裝置可以被拔除前,必須先卸載:
% umount /mnt/username裝置移除之後,系統訊息緩衝區會顯示如下的訊息:
umass0: at uhub3, port 2, addr 3 (disconnected)
da0 at umass-sim0 bus 0 scbus4 target 0 lun 0
da0: <STECH Simple Drive 1.04> s/n WD-WXE508CAN263 detached
(da0:umass-sim0:0:0:0): Periph destroyed可以取消註解在 /etc/auto_master 中的下行來自動掛載 USB 裝置:
/media -media -nosuid然後加入這些行到 /etc/devd.conf:
notify 100 {
match "system" "GEOM";
match "subsystem" "DEV";
action "/usr/sbin/automount -c";
};# service automount restart
# service devd restart要設定讓 autofs(5) 在開機時啟動可以加入此行到 /etc/rc.conf:
autofs_enable="YES"
立即啟動服務:
# service automount start
# service automountd start
# service autounmountd start
# service devd start可以被自動掛載的檔案系統會在 /media/ 中以目錄呈現,會以檔案系統的標籤來命名目錄,若標籤遺失,則會以裝置節點命名。
檔案系統會在第一次存取時自動掛載,並在一段時間未使用後自動卸載。自動掛載的磁碟也可手動卸載:
# automount -fu這個機制一般會用在記憶卡與 USB 隨身碟,也可用在任何 Block 裝置,包含光碟機或 iSCSILUN。
Compact Disc (CD) media provide a number of features that differentiate them from conventional disks. They are designed so that they can be read continuously without delays to move the head between tracks. While CD media do have tracks, these refer to a section of data to be read continuously, and not a physical property of the disk. The ISO 9660 file system was designed to deal with these differences.
The FreeBSD Ports Collection provides several utilities for burning and duplicating audio and data CDs. This chapter demonstrates the use of several command line utilities. For CD burning software with a graphical utility, consider installing the sysutils/xcdroast or sysutils/k3b packages or ports.
The GENERIC kernel provides support for SCSI, USB, and ATAPICD readers and burners. If a custom kernel is used, the options that need to be present in the kernel configuration file vary by the type of device.
For a SCSI burner, make sure these options are present:
device scbus # SCSI bus (required for ATA/SCSI) device da # Direct Access (disks) device pass # Passthrough device (direct ATA/SCSI access) device cd # needed for CD and DVD burners
For a USB burner, make sure these options are present:
device scbus # SCSI bus (required for ATA/SCSI) device da # Direct Access (disks) device pass # Passthrough device (direct ATA/SCSI access) device cd # needed for CD and DVD burners device uhci # provides USB 1.x support device ohci # provides USB 1.x support device ehci # provides USB 2.0 support device xhci # provides USB 3.0 support device usb # USB Bus (required) device umass # Disks/Mass storage - Requires scbus and da
For an ATAPI burner, make sure these options are present:
device ata # Legacy ATA/SATA controllers device scbus # SCSI bus (required for ATA/SCSI) device pass # Passthrough device (direct ATA/SCSI access) device cd # needed for CD and DVD burners
On FreeBSD versions prior to 10.x, this line is also needed in the kernel configuration file if the burner is an ATAPI device: device atapicam Alternately, this driver can be loaded at boot time by adding the following line to /boot/loader.conf: atapicam_load="YES" This will require a reboot of the system as this driver can only be loaded at boot time. |
To verify that FreeBSD recognizes the device, run dmesg and look for an entry for the device. On systems prior to 10.x, the device name in the first line of the output will be acd0 instead of cd0.
% dmesg | grep cd
cd0 at ahcich1 bus 0 scbus1 target 0 lun 0
cd0: <HL-DT-ST DVDRAM GU70N LT20> Removable CD-ROM SCSI-0 device
cd0: Serial Number M3OD3S34152
cd0: 150.000MB/s transfers (SATA 1.x, UDMA6, ATAPI 12bytes, PIO 8192bytes)
cd0: Attempt to query device size failed: NOT READY, Medium not present - tray closedIn FreeBSD, cdrecord can be used to burn CDs. This command is installed with the sysutils/cdrtools package or port.
While cdrecord has many options, basic usage is simple. Specify the name of the ISO file to burn and, if the system has multiple burner devices, specify the name of the device to use:
# cdrecord dev=device imagefile.isoTo determine the device name of the burner, use -scanbus which might produce results like this:
# cdrecord -scanbus
ProDVD-ProBD-Clone 3.00 (amd64-unknown-freebsd10.0) Copyright (C) 1995-2010 Jörg Schilling
Using libscg version 'schily-0.9'
scsibus0:
0,0,0 0) 'SEAGATE ' 'ST39236LW ' '0004' Disk
0,1,0 1) 'SEAGATE ' 'ST39173W ' '5958' Disk
0,2,0 2) *
0,3,0 3) 'iomega ' 'jaz 1GB ' 'J.86' Removable Disk
0,4,0 4) 'NEC ' 'CD-ROM DRIVE:466' '1.26' Removable CD-ROM
0,5,0 5) *
0,6,0 6) *
0,7,0 7) *
scsibus1:
1,0,0 100) *
1,1,0 101) *
1,2,0 102) *
1,3,0 103) *
1,4,0 104) *
1,5,0 105) 'YAMAHA ' 'CRW4260 ' '1.0q' Removable CD-ROM
1,6,0 106) 'ARTEC ' 'AM12S ' '1.06' Scanner
1,7,0 107) *Locate the entry for the CD burner and use the three numbers separated by commas as the value for dev. In this case, the Yamaha burner device is 1,5,0, so the appropriate input to specify that device is dev=1,5,0. Refer to the manual page for cdrecord for other ways to specify this value and for information on writing audio tracks and controlling the write speed.
Alternately, run the following command to get the device address of the burner:
# camcontrol devlist
<MATSHITA CDRW/DVD UJDA740 1.00> at scbus1 target 0 lun 0 (cd0,pass0)Use the numeric values for scbus, target, and lun. For this example, 1,0,0 is the device name to use.
In order to produce a data CD, the data files that are going to make up the tracks on the CD must be prepared before they can be burned to the CD. In FreeBSD, sysutils/cdrtools installs mkisofs, which can be used to produce an ISO 9660 file system that is an image of a directory tree within a UNIX™ file system. The simplest usage is to specify the name of the ISO file to create and the path to the files to place into the ISO 9660 file system:
# mkisofs -o imagefile.iso /path/to/treeThis command maps the file names in the specified path to names that fit the limitations of the standard ISO 9660 file system, and will exclude files that do not meet the standard for ISO file systems.
A number of options are available to overcome the restrictions imposed by the standard. In particular, -R enables the Rock Ridge extensions common to UNIX™ systems and -J enables Joliet extensions used by Microsoft™ systems.
For CDs that are going to be used only on FreeBSD systems, -U can be used to disable all filename restrictions. When used with -R, it produces a file system image that is identical to the specified FreeBSD tree, even if it violates the ISO 9660 standard.
The last option of general use is -b. This is used to specify the location of a boot image for use in producing an "El Torito" bootable CD. This option takes an argument which is the path to a boot image from the top of the tree being written to the CD. By default, mkisofs creates an ISO image in "floppy disk emulation" mode, and thus expects the boot image to be exactly 1200, 1440 or 2880 KB in size. Some boot loaders, like the one used by the FreeBSD distribution media, do not use emulation mode. In this case, -no-emul-boot should be used. So, if /tmp/myboot holds a bootable FreeBSD system with the boot image in /tmp/myboot/boot/cdboot, this command would produce /tmp/bootable.iso:
# mkisofs -R -no-emul-boot -b boot/cdboot -o /tmp/bootable.iso /tmp/mybootThe resulting ISO image can be mounted as a memory disk with:
# mdconfig -a -t vnode -f /tmp/bootable.iso -u 0
# mount -t cd9660 /dev/md0 /mntOne can then verify that /mnt and /tmp/myboot are identical.
There are many other options available for mkisofs to fine-tune its behavior. Refer to mkisofs(8) for details.
It is possible to copy a data CD to an image file that is functionally equivalent to the image file created with The resulting image file can be burned to CD as described in 燒錄 CD. |
Once an ISO has been burned to a CD, it can be mounted by specifying the file system type, the name of the device containing the CD, and an existing mount point:
# mount -t cd9660 /dev/cd0 /mntSince mount assumes that a file system is of type ufs, a Incorrect super block error will occur if -t cd9660 is not included when mounting a data CD.
While any data CD can be mounted this way, disks with certain ISO 9660 extensions might behave oddly. For example, Joliet disks store all filenames in two-byte Unicode characters. If some non-English characters show up as question marks, specify the local charset with -C. For more information, refer to mount_cd9660(8).
In order to do this character conversion with the help of cd9660_iconv_load="YES" and then rebooting the machine, or by directly loading the module with |
Occasionally, Device not configured will be displayed when trying to mount a data CD. This usually means that the CD drive has not detected a disk in the tray, or that the drive is not visible on the bus. It can take a couple of seconds for a CD drive to detect media, so be patient.
Sometimes, a SCSICD drive may be missed because it did not have enough time to answer the bus reset. To resolve this, a custom kernel can be created which increases the default SCSI delay. Add the following option to the custom kernel configuration file and rebuild the kernel using the instructions in 編譯與安裝自訂核心:
options SCSI_DELAY=15000
This tells the SCSI bus to pause 15 seconds during boot, to give the CD drive every possible chance to answer the bus reset.
It is possible to burn a file directly to CD, without creating an ISO 9660 file system. This is known as burning a raw data CD and some people do this for backup purposes. This type of disk can not be mounted as a normal data CD. In order to retrieve the data burned to such a CD, the data must be read from the raw device node. For example, this command will extract a compressed tar file located on the second CD device into the current working directory: In order to mount a data CD, the data must be written using |
To duplicate an audio CD, extract the audio data from the CD to a series of files, then write these files to a blank CD.
Duplicating an Audio CD describes how to duplicate and burn an audio CD. If the FreeBSD version is less than 10.0 and the device is ATAPI, the atapicam module must be first loaded using the instructions in 支援的裝置.
Procedure: Duplicating an Audio CD
The sysutils/cdrtools package or port installs cdda2wav. This command can be used to extract all of the audio tracks, with each track written to a separate WAV file in the current working directory:
% cdda2wav -vall -B -OwavA device name does not need to be specified if there is only one CD device on the system. Refer to the cdda2wav manual page for instructions on how to specify a device and to learn more about the other options available for this command.
Use cdrecord to write the .wav files:
% cdrecord -v dev=2,0 -dao -useinfo *.wavMake sure that 2,0 is set appropriately, as described in 燒錄 CD.
Compared to the CD, the DVD is the next generation of optical media storage technology. The DVD can hold more data than any CD and is the standard for video publishing.
Five physical recordable formats can be defined for a recordable DVD:
DVD-R: This was the first DVD recordable format available. The DVD-R standard is defined by the DVD Forum. This format is write once.
DVD-RW: This is the rewritable version of the DVD-R standard. A DVD-RW can be rewritten about 1000 times.
DVD-RAM: This is a rewritable format which can be seen as a removable hard drive. However, this media is not compatible with most DVD-ROM drives and DVD-Video players as only a few DVD writers support the DVD-RAM format. Refer to 使用 DVD-RAM for more information on DVD-RAM use.
DVD+RW: This is a rewritable format defined by the DVD+RW Alliance. A DVD+RW can be rewritten about 1000 times.
DVD+R: This format is the write once variation of the DVD+RW format.
A single layer recordable DVD can hold up to 4,700,000,000 bytes which is actually 4.38 GB or 4485 MB as 1 kilobyte is 1024 bytes.
A distinction must be made between the physical media and the application. For example, a DVD-Video is a specific file layout that can be written on any recordable DVD physical media such as DVD-R, DVD+R, or DVD-RW. Before choosing the type of media, ensure that both the burner and the DVD-Video player are compatible with the media under consideration. |
To perform DVD recording, use growisofs(1). This command is part of the sysutils/dvd+rw-tools utilities which support all DVD media types.
These tools use the SCSI subsystem to access the devices, therefore ATAPI/CAM support must be loaded or statically compiled into the kernel. This support is not needed if the burner uses the USB interface. Refer to USB 儲存裝置 for more details on USB device configuration.
DMA access must also be enabled for ATAPI devices, by adding the following line to /boot/loader.conf:
hw.ata.atapi_dma="1"
Before attempting to use dvd+rw-tools, consult the Hardware Compatibility Notes.
For a graphical user interface, consider using sysutils/k3b which provides a user friendly interface to growisofs(1) and many other burning tools. |
Since growisofs(1) is a front-end to mkisofs, it will invoke mkisofs(8) to create the file system layout and perform the write on the DVD. This means that an image of the data does not need to be created before the burning process.
To burn to a DVD+R or a DVD-R the data in /path/to/data, use the following command:
# growisofs -dvd-compat -Z /dev/cd0 -J -R /path/to/dataIn this example, -J -R is passed to mkisofs(8) to create an ISO 9660 file system with Joliet and Rock Ridge extensions. Refer to mkisofs(8) for more details.
For the initial session recording, -Z is used for both single and multiple sessions. Replace /dev/cd0, with the name of the DVD device. Using -dvd-compat indicates that the disk will be closed and that the recording will be unappendable. This should also provide better media compatibility with DVD-ROM drives.
To burn a pre-mastered image, such as imagefile.iso, use:
# growisofs -dvd-compat -Z /dev/cd0=imagefile.isoThe write speed should be detected and automatically set according to the media and the drive being used. To force the write speed, use -speed=. Refer to growisofs(1) for example usage.
In order to support working files larger than 4.38GB, an UDF/ISO-9660 hybrid file system must be created by passing To create this type of ISO file: To burn files directly to a disk: When an ISO image already contains large files, no additional options are required for growisofs(1) to burn that image on a disk. Be sure to use an up-to-date version of sysutils/cdrtools, which contains mkisofs(8), as an older version may not contain large files support. If the latest version does not work, install sysutils/cdrtools-devel and read its mkisofs(8). |
A DVD-Video is a specific file layout based on the ISO 9660 and micro-UDF (M-UDF) specifications. Since DVD-Video presents a specific data structure hierarchy, a particular program such as multimedia/dvdauthor is needed to author the DVD.
If an image of the DVD-Video file system already exists, it can be burned in the same way as any other image. If dvdauthor was used to make the DVD and the result is in /path/to/video, the following command should be used to burn the DVD-Video:
# growisofs -Z /dev/cd0 -dvd-video /path/to/video-dvd-video is passed to mkisofs(8) to instruct it to create a DVD-Video file system layout. This option implies the -dvd-compat growisofs(1) option.
Unlike CD-RW, a virgin DVD+RW needs to be formatted before first use. It is recommended to let growisofs(1) take care of this automatically whenever appropriate. However, it is possible to use dvd+rw-format to format the DVD+RW:
# dvd+rw-format /dev/cd0Only perform this operation once and keep in mind that only virgin DVD+RW medias need to be formatted. Once formatted, the DVD+RW can be burned as usual.
To burn a totally new file system and not just append some data onto a DVD+RW, the media does not need to be blanked first. Instead, write over the previous recording like this:
# growisofs -Z /dev/cd0 -J -R /path/to/newdataThe DVD+RW format supports appending data to a previous recording. This operation consists of merging a new session to the existing one as it is not considered to be multi-session writing. growisofs(1) will grow the ISO 9660 file system present on the media.
For example, to append data to a DVD+RW, use the following:
# growisofs -M /dev/cd0 -J -R /path/to/nextdataThe same mkisofs(8) options used to burn the initial session should be used during next writes.
Use |
To blank the media, use:
# growisofs -Z /dev/cd0=/dev/zeroA DVD-RW accepts two disc formats: incremental sequential and restricted overwrite. By default, DVD-RW discs are in sequential format.
A virgin DVD-RW can be directly written without being formatted. However, a non-virgin DVD-RW in sequential format needs to be blanked before writing a new initial session.
To blank a DVD-RW in sequential mode:
# dvd+rw-format -blank=full /dev/cd0A full blanking using Since growisofs(1) automatically attempts to detect fast blanked media and engage DAO write, One should instead use restricted overwrite mode with any DVD-RW as this format is more flexible than the default of incremental sequential. |
To write data on a sequential DVD-RW, use the same instructions as for the other DVD formats:
# growisofs -Z /dev/cd0 -J -R /path/to/dataTo append some data to a previous recording, use -M with growisofs(1). However, if data is appended on a DVD-RW in incremental sequential mode, a new session will be created on the disc and the result will be a multi-session disc.
A DVD-RW in restricted overwrite format does not need to be blanked before a new initial session. Instead, overwrite the disc with -Z. It is also possible to grow an existing ISO 9660 file system written on the disc with -M. The result will be a one-session DVD.
To put a DVD-RW in restricted overwrite format, the following command must be used:
# dvd+rw-format /dev/cd0To change back to sequential format, use:
# dvd+rw-format -blank=full /dev/cd0Few DVD-ROM drives support multi-session DVDs and most of the time only read the first session. DVD+R, DVD-R and DVD-RW in sequential format can accept multiple sessions. The notion of multiple sessions does not exist for the DVD+RW and the DVD-RW restricted overwrite formats.
Using the following command after an initial non-closed session on a DVD+R, DVD-R, or DVD-RW in sequential format, will add a new session to the disc:
# growisofs -M /dev/cd0 -J -R /path/to/nextdataUsing this command with a DVD+RW or a DVD-RW in restricted overwrite mode will append data while merging the new session to the existing one. The result will be a single-session disc. Use this method to add data after an initial write on these types of media.
Since some space on the media is used between each session to mark the end and start of sessions, one should add sessions with a large amount of data to optimize media space. The number of sessions is limited to 154 for a DVD+R, about 2000 for a DVD-R, and 127 for a DVD+R Double Layer. |
To obtain more information about a DVD, use dvd+rw-mediainfo /dev/cd0 while the disc in the specified drive.
More information about dvd+rw-tools can be found in growisofs(1), on the dvd+rw-tools web site, and in the cdwrite mailing list archives.
When creating a problem report related to the use of dvd+rw-tools, always include the output of |
DVD-RAM writers can use either a SCSI or ATAPI interface. For ATAPI devices, DMA access has to be enabled by adding the following line to /boot/loader.conf:
hw.ata.atapi_dma="1"
A DVD-RAM can be seen as a removable hard drive. Like any other hard drive, the DVD-RAM must be formatted before it can be used. In this example, the whole disk space will be formatted with a standard UFS2 file system:
# dd if=/dev/zero of=/dev/acd0 bs=2k count=1
# bsdlabel -Bw acd0
# newfs /dev/acd0The DVD device, acd0, must be changed according to the configuration.
Once the DVD-RAM has been formatted, it can be mounted as a normal hard drive:
# mount /dev/acd0 /mntOnce mounted, the DVD-RAM will be both readable and writeable.
This section explains how to format a 3.5 inch floppy disk in FreeBSD.
Procedure: Steps to Format a Floppy
A floppy disk needs to be low-level formatted before it can be used. This is usually done by the vendor, but formatting is a good way to check media integrity. To low-level format the floppy disk on FreeBSD, use fdformat(1). When using this utility, make note of any error messages, as these can help determine if the disk is good or bad.
To format the floppy, insert a new 3.5 inch floppy disk into the first floppy drive and issue:
# /usr/sbin/fdformat -f 1440 /dev/fd0After low-level formatting the disk, create a disk label as it is needed by the system to determine the size of the disk and its geometry. The supported geometry values are listed in /etc/disktab.
To write the disk label, use bsdlabel(8):
# /sbin/bsdlabel -B -w /dev/fd0 fd1440The floppy is now ready to be high-level formatted with a file system. The floppy’s file system can be either UFS or FAT, where FAT is generally a better choice for floppies.
To format the floppy with FAT, issue:
# /sbin/newfs_msdos /dev/fd0The disk is now ready for use. To use the floppy, mount it with mount_msdosfs(8). One can also install and use emulators/mtools from the Ports Collection.
為了要能夠從磁碟故障、意外刪除文件、隨機文件損壞或完全機器毀壞,包含本地備份毀壞進行恢復,執行備份計劃是必要的。
備份的類型與排程會依情況有所不同,取決於資料的重要性、檔案還原所需的程度以及可接受的停機時間。一些可用來備份的技術有:
封存整個檔案系統,備份至永久、異地媒體。這可在以上所列的所有問題發生時提供保護,但要還原會較慢且不方便,特別是對於沒有權限的使用者。
檔案系統快照 (Snapshot),對於還原已刪除的檔案或先前版本的檔案非常有用。
整個檔案系統或磁碟的複本,使用排程的 net/rsync 來與網路上的另一個系統同步。
硬體或軟體 RAID,來最小化或避免當磁碟故障時的停機時間。
通常會混合使用各種備份技術,例如,建立一個排程每週自動做儲存於異地的完整系統備份,並使用每小時的 ZFS 快照來輔助備份。此外,在對檔案做編輯或刪除前手動備份各別目錄或檔案。
本章節會介紹一些可以用來在 FreeBSD 上建立與管理系統備份的工具。
要備份一個檔案系統,會用到 dump(8) 這個傳統 UNIX™ 程式來建立備份,並可使用 restore(8) 來還原備份。這兩個工具可在磁碟區塊的層級運作,這個層級比由檔案系統建立檔案、連結與目錄的抽象層級還要低,因此不像其他的備份軟體,dump 必須一次備份整個檔案系統,且無法只備份部份檔案系統或跨多個檔案系統的目錄樹,dump 會備份構成檔案與目錄的原始資料區塊,而非直接備份檔案與目錄。
在根目錄使用 |
還原資料時,restore 預設會儲存暫存檔案於 /tmp/,當使用一個 /tmp 較小的復原磁碟時,請設定 TMPDIR 到一個擁有較多可用空間的目錄以讓還原可以順利執行。
當使用 dump 時,請小心最早自 AT&T UNIX™,circa 1975 的版本 6 仍有一些問題存在,預設的參數會假設備份到一個 9 軌的磁帶,這並非其他類型的媒體或現今可用的高密度磁帶,必須另外在指令列修改這個預設值。
雖然可以使用 rdump(8) 與 rrestore(8) 工具可以跨網路備份一個檔案系統到另一個系統或備份到連結另一台電腦的磁帶機,但這使用兩個工具備份的安全性並不足夠。
可改以在較安全的 SSH 連線上使用 dump 與 restore。以下例子會建立一個完整、壓縮的 /usr 備份並透過 SSH 連線傳送備份檔案到指定的主機。
dump# /sbin/dump -0uan -f - /usr | gzip -2 | ssh -c blowfish \
targetuser@targetmachine.example.com dd of=/mybigfiles/dump-usr-l0.gz這個例子會設定 RSH,以便透過 SSH 連線寫入備份到遠端系統的磁帶機:
dump 透過 RSH 設定# env RSH=/usr/bin/ssh /sbin/dump -0uan -f targetuser@targetmachine.example.com:/dev/sa0 /usr系統已有內建數個工具可在需要時用來備份與還原指定的檔案與目錄。
要備份一個目錄中的所有檔案最好的選擇是 tar(1),這個工具最早可以追朔自 AT&T UNIX™ 版本 6 時,因此預設會做一個遞迴備份到一個磁帶機,可以使用參數來改指定備份檔案的名稱。
這個例子會建立目前目錄的壓縮備份並儲存至 /tmp/mybackup.tgz,在建立備份檔案時,要確認備份檔案不要儲存到與目前備份目錄相同的目錄。
tar 備份目前目錄# tar czvf /tmp/mybackup.tgz .要還原整個備份,先 cd 進入要放置還原檔的目錄並指定備份的名稱。注意,這個動作會覆寫任何在該還原目錄中任何較新版的檔案,當不確定時,可先還原到一個暫時的目錄或指定備份檔中的檔案做還原。
tar 還原目前目錄# tar xzvf /tmp/mybackup.tgz除此之外還有許多可用的參數在 tar(1) 中會有說明。本工具也支援使用排除模式 (Exclude pattern) 來指定那些檔案應該在備份指定目錄或自備份還原檔案時排除。
要使用指定的檔案與目錄清單做備份使用 cpio(1) 是不錯的選擇。它並不像 tar,cpio 並不知道如何走訪目錄樹,所以必須提供檔案的清單才能做備份。
例如,檔案的清單可以使用 ls 或 find 來產生。以下例子會建立一個目前目錄的遞迴清單然後轉送 (Piped) 給 cpio 來建立名稱為 /tmp/mybackup.cpio 的備份檔。
ls 與 cpio 來製作目前目錄的遞迴備份# ls -R | cpio -ovF /tmp/mybackup.cpio有一個備份工具嘗試整合 tar 與 cpio 所提供的功能,便是 pax(1)。經歷數年,各種版本的 tar 與 cpio 變的有一些無法相容。POSIX™ 開發出 pax,嘗試讀取與寫入各種版本的 cpio and tar 格式並加入自己的新格式。
以先前的例子改使用 pax 會是:
pax 備份目前目錄# pax -wf /tmp/mybackup.pax .隨著磁帶的技術持續發展,當今的備份系統將異地備份與本地可移除媒體做了結合。FreeBSD 支援任何使用 SCSI 的磁帶機,如 LTO 或 DAT,並有限制的支援 SATA 與 USB 磁帶機。
SCSI 磁帶機在 FreeBSD 會使用 sa(4) 驅動程式以及 /dev/sa0, /dev/nsa0 與 /dev/esa0 裝置,實體裝置名稱為 /dev/sa0,當使用 /dev/nsa0 時,備份程式在寫入檔案之後不會倒帶,這可允許寫入超過一個檔案到磁帶,而使用 /dev/esa0 時,當關閉裝置後便會退出磁帶。
在 FreeBSD 中會使用 mt 來做磁帶機的控制操作,例如在磁帶中搜尋檔案或寫入磁帶控制記號到磁帶。例如,要保留磁帶上的前三個檔案,可以在寫入新檔案前跳過這些檔案:
# mt -f /dev/nsa0 fsf 3這個工具尚支援許多操作,請參考 mt(1) 了解詳情。
要使用 tar 寫入單一檔案到磁帶,可指定磁帶裝置的名稱以及要備份的檔案:
# tar cvf /dev/sa0 file要從磁帶上的 tar 封存檔還原檔案到目前的目錄可:
# tar xvf /dev/sa0要備份一個 UFS 檔案系統可使用 dump。以下例子會備份 /usr 並在完成時不做倒帶:
# dump -0aL -b64 -f /dev/nsa0 /usr要以互動的方式從磁帶上的 dump 檔案還原到目前目錄:
# restore -i -f /dev/nsa0FreeBSD Port 套件集提供了許多第三方工具可用於排程建立備份,簡化磁帶備份並讓備份更簡單方便。許多這類的應用程式是以客戶端/伺服器為基礎,可用來自動化單一系統或網路上所有電腦的備份。
較熱門的工具包含 Amanda, Bacula, rsync 以及 duplicity。
除了正常的備份外,建議將下以步驟做為緊急準備計劃的一部份。
替以下指令的輸出建立一份可列印的複本:
gpart show
more /etc/fstab
dmesg
在安全的地方保存這份列印結果與安裝媒體的複本,在緊急還原時可能會需要,接著開機進入安裝媒體並選擇 Live CD 以存取救援 Shell (Rescue shell),這個救援模式可以用來檢視目前系統的狀態,若有需要,可重新格式化磁碟然後自備份還原資料。
FreeBSD/i386 11.2-RELEASE 的安裝媒體未內含救援 Shell,針對該版本,可改自 ftp://ftp.FreeBSD.org/pub/FreeBSD/releases/i386/ISO-IMAGES/11.2/FreeBSD-11.2-RELEASE-i386-livefs.iso 下載 Livefs CD 映像檔並燒錄。 |
然後,測試救援 Shell 下的備份。記錄下整個程序,將這份記錄隨媒體、列印結果、備份檔一併保存,這份記錄可以避免在緊張壓力下做緊急還原時因不慎造成備份的毀壞。
要再安全性一點,則可將最新的備份儲存在與實體電腦與磁碟機有一段明顯距離的遠端位置。
In addition to physical disks, FreeBSD also supports the creation and use of memory disks. One possible use for a memory disk is to access the contents of an ISO file system without the overhead of first burning it to a CD or DVD, then mounting the CD/DVD media.
In FreeBSD, the md(4) driver is used to provide support for memory disks. The GENERIC kernel includes this driver. When using a custom kernel configuration file, ensure it includes this line:
device md
To mount an existing file system image, use mdconfig to specify the name of the ISO file and a free unit number. Then, refer to that unit number to mount it on an existing mount point. Once mounted, the files in the ISO will appear in the mount point. This example attaches diskimage.iso to the memory device /dev/md0 then mounts that memory device on /mnt:
# mdconfig -f diskimage.iso -u 0
# mount -t cd9660 /dev/md0 /mntNotice that -t cd9660 was used to mount an ISO format. If a unit number is not specified with -u, mdconfig will automatically allocate an unused memory device and output the name of the allocated unit, such as md4. Refer to mdconfig(8) for more details about this command and its options.
When a memory disk is no longer in use, its resources should be released back to the system. First, unmount the file system, then use mdconfig to detach the disk from the system and release its resources. To continue this example:
# umount /mnt
# mdconfig -d -u 0To determine if any memory disks are still attached to the system, type mdconfig -l.
FreeBSD also supports memory disks where the storage to use is allocated from either a hard disk or an area of memory. The first method is commonly referred to as a file-backed file system and the second method as a memory-backed file system. Both types can be created using mdconfig.
To create a new memory-backed file system, specify a type of swap and the size of the memory disk to create. Then, format the memory disk with a file system and mount as usual. This example creates a 5M memory disk on unit 1. That memory disk is then formatted with the UFS file system before it is mounted:
# mdconfig -a -t swap -s 5m -u 1
# newfs -U md1
/dev/md1: 5.0MB (10240 sectors) block size 16384, fragment size 2048
using 4 cylinder groups of 1.27MB, 81 blks, 192 inodes.
with soft updates
super-block backups (for fsck -b #) at:
160, 2752, 5344, 7936
# mount /dev/md1 /mnt
# df /mnt
Filesystem 1K-blocks Used Avail Capacity Mounted on
/dev/md1 4718 4 4338 0% /mntTo create a new file-backed memory disk, first allocate an area of disk to use. This example creates an empty 5MB file named newimage:
# dd if=/dev/zero of=newimage bs=1k count=5k
5120+0 records in
5120+0 records outNext, attach that file to a memory disk, label the memory disk and format it with the UFS file system, mount the memory disk, and verify the size of the file-backed disk:
# mdconfig -f newimage -u 0
# bsdlabel -w md0 auto
# newfs -U md0a
/dev/md0a: 5.0MB (10224 sectors) block size 16384, fragment size 2048
using 4 cylinder groups of 1.25MB, 80 blks, 192 inodes.
super-block backups (for fsck -b #) at:
160, 2720, 5280, 7840
# mount /dev/md0a /mnt
# df /mnt
Filesystem 1K-blocks Used Avail Capacity Mounted on
/dev/md0a 4710 4 4330 0% /mntIt takes several commands to create a file- or memory-backed file system using mdconfig. FreeBSD also comes with mdmfs which automatically configures a memory disk, formats it with the UFS file system, and mounts it. For example, after creating newimage with dd, this one command is equivalent to running the bsdlabel, newfs, and mount commands shown above:
# mdmfs -F newimage -s 5m md0 /mntTo instead create a new memory-based memory disk with mdmfs, use this one command:
# mdmfs -s 5m md1 /mntIf the unit number is not specified, mdmfs will automatically select an unused memory device. For more details about mdmfs, refer to mdmfs(8).
FreeBSD offers a feature in conjunction with Soft Updates: file system snapshots.
UFS snapshots allow a user to create images of specified file systems, and treat them as a file. Snapshot files must be created in the file system that the action is performed on, and a user may create no more than 20 snapshots per file system. Active snapshots are recorded in the superblock so they are persistent across unmount and remount operations along with system reboots. When a snapshot is no longer required, it can be removed using rm(1). While snapshots may be removed in any order, all the used space may not be acquired because another snapshot will possibly claim some of the released blocks.
The un-alterable snapshot file flag is set by mksnap_ffs(8) after initial creation of a snapshot file. unlink(1) makes an exception for snapshot files since it allows them to be removed.
Snapshots are created using mount(8). To place a snapshot of /var in the file /var/snapshot/snap, use the following command:
# mount -u -o snapshot /var/snapshot/snap /varAlternatively, use mksnap_ffs(8) to create the snapshot:
# mksnap_ffs /var /var/snapshot/snapOne can find snapshot files on a file system, such as /var, using find(1):
# find /var -flags snapshotOnce a snapshot has been created, it has several uses:
Some administrators will use a snapshot file for backup purposes, because the snapshot can be transferred to CDs or tape.
The file system integrity checker, fsck(8), may be run on the snapshot. Assuming that the file system was clean when it was mounted, this should always provide a clean and unchanging result.
Running dump(8) on the snapshot will produce a dump file that is consistent with the file system and the timestamp of the snapshot. dump(8) can also take a snapshot, create a dump image, and then remove the snapshot in one command by using -L.
The snapshot can be mounted as a frozen image of the file system. To mount(8) the snapshot /var/snapshot/snap run:
# mdconfig -a -t vnode -o readonly -f /var/snapshot/snap -u 4
# mount -r /dev/md4 /mntThe frozen /var is now available through /mnt. Everything will initially be in the same state it was during the snapshot creation time. The only exception is that any earlier snapshots will appear as zero length files. To unmount the snapshot, use:
# umount /mnt
# mdconfig -d -u 4For more information about softupdates and file system snapshots, including technical papers, visit Marshall Kirk McKusick’s website at http://www.mckusick.com/.
磁碟配額可以用來限制使用者或群組成員能夠在各別檔案系統上使用的磁碟空間量或檔案數量。這個可避免一個使用者或群組成員耗盡所有磁碟的可用空間。
本節將說明如何設定 UFS 檔案系統的磁碟配額。要在 ZFS 檔案系統上設定配額,請參考 資料集、使用者以及群組配額
查看 FreeBSD 核心是否支援磁碟配額:
% sysctl kern.features.ufs_quota
kern.features.ufs_quota: 1在本例中,數值 1 代表支援磁碟配額,若為 0,則需加入下列設定到自訂核心設定檔然後依照 設定 FreeBSD 核心 的指示重新編譯核心:
options QUOTA
接著,在 /etc/rc.conf 開啟磁碟配額:
quota_enable="YES"
正常在開機時,會使用 quotacheck(8) 檢查每個檔案系統的配額完整性,這個程式會確保在配額資料庫中的資料正確的反映了檔案系統上的資料。這是一個耗費時間的程序,會明顯的影響系統開機的時間,要跳過這個步驟可以加入此變數到 /etc/rc.conf:
check_quotas="NO"
最後,編輯 /etc/fstab 來開啟在各個檔案系統上的磁碟配額。要開啟在檔案系統上對每個使用者的配額要加入 userquota 選項到 /etc/fstab 要開啟配額的檔案系統的項目中。例如:
/dev/da1s2g /home ufs rw,userquota 1 2
要開啟群組配額,則使用 groupquota。要同時開啟使用者及群組配額,可使用逗號隔開選項:
/dev/da1s2g /home ufs rw,userquota,groupquota 1 2
預設配額檔案會儲存在檔案系統的根目錄的 quota.user 及 quota.group,請參考 fstab(5) 來取得更多資訊,較不建議指定其他位置來儲存配額檔案。
設定完成之後,重新啟動系統,/etc/rc 會自動執行適當的指令對所有在 /etc/fstab 中開啟配磁的檔案系統建立初始的配額檔。
在一般的操作中,並不需要手動執行 quotacheck(8), quotaon(8) 或是 quotaoff(8),雖然如此,仍應閱讀這些指令的操作手冊來熟悉這些指令的操作。
要確認配額已經開啟,可執行:
# quota -v每個有開啟配額的檔案系統應該會有一行磁碟用量及目前配額限制的摘要。
現在系統已準備好可以使用 edquota 分配配額限制。
有數個選項可以強制限制使用者或群組對磁碟空間的使用量以及可以建立多少檔案。可以用磁碟空間 (block 配額),檔案數量 (inode 配額) 或同時使用來分配。每種限制又可進一步細分為兩個類型:硬性 (Hard) 及軟性 (Soft) 限制。
硬性限制無法被超額使用。一旦使用者超出了硬性限制,該使用者在該檔案系統將無法再使用任何空間。舉例來說,若一個使用者在一個檔案系統上有 500 KB 的硬性限制,且目前已經使用了 490 KB,該使用者只能再使用 10 KB 的空間,若嘗試使用 11 KB 的空間將會失敗。
軟性限制在有限的時間內可以被超額使用,即為寬限期 (Grace period),預設為一週。若一個使用者超出限制並超過寬限期,則軟性限制將轉為硬性限制並且將不允許再使用空間。當使用者使用的空間回到低於軟性限制內,寬限期就會被重置。
在下面的例子中,會編輯 test 的配額。當執行 edquota 時,將會使用 EDITOR 指定的編輯器來編輯配額限制。預設的編輯器為 vi。
# edquota -u test
Quotas for user test:
/usr: kbytes in use: 65, limits (soft = 50, hard = 75)
inodes in use: 7, limits (soft = 50, hard = 60)
/usr/var: kbytes in use: 0, limits (soft = 50, hard = 75)
inodes in use: 0, limits (soft = 50, hard = 60)正常每個開啟配額的檔案系統會有兩行需要設定,一行代表區塊限制 (Block limit) 而另一行代表節點限制 (inode limit),更改行內的值來修改配額限制。舉例來說,要在 /usr 提高區塊的軟性限制到 500 以及硬性限制到 600,可更改行內的值如下:
/usr: kbytes in use: 65, limits (soft = 500, hard = 600)
新的配額限制將在離開編輯器後生效。
有時會想要針對一群使用者設定配額限,這時可以透過指定想要的配額給第一個使用者,若然後使用 -p 來複製配額到指定範圍的使用者 ID (UID)。以下指定將複製配額限制給 UID 10,000 到 19,999 的使用者:
# edquota -p test 10000-19999要取得更多資訊,請參考 edquota(8)。
要檢查各別使用者或群組的配額與磁碟用量可使用 quota(1)。使用者僅可查看自己的配額以及所屬群組的配額,只有使超級使用者可以檢視所有使用者及群組的配額。要取得某個有開啟配額的檔案系統的所有配額及磁碟用量摘要,可使用 repquota(8)。
正常情況,使用者未使用任何磁碟空間的檔案系統並不會顯示在 quota 的輸出結果中,即使該使用者有在該檔案系統設定配額限制,使用 -v 可以顯示這些檔案系統。以下是使用使用 quota -v 查詢某個使用者在兩個檔案系統上的配額限制的範例輸出。
Disk quotas for user test (uid 1002):
Filesystem usage quota limit grace files quota limit grace
/usr 65* 50 75 5days 7 50 60
/usr/var 0 50 75 0 50 60在這個例子當中,使用者在 /usr 的軟性限制 50 KB 已經超出了 15 KB 並已經過了 5 天寬限期。星號 * 代表該使用者目前已超出配額限制。
在 NFS 伺服器上,配額會由配額子系統強制執行,rpc.rquotad(8) Daemon 會提供配額資訊給 NFS 客戶端的 quota,讓在那些主機的使用者可以查看它們的配額統計資訊。
在 NFS 伺服器上將 /etc/inetd.conf 中 rpc.rquotad 行前的 # 移除來開啟:
rquotad/1 dgram rpc/udp wait root /usr/libexec/rpc.rquotad rpc.rquotad
然後重新啟動 inetd:
# service inetd restartFreeBSD offers excellent online protections against unauthorized data access. File permissions and Mandatory Access Control (MAC) help prevent unauthorized users from accessing data while the operating system is active and the computer is powered up. However, the permissions enforced by the operating system are irrelevant if an attacker has physical access to a computer and can move the computer’s hard drive to another system to copy and analyze the data.
Regardless of how an attacker may have come into possession of a hard drive or powered-down computer, the GEOM-based cryptographic subsystems built into FreeBSD are able to protect the data on the computer’s file systems against even highly-motivated attackers with significant resources. Unlike encryption methods that encrypt individual files, the built-in gbde and geli utilities can be used to transparently encrypt entire file systems. No cleartext ever touches the hard drive’s platter.
This chapter demonstrates how to create an encrypted file system on FreeBSD. It first demonstrates the process using gbde and then demonstrates the same example using geli.
The objective of the gbde(4) facility is to provide a formidable challenge for an attacker to gain access to the contents of a cold storage device. However, if the computer is compromised while up and running and the storage device is actively attached, or the attacker has access to a valid passphrase, it offers no protection to the contents of the storage device. Thus, it is important to provide physical security while the system is running and to protect the passphrase used by the encryption mechanism.
This facility provides several barriers to protect the data stored in each disk sector. It encrypts the contents of a disk sector using 128-bit AES in CBC mode. Each sector on the disk is encrypted with a different AES key. For more information on the cryptographic design, including how the sector keys are derived from the user-supplied passphrase, refer to gbde(4).
FreeBSD provides a kernel module for gbde which can be loaded with this command:
# kldload geom_bdeIf using a custom kernel configuration file, ensure it contains this line:
options GEOM_BDE
The following example demonstrates adding a new hard drive to a system that will hold a single encrypted partition that will be mounted as /private.
Procedure: Encrypting a Partition with gbde
Add the New Hard Drive
Install the new drive to the system as explained in 加入磁碟. For the purposes of this example, a new hard drive partition has been added as /dev/ad4s1c and /dev/ad0s1* represents the existing standard FreeBSD partitions.
# ls /dev/ad*
/dev/ad0 /dev/ad0s1b /dev/ad0s1e /dev/ad4s1
/dev/ad0s1 /dev/ad0s1c /dev/ad0s1f /dev/ad4s1c
/dev/ad0s1a /dev/ad0s1d /dev/ad4Create a Directory to Hold gbde Lock Files
# mkdir /etc/gbdeThe gbde lock file contains information that gbde requires to access encrypted partitions. Without access to the lock file, gbde will not be able to decrypt the data contained in the encrypted partition without significant manual intervention which is not supported by the software. Each encrypted partition uses a separate lock file.
Initialize the gbde Partition
A gbde partition must be initialized before it can be used. This initialization needs to be performed only once. This command will open the default editor, in order to set various configuration options in a template. For use with the UFS file system, set the sector_size to 2048:
# gbde init /dev/ad4s1c -i -L /etc/gbde/ad4s1c.lock
# $FreeBSD: head/zh_TW.UTF-8/books/handbook/book.xml 53653 2019-12-03 17:05:41Z rcyu $Once the edit is saved, the user will be asked twice to type the passphrase used to secure the data. The passphrase must be the same both times. The ability of gbde to protect data depends entirely on the quality of the passphrase. For tips on how to select a secure passphrase that is easy to remember, see http://world.std.com/~reinhold/diceware.htm.
This initialization creates a lock file for the gbde partition. In this example, it is stored as /etc/gbde/ad4s1c.lock. Lock files must end in ".lock" in order to be correctly detected by the /etc/rc.d/gbde start up script.
Lock files must be backed up together with the contents of any encrypted partitions. Without the lock file, the legitimate owner will be unable to access the data on the encrypted partition. |
Attach the Encrypted Partition to the Kernel
# gbde attach /dev/ad4s1c -l /etc/gbde/ad4s1c.lockThis command will prompt to input the passphrase that was selected during the initialization of the encrypted partition. The new encrypted device will appear in /dev as /dev/device_name.bde:
# ls /dev/ad*
/dev/ad0 /dev/ad0s1b /dev/ad0s1e /dev/ad4s1
/dev/ad0s1 /dev/ad0s1c /dev/ad0s1f /dev/ad4s1c
/dev/ad0s1a /dev/ad0s1d /dev/ad4 /dev/ad4s1c.bdeCreate a File System on the Encrypted Device
Once the encrypted device has been attached to the kernel, a file system can be created on the device. This example creates a UFS file system with soft updates enabled. Be sure to specify the partition which has a *.bde extension:
# newfs -U /dev/ad4s1c.bdeMount the Encrypted Partition
Create a mount point and mount the encrypted file system:
# mkdir /private
# mount /dev/ad4s1c.bde /privateVerify That the Encrypted File System is Available
The encrypted file system should now be visible and available for use:
% df -H
Filesystem Size Used Avail Capacity Mounted on
/dev/ad0s1a 1037M 72M 883M 8% /
/devfs 1.0K 1.0K 0B 100% /dev
/dev/ad0s1f 8.1G 55K 7.5G 0% /home
/dev/ad0s1e 1037M 1.1M 953M 0% /tmp
/dev/ad0s1d 6.1G 1.9G 3.7G 35% /usr
/dev/ad4s1c.bde 150G 4.1K 138G 0% /privateAfter each boot, any encrypted file systems must be manually re-attached to the kernel, checked for errors, and mounted, before the file systems can be used. To configure these steps, add the following lines to /etc/rc.conf:
gbde_autoattach_all="YES" gbde_devices="ad4s1c" gbde_lockdir="/etc/gbde"
This requires that the passphrase be entered at the console at boot time. After typing the correct passphrase, the encrypted partition will be mounted automatically. Additional gbde boot options are available and listed in rc.conf(5).
sysinstall is incompatible with gbde-encrypted devices. All *.bde devices must be detached from the kernel before starting sysinstall or it will crash during its initial probing for devices. To detach the encrypted device used in the example, use the following command: |
geli 做磁碟加密An alternative cryptographic GEOM class is available using geli. This control utility adds some features and uses a different scheme for doing cryptographic work. It provides the following features:
Utilizes the crypto(9) framework and automatically uses cryptographic hardware when it is available.
Supports multiple cryptographic algorithms such as AES, Blowfish, and 3DES.
Allows the root partition to be encrypted. The passphrase used to access the encrypted root partition will be requested during system boot.
Allows the use of two independent keys.
It is fast as it performs simple sector-to-sector encryption.
Allows backup and restore of master keys. If a user destroys their keys, it is still possible to get access to the data by restoring keys from the backup.
Allows a disk to attach with a random, one-time key which is useful for swap partitions and temporary file systems.
More features and usage examples can be found in geli(8).
The following example describes how to generate a key file which will be used as part of the master key for the encrypted provider mounted under /private. The key file will provide some random data used to encrypt the master key. The master key will also be protected by a passphrase. The provider’s sector size will be 4kB. The example describes how to attach to the geli provider, create a file system on it, mount it, work with it, and finally, how to detach it.
Procedure: Encrypting a Partition with geli
Load geli Support
Support for geli is available as a loadable kernel module. To configure the system to automatically load the module at boot time, add the following line to /boot/loader.conf:
geom_eli_load="YES"
To load the kernel module now:
# kldload geom_eliFor a custom kernel, ensure the kernel configuration file contains these lines:
options GEOM_ELI device crypto
Generate the Master Key
The following commands generate a master key (/root/da2.key) that is protected with a passphrase. The data source for the key file is /dev/random and the sector size of the provider (/dev/da2.eli) is 4kB as a bigger sector size provides better performance:
# dd if=/dev/random of=/root/da2.key bs=64 count=1
# geli init -s 4096 -K /root/da2.key /dev/da2
Enter new passphrase:
Reenter new passphrase:It is not mandatory to use both a passphrase and a key file as either method of securing the master key can be used in isolation.
If the key file is given as "-", standard input will be used. For example, this command generates three key files:
# cat keyfile1 keyfile2 keyfile3 | geli init -K - /dev/da2Attach the Provider with the Generated Key
To attach the provider, specify the key file, the name of the disk, and the passphrase:
# geli attach -k /root/da2.key /dev/da2
Enter passphrase:This creates a new device with an .eli extension:
# ls /dev/da2*
/dev/da2 /dev/da2.eliCreate the New File System
Next, format the device with the UFS file system and mount it on an existing mount point:
# dd if=/dev/random of=/dev/da2.eli bs=1m
# newfs /dev/da2.eli
# mount /dev/da2.eli /privateThe encrypted file system should now be available for use:
# df -H
Filesystem Size Used Avail Capacity Mounted on
/dev/ad0s1a 248M 89M 139M 38% /
/devfs 1.0K 1.0K 0B 100% /dev
/dev/ad0s1f 7.7G 2.3G 4.9G 32% /usr
/dev/ad0s1d 989M 1.5M 909M 0% /tmp
/dev/ad0s1e 3.9G 1.3G 2.3G 35% /var
/dev/da2.eli 150G 4.1K 138G 0% /privateOnce the work on the encrypted partition is done, and the /private partition is no longer needed, it is prudent to put the device into cold storage by unmounting and detaching the geli encrypted partition from the kernel:
# umount /private
# geli detach da2.eliA rc.d script is provided to simplify the mounting of geli-encrypted devices at boot time. For this example, add these lines to /etc/rc.conf:
geli_devices="da2" geli_da2_flags="-k /root/da2.key"
This configures /dev/da2 as a geli provider with a master key of /root/da2.key. The system will automatically detach the provider from the kernel before the system shuts down. During the startup process, the script will prompt for the passphrase before attaching the provider. Other kernel messages might be shown before and after the password prompt. If the boot process seems to stall, look carefully for the password prompt among the other messages. Once the correct passphrase is entered, the provider is attached. The file system is then mounted, typically by an entry in /etc/fstab. Refer to 掛載與卸載檔案系統 for instructions on how to configure a file system to mount at boot time.
Like the encryption of disk partitions, encryption of swap space is used to protect sensitive information. Consider an application that deals with passwords. As long as these passwords stay in physical memory, they are not written to disk and will be cleared after a reboot. However, if FreeBSD starts swapping out memory pages to free space, the passwords may be written to the disk unencrypted. Encrypting swap space can be a solution for this scenario.
This section demonstrates how to configure an encrypted swap partition using gbde(8) or geli(8) encryption. It assumes that /dev/ada0s1b is the swap partition.
Swap partitions are not encrypted by default and should be cleared of any sensitive data before continuing. To overwrite the current swap partition with random garbage, execute the following command:
# dd if=/dev/random of=/dev/ada0s1b bs=1mTo encrypt the swap partition using gbde(8), add the .bde suffix to the swap line in /etc/fstab:
# Device Mountpoint FStype Options Dump Pass# /dev/ada0s1b.bde none swap sw 0 0
To instead encrypt the swap partition using geli(8), use the .eli suffix:
# Device Mountpoint FStype Options Dump Pass# /dev/ada0s1b.eli none swap sw 0 0
By default, geli(8) uses the AES algorithm with a key length of 128 bits. Normally the default settings will suffice. If desired, these defaults can be altered in the options field in /etc/fstab. The possible flags are:
Data integrity verification algorithm used to ensure that the encrypted data has not been tampered with. See geli(8) for a list of supported algorithms.
Encryption algorithm used to protect the data. See geli(8) for a list of supported algorithms.
The length of the key used for the encryption algorithm. See geli(8) for the key lengths that are supported by each encryption algorithm.
The size of the blocks data is broken into before it is encrypted. Larger sector sizes increase performance at the cost of higher storage overhead. The recommended size is 4096 bytes.
This example configures an encrypted swap partition using the Blowfish algorithm with a key length of 128 bits and a sectorsize of 4 kilobytes:
# Device Mountpoint FStype Options Dump Pass# /dev/ada0s1b.eli none swap sw,ealgo=blowfish,keylen=128,sectorsize=4096 0 0
Once the system has rebooted, proper operation of the encrypted swap can be verified using swapinfo.
If gbde(8) is being used:
% swapinfo
Device 1K-blocks Used Avail Capacity
/dev/ada0s1b.bde 542720 0 542720 0%If geli(8) is being used:
% swapinfo
Device 1K-blocks Used Avail Capacity
/dev/ada0s1b.eli 542720 0 542720 0%High availability is one of the main requirements in serious business applications and highly-available storage is a key component in such environments. In FreeBSD, the Highly Available STorage (HAST) framework allows transparent storage of the same data across several physically separated machines connected by a TCP/IP network. HAST can be understood as a network-based RAID1 (mirror), and is similar to the DRBD® storage system used in the GNU/Linux™ platform. In combination with other high-availability features of FreeBSD like CARP, HAST makes it possible to build a highly-available storage cluster that is resistant to hardware failures.
The following are the main features of HAST:
Can be used to mask I/O errors on local hard drives.
File system agnostic as it works with any file system supported by FreeBSD.
Efficient and quick resynchronization as only the blocks that were modified during the downtime of a node are synchronized.
Can be used in an already deployed environment to add additional redundancy.
Together with CARP, Heartbeat, or other tools, it can be used to build a robust and durable storage system.
After reading this section, you will know:
What HAST is, how it works, and which features it provides.
How to set up and use HAST on FreeBSD.
How to integrate CARP and devd(8) to build a robust storage system.
Before reading this section, you should:
了解 UNIX™ 及 FreeBSD 基礎 (FreeBSD 基礎)。
Know how to configure network interfaces and other core FreeBSD subsystems (設定與調校).
Have a good understanding of FreeBSD networking (網路通訊).
The HAST project was sponsored by The FreeBSD Foundation with support from http://www.omc.net/ and http://www.transip.nl/.
HAST provides synchronous block-level replication between two physical machines: the primary, also known as the master node, and the secondary, or slave node. These two machines together are referred to as a cluster.
Since HAST works in a primary-secondary configuration, it allows only one of the cluster nodes to be active at any given time. The primary node, also called active, is the one which will handle all the I/O requests to HAST-managed devices. The secondary node is automatically synchronized from the primary node.
The physical components of the HAST system are the local disk on primary node, and the disk on the remote, secondary node.
HAST operates synchronously on a block level, making it transparent to file systems and applications. HAST provides regular GEOM providers in /dev/hast/ for use by other tools or applications. There is no difference between using HAST-provided devices and raw disks or partitions.
Each write, delete, or flush operation is sent to both the local disk and to the remote disk over TCP/IP. Each read operation is served from the local disk, unless the local disk is not up-to-date or an I/O error occurs. In such cases, the read operation is sent to the secondary node.
HAST tries to provide fast failure recovery. For this reason, it is important to reduce synchronization time after a node’s outage. To provide fast synchronization, HAST manages an on-disk bitmap of dirty extents and only synchronizes those during a regular synchronization, with an exception of the initial sync.
There are many ways to handle synchronization. HAST implements several replication modes to handle different synchronization methods:
memsync: This mode reports a write operation as completed when the local write operation is finished and when the remote node acknowledges data arrival, but before actually storing the data. The data on the remote node will be stored directly after sending the acknowledgement. This mode is intended to reduce latency, but still provides good reliability. This mode is the default.
fullsync: This mode reports a write operation as completed when both the local write and the remote write complete. This is the safest and the slowest replication mode.
async: This mode reports a write operation as completed when the local write completes. This is the fastest and the most dangerous replication mode. It should only be used when replicating to a distant node where latency is too high for other modes.
The HAST framework consists of several components:
The hastd(8) daemon which provides data synchronization. When this daemon is started, it will automatically load geom_gate.ko.
The userland management utility, hastctl(8).
The hast.conf(5) configuration file. This file must exist before starting hastd.
Users who prefer to statically build GEOM_GATE support into the kernel should add this line to the custom kernel configuration file, then rebuild the kernel using the instructions in 設定 FreeBSD 核心:
options GEOM_GATE
The following example describes how to configure two nodes in master-slave/primary-secondary operation using HAST to replicate the data between the two. The nodes will be called hasta, with an IP address of 172.16.0.1, and hastb, with an IP address of 172.16.0.2. Both nodes will have a dedicated hard drive /dev/ad6 of the same size for HAST operation. The HAST pool, sometimes referred to as a resource or the GEOM provider in /dev/hast/, will be called test.
Configuration of HAST is done using /etc/hast.conf. This file should be identical on both nodes. The simplest configuration is:
resource test {
on hasta {
local /dev/ad6
remote 172.16.0.2
}
on hastb {
local /dev/ad6
remote 172.16.0.1
}
}For more advanced configuration, refer to hast.conf(5).
It is also possible to use host names in the |
Once the configuration exists on both nodes, the HAST pool can be created. Run these commands on both nodes to place the initial metadata onto the local disk and to start hastd(8):
# hastctl create test
# service hastd onestartIt is not possible to use GEOM providers with an existing file system or to convert an existing storage to a HAST-managed pool. This procedure needs to store some metadata on the provider and there will not be enough required space available on an existing provider. |
A HAST node’s primary or secondary role is selected by an administrator, or software like Heartbeat, using hastctl(8). On the primary node, hasta, issue this command:
# hastctl role primary testRun this command on the secondary node, hastb:
# hastctl role secondary testVerify the result by running hastctl on each node:
# hastctl status testCheck the status line in the output. If it says degraded, something is wrong with the configuration file. It should say complete on each node, meaning that the synchronization between the nodes has started. The synchronization completes when hastctl status reports 0 bytes of dirty extents.
The next step is to create a file system on the GEOM provider and mount it. This must be done on the primary node. Creating the file system can take a few minutes, depending on the size of the hard drive. This example creates a UFS file system on /dev/hast/test:
# newfs -U /dev/hast/test
# mkdir /hast/test
# mount /dev/hast/test /hast/testOnce the HAST framework is configured properly, the final step is to make sure that HAST is started automatically during system boot. Add this line to /etc/rc.conf:
hastd_enable="YES"
The goal of this example is to build a robust storage system which is resistant to the failure of any given node. If the primary node fails, the secondary node is there to take over seamlessly, check and mount the file system, and continue to work without missing a single bit of data.
To accomplish this task, the Common Address Redundancy Protocol (CARP) is used to provide for automatic failover at the IP layer. CARP allows multiple hosts on the same network segment to share an IP address. Set up CARP on both nodes of the cluster according to the documentation available in 共用位址備援協定 (CARP). In this example, each node will have its own management IP address and a shared IP address of 172.16.0.254. The primary HAST node of the cluster must be the master CARP node.
The HAST pool created in the previous section is now ready to be exported to the other hosts on the network. This can be accomplished by exporting it through NFS or Samba, using the shared IP address 172.16.0.254. The only problem which remains unresolved is an automatic failover should the primary node fail.
In the event of CARP interfaces going up or down, the FreeBSD operating system generates a devd(8) event, making it possible to watch for state changes on the CARP interfaces. A state change on the CARP interface is an indication that one of the nodes failed or came back online. These state change events make it possible to run a script which will automatically handle the HAST failover.
To catch state changes on the CARP interfaces, add this configuration to /etc/devd.conf on each node:
notify 30 {
match "system" "IFNET";
match "subsystem" "carp0";
match "type" "LINK_UP";
action "/usr/local/sbin/carp-hast-switch master";
};
notify 30 {
match "system" "IFNET";
match "subsystem" "carp0";
match "type" "LINK_DOWN";
action "/usr/local/sbin/carp-hast-switch slave";
};If the systems are running FreeBSD 10 or higher, replace carp0 with the name of the CARP-configured interface. |
Restart devd(8) on both nodes to put the new configuration into effect:
# service devd restartWhen the specified interface state changes by going up or down , the system generates a notification, allowing the devd(8) subsystem to run the specified automatic failover script, /usr/local/sbin/carp-hast-switch. For further clarification about this configuration, refer to devd.conf(5).
Here is an example of an automated failover script:
#!/bin/sh
# Original script by Freddie Cash <fjwcash@gmail.com>
# Modified by Michael W. Lucas <mwlucas@BlackHelicopters.org>
# and Viktor Petersson <vpetersson@wireload.net>
# The names of the HAST resources, as listed in /etc/hast.conf
resources="test"
# delay in mounting HAST resource after becoming master
# make your best guess
delay=3
# logging
log="local0.debug"
name="carp-hast"
# end of user configurable stuff
case "$1" in
master)
logger -p $log -t $name "Switching to primary provider for ${resources}."
sleep ${delay}
# Wait for any "hastd secondary" processes to stop
for disk in ${resources}; do
while $( pgrep -lf "hastd: ${disk} \(secondary\)" > /dev/null 2>&1 ); do
sleep 1
done
# Switch role for each disk
hastctl role primary ${disk}
if [ $? -ne 0 ]; then
logger -p $log -t $name "Unable to change role to primary for resource ${disk}."
exit 1
fi
done
# Wait for the /dev/hast/* devices to appear
for disk in ${resources}; do
for I in $( jot 60 ); do
[ -c "/dev/hast/${disk}" ] && break
sleep 0.5
done
if [ ! -c "/dev/hast/${disk}" ]; then
logger -p $log -t $name "GEOM provider /dev/hast/${disk} did not appear."
exit 1
fi
done
logger -p $log -t $name "Role for HAST resources ${resources} switched to primary."
logger -p $log -t $name "Mounting disks."
for disk in ${resources}; do
mkdir -p /hast/${disk}
fsck -p -y -t ufs /dev/hast/${disk}
mount /dev/hast/${disk} /hast/${disk}
done
;;
slave)
logger -p $log -t $name "Switching to secondary provider for ${resources}."
# Switch roles for the HAST resources
for disk in ${resources}; do
if ! mount | grep -q "^/dev/hast/${disk} on "
then
else
umount -f /hast/${disk}
fi
sleep $delay
hastctl role secondary ${disk} 2>&1
if [ $? -ne 0 ]; then
logger -p $log -t $name "Unable to switch role to secondary for resource ${disk}."
exit 1
fi
logger -p $log -t $name "Role switched to secondary for resource ${disk}."
done
;;
esacIn a nutshell, the script takes these actions when a node becomes master:
Promotes the HAST pool to primary on the other node.
Checks the file system under the HAST pool.
Mounts the pool.
When a node becomes secondary:
Unmounts the HAST pool.
Degrades the HAST pool to secondary.
This is just an example script which serves as a proof of concept. It does not handle all the possible scenarios and can be extended or altered in any way, for example, to start or stop required services. |
For this example, a standard UFS file system was used. To reduce the time needed for recovery, a journal-enabled UFS or ZFS file system can be used instead. |
More detailed information with additional examples can be found at http://wiki.FreeBSD.org/HAST.
HAST should generally work without issues. However, as with any other software product, there may be times when it does not work as supposed. The sources of the problems may be different, but the rule of thumb is to ensure that the time is synchronized between the nodes of the cluster.
When troubleshooting HAST, the debugging level of hastd(8) should be increased by starting hastd with -d. This argument may be specified multiple times to further increase the debugging level. Consider also using -F, which starts hastd in the foreground.
Split-brain occurs when the nodes of the cluster are unable to communicate with each other, and both are configured as primary. This is a dangerous condition because it allows both nodes to make incompatible changes to the data. This problem must be corrected manually by the system administrator.
The administrator must either decide which node has more important changes, or perform the merge manually. Then, let HAST perform full synchronization of the node which has the broken data. To do this, issue these commands on the node which needs to be resynchronized:
# hastctl role init test
# hastctl create test
# hastctl role secondary test在 FreeBSD 中,GEOM 可允許對類別做存取與控制,例如:主開機記錄 (Master Boot Record) 與 BSD 標籤,透過利用提供者,或在 /dev 中的磁碟裝置。透過支援各種 RAID 的配置,GEOM 透明的提供了對作業系統與作業系統工具的存取。
This chapter covers the use of disks under the GEOM framework in FreeBSD. This includes the major RAID control utilities which use the framework for configuration. This chapter is not a definitive guide to RAID configurations and only GEOM-supported RAID classifications are discussed.
讀完這章,您將了解:
What type of RAID support is available through GEOM.
How to use the base utilities to configure, maintain, and manipulate the various RAID levels.
How to mirror, stripe, encrypt, and remotely connect disk devices through GEOM.
How to troubleshoot disks attached to the GEOM framework.
在開始閱讀這章之前,您需要:
Understand how FreeBSD treats disk devices (儲存設備).
了解如何設定並安裝新的核心 (設定 FreeBSD 核心)。
串連會合併數個磁碟成單一個磁碟區 (Volume),可以透過使用硬體 RAID 控制器來做到串連。GEOM 磁碟子系統提供了軟體支援的磁碟串連,也就是所謂的 RAID0,而不需要 RAID 磁碟控制器。
在 RAID0 中,資料會被切割成數個資料區塊 (Block) 寫入到磁碟陣列中的每一個磁碟機。如下圖所示,取代以往等候系統寫入 256k 到一個磁碟的時間, RAID0 可以同時寫入 64k 到磁碟陣列中四個磁碟的每個磁碟,這可提供優異的 I/O 效能,若使用多個磁碟控制器可增加更多的效能。
在 RAID0 串連中的每個磁碟必須要相同大小,因為 I/O 的請求是平行交錯讀取或寫入到多個磁碟的。
RAID0 並不提供任何備援 (Redundancy) 功能。這意謂著若磁碟陣列中的其中一個磁碟故障,所有在該磁碟上的資料便會遺失。若資料很重要,請規畫備份策略,定期儲存備份到遠端系統或裝置。 |
The process for creating a software, GEOM-based RAID0 on a FreeBSD system using commodity disks is as follows. Once the stripe is created, refer to gstripe(8) for more information on how to control an existing stripe.
Procedure: Creating a Stripe of Unformatted ATA Disks
Load the geom_stripe.ko module:
# kldload geom_stripeEnsure that a suitable mount point exists. If this volume will become a root partition, then temporarily use another mount point such as /mnt.
Determine the device names for the disks which will be striped, and create the new stripe device. For example, to stripe two unused and unpartitioned ATA disks with device names of /dev/ad2 and /dev/ad3:
# gstripe label -v st0 /dev/ad2 /dev/ad3
Metadata value stored on /dev/ad2.
Metadata value stored on /dev/ad3.
Done.Write a standard label, also known as a partition table, on the new volume and install the default bootstrap code:
# bsdlabel -wB /dev/stripe/st0This process should create two other devices in /dev/stripe in addition to st0. Those include st0a and st0c. At this point, a UFS file system can be created on st0a using newfs:
# newfs -U /dev/stripe/st0aMany numbers will glide across the screen, and after a few seconds, the process will be complete. The volume has been created and is ready to be mounted.
To manually mount the created disk stripe:
# mount /dev/stripe/st0a /mntTo mount this striped file system automatically during the boot process, place the volume information in /etc/fstab. In this example, a permanent mount point, named stripe, is created:
# mkdir /stripe
# echo "/dev/stripe/st0a /stripe ufs rw 2 2" \
>> /etc/fstabThe geom_stripe.ko module must also be automatically loaded during system initialization, by adding a line to /boot/loader.conf:
# sysrc -f /boot/loader.conf geom_stripe_load=YESRAID1 或鏡像是一項寫入相同資料到超過一個磁碟機的技術。鏡像通常用來保護資料因磁碟機故障導致的損失,每個在鏡像中的磁碟機會擁有完全相同的資料,當各別磁碟機故障時,鏡像會繼續運作,由還可運作的磁碟機提供資料。電腦會繼續執行,等到管理者有時間更換故障的硬碟,而不會被使用者中斷運作。
Two common situations are illustrated in these examples. The first creates a mirror out of two new drives and uses it as a replacement for an existing single drive. The second example creates a mirror on a single new drive, copies the old drive’s data to it, then inserts the old drive into the mirror. While this procedure is slightly more complicated, it only requires one new drive.
Traditionally, the two drives in a mirror are identical in model and capacity, but gmirror(8) does not require that. Mirrors created with dissimilar drives will have a capacity equal to that of the smallest drive in the mirror. Extra space on larger drives will be unused. Drives inserted into the mirror later must have at least as much capacity as the smallest drive already in the mirror.
The mirroring procedures shown here are non-destructive, but as with any major disk operation, make a full backup first. |
Many disk systems store metadata at the end of each disk. Old metadata should be erased before reusing the disk for a mirror. Most problems are caused by two particular types of leftover metadata: GPT partition tables and old metadata from a previous mirror.
GPT metadata can be erased with gpart(8). This example erases both primary and backup GPT partition tables from disk ada8:
# gpart destroy -F ada8A disk can be removed from an active mirror and the metadata erased in one step using gmirror(8). Here, the example disk ada8 is removed from the active mirror gm4:
# gmirror remove gm4 ada8If the mirror is not running, but old mirror metadata is still on the disk, use gmirror clear to remove it:
# gmirror clear ada8gmirror(8) stores one block of metadata at the end of the disk. Because GPT partition schemes also store metadata at the end of the disk, mirroring entire GPT disks with gmirror(8) is not recommended. MBR partitioning is used here because it only stores a partition table at the start of the disk and does not conflict with the mirror metadata.
In this example, FreeBSD has already been installed on a single disk, ada0. Two new disks, ada1 and ada2, have been connected to the system. A new mirror will be created on these two disks and used to replace the old single disk.
The geom_mirror.ko kernel module must either be built into the kernel or loaded at boot- or run-time. Manually load the kernel module now:
# gmirror loadCreate the mirror with the two new drives:
# gmirror label -v gm0 /dev/ada1 /dev/ada2gm0 is a user-chosen device name assigned to the new mirror. After the mirror has been started, this device name appears in /dev/mirror/.
MBR and bsdlabel partition tables can now be created on the mirror with gpart(8). This example uses a traditional file system layout, with partitions for /, swap, /var, /tmp, and /usr. A single / and a swap partition will also work.
Partitions on the mirror do not have to be the same size as those on the existing disk, but they must be large enough to hold all the data already present on ada0.
# gpart create -s MBR mirror/gm0
# gpart add -t freebsd -a 4k mirror/gm0
# gpart show mirror/gm0
=> 63 156301423 mirror/gm0 MBR (74G)
63 63 - free - (31k)
126 156301299 1 freebsd (74G)
156301425 61 - free - (30k)# gpart create -s BSD mirror/gm0s1
# gpart add -t freebsd-ufs -a 4k -s 2g mirror/gm0s1
# gpart add -t freebsd-swap -a 4k -s 4g mirror/gm0s1
# gpart add -t freebsd-ufs -a 4k -s 2g mirror/gm0s1
# gpart add -t freebsd-ufs -a 4k -s 1g mirror/gm0s1
# gpart add -t freebsd-ufs -a 4k mirror/gm0s1
# gpart show mirror/gm0s1
=> 0 156301299 mirror/gm0s1 BSD (74G)
0 2 - free - (1.0k)
2 4194304 1 freebsd-ufs (2.0G)
4194306 8388608 2 freebsd-swap (4.0G)
12582914 4194304 4 freebsd-ufs (2.0G)
16777218 2097152 5 freebsd-ufs (1.0G)
18874370 137426928 6 freebsd-ufs (65G)
156301298 1 - free - (512B)Make the mirror bootable by installing bootcode in the MBR and bsdlabel and setting the active slice:
# gpart bootcode -b /boot/mbr mirror/gm0
# gpart set -a active -i 1 mirror/gm0
# gpart bootcode -b /boot/boot mirror/gm0s1Format the file systems on the new mirror, enabling soft-updates.
# newfs -U /dev/mirror/gm0s1a
# newfs -U /dev/mirror/gm0s1d
# newfs -U /dev/mirror/gm0s1e
# newfs -U /dev/mirror/gm0s1fFile systems from the original ada0 disk can now be copied onto the mirror with dump(8) and restore(8).
# mount /dev/mirror/gm0s1a /mnt
# dump -C16 -b64 -0aL -f - / | (cd /mnt && restore -rf -)
# mount /dev/mirror/gm0s1d /mnt/var
# mount /dev/mirror/gm0s1e /mnt/tmp
# mount /dev/mirror/gm0s1f /mnt/usr
# dump -C16 -b64 -0aL -f - /var | (cd /mnt/var && restore -rf -)
# dump -C16 -b64 -0aL -f - /tmp | (cd /mnt/tmp && restore -rf -)
# dump -C16 -b64 -0aL -f - /usr | (cd /mnt/usr && restore -rf -)Edit /mnt/etc/fstab to point to the new mirror file systems:
# Device Mountpoint FStype Options Dump Pass# /dev/mirror/gm0s1a / ufs rw 1 1 /dev/mirror/gm0s1b none swap sw 0 0 /dev/mirror/gm0s1d /var ufs rw 2 2 /dev/mirror/gm0s1e /tmp ufs rw 2 2 /dev/mirror/gm0s1f /usr ufs rw 2 2
If the geom_mirror.ko kernel module has not been built into the kernel, /mnt/boot/loader.conf is edited to load the module at boot:
geom_mirror_load="YES"
Reboot the system to test the new mirror and verify that all data has been copied. The BIOS will see the mirror as two individual drives rather than a mirror. Because the drives are identical, it does not matter which is selected to boot.
See 疑難排解 if there are problems booting. Powering down and disconnecting the original ada0 disk will allow it to be kept as an offline backup.
In use, the mirror will behave just like the original single drive.
In this example, FreeBSD has already been installed on a single disk, ada0. A new disk, ada1, has been connected to the system. A one-disk mirror will be created on the new disk, the existing system copied onto it, and then the old disk will be inserted into the mirror. This slightly complex procedure is required because gmirror needs to put a 512-byte block of metadata at the end of each disk, and the existing ada0 has usually had all of its space already allocated.
Load the geom_mirror.ko kernel module:
# gmirror loadCheck the media size of the original disk with diskinfo:
# diskinfo -v ada0 | head -n3
/dev/ada0
512 # sectorsize
1000204821504 # mediasize in bytes (931G)Create a mirror on the new disk. To make certain that the mirror capacity is not any larger than the original ada0 drive, gnop(8) is used to create a fake drive of the exact same size. This drive does not store any data, but is used only to limit the size of the mirror. When gmirror(8) creates the mirror, it will restrict the capacity to the size of gzero.nop, even if the new ada1 drive has more space. Note that the 1000204821504 in the second line is equal to ada0's media size as shown by diskinfo above.
# geom zero load
# gnop create -s 1000204821504 gzero
# gmirror label -v gm0 gzero.nop ada1
# gmirror forget gm0Since gzero.nop does not store any data, the mirror does not see it as connected. The mirror is told to "forget" unconnected components, removing references to gzero.nop. The result is a mirror device containing only a single disk, ada1.
After creating gm0, view the partition table on ada0. This output is from a 1 TB drive. If there is some unallocated space at the end of the drive, the contents may be copied directly from ada0 to the new mirror.
However, if the output shows that all of the space on the disk is allocated, as in the following listing, there is no space available for the 512-byte mirror metadata at the end of the disk.
# gpart show ada0
=> 63 1953525105 ada0 MBR (931G)
63 1953525105 1 freebsd [active] (931G)In this case, the partition table must be edited to reduce the capacity by one sector on mirror/gm0. The procedure will be explained later.
In either case, partition tables on the primary disk should be first copied using gpart backup and gpart restore.
# gpart backup ada0 > table.ada0
# gpart backup ada0s1 > table.ada0s1These commands create two files, table.ada0 and table.ada0s1. This example is from a 1 TB drive:
# cat table.ada0
MBR 4
1 freebsd 63 1953525105 [active]# cat table.ada0s1
BSD 8
1 freebsd-ufs 0 4194304
2 freebsd-swap 4194304 33554432
4 freebsd-ufs 37748736 50331648
5 freebsd-ufs 88080384 41943040
6 freebsd-ufs 130023424 838860800
7 freebsd-ufs 968884224 984640881If no free space is shown at the end of the disk, the size of both the slice and the last partition must be reduced by one sector. Edit the two files, reducing the size of both the slice and last partition by one. These are the last numbers in each listing.
# cat table.ada0
MBR 4
1 freebsd 63 1953525104 [active]# cat table.ada0s1
BSD 8
1 freebsd-ufs 0 4194304
2 freebsd-swap 4194304 33554432
4 freebsd-ufs 37748736 50331648
5 freebsd-ufs 88080384 41943040
6 freebsd-ufs 130023424 838860800
7 freebsd-ufs 968884224 984640880If at least one sector was unallocated at the end of the disk, these two files can be used without modification.
Now restore the partition table into mirror/gm0:
# gpart restore mirror/gm0 < table.ada0
# gpart restore mirror/gm0s1 < table.ada0s1Check the partition table with gpart show. This example has gm0s1a for /, gm0s1d for /var, gm0s1e for /usr, gm0s1f for /data1, and gm0s1g for /data2.
# gpart show mirror/gm0
=> 63 1953525104 mirror/gm0 MBR (931G)
63 1953525042 1 freebsd [active] (931G)
1953525105 62 - free - (31k)
# gpart show mirror/gm0s1
=> 0 1953525042 mirror/gm0s1 BSD (931G)
0 2097152 1 freebsd-ufs (1.0G)
2097152 16777216 2 freebsd-swap (8.0G)
18874368 41943040 4 freebsd-ufs (20G)
60817408 20971520 5 freebsd-ufs (10G)
81788928 629145600 6 freebsd-ufs (300G)
710934528 1242590514 7 freebsd-ufs (592G)
1953525042 63 - free - (31k)Both the slice and the last partition must have at least one free block at the end of the disk.
Create file systems on these new partitions. The number of partitions will vary to match the original disk, ada0.
# newfs -U /dev/mirror/gm0s1a
# newfs -U /dev/mirror/gm0s1d
# newfs -U /dev/mirror/gm0s1e
# newfs -U /dev/mirror/gm0s1f
# newfs -U /dev/mirror/gm0s1gMake the mirror bootable by installing bootcode in the MBR and bsdlabel and setting the active slice:
# gpart bootcode -b /boot/mbr mirror/gm0
# gpart set -a active -i 1 mirror/gm0
# gpart bootcode -b /boot/boot mirror/gm0s1Adjust /etc/fstab to use the new partitions on the mirror. Back up this file first by copying it to /etc/fstab.orig.
# cp /etc/fstab /etc/fstab.origEdit /etc/fstab, replacing /dev/ada0 with mirror/gm0.
# Device Mountpoint FStype Options Dump Pass# /dev/mirror/gm0s1a / ufs rw 1 1 /dev/mirror/gm0s1b none swap sw 0 0 /dev/mirror/gm0s1d /var ufs rw 2 2 /dev/mirror/gm0s1e /usr ufs rw 2 2 /dev/mirror/gm0s1f /data1 ufs rw 2 2 /dev/mirror/gm0s1g /data2 ufs rw 2 2
If the geom_mirror.ko kernel module has not been built into the kernel, edit /boot/loader.conf to load it at boot:
geom_mirror_load="YES"
File systems from the original disk can now be copied onto the mirror with dump(8) and restore(8). Each file system dumped with dump -L will create a snapshot first, which can take some time.
# mount /dev/mirror/gm0s1a /mnt
# dump -C16 -b64 -0aL -f - / | (cd /mnt && restore -rf -)
# mount /dev/mirror/gm0s1d /mnt/var
# mount /dev/mirror/gm0s1e /mnt/usr
# mount /dev/mirror/gm0s1f /mnt/data1
# mount /dev/mirror/gm0s1g /mnt/data2
# dump -C16 -b64 -0aL -f - /usr | (cd /mnt/usr && restore -rf -)
# dump -C16 -b64 -0aL -f - /var | (cd /mnt/var && restore -rf -)
# dump -C16 -b64 -0aL -f - /data1 | (cd /mnt/data1 && restore -rf -)
# dump -C16 -b64 -0aL -f - /data2 | (cd /mnt/data2 && restore -rf -)Restart the system, booting from ada1. If everything is working, the system will boot from mirror/gm0, which now contains the same data as ada0 had previously. See 疑難排解 if there are problems booting.
At this point, the mirror still consists of only the single ada1 disk.
After booting from mirror/gm0 successfully, the final step is inserting ada0 into the mirror.
When ada0 is inserted into the mirror, its former contents will be overwritten by data from the mirror. Make certain that mirror/gm0 has the same contents as ada0 before adding ada0 to the mirror. If the contents previously copied by dump(8) and restore(8) are not identical to what was on ada0, revert /etc/fstab to mount the file systems on ada0, reboot, and start the whole procedure again. |
# gmirror insert gm0 ada0
GEOM_MIRROR: Device gm0: rebuilding provider ada0Synchronization between the two disks will start immediately. Use gmirror status to view the progress.
# gmirror status
Name Status Components
mirror/gm0 DEGRADED ada1 (ACTIVE)
ada0 (SYNCHRONIZING, 64%)After a while, synchronization will finish.
GEOM_MIRROR: Device gm0: rebuilding provider ada0 finished.
# gmirror status
Name Status Components
mirror/gm0 COMPLETE ada1 (ACTIVE)
ada0 (ACTIVE)mirror/gm0 now consists of the two disks ada0 and ada1, and the contents are automatically synchronized with each other. In use, mirror/gm0 will behave just like the original single drive.
If the system no longer boots, BIOS settings may have to be changed to boot from one of the new mirrored drives. Either mirror drive can be used for booting, as they contain identical data.
If the boot stops with this message, something is wrong with the mirror device:
Mounting from ufs:/dev/mirror/gm0s1a failed with error 19.
Loader variables:
vfs.root.mountfrom=ufs:/dev/mirror/gm0s1a
vfs.root.mountfrom.options=rw
Manual root filesystem specification:
<fstype>:<device> [options]
Mount <device> using filesystem <fstype>
and with the specified (optional) option list.
eg. ufs:/dev/da0s1a
zfs:tank
cd9660:/dev/acd0 ro
(which is equivalent to: mount -t cd9660 -o ro /dev/acd0 /)
? List valid disk boot devices
. Yield 1 second (for background tasks)
<empty line> Abort manual input
mountroot>Forgetting to load the geom_mirror.ko module in /boot/loader.conf can cause this problem. To fix it, boot from a FreeBSD installation media and choose Shell at the first prompt. Then load the mirror module and mount the mirror device:
# gmirror load
# mount /dev/mirror/gm0s1a /mntEdit /mnt/boot/loader.conf, adding a line to load the mirror module:
geom_mirror_load="YES"
Save the file and reboot.
Other problems that cause error 19 require more effort to fix. Although the system should boot from ada0, another prompt to select a shell will appear if /etc/fstab is incorrect. Enter ufs:/dev/ada0s1a at the boot loader prompt and press Enter. Undo the edits in /etc/fstab then mount the file systems from the original disk (ada0) instead of the mirror. Reboot the system and try the procedure again.
Enter full pathname of shell or RETURN for /bin/sh:
# cp /etc/fstab.orig /etc/fstab
# rebootThe benefit of disk mirroring is that an individual disk can fail without causing the mirror to lose any data. In the above example, if ada0 fails, the mirror will continue to work, providing data from the remaining working drive, ada1.
To replace the failed drive, shut down the system and physically replace the failed drive with a new drive of equal or greater capacity. Manufacturers use somewhat arbitrary values when rating drives in gigabytes, and the only way to really be sure is to compare the total count of sectors shown by diskinfo -v. A drive with larger capacity than the mirror will work, although the extra space on the new drive will not be used.
After the computer is powered back up, the mirror will be running in a "degraded" mode with only one drive. The mirror is told to forget drives that are not currently connected:
# gmirror forget gm0Any old metadata should be cleared from the replacement disk using the instructions in Metadata 問題. Then the replacement disk, ada4 for this example, is inserted into the mirror:
# gmirror insert gm0 /dev/ada4Resynchronization begins when the new drive is inserted into the mirror. This process of copying mirror data to a new drive can take a while. Performance of the mirror will be greatly reduced during the copy, so inserting new drives is best done when there is low demand on the computer.
Progress can be monitored with gmirror status, which shows drives that are being synchronized and the percentage of completion. During resynchronization, the status will be DEGRADED, changing to COMPLETE when the process is finished.
RAID3 is a method used to combine several disk drives into a single volume with a dedicated parity disk. In a RAID3 system, data is split up into a number of bytes that are written across all the drives in the array except for one disk which acts as a dedicated parity disk. This means that disk reads from a RAID3 implementation access all disks in the array. Performance can be enhanced by using multiple disk controllers. The RAID3 array provides a fault tolerance of 1 drive, while providing a capacity of 1 - 1/n times the total capacity of all drives in the array, where n is the number of hard drives in the array. Such a configuration is mostly suitable for storing data of larger sizes such as multimedia files.
At least 3 physical hard drives are required to build a RAID3 array. Each disk must be of the same size, since I/O requests are interleaved to read or write to multiple disks in parallel. Also, due to the nature of RAID3, the number of drives must be equal to 3, 5, 9, 17, and so on, or 2^n + 1.
This section demonstrates how to create a software RAID3 on a FreeBSD system.
While it is theoretically possible to boot from a RAID3 array on FreeBSD, that configuration is uncommon and is not advised. |
In FreeBSD, support for RAID3 is implemented by the graid3(8)GEOM class. Creating a dedicated RAID3 array on FreeBSD requires the following steps.
First, load the geom_raid3.ko kernel module by issuing one of the following commands:
# graid3 loador:
# kldload geom_raid3Ensure that a suitable mount point exists. This command creates a new directory to use as the mount point:
# mkdir /multimediaDetermine the device names for the disks which will be added to the array, and create the new RAID3 device. The final device listed will act as the dedicated parity disk. This example uses three unpartitioned ATA drives: ada1 and ada2 for data, and ada3 for parity.
# graid3 label -v gr0 /dev/ada1 /dev/ada2 /dev/ada3
Metadata value stored on /dev/ada1.
Metadata value stored on /dev/ada2.
Metadata value stored on /dev/ada3.
Done.Partition the newly created gr0 device and put a UFS file system on it:
# gpart create -s GPT /dev/raid3/gr0
# gpart add -t freebsd-ufs /dev/raid3/gr0
# newfs -j /dev/raid3/gr0p1Many numbers will glide across the screen, and after a bit of time, the process will be complete. The volume has been created and is ready to be mounted:
# mount /dev/raid3/gr0p1 /multimedia/The RAID3 array is now ready to use.
Additional configuration is needed to retain this setup across system reboots.
The geom_raid3.ko module must be loaded before the array can be mounted. To automatically load the kernel module during system initialization, add the following line to /boot/loader.conf:
geom_raid3_load="YES"
The following volume information must be added to /etc/fstab in order to automatically mount the array’s file system during the system boot process:
/dev/raid3/gr0p1 /multimedia ufs rw 2 2
Some motherboards and expansion cards add some simple hardware, usually just a ROM, that allows the computer to boot from a RAID array. After booting, access to the RAID array is handled by software running on the computer’s main processor. This "hardware-assisted software RAID" gives RAID arrays that are not dependent on any particular operating system, and which are functional even before an operating system is loaded.
Several levels of RAID are supported, depending on the hardware in use. See graid(8) for a complete list.
graid(8) requires the geom_raid.ko kernel module, which is included in the GENERIC kernel starting with FreeBSD 9.1. If needed, it can be loaded manually with graid load.
Software RAID devices often have a menu that can be entered by pressing special keys when the computer is booting. The menu can be used to create and delete RAID arrays. graid(8) can also create arrays directly from the command line.
graid label is used to create a new array. The motherboard used for this example has an Intel software RAID chipset, so the Intel metadata format is specified. The new array is given a label of gm0, it is a mirror (RAID1), and uses drives ada0 and ada1.
Some space on the drives will be overwritten when they are made into a new array. Back up existing data first! |
# graid label Intel gm0 RAID1 ada0 ada1
GEOM_RAID: Intel-a29ea104: Array Intel-a29ea104 created.
GEOM_RAID: Intel-a29ea104: Disk ada0 state changed from NONE to ACTIVE.
GEOM_RAID: Intel-a29ea104: Subdisk gm0:0-ada0 state changed from NONE to ACTIVE.
GEOM_RAID: Intel-a29ea104: Disk ada1 state changed from NONE to ACTIVE.
GEOM_RAID: Intel-a29ea104: Subdisk gm0:1-ada1 state changed from NONE to ACTIVE.
GEOM_RAID: Intel-a29ea104: Array started.
GEOM_RAID: Intel-a29ea104: Volume gm0 state changed from STARTING to OPTIMAL.
Intel-a29ea104 created
GEOM_RAID: Intel-a29ea104: Provider raid/r0 for volume gm0 created.A status check shows the new mirror is ready for use:
# graid status
Name Status Components
raid/r0 OPTIMAL ada0 (ACTIVE (ACTIVE))
ada1 (ACTIVE (ACTIVE))The array device appears in /dev/raid/. The first array is called r0. Additional arrays, if present, will be r1, r2, and so on.
The BIOS menu on some of these devices can create arrays with special characters in their names. To avoid problems with those special characters, arrays are given simple numbered names like r0. To show the actual labels, like gm0 in the example above, use sysctl(8):
# sysctl kern.geom.raid.name_format=1Some software RAID devices support more than one volume on an array. Volumes work like partitions, allowing space on the physical drives to be split and used in different ways. For example, Intel software RAID devices support two volumes. This example creates a 40 G mirror for safely storing the operating system, followed by a 20 G RAID0 (stripe) volume for fast temporary storage:
# graid label -S 40G Intel gm0 RAID1 ada0 ada1
# graid add -S 20G gm0 RAID0Volumes appear as additional rX entries in /dev/raid/. An array with two volumes will show r0 and r1.
See graid(8) for the number of volumes supported by different software RAID devices.
Under certain specific conditions, it is possible to convert an existing single drive to a graid(8) array without reformatting. To avoid data loss during the conversion, the existing drive must meet these minimum requirements:
The drive must be partitioned with the MBR partitioning scheme. GPT or other partitioning schemes with metadata at the end of the drive will be overwritten and corrupted by the graid(8) metadata.
There must be enough unpartitioned and unused space at the end of the drive to hold the graid(8) metadata. This metadata varies in size, but the largest occupies 64 M, so at least that much free space is recommended.
If the drive meets these requirements, start by making a full backup. Then create a single-drive mirror with that drive:
# graid label Intel gm0 RAID1 ada0 NONEgraid(8) metadata was written to the end of the drive in the unused space. A second drive can now be inserted into the mirror:
# graid insert raid/r0 ada1Data from the original drive will immediately begin to be copied to the second drive. The mirror will operate in degraded status until the copy is complete.
Drives can be inserted into an array as replacements for drives that have failed or are missing. If there are no failed or missing drives, the new drive becomes a spare. For example, inserting a new drive into a working two-drive mirror results in a two-drive mirror with one spare drive, not a three-drive mirror.
In the example mirror array, data immediately begins to be copied to the newly-inserted drive. Any existing information on the new drive will be overwritten.
# graid insert raid/r0 ada1
GEOM_RAID: Intel-a29ea104: Disk ada1 state changed from NONE to ACTIVE.
GEOM_RAID: Intel-a29ea104: Subdisk gm0:1-ada1 state changed from NONE to NEW.
GEOM_RAID: Intel-a29ea104: Subdisk gm0:1-ada1 state changed from NEW to REBUILD.
GEOM_RAID: Intel-a29ea104: Subdisk gm0:1-ada1 rebuild start at 0.Individual drives can be permanently removed from a from an array and their metadata erased:
# graid remove raid/r0 ada1
GEOM_RAID: Intel-a29ea104: Disk ada1 state changed from ACTIVE to OFFLINE.
GEOM_RAID: Intel-a29ea104: Subdisk gm0:1-[unknown] state changed from ACTIVE to NONE.
GEOM_RAID: Intel-a29ea104: Volume gm0 state changed from OPTIMAL to DEGRADED.An array can be stopped without removing metadata from the drives. The array will be restarted when the system is booted.
# graid stop raid/r0Array status can be checked at any time. After a drive was added to the mirror in the example above, data is being copied from the original drive to the new drive:
# graid status
Name Status Components
raid/r0 DEGRADED ada0 (ACTIVE (ACTIVE))
ada1 (ACTIVE (REBUILD 28%))Some types of arrays, like RAID0 or CONCAT, may not be shown in the status report if disks have failed. To see these partially-failed arrays, add -ga:
# graid status -ga
Name Status Components
Intel-e2d07d9a BROKEN ada6 (ACTIVE (ACTIVE))Arrays are destroyed by deleting all of the volumes from them. When the last volume present is deleted, the array is stopped and metadata is removed from the drives:
# graid delete raid/r0Drives may unexpectedly contain graid(8) metadata, either from previous use or manufacturer testing. graid(8) will detect these drives and create an array, interfering with access to the individual drive. To remove the unwanted metadata:
Boot the system. At the boot menu, select 2 for the loader prompt. Enter:
OK set kern.geom.raid.enable=0
OK bootThe system will boot with graid(8) disabled.
Back up all data on the affected drive.
As a workaround, graid(8) array detection can be disabled by adding
kern.geom.raid.enable=0
to /boot/loader.conf.
To permanently remove the graid(8) metadata from the affected drive, boot a FreeBSD installation CD-ROM or memory stick, and select Shell. Use status to find the name of the array, typically raid/r0:
# graid status
Name Status Components
raid/r0 OPTIMAL ada0 (ACTIVE (ACTIVE))
ada1 (ACTIVE (ACTIVE))Delete the volume by name:
# graid delete raid/r0If there is more than one volume shown, repeat the process for each volume. After the last array has been deleted, the volume will be destroyed.
Reboot and verify data, restoring from backup if necessary. After the metadata has been removed, the kern.geom.raid.enable=0 entry in /boot/loader.conf can also be removed.
GEOM provides a simple mechanism for providing remote access to devices such as disks, CDs, and file systems through the use of the GEOM Gate network daemon, ggated. The system with the device runs the server daemon which handles requests made by clients using ggatec. The devices should not contain any sensitive data as the connection between the client and the server is not encrypted.
Similar to NFS, which is discussed in 網路檔案系統 (NFS), ggated is configured using an exports file. This file specifies which systems are permitted to access the exported resources and what level of access they are offered. For example, to give the client 192.168.1.5 read and write access to the fourth slice on the first SCSI disk, create /etc/gg.exports with this line:
192.168.1.5 RW /dev/da0s4d
Before exporting the device, ensure it is not currently mounted. Then, start ggated:
# ggatedSeveral options are available for specifying an alternate listening port or changing the default location of the exports file. Refer to ggated(8) for details.
To access the exported device on the client machine, first use ggatec to specify the IP address of the server and the device name of the exported device. If successful, this command will display a ggate device name to mount. Mount that specified device name on a free mount point. This example connects to the /dev/da0s4d partition on 192.168.1.1, then mounts /dev/ggate0 on /mnt:
# ggatec create -o rw 192.168.1.1 /dev/da0s4d
ggate0
# mount /dev/ggate0 /mntThe device on the server may now be accessed through /mnt on the client. For more details about ggatec and a few usage examples, refer to ggatec(8).
The mount will fail if the device is currently mounted on either the server or any other client on the network. If simultaneous access is needed to network resources, use NFS instead. |
When the device is no longer needed, unmount it with umount so that the resource is available to other clients.
During system initialization, the FreeBSD kernel creates device nodes as devices are found. This method of probing for devices raises some issues. For instance, what if a new disk device is added via USB? It is likely that a flash device may be handed the device name of da0 and the original da0 shifted to da1. This will cause issues mounting file systems if they are listed in /etc/fstab which may also prevent the system from booting.
One solution is to chain SCSI devices in order so a new device added to the SCSI card will be issued unused device numbers. But what about USB devices which may replace the primary SCSI disk? This happens because USB devices are usually probed before the SCSI card. One solution is to only insert these devices after the system has been booted. Another method is to use only a single ATA drive and never list the SCSI devices in /etc/fstab.
A better solution is to use glabel to label the disk devices and use the labels in /etc/fstab. Because glabel stores the label in the last sector of a given provider, the label will remain persistent across reboots. By using this label as a device, the file system may always be mounted regardless of what device node it is accessed through.
|
Permanent labels can be a generic or a file system label. Permanent file system labels can be created with tunefs(8) or newfs(8). These types of labels are created in a sub-directory of /dev, and will be named according to the file system type. For example, UFS2 file system labels will be created in /dev/ufs. Generic permanent labels can be created with glabel label. These are not file system specific and will be created in /dev/label.
Temporary labels are destroyed at the next reboot. These labels are created in /dev/label and are suited to experimentation. A temporary label can be created using glabel create.
To create a permanent label for a UFS2 file system without destroying any data, issue the following command:
# tunefs -L home /dev/da3A label should now exist in /dev/ufs which may be added to /etc/fstab:
/dev/ufs/home /home ufs rw 2 2
The file system must not be mounted while attempting to run |
Now the file system may be mounted:
# mount /homeFrom this point on, so long as the geom_label.ko kernel module is loaded at boot with /boot/loader.conf or the GEOM_LABEL kernel option is present, the device node may change without any ill effect on the system.
File systems may also be created with a default label by using the -L flag with newfs. Refer to newfs(8) for more information.
The following command can be used to destroy the label:
# glabel destroy homeThe following example shows how to label the partitions of a boot disk.
By permanently labeling the partitions on the boot disk, the system should be able to continue to boot normally, even if the disk is moved to another controller or transferred to a different system. For this example, it is assumed that a single ATA disk is used, which is currently recognized by the system as ad0. It is also assumed that the standard FreeBSD partition scheme is used, with /, /var, /usr and /tmp, as well as a swap partition.
Reboot the system, and at the loader(8) prompt, press 4 to boot into single user mode. Then enter the following commands:
# glabel label rootfs /dev/ad0s1a
GEOM_LABEL: Label for provider /dev/ad0s1a is label/rootfs
# glabel label var /dev/ad0s1d
GEOM_LABEL: Label for provider /dev/ad0s1d is label/var
# glabel label usr /dev/ad0s1f
GEOM_LABEL: Label for provider /dev/ad0s1f is label/usr
# glabel label tmp /dev/ad0s1e
GEOM_LABEL: Label for provider /dev/ad0s1e is label/tmp
# glabel label swap /dev/ad0s1b
GEOM_LABEL: Label for provider /dev/ad0s1b is label/swap
# exitThe system will continue with multi-user boot. After the boot completes, edit /etc/fstab and replace the conventional device names, with their respective labels. The final /etc/fstab will look like this:
# Device Mountpoint FStype Options Dump Pass# /dev/label/swap none swap sw 0 0 /dev/label/rootfs / ufs rw 1 1 /dev/label/tmp /tmp ufs rw 2 2 /dev/label/usr /usr ufs rw 2 2 /dev/label/var /var ufs rw 2 2
The system can now be rebooted. If everything went well, it will come up normally and mount will show:
# mount
/dev/label/rootfs on / (ufs, local)
devfs on /dev (devfs, local)
/dev/label/tmp on /tmp (ufs, local, soft-updates)
/dev/label/usr on /usr (ufs, local, soft-updates)
/dev/label/var on /var (ufs, local, soft-updates)The glabel(8) class supports a label type for UFS file systems, based on the unique file system id, ufsid. These labels may be found in /dev/ufsid and are created automatically during system startup. It is possible to use ufsid labels to mount partitions using /etc/fstab. Use glabel status to receive a list of file systems and their corresponding ufsid labels:
% glabel status
Name Status Components
ufsid/486b6fc38d330916 N/A ad4s1d
ufsid/486b6fc16926168e N/A ad4s1fIn the above example, ad4s1d represents /var, while ad4s1f represents /usr. Using the ufsid values shown, these partitions may now be mounted with the following entries in /etc/fstab:
/dev/ufsid/486b6fc38d330916 /var ufs rw 2 2 /dev/ufsid/486b6fc16926168e /usr ufs rw 2 2
Any partitions with ufsid labels can be mounted in this way, eliminating the need to manually create permanent labels, while still enjoying the benefits of device name independent mounting.
Support for journals on UFS file systems is available on FreeBSD. The implementation is provided through the GEOM subsystem and is configured using gjournal. Unlike other file system journaling implementations, the gjournal method is block based and not implemented as part of the file system. It is a GEOM extension.
Journaling stores a log of file system transactions, such as changes that make up a complete disk write operation, before meta-data and file writes are committed to the disk. This transaction log can later be replayed to redo file system transactions, preventing file system inconsistencies.
This method provides another mechanism to protect against data loss and inconsistencies of the file system. Unlike Soft Updates, which tracks and enforces meta-data updates, and snapshots, which create an image of the file system, a log is stored in disk space specifically for this task. For better performance, the journal may be stored on another disk. In this configuration, the journal provider or storage device should be listed after the device to enable journaling on.
The GENERIC kernel provides support for gjournal. To automatically load the geom_journal.ko kernel module at boot time, add the following line to /boot/loader.conf:
geom_journal_load="YES"
If a custom kernel is used, ensure the following line is in the kernel configuration file:
options GEOM_JOURNAL
Once the module is loaded, a journal can be created on a new file system using the following steps. In this example, da4 is a new SCSI disk:
# gjournal load
# gjournal label /dev/da4This will load the module and create a /dev/da4.journal device node on /dev/da4.
A UFS file system may now be created on the journaled device, then mounted on an existing mount point:
# newfs -O 2 -J /dev/da4.journal
# mount /dev/da4.journal /mntIn the case of several slices, a journal will be created for each individual slice. For instance, if ad4s1 and ad4s2 are both slices, then |
Journaling may also be enabled on current file systems by using tunefs. However, always make a backup before attempting to alter an existing file system. In most cases, gjournal will fail if it is unable to create the journal, but this does not protect against data loss incurred as a result of misusing tunefs. Refer to gjournal(8) and tunefs(8) for more information about these commands.
It is possible to journal the boot disk of a FreeBSD system. Refer to the article Implementing UFS Journaling on a Desktop PC for detailed instructions.
Z 檔案系統 或 ZFS 是設計來克服許多在以往設計中發現的主要問題的一個先進的檔案系統。
最初由 Sun™ 所開發,後來的開放源始碼 ZFS 開發已移到 OpenZFS 計劃。
ZFS 的設計目標主要有三個:
資料完整性:所有資料都會有一個資料的校驗碼 (checksum),資料寫入時會計算校驗碼然後一併寫入,往後讀取資料時會再計算一次校驗碼,若校驗碼與當初寫入時不相符,便可偵測到資料錯誤,此時若有可用的資料備援 (Data redundancy),ZFS 會嘗試自動修正錯誤。
儲存池:實體的儲存裝置都會先被加入到一個儲存池 (Pool),這個共用的儲存池可用來配置儲存空間,儲存池的空間可被所有的檔案系統使用且透過加入新的儲存裝置來增加空間。
效能:提供多個快取機制來增加效能。先進、以記憶體為基礎的讀取快取可使用 ARC。第二層以磁碟為基礎的讀取快取可使用 L2ARC,以磁碟為基礎的同步寫入快取則可使用 ZIL。
完整的功能清單與術語在 ZFS 特色與術語 中有詳述。
ZFS 與以往任何的檔案系統有顯著的不同,因為它不只是一個檔案系統,ZFS 的獨特優點來自結合了以往被分開的磁碟區管理程式 (Volume Manager) 及檔案系統兩個角色,讓檔案系統也能夠察覺磁碟底層結構的變動。傳統在一個磁碟上只能建立一個檔案系統,若有兩個磁碟則會需要建立兩個分開的檔案系統,在傳統要解決這個問題要使用硬體 RAID 來製作一個空間實際上由數顆實體磁碟所組成的單一的邏輯磁碟給作業系統,作業系統便可在這個邏輯磁碟上放置檔案系統,即使是在那些使用 GEOM 提供的軟體 RAID 解決方案也是一樣,把 UFS 檔案系統放在 RAID Transform 上面當做是一個單一的裝置。ZFS 結合了磁碟區管理程式 (Volume Manager) 與檔案系統來解決這個問題並讓建立多個檔案系統可以共用一個儲存池 (Pool)。ZFS 最大的優點是可以察覺實體磁碟配置的變動,當有額外的磁碟加入到儲存池時可以自動擴增現有的檔案系統,所有的檔案系統便可使用這個新的空間。ZFS 也有數個不同的屬性可以套用到各別檔案系統上,比起單一檔案系統,對建立數個不同檔案系統與資料集 (Dataset) 時有許多的好處。
這裡有一個啟動機制,可讓 FreeBSD 在系統初始化時掛載 ZFS 儲存池。要開啟這個功能,可加入此行到 /etc/rc.conf:
zfs_enable="YES"
然後啟動服務:
# service zfs start本節的例子會假設有三個 SCSI 磁碟,名稱分別為 da0, da1 及 da2。SATA 硬體的使用者裝置名稱改為 ada 。
要使用一個磁碟裝置建立一個簡單、無備援的儲存池可:
# zpool create example /dev/da0要檢視這個新的儲存池,可查看 df 的輸出結果:
# df
Filesystem 1K-blocks Used Avail Capacity Mounted on
/dev/ad0s1a 2026030 235230 1628718 13% /
devfs 1 1 0 100% /dev
/dev/ad0s1d 54098308 1032846 48737598 2% /usr
example 17547136 0 17547136 0% /example這個輸出結果說明 example 儲存池已建立且被掛載,現在已經可以作為檔案系統存取,可以在上面建立檔案且使用者可以瀏覽:
# cd /example
# ls
# touch testfile
# ls -al
total 4
drwxr-xr-x 2 root wheel 3 Aug 29 23:15 .
drwxr-xr-x 21 root wheel 512 Aug 29 23:12 ..
-rw-r--r-- 1 root wheel 0 Aug 29 23:15 testfile但是,這個儲存池並未運用到任何 ZFS 功能,若要在這個儲存池上建立一個有開啟壓縮功能的資料集:
# zfs create example/compressed
# zfs set compression=gzip example/compressedexample/compressed 資料集現在是一個 ZFS 壓縮的檔案系統,可以試著複製較大的檔案到 /example/compressed。
壓縮功能也可以使用以下指令關閉:
# zfs set compression=off example/compressed要卸載檔案系統,使用 zfs umount 然後再使用 df 確認:
# zfs umount example/compressed
# df
Filesystem 1K-blocks Used Avail Capacity Mounted on
/dev/ad0s1a 2026030 235232 1628716 13% /
devfs 1 1 0 100% /dev
/dev/ad0s1d 54098308 1032864 48737580 2% /usr
example 17547008 0 17547008 0% /example要重新掛載檔案系統以便再次使用,使用 zfs mount 然後以 df 檢查:
# zfs mount example/compressed
# df
Filesystem 1K-blocks Used Avail Capacity Mounted on
/dev/ad0s1a 2026030 235234 1628714 13% /
devfs 1 1 0 100% /dev
/dev/ad0s1d 54098308 1032864 48737580 2% /usr
example 17547008 0 17547008 0% /example
example/compressed 17547008 0 17547008 0% /example/compressed儲存池與檔案系統也可以從 mount 的結果查詢到:
# mount
/dev/ad0s1a on / (ufs, local)
devfs on /dev (devfs, local)
/dev/ad0s1d on /usr (ufs, local, soft-updates)
example on /example (zfs, local)
example/compressed on /example/compressed (zfs, local)在建立之後,ZFS 的資料集可如同其他檔案系統一般使用,且有許多額外功能可在每個資料集上設定。例如,建立一個預計存放重要的資料的新檔案系統 data,要設定每個資料區塊 (Data block) 要保留兩份備份:
# zfs create example/data
# zfs set copies=2 example/data現在,可以使用 df 指令來查看資料與空間的使用率:
# df
Filesystem 1K-blocks Used Avail Capacity Mounted on
/dev/ad0s1a 2026030 235234 1628714 13% /
devfs 1 1 0 100% /dev
/dev/ad0s1d 54098308 1032864 48737580 2% /usr
example 17547008 0 17547008 0% /example
example/compressed 17547008 0 17547008 0% /example/compressed
example/data 17547008 0 17547008 0% /example/data注意,從這個可以發現每個在儲存池上的檔案系統都擁有相同的可用空間,這是為什麼要在這些範例使用 df 的原因,為了要顯示檔案系統只會用它們所需要使用到的空間,且均取自同一個儲存池。ZFS 淘汰了磁碟區 (Volume) 與分割區 (Partition) 的概念,且允許多個檔案系統共用相同的儲存池。
不需要使用時可摧毀檔案系統後再摧毀儲存池:
# zfs destroy example/compressed
# zfs destroy example/data
# zpool destroy example磁碟損壞時,要避免資料因磁碟故障造成遺失便是使用 RAID。ZFS 在它的儲存池設計中支援了這項功能。RAID-Z 儲存池需要使用三個或更多的磁碟,但可以提供比鏡像 (Mirror) 儲存池更多的可用空間。
這個例子會建立一個 RAID-Z 儲存池,並指定要加入這個儲存池的磁碟:
# zpool create storage raidz da0 da1 da2Sun™ 建議用在 RAID-Z 設定的裝置數在三到九個之間。若需要由 10 個或更多磁碟組成單一儲存池的環境,可考慮分成較小的 RAID-Z 群組。若只有兩個可用的磁碟且需要做備援 (Redundancy),可考慮使用 ZFS 鏡像 (Mirror)。請參考 zpool(8) 取得更多詳細資訊。 |
先前的例子已經建立了 storage 儲存池 (zpool),現在這個例子會在該儲存池中建立一個新的檔案系統,名稱為 home:
# zfs create storage/home可以設定開啟壓縮及保留目錄及檔案額外備份的功能:
# zfs set copies=2 storage/home
# zfs set compression=gzip storage/home要讓這個空間作為使用者的新家目錄位置,需複製使用者資料到這個目錄並建立適合的符號連結 (Symbolic link):
# cp -rp /home/* /storage/home
# rm -rf /home /usr/home
# ln -s /storage/home /home
# ln -s /storage/home /usr/home現在使用者的資料會儲存在新建立的 /storage/home,可以加入新使用者並登入該使用者來測試。
試著建立檔案系統快照 (Snapshot),稍後可用來還原 (Rollback):
# zfs snapshot storage/home@08-30-08快照只可以使用整個檔案系統製作,無法使用各別目錄或檔案。
@ 字元用來區隔檔案系統名稱 (File system) 或磁碟區 (Volume) 名稱,若有重要的目錄意外被刪除,檔案系統可以備份然後還原到先前目錄還存在時的快照 (Snapshot):
# zfs rollback storage/home@08-30-08要列出所有可用的快照,可在檔案系統的 .zfs/snapshot 目錄執行 ls,舉例來說,要查看先前已做的快照:
# ls /storage/home/.zfs/snapshot也可以寫一個 Script 來對使用者資料做例行性的快照,但隨著時間快照可能消耗大量的磁碟空間。先前的快照可以使用指令移除:
# zfs destroy storage/home@08-30-08在測試之後,便可讓 /storage/home 成為真正的 /home 使用此指令:
# zfs set mountpoint=/home storage/home執行 df 興 mount 來確認系統現在是否以把檔案系統做為真正的 /home:
# mount
/dev/ad0s1a on / (ufs, local)
devfs on /dev (devfs, local)
/dev/ad0s1d on /usr (ufs, local, soft-updates)
storage on /storage (zfs, local)
storage/home on /home (zfs, local)
# df
Filesystem 1K-blocks Used Avail Capacity Mounted on
/dev/ad0s1a 2026030 235240 1628708 13% /
devfs 1 1 0 100% /dev
/dev/ad0s1d 54098308 1032826 48737618 2% /usr
storage 26320512 0 26320512 0% /storage
storage/home 26320512 0 26320512 0% /home這個動作完成 RAID-Z 最後的設定,有關已建立的檔案系統每日狀態更新可以做為 periodic(8) 的一部份在每天晚上執行。加入此行到 /etc/periodic.conf:
daily_status_zfs_enable="YES"
每個軟體 RAID 都有監控其狀態 (state) 的方式,而 RAID-Z 裝置的狀態可以使用這個指令來查看:
# zpool status -x如果所有儲存池為上線 (Online) 且正常,則訊息會顯示:
all pools are healthy如果有發生問題,可能磁碟會呈現離線 (Offline) 的狀態,此時儲存池的狀態會是:
pool: storage
state: DEGRADED
status: One or more devices has been taken offline by the administrator.
Sufficient replicas exist for the pool to continue functioning in a
degraded state.
action: Online the device using 'zpool online' or replace the device with
'zpool replace'.
scrub: none requested
config:
NAME STATE READ WRITE CKSUM
storage DEGRADED 0 0 0
raidz1 DEGRADED 0 0 0
da0 ONLINE 0 0 0
da1 OFFLINE 0 0 0
da2 ONLINE 0 0 0
errors: No known data errors這代表著裝置在之前被管理者使用此指令拿下線:
# zpool offline storage da1現在系統可以關機然後更換 da1,當系統恢復上線,則可以替換掉儲存池中故障的磁碟:
# zpool replace storage da1到這裡,可以再檢查狀態一次,這時不需使用 -x 參數來顯示所有的儲存池:
# zpool status storage
pool: storage
state: ONLINE
scrub: resilver completed with 0 errors on Sat Aug 30 19:44:11 2008
config:
NAME STATE READ WRITE CKSUM
storage ONLINE 0 0 0
raidz1 ONLINE 0 0 0
da0 ONLINE 0 0 0
da1 ONLINE 0 0 0
da2 ONLINE 0 0 0
errors: No known data errors在這個例子中,所有的磁碟均已正常運作。
ZFS 使用校驗碼 (Checksum) 來檢驗資料的完整性 (Integrity),會在建立檔案系統時便自動開啟。
校驗碼 (Checksum) 可以關閉,但並不建議!校驗碼只會使用非常少的儲存空間來確保資料的完整性。若關閉校驗碼會使許多 ZFS 功能無法正常運作,且關閉校驗碼對並不會明顯的改善效能。 |
檢驗校驗碼這個動作即所謂的清潔 (Scrub),可以使用以下指令來檢驗 storage 儲存池的資料完整性:
# zpool scrub storage清潔所需要的時間依儲存的資料量而定,較大的資料量相對會需要花費較長的時間來檢驗。清潔會對 I/O 有非常密集的操作且一次只能進行一個清潔動作。在清潔完成之後,可以使用 status 來查看狀態:
# zpool status storage
pool: storage
state: ONLINE
scrub: scrub completed with 0 errors on Sat Jan 26 19:57:37 2013
config:
NAME STATE READ WRITE CKSUM
storage ONLINE 0 0 0
raidz1 ONLINE 0 0 0
da0 ONLINE 0 0 0
da1 ONLINE 0 0 0
da2 ONLINE 0 0 0
errors: No known data errors查詢結果會顯示上次完成清潔的時間來協助追蹤是否要再做清潔。定期清潔可以協助保護資料不會默默損壞且確保儲存池的完整性。
zpool 管理ZFS 管理分成兩個主要的工具。zpool 工具用來控制儲存池的運作並可處理磁碟的新增、移除、更換與管理。zfs 工具用來建立、摧毀與管理檔案系統 (File system) 與磁碟區 (Volume) 的資料集。
建立 ZFS 儲存池 (zpool) 要做幾個涉及長遠規劃的決定,因為建立儲存池之後便無法再更改儲存池的結構。最重要的決定是要使用那一種型態的 vdev 來將實體磁碟設為同一群組。請參考 vdev 型態 的清單來取得有關可用選項的詳細資訊。大部份的 vdev 型態不允許在建立儲存池之後再加入額外的磁碟,鏡像 (Mirror) 是可以允許加入額外的磁碟到 vdev 的其中一個例外,另一個則是串連 (Stripe),可以加入額外的磁碟到 vdev 來升級為鏡像。雖然可以加入額外的 vdev 來擴充儲存池,但儲存池的配置在建立之後便無法更改,若要要更改,則必須先備份資料,把儲存池摧毀後再重新建立。
建立一個簡單的鏡像儲存池:
# zpool create mypool mirror /dev/ada1 /dev/ada2
# zpool status
pool: mypool
state: ONLINE
scan: none requested
config:
NAME STATE READ WRITE CKSUM
mypool ONLINE 0 0 0
mirror-0 ONLINE 0 0 0
ada1 ONLINE 0 0 0
ada2 ONLINE 0 0 0
errors: No known data errors可以一次建立數個 vdev,磁碟群組間使用 vdev 型態關鍵字來區隔,在這個例子使用 mirror:
# zpool create mypool mirror /dev/ada1 /dev/ada2 mirror /dev/ada3 /dev/ada4
pool: mypool
state: ONLINE
scan: none requested
config:
NAME STATE READ WRITE CKSUM
mypool ONLINE 0 0 0
mirror-0 ONLINE 0 0 0
ada1 ONLINE 0 0 0
ada2 ONLINE 0 0 0
mirror-1 ONLINE 0 0 0
ada3 ONLINE 0 0 0
ada4 ONLINE 0 0 0
errors: No known data errors儲存池也可以不使用整個磁碟而改使用分割區 (Partition) 來建立。把 ZFS 放到不同的分割區可讓同一個磁碟有其他的分割區可做其他用途,尤其是有 Bootcode 與檔案系統要用來開機的分割區,這讓磁碟可以用來開機也同樣可以做為儲存池的一部份。在 FreeBSD 用分割區來替代整個磁碟並不會對效能有影響。使用分割區也讓管理者可以對磁碟容量做 少算的預備,使用比完整容量少的容量,未來若要替換的磁碟號稱與原磁碟相同,但實際上卻比較小時,也可符合這個較小的分割區容量,以使用替換的磁碟。
使用分割區建立一個 RAID-Z2 儲存池:
# zpool create mypool raidz2 /dev/ada0p3 /dev/ada1p3 /dev/ada2p3 /dev/ada3p3 /dev/ada4p3 /dev/ada5p3
# zpool status
pool: mypool
state: ONLINE
scan: none requested
config:
NAME STATE READ WRITE CKSUM
mypool ONLINE 0 0 0
raidz2-0 ONLINE 0 0 0
ada0p3 ONLINE 0 0 0
ada1p3 ONLINE 0 0 0
ada2p3 ONLINE 0 0 0
ada3p3 ONLINE 0 0 0
ada4p3 ONLINE 0 0 0
ada5p3 ONLINE 0 0 0
errors: No known data errors不需使用的儲存池可以摧毀,來讓磁碟可以再次使用。摧毀一個儲存池要先卸載所有該儲存池的資料集。若資料集在使用中,卸載的操作會失敗且儲存池不會被摧毀。儲存池的摧毀可以使用 -f 來強制執行,但這可能造成那些有開啟這些資料集之中檔案的應用程式無法辨識的行為。
加入磁碟到儲存池 (zpool) 會有兩種情形:使用 zpool attach 加入一個磁碟到既有的 vdev,或使用 zpool add 加入 vdev 到儲存池。只有部份 vdev 型態 允許在 vdev 建立之後加入磁碟。
由單一磁碟所建立的儲存池缺乏備援 (Redundancy) 功能,可以偵測到資料的損壞但無法修復,因為資料沒有其他備份可用。備份數 (Copies) 屬性可以讓您從較小的故障中復原,如磁碟壞軌 (Bad sector),但無法提供與鏡像或 RAID-Z 同樣層級的保護。由單一磁碟所建立的儲存池可以使用 zpool attach 來加入額外的磁碟到 vdev,來建立鏡像。zpool attach 也可用來加入額外的磁碟到鏡像群組,來增加備援與讀取效率。若使用的磁碟已有分割區,可以複製該磁碟的分割區配置到另一個,使用 gpart backup 與 gpart restore 可讓這件事變的很簡單。
加入 ada1p3 來升級單一磁碟串連 (stripe) vdev ada0p3 採用鏡像型態 (mirror):
# zpool status
pool: mypool
state: ONLINE
scan: none requested
config:
NAME STATE READ WRITE CKSUM
mypool ONLINE 0 0 0
ada0p3 ONLINE 0 0 0
errors: No known data errors
# zpool attach mypool ada0p3 ada1p3
Make sure to wait until resilver is done before rebooting.
If you boot from pool 'mypool', you may need to update
boot code on newly attached disk 'ada1p3'.
Assuming you use GPT partitioning and 'da0' is your new boot disk
you may use the following command:
gpart bootcode -b /boot/pmbr -p /boot/gptzfsboot -i 1 da0
# gpart bootcode -b /boot/pmbr -p /boot/gptzfsboot -i 1 ada1
bootcode written to ada1
# zpool status
pool: mypool
state: ONLINE
status: One or more devices is currently being resilvered. The pool will
continue to function, possibly in a degraded state.
action: Wait for the resilver to complete.
scan: resilver in progress since Fri May 30 08:19:19 2014
527M scanned out of 781M at 47.9M/s, 0h0m to go
527M resilvered, 67.53% done
config:
NAME STATE READ WRITE CKSUM
mypool ONLINE 0 0 0
mirror-0 ONLINE 0 0 0
ada0p3 ONLINE 0 0 0
ada1p3 ONLINE 0 0 0 (resilvering)
errors: No known data errors
# zpool status
pool: mypool
state: ONLINE
scan: resilvered 781M in 0h0m with 0 errors on Fri May 30 08:15:58 2014
config:
NAME STATE READ WRITE CKSUM
mypool ONLINE 0 0 0
mirror-0 ONLINE 0 0 0
ada0p3 ONLINE 0 0 0
ada1p3 ONLINE 0 0 0
errors: No known data errors若不想選擇加入磁碟到既有的 vdev ,對 RAID-Z 來說,可選擇另一種方式,便是加入另一個 vdev 到儲存池。額外的 vdev 可以提供更高的效能,分散寫入資料到 vdev 之間,每個 vdev 會負責自己的備援。也可以混合使用不同的 vdev 型態,但並不建議,例如混合使用 mirror 與 RAID-Z,加入一個無備援的 vdev 到一個含有 mirror 或 RAID-Z vdev 的儲存池會讓資料損壞的風險擴大整個儲存池,由於會分散寫入資料,若在無備援的磁碟上發生故障的結果便是遺失大半寫到儲存池的資料區塊。
在每個 vdev 間的資料是串連的,例如,有兩個 mirror vdev,便跟 RAID 10 一樣在兩個 mirror 間分散寫入資料,且會做空間的分配,因此 vdev 會在同時達到全滿 100% 的用量。若 vdev 間的可用空間量不同則會影響到效能,因為資料量會不成比例的寫入到使用量較少的 vdev。
當連接額外的裝置到一個可以開機的儲存池,要記得更新 Bootcode。
連接第二個 mirror 群組 (ada2p3 及 ada3p3) 到既有的 mirror:
# zpool status
pool: mypool
state: ONLINE
scan: resilvered 781M in 0h0m with 0 errors on Fri May 30 08:19:35 2014
config:
NAME STATE READ WRITE CKSUM
mypool ONLINE 0 0 0
mirror-0 ONLINE 0 0 0
ada0p3 ONLINE 0 0 0
ada1p3 ONLINE 0 0 0
errors: No known data errors
# zpool add mypool mirror ada2p3 ada3p3
# gpart bootcode -b /boot/pmbr -p /boot/gptzfsboot -i 1 ada2
bootcode written to ada2
# gpart bootcode -b /boot/pmbr -p /boot/gptzfsboot -i 1 ada3
bootcode written to ada3
# zpool status
pool: mypool
state: ONLINE
scan: scrub repaired 0 in 0h0m with 0 errors on Fri May 30 08:29:51 2014
config:
NAME STATE READ WRITE CKSUM
mypool ONLINE 0 0 0
mirror-0 ONLINE 0 0 0
ada0p3 ONLINE 0 0 0
ada1p3 ONLINE 0 0 0
mirror-1 ONLINE 0 0 0
ada2p3 ONLINE 0 0 0
ada3p3 ONLINE 0 0 0
errors: No known data errors現在已無法從儲存池上移除 vdev,且磁碟只能夠在有足夠備援空間的情況下從 mirror 移除,若在 mirror 群組中只剩下一個磁碟,便會取消 mirror 然後還原為 stripe,若剩下的那個磁碟故障,便會影響到整個儲存池。
從一個三方 mirror 群組移除一個磁碟:
# zpool status
pool: mypool
state: ONLINE
scan: scrub repaired 0 in 0h0m with 0 errors on Fri May 30 08:29:51 2014
config:
NAME STATE READ WRITE CKSUM
mypool ONLINE 0 0 0
mirror-0 ONLINE 0 0 0
ada0p3 ONLINE 0 0 0
ada1p3 ONLINE 0 0 0
ada2p3 ONLINE 0 0 0
errors: No known data errors
# zpool detach mypool ada2p3
# zpool status
pool: mypool
state: ONLINE
scan: scrub repaired 0 in 0h0m with 0 errors on Fri May 30 08:29:51 2014
config:
NAME STATE READ WRITE CKSUM
mypool ONLINE 0 0 0
mirror-0 ONLINE 0 0 0
ada0p3 ONLINE 0 0 0
ada1p3 ONLINE 0 0 0
errors: No known data errors儲存池的狀態很重要,若有磁碟機離線或偵測到讀取、寫入或校驗碼 (Checksum) 錯誤,對應的錯誤計數便會增加。status 會顯示儲存池中每一個磁碟機的設定與狀態及整個儲存池的狀態。需要處置的方式與有關最近清潔 (Scrub) 的詳細資訊也會一併顯示。
# zpool status
pool: mypool
state: ONLINE
scan: scrub repaired 0 in 2h25m with 0 errors on Sat Sep 14 04:25:50 2013
config:
NAME STATE READ WRITE CKSUM
mypool ONLINE 0 0 0
raidz2-0 ONLINE 0 0 0
ada0p3 ONLINE 0 0 0
ada1p3 ONLINE 0 0 0
ada2p3 ONLINE 0 0 0
ada3p3 ONLINE 0 0 0
ada4p3 ONLINE 0 0 0
ada5p3 ONLINE 0 0 0
errors: No known data errors當偵測到錯誤發生,讀取、寫入或校驗碼 (Checksum) 的計數便會增加。使用 zpool clear mypool 可以清除錯誤訊息及重置計數。清空錯誤狀態對當儲存池發生錯誤要使用自動化 Script 通知的管理者來說會很重要,因在舊的錯誤尚未清除前不會回報後續的錯誤。
可能有一些情況會需要更換磁碟為另一個磁碟,當要更換運作中的磁碟,此程序會維持舊有的磁碟在更換的過程為上線的狀態,儲存池不會進入降級 (Degraded) 的狀態,來減少資料遺失的風險。zpool replace 會複製所有舊磁碟的資料到新磁碟,操作完成之後舊磁碟便會與 vdev 中斷連線。若新磁碟容量較舊磁碟大,也可以會增加儲存池來使用新的空間,請參考 擴增儲存池。
更換儲存池中正在運作的狀置:
# zpool status
pool: mypool
state: ONLINE
scan: none requested
config:
NAME STATE READ WRITE CKSUM
mypool ONLINE 0 0 0
mirror-0 ONLINE 0 0 0
ada0p3 ONLINE 0 0 0
ada1p3 ONLINE 0 0 0
errors: No known data errors
# zpool replace mypool ada1p3 ada2p3
Make sure to wait until resilver is done before rebooting.
If you boot from pool 'zroot', you may need to update
boot code on newly attached disk 'ada2p3'.
Assuming you use GPT partitioning and 'da0' is your new boot disk
you may use the following command:
gpart bootcode -b /boot/pmbr -p /boot/gptzfsboot -i 1 da0
# gpart bootcode -b /boot/pmbr -p /boot/gptzfsboot -i 1 ada2
# zpool status
pool: mypool
state: ONLINE
status: One or more devices is currently being resilvered. The pool will
continue to function, possibly in a degraded state.
action: Wait for the resilver to complete.
scan: resilver in progress since Mon Jun 2 14:21:35 2014
604M scanned out of 781M at 46.5M/s, 0h0m to go
604M resilvered, 77.39% done
config:
NAME STATE READ WRITE CKSUM
mypool ONLINE 0 0 0
mirror-0 ONLINE 0 0 0
ada0p3 ONLINE 0 0 0
replacing-1 ONLINE 0 0 0
ada1p3 ONLINE 0 0 0
ada2p3 ONLINE 0 0 0 (resilvering)
errors: No known data errors
# zpool status
pool: mypool
state: ONLINE
scan: resilvered 781M in 0h0m with 0 errors on Mon Jun 2 14:21:52 2014
config:
NAME STATE READ WRITE CKSUM
mypool ONLINE 0 0 0
mirror-0 ONLINE 0 0 0
ada0p3 ONLINE 0 0 0
ada2p3 ONLINE 0 0 0
errors: No known data errors當儲存池中的磁碟故障,該故障硬碟所屬的 vdev 便會進入降級 (Degraded) 狀態,所有的資料仍可使用,但效能可能會降低,因為遺失的資料必須從可用的備援資料計算才能取得。要將 vdev 恢復完整運作的狀態必須更換故障的實體裝置。然後 ZFS 便會開始修復 (Resilver,古代鏡子的修復稱 Resilver) 作業,會從可用的備援資料計算出故障磁碟中的資料並寫入到替換的裝置上。完成後 vdev 便會重新返回上線 (Online) 的狀態。
若 vdev 沒有任何備援資料或有多個裝置故障,沒有足夠的備援資料可以補償,儲存池便會進入故障 (Faulted) 的狀態。
更換故障的磁碟時,故障磁碟的名稱會更換為裝置的 GUID,若替換裝置要使用相同的裝置名稱,則在 zpool replace 不須加上新裝置名稱參數。
使用 zpool replace 更換故障的磁碟:
# zpool status
pool: mypool
state: DEGRADED
status: One or more devices could not be opened. Sufficient replicas exist for
the pool to continue functioning in a degraded state.
action: Attach the missing device and online it using 'zpool online'.
see: http://illumos.org/msg/ZFS-8000-2Q
scan: none requested
config:
NAME STATE READ WRITE CKSUM
mypool DEGRADED 0 0 0
mirror-0 DEGRADED 0 0 0
ada0p3 ONLINE 0 0 0
316502962686821739 UNAVAIL 0 0 0 was /dev/ada1p3
errors: No known data errors
# zpool replace mypool 316502962686821739 ada2p3
# zpool status
pool: mypool
state: DEGRADED
status: One or more devices is currently being resilvered. The pool will
continue to function, possibly in a degraded state.
action: Wait for the resilver to complete.
scan: resilver in progress since Mon Jun 2 14:52:21 2014
641M scanned out of 781M at 49.3M/s, 0h0m to go
640M resilvered, 82.04% done
config:
NAME STATE READ WRITE CKSUM
mypool DEGRADED 0 0 0
mirror-0 DEGRADED 0 0 0
ada0p3 ONLINE 0 0 0
replacing-1 UNAVAIL 0 0 0
15732067398082357289 UNAVAIL 0 0 0 was /dev/ada1p3/old
ada2p3 ONLINE 0 0 0 (resilvering)
errors: No known data errors
# zpool status
pool: mypool
state: ONLINE
scan: resilvered 781M in 0h0m with 0 errors on Mon Jun 2 14:52:38 2014
config:
NAME STATE READ WRITE CKSUM
mypool ONLINE 0 0 0
mirror-0 ONLINE 0 0 0
ada0p3 ONLINE 0 0 0
ada2p3 ONLINE 0 0 0
errors: No known data errors建議儲存池要定期清潔 (Scrub),最好是每一個月清潔一次。 scrub 作業對磁碟操作非常的密集,在執行時會降低磁碟的效能。在排程 scrub 時避免在使用高峰的時期,或使用 vfs.zfs.scrub_delay 來調整 scrub 的相對優先權來避免影響其他的工作。
# zpool scrub mypool
# zpool status
pool: mypool
state: ONLINE
scan: scrub in progress since Wed Feb 19 20:52:54 2014
116G scanned out of 8.60T at 649M/s, 3h48m to go
0 repaired, 1.32% done
config:
NAME STATE READ WRITE CKSUM
mypool ONLINE 0 0 0
raidz2-0 ONLINE 0 0 0
ada0p3 ONLINE 0 0 0
ada1p3 ONLINE 0 0 0
ada2p3 ONLINE 0 0 0
ada3p3 ONLINE 0 0 0
ada4p3 ONLINE 0 0 0
ada5p3 ONLINE 0 0 0
errors: No known data errors若發生需要取消清潔作業的事,可以下 zpool scrub -s mypool。
校驗碼 (Checksum) 會隨資料區塊一併儲存,這使得檔案系統可以做到自我修復。這個功能可以在校驗碼與儲存池中的另一個裝置不同時自動修復資料。舉例來說,有兩個磁碟做鏡像 (Mirror),其中一個磁碟機開始失常並無法正常儲存資料,甚至是資料放在長期封存的儲存裝置上,已經很久沒有被存取。傳統的檔案系統需要執行演算法來檢查並修復資料如 fsck(8),這些指令耗費時間,且在嚴重時需要管理者手動決定要做那一種修復操作。當 ZFS 偵測到資料區塊的校驗碼不對時,它除了把資料交給需要的應用程式外,也會修正在磁碟上錯誤的資料。這件事不需要與系統管理者作任何互動便會在一般的儲存池操作時完成。
接下來的例子會示範自我修復會如何運作。建立一個使用磁碟 /dev/ada0 及 /dev/ada1 做鏡像的儲存池。
# zpool create healer mirror /dev/ada0 /dev/ada1
# zpool status healer
pool: healer
state: ONLINE
scan: none requested
config:
NAME STATE READ WRITE CKSUM
healer ONLINE 0 0 0
mirror-0 ONLINE 0 0 0
ada0 ONLINE 0 0 0
ada1 ONLINE 0 0 0
errors: No known data errors
# zpool list
NAME SIZE ALLOC FREE CKPOINT EXPANDSZ FRAG CAP DEDUP HEALTH ALTROOT
healer 960M 92.5K 960M - - 0% 0% 1.00x ONLINE -將部份需要使用自我修復功能來保護的重要資料複製到該儲存池,建立一個儲存池的校驗碼供稍後做比較時使用。
# cp /some/important/data /healer
# zfs list
NAME SIZE ALLOC FREE CAP DEDUP HEALTH ALTROOT
healer 960M 67.7M 892M 7% 1.00x ONLINE -
# sha1 /healer > checksum.txt
# cat checksum.txt
SHA1 (/healer) = 2753eff56d77d9a536ece6694bf0a82740344d1f寫入隨機的資料到鏡像的第一個磁碟來模擬資料損毀的情況。要避免 ZFS 偵測到錯誤時馬上做修復,接著要將儲存池匯出,待模擬資料損毀之後再匯入。
這是一個危險的操作,會破壞重要的資料。在這裡使用僅為了示範用,不應在儲存池正常運作時嘗試使用,也不應將這個故意損壞資料的例子用在任何其他的檔案系統上,所以請勿使用任何不屬於該儲存池的其他磁碟裝置名稱並確定在執行指令前已對儲存池做正確的備份! |
# zpool export healer
# dd if=/dev/random of=/dev/ada1 bs=1m count=200
200+0 records in
200+0 records out
209715200 bytes transferred in 62.992162 secs (3329227 bytes/sec)
# zpool import healer儲存池的狀態顯示有一個裝置發生了錯誤。注意,應用程式從儲存池讀取的資料中並沒有任何的錯誤資料,ZFS 會自 ada0 裝置提供有正確校驗碼的資料。結果裡面 CKSUM 欄位含有非零值便是有錯誤校驗碼的裝置。
# zpool status healer
pool: healer
state: ONLINE
status: One or more devices has experienced an unrecoverable error. An
attempt was made to correct the error. Applications are unaffected.
action: Determine if the device needs to be replaced, and clear the errors
using 'zpool clear' or replace the device with 'zpool replace'.
see: http://illumos.org/msg/ZFS-8000-4J
scan: none requested
config:
NAME STATE READ WRITE CKSUM
healer ONLINE 0 0 0
mirror-0 ONLINE 0 0 0
ada0 ONLINE 0 0 0
ada1 ONLINE 0 0 1
errors: No known data errors錯誤已經被偵測到並且由未被影響的 ada0 鏡像磁碟上的備援提供資料。可與原來的校驗碼做比較來看儲存池是否已修復為一致。
# sha1 /healer >> checksum.txt
# cat checksum.txt
SHA1 (/healer) = 2753eff56d77d9a536ece6694bf0a82740344d1f
SHA1 (/healer) = 2753eff56d77d9a536ece6694bf0a82740344d1f儲存池在故意竄改資料前與後的兩個校驗碼仍相符顯示了 ZFS 在校驗碼不同時偵測與自動修正錯誤的能力。注意,這只在當儲存池中有足夠的備援時才可做到,由單一裝置組成的儲存池並沒有自我修復的能力。這也是為什麼在 ZFS 中校驗碼如此重要,任何原因都不該關閉。不需要 fsck(8) 或類似的檔案系統一致性檢查程式便能夠偵測與修正問題,且儲存儲存池在發生問題時仍可正常運作。接著需要做清潔作業來覆蓋在 ada1 上的錯誤資料。
# zpool scrub healer
# zpool status healer
pool: healer
state: ONLINE
status: One or more devices has experienced an unrecoverable error. An
attempt was made to correct the error. Applications are unaffected.
action: Determine if the device needs to be replaced, and clear the errors
using 'zpool clear' or replace the device with 'zpool replace'.
see: http://illumos.org/msg/ZFS-8000-4J
scan: scrub in progress since Mon Dec 10 12:23:30 2012
10.4M scanned out of 67.0M at 267K/s, 0h3m to go
9.63M repaired, 15.56% done
config:
NAME STATE READ WRITE CKSUM
healer ONLINE 0 0 0
mirror-0 ONLINE 0 0 0
ada0 ONLINE 0 0 0
ada1 ONLINE 0 0 627 (repairing)
errors: No known data errors清潔作業會從 ada0 讀取資料並重新寫入任何在 ada1 上有錯誤校驗碼的資料。這個操作可以由 zpool status 的輸出中呈現修復中 (repairing) 的項目來辨識。這個作業完成後,儲存池的狀態會更改為:
# zpool status healer
pool: healer
state: ONLINE
status: One or more devices has experienced an unrecoverable error. An
attempt was made to correct the error. Applications are unaffected.
action: Determine if the device needs to be replaced, and clear the errors
using 'zpool clear' or replace the device with 'zpool replace'.
see: http://illumos.org/msg/ZFS-8000-4J
scan: scrub repaired 66.5M in 0h2m with 0 errors on Mon Dec 10 12:26:25 2012
config:
NAME STATE READ WRITE CKSUM
healer ONLINE 0 0 0
mirror-0 ONLINE 0 0 0
ada0 ONLINE 0 0 0
ada1 ONLINE 0 0 2.72K
errors: No known data errors清潔操作完成便同步了 ada0 到 ada1 間的所有資料。執行 zpool clear 可以清除 (Clear) 儲存池狀態的錯誤訊息。
# zpool clear healer
# zpool status healer
pool: healer
state: ONLINE
scan: scrub repaired 66.5M in 0h2m with 0 errors on Mon Dec 10 12:26:25 2012
config:
NAME STATE READ WRITE CKSUM
healer ONLINE 0 0 0
mirror-0 ONLINE 0 0 0
ada0 ONLINE 0 0 0
ada1 ONLINE 0 0 0
errors: No known data errors儲存池現在恢復完整運作的狀態且清除所有的錯誤了。
可用的備援儲存池大小會受到每個 vdev 中容量最小的裝置限制。最小的裝置可以替換成較大的裝置,在更換 (Replace) 或修復 (Resilver) 作業後,儲存池可以成長到該新裝置的可用容量。例如,要做一個 1 TB 磁碟機與一個 2 TB 磁碟機的鏡像,可用的空間會是 1 TB,當 1 TB 磁碟機備更換成另一個 2 TB 的磁碟機時,修復程序會複製既有的資料到新的磁碟機,由於現在兩個裝置都有 2 TB 的容量,所以鏡像的可用空間便會成長到 2 TB。
可以在每個裝置用 zpool online -e 來觸發擴充的動作,在擴充完所有裝置後,儲存池便可使用額外的空間。
儲存池在移動到其他系統之前需要做匯出 (Export),會卸載所有的資料集,然後標記每個裝置為已匯出,為了避免被其他磁碟子系統存取,因此仍會鎖定這些裝置。這個動作讓儲存池可以在支援 ZFS 的其他機器、其他作業系統做匯入 (Import),甚至是不同的硬體架構 (有一些注意事項,請參考 zpool(8))。當資料集有被開啟的檔案,可使用 zpool export -f 來強制匯出儲存池,使用這個指令需要小心,資料集是被強制卸載的,因此有可能造成在該資料集開啟檔案的應用程式發生無法預期的結果。
匯出未使用的儲存池:
# zpool export mypool匯入儲存池會自動掛載資料集,若不想自動掛載,可以使用 zpool import -N。zpool import -o 可以設定在匯入時暫時使用的屬性。zpool import altroot= 允許匯入時指定基礎掛載點 (Base mount point) 來替換檔案系統根目錄。若儲存池先前用在不同的系統且不正常匯出,可能會需要使用 zpool import -f 來強制匯入。zpool import -a 會匯入所有沒有被其他系統使用的儲存池。
列出所有可以匯入的儲存池:
# zpool import
pool: mypool
id: 9930174748043525076
state: ONLINE
action: The pool can be imported using its name or numeric identifier.
config:
mypool ONLINE
ada2p3 ONLINE使用替代的根目錄匯入儲存池:
# zpool import -o altroot=/mnt mypool
# zfs list
zfs list
NAME USED AVAIL REFER MOUNTPOINT
mypool 110K 47.0G 31K /mnt/mypool在升級 FreeBSD 之後或儲存池是由其他使用舊版 ZFS 的系統匯入,儲存池可以手動升級到最新版本的 ZFS 來支援新的功能。在升級前請評估儲存池是否還要在舊的系統做匯入,由於升級是一個單向的程序,舊的儲存池可以升級,但有新功能的儲存池無法降級。
升級一個 v28 的儲存以支援功能旗標 (Feature Flags):
# zpool status
pool: mypool
state: ONLINE
status: The pool is formatted using a legacy on-disk format. The pool can
still be used, but some features are unavailable.
action: Upgrade the pool using 'zpool upgrade'. Once this is done, the
pool will no longer be accessible on software that does not support feat
flags.
scan: none requested
config:
NAME STATE READ WRITE CKSUM
mypool ONLINE 0 0 0
mirror-0 ONLINE 0 0 0
ada0 ONLINE 0 0 0
ada1 ONLINE 0 0 0
errors: No known data errors
# zpool upgrade
This system supports ZFS pool feature flags.
The following pools are formatted with legacy version numbers and can
be upgraded to use feature flags. After being upgraded, these pools
will no longer be accessible by software that does not support feature
flags.
VER POOL
--- ------------
28 mypool
Use 'zpool upgrade -v' for a list of available legacy versions.
Every feature flags pool has all supported features enabled.
# zpool upgrade mypool
This system supports ZFS pool feature flags.
Successfully upgraded 'mypool' from version 28 to feature flags.
Enabled the following features on 'mypool':
async_destroy
empty_bpobj
lz4_compress
multi_vdev_crash_dumpZFS 的新功能在 zpool upgrade 尚未完成之前無法使用。可以用 zpool upgrade -v 來查看升級後有那些新功能,也同時會列出已經支援那些功能。
升級儲存池支援新版的功能旗標 (Feature flags):
# zpool status
pool: mypool
state: ONLINE
status: Some supported features are not enabled on the pool. The pool can
still be used, but some features are unavailable.
action: Enable all features using 'zpool upgrade'. Once this is done,
the pool may no longer be accessible by software that does not support
the features. See zpool-features(7) for details.
scan: none requested
config:
NAME STATE READ WRITE CKSUM
mypool ONLINE 0 0 0
mirror-0 ONLINE 0 0 0
ada0 ONLINE 0 0 0
ada1 ONLINE 0 0 0
errors: No known data errors
# zpool upgrade
This system supports ZFS pool feature flags.
All pools are formatted using feature flags.
Some supported features are not enabled on the following pools. Once a
feature is enabled the pool may become incompatible with software
that does not support the feature. See zpool-features(7) for details.
POOL FEATURE
---------------
zstore
multi_vdev_crash_dump
spacemap_histogram
enabled_txg
hole_birth
extensible_dataset
bookmarks
filesystem_limits
# zpool upgrade mypool
This system supports ZFS pool feature flags.
Enabled the following features on 'mypool':
spacemap_histogram
enabled_txg
hole_birth
extensible_dataset
bookmarks
filesystem_limits在使用儲存池來開機的系統上的 Boot code 也必須一併更新來支援新的儲存池版本,可在含有 Boot code 的分割區使用 針對傳統使用 GPT 開機的系統,可以使用以下指令: 針對使用 EFI 開機的系統可以執行以下指令: 套用 Boot code 到所有儲存池中可開機的磁碟。請參考 gpart(8) 以取得更多資訊。 |
修改儲存池的指令會被記錄下來,會記錄的動作包含資料集的建立,屬性更改或更換磁碟。這個歷史記錄用來查看儲存池是如何建立、由誰執行、什麼動作及何時。歷史記錄並非儲存在日誌檔 (Log file),而是儲存在儲存池。查看這個歷史記錄的指令名稱為 zpool history:
# zpool history
History for 'tank':
2013-02-26.23:02:35 zpool create tank mirror /dev/ada0 /dev/ada1
2013-02-27.18:50:58 zfs set atime=off tank
2013-02-27.18:51:09 zfs set checksum=fletcher4 tank
2013-02-27.18:51:18 zfs create tank/backup輸出結果顯示曾在該儲存池上執行的 zpool 與 zfs 指令以及時間戳記。只有會修改儲存池或類似的指令會被記錄下來,像是 zfs list 這種指令並不會被記錄。當不指定儲存池名稱時,會列出所有儲存池的歷史記錄。
在提供選項 -i 或 -l 時 zpool history 可以顯更多詳細資訊。-i 會顯示使用者觸發的事件外,也會顯示內部記錄的 ZFS 事件。
# zpool history -i
History for 'tank':
2013-02-26.23:02:35 [internal pool create txg:5] pool spa 28; zfs spa 28; zpl 5;uts 9.1-RELEASE 901000 amd64
2013-02-27.18:50:53 [internal property set txg:50] atime=0 dataset = 21
2013-02-27.18:50:58 zfs set atime=off tank
2013-02-27.18:51:04 [internal property set txg:53] checksum=7 dataset = 21
2013-02-27.18:51:09 zfs set checksum=fletcher4 tank
2013-02-27.18:51:13 [internal create txg:55] dataset = 39
2013-02-27.18:51:18 zfs create tank/backup更多詳細的資訊可加上 -l 來取得,歷史記錄會以較長的格式顯示,包含的資訊有執行指令的使用者名稱、主機名稱以及更改的項目。
# zpool history -l
History for 'tank':
2013-02-26.23:02:35 zpool create tank mirror /dev/ada0 /dev/ada1 [user 0 (root) on :global]
2013-02-27.18:50:58 zfs set atime=off tank [user 0 (root) on myzfsbox:global]
2013-02-27.18:51:09 zfs set checksum=fletcher4 tank [user 0 (root) on myzfsbox:global]
2013-02-27.18:51:18 zfs create tank/backup [user 0 (root) on myzfsbox:global]輸出結果顯示 root 使用者使用 /dev/ada0 及 /dev/ada1 建立鏡像的儲存池。主機名稱 myzfsbox 在建立完儲存池後也同樣會顯示。由於儲存池可以從一個系統匯出再匯入到另一個系統,因此主機名稱也很重要,這樣一來可以清楚的辦識在其他系統上執行的每一個指令的主機名稱。
兩個 zpool history 選項可以合併使用來取得最完整的儲存池詳細資訊。儲存池歷史記錄在追蹤執行什麼動作或要取得除錯所需的輸出結果提供了非常有用的資訊。
內建的監視系統可以即時顯示儲存池的 I/O 統計資訊。它會顯示儲存池剩餘的空間與使用的空間,每秒執行了多少讀取與寫入的操作,有多少 I/O 頻寬被使用。預設會監視所有在系統中的儲存池都並顯示出來,可以提供儲存池名稱來只顯示該儲存池的監視資訊。舉一個簡單的例子:
# zpool iostat
capacity operations bandwidth
pool alloc free read write read write
---------- ----- ----- ----- ----- ----- -----
data 288G 1.53T 2 11 11.3K 57.1K要持續監視 I/O 的活動可以在最後的參數指定一個數字,這個數字代表每次更新資訊所間隔的秒數。在每次經過間隔的時間後會列出新一行的統計資訊,按下 Ctrl+C 可以中止監視。或者在指令列的間隔時間之後再指定一個數字,代表總共要顯示的統計資訊筆數。
使用 -v 可以顯示更詳細的 I/O 統計資訊。每個在儲存池中的裝置會以一行統計資訊顯示。這可以幫助了解每一個裝置做了多少讀取與寫入的操作,並可協助確認是否有各別裝置拖慢了整個儲存池的速度。以下範例會顯示有兩個裝置的鏡像儲存池:
# zpool iostat -v
capacity operations bandwidth
pool alloc free read write read write
----------------------- ----- ----- ----- ----- ----- -----
data 288G 1.53T 2 12 9.23K 61.5K
mirror 288G 1.53T 2 12 9.23K 61.5K
ada1 - - 0 4 5.61K 61.7K
ada2 - - 1 4 5.04K 61.7K
----------------------- ----- ----- ----- ----- ----- -----zfs 管理zfs 工具負責建立、摧毀與管理在一個儲存池中所有的 ZFS 資料集。儲存池使用 zpool 來管理。
不同於傳統的磁碟與磁碟區管理程式 (Volume manager) ,在 ZFS 中的空間並不會預先分配。傳統的檔案系統在分割與分配空間完後,若沒有增加新的磁碟便無法再增加額外的檔案系統。在 ZFS,可以隨時建立新的檔案系統,每個資料集 (Dataset) 都有自己的屬性,包含壓縮 (Compression)、去重複 (Deduplication)、快取 (Caching) 與配額 (Quota) 功能以及其他有用的屬性如唯讀 (Readonly)、區分大小寫 (Case sensitivity)、網路檔案分享 (Network file sharing) 以及掛載點 (Mount point)。資料集可以存在於其他資料集中,且子資料集會繼承其父資料集的屬性。每個資料集都可以作為一個單位來管理、委託 (Delegate)、備份 (Replicate)、快照 (Snapshot)、監禁 (Jail) 與摧毀 (Destroy),替每種不同類型或集合的檔案建立各別的資料集還有許多的好處。唯一的缺點是在當有非常大數量的資料集時,部份指令例如 zfs list 會變的較緩慢,且掛載上百個或其至上千個資料集可能會使 FreeBSD 的開機程序變慢。
建立一個新資料集並開啟 LZ4 壓縮:
# zfs list
NAME USED AVAIL REFER MOUNTPOINT
mypool 781M 93.2G 144K none
mypool/ROOT 777M 93.2G 144K none
mypool/ROOT/default 777M 93.2G 777M /
mypool/tmp 176K 93.2G 176K /tmp
mypool/usr 616K 93.2G 144K /usr
mypool/usr/home 184K 93.2G 184K /usr/home
mypool/usr/ports 144K 93.2G 144K /usr/ports
mypool/usr/src 144K 93.2G 144K /usr/src
mypool/var 1.20M 93.2G 608K /var
mypool/var/crash 148K 93.2G 148K /var/crash
mypool/var/log 178K 93.2G 178K /var/log
mypool/var/mail 144K 93.2G 144K /var/mail
mypool/var/tmp 152K 93.2G 152K /var/tmp
# zfs create -o compress=lz4 mypool/usr/mydataset
# zfs list
NAME USED AVAIL REFER MOUNTPOINT
mypool 781M 93.2G 144K none
mypool/ROOT 777M 93.2G 144K none
mypool/ROOT/default 777M 93.2G 777M /
mypool/tmp 176K 93.2G 176K /tmp
mypool/usr 704K 93.2G 144K /usr
mypool/usr/home 184K 93.2G 184K /usr/home
mypool/usr/mydataset 87.5K 93.2G 87.5K /usr/mydataset
mypool/usr/ports 144K 93.2G 144K /usr/ports
mypool/usr/src 144K 93.2G 144K /usr/src
mypool/var 1.20M 93.2G 610K /var
mypool/var/crash 148K 93.2G 148K /var/crash
mypool/var/log 178K 93.2G 178K /var/log
mypool/var/mail 144K 93.2G 144K /var/mail
mypool/var/tmp 152K 93.2G 152K /var/tmp摧毀資料集會比刪除所有在資料集上所殘留的檔案來的快,由於摧毀資料集並不會掃描所有檔案並更新所有相關的 Metadata。
摧毀先前建立的資料集:
# zfs list
NAME USED AVAIL REFER MOUNTPOINT
mypool 880M 93.1G 144K none
mypool/ROOT 777M 93.1G 144K none
mypool/ROOT/default 777M 93.1G 777M /
mypool/tmp 176K 93.1G 176K /tmp
mypool/usr 101M 93.1G 144K /usr
mypool/usr/home 184K 93.1G 184K /usr/home
mypool/usr/mydataset 100M 93.1G 100M /usr/mydataset
mypool/usr/ports 144K 93.1G 144K /usr/ports
mypool/usr/src 144K 93.1G 144K /usr/src
mypool/var 1.20M 93.1G 610K /var
mypool/var/crash 148K 93.1G 148K /var/crash
mypool/var/log 178K 93.1G 178K /var/log
mypool/var/mail 144K 93.1G 144K /var/mail
mypool/var/tmp 152K 93.1G 152K /var/tmp
# zfs destroy mypool/usr/mydataset
# zfs list
NAME USED AVAIL REFER MOUNTPOINT
mypool 781M 93.2G 144K none
mypool/ROOT 777M 93.2G 144K none
mypool/ROOT/default 777M 93.2G 777M /
mypool/tmp 176K 93.2G 176K /tmp
mypool/usr 616K 93.2G 144K /usr
mypool/usr/home 184K 93.2G 184K /usr/home
mypool/usr/ports 144K 93.2G 144K /usr/ports
mypool/usr/src 144K 93.2G 144K /usr/src
mypool/var 1.21M 93.2G 612K /var
mypool/var/crash 148K 93.2G 148K /var/crash
mypool/var/log 178K 93.2G 178K /var/log
mypool/var/mail 144K 93.2G 144K /var/mail
mypool/var/tmp 152K 93.2G 152K /var/tmp在最近版本的 ZFS,zfs destroy 是非同步的,且釋放出的空間會許要花費數分鐘才會出現在儲存池上,可使用 zpool get freeing poolname 來查看 freeing 屬性,這個屬性會指出資料集在背景已經釋放多少資料區塊了。若有子資料集,如快照 (Snapshot) 或其他資料集存在的話,則會無法摧毀父資料集。要摧毀一個資料集及其所有子資料集,可使用 -r 來做遞迴摧毀資料集及其所有子資料集,可用 -n -v 來列出會被這個操作所摧毀的資料集及快照,而不會真的摧毀,因摧毀快照所釋放出的空間也會同時顯示。
磁碟區 (Volume) 是特殊類型的資料集,不會被掛載成一個檔案系統,而是會被當做儲存區塊裝置出現在 /dev/zvol/poolname/dataset 下。這讓磁碟區可供其他檔案系統使用、拿來備份虛擬機器的磁碟或是使用 iSCSI 或 HAST 通訊協定匯出。
磁碟區可以被格式化成任何檔案系統,或不使用檔案系統來儲存原始資料。對一般使用者,磁碟區就像是一般的磁碟,可以放置一般的檔案系統在這些 zvols 上,並提供一般磁碟或檔案系統一般所沒有的功能。例如,使用壓縮屬性在一個 250 MB 的磁碟區可建立一個壓縮的 FAT 檔案系統。
# zfs create -V 250m -o compression=on tank/fat32
# zfs list tank
NAME USED AVAIL REFER MOUNTPOINT
tank 258M 670M 31K /tank
# newfs_msdos -F32 /dev/zvol/tank/fat32
# mount -t msdosfs /dev/zvol/tank/fat32 /mnt
# df -h /mnt | grep fat32
Filesystem Size Used Avail Capacity Mounted on
/dev/zvol/tank/fat32 249M 24k 249M 0% /mnt
# mount | grep fat32
/dev/zvol/tank/fat32 on /mnt (msdosfs, local)摧毀一個磁碟區與摧毀一個一般的檔案系統資料集差不多。操作上幾乎是即時的,但在背景會需要花費數分鐘來讓釋放空間再次可用。
資料集的名稱可以使用 zfs rename 更改。父資料集也同樣可以使用這個指令來更改名稱。重新命名一個資料集到另一個父資料集也會更改自父資料集繼承的屬性值。重新命名資料集後,會被卸載然後重新掛載到新的位置 (依繼承的新父資料集而定),可使用 -u 來避免重新掛載。
重新命名一個資料集並移動該資料集到另一個父資料集:
# zfs list
NAME USED AVAIL REFER MOUNTPOINT
mypool 780M 93.2G 144K none
mypool/ROOT 777M 93.2G 144K none
mypool/ROOT/default 777M 93.2G 777M /
mypool/tmp 176K 93.2G 176K /tmp
mypool/usr 704K 93.2G 144K /usr
mypool/usr/home 184K 93.2G 184K /usr/home
mypool/usr/mydataset 87.5K 93.2G 87.5K /usr/mydataset
mypool/usr/ports 144K 93.2G 144K /usr/ports
mypool/usr/src 144K 93.2G 144K /usr/src
mypool/var 1.21M 93.2G 614K /var
mypool/var/crash 148K 93.2G 148K /var/crash
mypool/var/log 178K 93.2G 178K /var/log
mypool/var/mail 144K 93.2G 144K /var/mail
mypool/var/tmp 152K 93.2G 152K /var/tmp
# zfs rename mypool/usr/mydataset mypool/var/newname
# zfs list
NAME USED AVAIL REFER MOUNTPOINT
mypool 780M 93.2G 144K none
mypool/ROOT 777M 93.2G 144K none
mypool/ROOT/default 777M 93.2G 777M /
mypool/tmp 176K 93.2G 176K /tmp
mypool/usr 616K 93.2G 144K /usr
mypool/usr/home 184K 93.2G 184K /usr/home
mypool/usr/ports 144K 93.2G 144K /usr/ports
mypool/usr/src 144K 93.2G 144K /usr/src
mypool/var 1.29M 93.2G 614K /var
mypool/var/crash 148K 93.2G 148K /var/crash
mypool/var/log 178K 93.2G 178K /var/log
mypool/var/mail 144K 93.2G 144K /var/mail
mypool/var/newname 87.5K 93.2G 87.5K /var/newname
mypool/var/tmp 152K 93.2G 152K /var/tmp快照也可以像這樣重新命名,由於快照的本質使其無法被重新命名到另一個父資料集。要遞迴重新命名快照可指定 -r,然後在子資料集中所有同名的快照也會一併被重新命名。
# zfs list -t snapshot
NAME USED AVAIL REFER MOUNTPOINT
mypool/var/newname@first_snapshot 0 - 87.5K -
# zfs rename mypool/var/newname@first_snapshot new_snapshot_name
# zfs list -t snapshot
NAME USED AVAIL REFER MOUNTPOINT
mypool/var/newname@new_snapshot_name 0 - 87.5K -每個 ZFS 資料集有數個屬性可以用來控制其行為。大部份的屬性會自動繼承自其父資料集,但可以被自己覆蓋。設定資料集上的屬性可使用 zfs set property=value dataset。大部份屬性有限制可用的值,zfs get 會顯示每個可以使用的屬性及其可用的值。大部份可以使用 zfs inherit 還原成其繼承的值。
也可設定使用者自訂的屬性。這些屬性也會成為資料集設定的一部份,且可以被用來提供資料集或其內容的額外資訊。要別分自訂屬性與 ZFS 提供的屬性,會使用冒號 (:) 建立一個自訂命名空間供自訂屬性使用。
# zfs set custom:costcenter=1234 tank
# zfs get custom:costcenter tank
NAME PROPERTY VALUE SOURCE
tank custom:costcenter 1234 local要移除自訂屬性,可用 zfs inherit 加上 -r。若父資料集未定義任何自訂屬性,將會將該屬性完全移除 (更改動作仍會記錄於儲存池的歷史記錄)。
# zfs inherit -r custom:costcenter tank
# zfs get custom:costcenter tank
NAME PROPERTY VALUE SOURCE
tank custom:costcenter - -
# zfs get all tank | grep custom:costcenter
#Two commonly used and useful dataset properties are the NFS and SMB share options. Setting these define if and how ZFS datasets may be shared on the network. At present, only setting sharing via NFS is supported on FreeBSD. To get the current status of a share, enter:
# zfs get sharenfs mypool/usr/home
NAME PROPERTY VALUE SOURCE
mypool/usr/home sharenfs on local
# zfs get sharesmb mypool/usr/home
NAME PROPERTY VALUE SOURCE
mypool/usr/home sharesmb off localTo enable sharing of a dataset, enter:
# zfs set sharenfs=on mypool/usr/homeIt is also possible to set additional options for sharing datasets through NFS, such as -alldirs, -maproot and -network. To set additional options to a dataset shared through NFS, enter:
# zfs set sharenfs="-alldirs,-maproot=root,-network=192.168.1.0/24" mypool/usr/home快照 (Snapshot) 是 ZFS 最強大的功能之一。快照提供了資料集唯讀、單一時間點 (Point-in-Time) 的複製功能,使用了寫入時複製 (Copy-On-Write, COW) 的技術,可以透過保存在磁碟上的舊版資料快速的建立快照。若沒有快照存在,在資料被覆蓋或刪除時,便回收空間供未來使用。由於只記錄前一個版本與目前資料集的差異,因此快照可節省磁碟空間。快照只允許在整個資料集上使用,無法在各別檔案或目錄。當建立了一個資料集的快照時,便備份了所有內含的資料,這包含了檔案系統屬性、檔案、目錄、權限等等。第一次建立快照時只會使用到更改參照到資料區塊的空間,不會用到其他額外的空間。使用 -r 可以對使用同名的資料集及其所有子資料集的建立一個遞迴快照,提供一致且即時 (Moment-in-time) 的完整檔案系統快照功能,這對於那些彼此有相關或相依檔案存放在不同資料集的應用程式非常重要。不使用快照所備份的資料其實是分散不同時間點的。
ZFS 中的快照提供了多種功能,即使是在其他缺乏快照功能的檔案系統上。一個使用快照的典型例子是在安裝軟體或執行系統升級這種有風險的動作時,能有一個快速的方式可以備份檔案系統目前的狀態,若動作失敗,可以使用快照還原 (Roll back) 到與快照建立時相同的系統狀態,若升級成功,便可刪除快照來釋放空間。若沒有快照功能,升級失敗通常會需要使用備份來恢復 (Restore) 系統,而這個動作非常繁瑣、耗時且可能會需要停機一段時間系統無法使用。使用快照可以快速的還原,即使系統正在執行一般的運作,只而要短暫或甚至不需停機。能夠節省大量在有數 TB 的儲存系統上從備份複製所需資料的時間。快照並非要用來取代儲存池的完整備份,但可以用在快速且簡單的保存某個特定時間點的資料集。
快照可以使用 zfs snapshot dataset@snapshotname 來建立。加入 -r 可以遞迴對所有同名的子資料集建立快照。
建立一個整個儲存池的遞迴快照:
# zfs list -t all
NAME USED AVAIL REFER MOUNTPOINT
mypool 780M 93.2G 144K none
mypool/ROOT 777M 93.2G 144K none
mypool/ROOT/default 777M 93.2G 777M /
mypool/tmp 176K 93.2G 176K /tmp
mypool/usr 616K 93.2G 144K /usr
mypool/usr/home 184K 93.2G 184K /usr/home
mypool/usr/ports 144K 93.2G 144K /usr/ports
mypool/usr/src 144K 93.2G 144K /usr/src
mypool/var 1.29M 93.2G 616K /var
mypool/var/crash 148K 93.2G 148K /var/crash
mypool/var/log 178K 93.2G 178K /var/log
mypool/var/mail 144K 93.2G 144K /var/mail
mypool/var/newname 87.5K 93.2G 87.5K /var/newname
mypool/var/newname@new_snapshot_name 0 - 87.5K -
mypool/var/tmp 152K 93.2G 152K /var/tmp
# zfs snapshot -r mypool@my_recursive_snapshot
# zfs list -t snapshot
NAME USED AVAIL REFER MOUNTPOINT
mypool@my_recursive_snapshot 0 - 144K -
mypool/ROOT@my_recursive_snapshot 0 - 144K -
mypool/ROOT/default@my_recursive_snapshot 0 - 777M -
mypool/tmp@my_recursive_snapshot 0 - 176K -
mypool/usr@my_recursive_snapshot 0 - 144K -
mypool/usr/home@my_recursive_snapshot 0 - 184K -
mypool/usr/ports@my_recursive_snapshot 0 - 144K -
mypool/usr/src@my_recursive_snapshot 0 - 144K -
mypool/var@my_recursive_snapshot 0 - 616K -
mypool/var/crash@my_recursive_snapshot 0 - 148K -
mypool/var/log@my_recursive_snapshot 0 - 178K -
mypool/var/mail@my_recursive_snapshot 0 - 144K -
mypool/var/newname@new_snapshot_name 0 - 87.5K -
mypool/var/newname@my_recursive_snapshot 0 - 87.5K -
mypool/var/tmp@my_recursive_snapshot 0 - 152K -建立的快照不會顯示在一般的 zfs list 操作結果,要列出快照需在 zfs list 後加上 -t snapshot,使用 -t all 可以同時列出檔案系統的內容及快照。
快照並不會直接掛載,因此 MOUNTPOINT 欄位的路徑如此顯示。在 AVAIL 欄位不會有可用的磁碟空間,因為快照建立之後便無法再寫入。比較快照與其原來建立時的資料集:
# zfs list -rt all mypool/usr/home
NAME USED AVAIL REFER MOUNTPOINT
mypool/usr/home 184K 93.2G 184K /usr/home
mypool/usr/home@my_recursive_snapshot 0 - 184K -同時顯示資料集與快照可以了解快照如何使用 COW 技術來運作。快照只會保存有更動 (差異) 的資料,並非整個檔案系統的內容,這個意思是說,快照只會在有做更動時使用一小部份的空間,複製一個檔案到該資料集,可以讓空間使用量變的更明顯,然後再做第二個快照:
# cp /etc/passwd /var/tmp
# zfs snapshot mypool/var/tmp@after_cp
# zfs list -rt all mypool/var/tmp
NAME USED AVAIL REFER MOUNTPOINT
mypool/var/tmp 206K 93.2G 118K /var/tmp
mypool/var/tmp@my_recursive_snapshot 88K - 152K -
mypool/var/tmp@after_cp 0 - 118K -第二快照只會包含了資料集做了複製動作後的更動,這樣的機制可以節省大量的空間。注意在複製之後快照 mypool/var/tmp@my_recursive_snapshot 於 USED 欄位中的大小也更改了,這說明了這個更動在前次快照與之後快照間的關係。
ZFS 提供了內建指令可以用來比對兩個快照 (Snapshot) 之間的差異,在使用者想要查看一段時間之間檔案系統所的變更時非常有用。例如 zfs diff 可以讓使用者在最後一次快照中找到意外刪除的檔案。對前面一節所做的兩個快照使用這個指令會產生以下結果:
# zfs list -rt all mypool/var/tmp
NAME USED AVAIL REFER MOUNTPOINT
mypool/var/tmp 206K 93.2G 118K /var/tmp
mypool/var/tmp@my_recursive_snapshot 88K - 152K -
mypool/var/tmp@after_cp 0 - 118K -
# zfs diff mypool/var/tmp@my_recursive_snapshot
M /var/tmp/
+ /var/tmp/passwd指令會列出指定快照 (在這個例子中為 mypool/var/tmp@my_recursive_snapshot) 與目前檔案系統間的更改。第一個欄位是更改的類型:
+ | 加入了該路徑或檔案。 |
- | 刪除了該路徑或檔案。 |
M | 修改了該路徑或檔案。 |
R | 重新命名了該路徑或檔案。 |
對照這個表格來看輸出的結果,可以明顯的看到 passwd 是在快照 mypool/var/tmp@my_recursive_snapshot 建立之後才加入的,結果也同樣看的到掛載到 /var/tmp 的父目錄已經做過修改。
在使用 ZFS 備份功能來傳輸一個資料集到另一個主機備份時比對兩個快照也同樣很有用。
比對兩個快照需要提供兩個資料集的完整資料集名稱與快照名稱:
# cp /var/tmp/passwd /var/tmp/passwd.copy
# zfs snapshot mypool/var/tmp@diff_snapshot
# zfs diff mypool/var/tmp@my_recursive_snapshot mypool/var/tmp@diff_snapshot
M /var/tmp/
+ /var/tmp/passwd
+ /var/tmp/passwd.copy
# zfs diff mypool/var/tmp@my_recursive_snapshot mypool/var/tmp@after_cp
M /var/tmp/
+ /var/tmp/passwd備份管理者可以比對兩個自傳送主機所接收到的兩個快照並查看實際在資料集中的變更。請參考 備份 一節來取得更多資訊。
只要至少有一個可用的快照便可以隨時還原。大多數在已不需要目前資料集,想要改用較舊版的資料的情況,例如,本地開發的測試發生錯誤、不良的系統更新破壞了系統的整體功能或需要還原意外刪除檔案或目錄 … 等,都是非常常見的情形。幸運的,要還原到某個快照只需要簡單輸入 zfs rollback snapshotname。會依快照所做的變更數量來決定處理的時間,還原的操作會在一段時間後完成。在這段時間中,資料集會一直保持一致的狀態,類似一個符合 ACID 原則的資料庫在做還原。還原可在資料集處於上線及可存取的情況下完成,不需要停機。還原到快照之後,資料集便回到當初執行快照時相同的狀態,所有沒有在快照中的其他資料便會被丟棄,因此往後若還有可能需要部份資料時,建議在還原到前一個快照之前先對目前的資料集做快照,這樣一來,使用者便可以在快照之間來回快換,而不會遺失重要的資料。
在第一個範例中,因為 rm 操作不小心移除了預期外的資料,要還原到快照。
# zfs list -rt all mypool/var/tmp
NAME USED AVAIL REFER MOUNTPOINT
mypool/var/tmp 262K 93.2G 120K /var/tmp
mypool/var/tmp@my_recursive_snapshot 88K - 152K -
mypool/var/tmp@after_cp 53.5K - 118K -
mypool/var/tmp@diff_snapshot 0 - 120K -
# ls /var/tmp
passwd passwd.copy vi.recover
# rm /var/tmp/passwd*
# ls /var/tmp
vi.recover在此時,使用者發現到刪除了太多檔案並希望能夠還原。ZFS 提供了簡單的方可以取回檔案,便是使用還原 (Rollback),但這只在有定期對重要的資料使用快照時可用。要拿回檔案並從最後一次快照重新開始,可執行以下指令:
# zfs rollback mypool/var/tmp@diff_snapshot
# ls /var/tmp
passwd passwd.copy vi.recover還原操作會將資料集還原為最後一次快照的狀態。這也可以還原到更早之前,有其他在其之後建立的快照。要這麼做時,ZFS 會發出這個警告:
# zfs list -rt snapshot mypool/var/tmp
AME USED AVAIL REFER MOUNTPOINT
mypool/var/tmp@my_recursive_snapshot 88K - 152K -
mypool/var/tmp@after_cp 53.5K - 118K -
mypool/var/tmp@diff_snapshot 0 - 120K -
# zfs rollback mypool/var/tmp@my_recursive_snapshot
cannot rollback to 'mypool/var/tmp@my_recursive_snapshot': more recent snapshots exist
use '-r' to force deletion of the following snapshots:
mypool/var/tmp@after_cp
mypool/var/tmp@diff_snapshot這個警告是因在該快照與資料集的目前狀態之間有其他快照存在,然而使用者想要還原到該快照。要完成這樣的還原動作,必須刪除在這之間的快照,因為 ZFS 無法追蹤不同資料集狀態間的變更。在使用者未指定 -r 來確認這個動作前,ZFS 不會刪除受影響的快照。若確定要這麼做,那麼必須要知道會遺失所有在這之間的快照,然後可執行以下指令:
# zfs rollback -r mypool/var/tmp@my_recursive_snapshot
# zfs list -rt snapshot mypool/var/tmp
NAME USED AVAIL REFER MOUNTPOINT
mypool/var/tmp@my_recursive_snapshot 8K - 152K -
# ls /var/tmp
vi.recover可從 zfs list -t snapshot 的結果來確認 zfs rollback -r 會移除的快照。
快照會掛載在父資料集下的隱藏目錄:.zfs/snapshots/snapshotname。預設不會顯示這些目錄,即使是用 ls -a 指令。雖然該目錄不會顯示,但該目錄實際存在,而且可以像一般的目錄一樣存取。一個名稱為 snapdir 的屬性可以控制是否在目錄清單中顯示這些隱藏目錄,設定該屬性為可見 (visible) 可以讓這些目錄出現在 ls 以及其他處理目錄內容的指令中。
# zfs get snapdir mypool/var/tmp
NAME PROPERTY VALUE SOURCE
mypool/var/tmp snapdir hidden default
# ls -a /var/tmp
. .. passwd vi.recover
# zfs set snapdir=visible mypool/var/tmp
# ls -a /var/tmp
. .. .zfs passwd vi.recover要還原個別檔案到先前的狀態非常簡單,只要從快照中複製檔案到父資料集。在 .zfs/snapshot 目錄結構下有一個與先前所做的快照名稱相同的目錄,可以很容易的找到。在下個範例中,我們會示範從隱藏的 .zfs 目錄還原一個檔案,透過從含有該檔案的最新版快照複製:
# rm /var/tmp/passwd
# ls -a /var/tmp
. .. .zfs vi.recover
# ls /var/tmp/.zfs/snapshot
after_cp my_recursive_snapshot
# ls /var/tmp/.zfs/snapshot/after_cp
passwd vi.recover
# cp /var/tmp/.zfs/snapshot/after_cp/passwd /var/tmp執行 ls .zfs/snapshot 時,雖然 snapdir 可能已經設為隱藏,但仍可能可以顯示該目錄中的內容,這取決於管理者是否要顯示這些目錄,可以只顯示特定的資料集,而其他的則不顯示。從這個隱藏的 .zfs/snapshot 複製檔案或目錄非常簡單,除此之外,嘗試其他的動作則會出現以下錯誤:
# cp /etc/rc.conf /var/tmp/.zfs/snapshot/after_cp/
cp: /var/tmp/.zfs/snapshot/after_cp/rc.conf: Read-only file system這個錯誤用來提醒使用者快照是唯讀的,在建立之後不能更改。無法複製檔案進去或從該快照目錄中移除,因為這會變更該資料集所代表的狀態。
快照所消耗的空間是依據自快照之後父檔案系統做了多少變更來決定,快照的 written 屬性可以用來追蹤有多少空間被快照所使用。
使用 zfs destroy dataset@snapshot 可以摧毀快照並回收空間。加上 -r 可以遞迴移除所有在父資料集下使用同名的快照。加入 -n -v 來顯示將要移除的快照清單以及估計回收的空間,而不會實際執行摧毀的操作。
複本 (Clone) 是快照的複製,但更像是一般的資料集,與快照不同的是,複本是非唯讀的 (可寫),且可掛載,可以有自己的屬性。使用 zfs clone 建立複本之後,便無法再摧毀用來建立複本的快照。複本與快照的父/子關係可以使用 zfs promote 來對換。提升複本之後 ,快照便會成為複本的子資料集,而不是原來的父資料集,這個動作會改變空間計算的方式,但並不會實際改變空間的使用量。複本可以被掛載到 ZFS 檔案系統階層中的任何一點,並非只能位於原來快照的位置底下。
要示範複本功能會用到這個範例資料集:
# zfs list -rt all camino/home/joe
NAME USED AVAIL REFER MOUNTPOINT
camino/home/joe 108K 1.3G 87K /usr/home/joe
camino/home/joe@plans 21K - 85.5K -
camino/home/joe@backup 0K - 87K -會使用到複本一般是要在可以保留快照以便出錯時可還原的情況下使用指定的資料集做實驗,由於快照並無法做更改,所以會建立一個可以讀/寫的快照複本。當在複本中做完想要執行的動作後,便可以提升複本成資料集,然後移除舊的檔案系統。嚴格來說這並非必要,因為複本與資料集可同時存在,不會有任何問題。
# zfs clone camino/home/joe@backup camino/home/joenew
# ls /usr/home/joe*
/usr/home/joe:
backup.txz plans.txt
/usr/home/joenew:
backup.txz plans.txt
# df -h /usr/home
Filesystem Size Used Avail Capacity Mounted on
usr/home/joe 1.3G 31k 1.3G 0% /usr/home/joe
usr/home/joenew 1.3G 31k 1.3G 0% /usr/home/joenew建立完的複本便有與建立快照時狀態相同的資料集,現在複本可以獨立於原來的資料集來做更改。剩下唯一與資料集之間的關係便是快照,ZFS 會在屬性 origin 記錄這個關係,一旦在快照與複本之間的相依關係因為使用 zfs promote 提升而移除時,複本的 origin 也會因為成為一個完全獨立的資料集而移除。以下範例會示範這個動作:
# zfs get origin camino/home/joenew
NAME PROPERTY VALUE SOURCE
camino/home/joenew origin camino/home/joe@backup -
# zfs promote camino/home/joenew
# zfs get origin camino/home/joenew
NAME PROPERTY VALUE SOURCE
camino/home/joenew origin - -做為部份更改之後,例如複製 loader.conf 到提升後的複本,這個例子中的舊目錄便無須保留,取而代之的是提升後的複本,這個動作可以用兩個連續的指令來完成:在舊資料集上執行 zfs destroy 並在與舊資料相似名稱 (也可能用完全不同的名稱) 的複本上執行 zfs rename。
# cp /boot/defaults/loader.conf /usr/home/joenew
# zfs destroy -f camino/home/joe
# zfs rename camino/home/joenew camino/home/joe
# ls /usr/home/joe
backup.txz loader.conf plans.txt
# df -h /usr/home
Filesystem Size Used Avail Capacity Mounted on
usr/home/joe 1.3G 128k 1.3G 0% /usr/home/joe快照的複本現在可以如同一般資料集一樣使用,它的內容包含了所有來自原始快照的資料以及後來加入的檔案,例如 loader.conf。複本可以在許多不同的情境下使用提供 ZFS 的使用者有用的功能,例如,Jail 可以透過含有已安裝了各種應用程式集的快照來提供,使用者可以複製這些快照然後加入自己想要嘗試的應用程式,一但更改可以滿足需求,便可提升複本為完整的資料集然後提供給終端使用者,讓終端使用者可以如同實際擁有資料集一般的使用,這個以節省提供這些 Jail 的時間與管理成本。
將資料保存在單一地點的單一儲存池上會讓資料暴露在盜竊、自然或人為的風險之下,定期備份整個儲存池非常重要,ZFS 提供了內建的序列化 (Serialization) 功能可以將資料以串流傳送到標準輸出。使用這項技術,不僅可以將資料儲存到另一個已連結到本地系統的儲存池,也可以透過網路將資料傳送到另一個系統,這種備份方式以快照為基礎 (請參考章節 ZFS 快照(Snapshot))。用來備份資料的指令為 zfs send 及 zfs receive。
以下例子將示範使用兩個儲存池來做 ZFS 備份:
# zpool list
NAME SIZE ALLOC FREE CKPOINT EXPANDSZ FRAG CAP DEDUP HEALTH ALTROOT
backup 960M 77K 896M - - 0% 0% 1.00x ONLINE -
mypool 984M 43.7M 940M - - 0% 4% 1.00x ONLINE -名為 mypool 的儲存池為主要的儲存池,資料會定期寫入與讀取的位置。第二個儲存池 backup 用來待命 (Standby),萬一主要儲存池無法使用時可替換。注意,ZFS 並不會自動做容錯移轉 (Fail-over),必須要由系統管理者在需要的時候手動完成。快照會用來提供一個與檔系統一致的版本來做備份,mypool 的快照建立之後,便可以複製到 backup 儲存池,只有快照可以做備份,最近一次快照之後所做的變更不會含在內容裡面。
# zfs snapshot mypool@backup1
# zfs list -t snapshot
NAME USED AVAIL REFER MOUNTPOINT
mypool@backup1 0 - 43.6M -快照存在以後,便可以使用 zfs send 來建立一個代表快照內容的串流,這個串流可以儲存成檔案或由其他儲存池接收。串流會寫入到標準輸出,但是必須要重新導向到一個檔案或轉接到其他地方,否則會錯誤:
# zfs send mypool@backup1
Error: Stream can not be written to a terminal.
You must redirect standard output.要使用 zfs send 備份一個資料集,可重新導向到一個位於在已掛載到備份儲存池上的檔案。確定該儲存池有足夠的空間容納要傳送的快照,這裡指的是該快照中內含的所有資料,並非只有上次快照到該快照間的變更。
# zfs send mypool@backup1 > /backup/backup1
# zpool list
NAME SIZE ALLOC FREE CKPOINT EXPANDSZ FRAG CAP DEDUP HEALTH ALTROOT
backup 960M 63.7M 896M - - 0% 6% 1.00x ONLINE -
mypool 984M 43.7M 940M - - 0% 4% 1.00x ONLINE -zfs send 會傳輸在快照 backup1 中所有的資料到儲存池 backup。可以使用 cron(8) 排程來自動完成建立與傳送快照的動作。
若不想將備份以封存檔案儲存,ZFS 可用實際的檔案系統來接收資料,讓備份的資料可以直接被存取。要取得實際包含在串流中的資料可以用 zfs receive 將串流轉換回檔案與目錄。以下例子會以管線符號連接 zfs send 及 zfs receive,將資料從一個儲存池複製到另一個,傳輸完成後可以直接使用接收儲存池上的資料。一個資料集只可以被複製到另一個空的資料集。
# zfs snapshot mypool@replica1
# zfs send -v mypool@replica1 | zfs receive backup/mypool
send from @ to mypool@replica1 estimated size is 50.1M
total estimated size is 50.1M
TIME SENT SNAPSHOT
# zpool list
NAME SIZE ALLOC FREE CKPOINT EXPANDSZ FRAG CAP DEDUP HEALTH ALTROOT
backup 960M 63.7M 896M - - 0% 6% 1.00x ONLINE -
mypool 984M 43.7M 940M - - 0% 4% 1.00x ONLINE -zfs send 也可以比較兩個快照之間的差異,並且只傳送兩者之間的差異,這麼做可以節省磁碟空間及傳輸時間。例如:
# zfs snapshot mypool@replica2
# zfs list -t snapshot
NAME USED AVAIL REFER MOUNTPOINT
mypool@replica1 5.72M - 43.6M -
mypool@replica2 0 - 44.1M -
# zpool list
NAME SIZE ALLOC FREE CKPOINT EXPANDSZ FRAG CAP DEDUP HEALTH ALTROOT
backup 960M 61.7M 898M - - 0% 6% 1.00x ONLINE -
mypool 960M 50.2M 910M - - 0% 5% 1.00x ONLINE -會建立一個名為 replica2 的第二個快照,這個快照只中只會含有目前與前次快照 replica1 之間檔案系統所做的變更。使用 zfs send -i 並指定要用來產生漸進備份串流的快照,串流中只會含有做過更改的資料。這個動作只在接收端已經有初始快照時才可用。
# zfs send -v -i mypool@replica1 mypool@replica2 | zfs receive /backup/mypool
send from @replica1 to mypool@replica2 estimated size is 5.02M
total estimated size is 5.02M
TIME SENT SNAPSHOT
# zpool list
NAME SIZE ALLOC FREE CKPOINT EXPANDSZ FRAG CAP DEDUP HEALTH ALTROOT
backup 960M 80.8M 879M - - 0% 8% 1.00x ONLINE -
mypool 960M 50.2M 910M - - 0% 5% 1.00x ONLINE -
# zfs list
NAME USED AVAIL REFER MOUNTPOINT
backup 55.4M 240G 152K /backup
backup/mypool 55.3M 240G 55.2M /backup/mypool
mypool 55.6M 11.6G 55.0M /mypool
# zfs list -t snapshot
NAME USED AVAIL REFER MOUNTPOINT
backup/mypool@replica1 104K - 50.2M -
backup/mypool@replica2 0 - 55.2M -
mypool@replica1 29.9K - 50.0M -
mypool@replica2 0 - 55.0M -如此一來,便成功傳輸漸進式的串流,只有做過更改的資料會被備份,不會傳送完整的 replica1。由於不會備份完整的儲存池,只傳送差異的部份,所以可以減少傳輸的時間並節省磁碟空間,特別是在網路緩慢或需要考量每位元傳輸成本時非常有用。
從儲存池 mypool 複製所有檔案與資料的新檔案系統 backup/mypool 便可以使用。若指定 -P,會一併複製資料集的屬性,這包含壓縮 (Compression) 設定,配額 (Quota) 及掛載點 (Mount point)。若指定 -R,會複製所有指定資料集的子資料集,及這些子資料集的所有屬性。可將傳送與接收自動化來定期使用第二個儲存池做備份。
透過網路來傳送串流是一個做遠端備份不錯的方式,但是也有一些缺點,透過網路連線傳送的資料沒有加密,這會讓任何人都可以在未告知傳送方的情況下攔截並轉換串流回資料,這是我們所不想見到的情況,特別是在使用網際網路傳送串流到遠端的主機時。SSH 可用來加密要透過網路連線傳送的資料,在 ZFS 只需要將串流重新導向到標準輸出,如此一來便可簡單的轉接到 SSH。若要讓檔案系統內容在傳送或在遠端系統中也維持在加密的狀態可考慮使用 PEFS。
有一些設定以及安全性注意事項必須先完成,只有對 zfs send 操作必要的步驟才會在此說明,要取得更多有關 SSH 的資訊請參考 OpenSSH。
必要的環境設定:
使用 SSH 金鑰設定傳送端與接收端間無密碼的 SSH 存取
正常會需要 root 的權限來傳送與接收串流,這需要可以 root 登入到接收端系統。但是,預設因安全性考慮會關閉以 root 登入。ZFS 委託 (ZFS Delegation) 系統可以用來允許一個非 root 使用者在每個系統上執行各自的發送與接收操作。
在傳送端系統上:
# zfs allow -u someuser send,snapshot mypool要掛載儲存池,無權限的使用者必須擁有該目錄且必須允許一般的使用者掛載檔案系統。在接收端系統上:
# sysctl vfs.usermount=1
vfs.usermount: 0 -> 1
# sysrc -f /etc/sysctl.conf vfs.usermount=1
# zfs create recvpool/backup
# zfs allow -u someuser create,mount,receive recvpool/backup
# chown someuser /recvpool/backup無權限的使用者現在有能力可以接收並掛載資料集,且 home 資料集可以被複製到遠端系統:
% zfs snapshot -r mypool/home@monday
% zfs send -R mypool/home@monday | ssh someuser@backuphost zfs recv -dvu recvpool/backup替儲存在儲存池 mypool 上的檔案系統資料集 home 製作一個遞迴快照 monday,然後使用 zfs send -R 來傳送包含該資料集及其所有子資料集、快照、複製與設定的串流。輸出會被導向到 SSH 連線的遠端主機 backuphost 上等候輸入的 zfs receive,在此建議使用完整網域名稱或 IP 位置。接收端的機器會寫入資料到 recvpool 儲存池上的 backup 資料集,在 zfs recv 加上 -d 可覆寫在接收端使用相同名稱的快照,加上 -u 可讓檔案系統在接收端不會被掛載,當使用 -v,會顯示更多有關傳輸的詳細資訊,包含已花費的時間及已傳輸的資料量。
資料集配額 (Dataset quota) 可用來限制特定資料集可以使用的的空間量。參考配額 (Reference Quota) 的功能也非常相似,差在參考配額只會計算資料集自己使用的空間,不含快照與子資料集。類似的,使用者 (User) 與群組 (Group) 配額可以用來避免使用者或群組用掉儲存池或資料集的所有空間。
要設定 storage/home/bob 的資料集配額為 10 GB:
# zfs set quota=10G storage/home/bob要設定 storage/home/bob 的參考配額為 10 GB:
# zfs set refquota=10G storage/home/bob要移除 storage/home/bob 的 10 GB 配額:
# zfs set quota=none storage/home/bob設定使用者配額的一般格式為 userquota@user=size 使用者的名稱必須使用以下格式:
POSIX 相容的名稱,如 joe。
POSIX 數字 ID,如 789。
SID 名稱,如 joe.bloggs@example.com。
SID 數字 ID,如 S-1-123-456-789。
例如,要設定使用者名為 joe 的使用者配額為 50 GB:
# zfs set userquota@joe=50G要移除所有配額:
# zfs set userquota@joe=none使用者配額的屬性不會顯示在 |
要設定群組配額的一般格式為:groupquota@group=size。
要設定群組 firstgroup 的配額為 50 GB 可使用:
# zfs set groupquota@firstgroup=50G要移除群組 firstgroup 的配額,或確保該群組未設定配額可使用:
# zfs set groupquota@firstgroup=none如同使用者配額屬性,非 root 使用者只可以查看自己所屬群組的配額。而 root 或擁有 groupquota 權限的使用者,可以檢視並設定所有群組的任何配額。
要顯示在檔案系統或快照上每位使用者所使用的空間量及配額可使用 zfs userspace,要取得群組的資訊則可使用 zfs groupspace,要取得有關支援的選項資訊或如何只顯示特定選項的資訊請參考 zfs(1)。
有足夠權限的使用者及 root 可以使用以下指令列出 storage/home/bob 的配額:
# zfs get quota storage/home/bob保留空間 (Reservation) 可以確保資料集最少可用的空間量,其他任何資料集無法使用保留的空間,這個功能在要確保有足夠的可用空間來存放重要的資料集或日誌檔時特別有用。
reservation 屬性的一般格式為 reservation=size,所以要在 storage/home/bob 設定保留 10 GB 的空間可以用:
# zfs set reservation=10G storage/home/bob要清除任何保留空間:
# zfs set reservation=none storage/home/bob同樣的原則可以應用在 refreservation 屬性來設定參考保留空間 (Reference Reservation),參考保留空間的一般格式為 refreservation=size。
這個指令會顯示任何已設定於 storage/home/bob 的 reservation 或 refreservation:
# zfs get reservation storage/home/bob
# zfs get refreservation storage/home/bobZFS 提供直接的壓縮功能,在資料區塊層級壓縮資料不僅可以節省空間,也可以增加磁碟的效能。若資料壓縮了 25%,但壓縮的資料會使用了與未壓縮版本相同的速率寫入到磁碟,所以實際的寫入速度會是原來的 125%。壓縮功能也可來替代去重複 (Deduplication) 功能,因為壓縮並不需要使用額外的記憶體。
ZFS 提了多種不同的壓縮演算法,每一種都有不同的優缺點,隨著 ZFS v5000 引進了 LZ4 壓縮技術,可對整個儲存池開啟壓縮,而不像其他演算法需要消耗大量的效能來達成,最大的優點是 LZ4 擁有 提早放棄 的功能,若 LZ4 無法在資料一開始的部份達成至少 12.5% 的壓縮率,便會以不壓縮的方式來寫入資料區塊來避免 CPU 在那些已經壓縮過或無法壓縮的資料上浪費運算能力。要取得更多有關 ZFS 中可用的壓縮演算法詳細資訊,可參考術語章節中的壓縮 (Compression) 項目。
管理者可以使用資料集的屬性來監視壓縮的效果。
# zfs get used,compressratio,compression,logicalused mypool/compressed_dataset
NAME PROPERTY VALUE SOURCE
mypool/compressed_dataset used 449G -
mypool/compressed_dataset compressratio 1.11x -
mypool/compressed_dataset compression lz4 local
mypool/compressed_dataset logicalused 496G -資料集目前使用了 449 GB 的空間 (在 used 屬性)。在尚未壓縮前,該資料集應該會使用 496 GB 的空間 (於 logicalused 屬性),這個結果顯示目前的壓縮比為 1.11:1。
壓縮功能在與使用者配額 (User Quota) 一併使用時可能會產生無法預期的副作用。使用者配額會限制一個使用者在一個資料集上可以使用多少空間,但衡量的依據是以 壓縮後 所使用的空間,因此,若一個使用者有 10 GB 的配額,寫入了 10 GB 可壓縮的資料,使用者將還會有空間儲存額外的資料。若使用者在之後更新了一個檔案,例如一個資料庫,可能有更多或較少的可壓縮資料,那麼剩餘可用的空間量也會因此而改變,這可能會造成奇怪的現象便是,一個使用者雖然沒有增加實際的資料量 (於 logicalused 屬性),但因為更改影響了壓縮率,導致使用者達到配額的上限。
壓縮功能在與備份功能一起使用時也可能會有類似的問題,通常會使用配額功能來限制能夠儲存的資料量來確保有足夠的備份空間可用。但是由於配額功能並不會考量壓縮狀況,可能會有比未壓縮版本備份更多的資料量會被寫入到資料集。
當開啟,去重複 (Deduplication) 功能會使用每個資料區塊的校驗碼 (Checksum) 來偵測重複的資料區塊,當新的資料區塊與現有的資料區塊重複,ZFS 便會寫入連接到現有資料的參考來替代寫入重複的資料區塊,這在資料中有大量重複的檔案或資訊時可以節省大量的空間,要注意的是:去重複功能需要使用大量的記憶體且大部份可節省的空間可改開啟壓縮功能來達成,而壓縮功能不需要使用額外的記憶體。
要開啟去重複功能,需在目標儲存池設定 dedup 屬性:
# zfs set dedup=on pool只有要被寫入到儲存池的新資料才會做去重複的動作,先前已被寫入到儲存池的資料不會因此啟動了這個選項而做去重複。查看已開啟去重複屬性的儲存池會如下:
# zpool list
NAME SIZE ALLOC FREE CKPOINT EXPANDSZ FRAG CAP DEDUP HEALTH ALTROOT
pool 2.84G 2.19M 2.83G - - 0% 0% 1.00x ONLINE -DEDUP 欄位會顯示儲存池的實際去重複率,數值為 1.00x 代表資料尚未被去重複。在下一個例子會在前面所建立的去重複儲存池中複製三份 Port 樹到不同的目錄中。
# for d in dir1 dir2 dir3; do
> mkdir $d && cp -R /usr/ports $d &
> done已經偵測到重複的資料並做去重複:
# zpool list
NAME SIZE ALLOC FREE CKPOINT EXPANDSZ FRAG CAP DEDUP HEALTH ALTROOT
pool 2.84G 20.9M 2.82G - - 0% 0% 3.00x ONLINE -DEDUP 欄位顯示有 3.00x 的去重複率,這代表已偵測到多份複製的 Port 樹資料並做了去重複的動作,且只會使用第三份資料所佔的空間。去重複能節省空間的潛力可以非常巨大,但會需要消耗大量的記憶體來持續追蹤去重複的資料區塊。
去重複並非總是有效益的,特別是當儲存池中的資料本身並沒有重複時。ZFS 可以透過在現有儲存池上模擬開啟去重複功能來顯示可能節省的空間:
# zdb -S pool
Simulated DDT histogram:
bucket allocated referenced
______ ______________________________ ______________________________
refcnt blocks LSIZE PSIZE DSIZE blocks LSIZE PSIZE DSIZE
------ ------ ----- ----- ----- ------ ----- ----- -----
1 2.58M 289G 264G 264G 2.58M 289G 264G 264G
2 206K 12.6G 10.4G 10.4G 430K 26.4G 21.6G 21.6G
4 37.6K 692M 276M 276M 170K 3.04G 1.26G 1.26G
8 2.18K 45.2M 19.4M 19.4M 20.0K 425M 176M 176M
16 174 2.83M 1.20M 1.20M 3.33K 48.4M 20.4M 20.4M
32 40 2.17M 222K 222K 1.70K 97.2M 9.91M 9.91M
64 9 56K 10.5K 10.5K 865 4.96M 948K 948K
128 2 9.50K 2K 2K 419 2.11M 438K 438K
256 5 61.5K 12K 12K 1.90K 23.0M 4.47M 4.47M
1K 2 1K 1K 1K 2.98K 1.49M 1.49M 1.49M
Total 2.82M 303G 275G 275G 3.20M 319G 287G 287G
dedup = 1.05, compress = 1.11, copies = 1.00, dedup * compress / copies = 1.16在 zdb -S 分析完儲存池後會顯示在啟動去重複後可達到的空間減少比例。在本例中,1.16 是非常差的空間節省比例,因為這個比例使用壓縮功能便能達成。若在此儲存池上啟動去重複並不能明顯的節省空間使用量,那麼就不值得耗費大量的記憶體來開啟去重複功能。透過公式 ratio = dedup * compress / copies,系統管理者可以規劃儲存空間的配置,來判斷要處理的資料是否有足夠的重複資料區塊來平衡所需的記憶體。若資料是可壓縮的,那麼空間節少的效果可能會非常好,建議先開啟壓縮功能,且壓縮功能也可以大大提高效能。去重複功能只有在可以節省可觀的空間且有足夠的記憶體做 DDT 時才開啟。
zfs jail 以及相關的 jailed 屬性可以用來將一個 ZFS 資料集委託給一個 Jail 管理。zfs jail jailid 可以將一個資料集連結到一個指定的 Jail,而 zfs unjail 則可解除連結。資料集要可以在 Jail 中控制需設定 jailed 屬性,一旦資料集被隔離便無法再掛載到主機,因為有掛載點可能會破壞主機的安全性。
一個全面性的權限委託系統可能無權限的使用者執行 ZFS 的管理功能。例如,若每個使用者的家目錄均為一個資料集,便可以給予使用者權限建立與摧毀它們家目錄中的快照。可以給予備份使用者使用備份功能的權限。一個使用量統計的 Script 可以允許其在執行時能存取所有使用者的空間利用率資料。甚至可以將委託權限委託給其他人,每個子指令與大多數屬性都可使用權限委託。
zfs allow someuser create mydataset 可以給予指定的使用者在指定的父資料集下建立子資料集的權限。這裡需要注意:建立新資料集會牽涉到掛載,因此需要設定 FreeBSD 的 vfs.usermount sysctl(8) 為 1 來允許非 root 的使用者掛載一個檔案系統。這裡還有另一項限制可以避免濫用:非 root 使用者必須擁有掛載點在檔案系統中所在位置的權限才可掛載。
這裡有數個可調校的項目可以調整,來讓 ZFS 在面對各種工作都能以最佳狀況運作。
vfs.zfs.arc_max - Maximum size of the ARC. The default is all RAM but 1 GB, or 5/8 of all RAM, whichever is more. However, a lower value should be used if the system will be running any other daemons or processes that may require memory. This value can be adjusted at runtime with sysctl(8) and can be set in /boot/loader.conf or /etc/sysctl.conf.
vfs.zfs.arc_meta_limit - Limit the portion of the ARC that can be used to store metadata. The default is one fourth of vfs.zfs.arc_max. Increasing this value will improve performance if the workload involves operations on a large number of files and directories, or frequent metadata operations, at the cost of less file data fitting in the ARC. This value can be adjusted at runtime with sysctl(8) and can be set in /boot/loader.conf or /etc/sysctl.conf.
vfs.zfs.arc_min - Minimum size of the ARC. The default is one half of vfs.zfs.arc_meta_limit. Adjust this value to prevent other applications from pressuring out the entire ARC. This value can be adjusted at runtime with sysctl(8) and can be set in /boot/loader.conf or /etc/sysctl.conf.
vfs.zfs.vdev.cache.size - A preallocated amount of memory reserved as a cache for each device in the pool. The total amount of memory used will be this value multiplied by the number of devices. This value can only be adjusted at boot time, and is set in /boot/loader.conf.
vfs.zfs.min_auto_ashift - Minimum ashift (sector size) that will be used automatically at pool creation time. The value is a power of two. The default value of 9 represents 2^9 = 512, a sector size of 512 bytes. To avoid write amplification and get the best performance, set this value to the largest sector size used by a device in the pool.
Many drives have 4 KB sectors. Using the default ashift of 9 with these drives results in write amplification on these devices. Data that could be contained in a single 4 KB write must instead be written in eight 512-byte writes. ZFS tries to read the native sector size from all devices when creating a pool, but many drives with 4 KB sectors report that their sectors are 512 bytes for compatibility. Setting vfs.zfs.min_auto_ashift to 12 (2^12 = 4096) before creating a pool forces ZFS to use 4 KB blocks for best performance on these drives.
Forcing 4 KB blocks is also useful on pools where disk upgrades are planned. Future disks are likely to use 4 KB sectors, and ashift values cannot be changed after a pool is created.
In some specific cases, the smaller 512-byte block size might be preferable. When used with 512-byte disks for databases, or as storage for virtual machines, less data is transferred during small random reads. This can provide better performance, especially when using a smaller ZFS record size.
vfs.zfs.prefetch_disable - Disable prefetch. A value of 0 is enabled and 1 is disabled. The default is 0, unless the system has less than 4 GB of RAM. Prefetch works by reading larger blocks than were requested into the ARC in hopes that the data will be needed soon. If the workload has a large number of random reads, disabling prefetch may actually improve performance by reducing unnecessary reads. This value can be adjusted at any time with sysctl(8).
vfs.zfs.vdev.trim_on_init - Control whether new devices added to the pool have the TRIM command run on them. This ensures the best performance and longevity for SSDs, but takes extra time. If the device has already been secure erased, disabling this setting will make the addition of the new device faster. This value can be adjusted at any time with sysctl(8).
vfs.zfs.vdev.max_pending - Limit the number of pending I/O requests per device. A higher value will keep the device command queue full and may give higher throughput. A lower value will reduce latency. This value can be adjusted at any time with sysctl(8).
vfs.zfs.top_maxinflight - Maxmimum number of outstanding I/Os per top-level vdev. Limits the depth of the command queue to prevent high latency. The limit is per top-level vdev, meaning the limit applies to each mirror, RAID-Z, or other vdev independently. This value can be adjusted at any time with sysctl(8).
vfs.zfs.l2arc_write_max - Limit the amount of data written to the L2ARC per second. This tunable is designed to extend the longevity of SSDs by limiting the amount of data written to the device. This value can be adjusted at any time with sysctl(8).
vfs.zfs.l2arc_write_boost - The value of this tunable is added to vfs.zfs.l2arc_write_max and increases the write speed to the SSD until the first block is evicted from the L2ARC. This "Turbo Warmup Phase" is designed to reduce the performance loss from an empty L2ARC after a reboot. This value can be adjusted at any time with sysctl(8).
vfs.zfs.scrub_delay - Number of ticks to delay between each I/O during a scrub. To ensure that a scrub does not interfere with the normal operation of the pool, if any other I/O is happening the scrub will delay between each command. This value controls the limit on the total IOPS (I/Os Per Second) generated by the scrub. The granularity of the setting is determined by the value of kern.hz which defaults to 1000 ticks per second. This setting may be changed, resulting in a different effective IOPS limit. The default value is 4, resulting in a limit of: 1000 ticks/sec / 4 = 250 IOPS. Using a value of 20 would give a limit of: 1000 ticks/sec / 20 = 50 IOPS. The speed of scrub is only limited when there has been recent activity on the pool, as determined by vfs.zfs.scan_idle. This value can be adjusted at any time with sysctl(8).
vfs.zfs.resilver_delay - Number of milliseconds of delay inserted between each I/O during a resilver. To ensure that a resilver does not interfere with the normal operation of the pool, if any other I/O is happening the resilver will delay between each command. This value controls the limit of total IOPS (I/Os Per Second) generated by the resilver. The granularity of the setting is determined by the value of kern.hz which defaults to 1000 ticks per second. This setting may be changed, resulting in a different effective IOPS limit. The default value is 2, resulting in a limit of: 1000 ticks/sec / 2 = 500 IOPS. Returning the pool to an Online state may be more important if another device failing could Fault the pool, causing data loss. A value of 0 will give the resilver operation the same priority as other operations, speeding the healing process. The speed of resilver is only limited when there has been other recent activity on the pool, as determined by vfs.zfs.scan_idle. This value can be adjusted at any time with sysctl(8).
vfs.zfs.scan_idle - Number of milliseconds since the last operation before the pool is considered idle. When the pool is idle the rate limiting for scrub and resilver are disabled. This value can be adjusted at any time with sysctl(8).
vfs.zfs.txg.timeout - Maximum number of seconds between transaction groups. The current transaction group will be written to the pool and a fresh transaction group started if this amount of time has elapsed since the previous transaction group. A transaction group my be triggered earlier if enough data is written. The default value is 5 seconds. A larger value may improve read performance by delaying asynchronous writes, but this may cause uneven performance when the transaction group is written. This value can be adjusted at any time with sysctl(8).
ZFS 所提供的部份功能需要使用大量記憶體,且可能需要對有限 RAM 的系統調校來取得最佳的效率。
最低需求,總系統記憶體應至少有 1 GB,建議的 RAM 量需視儲存池的大小以及使用的 ZFS 功能而定。一般的經驗法則是每 1 TB 的儲存空間需要 1 GB 的 RAM,若有開啟去重複的功能,一般的經驗法則是每 1 TB 的要做去重複的儲存空間需要 5 GB 的 RAM。雖然有部份使用者成功使用較少的 RAM 來運作 ZFS,但系統在負載較重時有可能會因為記憶用耗而導致當機,對於要使用低於建議 RAM 需求量來運作的系統可能會需要更進一步的調校。
由於在 i386™ 平台上位址空間的限制,在 i386™ 架構上的 ZFS 使用者必須加入這個選項到自訂核心設定檔,重新編譯核心並重新開啟:
options KVA_PAGES=512
這個選項會增加核心位址空間,允許調整 vm.kvm_size 超出目前的 1 GB 限制或在 PAE 的 2 GB 限制。要找到這個選項最合適的數值,可以將想要的位址空間換算成 MB 然後除以 4,在本例中,以 2 GB 計算後即為 512。
在所有的 FreeBSD 架構上均可增加 kmem 位址空間,經測試在一個 1 GB 實體記憶體的測試系統上,加入以下選項到 /boot/loader.conf,重新開啟系統,可成功設定:
vm.kmem_size="330M" vm.kmem_size_max="330M" vfs.zfs.arc_max="40M" vfs.zfs.vdev.cache.size="5M"
要取得更多詳細的 ZFS 相關調校的建議清單,請參考 https://wiki.freebsd.org/ZFSTuningGuide。
ZFS 是一個從本質上與眾不同的檔案系統,由於它並非只是一個檔案系統,ZFS 結合了檔案系統及磁碟區管理程式,讓額外的儲存裝置可以即時的加入到系統並可讓既有的檔案系統立即使用這些在儲存池中空間。透過結合傳統區分為二的兩個角色,ZFS 能夠克服以往 RAID 磁碟群組無法擴充的限制。每個在儲存池頂層的裝置稱作 vdev,其可以是一個簡單的磁碟或是一個 RAID 如鏡像或 RAID-Z 陣列。ZFS 的檔案系統 (稱作 資料集 (Dataset)) 每一個資料集均可存取整個存池所共通的可用空間,隨著使用儲存池來配置空間區塊,儲存池能給每個檔案系統使用的可用空間就會減少,這個方法可以避免擴大分割區會使的可用空間分散分割區之間的常見問題。
儲存池 (Pool) | 儲存池 (Pool) 是建構 ZFS 最基礎的單位。一個儲存池可由一個或多個 vdev 所組成,是用來儲存資料的底層裝置。儲存池會被拿來建立一個或多個檔案系統 (資料集 Dataset) 或區塊裝置 (磁碟區 Volume),這些資料集與磁碟區會共用儲存池的剩餘可用空間。每一個儲存池可由名稱與 GUID 來辨識。可用的功能會依儲存池上的 ZFS 版本而有不同。 | ||
vdev 型態 (vdev Types) | 儲存池是由一個或多個 vdev 所組成,vdev 可以是一個磁碟或是 RAID Transform 的磁碟群組。當使用多個 vdev,ZFS 可以分散資料到各個 vdev 來增加效能與最大的可用空間。
| ||
交易群組 (Transaction Group, TXG) | 交易群組是一種將更動的資料區塊包裝成一組的方式,最後再一次寫入到儲存池。交易群組是 ZFS 用來檢驗一致性的基本單位。每個交易群組會被分配一個獨一無二的 64-bit 連續代號。最多一次可以有三個活動中的交易群組,這三個交易群組的每一個都有這三種狀態: * 開放 (Open) - 新的交易群組建立之後便處於開放的狀態,可以接受新的寫入動作。永遠會有開放狀態的交易群組,即始交易群組可能會因到達上限而拒絕新的寫入動作。一但開放的交易群組到達上限或到達 | ||
Adaptive Replacement Cache (ARC) | ZFS 使用了自適應替換快取 (Adaptive Replacement Cache, ARC),而不是傳統的最近最少使用 (Least Recently Used, LRU) 快取,LRU 快取在快取中是一個簡單的項目清單,會依每個物件最近使用的時間來排序,新項會加入到清單的最上方,當快取額滿了便會去除清單最下方的項目來空出空間給較常使用的物件。ARC 結合了四種快取清單,最近最常使用 (Most Recently Used, MRU) 及最常使用 (Most Frequently Used, MFU) 物件加上兩個清單各自的幽靈清單 (Ghost list),這些幽靈清單會追蹤最近被去除的物件來避免又被加回到快取,避免過去只有偶爾被使用的物件加入清單可以增加快取的命中率。同時使用 MRU 及 MFU 的另外一個優點是掃描一個完整檔案系統可以去除在 MRU 或 LRU 快取中的所有資料,有利於這些才剛存取的內容。使用 ZFS 也有 MFU 可只追蹤最常使用的物件並保留最常被存取的資料區塊快取。 | ||
L2ARC | L2ARC 是 ZFS 快取系統的第二層,主要的 ARC 會儲存在 RAM 當中,但因為 RAM 可用的空間量通常有限,因此 ZFS 也可以使用 快取 vdev (Cache vdev)。固態磁碟 (Solid State Disk, SSD) 常被拿來此處作為快取裝置,因為比起傳統旋轉碟片的磁碟,固態磁碟有較快的速度與較低的延遲。L2ARC 是選用的,但使用可以明顯增進那些已使用 SSD 快取的檔案讀取速度,無須從一般磁碟讀取。L2ARC 也同樣可以加速去重複 (Deduplication),因為 DDT 並不適合放在 RAM,但適合放在 L2ARC,比起要從磁碟讀取,可以加快不少速度。為了避免 SSD 因寫入次速過多而過早耗損,加入到快取裝置的資料速率會被限制,直到快取用盡 (去除第一個資料區塊來騰出空間) 之前,寫入到 L2ARC 的資料速率會限制在寫入限制 (Write limit) 與加速限制 (Boost limit) 的總合,之後則會限制為寫入限制,可以控制這兩個速度限制的 sysctl(8) 數值分別為 | ||
ZIL | ZIL 會使用比主要儲存池還更快的儲存裝置來加速同步寫入動作 (Synchronous transaction),如 SSD。當應用程式請求做一個同步的寫入時 (保証資料會安全的儲存到磁碟,而不是先快取稍後再寫入),資料會先寫入到速度較快的 ZIL 儲存空間,之後再一併寫入到一般的磁碟。這可大量的減少延遲並增進效能。ZIL 只會有利於使用像資料庫這類的同步工作,一般非同步的寫入像複製檔案,則完全不會用到 ZIL。 | ||
寫入時複製 (Copy-On-Write) | 不像傳統的檔案系統,在 ZFS,當資料要被覆寫時,不會直接覆寫舊資料所在的位置,而是將新資料會寫入到另一個資料區塊,只在資料寫入完成後才會更新 Metadata 指向新的位置。因此,在發生寫入中斷 (在寫入檔案的過程中系統當機或電源中斷) 時,原來檔案的完整內容並不會遺失,只會放棄未寫入完成的新資料,這也意謂著 ZFS 在發生預期之外的關機後不需要做 fsck(8)。 | ||
資料集 (Dataset) | 資料集 (Dataset) 是 ZFS 檔案系統、磁碟區、快照或複本的通用術語。每個資料集都有獨一無二的名稱使用 poolname/path@snapshot 格式。儲存池的根部技術上來說也算一個資料集,子資料集會採用像目錄一樣的層級來命名,例如 mypool/home,home 資料集是 mypool 的子資料集並且會繼承其屬性。這可以在往後繼續擴展成 mypool/home/user,這個孫資料集會繼承其父及祖父的屬性。在子資料集的屬性可以覆蓋預設繼承自父及祖父的屬性。資料集及其子資料級的管理權限可以委託 (Delegate) 給他人。 | ||
檔案系統 (File system) | ZFS 資料集最常被當做檔案系統使用。如同大多數其他的檔案系統,ZFS 檔案系統會被掛載在系統目錄層級的某一處且內含各自擁有權限、旗標及 Metadata 的檔案與目錄。 | ||
磁碟區 (Volume) | 除了一般的檔案系統資料集之外,ZFS 也可以建立磁碟區 (Volume),磁碟區是資料區塊裝置。磁碟區有許多與資料集相似的功能,包含複製時寫入、快照、複本以及資料校驗。要在 ZFS 的頂層執行其他檔案系統格式時使用磁碟區非常有用,例如 UFS 虛擬化或匯出 iSCSI 延伸磁區 (Extent)。 | ||
快照 (Snapshot) | ZFS 的寫入時複製 (Copy-On-Write, COW) 設計可以使用任意的名稱做到幾乎即時、一致的快照。在製做資料集的快照或父資料集遞迴快照 (會包含其所有子資料集) 之後,新的資料會寫入到資的資料區塊,但不會回收舊的資料區塊為可用空間,快照中會使用原版本的檔案系統,而快照之後所做的變更則會儲存在目前的檔案系統,因此不會重複使用額外的空間。當新的資料寫入到目前的檔案系統,便會配置新的資料區塊來儲存這些資料。快照表面大小 (Apparent size) 會隨著在目前檔案系統停止使用的資料區塊而成長,但僅限於快照。可以用唯讀的方式掛載這些快照來復原先前版本的檔案,也可以還原 (Rollback) 目前的檔案系統到指定的快照,來還原任何在快照之後所做的變更。每個在儲存池中的資料區塊都會有一個參考記數器,可以用來持續追蹤有多少快照、複本、資料集或是磁碟區使用這個資料區塊,當刪除檔案與快照參照的計數變會滅少,直到沒有任何東西參考這個資料區塊才會被回收為可用空間。快照也可使用 hold 來標記,檔標記為 hold 時,任何嘗試要刪除該快照的動作便會回傳 | ||
複本 (Clone) | 快照也可以做複本,複本是可寫入版本的快照,讓檔案系統可分支成為新的資料集。如同快照,複本一開始不會消耗任何額外空間,隨著新資料寫入到複本會配置新的資料區塊,複本的表面大小 (Apparent size) 才會成長,當在複本檔案系統或磁碟區的資料區塊被覆寫時,在先前資料區塊的參考計數則會減少。建立複本所使用的快照無法被刪除,因為複本會相依該快照,快照為父,複本為子。複本可以被提升 (promoted)、反轉相依關係,來讓複本成為父,之前的父變為子,這個操作不需要額外的空間。由於反轉了父與子使用的空間量,所以可能會影響既有的配額 (Quota) 與保留空間 (Reservation)。 | ||
校驗碼 (Checksum) | 配置每個資料區塊快的同時也會做資料校驗,資料校驗用的演算法是依資料集屬性而有所不同的,請參考 * | ||
壓縮 (Compression) | 每個資料集都有壓縮 (Compression) 屬性,預設是關閉的,這個屬性可以設定使用以下幾個壓縮演算法的其中一個來壓縮寫入到資料集的新資料。壓縮除了減少空間使用量外,常也會增加讀取與寫入的吞吐量,因為會減少讀取與寫入的資料區塊。 * LZ4 - ZFS 儲存池版本 5000 (功能旗標) 後所增加,LZ4 現在是建議的壓縮演算法,在處理可壓縮的資料時 LZ4 壓縮比 LZJB 快將近 50%,在處理不可壓縮的資料時快將近三倍,LZ4 解壓縮也比 LZJB 將近 80%。在現代的 CPU 上,LZ4 經常平均可用 500 MB/s 的速度壓縮,而解壓縮可到達 1.5 GB/s (每個 CPU 核心)。 * LZJB - 預設的壓縮演算法。由 Jeff Bonwick 所開發 (ZFS 的創始人之一)。LZJB 與 GZIP 相比,可以較低的 CPU 提供較佳的壓縮功能。在未來預設的壓縮演算法將會更換為 LZ4。
* GZIP - 在 ZFS 可用的熱門串流壓縮演算法。使用 GZIP 主要的優點之一便是可設定壓縮層級。當設定 * ZLE - 零長度編號是一個特殊的壓縮演算法,它只會壓縮連續的零。這種壓縮演算法只在資料集中含有大量為零的資料區塊時有用。 | ||
備份數 (Copies) | 當設定大於 1 的數值時, | ||
去重複 (Deduplication) | 校驗碼讓在寫入時可以偵測重複資料區塊,使用去重複,可以增加既有、完全相同的資料區塊參考數來節省儲存空間。要偵測重複的資料區塊需要在記憶體中儲存去重複資料表 (Deduplication table, DDT),這個資料表中會有唯一的校驗碼清單、這些資料區塊的所在位置以及參考數。當寫入新資料時,便會計算校驗碼然後比對清單中是否有符合的既有資料區塊已在清單。去重複使用了 SHA256 校驗碼演算法來提供一個安全的加密雜湊,去重複功能是可以調校的,若 | ||
清潔 (Scrub) | ZFS 有 | ||
資料集配額 (Dataset Quota) | 除了配額及空間保留外,ZFS 提供非常快速且準確的資料集、使用者及群組空間的計算功能,這可讓管理者調整空間配置的方式且可為重要的檔案系統保留空間。 ZFS supports different types of quotas: the dataset quota, the reference quota (refquota), the user quota, and the group quota. 配額會限制資料集及後裔包含資料集的快照、子資料集及子資料集的快照能使用的空間量。
| ||
參考配額 (Reference Quota) | 參考配額可以設定一個硬性限制 (Hard limit) 來限制資料集能使用的空間量,而這個硬性限制只包含了資料集參考的空間,並不含其後裔所使用的空間,如:檔案系統或快照。 | ||
使用者配額 (User Quota) | 使用者配額在用來限制特定使用者能使用的空間量時非常有用。 | ||
群組配額 (Group Quota) | 群組配額可以限制特定群組能使用的空間量。 | ||
資料集保留空間 (Dataset Reservation) |
不管那一種保留空間在許多情境皆很有用,例如:要規劃與測試磁碟空間配置在新系統上的適應性,或是確保有足夠的空間供稽查日誌或系統還原程序及檔案使用。 | ||
參考保留空間 (Reference Reservation) |
| ||
修復 (Resilver) | 當有磁碟故障且被更換後,新的磁碟必須回存先前所遺失的資料,會使用分散在其他磁碟上的奇偶校驗資訊來計算並寫入遺失的資料到新的磁碟機的這個程序稱作 修復 (Resilvering)。 | ||
上線 (Online) | 一個儲存池或 vdev 處於線上 ( | ||
離線 (Offline) | 若有足夠的備援可避免儲存池或 vdev 進入故障 (Faulted) 狀態,個別裝置若可由管理者設為離線 ( | ||
降級 (Degraded) | 一個儲存池或 vdev 處於降級 ( | ||
故障 (Faulted) | 一個儲存池或 vdev 處於故障 ( |
File systems are an integral part of any operating system. They allow users to upload and store files, provide access to data, and make hard drives useful. Different operating systems differ in their native file system. Traditionally, the native FreeBSD file system has been the Unix File System UFS which has been modernized as UFS2. Since FreeBSD 7.0, the Z File System (ZFS) is also available as a native file system. See Z 檔案系統 (ZFS) for more information.
In addition to its native file systems, FreeBSD supports a multitude of other file systems so that data from other operating systems can be accessed locally, such as data stored on locally attached USB storage devices, flash drives, and hard disks. This includes support for the Linux™ Extended File System (EXT).
There are different levels of FreeBSD support for the various file systems. Some require a kernel module to be loaded and others may require a toolset to be installed. Some non-native file system support is full read-write while others are read-only.
讀完這章,您將了解:
The difference between native and supported file systems.
Which file systems are supported by FreeBSD.
How to enable, configure, access, and make use of non-native file systems.
在開始閱讀這章之前,您需要:
Understand UNIX™ and FreeBSD basics.
Be familiar with the basics of kernel configuration and compilation.
Feel comfortable installing software in FreeBSD.
Have some familiarity with disks, storage, and device names in FreeBSD.
FreeBSD provides built-in support for several Linux™ file systems. This section demonstrates how to load support for and how to mount the supported Linux™ file systems.
Kernel support for ext2 file systems has been available since FreeBSD 2.2. In FreeBSD 8.x and earlier, the code is licensed under the GPL. Since FreeBSD 9.0, the code has been rewritten and is now BSD licensed.
The ext2fs(5) driver allows the FreeBSD kernel to both read and write to ext2 file systems.
This driver can also be used to access ext3 and ext4 file systems. The ext2fs(5) filesystem has full read and write support for ext4 as of FreeBSD 12.0-RELEASE. Additionally, extended attributes and ACLs are also supported, while journalling and encryption are not. Starting with FreeBSD 12.1-RELEASE, a DTrace provider will be available as well. Prior versions of FreeBSD can access ext4 in read and write mode using sysutils/fusefs-ext2. |
To access an ext file system, first load the kernel loadable module:
# kldload ext2fsThen, mount the ext volume by specifying its FreeBSD partition name and an existing mount point. This example mounts /dev/ad1s1 on /mnt:
# mount -t ext2fs /dev/ad1s1 /mnt虛擬化軟體可以讓同一台機器得以同時執行多種作業系統。在 PC 上的這類軟體系統通常涉及的角色有執行虛擬化軟體的主端 (Host) 作業系統以及數個安裝在其中的客端 (Guest) 作業系統。
讀完這章,您將了解:
主端作業系統及客端作業系統的差別。
如何在 Intel™-based Apple™Mac™ 電腦安裝 FreeBSD 。
如何在 Microsoft™ Windows™ 使用 Virtual PC 安裝 FreeBSD。
如何以 FreeBSD 作為客端安裝在 bhyve。
如何調校 FreeBSD 系統來取得虛擬化的最佳效能。
在開始閱讀這章之前,您需要:
知道如何安裝 FreeBSD。
知道如何設定網路連線。
知道如何安裝其他第三方軟體。
Mac™ 的 Parallels Desktop 是一套商業軟體可在 Intel™ 為基礎的 Apple™Mac™ 的 Mac OS™ 10.4.6 或更新版本上執行。 該軟體完全支援使用 FreeBSD 作為客端作業系統。 在 Mac OS™ X 裝好 Parallels 後,使用者必先完成虛擬機器的設定後才可安裝想使用的客端作業系統。
在 Parallels 上安裝 FreeBSD 的第一步是建立供安裝 FreeBSD 使用的新虛擬機器。提示出現後請選擇 Guest OS Type 為 :
根據您對此虛擬 FreeBSD 作業系統的規畫選擇合理的磁碟及記憶體空間,對大多數在 Parallels 下的 FreeBSD 使用來講 4GB 的磁碟空間與 512MB 的 RAM 便足夠:
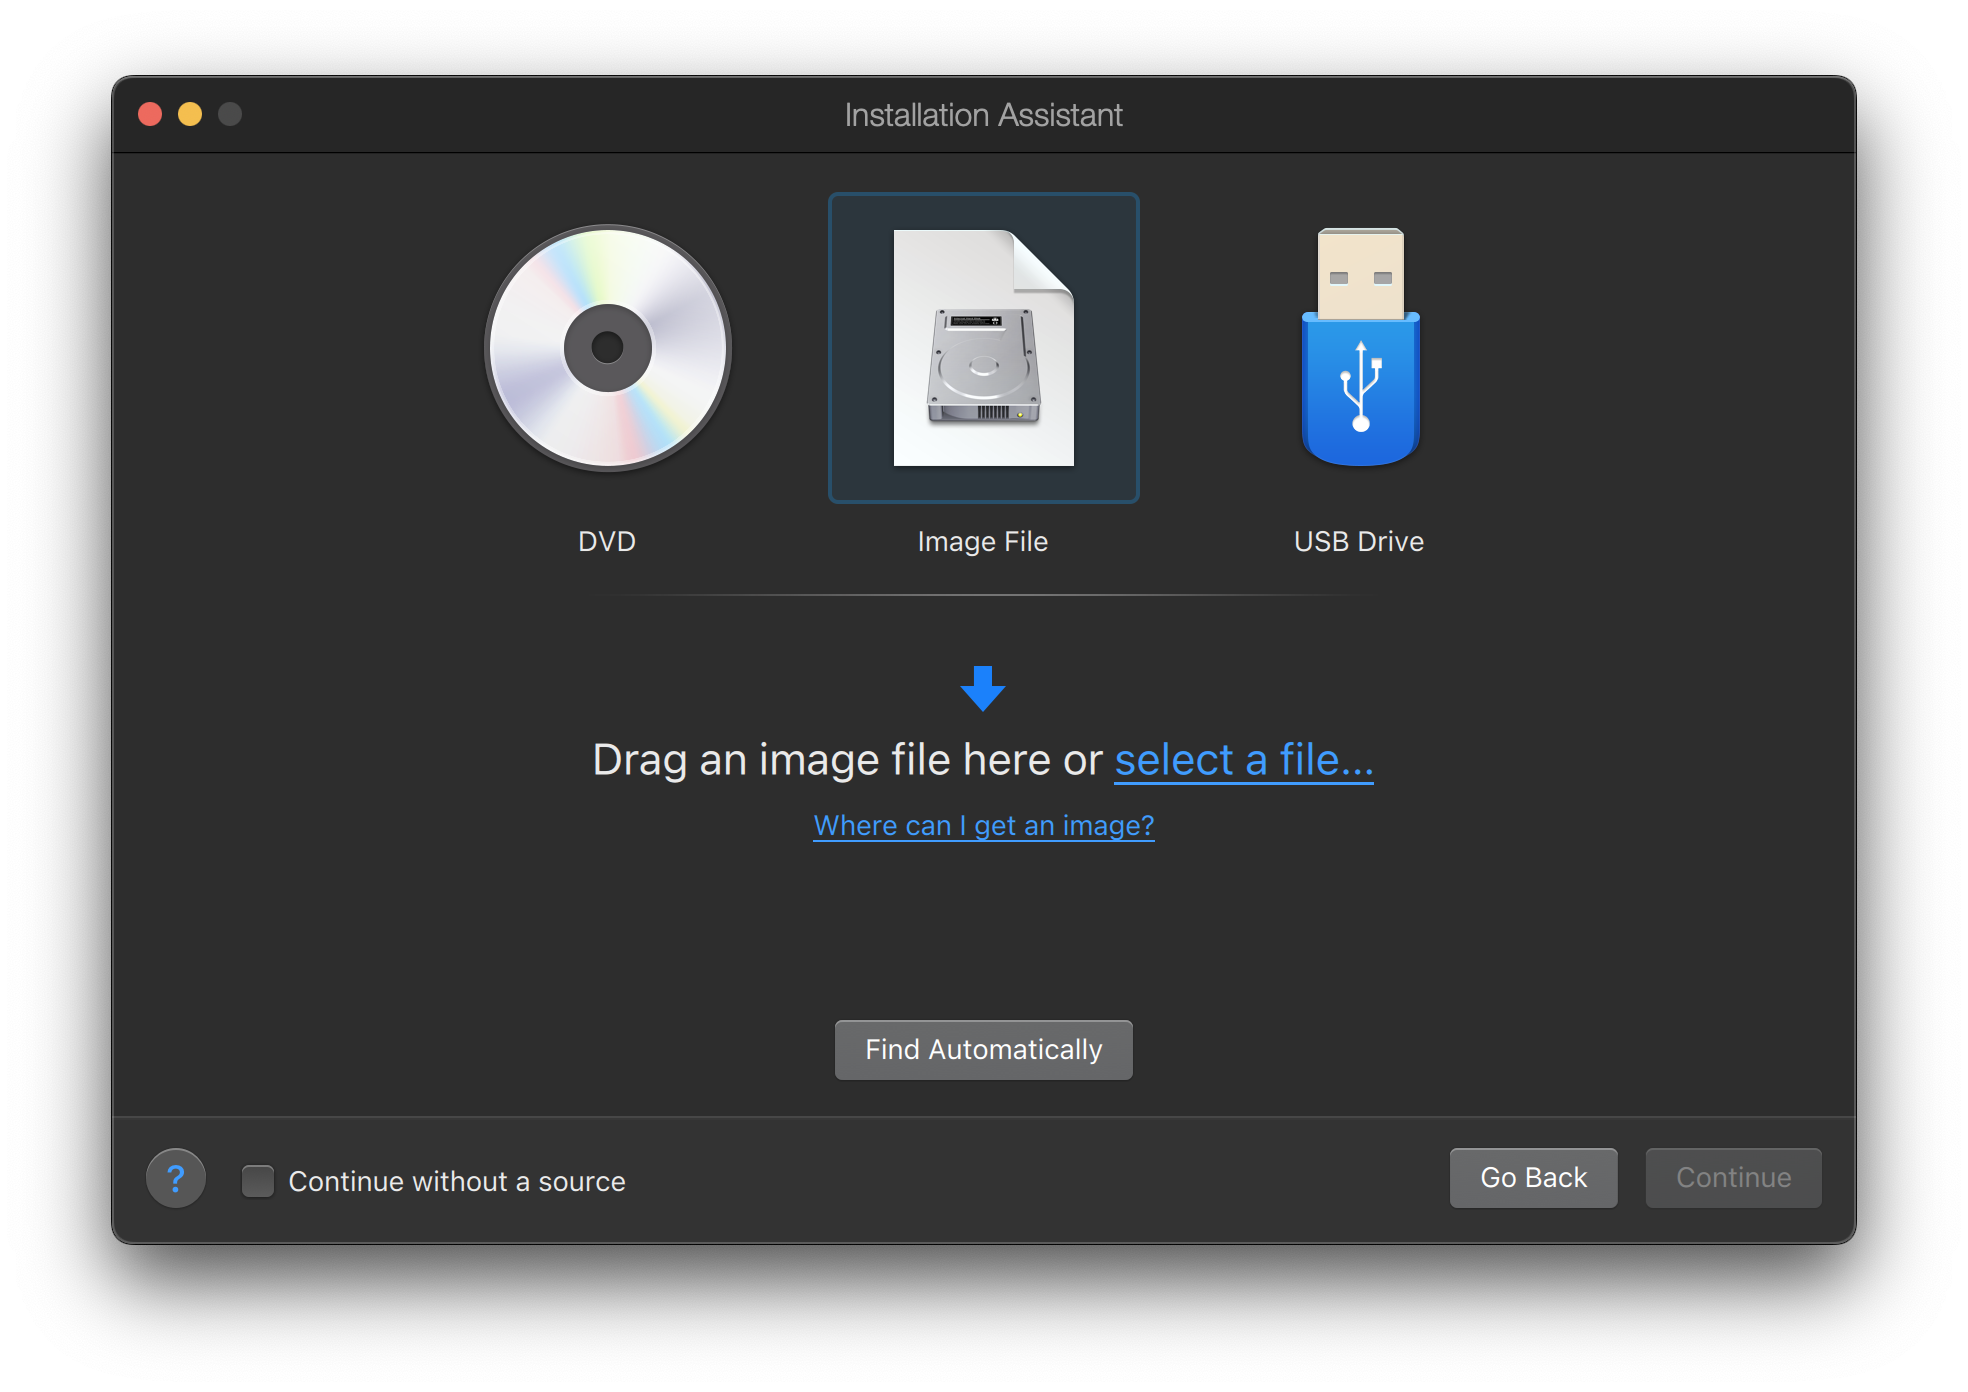
選擇網路類型以及網路介面:
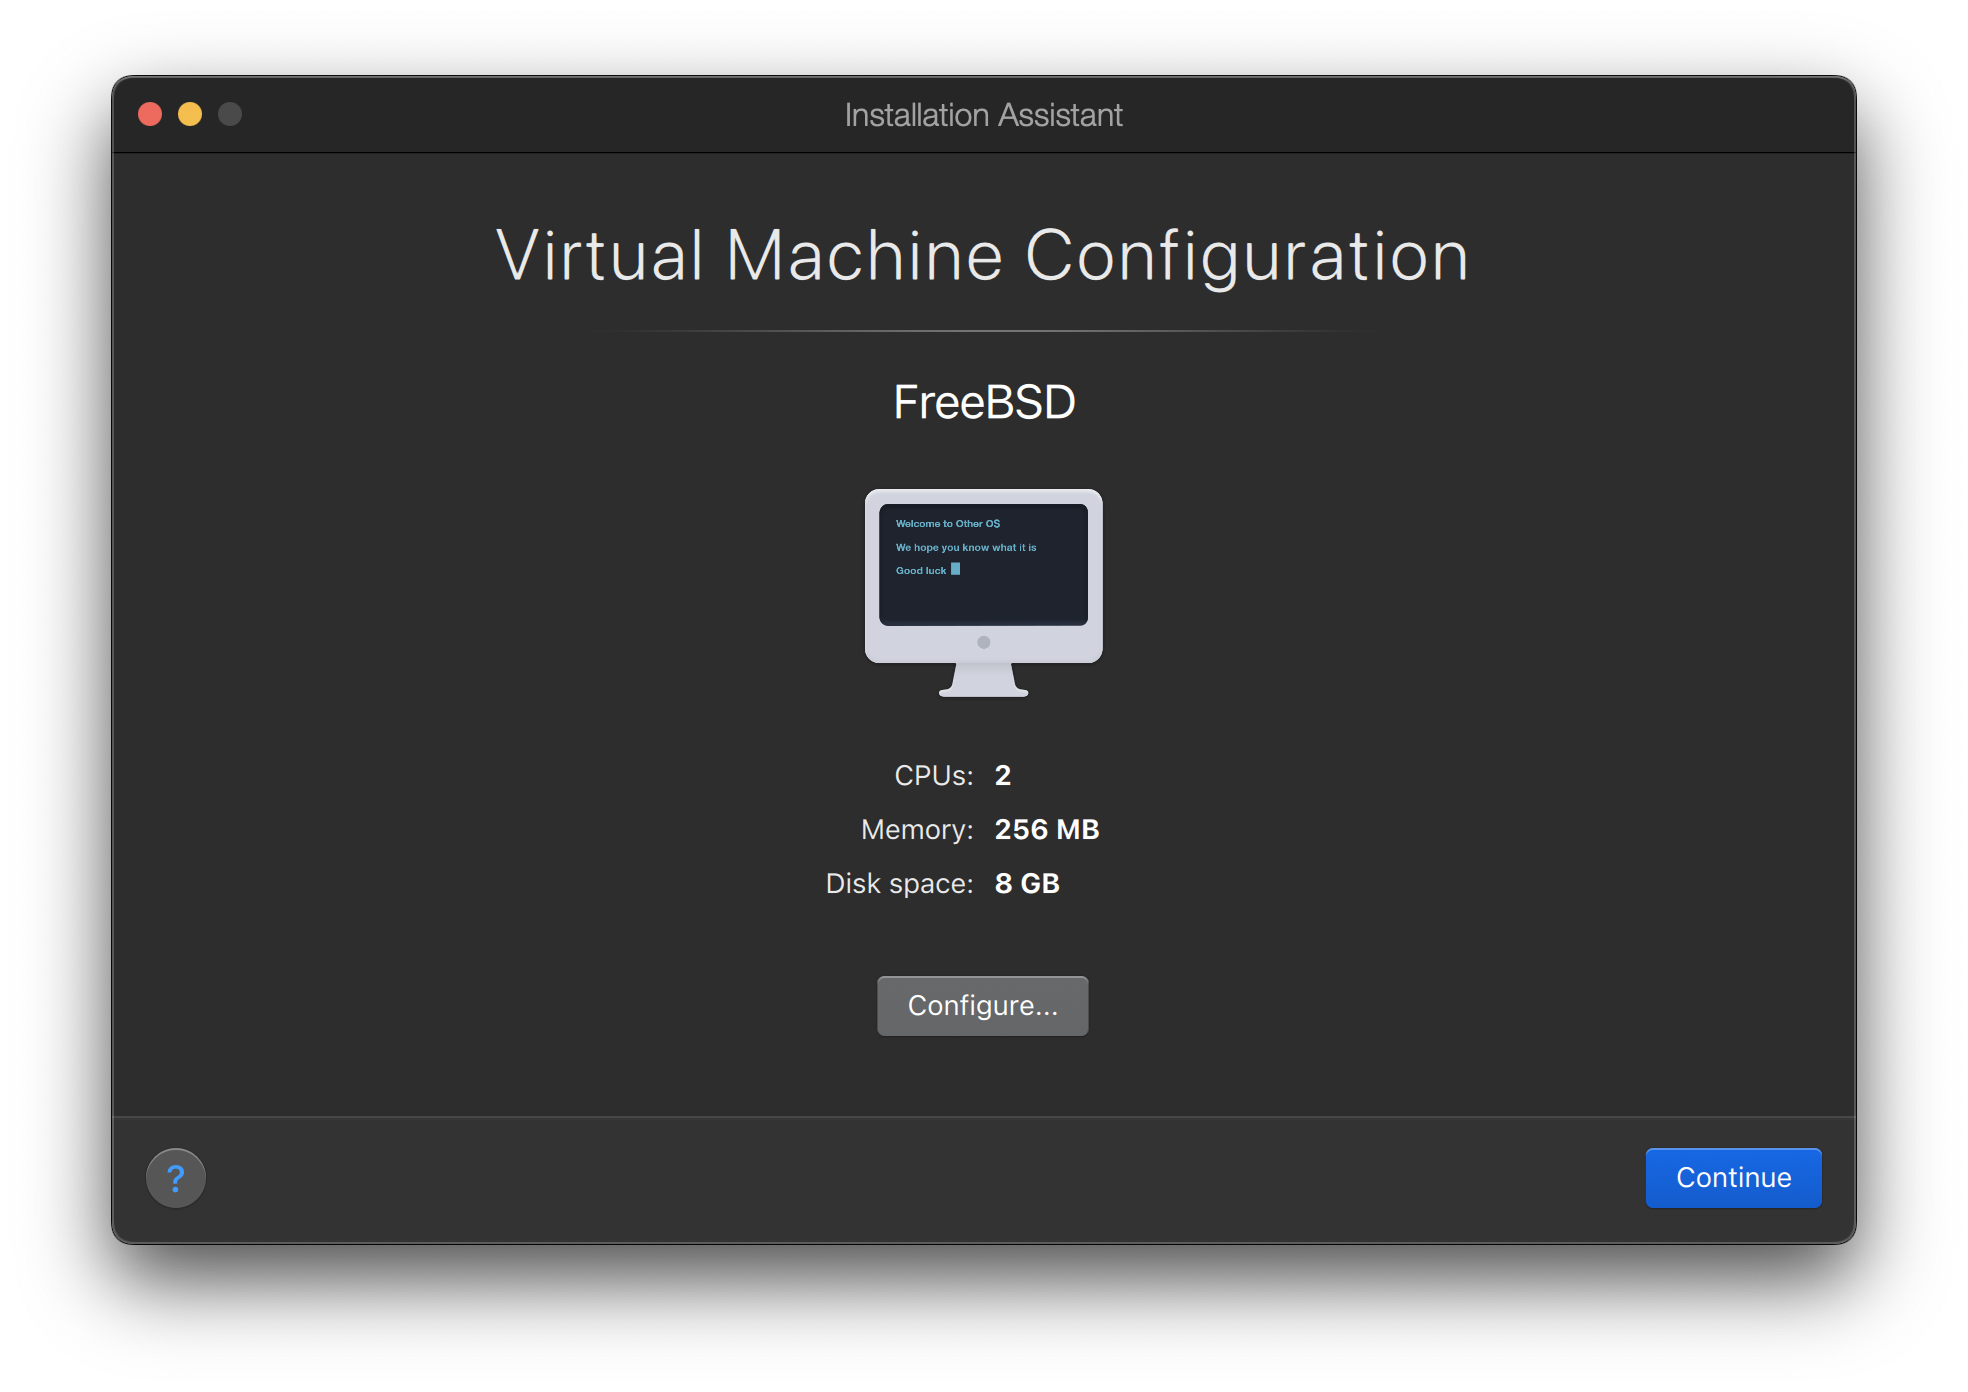

儲存並完成設定:
在 FreeBSD 虛擬機器新增後,就可以繼續以其安裝 FreeBSD。 安裝方面,比較好的作法是使用官方的 FreeBSD CD/DVD 或者是自官方 FTP 站下載的 ISO 映像檔。 複製適合的 ISO 映像檔到 Mac™ 檔案系統本地端或放入 CD/DVD 到 Mac™ 的 CD-ROM 磁碟機。在 FreeBSD Parallels 視窗的右下角點選磁碟圖示後會出現一個視窗,可用來建立虛擬機器內的 CD-ROM 磁碟機與磁碟上 ISO 檔案或實際 CD-ROM 磁碟機的關聯。
建立與 CD-ROM 來源的關聯後,點選重新開機圖示重新開啟 FreeBSD 虛擬機器。Parallels 會重新開機進入一個特殊的 BIOS 畫面並檢查是否有 CD-ROM。
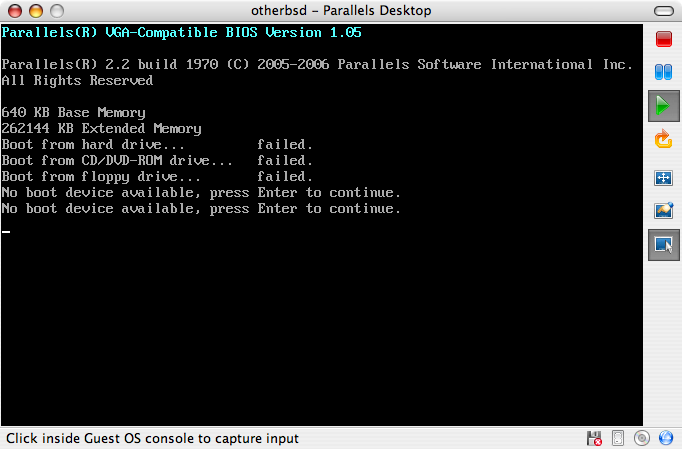
在此處會找到 FreeBSD 安裝媒體並開始正常的 FreeBSD 安裝程序。完成安裝,但不要在此時嘗試設定 Xorg。

當安裝完成後,重新開機將會進入新安裝的 FreeBSD 虛擬機器。
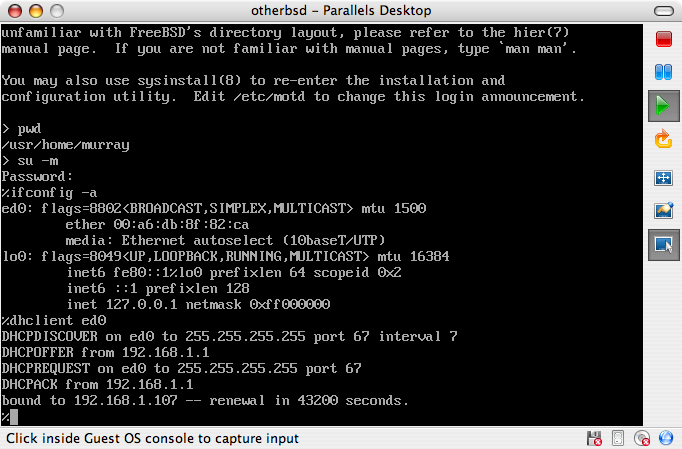
在成功將 FreeBSD 安裝到 Mac OS™ X 的 Parallels 後,有數個設定步驟要完成來最佳化系統在虛擬機器上的運作。
設定 Boot Loader 變數
最重要的一個步驟是減少 kern.hz 參數來減少 FreeBSD 在 Parallels 環境下對 CPU 的使用率。加入以下行到 /boot/loader.conf 來完成這個動作:
kern.hz=100
若沒有完成此設定,閒置的 FreeBSD Parallels 客端將會消耗掉單一處理器的 iMac™ 將近 15% 的 CPU。完成此更改後使用率會減至接近 5%。
建立新核心設定檔
設定網路
最基本的網路設定是使用 DHCP 來讓虛擬機器連線到與主端 Mac™ 相同的區域網路,這可以透過加入 ifconfig_ed0="DHCP" 到 /etc/rc.conf 來完成。更進階的網路設定在 進階網路設定 中描述。
給 Windows™ 使用的 Virtual PC 是一套可免費下載的 Microsoft™ 軟體產品,請參考此網站取得系統需求。Virtual PC 在 Microsoft™ Windows™ 上安裝完成之後,使用者可以設定一台虛擬機器然後安裝想要的客端作業系統。
安裝 FreeBSD 到 Virtual PC 的第一個步驟是建立新的虛擬機器來安裝 FreeBSD。當提示畫面出現時,請選擇 :
當提示畫面出現時,選擇 為 :
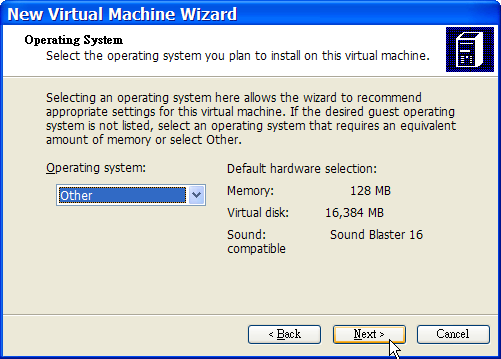
然後,根據您對此虛擬 FreeBSD 作業系統的規畫選擇合理的磁碟及記憶體空間,對大多數在 Virtual PC 下的 FreeBSD 使用來講 4GB 的磁碟空間與 512MB 的 RAM 便足夠:
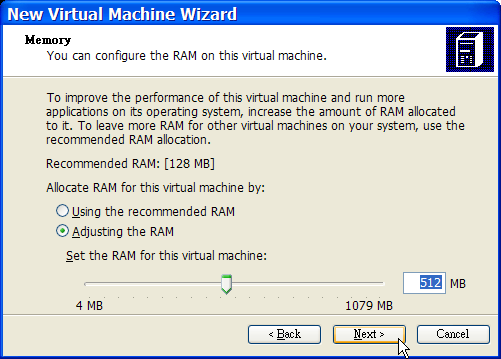
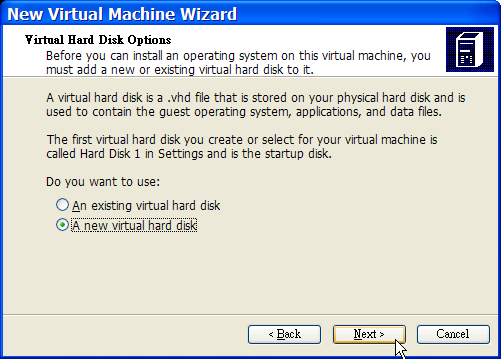
儲存並完成設定:
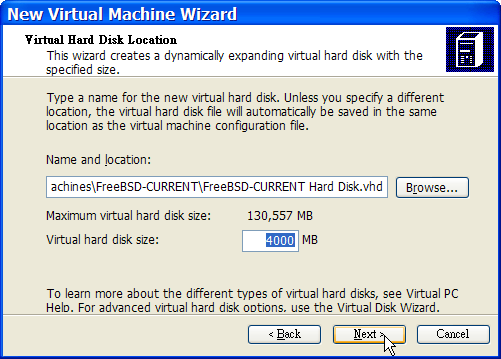
選擇 FreeBSD 虛擬機器然後點選 Settings,接著設定網路類型及網路介面卡:

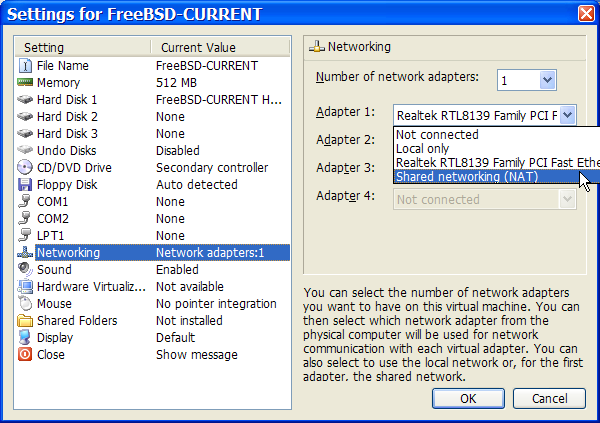
FreeBSD 虛擬機器建立完成之後,便可安裝 FreeBSD 到該虛擬機器。安裝最好使用官方 FreeBSD CD/DVD 或使用自官方 FTP 站下載的 ISO 映像檔。複製適當的 ISO 映像檔到本地 Windows™ 檔案系統或插入 CD/DVD 到 CD 磁碟機,然後雙擊點選 FreeBSD 虛擬機器來開機。接著,點選 CD 並在 Virtual PC 視窗選擇 Capture ISO Image…,這將會顯示一個視窗可以建立虛擬機器中的 CD-ROM 與 ISO 檔或磁碟或實體 CD-ROM 磁碟機之間的關聯。

建立與 CD-ROM 來源的關聯後,點選 Action 及 Reset 重新開機 FreeBSD 虛擬機器。Virtual PC 會重新開始並進入特殊的 BIOS 來做 CD-ROM 的第一次檢查。
在這個情況下會找到 FreeBSD 安裝媒體然後開始正常的 FreeBSD 安裝。接著繼續安裝,但此時請不要嘗試設定 Xorg。
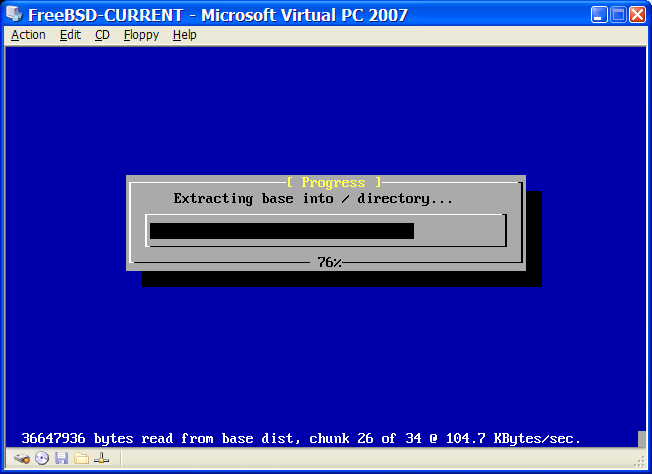
當安裝完成之後,記得退出 CD/DVD 或釋放 ISO 映像檔。最後,重新開機進入新安裝的 FreeBSD 虛擬機器。
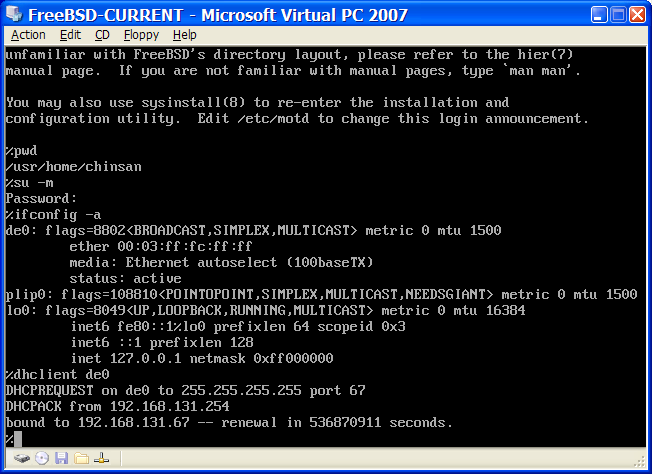
在成功將 FreeBSD 安裝到 Microsoft™ Windows™ 的 Virtual PC 後,有數個設定步驟要完成來最佳化系統在虛擬機器上的運作。
設定 Boot Loader 變數
最重要的一個步驟是減少 kern.hz,來減少 FreeBSD 在 Virtual PC 環境下 CPU 的使用量。這可以透過加入下列幾行到 /boot/loader.conf 來完成:
kern.hz=100
若沒有完成此設定,閒置的 FreeBSD Virtual PC 客端 OS 會消耗掉單一處理器的電腦 40% 的 CPU。完成此更改後使用率會減至接近 3%。
建立新核心設定檔
設定網路
最基本的網路設定是使用 DHCP 來讓虛擬機器連線到與主端 Microsoft™ Windows™ 相同的區域網路,這可以透過加入 ifconfig_de0="DHCP" 到 /etc/rc.conf 來完成。更進階的網路設定在 進階網路設定 中描述。
VMware Fusion 是一套商業軟體可在 Intel™ 為基礎的 Apple™Mac™ 的 Mac OS™ 10.4.9 或更新版本上執行。 該軟體完全支援使用 FreeBSD 作為客端作業系統。 在 Mac OS™ X 裝好 VMware Fusion 後,使用者必先完成虛擬機器的設定後才可安裝想使用的客端作業系統。
第一個步驟是啟動 VMware Fusion 載入 Virtual Machine Library,點選 建立虛擬機器:
這個動做會載入 New Virtual Machine Assistant,點選 繼續:

選擇 為 以及在 Version 提示出現時選擇 或 :
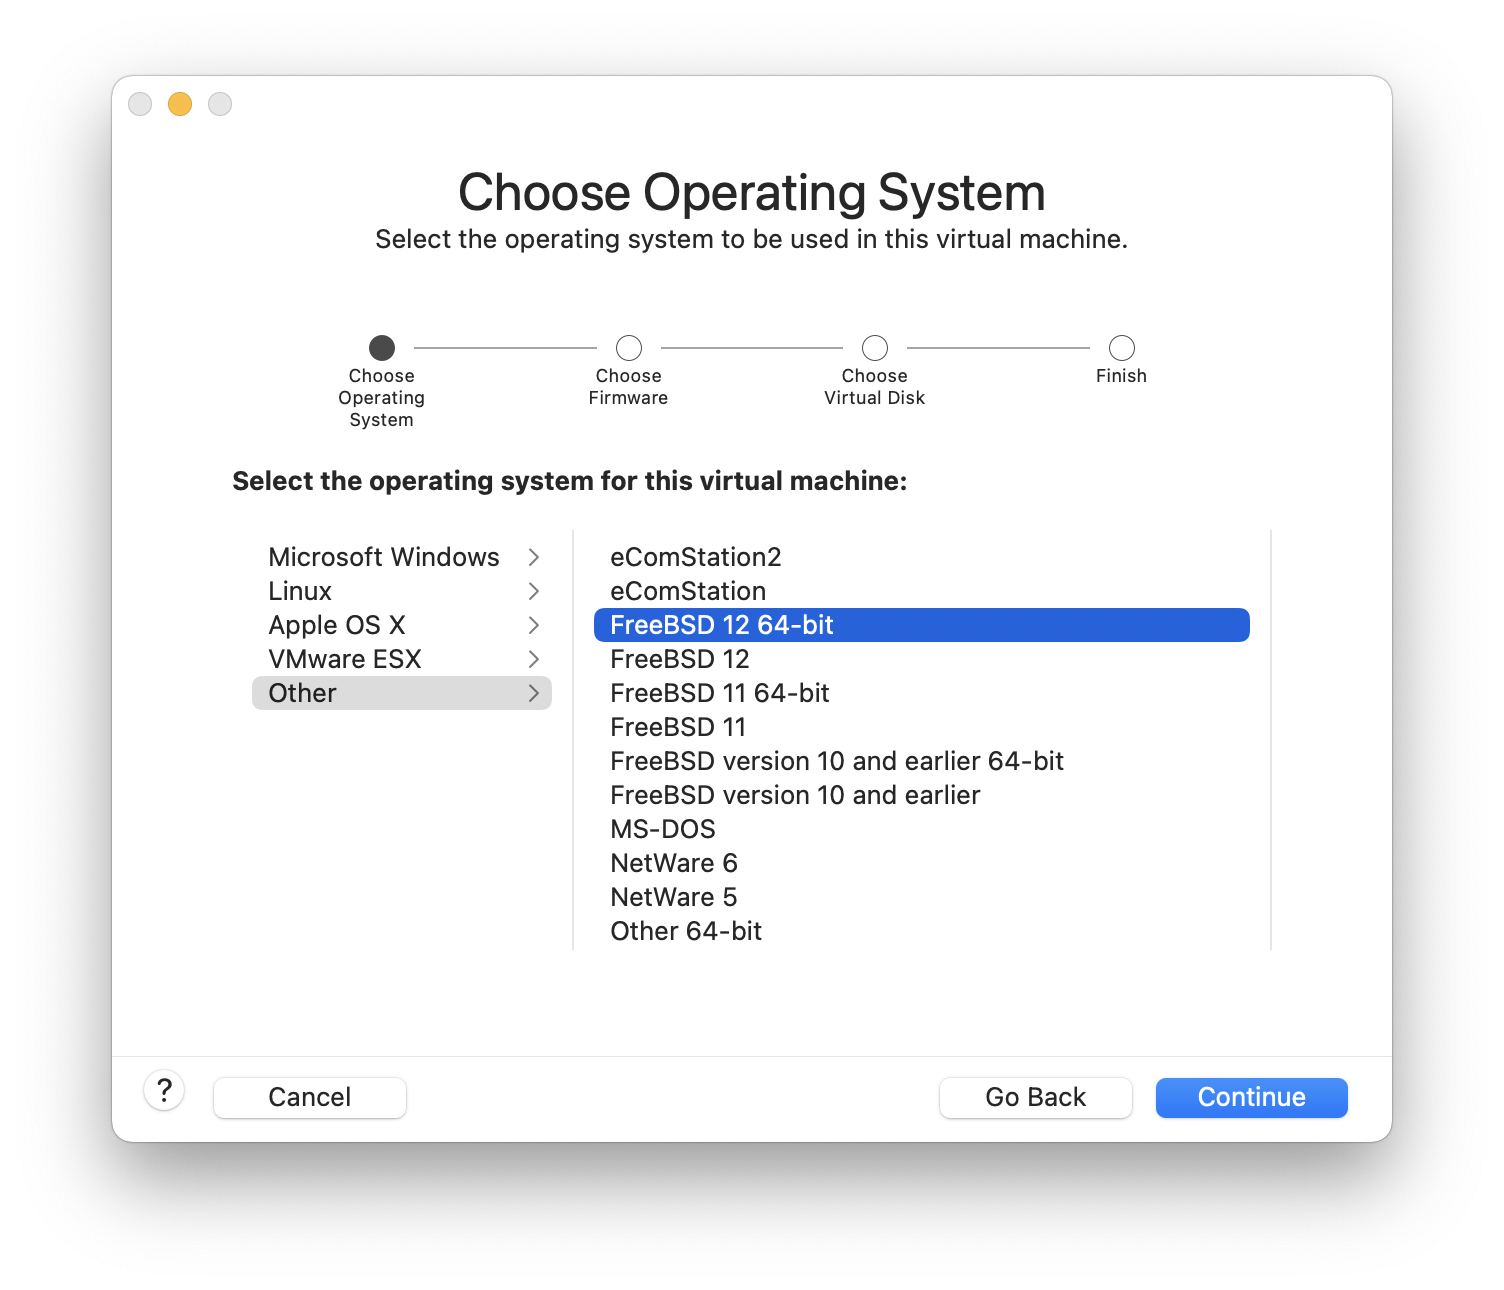
選擇虛擬機器要使用的名稱以及要儲存目錄位置:
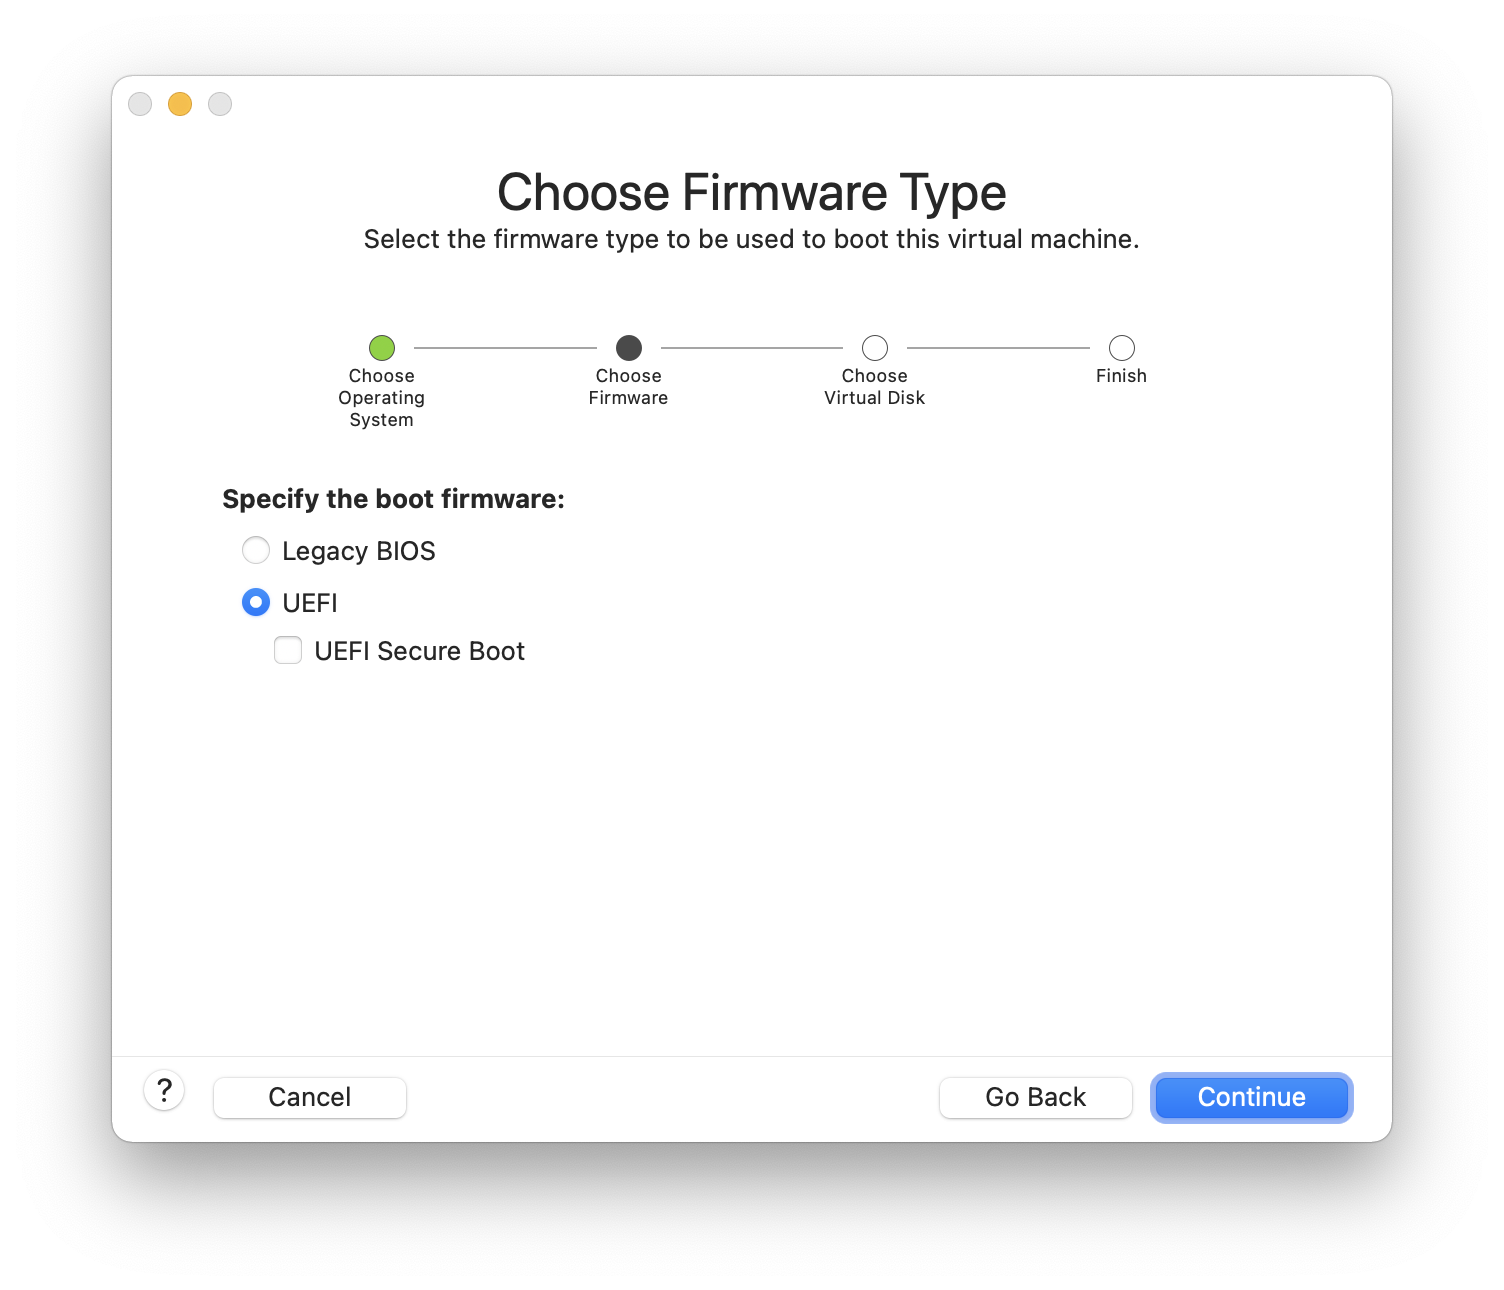
選擇虛擬機器的 Virtual Hard Disk 大小:

選擇安裝虛擬機器的方式,可從 ISO 映像檔或從 CD/DVD:

點選 接著虛擬機器會開機:
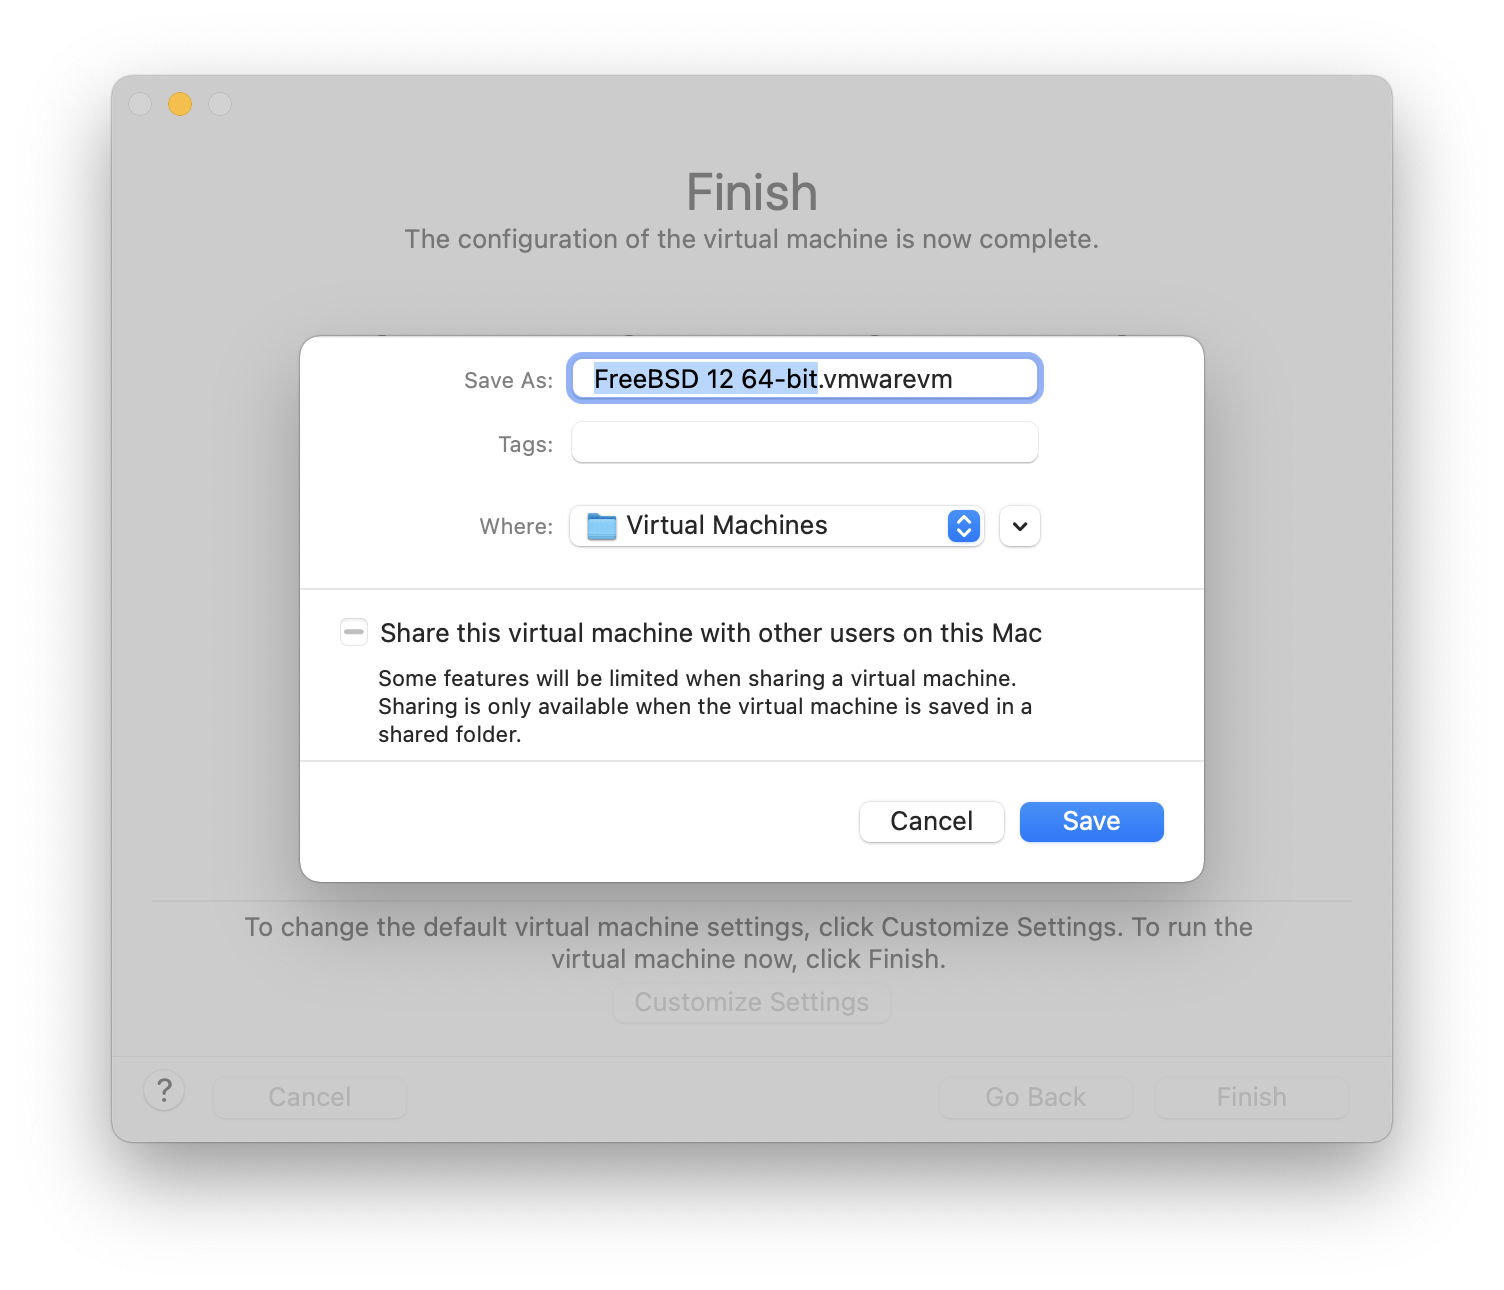
照往常方式安裝 FreeBSD:
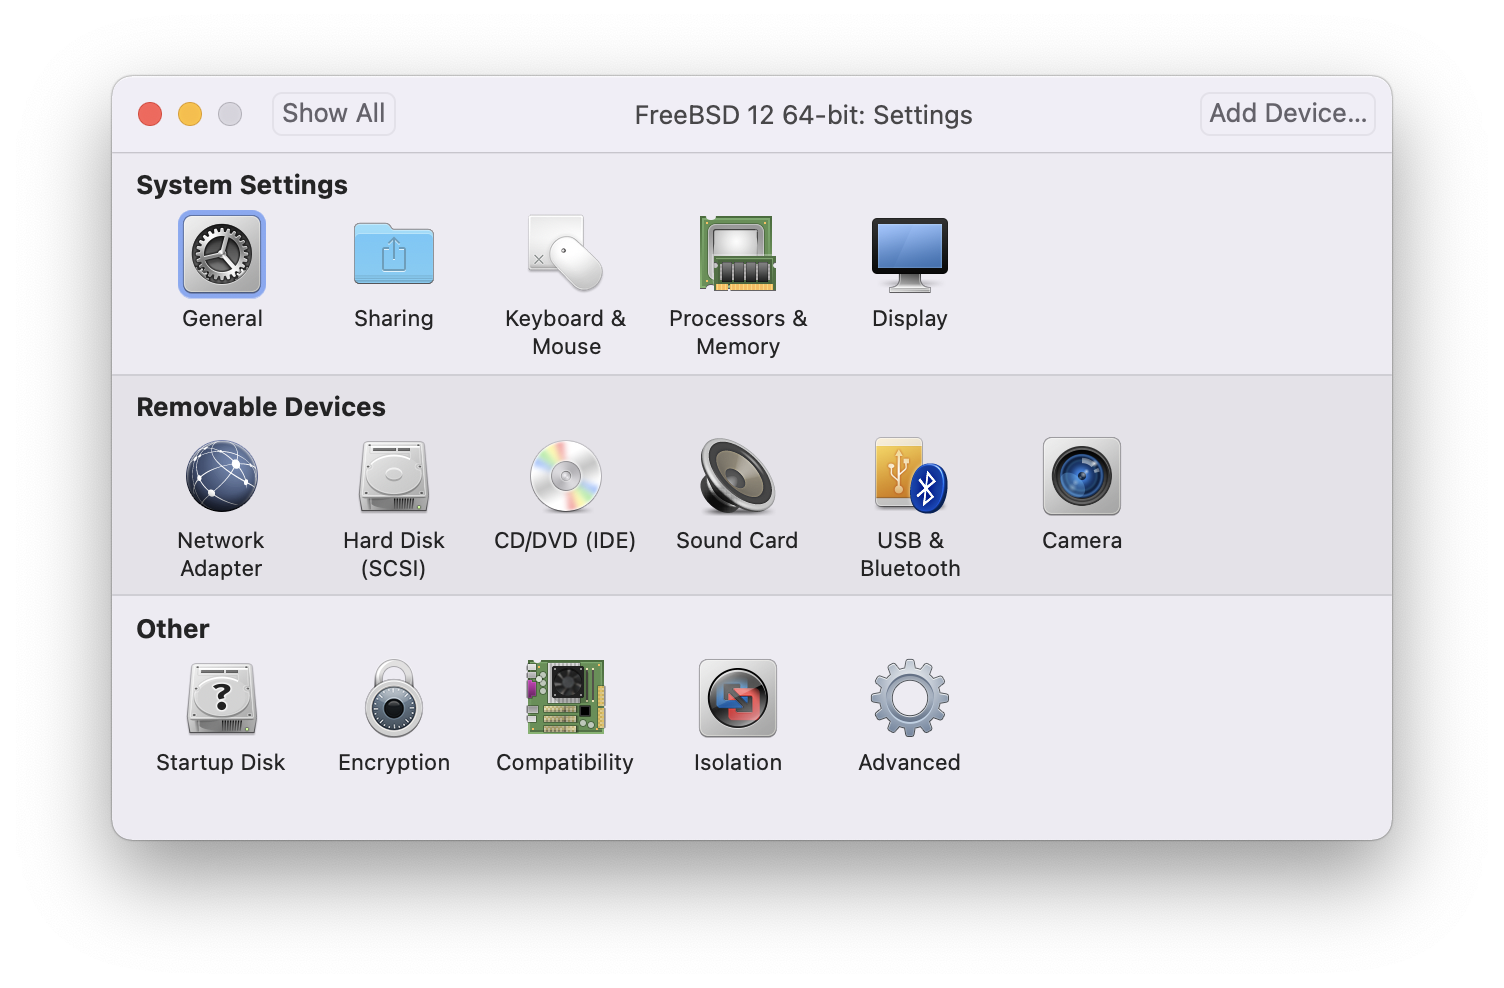
安裝完成後,可以修改虛擬機器的設定,例如記憶體使用量:
虛擬機器的 System Hardware 設定無法在虛擬機器執行時修改。 |
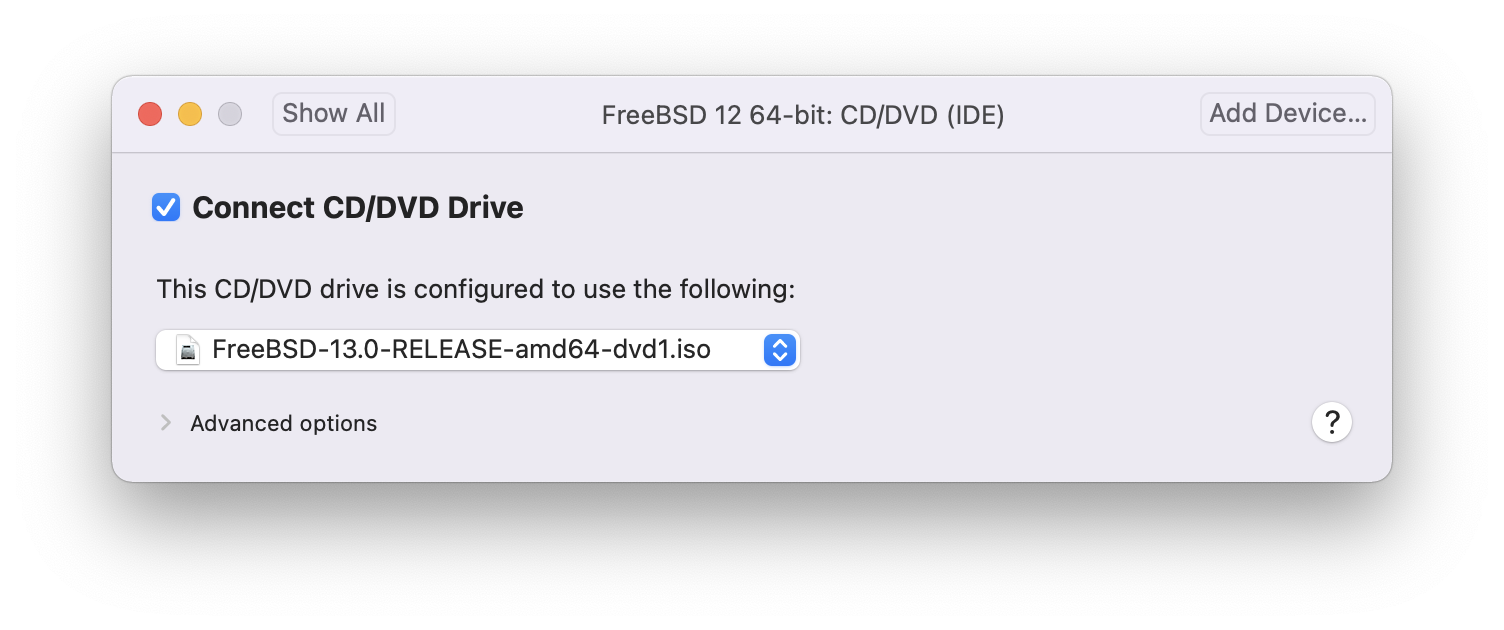
虛擬機器要使用的 CPU 數量:
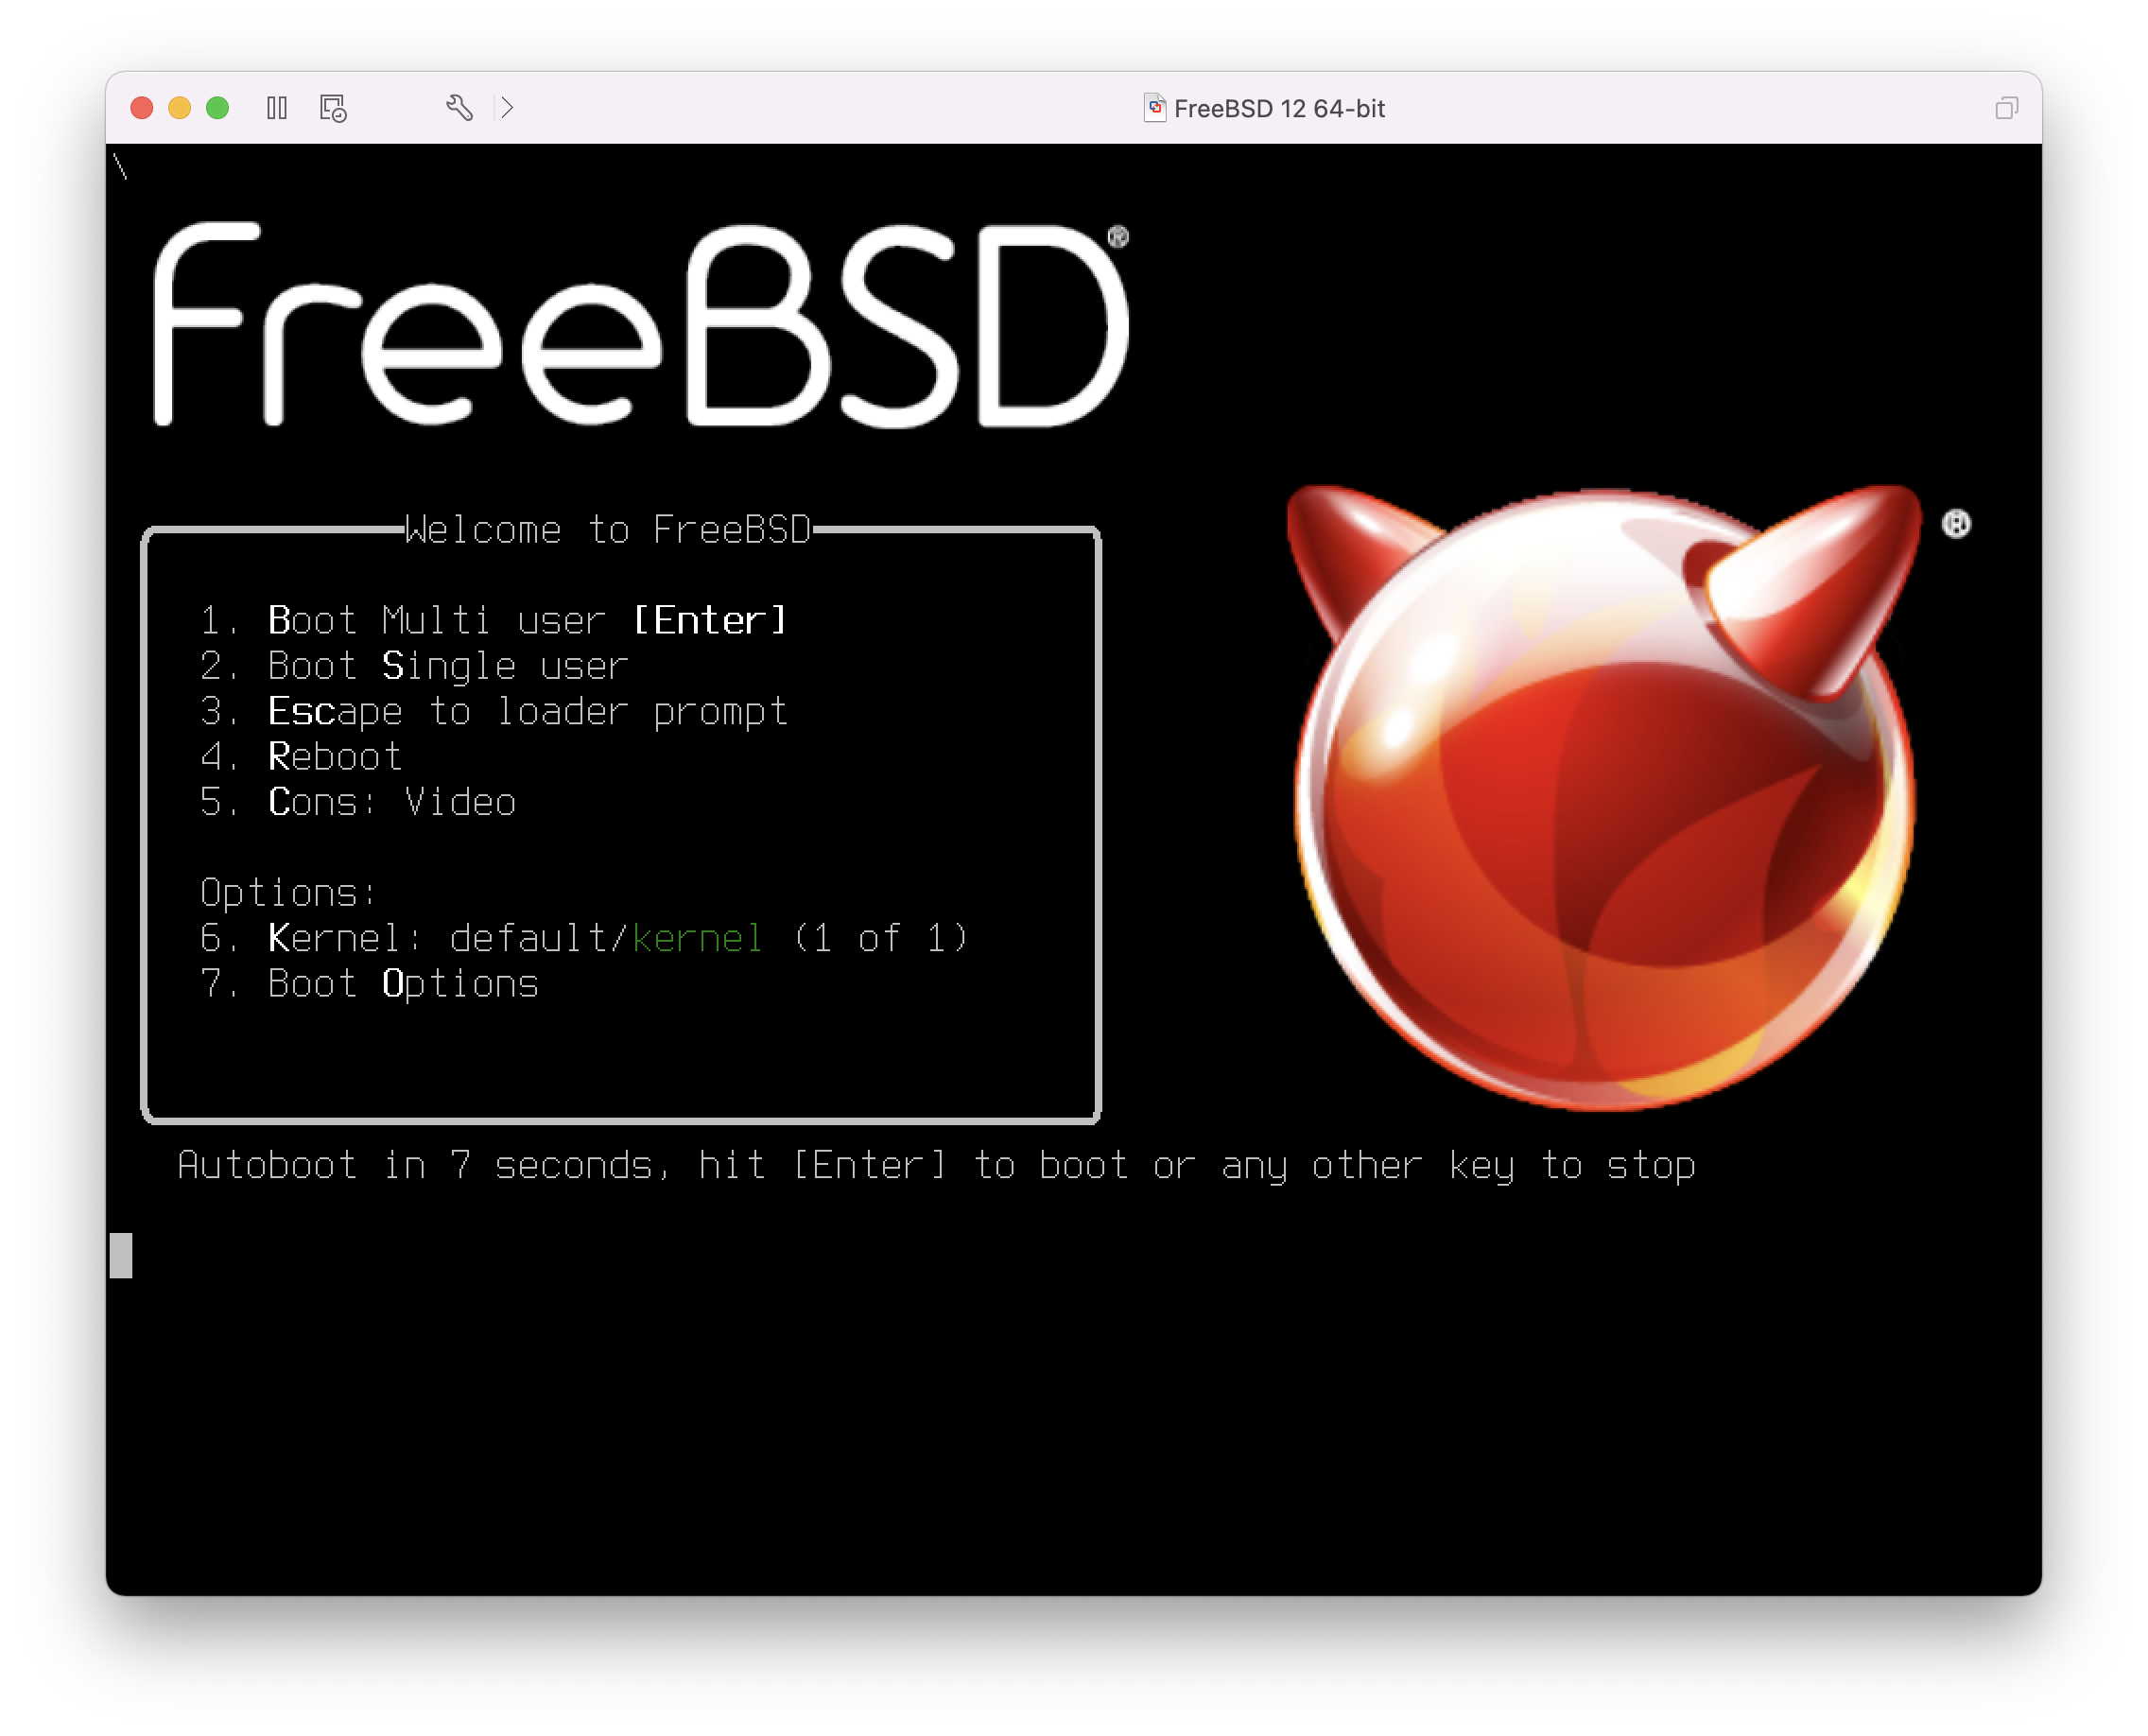
CD-ROM 裝置的狀態,正常情況 CD/DVD/ISO 在不需要時會中斷與虛擬機器的連線。

最後一件事是更改虛擬機器連線到網路的方式,要允許除了主端以外的機器連線到虛擬機器,請選擇 。否則會偏好使用 來讓虛擬機器可以存取網際網路,但外部網路無法連線到虛擬機器。

在修改設定之後,開機進入新安裝的 FreeBSD 虛擬機器。
在成功將 FreeBSD 安裝到 Mac OS™ X 的 VMware Fusion 後,有數個設定步驟要完成來最佳化系統在虛擬機器上的運作。
設定 Boot Loader 變數
最重要的一個步驟是減少 kern.hz,來減少 FreeBSD 在 VMware Fusion 環境下 CPU 的使用量。這可以透過加入下列幾行到 /boot/loader.conf 來完成:
kern.hz=100
若沒有完成此設定,閒置的 FreeBSD VMware Fusion 客端將會消耗掉單一處理器的 iMac™ 將近 15% 的 CPU。完成此更改後使用率會減至接近 5%。
建立新核心設定檔
設定網路
最基本的網路設定是使用 DHCP 來讓虛擬機器連線到與主端 Mac™ 相同的區域網路,這可以透過加入 ifconfig_em0="DHCP" 到 /etc/rc.conf 來完成。更進階的網路設定在 進階網路設定 中描述。
在 VirtualBox™ 中使用 FreeBSD 做為客端系統也可運作的很好,虛擬化軟體可支援最常見的幾個作業系統,這當然也包含 FreeBSD。
VirtualBox™ guest additions 支援以下功能:
剪貼簿共享。
滑鼠指標整合。
主機時間同步。
視窗縮放。
無痕模式。
以下指令均是在 FreeBSD 客端中執行。 |
首先,在 FreeBSD 客端安裝 emulators/virtualbox-ose-additions 套件或 Port,以下指令會安裝 Port:
# cd /usr/ports/emulators/virtualbox-ose-additions && make install clean加入下行到 /etc/rc.conf:
vboxguest_enable="YES" vboxservice_enable="YES"
若有使用 ntpd(8) 或 ntpdate(8),便可關閉主機時間同步功能:
vboxservice_flags="--disable-timesync"
Xorg 會自動辨識 vboxvideo 驅動程式,也可手動在 /etc/X11/xorg.conf 中輸入:
Section "Device" Identifier "Card0" Driver "vboxvideo" VendorName "InnoTek Systemberatung GmbH" BoardName "VirtualBox Graphics Adapter" EndSection
要使用 vboxmouse 驅動程式,可調整在 /etc/X11/xorg.conf 中與滑鼠相關的一節:
Section "InputDevice" Identifier "Mouse0" Driver "vboxmouse" EndSection
HAL 的使用者應建立以下 /usr/local/etc/hal/fdi/policy/90-vboxguest.fdi 或複製自 /usr/local/shared/hal/fdi/policy/10osvendor/90-vboxguest.fdi:
<?xml version="1.0" encoding="utf-8"?>
<!--
# Sun VirtualBox
# Hal driver description for the vboxmouse driver
# $Id: chapter.xml,v 1.33 2012-03-17 04:53:52 eadler Exp $
Copyright (C) 2008-2009 Sun Microsystems, Inc.
This file is part of VirtualBox Open Source Edition (OSE, as
available from http://www.virtualbox.org. This file is free software;
you can redistribute it and/or modify it under the terms of the GNU
General Public License (GPL) as published by the Free Software
Foundation, in version 2 as it comes in the "COPYING" file of the
VirtualBox OSE distribution. VirtualBox OSE is distributed in the
hope that it will be useful, but WITHOUT ANY WARRANTY of any kind.
Please contact Sun Microsystems, Inc., 4150 Network Circle, Santa
Clara, CA 95054 USA or visit http://www.sun.com if you need
additional information or have any questions.
-->
<deviceinfo version="0.2">
<device>
<match key="info.subsystem" string="pci">
<match key="info.product" string="VirtualBox guest Service">
<append key="info.capabilities" type="strlist">input</append>
<append key="info.capabilities" type="strlist">input.mouse</append>
<merge key="input.x11_driver" type="string">vboxmouse</merge>
<merge key="input.device" type="string">/dev/vboxguest</merge>
</match>
</match>
</device>
</deviceinfo>Shared folders for file transfers between host and VM are accessible by mounting them using mount_vboxvfs. A shared folder can be created on the host using the VirtualBox GUI or via vboxmanage. For example, to create a shared folder called myshare under /mnt/bsdboxshare for the VM named BSDBox, run:
# vboxmanage sharedfolder add 'BSDBox' --name myshare --hostpath /mnt/bsdboxshareNote that the shared folder name must not contain spaces. Mount the shared folder from within the guest system like this:
# mount_vboxvfs -w myshare /mntVirtualBox™ 是一套積極開發、完整的虛擬化套件,適用大多數作業系統,包含 Windows™, Mac OS™, Linux™ 與 FreeBSD,它同樣能夠執行類 Windows™ 或 UNIX™ 的客端系統。它是以開源軟體的方式發佈,但閉源元件可獨立在擴充包中使用,這些元件包含對 USB 2.0 裝置的支援。更多資訊可在 VirtualBox wiki 的 Downloads 頁面。目前,這些擴充套件並不支援 FreeBSD。
VirtualBox™ 可於 emulators/virtualbox-ose 以 FreeBSD 套件或 Port 的方式取得。要安裝 Port 可使用以下指令:
# cd /usr/ports/emulators/virtualbox-ose
# make install clean在 Port 的設定選單中 GuestAdditions 相關程式是最有用的選項之一,這些程式可在客端作業系統提供數個有用的功能,如滑鼠指標整合 (允許滑鼠在主端與客端之間移動,不需要按特殊快速鍵來切換) 與較快的影像繪圖速度,特別是在 Windows™ 的客端系統。Guest additions 可在客端系統安裝完之後的 Devices 選單找到。
還有一些設定需要在 VirtualBox™ 第一次啟動端做修改,Port 會安裝一個核心模組在 /boot/modules,該模組必須在核心中載入:
# kldload vboxdrv要確保該模組在重新開機後會載入,可加入下行到 /boot/loader.conf:
vboxdrv_load="YES"
要使用可支援橋接或僅限主端 (Host-only) 的網路,可加入下行到 /etc/rc.conf,然後重新啟動電腦:
vboxnet_enable="YES"
在安裝 VirtualBox™ 的過程中會建立 vboxusers 群組,所有需要存取 VirtualBox™ 的使用者均需要加入成為此群組的成員,pw 可用來加入新的成員:
# pw groupmod vboxusers -m yourusername/dev/vboxnetctl 的預設權限是受限的,需要更改後才可使用橋接網路:
# chown root:vboxusers /dev/vboxnetctl
# chmod 0660 /dev/vboxnetctl要永久變更權限,可加入下列幾行到 /etc/devfs.conf:
own vboxnetctl root:vboxusers perm vboxnetctl 0660
要執行 VirtualBox™,可在 Xorg 工作階段輸入:
% VirtualBox要取得更多有關設定與使用 VirtualBox™ 的資訊,請參考 官方網站。供 FreeBSD 特定的資訊與疑難排解操作指示,可參考 FreeBSD wiki 中相關的頁面。
VirtualBox™ can be configured to pass USB devices through to the guest operating system. The host controller of the OSE version is limited to emulating USB 1.1 devices until the extension pack supporting USB 2.0 and 3.0 devices becomes available on FreeBSD.
For VirtualBox™ to be aware of USB devices attached to the machine, the user needs to be a member of the operator group.
# pw groupmod operator -m yourusernameThen, add the following to /etc/devfs.rules, or create this file if it does not exist yet:
[system=10] add path 'usb/*' mode 0660 group operator
若服務未執行,請加入下行到 /etc/rc.conf:
devfs_system_ruleset="system"
然後重新啟動 devfs:
# service devfs restart重新啟動登作階段與 VirtualBox™ 來讓這些變更生效,且建立必要的 USB 的過濾器。
透過共享實體磁碟機可讓客端系統能夠存取主端系統的 DVD/CD 磁碟機。在 VirtualBox™ 中,這個功能可在虛擬機器設定中的儲存 (Storage) 視窗中設定。若需要,可先建立一個空的 IDECD/DVD 裝置,然後在跳出的選單中選擇要做為虛擬 CD/DVD 磁碟機的主端磁碟機,此時會出現一個標籤為 Passthrough 的核選方塊,勾選這個核選方塊可讓虛擬機器直接使用該硬體,例如,音樂 CD 或燒錄機只會在有勾選此選項時能夠運作。
VirtualBox™DVD/CD 功能要能運作需要執行 HAL,因此需在 /etc/rc.conf 中開啟,若該服務尚未啟動,則啟動它:
hald_enable="YES"
# service hald start為了讓使用者能夠使用 VirtualBox™DVD/CD 功能,這些使用者需要存取 /dev/xpt0, /dev/cdN 以及 /dev/passN,這通常可讓這些使用者成為 operator 的成員來達成。對這些裝置的權限必須加入下行到 /etc/devfs.conf 來修正:
perm cd* 0660 perm xpt0 0660 perm pass* 0660
# service devfs restartThe bhyveBSD-licensed hypervisor became part of the base system with FreeBSD 10.0-RELEASE. This hypervisor supports a number of guests, including FreeBSD, OpenBSD, and many Linux™ distributions. By default, bhyve provides access to serial console and does not emulate a graphical console. Virtualization offload features of newer CPUs are used to avoid the legacy methods of translating instructions and manually managing memory mappings.
The bhyve design requires a processor that supports Intel™ Extended Page Tables (EPT) or AMD™ Rapid Virtualization Indexing (RVI) or Nested Page Tables (NPT). Hosting Linux™ guests or FreeBSD guests with more than one vCPU requires VMX unrestricted mode support (UG). Most newer processors, specifically the Intel™ Core™ i3/i5/i7 and Intel™ Xeon™ E3/E5/E7, support these features. UG support was introduced with Intel’s Westmere micro-architecture. For a complete list of Intel™ processors that support EPT, refer to https://ark.intel.com/content/www/us/en/ark/search/featurefilter.html?productType=873&0_ExtendedPageTables=True. RVI is found on the third generation and later of the AMD Opteron™ (Barcelona) processors. The easiest way to tell if a processor supports bhyve is to run dmesg or look in /var/run/dmesg.boot for the POPCNT processor feature flag on the Features2 line for AMD™ processors or EPT and UG on the VT-x line for Intel™ processors.
The first step to creating a virtual machine in bhyve is configuring the host system. First, load the bhyve kernel module:
# kldload vmmThen, create a tap interface for the network device in the virtual machine to attach to. In order for the network device to participate in the network, also create a bridge interface containing the tap interface and the physical interface as members. In this example, the physical interface is igb0:
# ifconfig tap0 create
# sysctl net.link.tap.up_on_open=1
net.link.tap.up_on_open: 0 -> 1
# ifconfig bridge0 create
# ifconfig bridge0 addm igb0 addm tap0
# ifconfig bridge0 upCreate a file to use as the virtual disk for the guest machine. Specify the size and name of the virtual disk:
# truncate -s 16G guest.imgDownload an installation image of FreeBSD to install:
# fetch ftp://ftp.freebsd.org/pub/FreeBSD/releases/ISO-IMAGES/10.3/FreeBSD-10.3-RELEASE-amd64-bootonly.iso
FreeBSD-10.3-RELEASE-amd64-bootonly.iso 100% of 230 MB 570 kBps 06m17sFreeBSD comes with an example script for running a virtual machine in bhyve. The script will start the virtual machine and run it in a loop, so it will automatically restart if it crashes. The script takes a number of options to control the configuration of the machine: -c controls the number of virtual CPUs, -m limits the amount of memory available to the guest, -t defines which tap device to use, -d indicates which disk image to use, -i tells bhyve to boot from the CD image instead of the disk, and -I defines which CD image to use. The last parameter is the name of the virtual machine, used to track the running machines. This example starts the virtual machine in installation mode:
# sh /usr/shared/examples/bhyve/vmrun.sh -c 1 -m 1024M -t tap0 -d guest.img -i -I FreeBSD-10.3-RELEASE-amd64-bootonly.iso guestnameThe virtual machine will boot and start the installer. After installing a system in the virtual machine, when the system asks about dropping in to a shell at the end of the installation, choose Yes.
Reboot the virtual machine. While rebooting the virtual machine causes bhyve to exit, the vmrun.sh script runs bhyve in a loop and will automatically restart it. When this happens, choose the reboot option from the boot loader menu in order to escape the loop. Now the guest can be started from the virtual disk:
# sh /usr/shared/examples/bhyve/vmrun.sh -c 4 -m 1024M -t tap0 -d guest.img guestnameIn order to boot operating systems other than FreeBSD, the sysutils/grub2-bhyve port must be first installed.
Next, create a file to use as the virtual disk for the guest machine:
# truncate -s 16G linux.imgStarting a virtual machine with bhyve is a two step process. First a kernel must be loaded, then the guest can be started. The Linux™ kernel is loaded with sysutils/grub2-bhyve. Create a device.map that grub will use to map the virtual devices to the files on the host system:
(hd0) ./linux.img (cd0) ./somelinux.iso
Use sysutils/grub2-bhyve to load the Linux™ kernel from the ISO image:
# grub-bhyve -m device.map -r cd0 -M 1024M linuxguestThis will start grub. If the installation CD contains a grub.cfg, a menu will be displayed. If not, the vmlinuz and initrd files must be located and loaded manually:
grub> ls
(hd0) (cd0) (cd0,msdos1) (host)
grub> ls (cd0)/isolinux
boot.cat boot.msg grub.conf initrd.img isolinux.bin isolinux.cfg memtest
splash.jpg TRANS.TBL vesamenu.c32 vmlinuz
grub> linux (cd0)/isolinux/vmlinuz
grub> initrd (cd0)/isolinux/initrd.img
grub> bootNow that the Linux™ kernel is loaded, the guest can be started:
# bhyve -A -H -P -s 0:0,hostbridge -s 1:0,lpc -s 2:0,virtio-net,tap0 -s 3:0,virtio-blk,./linux.img \
-s 4:0,ahci-cd,./somelinux.iso -l com1,stdio -c 4 -m 1024M linuxguestThe system will boot and start the installer. After installing a system in the virtual machine, reboot the virtual machine. This will cause bhyve to exit. The instance of the virtual machine needs to be destroyed before it can be started again:
# bhyvectl --destroy --vm=linuxguestNow the guest can be started directly from the virtual disk. Load the kernel:
# grub-bhyve -m device.map -r hd0,msdos1 -M 1024M linuxguest
grub> ls
(hd0) (hd0,msdos2) (hd0,msdos1) (cd0) (cd0,msdos1) (host)
(lvm/VolGroup-lv_swap) (lvm/VolGroup-lv_root)
grub> ls (hd0,msdos1)/
lost+found/ grub/ efi/ System.map-2.6.32-431.el6.x86_64 config-2.6.32-431.el6.x
86_64 symvers-2.6.32-431.el6.x86_64.gz vmlinuz-2.6.32-431.el6.x86_64
initramfs-2.6.32-431.el6.x86_64.img
grub> linux (hd0,msdos1)/vmlinuz-2.6.32-431.el6.x86_64 root=/dev/mapper/VolGroup-lv_root
grub> initrd (hd0,msdos1)/initramfs-2.6.32-431.el6.x86_64.img
grub> bootBoot the virtual machine:
# bhyve -A -H -P -s 0:0,hostbridge -s 1:0,lpc -s 2:0,virtio-net,tap0 \
-s 3:0,virtio-blk,./linux.img -l com1,stdio -c 4 -m 1024M linuxguestLinux™ will now boot in the virtual machine and eventually present you with the login prompt. Login and use the virtual machine. When you are finished, reboot the virtual machine to exit bhyve. Destroy the virtual machine instance:
# bhyvectl --destroy --vm=linuxguestIn addition to bhyveload and grub-bhyve, the bhyve hypervisor can also boot virtual machines using the UEFI userspace firmware. This option may support guest operating systems that are not supported by the other loaders.
In order to make use of the UEFI support in bhyve, first obtain the UEFI firmware images. This can be done by installing sysutils/bhyve-firmware port or package.
With the firmware in place, add the flags -l bootrom,/path/to/firmware to your bhyve command line. The actual bhyve command may look like this:
# bhyve -AHP -s 0:0,hostbridge -s 1:0,lpc \
-s 2:0,virtio-net,tap1 -s 3:0,virtio-blk,./disk.img \
-s 4:0,ahci-cd,./install.iso -c 4 -m 1024M \
-l bootrom,/usr/local/shared/uefi-firmware/BHYVE_UEFI.fd \
guestsysutils/bhyve-firmware also contains a CSM-enabled firmware, to boot guests with no UEFI support in legacy BIOS mode:
# bhyve -AHP -s 0:0,hostbridge -s 1:0,lpc \
-s 2:0,virtio-net,tap1 -s 3:0,virtio-blk,./disk.img \
-s 4:0,ahci-cd,./install.iso -c 4 -m 1024M \
-l bootrom,/usr/local/shared/uefi-firmware/BHYVE_UEFI_CSM.fd \
guestThe UEFI firmware support is particularly useful with predominantly graphical guest operating systems such as Microsoft Windows™.
Support for the UEFI-GOP framebuffer may also be enabled with the -s 29,fbuf,tcp=0.0.0.0:5900 flags. The framebuffer resolution may be configured with w=800 and h=600, and bhyve can be instructed to wait for a VNC connection before booting the guest by adding wait. The framebuffer may be accessed from the host or over the network via the VNC protocol.
bhyve 指令的結果會如下:
# bhyve -AHP -s 0:0,hostbridge -s 31:0,lpc \
-s 2:0,virtio-net,tap1 -s 3:0,virtio-blk,./disk.img \
-s 4:0,ahci-cd,./install.iso -c 4 -m 1024M \
-s 29,fbuf,tcp=0.0.0.0:5900,w=800,h=600,wait \
-l bootrom,/usr/local/shared/uefi-firmware/BHYVE_UEFI.fd \
guestNote, in BIOS emulation mode, the framebuffer will cease receiving updates once control is passed from firmware to guest operating system.
If ZFS is available on the host machine, using ZFS volumes instead of disk image files can provide significant performance benefits for the guest VMs. A ZFS volume can be created by:
# zfs create -V16G -o volmode=dev zroot/linuxdisk0When starting the VM, specify the ZFS volume as the disk drive:
# bhyve -A -H -P -s 0:0,hostbridge -s 1:0,lpc -s 2:0,virtio-net,tap0 -s3:0,virtio-blk,/dev/zvol/zroot/linuxdisk0 \
-l com1,stdio -c 4 -m 1024M linuxguestIt is advantageous to wrap the bhyve console in a session management tool such as sysutils/tmux or sysutils/screen in order to detach and reattach to the console. It is also possible to have the console of bhyve be a null modem device that can be accessed with cu. To do this, load the nmdm kernel module and replace -l com1,stdio with -l com1,/dev/nmdm0A. The /dev/nmdm devices are created automatically as needed, where each is a pair, corresponding to the two ends of the null modem cable (/dev/nmdm0A and /dev/nmdm0B). See nmdm(4) for more information.
# kldload nmdm
# bhyve -A -H -P -s 0:0,hostbridge -s 1:0,lpc -s 2:0,virtio-net,tap0 -s 3:0,virtio-blk,./linux.img \
-l com1,/dev/nmdm0A -c 4 -m 1024M linuxguest
# cu -l /dev/nmdm0B
Connected
Ubuntu 13.10 handbook ttyS0
handbook login:A device node is created in /dev/vmm for each virtual machine. This allows the administrator to easily see a list of the running virtual machines:
# ls -al /dev/vmm
total 1
dr-xr-xr-x 2 root wheel 512 Mar 17 12:19 ./
dr-xr-xr-x 14 root wheel 512 Mar 17 06:38 ../
crw------- 1 root wheel 0x1a2 Mar 17 12:20 guestname
crw------- 1 root wheel 0x19f Mar 17 12:19 linuxguest
crw------- 1 root wheel 0x1a1 Mar 17 12:19 otherguestA specified virtual machine can be destroyed using bhyvectl:
# bhyvectl --destroy --vm=guestnameXen is a GPLv2-licensed type 1 hypervisor for Intel™ and ARM™ architectures. FreeBSD has included i386™ and AMD™ 64-Bit DomU and Amazon EC2 unprivileged domain (virtual machine) support since FreeBSD 8.0 and includes Dom0 control domain (host) support in FreeBSD 11.0. Support for para-virtualized (PV) domains has been removed from FreeBSD 11 in favor of hardware virtualized (HVM) domains, which provides better performance.
Xen™ is a bare-metal hypervisor, which means that it is the first program loaded after the BIOS. A special privileged guest called the Domain-0 (Dom0 for short) is then started. The Dom0 uses its special privileges to directly access the underlying physical hardware, making it a high-performance solution. It is able to access the disk controllers and network adapters directly. The Xen™ management tools to manage and control the Xen™ hypervisor are also used by the Dom0 to create, list, and destroy VMs. Dom0 provides virtual disks and networking for unprivileged domains, often called DomU. Xen™ Dom0 can be compared to the service console of other hypervisor solutions, while the DomU is where individual guest VMs are run.
Xen™ can migrate VMs between different Xen™ servers. When the two xen hosts share the same underlying storage, the migration can be done without having to shut the VM down first. Instead, the migration is performed live while the DomU is running and there is no need to restart it or plan a downtime. This is useful in maintenance scenarios or upgrade windows to ensure that the services provided by the DomU are still provided. Many more features of Xen™ are listed on the Xen Wiki Overview page. Note that not all features are supported on FreeBSD yet.
To run the Xen™ hypervisor on a host, certain hardware functionality is required. Hardware virtualized domains require Extended Page Table (EPT) and Input/Output Memory Management Unit (IOMMU) support in the host processor.
In order to run a FreeBSD Xen™ Dom0 the box must be booted using legacy boot (BIOS). |
Users of FreeBSD 11 should install the emulators/xen-kernel47 and sysutils/xen-tools47 packages that are based on Xen version 4.7. Systems running on FreeBSD-12.0 or newer can use Xen 4.11 provided by emulators/xen-kernel411 and sysutils/xen-tools411, respectively.
Configuration files must be edited to prepare the host for the Dom0 integration after the Xen packages are installed. An entry to /etc/sysctl.conf disables the limit on how many pages of memory are allowed to be wired. Otherwise, DomU VMs with higher memory requirements will not run.
# echo 'vm.max_wired=-1' >> /etc/sysctl.confAnother memory-related setting involves changing /etc/login.conf, setting the memorylocked option to unlimited. Otherwise, creating DomU domains may fail with Cannot allocate memory errors. After making the change to /etc/login.conf, run cap_mkdb to update the capability database. See 限制資源 for details.
# sed -i '' -e 's/memorylocked=64K/memorylocked=unlimited/' /etc/login.conf
# cap_mkdb /etc/login.confAdd an entry for the Xen™ console to /etc/ttys:
# echo 'xc0 "/usr/libexec/getty Pc" xterm onifconsole secure' >> /etc/ttysSelecting a Xen™ kernel in /boot/loader.conf activates the Dom0. Xen™ also requires resources like CPU and memory from the host machine for itself and other DomU domains. How much CPU and memory depends on the individual requirements and hardware capabilities. In this example, 8 GB of memory and 4 virtual CPUs are made available for the Dom0. The serial console is also activated and logging options are defined.
The following command is used for Xen 4.7 packages:
# sysrc -f /boot/loader.conf hw.pci.mcfg=0
# sysrc -f /boot/loader.conf if_tap_load="YES"
# sysrc -f /boot/loader.conf xen_kernel="/boot/xen"
# sysrc -f /boot/loader.conf xen_cmdline="dom0_mem=8192M dom0_max_vcpus=4 dom0pvh=1 console=com1,vga com1=115200,8n1 guest_loglvl=all loglvl=all"For Xen versions 4.11 and higher, the following command should be used instead:
# sysrc -f /boot/loader.conf if_tap_load="YES"
# sysrc -f /boot/loader.conf xen_kernel="/boot/xen"
# sysrc -f /boot/loader.conf xen_cmdline="dom0_mem=8192M dom0_max_vcpus=4 dom0=pvh console=com1,vga com1=115200,8n1 guest_loglvl=all loglvl=all"Log files that Xen™ creates for the DomU VMs are stored in /var/log/xen. Please be sure to check the contents of that directory if experiencing issues. |
Activate the xencommons service during system startup:
# sysrc xencommons_enable=yesThese settings are enough to start a Dom0-enabled system. However, it lacks network functionality for the DomU machines. To fix that, define a bridged interface with the main NIC of the system which the DomU VMs can use to connect to the network. Replace em0 with the host network interface name.
# sysrc cloned_interfaces="bridge0"
# sysrc ifconfig_bridge0="addm em0 SYNCDHCP"
# sysrc ifconfig_em0="up"Restart the host to load the Xen™ kernel and start the Dom0.
# rebootAfter successfully booting the Xen™ kernel and logging into the system again, the Xen™ management tool xl is used to show information about the domains.
# xl list
Name ID Mem VCPUs State Time(s)
Domain-0 0 8192 4 r----- 962.0The output confirms that the Dom0 (called Domain-0) has the ID 0 and is running. It also has the memory and virtual CPUs that were defined in /boot/loader.conf earlier. More information can be found in the Xen Documentation. DomU guest VMs can now be created.
Unprivileged domains consist of a configuration file and virtual or physical hard disks. Virtual disk storage for the DomU can be files created by truncate(1) or ZFS volumes as described in 建立與摧毀磁碟區. In this example, a 20 GB volume is used. A VM is created with the ZFS volume, a FreeBSD ISO image, 1 GB of RAM and two virtual CPUs. The ISO installation file is retrieved with fetch(1) and saved locally in a file called freebsd.iso.
# fetch ftp://ftp.freebsd.org/pub/FreeBSD/releases/ISO-IMAGES/12.0/FreeBSD-12.0-RELEASE-amd64-bootonly.iso -o freebsd.isoA ZFS volume of 20 GB called xendisk0 is created to serve as the disk space for the VM.
# zfs create -V20G -o volmode=dev zroot/xendisk0The new DomU guest VM is defined in a file. Some specific definitions like name, keymap, and VNC connection details are also defined. The following freebsd.cfg contains a minimum DomU configuration for this example:
# cat freebsd.cfg
builder = "hvm" (1)
name = "freebsd" (2)
memory = 1024 (3)
vcpus = 2 (4)
vif = [ 'mac=00:16:3E:74:34:32,bridge=bridge0' ] (5)
disk = [
'/dev/zvol/tank/xendisk0,raw,hda,rw', (6)
'/root/freebsd.iso,raw,hdc:cdrom,r' (7)
]
vnc = 1 (8)
vnclisten = "0.0.0.0"
serial = "pty"
usbdevice = "tablet"These lines are explained in more detail:
| 1 | This defines what kind of virtualization to use. hvm refers to hardware-assisted virtualization or hardware virtual machine. Guest operating systems can run unmodified on CPUs with virtualization extensions, providing nearly the same performance as running on physical hardware. generic is the default value and creates a PV domain. |
| 2 | Name of this virtual machine to distinguish it from others running on the same Dom0. Required. |
| 3 | Quantity of RAM in megabytes to make available to the VM. This amount is subtracted from the hypervisor’s total available memory, not the memory of the Dom0. |
| 4 | Number of virtual CPUs available to the guest VM. For best performance, do not create guests with more virtual CPUs than the number of physical CPUs on the host. |
| 5 | Virtual network adapter. This is the bridge connected to the network interface of the host. The mac parameter is the MAC address set on the virtual network interface. This parameter is optional, if no MAC is provided Xen™ will generate a random one. |
| 6 | Full path to the disk, file, or ZFS volume of the disk storage for this VM. Options and multiple disk definitions are separated by commas. |
| 7 | Defines the Boot medium from which the initial operating system is installed. In this example, it is the ISO imaged downloaded earlier. Consult the Xen™ documentation for other kinds of devices and options to set. |
| 8 | Options controlling VNC connectivity to the serial console of the DomU. In order, these are: active VNC support, define IP address on which to listen, device node for the serial console, and the input method for precise positioning of the mouse and other input methods. keymap defines which keymap to use, and is english by default. |
After the file has been created with all the necessary options, the DomU is created by passing it to xl create as a parameter.
# xl create freebsd.cfgEach time the Dom0 is restarted, the configuration file must be passed to |
The output of xl list confirms that the DomU has been created.
# xl list
Name ID Mem VCPUs State Time(s)
Domain-0 0 8192 4 r----- 1653.4
freebsd 1 1024 1 -b---- 663.9To begin the installation of the base operating system, start the VNC client, directing it to the main network address of the host or to the IP address defined on the vnclisten line of freebsd.cfg. After the operating system has been installed, shut down the DomU and disconnect the VNC viewer. Edit freebsd.cfg, removing the line with the cdrom definition or commenting it out by inserting a # character at the beginning of the line. To load this new configuration, it is necessary to remove the old DomU with xl destroy, passing either the name or the id as the parameter. Afterwards, recreate it using the modified freebsd.cfg.
# xl destroy freebsd
# xl create freebsd.cfgThe machine can then be accessed again using the VNC viewer. This time, it will boot from the virtual disk where the operating system has been installed and can be used as a virtual machine.
This section contains basic information in order to help troubleshoot issues found when using FreeBSD as a Xen™ host or guest.
Please note that the following troubleshooting tips are intended for Xen™ 4.11 or newer. If you are still using Xen™ 4.7 and having issues consider migrating to a newer version of Xen™.
In order to troubleshoot host boot issues you will likely need a serial cable, or a debug USB cable. Verbose Xen™ boot output can be obtained by adding options to the xen_cmdline option found in loader.conf. A couple of relevant debug options are:
iommu=debug: can be used to print additional diagnostic information about the iommu.
dom0=verbose: can be used to print additional diagnostic information about the dom0 build process.
sync_console: flag to force synchronous console output. Useful for debugging to avoid losing messages due to rate limiting. Never use this option in production environments since it can allow malicious guests to perform DoS attacks against Xen™ using the console.
FreeBSD should also be booted in verbose mode in order to identify any issues. To activate verbose booting, run this command:
# sysrc -f /boot/loader.conf boot_verbose="YES"If none of these options help solving the problem, please send the serial boot log to freebsd-xen@FreeBSD.org and xen-devel@lists.xenproject.org for further analysis.
Issues can also arise when creating guests, the following attempts to provide some help for those trying to diagnose guest creation issues.
The most common cause of guest creation failures is the xl command spitting some error and exiting with a return code different than 0. If the error provided is not enough to help identify the issue, more verbose output can also be obtained from xl by using the v option repeatedly.
# xl -vvv create freebsd.cfg
Parsing config from freebsd.cfg
libxl: debug: libxl_create.c:1693:do_domain_create: Domain 0:ao 0x800d750a0: create: how=0x0 callback=0x0 poller=0x800d6f0f0
libxl: debug: libxl_device.c:397:libxl__device_disk_set_backend: Disk vdev=xvda spec.backend=unknown
libxl: debug: libxl_device.c:432:libxl__device_disk_set_backend: Disk vdev=xvda, using backend phy
libxl: debug: libxl_create.c:1018:initiate_domain_create: Domain 1:running bootloader
libxl: debug: libxl_bootloader.c:328:libxl__bootloader_run: Domain 1:not a PV/PVH domain, skipping bootloader
libxl: debug: libxl_event.c:689:libxl__ev_xswatch_deregister: watch w=0x800d96b98: deregister unregistered
domainbuilder: detail: xc_dom_allocate: cmdline="", features=""
domainbuilder: detail: xc_dom_kernel_file: filename="/usr/local/lib/xen/boot/hvmloader"
domainbuilder: detail: xc_dom_malloc_filemap : 326 kB
libxl: debug: libxl_dom.c:988:libxl__load_hvm_firmware_module: Loading BIOS: /usr/local/shared/seabios/bios.bin
...If the verbose output does not help diagnose the issue there are also QEMU and Xen™ toolstack logs in /var/log/xen. Note that the name of the domain is appended to the log name, so if the domain is named freebsd you should find a /var/log/xen/xl-freebsd.log and likely a /var/log/xen/qemu-dm-freebsd.log. Both log files can contain useful information for debugging. If none of this helps solve the issue, please send the description of the issue you are facing and as much information as possible to freebsd-xen@FreeBSD.org and xen-devel@lists.xenproject.org in order to get help.
FreeBSD 計劃的使用者及貢獻者分佈在世界各地,也因此 FreeBSD 支援多語系,讓使用者可以使用非英文語言來檢視、輸入或處理資料。使用者可以選擇大多數主要語言,包含但不限於以下語言:中文、德文、日文、韓文、法文、俄文及越南文。
國際化 (Internationalization) 一詞可以縮寫為 i18n,即 第一個字母到最後一個字母間的字母數量。L10n 也使用同樣的命名規則,但源自 在地化 (Localization)。 i18n/L10n 的方法、協定及應用程式讓使用者可以自己選擇使用的語言。
本章會討論 FreeBSD 的國際化及在地化功能。在閱讀本章之後,您會了解:
語系名稱如何組成。
如何設定登入 Shell 的語系。
如何設定 Console 給非英文語言的使用者。
如果設定 Xorg 使用不同語言。
如何找到支援 i18n 的應用程式。
那裡可以找到更多設定特定語言的資訊。
在開始閱讀這章之前,您需要:
了解如何 安裝其他第三方應用程式。
語系設定值由三個元件所組成:語言代號、城市代號及編碼。語系名稱組成的方式如下:
LanguageCode_CountryCode.Encoding
LanguageCode 與 CountryCode 用來表示城市及特定語言。常用語言及城市代碼 提供了幾個 LanguageCode_CountryCode 的範例:
| 語言代號_城市代號 | 說明 |
|---|---|
en_US | 英文,美國 |
ru_RU | 俄文,俄國 |
zh_TW | 繁體中文,台灣 |
完整可用的語系清單可用以下指令查詢:
% locale -a | more查詢目前使用的語系設定:
% locale語言特定的字元集如 ISO8859-1, ISO8859-15, KOI8-R 及 CP437 在 multibyte(3) 有詳細說明。可用的字元集可在 IANA Registry 查詢。
某些語言,如中文或日文,無法使用 ASCII 字元表示,會需要使用寬 (Wide) 字元或多位元組 (Multibyte) 字元來擴充的語言編碼。EUC 與 Big5 即是使用寬子元或多位元組字元的例子。舊的應用程式會誤判這些字元為控制字元,新的應用程式則通常可以辨識這些字元,依實作的需要,使用者可能需要開啟寬字元或多位元組字元支援或者使用正確的字元設定來編譯應用程式。
FreeBSD 使用 Xorg 相容的語系編碼。 |
本節剩餘的部份將說明各種在 FreeBSD 系統上設定語系的方法。下一節將會探討如何尋找以及編譯使用 i18n 支援的應用程式。
語系設定可在使用者的 ~/.login_conf 或使用者的 Shell 的啟動檔設定:~/.profile, ~/.bashrc 或 ~/.cshrc。
有兩個環境變數需要設定:
LANG 用來設定語系
MM_CHARSET 用來設定應用程式所使用的 MIME 字元集
除了使用者的 Shell 設定外,這些變數也應針對特定應用程式設定以及 Xorg 設定。
兩種可以完成所需變數設定的方法有:登入類別 (Login class) 法 (較建議) 及 啟動檔 (Startup file) 法。以下兩節將示範如何使用這兩個方法。
第一種方式,同時也是建議使用的方法,它可以對任何可能的 Shell 設定需要的語系及 MIME 字元集變數。此設定也可由每位使用者自行設定或者由超級管理者為所有使用者設定。
以下精簡範例示範在一個使用者的家目錄中的 .login_conf 設定 Latin-1 編碼使用的兩個環境變數:
me:\ :charset=ISO-8859-1:\ :lang=de_DE.ISO8859-1:
以下使用者的 ~/.login_conf 範例設定了繁體中文於 BIG-5 編碼使用到的環境變數。有一部份應用程式無法正確處理中文、日文及韓文的語系變數,因此需要額外多做一些設定:
#Users who do not wish to use monetary units or time formats #of Taiwan can manually change each variable me:\ :lang=zh_TW.Big5:\ :setenv=LC_ALL=zh_TW.Big5,LC_COLLATE=zh_TW.Big5,LC_CTYPE=zh_TW.Big5,LC_MESSAGES=zh_TW.Big5,LC_MONETARY=zh_TW.Big5,LC_NUMERIC=zh_TW.Big5,LC_TIME=zh_TW.Big5:\ :charset=big5:\ :xmodifiers="@im=gcin": #Set gcin as the XIM Input Server
或者,超級使用者可以設定所有系統使用者的語系。以下在 /etc/login.conf 中的變數可用來設定語系及 MIME 字元集:
language_name|Account Type Description:\ :charset=MIME_charset:\ :lang=locale_name:\ :tc=default:
若套用之前的 Latin-1 編碼範例如下:
german|German Users Accounts:\ :charset=ISO-8859-1:\ :lang=de_DE.ISO8859-1:\ :tc=default:
請參考 login.conf(5) 以取得更多有關這些變數的詳細資訊。請注意,它已經含有預先定義的 russian class。
每次編輯 /etc/login.conf 之後,請記得要執行以下指令來更新登入類別的能力資料庫(Capability database):
# cap_mkdb /etc/login.conf除了手動編輯 /etc/login.conf 之外,尚有需多工具可用來為新建立的使用者設定語系。
當使用 vipw 來新增使用者時,可指定 language 來設定語系:
user:password:1111:11:language:0:0:User Name:/home/user:/bin/sh
當使用 adduser 來新增使用者時,可對所有使用者或指定的使用者事先設定預設的語言。
若所有新的使用者都使用同樣的語言,可在 /etc/adduser.conf 設定 defaultclass=language。
要在建立使用者時覆蓋預設的設定,可在出現此提示時輸入需要的語系:
Enter login class: default []:或執行 adduser 時指定語系:
# adduser -class language若使用 pw 來新增使用者,則可指定語系如下:
# pw useradd user_name -L languageTo change the login class of an existing user, chpass can be used. Invoke it as superuser and provide the username to edit as the argument.
# chpass user_name第二種方法,較不建議使用,因每一種使用到的 Shell 都需要手動設定,而每一種 Shell 都有不同的設定檔以及語法。例如將一位使用者的 sh shell 設定為德語,需要將下列行加到 ~/.profile,若要設定給使用該 Shell 的所有使用者則必須將下列行加到 /etc/profile 或 /usr/shared/skel/dot.profile:
LANG=de_DE.ISO8859-1; export LANG MM_CHARSET=ISO-8859-1; export MM_CHARSET
然而,在 csh shell 所使用的設定檔名稱及語法不同。同樣的設定需加入下列行至 ~/.csh.login, /etc/csh.login 或 /usr/shared/skel/dot.login:
setenv LANG de_DE.ISO8859-1 setenv MM_CHARSET ISO-8859-1
更複雜一點的情況,Xorg 的 ~/.xinitrc 語系設定會依使用的 Shell 而有所不同。第一個例子是針對 sh shell 而第二個則是針對 csh shell:
LANG=de_DE.ISO8859-1; export LANG
setenv LANG de_DE.ISO8859-1
已有許多語系的字型可在 Console 使用,要查看可用的字型清單,可輸入 ls /usr/shared/syscons/fonts。要設定 Console 的字型,可在 /etc/rc.conf 指定去掉 .fnt 字尾的字型名稱 font_name:
font8x16=font_name font8x14=font_name font8x8=font_name
鍵盤對應表 (Keymap) 及螢幕對應表 (Screenmap) 用可加入下行到 /etc/rc.conf 來設定:
scrnmap=screenmap_name keymap=keymap_name keychange="fkey_number sequence"
要查看可用的螢幕對應表,可輸入 ls /usr/shared/syscons/scrnmaps。在設定螢幕對應表 screenmap_name 時請去掉 .scm 字尾。在 VGA Adapter 的字型字元矩陣擴充位元 8 到位元 9 時會需要使用螢幕對應表與相關的字型對應來解決,因此若螢幕字型使用位元 8 的欄位,字母會移出虛擬繪圖區 (Pseudographics area)。
要查看可用的鍵盤對應表,可輸入 ls /usr/shared/syscons/keymaps。在設定鍵盤對應表 keymap_name 時請去掉 .kbd 字尾。若要不重開機測試鍵盤對應用可使用 kbdmap(1)。
keychange 項目用在當功能鍵序列無法定義在鍵盤對應表時,可設定對應選擇終對機類型的功能鍵。
接下來,在 /etc/ttys 為所有虛擬終端機項目設定正確的 Console 終端機類型。已定義供特定字元集使用的終端機類型 摘要了可用的終端機類型:
| 字元集 | 終端機類型 |
|---|---|
ISO8859-1 or ISO8859-15 |
|
ISO8859-2 |
|
ISO8859-7 |
|
KOI8-R |
|
KOI8-U |
|
CP437 (VGA 預設值) |
|
US-ASCII |
|
對於使用寬字元或多位元組字元的語言,需從 Port 套件集安裝支援該語言的 Console。 可用的 Port 摘要在 Port 套件集中可用的 Console。安裝完成之後,請參考 Port 的 pkg-message 或操作手冊來取得設定及使用說明。
| 語言 | Port 位置 |
|---|---|
繁體中文 (BIG-5) | |
中文/日文/韓文 | |
中文/日文/韓文 | |
日文 | |
日文 | |
日文 |
若在 /etc/rc.conf 有開啟 moused,可能會需要額外的設定。預設 syscons(4) 驅動程式的滑鼠游標會佔用字元集 0xd0-0xd3 的範圍,若語言有使用到此範圍,可加入以下行到 /etc/rc.conf 來移動游標的範圍:
mousechar_start=3
X Window 系統 會說明如何安裝並設定 Xorg。當要設定 Xorg 在地化時,可從 FreeBSD Port 套件集中取得其他可用的字型及輸入法。應用程式特定的 i18n 設定像是字型與選單,可以在 ~/.Xresources 中調校且可允許使用者在圖型化應用程式選單檢視其所選擇的語言。
X 輸入法 (X Input Method, XIM) 協定是 Xorg 針對輸入非英語字元的標準。可用的輸入法 摘要了在 FreeBSD 套件集中可用的輸入法應用程式。也可使用其他如 Fcitx 及 Uim 應用程式。
| 語言 | 輸入法 |
|---|---|
中文 | |
中文 | |
中文 | |
中文 | |
中文 | |
中文 | |
中文 | |
日文 | |
日文 | |
日文 | |
日文 | |
日文 | |
日文 | |
日文 | |
日文 | |
日文 | |
日文 | |
日文 | |
日文 | |
日文 | |
日文 | |
日文 | |
日文 | |
日文 | |
日文 | |
韓文 | |
韓文 | |
韓文 | |
韓文 | |
韓文 | |
越南文 | |
越南文 |
i18n 應用程式會使用 i18n 工具包做為程式庫開發。這讓開發人員可以寫一個簡單的檔案並翻譯顯示的選單及文字至各種語言。
FreeBSD Port 套件集中含有許多內建支援寬字元或多位元組字元的應用程式可支援各種語言。該類型的應用程式在名稱上會註明 i18n 以易於辨識。雖然如此,但不一定支援您所需要的語言。
有一部份應用程式可以使用指定的字元集來編譯。通常會在 Port 的 Makefile 中設定,或者傳送參數給 configure。請參考各 FreeBSD Port 原始碼中的 i18n 說明文件以取得更多有關需要的設定值資訊或 Port 的 Makefile 來了解在編譯時有那些可以使用的編譯選項。
This section provides configuration examples for localizing a FreeBSD system for the Russian language. It then provides some additional resources for localizing other languages.
This section shows the specific settings needed to localize a FreeBSD system for the Russian language. Refer to Using Localization for a more complete description of each type of setting.
To set this locale for the login shell, add the following lines to each user’s ~/.login_conf:
me:My Account:\ :charset=KOI8-R:\ :lang=ru_RU.KOI8-R:
To configure the console, add the following lines to /etc/rc.conf:
keymap="ru.utf-8" scrnmap="utf-82cp866" font8x16="cp866b-8x16" font8x14="cp866-8x14" font8x8="cp866-8x8" mousechar_start=3
For each ttyv entry in /etc/ttys, use cons25r as the terminal type.
To configure printing, a special output filter is needed to convert from KOI8-R to CP866 since most printers with Russian characters come with hardware code page CP866. FreeBSD includes a default filter for this purpose, /usr/libexec/lpr/ru/koi2alt. To use this filter, add this entry to /etc/printcap:
lp|Russian local line printer:\ :sh:of=/usr/libexec/lpr/ru/koi2alt:\ :lp=/dev/lpt0:sd=/var/spool/output/lpd:lf=/var/log/lpd-errs:
Refer to printcap(5) for a more detailed explanation.
To configure support for Russian filenames in mounted MS-DOS™ file systems, include -L and the locale name when adding an entry to /etc/fstab:
/dev/ad0s2 /dos/c msdos rw,-Lru_RU.KOI8-R 0 0
Refer to mount_msdosfs(8) for more details.
To configure Russian fonts for Xorg, install the x11-fonts/xorg-fonts-cyrillic package. Then, check the "Files" section in /etc/X11/xorg.conf. The following line must be added before any other FontPath entries:
FontPath "/usr/local/lib/X11/fonts/cyrillic"
Additional Cyrillic fonts are available in the Ports Collection.
To activate a Russian keyboard, add the following to the "Keyboard" section of /etc/xorg.conf:
Option "XkbLayout" "us,ru" Option "XkbOptions" "grp:toggle"
Make sure that XkbDisable is commented out in that file.
For grp:toggle use Right Alt, for grp:ctrl_shift_toggle use Ctrl+Shift. For grp:caps_toggle use CapsLock. The old CapsLock function is still available in LAT mode only using Shift+CapsLock. grp:caps_toggle does not work in Xorg for some unknown reason.
If the keyboard has "Windows™" keys, and some non-alphabetical keys are mapped incorrectly, add the following line to /etc/xorg.conf:
Option "XkbVariant" ",winkeys"
The Russian XKB keyboard may not work with non-localized applications. Minimally localized applications should call a |
See http://koi8.pp.ru/xwin.html for more instructions on localizing Xorg applications. For more general information about KOI8-R encoding, refer to http://koi8.pp.ru/.
This section lists some additional resources for configuring other locales.
The FreeBSD-Taiwan Project has a Chinese HOWTO for FreeBSD at http://netlab.cse.yzu.edu.tw/~statue/freebsd/zh-tut/.
A complete article on Greek support in FreeBSD is available here, in Greek only, as part of the official FreeBSD Greek documentation.
For Japanese, refer to http://www.jp.FreeBSD.org/, and for Korean, refer to http://www.kr.FreeBSD.org/.
Some FreeBSD contributors have translated parts of the FreeBSD documentation to other languages. They are available through links on the FreeBSD web site or in /usr/shared/doc.
FreeBSD 在每次的發佈之間持續在開發。有些人偏好正式發佈的版本,也有另一群人喜歡使用最新的開發版本。然而,即使是正式發佈的版本也時常會有安全性與其他緊急修復的更新,因此,無論使用哪種版本,FreeBSD 都提供所有必要的工具來讓系統能維持最新的版本,且讓各種版本都能簡單的升級。本章將說明如何追蹤開發版本的系統及讓 FreeBSD 系統維持最新版本的基本工具。
讀完這章,您將了解:
如何使用 freebsd-update, Subversion 來維持 FreeBSD 系統為最新版。
如何比對已安裝系統與已知原始複本間的狀態。
如何使用 Subversion 或說明文件 Port 來維持已安裝的文件為新版。
兩種開發分支間的差異:FreeBSD-STABLE 與 FreeBSD-CURRENT。
如何重新編譯及重新安裝整個基礎系統 (Base system)。
在開始閱讀這章之前,您需要:
正確的設定網路連線 (進階網路設定)。
了解如何安裝其他第三方軟體 (安裝應用程式:套件與 Port)。
本章會經常使用 |
隨時套用安全性更新以及升級到新發佈的作業系統版本對管理一個持續運作的系統是非常重要的任務,FreeBSD 內含可以執行這兩項任務的工具程式,叫做 freebsd-update。
這個工具程式支援使用 Binary 對 FreeBSD 做安全性與和錯誤更新,不需要手動編譯和安裝修補 (Patch) 或新核心。目前由安全性團隊提供支援的 Binary 更新可用於所有的架構和發行版。支援的發行版清單及各自的支援期限列於 https://www.FreeBSD.org/security/。
這個工具程式也支援升級作業系統到次要的發佈版以及升級到另一個發佈版分支。在升級到新的發佈版本前,需先查看該版本的發佈公告,因為發行公告中包含了該發行版本的相關重要資訊。發行公告可自 https://www.FreeBSD.org/releases/ 取得。
如果有使用 |
本節將說明 freebsd-update 使用的設定檔, 示範如何套用安全性修補及如何升級到主要或次要的作業系統發行版,並討論升級作業系統的需要考量的事項。
freebsd-update 預設的設定檔不需變更即可運作。 部份使用者可能會想要調校位於 /etc/freebsd-update.conf 的預設設定檔來對程序有更好的控制。該設定檔中的註解均有說明可用的選項,但以下幾個項目可能需要進一步的說明:
# Components of the base system which should be kept updated. Components world kernel
這個參數控制 FreeBSD 要保持最新版本的部份。 預設是更新整個基礎系統 (Base system) 和核心。 可指定個別元件,例如:src/base 或 src/sys。 雖然如此,最好的選項是維持預設值,因為更改指定特定項目時需列出每一個需要的項目。時間一久可能會因為原始碼和 Binary 檔案沒有更新而造成慘重的後果。
# Paths which start with anything matching an entry in an IgnorePaths # statement will be ignored. IgnorePaths /boot/kernel/linker.hints
要保持特定的目錄在更新過程不被更動,例如 /bin 或 /sbin,可以將他們的路徑加到此敘述中。 這個選項可以防止 freebsd-update 覆蓋本地的修改。
# Paths which start with anything matching an entry in an UpdateIfUnmodified # statement will only be updated if the contents of the file have not been # modified by the user (unless changes are merged; see below). UpdateIfUnmodified /etc/ /var/ /root/ /.cshrc /.profile
這個選項只會更新特定目錄中未修改的設定檔。任何使用者修改的檔案都不會自動更新。 有另一個選項 KeepModifiedMetadata 可讓 freebsd-update 在合併時儲存使用者做的變更。
# When upgrading to a new FreeBSD release, files which match MergeChanges # will have any local changes merged into the version from the new release. MergeChanges /etc/ /var/named/etc/ /boot/device.hints
列出 freebsd-update 應嘗試合併的設定檔目錄。 檔案合併程序是指一系列類似 mergemaster(8) 做的 diff(1) 修補動作, 但是選項比較少。 合併的動作包含接受、開啟編輯器,或讓 freebsd-update 中止。 如果有疑慮,請先備份 /etc,然後再接受合併。 更多關於 mergemaster 的資訊, 參見 mergemaster(8)。
# Directory in which to store downloaded updates and temporary # files used by FreeBSD Update. # WorkDir /var/db/freebsd-update
這個目錄是所有修補檔和暫存檔的存放處。當使用者進行版本升級時,這個位置應該要有至少 1GB 的可用磁碟空間。
# When upgrading between releases, should the list of Components be # read strictly (StrictComponents yes) or merely as a list of components # which *might* be installed of which FreeBSD Update should figure out # which actually are installed and upgrade those (StrictComponents no)? # StrictComponents no
當這個選項設定為 yes 時,freebsd-update 將會假設 Components 清單已完成,將不會對清單之外的項目做變更。 實際上 freebsd-update 會將嘗試更新每一個屬於 Components 清單中的檔案。
套用 FreeBSD 安全性修補的過程已經被簡化,讓系統管理員可使用 freebsd-update 來保持系統更新。更多有關 FreeBSD 安全性報告的資訊可以參考 FreeBSD 安全報告。
FreeBSD 安全性修補可以使用以下指令下載並安裝。 第一個指令會偵測是否有可用的修補,如果有,將列出若執行修補後會變更的檔案清單。第二個指令將會套用修補。
# freebsd-update fetch
# freebsd-update install如果更新套用了任何核心修補,系統將會需要重新開機以使用修補過的核心。如果修補套用在任何執行中的 Binary,受影響的應用程式應重新啟動來使用修補過的 Binary 版本。
加入以下項目至 /etc/crontab 可設定系統每天自動檢查更新一次:
@daily root freebsd-update cron
如果有新的修補,該程式會會自動下載,但不會執行。root 使用者會收到電子郵件通知複查該修補並手動執行 freebsd-update install 安裝。
如果有發生任何錯誤,freebsd-update 可以使用以下指令還原最後所做的變更:
# freebsd-update rollback
Uninstalling updates... done.再次強調,若核心或任何核心模組有做過修改應重新啟動系統,以及任何受影響的 Binary 應重新執行。
只有 GENERIC 核心可使用 freebsd-update 自動更新。 如果有安裝自訂的核心,在 freebsd-update 完成安裝更新後,需要重新編譯和重新安裝。 預設的核心名稱為 GENERIC,可使用 uname(1) 指令來檢查安裝的核心。
隨時在 /boot/GENERIC 保留一份 GENERIC 核心的複本將有助於診斷各種問題及執行版本升級。請參考 在 FreeBSD 9.X 及之後版本自訂核心 來了解有關如何取得 GENERIC 核心的複本說明。 |
除非在 /etc/freebsd-update.conf 的預設設定檔被修改,否則 freebsd-update 將會安裝更新後的核心原始碼和其餘的更新,可依平常的方式執行重新編譯與重新安裝核心。
以 freebsd-update 發行的更新並非總是會更新核心。若核心的原始碼沒有被 freebsd-update install 修改則不需要重新編譯自訂的核心。雖然如此 freebsd-update 總是會更新 /usr/src/sys/conf/newvers.sh,目前修補的版本如 uname -r 執行結果中的 -p 數字,便是由該檔取得。即使沒有做任何其他變更,重新編譯自訂核心可讓 uname 準確的回報系統目前的修補版本。當維護多個系統時這會特別有用,因其可讓你快速評估每個系統安裝的更新。
從 FreeBSD 的次要版本升級到另一個版本,例如從 FreeBSD 9.0 到 FreeBSD 9.1, 叫作 次要版本 (Minor version) 更新。 主要版本 (Major version) 更新發生在當 FreeBSD 從一個主要版本升級到主要版本升級到另一個主要版本時,例如從 FreeBSD 9.X 到 FreeBSD 10.X。 兩種更新都可以透過提供 freebsd-update 目標的發佈版本來執行。
如果系統正在執行自訂的核心,請在開始升級前,確定有保留一份 GENERIC 核心的複本在 /boot/GENERIC。 請參考 在 FreeBSD 9.X 及之後版本自訂核心 關於如何取得 GENERIC 核心複本的說明。 |
在 FreeBSD 9.0 系統執行以下指令,將會把系統升級至 FreeBSD 9.1:
# freebsd-update -r 9.1-RELEASE upgrade收到這個指令後,freebsd-update 會開始評估設定檔和目前的系統來收集升級所需的資訊。 螢幕會顯示偵測到或沒偵測到的元件清單。例如:
Looking up update.FreeBSD.org mirrors... 1 mirrors found.
Fetching metadata signature for 9.0-RELEASE from update1.FreeBSD.org... done.
Fetching metadata index... done.
Inspecting system... done.
The following components of FreeBSD seem to be installed:
kernel/smp src/base src/bin src/contrib src/crypto src/etc src/games
src/gnu src/include src/krb5 src/lib src/libexec src/release src/rescue
src/sbin src/secure src/share src/sys src/tools src/ubin src/usbin
world/base world/info world/lib32 world/manpages
The following components of FreeBSD do not seem to be installed:
kernel/generic world/catpages world/dict world/doc world/games
world/proflibs
Does this look reasonable (y/n)? y此時,freebsd-update 將會嘗試下載所有升級需要的檔案。 在某些情況,會詢問使用者一些關於要安裝什麼或要如何繼續。
當使用自訂核心,上述的步驟將會產生如下的警告:
WARNING: This system is running a "MYKERNEL" kernel, which is not a
kernel configuration distributed as part of FreeBSD 9.0-RELEASE.
This kernel will not be updated: you MUST update the kernel manually
before running "/usr/sbin/freebsd-update install"這時的警告可以安全地忽略,升級過程將會使用更新過的 GENERIC 核心來進行。
所有的修補都下載到本地系統之後, 將會開始套用更新。這個過程可能會花點時間,取決於機器的速度和工作量。設定檔將會被合併。 合併的過程中當檔案被合併或是手動合併畫面上出現編輯器時需要使用者操作。 每一個成功合併的結果將會顯示給使用者並繼續程序,失敗或忽略合併將會使程序中斷。使用者可能想要備份 /etc 並稍後手動合併重要的檔案,例如:master.passwd 或 group。
所有的修補與合併動作會在另一個目錄進行,並不會直接修改。當成功套用所有修補,所有設定檔已合併且過程順利,使用者可使用以下指令將變更安裝到磁碟: |
核心與核心模組會先修補,若系統正在執行自訂的核心,使用 nextboot(8) 來設定下次開機使用更新過的 /boot/GENERIC:
# nextboot -k GENERIC若機器在遠端進行更新,請在使用 GENERIC 核心重新開機前,請確定該核心含有所有系統所需的驅動程式以正常開機並連線至網路。特別是在執行的自訂核心有使用到由核心模組提供內建功能,請確定將這些模組已暫時使用 /boot/loader.conf 設定檔載入到 GENERIC 核心。建議關閉非必須的服務和磁碟與網路掛載直到升級程序完成。 |
機器現在應使用更新過的核心重新開機:
# shutdown -r now一旦系統重新上線,使用以下指令繼續 freebsd-update。 由於程序的狀態已被儲存,freebsd-update 不會重頭開始,但會進行下一個階段並移除所有舊的共用程式庫和目標檔。
# freebsd-update install取決於是否有任何程式庫版本編號衝突,也可能只有兩個而不是三個安裝階段。 |
升級程序現在完成了。如果所做的是主要的版本升級,則需依 主要版號升級後的套件升級 的說明重新安裝所有的 Port 和套件。
在使用 freebsd-update 前,請確定已有 GENERIC 核心的複本於 /boot/GENERIC。若只編譯過一次自訂核心,那麼 /boot/kernel.old 就是 GENERIC 核心,只需要將該目錄重新命名為 /boot/kernel。
若有編譯自訂核心過超過一次,或已經不曉得編譯自訂核心的次數,則需取得與目前作業系統版本相符的 GENERIC 核心複本。若可直接操作實體系統,則可以從安裝媒體取得 GENERIC 核心複本:
# mount /cdrom
# cd /cdrom/usr/freebsd-dist
# tar -C/ -xvf kernel.txz boot/kernel/kernel或者,可以從原始碼重新編譯 GENERIC 核心:
# cd /usr/src
# make kernel __MAKE_CONF=/dev/null SRCCONF=/dev/null這個核心要被 freebsd-update 認做 GENERIC 核心,GENERIC 設定檔必須不能做任何修改,也建議在編譯核心時不要使用其他特殊選項。
freebsd-update 僅需要 /boot/GENERIC 存在便可,因此不須重新開機進入 GENERIC。
一般來說,已安裝的應用程式在次要版本升級仍可沒問題的正常執行。但主要版本升級會採用不同的應用程式 Binary 介面 (Application Binary Interfaces, ABIs),會導致大部份第三方應用程式無法正常執行。 因此在主要版本升級後,需要升及所有已安裝的套件和 Port,套件可以使用 pkg upgrade 來升級,而 Port 則需使用 ports-mgmt/portmaster 工具。
強制升級所有已安裝的套件會使用檔案庫中新版本的套件來取得目前套件,即使該版號沒有增加。由於在升級 FreeBSD 主要版本時會變更 ABI 版本,因此這是必要動作。強制升級可以執行以下指令來完成:
# pkg-static upgrade -f重新編譯所有已安裝的應用程式可以執行以下指令來完成:
# portmaster -af這個指令會在安裝每個應用程式有可設定選項時顯示設定畫面,並會等待使用者操作該畫面,要避免這種情況並使用預設的設定選項,可在上述指令加上 -G 參數。
完成軟體升級後,最後需執行 freebsd-update 來完成最後的升級動作:
# freebsd-update install若有使用臨時 GENERIC 核心,便應在此時依據 設定 FreeBSD 核心 的說明編譯並安裝新的自訂核心。
重新開機使用新的 FreeBSD 版本後,升級程序便正式完成。
已安裝的 FreeBSD 版本狀態可以使用 freebsd-update IDS 與另一個已知良好的複本來做比對測試。 這個指令會評估目前版本的系統工具,程式庫和設定檔,可做為內建的入侵偵測系統來使用 (Intrusion Detection System, IDS)。
這個指令並非用來取代真正的 IDS,如 security/snort。由於 |
要開始比對,需指定輸出的檔案來儲存結果:
# freebsd-update IDS >> outfile.ids系統將會開始檢查並且會產生相當長的檔案清單,內容包含發佈版本已知的與目前安裝版本的 SHA256 雜湊值會儲存到指定的輸出檔。
清單中的項目會相當的多,但輸出的格式可以很簡單的用來分析。例如,要取得與發佈版本不同的檔案清單,可使用以下指令:
# cat outfile.ids | awk '{ print $1 }' | more
/etc/master.passwd
/etc/motd
/etc/passwd
/etc/pf.conf實際的檔案會更多,此範例的輸出已精簡。部份檔案可能本來就會被修改。例如 /etc/passwd 在新增使用者到系統時會被修改,核心模組也有可能因使用 freebsd-update 更新而有所不同。要排除特定的檔案或目錄可將這些檔案或目錄加入到 /etc/freebsd-update.conf 中的 IDSIgnorePaths 選項。
說明文件是 FreeBSD 作業系統不可或缺的一部份。最新版本的 FreeBSD 文件除了可在 FreeBSD 網站 (https://www.freebsd.org/doc/) 取得,也可很簡單的取得本地的 FreeBSD 網站、使用手冊、FAQ 及文章副本。
本節將說明如何使用原始碼與 FreeBSD Port 套件集來取得最新版本 FreeBSD 文件本地複本。
有關編輯與提出修正說明文件的資訊,請參考 FreeBSD 文件計畫入門書 (FreeBSD Documentation Project Primer)。
從原始碼重新編譯 FreeBSD 文件需要一些不屬於 FreeBSD 基礎系統的工具。需要的工具可安裝由 FreeBSD 文件計劃所開發的 textproc/docproj 套件或 Port。
安裝完成之後,可使用 svnlite 來取得乾淨的文件原始碼複本:
# svnlite checkout https://svn.FreeBSD.org/doc/head /usr/doc第一次下載文件原始碼需要一些時間,請耐心等候執行完畢。
往後更新文件原始碼可執行:
# svnlite update /usr/doc下載最新的文件原始碼到 /usr/doc 之後,便完成要更新已安裝文件的準備動作。
完整更新所有可用的語言可以執行:
# cd /usr/doc
# make install clean若只想要更新特定語言,可對 /usr/doc 中特定語言的子目錄執行 make:
# cd /usr/doc/en_US.ISO8859-1
# make install clean另一個更新文件的方式是在 /usr/doc 或特定的語言子目錄下執行此指令:
# make update要指定安裝的輸出格式可使用 FORMATS 來設定:
# cd /usr/doc
# make FORMATS='html html-split' install clean有數個選項可更新部份文件或只編譯特定翻譯來簡化更新程序。這些選項可在 /etc/make.conf 設為系統全域的預設選項,或是透過指令傳送給 make。
選項有:
DOC_LANG要編譯與安裝的語言及編碼清單,例如 en_US.ISO8859-1 代表英語文件。
FORMATS要編譯的輸出格式清單,目前支援 html, html-split, txt, ps 以及 pdf。
DOCDIR要安裝文件的位置,預設為 /usr/shared/doc。
要取得更多可做為 FreeBSD 系統全域選項的 make 變數,請參考 make.conf(5)。
前一節介紹了由原始碼更新 FreeBSD 文件的方法,本節將說明使用 Port 套件集的替代方法,可由以下方式達成:
安裝事先編譯好的文件套件,無須在本地編譯任何東西或安裝文件工具集。
使用 Port 框架來編譯文件原始碼,可讓取得與編譯文件的步驟更簡單。
這個更新 FreeBSD 文件的方法,會使用到一系列由文件工程團隊 doceng@FreeBSD.org 每月更新的文件 Port 與套件。這些套件列於 FreeBSD Port 套件集的 docs 分類下 (http://www.freshports.org/docs/)。
文件 Port 的組織方式如下:
misc/freebsd-doc-en 套件或 Port 會安裝所有英語的文件。
misc/freebsd-doc-all 套件或 Port 會安裝所有可用語言的文件。
每個翻譯語言都有套件與 Port,如 misc/freebsd-doc-hu 為匈牙利語文件。
當使用 Binary 套件時,會安裝指定語言 FreeBSD 文件的所有可用格式。例如以下指令會安裝最新的匈牙利語文件套件:
# pkg install hu-freebsd-doc套件使用的名稱格式與 Port 的名稱不同: |
要指定文件的格式,需以編譯 Port 來代替安裝套件。例如要編譯並安裝英語文件:
# cd /usr/ports/misc/freebsd-doc-en
# make install cleanPort 提供設定選單來指定要編譯與安裝的格式,預設會選擇分頁的 HTML (類似 http://www.FreeBSD.org 使用的格式) 以及 PDF。
此外,編譯文件 Port 時也可指定數個 make 選項,包括:
WITH_HTML編譯一份文件使用一個 HTML 檔的 HTML 格式。格式化後的文件會儲存至名稱為 article.html 或 book.html 的檔案。
WITH_PDF格式化的文件會儲存至名稱為 article.pdf 或 book.pdf 的檔案。
DOCBASE指定要安裝文件的位置,預設為 /usr/local/shared/doc/freebsd。
以下範例使用變數來安裝 PDF 的匈牙利語文件到特定目錄:
# cd /usr/ports/misc/freebsd-doc-hu
# make -DWITH_PDF DOCBASE=share/doc/freebsd/hu install clean文件套件或 Port 可以依 安裝應用程式:套件與 Port 的說明更新。例如以下指令會使用 ports-mgmt/portmaster 更新已安裝的匈牙利語文件:
# portmaster -PP hu-freebsd-docFreeBSD 有兩個開發分支:FreeBSD-CURRENT 及 FreeBSD-STABLE。
本節將說明每個分支及其的特定使用者,也會說明如何在各別分支維持系統為最新版。
FreeBSD-CURRENT 是 FreeBSD 開發的 "最前線",FreeBSD-CURRENT 的使用者需具備較強的技術能力。技術能力較弱的使用者應改追蹤 FreeBSD-STABLE 開發分支。
FreeBSD-CURRENT 是 FreeBSD 最新的原始碼,其中包括正在進行的開發工作、實驗性的變更以及不一定會在下一個官方發行版出現的過渡機制。 雖然 FreeBSD 開發者每天編譯 FreeBSD-CURRENT 原始碼,但仍可能有短暫時間原始碼是無法編譯的。雖然這些問題會儘快被解決,但是無論 FreeBSD-CURRENT 帶來災難或是新功能,同步原始碼時都要考量這個問題。
FreeBSD-CURRENT 主要給下以三種族群:
致力於開發某一部份原始碼樹的 FreeBSD 社群成員。
FreeBSD 社群成員中活耀的測試人員。 他們願意花時間解決問題,對 FreeBSD 的變更及大方向提出專業建議並送交修補。
隨時關注的使用者,使用目前原始碼做為參考用途,或是偶爾提供意見或貢獻原始碼。
不應將 FreeBSD-CURRENT 當做下一個發行版前取得新功能的快速途徑,因為尚未發行的功能並未被完整測試,很可能有問題。這也不是一個快速取得問題修正的方式,因為任何已知的問題修正有可能產生新的問題。 使用 FreeBSD-CURRENT 不在 "官方支援" 的範圍內。
若要追蹤 FreeBSD-CURRENT:
加入 freebsd-current 和 svn-src-head 郵遞論壇。這是 重要 的,是為了要了解目前人們對於系統目前狀態的評論並接收有關 FreeBSD-CURRENT 目前狀態的重要公告。
svn-src-head 郵遞論壇會記錄每一次修改的提交項目,以及可能產生的副作用的相關資訊。
要加入這兩個郵遞論壇,請前往 http://lists.FreeBSD.org/mailman/listinfo 點選要訂閱的郵遞論壇,並依照網頁指示的步驟操作。要追蹤整個原始碼樹,不單只有 FreeBSD-CURRENT 的變更,可訂閱 svn-src-all 郵遞論壇。
同步 FreeBSD-CURRENT 原始碼。 通常會使用 svnlite 自列於 Subversion 鏡像站 中的其中一個 Subversion 鏡像站的 head 分支中取出 -CURRENT 的程式碼。
考量到檔案庫的大小,部份使用者選擇只同步他們有興趣或貢獻修補的部份原始碼。然而, 計劃要從原始碼編譯整個作業系統的使用者須下載 全部 的 FreeBSD-CURRENT,不可只有選擇的部份。
編譯 FreeBSD-CURRENT 前,請仔細地閱讀 /usr/src/Makefile 並依照 從原始碼更新 FreeBSD 的指示操作。 閱讀 FreeBSD-CURRENT 郵遞論壇 以及 /usr/src/UPDATING 來了解升級的相關資訊,有時會含有升級下一個發行版的必要資訊。
要活躍!我們非常鼓勵 FreeBSD-CURRENT 的使用者發表他們對加強哪些功能或是修復哪些錯誤的建議。 如果您在建議時能附上相關程式碼的話,是最好的。
FreeBSD-STABLE 是一個開發分支,會在主要的版本更新後產生,進入這個分支的步伐會比較緩慢,而且通常會假定已經在 FreeBSD-CURRENT 中做過測試,所以問題會比較少,但這仍然是一個開發分支,在任何時間點,FreeBSD-STABLE 中的原始碼不能保証能供一般使用,它只是另一個開發支線,並不是供最終使用者使用的資源,若沒有任何資源可以做測試的使用者應改使用最新版本的 FreeBSD 發佈版。
對於那些有興趣追蹤或為 FreeBSD 開發流程提供一些貢獻的人,特別是針對下一個主要發佈版的 FreeBSD,應該考慮追蹤 FreeBSD-STABLE。
雖然 FreeBSD-STABLE 分支應該已經做過編譯並執行過,但這仍然無法保証不會出任何問題。由於使用 FreeBSD-STABLE 的人比 FreeBSD-CURRENT 更多,因此不可避免的,有時仍會在 FreeBSD-STABLE 中發現未在 FreeBSD-CURRENT 中出現的問題與特殊狀況。基於這個原因,任何人都不應盲目的追蹤 FreeBSD-STABLE,特別重要的是 不 要將任何產線上的伺服器更新成未經開發或測試環境中測試過的 FreeBSD-STABLE。
若要追蹤 FreeBSD-STABLE:
加入 freebsd-stable 郵遞論壇來隨時了解 FreeBSD-STABLE 可能需要的編譯相依項目或任何需要特別注意的問題,當有一些有爭議的修復或更新時,開發人員也會在郵遞論壇中公告,如果有使用者對所提出的更改有任何的疑慮,可讓使用者有機會能反應問題。
加入要追蹤的分支所相關的 svn 郵遞論壇,例如,在追蹤 9-STABLE 分支的使用者會加入 svn-src-stable-9 郵遞論壇,該郵遞論壇會記錄每次變更的提交記錄,以及有關可能出現的副作用的任何相關訊息。
要加入這些郵遞論壇,請前往 http://lists.FreeBSD.org/mailman/listinfo 點選要訂閱的郵遞論壇,並依照網頁指示的步驟操作。要追蹤整個原始碼樹的變更,可訂閱 svn-src-all 郵遞論壇。
要安裝新的 FreeBSD-STABLE 系統,可安裝在 FreeBSD 鏡像站 中最近的 FreeBSD-STABLE 發佈版或使用每月使用 FreeBSD-STABLE 所編譯的快照 (Snapshot),請參考 www.freebsd.org/snapshots 取得更多有關快照的資訊。
要編譯或升級已有的 FreeBSD 系統到 FreeBSD-STABLE 可使用 svn 來取出欲升級的分支程式碼,可用分支的名稱如:stable/9 會列在 www.freebsd.org/releng。
編譯 FreeBSD-STABLE 前,請仔細地閱讀 /usr/src/Makefile 並依照 從原始碼更新 FreeBSD 的指示操作。 閱讀 FreeBSD-STABLE 郵遞論壇 以及 /usr/src/UPDATING 來了解升級的相關資訊,有時會含有升級下一個發行版的必要資訊。
從編譯原始碼來更新 FreeBSD 比起用 Binary 更新有幾項優點,在編譯程式碼時可以自訂選項來充分運用特定硬體,部份基礎系統可以使用非預設的設定值編譯,或是在不需要或不想要的時候跳過編譯。使用編譯的程序來更新系統比起安裝 Binary 來更新會耗時許多,但能夠完整自訂一個量身定做版本的 FreeBSD。
這是從原始碼編譯來更新 FreeBSD 的標準步驟快速的參考,稍後的章節會更詳細的說明這個程序。
更新並編譯
# svnlite update /usr/src (1)
check /usr/src/UPDATING (2)
# cd /usr/src (3)
# make -j4 buildworld (4)
# make -j4 kernel (5)
# shutdown -r now (6)
# cd /usr/src (7)
# make installworld (8)
# mergemaster -Ui (9)
# shutdown -r now (10)| 1 | 取得最新版本的原始碼,請參考 更新原始碼 來了解更多取得與更新原始碼的資訊。 |
| 2 | 檢查 /usr/src/UPDATING 看是否有任後在原始碼編譯之前或之後需要手動操作的步驟。 |
| 3 | 前往原始碼目錄。 |
| 4 | 編譯世界 (World),即除了核心 (Kernel) 外的所有東西。 |
| 5 | 編譯並安裝核心,此動作等同於 make buildkernel installkernel。 |
| 6 | 重新啟動系統以使用新的核心。 |
| 7 | 前往原始碼目錄。 |
| 8 | 安裝世界。 |
| 9 | 更新與合併在 /etc/ 中的設定檔案。 |
| 10 | 重新啟動系統以使用新編譯好的世界與核心。 |
FreeBSD 的原始碼位於 /usr/src/,較建議透過 Subversion 版本控制系統來更新這份原始碼,要確認原始碼已在版本控制系統的管控下可:
# svnlite info /usr/src
Path: /usr/src
Working Copy Root Path: /usr/src
...此結果代表 /usr/src/ 已在版本控制系統的管控下並且可以使用 svnlite(1) 來更新:
# svnlite update /usr/src若該目錄最近沒有更新過,可能會需要一些時間來完成更新動作。在更新完成之後,原始碼便為最新版本,並可開始依下一章節的說明來編譯程序。
取得原始碼 若輸出結果顯示
查看 FreeBSD 目前使用的版本可使用 uname(1): 根據 FreeBSD 版本與檔案庫路徑,要更新
|
編譯世界 (world) 即編譯整個作業系統除了核心 (Kernel),要先做這個動作以便提供最新的工具來編譯核心,接著便可編譯核心:
# cd /usr/src
# make buildworld
# make buildkernel編譯完的程式會寫入至 /usr/obj。
以上這些均為基本的步驟,用來控制編譯的其他選項在以下章節會說明。
部份 FreeBSD 編譯系統版本會保留先前編譯的程式於暫存的物件目錄 /usr/obj,避免重新編譯那些尚未更動過的程式碼可加速後續的編譯動作,若要強制重新編譯所有東西可在開始編譯前使用 cleanworld:
# make cleanworld在多核處理器上增加編譯工作的數量可增加編譯速度,可使用 sysctl hw.ncpu 來查看有多少核心,不同處理器使用不同版本的 FreeBSD 編譯系統,所以唯一能了解不同工作數量對編譯速度影響的方式便是測試。在一開始可考慮選擇一個介於 1/2 到 2 倍核心數之間的數值,工作的數量可使用 -j 來指定。
使用四個工作來編譯世界與核心:
# make -j4 buildworld buildkernel若原始碼有更動,便須執行 buildworld,完成之後,便可隨時執行 buildkernel 來編譯核心,若要只編譯核心可:
# cd /usr/src
# make buildkernel標準的 FreeBSD 核心是以一個名為 GENERIC 的核心設定檔 (Kernel config file)為基礎,GENERIC 核心中內含了所有最常用的裝置驅動程式與選項,有時這個檔案對編譯自訂核心也非常有用,可根據其來加入或移除裝置驅動程式或選項來滿足特定需求。
例如,要開發一個 RAM 受到嚴重限制的小型嵌入式電腦,便可移除不需要的裝置驅動程式或選項來縮小核心。
核心設定檔位於 /usr/src/sys/arch/conf/,其中使用的 arch 即為 uname -m 輸出的結果,大部份的電腦為 amd64,那其設定檔目錄則為 /usr/src/sys/amd64/conf/。
/usr/src 可以被刪除或重建,所以較建議將自訂核心設定檔放在另一個目錄,如 /root,並將核心設定檔以連結放至 conf 目錄,若該目錄被刪除或覆寫,便可重新建立一個新的核心設定的連結。 |
自訂設定檔可由複製 GENERIC 設定檔來建立,在此範例,新的自訂核心要用在儲存伺服器,所以將其命名為 STORAGESERVER:
# cp /usr/src/sys/amd64/conf/GENERIC /root/STORAGESERVER
# cd /usr/src/sys/amd64/conf
# ln -s /root/STORAGESERVER .接著編譯 /root/STORAGESERVER,要加入或移除裝置或選項可見 config(5)。
自訂核心要在指令列設定 KERNCONF 為核心設定檔來編譯:
# make buildkernel KERNCONF=STORAGESERVER在完成 buildworld 與 buildkernel 兩個步驟之後,便可安裝新的核心與世界:
# cd /usr/src
# make installkernel
# shutdown -r now
# cd /usr/src
# make installworld
# shutdown -r now若使用自訂核心,則同樣須設定 KERNCONF 來使用新的自訂核心:
# cd /usr/src
# make installkernel KERNCONF=STORAGESERVER
# shutdown -r now
# cd /usr/src
# make installworld
# shutdown -r now還有最後一些的工作要做來完成更新,任何修改過的設定檔要與新版本的設定檔合併、移除找到的過時程式庫,然後重新啟動系統。
mergemaster(8) 可簡單的將修改過的系統設定檔與新版設定檔合併。
使用 -Ui,mergemaster(8) 會自動更新那些未被使用者修改過的設定檔並安裝尚不存在的檔案:
# mergemaster -Ui若檔案需要手動合併,會有互動式介面可讓使用者選擇要保留那一邊的檔案,請參考 mergemaster(8) 取得更多資訊。
部份廢棄的檔案或目錄可以在更新之後保留,可使用以下指令找出這些檔案:
# make check-old並用以下指令刪除:
# make delete-old部份廢棄的程式庫也可以保留下來,可使用以下指令來偵測這些程式庫:
# make check-old-libs並使用以下指令刪除
# make delete-old-libs那些仍使用舊程式庫的程式將在刪除程式庫之後無法正常運作,而這些程式須要在刪除舊程式庫之後重新編譯或更換。
當確認所有舊檔案或目錄可安全的刪除時,要避免刪除每一個檔案時均需按下 y 與 Enter 鍵可在指令設定 |
當有多部主機需要追蹤相同的原始碼樹,要在每一部主機的系統下載原始碼與重新編譯所有的東西會耗費不少磁碟空間、網路頻寬與 CPU 運算,要解決這個問題的方法是先在一部主機上做完大部份的工作,而其餘的主機透過 NFS 掛載使用編譯完的成果。本節會介紹如何做這件事。要取得更多有關使用 NFS 的資訊請參考 網路檔案系統 (NFS)。
首先,要先確認要執行同一組 Binary 的一群主機,這群主機又稱作 建置集 (Build set),其中每部主機可以有自己的自訂核心,但會執行相同的 Userland binary。建置集中需挑選一部做為建置主機 (Build machine),這部主機將會拿來編譯 World 與核心 (Kernel),理想情況下,要挑選一部速度較快、有足夠的 CPU 能夠執行 make buildworld 與 make buildkernel 的主機。
再挑選一部主機做為測試主機 (Test machine),這部主機,要在將系統更新上正式運作的環境前做測試,這必須一部能夠承受服務停止一段時間的主機,它也可是同時是建置主機,但不是一定要。
所有在此建置集中的主機需要透過 NFS 掛載在建置主機上的 /usr/obj 與 /usr/src。在有多個建置集時,/usr/src 也應放在其中一部建置主機,然後由其他主機使用 NFS 掛載。
確保在建置集中的所有主機的 /etc/make.conf 及 /etc/src.conf 與建置主機一致,這是由於建置主機必須編譯整個基礎系統 (Base system) 給所有建置集中的主機安裝。此外,每一部建置主機應在 /etc/make.conf 使用 KERNCONF 設定其核心名稱,且建置主機應列出所有要編譯的核心名稱在 KERNCONF,並且把自己要用的核心放在第一個。建置主機也必須有每部主機的核心設定檔在其 /usr/src/sys/arch/conf。
在建置主機上,編譯核心與 World 如 從原始碼更新 FreeBSD 所述,但不要在建置主機上安裝所有編譯好的東西,而是要將編譯好的核心安裝到測試主機,在測試主機透過 NFS 掛載 /usr/src 及 /usr/obj。然後執行 shutdown now 進入單使用者模式來安裝新的核心與 World 並如同往常執行 mergemaster。完成之後,重新開機回到正常的多使用者模式運作。
在測試主機上檢驗完所有東西皆運作正常之後,使用相同的程序將編譯好的結果安裝到在建置集中的其他主機。
同樣的方法也可用在 Port 樹,第一個步驟是透過 NFS 共享 /usr/ports 給所有在建置集中的主機。要設定 /etc/make.conf 使用共享的 distfiles,可設定 DISTDIR 為由 NFS 掛載對應到的使用者 root 可寫入的通用共享目錄。每一台主機應設定 WRKDIRPREFIX 到一個本地的編譯目錄,若 Port 要在本地編譯。或者,若建置系統要編譯並散佈套件到建置集中的主機可在建置系統上設定 PACKAGES 到一個類似 DISTDIR 的目錄。
DTrace,又被稱作 Dynamic Tracing ,由 Sun™ 開發,用在生產 (production) 跟預生產 (pre-production) 系統中找出效能瓶頸的工具。 除了診斷性能問題外,DTrace 還可以用於查詢以及除錯 FreeBSD 核心和使用者層級程式的未預期行為。
DTrace 是一個卓越的分析工具,具有一系列令人驚豔、用於診斷系統問題的功能。 它還可以執行預先寫好的腳本,以使用其功能。 使用者可以用 DTrace D 語言編寫自己的工具,從而允許他們根據特定的需求客製化。
FreeBSD 實做提供對核心層級的 DTrace 全面的支援,以及對使用者層級的 DTrace 實驗性的支援。
使用者層級的 DTrace 允許使用者使用 pid 執行函式邊界追蹤 (function boundary tracing),並將 static probes 插入到使用者程式以供之後追蹤。
一些 ports,像是 databases/postgresql12-server 和 lang/php74 提供 DTrace 選項,以提供 static probes 功能。
DTrace 的官方指南由 Illumos 維護,在 DTrace Guide。
讀完這章,您將了解:
什麼是 DTrace 以及其提供的功能。
Solaris™ 實做的 DTrace 跟 FreeBSD 提供的 DTrace 之間的不同之處。
如何在 FreeBSD 上啟用和使用 DTrace。
在開始閱讀這章之前,您需要:
了解 UNIX™ 及 FreeBSD 基礎 (FreeBSD 基礎)。
了解安全性以及其跟 FreeBSD 的關係 (安全性)。
雖然 FreeBSD 的 DTrace 和 Solaris™ 的 DTrace 類似,但是還是有存在差異。 最重要的區別為,在 FreeBSD 中,DTrace 是作為一組核心模組 (kernel modules) 實做的,並且在載入模組之前無法使用。 要載入所有需要的模組:
# kldload dtraceall從 FreeBSD 10.0-RELEASE 之後,模組會在執行 dtrace 時自動載入。
FreeBSD 使用 DDB_CTF 核心選項來支援從核心模組和核心本身載入 CTF 資料。
CTF 是 Solaris™ Compact C Type Format,它封裝了一種簡化形式的除錯資訊,類似於 DWARF 和 古老的 stabs。
CTF 資料通過`ctfconvert` and ctfmerge 建構工具,加入到二進制文件中。
ctfconvert 工具分析編譯器創建的 DWARF 部份合併到執行檔或函式庫中。ELF 除錯部份,而 ctfmerge 將目標的 CTFELF
與 Solaris™ 相比,FreeBSD 存在一些不同的 providers。
最值得注意的是 dtmalloc provider 允許在 FreeBSD 核心中按照類型 (type) 追蹤 malloc()。
Solaris™ 中的一些 providers,例如 cpc 和 mib,在 FreeBSD 中則不存在。
這些可能會在 FreeBSD 未來的版本中出現。
此外,兩個作業系統中一些可用的 providers 是不相容的,因為他們具有不同的參數類型。
因此,在 Solaris™ 上拓寫的 D 腳本在未經修改的情況下可能可以或不可以在 FreeBSD 上執行,反之亦然。
因為安全的差異,只有 root 可以在 FreeBSD 上使用 DTrace。
Solaris™ 擁有一些 FreeBSD 中還不存在的低階 (low level) 安全檢查。
因此 /dev/dtrace/dtrace 被嚴格限制成 root。
DTrace 使用 Common Development and Distribution License (CDDL) 授權。
要在 FreeBSD 上查看此授權, 請參閱 /usr/src/cddl/contrib/opensolaris/OPENSOLARIS.LICENSE 或者在 http://opensource.org/licenses/CDDL-1.0 線上查看。
雖然具有 DTrace 支援的 FreeBSD 核心使用 BSD 授權,但當模組使用二進制形式或者二進制文件發布時,將使用 CDDL 授權。
在 FreeBSD 9.2 和 10.0 中,DTrace 內建於 GENERIC 核心裡。 FreeBSD 早期版本的使用者或喜歡在 DTrace 支援下靜態編譯的使用者應加入下列幾行到客製化核心配置文件,並根據 Configuring the FreeBSD Kernel 中的說明重新編譯核心:
options KDTRACE_HOOKS options DDB_CTF makeoptions DEBUG=-g makeoptions WITH_CTF=1
AMD64 架構的使用者應加入下列幾行:
options KDTRACE_FRAME
此選項提供對 FBT 的支援,
雖然 DTrace 可以在沒有此選項的情況下運作,但對函式邊界追蹤的支援有限。
一旦 FreeBSD 系統使用新的核心重新啟動,或者使用 kldload dtraceall 載入 DTrace 核心模組後,系統需要支援 Korn shell,因為 DTrace 工具箱有幾個用 ksh 拓寫的工具。
確保已經安裝 shells/ksh93 套件或者 port,
也可以在 shells/pdksh 或者 shells/mksh 下執行這些工具。
最後,安裝目前的 DTrace 工具箱,這是一組用於收集系統資訊的現成腳本,
有一些腳本可以檢查打開的文件、記憶體、CPU 使用情況等等。
FreeBSD 10 將其中一些腳本安裝在 /usr/share/dtrace 中。
在其他 FreeBSD 的版本中,要安裝 DTrace 工具箱,請使用 sysutils/dtrace-toolkit 套件或者 port。
/usr/share/dtrace 中的腳本已專門移植到 FreeBSD, 並非所有在 DTrace 工具箱中的所有腳本都能在 FreeBSD 上按照原樣運作,一些腳本可能需要一些修改才能在 FreeBSD 上運作。 |
DTrace 工具箱包含許多使用 DTrace 特殊語言的腳本, 這種語言被稱為 D 語言,它與 C++ 非常類似, 對於該語言的深度討論超出了此文件的範圍, 他在 Illumos Dynamic Tracing Guide 有廣泛的介紹。
DTrace 腳本由一個或多個 probes 或檢查點 (instrumentation points) 的列表組成,其中每個 probe 都與一個行為有關, 只要能滿足 probe 的條件,就會執行相關的行為, 舉例來說,打開文件、啟動一個行程或執行一行程式。 該行為可能是紀錄一些資訊,或修改上下文變數 (context variables), 上下文變數的讀寫允許 probes 分享資訊和共同分析不同事件的相關性。
想要查看所有的 probes,系統管理員可以執行以下指令:
# dtrace -l | more每個 probe 都有一個 ID、一個 PROVIDER (dtrace 或者 fbt)、一個 MODULE 和一個 FUNCTION NAME。
有關此指令的更多資訊,請參閱 dtrace(1)。
本節中的例子概述如何使用 DTrace 工具箱中完全支援的兩個腳本: hotkernel 和 procsystime 腳本。
hotkernel 腳本設計成觀察哪個函式使用的核心時間最多, 它會產生類似於以下內容的輸出:
# cd /usr/local/share/dtrace-toolkit
# ./hotkernel
Sampling... Hit Ctrl-C to end.按照說明,使用 Ctrl+C 組合鍵停止行程, 中止後,腳本將顯示一整列的核心函式和時間資訊,按照時間遞增排序:
kernel`_thread_lock_flags 2 0.0%
0xc1097063 2 0.0%
kernel`sched_userret 2 0.0%
kernel`kern_select 2 0.0%
kernel`generic_copyin 3 0.0%
kernel`_mtx_assert 3 0.0%
kernel`vm_fault 3 0.0%
kernel`sopoll_generic 3 0.0%
kernel`fixup_filename 4 0.0%
kernel`_isitmyx 4 0.0%
kernel`find_instance 4 0.0%
kernel`_mtx_unlock_flags 5 0.0%
kernel`syscall 5 0.0%
kernel`DELAY 5 0.0%
0xc108a253 6 0.0%
kernel`witness_lock 7 0.0%
kernel`read_aux_data_no_wait 7 0.0%
kernel`Xint0x80_syscall 7 0.0%
kernel`witness_checkorder 7 0.0%
kernel`sse2_pagezero 8 0.0%
kernel`strncmp 9 0.0%
kernel`spinlock_exit 10 0.0%
kernel`_mtx_lock_flags 11 0.0%
kernel`witness_unlock 15 0.0%
kernel`sched_idletd 137 0.3%
0xc10981a5 42139 99.3%此腳本也是用於核心模組,
要使用此功能,請使用 -m 執行腳本:
# ./hotkernel -m
Sampling... Hit Ctrl-C to end.
^C
MODULE COUNT PCNT
0xc107882e 1 0.0%
0xc10e6aa4 1 0.0%
0xc1076983 1 0.0%
0xc109708a 1 0.0%
0xc1075a5d 1 0.0%
0xc1077325 1 0.0%
0xc108a245 1 0.0%
0xc107730d 1 0.0%
0xc1097063 2 0.0%
0xc108a253 73 0.0%
kernel 874 0.4%
0xc10981a5 213781 99.6%procsystime 抓取和輸出系統調用時間,給設定行程 ID (PID) 或行程名稱的行程。
在以下的例子中,生成了 /bin/csh 新物件,
然後,procsystime 被執行並一直等待,同時在 csh 的另一個化身上輸入一些指令,
以下是本次測試的結果:
# ./procsystime -n csh
Tracing... Hit Ctrl-C to end...
^C
Elapsed Times for processes csh,
SYSCALL TIME (ns)
getpid 6131
sigreturn 8121
close 19127
fcntl 19959
dup 26955
setpgid 28070
stat 31899
setitimer 40938
wait4 62717
sigaction 67372
sigprocmask 119091
gettimeofday 183710
write 263242
execve 492547
ioctl 770073
vfork 3258923
sigsuspend 6985124
read 3988049784如圖所示,read() 系統調用使用的時間最多(以奈秒為單位),而 getpid() 系統調用使用的時間最少。
This chapter covers the use of USB Device Mode and USB On The Go (USB OTG) in FreeBSD. This includes virtual serial consoles, virtual network interfaces, and virtual USB drives.
When running on hardware that supports USB device mode or USB OTG, like that built into many embedded boards, the FreeBSD USB stack can run in device mode. Device mode makes it possible for the computer to present itself as different kinds of USB device classes, including serial ports, network adapters, and mass storage, or a combination thereof. A USB host like a laptop or desktop computer is able to access them just like physical USB devices. Device mode is sometimes called the "USB gadget mode".
There are two basic ways the hardware can provide the device mode functionality: with a separate "client port", which only supports the device mode, and with a USB OTG port, which can provide both device and host mode. For USB OTG ports, the USB stack switches between host-side and device-side automatically, depending on what is connected to the port. Connecting a USB device like a memory stick to the port causes FreeBSD to switch to host mode. Connecting a USB host like a computer causes FreeBSD to switch to device mode. Single purpose "client ports" always work in device mode.
What FreeBSD presents to the USB host depends on the hw.usb.template sysctl. Some templates provide a single device, such as a serial terminal; others provide multiple ones, which can all be used at the same time. An example is the template 10, which provides a mass storage device, a serial console, and a network interface. See usb_template(4) for the list of available values.
Note that in some cases, depending on the hardware and the hosts operating system, for the host to notice the configuration change, it must be either physically disconnected and reconnected, or forced to rescan the USB bus in a system-specific way. When FreeBSD is running on the host, usbconfig(8)reset can be used. This also must be done after loading usb_template.ko if the USB host was already connected to the USBOTG socket.
讀完這章,您將了解:
How to set up USB Device Mode functionality on FreeBSD.
How to configure the virtual serial port on FreeBSD.
How to connect to the virtual serial port from various operating systems.
How to configure FreeBSD to provide a virtual USB network interface.
How to configure FreeBSD to provide a virtual USB storage device.
Virtual serial port support is provided by templates number 3, 8, and 10. Note that template 3 works with Microsoft Windows 10 without the need for special drivers and INF files. Other host operating systems work with all three templates. Both usb_template(4) and umodem(4) kernel modules must be loaded.
To enable USB device mode serial ports, add those lines to /etc/ttys:
ttyU0 "/usr/libexec/getty 3wire" vt100 onifconsole secure
ttyU1 "/usr/libexec/getty 3wire" vt100 onifconsole secure然後加入這些行到 /etc/devd.conf:
notify 100 {
match "system" "DEVFS";
match "subsystem" "CDEV";
match "type" "CREATE";
match "cdev" "ttyU[0-9]+";
action "/sbin/init q";
};Reload the configuration if devd(8) is already running:
# service devd restartMake sure the necessary modules are loaded and the correct template is set at boot by adding those lines to /boot/loader.conf, creating it if it does not already exist:
umodem_load="YES"
hw.usb.template=3To load the module and set the template without rebooting use:
# kldload umodem
# sysctl hw.usb.template=3To connect to a board configured to provide USB device mode serial ports, connect the USB host, such as a laptop, to the boards USB OTG or USB client port. Use pstat -t on the host to list the terminal lines. Near the end of the list you should see a USB serial port, eg "ttyU0". To open the connection, use:
# cu -l /dev/ttyU0After pressing the Enter key a few times you will see a login prompt.
To connect to a board configured to provide USB device mode serial ports, connect the USB host, such as a laptop, to the boards USB OTG or USB client port. To open the connection, use:
# cu -l /dev/cu.usbmodemFreeBSD1To connect to a board configured to provide USB device mode serial ports, connect the USB host, such as a laptop, to the boards USB OTG or USB client port. To open the connection, use:
# minicom -D /dev/ttyACM0To connect to a board configured to provide USB device mode serial ports, connect the USB host, such as a laptop, to the boards USB OTG or USB client port. To open a connection you will need a serial terminal program, such as PuTTY. To check the COM port name used by Windows, run Device Manager, expand "Ports (COM & LPT)". You will see a name similar to "USB Serial Device (COM4)". Run serial terminal program of your choice, for example PuTTY. In the PuTTY dialog set "Connection type" to "Serial", type the COMx obtained from Device Manager in the "Serial line" dialog box and click Open.
Virtual network interfaces support is provided by templates number 1, 8, and 10. Note that none of them works with Microsoft Windows. Other host operating systems work with all three templates. Both usb_template(4) and if_cdce(4) kernel modules must be loaded.
Make sure the necessary modules are loaded and the correct template is set at boot by adding those lines to /boot/loader.conf, creating it if it does not already exist:
if_cdce_load="YES"
hw.usb.template=1To load the module and set the template without rebooting use:
# kldload if_cdce
# sysctl hw.usb.template=1cfumass(4) 驅動程式是一個在 FreeBSD 12.0 之後才可用的 USB 裝置模式驅動程式。 |
Mass Storage target is provided by templates 0 and 10. Both usb_template(4) and cfumass(4) kernel modules must be loaded. cfumass(4) interfaces to the CTL subsystem, the same one that is used for iSCSI or Fibre Channel targets. On the host side, USB Mass Storage initiators can only access a single LUN, LUN 0.
The simplest way to set up a read-only USB storage target is to use the cfumass rc script. To configure it this way, copy the files to be presented to the USB host machine into the /var/cfumass directory, and add this line to /etc/rc.conf:
cfumass_enable="YES"
To configure the target without restarting, run this command:
# service cfumass startDifferently from serial and network functionality, the template should not be set to 0 or 10 in /boot/loader.conf. This is because the LUN must be set up before setting the template. The cfumass startup script sets the correct template number automatically when started.
The rest of this chapter provides detailed description of setting the target without using the cfumass rc file. This is necessary if eg one wants to provide a writeable LUN.
USB Mass Storage does not require the ctld(8) daemon to be running, although it can be used if desired. This is different from iSCSI. Thus, there are two ways to configure the target: ctladm(8), or ctld(8). Both require the cfumass.ko kernel module to be loaded. The module can be loaded manually:
# kldload cfumassIf cfumass.ko has not been built into the kernel, /boot/loader.conf can be set to load the module at boot:
cfumass_load="YES"
A LUN can be created without the ctld(8) daemon:
# ctladm create -b block -o file=/data/target0This presents the contents of the image file /data/target0 as a LUN to the USB host. The file must exist before executing the command. To configure the LUN at system startup, add the command to /etc/rc.local.
ctld(8) can also be used to manage LUNs. Create /etc/ctl.conf, add a line to /etc/rc.conf to make sure ctld(8) is automatically started at boot, and then start the daemon.
This is an example of a simple /etc/ctl.conf configuration file. Refer to ctl.conf(5) for a more complete description of the options.
target naa.50015178f369f092 {
lun 0 {
path /data/target0
size 4G
}
}The example creates a single target with a single LUN. The naa.50015178f369f092 is a device identifier composed of 32 random hexadecimal digits. The path line defines the full path to a file or zvol backing the LUN. That file must exist before starting ctld(8). The second line is optional and specifies the size of the LUN.
To make sure the ctld(8) daemon is started at boot, add this line to /etc/rc.conf:
ctld_enable="YES"
To start ctld(8) now, run this command:
# service ctld start當 ctld(8) Daemon 啟動後,它會讀取 /etc/ctl.conf,若這個檔案在 Daemon 啟動之後才做修改,要重新載入變更的內容才能立即生效:
# service ctld reloadFreeBSD 是一種廣泛的被使用在高效能的網路伺服器中的作業系統,這些章節包含了:
序列通訊
PPP 和在乙太網路使用 PPP
電子郵件
執行網路伺服器
防火牆
其他的進階網路主題
這些章節是讓您在需要查資料的時候翻閱用的。 您不需要依照特定的順序來讀,也不需要將這些章節全部讀過之後才將 FreeBSD 用在網路環境下。
UNIX™ 從最早的第一台 UNIX™ 仰賴序列線路來讓使用者輸入與輸出以來一直都支援序列通訊,雖與每秒 10 個字元的序列印表機及鍵盤組成的終端機時代比起已改變很多。本章將說明幾種可在 FreeBSD 使用的序列通訊方式。
讀完這章,您將了解:
如何連線終端機到 FreeBSD 系統。
如何使用數據機撥號給遠端主機。
如何允許遠端使用者透過數據機來登入 FreeBSD 系統。
如何從序列 Console 啟動 FreeBSD 系統。
在開始閱讀這章之前,您需要:
了解如何 設定並安裝自訂核心。
了解 FreeBSD 的權限與程序。
能夠取得要在 FreeBSD 使用的序列硬體的技術手冊。
The following terms are often used in serial communications:
Bits per Second (bps) is the rate at which data is transmitted.
Data Terminal Equipment (DTE) is one of two endpoints in a serial communication. An example would be a computer.
Data Communications Equipment (DTE) is the other endpoint in a serial communication. Typically, it is a modem or serial terminal.
The original standard which defined hardware serial communications. It has since been renamed to TIA-232.
When referring to communication data rates, this section does not use the term baud. Baud refers to the number of electrical state transitions made in a period of time, while bps is the correct term to use.
To connect a serial terminal to a FreeBSD system, a serial port on the computer and the proper cable to connect to the serial device are needed. Users who are already familiar with serial hardware and cabling can safely skip this section.
There are several different kinds of serial cables. The two most common types are null-modem cables and standard RS-232 cables. The documentation for the hardware should describe the type of cable required.
These two types of cables differ in how the wires are connected to the connector. Each wire represents a signal, with the defined signals summarized in RS-232C 信號名稱. A standard serial cable passes all of the RS-232C signals straight through. For example, the "Transmitted Data" pin on one end of the cable goes to the "Transmitted Data" pin on the other end. This is the type of cable used to connect a modem to the FreeBSD system, and is also appropriate for some terminals.
A null-modem cable switches the "Transmitted Data" pin of the connector on one end with the "Received Data" pin on the other end. The connector can be either a DB-25 or a DB-9.
A null-modem cable can be constructed using the pin connections summarized in DB-25 對 DB-25 Null-Modem 線, DB-9 對 DB-9 Null-Modem 線, and DB-9 對 DB-25 Null-Modem 線. While the standard calls for a straight-through pin 1 to pin 1 "Protective Ground" line, it is often omitted. Some terminals work using only pins 2, 3, and 7, while others require different configurations. When in doubt, refer to the documentation for the hardware.
| 縮寫 | Names |
|---|---|
RD | Received Data |
TD | Transmitted Data |
DTR | Data Terminal Ready |
DSR | Data Set Ready |
DCD | Data Carrier Detect |
SG | Signal Ground |
RTS | Request to Send |
CTS | Clear to Send |
| 信號 | 針腳 # | 針腳 # | 信號 | |
|---|---|---|---|---|
SG | 7 | connects to | 7 | SG |
TD | 2 | connects to | 3 | RD |
RD | 3 | connects to | 2 | TD |
RTS | 4 | connects to | 5 | CTS |
CTS | 5 | connects to | 4 | RTS |
DTR | 20 | connects to | 6 | DSR |
DTR | 20 | connects to | 8 | DCD |
DSR | 6 | connects to | 20 | DTR |
DCD | 8 | connects to | 20 | DTR |
| 信號 | 針腳 # | 針腳 # | 信號 | |
|---|---|---|---|---|
RD | 2 | connects to | 3 | TD |
TD | 3 | connects to | 2 | RD |
DTR | 4 | connects to | 6 | DSR |
DTR | 4 | connects to | 1 | DCD |
SG | 5 | connects to | 5 | SG |
DSR | 6 | connects to | 4 | DTR |
DCD | 1 | connects to | 4 | DTR |
RTS | 7 | connects to | 8 | CTS |
CTS | 8 | connects to | 7 | RTS |
| 信號 | 針腳 # | 針腳 # | 信號 | |
|---|---|---|---|---|
RD | 2 | connects to | 2 | TD |
TD | 3 | connects to | 3 | RD |
DTR | 4 | connects to | 6 | DSR |
DTR | 4 | connects to | 8 | DCD |
SG | 5 | connects to | 7 | SG |
DSR | 6 | connects to | 20 | DTR |
DCD | 1 | connects to | 20 | DTR |
RTS | 7 | connects to | 5 | CTS |
CTS | 8 | connects to | 4 | RTS |
When one pin at one end connects to a pair of pins at the other end, it is usually implemented with one short wire between the pair of pins in their connector and a long wire to the other single pin. |
Serial ports are the devices through which data is transferred between the FreeBSD host computer and the terminal. Several kinds of serial ports exist. Before purchasing or constructing a cable, make sure it will fit the ports on the terminal and on the FreeBSD system.
Most terminals have DB-25 ports. Personal computers may have DB-25 or DB-9 ports. A multiport serial card may have RJ-12 or RJ-45/ ports. See the documentation that accompanied the hardware for specifications on the kind of port or visually verify the type of port.
In FreeBSD, each serial port is accessed through an entry in /dev. There are two different kinds of entries:
Call-in ports are named /dev/ttyuN where N is the port number, starting from zero. If a terminal is connected to the first serial port (COM1), use /dev/ttyu0 to refer to the terminal. If the terminal is on the second serial port (COM2), use /dev/ttyu1, and so forth. Generally, the call-in port is used for terminals. Call-in ports require that the serial line assert the "Data Carrier Detect" signal to work correctly.
Call-out ports are named /dev/cuauN on FreeBSD versions 8.X and higher and /dev/cuadN on FreeBSD versions 7.X and lower. Call-out ports are usually not used for terminals, but are used for modems. The call-out port can be used if the serial cable or the terminal does not support the "Data Carrier Detect" signal.
FreeBSD also provides initialization devices (/dev/ttyuN.init and /dev/cuauN.init or /dev/cuadN.init) and locking devices (/dev/ttyuN.lock and /dev/cuauN.lock or /dev/cuadN.lock). The initialization devices are used to initialize communications port parameters each time a port is opened, such as crtscts for modems which use RTS/CTS signaling for flow control. The locking devices are used to lock flags on ports to prevent users or programs changing certain parameters. Refer to termios(4), sio(4), and stty(1) for information on terminal settings, locking and initializing devices, and setting terminal options, respectively.
By default, FreeBSD supports four serial ports which are commonly known as COM1, COM2, COM3, and COM4. FreeBSD also supports dumb multi-port serial interface cards, such as the BocaBoard 1008 and 2016, as well as more intelligent multi-port cards such as those made by Digiboard. However, the default kernel only looks for the standard COM ports.
To see if the system recognizes the serial ports, look for system boot messages that start with uart:
# grep uart /var/run/dmesg.bootIf the system does not recognize all of the needed serial ports, additional entries can be added to /boot/device.hints. This file already contains hint.uart.0.* entries for COM1 and hint.uart.1.* entries for COM2. When adding a port entry for COM3 use 0x3E8, and for COM4 use 0x2E8. Common IRQ addresses are 5 for COM3 and 9 for COM4.
To determine the default set of terminal I/O settings used by the port, specify its device name. This example determines the settings for the call-in port on COM2:
# stty -a -f /dev/ttyu1System-wide initialization of serial devices is controlled by /etc/rc.d/serial. This file affects the default settings of serial devices. To change the settings for a device, use stty. By default, the changed settings are in effect until the device is closed and when the device is reopened, it goes back to the default set. To permanently change the default set, open and adjust the settings of the initialization device. For example, to turn on CLOCAL mode, 8 bit communication, and XON/XOFF flow control for ttyu5, type:
# stty -f /dev/ttyu5.init clocal cs8 ixon ixoffTo prevent certain settings from being changed by an application, make adjustments to the locking device. For example, to lock the speed of ttyu5 to 57600 bps, type:
# stty -f /dev/ttyu5.lock 57600Now, any application that opens ttyu5 and tries to change the speed of the port will be stuck with 57600 bps.
Terminals provide a convenient and low-cost way to access a FreeBSD system when not at the computer’s console or on a connected network. This section describes how to use terminals with FreeBSD.
The original UNIX™ systems did not have consoles. Instead, users logged in and ran programs through terminals that were connected to the computer’s serial ports.
The ability to establish a login session on a serial port still exists in nearly every UNIX™-like operating system today, including FreeBSD. By using a terminal attached to an unused serial port, a user can log in and run any text program that can normally be run on the console or in an xterm window.
Many terminals can be attached to a FreeBSD system. An older spare computer can be used as a terminal wired into a more powerful computer running FreeBSD. This can turn what might otherwise be a single-user computer into a powerful multiple-user system.
FreeBSD supports three types of terminals:
Dumb terminals are specialized hardware that connect to computers over serial lines. They are called "dumb" because they have only enough computational power to display, send, and receive text. No programs can be run on these devices. Instead, dumb terminals connect to a computer that runs the needed programs.
There are hundreds of kinds of dumb terminals made by many manufacturers, and just about any kind will work with FreeBSD. Some high-end terminals can even display graphics, but only certain software packages can take advantage of these advanced features.
Dumb terminals are popular in work environments where workers do not need access to graphical applications.
Since a dumb terminal has just enough ability to display, send, and receive text, any spare computer can be a dumb terminal. All that is needed is the proper cable and some terminal emulation software to run on the computer.
This configuration can be useful. For example, if one user is busy working at the FreeBSD system’s console, another user can do some text-only work at the same time from a less powerful personal computer hooked up as a terminal to the FreeBSD system.
There are at least two utilities in the base-system of FreeBSD that can be used to work through a serial connection: cu(1) and tip(1).
For example, to connect from a client system that runs FreeBSD to the serial connection of another system:
# cu -l /dev/cuauNPorts are numbered starting from zero. This means that COM1 is /dev/cuau0.
Additional programs are available through the Ports Collection, such as comms/minicom.
X terminals are the most sophisticated kind of terminal available. Instead of connecting to a serial port, they usually connect to a network like Ethernet. Instead of being relegated to text-only applications, they can display any Xorg application.
This chapter does not cover the setup, configuration, or use of X terminals.
This section describes how to configure a FreeBSD system to enable a login session on a serial terminal. It assumes that the system recognizes the serial port to which the terminal is connected and that the terminal is connected with the correct cable.
In FreeBSD, init reads /etc/ttys and starts a getty process on the available terminals. The getty process is responsible for reading a login name and starting the login program. The ports on the FreeBSD system which allow logins are listed in /etc/ttys. For example, the first virtual console, ttyv0, has an entry in this file, allowing logins on the console. This file also contains entries for the other virtual consoles, serial ports, and pseudo-ttys. For a hardwired terminal, the serial port’s /dev entry is listed without the /dev part. For example, /dev/ttyv0 is listed as ttyv0.
The default /etc/ttys configures support for the first four serial ports, ttyu0 through ttyu3:
ttyu0 "/usr/libexec/getty std.9600" dialup off secure ttyu1 "/usr/libexec/getty std.9600" dialup off secure ttyu2 "/usr/libexec/getty std.9600" dialup off secure ttyu3 "/usr/libexec/getty std.9600" dialup off secure
When attaching a terminal to one of those ports, modify the default entry to set the required speed and terminal type, to turn the device on and, if needed, to change the port’s secure setting. If the terminal is connected to another port, add an entry for the port.
設定終端機項目 configures two terminals in /etc/ttys. The first entry configures a Wyse-50 connected to COM2. The second entry configures an old computer running Procomm terminal software emulating a VT-100 terminal. The computer is connected to the sixth serial port on a multi-port serial card.
ttyu1 "/usr/libexec/getty std.38400" wy50 on insecure ttyu5 "/usr/libexec/getty std.19200" vt100 on insecure
The first field specifies the device name of the serial terminal.
The second field tells getty to initialize and open the line, set the line speed, prompt for a user name, and then execute the login program. The optional getty type configures characteristics on the terminal line, like bps rate and parity. The available getty types are listed in /etc/gettytab. In almost all cases, the getty types that start with std will work for hardwired terminals as these entries ignore parity. There is a std entry for each bps rate from 110 to 115200. Refer to gettytab(5) for more information.When setting the getty type, make sure to match the communications settings used by the terminal. For this example, the Wyse-50 uses no parity and connects at 38400 bps. The computer uses no parity and connects at 19200 bps.
The third field is the type of terminal. For dial-up ports, unknown or dialup is typically used since users may dial up with practically any type of terminal or software. Since the terminal type does not change for hardwired terminals, a real terminal type from /etc/termcap can be specified. For this example, the Wyse-50 uses the real terminal type while the computer running Procomm is set to emulate a VT-100.
The fourth field specifies if the port should be enabled. To enable logins on this port, this field must be set to on.
The final field is used to specify whether the port is secure. Marking a port as secure means that it is trusted enough to allow root to login from that port. Insecure ports do not allow root logins. On an insecure port, users must login from unprivileged accounts and then use su or a similar mechanism to gain superuser privileges, as described in 超級使用者帳號. For security reasons, it is recommended to change this setting to insecure.
After making any changes to /etc/ttys, send a SIGHUP (hangup) signal to the init process to force it to re-read its configuration file:
# kill -HUP 1Since init is always the first process run on a system, it always has a process ID of 1.
If everything is set up correctly, all cables are in place, and the terminals are powered up, a getty process should now be running on each terminal and login prompts should be available on each terminal.
Even with the most meticulous attention to detail, something could still go wrong while setting up a terminal. Here is a list of common symptoms and some suggested fixes.
If no login prompt appears, make sure the terminal is plugged in and powered up. If it is a personal computer acting as a terminal, make sure it is running terminal emulation software on the correct serial port.
Make sure the cable is connected firmly to both the terminal and the FreeBSD computer. Make sure it is the right kind of cable.
Make sure the terminal and FreeBSD agree on the bps rate and parity settings. For a video display terminal, make sure the contrast and brightness controls are turned up. If it is a printing terminal, make sure paper and ink are in good supply.
Use ps to make sure that a getty process is running and serving the terminal. For example, the following listing shows that a getty is running on the second serial port, ttyu1, and is using the std.38400 entry in /etc/gettytab:
# ps -axww|grep ttyu
22189 d1 Is+ 0:00.03 /usr/libexec/getty std.38400 ttyu1If no getty process is running, make sure the port is enabled in /etc/ttys. Remember to run kill -HUP 1 after modifying /etc/ttys.
If the getty process is running but the terminal still does not display a login prompt, or if it displays a prompt but will not accept typed input, the terminal or cable may not support hardware handshaking. Try changing the entry in /etc/ttys from std.38400 to 3wire.38400, then run kill -HUP 1 after modifying /etc/ttys. The 3wire entry is similar to std, but ignores hardware handshaking. The baud rate may need to be reduced or software flow control enabled when using 3wire to prevent buffer overflows.
If garbage appears instead of a login prompt, make sure the terminal and FreeBSD agree on the bps rate and parity settings. Check the getty processes to make sure the correct getty type is in use. If not, edit /etc/ttys and run kill -HUP 1.
If characters appear doubled and the password appears when typed, switch the terminal, or the terminal emulation software, from "half duplex" or "local echo" to "full duplex."
Configuring a FreeBSD system for dial-in service is similar to configuring terminals, except that modems are used instead of terminal devices. FreeBSD supports both external and internal modems.
External modems are more convenient because they often can be configured via parameters stored in non-volatile RAM and they usually provide lighted indicators that display the state of important RS-232 signals, indicating whether the modem is operating properly.
Internal modems usually lack non-volatile RAM, so their configuration may be limited to setting DIP switches. If the internal modem has any signal indicator lights, they are difficult to view when the system’s cover is in place.
When using an external modem, a proper cable is needed. A standard RS-232C serial cable should suffice.
FreeBSD needs the RTS and CTS signals for flow control at speeds above 2400 bps, the CD signal to detect when a call has been answered or the line has been hung up, and the DTR signal to reset the modem after a session is complete. Some cables are wired without all of the needed signals, so if a login session does not go away when the line hangs up, there may be a problem with the cable. Refer to 序列線與埠 for more information about these signals.
Like other UNIX™-like operating systems, FreeBSD uses the hardware signals to find out when a call has been answered or a line has been hung up and to hangup and reset the modem after a call. FreeBSD avoids sending commands to the modem or watching for status reports from the modem.
FreeBSD supports the NS8250, NS16450, NS16550, and NS16550A-based RS-232C (CCITT V.24) communications interfaces. The 8250 and 16450 devices have single-character buffers. The 16550 device provides a 16-character buffer, which allows for better system performance. Bugs in plain 16550 devices prevent the use of the 16-character buffer, so use 16550A devices if possible. Because single-character-buffer devices require more work by the operating system than the 16-character-buffer devices, 16550A-based serial interface cards are preferred. If the system has many active serial ports or will have a heavy load, 16550A-based cards are better for low-error-rate communications.
The rest of this section demonstrates how to configure a modem to receive incoming connections, how to communicate with the modem, and offers some troubleshooting tips.
As with terminals, init spawns a getty process for each configured serial port used for dial-in connections. When a user dials the modem’s line and the modems connect, the "Carrier Detect" signal is reported by the modem. The kernel notices that the carrier has been detected and instructs getty to open the port and display a login: prompt at the specified initial line speed. In a typical configuration, if garbage characters are received, usually due to the modem’s connection speed being different than the configured speed, getty tries adjusting the line speeds until it receives reasonable characters. After the user enters their login name, getty executes login, which completes the login process by asking for the user’s password and then starting the user’s shell.
There are two schools of thought regarding dial-up modems. One configuration method is to set the modems and systems so that no matter at what speed a remote user dials in, the dial-in RS-232 interface runs at a locked speed. The benefit of this configuration is that the remote user always sees a system login prompt immediately. The downside is that the system does not know what a user’s true data rate is, so full-screen programs like Emacs will not adjust their screen-painting methods to make their response better for slower connections.
The second method is to configure the RS-232 interface to vary its speed based on the remote user’s connection speed. Because getty does not understand any particular modem’s connection speed reporting, it gives a login: message at an initial speed and watches the characters that come back in response. If the user sees junk, they should press Enter until they see a recognizable prompt. If the data rates do not match, getty sees anything the user types as junk, tries the next speed, and gives the login: prompt again. This procedure normally only takes a keystroke or two before the user sees a good prompt. This login sequence does not look as clean as the locked-speed method, but a user on a low-speed connection should receive better interactive response from full-screen programs.
When locking a modem’s data communications rate at a particular speed, no changes to /etc/gettytab should be needed. However, for a matching-speed configuration, additional entries may be required in order to define the speeds to use for the modem. This example configures a 14.4 Kbps modem with a top interface speed of 19.2 Kbps using 8-bit, no parity connections. It configures getty to start the communications rate for a V.32bis connection at 19.2 Kbps, then cycles through 9600 bps, 2400 bps, 1200 bps, 300 bps, and back to 19.2 Kbps. Communications rate cycling is implemented with the nx= (next table) capability. Each line uses a tc= (table continuation) entry to pick up the rest of the settings for a particular data rate.
#
# Additions for a V.32bis Modem
#
um|V300|High Speed Modem at 300,8-bit:\
:nx=V19200:tc=std.300:
un|V1200|High Speed Modem at 1200,8-bit:\
:nx=V300:tc=std.1200:
uo|V2400|High Speed Modem at 2400,8-bit:\
:nx=V1200:tc=std.2400:
up|V9600|High Speed Modem at 9600,8-bit:\
:nx=V2400:tc=std.9600:
uq|V19200|High Speed Modem at 19200,8-bit:\
:nx=V9600:tc=std.19200:For a 28.8 Kbps modem, or to take advantage of compression on a 14.4 Kbps modem, use a higher communications rate, as seen in this example:
#
# Additions for a V.32bis or V.34 Modem
# Starting at 57.6 Kbps
#
vm|VH300|Very High Speed Modem at 300,8-bit:\
:nx=VH57600:tc=std.300:
vn|VH1200|Very High Speed Modem at 1200,8-bit:\
:nx=VH300:tc=std.1200:
vo|VH2400|Very High Speed Modem at 2400,8-bit:\
:nx=VH1200:tc=std.2400:
vp|VH9600|Very High Speed Modem at 9600,8-bit:\
:nx=VH2400:tc=std.9600:
vq|VH57600|Very High Speed Modem at 57600,8-bit:\
:nx=VH9600:tc=std.57600:For a slow CPU or a heavily loaded system without 16550A-based serial ports, this configuration may produce sio "silo" errors at 57.6 Kbps.
The configuration of /etc/ttys is similar to 設定終端機項目, but a different argument is passed to getty and dialup is used for the terminal type. Replace xxx with the process init will run on the device:
ttyu0 "/usr/libexec/getty xxx" dialup on
The dialup terminal type can be changed. For example, setting vt102 as the default terminal type allows users to use VT102 emulation on their remote systems.
For a locked-speed configuration, specify the speed with a valid type listed in /etc/gettytab. This example is for a modem whose port speed is locked at 19.2 Kbps:
ttyu0 "/usr/libexec/getty std.19200" dialup on
In a matching-speed configuration, the entry needs to reference the appropriate beginning "auto-baud" entry in /etc/gettytab. To continue the example for a matching-speed modem that starts at 19.2 Kbps, use this entry:
ttyu0 "/usr/libexec/getty V19200" dialup on
After editing /etc/ttys, wait until the modem is properly configured and connected before signaling init:
# kill -HUP 1High-speed modems, like V.32, V.32bis, and V.34 modems, use hardware (RTS/CTS) flow control. Use stty to set the hardware flow control flag for the modem port. This example sets the crtscts flag on COM2's dial-in and dial-out initialization devices:
# stty -f /dev/ttyu1.init crtscts
# stty -f /dev/cuau1.init crtsctsThis section provides a few tips for troubleshooting a dial-up modem that will not connect to a FreeBSD system.
Hook up the modem to the FreeBSD system and boot the system. If the modem has status indication lights, watch to see whether the modem’s DTR indicator lights when the login: prompt appears on the system’s console. If it lights up, that should mean that FreeBSD has started a getty process on the appropriate communications port and is waiting for the modem to accept a call.
If the DTR indicator does not light, login to the FreeBSD system through the console and type ps ax to see if FreeBSD is running a getty process on the correct port:
114 ?? I 0:00.10 /usr/libexec/getty V19200 ttyu0If the second column contains a d0 instead of a ?? and the modem has not accepted a call yet, this means that getty has completed its open on the communications port. This could indicate a problem with the cabling or a misconfigured modem because getty should not be able to open the communications port until the carrier detect signal has been asserted by the modem.
If no getty processes are waiting to open the port, double-check that the entry for the port is correct in /etc/ttys. Also, check /var/log/messages to see if there are any log messages from init or getty.
Next, try dialing into the system. Be sure to use 8 bits, no parity, and 1 stop bit on the remote system. If a prompt does not appear right away, or the prompt shows garbage, try pressing Enter about once per second. If there is still no login: prompt, try sending a BREAK. When using a high-speed modem, try dialing again after locking the dialing modem’s interface speed.
If there is still no login: prompt, check /etc/gettytab again and double-check that:
The initial capability name specified in the entry in /etc/ttys matches the name of a capability in /etc/gettytab.
Each nx= entry matches another gettytab capability name.
Each tc= entry matches another gettytab capability name.
If the modem on the FreeBSD system will not answer, make sure that the modem is configured to answer the phone when DTR is asserted. If the modem seems to be configured correctly, verify that the DTR line is asserted by checking the modem’s indicator lights.
If it still does not work, try sending an email to the FreeBSD general questions mailing list describing the modem and the problem.
The following are tips for getting the host to connect over the modem to another computer. This is appropriate for establishing a terminal session with a remote host.
This kind of connection can be helpful to get a file on the Internet if there are problems using PPP. If PPP is not working, use the terminal session to FTP the needed file. Then use zmodem to transfer it to the machine.
A generic Hayes dialer is built into tip. Use at=hayes in /etc/remote.
The Hayes driver is not smart enough to recognize some of the advanced features of newer modems messages like BUSY, NO DIALTONE, or CONNECT 115200. Turn those messages off when using tip with ATX0&W.
The dial timeout for tip is 60 seconds. The modem should use something less, or else tip will think there is a communication problem. Try ATS7=45&W.
AT 指令Create a "direct" entry in /etc/remote. For example, if the modem is hooked up to the first serial port, /dev/cuau0, use the following line:
cuau0:dv=/dev/cuau0:br#19200:pa=none
Use the highest bps rate the modem supports in the br capability. Then, type tip cuau0 to connect to the modem.
Or, use cu as root with the following command:
# cu -lline -sspeedline is the serial port, such as /dev/cuau0, and speed is the speed, such as 57600. When finished entering the AT commands, type ~. to exit.
@ 符號無法運作The @ sign in the phone number capability tells tip to look in /etc/phones for a phone number. But, the @ sign is also a special character in capability files like /etc/remote, so it needs to be escaped with a backslash:
pn=\@
Put a "generic" entry in /etc/remote. For example:
tip115200|Dial any phone number at 115200 bps:\
:dv=/dev/cuau0:br#115200:at=hayes:pa=none:du:
tip57600|Dial any phone number at 57600 bps:\
:dv=/dev/cuau0:br#57600:at=hayes:pa=none:du:This should now work:
# tip -115200 5551234Users who prefer cu over tip, can use a generic cu entry:
cu115200|Use cu to dial any number at 115200bps:\
:dv=/dev/cuau1:br#57600:at=hayes:pa=none:du:and type:
# cu 5551234 -s 115200Put in an entry for tip1200 or cu1200, but go ahead and use whatever bps rate is appropriate with the br capability. tip thinks a good default is 1200 bps which is why it looks for a tip1200 entry. 1200 bps does not have to be used, though.
Rather than waiting until connected and typing CONNECT host each time, use tip's cm capability. For example, these entries in /etc/remote will let you type tip pain or tip muffin to connect to the hosts pain or muffin, and tip deep13 to connect to the terminal server.
pain|pain.deep13.com|Forrester's machine:\
:cm=CONNECT pain\n:tc=deep13:
muffin|muffin.deep13.com|Frank's machine:\
:cm=CONNECT muffin\n:tc=deep13:
deep13:Gizmonics Institute terminal server:\
:dv=/dev/cuau2:br#38400:at=hayes:du:pa=none:pn=5551234:tip 使用超過一行This is often a problem where a university has several modem lines and several thousand students trying to use them.
Make an entry in /etc/remote and use @ for the pn capability:
big-university:\
:pn=\@:tc=dialout
dialout:\
:dv=/dev/cuau3:br#9600:at=courier:du:pa=none:Then, list the phone numbers in /etc/phones:
big-university 5551111 big-university 5551112 big-university 5551113 big-university 5551114
tip will try each number in the listed order, then give up. To keep retrying, run tip in a while loop.
Ctrl+P is the default "force" character, used to tell tip that the next character is literal data. The force character can be set to any other character with the ~s escape, which means "set a variable."
Type ~sforce=single-char followed by a newline. single-char is any single character. If single-char is left out, then the force character is the null character, which is accessed by typing Ctrl+2 or Ctrl+Space. A pretty good value for single-char is Shift+Ctrl+6, which is only used on some terminal servers.
To change the force character, specify the following in ~/.tiprc:
force=single-char
This happens when Ctrl+A is pressed, which is tip's "raise character", specially designed for people with broken caps-lock keys. Use ~s to set raisechar to something reasonable. It can be set to be the same as the force character, if neither feature is used.
Here is a sample ~/.tiprc for Emacs users who need to type Ctrl+2 and Ctrl+A:
force=^^ raisechar=^^
The ^^ is Shift+Ctrl+6.
tip 傳輸檔案When talking to another UNIX™-like operating system, files can be sent and received using ~p (put) and ~t (take). These commands run cat and echo on the remote system to accept and send files. The syntax is:
~p local-file [ remote-file ]
~t remote-file [ local-file ]
There is no error checking, so another protocol, like zmodem, should probably be used.
FreeBSD has the ability to boot a system with a dumb terminal on a serial port as a console. This configuration is useful for system administrators who wish to install FreeBSD on machines that have no keyboard or monitor attached, and developers who want to debug the kernel or device drivers.
As described in FreeBSD 開機程序, FreeBSD employs a three stage bootstrap. The first two stages are in the boot block code which is stored at the beginning of the FreeBSD slice on the boot disk. The boot block then loads and runs the boot loader as the third stage code.
In order to set up booting from a serial console, the boot block code, the boot loader code, and the kernel need to be configured.
This section provides a fast overview of setting up the serial console. This procedure can be used when the dumb terminal is connected to COM1.
Procedure: Configuring a Serial Console on COM1
Connect the serial cable to COM1 and the controlling terminal.
To configure boot messages to display on the serial console, issue the following command as the superuser:
sysrc -f /boot/loader.conf console=comconsoleEdit /etc/ttys and change off to on and dialup to vt100 for the ttyu0 entry. Otherwise, a password will not be required to connect via the serial console, resulting in a potential security hole.
Reboot the system to see if the changes took effect.
If a different configuration is required, see the next section for a more in-depth configuration explanation.
This section provides a more detailed explanation of the steps needed to setup a serial console in FreeBSD.
Procedure: Configuring a Serial Console
Prepare a serial cable.
Use either a null-modem cable or a standard serial cable and a null-modem adapter. See 序列線與埠 for a discussion on serial cables.
Unplug the keyboard.
Many systems probe for the keyboard during the Power-On Self-Test (POST) and will generate an error if the keyboard is not detected. Some machines will refuse to boot until the keyboard is plugged in.
If the computer complains about the error, but boots anyway, no further configuration is needed.
If the computer refuses to boot without a keyboard attached, configure the BIOS so that it ignores this error. Consult the motherboard’s manual for details on how to do this.
Try setting the keyboard to "Not installed" in the BIOS. This setting tells the BIOS not to probe for a keyboard at power-on so it should not complain if the keyboard is absent. If that option is not present in the BIOS, look for an "Halt on Error" option instead. Setting this to "All but Keyboard" or to "No Errors" will have the same effect. |
If the system has a PS/2™ mouse, unplug it as well. PS/2™ mice share some hardware with the keyboard and leaving the mouse plugged in can fool the keyboard probe into thinking the keyboard is still there.
While most systems will boot without a keyboard, quite a few will not boot without a graphics adapter. Some systems can be configured to boot with no graphics adapter by changing the "graphics adapter" setting in the BIOS configuration to "Not installed". Other systems do not support this option and will refuse to boot if there is no display hardware in the system. With these machines, leave some kind of graphics card plugged in, even if it is just a junky mono board. A monitor does not need to be attached. |
Plug a dumb terminal, an old computer with a modem program, or the serial port on another UNIX™ box into the serial port.
Add the appropriate hint.sio.* entries to /boot/device.hints for the serial port. Some multi-port cards also require kernel configuration options. Refer to sio(4) for the required options and device hints for each supported serial port.
Create boot.config in the root directory of the a partition on the boot drive.
This file instructs the boot block code how to boot the system. In order to activate the serial console, one or more of the following options are needed. When using multiple options, include them all on the same line:
-hToggles between the internal and serial consoles. Use this to switch console devices. For instance, to boot from the internal (video) console, use -h to direct the boot loader and the kernel to use the serial port as its console device. Alternatively, to boot from the serial port, use -h to tell the boot loader and the kernel to use the video display as the console instead.
-DToggles between the single and dual console configurations. In the single configuration, the console will be either the internal console (video display) or the serial port, depending on the state of -h. In the dual console configuration, both the video display and the serial port will become the console at the same time, regardless of the state of -h. However, the dual console configuration takes effect only while the boot block is running. Once the boot loader gets control, the console specified by -h becomes the only console.
-PMakes the boot block probe the keyboard. If no keyboard is found, the -D and -h options are automatically set.
Due to space constraints in the current version of the boot blocks, |
Use either -P to select the console automatically or -h to activate the serial console. Refer to boot(8) and boot.config(5) for more details.
The options, except for -P, are passed to the boot loader. The boot loader will determine whether the internal video or the serial port should become the console by examining the state of -h. This means that if -D is specified but -h is not specified in /boot.config, the serial port can be used as the console only during the boot block as the boot loader will use the internal video display as the console.
Boot the machine.
When FreeBSD starts, the boot blocks echo the contents of /boot.config to the console. For example:
/boot.config: -P
Keyboard: noThe second line appears only if -P is in /boot.config and indicates the presence or absence of the keyboard. These messages go to either the serial or internal console, or both, depending on the option in /boot.config:
| Options | Message goes to |
|---|---|
none | internal console |
| serial console |
| serial and internal consoles |
| serial and internal consoles |
| internal console |
| serial console |
After the message, there will be a small pause before the boot blocks continue loading the boot loader and before any further messages are printed to the console. Under normal circumstances, there is no need to interrupt the boot blocks, but one can do so in order to make sure things are set up correctly.
Press any key, other than Enter, at the console to interrupt the boot process. The boot blocks will then prompt for further action:
>> FreeBSD/i386 BOOT
Default: 0:ad(0,a)/boot/loader
boot:Verify that the above message appears on either the serial or internal console, or both, according to the options in /boot.config. If the message appears in the correct console, press Enter to continue the boot process.
If there is no prompt on the serial terminal, something is wrong with the settings. Enter -h then Enter or Return to tell the boot block (and then the boot loader and the kernel) to choose the serial port for the console. Once the system is up, go back and check what went wrong.
During the third stage of the boot process, one can still switch between the internal console and the serial console by setting appropriate environment variables in the boot loader. See loader(8) for more information.
This line in /boot/loader.conf or /boot/loader.conf.local configures the boot loader and the kernel to send their boot messages to the serial console, regardless of the options in /boot.config: console="comconsole" That line should be the first line of /boot/loader.conf so that boot messages are displayed on the serial console as early as possible. If that line does not exist, or if it is set to At the moment, the boot loader has no option equivalent to |
While it is not required, it is possible to provide a |
By default, the serial port settings are 9600 baud, 8 bits, no parity, and 1 stop bit. To change the default console speed, use one of the following options:
Edit /etc/make.conf and set BOOT_COMCONSOLE_SPEED to the new console speed. Then, recompile and install the boot blocks and the boot loader:
# cd /sys/boot
# make clean
# make
# make installIf the serial console is configured in some other way than by booting with -h, or if the serial console used by the kernel is different from the one used by the boot blocks, add the following option, with the desired speed, to a custom kernel configuration file and compile a new kernel:
options CONSPEED=19200
Add the -S_19200_ boot option to /boot.config, replacing 19200 with the speed to use.
Add the following options to /boot/loader.conf. Replace 115200 with the speed to use.
boot_multicons="YES" boot_serial="YES" comconsole_speed="115200" console="comconsole,vidconsole"
To configure the ability to drop into the kernel debugger from the serial console, add the following options to a custom kernel configuration file and compile the kernel using the instructions in 設定 FreeBSD 核心. Note that while this is useful for remote diagnostics, it is also dangerous if a spurious BREAK is generated on the serial port. Refer to ddb(4) and ddb(8) for more information about the kernel debugger.
options BREAK_TO_DEBUGGER options DDB
FreeBSD 支援點對點 (Point-to-Point, PPP) 通訊協定,可透過撥號數據機用來建立網路或網際網路連線。本章將說明如何設定在 FreeBSD 中以數據機為基礎的通訊服務。
讀完這章,您將了解:
如何設定、使用 PPP 連線及排除問題。
如何設定在乙太網路 (Ethernet) 上的 PPP (PPPoE)。
如何設定在 ATM 上的 PPP (PPPoA)。
在開始閱讀這章之前,您需要:
熟悉基本網路術語。
了解撥號連線及 PPP 的基礎及目的。
FreeBSD provides built-in support for managing dial-up PPP connections using ppp(8). The default FreeBSD kernel provides support for tun which is used to interact with a modem hardware. Configuration is performed by editing at least one configuration file, and configuration files containing examples are provided. Finally, ppp is used to start and manage connections.
In order to use a PPP connection, the following items are needed:
A dial-up account with an Internet Service Provider (ISP).
A dial-up modem.
The dial-up number for the ISP.
The login name and password assigned by the ISP.
The IP address of one or more DNS servers. Normally, the ISP provides these addresses. If it did not, FreeBSD can be configured to use DNS negotiation.
If any of the required information is missing, contact the ISP.
The following information may be supplied by the ISP, but is not necessary:
The IP address of the default gateway. If this information is unknown, the ISP will automatically provide the correct value during connection setup. When configuring PPP on FreeBSD, this address is referred to as HISADDR.
The subnet mask. If the ISP has not provided one, 255.255.255.255 will be used in the ppp(8) configuration file.
*
If the ISP has assigned a static IP address and hostname, it should be input into the configuration file. Otherwise, this information will be automatically provided during connection setup.
The rest of this section demonstrates how to configure FreeBSD for common PPP connection scenarios. The required configuration file is /etc/ppp/ppp.conf and additional files and examples are available in /usr/shared/examples/ppp/.
Throughout this section, many of the file examples display line numbers. These line numbers have been added to make it easier to follow the discussion and are not meant to be placed in the actual file. When editing a configuration file, proper indentation is important. Lines that end in a |
In order to configure a PPP connection, first edit /etc/ppp/ppp.conf with the dial-in information for the ISP. This file is described as follows:
1 default: 2 set log Phase Chat LCP IPCP CCP tun command 3 ident user-ppp VERSION 4 set device /dev/cuau0 5 set speed 115200 6 set dial "ABORT BUSY ABORT NO\\sCARRIER TIMEOUT 5 \ 7 \"\" AT OK-AT-OK ATE1Q0 OK \\dATDT\\T TIMEOUT 40 CONNECT" 8 set timeout 180 9 enable dns 10 11 provider: 12 set phone "(123) 456 7890" 13 set authname foo 14 set authkey bar 15 set timeout 300 16 set ifaddr x.x.x.x/0 y.y.y.y/0 255.255.255.255 0.0.0.0 17 add default HISADDR
Identifies the default entry. Commands in this entry (lines 2 through 9) are executed automatically when ppp is run.
Enables verbose logging parameters for testing the connection. Once the configuration is working satisfactorily, this line should be reduced to:
set log phase tun
Displays the version of ppp(8) to the PPP software running on the other side of the connection.
Identifies the device to which the modem is connected, where COM1 is /dev/cuau0 and COM2 is /dev/cuau1.
Sets the connection speed. If 115200 does not work on an older modem, try 38400 instead.
The dial string written as an expect-send syntax. Refer to chat(8) for more information.
Note that this command continues onto the next line for readability. Any command in ppp.conf may do this if the last character on the line is \.
Sets the idle timeout for the link in seconds.
Instructs the peer to confirm the DNS settings. If the local network is running its own DNS server, this line should be commented out, by adding a # at the beginning of the line, or removed.
A blank line for readability. Blank lines are ignored by ppp(8).
Identifies an entry called provider. This could be changed to the name of the ISP so that load ISP can be used to start the connection.
Use the phone number for the ISP. Multiple phone numbers may be specified using the colon (:) or pipe character (|) as a separator. To rotate through the numbers, use a colon. To always attempt to dial the first number first and only use the other numbers if the first number fails, use the pipe character. Always enclose the entire set of phone numbers between quotation marks (") to prevent dialing failures.
Use the user name and password for the ISP.
Sets the default idle timeout in seconds for the connection. In this example, the connection will be closed automatically after 300 seconds of inactivity. To prevent a timeout, set this value to zero.
Sets the interface addresses. The values used depend upon whether a static IP address has been obtained from the ISP or if it instead negotiates a dynamic IP address during connection.
If the ISP has allocated a static IP address and default gateway, replace x.x.x.x with the static IP address and replace y.y.y.y with the IP address of the default gateway. If the ISP has only provided a static IP address without a gateway address, replace y.y.y.y with 10.0.0.2/0.
If the IP address changes whenever a connection is made, change this line to the following value. This tells ppp(8) to use the IP Configuration Protocol (IPCP) to negotiate a dynamic IP address:
set ifaddr 10.0.0.1/0 10.0.0.2/0 255.255.255.255 0.0.0.0
Keep this line as-is as it adds a default route to the gateway. The HISADDR will automatically be replaced with the gateway address specified on line 16. It is important that this line appears after line 16.
Depending upon whether ppp(8) is started manually or automatically, a /etc/ppp/ppp.linkup may also need to be created which contains the following lines. This file is required when running ppp in -auto mode. This file is used after the connection has been established. At this point, the IP address will have been assigned and it is now be possible to add the routing table entries. When creating this file, make sure that provider matches the value demonstrated in line 11 of ppp.conf.
provider:
add default HISADDRThis file is also needed when the default gateway address is "guessed" in a static IP address configuration. In this case, remove line 17 from ppp.conf and create /etc/ppp/ppp.linkup with the above two lines. More examples for this file can be found in /usr/shared/examples/ppp/.
By default, ppp must be run as root. To change this default, add the account of the user who should run ppp to the network group in /etc/group.
Then, give the user access to one or more entries in /etc/ppp/ppp.conf with allow. For example, to give fred and mary permission to only the provider: entry, add this line to the provider: section:
allow users fred mary
To give the specified users access to all entries, put that line in the default section instead.
It is possible to configure PPP to supply DNS and NetBIOS nameserver addresses on demand.
To enable these extensions with PPP version 1.x, the following lines might be added to the relevant section of /etc/ppp/ppp.conf.
enable msext set ns 203.14.100.1 203.14.100.2 set nbns 203.14.100.5
And for PPP version 2 and above:
accept dns set dns 203.14.100.1 203.14.100.2 set nbns 203.14.100.5
This will tell the clients the primary and secondary name server addresses, and a NetBIOS nameserver host.
In version 2 and above, if the set dns line is omitted, PPP will use the values found in /etc/resolv.conf.
Some ISPs set their system up so that the authentication part of the connection is done using either of the PAP or CHAP authentication mechanisms. If this is the case, the ISP will not give a login: prompt at connection, but will start talking PPP immediately.
PAP is less secure than CHAP, but security is not normally an issue here as passwords, although being sent as plain text with PAP, are being transmitted down a serial line only. There is not much room for crackers to "eavesdrop".
The following alterations must be made:
13 set authname MyUserName 14 set authkey MyPassword 15 set login
This line specifies the PAP/CHAP user name. Insert the correct value for MyUserName.
This line specifies the PAP/CHAP password. Insert the correct value for MyPassword. You may want to add an additional line, such as:
16 accept PAP
或
16 accept CHAP
to make it obvious that this is the intention, but PAP and CHAP are both accepted by default.
The ISP will not normally require a login to the server when using PAP or CHAP. Therefore, disable the "set login" string.
PPP has ability to use internal NAT without kernel diverting capabilities. This functionality may be enabled by the following line in /etc/ppp/ppp.conf:
nat enable yes
Alternatively, NAT may be enabled by command-line option -nat. There is also /etc/rc.conf knob named ppp_nat, which is enabled by default.
When using this feature, it may be useful to include the following /etc/ppp/ppp.conf options to enable incoming connections forwarding:
nat port tcp 10.0.0.2:ftp ftp nat port tcp 10.0.0.2:http http
or do not trust the outside at all
nat deny_incoming yes
While ppp is now configured, some edits still need to be made to /etc/rc.conf.
Working from the top down in this file, make sure the hostname= line is set:
hostname="foo.example.com"
If the ISP has supplied a static IP address and name, use this name as the host name.
Look for the network_interfaces variable. To configure the system to dial the ISP on demand, make sure the tun0 device is added to the list, otherwise remove it.
network_interfaces="lo0 tun0" ifconfig_tun0=
The ppp -auto mysystem This script is executed at network configuration time, starting the ppp daemon in automatic mode. If this machine acts as a gateway, consider including |
Make sure that the router program is set to NO with the following line in /etc/rc.conf:
router_enable="NO"
It is important that the routed daemon is not started, as routed tends to delete the default routing table entries created by ppp.
It is probably a good idea to ensure that the sendmail_flags line does not include the -q option, otherwise sendmail will attempt to do a network lookup every now and then, possibly causing your machine to dial out. You may try:
sendmail_flags="-bd"
The downside is that sendmail is forced to re-examine the mail queue whenever the ppp link. To automate this, include !bg in ppp.linkup:
1 provider: 2 delete ALL 3 add 0 0 HISADDR 4 !bg sendmail -bd -q30m
An alternative is to set up a "dfilter" to block SMTP traffic. Refer to the sample files for further details.
pppAll that is left is to reboot the machine. After rebooting, either type:
# pppand then dial provider to start the PPP session, or, to configure ppp to establish sessions automatically when there is outbound traffic and start_if.tun0 does not exist, type:
# ppp -auto providerIt is possible to talk to the ppp program while it is running in the background, but only if a suitable diagnostic port has been set up. To do this, add the following line to the configuration:
set server /var/run/ppp-tun%d DiagnosticPassword 0177
This will tell PPP to listen to the specified UNIX™ domain socket, asking clients for the specified password before allowing access. The %d in the name is replaced with the tun device number that is in use.
Once a socket has been set up, the pppctl(8) program may be used in scripts that wish to manipulate the running program.
An alternative to getty is comms/mgetty+sendfax port), a smarter version of getty designed with dial-up lines in mind.
The advantages of using mgetty is that it actively talks to modems, meaning if port is turned off in /etc/ttys then the modem will not answer the phone.
Later versions of mgetty (from 0.99beta onwards) also support the automatic detection of PPP streams, allowing clients scriptless access to the server.
Refer to http://mgetty.greenie.net/doc/mgetty_toc.html for more information on mgetty.
By default the comms/mgetty+sendfax port comes with the AUTO_PPP option enabled allowing mgetty to detect the LCP phase of PPP connections and automatically spawn off a ppp shell. However, since the default login/password sequence does not occur it is necessary to authenticate users using either PAP or CHAP.
This section assumes the user has successfully compiled, and installed the comms/mgetty+sendfax port on his system.
Ensure that /usr/local/etc/mgetty+sendfax/login.config has the following:
/AutoPPP/ - - /etc/ppp/ppp-pap-dialup
This tells mgetty to run ppp-pap-dialup for detected PPP connections.
Create an executable file called /etc/ppp/ppp-pap-dialup containing the following:
#!/bin/sh exec /usr/sbin/ppp -direct pap$IDENT
For each dial-up line enabled in /etc/ttys, create a corresponding entry in /etc/ppp/ppp.conf. This will happily co-exist with the definitions we created above.
pap: enable pap set ifaddr 203.14.100.1 203.14.100.20-203.14.100.40 enable proxy
Each user logging in with this method will need to have a username/password in /etc/ppp/ppp.secret, or alternatively add the following option to authenticate users via PAP from /etc/passwd.
enable passwdauth
To assign some users a static IP number, specify the number as the third argument in /etc/ppp/ppp.secret. See /usr/shared/examples/ppp/ppp.secret.sample for examples.
This section covers a few issues which may arise when using PPP over a modem connection. Some ISPs present the ssword prompt while others present password. If the ppp script is not written accordingly, the login attempt will fail. The most common way to debug ppp connections is by connecting manually as described in this section.
When using a custom kernel, make sure to include the following line in the kernel configuration file:
device uart
The uart device is already included in the GENERIC kernel, so no additional steps are necessary in this case. Just check the dmesg output for the modem device with:
# dmesg | grep uartThis should display some pertinent output about the uart devices. These are the COM ports we need. If the modem acts like a standard serial port, it should be listed on uart1, or COM2. If so, a kernel rebuild is not required. When matching up, if the modem is on uart1, the modem device would be /dev/cuau1.
Connecting to the Internet by manually controlling ppp is quick, easy, and a great way to debug a connection or just get information on how the ISP treats ppp client connections. Lets start PPP from the command line. Note that in all of our examples we will use example as the hostname of the machine running PPP. To start ppp:
# pppppp ON example> set device /dev/cuau1This second command sets the modem device to cuau1.
ppp ON example> set speed 115200This sets the connection speed to 115,200 kbps.
ppp ON example> enable dnsThis tells ppp to configure the resolver and add the nameserver lines to /etc/resolv.conf. If ppp cannot determine the hostname, it can manually be set later.
ppp ON example> termThis switches to "terminal" mode in order to manually control the modem.
deflink: Entering terminal mode on /dev/cuau1 type '~h' for help
at
OK
atdt123456789Use at to initialize the modem, then use atdt and the number for the ISP to begin the dial in process.
CONNECTConfirmation of the connection, if we are going to have any connection problems, unrelated to hardware, here is where we will attempt to resolve them.
ISP Login:myusernameAt this prompt, return the prompt with the username that was provided by the ISP.
ISP Pass:mypasswordAt this prompt, reply with the password that was provided by the ISP. Just like logging into FreeBSD, the password will not echo.
Shell or PPP:pppDepending on the ISP, this prompt might not appear. If it does, it is asking whether to use a shell on the provider or to start ppp. In this example, ppp was selected in order to establish an Internet connection.
Ppp ON example>Notice that in this example the first p has been capitalized. This shows that we have successfully connected to the ISP.
PPp ON example>We have successfully authenticated with our ISP and are waiting for the assigned IP address.
PPP ON example>We have made an agreement on an IP address and successfully completed our connection.
PPP ON example>add default HISADDRHere we add our default route, we need to do this before we can talk to the outside world as currently the only established connection is with the peer. If this fails due to existing routes, put a bang character ! in front of the add. Alternatively, set this before making the actual connection and it will negotiate a new route accordingly.
If everything went good we should now have an active connection to the Internet, which could be thrown into the background using CTRL+z If PPP returns to ppp then the connection has bee lost. This is good to know because it shows the connection status. Capital P’s represent a connection to the ISP and lowercase p’s show that the connection has been lost.
If a connection cannot be established, turn hardware flow CTS/RTS to off using set ctsrts off. This is mainly the case when connected to some PPP-capable terminal servers, where PPP hangs when it tries to write data to the communication link, and waits for a Clear To Send (CTS) signal which may never come. When using this option, include set accmap as it may be required to defeat hardware dependent on passing certain characters from end to end, most of the time XON/XOFF. Refer to ppp(8) for more information on this option and how it is used.
An older modem may need set parity even. Parity is set at none be default, but is used for error checking with a large increase in traffic, on older modems.
PPP may not return to the command mode, which is usually a negotiation error where the ISP is waiting for negotiating to begin. At this point, using ~p will force ppp to start sending the configuration information.
If a login prompt never appears, PAP or CHAP authentication is most likely required. To use PAP or CHAP, add the following options to PPP before going into terminal mode:
ppp ON example> set authname myusernameWhere myusername should be replaced with the username that was assigned by the ISP.
ppp ON example> set authkey mypasswordWhere mypassword should be replaced with the password that was assigned by the ISP.
If a connection is established, but cannot seem to find any domain name, try to ping(8) an IP address. If there is 100 percent (100%) packet loss, it is likely that a default route was not assigned. Double check that add default HISADDR was set during the connection. If a connection can be made to a remote IP address, it is possible that a resolver address has not been added to /etc/resolv.conf. This file should look like:
domain example.com nameserver x.x.x.x nameserver y.y.y.y
Where x.x.x.x and y.y.y.y should be replaced with the IP address of the ISP’s DNS servers.
To configure syslog(3) to provide logging for the PPP connection, make sure this line exists in /etc/syslog.conf:
!ppp *.* /var/log/ppp.log
本節介紹如何設定在 乙太網路使用 PPP (PPPoE)。
以下有一個可用的的 ppp.conf 範例:
default: set log Phase tun command # you can add more detailed logging if you wish set ifaddr 10.0.0.1/0 10.0.0.2/0 name_of_service_provider: set device PPPoE:xl1 # replace xl1 with your Ethernet device set authname YOURLOGINNAME set authkey YOURPASSWORD set dial set login add default HISADDR
以 root 身份執行:
# ppp -ddial name_of_service_provider將以下參數加到 /etc/rc.conf:
ppp_enable="YES" ppp_mode="ddial" ppp_nat="YES" # if you want to enable nat for your local network, otherwise NO ppp_profile="name_of_service_provider"
有時需要使用服務標籤 (Service Tag) 才能建立連線,服務標籤用來區別不同網路要各自連線的 PPPoE 伺服器。
所需的服務標籤資訊應該會在 ISP 所提供的文件中說明。
最後的手段是嘗試安裝 net/rr-pppoe 套件或 Port。但是請注意,這可能會解除安裝數據機中的程式並使其無法運作,所以請三思而為。只需要安裝數據機所提供的程式,然後由該程式進入 System 選單,基本資料 (Profile name) 的名稱應該會列出來,通常是 ISP 的名稱。
基本資料名稱 (Profile Name) 即服務標籤,會被用在 ppp.conf 中的 PPPoE 設定項目,set device 的提供商 (Provider) 部份。請參考 ppp(8) 以取得詳細說明,結果應如下:
set device PPPoE:xl1:ISP
別忘記更改 xl1 為乙太網路卡的裝置名稱。
別忘記更改 ISP 為基本資料名稱。
要取得更進一步資訊,請參考 Renaud Waldura 所著的 Cheaper Broadband with FreeBSD on DSL。
這台數據機並不採用 RFC 2516 所定義的規格。
為了要讓 FreeBSD 能夠與這台裝置通訊,必須設定 sysctl,這可以透過更新 /etc/sysctl.conf 來讓開機時自動設定。
net.graph.nonstandard_pppoe=1
或可以執行以下指令立即更改:
# sysctl net.graph.nonstandard_pppoe=1不幸的是,由於這是一個全系統的設定,這可能導致一般 PPPoE 客戶端或伺服器無法與 3Com™HomeConnect™ ADSL 數據機同時使用。
The following describes how to set up PPP over ATM (PPPoA). PPPoA is a popular choice among European DSL providers.
The mpd application can be used to connect to a variety of services, in particular PPTP services. It can be installed using the net/mpd5 package or port. Many ADSL modems require that a PPTP tunnel is created between the modem and computer.
Once installed, configure mpd to suit the provider’s settings. The port places a set of sample configuration files which are well documented in /usr/local/etc/mpd/. A complete guide to configure mpd is available in HTML format in /usr/ports/shared/doc/mpd/. Here is a sample configuration for connecting to an ADSL service with mpd. The configuration is spread over two files, first the mpd.conf:
This example mpd.conf only works with mpd 4.x. |
default:
load adsl
adsl:
new -i ng0 adsl adsl
set bundle authname username (1)
set bundle password password (2)
set bundle disable multilink
set link no pap acfcomp protocomp
set link disable chap
set link accept chap
set link keep-alive 30 10
set ipcp no vjcomp
set ipcp ranges 0.0.0.0/0 0.0.0.0/0
set iface route default
set iface disable on-demand
set iface enable proxy-arp
set iface idle 0
open| 1 | The username used to authenticate with your ISP. |
| 2 | The password used to authenticate with your ISP. |
Information about the link, or links, to establish is found in mpd.links. An example mpd.links to accompany the above example is given beneath:
adsl:
set link type pptp
set pptp mode active
set pptp enable originate outcall
set pptp self 10.0.0.1 (1)
set pptp peer 10.0.0.138 (2)| 1 | The IP address of FreeBSD computer running mpd. |
| 2 | The IP address of the ADSL modem. The Alcatel SpeedTouch™ Home defaults to 10.0.0.138. |
It is possible to initialize the connection easily by issuing the following command as root:
# mpd -b adslTo view the status of the connection:
% ifconfig ng0
ng0: flags=88d1<UP,POINTOPOINT,RUNNING,NOARP,SIMPLEX,MULTICAST> mtu 1500
inet 216.136.204.117 --> 204.152.186.171 netmask 0xffffffffUsing mpd is the recommended way to connect to an ADSL service with FreeBSD.
It is also possible to use FreeBSD to connect to other PPPoA services using net/pptpclient.
To use net/pptpclient to connect to a DSL service, install the port or package, then edit /etc/ppp/ppp.conf. An example section of ppp.conf is given below. For further information on ppp.conf options consult ppp(8).
adsl: set log phase chat lcp ipcp ccp tun command set timeout 0 enable dns set authname username (1) set authkey password (2) set ifaddr 0 0 add default HISADDR
| 1 | The username for the DSL provider. |
| 2 | The password for your account. |
Since the account’s password is added to ppp.conf in plain text form, make sure nobody can read the contents of this file: |
This will open a tunnel for a PPP session to the DSL router. Ethernet DSL modems have a preconfigured LAN IP address to connect to. In the case of the Alcatel SpeedTouch™ Home, this address is 10.0.0.138. The router’s documentation should list the address the device uses. To open the tunnel and start a PPP session:
# pptp address adslIf an ampersand ("&") is added to the end of this command, pptp will return the prompt. |
A tun virtual tunnel device will be created for interaction between the pptp and ppp processes. Once the prompt is returned, or the pptp process has confirmed a connection, examine the tunnel:
% ifconfig tun0
tun0: flags=8051<UP,POINTOPOINT,RUNNING,MULTICAST> mtu 1500
inet 216.136.204.21 --> 204.152.186.171 netmask 0xffffff00
Opened by PID 918If the connection fails, check the configuration of the router, which is usually accessible using a web browser. Also, examine the output of pptp and the contents of the log file, /var/log/ppp.log for clues.
"電子郵件" 或稱 email,是現今使用最廣泛的溝通方式之一。本章主要介紹如何在 FreeBSD 上執行郵件伺服器,以及如何使用 FreeBSD 收發信件,若欲瞭解細節請參閱 參考書目 內的參考書籍。
讀完這章,您將了解:
哪些軟體元件與收發電子郵件有關。
FreeBSD 內的 Sendmail 設定檔在哪。
遠端信箱 (Mailbox) 與本機信箱的差異。
如何阻擋垃圾郵件寄件者 (Spammer) 非法使用郵件伺服器作為中繼站。
如何安裝與設定其他的郵件傳輸代理程式 (Mail Transfer Agent) 來取代 Sendmail。
如何排除常見的郵件伺服器問題。
如何設定系統只能寄送郵件。
如何在撥號連線上使用郵件。
如何設定 SMTP 認証來增加安全性。
如何安裝並使用郵件使用者代理程式 (Mail User Agent) 如 mutt 來寄發與接收電子郵件。
如何從遠端的 POP 或 IMAP 伺服器下載郵件。
如何自動套用過濾器及規則在收到的電子郵件上。
在開始閱讀這章之前,您需要:
正確的設定網路連線 (進階網路設定)。
正確的設定郵件主機的 DNS 資訊 (網路伺服器)。
了解如何安裝其他第三方軟體 (安裝應用程式:套件與 Port)。
There are five major parts involved in an email exchange: the Mail User Agent (MUA), the Mail Transfer Agent (MTA), a mail host, a remote or local mailbox, and DNS. This section provides an overview of these components.
The Mail User Agent (MUA) is an application which is used to compose, send, and receive emails. This application can be a command line program, such as the built-in mail utility or a third-party application from the Ports Collection, such as mutt, alpine, or elm. Dozens of graphical programs are also available in the Ports Collection, including Claws Mail, Evolution, and Thunderbird. Some organizations provide a web mail program which can be accessed through a web browser. More information about installing and using a MUA on FreeBSD can be found in 郵件使用者代理程式.
The Mail Transfer Agent (MTA) is responsible for receiving incoming mail and delivering outgoing mail. FreeBSD ships with Sendmail as the default MTA, but it also supports numerous other mail server daemons, including Exim, Postfix, and qmail. Sendmail configuration is described in Sendmail 設定檔. If another MTA is installed using the Ports Collection, refer to its post-installation message for FreeBSD-specific configuration details and the application’s website for more general configuration instructions.
The mail host is a server that is responsible for delivering and receiving mail for a host or a network. The mail host collects all mail sent to the domain and stores it either in the default mbox or the alternative Maildir format, depending on the configuration. Once mail has been stored, it may either be read locally using a MUA or remotely accessed and collected using protocols such as POP or IMAP. If mail is read locally, a POP or IMAP server does not need to be installed.
To access mailboxes remotely, a POP or IMAP server is required as these protocols allow users to connect to their mailboxes from remote locations. IMAP offers several advantages over POP. These include the ability to store a copy of messages on a remote server after they are downloaded and concurrent updates. IMAP can be useful over low-speed links as it allows users to fetch the structure of messages without downloading them. It can also perform tasks such as searching on the server in order to minimize data transfer between clients and servers.
Several POP and IMAP servers are available in the Ports Collection. These include mail/qpopper, mail/imap-uw, mail/courier-imap, and mail/dovecot2.
The Domain Name System (DNS) and its daemon named play a large role in the delivery of email. In order to deliver mail from one site to another, the MTA will look up the remote site in DNS to determine which host will receive mail for the destination. This process also occurs when mail is sent from a remote host to the MTA.
In addition to mapping hostnames to IP addresses, DNS is responsible for storing information specific to mail delivery, known as Mail eXchanger MX records. The MX record specifies which hosts will receive mail for a particular domain.
To view the MX records for a domain, specify the type of record. Refer to host(1), for more details about this command:
% host -t mx FreeBSD.org
FreeBSD.org mail is handled by 10 mx1.FreeBSD.orgRefer to 網域名稱系統 (DNS) for more information about DNS and its configuration.
Sendmail is the default MTA installed with FreeBSD. It accepts mail from MUAs and delivers it to the appropriate mail host, as defined by its configuration. Sendmail can also accept network connections and deliver mail to local mailboxes or to another program.
The configuration files for Sendmail are located in /etc/mail. This section describes these files in more detail.
This access database file defines which hosts or IP addresses have access to the local mail server and what kind of access they have. Hosts listed as OK, which is the default option, are allowed to send mail to this host as long as the mail’s final destination is the local machine. Hosts listed as REJECT are rejected for all mail connections. Hosts listed as RELAY are allowed to send mail for any destination using this mail server. Hosts listed as ERROR will have their mail returned with the specified mail error. If a host is listed as SKIP, Sendmail will abort the current search for this entry without accepting or rejecting the mail. Hosts listed as QUARANTINE will have their messages held and will receive the specified text as the reason for the hold.
Examples of using these options for both IPv4 and IPv6 addresses can be found in the FreeBSD sample configuration, /etc/mail/access.sample:
# $FreeBSD: head/zh_TW.UTF-8/books/handbook/book.xml 53653 2019-12-03 17:05:41Z rcyu $ # # Mail relay access control list. Default is to reject mail unless the # destination is local, or listed in /etc/mail/local-host-names # ## Examples (commented out for safety) #From:cyberspammer.com ERROR:"550 We don't accept mail from spammers" #From:okay.cyberspammer.com OK #Connect:sendmail.org RELAY #To:sendmail.org RELAY #Connect:128.32 RELAY #Connect:128.32.2 SKIP #Connect:IPv6:1:2:3:4:5:6:7 RELAY #Connect:suspicious.example.com QUARANTINE:Mail from suspicious host #Connect:[127.0.0.3] OK #Connect:[IPv6:1:2:3:4:5:6:7:8] OK
To configure the access database, use the format shown in the sample to make entries in /etc/mail/access, but do not put a comment symbol (#) in front of the entries. Create an entry for each host or network whose access should be configured. Mail senders that match the left side of the table are affected by the action on the right side of the table.
Whenever this file is updated, update its database and restart Sendmail:
# makemap hash /etc/mail/access < /etc/mail/access
# service sendmail restartThis database file contains a list of virtual mailboxes that are expanded to users, files, programs, or other aliases. Here are a few entries to illustrate the file format:
root: localuser ftp-bugs: joe,eric,paul bit.bucket: /dev/null procmail: "|/usr/local/bin/procmail"
The mailbox name on the left side of the colon is expanded to the target(s) on the right. The first entry expands the root mailbox to the localuser mailbox, which is then looked up in the /etc/mail/aliases database. If no match is found, the message is delivered to localuser. The second entry shows a mail list. Mail to ftp-bugs is expanded to the three local mailboxes joe, eric, and paul. A remote mailbox could be specified as user@example.com. The third entry shows how to write mail to a file, in this case /dev/null. The last entry demonstrates how to send mail to a program, /usr/local/bin/procmail, through a UNIX™ pipe. Refer to aliases(5) for more information about the format of this file.
Whenever this file is updated, run newaliases to update and initialize the aliases database.
This is the master configuration file for Sendmail. It controls the overall behavior of Sendmail, including everything from rewriting email addresses to printing rejection messages to remote mail servers. Accordingly, this configuration file is quite complex. Fortunately, this file rarely needs to be changed for standard mail servers.
The master Sendmail configuration file can be built from m4(1) macros that define the features and behavior of Sendmail. Refer to /usr/src/contrib/sendmail/cf/README for some of the details.
Whenever changes to this file are made, Sendmail needs to be restarted for the changes to take effect.
This database file maps mail addresses for virtual domains and users to real mailboxes. These mailboxes can be local, remote, aliases defined in /etc/mail/aliases, or files. This allows multiple virtual domains to be hosted on one machine.
FreeBSD provides a sample configuration file in /etc/mail/virtusertable.sample to further demonstrate its format. The following example demonstrates how to create custom entries using that format:
root@example.com root postmaster@example.com postmaster@noc.example.net @example.com joe
This file is processed in a first match order. When an email address matches the address on the left, it is mapped to the local mailbox listed on the right. The format of the first entry in this example maps a specific email address to a local mailbox, whereas the format of the second entry maps a specific email address to a remote mailbox. Finally, any email address from example.com which has not matched any of the previous entries will match the last mapping and be sent to the local mailbox joe. When creating custom entries, use this format and add them to /etc/mail/virtusertable. Whenever this file is edited, update its database and restart Sendmail:
# makemap hash /etc/mail/virtusertable < /etc/mail/virtusertable
# service sendmail restartIn a default FreeBSD installation, Sendmail is configured to only send mail from the host it is running on. For example, if a POP server is available, users will be able to check mail from remote locations but they will not be able to send outgoing emails from outside locations. Typically, a few moments after the attempt, an email will be sent from MAILER-DAEMON with a 5.7 Relaying Denied message.
The most straightforward solution is to add the ISP’s FQDN to /etc/mail/relay-domains. If multiple addresses are needed, add them one per line:
your.isp.example.com other.isp.example.net users-isp.example.org www.example.org
After creating or editing this file, restart Sendmail with service sendmail restart.
Now any mail sent through the system by any host in this list, provided the user has an account on the system, will succeed. This allows users to send mail from the system remotely without opening the system up to relaying SPAM from the Internet.
FreeBSD comes with Sendmail already installed as the MTA which is in charge of outgoing and incoming mail. However, the system administrator can change the system’s MTA. A wide choice of alternative MTAs is available from the mail category of the FreeBSD Ports Collection.
Once a new MTA is installed, configure and test the new software before replacing Sendmail. Refer to the documentation of the new MTA for information on how to configure the software.
Once the new MTA is working, use the instructions in this section to disable Sendmail and configure FreeBSD to use the replacement MTA.
If Sendmail’s outgoing mail service is disabled, it is important that it is replaced with an alternative mail delivery system. Otherwise, system functions such as periodic(8) will be unable to deliver their results by email. Many parts of the system expect a functional MTA. If applications continue to use Sendmail’s binaries to try to send email after they are disabled, mail could go into an inactive Sendmail queue and never be delivered. |
In order to completely disable Sendmail, add or edit the following lines in /etc/rc.conf:
sendmail_enable="NO" sendmail_submit_enable="NO" sendmail_outbound_enable="NO" sendmail_msp_queue_enable="NO"
To only disable Sendmail’s incoming mail service, use only this entry in /etc/rc.conf:
sendmail_enable="NO"
More information on Sendmail’s startup options is available in rc.sendmail(8).
When a new MTA is installed using the Ports Collection, its startup script is also installed and startup instructions are mentioned in its package message. Before starting the new MTA, stop the running Sendmail processes. This example stops all of these services, then starts the Postfix service:
# service sendmail stop
# service postfix startTo start the replacement MTA at system boot, add its configuration line to /etc/rc.conf. This entry enables the Postfix MTA:
postfix_enable="YES"
Some extra configuration is needed as Sendmail is so ubiquitous that some software assumes it is already installed and configured. Check /etc/periodic.conf and make sure that these values are set to NO. If this file does not exist, create it with these entries:
daily_clean_hoststat_enable="NO" daily_status_mail_rejects_enable="NO" daily_status_include_submit_mailq="NO" daily_submit_queuerun="NO"
Some alternative MTAs provide their own compatible implementations of the Sendmail command-line interface in order to facilitate using them as drop-in replacements for Sendmail. However, some MUAs may try to execute standard Sendmail binaries instead of the new MTA’s binaries. FreeBSD uses /etc/mail/mailer.conf to map the expected Sendmail binaries to the location of the new binaries. More information about this mapping can be found in mailwrapper(8).
The default /etc/mail/mailer.conf looks like this:
# $FreeBSD: head/zh_TW.UTF-8/books/handbook/book.xml 53653 2019-12-03 17:05:41Z rcyu $ # # Execute the "real" sendmail program, named /usr/libexec/sendmail/sendmail # sendmail /usr/libexec/sendmail/sendmail send-mail /usr/libexec/sendmail/sendmail mailq /usr/libexec/sendmail/sendmail newaliases /usr/libexec/sendmail/sendmail hoststat /usr/libexec/sendmail/sendmail purgestat /usr/libexec/sendmail/sendmail
When any of the commands listed on the left are run, the system actually executes the associated command shown on the right. This system makes it easy to change what binaries are executed when these default binaries are invoked.
Some MTAs, when installed using the Ports Collection, will prompt to update this file for the new binaries. For example, Postfix will update the file like this:
# # Execute the Postfix sendmail program, named /usr/local/sbin/sendmail # sendmail /usr/local/sbin/sendmail send-mail /usr/local/sbin/sendmail mailq /usr/local/sbin/sendmail newaliases /usr/local/sbin/sendmail
If the installation of the MTA does not automatically update /etc/mail/mailer.conf, edit this file in a text editor so that it points to the new binaries. This example points to the binaries installed by mail/ssmtp:
sendmail /usr/local/sbin/ssmtp send-mail /usr/local/sbin/ssmtp mailq /usr/local/sbin/ssmtp newaliases /usr/local/sbin/ssmtp hoststat /usr/bin/true purgestat /usr/bin/true
Once everything is configured, it is recommended to reboot the system. Rebooting provides the opportunity to ensure that the system is correctly configured to start the new MTA automatically on boot.
The host may actually be in a different domain. For example, in order for a host in foo.bar.edu to reach a host called mumble in the bar.edu domain, refer to it by the Fully-Qualified Domain Name FQDN, mumble.bar.edu, instead of just mumble.
This is because the version of BIND which ships with FreeBSD no longer provides default abbreviations for non-FQDNs other than the local domain. An unqualified host such as mumble must either be found as mumble.foo.bar.edu, or it will be searched for in the root domain.
In older versions of BIND, the search continued across mumble.bar.edu, and mumble.edu. RFC 1535 details why this is considered bad practice or even a security hole.
As a good workaround, place the line:
search foo.bar.edu bar.edu
instead of the previous:
domain foo.bar.edu
into /etc/resolv.conf. However, make sure that the search order does not go beyond the "boundary between local and public administration", as RFC 1535 calls it.
Connect to a FreeBSD mail gateway on the LAN. The PPP connection is non-dedicated.
One way to do this is to get a full-time Internet server to provide secondary MX services for the domain. In this example, the domain is example.com and the ISP has configured example.net to provide secondary MX services to the domain:
example.com. MX 10 example.com.
MX 20 example.net.Only one host should be specified as the final recipient. For Sendmail, add Cw example.com in /etc/mail/sendmail.cf on example.com.
When the sending MTA attempts to deliver mail, it will try to connect to the system, example.com, over the PPP link. This will time out if the destination is offline. The MTA will automatically deliver it to the secondary MX site at the Internet Service Provider (ISP), example.net. The secondary MX site will periodically try to connect to the primary MX host, example.com.
Use something like this as a login script:
#!/bin/sh # Put me in /usr/local/bin/pppmyisp ( sleep 60 ; /usr/sbin/sendmail -q ) & /usr/sbin/ppp -direct pppmyisp
When creating a separate login script for users, instead use sendmail -qRexample.com in the script above. This will force all mail in the queue for example.com to be processed immediately.
A further refinement of the situation can be seen from this example from the FreeBSD Internet service provider’s mailing list:
> we provide the secondary MX for a customer. The customer connects to > our services several times a day automatically to get the mails to > his primary MX (We do not call his site when a mail for his domains > arrived). Our sendmail sends the mailqueue every 30 minutes. At the > moment he has to stay 30 minutes online to be sure that all mail is > gone to the primary MX. > > Is there a command that would initiate sendmail to send all the mails > now? The user has not root-privileges on our machine of course. In the privacy flags section of sendmail.cf, there is a definition Opgoaway,restrictqrun Remove restrictqrun to allow non-root users to start the queue processing. You might also like to rearrange the MXs. We are the 1st MX for our customers like this, and we have defined: # If we are the best MX for a host, try directly instead of generating # local config error. OwTrue That way a remote site will deliver straight to you, without trying the customer connection. You then send to your customer. Only works for hosts, so you need to get your customer to name their mail machine customer.com as well as hostname.customer.com in the DNS. Just put an A record in the DNS for customer.com.
This section covers more involved topics such as mail configuration and setting up mail for an entire domain.
Out of the box, one can send email to external hosts as long as /etc/resolv.conf is configured or the network has access to a configured DNS server. To have email delivered to the MTA on the FreeBSD host, do one of the following:
Run a DNS server for the domain.
Get mail delivered directly to the FQDN for the machine.
In order to have mail delivered directly to a host, it must have a permanent static IP address, not a dynamic IP address. If the system is behind a firewall, it must be configured to allow SMTP traffic. To receive mail directly at a host, one of these two must be configured:
Make sure that the lowest-numbered MX record in DNS points to the host’s static IP address.
Make sure there is no MX entry in the DNS for the host.
Either of the above will allow mail to be received directly at the host.
Try this:
# hostname
example.FreeBSD.org
# host example.FreeBSD.org
example.FreeBSD.org has address 204.216.27.XXIn this example, mail sent directly to yourlogin@example.FreeBSD.org should work without problems, assuming Sendmail is running correctly on example.FreeBSD.org.
For this example:
# host example.FreeBSD.org
example.FreeBSD.org has address 204.216.27.XX
example.FreeBSD.org mail is handled (pri=10) by nevdull.FreeBSD.orgAll mail sent to example.FreeBSD.org will be collected on hub under the same username instead of being sent directly to your host.
The above information is handled by the DNS server. The DNS record that carries mail routing information is the MX entry. If no MX record exists, mail will be delivered directly to the host by way of its IP address.
The MX entry for freefall.FreeBSD.org at one time looked like this:
freefall MX 30 mail.crl.net freefall MX 40 agora.rdrop.com freefall MX 10 freefall.FreeBSD.org freefall MX 20 who.cdrom.com
freefall had many MX entries. The lowest MX number is the host that receives mail directly, if available. If it is not accessible for some reason, the next lower-numbered host will accept messages temporarily, and pass it along when a lower-numbered host becomes available.
Alternate MX sites should have separate Internet connections in order to be most useful. Your ISP can provide this service.
When configuring a MTA for a network, any mail sent to hosts in its domain should be diverted to the MTA so that users can receive their mail on the master mail server.
To make life easiest, a user account with the same username should exist on both the MTA and the system with the MUA. Use adduser(8) to create the user accounts.
The MTA must be the designated mail exchanger for each workstation on the network. This is done in theDNS configuration with an MX record:
example.FreeBSD.org A 204.216.27.XX ; Workstation MX 10 nevdull.FreeBSD.org ; Mailhost
This will redirect mail for the workstation to the MTA no matter where the A record points. The mail is sent to the MX host.
This must be configured on a DNS server. If the network does not run its own DNS server, talk to the ISP or DNS provider.
The following is an example of virtual email hosting. Consider a customer with the domain customer1.org, where all the mail for customer1.org should be sent to mail.myhost.com. The DNS entry should look like this:
customer1.org MX 10 mail.myhost.com
An A> record is not needed for customer1.org in order to only handle email for that domain. However, running ping against customer1.org will not work unless an A record exists for it.
Tell the MTA which domains and/or hostnames it should accept mail for. Either of the following will work for Sendmail:
Add the hosts to /etc/mail/local-host-names when using the FEATURE(use_cw_file).
Add a Cwyour.host.com line to /etc/sendmail.cf.
There are many instances where one may only want to send mail through a relay. Some examples are:
The computer is a desktop machine that needs to use programs such as mail(1), using the ISP’s mail relay.
The computer is a server that does not handle mail locally, but needs to pass off all mail to a relay for processing.
While any MTA is capable of filling this particular niche, it can be difficult to properly configure a full-featured MTA just to handle offloading mail. Programs such as Sendmail and Postfix are overkill for this use.
Additionally, a typical Internet access service agreement may forbid one from running a "mail server".
The easiest way to fulfill those needs is to install the mail/ssmtp port:
# cd /usr/ports/mail/ssmtp
# make install replace cleanOnce installed, mail/ssmtp can be configured with /usr/local/etc/ssmtp/ssmtp.conf:
root=yourrealemail@example.com mailhub=mail.example.com rewriteDomain=example.com hostname=_HOSTNAME_
Use the real email address for root. Enter the ISP’s outgoing mail relay in place of mail.example.com. Some ISPs call this the "outgoing mail server" or "SMTP server".
Make sure to disable Sendmail, including the outgoing mail service. See 關閉 Sendmail for details.
mail/ssmtp has some other options available. Refer to the examples in /usr/local/etc/ssmtp or the manual page of ssmtp for more information.
Setting up ssmtp in this manner allows any software on the computer that needs to send mail to function properly, while not violating the ISP’s usage policy or allowing the computer to be hijacked for spamming.
When using a static IP address, one should not need to adjust the default configuration. Set the hostname to the assigned Internet name and Sendmail will do the rest.
When using a dynamically assigned IP address and a dialup PPP connection to the Internet, one usually has a mailbox on the ISP’s mail server. In this example, the ISP’s domain is example.net, the user name is user, the hostname is bsd.home, and the ISP has allowed relay.example.net as a mail relay.
In order to retrieve mail from the ISP’s mailbox, install a retrieval agent from the Ports Collection. mail/fetchmail is a good choice as it supports many different protocols. Usually, the ISP will provide POP. When using user PPP, email can be automatically fetched when an Internet connection is established with the following entry in /etc/ppp/ppp.linkup:
MYADDR: !bg su user -c fetchmail
When using Sendmail to deliver mail to non-local accounts, configure Sendmail to process the mail queue as soon as the Internet connection is established. To do this, add this line after the above fetchmail entry in /etc/ppp/ppp.linkup:
!bg su user -c "sendmail -q"
In this example, there is an account for user on bsd.home. In the home directory of user on bsd.home, create a .fetchmailrc which contains this line:
poll example.net protocol pop3 fetchall pass MySecret
This file should not be readable by anyone except user as it contains the password MySecret.
In order to send mail with the correct from: header, configure Sendmail to use user@example.net rather than user@bsd.home and to send all mail via relay.example.net, allowing quicker mail transmission.
The following .mc should suffice:
VERSIONID(`bsd.home.mc version 1.0') OSTYPE(bsd4.4)dnl FEATURE(nouucp)dnl MAILER(local)dnl MAILER(smtp)dnl Cwlocalhost Cwbsd.home MASQUERADE_AS(`example.net')dnl FEATURE(allmasquerade)dnl FEATURE(masquerade_envelope)dnl FEATURE(nocanonify)dnl FEATURE(nodns)dnl define(`SMART_HOST', `relay.example.net') Dmbsd.home define(`confDOMAIN_NAME',`bsd.home')dnl define(`confDELIVERY_MODE',`deferred')dnl
Refer to the previous section for details of how to convert this file into the sendmail.cf format. Do not forget to restart Sendmail after updating sendmail.cf.
Configuring SMTP authentication on the MTA provides a number of benefits. SMTP authentication adds a layer of security to Sendmail, and provides mobile users who switch hosts the ability to use the same MTA without the need to reconfigure their mail client’s settings each time.
Install security/cyrus-sasl2 from the Ports Collection. This port supports a number of compile-time options. For the SMTP authentication method demonstrated in this example, make sure that LOGIN is not disabled.
After installing security/cyrus-sasl2, edit /usr/local/lib/sasl2/Sendmail.conf, or create it if it does not exist, and add the following line:
pwcheck_method: saslauthd
Next, install security/cyrus-sasl2-saslauthd and add the following line to /etc/rc.conf:
saslauthd_enable="YES"
Finally, start the saslauthd daemon:
# service saslauthd startThis daemon serves as a broker for Sendmail to authenticate against the FreeBSD passwd(5) database. This saves the trouble of creating a new set of usernames and passwords for each user that needs to use SMTP authentication, and keeps the login and mail password the same.
Next, edit /etc/make.conf and add the following lines:
SENDMAIL_CFLAGS=-I/usr/local/include/sasl -DSASL SENDMAIL_LDFLAGS=-L/usr/local/lib SENDMAIL_LDADD=-lsasl2
These lines provide Sendmail the proper configuration options for linking to cyrus-sasl2 at compile time. Make sure that cyrus-sasl2 has been installed before recompiling Sendmail.
Recompile Sendmail by executing the following commands:
# cd /usr/src/lib/libsmutil
# make cleandir && make obj && make
# cd /usr/src/lib/libsm
# make cleandir && make obj && make
# cd /usr/src/usr.sbin/sendmail
# make cleandir && make obj && make && make installThis compile should not have any problems if /usr/src has not changed extensively and the shared libraries it needs are available.
After Sendmail has been compiled and reinstalled, edit /etc/mail/freebsd.mc or the local .mc. Many administrators choose to use the output from hostname(1) as the name of .mc for uniqueness. Add these lines:
dnl set SASL options TRUST_AUTH_MECH(`GSSAPI DIGEST-MD5 CRAM-MD5 LOGIN')dnl define(`confAUTH_MECHANISMS', `GSSAPI DIGEST-MD5 CRAM-MD5 LOGIN')dnl
These options configure the different methods available to Sendmail for authenticating users. To use a method other than pwcheck, refer to the Sendmail documentation.
Finally, run make(1) while in /etc/mail. That will run the new .mc and create a .cf named either freebsd.cf or the name used for the local .mc. Then, run make install restart, which will copy the file to sendmail.cf, and properly restart Sendmail. For more information about this process, refer to /etc/mail/Makefile.
To test the configuration, use a MUA to send a test message. For further investigation, set the LogLevel of Sendmail to 13 and watch /var/log/maillog for any errors.
For more information, refer to SMTP authentication.
A MUA is an application that is used to send and receive email. As email "evolves" and becomes more complex, MUAs are becoming increasingly powerful and provide users increased functionality and flexibility. The mail category of the FreeBSD Ports Collection contains numerous MUAs. These include graphical email clients such as Evolution or Balsa and console based clients such as mutt or alpine.
mailmail(1) is the default MUA installed with FreeBSD. It is a console based MUA that offers the basic functionality required to send and receive text-based email. It provides limited attachment support and can only access local mailboxes.
Although mail does not natively support interaction with POP or IMAP servers, these mailboxes may be downloaded to a local mbox using an application such as fetchmail.
In order to send and receive email, run mail:
% mailThe contents of the user’s mailbox in /var/mail are automatically read by mail. Should the mailbox be empty, the utility exits with a message indicating that no mail could be found. If mail exists, the application interface starts, and a list of messages will be displayed. Messages are automatically numbered, as can be seen in the following example:
Mail version 8.1 6/6/93. Type ? for help.
"/var/mail/marcs": 3 messages 3 new
>N 1 root@localhost Mon Mar 8 14:05 14/510 "test"
N 2 root@localhost Mon Mar 8 14:05 14/509 "user account"
N 3 root@localhost Mon Mar 8 14:05 14/509 "sample"Messages can now be read by typing t followed by the message number. This example reads the first email:
& t 1
Message 1:
From root@localhost Mon Mar 8 14:05:52 2004
X-Original-To: marcs@localhost
Delivered-To: marcs@localhost
To: marcs@localhost
Subject: test
Date: Mon, 8 Mar 2004 14:05:52 +0200 (SAST)
From: root@localhost (Charlie Root)
This is a test message, please reply if you receive it.As seen in this example, the message will be displayed with full headers. To display the list of messages again, press h.
If the email requires a reply, press either R or rmail keys. R instructs mail to reply only to the sender of the email, while r replies to all other recipients of the message. These commands can be suffixed with the mail number of the message to reply to. After typing the response, the end of the message should be marked by a single . on its own line. An example can be seen below:
& R 1
To: root@localhost
Subject: Re: test
Thank you, I did get your email.
.
EOTIn order to send a new email, press m, followed by the recipient email address. Multiple recipients may be specified by separating each address with the , delimiter. The subject of the message may then be entered, followed by the message contents. The end of the message should be specified by putting a single . on its own line.
& mail root@localhost
Subject: I mastered mail
Now I can send and receive email using mail ... :)
.
EOTWhile using mail, press ? to display help at any time. Refer to mail(1) for more help on how to use mail.
mail(1) was not designed to handle attachments and thus deals with them poorly. Newer MUAs handle attachments in a more intelligent way. Users who prefer to use |
mutt is a powerful MUA, with many features, including:
The ability to thread messages.
PGP support for digital signing and encryption of email.
MIME support.
Maildir support.
Highly customizable.
Refer to http://www.mutt.org for more information on mutt.
mutt may be installed using the mail/mutt port. After the port has been installed, mutt can be started by issuing the following command:
% muttmutt will automatically read and display the contents of the user mailbox in /var/mail. If no mails are found, mutt will wait for commands from the user. The example below shows mutt displaying a list of messages:
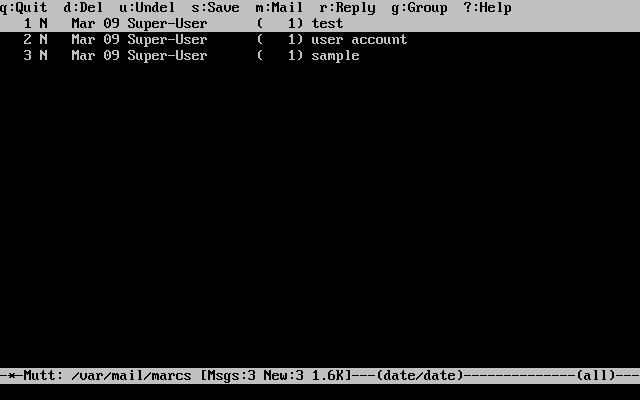
To read an email, select it using the cursor keys and press Enter. An example of mutt displaying email can be seen below:
Similar to mail(1), mutt can be used to reply only to the sender of the message as well as to all recipients. To reply only to the sender of the email, press r. To send a group reply to the original sender as well as all the message recipients, press g.
By default, mutt uses the vi(1) editor for creating and replying to emails. Each user can customize this by creating or editing the .muttrc in their home directory and setting the |
To compose a new mail message, press m. After a valid subject has been given, mutt will start vi(1) so the email can be written. Once the contents of the email are complete, save and quit from vi. mutt will resume, displaying a summary screen of the mail that is to be delivered. In order to send the mail, press y. An example of the summary screen can be seen below:
mutt contains extensive help which can be accessed from most of the menus by pressing ?. The top line also displays the keyboard shortcuts where appropriate.
alpine is aimed at a beginner user, but also includes some advanced features.
alpine has had several remote vulnerabilities discovered in the past, which allowed remote attackers to execute arbitrary code as users on the local system, by the action of sending a specially-prepared email. While known problems have been fixed, alpine code is written in an insecure style and the FreeBSD Security Officer believes there are likely to be other undiscovered vulnerabilities. Users install alpine at their own risk. |
The current version of alpine may be installed using the mail/alpine port. Once the port has installed, alpine can be started by issuing the following command:
% alpineThe first time alpine runs, it displays a greeting page with a brief introduction, as well as a request from the alpine development team to send an anonymous email message allowing them to judge how many users are using their client. To send this anonymous message, press Enter. Alternatively, press E to exit the greeting without sending an anonymous message. An example of the greeting page is shown below:
The main menu is then presented, which can be navigated using the cursor keys. This main menu provides shortcuts for the composing new mails, browsing mail directories, and administering address book entries. Below the main menu, relevant keyboard shortcuts to perform functions specific to the task at hand are shown.
The default directory opened by alpine is inbox. To view the message index, press I, or select the option shown below:
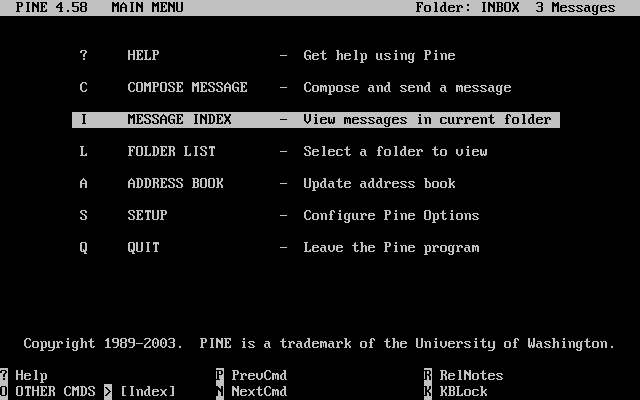
The message index shows messages in the current directory and can be navigated by using the cursor keys. Highlighted messages can be read by pressing Enter.

In the screenshot below, a sample message is displayed by alpine. Contextual keyboard shortcuts are displayed at the bottom of the screen. An example of one of a shortcut is r, which tells the MUA to reply to the current message being displayed.
Replying to an email in alpine is done using the pico editor, which is installed by default with alpine. pico makes it easy to navigate the message and is easier for novice users to use than vi(1) or mail(1). Once the reply is complete, the message can be sent by pressing Ctrl+X. alpine will ask for confirmation before sending the message.
alpine can be customized using the option from the main menu. Consult http://www.washington.edu/alpine/ for more information.
fetchmail is a full-featured IMAP and POP client. It allows users to automatically download mail from remote IMAP and POP servers and save it into local mailboxes where it can be accessed more easily. fetchmail can be installed using the mail/fetchmail port, and offers various features, including:
Support for the POP3, APOP, KPOP, IMAP, ETRN and ODMR protocols.
Ability to forward mail using SMTP, which allows filtering, forwarding, and aliasing to function normally.
May be run in daemon mode to check periodically for new messages.
Can retrieve multiple mailboxes and forward them, based on configuration, to different local users.
This section explains some of the basic features of fetchmail. This utility requires a .fetchmailrc configuration in the user’s home directory in order to run correctly. This file includes server information as well as login credentials. Due to the sensitive nature of the contents of this file, it is advisable to make it readable only by the user, with the following command:
% chmod 600 .fetchmailrcThe following .fetchmailrc serves as an example for downloading a single user mailbox using POP. It tells fetchmail to connect to example.com using a username of joesoap and a password of XXX. This example assumes that the user joesoap exists on the local system.
poll example.com protocol pop3 username "joesoap" password "XXX"
The next example connects to multiple POP and IMAP servers and redirects to different local usernames where applicable:
poll example.com proto pop3: user "joesoap", with password "XXX", is "jsoap" here; user "andrea", with password "XXXX"; poll example2.net proto imap: user "john", with password "XXXXX", is "myth" here;
fetchmail can be run in daemon mode by running it with -d, followed by the interval (in seconds) that fetchmail should poll servers listed in .fetchmailrc. The following example configures fetchmail to poll every 600 seconds:
% fetchmail -d 600More information on fetchmail can be found at http://www.fetchmail.info/.
procmail is a powerful application used to filter incoming mail. It allows users to define "rules" which can be matched to incoming mails to perform specific functions or to reroute mail to alternative mailboxes or email addresses. procmail can be installed using the mail/procmail port. Once installed, it can be directly integrated into most MTAs. Consult the MTA documentation for more information. Alternatively, procmail can be integrated by adding the following line to a .forward in the home directory of the user:
"|exec /usr/local/bin/procmail || exit 75"
The following section displays some basic procmail rules, as well as brief descriptions of what they do. Rules must be inserted into a .procmailrc, which must reside in the user’s home directory.
The majority of these rules can be found in procmailex(5).
To forward all mail from user@example.com to an external address of goodmail@example2.com:
:0 * ^From.*user@example.com ! goodmail@example2.com
To forward all mails shorter than 1000 bytes to an external address of goodmail@example2.com:
:0 * < 1000 ! goodmail@example2.com
To send all mail sent to alternate@example.com to a mailbox called alternate:
:0 * ^TOalternate@example.com alternate
To send all mail with a subject of "Spam" to /dev/null:
:0 ^Subject:.*Spam /dev/null
A useful recipe that parses incoming FreeBSD.org mailing lists and places each list in its own mailbox:
:0
* ^Sender:.owner-freebsd-\/[^@]+@FreeBSD.ORG
{
LISTNAME=${MATCH}
:0
* LISTNAME??^\/[^@]+
FreeBSD-${MATCH}
}本章節涵蓋一些在 UNIX™ 系統常用的網路服務,包含安裝、設定、測試及維護各種不同類型的網路服務。本章會提供範例設定檔以供參考。
讀完本章,您將了解:
如何管理 inetd Daemon。
如何設定網路檔案系統 (Network File System, NFS)。
如何設定網路資訊伺服器 (Network Information Server, NIS) 來集中管理及共用使用者帳號。
如何設定 FreeBSD 成為 LDAP 伺服器或客戶端
如何設定使用 DHCP 自動網路設定。
如何設定網域名稱伺服器 (Domain Name Server, DNS)。
如何設定 ApacheHTTP 伺服器。
如何設定檔案傳輸協定 (File Transfer Protocol, FTP) 伺服器。
如何設定 Samba 檔案與列印伺服器供 Windows™ 客戶端使用。
如何同步時間與日期,並使用網路時間協定 (Network Time Protocol, NTP) 設定時間伺服器。
如何設定 iSCSI。
本章假設您有以下基礎知識:
/etc/rc Script。
網路術語。
安裝其他第三方軟體 (安裝應用程式:套件與 Port)。
The inetd(8) daemon is sometimes referred to as a Super-Server because it manages connections for many services. Instead of starting multiple applications, only the inetd service needs to be started. When a connection is received for a service that is managed by inetd, it determines which program the connection is destined for, spawns a process for that program, and delegates the program a socket. Using inetd for services that are not heavily used can reduce system load, when compared to running each daemon individually in stand-alone mode.
Primarily, inetd is used to spawn other daemons, but several trivial protocols are handled internally, such as chargen, auth, time, echo, discard, and daytime.
This section covers the basics of configuring inetd.
Configuration of inetd is done by editing /etc/inetd.conf. Each line of this configuration file represents an application which can be started by inetd. By default, every line starts with a comment (), meaning that inetd is not listening for any applications. To configure inetd to listen for an application’s connections, remove the at the beginning of the line for that application.
After saving your edits, configure inetd to start at system boot by editing /etc/rc.conf:
inetd_enable="YES"
To start inetd now, so that it listens for the service you configured, type:
# service inetd startOnce inetd is started, it needs to be notified whenever a modification is made to /etc/inetd.conf:
# service inetd reloadTypically, the default entry for an application does not need to be edited beyond removing the #. In some situations, it may be appropriate to edit the default entry.
As an example, this is the default entry for ftpd(8) over IPv4:
ftp stream tcp nowait root /usr/libexec/ftpd ftpd -l
The seven columns in an entry are as follows:
service-name
socket-type
protocol
{wait|nowait}[/max-child[/max-connections-per-ip-per-minute[/max-child-per-ip]]]
user[:group][/login-class]
server-program
server-program-argumentswhere:
The service name of the daemon to start. It must correspond to a service listed in /etc/services. This determines which port inetd listens on for incoming connections to that service. When using a custom service, it must first be added to /etc/services.
Either stream, dgram, raw, or seqpacket. Use stream for TCP connections and dgram for UDP services.
Use one of the following protocol names:
| Protocol Name | Explanation |
|---|---|
tcp or tcp4 | TCP IPv4 |
udp or udp4 | UDP IPv4 |
tcp6 | TCP IPv6 |
udp6 | UDP IPv6 |
tcp46 | Both TCP IPv4 and IPv6 |
udp46 | Both UDP IPv4 and IPv6 |
In this field, wait or nowait must be specified. max-child, max-connections-per-ip-per-minute and max-child-per-ip are optional.
wait|nowait indicates whether or not the service is able to handle its own socket. dgram socket types must use wait while stream daemons, which are usually multi-threaded, should use nowait. wait usually hands off multiple sockets to a single daemon, while nowait spawns a child daemon for each new socket.
The maximum number of child daemons inetd may spawn is set by max-child. For example, to limit ten instances of the daemon, place a /10 after nowait. Specifying /0 allows an unlimited number of children.
max-connections-per-ip-per-minute limits the number of connections from any particular IP address per minute. Once the limit is reached, further connections from this IP address will be dropped until the end of the minute. For example, a value of /10 would limit any particular IP address to ten connection attempts per minute. max-child-per-ip limits the number of child processes that can be started on behalf on any single IP address at any moment. These options can limit excessive resource consumption and help to prevent Denial of Service attacks.
An example can be seen in the default settings for fingerd(8):
finger stream tcp nowait/3/10 nobody /usr/libexec/fingerd fingerd -k -s
The username the daemon will run as. Daemons typically run as root, daemon, or nobody.
The full path to the daemon. If the daemon is a service provided by inetd internally, use internal.
Used to specify any command arguments to be passed to the daemon on invocation. If the daemon is an internal service, use internal.
Like most server daemons, inetd has a number of options that can be used to modify its behavior. By default, inetd is started with -wW -C 60. These options enable TCP wrappers for all services, including internal services, and prevent any IP address from requesting any service more than 60 times per minute.
To change the default options which are passed to inetd, add an entry for inetd_flags in /etc/rc.conf. If inetd is already running, restart it with service inetd restart.
The available rate limiting options are:
Specify the default maximum number of simultaneous invocations of each service, where the default is unlimited. May be overridden on a per-service basis by using max-child in /etc/inetd.conf.
Specify the default maximum number of times a service can be invoked from a single IP address per minute. May be overridden on a per-service basis by using max-connections-per-ip-per-minute in /etc/inetd.conf.
Specify the maximum number of times a service can be invoked in one minute, where the default is 256. A rate of 0 allows an unlimited number.
Specify the maximum number of times a service can be invoked from a single IP address at any one time, where the default is unlimited. May be overridden on a per-service basis by using max-child-per-ip in /etc/inetd.conf.
Additional options are available. Refer to inetd(8) for the full list of options.
Many of the daemons which can be managed by inetd are not security-conscious. Some daemons, such as fingerd, can provide information that may be useful to an attacker. Only enable the services which are needed and monitor the system for excessive connection attempts. max-connections-per-ip-per-minute, max-child and max-child-per-ip can be used to limit such attacks.
By default, TCP wrappers is enabled. Consult hosts_access(5) for more information on placing TCP restrictions on various inetd invoked daemons.
FreeBSD supports the Network File System (NFS), which allows a server to share directories and files with clients over a network. With NFS, users and programs can access files on remote systems as if they were stored locally.
NFS has many practical uses. Some of the more common uses include:
Data that would otherwise be duplicated on each client can be kept in a single location and accessed by clients on the network.
Several clients may need access to the /usr/ports/distfiles directory. Sharing that directory allows for quick access to the source files without having to download them to each client.
On large networks, it is often more convenient to configure a central NFS server on which all user home directories are stored. Users can log into a client anywhere on the network and have access to their home directories.
Administration of NFS exports is simplified. For example, there is only one file system where security or backup policies must be set.
Removable media storage devices can be used by other machines on the network. This reduces the number of devices throughout the network and provides a centralized location to manage their security. It is often more convenient to install software on multiple machines from a centralized installation media.
NFS consists of a server and one or more clients. The client remotely accesses the data that is stored on the server machine. In order for this to function properly, a few processes have to be configured and running.
These daemons must be running on the server:
| Daemon | 說明 |
|---|---|
nfsd | The NFS daemon which services requests from NFS clients. |
mountd | The NFS mount daemon which carries out requests received from nfsd. |
rpcbind | This daemon allows NFS clients to discover which port the NFS server is using. |
Running nfsiod(8) on the client can improve performance, but is not required.
The file systems which the NFS server will share are specified in /etc/exports. Each line in this file specifies a file system to be exported, which clients have access to that file system, and any access options. When adding entries to this file, each exported file system, its properties, and allowed hosts must occur on a single line. If no clients are listed in the entry, then any client on the network can mount that file system.
The following /etc/exports entries demonstrate how to export file systems. The examples can be modified to match the file systems and client names on the reader’s network. There are many options that can be used in this file, but only a few will be mentioned here. See exports(5) for the full list of options.
This example shows how to export /cdrom to three hosts named alpha, bravo, and charlie:
/cdrom -ro alpha bravo charlie
The -ro flag makes the file system read-only, preventing clients from making any changes to the exported file system. This example assumes that the host names are either in DNS or in /etc/hosts. Refer to hosts(5) if the network does not have a DNS server.
The next example exports /home to three clients by IP address. This can be useful for networks without DNS or /etc/hosts entries. The -alldirs flag allows subdirectories to be mount points. In other words, it will not automatically mount the subdirectories, but will permit the client to mount the directories that are required as needed.
/usr/home -alldirs 10.0.0.2 10.0.0.3 10.0.0.4
This next example exports /a so that two clients from different domains may access that file system. The -maproot=root allows root on the remote system to write data on the exported file system as root. If -maproot=root is not specified, the client’s root user will be mapped to the server’s nobody account and will be subject to the access limitations defined for nobody.
/a -maproot=root host.example.com box.example.org
A client can only be specified once per file system. For example, if /usr is a single file system, these entries would be invalid as both entries specify the same host:
# Invalid when /usr is one file system /usr/src client /usr/ports client
The correct format for this situation is to use one entry:
/usr/src /usr/ports client
The following is an example of a valid export list, where /usr and /exports are local file systems:
# Export src and ports to client01 and client02, but only # client01 has root privileges on it /usr/src /usr/ports -maproot=root client01 /usr/src /usr/ports client02 # The client machines have root and can mount anywhere # on /exports. Anyone in the world can mount /exports/obj read-only /exports -alldirs -maproot=root client01 client02 /exports/obj -ro
To enable the processes required by the NFS server at boot time, add these options to /etc/rc.conf:
rpcbind_enable="YES" nfs_server_enable="YES" mountd_flags="-r"
The server can be started now by running this command:
# service nfsd startWhenever the NFS server is started, mountd also starts automatically. However, mountd only reads /etc/exports when it is started. To make subsequent /etc/exports edits take effect immediately, force mountd to reread it:
# service mountd reloadTo enable NFS clients, set this option in each client’s /etc/rc.conf:
nfs_client_enable="YES"
Then, run this command on each NFS client:
# service nfsclient startThe client now has everything it needs to mount a remote file system. In these examples, the server’s name is server and the client’s name is client. To mount /home on server to the /mnt mount point on client:
# mount server:/home /mntThe files and directories in /home will now be available on client, in the /mnt directory.
To mount a remote file system each time the client boots, add it to /etc/fstab:
server:/home /mnt nfs rw 0 0
Refer to fstab(5) for a description of all available options.
Some applications require file locking to operate correctly. To enable locking, add these lines to /etc/rc.conf on both the client and server:
rpc_lockd_enable="YES" rpc_statd_enable="YES"
Then start the applications:
# service lockd start
# service statd startIf locking is not required on the server, the NFS client can be configured to lock locally by including -L when running mount. Refer to mount_nfs(8) for further details.
The automatic mounter daemon, amd, automatically mounts a remote file system whenever a file or directory within that file system is accessed. File systems that are inactive for a period of time will be automatically unmounted by amd.
This daemon provides an alternative to modifying /etc/fstab to list every client. It operates by attaching itself as an NFS server to the /host and /net directories. When a file is accessed within one of these directories, amd looks up the corresponding remote mount and automatically mounts it. /net is used to mount an exported file system from an IP address while /host is used to mount an export from a remote hostname. For instance, an attempt to access a file within /host/foobar/usr would tell amd to mount the /usr export on the host foobar.
In this example, showmount -e shows the exported file systems that can be mounted from the NFS server, foobar:
% showmount -e foobar
Exports list on foobar:
/usr 10.10.10.0
/a 10.10.10.0
% cd /host/foobar/usrThe output from showmount shows /usr as an export. When changing directories to /host/foobar/usr, amd intercepts the request and attempts to resolve the hostname foobar. If successful, amd automatically mounts the desired export.
To enable amd at boot time, add this line to /etc/rc.conf:
amd_enable="YES"
To start amd now:
# service amd startCustom flags can be passed to amd from the amd_flags environment variable. By default, amd_flags is set to:
amd_flags="-a /.amd_mnt -l syslog /host /etc/amd.map /net /etc/amd.map"
The default options with which exports are mounted are defined in /etc/amd.map. Some of the more advanced features of amd are defined in /etc/amd.conf.
Consult amd(8) and amd.conf(5) for more information.
The autofs(5) facility is a common name for several components that, together, allow for automatic mounting of remote and local filesystems whenever a file or directory within that file system is accessed. It consists of the kernel component, autofs(5), and several userspace applications: automount(8), automountd(8) and autounmountd(8). It serves as an alternative for amd(8) from previous FreeBSD releases. Amd is still provided for backward compatibility purposes, as the two use different map format; the one used by autofs is the same as with other SVR4 automounters, such as the ones in Solaris, MacOS X, and Linux.
The autofs(5) virtual filesystem is mounted on specified mountpoints by automount(8), usually invoked during boot.
Whenever a process attempts to access file within the autofs(5) mountpoint, the kernel will notify automountd(8) daemon and pause the triggering process. The automountd(8) daemon will handle kernel requests by finding the proper map and mounting the filesystem according to it, then signal the kernel to release blocked process. The autounmountd(8) daemon automatically unmounts automounted filesystems after some time, unless they are still being used.
The primary autofs configuration file is /etc/auto_master. It assigns individual maps to top-level mounts. For an explanation of auto_master and the map syntax, refer to auto_master(5).
There is a special automounter map mounted on /net. When a file is accessed within this directory, autofs(5) looks up the corresponding remote mount and automatically mounts it. For instance, an attempt to access a file within /net/foobar/usr would tell automountd(8) to mount the /usr export from the host foobar.
In this example, showmount -e shows the exported file systems that can be mounted from the NFS server, foobar:
% showmount -e foobar
Exports list on foobar:
/usr 10.10.10.0
/a 10.10.10.0
% cd /net/foobar/usrThe output from showmount shows /usr as an export. When changing directories to /host/foobar/usr, automountd(8) intercepts the request and attempts to resolve the hostname foobar. If successful, automountd(8) automatically mounts the source export.
To enable autofs(5) at boot time, add this line to /etc/rc.conf:
autofs_enable="YES"
Then autofs(5) can be started by running:
# service automount start
# service automountd start
# service autounmountd startThe autofs(5) map format is the same as in other operating systems. Information about this format from other sources can be useful, like the Mac OS X document.
Consult the automount(8), automountd(8), autounmountd(8), and auto_master(5) manual pages for more information.
Network Information System (NIS) is designed to centralize administration of UNIX™-like systems such as Solaris™, HP-UX, AIX™, Linux, NetBSD, OpenBSD, and FreeBSD. NIS was originally known as Yellow Pages but the name was changed due to trademark issues. This is the reason why NIS commands begin with yp.
NIS is a Remote Procedure Call (RPC)-based client/server system that allows a group of machines within an NIS domain to share a common set of configuration files. This permits a system administrator to set up NIS client systems with only minimal configuration data and to add, remove, or modify configuration data from a single location.
FreeBSD uses version 2 of the NIS protocol.
Table 28.1 summarizes the terms and important processes used by NIS:
| 術語 | 說明 |
|---|---|
NIS domain name | NIS servers and clients share an NIS domain name. Typically, this name does not have anything to do with DNS. |
This service enables RPC and must be running in order to run an NIS server or act as an NIS client. | |
This service binds an NIS client to its NIS server. It will take the NIS domain name and use RPC to connect to the server. It is the core of client/server communication in an NIS environment. If this service is not running on a client machine, it will not be able to access the NIS server. | |
This is the process for the NIS server. If this service stops running, the server will no longer be able to respond to NIS requests so hopefully, there is a slave server to take over. Some non-FreeBSD clients will not try to reconnect using a slave server and the ypbind process may need to be restarted on these clients. | |
This process only runs on NIS master servers. This daemon allows NIS clients to change their NIS passwords. If this daemon is not running, users will have to login to the NIS master server and change their passwords there. |
There are three types of hosts in an NIS environment:
NIS master server
This server acts as a central repository for host configuration information and maintains the authoritative copy of the files used by all of the NIS clients. The passwd, group, and other various files used by NIS clients are stored on the master server. While it is possible for one machine to be an NIS master server for more than one NIS domain, this type of configuration will not be covered in this chapter as it assumes a relatively small-scale NIS environment.
NIS slave servers
NIS slave servers maintain copies of the NIS master’s data files in order to provide redundancy. Slave servers also help to balance the load of the master server as NIS clients always attach to the NIS server which responds first.
NIS clients
NIS clients authenticate against the NIS server during log on.
Information in many files can be shared using NIS. The master.passwd, group, and hosts files are commonly shared via NIS. Whenever a process on a client needs information that would normally be found in these files locally, it makes a query to the NIS server that it is bound to instead.
This section describes a sample NIS environment which consists of 15 FreeBSD machines with no centralized point of administration. Each machine has its own /etc/passwd and /etc/master.passwd. These files are kept in sync with each other only through manual intervention. Currently, when a user is added to the lab, the process must be repeated on all 15 machines.
The configuration of the lab will be as follows:
| Machine name | IP 位址 | Machine role |
|---|---|---|
|
| NIS master |
|
| NIS slave |
|
| Faculty workstation |
|
| Client machine |
|
| Other client machines |
If this is the first time an NIS scheme is being developed, it should be thoroughly planned ahead of time. Regardless of network size, several decisions need to be made as part of the planning process.
When a client broadcasts its requests for info, it includes the name of the NIS domain that it is part of. This is how multiple servers on one network can tell which server should answer which request. Think of the NIS domain name as the name for a group of hosts.
Some organizations choose to use their Internet domain name for their NIS domain name. This is not recommended as it can cause confusion when trying to debug network problems. The NIS domain name should be unique within the network and it is helpful if it describes the group of machines it represents. For example, the Art department at Acme Inc. might be in the "acme-art"NIS domain. This example will use the domain name test-domain.
However, some non-FreeBSD operating systems require the NIS domain name to be the same as the Internet domain name. If one or more machines on the network have this restriction, the Internet domain name must be used as the NIS domain name.
There are several things to keep in mind when choosing a machine to use as a NIS server. Since NIS clients depend upon the availability of the server, choose a machine that is not rebooted frequently. The NIS server should ideally be a stand alone machine whose sole purpose is to be an NIS server. If the network is not heavily used, it is acceptable to put the NIS server on a machine running other services. However, if the NIS server becomes unavailable, it will adversely affect all NIS clients.
The canonical copies of all NIS files are stored on the master server. The databases used to store the information are called NIS maps. In FreeBSD, these maps are stored in /var/yp/[domainname] where [domainname] is the name of the NIS domain. Since multiple domains are supported, it is possible to have several directories, one for each domain. Each domain will have its own independent set of maps.
NIS master and slave servers handle all NIS requests through ypserv(8). This daemon is responsible for receiving incoming requests from NIS clients, translating the requested domain and map name to a path to the corresponding database file, and transmitting data from the database back to the client.
Setting up a master NIS server can be relatively straight forward, depending on environmental needs. Since FreeBSD provides built-in NIS support, it only needs to be enabled by adding the following lines to /etc/rc.conf:
nisdomainname="test-domain" (1) nis_server_enable="YES" (2) nis_yppasswdd_enable="YES" (3)
| 1 | This line sets the NIS domain name to test-domain. |
| 2 | This automates the start up of the NIS server processes when the system boots. |
| 3 | This enables the rpc.yppasswdd(8) daemon so that users can change their NIS password from a client machine. |
Care must be taken in a multi-server domain where the server machines are also NIS clients. It is generally a good idea to force the servers to bind to themselves rather than allowing them to broadcast bind requests and possibly become bound to each other. Strange failure modes can result if one server goes down and others are dependent upon it. Eventually, all the clients will time out and attempt to bind to other servers, but the delay involved can be considerable and the failure mode is still present since the servers might bind to each other all over again.
A server that is also a client can be forced to bind to a particular server by adding these additional lines to /etc/rc.conf:
nis_client_enable="YES" # run client stuff as well nis_client_flags="-S NIS domain,server"
After saving the edits, type /etc/netstart to restart the network and apply the values defined in /etc/rc.conf. Before initializing the NIS maps, start ypserv(8):
# service ypserv startNIS maps are generated from the configuration files in /etc on the NIS master, with one exception: /etc/master.passwd. This is to prevent the propagation of passwords to all the servers in the NIS domain. Therefore, before the NIS maps are initialized, configure the primary password files:
# cp /etc/master.passwd /var/yp/master.passwd
# cd /var/yp
# vi master.passwdIt is advisable to remove all entries for system accounts as well as any user accounts that do not need to be propagated to the NIS clients, such as the root and any other administrative accounts.
Ensure that the /var/yp/master.passwd is neither group or world readable by setting its permissions to |
After completing this task, initialize the NIS maps. FreeBSD includes the ypinit(8) script to do this. When generating maps for the master server, include -m and specify the NIS domain name:
ellington# ypinit -m test-domain
Server Type: MASTER Domain: test-domain
Creating an YP server will require that you answer a few questions.
Questions will all be asked at the beginning of the procedure.
Do you want this procedure to quit on non-fatal errors? [y/n: n] n
Ok, please remember to go back and redo manually whatever fails.
If not, something might not work.
At this point, we have to construct a list of this domains YP servers.
rod.darktech.org is already known as master server.
Please continue to add any slave servers, one per line. When you are
done with the list, type a <control D>.
master server : ellington
next host to add: coltrane
next host to add: ^D
The current list of NIS servers looks like this:
ellington
coltrane
Is this correct? [y/n: y] y
[..output from map generation..]
NIS Map update completed.
ellington has been setup as an YP master server without any errors.This will create /var/yp/Makefile from /var/yp/Makefile.dist. By default, this file assumes that the environment has a single NIS server with only FreeBSD clients. Since test-domain has a slave server, edit this line in /var/yp/Makefile so that it begins with a comment (#):
NOPUSH = "True"
Every time a new user is created, the user account must be added to the master NIS server and the NIS maps rebuilt. Until this occurs, the new user will not be able to login anywhere except on the NIS master. For example, to add the new user jsmith to the test-domain domain, run these commands on the master server:
# pw useradd jsmith
# cd /var/yp
# make test-domainThe user could also be added using adduser jsmith instead of pw useradd smith.
To set up an NIS slave server, log on to the slave server and edit /etc/rc.conf as for the master server. Do not generate any NIS maps, as these already exist on the master server. When running ypinit on the slave server, use -s (for slave) instead of -m (for master). This option requires the name of the NIS master in addition to the domain name, as seen in this example:
coltrane# ypinit -s ellington test-domain
Server Type: SLAVE Domain: test-domain Master: ellington
Creating an YP server will require that you answer a few questions.
Questions will all be asked at the beginning of the procedure.
Do you want this procedure to quit on non-fatal errors? [y/n: n] n
Ok, please remember to go back and redo manually whatever fails.
If not, something might not work.
There will be no further questions. The remainder of the procedure
should take a few minutes, to copy the databases from ellington.
Transferring netgroup...
ypxfr: Exiting: Map successfully transferred
Transferring netgroup.byuser...
ypxfr: Exiting: Map successfully transferred
Transferring netgroup.byhost...
ypxfr: Exiting: Map successfully transferred
Transferring master.passwd.byuid...
ypxfr: Exiting: Map successfully transferred
Transferring passwd.byuid...
ypxfr: Exiting: Map successfully transferred
Transferring passwd.byname...
ypxfr: Exiting: Map successfully transferred
Transferring group.bygid...
ypxfr: Exiting: Map successfully transferred
Transferring group.byname...
ypxfr: Exiting: Map successfully transferred
Transferring services.byname...
ypxfr: Exiting: Map successfully transferred
Transferring rpc.bynumber...
ypxfr: Exiting: Map successfully transferred
Transferring rpc.byname...
ypxfr: Exiting: Map successfully transferred
Transferring protocols.byname...
ypxfr: Exiting: Map successfully transferred
Transferring master.passwd.byname...
ypxfr: Exiting: Map successfully transferred
Transferring networks.byname...
ypxfr: Exiting: Map successfully transferred
Transferring networks.byaddr...
ypxfr: Exiting: Map successfully transferred
Transferring netid.byname...
ypxfr: Exiting: Map successfully transferred
Transferring hosts.byaddr...
ypxfr: Exiting: Map successfully transferred
Transferring protocols.bynumber...
ypxfr: Exiting: Map successfully transferred
Transferring ypservers...
ypxfr: Exiting: Map successfully transferred
Transferring hosts.byname...
ypxfr: Exiting: Map successfully transferred
coltrane has been setup as an YP slave server without any errors.
Remember to update map ypservers on ellington.This will generate a directory on the slave server called /var/yp/test-domain which contains copies of the NIS master server’s maps. Adding these /etc/crontab entries on each slave server will force the slaves to sync their maps with the maps on the master server:
20 * * * * root /usr/libexec/ypxfr passwd.byname 21 * * * * root /usr/libexec/ypxfr passwd.byuid
These entries are not mandatory because the master server automatically attempts to push any map changes to its slaves. However, since clients may depend upon the slave server to provide correct password information, it is recommended to force frequent password map updates. This is especially important on busy networks where map updates might not always complete.
To finish the configuration, run /etc/netstart on the slave server in order to start the NIS services.
An NIS client binds to an NIS server using ypbind(8). This daemon broadcasts RPC requests on the local network. These requests specify the domain name configured on the client. If an NIS server in the same domain receives one of the broadcasts, it will respond to ypbind, which will record the server’s address. If there are several servers available, the client will use the address of the first server to respond and will direct all of its NIS requests to that server. The client will automatically ping the server on a regular basis to make sure it is still available. If it fails to receive a reply within a reasonable amount of time, ypbind will mark the domain as unbound and begin broadcasting again in the hopes of locating another server.
To configure a FreeBSD machine to be an NIS client:
Edit /etc/rc.conf and add the following lines in order to set the NIS domain name and start ypbind(8) during network startup:
nisdomainname="test-domain" nis_client_enable="YES"
To import all possible password entries from the NIS server, use vipw to remove all user accounts except one from /etc/master.passwd. When removing the accounts, keep in mind that at least one local account should remain and this account should be a member of wheel. If there is a problem with NIS, this local account can be used to log in remotely, become the superuser, and fix the problem. Before saving the edits, add the following line to the end of the file:
+:::::::::
This line configures the client to provide anyone with a valid account in the NIS server’s password maps an account on the client. There are many ways to configure the NIS client by modifying this line. One method is described in 使用 Netgroups. For more detailed reading, refer to the book Managing NFS and NIS, published by O’Reilly Media.
To import all possible group entries from the NIS server, add this line to /etc/group:
+:*::
To start the NIS client immediately, execute the following commands as the superuser:
# /etc/netstart
# service ypbind startAfter completing these steps, running ypcat passwd on the client should show the server’s passwd map.
Since RPC is a broadcast-based service, any system running ypbind within the same domain can retrieve the contents of the NIS maps. To prevent unauthorized transactions, ypserv(8) supports a feature called "securenets" which can be used to restrict access to a given set of hosts. By default, this information is stored in /var/yp/securenets, unless ypserv(8) is started with -p and an alternate path. This file contains entries that consist of a network specification and a network mask separated by white space. Lines starting with # are considered to be comments. A sample securenets might look like this:
# allow connections from local host -- mandatory 127.0.0.1 255.255.255.255 # allow connections from any host # on the 192.168.128.0 network 192.168.128.0 255.255.255.0 # allow connections from any host # between 10.0.0.0 to 10.0.15.255 # this includes the machines in the testlab 10.0.0.0 255.255.240.0
If ypserv(8) receives a request from an address that matches one of these rules, it will process the request normally. If the address fails to match a rule, the request will be ignored and a warning message will be logged. If the securenets does not exist, ypserv will allow connections from any host.
TCP Wrapper is an alternate mechanism for providing access control instead of securenets. While either access control mechanism adds some security, they are both vulnerable to "IP spoofing" attacks. All NIS-related traffic should be blocked at the firewall.
Servers using securenets may fail to serve legitimate NIS clients with archaic TCP/IP implementations. Some of these implementations set all host bits to zero when doing broadcasts or fail to observe the subnet mask when calculating the broadcast address. While some of these problems can be fixed by changing the client configuration, other problems may force the retirement of these client systems or the abandonment of securenets.
The use of TCP Wrapper increases the latency of the NIS server. The additional delay may be long enough to cause timeouts in client programs, especially in busy networks with slow NIS servers. If one or more clients suffer from latency, convert those clients into NIS slave servers and force them to bind to themselves.
In this example, the basie system is a faculty workstation within the NIS domain. The passwd map on the master NIS server contains accounts for both faculty and students. This section demonstrates how to allow faculty logins on this system while refusing student logins.
To prevent specified users from logging on to a system, even if they are present in the NIS database, use vipw to add -username with the correct number of colons towards the end of /etc/master.passwd on the client, where username is the username of a user to bar from logging in. The line with the blocked user must be before the + line that allows NIS users. In this example, bill is barred from logging on to basie:
basie# cat /etc/master.passwd
root:[password]:0:0::0:0:The super-user:/root:/bin/csh
toor:[password]:0:0::0:0:The other super-user:/root:/bin/sh
daemon:*:1:1::0:0:Owner of many system processes:/root:/usr/sbin/nologin
operator:*:2:5::0:0:System &:/:/usr/sbin/nologin
bin:*:3:7::0:0:Binaries Commands and Source,,,:/:/usr/sbin/nologin
tty:*:4:65533::0:0:Tty Sandbox:/:/usr/sbin/nologin
kmem:*:5:65533::0:0:KMem Sandbox:/:/usr/sbin/nologin
games:*:7:13::0:0:Games pseudo-user:/usr/games:/usr/sbin/nologin
news:*:8:8::0:0:News Subsystem:/:/usr/sbin/nologin
man:*:9:9::0:0:Mister Man Pages:/usr/shared/man:/usr/sbin/nologin
bind:*:53:53::0:0:Bind Sandbox:/:/usr/sbin/nologin
uucp:*:66:66::0:0:UUCP pseudo-user:/var/spool/uucppublic:/usr/libexec/uucp/uucico
xten:*:67:67::0:0:X-10 daemon:/usr/local/xten:/usr/sbin/nologin
pop:*:68:6::0:0:Post Office Owner:/nonexistent:/usr/sbin/nologin
nobody:*:65534:65534::0:0:Unprivileged user:/nonexistent:/usr/sbin/nologin
-bill:::::::::
+:::::::::
basie#Barring specified users from logging on to individual systems becomes unscaleable on larger networks and quickly loses the main benefit of NIS: centralized administration.
Netgroups were developed to handle large, complex networks with hundreds of users and machines. Their use is comparable to UNIX™ groups, where the main difference is the lack of a numeric ID and the ability to define a netgroup by including both user accounts and other netgroups.
To expand on the example used in this chapter, the NIS domain will be extended to add the users and systems shown in Tables 28.2 and 28.3:
| 使用者名稱 | 說明 |
|---|---|
| IT department employees |
| IT department apprentices |
| employees |
| interns |
| 機器名稱 | 說明 |
|---|---|
| Only IT employees are allowed to log onto these servers. |
| All members of the IT department are allowed to login onto these servers. |
| Ordinary workstations used by employees. |
| A very old machine without any critical data. Even interns are allowed to use this system. |
When using netgroups to configure this scenario, each user is assigned to one or more netgroups and logins are then allowed or forbidden for all members of the netgroup. When adding a new machine, login restrictions must be defined for all netgroups. When a new user is added, the account must be added to one or more netgroups. If the NIS setup is planned carefully, only one central configuration file needs modification to grant or deny access to machines.
The first step is the initialization of the NIS netgroup map. In FreeBSD, this map is not created by default. On the NIS master server, use an editor to create a map named /var/yp/netgroup.
This example creates four netgroups to represent IT employees, IT apprentices, employees, and interns:
IT_EMP (,alpha,test-domain) (,beta,test-domain)
IT_APP (,charlie,test-domain) (,delta,test-domain)
USERS (,echo,test-domain) (,foxtrott,test-domain) \
(,golf,test-domain)
INTERNS (,able,test-domain) (,baker,test-domain)Each entry configures a netgroup. The first column in an entry is the name of the netgroup. Each set of brackets represents either a group of one or more users or the name of another netgroup. When specifying a user, the three comma-delimited fields inside each group represent:
The name of the host(s) where the other fields representing the user are valid. If a hostname is not specified, the entry is valid on all hosts.
The name of the account that belongs to this netgroup.
The NIS domain for the account. Accounts may be imported from other NIS domains into a netgroup.
If a group contains multiple users, separate each user with whitespace. Additionally, each field may contain wildcards. See netgroup(5) for details.
Netgroup names longer than 8 characters should not be used. The names are case sensitive and using capital letters for netgroup names is an easy way to distinguish between user, machine and netgroup names.
Some non-FreeBSD NIS clients cannot handle netgroups containing more than 15 entries. This limit may be circumvented by creating several sub-netgroups with 15 users or fewer and a real netgroup consisting of the sub-netgroups, as seen in this example:
BIGGRP1 (,joe1,domain) (,joe2,domain) (,joe3,domain) [...] BIGGRP2 (,joe16,domain) (,joe17,domain) [...] BIGGRP3 (,joe31,domain) (,joe32,domain) BIGGROUP BIGGRP1 BIGGRP2 BIGGRP3
Repeat this process if more than 225 (15 times 15) users exist within a single netgroup.
To activate and distribute the new NIS map:
ellington# cd /var/yp
ellington# makeThis will generate the three NIS maps netgroup, netgroup.byhost and netgroup.byuser. Use the map key option of ypcat(1) to check if the new NIS maps are available:
ellington% ypcat -k netgroup
ellington% ypcat -k netgroup.byhost
ellington% ypcat -k netgroup.byuserThe output of the first command should resemble the contents of /var/yp/netgroup. The second command only produces output if host-specific netgroups were created. The third command is used to get the list of netgroups for a user.
To configure a client, use vipw(8) to specify the name of the netgroup. For example, on the server named war, replace this line:
+:::::::::
with
+@IT_EMP:::::::::
This specifies that only the users defined in the netgroup IT_EMP will be imported into this system’s password database and only those users are allowed to login to this system.
This configuration also applies to the ~ function of the shell and all routines which convert between user names and numerical user IDs. In other words, cd ~user will not work, ls -l will show the numerical ID instead of the username, and find . -user joe -print will fail with the message No such user. To fix this, import all user entries without allowing them to login into the servers. This can be achieved by adding an extra line:
+:::::::::/usr/sbin/nologin
This line configures the client to import all entries but to replace the shell in those entries with /usr/sbin/nologin.
Make sure that extra line is placed after +@IT_EMP:::::::::. Otherwise, all user accounts imported from NIS will have /usr/sbin/nologin as their login shell and no one will be able to login to the system.
To configure the less important servers, replace the old +::::::::: on the servers with these lines:
+@IT_EMP::::::::: +@IT_APP::::::::: +:::::::::/usr/sbin/nologin
The corresponding lines for the workstations would be:
+@IT_EMP::::::::: +@USERS::::::::: +:::::::::/usr/sbin/nologin
NIS supports the creation of netgroups from other netgroups which can be useful if the policy regarding user access changes. One possibility is the creation of role-based netgroups. For example, one might create a netgroup called BIGSRV to define the login restrictions for the important servers, another netgroup called SMALLSRV for the less important servers, and a third netgroup called USERBOX for the workstations. Each of these netgroups contains the netgroups that are allowed to login onto these machines. The new entries for the NIS netgroup map would look like this:
BIGSRV IT_EMP IT_APP SMALLSRV IT_EMP IT_APP ITINTERN USERBOX IT_EMP ITINTERN USERS
This method of defining login restrictions works reasonably well when it is possible to define groups of machines with identical restrictions. Unfortunately, this is the exception and not the rule. Most of the time, the ability to define login restrictions on a per-machine basis is required.
Machine-specific netgroup definitions are another possibility to deal with the policy changes. In this scenario, the /etc/master.passwd of each system contains two lines starting with "+". The first line adds a netgroup with the accounts allowed to login onto this machine and the second line adds all other accounts with /usr/sbin/nologin as shell. It is recommended to use the "ALL-CAPS" version of the hostname as the name of the netgroup:
+@BOXNAME::::::::: +:::::::::/usr/sbin/nologin
Once this task is completed on all the machines, there is no longer a need to modify the local versions of /etc/master.passwd ever again. All further changes can be handled by modifying the NIS map. Here is an example of a possible netgroup map for this scenario:
# Define groups of users first IT_EMP (,alpha,test-domain) (,beta,test-domain) IT_APP (,charlie,test-domain) (,delta,test-domain) DEPT1 (,echo,test-domain) (,foxtrott,test-domain) DEPT2 (,golf,test-domain) (,hotel,test-domain) DEPT3 (,india,test-domain) (,juliet,test-domain) ITINTERN (,kilo,test-domain) (,lima,test-domain) D_INTERNS (,able,test-domain) (,baker,test-domain) # # Now, define some groups based on roles USERS DEPT1 DEPT2 DEPT3 BIGSRV IT_EMP IT_APP SMALLSRV IT_EMP IT_APP ITINTERN USERBOX IT_EMP ITINTERN USERS # # And a groups for a special tasks # Allow echo and golf to access our anti-virus-machine SECURITY IT_EMP (,echo,test-domain) (,golf,test-domain) # # machine-based netgroups # Our main servers WAR BIGSRV FAMINE BIGSRV # User india needs access to this server POLLUTION BIGSRV (,india,test-domain) # # This one is really important and needs more access restrictions DEATH IT_EMP # # The anti-virus-machine mentioned above ONE SECURITY # # Restrict a machine to a single user TWO (,hotel,test-domain) # [...more groups to follow]
It may not always be advisable to use machine-based netgroups. When deploying a couple of dozen or hundreds of systems, role-based netgroups instead of machine-based netgroups may be used to keep the size of the NIS map within reasonable limits.
NIS requires that all hosts within an NIS domain use the same format for encrypting passwords. If users have trouble authenticating on an NIS client, it may be due to a differing password format. In a heterogeneous network, the format must be supported by all operating systems, where DES is the lowest common standard.
To check which format a server or client is using, look at this section of /etc/login.conf:
default:\ :passwd_format=des:\ :copyright=/etc/COPYRIGHT:\ [Further entries elided]
In this example, the system is using the DES format. Other possible values are blf for Blowfish and md5 for MD5 encrypted passwords.
If the format on a host needs to be edited to match the one being used in the NIS domain, the login capability database must be rebuilt after saving the change:
# cap_mkdb /etc/login.confThe format of passwords for existing user accounts will not be updated until each user changes their password after the login capability database is rebuilt. |
輕量級目錄存取協定 (Lightweight Directory Access Protocol, LDAP) 是一個利用分散式目錄資訊服務來做到存取、修改與認証物件的應用層通訊協定,可以想像成是一本可以儲存數個階層、同質資訊的電話簿或記錄簿。它用在 Active Directory 及 OpenLDAP 網路,允許使用者利用一個帳號來存取數個階層的內部資訊,例如:電子郵件認証、取得員工聯絡資訊及內部網站的認証皆可使用 LDAP 伺服器資料庫中的單一使用者帳號來存取。
本章節將介紹在 FreeBSD 系統上如何快速的設定一個 LDAP 伺服器。本章節假設管理者已做好規劃,這包含:要儲存何種類型的資訊、這些資訊要來做什麼、那些使用者擁有存取這些資訊的權限以及如何確保這些資訊不會被未經授權存取。
LDAP 使用了數個術語在開始設置之前必須先了解。所有的目錄項目由一群屬性 (attributes) 所組成,每個屬性集皆有一個獨特的辨識碼稱為辨識名稱 (Distinguished Name, DN),這個辨識碼會由數個其他的屬性,如:常用或相對辨識名稱 (Relative Distinguished Name, RDN) 所組成,這就像目錄有絕對路徑與相對路徑,可以把 DN 當做絕對路徑,RDN 當做相對路徑。
LDAP 項目的例子如下。這個例子會搜尋指定使用者帳號 (uid)、組織單位 (ou) 及組織的項目 (o):
% ldapsearch -xb "uid=trhodes,ou=users,o=example.com"
# extended LDIF
#
# LDAPv3
# base <uid=trhodes,ou=users,o=example.com> with scope subtree
# filter: (objectclass=*)
# requesting: ALL
#
# trhodes, users, example.com
dn: uid=trhodes,ou=users,o=example.com
mail: trhodes@example.com
cn: Tom Rhodes
uid: trhodes
telephoneNumber: (123) 456-7890
# search result
search: 2
result: 0 Success
# numResponses: 2
# numEntries: 1這個範例項目會顯示 dn, mail, cn, uid 以及 telephoneNumber 屬性的數值。而 cn 屬性則是 RDN。
更多有關 LDAP 以及其術語的資訊可在 http://www.openldap.org/doc/admin24/intro.html 找到。
FreeBSD 並未提供內建的 LDAP 伺服器,要開始設定前請先安裝 net/openldap-server 套件或 Port:
# pkg install openldap-server在套件中已開啟了許多的預設選項,可以透過執行 pkg info openldap-server 來查看已開啟的選項,若有不足的地方 (例如需要開啟 SQL 的支援),請考慮使用適當的方式重新編譯該 Port。
安裝程序會建立目錄 /var/db/openldap-data 來儲存資料,同時需要建立儲存憑證的目錄:
# mkdir /usr/local/etc/openldap/private接下來是設定憑証機構 (Certificate authority)。以下指令必須在 /usr/local/etc/openldap/private 下執行,這很重要是由於檔案權限須要被限制且其他使用者不應有這些檔案的存取權限,更多有關憑証的詳細資訊以及相關的參數可在 OpenSSL 中找到。要建立憑証授權,需先輸人這個指令並依提示操作:
# openssl req -days 365 -nodes -new -x509 -keyout ca.key -out ../ca.crt提示輸入的項目除了通用名稱 (Common Name) 外其他是可以一樣的,這個項目必須使用跟系統主機名稱 不同 的名稱。若這是一個自行簽署的憑証 (Self signed certificate),則在憑証機構 CA 的前面加上主機名稱。
接下來的工作是建立一個伺服器的憑証簽署請求與一個私鑰。請輸入以下指令然後依提示操作:
# openssl req -days 365 -nodes -new -keyout server.key -out server.csr在憑証產生程序的過程中請確認 Common Name 屬性設定正確。憑証簽署請求 (Certificate Signing Request) 必須經過憑証機構簽署後才會成為有效的憑証:
# openssl x509 -req -days 365 -in server.csr -out ../server.crt -CA ../ca.crt -CAkey ca.key -CAcreateserial在憑証產生程序的最後一步是產生並簽署客戶端憑証:
# openssl req -days 365 -nodes -new -keyout client.key -out client.csr
# openssl x509 -req -days 3650 -in client.csr -out ../client.crt -CA ../ca.crt -CAkey ca.key記得當提示時要使用同樣的 Common Name 屬性。完成之後,請確認執行的指令產生了 8 個新檔案。
OpenLDAP 伺服器所執行的 Daemon 為 slapd,OpenLDAP 是透過 slapd.ldif 來做設定, OpenLDAP 官方已停止採用舊的 slapd.conf 格式。
這裡有些 slapd.ldif 的 設定檔範例 可以使用,同時您也可以在 /usr/local/etc/openldap/slapd.ldif.sample 找到範例資訊。相關可用的選項在 slapd-config(5) 文件會有說明。slapd.ldif 的每個段落,如同其他 LDAP 屬性設定一樣會透過獨一無二 DN 來辨識,並請確保 dn: 描述與其相關屬性之間沒有空行。以下的範例中會實作一個使用 TLS 的安全通道,首先是全域的設定:
# # See slapd-config(5) for details on configuration options. # This file should NOT be world readable. # dn: cn=config objectClass: olcGlobal cn: config # # # Define global ACLs to disable default read access. # olcArgsFile: /var/run/openldap/slapd.args olcPidFile: /var/run/openldap/slapd.pid olcTLSCertificateFile: /usr/local/etc/openldap/server.crt olcTLSCertificateKeyFile: /usr/local/etc/openldap/private/server.key olcTLSCACertificateFile: /usr/local/etc/openldap/ca.crt #olcTLSCipherSuite: HIGH olcTLSProtocolMin: 3.1 olcTLSVerifyClient: never
這個檔案中必須指定憑証機構 (Certificate Authority)、伺服器憑証 (Server Certificate) 與伺服器私鑰 (Server Private Key),建議可讓客戶端決定使用的安全密碼 (Security Cipher),略過 olcTLSCipherSuite 選項 (此選項不相容 openssl 以外的 TLS 客戶端)。選項 olcTLSProtocolMin 讓伺服器可要求一個安全等級的最低限度,建議使用。伺服器有進行驗証的必要,但客戶端並不需要,因此可設定 olcTLSVerifyClient: never。
第二個部份是設定後端要採用的模組有那些,可使用以下方式設定:
# # Load dynamic backend modules: # dn: cn=module,cn=config objectClass: olcModuleList cn: module olcModulepath: /usr/local/libexec/openldap olcModuleload: back_mdb.la #olcModuleload: back_bdb.la #olcModuleload: back_hdb.la #olcModuleload: back_ldap.la #olcModuleload: back_passwd.la #olcModuleload: back_shell.la
第三個部份要載入資料庫所需的 ldif 綱要 (Schema),這個動作是必要的。
dn: cn=schema,cn=config objectClass: olcSchemaConfig cn: schema include: file:///usr/local/etc/openldap/schema/core.ldif include: file:///usr/local/etc/openldap/schema/cosine.ldif include: file:///usr/local/etc/openldap/schema/inetorgperson.ldif include: file:///usr/local/etc/openldap/schema/nis.ldif
接下來是前端設定的部份:
# Frontend settings
#
dn: olcDatabase={-1}frontend,cn=config
objectClass: olcDatabaseConfig
objectClass: olcFrontendConfig
olcDatabase: {-1}frontend
olcAccess: to * by * read
#
# Sample global access control policy:
# Root DSE: allow anyone to read it
# Subschema (sub)entry DSE: allow anyone to read it
# Other DSEs:
# Allow self write access
# Allow authenticated users read access
# Allow anonymous users to authenticate
#
#olcAccess: to dn.base="" by * read
#olcAccess: to dn.base="cn=Subschema" by * read
#olcAccess: to *
# by self write
# by users read
# by anonymous auth
#
# if no access controls are present, the default policy
# allows anyone and everyone to read anything but restricts
# updates to rootdn. (e.g., "access to * by * read")
#
# rootdn can always read and write EVERYTHING!
#
olcPasswordHash: {SSHA}
# {SSHA} is already the default for olcPasswordHash再來是設定後端的部份,之後唯一能夠存取 OpenLDAP 伺服器設定的方式是使用全域超級使用者。
dn: olcDatabase={0}config,cn=config
objectClass: olcDatabaseConfig
olcDatabase: {0}config
olcAccess: to * by * none
olcRootPW: {SSHA}iae+lrQZILpiUdf16Z9KmDmSwT77Dj4U預設的管理者使用者名稱是 cn=config,可在 Shell 中輸入 slappasswd,決定要使用的密碼並將其產生的編碼放到 olcRootPW 欄位中。若這個選項在這時沒有設定好,在匯入 slapd.ldif 之後將沒有任何人有辦法修改全域的設定。
最後一個部份是有關資料庫後端的設定:
#######################################################################
# LMDB database definitions
#######################################################################
#
dn: olcDatabase=mdb,cn=config
objectClass: olcDatabaseConfig
objectClass: olcMdbConfig
olcDatabase: mdb
olcDbMaxSize: 1073741824
olcSuffix: dc=domain,dc=example
olcRootDN: cn=mdbadmin,dc=domain,dc=example
# Cleartext passwords, especially for the rootdn, should
# be avoided. See slappasswd(8) and slapd-config(5) for details.
# Use of strong authentication encouraged.
olcRootPW: {SSHA}X2wHvIWDk6G76CQyCMS1vDCvtICWgn0+
# The database directory MUST exist prior to running slapd AND
# should only be accessible by the slapd and slap tools.
# Mode 700 recommended.
olcDbDirectory: /var/db/openldap-data
# Indices to maintain
olcDbIndex: objectClass eq這裡指定的資料庫即實際用來保存LDAP 目錄的資料,也可以使用 mdb 以外的項目,資料庫的超級使用者可在這裡設定 (與全域的超級使用者是不同的東西):olcRootDN 需填寫使用者名稱 (可自訂),olcRootPW 需填寫該使用者編碼後的密碼,將密碼編碼可使用 slappasswd 如同前面所述。
當設定完成之後,需將 slapd.ldif 放在一個空的目錄當中,建議如以下方式建立:
# mkdir /usr/local/etc/openldap/slapd.d/匯入設定資料庫:
# /usr/local/sbin/slapadd -n0 -F /usr/local/etc/openldap/slapd.d/ -l /usr/local/etc/openldap/slapd.ldif啟動 slapd Daemon:
# /usr/local/libexec/slapd -F /usr/local/etc/openldap/slapd.d/選項 -d 可以用來除錯使用,如同 slapd(8) 中所說明的,若要檢驗伺服器是否正常執行與運作可以:
# ldapsearch -x -b '' -s base '(objectclass=*)' namingContexts
# extended LDIF
#
# LDAPv3
# base <> with scope baseObject
# filter: (objectclass=*)
# requesting: namingContexts
#
#
dn:
namingContexts: dc=domain,dc=example
# search result
search: 2
result: 0 Success
# numResponses: 2
# numEntries: 1伺服器端仍必須受到信任,若在此之前未做過這個動作,請依照以下指示操作。安裝 OpenSSL 套件或 Port:
# pkg install openssl進入 ca.crt 所在的目錄 (以這邊使用的例子來說則是 /usr/local/etc/openldap),執行:
# c_rehash .現在 CA 與伺服器憑証可以依其用途被辨識,可進入 server.crt 所在的目錄執行以下指令來檢查:
# openssl verify -verbose -CApath . server.crt若 slapd 已正在執行,就重新啟動它。如同 /usr/local/etc/rc.d/slapd 所述,要讓 slapd 開機時可正常執行,須要加入以下行到 /etc/rc.conf:
lapd_enable="YES" slapd_flags='-h "ldapi://%2fvar%2frun%2fopenldap%2fldapi/ ldap://0.0.0.0/"' slapd_sockets="/var/run/openldap/ldapi" slapd_cn_config="YES"
開機啟動 slapd 並不會提供除錯的功能,您可以檢查 /var/log/debug.log, dmesg -a 及 /var/log/messages 檢確認是否有正常運作。
以下範例會新增群組 team 及使用者 john 到 domain.example LDAP 資料庫,而該資料庫目前是空的。首先要先建立 domain.ldif 檔:
# cat domain.ldif
dn: dc=domain,dc=example
objectClass: dcObject
objectClass: organization
o: domain.example
dc: domain
dn: ou=groups,dc=domain,dc=example
objectClass: top
objectClass: organizationalunit
ou: groups
dn: ou=users,dc=domain,dc=example
objectClass: top
objectClass: organizationalunit
ou: users
dn: cn=team,ou=groups,dc=domain,dc=example
objectClass: top
objectClass: posixGroup
cn: team
gidNumber: 10001
dn: uid=john,ou=users,dc=domain,dc=example
objectClass: top
objectClass: account
objectClass: posixAccount
objectClass: shadowAccount
cn: John McUser
uid: john
uidNumber: 10001
gidNumber: 10001
homeDirectory: /home/john/
loginShell: /usr/bin/bash
userPassword: secret請查看 OpenLDAP 說明文件取得更詳細的資訊,使用 slappasswd 來將純文字的密碼 secret 更改為已編碼的型式來填寫 userPassword 欄位。在 loginShell 所指定的路徑,必須在所有可讓 john 登入的系統中存在。最後是使用 mdb 管理者修改資料庫:
# ldapadd -W -D "cn=mdbadmin,dc=domain,dc=example" -f domain.ldif要修改全域設定只能使用全域的超及使用者。例如,假設一開始採用了 olcTLSCipherSuite: HIGH:MEDIUM:SSLv3 選項,但最後想要把它移除,可以建立一個有以下內容的檔案:
# cat global_mod
dn: cn=config
changetype: modify
delete: olcTLSCipherSuite然後套用修改內容:
# ldapmodify -f global_mod -x -D "cn=config" -W當提示輸入密碼時,提供當時在設定後端一節所設定的密碼,在這裡無須填寫使用者名稱,cn=config 代表要修改資料庫資料的位置。也可以使用 ldapmodify 刪除其中一行屬性,或是 ldapdelete 刪除整筆資料。
若有問題無法正常執行,或是全域的超級使用者無法存取後端的設定,可以刪除並重建整個後端設定:
# rm -rf /usr/local/etc/openldap/slapd.d/可以修改 slapd.ldif 後再重新匯入一次。請注意,這個步驟只在沒有其他方式可用時才使用。
本章節的設定說明只針對伺服器端的部份,在同一台主機中也可以同時有安裝 LDAP 客戶端但需要額外做設定。
動態主機設置協定 (Dynamic Host Configuration Protocol, DHCP) 可分配必要的位置資訊給一個連線到網路的系統以在該網路通訊。FreeBSD 內含 OpenBSD 版本的 dhclient,可用來做為客戶端來取得位置資訊。FreeBSD 預設並不會安裝 DHCP 伺服器,但在 FreeBSD Port 套件集中有許多可用的伺服器。有關 DHCP 通訊協定的完整說明位於 RFC 2131,相關資源也可至 isc.org/downloads/dhcp/ 取得。
本節將介紹如何使用內建的 DHCP 客戶端,接著會介紹如何安裝並設定一個 DHCP 伺服器。
在 FreeBSD 中,bpf(4) 裝置同時會被 DHCP 伺服器與 DHCP 客戶端所使用。這個裝置會在 GENERIC 核心中被引用並隨著 FreeBSD 安裝。想要建立自訂核心的使用者若要使用 DHCP 則須保留這個裝置。 另外要注意 bpf 也會讓有權限的使用者在該系統上可執行網路封包監聽程式。 |
DHCP 客戶端內含在 FreeBSD 安裝程式當中,這讓在新安裝的系統上設定自動從 DHCP 伺服器接收網路位置資訊變的更簡單。請參考 安裝後注意事項 取得網路設置的範例。
當 dhclient 在客戶端機器上執行時,它便會開始廣播請求取得設置資訊。預設這些請求會使用 UDP 埠號 68。而伺服器則會在 UDP 埠號 67 來回覆,將 IP 位址與其他相關的網路資訊,如:子網路遮罩、預設閘道及 DNS 伺服器位址告訴客戶端,詳細的清單可在 dhcp-options(5) 找到。
預設當 FreeBSD 系統開機時,其 DHCP 客戶端會在背景執行或稱非同步 (Asynchronously) 執行,在完成 DHCP 程序的同時其他啟動 Script 會繼續執行,來加速系統啟動。
背景 DHCP 在 DHCP 伺服器可以快速的回應客戶端請求時可運作的很好。然而 DHCP 在某些系統可能需要較長的時間才能完成,若網路服務嘗試在 DHCP 尚未分配網路位置資訊前執行則會失敗。使用同步 (Synchronous) 模式執行 DHCP 可避免這個問題,因為同步模式會暫停啟動直到 DHCP 已設置完成。
在 /etc/rc.conf 中的這行用來設定採用背景 (非同步模式):
ifconfig_fxp0="DHCP"
若系統已經在安裝時設定使用 DHCP,這行可能會已存在。替換在例子中的 fxp0 為實際要動態設置的網路介面名稱,如 設定網路介面卡 中的說明。
要改設定系統採用同步模式,在啟動時暫停等候 DHCP 完成,使用 “SYNCDHCP”:
ifconfig_fxp0="SYNCDHCP"
尚有其他可用的客戶端選項,請在 rc.conf(5) 搜尋 dhclient 來取得詳細資訊。
DHCP 客戶端會使用到以下檔案:
/etc/dhclient.conf
dhclient 用到的設定檔。通常這個檔案只會有註解,因為預設便適用大多數客戶端。這個設定檔在 dhclient.conf(5) 中有說明。
/sbin/dhclient
有關指令本身的更多資訊可於 dhclient(8) 找到。
/sbin/dhclient-script
FreeBSD 特定的 DHCP 客戶端設定 Script。在 dhclient-script(8) 中有說明,但應不須做任何修改便可正常運作。
/var/db/dhclient.leases.interface
DHCP 客戶端會在這個檔案中儲存有效租約的資料,寫入的格式類似日誌,在 dhclient.leases(5) 有說明。
本節將示範如何設定 FreeBSD 系統成為 DHCP 伺服器,使用 Internet Systems Consortium (ISC) 所實作的 DHCP 伺服器,這個伺服器及其文件可使用 net/isc-dhcp44-server 套件或 Port 安裝。
net/isc-dhcp44-server 的安裝程式會安裝一份範例設定檔,複製 /usr/local/etc/dhcpd.conf.example 到 /usr/local/etc/dhcpd.conf 並在這個新檔案做編輯。
這個設定檔內容包括了子網路及主機的宣告,用來定義要提供給 DHCP 客戶端的資訊。如以下行設定:
option domain-name "example.org";(1)
option domain-name-servers ns1.example.org;(2)
option subnet-mask 255.255.255.0;(3)
default-lease-time 600;(4)
max-lease-time 72400;(5)
ddns-update-style none;(6)
subnet 10.254.239.0 netmask 255.255.255.224 {
range 10.254.239.10 10.254.239.20;(7)
option routers rtr-239-0-1.example.org, rtr-239-0-2.example.org;(8)
}
host fantasia {
hardware ethernet 08:00:07:26:c0:a5;(9)
fixed-address fantasia.fugue.com;(10)
}| 1 | 這個選項指定了要提供給客戶端的預設搜尋網域。請參考 resolv.conf(5) 取得更多資訊。 |
| 2 | 這個選項指定了客戶端應使用的 DNS 伺服器清單 (以逗號分隔)。如範例中所示,可使用伺服器的完整網域名稱 (Fully Qualified Domain Names, FQDN) 或伺服器的 IP 位址。 |
| 3 | 要提供給客戶端的子網路遮罩。 |
| 4 | 預設租約到期時間 (秒)。客戶端可以自行設定覆蓋這個數值。 |
| 5 | 一個租約最多允許的時間長度 (秒)。若客戶端請求更長的租約,仍會發出租約,但最多只會在 max-lease-time 內有效。 |
| 6 | 預設的 none 會關閉動態 DNS 更新。更改此值為 interim 可讓 DHCP 伺服器每當發出一個租約便通知 DNS 伺服器更新,如此一來 DNS 伺服器便知道網路中該電腦的 IP 位址。不要更改此預設值,除非 DNS 伺服器已設定為支援動態 DNS。 |
| 7 | 此行會建立一個可用 IP 位址的儲存池來保留這些要分配給 DHCP 客戶端的位址。位址範圍必須在前一行所指定的網路或子網路中有效。 |
| 8 | 宣告在開始的 { 括號之前所指定的網路或子網路中有效的預設通訊閘。 |
| 9 | 指定客戶端的硬體 MAC 位址,好讓 DHCP 伺服器在客戶端發出請求時可以辨識客戶端。 |
| 10 | 指定這個主機應分配相同的 IP 位址。在此處用主機名稱是正確的,由於 DHCP 伺服器會在回傳租約資訊前先解析主機名稱。 |
此設定檔還支援其他選項,請參考隨伺服器一併安裝的 dhcpd.conf(5) 來取得詳細資訊與範例。
完成 dhcpd.conf 的設定之後,在 /etc/rc.conf 啟動 DHCP 伺服器:
dhcpd_enable="YES" dhcpd_ifaces="dc0"
替換 dc0 為 DHCP 伺服器要傾聽 DHCP 客戶端請求的網路介面 (多個介面可以空白分隔)。
執行以下指令來啟動伺服器:
# service isc-dhcpd start往後任何對伺服器設定的變更會需要使用 service(8) 中止 dhcpd 服務然後啟動。
DHCP 伺服器會使用到以下檔案。注意,操作手冊會與伺服器軟體一同安裝。
/usr/local/sbin/dhcpd
更多有關 dhcpd 伺服器的資訊可在 dhcpd(8) 找到。
/usr/local/etc/dhcpd.conf
伺服器設定檔需要含有所有要提供給客戶端的資訊以及有關伺服器運作的資訊。在 dhcpd.conf(5) 有此設定檔的說明。
/var/db/dhcpd.leases
DHCP 伺服器會儲存一份已發出租約的資料於這個檔案,寫入的格式類似日誌。參考 dhcpd.leases(5) 會有更完整的說明。
/usr/local/sbin/dhcrelay
這個 Daemon 會用在更進階的環境中,在一個 DHCP 伺服器要轉發來自客戶端的請求到另一個網路的另一個 DHCP 伺服器的環境。若需要使用此功能,請安裝 net/isc-dhcp44-relay 套件或 Port,安裝會包含 dhcrelay(8),裡面有提供更詳細的資訊。
網域名稱系統 (Domain Name System, DNS) 是一種協定用來轉換網域名稱為 IP 位址,反之亦然。DNS 會協調網際網路上有權的根節點 (Authoritative root)、最上層網域 (Top Level Domain, TLD) 及其他小規模名稱伺服器來取得結果,而這些伺服器可管理與快取個自的網域資訊。要在系統上做 DNS 查詢並不需要架設一個名稱伺服器。
以下表格會說明一些與 DNS 有關的術語:
| 術語 | 定義 |
|---|---|
正向 DNS (Forward DNS) | 將主機名稱對應 IP 位址的動作。 |
源頭 (Origin) | 代表某個轄區檔案中所涵蓋的網域。 |
解析器 (Resolver) | 主機向名稱伺服器查詢轄區資訊的系統程序。 |
反向 DNS (Reverse DNS) | 將 IP 對應主機名稱的動作。 |
根轄區 (Root zone) | 網際網路轄區階層的最開始,所有的轄區會在根轄區之下,類似在檔案系統中所有的檔案會在根目錄底下。 |
轄區 (Zone) | 獨立的網域、子網域或或由相同授權 (Authority) 管理的部分 DNS。 |
轄區範例:
. 是一般在文件中表達根轄區的方式。
org. 是一個在根轄區底下的最上層網域 (Top Level Domain , TLD)。
example.org. 是一個在 org. TLD 底下的轄區。
1.168.192.in-addr.arpa 是一個轄區用來代表所有在 192.168.1.* IP 位址空間底下的 IP 位址。
如您所見,更詳細的主機名稱會加在左方,例如 example.org. 比 org. 更具體,如同 org. 比根轄區更具體,主機名稱每一部份的架構很像檔案系統:/dev 目錄在根目錄底下,以此類推。
名稱伺服器通常有兩種形式:有權的 (Authoritative) 名稱伺服器與快取 (或稱解析) 名稱伺服器。
以下情況會需要一台有權的名稱伺服器:
想要提供 DNS 資訊給全世界,做為官方回覆查詢。
已經註冊了一個網域,例如 example.org,且要將 IP 位址分配到主機名稱下。
一段 IP 位址範圍需要反向 DNS 項目 (IP 轉主機名稱)。
要有一台備援或次要名稱伺服器用來回覆查詢。
以下情況會需要一台快取名稱伺服器:
比起查詢外部的名稱伺服器本地 DNS 伺服器可以快取並更快的回應。
當查詢 www.FreeBSD.org 時,解析程式通常會查詢上游 ISP 的名稱伺服器然後接收其回覆,使用本地、快取 DNS 伺服器,只需要由快取 DNS 伺服器對外部做一次查詢,其他的查詢則不需要再向區域網路之外查詢,因為這些資訊已經在本地被快取了。
Unbound 由 FreeBSD 基礎系統提供,預設只會提供本機的 DNS 解析,雖然基礎系統的套件可被設定提供本機以外的解析服務,但要解決這樣的需求仍建議安裝 FreeBSD Port 套件集中的 Unbound。
要開啟 Unbound 可加入下行到 /etc/rc.conf:
local_unbound_enable="YES"
任何已存在於 /etc/resolv.conf 中的名稱伺服器會在新的 Unbound 設定中被設為追隨者 (Forwarder)。
若任一個列在清單中的名稱伺服器不支援 DNSSEC,則本地的 DNS 解析便會失敗,請確認有測試每一台名稱伺服器並移除所有測試失敗的項目。以下指令會顯示出信認樹或在 |
% drill -S FreeBSD.org @192.168.1.1確認完每一台名稱伺服器都支援 DNSSEC 後啟動 Unbound:
# service local_unbound onestart這將會更新 /etc/resolv.conf 來讓查詢已用 DNSSEC 確保安全的網域現在可以運作,例如,執行以下指令來檢驗 FreeBSD.org DNSSEC 信任樹:
% drill -S FreeBSD.org
;; Number of trusted keys: 1
;; Chasing: freebsd.org. A
DNSSEC Trust tree:
freebsd.org. (A)
|---freebsd.org. (DNSKEY keytag: 36786 alg: 8 flags: 256)
|---freebsd.org. (DNSKEY keytag: 32659 alg: 8 flags: 257)
|---freebsd.org. (DS keytag: 32659 digest type: 2)
|---org. (DNSKEY keytag: 49587 alg: 7 flags: 256)
|---org. (DNSKEY keytag: 9795 alg: 7 flags: 257)
|---org. (DNSKEY keytag: 21366 alg: 7 flags: 257)
|---org. (DS keytag: 21366 digest type: 1)
| |---. (DNSKEY keytag: 40926 alg: 8 flags: 256)
| |---. (DNSKEY keytag: 19036 alg: 8 flags: 257)
|---org. (DS keytag: 21366 digest type: 2)
|---. (DNSKEY keytag: 40926 alg: 8 flags: 256)
|---. (DNSKEY keytag: 19036 alg: 8 flags: 257)
;; Chase successful開放源碼的 Apache HTTP Server 是目前最廣泛被使用的網頁伺服器,FreeBSD 預設並不會安裝這個網頁伺服器,但可從 www/apache24 套件或 Port 安裝。
本節將會摘要如何設定並啟動在 FreeBSD 上 2.x 版的 Apache HTTP Server,要取得有關 Apache 更詳細的資訊及其設定項目請參考 httpd.apache.org。
在 FreeBSD 中,主 Apache HTTP Server 設定檔會安裝於 /usr/local/etc/apache2x/httpd.conf,其中 x 代表版號,這份 ASCII 文字檔中以 # 做為行首的是註解,而最常需修改的項目有:
ServerRoot "/usr/local"指定該 Apache 的預設安裝路徑,Binary 檔會儲存在伺服器根目錄 (Server root) 下的 bin 與 sbin 子目錄,而設定檔會儲存在 etc/apache2x 子目錄。
ServerAdmin you@example.com更改此項目為您要接收問題回報的電子郵件位址,這個位址也會顯示在一些伺服器產生的頁面上,如:錯誤頁面。
ServerName www.example.com:80讓管理者可以設定伺服器要回傳給客戶端的主機名稱 (Hostname),例如,www 可以更改為實際的主機名稱,若系統並未有註冊的 DNS 名稱,則可改輸入其 IP 位址,若伺服器需要傾聽其他埠號,可更改 80 為其他埠號。
DocumentRoot "/usr/local/www/apache2x/data"提供文件的目錄,預設所有的請求均會到此目錄,但可以使用符號連結與別名來指向其他地方。
在對 Apache 設定檔做變更之前,建議先做備份,在 Apache 設定完成之後,儲存讓檔案並使用 apachectl 檢驗設定,執行 apachectl configtest 的結果應回傳 Syntax OK。
要在系統啟動時執行 Apache,可加入下行到 /etc/rc.conf:
apache24_enable="YES"
若 Apache 要使用非預設的選項啟動,可加入下行到 /etc/rc.conf 來指定所需的旗標參數:
apache24_flags=""
若 apachectl 未回報設定錯,則可啟動 httpd:
# service apache24 starthttpd 服務可以透過在網頁瀏覽器中輸入 http://localhost 來測試,將 localhost 更改為執行 httpd 那台主機的完整網域名稱 (Fully-qualified domain name)。預設會顯示的網頁為 /usr/local/www/apache24/data/index.html。
後續若有在 httpd 執行中時修改 Apache 設定檔可使用以下指令來測試是否有誤:
# service apache24 configtest注意, |
虛擬主機允許在一個 Apache 伺服器執行多個網站,虛擬主機可以是以 IP 為主 (IP-based) 或以名稱為主 (name-based)。以 IP 為主的虛擬主機中的每一個網站要使用不同的 IP 位址。以名稱為主的虛擬主機會使用客戶端的 HTTP/1.1 標頭來判斷主機名稱,這可讓不同的網站共用相同的 IP 位址。
要設定 Apache 使用以名稱為主的虛擬主機可在每一個網站加入 VirtualHost 區塊,例如,有一個名稱為 www.domain.tld 的主機擁有一個 www.someotherdomain.tld 的虛擬網域,可加入以下項目到 httpd.conf:
<VirtualHost *>
ServerName www.domain.tld
DocumentRoot /www/domain.tld
</VirtualHost>
<VirtualHost *>
ServerName www.someotherdomain.tld
DocumentRoot /www/someotherdomain.tld
</VirtualHost>每一個虛擬主機均需更改其 ServerName 與 DocumentRoot 的值為實際要使用的值。
更多有關設定虛擬主機的資訊,可參考 Apache 官方說明文件於:http://httpd.apache.org/docs/vhosts/。
Apache 使用模組 (Module) 來擴充伺服器所提供的功能。請參考 http://httpd.apache.org/docs/current/mod/ 來取得可用模組的完整清單與設定詳細資訊。
在 FreeBSD 中有些模組可以隨著 www/apache24 Port 編譯,只要在 /usr/ports/www/apache24 輸入 make config 便可查看有那一些模組是預設開啟的,若模組未與 Port 一併編譯,FreeBSD Port 套件集也提供了一個簡單的方式可安裝各種模組,本節將介紹最常使用的三個模組。
mod_ssl 模組利用了 OpenSSL 透過 Secure Sockets Layer (SSLv3) 與 Transport Layer Security (TLSv1) 通訊協定來提供強大的加密,這個模組提供了向受信認的憑証簽署機構申請簽章憑証所需的任何東西,讓 FreeBSD 上能夠執行安全的網頁伺服器。
在 FreeBSD 中 mod_ssl 模組預設在套件與 Port 均是開啟的,可用的設定項目在 http://httpd.apache.org/docs/current/mod/mod_ssl.html 會說明。
mod_perl 模組讓您可以使用 Perl 撰寫 Apache 模組,除此之外,嵌入到伺服器的直譯器可避免啟動外部直譯器的額外開銷與 Perl 耗費的啟動時間。
mod_perl 可以使用 www/mod_perl2 套件或 Port 安裝,有關使用此模組的說明文件可在 http://perl.apache.org/docs/2.0/index.html 中找到。
PHP: Hypertext Preprocessor (PHP) 是一般用途的腳本 (Script) 語言,特別適用於網站開發,能夠嵌入在 HTML 當中,它的語法參考自 C, Java™ 及 Perl,目的在讓網頁開發人員能快速的寫出動態網頁。
要在 Apache 網頁伺服器上加入對 PHP5 的支援,可安裝 www/mod_php56 套件或 Port,這會安裝並設定支援動態 PHP 應用程式所需的模組。安裝過程會自動加入下行到 /usr/local/etc/apache24/httpd.conf:
LoadModule php5_module libexec/apache24/libphp5.so
接著,執行 graceful 重新啟動來載入 PHP 模組:
# apachectl graceful由 www/mod_php56 所提供的 PHP 支援是有限的,若需要額外的支援可以使用 lang/php56-extensions Port 來安裝,該 Port 提供了選單介面來選擇可用的 PHP 擴充套件。
或者,可以找到適當的 Port 來安裝各別的擴充套件,例如,要增加 PHP 對 MySQL 資料庫伺服器的支援可安裝 databases/php56-mysql。
在安裝完擴充套件之後,必須重新載入 Apache 伺服器來使用新的設定值:
# apachectl graceful除了 mod_perl 與 mod_php 外,也有其他語言可用來建立動態網頁內容,這包含了 Django 與 Ruby on Rails。
Django 是以 BSD 授權的框架 (Framework),指在讓開發人員能快速的寫出高效、優雅的網頁應用程式。它提供了物件關聯對應器 (Object-relational mapper),所以各種資料型態可當做 Python 的物件來開發,且提供了豐富的動態資料庫存取 API 給這些物件,讓開發人員不再需要寫 SQL。它也同時提供了可擴充的樣板系統,來讓應用程式的邏輯與 HTML 呈現能夠被拆開。
Django 需要 mod_python,以及一個 SQL 資料庫引擎才能運作。在 FreeBSD 中的 www/py-django Port 會自動安裝 mod_python 以及對 PostgreSQL, MySQL 或 SQLite 資料庫的支援,預設為 SQLite,要更改資料庫引擎可在 /usr/ports/www/py-django 輸入 make config 然後再安裝該 Port。
Django 安裝完成之後,應用程式會需要一個專案目錄並搭配 Apache 設定才能使用內嵌的 Python 直譯器,此直譯器會用來呼叫網站上指定 URL 的應用程式。
要設定 Apache 傳遞某個 URL 請求到網站應用程式,可加入下行到 httpd.conf 來指定專案目錄的完整路徑:
<Location "/">
SetHandler python-program
PythonPath "['/dir/to/the/django/packages/'] + sys.path"
PythonHandler django.core.handlers.modpython
SetEnv DJANGO_SETTINGS_MODULE mysite.settings
PythonAutoReload On
PythonDebug On
</Location>請參考 https://docs.djangoproject.com 來取得如何使用 Django 的更多資訊。
Ruby on Rails 是另外一套開放源碼的網站框架 (Framework),提供了完整的開發堆疊,這使得網頁開發人員可以更有生產力且能夠快速的寫出強大的應用程式,在 FreeBSD 它可以使用 www/rubygem-rails 套件或 Port 安裝。
請參考 http://guides.rubyonrails.org 來取得更多有關如何使用 Ruby on Rails 的資訊。
檔案傳輸協定 (File Transfer Protocol, FTP) 提供了使用一個簡單的方式能夠將檔案傳輸到與接收自 FTP 伺服器,FreeBSD 內建了 FTP 伺服器軟體 ftpd 在基礎系統 (Base system) 中。
FreeBSD 提供了多個設定檔來控制對 FTP 伺服器的存取,本節將摘要這些檔案的設定方式,請參考 ftpd(8) 來取得更多有關內建 FTP 伺服器的詳細資訊。
最重要的一個設定步驟便是決定那些帳號能夠存取 FTP 伺服器,FreeBSD 系統有數個系統帳號,這些帳號不應該能夠擁有 FTP 存取權,不允許存取 FTP 的使用者清單可在 /etc/ftpusers 找到,預設該檔案內會有所有的系統帳號,其他不應允許存取 FTP 的使用者也可在此加入。
在某些情況可能會布望限制某些使用者的存取,而不是完全避免這些使用者使用 FTP,這可以透過建立 /etc/ftpchroot 來完成,詳如 ftpchroot(5) 所述,這個檔案會列出受到 FTP 存取限制的使用者與群組。
要在伺服器上開啟匿名 FTP 存取權,可在 FreeBSD 系統上建立一個名稱為 ftp 使用者,使用者將能夠使用 ftp 或 anonymous 使用者名稱來登入 FTP 伺服器,當提示輸入密碼時,輸入任何值都會被接受,但是慣例上應使用電子郵件位址來當做密碼。當匿名使用者登入時 FTP 伺服器會呼叫 chroot(2) 來限制使用者只能存取 ftp 使用者的家目錄。
要設定顯示給 FTP 客戶端的歡迎訊息有兩個文字檔可以建立,/etc/ftpwelcome 的內容會在收到登入提示前顯示給使用者看,登入成功能後,則會顯示 /etc/ftpmotd 的內容。注意,這個檔案的路徑是相對於登入環境的,所以 ~ftp/etc/ftpmotd 的內容只會對匿名使用者顯示。
設定完 FTP 伺服器之後,在 /etc/rc.conf 設定適當的變數來在開機時啟動該服務:
ftpd_enable="YES"
要立即啟動服務可:
# service ftpd start要測試到 FTP 伺服器的連線可輸入:
% ftp localhostftpd daemon 會使用 syslog(3) 來記錄訊息,預設,系統記錄 Daemon 會寫入有關 FTP 的訊息到 /var/log/xferlog,FTP 記錄的位置可以透過更改 /etc/syslog.conf 中下行來做修改:
ftp.info /var/log/xferlog
要注意啟動匿名 FTP 伺服器可能的潛藏問題,尤其是要讓匿名使用者上傳檔案時要再次確認,因為這可能讓該 FTP 站變成用來交換未授權商業軟體的交流平台或者更糟的狀況。若真的需要匿名 FTP 上傳,那麼請檢查權限設定,讓這些檔案在尚未被管理者審查前不能夠被其他匿名使用者讀取。 |
Samba 是熱門的開放源碼軟體套件,使用 SMB/CIFS 通訊協定提供檔案與列印服務,此通訊協定內建於 Microsoft™ Windows™ 系統,在非 Microsoft™ Windows™ 的系統可透過安裝 Samba 客戶端程式庫來支援此協定。此通訊協定讓客戶端可以存取共享的資料與印表機,這些共享的資源可掛載到一個本機的磁碟機,而共享的印表機則可以當做本機的印表機使用。
在 FreeBSD 上,可以使用 net/samba48 Port 或套件來安裝 Samba 客戶端程式庫,這個客戶端提供了讓 FreeBSD 系統能存取 SMB/CIFS 在 Microsoft™ Windows™ 網路中共享的資源。
FreeBSD 系統也可以透過安裝 net/samba48 Port 或套件來設定成 Samba 伺服器,這讓管理者可以在 FreeBSD 系統上建立 SMB/CIFS 的共享資源,讓執行 Microsoft™ Windows™ 或 Samba 客戶端程式庫的客戶端能夠存取。
Samba 的設定位於 /usr/local/etc/smb4.conf,必須先設定這個檔案才可使用 Samba。
要共享目錄與印表機給在工作群組中的 Windows™ 客戶端的簡易 smb4.conf 範例如下。對於涉及 LDAP 或 Active Directory 的複雜安裝,可使用 samba-tool(8) 來建立初始的 smb4.conf。
[global] workgroup = WORKGROUP server string = Samba Server Version %v netbios name = ExampleMachine wins support = Yes security = user passdb backend = tdbsam # Example: share /usr/src accessible only to 'developer' user [src] path = /usr/src valid users = developer writable = yes browsable = yes read only = no guest ok = no public = no create mask = 0666 directory mask = 0755
在 /usr/local/etc/smb4.conf 中加入用來描述網路環境的設定有:
workgroup要提供的工作群組名稱。
netbios nameSamba 伺服器已知的 NetBIOS 名稱,預設為主機的 DNS 名稱第一節。
server string會顯示於 net view 輸出結果以及其他會尋找伺服器描述文字並顯示的網路工具的文字。
wins support不論 Samba 是否要作為 WINS 伺服器,請不要在網路上開啟超過一台伺服器的 WINS 功能。
在 /usr/local/etc/smb4.conf 中最重要的設定便是安全性模式以及後端密碼格式,以下項目管控的選項有:
security最常見的設定為 security = share 以及 security = user,若客戶端使用的使用者名稱與在 FreeBSD 主機上使用的使用者名稱相同,則應該使用使用者 (user) 層級的安全性,這是預設的安全性原則且它會要求客戶端在存取共享資源前先登入。
安全性為共享 (share) 層級時,客戶端存取共享資源不需要先使用有效的使用者名稱與密碼登入伺服器,在是在舊版 Samba 所採用的預設安全性模式。
passdb backendSamba 支援數種不同的後端認証模式,客戶端可以使用 LDAP, NIS+, SQL 資料庫或修改過的密碼檔來認証,建議的認証方式是 tdbsam,適用於簡易的網路環境且在此處說明,對於較大或更複雜的網路則較建議使用 ldapsam,而 smbpasswd 是舊版的預設值,現在已廢棄不使用。
FreeBSD 使用者帳號必須對應 SambaSAMAccount 資料庫, 才能讓 Windows™ 客戶端存取共享資源,要對應既有的 FreeBSD 使用者帳號可使用 pdbedit(8):
# pdbedit -a username本節只會提到一些最常用的設定,請參考 官方 Samba HOWTO 來取得有關可用設定選項的額外資訊。
要在開機時啟動 Samba,可加入下行到 /etc/rc.conf:
samba_server_enable="YES"
要立即啟動 Samba:
# service samba_server start
Performing sanity check on Samba configuration: OK
Starting nmbd.
Starting smbd.Samba 由三個獨立的 Daemon 所組成,nmbd 與 smbd daemon 可透過 samba_enable 來啟動,若同時也需要 winbind 名稱解析服務則需額外設定:
winbindd_enable="YES"
Samba 可以隨時停止,要停止可輸入:
# service samba_server stopSamba 是一套擁有能整合 Microsoft™ Windows™ 網路功能的複雜軟體套件,除了在此處說明的基礎設定,要取得更多的功能資訊,請參考 http://www.samba.org。
隨著使用時間,電腦的時鐘會逐漸偏移,這對需要網路上電腦有相同準確度時間的許多網路服務來說是一個大問題。準確的時間同樣能確保檔案時間戳記的一致性。網路時間協定 (Network Time Protocol, NTP) 是一種在網路上可以確保時間準確的方式。
FreeBSD 內含 ntpd(8) 可設定來查詢其他 NTP 伺服器來同步電腦的時間或提供時間服務給其他在網路上的電腦。
本節將會介紹如何設定 FreeBSD 上的 ntpd,更進一步的說明文件可於 /usr/shared/doc/ntp/ 找到 HTML 格式的版本。
在 FreeBSD,內建的 ntpd 可用來同步系統的時間,Ntpd 要使用 rc.conf(5) 中的變數以及下一節會詳細說明的 /etc/ntp.conf 來設定。
Ntpd 與網路中各節點的通訊採用 UDP 封包,在伺服器與 NTP 各節點間的防火牆必須設定成可允許進/出埠 123 的 UDP 封包。
Ntpd 會讀取 /etc/ntp.conf 來得知要從那些 NTP 伺服器查詢時間,建議可設定多個 NTP 伺服器,來避免萬一其中一個伺服器無法連線或是時間不可靠的問題,當 ntpd 收到回應,它會偏好先採用較可信賴的伺服器。查詢的伺服器可以是來自本地網路的 ISP 所提供,也可從線上可公開存取的NTP 伺服器清單中挑選,您可以選擇一個離您地理位置較近的伺服器並閱讀它的使用規則。也有 可公開存取的 NTP 池線上清單可用,由一個地理區域所組織,除此之外 FreeBSD 提供了計劃贊助的伺服器池,0.freebsd.pool.ntp.org。
這份簡單的 ntp.conf 範例檔可以放心的使用,其中包含了建議的 restrict 選項可避免伺服器被公開存取。
# Disallow ntpq control/query access. Allow peers to be added only # based on pool and server statements in this file. restrict default limited kod nomodify notrap noquery nopeer restrict source limited kod nomodify notrap noquery # Allow unrestricted access from localhost for queries and control. restrict 127.0.0.1 restrict ::1 # Add a specific server. server ntplocal.example.com iburst # Add FreeBSD pool servers until 3-6 good servers are available. tos minclock 3 maxclock 6 pool 0.freebsd.pool.ntp.org iburst # Use a local leap-seconds file. leapfile "/var/db/ntpd.leap-seconds.list"
這個檔案的格式在 ntp.conf(5) 有詳細說明,以下的說明僅快速的帶過以上範例檔有用到的一些關鍵字。
預設 NTP 伺服器是可以被任何網路主機所存取,restrict 關鍵字可以控制有那些系統可以存取伺服器。restrict 支援設定多項,每一項可再更進一步調整前面所做的設定。範例中的設定授權本地系統有完整的查詢及控制權限,而遠端系統只有查詢時間的權限。要了解更詳細的資訊請參考 ntp.conf(5) 中的 Access Control Support 一節。
server 關鍵字可指定要查詢的伺服器,設定檔中可以使用多個 server 關鍵字,一個伺服器列一行。pool 關鍵字可指定伺服器池,Ntpd 會加入該伺服器池中的一或多台伺服器,直到數量滿足 tos minclock 的設定。iburst 關鍵字會指示 ntpd 在建立連線時執行 8 連發快速封包交換,可以更快的同步系統時間。
leapfile 關鍵字用來指定含有閏秒 (Leap second) 資訊的檔案位置,該檔案是由 periodic(8) 自動更新。這個關鍵字指定的檔案位置必須與 /etc/rc.conf 中設定的 ntp_db_leapfile 相同。
設定 ntpd_enable="YES" 可讓開機時會啟動 ntpd。將 ntpd_enable=YES 加到 /etc/rc.conf 之後,可輸入以下指令讓 ntpd 不需重新開機立即啟動:
# service ntpd start要使用 ntpd 必須設定 ntpd_enable,以下所列的 rc.conf 變數可視所需請況設定。
設定 ntpd_sync_on_start=YES 可讓 ntpd 可以在系統啟動時一次同步任何差距的時間,正常情況若時鐘的差距超過 1000 秒便會記錄錯誤並且中止。這個設定項目在沒有電池備援的時鐘上特別有用。
設定 ntpd_oomprotect=YES 可保護 ntpd daemon 被系統中止並嘗試從記憶體不足 (Out Of Memory, OOM) 的情況恢復運作。
設定 ntpd_config= 可更改 ntp.conf 檔案的位置。
設定 ntpd_flags= 可設定使用任何其他所需 ntpd 參數,但要避免使用由 /etc/rc.d/ntpd 內部控管的參數如下:
-p (pid 檔案位置)
-c (改用 ntpd_config= 設定)
ntpd 使用者執行 Ntpd在 FreeBSD 上的 Ntpd 現在可以使用無特權的使用者啟動並執行,要達到這個功能需要 mac_ntpd(4) 規則模組。/etc/rc.d/ntpd 啟動 Script 會先檢查 NTP 的設定,若可以的話它會載入 mac_ntpd 模組,然後以無特權的使用者 ntpd (user id 123) 來啟動 ntpd。為了避免檔案與目錄存取權限的問題,當設定中有任何檔案相關的選項時,啟動 Script 不會自動以 ntpd 身份啟動 ntpd。
在 ntpd_flags 若出現以下任何參數則需要以最下面的方式手動設定才能以 ntpd 使用者的身份執行:
-f 或 --driftfile
-i 或 --jaildir
-k 或 --keyfile
-l 或 --logfile
-s 或 --statsdir
在 ntp.conf 若出現以下任何關鍵字則需要以最下面的方式手動設定才能以 ntpd 使用者的身份執行:
crypto
driftfile
key
logdir
statsdir
要手動設定以使用者 ntpd 身份執行 ntpd 你必須:
確保 ntpd 使用者有權限存取所有在設定檔中指定的檔案與目錄。
讓 mac_ntpd 模組載入或編譯至核心,請參考 mac_ntpd(4) 取得詳細資訊。
在 /etc/rc.conf 中設定 ntpd_user="ntpd"
ntpd 並不需要永久的網際網路連線才能正常運作,若有一個 PPP 連線是設定成需要時撥號,那麼便需要避免 NTP 的流量觸發撥號或是保持連線不中斷,這可在 /etc/ppp/ppp.conf 使用 filter 項目設定,例如:
set filter dial 0 deny udp src eq 123 # Prevent NTP traffic from initiating dial out set filter dial 1 permit 0 0 set filter alive 0 deny udp src eq 123 # Prevent incoming NTP traffic from keeping the connection open set filter alive 1 deny udp dst eq 123 # Prevent outgoing NTP traffic from keeping the connection open set filter alive 2 permit 0/0 0/0
要取得更詳細的資訊,請參考於 ppp(8) 的 PACKET FILTERING 小節以及在 /usr/shared/examples/ppp/ 中的範例。
部份網際網路存取提供商會封鎖較小編號的埠,這會讓 NTP 無法運作,因為回應永遠無到傳送到該主機。 |
iSCSI is a way to share storage over a network. Unlike NFS, which works at the file system level, iSCSI works at the block device level.
In iSCSI terminology, the system that shares the storage is known as the target. The storage can be a physical disk, or an area representing multiple disks or a portion of a physical disk. For example, if the disk(s) are formatted with ZFS, a zvol can be created to use as the iSCSI storage.
The clients which access the iSCSI storage are called initiators. To initiators, the storage available through iSCSI appears as a raw, unformatted disk known as a LUN. Device nodes for the disk appear in /dev/ and the device must be separately formatted and mounted.
FreeBSD provides a native, kernel-based iSCSI target and initiator. This section describes how to configure a FreeBSD system as a target or an initiator.
To configure an iSCSI target, create the /etc/ctl.conf configuration file, add a line to /etc/rc.conf to make sure the ctld(8) daemon is automatically started at boot, and then start the daemon.
The following is an example of a simple /etc/ctl.conf configuration file. Refer to ctl.conf(5) for a more complete description of this file’s available options.
portal-group pg0 {
discovery-auth-group no-authentication
listen 0.0.0.0
listen [::]
}
target iqn.2012-06.com.example:target0 {
auth-group no-authentication
portal-group pg0
lun 0 {
path /data/target0-0
size 4G
}
}The first entry defines the pg0 portal group. Portal groups define which network addresses the ctld(8) daemon will listen on. The discovery-auth-group no-authentication entry indicates that any initiator is allowed to perform iSCSI target discovery without authentication. Lines three and four configure ctld(8) to listen on all IPv4 (listen 0.0.0.0) and IPv6 (listen [::]) addresses on the default port of 3260.
It is not necessary to define a portal group as there is a built-in portal group called default. In this case, the difference between default and pg0 is that with default, target discovery is always denied, while with pg0, it is always allowed.
The second entry defines a single target. Target has two possible meanings: a machine serving iSCSI or a named group of LUNs. This example uses the latter meaning, where iqn.2012-06.com.example:target0 is the target name. This target name is suitable for testing purposes. For actual use, change com.example to the real domain name, reversed. The 2012-06 represents the year and month of acquiring control of that domain name, and target0 can be any value. Any number of targets can be defined in this configuration file.
The auth-group no-authentication line allows all initiators to connect to the specified target and portal-group pg0 makes the target reachable through the pg0 portal group.
The next section defines the LUN. To the initiator, each LUN will be visible as a separate disk device. Multiple LUNs can be defined for each target. Each LUN is identified by a number, where LUN 0 is mandatory. The path /data/target0-0 line defines the full path to a file or zvol backing the LUN. That path must exist before starting ctld(8). The second line is optional and specifies the size of the LUN.
Next, to make sure the ctld(8) daemon is started at boot, add this line to /etc/rc.conf:
ctld_enable="YES"
To start ctld(8) now, run this command:
# service ctld startAs the ctld(8) daemon is started, it reads /etc/ctl.conf. If this file is edited after the daemon starts, use this command so that the changes take effect immediately:
# service ctld reloadThe previous example is inherently insecure as it uses no authentication, granting anyone full access to all targets. To require a username and password to access targets, modify the configuration as follows:
auth-group ag0 {
chap username1 secretsecret
chap username2 anothersecret
}
portal-group pg0 {
discovery-auth-group no-authentication
listen 0.0.0.0
listen [::]
}
target iqn.2012-06.com.example:target0 {
auth-group ag0
portal-group pg0
lun 0 {
path /data/target0-0
size 4G
}
}The auth-group section defines username and password pairs. An initiator trying to connect to iqn.2012-06.com.example:target0 must first specify a defined username and secret. However, target discovery is still permitted without authentication. To require target discovery authentication, set discovery-auth-group to a defined auth-group name instead of no-authentication.
It is common to define a single exported target for every initiator. As a shorthand for the syntax above, the username and password can be specified directly in the target entry:
target iqn.2012-06.com.example:target0 {
portal-group pg0
chap username1 secretsecret
lun 0 {
path /data/target0-0
size 4G
}
}The iSCSI initiator described in this section is supported starting with FreeBSD 10.0-RELEASE. To use the iSCSI initiator available in older versions, refer to iscontrol(8). |
The iSCSI initiator requires that the iscsid(8) daemon is running. This daemon does not use a configuration file. To start it automatically at boot, add this line to /etc/rc.conf:
iscsid_enable="YES"
To start iscsid(8) now, run this command:
# service iscsid startConnecting to a target can be done with or without an /etc/iscsi.conf configuration file. This section demonstrates both types of connections.
To connect an initiator to a single target, specify the IP address of the portal and the name of the target:
# iscsictl -A -p 10.10.10.10 -t iqn.2012-06.com.example:target0To verify if the connection succeeded, run iscsictl without any arguments. The output should look similar to this:
Target name Target portal State iqn.2012-06.com.example:target0 10.10.10.10 Connected: da0
In this example, the iSCSI session was successfully established, with /dev/da0 representing the attached LUN. If the iqn.2012-06.com.example:target0 target exports more than one LUN, multiple device nodes will be shown in that section of the output:
Connected: da0 da1 da2.Any errors will be reported in the output, as well as the system logs. For example, this message usually means that the iscsid(8) daemon is not running:
Target name Target portal State iqn.2012-06.com.example:target0 10.10.10.10 Waiting for iscsid(8)
The following message suggests a networking problem, such as a wrong IP address or port:
Target name Target portal State iqn.2012-06.com.example:target0 10.10.10.11 Connection refused
This message means that the specified target name is wrong:
Target name Target portal State iqn.2012-06.com.example:target0 10.10.10.10 Not found
This message means that the target requires authentication:
Target name Target portal State iqn.2012-06.com.example:target0 10.10.10.10 Authentication failed
To specify a CHAP username and secret, use this syntax:
# iscsictl -A -p 10.10.10.10 -t iqn.2012-06.com.example:target0 -u user -s secretsecretTo connect using a configuration file, create /etc/iscsi.conf with contents like this:
t0 {
TargetAddress = 10.10.10.10
TargetName = iqn.2012-06.com.example:target0
AuthMethod = CHAP
chapIName = user
chapSecret = secretsecret
}The t0 specifies a nickname for the configuration file section. It will be used by the initiator to specify which configuration to use. The other lines specify the parameters to use during connection. The TargetAddress and TargetName are mandatory, whereas the other options are optional. In this example, the CHAP username and secret are shown.
To connect to the defined target, specify the nickname:
# iscsictl -An t0Alternately, to connect to all targets defined in the configuration file, use:
# iscsictl -AaTo make the initiator automatically connect to all targets in /etc/iscsi.conf, add the following to /etc/rc.conf:
iscsictl_enable="YES" iscsictl_flags="-Aa"
防火牆能夠過濾透過系統內送 (Incoming) 與外發 (Outgoing) 的流量,防火牆可使用一組或多組 "規則 (Rules)" 來檢查網路連線中進出的網路封包(Network packets),並且能允許或阻擋其通過。 而防火牆規則可以檢查封包中一個或數個特徵,例如通訊協定類型、來源或目的主機位址,以及來源及目地的連接埠 (Port)。
防火牆可以加強主機或網路的安全性,它可以用來完成下列事情:
保護並隔離內部網路的應用程式、服務與主機,避免來自網際網路不必要的存取。
限制或者禁止內部網路的主機存取網際網路服務。
支援網路位址轉譯 (Network address translation, NAT),可允許內部網路使用私有 IP 位址並共用一個連線使用一個 IP 位址連到網際網路或者自動分配一個共用池當中的公開位址。
FreeBSD 有三種內建於基礎系統的防火牆:PF, IPFW 與 IPFILTER 即 IPF。FreeBSD 也提供了兩種流量限制程式 (Traffic shaper) 來控制頻寬的用量:altq(4) 與 dummynet(4),ALTQ 一般配合 PF 使用,而 dummynet 會配合 IPFW。每一種防火牆都會使用規則來管制來自與送往 FreeBSD 的封包,儘管它們用不同的方式運作且有不同的規則語法。
FreeBSD 提供多個防火牆是為了滿足不同的需求與各種使用者的偏好,每位使用者應評估那一種防火牆最能滿足其需求。
讀完這章,您將了解:
如何定義封包過濾規則。
FreeBSD 內建防火牆之間的差異。
如何使用與設定 PF 防火牆。
如何使用與設定 IPFW 防火牆。
如何使用與設定 IPFILTER 防火牆。
在開始閱讀這章之前,您需要:
了解 FreeBSD 基礎及網路概念。
由於所有防火牆均是以監控所選封包的控制欄位值為基礎運作,所以防火牆規則集的建立者必須很明白 TCP/IP 是如何運作的,在封包的控制欄位中會有那些數值,這些數值會被如何用在一般的連線階段,要了解更多相關資訊,可參考 Daryl’s TCP/IP Primer。 |
一個規則集 (Ruleset) 中會有一群根據封包內的資料來判斷通過或封鎖的規則,主機間雙向的封包交換構成一個連線階段的對話,防火牆規則集會同時處理接收自網際網路的封包以及由系統所產生的回應封包,每一個 TCP/IP 服務都會預先定義其通訊協定以及要傾聽的埠,要送往指定服務的封包會誕生在來源位址,使用一個不需特殊權限的埠並傳送給目標位址上特定服務的埠,所有上述過程中的參數均可用來當做建立規則的篩選條件,來允許或封鎖服務。
要查詢一個不清楚的埠號,可參考 /etc/services,或者至 http://en.wikipedia.org/wiki/List_of_TCP_and_UDP_port_numbers 查詢埠號來找出特定埠號的用途。
查看這個連結來了解有 那些埠號會被木馬程式使用。
FTP 有兩個模式:主動 (Active) 模式與被動 (Passive) 模式,兩者的差異在於取得資料通道的方式,被動模式會較安全,由於資料通道會取自 FTP 連線請求者。想要取得 FTP 與兩種模式更進一步的說明,詳見 http://www.slacksite.com/other/ftp.html。
防火牆規則集可以為排除式 ("exclusive") 或者內含式 ("inclusive"),一個排除式的防火牆會允許所有的連線通過除了符合規則集的連線,內含式的防火牆則會反過來只允許符合規則集的連線並封鎖其他任何的連線。
內含式的防火牆對於外發的流量有較好的控制,使其成為提供網際網路服務的系統的最佳選擇,它同時可以控制可存取私有網路的網際網路連線,所有不符合該規則的連線會被封鎖並記錄。一般來說,內含式的防火牆會比排除式的防火牆安全,因為內含式的防火牆可以明顯的減少不必要連線所造成風險。
除非另有說明,否則所有在此章節的範例規則集均為內含式防火牆規則集。 |
使用具狀態防火牆 ("Stateful firewall") 可以更進一步加強安全性,這種類型的防火牆可持續追蹤連線,只允許與現有連線相符的封包或符合允許條件的新連線通過。
狀態過濾技術 (Stateful filtering) 將所有的流量當做是一個由雙向封包交換所組成的連線階段,當在符合的規則上指定狀態 (State) 時,防火牆會自動產生內部規則來處理該連線階段中每個預期會通過的封包,這種防火牆有足夠的比對能力可以辨別是否為同一個連線階段的封包,任何不符合連線階段樣板的封包都會被自動拒絕。
當連線階段結束時,該規則將會動態狀態表 (Dynamic state table) 中移除。
Stateful filtering 讓管理者可以專注於封鎖/傳遞新的連線階段,若新的連線階段通過,那麼該連線階段後續的封包將會自動允許通過,且任何假冒的封包會自動被拒絕。若新的連線階最被封鎖,將不允許其任何後續的封包。Stateful filtering 提供了進階的比對能力,能夠抵禦不同種類由攻擊者發動的 flood 攻擊。
NAT 代表 Network Address Translation 即網路位址轉譯,NAT 功能讓在防火牆之後的私有 LAN 可以共用一個 ISP 分配的 IP 位址 (甚至是動態分配的),NAT 每一台在該 LAN 中的電腦均可連線網際網路,而不需要支付 ISP 多個網路帳號或 IP 位址的額外費用。
NAT 在當封包要外送到防火牆之外的網際網路時,會自動轉譯每一台電腦在私有 LAN 的 IP 位址成為一個公有 IP 位址,它也同樣會對回傳的封包做反向轉譯。
根據 RFC1918,會保留以下範圍的 IP 位址做為私有網路使用,永遠不會被傳送到網際網路,因此可供 NAT 使用:
10.0.0.0/8.
172.16.0.0/12.
192.168.0.0/16.
在使用防火牆規則時要_非常小心_,有一些設定_會將管理者鎖在伺服器之外_,保險起見的方式是在本機的 Console 做初次的防火牆設定,不要直接由遠端透過 ssh 來設定防火牆。 |
自 FreeBSD 5.3 開始,基礎系統便有內建 OpenBSD’s PF 防火牆的移植版本,PF 是一套完整、多功能的防火牆,並可選擇開啟 ALTQ (Alternate Queuing) 的支援來提供 Quality of Service (QoS) 機制。
OpenBSD 計劃有維護一份官方參考文件於 PF FAQ ,Peter Hansteen 有維一份詳盡的 PF 教學於 http://home.nuug.no/~peter/pf/。
When reading the PF FAQ, keep in mind that FreeBSD’s version of PF has diverged substantially from the upstream OpenBSD version over the years. Not all features work the same way on FreeBSD as they do in OpenBSD and vice versa. |
要詢問有關設定與執行 PF 防火牆的問題可至 FreeBSD packet filter 郵遞論壇,在詢問問題之前請先查看該郵遞論壇的封存資料,因您的問題可能已有解答。
This section of the Handbook focuses on PF as it pertains to FreeBSD. It demonstrates how to enable PF and ALTQ. It also provides several examples for creating rulesets on a FreeBSD system.
To use PF, its kernel module must be first loaded. This section describes the entries that can be added to /etc/rc.conf to enable PF.
Start by adding pf_enable=yes to /etc/rc.conf:
# sysrc pf_enable=yesAdditional options, described in pfctl(8), can be passed to PF when it is started. Add or change this entry in /etc/rc.conf and specify any required flags between the two quotes (""):
pf_flags="" # additional flags for pfctl startup
PF will not start if it cannot find its ruleset configuration file. By default, FreeBSD does not ship with a ruleset and there is no /etc/pf.conf. Example rulesets can be found in /usr/shared/examples/pf/. If a custom ruleset has been saved somewhere else, add a line to /etc/rc.conf which specifies the full path to the file:
pf_rules="/path/to/pf.conf"
Logging support for PF is provided by pflog(4). To enable logging support, add pflog_enable=yes to /etc/rc.conf:
# sysrc pflog_enable=yesThe following lines can also be added to change the default location of the log file or to specify any additional flags to pass to pflog(4) when it is started:
pflog_logfile="/var/log/pflog" # where pflogd should store the logfile pflog_flags="" # additional flags for pflogd startup
Finally, if there is a LAN behind the firewall and packets need to be forwarded for the computers on the LAN, or NAT is required, enable the following option:
gateway_enable="YES" # Enable as LAN gateway
After saving the needed edits, PF can be started with logging support by typing:
# service pf start
# service pflog startBy default, PF reads its configuration rules from /etc/pf.conf and modifies, drops, or passes packets according to the rules or definitions specified in this file. The FreeBSD installation includes several sample files located in /usr/shared/examples/pf/. Refer to the PF FAQ for complete coverage of PF rulesets.
To control PF, use pfctl. 有用的 pfctl 選項 summarizes some useful options to this command. Refer to pfctl(8) for a description of all available options:
| 指令 | 用途 |
|---|---|
| Enable PF. |
| Disable PF. |
| Flush all NAT, filter, state, and table rules and reload /etc/pf.conf. |
| Report on the filter rules, NAT rules, or state table. |
| Check /etc/pf.conf for errors, but do not load ruleset. |
security/sudo is useful for running commands like |
To keep an eye on the traffic that passes through the PF firewall, consider installing the sysutils/pftop package or port. Once installed, pftop can be run to view a running snapshot of traffic in a format which is similar to top(1).
This section demonstrates how to create a customized ruleset. It starts with the simplest of rulesets and builds upon its concepts using several examples to demonstrate real-world usage of PF’s many features.
The simplest possible ruleset is for a single machine that does not run any services and which needs access to one network, which may be the Internet. To create this minimal ruleset, edit /etc/pf.conf so it looks like this:
block in all pass out all keep state
The first rule denies all incoming traffic by default. The second rule allows connections created by this system to pass out, while retaining state information on those connections. This state information allows return traffic for those connections to pass back and should only be used on machines that can be trusted. The ruleset can be loaded with:
# pfctl -e ; pfctl -f /etc/pf.confIn addition to keeping state, PF provides lists and macros which can be defined for use when creating rules. Macros can include lists and need to be defined before use. As an example, insert these lines at the very top of the ruleset:
tcp_services = "{ ssh, smtp, domain, www, pop3, auth, pop3s }"
udp_services = "{ domain }"PF understands port names as well as port numbers, as long as the names are listed in /etc/services. This example creates two macros. The first is a list of seven TCP port names and the second is one UDP port name. Once defined, macros can be used in rules. In this example, all traffic is blocked except for the connections initiated by this system for the seven specified TCP services and the one specified UDP service:
tcp_services = "{ ssh, smtp, domain, www, pop3, auth, pop3s }"
udp_services = "{ domain }"
block all
pass out proto tcp to any port $tcp_services keep state
pass proto udp to any port $udp_services keep stateEven though UDP is considered to be a stateless protocol, PF is able to track some state information. For example, when a UDP request is passed which asks a name server about a domain name, PF will watch for the response to pass it back.
Whenever an edit is made to a ruleset, the new rules must be loaded so they can be used:
# pfctl -f /etc/pf.confIf there are no syntax errors, pfctl will not output any messages during the rule load. Rules can also be tested before attempting to load them:
# pfctl -nf /etc/pf.confIncluding -n causes the rules to be interpreted only, but not loaded. This provides an opportunity to correct any errors. At all times, the last valid ruleset loaded will be enforced until either PF is disabled or a new ruleset is loaded.
Adding |
This section demonstrates how to configure a FreeBSD system running PF to act as a gateway for at least one other machine. The gateway needs at least two network interfaces, each connected to a separate network. In this example, xl1 is connected to the Internet and xl0 is connected to the internal network.
First, enable the gateway to let the machine forward the network traffic it receives on one interface to another interface. This sysctl setting will forward IPv4 packets:
# sysctl net.inet.ip.forwarding=1To forward IPv6 traffic, use:
# sysctl net.inet6.ip6.forwarding=1To enable these settings at system boot, use sysrc(8) to add them to /etc/rc.conf:
# sysrc gateway_enable=yes
# sysrc ipv6_gateway_enable=yesVerify with ifconfig that both of the interfaces are up and running.
Next, create the PF rules to allow the gateway to pass traffic. While the following rule allows stateful traffic to pass from the Internet to hosts on the network, the to keyword does not guarantee passage all the way from source to destination:
pass in on xl1 from xl1:network to xl0:network port $ports keep state
That rule only lets the traffic pass in to the gateway on the internal interface. To let the packets go further, a matching rule is needed:
pass out on xl0 from xl1:network to xl0:network port $ports keep state
While these two rules will work, rules this specific are rarely needed. For a busy network admin, a readable ruleset is a safer ruleset. The remainder of this section demonstrates how to keep the rules as simple as possible for readability. For example, those two rules could be replaced with one rule:
pass from xl1:network to any port $ports keep state
The interface:network notation can be replaced with a macro to make the ruleset even more readable. For example, a $localnet macro could be defined as the network directly attached to the internal interface ($xl1:network). Alternatively, the definition of $localnet could be changed to an IP address/netmask notation to denote a network, such as 192.168.100.1/24 for a subnet of private addresses.
If required, $localnet could even be defined as a list of networks. Whatever the specific needs, a sensible $localnet definition could be used in a typical pass rule as follows:
pass from $localnet to any port $ports keep state
The following sample ruleset allows all traffic initiated by machines on the internal network. It first defines two macros to represent the external and internal 3COM interfaces of the gateway.
For dialup users, the external interface will use tun0. For an ADSL connection, specifically those using PPP over Ethernet (PPPoE), the correct external interface is tun0, not the physical Ethernet interface. |
ext_if = "xl0" # macro for external interface - use tun0 for PPPoE
int_if = "xl1" # macro for internal interface
localnet = $int_if:network
# ext_if IP address could be dynamic, hence ($ext_if)
nat on $ext_if from $localnet to any -> ($ext_if)
block all
pass from { lo0, $localnet } to any keep stateThis ruleset introduces the nat rule which is used to handle the network address translation from the non-routable addresses inside the internal network to the IP address assigned to the external interface. The parentheses surrounding the last part of the nat rule ($ext_if) is included when the IP address of the external interface is dynamically assigned. It ensures that network traffic runs without serious interruptions even if the external IP address changes.
Note that this ruleset probably allows more traffic to pass out of the network than is needed. One reasonable setup could create this macro:
client_out = "{ ftp-data, ftp, ssh, domain, pop3, auth, nntp, http, \
https, cvspserver, 2628, 5999, 8000, 8080 }"to use in the main pass rule:
pass inet proto tcp from $localnet to any port $client_out \
flags S/SA keep stateA few other pass rules may be needed. This one enables SSH on the external interface:
pass in inet proto tcp to $ext_if port ssh
This macro definition and rule allows DNS and NTP for internal clients:
udp_services = "{ domain, ntp }"
pass quick inet proto { tcp, udp } to any port $udp_services keep stateNote the quick keyword in this rule. Since the ruleset consists of several rules, it is important to understand the relationships between the rules in a ruleset. Rules are evaluated from top to bottom, in the sequence they are written. For each packet or connection evaluated by PF, the last matching rule in the ruleset is the one which is applied. However, when a packet matches a rule which contains the quick keyword, the rule processing stops and the packet is treated according to that rule. This is very useful when an exception to the general rules is needed.
Configuring working FTP rules can be problematic due to the nature of the FTP protocol. FTP pre-dates firewalls by several decades and is insecure in its design. The most common points against using FTP include:
Passwords are transferred in the clear.
The protocol demands the use of at least two TCP connections (control and data) on separate ports.
When a session is established, data is communicated using randomly selected ports.
All of these points present security challenges, even before considering any potential security weaknesses in client or server software. More secure alternatives for file transfer exist, such as sftp(1) or scp(1), which both feature authentication and data transfer over encrypted connections..
For those situations when FTP is required, PF provides redirection of FTP traffic to a small proxy program called ftp-proxy(8), which is included in the base system of FreeBSD. The role of the proxy is to dynamically insert and delete rules in the ruleset, using a set of anchors, to correctly handle FTP traffic.
To enable the FTP proxy, add this line to /etc/rc.conf:
ftpproxy_enable="YES"
Then start the proxy by running service ftp-proxy start.
For a basic configuration, three elements need to be added to /etc/pf.conf. First, the anchors which the proxy will use to insert the rules it generates for the FTP sessions:
nat-anchor "ftp-proxy/*" rdr-anchor "ftp-proxy/*"
Second, a pass rule is needed to allow FTP traffic in to the proxy.
Third, redirection and NAT rules need to be defined before the filtering rules. Insert this rdr rule immediately after the nat rule:
rdr pass on $int_if proto tcp from any to any port ftp -> 127.0.0.1 port 8021
Finally, allow the redirected traffic to pass:
pass out proto tcp from $proxy to any port ftp
where $proxy expands to the address the proxy daemon is bound to.
Save /etc/pf.conf, load the new rules, and verify from a client that FTP connections are working:
# pfctl -f /etc/pf.confThis example covers a basic setup where the clients in the local network need to contact FTP servers elsewhere. This basic configuration should work well with most combinations of FTP clients and servers. As shown in ftp-proxy(8), the proxy’s behavior can be changed in various ways by adding options to the ftpproxy_flags= line. Some clients or servers may have specific quirks that must be compensated for in the configuration, or there may be a need to integrate the proxy in specific ways such as assigning FTP traffic to a specific queue.
For ways to run an FTP server protected by PF and ftp-proxy(8), configure a separate ftp-proxy in reverse mode, using -R, on a separate port with its own redirecting pass rule.
Many of the tools used for debugging or troubleshooting a TCP/IP network rely on the Internet Control Message Protocol (ICMP), which was designed specifically with debugging in mind.
The ICMP protocol sends and receives control messages between hosts and gateways, mainly to provide feedback to a sender about any unusual or difficult conditions enroute to the target host. Routers use ICMP to negotiate packet sizes and other transmission parameters in a process often referred to as path MTU discovery.
From a firewall perspective, some ICMP control messages are vulnerable to known attack vectors. Also, letting all diagnostic traffic pass unconditionally makes debugging easier, but it also makes it easier for others to extract information about the network. For these reasons, the following rule may not be optimal:
pass inet proto icmp from any to any
One solution is to let all ICMP traffic from the local network through while stopping all probes from outside the network:
pass inet proto icmp from $localnet to any keep state pass inet proto icmp from any to $ext_if keep state
Additional options are available which demonstrate some of PF’s flexibility. For example, rather than allowing all ICMP messages, one can specify the messages used by ping(8) and traceroute(8). Start by defining a macro for that type of message:
icmp_types = "echoreq"
and a rule which uses the macro:
pass inet proto icmp all icmp-type $icmp_types keep state
If other types of ICMP packets are needed, expand icmp_types to a list of those packet types. Type more /usr/src/sbin/pfctl/pfctl_parser.c to see the list of ICMP message types supported by PF. Refer to http://www.iana.org/assignments/icmp-parameters/icmp-parameters.xhtml for an explanation of each message type.
Since Unix traceroute uses UDP by default, another rule is needed to allow Unix traceroute:
# allow out the default range for traceroute(8): pass out on $ext_if inet proto udp from any to any port 33433 >< 33626 keep state
Since TRACERT.EXE on Microsoft Windows systems uses ICMP echo request messages, only the first rule is needed to allow network traces from those systems. Unix traceroute can be instructed to use other protocols as well, and will use ICMP echo request messages if -I is used. Check the traceroute(8) man page for details.
Internet protocols are designed to be device independent, and one consequence of device independence is that the optimal packet size for a given connection cannot always be predicted reliably. The main constraint on packet size is the Maximum Transmission Unit (MTU) which sets the upper limit on the packet size for an interface. Type ifconfig to view the MTUs for a system’s network interfaces.
TCP/IP uses a process known as path MTU discovery to determine the right packet size for a connection. This process sends packets of varying sizes with the "Do not fragment" flag set, expecting an ICMP return packet of "type 3, code 4" when the upper limit has been reached. Type 3 means "destination unreachable", and code 4 is short for "fragmentation needed, but the do-not-fragment flag is set". To allow path MTU discovery in order to support connections to other MTUs, add the destination unreachable type to the icmp_types macro:
icmp_types = "{ echoreq, unreach }"Since the pass rule already uses that macro, it does not need to be modified to support the new ICMP type:
pass inet proto icmp all icmp-type $icmp_types keep state
Some types of data are relevant to filtering and redirection at a given time, but their definition is too long to be included in the ruleset file. PF supports the use of tables, which are defined lists that can be manipulated without needing to reload the entire ruleset, and which can provide fast lookups. Table names are always enclosed within < >, like this:
table <clients> { 192.168.2.0/24, !192.168.2.5 }In this example, the 192.168.2.0/24 network is part of the table, except for the address 192.168.2.5, which is excluded using the ! operator. It is also possible to load tables from files where each item is on a separate line, as seen in this example /etc/clients:
192.168.2.0/24 !192.168.2.5
To refer to the file, define the table like this:
table <clients> persist file "/etc/clients"
Once the table is defined, it can be referenced by a rule:
pass inet proto tcp from <clients> to any port $client_out flags S/SA keep state
A table’s contents can be manipulated live, using pfctl. This example adds another network to the table:
# pfctl -t clients -T add 192.168.1.0/16Note that any changes made this way will take affect now, making them ideal for testing, but will not survive a power failure or reboot. To make the changes permanent, modify the definition of the table in the ruleset or edit the file that the table refers to. One can maintain the on-disk copy of the table using a cron(8) job which dumps the table’s contents to disk at regular intervals, using a command such as pfctl -t clients -T show >/etc/clients. Alternatively, /etc/clients can be updated with the in-memory table contents:
# pfctl -t clients -T replace -f /etc/clientsThose who run SSH on an external interface have probably seen something like this in the authentication logs:
Sep 26 03:12:34 skapet sshd[25771]: Failed password for root from 200.72.41.31 port 40992 ssh2 Sep 26 03:12:34 skapet sshd[5279]: Failed password for root from 200.72.41.31 port 40992 ssh2 Sep 26 03:12:35 skapet sshd[5279]: Received disconnect from 200.72.41.31: 11: Bye Bye Sep 26 03:12:44 skapet sshd[29635]: Invalid user admin from 200.72.41.31 Sep 26 03:12:44 skapet sshd[24703]: input_userauth_request: invalid user admin Sep 26 03:12:44 skapet sshd[24703]: Failed password for invalid user admin from 200.72.41.31 port 41484 ssh2
This is indicative of a brute force attack where somebody or some program is trying to discover the user name and password which will let them into the system.
If external SSH access is needed for legitimate users, changing the default port used by SSH can offer some protection. However, PF provides a more elegant solution. Pass rules can contain limits on what connecting hosts can do and violators can be banished to a table of addresses which are denied some or all access. It is even possible to drop all existing connections from machines which overreach the limits.
To configure this, create this table in the tables section of the ruleset:
table <bruteforce> persist
Then, somewhere early in the ruleset, add rules to block brute access while allowing legitimate access:
block quick from <bruteforce>
pass inet proto tcp from any to $localnet port $tcp_services \
flags S/SA keep state \
(max-src-conn 100, max-src-conn-rate 15/5, \
overload <bruteforce> flush global)The part in parentheses defines the limits and the numbers should be changed to meet local requirements. It can be read as follows:
max-src-conn is the number of simultaneous connections allowed from one host.
max-src-conn-rate is the rate of new connections allowed from any single host (15) per number of seconds (5).
overload <bruteforce> means that any host which exceeds these limits gets its address added to the bruteforce table. The ruleset blocks all traffic from addresses in the bruteforce table.
Finally, flush global says that when a host reaches the limit, that all (global) of that host’s connections will be terminated (flush).
These rules will not block slow bruteforcers, as described in http://home.nuug.no/~peter/hailmary2013/. |
This example ruleset is intended mainly as an illustration. For example, if a generous number of connections in general are wanted, but the desire is to be more restrictive when it comes to ssh, supplement the rule above with something like the one below, early on in the rule set:
pass quick proto { tcp, udp } from any to any port ssh \
flags S/SA keep state \
(max-src-conn 15, max-src-conn-rate 5/3, \
overload <bruteforce> flush global)It May Not be Necessary to Block All Overloaders It is worth noting that the overload mechanism is a general technique which does not apply exclusively to SSH, and it is not always optimal to entirely block all traffic from offenders. For example, an overload rule could be used to protect a mail service or a web service, and the overload table could be used in a rule to assign offenders to a queue with a minimal bandwidth allocation or to redirect to a specific web page. |
Over time, tables will be filled by overload rules and their size will grow incrementally, taking up more memory. Sometimes an IP address that is blocked is a dynamically assigned one, which has since been assigned to a host who has a legitimate reason to communicate with hosts in the local network.
For situations like these, pfctl provides the ability to expire table entries. For example, this command will remove <bruteforce> table entries which have not been referenced for 86400 seconds:
# pfctl -t bruteforce -T expire 86400Similar functionality is provided by security/expiretable, which removes table entries which have not been accessed for a specified period of time.
Once installed, expiretable can be run to remove <bruteforce> table entries older than a specified age. This example removes all entries older than 24 hours:
/usr/local/sbin/expiretable -v -d -t 24h bruteforce
Not to be confused with the spamd daemon which comes bundled with spamassassin, mail/spamd can be configured with PF to provide an outer defense against SPAM. This spamd hooks into the PF configuration using a set of redirections.
Spammers tend to send a large number of messages, and SPAM is mainly sent from a few spammer friendly networks and a large number of hijacked machines, both of which are reported to blacklists fairly quickly.
When an SMTP connection from an address in a blacklist is received, spamd presents its banner and immediately switches to a mode where it answers SMTP traffic one byte at a time. This technique, which is intended to waste as much time as possible on the spammer’s end, is called tarpitting. The specific implementation which uses one byte SMTP replies is often referred to as stuttering.
This example demonstrates the basic procedure for setting up spamd with automatically updated blacklists. Refer to the man pages which are installed with mail/spamd for more information.
Procedure: Configuring spamd
Install the mail/spamd package or port. To use spamd’s greylisting features, fdescfs(5) must be mounted at /dev/fd. Add the following line to /etc/fstab:
fdescfs /dev/fd fdescfs rw 0 0
Then, mount the filesystem:
# mount fdescfs
Next, edit the PF ruleset to include:
table <spamd> persist
table <spamd-white> persist
rdr pass on $ext_if inet proto tcp from <spamd> to \
{ $ext_if, $localnet } port smtp -> 127.0.0.1 port 8025
rdr pass on $ext_if inet proto tcp from !<spamd-white> to \
{ $ext_if, $localnet } port smtp -> 127.0.0.1 port 8025The two tables <spamd> and <spamd-white> are essential. SMTP traffic from an address listed in <spamd> but not in <spamd-white> is redirected to the spamd daemon listening at port 8025.
The next step is to configure spamd in /usr/local/etc/spamd.conf and to add some rc.conf parameters.
The installation of mail/spamd includes a sample configuration file (/usr/local/etc/spamd.conf.sample) and a man page for spamd.conf. Refer to these for additional configuration options beyond those shown in this example.
One of the first lines in the configuration file that does not begin with a # comment sign contains the block which defines the all list, which specifies the lists to use:
all:\
:traplist:whitelist:This entry adds the desired blacklists, separated by colons (:). To use a whitelist to subtract addresses from a blacklist, add the name of the whitelist immediately after the name of that blacklist. For example: :blacklist:whitelist:.
This is followed by the specified blacklist’s definition:
traplist:\
:black:\
:msg="SPAM. Your address %A has sent spam within the last 24 hours":\
:method=http:\
:file=www.openbsd.org/spamd/traplist.gzwhere the first line is the name of the blacklist and the second line specifies the list type. The msg field contains the message to display to blacklisted senders during the SMTP dialogue. The method field specifies how spamd-setup fetches the list data; supported methods are http, ftp, from a file in a mounted file system, and via exec of an external program. Finally, the file field specifies the name of the file spamd expects to receive.
The definition of the specified whitelist is similar, but omits the msg field since a message is not needed:
whitelist:\
:white:\
:method=file:\
:file=/var/mail/whitelist.txtChoose Data Sources with Care Using all the blacklists in the sample spamd.conf will blacklist large blocks of the Internet. Administrators need to edit the file to create an optimal configuration which uses applicable data sources and, when necessary, uses custom lists. |
Next, add this entry to /etc/rc.conf. Additional flags are described in the man page specified by the comment:
spamd_flags="-v" # use "" and see spamd-setup(8) for flags
When finished, reload the ruleset, start spamd by typing service obspamd start, and complete the configuration using spamd-setup. Finally, create a cron(8) job which calls spamd-setup to update the tables at reasonable intervals.
On a typical gateway in front of a mail server, hosts will soon start getting trapped within a few seconds to several minutes.
PF also supports greylisting, which temporarily rejects messages from unknown hosts with 45n codes. Messages from greylisted hosts which try again within a reasonable time are let through. Traffic from senders which are set up to behave within the limits set by RFC 1123 and RFC 2821 are immediately let through.
More information about greylisting as a technique can be found at the greylisting.org web site. The most amazing thing about greylisting, apart from its simplicity, is that it still works. Spammers and malware writers have been very slow to adapt to bypass this technique.
The basic procedure for configuring greylisting is as follows:
Procedure: Configuring Greylisting
Make sure that fdescfs(5) is mounted as described in Step 1 of the previous Procedure.
To run spamd in greylisting mode, add this line to /etc/rc.conf:
spamd_grey="YES" # use spamd greylisting if YES
Refer to the spamd man page for descriptions of additional related parameters.
To complete the greylisting setup:
# service obspamd restart # service obspamlogd start
Behind the scenes, the spamdb database tool and the spamlogd whitelist updater perform essential functions for the greylisting feature. spamdb is the administrator’s main interface to managing the black, grey, and white lists via the contents of the /var/db/spamdb database.
This section describes how block-policy, scrub, and antispoof can be used to make the ruleset behave sanely.
The block-policy is an option which can be set in the options part of the ruleset, which precedes the redirection and filtering rules. This option determines which feedback, if any, PF sends to hosts that are blocked by a rule. The option has two possible values: drop drops blocked packets with no feedback, and return returns a status code such as Connection refused.
If not set, the default policy is drop. To change the block-policy, specify the desired value:
set block-policy return
In PF, scrub is a keyword which enables network packet normalization. This process reassembles fragmented packets and drops TCP packets that have invalid flag combinations. Enabling scrub provides a measure of protection against certain kinds of attacks based on incorrect handling of packet fragments. A number of options are available, but the simplest form is suitable for most configurations:
scrub in all
Some services, such as NFS, require specific fragment handling options. Refer to https://home.nuug.no/~peter/pf/en/scrub.html for more information.
This example reassembles fragments, clears the "do not fragment" bit, and sets the maximum segment size to 1440 bytes:
scrub in all fragment reassemble no-df max-mss 1440
The antispoof mechanism protects against activity from spoofed or forged IP addresses, mainly by blocking packets appearing on interfaces and in directions which are logically not possible.
These rules weed out spoofed traffic coming in from the rest of the world as well as any spoofed packets which originate in the local network:
antispoof for $ext_if antispoof for $int_if
Even with a properly configured gateway to handle network address translation, one may have to compensate for other people’s misconfigurations. A common misconfiguration is to let traffic with non-routable addresses out to the Internet. Since traffic from non-routeable addresses can play a part in several DoS attack techniques, consider explicitly blocking traffic from non-routeable addresses from entering the network through the external interface.
In this example, a macro containing non-routable addresses is defined, then used in blocking rules. Traffic to and from these addresses is quietly dropped on the gateway’s external interface.
martians = "{ 127.0.0.0/8, 192.168.0.0/16, 172.16.0.0/12, \
10.0.0.0/8, 169.254.0.0/16, 192.0.2.0/24, \
0.0.0.0/8, 240.0.0.0/4 }"
block drop in quick on $ext_if from $martians to any
block drop out quick on $ext_if from any to $martiansOn FreeBSD, ALTQ can be used with PF to provide Quality of Service (QOS). Once ALTQ is enabled, queues can be defined in the ruleset which determine the processing priority of outbound packets.
Before enabling ALTQ, refer to altq(4) to determine if the drivers for the network cards installed on the system support it.
ALTQ is not available as a loadable kernel module. If the system’s interfaces support ALTQ, create a custom kernel using the instructions in 設定 FreeBSD 核心. The following kernel options are available. The first is needed to enable ALTQ. At least one of the other options is necessary to specify the queueing scheduler algorithm:
options ALTQ options ALTQ_CBQ # Class Based Queuing (CBQ) options ALTQ_RED # Random Early Detection (RED) options ALTQ_RIO # RED In/Out options ALTQ_HFSC # Hierarchical Packet Scheduler (HFSC) options ALTQ_PRIQ # Priority Queuing (PRIQ)
The following scheduler algorithms are available:
Class Based Queuing (CBQ) is used to divide a connection’s bandwidth into different classes or queues to prioritize traffic based on filter rules.
Random Early Detection (RED) is used to avoid network congestion by measuring the length of the queue and comparing it to the minimum and maximum thresholds for the queue. When the queue is over the maximum, all new packets are randomly dropped.
In Random Early Detection In and Out (RIO) mode, RED maintains multiple average queue lengths and multiple threshold values, one for each QOS level.
Hierarchical Fair Service Curve Packet Scheduler (HFSC) is described in http://www-2.cs.cmu.edu/~hzhang/HFSC/main.html.
Priority Queuing (PRIQ) always passes traffic that is in a higher queue first.
More information about the scheduling algorithms and example rulesets are available at the OpenBSD’s web archive.
IPFW 是一套專為 FreeBSD 所寫的具狀態防火牆 (Stateful firewall),它同時支援 IPv4 與 IPv6,它由數個元件組成:核心防火牆過濾規則處理器與其整合的封包計帳設施、記錄設施、NAT、dummynet(4) 流量限制程式、轉送設施、橋接設施以及 ipstealth 設施。
FreeBSD 提供一個範本規則集於 /etc/rc.firewall,其定義了幾個常見情境會使用的防火牆類型來協助初學的使用者撰寫合適的規則集。IPFW 提供了強大的語法讓進階的使用者可以用來自訂符合環境安全性要求的規則集。
本節將介紹如何開啟 IPFW、規則語法的概要以及示範幾種常見情境所使用的規則集。
IPFW is included in the basic FreeBSD install as a kernel loadable module, meaning that a custom kernel is not needed in order to enable IPFW.
For those users who wish to statically compile IPFW support into a custom kernel, see IPFW 核心選項.
To configure the system to enable IPFW at boot time, add firewall_enable="YES" to /etc/rc.conf:
# sysrc firewall_enable="YES"To use one of the default firewall types provided by FreeBSD, add another line which specifies the type:
# sysrc firewall_type="open"The available types are:
open: passes all traffic.
client: protects only this machine.
simple: protects the whole network.
closed: entirely disables IP traffic except for the loopback interface.
workstation: protects only this machine using stateful rules.
UNKNOWN: disables the loading of firewall rules.
filename: full path of the file containing the firewall ruleset.
If firewall_type is set to either client or simple, modify the default rules found in /etc/rc.firewall to fit the configuration of the system.
Note that the filename type is used to load a custom ruleset.
An alternate way to load a custom ruleset is to set the firewall_script variable to the absolute path of an executable script that includes IPFW commands. The examples used in this section assume that the firewall_script is set to /etc/ipfw.rules:
# sysrc firewall_script="/etc/ipfw.rules"To enable logging through syslogd(8), include this line:
# sysrc firewall_logging="YES"Only firewall rules with the |
There is no /etc/rc.conf variable to set logging limits. To limit the number of times a rule is logged per connection attempt, specify the number using this line in /etc/sysctl.conf:
# echo "net.inet.ip.fw.verbose_limit=5" >> /etc/sysctl.confTo enable logging through a dedicated interface named ipfw0, add this line to /etc/rc.conf instead:
# sysrc firewall_logif="YES"Then use tcpdump to see what is being logged:
# tcpdump -t -n -i ipfw0There is no overhead due to logging unless tcpdump is attached. |
After saving the needed edits, start the firewall. To enable logging limits now, also set the sysctl value specified above:
# service ipfw start
# sysctl net.inet.ip.fw.verbose_limit=5When a packet enters the IPFW firewall, it is compared against the first rule in the ruleset and progresses one rule at a time, moving from top to bottom in sequence. When the packet matches the selection parameters of a rule, the rule’s action is executed and the search of the ruleset terminates for that packet. This is referred to as "first match wins". If the packet does not match any of the rules, it gets caught by the mandatory IPFW default rule number 65535, which denies all packets and silently discards them. However, if the packet matches a rule that contains the count, skipto, or tee keywords, the search continues. Refer to ipfw(8) for details on how these keywords affect rule processing.
When creating an IPFW rule, keywords must be written in the following order. Some keywords are mandatory while other keywords are optional. The words shown in uppercase represent a variable and the words shown in lowercase must precede the variable that follows it. The # symbol is used to mark the start of a comment and may appear at the end of a rule or on its own line. Blank lines are ignored.
CMD RULE_NUMBER set SET_NUMBER ACTION log LOG_AMOUNT PROTO from SRC SRC_PORT to DST DST_PORT OPTIONS
This section provides an overview of these keywords and their options. It is not an exhaustive list of every possible option. Refer to ipfw(8) for a complete description of the rule syntax that can be used when creating IPFW rules.
Every rule must start with ipfw add.
Each rule is associated with a number from 1 to 65534. The number is used to indicate the order of rule processing. Multiple rules can have the same number, in which case they are applied according to the order in which they have been added.
Each rule is associated with a set number from 0 to 31. Sets can be individually disabled or enabled, making it possible to quickly add or delete a set of rules. If a SET_NUMBER is not specified, the rule will be added to set 0.
A rule can be associated with one of the following actions. The specified action will be executed when the packet matches the selection criterion of the rule.
allow | accept | pass | permit: these keywords are equivalent and allow packets that match the rule.
check-state: checks the packet against the dynamic state table. If a match is found, execute the action associated with the rule which generated this dynamic rule, otherwise move to the next rule. A check-state rule does not have selection criterion. If no check-state rule is present in the ruleset, the dynamic rules table is checked at the first keep-state or limit rule.
count: updates counters for all packets that match the rule. The search continues with the next rule.
deny | drop: either word silently discards packets that match this rule.
Additional actions are available. Refer to ipfw(8) for details.
When a packet matches a rule with the log keyword, a message will be logged to syslogd(8) with a facility name of SECURITY. Logging only occurs if the number of packets logged for that particular rule does not exceed a specified LOG_AMOUNT. If no LOG_AMOUNT is specified, the limit is taken from the value of net.inet.ip.fw.verbose_limit. A value of zero removes the logging limit. Once the limit is reached, logging can be re-enabled by clearing the logging counter or the packet counter for that rule, using ipfw resetlog.
Logging is done after all other packet matching conditions have been met, and before performing the final action on the packet. The administrator decides which rules to enable logging on. |
This optional value can be used to specify any protocol name or number found in /etc/protocols.
The from keyword must be followed by the source address or a keyword that represents the source address. An address can be represented by any, me (any address configured on an interface on this system), me6, (any IPv6 address configured on an interface on this system), or table followed by the number of a lookup table which contains a list of addresses. When specifying an IP address, it can be optionally followed by its CIDR mask or subnet mask. For example, 1.2.3.4/25 or 1.2.3.4:255.255.255.128.
An optional source port can be specified using the port number or name from /etc/services.
The to keyword must be followed by the destination address or a keyword that represents the destination address. The same keywords and addresses described in the SRC section can be used to describe the destination.
An optional destination port can be specified using the port number or name from /etc/services.
Several keywords can follow the source and destination. As the name suggests, OPTIONS are optional. Commonly used options include in or out, which specify the direction of packet flow, icmptypes followed by the type of ICMP message, and keep-state.
When a keep-state rule is matched, the firewall will create a dynamic rule which matches bidirectional traffic between the source and destination addresses and ports using the same protocol.
The dynamic rules facility is vulnerable to resource depletion from a SYN-flood attack which would open a huge number of dynamic rules. To counter this type of attack with IPFW, use limit. This option limits the number of simultaneous sessions by checking the open dynamic rules, counting the number of times this rule and IP address combination occurred. If this count is greater than the value specified by limit, the packet is discarded.
Dozens of OPTIONS are available. Refer to ipfw(8) for a description of each available option.
This section demonstrates how to create an example stateful firewall ruleset script named /etc/ipfw.rules. In this example, all connection rules use in or out to clarify the direction. They also use via interface-name to specify the interface the packet is traveling over.
When first creating or testing a firewall ruleset, consider temporarily setting this tunable: net.inet.ip.fw.default_to_accept="1" This sets the default policy of ipfw(8) to be more permissive than the default |
The firewall script begins by indicating that it is a Bourne shell script and flushes any existing rules. It then creates the cmd variable so that ipfw add does not have to be typed at the beginning of every rule. It also defines the pif variable which represents the name of the interface that is attached to the Internet.
#!/bin/sh # Flush out the list before we begin. ipfw -q -f flush # Set rules command prefix cmd="ipfw -q add" pif="dc0" # interface name of NIC attached to Internet
The first two rules allow all traffic on the trusted internal interface and on the loopback interface:
# Change xl0 to LAN NIC interface name $cmd 00005 allow all from any to any via xl0 # No restrictions on Loopback Interface $cmd 00010 allow all from any to any via lo0
The next rule allows the packet through if it matches an existing entry in the dynamic rules table:
$cmd 00101 check-state
The next set of rules defines which stateful connections internal systems can create to hosts on the Internet:
# Allow access to public DNS # Replace x.x.x.x with the IP address of a public DNS server # and repeat for each DNS server in /etc/resolv.conf $cmd 00110 allow tcp from any to x.x.x.x 53 out via $pif setup keep-state $cmd 00111 allow udp from any to x.x.x.x 53 out via $pif keep-state # Allow access to ISP's DHCP server for cable/DSL configurations. # Use the first rule and check log for IP address. # Then, uncomment the second rule, input the IP address, and delete the first rule $cmd 00120 allow log udp from any to any 67 out via $pif keep-state #$cmd 00120 allow udp from any to x.x.x.x 67 out via $pif keep-state # Allow outbound HTTP and HTTPS connections $cmd 00200 allow tcp from any to any 80 out via $pif setup keep-state $cmd 00220 allow tcp from any to any 443 out via $pif setup keep-state # Allow outbound email connections $cmd 00230 allow tcp from any to any 25 out via $pif setup keep-state $cmd 00231 allow tcp from any to any 110 out via $pif setup keep-state # Allow outbound ping $cmd 00250 allow icmp from any to any out via $pif keep-state # Allow outbound NTP $cmd 00260 allow udp from any to any 123 out via $pif keep-state # Allow outbound SSH $cmd 00280 allow tcp from any to any 22 out via $pif setup keep-state # deny and log all other outbound connections $cmd 00299 deny log all from any to any out via $pif
The next set of rules controls connections from Internet hosts to the internal network. It starts by denying packets typically associated with attacks and then explicitly allows specific types of connections. All the authorized services that originate from the Internet use limit to prevent flooding.
# Deny all inbound traffic from non-routable reserved address spaces $cmd 00300 deny all from 192.168.0.0/16 to any in via $pif #RFC 1918 private IP $cmd 00301 deny all from 172.16.0.0/12 to any in via $pif #RFC 1918 private IP $cmd 00302 deny all from 10.0.0.0/8 to any in via $pif #RFC 1918 private IP $cmd 00303 deny all from 127.0.0.0/8 to any in via $pif #loopback $cmd 00304 deny all from 0.0.0.0/8 to any in via $pif #loopback $cmd 00305 deny all from 169.254.0.0/16 to any in via $pif #DHCP auto-config $cmd 00306 deny all from 192.0.2.0/24 to any in via $pif #reserved for docs $cmd 00307 deny all from 204.152.64.0/23 to any in via $pif #Sun cluster interconnect $cmd 00308 deny all from 224.0.0.0/3 to any in via $pif #Class D & E multicast # Deny public pings $cmd 00310 deny icmp from any to any in via $pif # Deny ident $cmd 00315 deny tcp from any to any 113 in via $pif # Deny all Netbios services. $cmd 00320 deny tcp from any to any 137 in via $pif $cmd 00321 deny tcp from any to any 138 in via $pif $cmd 00322 deny tcp from any to any 139 in via $pif $cmd 00323 deny tcp from any to any 81 in via $pif # Deny fragments $cmd 00330 deny all from any to any frag in via $pif # Deny ACK packets that did not match the dynamic rule table $cmd 00332 deny tcp from any to any established in via $pif # Allow traffic from ISP's DHCP server. # Replace x.x.x.x with the same IP address used in rule 00120. #$cmd 00360 allow udp from any to x.x.x.x 67 in via $pif keep-state # Allow HTTP connections to internal web server $cmd 00400 allow tcp from any to me 80 in via $pif setup limit src-addr 2 # Allow inbound SSH connections $cmd 00410 allow tcp from any to me 22 in via $pif setup limit src-addr 2 # Reject and log all other incoming connections $cmd 00499 deny log all from any to any in via $pif
The last rule logs all packets that do not match any of the rules in the ruleset:
# Everything else is denied and logged $cmd 00999 deny log all from any to any
FreeBSD’s IPFW firewall has two implementations of NAT: one being the userland natd(8) daemon, and the more recent IPFW’s built-in NAT facility also known as in-kernel NAT. Both work in conjunction with IPFW to provide network address translation. This can be used to provide an Internet Connection Sharing solution so that several internal computers can connect to the Internet using a single public IP address.
To do this, the FreeBSD machine connected to the Internet must act as a gateway. This system must have two NICs, where one is connected to the Internet and the other is connected to the internal LAN. Each machine connected to the LAN should be assigned an IP address in the private network space, as defined by RFC 1918.
Some additional configuration is needed in order to enable the in-kernel NAT function of IPFW. To enable in-kernel NAT support at boot time, the following must be set in /etc/rc.conf:
gateway_enable="YES" firewall_enable="YES" firewall_nat_enable="YES"
When |
When the ruleset contains stateful rules, the positioning of the NAT rule is critical and the skipto action is used. The skipto action requires a rule number so that it knows which rule to jump to. Furthermore, because of the architecture of libalias(3), a library implemented as a kernel module used for the in-kernel NAT facility of IPFW, it is necessary to disable TCP segmentation offloading, or in short TSO. TSO can be disabled on a per network interface basis by using ifconfig(8) or on a system wide basis using sysctl(8). To disable TSO system wide, the following must be set in /etc/sysctl.conf:
net.inet.tcp.tso="0"
The example below builds upon the firewall ruleset shown in the previous section. It adds some additional entries and modifies some existing rules in order to configure the firewall for in-kernel NAT. It starts by adding some additional variables which represent the rule number to skip to, the keep-state option, and a list of TCP ports which will be used to reduce the number of rules.
#!/bin/sh ipfw -q -f flush cmd="ipfw -q add" skip="skipto 1000" pif=dc0 ks="keep-state" good_tcpo="22,25,37,53,80,443,110"
A NAT instance will also be configured. With in-kernel NAT it is possible to have multiple NAT instances each with their own configuration. Although, for this example only one NAT instance is needed; NAT instance number 1. The configuration takes a few arguments and flags such as: if which indicates the public interface, same_ports which takes care that alliased ports and local port numbers are mapped the same, unreg_only will result in only unregistered (private) address spaces to be processed by the NAT instance, and reset which will help to keep a functioning NAT instance even when the public IP address of the IPFW machine changes. For all possible options that can be passed to a single NAT instance configuration consult ipfw(8). Furthermore, because of the nature of a stateful NATing firewall, it is neseccary to allow translated packets to be reinjected in the firewall for further processing, this can be achieved by disabling one_pass behavior at the start of the firewall script.
ipfw disable one_pass ipfw -q nat 1 config if $pif same_ports unreg_only reset
The inbound NAT rule is inserted after the two rules which allow all traffic on the trusted and loopback interfaces and after the reassamble rule but before the check-state rule. It is important that the rule number selected for this NAT rule, in this example 100, is higher than the first three rules and lower than the check-state rule. Furthermore, because of the behavior of in-kernel NAT it is advised to place a reassamble rule just before the first NAT rule and after the rules that allow traffic on trusted interface. Normally, IP fragmentation should not happen, but when dealing with IPSEC/ESP/GRE tunneling traffic it might and the reassmabling of fragments is necessary before handing the complete packet over to the in-kernel NAT engine.
The reassemble rule was not needed with userland natd(8) because the internal workings of the IPFW The current NAT instance number and NAT rule number does not match with the default NAT instance number and rule number created by rc.firewall which is a script to set up the baked-in default firewall rulesets present in FreeBSD. |
$cmd 005 allow all from any to any via xl0 # exclude LAN traffic $cmd 010 allow all from any to any via lo0 # exclude loopback traffic $cmd 099 reass all from any to any in # reassamble inbound packets $cmd 100 nat 1 ip from any to any in via $pif # NAT any inbound packets # Allow the packet through if it has an existing entry in the dynamic rules table $cmd 101 check-state
The outbound rules are modified to replace the allow action with the $skip variable, indicating that rule processing will continue at rule 1000. The seven tcp rules have been replaced by rule 125 as the $good_tcpo variable contains the seven allowed outbound ports.
Remember that IPFW’s firewall performance is largely determined by the number of rules present in the ruleset. |
# Authorized outbound packets $cmd 120 $skip udp from any to x.x.x.x 53 out via $pif $ks $cmd 121 $skip udp from any to x.x.x.x 67 out via $pif $ks $cmd 125 $skip tcp from any to any $good_tcpo out via $pif setup $ks $cmd 130 $skip icmp from any to any out via $pif $ks
The inbound rules remain the same, except for the very last rule which removes the via $pif in order to catch both inbound and outbound rules. The NAT rule must follow this last outbound rule, must have a higher number than that last rule, and the rule number must be referenced by the skipto action. In this ruleset, rule number 1000 handles passing all packets to our configured instance for NAT processing. The next rule allows any packet which has undergone NAT processing to pass.
$cmd 999 deny log all from any to any $cmd 1000 nat 1 ip from any to any out via $pif # skipto location for outbound stateful rules $cmd 1001 allow ip from any to any
In this example, rules 100, 101, 125, 1000, and 1001 control the address translation of the outbound and inbound packets so that the entries in the dynamic state table always register the private LANIP address.
Consider an internal web browser which initializes a new outbound HTTP session over port 80. When the first outbound packet enters the firewall, it does not match rule 100 because it is headed out rather than in. It passes rule 101 because this is the first packet and it has not been posted to the dynamic state table yet. The packet finally matches rule 125 as it is outbound on an allowed port and has a source IP address from the internal LAN. On matching this rule, two actions take place. First, the keep-state action adds an entry to the dynamic state table and the specified action, skipto rule 1000, is executed. Next, the packet undergoes NAT and is sent out to the Internet. This packet makes its way to the destination web server, where a response packet is generated and sent back. This new packet enters the top of the ruleset. It matches rule 100 and has its destination IP address mapped back to the original internal address. It then is processed by the check-state rule, is found in the table as an existing session, and is released to the LAN.
On the inbound side, the ruleset has to deny bad packets and allow only authorized services. A packet which matches an inbound rule is posted to the dynamic state table and the packet is released to the LAN. The packet generated as a response is recognized by the check-state rule as belonging to an existing session. It is then sent to rule 1000 to undergo NAT before being released to the outbound interface.
Transition from userland natd(8) to in-kernel NAT might seem seamless at first but there is small catch. When using the GENERIC kernel, IPFW will load the libalias.ko kernel module, when |
The drawback with NAT in general is that the LAN clients are not accessible from the Internet. Clients on the LAN can make outgoing connections to the world but cannot receive incoming ones. This presents a problem if trying to run Internet services on one of the LAN client machines. A simple way around this is to redirect selected Internet ports on the NAT providing machine to a LAN client.
For example, an IRC server runs on client A and a web server runs on client B. For this to work properly, connections received on ports 6667 (IRC) and 80 (HTTP) must be redirected to the respective machines.
With in-kernel NAT all configuration is done in the NAT instance configuration. For a full list of options that an in-kernel NAT instance can use, consult ipfw(8). The IPFW syntax follows the syntax of natd. The syntax for redirect_port is as follows:
redirect_port proto targetIP:targetPORT[-targetPORT] [aliasIP:]aliasPORT[-aliasPORT] [remoteIP[:remotePORT[-remotePORT]]]
To configure the above example setup, the arguments should be:
redirect_port tcp 192.168.0.2:6667 6667 redirect_port tcp 192.168.0.3:80 80
After adding these arguments to the configuration of NAT instance 1 in the above ruleset, the TCP ports will be port forwarded to the LAN client machines running the IRC and HTTP services.
ipfw -q nat 1 config if $pif same_ports unreg_only reset \ redirect_port tcp 192.168.0.2:6667 6667 \ redirect_port tcp 192.1683.0.3:80 80
Port ranges over individual ports can be indicated with redirect_port. For example, tcp 192.168.0.2:2000-3000 2000-3000 would redirect all connections received on ports 2000 to 3000 to ports 2000 to 3000 on client A.
Address redirection is useful if more than one IP address is available. Each LAN client can be assigned its own external IP address by ipfw(8), which will then rewrite outgoing packets from the LAN clients with the proper external IP address and redirects all traffic incoming on that particular IP address back to the specific LAN client. This is also known as static NAT. For example, if IP addresses 128.1.1.1, 128.1.1.2, and 128.1.1.3 are available, 128.1.1.1 can be used as the ipfw(8) machine’s external IP address, while 128.1.1.2 and 128.1.1.3 are forwarded back to LAN clients A and B.
The redirect_address syntax is as below, where localIP is the internal IP address of the LAN client, and publicIP the external IP address corresponding to the LAN client.
redirect_address localIP publicIP
In the example, the arguments would read:
redirect_address 192.168.0.2 128.1.1.2 redirect_address 192.168.0.3 128.1.1.3
Like redirect_port, these arguments are placed in a NAT instance configuration. With address redirection, there is no need for port redirection, as all data received on a particular IP address is redirected.
The external IP addresses on the ipfw(8) machine must be active and aliased to the external interface. Refer to rc.conf(5) for details.
Let us start with a statement: the userspace NAT implementation: natd(8), has more overhead than in-kernel NAT. For natd(8) to translate packets, the packets have to be copied from the kernel to userspace and back which brings in extra overhead that is not present with in-kernel NAT.
要在開機時啟動 Userspace 的 NAT daemon natd(8) 需在 /etc/rc.conf 中做以下最小設定,其中 natd_interface 要設成連接到網際網路的 NIC 名稱,rc(8) script of natd(8) 會自動檢查是否有使用動態 IP 位址,並且自行設定並處理。
gateway_enable="YES" natd_enable="YES" natd_interface="rl0"
In general, the above ruleset as explained for in-kernel NAT can also be used together with natd(8). The only exceptions are the configuration of the in-kernel NAT instance (ipfw -q nat 1 config …) not being applicable any more, rule number 100 and 1000 will have to change sligthly as below, and reassemble rule 99 is not needed anymore as the divert action is used which covers fragmentation.
$cmd 100 divert natd ip from any to any in via $pif $cmd 1000 divert natd ip from any to any out via $pif
To configure port or address redirection, a similar syntax as with in-kernel NAT is used. Although, now, instead of specifying the configuration in our ruleset script like with in-kernel NAT, configuration of natd(8) is best done in a configuration file. To do this, an extra flag must be passed via /etc/rc.conf which specifies the path of the configuration file.
natd_flags="-f /etc/natd.conf"
The specified file must contain a list of configuration options, one per line. For more information about the configuration file and possible variables, consult natd(8). Below are two example entries, one per line: redirect_port tcp 192.168.0.2:6667 6667 redirect_address 192.168.0.3 128.1.1.3 |
ipfw can be used to make manual, single rule additions or deletions to the active firewall while it is running. The problem with using this method is that all the changes are lost when the system reboots. It is recommended to instead write all the rules in a file and to use that file to load the rules at boot time and to replace the currently running firewall rules whenever that file changes.
ipfw is a useful way to display the running firewall rules to the console screen. The IPFW accounting facility dynamically creates a counter for each rule that counts each packet that matches the rule. During the process of testing a rule, listing the rule with its counter is one way to determine if the rule is functioning as expected.
To list all the running rules in sequence:
# ipfw listTo list all the running rules with a time stamp of when the last time the rule was matched:
# ipfw -t listThe next example lists accounting information and the packet count for matched rules along with the rules themselves. The first column is the rule number, followed by the number of matched packets and bytes, followed by the rule itself.
# ipfw -a listTo list dynamic rules in addition to static rules:
# ipfw -d listTo also show the expired dynamic rules:
# ipfw -d -e listTo zero the counters:
# ipfw zeroTo zero the counters for just the rule with number NUM:
# ipfw zero NUMEven with the logging facility enabled, IPFW will not generate any rule logging on its own. The firewall administrator decides which rules in the ruleset will be logged, and adds the log keyword to those rules. Normally only deny rules are logged. It is customary to duplicate the "ipfw default deny everything" rule with the log keyword included as the last rule in the ruleset. This way, it is possible to see all the packets that did not match any of the rules in the ruleset.
Logging is a two edged sword. If one is not careful, an over abundance of log data or a DoS attack can fill the disk with log files. Log messages are not only written to syslogd, but also are displayed on the root console screen and soon become annoying.
The IPFIREWALL_VERBOSE_LIMIT=5 kernel option limits the number of consecutive messages sent to syslogd(8), concerning the packet matching of a given rule. When this option is enabled in the kernel, the number of consecutive messages concerning a particular rule is capped at the number specified. There is nothing to be gained from 200 identical log messages. With this option set to five, five consecutive messages concerning a particular rule would be logged to syslogd and the remainder identical consecutive messages would be counted and posted to syslogd with a phrase like the following:
last message repeated 45 times
All logged packets messages are written by default to /var/log/security, which is defined in /etc/syslog.conf.
Most experienced IPFW users create a file containing the rules and code them in a manner compatible with running them as a script. The major benefit of doing this is the firewall rules can be refreshed in mass without the need of rebooting the system to activate them. This method is convenient in testing new rules as the procedure can be executed as many times as needed. Being a script, symbolic substitution can be used for frequently used values to be substituted into multiple rules.
This example script is compatible with the syntax used by the sh(1), csh(1), and tcsh(1) shells. Symbolic substitution fields are prefixed with a dollar sign ($). Symbolic fields do not have the $ prefix. The value to populate the symbolic field must be enclosed in double quotes ("").
Start the rules file like this:
############### start of example ipfw rules script ############# # ipfw -q -f flush # Delete all rules # Set defaults oif="tun0" # out interface odns="192.0.2.11" # ISP's DNS server IP address cmd="ipfw -q add " # build rule prefix ks="keep-state" # just too lazy to key this each time $cmd 00500 check-state $cmd 00502 deny all from any to any frag $cmd 00501 deny tcp from any to any established $cmd 00600 allow tcp from any to any 80 out via $oif setup $ks $cmd 00610 allow tcp from any to $odns 53 out via $oif setup $ks $cmd 00611 allow udp from any to $odns 53 out via $oif $ks ################### End of example ipfw rules script ############
The rules are not important as the focus of this example is how the symbolic substitution fields are populated.
If the above example was in /etc/ipfw.rules, the rules could be reloaded by the following command:
# sh /etc/ipfw.rules/etc/ipfw.rules can be located anywhere and the file can have any name.
The same thing could be accomplished by running these commands by hand:
# ipfw -q -f flush
# ipfw -q add check-state
# ipfw -q add deny all from any to any frag
# ipfw -q add deny tcp from any to any established
# ipfw -q add allow tcp from any to any 80 out via tun0 setup keep-state
# ipfw -q add allow tcp from any to 192.0.2.11 53 out via tun0 setup keep-state
# ipfw -q add 00611 allow udp from any to 192.0.2.11 53 out via tun0 keep-stateIn order to statically compile IPFW support into a custom kernel, refer to the instructions in 設定 FreeBSD 核心. The following options are available for the custom kernel configuration file:
options IPFIREWALL # enables IPFW options IPFIREWALL_VERBOSE # enables logging for rules with log keyword to syslogd(8) options IPFIREWALL_VERBOSE_LIMIT=5 # limits number of logged packets per-entry options IPFIREWALL_DEFAULT_TO_ACCEPT # sets default policy to pass what is not explicitly denied options IPFIREWALL_NAT # enables in-kernel NAT support options IPFIREWALL_NAT64 # enables in-kernel NAT64 support options IPFIREWALL_NPTV6 # enables in-kernel IPv6 NPT support options IPFIREWALL_PMOD # enables protocols modification module support options IPDIVERT # enables NAT through natd(8)
IPFW can be loaded as a kernel module: options above are built by default as modules or can be set at runtime using tunables. |
IPFILTER 即為 IPF,是一套跨平台、開放源碼的防火牆,已被移植到各種作業系統,包含 FreeBSD, NetBSD, OpenBSD 與 Solaris™。
IPFILTER 是核心端 (Kernel-side) 的防火牆且 NAT 機制可由 Userland 的程式控制與監控,防火牆規則可以使用 ipf 設定或刪除,NAT 規則可以使用 ipnat 設定或刪除,可使用 ipfstat 來列出 IPFILTER 在核心部份的執行期統計資訊,可使用 ipmon 來記錄 IPFILTER 動作到系統記錄檔。
IPF 原來是以 "最後一個符合的條件優先" 的規則處理邏輯所撰寫並只能使用無狀態 (Stateless) 的規則,之後 IPF 才被加強支援快速 (quick) 與保留狀態 (keep state) 的選項。
IPF FAQ 位於 http://www.phildev.net/ipf/index.html,可搜尋的 IPFilter 郵遞論壇封存資料可至 http://marc.info/?l=ipfilter 取得。
由於 FreeBSD 也支援 IPF 因此操作手冊特別在此章節對此介紹,本節提供幾個有使用快速 (quick) 與保留狀態 (keep state) 選項的規則範例。
IPF is included in the basic FreeBSD install as a kernel loadable module, meaning that a custom kernel is not needed in order to enable IPF.
For users who prefer to statically compile IPF support into a custom kernel, refer to the instructions in 設定 FreeBSD 核心. The following kernel options are available:
options IPFILTER options IPFILTER_LOG options IPFILTER_LOOKUP options IPFILTER_DEFAULT_BLOCK
where options IPFILTER enables support for IPFILTER, options IPFILTER_LOG enables IPF logging using the ipl packet logging pseudo-device for every rule that has the log keyword, IPFILTER_LOOKUP enables IP pools in order to speed up IP lookups, and options IPFILTER_DEFAULT_BLOCK changes the default behavior so that any packet not matching a firewall pass rule gets blocked.
To configure the system to enable IPF at boot time, add the following entries to /etc/rc.conf. These entries will also enable logging and default pass all. To change the default policy to block all without compiling a custom kernel, remember to add a block all rule at the end of the ruleset.
ipfilter_enable="YES" # Start ipf firewall
ipfilter_rules="/etc/ipf.rules" # loads rules definition text file
ipmon_enable="YES" # Start IP monitor log
ipmon_flags="-Ds" # D = start as daemon
# s = log to syslog
# v = log tcp window, ack, seq
# n = map IP & port to namesIf NAT functionality is needed, also add these lines:
gateway_enable="YES" # Enable as LAN gateway ipnat_enable="YES" # Start ipnat function ipnat_rules="/etc/ipnat.rules" # rules definition file for ipnat
Then, to start IPF now:
# service ipfilter start
To load the firewall rules, specify the name of the ruleset file using ipf. The following command can be used to replace the currently running firewall rules:
# ipf -Fa -f /etc/ipf.ruleswhere -Fa flushes all the internal rules tables and -f specifies the file containing the rules to load.
This provides the ability to make changes to a custom ruleset and update the running firewall with a fresh copy of the rules without having to reboot the system. This method is convenient for testing new rules as the procedure can be executed as many times as needed.
Refer to ipf(8) for details on the other flags available with this command.
This section describes the IPF rule syntax used to create stateful rules. When creating rules, keep in mind that unless the quick keyword appears in a rule, every rule is read in order, with the last matching rule being the one that is applied. This means that even if the first rule to match a packet is a pass, if there is a later matching rule that is a block, the packet will be dropped. Sample rulesets can be found in /usr/shared/examples/ipfilter.
When creating rules, a # character is used to mark the start of a comment and may appear at the end of a rule, to explain that rule’s function, or on its own line. Any blank lines are ignored.
The keywords which are used in rules must be written in a specific order, from left to right. Some keywords are mandatory while others are optional. Some keywords have sub-options which may be keywords themselves and also include more sub-options. The keyword order is as follows, where the words shown in uppercase represent a variable and the words shown in lowercase must precede the variable that follows it:
ACTION DIRECTION OPTIONS proto PROTO_TYPE from SRC_ADDR SRC_PORT to DST_ADDR DST_PORT TCP_FLAG|ICMP_TYPE keep state STATE
This section describes each of these keywords and their options. It is not an exhaustive list of every possible option. Refer to ipf(5) for a complete description of the rule syntax that can be used when creating IPF rules and examples for using each keyword.
The action keyword indicates what to do with the packet if it matches that rule. Every rule must have an action. The following actions are recognized:
block: drops the packet.
pass: allows the packet.
log: generates a log record.
count: counts the number of packets and bytes which can provide an indication of how often a rule is used.
auth: queues the packet for further processing by another program.
call: provides access to functions built into IPF that allow more complex actions.
decapsulate: removes any headers in order to process the contents of the packet.
Next, each rule must explicitly state the direction of traffic using one of these keywords:
in: the rule is applied against an inbound packet.
out: the rule is applied against an outbound packet.
all: the rule applies to either direction.
If the system has multiple interfaces, the interface can be specified along with the direction. An example would be in on fxp0.
Options are optional. However, if multiple options are specified, they must be used in the order shown here.
log: when performing the specified ACTION, the contents of the packet’s headers will be written to the ipl(4) packet log pseudo-device.
quick: if a packet matches this rule, the ACTION specified by the rule occurs and no further processing of any following rules will occur for this packet.
on: must be followed by the interface name as displayed by ifconfig(8). The rule will only match if the packet is going through the specified interface in the specified direction.
When using the log keyword, the following qualifiers may be used in this order:
body: indicates that the first 128 bytes of the packet contents will be logged after the headers.
first: if the log keyword is being used in conjunction with a keep state option, this option is recommended so that only the triggering packet is logged and not every packet which matches the stateful connection.
Additional options are available to specify error return messages. Refer to ipf(5) for more details.
The protocol type is optional. However, it is mandatory if the rule needs to specify a SRC_PORT or a DST_PORT as it defines the type of protocol. When specifying the type of protocol, use the proto keyword followed by either a protocol number or name from /etc/protocols. Example protocol names include tcp, udp, or icmp. If PROTO_TYPE is specified but no SRC_PORT or DST_PORT is specified, all port numbers for that protocol will match that rule.
The from keyword is mandatory and is followed by a keyword which represents the source of the packet. The source can be a hostname, an IP address followed by the CIDR mask, an address pool, or the keyword all. Refer to ipf(5) for examples.
There is no way to match ranges of IP addresses which do not express themselves easily using the dotted numeric form / mask-length notation. The net-mgmt/ipcalc package or port may be used to ease the calculation of the CIDR mask. Additional information is available at the utility’s web page: http://jodies.de/ipcalc.
The port number of the source is optional. However, if it is used, it requires PROTO_TYPE to be first defined in the rule. The port number must also be preceded by the proto keyword.
A number of different comparison operators are supported: = (equal to), != (not equal to), < (less than), > (greater than), ⇐ (less than or equal to), and >= (greater than or equal to).
To specify port ranges, place the two port numbers between <> (less than and greater than ), >< (greater than and less than ), or : (greater than or equal to and less than or equal to).
The to keyword is mandatory and is followed by a keyword which represents the destination of the packet. Similar to SRC_ADDR, it can be a hostname, an IP address followed by the CIDR mask, an address pool, or the keyword all.
Similar to SRC_PORT, the port number of the destination is optional. However, if it is used, it requires PROTO_TYPE to be first defined in the rule. The port number must also be preceded by the proto keyword.
If tcp is specified as the PROTO_TYPE, flags can be specified as letters, where each letter represents one of the possible TCP flags used to determine the state of a connection. Possible values are: S (SYN), A (ACK), P (PSH), F (FIN), U (URG), R (RST), C (CWN), and E (ECN).
If icmp is specified as the PROTO_TYPE, the ICMP type to match can be specified. Refer to ipf(5) for the allowable types.
If a pass rule contains keep state, IPF will add an entry to its dynamic state table and allow subsequent packets that match the connection. IPF can track state for TCP, UDP, and ICMP sessions. Any packet that IPF can be certain is part of an active session, even if it is a different protocol, will be allowed.
In IPF, packets destined to go out through the interface connected to the public Internet are first checked against the dynamic state table. If the packet matches the next expected packet comprising an active session conversation, it exits the firewall and the state of the session conversation flow is updated in the dynamic state table. Packets that do not belong to an already active session are checked against the outbound ruleset. Packets coming in from the interface connected to the public Internet are first checked against the dynamic state table. If the packet matches the next expected packet comprising an active session, it exits the firewall and the state of the session conversation flow is updated in the dynamic state table. Packets that do not belong to an already active session are checked against the inbound ruleset.
Several keywords can be added after keep state. If used, these keywords set various options that control stateful filtering, such as setting connection limits or connection age. Refer to ipf(5) for the list of available options and their descriptions.
This section demonstrates how to create an example ruleset which only allows services matching pass rules and blocks all others.
FreeBSD uses the loopback interface (lo0) and the IP address 127.0.0.1 for internal communication. The firewall ruleset must contain rules to allow free movement of these internally used packets:
# no restrictions on loopback interface pass in quick on lo0 all pass out quick on lo0 all
The public interface connected to the Internet is used to authorize and control access of all outbound and inbound connections. If one or more interfaces are cabled to private networks, those internal interfaces may require rules to allow packets originating from the LAN to flow between the internal networks or to the interface attached to the Internet. The ruleset should be organized into three major sections: any trusted internal interfaces, outbound connections through the public interface, and inbound connections through the public interface.
These two rules allow all traffic to pass through a trusted LAN interface named xl0:
# no restrictions on inside LAN interface for private network pass out quick on xl0 all pass in quick on xl0 all
The rules for the public interface’s outbound and inbound sections should have the most frequently matched rules placed before less commonly matched rules, with the last rule in the section blocking and logging all packets for that interface and direction.
This set of rules defines the outbound section of the public interface named dc0. These rules keep state and identify the specific services that internal systems are authorized for public Internet access. All the rules use quick and specify the appropriate port numbers and, where applicable, destination addresses.
# interface facing Internet (outbound) # Matches session start requests originating from or behind the # firewall, destined for the Internet. # Allow outbound access to public DNS servers. # Replace x.x.x. with address listed in /etc/resolv.conf. # Repeat for each DNS server. pass out quick on dc0 proto tcp from any to x.x.x. port = 53 flags S keep state pass out quick on dc0 proto udp from any to xxx port = 53 keep state # Allow access to ISP's specified DHCP server for cable or DSL networks. # Use the first rule, then check log for the IP address of DHCP server. # Then, uncomment the second rule, replace z.z.z.z with the IP address, # and comment out the first rule pass out log quick on dc0 proto udp from any to any port = 67 keep state #pass out quick on dc0 proto udp from any to z.z.z.z port = 67 keep state # Allow HTTP and HTTPS pass out quick on dc0 proto tcp from any to any port = 80 flags S keep state pass out quick on dc0 proto tcp from any to any port = 443 flags S keep state # Allow email pass out quick on dc0 proto tcp from any to any port = 110 flags S keep state pass out quick on dc0 proto tcp from any to any port = 25 flags S keep state # Allow NTP pass out quick on dc0 proto tcp from any to any port = 37 flags S keep state # Allow FTP pass out quick on dc0 proto tcp from any to any port = 21 flags S keep state # Allow SSH pass out quick on dc0 proto tcp from any to any port = 22 flags S keep state # Allow ping pass out quick on dc0 proto icmp from any to any icmp-type 8 keep state # Block and log everything else block out log first quick on dc0 all
This example of the rules in the inbound section of the public interface blocks all undesirable packets first. This reduces the number of packets that are logged by the last rule.
# interface facing Internet (inbound) # Block all inbound traffic from non-routable or reserved address spaces block in quick on dc0 from 192.168.0.0/16 to any #RFC 1918 private IP block in quick on dc0 from 172.16.0.0/12 to any #RFC 1918 private IP block in quick on dc0 from 10.0.0.0/8 to any #RFC 1918 private IP block in quick on dc0 from 127.0.0.0/8 to any #loopback block in quick on dc0 from 0.0.0.0/8 to any #loopback block in quick on dc0 from 169.254.0.0/16 to any #DHCP auto-config block in quick on dc0 from 192.0.2.0/24 to any #reserved for docs block in quick on dc0 from 204.152.64.0/23 to any #Sun cluster interconnect block in quick on dc0 from 224.0.0.0/3 to any #Class D & E multicast # Block fragments and too short tcp packets block in quick on dc0 all with frags block in quick on dc0 proto tcp all with short # block source routed packets block in quick on dc0 all with opt lsrr block in quick on dc0 all with opt ssrr # Block OS fingerprint attempts and log first occurrence block in log first quick on dc0 proto tcp from any to any flags FUP # Block anything with special options block in quick on dc0 all with ipopts # Block public pings and ident block in quick on dc0 proto icmp all icmp-type 8 block in quick on dc0 proto tcp from any to any port = 113 # Block incoming Netbios services block in log first quick on dc0 proto tcp/udp from any to any port = 137 block in log first quick on dc0 proto tcp/udp from any to any port = 138 block in log first quick on dc0 proto tcp/udp from any to any port = 139 block in log first quick on dc0 proto tcp/udp from any to any port = 81
Any time there are logged messages on a rule with the log first option, run ipfstat -hio to evaluate how many times the rule has been matched. A large number of matches may indicate that the system is under attack.
The rest of the rules in the inbound section define which connections are allowed to be initiated from the Internet. The last rule denies all connections which were not explicitly allowed by previous rules in this section.
# Allow traffic in from ISP's DHCP server. Replace z.z.z.z with # the same IP address used in the outbound section. pass in quick on dc0 proto udp from z.z.z.z to any port = 68 keep state # Allow public connections to specified internal web server pass in quick on dc0 proto tcp from any to x.x.x.x port = 80 flags S keep state # Block and log only first occurrence of all remaining traffic. block in log first quick on dc0 all
To enable NAT, add these statements to /etc/rc.conf and specify the name of the file containing the NAT rules:
gateway_enable="YES" ipnat_enable="YES" ipnat_rules="/etc/ipnat.rules"
NAT rules are flexible and can accomplish many different things to fit the needs of both commercial and home users. The rule syntax presented here has been simplified to demonstrate common usage. For a complete rule syntax description, refer to ipnat(5).
The basic syntax for a NAT rule is as follows, where map starts the rule and IF should be replaced with the name of the external interface:
map IF LAN_IP_RANGE -> PUBLIC_ADDRESS
The LAN_IP_RANGE is the range of IP addresses used by internal clients. Usually, it is a private address range such as 192.168.1.0/24. The PUBLIC_ADDRESS can either be the static external IP address or the keyword 0/32 which represents the IP address assigned to IF.
In IPF, when a packet arrives at the firewall from the LAN with a public destination, it first passes through the outbound rules of the firewall ruleset. Then, the packet is passed to the NAT ruleset which is read from the top down, where the first matching rule wins. IPF tests each NAT rule against the packet’s interface name and source IP address. When a packet’s interface name matches a NAT rule, the packet’s source IP address in the private LAN is checked to see if it falls within the IP address range specified in LAN_IP_RANGE. On a match, the packet has its source IP address rewritten with the public IP address specified by PUBLIC_ADDRESS. IPF posts an entry in its internal NAT table so that when the packet returns from the Internet, it can be mapped back to its original private IP address before being passed to the firewall rules for further processing.
For networks that have large numbers of internal systems or multiple subnets, the process of funneling every private IP address into a single public IP address becomes a resource problem. Two methods are available to relieve this issue.
The first method is to assign a range of ports to use as source ports. By adding the portmap keyword, NAT can be directed to only use source ports in the specified range:
map dc0 192.168.1.0/24 -> 0/32 portmap tcp/udp 20000:60000
Alternately, use the auto keyword which tells NAT to determine the ports that are available for use:
map dc0 192.168.1.0/24 -> 0/32 portmap tcp/udp auto
The second method is to use a pool of public addresses. This is useful when there are too many LAN addresses to fit into a single public address and a block of public IP addresses is available. These public addresses can be used as a pool from which NAT selects an IP address as a packet’s address is mapped on its way out.
The range of public IP addresses can be specified using a netmask or CIDR notation. These two rules are equivalent:
map dc0 192.168.1.0/24 -> 204.134.75.0/255.255.255.0 map dc0 192.168.1.0/24 -> 204.134.75.0/24
A common practice is to have a publically accessible web server or mail server segregated to an internal network segment. The traffic from these servers still has to undergo NAT, but port redirection is needed to direct inbound traffic to the correct server. For example, to map a web server using the internal address 10.0.10.25 to its public IP address of 20.20.20.5, use this rule:
rdr dc0 20.20.20.5/32 port 80 -> 10.0.10.25 port 80
If it is the only web server, this rule would also work as it redirects all external HTTP requests to 10.0.10.25:
rdr dc0 0.0.0.0/0 port 80 -> 10.0.10.25 port 80
IPF has a built in FTP proxy which can be used with NAT. It monitors all outbound traffic for active or passive FTP connection requests and dynamically creates temporary filter rules containing the port number used by the FTP data channel. This eliminates the need to open large ranges of high order ports for FTP connections.
In this example, the first rule calls the proxy for outbound FTP traffic from the internal LAN. The second rule passes the FTP traffic from the firewall to the Internet, and the third rule handles all non-FTP traffic from the internal LAN:
map dc0 10.0.10.0/29 -> 0/32 proxy port 21 ftp/tcp map dc0 0.0.0.0/0 -> 0/32 proxy port 21 ftp/tcp map dc0 10.0.10.0/29 -> 0/32
The FTP map rules go before the NAT rule so that when a packet matches an FTP rule, the FTP proxy creates temporary filter rules to let the FTP session packets pass and undergo NAT. All LAN packets that are not FTP will not match the FTP rules but will undergo NAT if they match the third rule.
Without the FTP proxy, the following firewall rules would instead be needed. Note that without the proxy, all ports above 1024 need to be allowed:
# Allow out LAN PC client FTP to public Internet # Active and passive modes pass out quick on rl0 proto tcp from any to any port = 21 flags S keep state # Allow out passive mode data channel high order port numbers pass out quick on rl0 proto tcp from any to any port > 1024 flags S keep state # Active mode let data channel in from FTP server pass in quick on rl0 proto tcp from any to any port = 20 flags S keep state
Whenever the file containing the NAT rules is edited, run ipnat with -CF to delete the current NAT rules and flush the contents of the dynamic translation table. Include -f and specify the name of the NAT ruleset to load:
# ipnat -CF -f /etc/ipnat.rulesTo display the NAT statistics:
# ipnat -sTo list the NAT table’s current mappings:
# ipnat -lTo turn verbose mode on and display information relating to rule processing and active rules and table entries:
# ipnat -vIPF includes ipfstat(8) which can be used to retrieve and display statistics which are gathered as packets match rules as they go through the firewall. Statistics are accumulated since the firewall was last started or since the last time they were reset to zero using ipf -Z.
The default ipfstat output looks like this:
input packets: blocked 99286 passed 1255609 nomatch 14686 counted 0
output packets: blocked 4200 passed 1284345 nomatch 14687 counted 0
input packets logged: blocked 99286 passed 0
output packets logged: blocked 0 passed 0
packets logged: input 0 output 0
log failures: input 3898 output 0
fragment state(in): kept 0 lost 0
fragment state(out): kept 0 lost 0
packet state(in): kept 169364 lost 0
packet state(out): kept 431395 lost 0
ICMP replies: 0 TCP RSTs sent: 0
Result cache hits(in): 1215208 (out): 1098963
IN Pullups succeeded: 2 failed: 0
OUT Pullups succeeded: 0 failed: 0
Fastroute successes: 0 failures: 0
TCP cksum fails(in): 0 (out): 0
Packet log flags set: (0)Several options are available. When supplied with either -i for inbound or -o for outbound, the command will retrieve and display the appropriate list of filter rules currently installed and in use by the kernel. To also see the rule numbers, include -n. For example, ipfstat -on displays the outbound rules table with rule numbers:
@1 pass out on xl0 from any to any
@2 block out on dc0 from any to any
@3 pass out quick on dc0 proto tcp/udp from any to any keep stateInclude -h to prefix each rule with a count of how many times the rule was matched. For example, ipfstat -oh displays the outbound internal rules table, prefixing each rule with its usage count:
2451423 pass out on xl0 from any to any
354727 block out on dc0 from any to any
430918 pass out quick on dc0 proto tcp/udp from any to any keep stateTo display the state table in a format similar to top(1), use ipfstat -t. When the firewall is under attack, this option provides the ability to identify and see the attacking packets. The optional sub-flags give the ability to select the destination or source IP, port, or protocol to be monitored in real time. Refer to ipfstat(8) for details.
IPF provides ipmon, which can be used to write the firewall’s logging information in a human readable format. It requires that options IPFILTER_LOG be first added to a custom kernel using the instructions in 設定 FreeBSD 核心.
This command is typically run in daemon mode in order to provide a continuous system log file so that logging of past events may be reviewed. Since FreeBSD has a built in syslogd(8) facility to automatically rotate system logs, the default rc.confipmon_flags statement uses -Ds:
ipmon_flags="-Ds" # D = start as daemon
# s = log to syslog
# v = log tcp window, ack, seq
# n = map IP & port to namesLogging provides the ability to review, after the fact, information such as which packets were dropped, what addresses they came from, and where they were going. This information is useful in tracking down attackers.
Once the logging facility is enabled in rc.conf and started with service ipmon start, IPF will only log the rules which contain the log keyword. The firewall administrator decides which rules in the ruleset should be logged and normally only deny rules are logged. It is customary to include the log keyword in the last rule in the ruleset. This makes it possible to see all the packets that did not match any of the rules in the ruleset.
By default, ipmon -Ds mode uses local0 as the logging facility. The following logging levels can be used to further segregate the logged data:
LOG_INFO - packets logged using the "log" keyword as the action rather than pass or block.
LOG_NOTICE - packets logged which are also passed
LOG_WARNING - packets logged which are also blocked
LOG_ERR - packets which have been logged and which can be considered short due to an incomplete headerIn order to setup IPF to log all data to /var/log/ipfilter.log, first create the empty file:
# touch /var/log/ipfilter.logThen, to write all logged messages to the specified file, add the following statement to /etc/syslog.conf:
local0.* /var/log/ipfilter.log
To activate the changes and instruct syslogd(8) to read the modified /etc/syslog.conf, run service syslogd reload.
Do not forget to edit /etc/newsyslog.conf to rotate the new log file.
Messages generated by ipmon consist of data fields separated by white space. Fields common to all messages are:
The date of packet receipt.
The time of packet receipt. This is in the form HH:MM:SS.F, for hours, minutes, seconds, and fractions of a second.
The name of the interface that processed the packet.
The group and rule number of the rule in the format @0:17.
The action: p for passed, b for blocked, S for a short packet, n did not match any rules, and L for a log rule.
The addresses written as three fields: the source address and port separated by a comma, the → symbol, and the destination address and port. For example: 209.53.17.22,80 → 198.73.220.17,1722.
PR followed by the protocol name or number: for example, PR tcp.
len followed by the header length and total length of the packet: for example, len 20 40.
If the packet is a TCP packet, there will be an additional field starting with a hyphen followed by letters corresponding to any flags that were set. Refer to ipf(5) for a list of letters and their flags.
If the packet is an ICMP packet, there will be two fields at the end: the first always being "icmp" and the next being the ICMP message and sub-message type, separated by a slash. For example: icmp 3/3 for a port unreachable message.
Blacklistd is a daemon listening to sockets to receive notifications from other daemons about connection attempts that failed or were successful. It is most widely used in blocking too many connection attempts on open ports. A prime example is SSH running on the internet getting a lot of requests from bots or scripts trying to guess passwords and gain access. Using blacklistd, the daemon can notify the firewall to create a filter rule to block excessive connection attempts from a single source after a number of tries. Blacklistd was first developed on NetBSD and appeared there in version 7. FreeBSD 11 imported blacklistd from NetBSD.
This chapter describes how to set up blacklistd, configure it, and provides examples on how to use it. Readers should be familiar with basic firewall concepts like rules. For details, refer to the firewall chapter. PF is used in the examples, but other firewalls available on FreeBSD should be able to work with blacklistd, too.
The main configuration for blacklistd is stored in blacklistd.conf(5). Various command line options are also available to change blacklistd’s run-time behavior. Persistent configuration across reboots should be stored in /etc/blacklistd.conf. To enable the daemon during system boot, add a blacklistd_enable line to /etc/rc.conf like this:
# sysrc blacklistd_enable=yesTo start the service manually, run this command:
# service blacklistd startRules for blacklistd are configured in blacklistd.conf(5) with one entry per line. Each rule contains a tuple separated by spaces or tabs. Rules either belong to a local or a remote, which applies to the machine where blacklistd is running or an outside source, respectively.
An example blacklistd.conf entry for a local rule looks like this:
[local] ssh stream * * * 3 24h
All rules that follow the [local] section are treated as local rules (which is the default), applying to the local machine. When a [remote] section is encountered, all rules that follow it are handled as remote machine rules.
Seven fields define a rule separated by either tabs or spaces. The first four fields identify the traffic that should be blacklisted. The three fields that follow define backlistd’s behavior. Wildcards are denoted as asterisks (*), matching anything in this field. The first field defines the location. In local rules, these are the network ports. The syntax for the location field is as follows:
[address|interface][/mask][:port]
Adressses can be specified as IPv4 in numeric format or IPv6 in square brackets. An interface name like em0 can also be used.
The socket type is defined by the second field. TCP sockets are of type stream, whereas UDP is denoted as dgram. The example above uses TCP, since SSH is using that protocol.
A protocol can be used in the third field of a blacklistd rule. The following protocols can be used: tcp, udp, tcp6, udp6, or numeric. A wildcard, like in the example, is typically used to match all protocols unless there is a reason to distinguish traffic by a certain protocol.
In the fourth field, the effective user or owner of the daemon process that is reporting the event is defined. The username or UID can be used here, as well as a wildcard (see example rule above).
The packet filter rule name is declared by the fifth field, which starts the behavior part of the rule. By default, blacklistd puts all blocks under a pf anchor called blacklistd in pf.conf like this:
anchor "blacklistd/*" in on $ext_if block in pass out
For separate blacklists, an anchor name can be used in this field. In other cases, the wildcard will suffice. When a name starts with a hyphen (-) it means that an anchor with the default rule name prepended should be used. A modified example from the above using the hyphen would look like this:
ssh stream * * -ssh 3 24h
With such a rule, any new blacklist rules are added to an anchor called blacklistd-ssh.
To block whole subnets for a single rule violation, a / in the rule name can be used. This causes the remaining portion of the name to be interpreted as the mask to be applied to the address specified in the rule. For example, this rule would block every address adjoining /24.
22 stream tcp * */24 3 24h
It is important to specify the proper protocol here. IPv4 and IPv6 treat /24 differently, that is the reason why |
This rule defines that if any one host in that network is misbehaving, everything else on that network will be blocked, too.
The sixth field, called nfail, sets the number of login failures required to blacklist the remote IP in question. When a wildcard is used at this position, it means that blocks will never happen. In the example rule above, a limit of three is defined meaning that after three attempts to log into SSH on one connection, the IP is blocked.
The last field in a blacklistd rule definition specifies how long a host is blacklisted. The default unit is seconds, but suffixes like m, h, and d can also be specified for minutes, hours, and days, respectively.
The example rule in its entirety means that after three times authenticating to SSH will result in a new PF block rule for that host. Rule matches are performed by first checking local rules one after another, from most specific to least specific. When a match occurs, the remote rules are applied and the name, nfail, and disable fields are changed by the remote rule that matched.
Remote rules are used to specify how blacklistd changes its behavior depending on the remote host currently being evaluated. Each field in a remote rule is the same as in a local rule. The only difference is in the way blacklistd is using them. To explain it, this example rule is used:
[remote] 203.0.113.128/25 * * * =/25 = 48h
The address field can be an IP address (either v4 or v6), a port or both. This allows setting special rules for a specific remote address range like in this example. The fields for type, protocol and owner are identically interpreted as in the local rule.
The name fields is different though: the equal sign (=) in a remote rule tells blacklistd to use the value from the matching local rule. It means that the firewall rule entry is taken and the /25 prefix (a netmask of 255.255.255.128) is added. When a connection from that address range is blacklisted, the entire subnet is affected. A PF anchor name can also be used here, in which case blacklistd will add rules for this address block to the anchor of that name. The default table is used when a wildcard is specified.
A custom number of failures in the nfail column can be defined for an address. This is useful for exceptions to a specific rule, to maybe allow someone a less strict application of rules or a bit more leniency in login tries. Blocking is disabled when an asterisk is used in this sixth field.
Remote rules allow a stricter enforcement of limits on attempts to log in compared to attempts coming from a local network like an office.
There are a few software packages in FreeBSD that can utilize blacklistd’s functionality. The two most prominent ones are ftpd(8) and sshd(8) to block excessive connection attempts. To activate blacklistd in the SSH daemon, add the following line to /etc/ssh/sshd_config:
UseBlacklist yes
接著重新啟動 sshd 來使變更生效。
Blacklisting for ftpd(8) is enabled using -B, either in /etc/inetd.conf or as a flag in /etc/rc.conf like this:
ftpd_flags="-B"
That is all that is needed to make these programs talk to blacklistd.
Blacklistd provides the user with a management utility called blacklistctl(8). It displays blocked addresses and networks that are blacklisted by the rules defined in blacklistd.conf(5). To see the list of currently blocked hosts, use dump combined with -b like this.
# blacklistctl dump -b
address/ma:port id nfail last access
213.0.123.128/25:22 OK 6/3 2019/06/08 14:30:19This example shows that there were 6 out of three permitted attempts on port 22 coming from the address range 213.0.123.128/25. There are more attempts listed than are allowed because SSH allows a client to try multiple logins on a single TCP connection. A connection that is currently going on is not stopped by blacklistd. The last connection attempt is listed in the last access column of the output.
To see the remaining time that this host will be on the blacklist, add -r to the previous command.
# blacklistctl dump -br
address/ma:port id nfail remaining time
213.0.123.128/25:22 OK 6/3 36sIn this example, there are 36s seconds left until this host will not be blocked any more.
Sometimes it is necessary to remove a host from the block list before the remaining time expires. Unfortunately, there is no functionality in blacklistd to do that. However, it is possible to remove the address from the PF table using pfctl. For each blocked port, there is a child anchor inside the blacklistd anchor defined in /etc/pf.conf. For example, if there is a child anchor for blocking port 22 it is called blacklistd/22. There is a table inside that child anchor that contains the blocked addresses. This table is called port followed by the port number. In this example, it would be called port22. With that information at hand, it is now possible to use pfctl(8) to display all addresses listed like this:
# pfctl -a blacklistd/22 -t port22 -T show
...
213.0.123.128/25
...After identifying the address to be unblocked from the list, the following command removes it from the list:
# pfctl -a blacklistd/22 -T delete 213.0.123.128/25The address is now removed from PF, but will still show up in the blacklistctl list, since it does not know about any changes made in PF. The entry in blacklistd’s database will eventually expire and be removed from its output eventually. The entry will be added again if the host is matching one of the block rules in blacklistd again.
This chapter covers a number of advanced networking topics.
讀完這章,您將了解:
The basics of gateways and routes.
How to set up USB tethering.
How to set up IEEE™ 802.11 and Bluetooth™ devices.
How to make FreeBSD act as a bridge.
How to set up network PXE booting.
How to set up IPv6 on a FreeBSD machine.
How to enable and utilize the features of the Common Address Redundancy Protocol (CARP) in FreeBSD.
如何在 FreeBSD 上設定多個 VLAN。
Configure bluetooth headset.
在開始閱讀這章之前,您需要:
Understand the basics of the /etc/rc scripts.
熟悉基本網路術語。
Know how to configure and install a new FreeBSD kernel (設定 FreeBSD 核心).
了解如何安裝其他第三方軟體 (安裝應用程式:套件與 Port)。
Routing is the mechanism that allows a system to find the network path to another system. A route is a defined pair of addresses which represent the "destination" and a "gateway". The route indicates that when trying to get to the specified destination, send the packets through the specified gateway. There are three types of destinations: individual hosts, subnets, and "default". The "default route" is used if no other routes apply. There are also three types of gateways: individual hosts, interfaces, also called links, and Ethernet hardware (MAC) addresses. Known routes are stored in a routing table.
This section provides an overview of routing basics. It then demonstrates how to configure a FreeBSD system as a router and offers some troubleshooting tips.
To view the routing table of a FreeBSD system, use netstat(1):
% netstat -r
Routing tables
Internet:
Destination Gateway Flags Refs Use Netif Expire
default outside-gw UGS 37 418 em0
localhost localhost UH 0 181 lo0
test0 0:e0:b5:36:cf:4f UHLW 5 63288 re0 77
10.20.30.255 link#1 UHLW 1 2421
example.com link#1 UC 0 0
host1 0:e0:a8:37:8:1e UHLW 3 4601 lo0
host2 0:e0:a8:37:8:1e UHLW 0 5 lo0 =>
host2.example.com link#1 UC 0 0
224 link#1 UC 0 0The entries in this example are as follows:
The first route in this table specifies the default route. When the local system needs to make a connection to a remote host, it checks the routing table to determine if a known path exists. If the remote host matches an entry in the table, the system checks to see if it can connect using the interface specified in that entry.
If the destination does not match an entry, or if all known paths fail, the system uses the entry for the default route. For hosts on a local area network, the Gateway field in the default route is set to the system which has a direct connection to the Internet. When reading this entry, verify that the Flags column indicates that the gateway is usable (UG).
The default route for a machine which itself is functioning as the gateway to the outside world will be the gateway machine at the Internet Service Provider (ISP).
The second route is the localhost route. The interface specified in the Netif column for localhost is lo0, also known as the loopback device. This indicates that all traffic for this destination should be internal, rather than sending it out over the network.
The addresses beginning with 0:e0: are MAC addresses. FreeBSD will automatically identify any hosts, test0 in the example, on the local Ethernet and add a route for that host over the Ethernet interface, re0. This type of route has a timeout, seen in the Expire column, which is used if the host does not respond in a specific amount of time. When this happens, the route to this host will be automatically deleted. These hosts are identified using the Routing Information Protocol (RIP), which calculates routes to local hosts based upon a shortest path determination.
FreeBSD will automatically add subnet routes for the local subnet. In this example, 10.20.30.255 is the broadcast address for the subnet 10.20.30 and example.com is the domain name associated with that subnet. The designation link#1 refers to the first Ethernet card in the machine.
Local network hosts and local subnets have their routes automatically configured by a daemon called routed(8). If it is not running, only routes which are statically defined by the administrator will exist.
The host1 line refers to the host by its Ethernet address. Since it is the sending host, FreeBSD knows to use the loopback interface (lo0) rather than the Ethernet interface.
The two host2 lines represent aliases which were created using ifconfig(8). The ⇒ symbol after the lo0 interface says that an alias has been set in addition to the loopback address. Such routes only show up on the host that supports the alias and all other hosts on the local network will have a link#1 line for such routes.
The final line (destination subnet 224) deals with multicasting.
Various attributes of each route can be seen in the Flags column. 常見路由表標記 summarizes some of these flags and their meanings:
| 指令 | 用途 |
|---|---|
U | The route is active (up). |
H | The route destination is a single host. |
G | Send anything for this destination on to this gateway, which will figure out from there where to send it. |
S | This route was statically configured. |
C | Clones a new route based upon this route for machines to connect to. This type of route is normally used for local networks. |
W | The route was auto-configured based upon a local area network (clone) route. |
L | Route involves references to Ethernet (link) hardware. |
On a FreeBSD system, the default route can defined in /etc/rc.conf by specifying the IP address of the default gateway:
defaultrouter="10.20.30.1"
It is also possible to manually add the route using route:
# route add default 10.20.30.1Note that manually added routes will not survive a reboot. For more information on manual manipulation of network routing tables, refer to route(8).
A FreeBSD system can be configured as the default gateway, or router, for a network if it is a dual-homed system. A dual-homed system is a host which resides on at least two different networks. Typically, each network is connected to a separate network interface, though IP aliasing can be used to bind multiple addresses, each on a different subnet, to one physical interface.
In order for the system to forward packets between interfaces, FreeBSD must be configured as a router. Internet standards and good engineering practice prevent the FreeBSD Project from enabling this feature by default, but it can be configured to start at boot by adding this line to /etc/rc.conf:
gateway_enable="YES" # Set to YES if this host will be a gateway
To enable routing now, set the sysctl(8) variable net.inet.ip.forwarding to 1. To stop routing, reset this variable to 0.
The routing table of a router needs additional routes so it knows how to reach other networks. Routes can be either added manually using static routes or routes can be automatically learned using a routing protocol. Static routes are appropriate for small networks and this section describes how to add a static routing entry for a small network.
Consider the following network:
In this scenario, RouterA is a FreeBSD machine that is acting as a router to the rest of the Internet. It has a default route set to 10.0.0.1 which allows it to connect with the outside world. RouterB is already configured to use 192.168.1.1 as its default gateway.
Before adding any static routes, the routing table on RouterA looks like this:
% netstat -nr
Routing tables
Internet:
Destination Gateway Flags Refs Use Netif Expire
default 10.0.0.1 UGS 0 49378 xl0
127.0.0.1 127.0.0.1 UH 0 6 lo0
10.0.0.0/24 link1 UC 0 0 xl0
192.168.1.0/24 link2 UC 0 0 xl1With the current routing table, RouterA does not have a route to the 192.168.2.0/24 network. The following command adds the Internal Net 2 network to RouterA's routing table using 192.168.1.2 as the next hop:
# route add -net 192.168.2.0/24 192.168.1.2Now, RouterA can reach any host on the 192.168.2.0/24 network. However, the routing information will not persist if the FreeBSD system reboots. If a static route needs to be persistent, add it to /etc/rc.conf:
# Add Internal Net 2 as a persistent static route static_routes="internalnet2" route_internalnet2="-net 192.168.2.0/24 192.168.1.2"
The static_routes configuration variable is a list of strings separated by a space, where each string references a route name. The variable route_internalnet2 contains the static route for that route name.
Using more than one string in static_routes creates multiple static routes. The following shows an example of adding static routes for the 192.168.0.0/24 and 192.168.1.0/24 networks:
static_routes="net1 net2" route_net1="-net 192.168.0.0/24 192.168.0.1" route_net2="-net 192.168.1.0/24 192.168.1.1"
When an address space is assigned to a network, the service provider configures their routing tables so that all traffic for the network will be sent to the link for the site. But how do external sites know to send their packets to the network’s ISP?
There is a system that keeps track of all assigned address spaces and defines their point of connection to the Internet backbone, or the main trunk lines that carry Internet traffic across the country and around the world. Each backbone machine has a copy of a master set of tables, which direct traffic for a particular network to a specific backbone carrier, and from there down the chain of service providers until it reaches a particular network.
It is the task of the service provider to advertise to the backbone sites that they are the point of connection, and thus the path inward, for a site. This is known as route propagation.
Sometimes, there is a problem with route propagation and some sites are unable to connect. Perhaps the most useful command for trying to figure out where routing is breaking down is traceroute. It is useful when ping fails.
When using traceroute, include the address of the remote host to connect to. The output will show the gateway hosts along the path of the attempt, eventually either reaching the target host, or terminating because of a lack of connection. For more information, refer to traceroute(8).
FreeBSD natively supports both multicast applications and multicast routing. Multicast applications do not require any special configuration in order to run on FreeBSD. Support for multicast routing requires that the following option be compiled into a custom kernel:
options MROUTING
The multicast routing daemon, mrouted can be installed using the net/mrouted package or port. This daemon implements the DVMRP multicast routing protocol and is configured by editing /usr/local/etc/mrouted.conf in order to set up the tunnels and DVMRP. The installation of mrouted also installs map-mbone and mrinfo, as well as their associated man pages. Refer to these for configuration examples.
DVMRP has largely been replaced by the PIM protocol in many multicast installations. Refer to pim(4) for more information. |
Most wireless networks are based on the IEEE™ 802.11 standards. A basic wireless network consists of multiple stations communicating with radios that broadcast in either the 2.4GHz or 5GHz band, though this varies according to the locale and is also changing to enable communication in the 2.3GHz and 4.9GHz ranges.
802.11 networks are organized in two ways. In infrastructure mode, one station acts as a master with all the other stations associating to it, the network is known as a BSS, and the master station is termed an access point (AP). In a BSS, all communication passes through the AP; even when one station wants to communicate with another wireless station, messages must go through the AP. In the second form of network, there is no master and stations communicate directly. This form of network is termed an IBSS and is commonly known as an ad-hoc network.
802.11 networks were first deployed in the 2.4GHz band using protocols defined by the IEEE™ 802.11 and 802.11b standard. These specifications include the operating frequencies and the MAC layer characteristics, including framing and transmission rates, as communication can occur at various rates. Later, the 802.11a standard defined operation in the 5GHz band, including different signaling mechanisms and higher transmission rates. Still later, the 802.11g standard defined the use of 802.11a signaling and transmission mechanisms in the 2.4GHz band in such a way as to be backwards compatible with 802.11b networks.
Separate from the underlying transmission techniques, 802.11 networks have a variety of security mechanisms. The original 802.11 specifications defined a simple security protocol called WEP. This protocol uses a fixed pre-shared key and the RC4 cryptographic cipher to encode data transmitted on a network. Stations must all agree on the fixed key in order to communicate. This scheme was shown to be easily broken and is now rarely used except to discourage transient users from joining networks. Current security practice is given by the IEEE™ 802.11i specification that defines new cryptographic ciphers and an additional protocol to authenticate stations to an access point and exchange keys for data communication. Cryptographic keys are periodically refreshed and there are mechanisms for detecting and countering intrusion attempts. Another security protocol specification commonly used in wireless networks is termed WPA, which was a precursor to 802.11i. WPA specifies a subset of the requirements found in 802.11i and is designed for implementation on legacy hardware. Specifically, WPA requires only the TKIP cipher that is derived from the original WEP cipher. 802.11i permits use of TKIP but also requires support for a stronger cipher, AES-CCM, for encrypting data. The AES cipher was not required in WPA because it was deemed too computationally costly to be implemented on legacy hardware.
The other standard to be aware of is 802.11e. It defines protocols for deploying multimedia applications, such as streaming video and voice over IP (VoIP), in an 802.11 network. Like 802.11i, 802.11e also has a precursor specification termed WME (later renamed WMM) that has been defined by an industry group as a subset of 802.11e that can be deployed now to enable multimedia applications while waiting for the final ratification of 802.11e. The most important thing to know about 802.11e and WME/WMM is that it enables prioritized traffic over a wireless network through Quality of Service (QoS) protocols and enhanced media access protocols. Proper implementation of these protocols enables high speed bursting of data and prioritized traffic flow.
FreeBSD supports networks that operate using 802.11a, 802.11b, and 802.11g. The WPA and 802.11i security protocols are likewise supported (in conjunction with any of 11a, 11b, and 11g) and QoS and traffic prioritization required by the WME/WMM protocols are supported for a limited set of wireless devices.
Connecting a computer to an existing wireless network is a very common situation. This procedure shows the steps required.
Obtain the SSID (Service Set Identifier) and PSK (Pre-Shared Key) for the wireless network from the network administrator.
Identify the wireless adapter. The FreeBSD GENERIC kernel includes drivers for many common wireless adapters. If the wireless adapter is one of those models, it will be shown in the output from ifconfig(8):
% ifconfig | grep -B3 -i wirelessOn FreeBSD 11 or higher, use this command instead:
% sysctl net.wlan.devicesIf a wireless adapter is not listed, an additional kernel module might be required, or it might be a model not supported by FreeBSD.
This example shows the Atheros ath0 wireless adapter.
Add an entry for this network to /etc/wpa_supplicant.conf. If the file does not exist, create it. Replace myssid and mypsk with the SSID and PSK provided by the network administrator.
network={
ssid="myssid"
psk="mypsk"
}Add entries to /etc/rc.conf to configure the network on startup:
wlans_ath0="wlan0" ifconfig_wlan0="WPA SYNCDHCP"
Restart the computer, or restart the network service to connect to the network:
# service netif restartTo use wireless networking, a wireless networking card is needed and the kernel needs to be configured with the appropriate wireless networking support. The kernel is separated into multiple modules so that only the required support needs to be configured.
The most commonly used wireless devices are those that use parts made by Atheros. These devices are supported by ath(4) and require the following line to be added to /boot/loader.conf:
if_ath_load="YES"
The Atheros driver is split up into three separate pieces: the driver (ath(4)), the hardware support layer that handles chip-specific functions (ath_hal(4)), and an algorithm for selecting the rate for transmitting frames. When this support is loaded as kernel modules, any dependencies are automatically handled. To load support for a different type of wireless device, specify the module for that device. This example is for devices based on the Intersil Prism parts (wi(4)) driver:
if_wi_load="YES"
The examples in this section use an ath(4) device and the device name in the examples must be changed according to the configuration. A list of available wireless drivers and supported adapters can be found in the FreeBSD Hardware Notes, available on the Release Information page of the FreeBSD website. If a native FreeBSD driver for the wireless device does not exist, it may be possible to use the Windows™ driver with the help of the NDIS driver wrapper. |
In addition, the modules that implement cryptographic support for the security protocols to use must be loaded. These are intended to be dynamically loaded on demand by the wlan(4) module, but for now they must be manually configured. The following modules are available: wlan_wep(4), wlan_ccmp(4), and wlan_tkip(4). The wlan_ccmp(4) and wlan_tkip(4) drivers are only needed when using the WPA or 802.11i security protocols. If the network does not use encryption, wlan_wep(4) support is not needed. To load these modules at boot time, add the following lines to /boot/loader.conf:
wlan_wep_load="YES" wlan_ccmp_load="YES" wlan_tkip_load="YES"
Once this information has been added to /boot/loader.conf, reboot the FreeBSD box. Alternately, load the modules by hand using kldload(8).
For users who do not want to use modules, it is possible to compile these drivers into the kernel by adding the following lines to a custom kernel configuration file: device wlan # 802.11 support device wlan_wep # 802.11 WEP support device wlan_ccmp # 802.11 CCMP support device wlan_tkip # 802.11 TKIP support device wlan_amrr # AMRR transmit rate control algorithm device ath # Atheros pci/cardbus NIC's device ath_hal # pci/cardbus chip support options AH_SUPPORT_AR5416 # enable AR5416 tx/rx descriptors device ath_rate_sample # SampleRate tx rate control for ath With this information in the kernel configuration file, recompile the kernel and reboot the FreeBSD machine. |
Information about the wireless device should appear in the boot messages, like this:
ath0: <Atheros 5212> mem 0x88000000-0x8800ffff irq 11 at device 0.0 on cardbus1
ath0: [ITHREAD]
ath0: AR2413 mac 7.9 RF2413 phy 4.5Since the regulatory situation is different in various parts of the world, it is necessary to correctly set the domains that apply to your location to have the correct information about what channels can be used.
The available region definitions can be found in /etc/regdomain.xml. To set the data at runtime, use ifconfig:
# ifconfig wlan0 regdomain ETSI country ATTo persist the settings, add it to /etc/rc.conf:
# sysrc create_args_wlan0="country AT regdomain ETSI"Infrastructure (BSS) mode is the mode that is typically used. In this mode, a number of wireless access points are connected to a wired network. Each wireless network has its own name, called the SSID. Wireless clients connect to the wireless access points.
To scan for available networks, use ifconfig(8). This request may take a few moments to complete as it requires the system to switch to each available wireless frequency and probe for available access points. Only the superuser can initiate a scan:
# ifconfig wlan0 create wlandev ath0
# ifconfig wlan0 up scan
SSID/MESH ID BSSID CHAN RATE S:N INT CAPS
dlinkap 00:13:46:49:41:76 11 54M -90:96 100 EPS WPA WME
freebsdap 00:11:95:c3:0d:ac 1 54M -83:96 100 EPS WPAThe interface must be |
The output of a scan request lists each BSS/IBSS network found. Besides listing the name of the network, the SSID, the output also shows the BSSID, which is the MAC address of the access point. The CAPS field identifies the type of each network and the capabilities of the stations operating there:
| 功能代號 | 意義 |
|---|---|
| Extended Service Set (ESS). Indicates that the station is part of an infrastructure network rather than an IBSS/ad-hoc network. |
| IBSS/ad-hoc network. Indicates that the station is part of an ad-hoc network rather than an ESS network. |
| Privacy. Encryption is required for all data frames exchanged within the BSS using cryptographic means such as WEP, TKIP or AES-CCMP. |
| Short Preamble. Indicates that the network is using short preambles, defined in 802.11b High Rate/DSSS PHY, and utilizes a 56 bit sync field rather than the 128 bit field used in long preamble mode. |
| Short slot time. Indicates that the 802.11g network is using a short slot time because there are no legacy (802.11b) stations present. |
One can also display the current list of known networks with:
# ifconfig wlan0 list scanThis information may be updated automatically by the adapter or manually with a scan request. Old data is automatically removed from the cache, so over time this list may shrink unless more scans are done.
This section provides a simple example of how to make the wireless network adapter work in FreeBSD without encryption. Once familiar with these concepts, it is strongly recommend to use WPA to set up the wireless network.
There are three basic steps to configure a wireless network: select an access point, authenticate the station, and configure an IP address. The following sections discuss each step.
Most of the time, it is sufficient to let the system choose an access point using the builtin heuristics. This is the default behavior when an interface is marked as up or it is listed in /etc/rc.conf:
wlans_ath0="wlan0" ifconfig_wlan0="DHCP"
If there are multiple access points, a specific one can be selected by its SSID:
wlans_ath0="wlan0" ifconfig_wlan0="ssid your_ssid_here DHCP"
In an environment where there are multiple access points with the same SSID, which is often done to simplify roaming, it may be necessary to associate to one specific device. In this case, the BSSID of the access point can be specified, with or without the SSID:
wlans_ath0="wlan0" ifconfig_wlan0="ssid your_ssid_here bssid xx:xx:xx:xx:xx:xx DHCP"
There are other ways to constrain the choice of an access point, such as limiting the set of frequencies the system will scan on. This may be useful for a multi-band wireless card as scanning all the possible channels can be time-consuming. To limit operation to a specific band, use the mode parameter:
wlans_ath0="wlan0" ifconfig_wlan0="mode 11g ssid your_ssid_here DHCP"
This example will force the card to operate in 802.11g, which is defined only for 2.4GHz frequencies so any 5GHz channels will not be considered. This can also be achieved with the channel parameter, which locks operation to one specific frequency, and the chanlist parameter, to specify a list of channels for scanning. More information about these parameters can be found in ifconfig(8).
Once an access point is selected, the station needs to authenticate before it can pass data. Authentication can happen in several ways. The most common scheme, open authentication, allows any station to join the network and communicate. This is the authentication to use for test purposes the first time a wireless network is setup. Other schemes require cryptographic handshakes to be completed before data traffic can flow, either using pre-shared keys or secrets, or more complex schemes that involve backend services such as RADIUS. Open authentication is the default setting. The next most common setup is WPA-PSK, also known as WPA Personal, which is described in WPA-PSK.
If using an Apple™AirPort™ Extreme base station for an access point, shared-key authentication together with a WEP key needs to be configured. This can be configured in /etc/rc.conf or by using wpa_supplicant(8). For a single AirPort™ base station, access can be configured with: wlans_ath0="wlan0" ifconfig_wlan0="authmode shared wepmode on weptxkey 1 wepkey 01234567 DHCP" In general, shared key authentication should be avoided because it uses the WEP key material in a highly-constrained manner, making it even easier to crack the key. If WEP must be used for compatibility with legacy devices, it is better to use WEP with |
Once an access point is selected and the authentication parameters are set, an IP address must be obtained in order to communicate. Most of the time, the IP address is obtained via DHCP. To achieve that, edit /etc/rc.conf and add DHCP to the configuration for the device:
wlans_ath0="wlan0" ifconfig_wlan0="DHCP"
The wireless interface is now ready to bring up:
# service netif startOnce the interface is running, use ifconfig(8) to see the status of the interface ath0:
# ifconfig wlan0
wlan0: flags=8843<UP,BROADCAST,RUNNING,SIMPLEX,MULTICAST> mtu 1500
ether 00:11:95:d5:43:62
inet 192.168.1.100 netmask 0xffffff00 broadcast 192.168.1.255
media: IEEE 802.11 Wireless Ethernet OFDM/54Mbps mode 11g
status: associated
ssid dlinkap channel 11 (2462 Mhz 11g) bssid 00:13:46:49:41:76
country US ecm authmode OPEN privacy OFF txpower 21.5 bmiss 7
scanvalid 60 bgscan bgscanintvl 300 bgscanidle 250 roam:rssi 7
roam:rate 5 protmode CTS wme burstThe status: associated line means that it is connected to the wireless network. The bssid 00:13:46:49:41:76 is the MAC address of the access point and authmode OPEN indicates that the communication is not encrypted.
If an IP address cannot be obtained from a DHCP server, set a fixed IP address. Replace the DHCP keyword shown above with the address information. Be sure to retain any other parameters for selecting the access point:
wlans_ath0="wlan0" ifconfig_wlan0="inet 192.168.1.100 netmask 255.255.255.0 ssid your_ssid_here"
Wi-Fi Protected Access (WPA) is a security protocol used together with 802.11 networks to address the lack of proper authentication and the weakness of WEP. WPA leverages the 802.1X authentication protocol and uses one of several ciphers instead of WEP for data integrity. The only cipher required by WPA is the Temporary Key Integrity Protocol (TKIP). TKIP is a cipher that extends the basic RC4 cipher used by WEP by adding integrity checking, tamper detection, and measures for responding to detected intrusions. TKIP is designed to work on legacy hardware with only software modification. It represents a compromise that improves security but is still not entirely immune to attack. WPA also specifies the AES-CCMP cipher as an alternative to TKIP, and that is preferred when possible. For this specification, the term WPA2 or RSN is commonly used.
WPA defines authentication and encryption protocols. Authentication is most commonly done using one of two techniques: by 802.1X and a backend authentication service such as RADIUS, or by a minimal handshake between the station and the access point using a pre-shared secret. The former is commonly termed WPA Enterprise and the latter is known as WPA Personal. Since most people will not set up a RADIUS backend server for their wireless network, WPA-PSK is by far the most commonly encountered configuration for WPA.
The control of the wireless connection and the key negotiation or authentication with a server is done using wpa_supplicant(8). This program requires a configuration file, /etc/wpa_supplicant.conf, to run. More information regarding this file can be found in wpa_supplicant.conf(5).
WPA-PSK, also known as WPA Personal, is based on a pre-shared key (PSK) which is generated from a given password and used as the master key in the wireless network. This means every wireless user will share the same key. WPA-PSK is intended for small networks where the use of an authentication server is not possible or desired.
Always use strong passwords that are sufficiently long and made from a rich alphabet so that they will not be easily guessed or attacked. |
The first step is the configuration of /etc/wpa_supplicant.conf with the SSID and the pre-shared key of the network:
network={
ssid="freebsdap"
psk="freebsdmall"
}Then, in /etc/rc.conf, indicate that the wireless device configuration will be done with WPA and the IP address will be obtained with DHCP:
wlans_ath0="wlan0" ifconfig_wlan0="WPA DHCP"
Then, bring up the interface:
# service netif start
Starting wpa_supplicant.
DHCPDISCOVER on wlan0 to 255.255.255.255 port 67 interval 5
DHCPDISCOVER on wlan0 to 255.255.255.255 port 67 interval 6
DHCPOFFER from 192.168.0.1
DHCPREQUEST on wlan0 to 255.255.255.255 port 67
DHCPACK from 192.168.0.1
bound to 192.168.0.254 -- renewal in 300 seconds.
wlan0: flags=8843<UP,BROADCAST,RUNNING,SIMPLEX,MULTICAST> mtu 1500
ether 00:11:95:d5:43:62
inet 192.168.0.254 netmask 0xffffff00 broadcast 192.168.0.255
media: IEEE 802.11 Wireless Ethernet OFDM/36Mbps mode 11g
status: associated
ssid freebsdap channel 1 (2412 Mhz 11g) bssid 00:11:95:c3:0d:ac
country US ecm authmode WPA2/802.11i privacy ON deftxkey UNDEF
AES-CCM 3:128-bit txpower 21.5 bmiss 7 scanvalid 450 bgscan
bgscanintvl 300 bgscanidle 250 roam:rssi 7 roam:rate 5 protmode CTS
wme burst roaming MANUALOr, try to configure the interface manually using the information in /etc/wpa_supplicant.conf:
# wpa_supplicant -i wlan0 -c /etc/wpa_supplicant.conf
Trying to associate with 00:11:95:c3:0d:ac (SSID='freebsdap' freq=2412 MHz)
Associated with 00:11:95:c3:0d:ac
WPA: Key negotiation completed with 00:11:95:c3:0d:ac [PTK=CCMP GTK=CCMP]
CTRL-EVENT-CONNECTED - Connection to 00:11:95:c3:0d:ac completed (auth) [id=0 id_str=]The next operation is to launch dhclient(8) to get the IP address from the DHCP server:
# dhclient wlan0
DHCPREQUEST on wlan0 to 255.255.255.255 port 67
DHCPACK from 192.168.0.1
bound to 192.168.0.254 -- renewal in 300 seconds.
# ifconfig wlan0
wlan0: flags=8843<UP,BROADCAST,RUNNING,SIMPLEX,MULTICAST> mtu 1500
ether 00:11:95:d5:43:62
inet 192.168.0.254 netmask 0xffffff00 broadcast 192.168.0.255
media: IEEE 802.11 Wireless Ethernet OFDM/36Mbps mode 11g
status: associated
ssid freebsdap channel 1 (2412 Mhz 11g) bssid 00:11:95:c3:0d:ac
country US ecm authmode WPA2/802.11i privacy ON deftxkey UNDEF
AES-CCM 3:128-bit txpower 21.5 bmiss 7 scanvalid 450 bgscan
bgscanintvl 300 bgscanidle 250 roam:rssi 7 roam:rate 5 protmode CTS
wme burst roaming MANUALIf /etc/rc.conf has an |
If DHCP is not possible or desired, set a static IP address after wpa_supplicant(8) has authenticated the station:
# ifconfig wlan0 inet 192.168.0.100 netmask 255.255.255.0
# ifconfig wlan0
wlan0: flags=8843<UP,BROADCAST,RUNNING,SIMPLEX,MULTICAST> mtu 1500
ether 00:11:95:d5:43:62
inet 192.168.0.100 netmask 0xffffff00 broadcast 192.168.0.255
media: IEEE 802.11 Wireless Ethernet OFDM/36Mbps mode 11g
status: associated
ssid freebsdap channel 1 (2412 Mhz 11g) bssid 00:11:95:c3:0d:ac
country US ecm authmode WPA2/802.11i privacy ON deftxkey UNDEF
AES-CCM 3:128-bit txpower 21.5 bmiss 7 scanvalid 450 bgscan
bgscanintvl 300 bgscanidle 250 roam:rssi 7 roam:rate 5 protmode CTS
wme burst roaming MANUALWhen DHCP is not used, the default gateway and the nameserver also have to be manually set:
# route add default your_default_router
# echo "nameserver your_DNS_server" >> /etc/resolv.confThe second way to use WPA is with an 802.1X backend authentication server. In this case, WPA is called WPA Enterprise to differentiate it from the less secure WPA Personal. Authentication in WPA Enterprise is based on the Extensible Authentication Protocol (EAP).
EAP does not come with an encryption method. Instead, EAP is embedded inside an encrypted tunnel. There are many EAP authentication methods, but EAP-TLS, EAP-TTLS, and EAP-PEAP are the most common.
EAP with Transport Layer Security (EAP-TLS) is a well-supported wireless authentication protocol since it was the first EAP method to be certified by the Wi-Fi Alliance. EAP-TLS requires three certificates to run: the certificate of the Certificate Authority (CA) installed on all machines, the server certificate for the authentication server, and one client certificate for each wireless client. In this EAP method, both the authentication server and wireless client authenticate each other by presenting their respective certificates, and then verify that these certificates were signed by the organization’s CA.
As previously, the configuration is done via /etc/wpa_supplicant.conf:
network={
ssid="freebsdap" (1)
proto=RSN (2)
key_mgmt=WPA-EAP (3)
eap=TLS (4)
identity="loader" (5)
ca_cert="/etc/certs/cacert.pem" (6)
client_cert="/etc/certs/clientcert.pem" (7)
private_key="/etc/certs/clientkey.pem" (8)
private_key_passwd="freebsdmallclient" (9)
}| 1 | This field indicates the network name (SSID). |
| 2 | This example uses the RSN IEEE™ 802.11i protocol, also known as WPA2. |
| 3 | The key_mgmt line refers to the key management protocol to use. In this example, it is WPA using EAP authentication. |
| 4 | This field indicates the EAP method for the connection. |
| 5 | The identity field contains the identity string for EAP. |
| 6 | The ca_cert field indicates the pathname of the CA certificate file. This file is needed to verify the server certificate. |
| 7 | The client_cert line gives the pathname to the client certificate file. This certificate is unique to each wireless client of the network. |
| 8 | The private_key field is the pathname to the client certificate private key file. |
| 9 | The private_key_passwd field contains the passphrase for the private key. |
Then, add the following lines to /etc/rc.conf:
wlans_ath0="wlan0" ifconfig_wlan0="WPA DHCP"
The next step is to bring up the interface:
# service netif start
Starting wpa_supplicant.
DHCPREQUEST on wlan0 to 255.255.255.255 port 67 interval 7
DHCPREQUEST on wlan0 to 255.255.255.255 port 67 interval 15
DHCPACK from 192.168.0.20
bound to 192.168.0.254 -- renewal in 300 seconds.
wlan0: flags=8843<UP,BROADCAST,RUNNING,SIMPLEX,MULTICAST> mtu 1500
ether 00:11:95:d5:43:62
inet 192.168.0.254 netmask 0xffffff00 broadcast 192.168.0.255
media: IEEE 802.11 Wireless Ethernet DS/11Mbps mode 11g
status: associated
ssid freebsdap channel 1 (2412 Mhz 11g) bssid 00:11:95:c3:0d:ac
country US ecm authmode WPA2/802.11i privacy ON deftxkey UNDEF
AES-CCM 3:128-bit txpower 21.5 bmiss 7 scanvalid 450 bgscan
bgscanintvl 300 bgscanidle 250 roam:rssi 7 roam:rate 5 protmode CTS
wme burst roaming MANUALIt is also possible to bring up the interface manually using wpa_supplicant(8) and ifconfig(8).
With EAP-TLS, both the authentication server and the client need a certificate. With EAP-TTLS, a client certificate is optional. This method is similar to a web server which creates a secure SSL tunnel even if visitors do not have client-side certificates. EAP-TTLS uses an encrypted TLS tunnel for safe transport of the authentication data.
The required configuration can be added to /etc/wpa_supplicant.conf:
network={
ssid="freebsdap"
proto=RSN
key_mgmt=WPA-EAP
eap=TTLS (1)
identity="test" (2)
password="test" (3)
ca_cert="/etc/certs/cacert.pem" (4)
phase2="auth=MD5" (5)
}| 1 | This field specifies the EAP method for the connection. |
| 2 | The identity field contains the identity string for EAP authentication inside the encrypted TLS tunnel. |
| 3 | The password field contains the passphrase for the EAP authentication. |
| 4 | The ca_cert field indicates the pathname of the CA certificate file. This file is needed to verify the server certificate. |
| 5 | This field specifies the authentication method used in the encrypted TLS tunnel. In this example, EAP with MD5-Challenge is used. The "inner authentication" phase is often called "phase2". |
Next, add the following lines to /etc/rc.conf:
wlans_ath0="wlan0" ifconfig_wlan0="WPA DHCP"
The next step is to bring up the interface:
# service netif start
Starting wpa_supplicant.
DHCPREQUEST on wlan0 to 255.255.255.255 port 67 interval 7
DHCPREQUEST on wlan0 to 255.255.255.255 port 67 interval 15
DHCPREQUEST on wlan0 to 255.255.255.255 port 67 interval 21
DHCPACK from 192.168.0.20
bound to 192.168.0.254 -- renewal in 300 seconds.
wlan0: flags=8843<UP,BROADCAST,RUNNING,SIMPLEX,MULTICAST> mtu 1500
ether 00:11:95:d5:43:62
inet 192.168.0.254 netmask 0xffffff00 broadcast 192.168.0.255
media: IEEE 802.11 Wireless Ethernet DS/11Mbps mode 11g
status: associated
ssid freebsdap channel 1 (2412 Mhz 11g) bssid 00:11:95:c3:0d:ac
country US ecm authmode WPA2/802.11i privacy ON deftxkey UNDEF
AES-CCM 3:128-bit txpower 21.5 bmiss 7 scanvalid 450 bgscan
bgscanintvl 300 bgscanidle 250 roam:rssi 7 roam:rate 5 protmode CTS
wme burst roaming MANUALPEAPv0/EAP-MSCHAPv2 is the most common PEAP method. In this chapter, the term PEAP is used to refer to that method. |
Protected EAP (PEAP) is designed as an alternative to EAP-TTLS and is the most used EAP standard after EAP-TLS. In a network with mixed operating systems, PEAP should be the most supported standard after EAP-TLS.
PEAP is similar to EAP-TTLS as it uses a server-side certificate to authenticate clients by creating an encrypted TLS tunnel between the client and the authentication server, which protects the ensuing exchange of authentication information. PEAP authentication differs from EAP-TTLS as it broadcasts the username in the clear and only the password is sent in the encrypted TLS tunnel. EAP-TTLS will use the TLS tunnel for both the username and password.
Add the following lines to /etc/wpa_supplicant.conf to configure the EAP-PEAP related settings:
network={
ssid="freebsdap"
proto=RSN
key_mgmt=WPA-EAP
eap=PEAP (1)
identity="test" (2)
password="test" (3)
ca_cert="/etc/certs/cacert.pem" (4)
phase1="peaplabel=0" (5)
phase2="auth=MSCHAPV2" (6)
}| 1 | This field specifies the EAP method for the connection. |
| 2 | The identity field contains the identity string for EAP authentication inside the encrypted TLS tunnel. |
| 3 | The password field contains the passphrase for the EAP authentication. |
| 4 | The ca_cert field indicates the pathname of the CA certificate file. This file is needed to verify the server certificate. |
| 5 | This field contains the parameters for the first phase of authentication, the TLS tunnel. According to the authentication server used, specify a specific label for authentication. Most of the time, the label will be "client EAP encryption" which is set by using peaplabel=0. More information can be found in wpa_supplicant.conf(5). |
| 6 | This field specifies the authentication protocol used in the encrypted TLS tunnel. In the case of PEAP, it is auth=MSCHAPV2. |
將以下參數加到 /etc/rc.conf:
wlans_ath0="wlan0" ifconfig_wlan0="WPA DHCP"
Then, bring up the interface:
# service netif start
Starting wpa_supplicant.
DHCPREQUEST on wlan0 to 255.255.255.255 port 67 interval 7
DHCPREQUEST on wlan0 to 255.255.255.255 port 67 interval 15
DHCPREQUEST on wlan0 to 255.255.255.255 port 67 interval 21
DHCPACK from 192.168.0.20
bound to 192.168.0.254 -- renewal in 300 seconds.
wlan0: flags=8843<UP,BROADCAST,RUNNING,SIMPLEX,MULTICAST> mtu 1500
ether 00:11:95:d5:43:62
inet 192.168.0.254 netmask 0xffffff00 broadcast 192.168.0.255
media: IEEE 802.11 Wireless Ethernet DS/11Mbps mode 11g
status: associated
ssid freebsdap channel 1 (2412 Mhz 11g) bssid 00:11:95:c3:0d:ac
country US ecm authmode WPA2/802.11i privacy ON deftxkey UNDEF
AES-CCM 3:128-bit txpower 21.5 bmiss 7 scanvalid 450 bgscan
bgscanintvl 300 bgscanidle 250 roam:rssi 7 roam:rate 5 protmode CTS
wme burst roaming MANUALWired Equivalent Privacy (WEP) is part of the original 802.11 standard. There is no authentication mechanism, only a weak form of access control which is easily cracked.
WEP can be set up using ifconfig(8):
# ifconfig wlan0 create wlandev ath0
# ifconfig wlan0 inet 192.168.1.100 netmask 255.255.255.0 \
ssid my_net wepmode on weptxkey 3 wepkey 3:0x3456789012The weptxkey specifies which WEP key will be used in the transmission. This example uses the third key. This must match the setting on the access point. When unsure which key is used by the access point, try 1 (the first key) for this value.
The wepkey selects one of the WEP keys. It should be in the format index:key. Key 1 is used by default; the index only needs to be set when using a key other than the first key.
Replace the |
Refer to ifconfig(8) for further information.
The wpa_supplicant(8) facility can be used to configure a wireless interface with WEP. The example above can be set up by adding the following lines to /etc/wpa_supplicant.conf:
network={
ssid="my_net"
key_mgmt=NONE
wep_key3=3456789012
wep_tx_keyidx=3
}Then:
# wpa_supplicant -i wlan0 -c /etc/wpa_supplicant.conf
Trying to associate with 00:13:46:49:41:76 (SSID='dlinkap' freq=2437 MHz)
Associated with 00:13:46:49:41:76IBSS mode, also called ad-hoc mode, is designed for point to point connections. For example, to establish an ad-hoc network between the machines A and B, choose two IP addresses and a SSID.
On A:
# ifconfig wlan0 create wlandev ath0 wlanmode adhoc
# ifconfig wlan0 inet 192.168.0.1 netmask 255.255.255.0 ssid freebsdap
# ifconfig wlan0
wlan0: flags=8843<UP,BROADCAST,RUNNING,SIMPLEX,MULTICAST> metric 0 mtu 1500
ether 00:11:95:c3:0d:ac
inet 192.168.0.1 netmask 0xffffff00 broadcast 192.168.0.255
media: IEEE 802.11 Wireless Ethernet autoselect mode 11g <adhoc>
status: running
ssid freebsdap channel 2 (2417 Mhz 11g) bssid 02:11:95:c3:0d:ac
country US ecm authmode OPEN privacy OFF txpower 21.5 scanvalid 60
protmode CTS wme burstThe adhoc parameter indicates that the interface is running in IBSS mode.
B should now be able to detect A:
# ifconfig wlan0 create wlandev ath0 wlanmode adhoc
# ifconfig wlan0 up scan
SSID/MESH ID BSSID CHAN RATE S:N INT CAPS
freebsdap 02:11:95:c3:0d:ac 2 54M -64:-96 100 IS WMEThe I in the output confirms that A is in ad-hoc mode. Now, configure B with a different IP address:
# ifconfig wlan0 inet 192.168.0.2 netmask 255.255.255.0 ssid freebsdap
# ifconfig wlan0
wlan0: flags=8843<UP,BROADCAST,RUNNING,SIMPLEX,MULTICAST> metric 0 mtu 1500
ether 00:11:95:d5:43:62
inet 192.168.0.2 netmask 0xffffff00 broadcast 192.168.0.255
media: IEEE 802.11 Wireless Ethernet autoselect mode 11g <adhoc>
status: running
ssid freebsdap channel 2 (2417 Mhz 11g) bssid 02:11:95:c3:0d:ac
country US ecm authmode OPEN privacy OFF txpower 21.5 scanvalid 60
protmode CTS wme burstBoth A and B are now ready to exchange information.
FreeBSD can act as an Access Point (AP) which eliminates the need to buy a hardware AP or run an ad-hoc network. This can be particularly useful when a FreeBSD machine is acting as a gateway to another network such as the Internet.
Before configuring a FreeBSD machine as an AP, the kernel must be configured with the appropriate networking support for the wireless card as well as the security protocols being used. For more details, see 基礎設定.
The NDIS driver wrapper for Windows™ drivers does not currently support AP operation. Only native FreeBSD wireless drivers support AP mode. |
Once wireless networking support is loaded, check if the wireless device supports the host-based access point mode, also known as hostap mode:
# ifconfig wlan0 create wlandev ath0
# ifconfig wlan0 list caps
drivercaps=6f85edc1<STA,FF,TURBOP,IBSS,HOSTAP,AHDEMO,TXPMGT,SHSLOT,SHPREAMBLE,MONITOR,MBSS,WPA1,WPA2,BURST,WME,WDS,BGSCAN,TXFRAG>
cryptocaps=1f<WEP,TKIP,AES,AES_CCM,TKIPMIC>This output displays the card’s capabilities. The HOSTAP word confirms that this wireless card can act as an AP. Various supported ciphers are also listed: WEP, TKIP, and AES. This information indicates which security protocols can be used on the AP.
The wireless device can only be put into hostap mode during the creation of the network pseudo-device, so a previously created device must be destroyed first:
# ifconfig wlan0 destroythen regenerated with the correct option before setting the other parameters:
# ifconfig wlan0 create wlandev ath0 wlanmode hostap
# ifconfig wlan0 inet 192.168.0.1 netmask 255.255.255.0 ssid freebsdap mode 11g channel 1Use ifconfig(8) again to see the status of the wlan0 interface:
# ifconfig wlan0
wlan0: flags=8843<UP,BROADCAST,RUNNING,SIMPLEX,MULTICAST> metric 0 mtu 1500
ether 00:11:95:c3:0d:ac
inet 192.168.0.1 netmask 0xffffff00 broadcast 192.168.0.255
media: IEEE 802.11 Wireless Ethernet autoselect mode 11g <hostap>
status: running
ssid freebsdap channel 1 (2412 Mhz 11g) bssid 00:11:95:c3:0d:ac
country US ecm authmode OPEN privacy OFF txpower 21.5 scanvalid 60
protmode CTS wme burst dtimperiod 1 -dfsThe hostap parameter indicates the interface is running in the host-based access point mode.
The interface configuration can be done automatically at boot time by adding the following lines to /etc/rc.conf:
wlans_ath0="wlan0" create_args_wlan0="wlanmode hostap" ifconfig_wlan0="inet 192.168.0.1 netmask 255.255.255.0 ssid freebsdap mode 11g channel 1"
Although it is not recommended to run an AP without any authentication or encryption, this is a simple way to check if the AP is working. This configuration is also important for debugging client issues.
Once the AP is configured, initiate a scan from another wireless machine to find the AP:
# ifconfig wlan0 create wlandev ath0
# ifconfig wlan0 up scan
SSID/MESH ID BSSID CHAN RATE S:N INT CAPS
freebsdap 00:11:95:c3:0d:ac 1 54M -66:-96 100 ES WMEThe client machine found the AP and can be associated with it:
# ifconfig wlan0 inet 192.168.0.2 netmask 255.255.255.0 ssid freebsdap
# ifconfig wlan0
wlan0: flags=8843<UP,BROADCAST,RUNNING,SIMPLEX,MULTICAST> metric 0 mtu 1500
ether 00:11:95:d5:43:62
inet 192.168.0.2 netmask 0xffffff00 broadcast 192.168.0.255
media: IEEE 802.11 Wireless Ethernet OFDM/54Mbps mode 11g
status: associated
ssid freebsdap channel 1 (2412 Mhz 11g) bssid 00:11:95:c3:0d:ac
country US ecm authmode OPEN privacy OFF txpower 21.5 bmiss 7
scanvalid 60 bgscan bgscanintvl 300 bgscanidle 250 roam:rssi 7
roam:rate 5 protmode CTS wme burstThis section focuses on setting up a FreeBSD access point using the WPA2 security protocol. More details regarding WPA and the configuration of WPA-based wireless clients can be found in WPA.
The hostapd(8) daemon is used to deal with client authentication and key management on the WPA2-enabled AP.
The following configuration operations are performed on the FreeBSD machine acting as the AP. Once the AP is correctly working, hostapd(8) can be automatically started at boot with this line in /etc/rc.conf:
hostapd_enable="YES"
Before trying to configure hostapd(8), first configure the basic settings introduced in 基礎設定.
WPA2-PSK is intended for small networks where the use of a backend authentication server is not possible or desired.
The configuration is done in /etc/hostapd.conf:
interface=wlan0 (1) debug=1 (2) ctrl_interface=/var/run/hostapd (3) ctrl_interface_group=wheel (4) ssid=freebsdap (5) wpa=2 (6) wpa_passphrase=freebsdmall (7) wpa_key_mgmt=WPA-PSK (8) wpa_pairwise=CCMP (9)
| 1 | Wireless interface used for the access point. |
| 2 | Level of verbosity used during the execution of hostapd(8). A value of 1 represents the minimal level. |
| 3 | Pathname of the directory used by hostapd(8) to store domain socket files for communication with external programs such as hostapd_cli(8). The default value is used in this example. |
| 4 | The group allowed to access the control interface files. |
| 5 | The wireless network name, or SSID, that will appear in wireless scans. |
| 6 | Enable WPA and specify which WPA authentication protocol will be required. A value of 2 configures the AP for WPA2 and is recommended. Set to 1 only if the obsolete WPA is required. |
| 7 | ASCII passphrase for WPA authentication. |
| 8 | The key management protocol to use. This example sets WPA-PSK. |
| 9 | Encryption algorithms accepted by the access point. In this example, only the CCMP (AES) cipher is accepted. CCMP is an alternative to TKIP and is strongly preferred when possible. TKIP should be allowed only when there are stations incapable of using CCMP. |
The next step is to start hostapd(8):
# service hostapd forcestart# ifconfig wlan0
wlan0: flags=8943<UP,BROADCAST,RUNNING,PROMISC,SIMPLEX,MULTICAST> metric 0 mtu 1500
ether 04:f0:21:16:8e:10
inet6 fe80::6f0:21ff:fe16:8e10%wlan0 prefixlen 64 scopeid 0x9
nd6 options=21<PERFORMNUD,AUTO_LINKLOCAL>
media: IEEE 802.11 Wireless Ethernet autoselect mode 11na <hostap>
status: running
ssid No5ignal channel 36 (5180 MHz 11a ht/40+) bssid 04:f0:21:16:8e:10
country US ecm authmode WPA2/802.11i privacy MIXED deftxkey 2
AES-CCM 2:128-bit AES-CCM 3:128-bit txpower 17 mcastrate 6 mgmtrate 6
scanvalid 60 ampdulimit 64k ampdudensity 8 shortgi wme burst
dtimperiod 1 -dfs
groups: wlanOnce the AP is running, the clients can associate with it. See WPA for more details. It is possible to see the stations associated with the AP using ifconfig wlan0 list sta.
It is not recommended to use WEP for setting up an AP since there is no authentication mechanism and the encryption is easily cracked. Some legacy wireless cards only support WEP and these cards will only support an AP without authentication or encryption.
The wireless device can now be put into hostap mode and configured with the correct SSID and IP address:
# ifconfig wlan0 create wlandev ath0 wlanmode hostap
# ifconfig wlan0 inet 192.168.0.1 netmask 255.255.255.0 \
ssid freebsdap wepmode on weptxkey 3 wepkey 3:0x3456789012 mode 11gThe weptxkey indicates which WEP key will be used in the transmission. This example uses the third key as key numbering starts with 1. This parameter must be specified in order to encrypt the data.
The wepkey sets the selected WEP key. It should be in the format index:key. If the index is not given, key 1 is set. The index needs to be set when using keys other than the first key.
Use ifconfig(8) to see the status of the wlan0 interface:
# ifconfig wlan0
wlan0: flags=8843<UP,BROADCAST,RUNNING,SIMPLEX,MULTICAST> metric 0 mtu 1500
ether 00:11:95:c3:0d:ac
inet 192.168.0.1 netmask 0xffffff00 broadcast 192.168.0.255
media: IEEE 802.11 Wireless Ethernet autoselect mode 11g <hostap>
status: running
ssid freebsdap channel 4 (2427 Mhz 11g) bssid 00:11:95:c3:0d:ac
country US ecm authmode OPEN privacy ON deftxkey 3 wepkey 3:40-bit
txpower 21.5 scanvalid 60 protmode CTS wme burst dtimperiod 1 -dfsFrom another wireless machine, it is now possible to initiate a scan to find the AP:
# ifconfig wlan0 create wlandev ath0
# ifconfig wlan0 up scan
SSID BSSID CHAN RATE S:N INT CAPS
freebsdap 00:11:95:c3:0d:ac 1 54M 22:1 100 EPSIn this example, the client machine found the AP and can associate with it using the correct parameters. See WEP for more details.
A wired connection provides better performance and reliability, while a wireless connection provides flexibility and mobility. Laptop users typically want to roam seamlessly between the two types of connections.
On FreeBSD, it is possible to combine two or even more network interfaces together in a "failover" fashion. This type of configuration uses the most preferred and available connection from a group of network interfaces, and the operating system switches automatically when the link state changes.
Link aggregation and failover is covered in Link Aggregation 與容錯移轉 and an example for using both wired and wireless connections is provided at 乙太網路與無線介面間的容錯移轉模式.
This section describes a number of steps to help troubleshoot common wireless networking problems.
If the access point is not listed when scanning, check that the configuration has not limited the wireless device to a limited set of channels.
If the device cannot associate with an access point, verify that the configuration matches the settings on the access point. This includes the authentication scheme and any security protocols. Simplify the configuration as much as possible. If using a security protocol such as WPA or WEP, configure the access point for open authentication and no security to see if traffic will pass.
Debugging support is provided by wpa_supplicant(8). Try running this utility manually with -dd and look at the system logs.
Once the system can associate with the access point, diagnose the network configuration using tools like ping(8).
There are many lower-level debugging tools. Debugging messages can be enabled in the 802.11 protocol support layer using wlandebug(8). For example, to enable console messages related to scanning for access points and the 802.11 protocol handshakes required to arrange communication:
# wlandebug -i wlan0 +scan+auth+debug+assoc
net.wlan.0.debug: 0 => 0xc80000<assoc,auth,scan>Many useful statistics are maintained by the 802.11 layer and wlanstats, found in /usr/src/tools/tools/net80211, will dump this information. These statistics should display all errors identified by the 802.11 layer. However, some errors are identified in the device drivers that lie below the 802.11 layer so they may not show up. To diagnose device-specific problems, refer to the drivers' documentation.
If the above information does not help to clarify the problem, submit a problem report and include output from the above tools.
Many cellphones provide the option to share their data connection over USB (often called "tethering"). This feature uses either the RNDIS, CDC or a custom Apple™iPhone™/iPad™ protocol.
Before attaching a device, load the appropriate driver into the kernel:
# kldload if_urndis
# kldload if_cdce
# kldload if_iphethOnce the device is attached ue0 will be available for use like a normal network device. Be sure that the "USB tethering" option is enabled on the device.
Bluetooth is a wireless technology for creating personal networks operating in the 2.4 GHz unlicensed band, with a range of 10 meters. Networks are usually formed ad-hoc from portable devices such as cellular phones, handhelds, and laptops. Unlike Wi-Fi wireless technology, Bluetooth offers higher level service profiles, such as FTP-like file servers, file pushing, voice transport, serial line emulation, and more.
This section describes the use of a USB Bluetooth dongle on a FreeBSD system. It then describes the various Bluetooth protocols and utilities.
The Bluetooth stack in FreeBSD is implemented using the netgraph(4) framework. A broad variety of Bluetooth USB dongles is supported by ng_ubt(4). Broadcom BCM2033 based Bluetooth devices are supported by the ubtbcmfw(4) and ng_ubt(4) drivers. The 3Com Bluetooth PC Card 3CRWB60-A is supported by the ng_bt3c(4) driver. Serial and UART based Bluetooth devices are supported by sio(4), ng_h4(4), and hcseriald(8).
Before attaching a device, determine which of the above drivers it uses, then load the driver. For example, if the device uses the ng_ubt(4) driver:
# kldload ng_ubtIf the Bluetooth device will be attached to the system during system startup, the system can be configured to load the module at boot time by adding the driver to /boot/loader.conf:
ng_ubt_load="YES"
Once the driver is loaded, plug in the USB dongle. If the driver load was successful, output similar to the following should appear on the console and in /var/log/messages:
ubt0: vendor 0x0a12 product 0x0001, rev 1.10/5.25, addr 2
ubt0: Interface 0 endpoints: interrupt=0x81, bulk-in=0x82, bulk-out=0x2
ubt0: Interface 1 (alt.config 5) endpoints: isoc-in=0x83, isoc-out=0x3,
wMaxPacketSize=49, nframes=6, buffer size=294To start and stop the Bluetooth stack, use its startup script. It is a good idea to stop the stack before unplugging the device. Starting the bluetooth stack might require hcsecd(8) to be started. When starting the stack, the output should be similar to the following:
# service bluetooth start ubt0
BD_ADDR: 00:02:72:00:d4:1a
Features: 0xff 0xff 0xf 00 00 00 00 00
<3-Slot> <5-Slot> <Encryption> <Slot offset>
<Timing accuracy> <Switch> <Hold mode> <Sniff mode>
<Park mode> <RSSI> <Channel quality> <SCO link>
<HV2 packets> <HV3 packets> <u-law log> <A-law log> <CVSD>
<Paging scheme> <Power control> <Transparent SCO data>
Max. ACL packet size: 192 bytes
Number of ACL packets: 8
Max. SCO packet size: 64 bytes
Number of SCO packets: 8The Host Controller Interface (HCI) provides a uniform method for accessing Bluetooth baseband capabilities. In FreeBSD, a netgraph HCI node is created for each Bluetooth device. For more details, refer to ng_hci(4).
One of the most common tasks is discovery of Bluetooth devices within RF proximity. This operation is called inquiry. Inquiry and other HCI related operations are done using hccontrol(8). The example below shows how to find out which Bluetooth devices are in range. The list of devices should be displayed in a few seconds. Note that a remote device will only answer the inquiry if it is set to discoverable mode.
% hccontrol -n ubt0hci inquiry
Inquiry result, num_responses=1
Inquiry result #0
BD_ADDR: 00:80:37:29:19:a4
Page Scan Rep. Mode: 0x1
Page Scan Period Mode: 00
Page Scan Mode: 00
Class: 52:02:04
Clock offset: 0x78ef
Inquiry complete. Status: No error [00]The BD_ADDR is the unique address of a Bluetooth device, similar to the MAC address of a network card. This address is needed for further communication with a device and it is possible to assign a human readable name to a BD_ADDR. Information regarding the known Bluetooth hosts is contained in /etc/bluetooth/hosts. The following example shows how to obtain the human readable name that was assigned to the remote device:
% hccontrol -n ubt0hci remote_name_request 00:80:37:29:19:a4
BD_ADDR: 00:80:37:29:19:a4
Name: Pav's T39If an inquiry is performed on a remote Bluetooth device, it will find the computer as "your.host.name (ubt0)". The name assigned to the local device can be changed at any time.
Remote devices can be assigned aliases in /etc/bluetooth/hosts. More information about /etc/bluetooth/hosts file might be found in bluetooth.hosts(5).
The Bluetooth system provides a point-to-point connection between two Bluetooth units, or a point-to-multipoint connection which is shared among several Bluetooth devices. The following example shows how to create a connection to a remote device:
% hccontrol -n ubt0hci create_connection BT_ADDRcreate_connection accepts BT_ADDR as well as host aliases in /etc/bluetooth/hosts.
The following example shows how to obtain the list of active baseband connections for the local device:
% hccontrol -n ubt0hci read_connection_list
Remote BD_ADDR Handle Type Mode Role Encrypt Pending Queue State
00:80:37:29:19:a4 41 ACL 0 MAST NONE 0 0 OPENA connection handle is useful when termination of the baseband connection is required, though it is normally not required to do this by hand. The stack will automatically terminate inactive baseband connections.
# hccontrol -n ubt0hci disconnect 41
Connection handle: 41
Reason: Connection terminated by local host [0x16]Type hccontrol help for a complete listing of available HCI commands. Most of the HCI commands do not require superuser privileges.
By default, Bluetooth communication is not authenticated, and any device can talk to any other device. A Bluetooth device, such as a cellular phone, may choose to require authentication to provide a particular service. Bluetooth authentication is normally done with a PIN code, an ASCII string up to 16 characters in length. The user is required to enter the same PIN code on both devices. Once the user has entered the PIN code, both devices will generate a link key. After that, the link key can be stored either in the devices or in a persistent storage. Next time, both devices will use the previously generated link key. This procedure is called pairing. Note that if the link key is lost by either device, the pairing must be repeated.
The hcsecd(8) daemon is responsible for handling Bluetooth authentication requests. The default configuration file is /etc/bluetooth/hcsecd.conf. An example section for a cellular phone with the PIN code set to 1234 is shown below:
device {
bdaddr 00:80:37:29:19:a4;
name "Pav's T39";
key nokey;
pin "1234";
}The only limitation on PIN codes is length. Some devices, such as Bluetooth headsets, may have a fixed PIN code built in. The -d switch forces hcsecd(8) to stay in the foreground, so it is easy to see what is happening. Set the remote device to receive pairing and initiate the Bluetooth connection to the remote device. The remote device should indicate that pairing was accepted and request the PIN code. Enter the same PIN code listed in hcsecd.conf. Now the computer and the remote device are paired. Alternatively, pairing can be initiated on the remote device.
The following line can be added to /etc/rc.conf to configure hcsecd(8) to start automatically on system start:
hcsecd_enable="YES"
The following is a sample of the hcsecd(8) daemon output:
hcsecd[16484]: Got Link_Key_Request event from 'ubt0hci', remote bdaddr 0:80:37:29:19:a4 hcsecd[16484]: Found matching entry, remote bdaddr 0:80:37:29:19:a4, name 'Pav's T39', link key doesn't exist hcsecd[16484]: Sending Link_Key_Negative_Reply to 'ubt0hci' for remote bdaddr 0:80:37:29:19:a4 hcsecd[16484]: Got PIN_Code_Request event from 'ubt0hci', remote bdaddr 0:80:37:29:19:a4 hcsecd[16484]: Found matching entry, remote bdaddr 0:80:37:29:19:a4, name 'Pav's T39', PIN code exists hcsecd[16484]: Sending PIN_Code_Reply to 'ubt0hci' for remote bdaddr 0:80:37:29:19:a4
A Dial-Up Networking (DUN) profile can be used to configure a cellular phone as a wireless modem for connecting to a dial-up Internet access server. It can also be used to configure a computer to receive data calls from a cellular phone.
Network access with a PPP profile can be used to provide LAN access for a single Bluetooth device or multiple Bluetooth devices. It can also provide PC to PC connection using PPP networking over serial cable emulation.
In FreeBSD, these profiles are implemented with ppp(8) and the rfcomm_pppd(8) wrapper which converts a Bluetooth connection into something PPP can use. Before a profile can be used, a new PPP label must be created in /etc/ppp/ppp.conf. Consult rfcomm_pppd(8) for examples.
In this example, rfcomm_pppd(8) is used to open a connection to a remote device with a BD_ADDR of 00:80:37:29:19:a4 on a DUNRFCOMM channel:
# rfcomm_pppd -a 00:80:37:29:19:a4 -c -C dun -l rfcomm-dialupThe actual channel number will be obtained from the remote device using the SDP protocol. It is possible to specify the RFCOMM channel by hand, and in this case rfcomm_pppd(8) will not perform the SDP query. Use sdpcontrol(8) to find out the RFCOMM channel on the remote device.
In order to provide network access with the PPPLAN service, sdpd(8) must be running and a new entry for LAN clients must be created in /etc/ppp/ppp.conf. Consult rfcomm_pppd(8) for examples. Finally, start the RFCOMMPPP server on a valid RFCOMM channel number. The RFCOMMPPP server will automatically register the Bluetooth LAN service with the local SDP daemon. The example below shows how to start the RFCOMMPPP server.
# rfcomm_pppd -s -C 7 -l rfcomm-serverThis section provides an overview of the various Bluetooth protocols, their function, and associated utilities.
The Logical Link Control and Adaptation Protocol (L2CAP) provides connection-oriented and connectionless data services to upper layer protocols. L2CAP permits higher level protocols and applications to transmit and receive L2CAP data packets up to 64 kilobytes in length.
L2CAP is based around the concept of channels. A channel is a logical connection on top of a baseband connection, where each channel is bound to a single protocol in a many-to-one fashion. Multiple channels can be bound to the same protocol, but a channel cannot be bound to multiple protocols. Each L2CAP packet received on a channel is directed to the appropriate higher level protocol. Multiple channels can share the same baseband connection.
In FreeBSD, a netgraph L2CAP node is created for each Bluetooth device. This node is normally connected to the downstream Bluetooth HCI node and upstream Bluetooth socket nodes. The default name for the L2CAP node is "devicel2cap". For more details refer to ng_l2cap(4).
A useful command is l2ping(8), which can be used to ping other devices. Some Bluetooth implementations might not return all of the data sent to them, so 0 bytes in the following example is normal.
# l2ping -a 00:80:37:29:19:a4
0 bytes from 0:80:37:29:19:a4 seq_no=0 time=48.633 ms result=0
0 bytes from 0:80:37:29:19:a4 seq_no=1 time=37.551 ms result=0
0 bytes from 0:80:37:29:19:a4 seq_no=2 time=28.324 ms result=0
0 bytes from 0:80:37:29:19:a4 seq_no=3 time=46.150 ms result=0The l2control(8) utility is used to perform various operations on L2CAP nodes. This example shows how to obtain the list of logical connections (channels) and the list of baseband connections for the local device:
% l2control -a 00:02:72:00:d4:1a read_channel_list
L2CAP channels:
Remote BD_ADDR SCID/ DCID PSM IMTU/ OMTU State
00:07:e0:00:0b:ca 66/ 64 3 132/ 672 OPEN
% l2control -a 00:02:72:00:d4:1a read_connection_list
L2CAP connections:
Remote BD_ADDR Handle Flags Pending State
00:07:e0:00:0b:ca 41 O 0 OPENAnother diagnostic tool is btsockstat(1). It is similar to netstat(1), but for Bluetooth network-related data structures. The example below shows the same logical connection as l2control(8) above.
% btsockstat
Active L2CAP sockets
PCB Recv-Q Send-Q Local address/PSM Foreign address CID State
c2afe900 0 0 00:02:72:00:d4:1a/3 00:07:e0:00:0b:ca 66 OPEN
Active RFCOMM sessions
L2PCB PCB Flag MTU Out-Q DLCs State
c2afe900 c2b53380 1 127 0 Yes OPEN
Active RFCOMM sockets
PCB Recv-Q Send-Q Local address Foreign address Chan DLCI State
c2e8bc80 0 250 00:02:72:00:d4:1a 00:07:e0:00:0b:ca 3 6 OPENThe RFCOMM protocol provides emulation of serial ports over the L2CAP protocol. RFCOMM is a simple transport protocol, with additional provisions for emulating the 9 circuits of RS-232 (EIATIA-232-E) serial ports. It supports up to 60 simultaneous connections (RFCOMM channels) between two Bluetooth devices.
For the purposes of RFCOMM, a complete communication path involves two applications running on the communication endpoints with a communication segment between them. RFCOMM is intended to cover applications that make use of the serial ports of the devices in which they reside. The communication segment is a direct connect Bluetooth link from one device to another.
RFCOMM is only concerned with the connection between the devices in the direct connect case, or between the device and a modem in the network case. RFCOMM can support other configurations, such as modules that communicate via Bluetooth wireless technology on one side and provide a wired interface on the other side.
In FreeBSD, RFCOMM is implemented at the Bluetooth sockets layer.
The Service Discovery Protocol (SDP) provides the means for client applications to discover the existence of services provided by server applications as well as the attributes of those services. The attributes of a service include the type or class of service offered and the mechanism or protocol information needed to utilize the service.
SDP involves communication between a SDP server and a SDP client. The server maintains a list of service records that describe the characteristics of services associated with the server. Each service record contains information about a single service. A client may retrieve information from a service record maintained by the SDP server by issuing a SDP request. If the client, or an application associated with the client, decides to use a service, it must open a separate connection to the service provider in order to utilize the service. SDP provides a mechanism for discovering services and their attributes, but it does not provide a mechanism for utilizing those services.
Normally, a SDP client searches for services based on some desired characteristics of the services. However, there are times when it is desirable to discover which types of services are described by an SDP server’s service records without any prior information about the services. This process of looking for any offered services is called browsing.
The Bluetooth SDP server, sdpd(8), and command line client, sdpcontrol(8), are included in the standard FreeBSD installation. The following example shows how to perform a SDP browse query.
% sdpcontrol -a 00:01:03:fc:6e:ec browse
Record Handle: 00000000
Service Class ID List:
Service Discovery Server (0x1000)
Protocol Descriptor List:
L2CAP (0x0100)
Protocol specific parameter #1: u/int/uuid16 1
Protocol specific parameter #2: u/int/uuid16 1
Record Handle: 0x00000001
Service Class ID List:
Browse Group Descriptor (0x1001)
Record Handle: 0x00000002
Service Class ID List:
LAN Access Using PPP (0x1102)
Protocol Descriptor List:
L2CAP (0x0100)
RFCOMM (0x0003)
Protocol specific parameter #1: u/int8/bool 1
Bluetooth Profile Descriptor List:
LAN Access Using PPP (0x1102) ver. 1.0Note that each service has a list of attributes, such as the RFCOMM channel. Depending on the service, the user might need to make note of some of the attributes. Some Bluetooth implementations do not support service browsing and may return an empty list. In this case, it is possible to search for the specific service. The example below shows how to search for the OBEX Object Push (OPUSH) service:
% sdpcontrol -a 00:01:03:fc:6e:ec search OPUSHOffering services on FreeBSD to Bluetooth clients is done with the sdpd(8) server. The following line can be added to /etc/rc.conf:
sdpd_enable="YES"
Then the sdpd(8) daemon can be started with:
# service sdpd startThe local server application that wants to provide a Bluetooth service to remote clients will register the service with the local SDP daemon. An example of such an application is rfcomm_pppd(8). Once started, it will register the Bluetooth LAN service with the local SDP daemon.
The list of services registered with the local SDP server can be obtained by issuing a SDP browse query via the local control channel:
# sdpcontrol -l browseObject Exchange (OBEX) is a widely used protocol for simple file transfers between mobile devices. Its main use is in infrared communication, where it is used for generic file transfers between notebooks or PDAs, and for sending business cards or calendar entries between cellular phones and other devices with Personal Information Manager (PIM) applications.
The OBEX server and client are implemented by obexapp, which can be installed using the comms/obexapp package or port.
The OBEX client is used to push and/or pull objects from the OBEX server. An example object is a business card or an appointment. The OBEX client can obtain the RFCOMM channel number from the remote device via SDP. This can be done by specifying the service name instead of the RFCOMM channel number. Supported service names are: IrMC, FTRN, and OPUSH. It is also possible to specify the RFCOMM channel as a number. Below is an example of an OBEX session where the device information object is pulled from the cellular phone, and a new object, the business card, is pushed into the phone’s directory.
% obexapp -a 00:80:37:29:19:a4 -C IrMC
obex> get telecom/devinfo.txt devinfo-t39.txt
Success, response: OK, Success (0x20)
obex> put new.vcf
Success, response: OK, Success (0x20)
obex> di
Success, response: OK, Success (0x20)In order to provide the OPUSH service, sdpd(8) must be running and a root folder, where all incoming objects will be stored, must be created. The default path to the root folder is /var/spool/obex. Finally, start the OBEX server on a valid RFCOMM channel number. The OBEX server will automatically register the OPUSH service with the local SDP daemon. The example below shows how to start the OBEX server.
# obexapp -s -C 10The Serial Port Profile (SPP) allows Bluetooth devices to perform serial cable emulation. This profile allows legacy applications to use Bluetooth as a cable replacement, through a virtual serial port abstraction.
In FreeBSD, rfcomm_sppd(1) implements SPP and a pseudo tty is used as a virtual serial port abstraction. The example below shows how to connect to a remote device’s serial port service. A RFCOMM channel does not have to be specified as rfcomm_sppd(1) can obtain it from the remote device via SDP. To override this, specify a RFCOMM channel on the command line.
# rfcomm_sppd -a 00:07:E0:00:0B:CA -t
rfcomm_sppd[94692]: Starting on /dev/pts/6...
/dev/pts/6Once connected, the pseudo tty can be used as serial port:
# cu -l /dev/pts/6The pseudo tty is printed on stdout and can be read by wrapper scripts:
PTS=`rfcomm_sppd -a 00:07:E0:00:0B:CA -t` cu -l $PTS
By default, when FreeBSD is accepting a new connection, it tries to perform a role switch and become master. Some older Bluetooth devices which do not support role switching will not be able to connect. Since role switching is performed when a new connection is being established, it is not possible to ask the remote device if it supports role switching. However, there is a HCI option to disable role switching on the local side:
# hccontrol -n ubt0hci write_node_role_switch 0To display Bluetooth packets, use the third-party package hcidump, which can be installed using the comms/hcidump package or port. This utility is similar to tcpdump(1) and can be used to display the contents of Bluetooth packets on the terminal and to dump the Bluetooth packets to a file.
It is sometimes useful to divide a network, such as an Ethernet segment, into network segments without having to create IP subnets and use a router to connect the segments together. A device that connects two networks together in this fashion is called a "bridge".
A bridge works by learning the MAC addresses of the devices on each of its network interfaces. It forwards traffic between networks only when the source and destination MAC addresses are on different networks. In many respects, a bridge is like an Ethernet switch with very few ports. A FreeBSD system with multiple network interfaces can be configured to act as a bridge.
Bridging can be useful in the following situations:
The basic operation of a bridge is to join two or more network segments. There are many reasons to use a host-based bridge instead of networking equipment, such as cabling constraints or firewalling. A bridge can also connect a wireless interface running in hostap mode to a wired network and act as an access point.
A bridge can be used when firewall functionality is needed without routing or Network Address Translation (NAT).
An example is a small company that is connected via DSL or ISDN to an ISP. There are thirteen public IP addresses from the ISP and ten computers on the network. In this situation, using a router-based firewall is difficult because of subnetting issues. A bridge-based firewall can be configured without any IP addressing issues.
A bridge can join two network segments in order to inspect all Ethernet frames that pass between them using bpf(4) and tcpdump(1) on the bridge interface or by sending a copy of all frames out an additional interface known as a span port.
Two Ethernet networks can be joined across an IP link by bridging the networks to an EtherIP tunnel or a tap(4) based solution such as OpenVPN.
A network can be connected together with multiple links and use the Spanning Tree Protocol (STP) to block redundant paths.
This section describes how to configure a FreeBSD system as a bridge using if_bridge(4). A netgraph bridging driver is also available, and is described in ng_bridge(4).
Packet filtering can be used with any firewall package that hooks into the pfil(9) framework. The bridge can be used as a traffic shaper with altq(4) or dummynet(4). |
In FreeBSD, if_bridge(4) is a kernel module which is automatically loaded by ifconfig(8) when creating a bridge interface. It is also possible to compile bridge support into a custom kernel by adding device if_bridge to the custom kernel configuration file.
The bridge is created using interface cloning. To create the bridge interface:
# ifconfig bridge create
bridge0
# ifconfig bridge0
bridge0: flags=8802<BROADCAST,SIMPLEX,MULTICAST> metric 0 mtu 1500
ether 96:3d:4b:f1:79:7a
id 00:00:00:00:00:00 priority 32768 hellotime 2 fwddelay 15
maxage 20 holdcnt 6 proto rstp maxaddr 100 timeout 1200
root id 00:00:00:00:00:00 priority 0 ifcost 0 port 0When a bridge interface is created, it is automatically assigned a randomly generated Ethernet address. The maxaddr and timeout parameters control how many MAC addresses the bridge will keep in its forwarding table and how many seconds before each entry is removed after it is last seen. The other parameters control how STP operates.
Next, specify which network interfaces to add as members of the bridge. For the bridge to forward packets, all member interfaces and the bridge need to be up:
# ifconfig bridge0 addm fxp0 addm fxp1 up
# ifconfig fxp0 up
# ifconfig fxp1 upThe bridge can now forward Ethernet frames between fxp0 and fxp1. Add the following lines to /etc/rc.conf so the bridge is created at startup:
cloned_interfaces="bridge0" ifconfig_bridge0="addm fxp0 addm fxp1 up" ifconfig_fxp0="up" ifconfig_fxp1="up"
If the bridge host needs an IP address, set it on the bridge interface, not on the member interfaces. The address can be set statically or via DHCP. This example sets a static IP address:
# ifconfig bridge0 inet 192.168.0.1/24It is also possible to assign an IPv6 address to a bridge interface. To make the changes permanent, add the addressing information to /etc/rc.conf.
When packet filtering is enabled, bridged packets will pass through the filter inbound on the originating interface on the bridge interface, and outbound on the appropriate interfaces. Either stage can be disabled. When direction of the packet flow is important, it is best to firewall on the member interfaces rather than the bridge itself. The bridge has several configurable settings for passing non-IP and IP packets, and layer2 firewalling with ipfw(8). See if_bridge(4) for more information. |
For an Ethernet network to function properly, only one active path can exist between two devices. The STP protocol detects loops and puts redundant links into a blocked state. Should one of the active links fail, STP calculates a different tree and enables one of the blocked paths to restore connectivity to all points in the network.
The Rapid Spanning Tree Protocol (RSTP or 802.1w) provides backwards compatibility with legacy STP. RSTP provides faster convergence and exchanges information with neighboring switches to quickly transition to forwarding mode without creating loops. FreeBSD supports RSTP and STP as operating modes, with RSTP being the default mode.
STP can be enabled on member interfaces using ifconfig(8). For a bridge with fxp0 and fxp1 as the current interfaces, enable STP with:
# ifconfig bridge0 stp fxp0 stp fxp1
bridge0: flags=8843<UP,BROADCAST,RUNNING,SIMPLEX,MULTICAST> metric 0 mtu 1500
ether d6:cf:d5:a0:94:6d
id 00:01:02:4b:d4:50 priority 32768 hellotime 2 fwddelay 15
maxage 20 holdcnt 6 proto rstp maxaddr 100 timeout 1200
root id 00:01:02:4b:d4:50 priority 32768 ifcost 0 port 0
member: fxp0 flags=1c7<LEARNING,DISCOVER,STP,AUTOEDGE,PTP,AUTOPTP>
port 3 priority 128 path cost 200000 proto rstp
role designated state forwarding
member: fxp1 flags=1c7<LEARNING,DISCOVER,STP,AUTOEDGE,PTP,AUTOPTP>
port 4 priority 128 path cost 200000 proto rstp
role designated state forwardingThis bridge has a spanning tree ID of 00:01:02:4b:d4:50 and a priority of 32768. As the root id is the same, it indicates that this is the root bridge for the tree.
Another bridge on the network also has STP enabled:
bridge0: flags=8843<UP,BROADCAST,RUNNING,SIMPLEX,MULTICAST> metric 0 mtu 1500
ether 96:3d:4b:f1:79:7a
id 00:13:d4:9a:06:7a priority 32768 hellotime 2 fwddelay 15
maxage 20 holdcnt 6 proto rstp maxaddr 100 timeout 1200
root id 00:01:02:4b:d4:50 priority 32768 ifcost 400000 port 4
member: fxp0 flags=1c7<LEARNING,DISCOVER,STP,AUTOEDGE,PTP,AUTOPTP>
port 4 priority 128 path cost 200000 proto rstp
role root state forwarding
member: fxp1 flags=1c7<LEARNING,DISCOVER,STP,AUTOEDGE,PTP,AUTOPTP>
port 5 priority 128 path cost 200000 proto rstp
role designated state forwardingThe line root id 00:01:02:4b:d4:50 priority 32768 ifcost 400000 port 4 shows that the root bridge is 00:01:02:4b:d4:50 and has a path cost of 400000 from this bridge. The path to the root bridge is via port 4 which is fxp0.
Several ifconfig parameters are unique to bridge interfaces. This section summarizes some common uses for these parameters. The complete list of available parameters is described in ifconfig(8).
A private interface does not forward any traffic to any other port that is also designated as a private interface. The traffic is blocked unconditionally so no Ethernet frames will be forwarded, including ARP packets. If traffic needs to be selectively blocked, a firewall should be used instead.
A span port transmits a copy of every Ethernet frame received by the bridge. The number of span ports configured on a bridge is unlimited, but if an interface is designated as a span port, it cannot also be used as a regular bridge port. This is most useful for snooping a bridged network passively on another host connected to one of the span ports of the bridge. For example, to send a copy of all frames out the interface named fxp4:
# ifconfig bridge0 span fxp4If a bridge member interface is marked as sticky, dynamically learned address entries are treated as static entries in the forwarding cache. Sticky entries are never aged out of the cache or replaced, even if the address is seen on a different interface. This gives the benefit of static address entries without the need to pre-populate the forwarding table. Clients learned on a particular segment of the bridge cannot roam to another segment.
An example of using sticky addresses is to combine the bridge with VLANs in order to isolate customer networks without wasting IP address space. Consider that CustomerA is on vlan100, CustomerB is on vlan101, and the bridge has the address 192.168.0.1:
# ifconfig bridge0 addm vlan100 sticky vlan100 addm vlan101 sticky vlan101
# ifconfig bridge0 inet 192.168.0.1/24In this example, both clients see 192.168.0.1 as their default gateway. Since the bridge cache is sticky, one host cannot spoof the MAC address of the other customer in order to intercept their traffic.
Any communication between the VLANs can be blocked using a firewall or, as seen in this example, private interfaces:
# ifconfig bridge0 private vlan100 private vlan101The customers are completely isolated from each other and the full /24 address range can be allocated without subnetting.
The number of unique source MAC addresses behind an interface can be limited. Once the limit is reached, packets with unknown source addresses are dropped until an existing host cache entry expires or is removed.
The following example sets the maximum number of Ethernet devices for CustomerA on vlan100 to 10:
# ifconfig bridge0 ifmaxaddr vlan100 10Bridge interfaces also support monitor mode, where the packets are discarded after bpf(4) processing and are not processed or forwarded further. This can be used to multiplex the input of two or more interfaces into a single bpf(4) stream. This is useful for reconstructing the traffic for network taps that transmit the RX/TX signals out through two separate interfaces. For example, to read the input from four network interfaces as one stream:
# ifconfig bridge0 addm fxp0 addm fxp1 addm fxp2 addm fxp3 monitor up
# tcpdump -i bridge0The bridge interface and STP parameters can be monitored via bsnmpd(1) which is included in the FreeBSD base system. The exported bridge MIBs conform to IETF standards so any SNMP client or monitoring package can be used to retrieve the data.
To enable monitoring on the bridge, uncomment this line in /etc/snmpd.config by removing the beginning # symbol:
begemotSnmpdModulePath."bridge" = "/usr/lib/snmp_bridge.so"
Other configuration settings, such as community names and access lists, may need to be modified in this file. See bsnmpd(1) and snmp_bridge(3) for more information. Once these edits are saved, add this line to /etc/rc.conf:
bsnmpd_enable="YES"
Then, start bsnmpd(1):
# service bsnmpd startThe following examples use the Net-SNMP software (net-mgmt/net-snmp) to query a bridge from a client system. The net-mgmt/bsnmptools port can also be used. From the SNMP client which is running Net-SNMP, add the following lines to $HOME/.snmp/snmp.conf in order to import the bridge MIB definitions:
mibdirs +/usr/shared/snmp/mibs mibs +BRIDGE-MIB:RSTP-MIB:BEGEMOT-MIB:BEGEMOT-BRIDGE-MIB
To monitor a single bridge using the IETF BRIDGE-MIB (RFC4188):
% snmpwalk -v 2c -c public bridge1.example.com mib-2.dot1dBridge
BRIDGE-MIB::dot1dBaseBridgeAddress.0 = STRING: 66:fb:9b:6e:5c:44
BRIDGE-MIB::dot1dBaseNumPorts.0 = INTEGER: 1 ports
BRIDGE-MIB::dot1dStpTimeSinceTopologyChange.0 = Timeticks: (189959) 0:31:39.59 centi-seconds
BRIDGE-MIB::dot1dStpTopChanges.0 = Counter32: 2
BRIDGE-MIB::dot1dStpDesignatedRoot.0 = Hex-STRING: 80 00 00 01 02 4B D4 50
...
BRIDGE-MIB::dot1dStpPortState.3 = INTEGER: forwarding(5)
BRIDGE-MIB::dot1dStpPortEnable.3 = INTEGER: enabled(1)
BRIDGE-MIB::dot1dStpPortPathCost.3 = INTEGER: 200000
BRIDGE-MIB::dot1dStpPortDesignatedRoot.3 = Hex-STRING: 80 00 00 01 02 4B D4 50
BRIDGE-MIB::dot1dStpPortDesignatedCost.3 = INTEGER: 0
BRIDGE-MIB::dot1dStpPortDesignatedBridge.3 = Hex-STRING: 80 00 00 01 02 4B D4 50
BRIDGE-MIB::dot1dStpPortDesignatedPort.3 = Hex-STRING: 03 80
BRIDGE-MIB::dot1dStpPortForwardTransitions.3 = Counter32: 1
RSTP-MIB::dot1dStpVersion.0 = INTEGER: rstp(2)The dot1dStpTopChanges.0 value is two, indicating that the STP bridge topology has changed twice. A topology change means that one or more links in the network have changed or failed and a new tree has been calculated. The dot1dStpTimeSinceTopologyChange.0 value will show when this happened.
To monitor multiple bridge interfaces, the private BEGEMOT-BRIDGE-MIB can be used:
% snmpwalk -v 2c -c public bridge1.example.com
enterprises.fokus.begemot.begemotBridge
BEGEMOT-BRIDGE-MIB::begemotBridgeBaseName."bridge0" = STRING: bridge0
BEGEMOT-BRIDGE-MIB::begemotBridgeBaseName."bridge2" = STRING: bridge2
BEGEMOT-BRIDGE-MIB::begemotBridgeBaseAddress."bridge0" = STRING: e:ce:3b:5a:9e:13
BEGEMOT-BRIDGE-MIB::begemotBridgeBaseAddress."bridge2" = STRING: 12:5e:4d:74:d:fc
BEGEMOT-BRIDGE-MIB::begemotBridgeBaseNumPorts."bridge0" = INTEGER: 1
BEGEMOT-BRIDGE-MIB::begemotBridgeBaseNumPorts."bridge2" = INTEGER: 1
...
BEGEMOT-BRIDGE-MIB::begemotBridgeStpTimeSinceTopologyChange."bridge0" = Timeticks: (116927) 0:19:29.27 centi-seconds
BEGEMOT-BRIDGE-MIB::begemotBridgeStpTimeSinceTopologyChange."bridge2" = Timeticks: (82773) 0:13:47.73 centi-seconds
BEGEMOT-BRIDGE-MIB::begemotBridgeStpTopChanges."bridge0" = Counter32: 1
BEGEMOT-BRIDGE-MIB::begemotBridgeStpTopChanges."bridge2" = Counter32: 1
BEGEMOT-BRIDGE-MIB::begemotBridgeStpDesignatedRoot."bridge0" = Hex-STRING: 80 00 00 40 95 30 5E 31
BEGEMOT-BRIDGE-MIB::begemotBridgeStpDesignatedRoot."bridge2" = Hex-STRING: 80 00 00 50 8B B8 C6 A9To change the bridge interface being monitored via the mib-2.dot1dBridge subtree:
% snmpset -v 2c -c private bridge1.example.com
BEGEMOT-BRIDGE-MIB::begemotBridgeDefaultBridgeIf.0 s bridge2FreeBSD provides the lagg(4) interface which can be used to aggregate multiple network interfaces into one virtual interface in order to provide failover and link aggregation. Failover allows traffic to continue to flow as long as at least one aggregated network interface has an established link. Link aggregation works best on switches which support LACP, as this protocol distributes traffic bi-directionally while responding to the failure of individual links.
The aggregation protocols supported by the lagg interface determine which ports are used for outgoing traffic and whether or not a specific port accepts incoming traffic. The following protocols are supported by lagg(4):
This mode sends and receives traffic only through the master port. If the master port becomes unavailable, the next active port is used. The first interface added to the virtual interface is the master port and all subsequently added interfaces are used as failover devices. If failover to a non-master port occurs, the original port becomes master once it becomes available again.
Cisco™ Fast EtherChannel™ (FEC) is found on older Cisco™ switches. It provides a static setup and does not negotiate aggregation with the peer or exchange frames to monitor the link. If the switch supports LACP, that should be used instead.
The IEEE™ 802.3ad Link Aggregation Control Protocol (LACP) negotiates a set of aggregable links with the peer into one or more Link Aggregated Groups (LAGs). Each LAG is composed of ports of the same speed, set to full-duplex operation, and traffic is balanced across the ports in the LAG with the greatest total speed. Typically, there is only one LAG which contains all the ports. In the event of changes in physical connectivity, LACP will quickly converge to a new configuration.
LACP balances outgoing traffic across the active ports based on hashed protocol header information and accepts incoming traffic from any active port. The hash includes the Ethernet source and destination address and, if available, the VLAN tag, and the IPv4 or IPv6 source and destination address.
This mode distributes outgoing traffic using a round-robin scheduler through all active ports and accepts incoming traffic from any active port. Since this mode violates Ethernet frame ordering, it should be used with caution.
This section demonstrates how to configure a Cisco™ switch and a FreeBSD system for LACP load balancing. It then shows how to configure two Ethernet interfaces in failover mode as well as how to configure failover mode between an Ethernet and a wireless interface.
This example connects two fxp(4) Ethernet interfaces on a FreeBSD machine to the first two Ethernet ports on a Cisco™ switch as a single load balanced and fault tolerant link. More interfaces can be added to increase throughput and fault tolerance. Replace the names of the Cisco™ ports, Ethernet devices, channel group number, and IP address shown in the example to match the local configuration.
Frame ordering is mandatory on Ethernet links and any traffic between two stations always flows over the same physical link, limiting the maximum speed to that of one interface. The transmit algorithm attempts to use as much information as it can to distinguish different traffic flows and balance the flows across the available interfaces.
On the Cisco™ switch, add the FastEthernet0/1 and FastEthernet0/2 interfaces to channel group 1:
interface FastEthernet0/1
channel-group 1 mode active
channel-protocol lacp
!
interface FastEthernet0/2
channel-group 1 mode active
channel-protocol lacpOn the FreeBSD system, create the lagg(4) interface using the physical interfaces fxp0 and fxp1 and bring the interfaces up with an IP address of 10.0.0.3/24:
# ifconfig fxp0 up
# ifconfig fxp1 up
# ifconfig lagg0 create
# ifconfig lagg0 up laggproto lacp laggport fxp0 laggport fxp1 10.0.0.3/24Next, verify the status of the virtual interface:
# ifconfig lagg0
lagg0: flags=8843<UP,BROADCAST,RUNNING,SIMPLEX,MULTICAST> metric 0 mtu 1500
options=8<VLAN_MTU>
ether 00:05:5d:71:8d:b8
inet 10.0.0.3 netmask 0xffffff00 broadcast 10.0.0.255
media: Ethernet autoselect
status: active
laggproto lacp
laggport: fxp1 flags=1c<ACTIVE,COLLECTING,DISTRIBUTING>
laggport: fxp0 flags=1c<ACTIVE,COLLECTING,DISTRIBUTING>Ports marked as ACTIVE are part of the LAG that has been negotiated with the remote switch. Traffic will be transmitted and received through these active ports. Add -v to the above command to view the LAG identifiers.
To see the port status on the Cisco™ switch:
switch# show lacp neighbor
Flags: S - Device is requesting Slow LACPDUs
F - Device is requesting Fast LACPDUs
A - Device is in Active mode P - Device is in Passive mode
Channel group 1 neighbors
Partner's information:
LACP port Oper Port Port
Port Flags Priority Dev ID Age Key Number State
Fa0/1 SA 32768 0005.5d71.8db8 29s 0x146 0x3 0x3D
Fa0/2 SA 32768 0005.5d71.8db8 29s 0x146 0x4 0x3DFor more detail, type show lacp neighbor detail.
To retain this configuration across reboots, add the following entries to /etc/rc.conf on the FreeBSD system:
ifconfig_fxp0="up" ifconfig_fxp1="up" cloned_interfaces="lagg0" ifconfig_lagg0="laggproto lacp laggport fxp0 laggport fxp1 10.0.0.3/24"
Failover mode can be used to switch over to a secondary interface if the link is lost on the master interface. To configure failover, make sure that the underlying physical interfaces are up, then create the lagg(4) interface. In this example, fxp0 is the master interface, fxp1 is the secondary interface, and the virtual interface is assigned an IP address of 10.0.0.15/24:
# ifconfig fxp0 up
# ifconfig fxp1 up
# ifconfig lagg0 create
# ifconfig lagg0 up laggproto failover laggport fxp0 laggport fxp1 10.0.0.15/24The virtual interface should look something like this:
# ifconfig lagg0
lagg0: flags=8843<UP,BROADCAST,RUNNING,SIMPLEX,MULTICAST> metric 0 mtu 1500
options=8<VLAN_MTU>
ether 00:05:5d:71:8d:b8
inet 10.0.0.15 netmask 0xffffff00 broadcast 10.0.0.255
media: Ethernet autoselect
status: active
laggproto failover
laggport: fxp1 flags=0<>
laggport: fxp0 flags=5<MASTER,ACTIVE>Traffic will be transmitted and received on fxp0. If the link is lost on fxp0, fxp1 will become the active link. If the link is restored on the master interface, it will once again become the active link.
To retain this configuration across reboots, add the following entries to /etc/rc.conf:
ifconfig_fxp0="up" ifconfig_fxp1="up" cloned_interfaces="lagg0" ifconfig_lagg0="laggproto failover laggport fxp0 laggport fxp1 10.0.0.15/24"
For laptop users, it is usually desirable to configure the wireless device as a secondary which is only used when the Ethernet connection is not available. With lagg(4), it is possible to configure a failover which prefers the Ethernet connection for both performance and security reasons, while maintaining the ability to transfer data over the wireless connection.
This is achieved by overriding the physical wireless interface’s MAC address with that of the Ethernet interface.
In this example, the Ethernet interface, bge0, is the master and the wireless interface, wlan0, is the failover. The wlan0 device was created from iwn0 wireless interface, which will be configured with the MAC address of the Ethernet interface. First, determine the MAC address of the Ethernet interface:
# ifconfig bge0
bge0: flags=8843<UP,BROADCAST,RUNNING,SIMPLEX,MULTICAST> metric 0 mtu 1500
options=19b<RXCSUM,TXCSUM,VLAN_MTU,VLAN_HWTAGGING,VLAN_HWCSUM,TSO4>
ether 00:21:70:da:ae:37
inet6 fe80::221:70ff:feda:ae37%bge0 prefixlen 64 scopeid 0x2
nd6 options=29<PERFORMNUD,IFDISABLED,AUTO_LINKLOCAL>
media: Ethernet autoselect (1000baseT <full-duplex>)
status: activeReplace bge0 to match the system’s Ethernet interface name. The ether line will contain the MAC address of the specified interface. Now, change the MAC address of the underlying wireless interface:
# ifconfig iwn0 ether 00:21:70:da:ae:37Bring the wireless interface up, but do not set an IP address:
# ifconfig wlan0 create wlandev iwn0 ssid my_router upMake sure the bge0 interface is up, then create the lagg(4) interface with bge0 as master with failover to wlan0:
# ifconfig bge0 up
# ifconfig lagg0 create
# ifconfig lagg0 up laggproto failover laggport bge0 laggport wlan0The virtual interface should look something like this:
# ifconfig lagg0
lagg0: flags=8843<UP,BROADCAST,RUNNING,SIMPLEX,MULTICAST> metric 0 mtu 1500
options=8<VLAN_MTU>
ether 00:21:70:da:ae:37
media: Ethernet autoselect
status: active
laggproto failover
laggport: wlan0 flags=0<>
laggport: bge0 flags=5<MASTER,ACTIVE>Then, start the DHCP client to obtain an IP address:
# dhclient lagg0To retain this configuration across reboots, add the following entries to /etc/rc.conf:
ifconfig_bge0="up" wlans_iwn0="wlan0" ifconfig_wlan0="WPA" create_args_wlan0="wlanaddr 00:21:70:da:ae:37" cloned_interfaces="lagg0" ifconfig_lagg0="up laggproto failover laggport bge0 laggport wlan0 DHCP"
The Intel™ Preboot eXecution Environment (PXE) allows an operating system to boot over the network. For example, a FreeBSD system can boot over the network and operate without a local disk, using file systems mounted from an NFS server. PXE support is usually available in the BIOS. To use PXE when the machine starts, select the Boot from network option in the BIOS setup or type a function key during system initialization.
In order to provide the files needed for an operating system to boot over the network, a PXE setup also requires properly configured DHCP, TFTP, and NFS servers, where:
Initial parameters, such as an IP address, executable boot filename and location, server name, and root path are obtained from the DHCP server.
The operating system loader file is booted using TFTP.
The file systems are loaded using NFS.
When a computer PXE boots, it receives information over DHCP about where to obtain the initial boot loader file. After the host computer receives this information, it downloads the boot loader via TFTP and then executes the boot loader. In FreeBSD, the boot loader file is /boot/pxeboot. After /boot/pxeboot executes, the FreeBSD kernel is loaded and the rest of the FreeBSD bootup sequence proceeds, as described in FreeBSD 開機程序.
This section describes how to configure these services on a FreeBSD system so that other systems can PXE boot into FreeBSD. Refer to diskless(8) for more information.
As described, the system providing these services is insecure. It should live in a protected area of a network and be untrusted by other hosts. |
The steps shown in this section configure the built-in NFS and TFTP servers. The next section demonstrates how to install and configure the DHCP server. In this example, the directory which will contain the files used by PXE users is /b/tftpboot/FreeBSD/install. It is important that this directory exists and that the same directory name is set in both /etc/inetd.conf and /usr/local/etc/dhcpd.conf.
Create the root directory which will contain a FreeBSD installation to be NFS mounted:
# export NFSROOTDIR=/b/tftpboot/FreeBSD/install
# mkdir -p ${NFSROOTDIR}Enable the NFS server by adding this line to /etc/rc.conf:
nfs_server_enable="YES"
Export the diskless root directory via NFS by adding the following to /etc/exports:
/b -ro -alldirs -maproot=root
Start the NFS server:
# service nfsd startEnable inetd(8) by adding the following line to /etc/rc.conf:
inetd_enable="YES"
Uncomment the following line in /etc/inetd.conf by making sure it does not start with a # symbol:
tftp dgram udp wait root /usr/libexec/tftpd tftpd -l -s /b/tftpboot
Some PXE versions require the TCP version of TFTP. In this case, uncomment the second |
Start inetd(8):
# service inetd startInstall the base system into ${NFSROOTDIR}, either by decompressing the official archives or by rebuilding the FreeBSD kernel and userland (refer to 從原始碼更新 FreeBSD for more detailed instructions, but do not forget to add DESTDIR=${NFSROOTDIR} when running the make installkernel and make installworld commands.
Test that the TFTP server works and can download the boot loader which will be obtained via PXE:
# tftp localhost
tftp> get FreeBSD/install/boot/pxeboot
Received 264951 bytes in 0.1 secondsEdit ${NFSROOTDIR}/etc/fstab and create an entry to mount the root file system over NFS:
# Device Mountpoint FSType Options Dump Pass myhost.example.com:/b/tftpboot/FreeBSD/install / nfs ro 0 0
Replace myhost.example.com with the hostname or IP address of the NFS server. In this example, the root file system is mounted read-only in order to prevent NFS clients from potentially deleting the contents of the root file system.
Set the root password in the PXE environment for client machines which are PXE booting :
# chroot ${NFSROOTDIR}
# passwdIf needed, enable ssh(1) root logins for client machines which are PXE booting by editing ${NFSROOTDIR}/etc/ssh/sshd_config and enabling PermitRootLogin. This option is documented in sshd_config(5).
Perform any other needed customizations of the PXE environment in ${NFSROOTDIR}. These customizations could include things like installing packages or editing the password file with vipw(8).
When booting from an NFS root volume, /etc/rc detects the NFS boot and runs /etc/rc.initdiskless. In this case, /etc and /var need to be memory backed file systems so that these directories are writable but the NFS root directory is read-only:
# chroot ${NFSROOTDIR}
# mkdir -p conf/base
# tar -c -v -f conf/base/etc.cpio.gz --format cpio --gzip etc
# tar -c -v -f conf/base/var.cpio.gz --format cpio --gzip varWhen the system boots, memory file systems for /etc and /var will be created and mounted and the contents of the cpio.gz files will be copied into them. By default, these file systems have a maximum capacity of 5 megabytes. If your archives do not fit, which is usually the case for /var when binary packages have been installed, request a larger size by putting the number of 512 byte sectors needed (e.g., 5 megabytes is 10240 sectors) in ${NFSROOTDIR}/conf/base/etc/md_size and ${NFSROOTDIR}/conf/base/var/md_size files for /etc and /var file systems respectively.
The DHCP server does not need to be the same machine as the TFTP and NFS server, but it needs to be accessible in the network.
DHCP is not part of the FreeBSD base system but can be installed using the net/isc-dhcp44-server port or package.
Once installed, edit the configuration file, /usr/local/etc/dhcpd.conf. Configure the next-server, filename, and root-path settings as seen in this example:
subnet 192.168.0.0 netmask 255.255.255.0 {
range 192.168.0.2 192.168.0.3 ;
option subnet-mask 255.255.255.0 ;
option routers 192.168.0.1 ;
option broadcast-address 192.168.0.255 ;
option domain-name-servers 192.168.35.35, 192.168.35.36 ;
option domain-name "example.com";
# IP address of TFTP server
next-server 192.168.0.1 ;
# path of boot loader obtained via tftp
filename "FreeBSD/install/boot/pxeboot" ;
# pxeboot boot loader will try to NFS mount this directory for root FS
option root-path "192.168.0.1:/b/tftpboot/FreeBSD/install/" ;
}The next-server directive is used to specify the IP address of the TFTP server.
The filename directive defines the path to /boot/pxeboot. A relative filename is used, meaning that /b/tftpboot is not included in the path.
The root-path option defines the path to the NFS root file system.
Once the edits are saved, enable DHCP at boot time by adding the following line to /etc/rc.conf:
dhcpd_enable="YES"
Then start the DHCP service:
# service isc-dhcpd startOnce all of the services are configured and started, PXE clients should be able to automatically load FreeBSD over the network. If a particular client is unable to connect, when that client machine boots up, enter the BIOS configuration menu and confirm that it is set to boot from the network.
This section describes some troubleshooting tips for isolating the source of the configuration problem should no clients be able to PXE boot.
Use the net/wireshark package or port to debug the network traffic involved during the PXE booting process, which is illustrated in the diagram below.
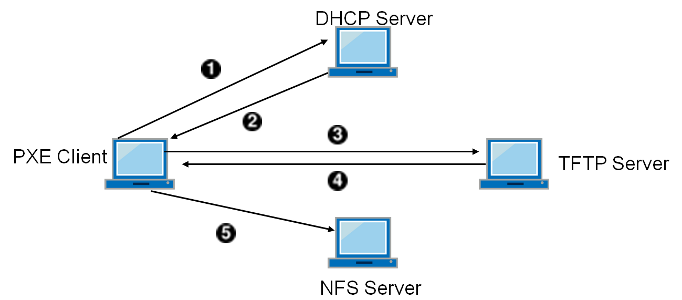
On the TFTP server, read /var/log/xferlog to ensure that pxeboot is being retrieved from the correct location. To test this example configuration:
# tftp 192.168.0.1
tftp> get FreeBSD/install/boot/pxeboot
Received 264951 bytes in 0.1 secondsMake sure that the root file system can be mounted via NFS. To test this example configuration:
# mount -t nfs 192.168.0.1:/b/tftpboot/FreeBSD/install /mntIPv6 is the new version of the well known IP protocol, also known as IPv4. IPv6 provides several advantages over IPv4 as well as many new features:
Its 128-bit address space allows for 340,282,366,920,938,463,463,374,607,431,768,211,456 addresses. This addresses the IPv4 address shortage and eventual IPv4 address exhaustion.
Routers only store network aggregation addresses in their routing tables, thus reducing the average space of a routing table to 8192 entries. This addresses the scalability issues associated with IPv4, which required every allocated block of IPv4 addresses to be exchanged between Internet routers, causing their routing tables to become too large to allow efficient routing.
Address autoconfiguration (RFC2462).
Mandatory multicast addresses.
Built-in IPsec (IP security).
Simplified header structure.
Support for mobile IP.
IPv6-to-IPv4 transition mechanisms.
FreeBSD includes the http://www.kame.net/IPv6 reference implementation and comes with everything needed to use IPv6. This section focuses on getting IPv6 configured and running.
There are three different types of IPv6 addresses:
A packet sent to a unicast address arrives at the interface belonging to the address.
These addresses are syntactically indistinguishable from unicast addresses but they address a group of interfaces. The packet destined for an anycast address will arrive at the nearest router interface. Anycast addresses are only used by routers.
These addresses identify a group of interfaces. A packet destined for a multicast address will arrive at all interfaces belonging to the multicast group. The IPv4 broadcast address, usually xxx.xxx.xxx.255, is expressed by multicast addresses in IPv6.
When reading an IPv6 address, the canonical form is represented as x:x:x:x:x:x:x:x, where each x represents a 16 bit hex value. An example is FEBC:A574:382B:23C1:AA49:4592:4EFE:9982.
Often, an address will have long substrings of all zeros. A :: (double colon) can be used to replace one substring per address. Also, up to three leading 0s per hex value can be omitted. For example, fe80::1 corresponds to the canonical form fe80:0000:0000:0000:0000:0000:0000:0001.
A third form is to write the last 32 bits using the well known IPv4 notation. For example, 2002::10.0.0.1 corresponds to the hexadecimal canonical representation 2002:0000:0000:0000:0000:0000:0a00:0001, which in turn is equivalent to 2002::a00:1.
To view a FreeBSD system’s IPv6 address, use ifconfig(8):
# ifconfigrl0: flags=8943<UP,BROADCAST,RUNNING,PROMISC,SIMPLEX,MULTICAST> mtu 1500
inet 10.0.0.10 netmask 0xffffff00 broadcast 10.0.0.255
inet6 fe80::200:21ff:fe03:8e1%rl0 prefixlen 64 scopeid 0x1
ether 00:00:21:03:08:e1
media: Ethernet autoselect (100baseTX )
status: activeIn this example, the rl0 interface is using fe80::200:21ff:fe03:8e1%rl0, an auto-configured link-local address which was automatically generated from the MAC address.
Some IPv6 addresses are reserved. A summary of these reserved addresses is seen in 已保留的 IPv6 位址:
| IPv6 address | Prefixlength (Bits) | 說明 | 說明 |
|---|---|---|---|
| 128 bits | unspecified | Equivalent to |
| 128 bits | loopback address | Equivalent to |
| 96 bits | embedded IPv4 | The lower 32 bits are the compatible IPv4 address. |
| 96 bits | IPv4 mapped IPv6 address | The lower 32 bits are the IPv4 address for hosts which do not support IPv6. |
| 10 bits | link-local | Equivalent to 169.254.0.0/16 in IPv4. |
| 7 bits | unique-local | Unique local addresses are intended for local communication and are only routable within a set of cooperating sites. |
| 8 bits | multicast | |
| 3 bits | global unicast | All global unicast addresses are assigned from this pool. The first 3 bits are |
For further information on the structure of IPv6 addresses, refer to RFC3513.
To configure a FreeBSD system as an IPv6 client, add these two lines to rc.conf:
ifconfig_rl0_ipv6="inet6 accept_rtadv" rtsold_enable="YES"
The first line enables the specified interface to receive router advertisement messages. The second line enables the router solicitation daemon, rtsol(8).
If the interface needs a statically assigned IPv6 address, add an entry to specify the static address and associated prefix length:
ifconfig_rl0_ipv6="inet6 2001:db8:4672:6565:2026:5043:2d42:5344 prefixlen 64"
To assign a default router, specify its address:
ipv6_defaultrouter="2001:db8:4672:6565::1"
In order to connect to other IPv6 networks, one must have a provider or a tunnel that supports IPv6:
Contact an Internet Service Provider to see if they offer IPv6.
Hurricane Electric offers tunnels with end-points all around the globe.
Install the net/freenet6 package or port for a dial-up connection. |
This section demonstrates how to take the directions from a tunnel provider and convert them into /etc/rc.conf settings that will persist through reboots.
The first /etc/rc.conf entry creates the generic tunneling interface gif0:
cloned_interfaces="gif0"
Next, configure that interface with the IPv4 addresses of the local and remote endpoints. Replace MY_IPv4_ADDR and REMOTE_IPv4_ADDR with the actual IPv4 addresses:
create_args_gif0="tunnel MY_IPv4_ADDR REMOTE_IPv4_ADDR"
To apply the IPv6 address that has been assigned for use as the IPv6 tunnel endpoint, add this line, replacing MY_ASSIGNED_IPv6_TUNNEL_ENDPOINT_ADDR with the assigned address:
ifconfig_gif0_ipv6="inet6 MY_ASSIGNED_IPv6_TUNNEL_ENDPOINT_ADDR"
Then, set the default route for the other side of the IPv6 tunnel. Replace MY_IPv6_REMOTE_TUNNEL_ENDPOINT_ADDR with the default gateway address assigned by the provider:
ipv6_defaultrouter="MY_IPv6_REMOTE_TUNNEL_ENDPOINT_ADDR"
If the FreeBSD system will route IPv6 packets between the rest of the network and the world, enable the gateway using this line:
ipv6_gateway_enable="YES"
This section demonstrates how to setup rtadvd(8) to advertise the IPv6 default route.
To enable rtadvd(8), add the following to /etc/rc.conf:
rtadvd_enable="YES"
It is important to specify the interface on which to do IPv6 router advertisement. For example, to tell rtadvd(8) to use rl0:
rtadvd_interfaces="rl0"
Next, create the configuration file, /etc/rtadvd.conf as seen in this example:
rl0:\ :addrs#1:addr="2001:db8:1f11:246::":prefixlen#64:tc=ether:
Replace rl0 with the interface to be used and 2001:db8:1f11:246:: with the prefix of the allocation.
For a dedicated /64 subnet, nothing else needs to be changed. Otherwise, change the prefixlen# to the correct value.
When IPv6 is enabled on a server, there may be a need to enable IPv4 mapped IPv6 address communication. This compatibility option allows for IPv4 addresses to be represented as IPv6 addresses. Permitting IPv6 applications to communicate with IPv4 and vice versa may be a security issue.
This option may not be required in most cases and is available only for compatibility. This option will allow IPv6-only applications to work with IPv4 in a dual stack environment. This is most useful for third party applications which may not support an IPv6-only environment. To enable this feature, add the following to /etc/rc.conf:
ipv6_ipv4mapping="YES"
Reviewing the information in RFC 3493, section 3.6 and 3.7 as well as RFC 4038 section 4.2 may be useful to some administrators.
The Common Address Redundancy Protocol (CARP) allows multiple hosts to share the same IP address and Virtual Host ID (VHID) in order to provide high availability for one or more services. This means that one or more hosts can fail, and the other hosts will transparently take over so that users do not see a service failure.
In addition to the shared IP address, each host has its own IP address for management and configuration. All of the machines that share an IP address have the same VHID. The VHID for each virtual IP address must be unique across the broadcast domain of the network interface.
High availability using CARP is built into FreeBSD, though the steps to configure it vary slightly depending upon the FreeBSD version. This section provides the same example configuration for versions before and equal to or after FreeBSD 10.
This example configures failover support with three hosts, all with unique IP addresses, but providing the same web content. It has two different masters named hosta.example.org and hostb.example.org, with a shared backup named hostc.example.org.
These machines are load balanced with a Round Robin DNS configuration. The master and backup machines are configured identically except for their hostnames and management IP addresses. These servers must have the same configuration and run the same services. When the failover occurs, requests to the service on the shared IP address can only be answered correctly if the backup server has access to the same content. The backup machine has two additional CARP interfaces, one for each of the master content server’s IP addresses. When a failure occurs, the backup server will pick up the failed master machine’s IP address.
Enable boot-time support for CARP by adding an entry for the carp.ko kernel module in /boot/loader.conf:
carp_load="YES"
To load the module now without rebooting:
# kldload carpFor users who prefer to use a custom kernel, include the following line in the custom kernel configuration file and compile the kernel as described in 設定 FreeBSD 核心:
device carp
The hostname, management IP address and subnet mask, shared IP address, and VHID are all set by adding entries to /etc/rc.conf. This example is for hosta.example.org:
hostname="hosta.example.org" ifconfig_em0="inet 192.168.1.3 netmask 255.255.255.0" ifconfig_em0_alias0="inet vhid 1 pass testpass alias 192.168.1.50/32"
The next set of entries are for hostb.example.org. Since it represents a second master, it uses a different shared IP address and VHID. However, the passwords specified with pass must be identical as CARP will only listen to and accept advertisements from machines with the correct password.
hostname="hostb.example.org" ifconfig_em0="inet 192.168.1.4 netmask 255.255.255.0" ifconfig_em0_alias0="inet vhid 2 pass testpass alias 192.168.1.51/32"
The third machine, hostc.example.org, is configured to handle failover from either master. This machine is configured with two CARPVHIDs, one to handle the virtual IP address for each of the master hosts. The CARP advertising skew, advskew, is set to ensure that the backup host advertises later than the master, since advskew controls the order of precedence when there are multiple backup servers.
hostname="hostc.example.org" ifconfig_em0="inet 192.168.1.5 netmask 255.255.255.0" ifconfig_em0_alias0="inet vhid 1 advskew 100 pass testpass alias 192.168.1.50/32" ifconfig_em0_alias1="inet vhid 2 advskew 100 pass testpass alias 192.168.1.51/32"
Having two CARPVHIDs configured means that hostc.example.org will notice if either of the master servers becomes unavailable. If a master fails to advertise before the backup server, the backup server will pick up the shared IP address until the master becomes available again.
If the original master server becomes available again, |
Once the configuration is complete, either restart networking or reboot each system. High availability is now enabled.
The configuration for these versions of FreeBSD is similar to the one described in the previous section, except that a CARP device must first be created and referred to in the configuration.
Enable boot-time support for CARP by loading the if_carp.ko kernel module in /boot/loader.conf:
if_carp_load="YES"
To load the module now without rebooting:
# kldload carpFor users who prefer to use a custom kernel, include the following line in the custom kernel configuration file and compile the kernel as described in 設定 FreeBSD 核心:
device carp
Next, on each host, create a CARP device:
# ifconfig carp0 createSet the hostname, management IP address, the shared IP address, and VHID by adding the required lines to /etc/rc.conf. Since a virtual CARP device is used instead of an alias, the actual subnet mask of /24 is used instead of /32. Here are the entries for hosta.example.org:
hostname="hosta.example.org" ifconfig_fxp0="inet 192.168.1.3 netmask 255.255.255.0" cloned_interfaces="carp0" ifconfig_carp0="vhid 1 pass testpass 192.168.1.50/24"
On hostb.example.org:
hostname="hostb.example.org" ifconfig_fxp0="inet 192.168.1.4 netmask 255.255.255.0" cloned_interfaces="carp0" ifconfig_carp0="vhid 2 pass testpass 192.168.1.51/24"
The third machine, hostc.example.org, is configured to handle failover from either of the master hosts:
hostname="hostc.example.org" ifconfig_fxp0="inet 192.168.1.5 netmask 255.255.255.0" cloned_interfaces="carp0 carp1" ifconfig_carp0="vhid 1 advskew 100 pass testpass 192.168.1.50/24" ifconfig_carp1="vhid 2 advskew 100 pass testpass 192.168.1.51/24"
Preemption is disabled in the GENERIC FreeBSD kernel. If preemption has been enabled with a custom kernel, This should be done on the carp interface which corresponds to the correct host. |
Once the configuration is complete, either restart networking or reboot each system. High availability is now enabled.
VLANs are a way of virtually dividing up a network into many different subnetworks, also referred to as segmenting. Each segment will have its own broadcast domain and be isolated from other VLANs.
在 FreeBSD 上,要使用 VLANs 必須有網路卡驅動程式的支援,要查看那些驅動程式支援 vlan,請參考 vlan(4) 操作手冊。
When configuring a VLAN, a couple pieces of information must be known. First, which network interface? Second, what is the VLAN tag?
To configure VLANs at run time, with a NIC of em0 and a VLAN tag of 5 the command would look like this:
# ifconfig em0.5 create vlan 5 vlandev em0 inet 192.168.20.20/24See how the interface name includes the NIC driver name and the VLAN tag, separated by a period? This is a best practice to make maintaining the VLAN configuration easy when many VLANs are present on a machine. |
To configure VLANs at boot time, /etc/rc.conf must be updated. To duplicate the configuration above, the following will need to be added:
vlans_em0="5" ifconfig_em0_5="inet 192.168.20.20/24"
Additional VLANs may be added, by simply adding the tag to the vlansem0 field and adding an additional line configuring the network on that VLAN tag’s interface.
It is useful to assign a symbolic name to an interface so that when the associated hardware is changed, only a few configuration variables need to be updated. For example, security cameras need to be run over VLAN 1 on em0. Later, if the em0 card is replaced with a card that uses the ixgb(4) driver, all references to em0.1 will not have to change to ixgb0.1.
To configure VLAN 5, on the NIC em0, assign the interface name cameras, and assign the interface an IP address of 192.168.20.20 with a 24-bit prefix, use this command:
# ifconfig em0.5 create vlan 5 vlandev em0 name cameras inet 192.168.20.20/24For an interface named video, use the following:
# ifconfig video.5 create vlan 5 vlandev video name cameras inet 192.168.20.20/24To apply the changes at boot time, add the following lines to /etc/rc.conf:
vlans_video="camera" create_args_camera="vlan 5" ifconfig_camera="inet 192.168.20.20/24"
FreeBSD CD 以及 DVD 組可從以下幾個線上零售商取得:
FreeBSD Mall, Inc.
2420 Sand Creek Rd C-1 #347
Brentwood, CA
94513
USA
Phone: +1 925 240-6652
Fax: +1 925 674-0821
Email: <info@freebsdmall.com>
WWW: https://www.freebsdmall.com
Getlinux
78 Rue de la Croix Rochopt
Épinay-sous-Sénart
91860
France
Email: <contact@getlinux.fr>
WWW: http://www.getlinux.fr/
Dr. Hinner EDV
Kochelseestr. 11
D-81371 München
Germany
Phone: (0177) 428 419 0
Email: <infow@hinner.de>
WWW: http://www.hinner.de/linux/freebsd.html
Linux Center
Galernaya Street, 55
Saint-Petersburg
190000
Russia
Phone: +7-812-309-06-86
Email: <info@linuxcenter.ru>
WWW: http://linuxcenter.ru/shop/freebsd
FreeBSD 的官方原始碼可從全球任一鏡像站透過匿名 FTP 取得。其中 ftp://ftp.FreeBSD.org/pub/FreeBSD/ 站可使用 HTTP 及 FTP,該站是由多台由計畫叢集管理員所維護的主機所組成,且在 GeoDNS 之後,可導向使用者到最近可用的鏡像站。
除此之外,FreeBSD 也可透過匿名 FTP 從下列鏡像站取得。要透過匿名 FTP 取得 FreeBSD 時,請先嘗試使用臨近的站台。列在 "主要鏡像站" 中的鏡像站通常會有完整的 FreeBSD 封存檔 (每一個架構目前所有可用的版本),但若要考慮下載速度,可能要使用您所在國家或區域的站台。區域的站台會有熱門架構最近期的版本,但不會有完整的 FreeBSD 封存檔。所有站台皆提供匿名 FTP 存取只有部份站台會以其他方式提供存取。每個站台可用的存取方式會列在主機名稱後的括號當中。
Central Servers, Primary Mirror Sites, Armenia, Australia, Austria, Brazil, Czech Republic, Denmark, Estonia, Finland, France, Germany, Greece, Hong Kong, Ireland, Japan, Korea, Latvia, Lithuania, Netherlands, New Zealand, Norway, Poland, Russia, Saudi Arabia, Slovenia, South Africa, Spain, Sweden, Switzerland, Taiwan, Ukraine, United Kingdom, United States of America.
(as of UTC)
Central Servers
ftp://ftp.FreeBSD.org/pub/FreeBSD/ (ftp / ftpv6 / http://ftp.FreeBSD.org/pub/FreeBSD/ / http://ftp.FreeBSD.org/pub/FreeBSD/)
Primary Mirror Sites
In case of problems, please contact the hostmaster <mirror-admin@FreeBSD.org> for this domain.
ftp://ftp4.FreeBSD.org/pub/FreeBSD/ (ftp / ftpv6 / http://ftp4.FreeBSD.org/pub/FreeBSD/ / http://ftp4.FreeBSD.org/pub/FreeBSD/)
ftp://ftp10.FreeBSD.org/pub/FreeBSD/ (ftp / ftpv6 / http://ftp10.FreeBSD.org/pub/FreeBSD/ / http://ftp10.FreeBSD.org/pub/FreeBSD/)
ftp://ftp14.FreeBSD.org/pub/FreeBSD/ (ftp / http://ftp14.FreeBSD.org/pub/FreeBSD/)
Armenia
In case of problems, please contact the hostmaster <hostmaster@am.FreeBSD.org> for this domain.
Australia
In case of problems, please contact the hostmaster <hostmaster@au.FreeBSD.org> for this domain.
Austria
In case of problems, please contact the hostmaster <hostmaster@at.FreeBSD.org> for this domain.
Brazil
In case of problems, please contact the hostmaster <hostmaster@br.FreeBSD.org> for this domain.
Czech Republic
In case of problems, please contact the hostmaster <hostmaster@cz.FreeBSD.org> for this domain.
Denmark
In case of problems, please contact the hostmaster <staff@dotsrc.org> for this domain.
Estonia
In case of problems, please contact the hostmaster <hostmaster@ee.FreeBSD.org> for this domain.
Finland
In case of problems, please contact the hostmaster <hostmaster@fi.FreeBSD.org> for this domain.
France
In case of problems, please contact the hostmaster <hostmaster@fr.FreeBSD.org> for this domain.
ftp://ftp1.fr.FreeBSD.org/pub/FreeBSD/ (ftp / http://ftp1.fr.FreeBSD.org/pub/FreeBSD/ / rsync)
ftp://ftp6.fr.FreeBSD.org/pub/FreeBSD/ (ftp / rsync)
Germany
In case of problems, please contact the hostmaster <de-bsd-hubs@de.FreeBSD.org> for this domain.
ftp://ftp1.de.FreeBSD.org/freebsd/ (ftp / http://www1.de.FreeBSD.org/freebsd/ / rsync://rsync3.de.FreeBSD.org/freebsd/)
ftp://ftp2.de.FreeBSD.org/pub/FreeBSD/ (ftp / http://ftp2.de.FreeBSD.org/pub/FreeBSD/ / rsync)
ftp://ftp4.de.FreeBSD.org/FreeBSD/ (ftp / http://ftp4.de.FreeBSD.org/pub/FreeBSD/)
ftp://ftp7.de.FreeBSD.org/pub/FreeBSD/ (ftp / http://ftp7.de.FreeBSD.org/pub/FreeBSD/)
Greece
In case of problems, please contact the hostmaster <hostmaster@gr.FreeBSD.org> for this domain.
Hong Kong
Ireland
In case of problems, please contact the hostmaster <hostmaster@ie.FreeBSD.org> for this domain.
ftp://ftp3.ie.FreeBSD.org/pub/FreeBSD/ (ftp / rsync)
Japan
In case of problems, please contact the hostmaster <hostmaster@jp.FreeBSD.org> for this domain.
Korea
In case of problems, please contact the hostmaster <hostmaster@kr.FreeBSD.org> for this domain.
Latvia
In case of problems, please contact the hostmaster <hostmaster@lv.FreeBSD.org> for this domain.
Lithuania
In case of problems, please contact the hostmaster <hostmaster@lt.FreeBSD.org> for this domain.
Netherlands
In case of problems, please contact the hostmaster <hostmaster@nl.FreeBSD.org> for this domain.
New Zealand
Norway
In case of problems, please contact the hostmaster <hostmaster@no.FreeBSD.org> for this domain.
ftp://ftp.no.FreeBSD.org/pub/FreeBSD/ (ftp / rsync)
Poland
In case of problems, please contact the hostmaster <hostmaster@pl.FreeBSD.org> for this domain.
ftp2.pl.FreeBSD.org
Russia
In case of problems, please contact the hostmaster <hostmaster@ru.FreeBSD.org> for this domain.
Saudi Arabia
In case of problems, please contact the hostmaster <ftpadmin@isu.net.sa> for this domain.
Slovenia
In case of problems, please contact the hostmaster <hostmaster@si.FreeBSD.org> for this domain.
South Africa
In case of problems, please contact the hostmaster <hostmaster@za.FreeBSD.org> for this domain.
Spain
In case of problems, please contact the hostmaster <hostmaster@es.FreeBSD.org> for this domain.
Sweden
In case of problems, please contact the hostmaster <hostmaster@se.FreeBSD.org> for this domain.
ftp://ftp2.se.FreeBSD.org/pub/FreeBSD/ (ftp / rsync://ftp2.se.FreeBSD.org/)
ftp://ftp4.se.FreeBSD.org/pub/FreeBSD/ (ftp / ftp://ftp4.se.FreeBSD.org/pub/FreeBSD/ / http://ftp4.se.FreeBSD.org/pub/FreeBSD/ / http://ftp4.se.FreeBSD.org/pub/FreeBSD/ / rsync://ftp4.se.FreeBSD.org/pub/FreeBSD/ / rsync://ftp4.se.FreeBSD.org/pub/FreeBSD/)
ftp://ftp6.se.FreeBSD.org/pub/FreeBSD/ (ftp / http://ftp6.se.FreeBSD.org/pub/FreeBSD/)
Switzerland
In case of problems, please contact the hostmaster <hostmaster@ch.FreeBSD.org> for this domain.
Taiwan
In case of problems, please contact the hostmaster <hostmaster@tw.FreeBSD.org> for this domain.
ftp://ftp.ch.FreeBSD.org/pub/FreeBSD/ (ftp / ftp://ftp.tw.FreeBSD.org/pub/FreeBSD/ / rsync / rsyncv6)
ftp://ftp2.tw.FreeBSD.org/pub/FreeBSD/ (ftp / ftp://ftp2.tw.FreeBSD.org/pub/FreeBSD/ / http://ftp2.tw.FreeBSD.org/pub/FreeBSD/ / http://ftp2.tw.FreeBSD.org/pub/FreeBSD/ / rsync / rsyncv6)
ftp://ftp6.tw.FreeBSD.org/pub/FreeBSD/ (ftp / http://ftp6.tw.FreeBSD.org/ / rsync)
ftp://ftp11.tw.FreeBSD.org/pub/FreeBSD/ (ftp / http://ftp11.tw.FreeBSD.org/FreeBSD/)
Ukraine
ftp://ftp.ua.FreeBSD.org/pub/FreeBSD/ (ftp / http://ftp.ua.FreeBSD.org/pub/FreeBSD/)
ftp://ftp6.ua.FreeBSD.org/pub/FreeBSD/ (ftp / http://ftp6.ua.FreeBSD.org/pub/FreeBSD / rsync://ftp6.ua.FreeBSD.org/FreeBSD/)
United Kingdom
In case of problems, please contact the hostmaster <hostmaster@uk.FreeBSD.org> for this domain.
ftp://ftp2.uk.FreeBSD.org/pub/FreeBSD/ (ftp / rsync://ftp2.uk.FreeBSD.org/ftp.freebsd.org/pub/FreeBSD/)
United States of America
In case of problems, please contact the hostmaster <hostmaster@us.FreeBSD.org> for this domain.
ftp://ftp4.us.FreeBSD.org/pub/FreeBSD/ (ftp / ftpv6 / http://ftp4.us.FreeBSD.org/pub/FreeBSD/ / http://ftp4.us.FreeBSD.org/pub/FreeBSD/)
ftp://ftp13.us.FreeBSD.org/pub/FreeBSD/ (ftp / http://ftp13.us.FreeBSD.org/pub/FreeBSD/ / rsync)
ftp://ftp14.us.FreeBSD.org/pub/FreeBSD/ (ftp / http://ftp14.us.FreeBSD.org/pub/FreeBSD/)
自 2012 年 7 月起,FreeBSD 儲存所有 FreeBSD 的原始碼、文件與 Port 套件集均使用 Subversion 作為其唯一的版本控制系統。
Subversion 只是一套開發人員工具。一般使用者可能會較喜歡使用 |
本節將示範如何在 FreeBSD 系統安裝 Subversion 以及使用它建立一個本地的 FreeBSD 檔案庫複本,也包含使用 Subversion 的其他資訊。
安裝 security/ca_root_nss 可讓 Subversion 能夠驗証 HTTPS 檔案庫伺服器的身份。root SSL 憑証可從 Port 安裝:
# cd /usr/ports/security/ca_root_nss
# make install clean或從套件:
# pkg install ca_root_nss輕量化版的 Subversion svnlite 已會隨 FreeBSD 安裝。Port 或套件版的 Subversion 僅在要使用其 Python 或 Perl API 時需要,或是新想要使用最新版本 Subversion 時才需要。
與正常 Subversion 唯一的差別只是指令名稱改為 svnlite。
若無法使用 svnlite 或需要完整版本的 Subversion 就必須安裝。
Subversion 可從 Port 套件集安裝:
# cd /usr/ports/devel/subversion
# make install cleanSubversion 也可以以套件安裝:
# pkg install subversion要下載原始碼乾淨的複本到本地目錄可使用 svn。在此目錄中的檔案稱作 本地工作複本 (Local working copy)。
在第一次使用 在現有非 |
Subversion 使用 URL 來指定檔案庫,使用的格式為 protocol://hostname/path。路徑的第一個部份為要存取的 FreeBSD 檔案庫,目前有三個檔案庫,base 為 FreeBSD 基礎系統原始碼、ports 為 Port 套件集以及 doc 為說明文件。舉例來說,URL https://svn.FreeBSD.org/ports/head/ 代表 Port 檔案庫的主要分支,使用 https 通訊協定。
使用指令從指定的檔案庫取出 (Checkout) 原始碼如下:
# svn checkout https://svn.FreeBSD.org/repository/branch lwcdirwhere:
repository 要是下列專案檔案庫其中之一:base, ports 或 doc。
branch 則依據使用的檔案庫來決定。ports 與 doc 大部份的更新皆在 head 分支,而 base 則會將 -CURRENT 的最新版本存放在 head 下,-STABLE 分支各自最新的版本則會放在 stable/9 (9.x) 與 stable/10 (10.x) 下。
lwcdir 則是要存放指定分支內容的目標目錄,通常 ports 會置於 /usr/ports,base 會置於 /usr/src 以及 doc 會置於 /usr/doc。
以下範例會使用 HTTPS 協定從 FreeBSD 的檔案庫取出 Port 套件集,並將本地工作複本放置於 /usr/ports。若 /usr/ports 已存在,且不是由 svn 所建立的,記得要在取出之前重新命名或刪除。
# svn checkout https://svn.FreeBSD.org/ports/head /usr/ports由於首次取出的動作必須下載遠端檔案庫中完整的分支,會需要花費一段時間,請耐心等候。
首次取出之後,往後要更新本地工作複本可以執行:
# svn update lwcdir要更新上述範例所建立的 /usr/ports 可執行:
# svn update /usr/ports因為只會傳輸有更新過的檔案,更新的動作會比取出還要快速。
另一種在取出之後更新本地工作複本的方式是透過 /usr/ports, /usr/src 以及 /usr/doc 目錄所提供的 Makefile。設定 SVN_UPDATE 並使用 update 目標。例如要更新 /usr/src:
# cd /usr/src
# make update SVN_UPDATE=yesFreeBSD Subversion 的檔案庫為:
svn.FreeBSD.org
這是可公開存取的鏡像站,使用了 GeoDNS 會自動選擇適合的後端伺服器。若要由瀏覽器檢視 Subversion 檔案庫可以使用 https://svnweb.FreeBSD.org/。
HTTPS is the preferred protocol, but the security/ca_root_nss package will need to be installed in order to automatically validate certificates.
要取得其他有關使用 Subversion 的資訊請參考 "Subversion Book",其書名為 Version Control with Subversion 或是 Subversion Documentation。
這些站台讓 FreeBSD 可透過 rsync 通訊協定取得。rsync 工具只會傳輸兩個檔案集之間的差異,所以能夠大大的加快在網路上同步的速度,這對大多數 FreeBSD FTP 伺服器的鏡像站非常有用。rsync 在許多作業系統上也可以使用,在 FreeBSD 上請參考 net/rsync Port 或使用套件。
rsync://ftp.cz.FreeBSD.org/
可用的檔案集:
ftp: FreeBSD FTP 伺服器的部份鏡像。
FreeBSD: FreeBSD FTP 伺服器的完整鏡像。
rsync://ftp.nl.FreeBSD.org/
可用的檔案集:
FreeBSD: FreeBSD FTP 伺服器的完整鏡像。
rsync://ftp.mtu.ru/
可用的檔案集:
FreeBSD: FreeBSD FTP 伺服器的完整鏡像。
FreeBSD-Archive: FreeBSD 封存 FTP 伺服器的鏡像。
rsync://ftp4.se.freebsd.org/
可用的檔案集:
FreeBSD: FreeBSD FTP 伺服器的完整鏡像。
rsync://ftp.tw.FreeBSD.org/
rsync://ftp2.tw.FreeBSD.org/
rsync://ftp6.tw.FreeBSD.org/
可用的檔案集:
FreeBSD: FreeBSD FTP 伺服器的完整鏡像。
rsync://rsync.mirrorservice.org/
可用的檔案集:
ftp.freebsd.org: FreeBSD FTP 伺服器的完整鏡像。
rsync://ftp-master.FreeBSD.org/
此伺服器僅供 FreeBSD 主要鏡像站使用。
可用的檔案集:
FreeBSD: FreeBSD FTP 伺服器的主要封存。
acl: FreeBSD 主要 ACL 清單。
rsync://ftp13.FreeBSD.org/
可用的檔案集:
FreeBSD: FreeBSD FTP 伺服器的完整鏡像。
雖然操作手冊提供 FreeBSD 作業系統各個部分完整的說明,卻難免有「小學而大遺」之憾,像是如何讓整個作業系統運作順暢。因此,身邊有 UNIX™ 系統管理的好書以及好的使用手冊是不可或缺的。
國際書籍:
FreeBSD 入門與應用 (光碟豪華版) (繁體中文), 博碩文化出版, 1997. ISBN 9-578-39435-7。
FreeBSD 技術內幕 (FreeBSD Unleashed 簡體中譯版), 機械工業出版社出版. ISBN 7-111-10201-0。
FreeBSD 使用大全第二版 (簡體中文), 機械工業出版社出版. ISBN 7-111-10286-X。
FreeBSD Handbook 第二版 (簡體中譯版), 人民郵電出版社出版. ISBN 7-115-10541-3。
FreeBSD & Windows 集成組網實務 (簡體中文), 中國鐵道出版社出版. ISBN 7-113-03845-X。
FreeBSD 網站架設實務 (簡體中文), 中國鐵道出版社出版. ISBN 7-113-03423-3。
FreeBSD (日文), CUTT 出版. ISBN 4-906391-22-2 C3055 P2400E。
Complete Introduction to FreeBSD (日文), Shoeisha Co., Ltd 出版. ISBN 4-88135-473-6 P3600E。
Personal UNIX Starter Kit FreeBSD (日文), ASCII 出版. ISBN 4-7561-1733-3 P3000E。
FreeBSD Handbook (日譯版), ASCII 出版. ISBN 4-7561-1580-2 P3800E。
FreeBSD mit Methode (德文), Computer und Literatur Verlag/Vertrieb Hanser 出版, 1998. ISBN 3-932311-31-0。
FreeBSD de Luxe (德文), Verlag Modere Industrie 出版, 2003. ISBN 3-8266-1343-0。
FreeBSD Install and Utilization Manual (日文), Mainichi Communications Inc. 出版, 1998. ISBN 4-8399-0112-0。
Onno W Purbo, Dodi Maryanto, Syahrial Hubbany, Widjil Widodo Building Internet Server with FreeBSD (印尼文), Elex Media Komputindo 出版。
FreeBSD 完全探索 (Absolute BSD: The Ultimate Guide to FreeBSD 繁體中譯版), GrandTech Press 出版, 2003. ISBN 986-7944-92-5。
FreeBSD 6.0 架設管理與應用 (繁體中文), 博碩出版, 2006. ISBN 9-575-27878-X。
英文書籍:
Absolute FreeBSD, 2nd Edition: The Complete Guide to FreeBSD, published by No Starch Press, 2007. ISBN: 978-1-59327-151-0
The Complete FreeBSD, published by O’Reilly, 2003. ISBN: 0596005164
The FreeBSD Corporate Networker’s Guide, published by Addison-Wesley, 2000. ISBN: 0201704811
FreeBSD: An Open-Source Operating System for Your Personal Computer, published by The Bit Tree Press, 2001. ISBN: 0971204500
Teach Yourself FreeBSD in 24 Hours, published by Sams, 2002. ISBN: 0672324245
FreeBSD 6 Unleashed, published by Sams, 2006. ISBN: 0672328755
FreeBSD: The Complete Reference, published by McGrawHill, 2003. ISBN: 0072224096
Ohio State University has written a UNIX Introductory Course which is available online in HTML and PostScript format.
An Italian translation of this document is available as part of the FreeBSD Italian Documentation Project.
Edinburgh University has written an Online Guide for newcomers to the UNIX environment.
Jpman Project, Japan FreeBSD Users Group. FreeBSD System Administrator’s Manual (Japanese translation). Mainichi Communications Inc., 1998. ISBN4-8399-0109-0 P3300E.
Dreyfus, Emmanuel. Cahiers de l’Admin: BSD 2nd Ed. (in French), Eyrolles, 2004. ISBN 2-212-11463-X
Computer Systems Research Group, UC Berkeley. 4.4BSD Programmer’s Reference Manual. O’Reilly & Associates, Inc., 1994. ISBN 1-56592-078-3
Computer Systems Research Group, UC Berkeley. 4.4BSD Programmer’s Supplementary Documents. O’Reilly & Associates, Inc., 1994. ISBN 1-56592-079-1
Harbison, Samuel P. and Steele, Guy L. Jr. C: A Reference Manual. 4th Ed. Prentice Hall, 1995. ISBN 0-13-326224-3
Kernighan, Brian and Dennis M. Ritchie. The C Programming Language. 2nd Ed. PTR Prentice Hall, 1988. ISBN 0-13-110362-8
Lehey, Greg. Porting UNIX Software. O’Reilly & Associates, Inc., 1995. ISBN 1-56592-126-7
Plauger, P. J. The Standard C Library. Prentice Hall, 1992. ISBN 0-13-131509-9
Spinellis, Diomidis. Code Reading: The Open Source Perspective. Addison-Wesley, 2003. ISBN 0-201-79940-5
Spinellis, Diomidis. Code Quality: The Open Source Perspective. Addison-Wesley, 2006. ISBN 0-321-16607-8
Stevens, W. Richard and Stephen A. Rago. Advanced Programming in the UNIX Environment. 2nd Ed. Reading, Mass. : Addison-Wesley, 2005. ISBN 0-201-43307-9
Stevens, W. Richard. UNIX Network Programming. 2nd Ed, PTR Prentice Hall, 1998. ISBN 0-13-490012-X
Andleigh, Prabhat K. UNIX System Architecture. Prentice-Hall, Inc., 1990. ISBN 0-13-949843-5
Jolitz, William. "Porting UNIX to the 386". Dr. Dobb’s Journal. January 1991-July 1992.
Leffler, Samuel J., Marshall Kirk McKusick, Michael J Karels and John Quarterman The Design and Implementation of the 4.3BSD UNIX Operating System. Reading, Mass. : Addison-Wesley, 1989. ISBN 0-201-06196-1
Leffler, Samuel J., Marshall Kirk McKusick, The Design and Implementation of the 4.3BSD UNIX Operating System: Answer Book. Reading, Mass. : Addison-Wesley, 1991. ISBN 0-201-54629-9
McKusick, Marshall Kirk, Keith Bostic, Michael J Karels, and John Quarterman. The Design and Implementation of the 4.4BSD Operating System. Reading, Mass. : Addison-Wesley, 1996. ISBN 0-201-54979-4
(Chapter 2 of this book is available online as part of the FreeBSD Documentation Project.)
Marshall Kirk McKusick, George V. Neville-Neil The Design and Implementation of the FreeBSD Operating System. Boston, Mass. : Addison-Wesley, 2004. ISBN 0-201-70245-2
Marshall Kirk McKusick, George V. Neville-Neil, Robert N. M. Watson The Design and Implementation of the FreeBSD Operating System, 2nd Ed.. Westford, Mass. : Pearson Education, Inc., 2014. ISBN 0-321-96897-2
Stevens, W. Richard. TCP/IP Illustrated, Volume 1: The Protocols. Reading, Mass. : Addison-Wesley, 1996. ISBN 0-201-63346-9
Schimmel, Curt. Unix Systems for Modern Architectures. Reading, Mass. : Addison-Wesley, 1994. ISBN 0-201-63338-8
Stevens, W. Richard. TCP/IP Illustrated, Volume 3: TCP for Transactions, HTTP, NNTP and the UNIX Domain Protocols. Reading, Mass. : Addison-Wesley, 1996. ISBN 0-201-63495-3
Vahalia, Uresh. UNIX Internals — The New Frontiers. Prentice Hall, 1996. ISBN 0-13-101908-2
Wright, Gary R. and W. Richard Stevens. TCP/IP Illustrated, Volume 2: The Implementation. Reading, Mass. : Addison-Wesley, 1995. ISBN 0-201-63354-X
Cheswick, William R. and Steven M. Bellovin. Firewalls and Internet Security: Repelling the Wily Hacker. Reading, Mass. : Addison-Wesley, 1995. ISBN 0-201-63357-4
Garfinkel, Simson. PGP Pretty Good Privacy O’Reilly & Associates, Inc., 1995. ISBN 1-56592-098-8
Anderson, Don and Tom Shanley. Pentium Processor System Architecture. 2nd Ed. Reading, Mass. : Addison-Wesley, 1995. ISBN 0-201-40992-5
Ferraro, Richard F. Programmer’s Guide to the EGA, VGA, and Super VGA Cards. 3rd ed. Reading, Mass. : Addison-Wesley, 1995. ISBN 0-201-62490-7
Intel Corporation publishes documentation on their CPUs, chipsets and standards on their developer web site, usually as PDF files.
Shanley, Tom. 80486 System Architecture. 3rd Ed. Reading, Mass. : Addison-Wesley, 1995. ISBN 0-201-40994-1
Shanley, Tom. ISA System Architecture. 3rd Ed. Reading, Mass. : Addison-Wesley, 1995. ISBN 0-201-40996-8
Shanley, Tom. PCI System Architecture. 4th Ed. Reading, Mass. : Addison-Wesley, 1999. ISBN 0-201-30974-2
Van Gilluwe, Frank. The Undocumented PC, 2nd Ed. Reading, Mass: Addison-Wesley Pub. Co., 1996. ISBN 0-201-47950-8
Messmer, Hans-Peter. The Indispensable PC Hardware Book, 4th Ed. Reading, Mass : Addison-Wesley Pub. Co., 2002. ISBN 0-201-59616-4
Lion, John Lion’s Commentary on UNIX, 6th Ed. With Source Code. ITP Media Group, 1996. ISBN 1573980137
Raymond, Eric S. The New Hacker’s Dictionary, 3rd edition. MIT Press, 1996. ISBN 0-262-68092-0. Also known as the Jargon File
Salus, Peter H. A quarter century of UNIX. Addison-Wesley Publishing Company, Inc., 1994. ISBN 0-201-54777-5
Simon Garfinkel, Daniel Weise, Steven Strassmann. The UNIX-HATERS Handbook. IDG Books Worldwide, Inc., 1994. ISBN 1-56884-203-1. Out of print, but available online.
Don Libes, Sandy Ressler Life with UNIX — special edition. Prentice-Hall, Inc., 1989. ISBN 0-13-536657-7
The BSD family tree. https://svnweb.freebsd.org/base/head/shared/misc/bsd-family-tree?view=co or /usr/shared/misc/bsd-family-tree on a FreeBSD machine.
Networked Computer Science Technical Reports Library. http://www.ncstrl.org/
Old BSD releases from the Computer Systems Research group (CSRG). http://www.mckusick.com/csrg/: The 4CD set covers all BSD versions from 1BSD to 4.4BSD and 4.4BSD-Lite2 (but not 2.11BSD, unfortunately). The last disk also holds the final sources plus the SCCS files.
Admin Magazin (in German), published by Medialinx AG. ISSN: 2190-1066
BSD Magazine, published by Software Press Sp. z o.o. SK. ISSN: 1898-9144
BSD Now — Video Podcast, published by Jupiter Broadcasting LLC
BSD Talk Podcast, by Will Backman
FreeBSD Journal, published by S&W Publishing, sponsored by The FreeBSD Foundation. ISBN: 978-0-615-88479-0
The rapid pace of FreeBSD progress makes print media impractical as a means of following the latest developments. Electronic resources are the best, if not often the only, way to stay informed of the latest advances. Since FreeBSD is a volunteer effort, the user community itself also generally serves as a "technical support department" of sorts, with electronic mail, web forums, and USENET news being the most effective way of reaching that community.
The most important points of contact with the FreeBSD user community are outlined below. Please send other resources not mentioned here to the FreeBSD documentation project mailing list so that they may also be included.
The FreeBSD Forums provide a web based discussion forum for FreeBSD questions and technical discussion.
The BSDConferences YouTube Channel provides a collection of high quality videos from BSD conferences around the world. This is a great way to watch key developers give presentations about new work in FreeBSD.
The mailing lists are the most direct way of addressing questions or opening a technical discussion to a concentrated FreeBSD audience. There are a wide variety of lists on a number of different FreeBSD topics. Sending questions to the most appropriate mailing list will invariably assure a faster and more accurate response.
The charters for the various lists are given at the bottom of this document. Please read the charter before joining or sending mail to any list. Most list subscribers receive many hundreds of FreeBSD related messages every day, and the charters and rules for use are meant to keep the signal-to-noise ratio of the lists high. To do less would see the mailing lists ultimately fail as an effective communications medium for the Project.
To test the ability to send email to FreeBSD lists, send a test message to freebsd-test. Please do not send test messages to any other list. |
When in doubt about what list to post a question to, see How to get best results from the FreeBSD-questions mailing list.
Before posting to any list, please learn about how to best use the mailing lists, such as how to help avoid frequently-repeated discussions, by reading the Mailing List Frequently Asked Questions (FAQ) document.
Archives are kept for all of the mailing lists and can be searched using the FreeBSD World Wide Web server. The keyword searchable archive offers an excellent way of finding answers to frequently asked questions and should be consulted before posting a question. Note that this also means that messages sent to FreeBSD mailing lists are archived in perpetuity. When protecting privacy is a concern, consider using a disposable secondary email address and posting only public information.
General lists: The following are general lists which anyone is free (and encouraged) to join:
| List | 用途 |
|---|---|
FreeBSD Evangelism | |
Important events and Project milestones (moderated) | |
Architecture and design discussions | |
Discussions pertaining to the maintenance of the FreeBSD problem report database and related tools | |
Bug reports | |
Non-technical items related to the FreeBSD community | |
FreeBSD-specific Chromium issues | |
Discussion concerning the use of FreeBSD-CURRENT | |
Issues for Internet Service Providers using FreeBSD | |
FreeBSD employment and consulting opportunities | |
User questions and technical support | |
Security notifications (moderated) | |
Discussion concerning the use of FreeBSD-STABLE | |
Where to send test messages instead of to one of the actual lists | |
FreeBSD advocacy for women |
Technical lists: The following lists are for technical discussion. Read the charter for each list carefully before joining or sending mail to one as there are firm guidelines for their use and content.
| List | 用途 |
|---|---|
ACPI and power management development | |
Porting AFS to FreeBSD | |
Porting FreeBSD to AMD64 systems (moderated) | |
Discussion about Apache related ports | |
Porting FreeBSD to ARM™ processors | |
Using ATM networking with FreeBSD | |
Using Bluetooth™ technology in FreeBSD | |
FreeBSD on cloud platforms (EC2, GCE, Azure, etc.) | |
Using FreeBSD in a clustered environment | |
Discussing database use and development under FreeBSD | |
Using and improving FreeBSD on the desktop | |
Build and test reports from the Continuous Integration servers | |
Notifications of the FreeBSD review system | |
Creating FreeBSD related documents | |
Writing device drivers for FreeBSD | |
Using and working on DTrace in FreeBSD | |
FreeBSD users of Eclipse IDE, tools, rich client applications and ports. | |
FreeBSD-specific ElasticSearch discussions | |
Using FreeBSD in embedded applications | |
Peer support of FreeBSD-related software that is no longer supported by the FreeBSD Project. | |
Emulation of other systems such as Linux/MS-DOS™/Windows™ | |
Porting Enlightenment and Enlightenment applications | |
FreeBSD-specific Erlang discussions | |
FreeBSD FireWire™ (iLink, IEEE 1394) technical discussion | |
Fortran on FreeBSD | |
File systems | |
Support for Games on FreeBSD | |
Gecko Rendering Engine issues | |
GEOM-specific discussions and implementations | |
Discussion of git use in the FreeBSD project | |
Porting GNOME and GNOME applications | |
General technical discussion | |
FreeBSD-specific Haskell issues and discussions | |
General discussion of hardware for running FreeBSD | |
FreeBSD Internationalization | |
FreeBSD on the IA-32 (Intel™ x86) platform | |
Porting FreeBSD to Intel™'s upcoming IA64 systems | |
Infiniband on FreeBSD | |
Technical discussion concerning the redesign of the IP firewall code | |
ISDN developers | |
Discussion about the jail(8) facility | |
Java™ developers and people porting JDK™s to FreeBSD | |
Porting KDE and KDE applications | |
Porting LFS to FreeBSD | |
Porting FreeBSD to MIPS™ | |
Discussions about mobile computing | |
Mono and C# applications on FreeBSD | |
Multimedia applications | |
Technical discussions about bus architecture | |
Networking discussion and TCP/IP source code | |
Discussions of high quality implementation of libm functions | |
FreeBSD-specific OCaml discussions | |
Office applications on FreeBSD | |
Performance tuning questions for high performance/load installations | |
Maintenance of a number of Perl-related ports | |
Discussion and questions about the packet filter firewall system | |
Binary package management and package tools discussion | |
Fallout logs from package building | |
Packaging the FreeBSD base system | |
Concerning ports to non Intel™ architecture platforms | |
Discussion of the Ports Collection | |
Important news and instructions about the Ports Collection (moderated) | |
Discussion of the ports bugs/PRs | |
Porting FreeBSD to the PowerPC™ | |
Technical discussion of FreeBSD on HP ProLiant server platforms | |
FreeBSD-specific Python issues | |
Discussion related to the rc.d system and its development | |
Development of realtime extensions to FreeBSD | |
FreeBSD-specific Ruby discussions | |
The SCSI subsystem | |
Security issues affecting FreeBSD | |
Using FreeBSD in embedded applications (obsolete; use freebsd-embedded instead) | |
FreeBSD Development Snapshot Announcements | |
Porting FreeBSD to SPARC™ based systems | |
FreeBSD’s conformance to the C99 and the POSIX™ standards | |
sysinstall(8) development | |
FreeBSD-specific Tcl/Tk discussions | |
Testing on FreeBSD | |
Porting TeX and its applications to FreeBSD | |
Threading in FreeBSD | |
Porting FreeBSD to the Tilera family of CPUs | |
Support Token Ring in FreeBSD | |
Maintenance of FreeBSD’s integrated toolchain | |
Translating FreeBSD documents and programs | |
Discussions of transport level network protocols in FreeBSD | |
Discussing FreeBSD support for USB | |
Discussion of various virtualization techniques supported by FreeBSD | |
Discussion on VuXML infrastructure | |
Maintenance and support of X11 on FreeBSD | |
Discussion of the FreeBSD port to Xen™ — implementation and usage | |
XFCE for FreeBSD — porting and maintaining | |
Zope for FreeBSD — porting and maintaining |
Limited lists: The following lists are for more specialized (and demanding) audiences and are probably not of interest to the general public. It is also a good idea to establish a presence in the technical lists before joining one of these limited lists in order to understand the communications etiquette involved.
| List | 用途 |
|---|---|
People running mirror sites (infrastructural support) | |
User group coordination | |
FreeBSD Work-In-Progress Status | |
Discussions of 802.11 stack, tools, device driver development |
Digest lists: All of the above lists are available in a digest format. Once subscribed to a list, the digest options can be changed in the account options section.
SVN lists: The following lists are for people interested in seeing the log messages for changes to various areas of the source tree. They are Read-Only lists and should not have mail sent to them.
| List | Source area | Area Description (source for) |
|---|---|---|
/usr/doc | All changes to the doc Subversion repository (except for user, projects and translations) | |
/usr/doc | All changes to the "head" branch of the doc Subversion repository | |
/usr/doc/projects | All changes to the projects area of the doc Subversion repository | |
/usr/doc | All changes to the administrative scripts, hooks, and other configuration data of the doc Subversion repository | |
/usr/ports | All changes to the ports Subversion repository | |
/usr/ports | All changes to the "head" branch of the ports Subversion repository | |
/usr/ports | All changes to the administrative scripts, hooks, and other configuration data of the ports Subversion repository | |
/usr/src | All changes to the src Subversion repository (except for user and projects) | |
/usr/src | All changes to the "head" branch of the src Subversion repository (the FreeBSD-CURRENT branch) | |
/usr/projects | All changes to the projects area of the src Subversion repository | |
/usr/src | All changes to the releases area of the src Subversion repository | |
/usr/src | All changes to the releng branches of the src Subversion repository (the security / release engineering branches) | |
/usr/src | All changes to the all stable branches of the src Subversion repository | |
/usr/src | All changes to the stable/6 branch of the src Subversion repository | |
/usr/src | All changes to the stable/7 branch of the src Subversion repository | |
/usr/src | All changes to the stable/8 branch of the src Subversion repository | |
/usr/src | All changes to the stable/9 branch of the src Subversion repository | |
/usr/src | All changes to the stable/10 branch of the src Subversion repository | |
/usr/src | All changes to the stable/11 branch of the src Subversion repository | |
/usr/src | All changes to the stable/12 branch of the src Subversion repository | |
/usr/src | All changes to the older stable branches of the src Subversion repository | |
/usr/src | All changes to the administrative scripts, hooks, and other configuration data of the src Subversion repository | |
/usr/src | All changes to the experimental user area of the src Subversion repository | |
/usr/src | All changes to the vendor work area of the src Subversion repository |
To subscribe to a list, click the list name at http://lists.FreeBSD.org/mailman/listinfo. The page that is displayed should contain all of the necessary subscription instructions for that list.
To actually post to a given list, send mail to listname@FreeBSD.org. It will then be redistributed to mailing list members world-wide.
To unsubscribe from a list, click on the URL found at the bottom of every email received from the list. It is also possible to send an email to listname-unsubscribe@FreeBSD.org to unsubscribe.
It is important to keep discussion in the technical mailing lists on a technical track. To only receive important announcements, instead join the FreeBSD announcements mailing list, which is intended for infrequent traffic.
All FreeBSD mailing lists have certain basic rules which must be adhered to by anyone using them. Failure to comply with these guidelines will result in two (2) written warnings from the FreeBSD Postmaster postmaster@FreeBSD.org, after which, on a third offense, the poster will removed from all FreeBSD mailing lists and filtered from further posting to them. We regret that such rules and measures are necessary at all, but today’s Internet is a pretty harsh environment, it would seem, and many fail to appreciate just how fragile some of its mechanisms are.
Rules of the road:
The topic of any posting should adhere to the basic charter of the list it is posted to. If the list is about technical issues, the posting should contain technical discussion. Ongoing irrelevant chatter or flaming only detracts from the value of the mailing list for everyone on it and will not be tolerated. For free-form discussion on no particular topic, the FreeBSD chat mailing list is freely available and should be used instead.
No posting should be made to more than 2 mailing lists, and only to 2 when a clear and obvious need to post to both lists exists. For most lists, there is already a great deal of subscriber overlap and except for the most esoteric mixes (say "-stable & -scsi"), there really is no reason to post to more than one list at a time. If a message is received with multiple mailing lists on the Cc line, trim the Cc line before replying. The person who replies is still responsible for cross-posting, no matter who the originator might have been.
Personal attacks and profanity (in the context of an argument) are not allowed, and that includes users and developers alike. Gross breaches of netiquette, like excerpting or reposting private mail when permission to do so was not and would not be forthcoming, are frowned upon but not specifically enforced. However, there are also very few cases where such content would fit within the charter of a list and it would therefore probably rate a warning (or ban) on that basis alone.
Advertising of non-FreeBSD related products or services is strictly prohibited and will result in an immediate ban if it is clear that the offender is advertising by spam.
Individual list charters:
ACPI and power management development
Andrew File System
This list is for discussion on porting and using AFS from CMU/Transarc
Important events / milestones
This is the mailing list for people interested only in occasional announcements of significant FreeBSD events. This includes announcements about snapshots and other releases. It contains announcements of new FreeBSD capabilities. It may contain calls for volunteers etc. This is a low volume, strictly moderated mailing list.
Architecture and design discussions
This list is for discussion of the FreeBSD architecture. Messages will mostly be kept strictly technical in nature. Examples of suitable topics are:
How to re-vamp the build system to have several customized builds running at the same time.
What needs to be fixed with VFS to make Heidemann layers work.
How do we change the device driver interface to be able to use the same drivers cleanly on many buses and architectures.
How to write a network driver.
Bluetooth™ in FreeBSD
This is the forum where FreeBSD’s Bluetooth™ users congregate. Design issues, implementation details, patches, bug reports, status reports, feature requests, and all matters related to Bluetooth™ are fair game.
Coordination of the Problem Report handling effort
The purpose of this list is to serve as a coordination and discussion forum for the Bugmeister, his Bugbusters, and any other parties who have a genuine interest in the PR database. This list is not for discussions about specific bugs, patches or PRs.
Bug reports
This is the mailing list for reporting bugs in FreeBSD. Whenever possible, bugs should be submitted using the web interface to it.
Non technical items related to the FreeBSD community
This list contains the overflow from the other lists about non-technical, social information. It includes discussion about whether Jordan looks like a toon ferret or not, whether or not to type in capitals, who is drinking too much coffee, where the best beer is brewed, who is brewing beer in their basement, and so on. Occasional announcements of important events (such as upcoming parties, weddings, births, new jobs, etc) can be made to the technical lists, but the follow ups should be directed to this -chat list.
FreeBSD-specific Chromium issues
This is a list for the discussion of Chromium support for FreeBSD. This is a technical list to discuss development and installation of Chromium.
Running FreeBSD on various cloud platforms
This list discusses running FreeBSD on Amazon EC2, Google Compute Engine, Microsoft Azure, and other cloud computing platforms.
FreeBSD core team
This is an internal mailing list for use by the core members. Messages can be sent to it when a serious FreeBSD-related matter requires arbitration or high-level scrutiny.
Discussions about the use of FreeBSD-CURRENT
This is the mailing list for users of FreeBSD-CURRENT. It includes warnings about new features coming out in -CURRENT that will affect the users, and instructions on steps that must be taken to remain -CURRENT. Anyone running "CURRENT" must subscribe to this list. This is a technical mailing list for which strictly technical content is expected.
Using and improving FreeBSD on the desktop
This is a forum for discussion of FreeBSD on the desktop. It is primarily a place for desktop porters and users to discuss issues and improve FreeBSD’s desktop support.
Continuous Integration reports of build and test results
All Continuous Integration reports of build and test results
Notifications of work in progress in FreeBSD’s review tool
Automated notifications of work in progress for review in FreeBSD’s review tools, including patches.
Documentation Project
This mailing list is for the discussion of issues and projects related to the creation of documentation for FreeBSD. The members of this mailing list are collectively referred to as "The FreeBSD Documentation Project". It is an open list; feel free to join and contribute!
Writing device drivers for FreeBSD
This is a forum for technical discussions related to device drivers on FreeBSD. It is primarily a place for device driver writers to ask questions about how to write device drivers using the APIs in the FreeBSD kernel.
Using and working on DTrace in FreeBSD
DTrace is an integrated component of FreeBSD that provides a framework for understanding the kernel as well as user space programs at run time. The mailing list is an archived discussion for developers of the code as well as those using it.
FreeBSD users of Eclipse IDE, tools, rich client applications and ports.
The intention of this list is to provide mutual support for everything to do with choosing, installing, using, developing and maintaining the Eclipse IDE, tools, rich client applications on the FreeBSD platform and assisting with the porting of Eclipse IDE and plugins to the FreeBSD environment.
The intention is also to facilitate exchange of information between the Eclipse community and the FreeBSD community to the mutual benefit of both.
Although this list is focused primarily on the needs of Eclipse users it will also provide a forum for those who would like to develop FreeBSD specific applications using the Eclipse framework.
Using FreeBSD in embedded applications
This list discusses topics related to using FreeBSD in embedded systems. This is a technical mailing list for which strictly technical content is expected. For the purpose of this list, embedded systems are those computing devices which are not desktops and which usually serve a single purpose as opposed to being general computing environments. Examples include, but are not limited to, all kinds of phone handsets, network equipment such as routers, switches and PBXs, remote measuring equipment, PDAs, Point Of Sale systems, and so on.
Emulation of other systems such as Linux/MS-DOS™/Windows™
This is a forum for technical discussions related to running programs written for other operating systems on FreeBSD.
Enlightenment
Discussions concerning the Enlightenment Desktop Environment for FreeBSD systems. This is a technical mailing list for which strictly technical content is expected.
Peer support of FreeBSD-related software that is no longer supported by the FreeBSD Project.
This list is for those interested in providing or making use of peer support of FreeBSD-related software for which the FreeBSD Project no longer provides official support in the form of security advisories and patches.
FireWire™ (iLink, IEEE 1394)
This is a mailing list for discussion of the design and implementation of a FireWire™ (aka IEEE 1394 aka iLink) subsystem for FreeBSD. Relevant topics specifically include the standards, bus devices and their protocols, adapter boards/cards/chips sets, and the architecture and implementation of code for their proper support.
Fortran on FreeBSD
This is the mailing list for discussion of Fortran related ports on FreeBSD: compilers, libraries, scientific and engineering applications from laptops to HPC clusters.
File systems
Discussions concerning FreeBSD filesystems. This is a technical mailing list for which strictly technical content is expected.
Games on FreeBSD
This is a technical list for discussions related to bringing games to FreeBSD. It is for individuals actively working on porting games to FreeBSD, to bring up problems or discuss alternative solutions. Individuals interested in following the technical discussion are also welcome.
Gecko Rendering Engine
This is a forum about Gecko applications using FreeBSD.
Discussion centers around Gecko Ports applications, their installation, their development and their support within FreeBSD.
GEOM
Discussions specific to GEOM and related implementations. This is a technical mailing list for which strictly technical content is expected.
Use of git in the FreeBSD project
Discussions of how to use git in FreeBSD infrastructure including the github mirror and other uses of git for project collaboration. Discussion area for people using git against the FreeBSD github mirror. People wanting to get started with the mirror or git in general on FreeBSD can ask here.
GNOME
Discussions concerning The GNOME Desktop Environment for FreeBSD systems. This is a technical mailing list for which strictly technical content is expected.
Infiniband on FreeBSD
Technical mailing list discussing Infiniband, OFED, and OpenSM on FreeBSD.
IP Firewall
This is the forum for technical discussions concerning the redesign of the IP firewall code in FreeBSD. This is a technical mailing list for which strictly technical content is expected.
Porting FreeBSD to IA64
This is a technical mailing list for individuals actively working on porting FreeBSD to the IA-64 platform from Intel™, to bring up problems or discuss alternative solutions. Individuals interested in following the technical discussion are also welcome.
ISDN Communications
This is the mailing list for people discussing the development of ISDN support for FreeBSD.
Java™ Development
This is the mailing list for people discussing the development of significant Java™ applications for FreeBSD and the porting and maintenance of JDK™s.
Jobs offered and sought
This is a forum for posting employment notices specifically related to FreeBSD and resumes from those seeking FreeBSD-related employment. This is not a mailing list for general employment issues since adequate forums for that already exist elsewhere.
Note that this list, like other FreeBSD.org mailing lists, is distributed worldwide. Be clear about the geographic location and the extent to which telecommuting or assistance with relocation is available.
Email should use open formats only — preferably plain text, but basic Portable Document Format (PDF), HTML, and a few others are acceptable to many readers. Closed formats such as Microsoft™ Word (.doc) will be rejected by the mailing list server.
KDE
Discussions concerning KDE on FreeBSD systems. This is a technical mailing list for which strictly technical content is expected.
Technical discussions
This is a forum for technical discussions related to FreeBSD. This is the primary technical mailing list. It is for individuals actively working on FreeBSD, to bring up problems or discuss alternative solutions. Individuals interested in following the technical discussion are also welcome. This is a technical mailing list for which strictly technical content is expected.
General discussion of FreeBSD hardware
General discussion about the types of hardware that FreeBSD runs on, various problems and suggestions concerning what to buy or avoid.
Mirror sites
Announcements and discussion for people who run FreeBSD mirror sites.
Issues for Internet Service Providers
This mailing list is for discussing topics relevant to Internet Service Providers (ISPs) using FreeBSD. This is a technical mailing list for which strictly technical content is expected.
Mono and C# applications on FreeBSD
This is a list for discussions related to the Mono development framework on FreeBSD. This is a technical mailing list. It is for individuals actively working on porting Mono or C# applications to FreeBSD, to bring up problems or discuss alternative solutions. Individuals interested in following the technical discussion are also welcome.
FreeBSD-specific OCaml discussions
This is a list for discussions related to the OCaml support on FreeBSD. This is a technical mailing list. It is for individuals working on OCaml ports, 3rd party libraries and frameworks. Individuals interested in the technical discussion are also welcome.
Office applications on FreeBSD
Discussion centers around office applications, their installation, their development and their support within FreeBSD.
Project Infrastructure Announcements
This is the mailing list for people interested in changes and issues related to the FreeBSD.org Project infrastructure.
This moderated list is strictly for announcements: no replies, requests, discussions, or opinions.
Discussions about tuning or speeding up FreeBSD
This mailing list exists to provide a place for hackers, administrators, and/or concerned parties to discuss performance related topics pertaining to FreeBSD. Acceptable topics includes talking about FreeBSD installations that are either under high load, are experiencing performance problems, or are pushing the limits of FreeBSD. Concerned parties that are willing to work toward improving the performance of FreeBSD are highly encouraged to subscribe to this list. This is a highly technical list ideally suited for experienced FreeBSD users, hackers, or administrators interested in keeping FreeBSD fast, robust, and scalable. This list is not a question-and-answer list that replaces reading through documentation, but it is a place to make contributions or inquire about unanswered performance related topics.
Discussion and questions about the packet filter firewall system
Discussion concerning the packet filter (pf) firewall system in terms of FreeBSD. Technical discussion and user questions are both welcome. This list is also a place to discuss the ALTQ QoS framework.
Binary package management and package tools discussion
Discussion of all aspects of managing FreeBSD systems by using binary packages to install software, including binary package toolkits and formats, their development and support within FreeBSD, package repository management, and third party packages.
Note that discussion of ports which fail to generate packages correctly should generally be considered as ports problems, and so inappropriate for this list.
Fallout logs from package building
All packages building failures logs from the package building clusters
Packaging the FreeBSD base system.
Discussions surrounding implementation and issues regarding packaging the FreeBSD base system.
Porting to Non Intel™ platforms
Cross-platform FreeBSD issues, general discussion and proposals for non Intel™ FreeBSD ports. This is a technical mailing list for which strictly technical content is expected.
Discussion of "ports"
Discussions concerning FreeBSD’s "ports collection" (/usr/ports), ports infrastructure, and general ports coordination efforts. This is a technical mailing list for which strictly technical content is expected.
Important news and instructions about the FreeBSD "Ports Collection"
Important news for developers, porters, and users of the "Ports Collection" (/usr/ports), including architecture/infrastructure changes, new capabilities, critical upgrade instructions, and release engineering information. This is a low-volume mailing list, intended for announcements.
Discussion of "ports" bugs
Discussions concerning problem reports for FreeBSD’s "ports collection" (/usr/ports), proposed ports, or modifications to ports. This is a technical mailing list for which strictly technical content is expected.
Technical discussion of FreeBSD on HP ProLiant server platforms
This mailing list is to be used for the technical discussion of the usage of FreeBSD on HP ProLiant servers, including the discussion of ProLiant-specific drivers, management software, configuration tools, and BIOS updates. As such, this is the primary place to discuss the hpasmd, hpasmcli, and hpacucli modules.
Python on FreeBSD
This is a list for discussions related to improving Python-support on FreeBSD. This is a technical mailing list. It is for individuals working on porting Python, its third party modules and Zope stuff to FreeBSD. Individuals interested in following the technical discussion are also welcome.
User questions
This is the mailing list for questions about FreeBSD. Do not send "how to" questions to the technical lists unless the question is quite technical.
FreeBSD-specific Ruby discussions
This is a list for discussions related to the Ruby support on FreeBSD. This is a technical mailing list. It is for individuals working on Ruby ports, third party libraries and frameworks.
Individuals interested in the technical discussion are also welcome.
SCSI subsystem
This is the mailing list for people working on the SCSI subsystem for FreeBSD. This is a technical mailing list for which strictly technical content is expected.
Security issues
FreeBSD computer security issues (DES, Kerberos, known security holes and fixes, etc). This is a technical mailing list for which strictly technical discussion is expected. Note that this is not a question-and-answer list, but that contributions (BOTH question AND answer) to the FAQ are welcome.
Security Notifications
Notifications of FreeBSD security problems and fixes. This is not a discussion list. The discussion list is FreeBSD-security.
Using FreeBSD in embedded applications
This list discusses topics related to unusually small and embedded FreeBSD installations. This is a technical mailing list for which strictly technical content is expected.
This list has been obsoleted by freebsd-embedded. |
FreeBSD Development Snapshot Announcements
This list provides notifications about the availability of new FreeBSD development snapshots for the head/ and stable/ branches.
Discussions about the use of FreeBSD-STABLE
This is the mailing list for users of FreeBSD-STABLE. "STABLE" is the branch where development continues after a RELEASE, including bug fixes and new features. The ABI is kept stable for binary compatibility. It includes warnings about new features coming out in -STABLE that will affect the users, and instructions on steps that must be taken to remain -STABLE. Anyone running "STABLE" should subscribe to this list. This is a technical mailing list for which strictly technical content is expected.
C99 & POSIX Conformance
This is a forum for technical discussions related to FreeBSD Conformance to the C99 and the POSIX standards.
Teaching with FreeBSD
Non technical mailing list discussing teaching with FreeBSD.
Testing on FreeBSD
Technical mailing list discussing testing on FreeBSD, including ATF/Kyua, test build infrastructure, port tests to FreeBSD from other operating systems (NetBSD, …), etc.
Porting TeX and its applications to FreeBSD
This is a technical mailing list for discussions related to TeX and its applications on FreeBSD. It is for individuals actively working on porting TeX to FreeBSD, to bring up problems or discuss alternative solutions. Individuals interested in following the technical discussion are also welcome.
Maintenance of FreeBSD’s integrated toolchain
This is the mailing list for discussions related to the maintenance of the toolchain shipped with FreeBSD. This could include the state of Clang and GCC, but also pieces of software such as assemblers, linkers and debuggers.
Discussions of transport level network protocols in FreeBSD
The transport mailing list exists for the discussion of issues and designs around the transport level protocols in the FreeBSD network stack, including TCP, SCTP and UDP. Other networking topics, including driver specific and network protocol issues should be discussed on the FreeBSD networking mailing list.
Translating FreeBSD documents and programs
A discussion list where translators of FreeBSD documents from English into other languages can talk about translation methods and tools. New members are asked to introduce themselves and mention the languages they are interested in translating.
Discussing FreeBSD support for USB
This is a mailing list for technical discussions related to FreeBSD support for USB.
User Group Coordination List
This is the mailing list for the coordinators from each of the local area Users Groups to discuss matters with each other and a designated individual from the Core Team. This mail list should be limited to meeting synopsis and coordination of projects that span User Groups.
Discussion of various virtualization techniques supported by FreeBSD
A list to discuss the various virtualization techniques supported by FreeBSD. On one hand the focus will be on the implementation of the basic functionality as well as adding new features. On the other hand users will have a forum to ask for help in case of problems or to discuss their use cases.
FreeBSD Work-In-Progress Status
This mailing list can be used by developers to announce the creation and progress of FreeBSD related work. Messages will be moderated. It is suggested to send the message "To:" a more topical FreeBSD list and only "BCC:" this list. This way the WIP can also be discussed on the topical list, as no discussion is allowed on this list.
Look inside the archives for examples of suitable messages.
An editorial digest of the messages to this list might be posted to the FreeBSD website every few months as part of the Status Reports . Past reports are archived.
Discussions of 802.11 stack, tools device driver development
The FreeBSD-wireless list focuses on 802.11 stack (sys/net80211), device driver and tools development. This includes bugs, new features and maintenance.
Discussion of the FreeBSD port to Xen™ — implementation and usage
A list that focuses on the FreeBSD Xen™ port. The anticipated traffic level is small enough that it is intended as a forum for both technical discussions of the implementation and design details as well as administrative deployment issues.
XFCE
This is a forum for discussions related to bring the XFCE environment to FreeBSD. This is a technical mailing list. It is for individuals actively working on porting XFCE to FreeBSD, to bring up problems or discuss alternative solutions. Individuals interested in following the technical discussion are also welcome.
Zope
This is a forum for discussions related to bring the Zope environment to FreeBSD. This is a technical mailing list. It is for individuals actively working on porting Zope to FreeBSD, to bring up problems or discuss alternative solutions. Individuals interested in following the technical discussion are also welcome.
The FreeBSD mailing lists are filtered in multiple ways to avoid the distribution of spam, viruses, and other unwanted emails. The filtering actions described in this section do not include all those used to protect the mailing lists.
Only certain types of attachments are allowed on the mailing lists. All attachments with a MIME content type not found in the list below will be stripped before an email is distributed on the mailing lists.
application/octet-stream
application/pdf
application/pgp-signature
application/x-pkcs7-signature
message/rfc822
multipart/alternative
multipart/related
multipart/signed
text/html
text/plain
text/x-diff
text/x-patch
Some of the mailing lists might allow attachments of other MIME content types, but the above list should be applicable for most of the mailing lists. |
If an email contains both an HTML and a plain text version, the HTML version will be removed. If an email contains only an HTML version, it will be converted to plain text.
In addition to two FreeBSD specific newsgroups, there are many others in which FreeBSD is discussed or are otherwise relevant to FreeBSD users.
Central Servers, Armenia, Australia, Austria, Czech Republic, Denmark, Finland, France, Germany, Hong Kong, Ireland, Japan, Latvia, Lithuania, Netherlands, Norway, Russia, Slovenia, South Africa, Spain, Sweden, Switzerland, Taiwan, United Kingdom, United States of America.
(as of UTC)
Central Servers
Armenia
http://www.at.FreeBSD.org/ (IPv6)
Australia
Austria
http://www.at.FreeBSD.org/ (IPv6)
Czech Republic
http://www.cz.FreeBSD.org/ (IPv6)
Denmark
http://www.dk.FreeBSD.org/ (IPv6)
Finland
France
Germany
Hong Kong
Ireland
Japan
Latvia
Lithuania
Netherlands
Norway
Russia
http://www.ru.FreeBSD.org/ (IPv6)
Slovenia
South Africa
Spain
Sweden
Switzerland
http://www.ch.FreeBSD.org/ (IPv6)
http://www2.ch.FreeBSD.org/ (IPv6)
Taiwan
United Kingdom
United States of America
http://www5.us.FreeBSD.org/ (IPv6)
The OpenPGP keys of the FreeBSD.org officers are shown here. These keys can be used to verify a signature or send encrypted email to one of the officers. A full list of FreeBSD OpenPGP keys is available in the PGP Keys article. The complete keyring can be downloaded at pgpkeyring.txt.
<security-officer@FreeBSD.org>pub rsa4096/D9AD2A18057474CB 2022-12-11 [C] [expires: 2026-01-24]
Key fingerprint = 0BE3 3275 D74C 953C 79F8 1107 D9AD 2A18 0574 74CB
uid FreeBSD Security Officer <security-officer@freebsd.org>
sub rsa4096/6E58DE901F001AEF 2022-12-11 [S] [expires: 2025-01-15]
sub rsa4096/46DB26D62F6039B7 2022-12-11 [E] [expires: 2025-01-15]-----BEGIN PGP PUBLIC KEY BLOCK----- mQINBGOVdeUBEADHF5VGg1iPbACB+7lomX6aDytUf0k2k2Yc/Kp6lfYv7JKU+1nr TcNF7Gt1YkajPSeWRKNZw/X94g4w5TEOHbJ6QQWx9g+N7RjEq75actQ/r2N5zY4S ujfFTepbvgR55mLTxlxGKFBmNrfNbpHRyh4GwFRgPlxf5Jy9SB+0m54yFS4QlSd0 pIzO0CLkjHUFy/8S93oSK2zUkgok5gLWruBXom+8VC3OtBElkWswPkE1pKZvMQCv VyM+7BS+MCFXSdZczDZZoEzpQJGhUYFsdg0KqlLv6z1rP+HsgUYKTkRpcrumDQV0 MMuCE4ECU6nFDDTnbR8Wn3LF5oTt0GtwS0nWf+nZ1SFTDURcSPR4Lp/PKjuDAkOS P8BaruCNx1ItHSwcnXw0gS4+h8FjtWNZpsawtzjjgApcl+m9KP6dkBcbN+i1DHm6 NG6YQVtVWyN8aOKmoC/FEm1CWh1bv+ri9XOkF2EqT/ktbjbT1hFoFGBkS9/35y1G 3KKyWtwKcyF4OXcArl6sQwGgiYnZEG3sUMaGrwQovRtMf7le3cAYsMkXyiAnEufa deuabYLD8qp9L/eNo+9aZmhJqQg4EQb+ePH7bGPNDZ+M5oGUwReX857FoWaPhs4L dAKQ1YwASxdKKh8wnaamjIeZSGP5TCjurH7pADAIaB3/D+ZNl2a7od+C1wARAQAB tDdGcmVlQlNEIFNlY3VyaXR5IE9mZmljZXIgPHNlY3VyaXR5LW9mZmljZXJAZnJl ZWJzZC5vcmc+iQJSBBMBCgA8AhsBBAsJCAcEFQoJCAUWAgMBAAIeBQIXgBYhBAvj MnXXTJU8efgRB9mtKhgFdHTLBQJjlXeQBQkF3u+rAAoJENmtKhgFdHTLOVoQALS3 cj7rqYkHiV4zDYrgPEp9O1kAyGI8VdfGAMkDVTqr+wP4v/o7LIUrgwZl5qxesVFB VknFr0Wp5g9h0iAjasoI5sDd6tH2SmumhBHXFVdftzDQhrugxH6fWRhHs0SaFYCk Qt5nFbcpUfWgtQ35XTbsL8iENdYpjKXsSFQrJneGSwxIjWYTFn6ps/AI3gwR8+Bn OffEFdYugJ049O6Vu6YBFJHrnMO7NbF4v95dVYuLtpMIaXWM+V9KITmhaBzFz5fM Q7UOzcLlbxOYKNIWcp8QQk429mayKW5VUeUExUD1ZzBHn+P6ZG7QTMDu/RmBqiHo ewCMVz4n9uXT5BiOngE4CvS0WQwHzK+k9MLpG2u/Bo9+LT0Ceh9Ou1rfU5+0tRwl GyOFFjf3INS7I7gkcAwxQ7dzDItN/UQPZpg8y9mABU2x4enz0AvTnb61d/1dnTEr tdNgU433he0ZnD1HurZCjBEWC656wv6iMdWcD8gjhMbmEpPmjvXcYlTO6zhEygSM DiwdQCWK2W4++YJerA6ULBi3niNWBpofOFH8XylV56ruhjtHCo7+/3carcMoPOJv lVZ1zCKxLro3TRBT15JTFBGqblRyTopFK3PuxW//GTnZOtpQEOV6yL4RAXcWeC1d 1hb5k/YxUmRF6XsDNEH4b08T8ZO8dV3dAV43Wh1oiQEzBBABCAAdFiEEuyjUCzYO 7pNq7RVv5fe8y6O93fgFAmObXVYACgkQ5fe8y6O93fiBlwf/W8y1XXJIx1ZA3n6u f7aS70rbP9KFPr4U0dixwKE/gbtIQ9ckeNXrDDWz0v0NCz4qS+33IPiJg1WcY3vR W90e7QgAueCo5TdZPImPbCs42vadpa5byMXS4Pw+xyT+d/yp2oLKYbj3En4bg1GM w71DezIjvV+e01UR++u1t9yZ8LOWM5Kumz1zyQLZDZ8qIKt1bBfpa+E0cEqtNQWu iGhQE3AHI8eWV+jBkg5y2zHRIevbWb1UPsj43lgkFtAGHk9rrM8Rmgr4AXr531iD srBwauKZ/MElcF3MINuLH+gkPPaFHw/YIpLRLaZXZVsw3Xi1RNXI2n2ea29dvs/C Lcf1vYkCMwQQAQgAHRYhBPwOh4rlr+eIAo1jVdOXkvSep+XCBQJjm14FAAoJENOX kvSep+XC0DcP/1ZB7k9p1T+9QbbZZE1PJiHby3815ccH3XKexbNmmakHIn3L6Cet F891Kqt9ssbhFRMNtyZ/k/8y8Hv5bKxVep5/HMyK+8aqfDFN0WMrqZh0/CiR6DJh gnAmPNw/hAVHMHaYGII9kCrFfPFJ02FKoc81g9F08odb7TV+UlvRjkErhRxF+dGS wQoO0RCbf0Z1cs7nd0Vb2z4IJh4XMxBjWc/uQ2Q9dH/0uRzwpAnR4YX+MG5YrX7Z zBvDyR0r76iQwRSDKgioNgkr6R3rq1NZGdaj+8b0LzdOqtzKJ/eupDe3+H67e/EN qymtreGjrubpiU9bKvYArisUqhE5KtguryvR6Qz9bj87nPg33DT3WWGVrwFRxBox dbWzjQFv0wug8m4GAwVF7fPR5/eW7IHw8zvgn0vSPcZz7MZ4e6Y5jN4kA5/xWJYZ Sps54qQWB+FA30unIXN68KqdIzONIbtaY3W4/JjJUCm4T+wEjKaH+wJX8w1DMjlg mkTmGh/UrTyC1vXbPgk9Sy3cRTICR1T9z7W8UlmTtnKrUklrjlFR7SXzrEXzLGOX Fm+NEHpHNXqzcm6c3QfzY/yQ9HSAQ/t7SUQ9caRePbDz3/msyPxtGFor9roQv6VN wRXCyRgkH4Y5tPhJAQ8G/FxX+VXFb93QL0lfelb23/BBu6cUwW63SRn5uQINBGOV dskBEADqo8z6TFAhrvHhJV5wHdj67guoYvpXP8gvdCqos8SLluqi0AWgJEwlqu7L mKQ6qMoJ+2DN6y+dEtvOVgBAgF63LLf3FQKq9FB/3uqeIiQlCIl3H43f8KttEZzf /lbry4Y6QhS2OXM31Ut9Q+1IfTGwvs1E8/J1U4jQrAGqNKknXyQyMweJ0jvvcSLJ nv3S7COUJVOT3cTgVeh3RIQlFzqK2rSQmygDpS8bT8MjCsZr+KGezKpbddKXio4a QW/e6nCMyYR8bo0GQ9DpsyAOsaENnkghncQhA7GdPZK9xLMNQMCp0OdcZlqRVjRZ OutuzNW6PPoczs/NQq02YWK4BPtSV7+ldS9gPZTLIpnRNQRzcnA0vnQTqSAfasVw sAGm+MpH7zcaMf2Tw1K08u7+5gyObgzUzQmGLCgo9VIncnDis0s4gfTmtrr5jCeV 7LYDQX+2fApMtXbVXeKJem1PS+Z6LPbW2HklxYuG5nFgewCYlQjKujfiwW1Clhi4 JQeE1Naobbaar99V/VeoHrOYAEWP0bkUyrFcocLJ+0g3KpjSkctIptgGGpMBKe4U 9O7pWoTki8Yz/uYQn/p0iZcG8SfKM8I4283jdsi5SUiNNJJZCBQTVA7d8MxUVv5+ qpX/v5XqYM3pHza2DLXzwfAE9O2dgN1OMZYIld+OnWcpm2PxIwARAQABiQRyBBgB CgAmFiEEC+MydddMlTx5+BEH2a0qGAV0dMsFAmOVdskCGwIFCQICKQACQAkQ2a0q GAV0dMvBdCAEGQEKAB0WIQS2FSd+gQh991yBgztuWN6QHwAa7wUCY5V2yQAKCRBu WN6QHwAa77gbEADpUBT14cesITuMsOWYsyEtNmB4UlTFWCktk/YzyCotasZxIhMP Xih9G1tDo9ExIWT8jNjSSA+w0Viua/PirDLvI8JtX1JiK3nwMenwlXwlkRAk9TJW y944YegHF/5ytntwZ/L4BMYc3MztyZbw+sDwnNBZKYmO8gwfYobtfoGxOR4Onb37 bbUVw62xHQIn2zafSmMQ4oMXZTm9EteIYwgcrC1h+Urv5IXCJZHrqmXCPE5g5XZ1 G9jqkwlaRYWjcLD0qxwc5m9LNrF6OBS9N6S7DncIYt9VupI5OCr1uRSqzqaBMFDC lTTH+dAx3b6J1KFB0UiHP3FeTalFh8L3NE+dN9apNAgkUWv/v4oo/6dkRu3NZse2 RAo/o2X5r40qk/lhydQRZTSTFsiuH3VUWVsgmqAHnHW7pMMw8FAlKhyRSFnhbW7r e0jj8XMIO7G5yjQKQCnYuPdXbx++bP1PzsEWDv9j/sph5arcosdo6tEXklWHED17 MEPIton1+NRfsU0peEVggQXlwdTcZN/h7FeCZ56dcwCWdCpSlv6CcWzRXSNUyJpK a9qfIqBX/monjy7w5IHmhvLwAYI6IoT11h1QDEfGfhrwWPwOjnXsaYm5E7wv8w69 PxMbOJbMpWSg8L7xW3LXKR1VwXggUC1+b3y67E5Ggi1hf0lfTnTMpL2ClO2QD/oC hMIafhzxbjh2WzgYahVHZH3gpHc1/0Bnc07s9+Pa6EYYM9r0XzezLW7bswOjVloR FreQ3FIF/2OSN0OGdm7dyYl0OliTIDDDlwK/l8bcckUcpHNR1dw0P3KvDlmLmzZy G4HmzzSBa9jiFirEfcg2rnGc6Zi382jGVALuYVplPXyMOUiChp0AAQZzTIYpXw/g pBE6em2k740yuK6WqG4yXXgk67FoH10TQvMd4Q73K4zw+9DMpThlUHcfBmAoViZw il7C0xl+ysHX8ZI3JU8s1r3XAnpqdHi4Wpixm/ctXbVnTSA3FQr2SctJYqR1VHRW GMW+Ii2SQDS+t9bZTzOgAPLDtfy+JqhBpwCB1a1EHftkJEojpfZipaYGkf3yc+vN wUeUHp/csF9CT7Qbqaj1t7fVWzv7jcVKpRwngIT4vTSzqbo6WC34FuUAH0t7tJ5K eZ625AqEFLmtqtDo+ydJhZrVrXBNXPfkx5hSVW/I9hvckMNwA3t0KfQC2sz+Z1Q1 a4vDWQYRytfyrgZkWGbXMn6l1JyqIolgJZuax2kYs7Vu3t8KptqCbv0ZBAGoMm7r RLgVodhI9voA8YxCirSChrueJYn+JKk8MIyk3DdXpBoocMIAjFJAUgXjV5NQpZMy xR8BEiQnBcHRIKVWEEyhbLtHpmCEsnKNyKVGoxs31IkEcgQYAQoAJgIbAhYhBAvj MnXXTJU8efgRB9mtKhgFdHTLBQJlhctvBQkD8n2mAkDBdCAEGQEKAB0WIQS2FSd+ gQh991yBgztuWN6QHwAa7wUCY5V2yQAKCRBuWN6QHwAa77gbEADpUBT14cesITuM sOWYsyEtNmB4UlTFWCktk/YzyCotasZxIhMPXih9G1tDo9ExIWT8jNjSSA+w0Viu a/PirDLvI8JtX1JiK3nwMenwlXwlkRAk9TJWy944YegHF/5ytntwZ/L4BMYc3Mzt yZbw+sDwnNBZKYmO8gwfYobtfoGxOR4Onb37bbUVw62xHQIn2zafSmMQ4oMXZTm9 EteIYwgcrC1h+Urv5IXCJZHrqmXCPE5g5XZ1G9jqkwlaRYWjcLD0qxwc5m9LNrF6 OBS9N6S7DncIYt9VupI5OCr1uRSqzqaBMFDClTTH+dAx3b6J1KFB0UiHP3FeTalF h8L3NE+dN9apNAgkUWv/v4oo/6dkRu3NZse2RAo/o2X5r40qk/lhydQRZTSTFsiu H3VUWVsgmqAHnHW7pMMw8FAlKhyRSFnhbW7re0jj8XMIO7G5yjQKQCnYuPdXbx++ bP1PzsEWDv9j/sph5arcosdo6tEXklWHED17MEPIton1+NRfsU0peEVggQXlwdTc ZN/h7FeCZ56dcwCWdCpSlv6CcWzRXSNUyJpKa9qfIqBX/monjy7w5IHmhvLwAYI6 IoT11h1QDEfGfhrwWPwOjnXsaYm5E7wv8w69PxMbOJbMpWSg8L7xW3LXKR1VwXgg UC1+b3y67E5Ggi1hf0lfTnTMpL2ClAkQ2a0qGAV0dMsjqhAAorQ725G342raJ+os 6+E/EFNsr4SR5H+AeinlQ2ymNSeO/ODsV6dmyYD3hed0mAXvIJt2B46fFC4eAP9f VOIbMMhPMpnJuZyLPDi8gXcZLgWSRhJ88R98KIsmKlh+/fdZM4RI1JLjICi7kyNR 4jtKCzLj0DYVBzp1mn0lTwtFzv7SC9djpqFLnO5YoGPWfQHHhY02Trh2posRwAHO oacXSFvsoQv6k6XNlStJ4lnrkH6t+Od4kU3/TJ0eQXs7Zd2WEVnMe1IhbihsGcAY mzZzZlLOhskHCeVE2taHiXC6h4tC3/69I16N8ICauxGY41clPhiNmVaAzmkunOPz ry5utl6HkpZ5/3UMVHI1JIvsfJW+vSMUhdcQILAv6DbRWWHeax3ZZ6iAVGCtJS7U glwZM1Xor0okGtIS+aJ/Cw7tZ8Nm18lutcrf2MVW+BWpzMQKnWFQYTn1NEWjzYnx 9Na22+E8AvW02TdS0NSiP0sG/0q7lBNEck9vH4WEbbEXktj51Dg4ISUhQyW8BWwW X+kSiNeqtcaikUb8SFj5vpTDotTSzikfT/jisvR5goTMNFCVHFZdXCdsbUZd8Iub egAOh6Db/06y3mFYDEfcGJipab400OY03a2xw9Vz+YxrKfELCTBo2tZv+3K8kXgq XFcbyJnkXmjnYM/sw5kKqtzuc7i5Ag0EY5V3BwEQAMpFVczZo9ZPNsgW791UW5o6 wnrnd1nIO+S4rc37q2TEz8KGHCuxo5NwffZ2t6Ln04BI54pbapg17b7a0hPka37H FkL28n4VyMdx0CsAm3QEfUsdK6xwKV2SucYeVcrV1upcN4PdXD7su1I7/A4CWXFJ G047zJ0Z89lJZiQEiAq7ghvEoinC0sm+0a6ao/ocqCgWCKM1yCPOyzJXleRrv29S RnYziMR+q2U0x9xg9Xl6GMwUmFwbJc9nORVvLH7fbU6/du8EgoAYrglFOFZG/TSo lSGWRSMiavz0JSD/i+rEN4aIT4WfBe+L9Wy1AmrNxiAO+zKmzHQu3JSxDncr+y+h cd+W0gqw10FoI9jWLcL7kR+6a0iOjuJSXSopq2l3DafiPxtCFmr4CGQhzBHM6e4/ v/NNd3F0XpVbJ6RQph7lkfvfz8q2lvUlHhezJ0p1xXmhff9CHjdVMhmAmz5+imBA Xk2mottNfKb0pFEen1xY3K/UPA4g+oPsSj495MsvIg9eIMCcC3/z0SEUMWH/styy JzPqfpyfGwZeTcIj9vg2o+RnGvmcLVYA/EGToPk905kv/cK73oy8bZyOB0zMg7T9 PaWgLUO0sqjqo0Mw3knFySg3oRXlcilPQvfPdX0JvwLpc9DWlr1+1GkCXJ08lWug Jc96CJQupKRb1IbC0oUXABEBAAGJAjwEGAEKACYWIQQL4zJ110yVPHn4EQfZrSoY BXR0ywUCY5V3BwIbDAUJAgIpAAAKCRDZrSoYBXR0ywwtD/wIDmEcHdFlyFRTomUB jbeK2uzcZIhkkgL58lc63UPle5iJ2FBvmYS+0rQS53sVEsccn5KfkOwTryKllvWb l0IzuiqfawxALcfWpfZJHzTMSnDHfgXvOOyFMQruqRDAHAr7PNC0CnbT0sEF2ZFz ad8M9fLqtkXUx4mgECNGJ4CVqg75KY8uUzv/BmRwEf587FT5/iAIed5MjFB2VFDX 9GABcvTTbHxCZIxnxl3cs15SxT0lAofZ2ueU6kWYWZSXFeaEM/4ymPJws2mmV0Ak bJghLXCn9Mx3nX6NTZZ9Harbru+RzW3/Hg3DZd0J9vko8PafP0l1NWtgyX74CqvT gjzTxXTnqrRXzcczK7fhcC2u4i0prPtXXcyyi7SwpoLikaZCLFFhUmOx+mS5Tjtg FyFZBNxnO7iAwkzfcTcC9sPoWaFmiQf6q5EIYzG+WQpncj80mxl3HWOP6oFj/hZJ RYseKeMkvJzLTo87rFdM6CsMrLwETR6e+aWM0btPFil1rXVACNOjsy0bxTV8OJEf yxnYmyjvnBvB0kdiaVEDdVhxgSqzLAX4mgXa49/V6M/uzMr+n3/A1Jdk4V6fVm8S 5cFIXxoUat3cB4xGaT9OWD3o1NPr6eS9Vo0EsJlRl81SG68fS+Qtk2fX27T68YG4 Aa3zMfZxUsVuFLtTuQbRC+fJpIkCPAQYAQoAJgIbDBYhBAvjMnXXTJU8efgRB9mt KhgFdHTLBQJlhcuqBQkD8n1oAAoJENmtKhgFdHTLoO0QAJsTE9fkleb7YzPEuP9G J3jx8PGdWm7n+8UNdr24kS6gOXVUfPZrWa5So21hcIwZb4PZDqHSVSQnRciKhSnG 7gplYPNGZ4+FWbLr/mBRYarjkVFLUuCPexSIjxV1KSGJnWs9YTVAKZAz75GpCML6 jD6biCOQCQ86wqOdWvZIZR8YvurrxR64ABB0rjbsaG8cNOUX1cwAfdLwthf64dS+ 2m3lqNGDHkP5eNL0RIxC5gXYEp0lvmlMH3ZuO5WrfH73PTDg89bxXeuhrFmSEwf4 xWm603oi8/2qQvR9/7jb0o+t71NQuWrWIFONZWWgZBUGso+uyT3XgY4YqKGR3z2Q zKHYnJ6M7SvSYpqS7RtcxcCXF0HGNfES8cAgtKVpFtbtSwXXp8O8oLyjmVIO/NjU pbLOGdFIsarsezLFV9f2fqZ63J34hyUSg8LrYVV1fA5DJUpebbX4hLpdk0MMtgG4 3BwKIGlJTpL5RkQ/uQU3YW2kairy7o+1imDD0TRzQxtdjVOI5vnlTNcfJZIIfLx4 drABA12OvpX3dfPV62R+8BAlJFT430CG6AISJIBqJRFvuikmnZGUvEHmOUs/FLbb aXTPkKc7tR2WIwljRvMV+Qk84cWcX6YchMslMuiDM1mtlQZig34WHGSE+zCWnXAs lIHlSwox7qfdO0Kz2XncSbIA =QvUh -----END PGP PUBLIC KEY BLOCK-----
<core-secretary@FreeBSD.org>pub rsa4096/4D632518C3546B05 2024-02-17 [SC] [expires: 2025-02-16]
Key fingerprint = 1A23 6A92 528D 00DD 7965 76FE 4D63 2518 C354 6B05
uid FreeBSD Core Team Secretary <core-secretary@FreeBSD.org>
sub rsa4096/CABFDE12CA516ED2 2024-02-17 [E] [expires: 2025-02-16]-----BEGIN PGP PUBLIC KEY BLOCK----- mQINBGXQ1o8BEAC+Rcg8cmVxuP17Vu+q5KgCx/XiulQuqKXAqqBlYCH2jqk6DINP yFrREGBhzd/qNmlAYEahQ4Zgl0bUZNTrZVDyzicOvPP0jH+KSTQwRs7NOawEdlVO cyHrwDCPEqf5ZzD4NhfTriEOw+j0pEH/onitUGvoQRtx15xWyaJQxDEBMTYMLewE 86D1bltwnTNczE3UZb7oQLJXkAX5hcLtou70XJGgZITvJkK+kp/xot2eFjnqRz/u WeXnKhYAmC07EKwZ1uw047eHKwMMRBYqzApLwoQtfE430Kxf2q8de64x8zDbi6YM 1J4r8OAxOtHVyfJ0j7Q23DEZz0VVb4b1Tx5OG2Re/KSNvqI0awJO4TcRmOR88OyY dzyXgnX6Sa7GVQY1FXvn7vtFuDAt7egZOzeomSHL9bdX07LTQ4UtM88EV9wm3q4q smoatV9jsvPQ1zxCU3aQD/5eWTJH2/kz1LIuBL/Qi5XQpJn91lBtUWJrCgkHWPGu f//rnnXmsG7DAChW+yZ7cFO8lfNa8sFhPqSxCYphWmJTrvadyQtDngB8JakWdnmK pfGS6y5lel+181vw38ZZKt04AKM+nDY8051lBM7Q9Q6kTLI33UZeImndx5xYukVD kV6aQ31HYfEark15c7iEz+OAcwFnM2ntXMt7kKGd40CqzusiPcQkPqPbAQARAQAB tDhGcmVlQlNEIENvcmUgVGVhbSBTZWNyZXRhcnkgPGNvcmUtc2VjcmV0YXJ5QEZy ZWVCU0Qub3JnPokCVwQTAQoAQRYhBBojapJSjQDdeWV2/k1jJRjDVGsFBQJl0NaP AhsDBQkB4TOACAsJDQgMBwsDBRUKCQgLBRYDAgEAAh4FAheAAAoJEE1jJRjDVGsF nacP/3PSg8JPmWoBfWrgT287NZ7OAU16/uGpDxlBUoVeEtkEDqZVW8yBFzrMhbwj bJs3CZ+L85HMUDLZoxSwVnPM8PLVRzHTybYV7agYYzMox5C/jp2aeAgy9KYVd0Tk 07GMTYrSh4fhHWpxXz7IBOxk0RXvQxTHlg1u0DASkibYb2UTDcUNG5Q9kP/8jaIZ kVDX8a5LDdOCgWaYdKPg4blv/UMjkegJz+Ayp7gXTcux6koW5F6ysSw9sgLBWb2D b/KNIi4MBMe46xyXB/dqGAR4ibrUXTcQ4OAZNq1L6uWG1A49XuSgykdIwr00MzQw wfVpKT31ww4ayVHLgj7NuqPlab9S5/fPfJ4MAvGE4GqWQFgsPKgKImUMgnnxTGpv l7Dqk2MnWqn+wEi0bRES0PVBG96G+sZJQeaxBhoB+HwUSFqoZQg166AJIl//4t2w bx0a1aWQSS0DZt3wsQW3NW9AE6L+FnFfIc2pQVoLjmvcGalDuvnemRmEOgotiZmt 32bi2aWxg0/Qio2rjLS2LpV+fhwDSN3Agvtnu53yUdD1TFFjTSMloM4SKhiXoPbI XgfCLiBLNMsZL0AvO7wQfSePzPYxDLyEcwsfPJ8be+eGG1L62RUyad+MdfyXMH/S m0sgqW/MW6Nv10RyPQOq3Jbgmp2laRMzKTOvQt5WwQf2FEl9uQINBGXQ1o8BEAC9 1cBYn6Z0QmM0OFWdXQI6fMOeNokaa6ngPgt7bzW5NjryqTdwyHOPZdm4DWf1SO/0 +fJRCqxbICyuMAFrb9fDle8bodALjm5ZquTL3D61HpZD4+RwOzOjYP6wLm7h38HT /yIyK882Ovlw4Xz/TeSiL/VUSWE9twW7yz3oreCeLUBAfzacS9y+syO+aquEd0/x JBz+mPQbrqfS64rCZXMZEivgsjkQoE6RM+n1rF4kw4Eu3E2kPevVwsoAaY+MEUM8 JAXaJMaNcLIhbeMy7dO/z6z2I3h5bUw5KxfVwzYSzSeRpYh53dNaB4NY+f5/vTrL 4dZmqBcLgcV0zZ02dj/u0SiwWlUFUpFGuSiW16DN7+2zG1zOWi7Nl44JawM62Tlf mO8zruVGEHaV3e8fFwBLRKM0Sc7e3aLECISsfYeC5ZbRRbpQ1KX+VQr3FBKAMzG4 l9Go7vZ+UcLKpQx2rVPTJt1vDnRV49X6CF2Q/lV9iafQ4MTy6ACdAloT1yfH/lhU iWQo1qDyRCSlmNBDsYl8gLrwMp4gGQAv3imZHxnJF5ru3nUYGG0U08D5mf2sWv5P Wh7By8Jm8bmaP8cUF86lO9BJXh2d9QN5jqrAtXqYzenZ+ABSoL1XrD/yv3270rH7 H4gAUtgP+vJ3uMyRu9055OC+ie/b613NojCW5nYN2QARAQABiQI8BBgBCgAmFiEE GiNqklKNAN15ZXb+TWMlGMNUawUFAmXQ1o8CGwwFCQHhM4AACgkQTWMlGMNUawXh 7w/+KjbEWTwAhjm2HJ3w4tXtPC5URg+A+BzYYVH/q0+956c1QeD0LYafHBw4LEMI lhRvHQnmzwjtY8v/DgmLOVDMiMWVHo0Q2iQyMvOT1WyEPcgOTJLhvyVzDqRZx7AS B4G8uNVkKAdBZ7OSXAP27lR/2SEoG05esw8b7Y39pVtucC3aeiua+19PLJWadBjj XuvXuSCho0km+nk4IgadYmxIDyiMeyKZ8wCl7CJkzECm83q2OtNsMe3k8lgEXybt KlQxnYApZmhqLMV5ob8WOk3AgAVsif1m332CiEIb1Sfx6wt3nXy/410CXdDDucuj ndJVfJ6Un33tn0irZ5scPA2HmzK1PGMfgOGtkM8B3LE/x8kEKeWKb3l9boB32Unm iTfKgEna+JISEab3bzOPWdCQFB8LyGXuWlhtvqmRoX8GtiMRy/F4mzh+l3lYHjj3 4EvPVyippO5zwU+S9HElJ2G37K6zrOmd5cGBrw4aBDoO70QVrMN4O86uvC9kChDb qyFF5UgXg29QxJjiSCv98ksDMqpJ5AFYrmrsBtwU64OANrxxJ4AZLQ1apYmG9RWD VHZgfeI60FNBLfKwix9UffFT7piQ/MLrjSde8gPH5S6ezBMrYpfGEopaI9A5qXe3 LnHz88gfdmaBM77YDZM/p23nmCrUxlE3kkbgjTY8NRjYyF8= =MkAH -----END PGP PUBLIC KEY BLOCK-----
<portmgr-secretary@FreeBSD.org>pub ed25519/E3C401F60D709D59 2023-03-06 [SC] [expires: 2027-03-05]
Key fingerprint = BED4 A1D3 6555 B681 2E9F ABDA E3C4 01F6 0D70 9D59
uid FreeBSD Ports Management Team Secretary <portmgr-secretary@FreeBSD.org>
sub cv25519/2C92B55E27A641C3 2023-03-06 [E] [expires: 2027-03-05]-----BEGIN PGP PUBLIC KEY BLOCK----- mDMEZAXJvxYJKwYBBAHaRw8BAQdASFAC20WL3R1T6uNyGMZbfJCxDkcP4C5vi3Op tcZ2fbq0R0ZyZWVCU0QgUG9ydHMgTWFuYWdlbWVudCBUZWFtIFNlY3JldGFyeSA8 cG9ydG1nci1zZWNyZXRhcnlARnJlZUJTRC5vcmc+iJYEExYKAD4WIQS+1KHTZVW2 gS6fq9rjxAH2DXCdWQUCZAXJvwIbAwUJB4TOAAULCQgHAwUVCgkICwUWAwIBAAIe BQIXgAAKCRDjxAH2DXCdWYN1AP43TjyfZtZ3DLYT++g0+SuPsoO/3yWVybA+UmFL zb8MngEA+LLNUfvEwCuXS/soh+ww5bpfmi3UUmeGiQEAXug3iA+JATMEEAEKAB0W IQT7N0XIbxXo7ayBMvzYKU7Du8TX1QUCZAXLkwAKCRDYKU7Du8TX1XHMB/9R1MX4 6zMgpKqPPt76GOI+eGEdBK6bY8aJZjQGdqTh9f6VtXVoTGIG7cvhc9X8tDBoB0PT 2KZWheF51AV1+NHU4HwLAQ1BMebrFvWSfkw4xg4fBGwDhz9/GN85No+Js772V5ey 8lRiL6meRVWxMlLyWcxGd8JjcC5yX/iAUQ3SBGCLqW7unWjjg7CTd+AMBwcqPGrv ax8q6eFVguJcHJAjMnKf6HAy4cpK3s+uMoUBCGnszSN12B3ysKfyC4pNO/pix5tA Q5v8aRqTeFPh5zmNhWo0KGPzplTPqRQSHDl7GDQC8Ru3MhzFkeWzHsexjZVwS6W2 DPcYpuuAsA0XOZIZiQIzBBABCgAdFiEEEBpxaxYrAOVb7eoFrbv4YQo3ibcFAmQF 0u0ACgkQrbv4YQo3ibccwg/9F2Xuic3nhKxRbB3mJeDo6SYQETa/Gh1qQ34+8zlt 8UMazOx67gnYQfy+pXjro6eQ2up0a4eUYezcNOudqAQD21nRz3HA6EQVNcE/TzEA xl5CJntTaLOt7S+EDXFW5BuQIvhhoMGgm8+WNVgA0EJ7tfL0OcYBSvr19fqwChEn 9c14cSk6mgHSsleP5NvskYN053pxHwy0LTSb8YBBv52th37t/CRFC1363rS5q+D7 JixFopd1O5pKpA5ipvE4gGgRjPtwjx0SjjepwK/3fuhEJQQyKzTIKlMfu2Dj/iR2 Li1Sfccau5LQXOj9fUITU3u1YG7yrm8VGzT7ao4d+KRwgMLjd2pLqiGIbbJwGBiP FRmtilWQoeIlmSlFX4obAA517DOK0pW1mH8+eEn4EJd3SekT3yzFyKTASv0J48Z8 3F928xg+eZvHxVC0t1J+J5IG0gt3EEncuWKIPQGR7PiQbti6R3FQVTz6WfMWOebP Qi0E9F/Aqakr6Vj2sKGrDq+ebpaF5G8Yw1YrUl2IDiPzkCegp3ZbI0wh11Xvzhi8 LXPQGK4jBQas4G8cegfitzmtdGRHYrbMv0R9I4mvaL+WlOuD2AvyVG28lguqVhnN AZP+ohdquYyX2CNCVvbKWAtXo6Ur0vWG8BL8m6defAtEkIwVBALaOHQOSI3aNUz4 lwy4OARkBcm/EgorBgEEAZdVAQUBAQdAsefmSfxEOdOr02+K/6noYCuJ1FeAWVz6 jFYQ+9w6jggDAQgHiH4EGBYKACYWIQS+1KHTZVW2gS6fq9rjxAH2DXCdWQUCZAXJ vwIbDAUJB4TOAAAKCRDjxAH2DXCdWRl4AP9h5ot212BK29S6ZcMBhHvmtF5PG1oD c7LnZycSRmbFiwEAndCMpAGOhDW8iVgDd0wLQq/ZMPe+xccfG1b3zFH2EgE= =iiAT -----END PGP PUBLIC KEY BLOCK-----
<doceng-secretary@FreeBSD.org>pub rsa2048/E1C03580AEB45E58 2019-10-31 [SC] [expires: 2022-10-30]
Key fingerprint = F24D 7B32 B864 625E 5541 A0E4 E1C0 3580 AEB4 5E58
uid FreeBSD Doceng Team Secretary <doceng-secretary@freebsd.org>
sub rsa2048/9EA8D713509472FC 2019-10-31 [E] [expires: 2022-10-30]-----BEGIN PGP PUBLIC KEY BLOCK----- mQENBF27FFcBCADeoSsIgyQUY8vREwkTikwFFlNg31MVy5s/Nq1cNK1PRfRMnprS yfB62KqbYuz16bmQKaA9zHN4FGfiTvR6tl66LVHm1s/5HPiLv8sP14GsruLro9zN v72dO7a9i68bMw+jarPOnu9dGiDFEI0dACOkdCGEYKEUapQeNpmWRrQ46BeXyFwF JcNx76bJJUkwk6fWC0W63D762e6lCEX6ndoaPjjLBnFvtx13heNGUc8RukBwe2mA U5pSGHj47J05bdWiRSwZaXa8PcW+20zTWaP755w7zWe4h60GANY7OsT9nuOqsioJ QonxTrJuZweKRV8fNQ1EfDws3HZr7/7iXvO3ABEBAAG0PEZyZWVCU0QgRG9jZW5n IFRlYW0gU2VjcmV0YXJ5IDxkb2Nlbmctc2VjcmV0YXJ5QGZyZWVic2Qub3JnPokB VAQTAQoAPhYhBPJNezK4ZGJeVUGg5OHANYCutF5YBQJduxRXAhsDBQkFo5qABQsJ CAcDBRUKCQgLBRYDAgEAAh4BAheAAAoJEOHANYCutF5YB2IIALw+EPYmOz9qlqIn oTFmk/5MrcdzC5iLEfxubbF6TopDWsWPiOh5mAuvfEmROSGf6ctvdYe9UtQV3VNY KeeyskeFrIBOFo2KG/dFqKPAWef6IfhbW3HWDWo5uOBg01jHzQ/pB1n6SMKiXfsM idL9wN+UQKxF3Y7S/bVrZTV0isRUolO9+8kQeSYT/NMojVM0H2fWrTP/TaNEW4fY JBDAl5hsktzdl8sdbNqdC0GiX3xb4GvgVzGGQELagsxjfuXk6PfOyn6Wx2d+yRcI FrKojmhihBp5VGFQkntBIXQkaW0xhW+WBGxwXdaAl0drQlZ3W+edgdOl705x73kf Uw3Fh2a5AQ0EXbsUVwEIANEPAsltM4vFj2pi5xEuHEcZIrIX/ZJhoaBtZkqvkB+H 4pu3/eQHK5hg0Dw12ugffPMz8mi57iGNI9TXd8ZYMJxAdvEZSDHCKZTX9G+FcxWa /AzKNiG25uSISzz7rMB/lV1gofCdGtpHFRFTiNxFcoacugTdlYDiscgJZMJSg/hC GXBdEKXR5WRAgAGandcL8llCToOt1lZEOkd5vJM861w6evgDhAZ2HGhRuG8/NDxG r4UtlnYGUCFof/Q4oPNbDJzmZXF+8OQyTNcEpVD3leEOWG1Uv5XWS2XKVHcHZZ++ ISo/B5Q6Oi3SJFCVV9f+g09YF+PgfP/mVMBgif2fT20AEQEAAYkBPAQYAQoAJhYh BPJNezK4ZGJeVUGg5OHANYCutF5YBQJduxRXAhsMBQkFo5qAAAoJEOHANYCutF5Y kecIAMTh2VHQqjXHTszQMsy3NjiTVVITI3z+pzY0u2EYmLytXQ2pZMzLHMcklmub 5po0X4EvL6bZiJcLMI2mSrOs0Gp8P3hyMI40IkqoLMp7VA2LFlPgIJ7K5W4oVwf8 khY6lw7qg2l69APm/MM3xAyiL4p6MU8tpvWg5AncZ6lxyy27rxVflzEtCrKQuG/a oVaOlMjH3uxvOK6IIxlhvWD0nKs/e2h2HIAZ+ILE6ytS5ZEg2GXuigoQZdEnv71L xyvE9JANwGZLkDxnS5pgN2ikfkQYlFpJEkrNTQleCOHIIIp8vgJngEaP51xOIbQM CiG/y3cmKQ/ZfH7BBvlZVtZKQsI= =MQKT -----END PGP PUBLIC KEY BLOCK-----
最後修改於: December 8, 2023 由 Ruey-Cherng Yu