
% cc foobar.cFreeBSD Developers' Handbook
Copyright © 1995-2023 The FreeBSD Documentation Project
trademarks
FreeBSD is a registered trademark of the FreeBSD Foundation.
IBM, AIX, OS/2, PowerPC, PS/2, S/390, and ThinkPad are trademarks of International Business Machines Corporation in the United States, other countries, or both.
IEEE, POSIX, and 802 are registered trademarks of Institute of Electrical and Electronics Engineers, Inc. in the United States.
Apple, AirPort, FireWire, iMac, iPhone, iPad, Mac, Macintosh, Mac OS, Quicktime, and TrueType are trademarks of Apple Inc., registered in the U.S. and other countries.
Intel, Celeron, Centrino, Core, EtherExpress, i386, i486, Itanium, Pentium, and Xeon are trademarks or registered trademarks of Intel Corporation or its subsidiaries in the United States and other countries.
Linux is a registered trademark of Linus Torvalds.
Microsoft, IntelliMouse, MS-DOS, Outlook, Windows, Windows Media and Windows NT are either registered trademarks or trademarks of Microsoft Corporation in the United States and/or other countries.
Motif, OSF/1, and UNIX are registered trademarks and IT DialTone and The Open Group are trademarks of The Open Group in the United States and other countries.
Sun, Sun Microsystems, Java, Java Virtual Machine, JDK, JRE, JSP, JVM, Netra, OpenJDK, Solaris, StarOffice, SunOS and VirtualBox are trademarks or registered trademarks of Sun Microsystems, Inc. in the United States and other countries.
Many of the designations used by manufacturers and sellers to distinguish their products are claimed as trademarks. Where those designations appear in this document, and the FreeBSD Project was aware of the trademark claim, the designations have been followed by the “™” or the “®” symbol.
Table of Contents
[ Split HTML / Single HTML ]
Abstract
Welcome to the Developers' Handbook. This manual is a work in progress and is the work of many individuals. Many sections do not yet exist and some of those that do exist need to be updated. If you are interested in helping with this project, send email to the FreeBSD documentation project mailing list.
The latest version of this document is always available from the FreeBSD World Wide Web server. It may also be downloaded in a variety of formats and compression options from the FreeBSD download server or one of the numerous mirror sites.
Part I: Basics
Chapter 1. Introduction
1.1. Developing on FreeBSD
So here we are. System all installed and you are ready to start programming. But where to start? What does FreeBSD provide? What can it do for me, as a programmer?
These are some questions which this chapter tries to answer. Of course, programming has different levels of proficiency like any other trade. For some it is a hobby, for others it is their profession. The information in this chapter might be aimed toward the beginning programmer; indeed, it could serve useful for the programmer unfamiliar with the FreeBSD platform.
1.2. The BSD Vision
To produce the best UNIX® like operating system package possible, with due respect to the original software tools ideology as well as usability, performance and stability.
1.3. Architectural Guidelines
Our ideology can be described by the following guidelines
Do not add new functionality unless an implementor cannot complete a real application without it.
It is as important to decide what a system is not as to decide what it is. Do not serve all the world’s needs; rather, make the system extensible so that additional needs can be met in an upwardly compatible fashion.
The only thing worse than generalizing from one example is generalizing from no examples at all.
If a problem is not completely understood, it is probably best to provide no solution at all.
If you can get 90 percent of the desired effect for 10 percent of the work, use the simpler solution.
Isolate complexity as much as possible.
Provide mechanism, rather than policy. In particular, place user interface policy in the client’s hands.
From Scheifler & Gettys: "X Window System"
1.4. The Layout of /usr/src
The complete source code for FreeBSD is available from our public Git repository. The source code is normally installed in /usr/src. The layout of the source tree is described by the top-level README.md file.
Chapter 2. Programming Tools
2.1. Synopsis
This chapter is an introduction to using some of the programming tools supplied with FreeBSD, although much of it will be applicable to many other versions of UNIX®. It does not attempt to describe coding in any detail. Most of the chapter assumes little or no previous programming knowledge, although it is hoped that most programmers will find something of value in it.
2.2. Introduction
FreeBSD offers an excellent development environment.
Compilers for C and C++ and an assembler come with the basic system, not to mention classic UNIX® tools such as sed and awk.
If that is not enough, there are many more compilers and interpreters in the Ports collection.
The following section, Introduction to Programming, lists some of the available options.
FreeBSD is very compatible with standards such as POSIX® and ANSI C, as well with its own BSD heritage, so it is possible to write applications that will compile and run with little or no modification on a wide range of platforms.
However, all this power can be rather overwhelming at first if you have never written programs on a UNIX® platform before. This document aims to help you get up and running, without getting too deeply into more advanced topics. The intention is that this document should give you enough of the basics to be able to make some sense of the documentation.
Most of the document requires little or no knowledge of programming, although it does assume a basic competence with using UNIX® and a willingness to learn!
2.3. Introduction to Programming
A program is a set of instructions that tell the computer to do various things; sometimes the instruction it has to perform depends on what happened when it performed a previous instruction. This section gives an overview of the two main ways in which you can give these instructions, or "commands" as they are usually called. One way uses an interpreter, the other a compiler. As human languages are too difficult for a computer to understand in an unambiguous way, commands are usually written in one or other languages specially designed for the purpose.
2.3.1. Interpreters
With an interpreter, the language comes as an environment, where you type in commands at a prompt and the environment executes them for you. For more complicated programs, you can type the commands into a file and get the interpreter to load the file and execute the commands in it. If anything goes wrong, many interpreters will drop you into a debugger to help you track down the problem.
The advantage of this is that you can see the results of your commands immediately, and mistakes can be corrected readily. The biggest disadvantage comes when you want to share your programs with someone. They must have the same interpreter, or you must have some way of giving it to them, and they need to understand how to use it. Also users may not appreciate being thrown into a debugger if they press the wrong key! From a performance point of view, interpreters can use up a lot of memory, and generally do not generate code as efficiently as compilers.
In my opinion, interpreted languages are the best way to start if you have not done any programming before.
This kind of environment is typically found with languages like Lisp, Smalltalk, Perl and Basic.
It could also be argued that the UNIX® shell (sh, csh) is itself an interpreter, and many people do in fact write shell "scripts" to help with various "housekeeping" tasks on their machine.
Indeed, part of the original UNIX® philosophy was to provide lots of small utility programs that could be linked together in shell scripts to perform useful tasks.
2.3.2. Interpreters Available with FreeBSD
Here is a list of interpreters that are available from the FreeBSD Ports Collection, with a brief discussion of some of the more popular interpreted languages.
Instructions on how to get and install applications from the Ports Collection can be found in the Ports section of the handbook.
- BASIC
Short for Beginner’s All-purpose Symbolic Instruction Code. Developed in the 1950s for teaching University students to program and provided with every self-respecting personal computer in the 1980s, BASIC has been the first programming language for many programmers. It is also the foundation for Visual Basic.
The Bywater Basic Interpreter can be found in the Ports Collection as lang/bwbasic and the Phil Cockroft’s Basic Interpreter (formerly Rabbit Basic) is available as lang/pbasic.
- Lisp
A language that was developed in the late 1950s as an alternative to the "number-crunching" languages that were popular at the time. Instead of being based on numbers, Lisp is based on lists; in fact, the name is short for "List Processing". It is very popular in AI (Artificial Intelligence) circles.
Lisp is an extremely powerful and sophisticated language, but can be rather large and unwieldy.
Various implementations of Lisp that can run on UNIX® systems are available in the Ports Collection for FreeBSD. CLISP by Bruno Haible and Michael Stoll is available as lang/clisp. SLisp, a simpler Lisp implementations, is available as lang/slisp.
- Perl
Very popular with system administrators for writing scripts; also often used on World Wide Web servers for writing CGI scripts.
Perl is available in the Ports Collection as lang/perl5.36 for all FreeBSD releases.
- Scheme
A dialect of Lisp that is rather more compact and cleaner than Common Lisp. Popular in Universities as it is simple enough to teach to undergraduates as a first language, while it has a high enough level of abstraction to be used in research work.
Scheme is available from the Ports Collection as lang/elk for the Elk Scheme Interpreter. The MIT Scheme Interpreter can be found in lang/mit-scheme and the SCM Scheme Interpreter in lang/scm.
- Lua
Lua is a lightweight embeddable scripting language. It is widely portable and relatively simple. Lua is available in the Ports Collection in lang/lua54. It is also included in the base system as /usr/libexec/flua for use by base system components. Third party software should not depend on flua.
- Python
Python is an Object-Oriented, interpreted language. Its advocates argue that it is one of the best languages to start programming with, since it is relatively easy to start with, but is not limited in comparison to other popular interpreted languages that are used for the development of large, complex applications (Perl and Tcl are two other languages that are popular for such tasks).
The latest version of Python is available from the Ports Collection in lang/python.
- Ruby
Ruby is an interpreter, pure object-oriented programming language. It has become widely popular because of its easy to understand syntax, flexibility when writing code, and the ability to easily develop and maintain large, complex programs.
Ruby is available from the Ports Collection as lang/ruby32.
- Tcl and Tk
Tcl is an embeddable, interpreted language, that has become widely used and became popular mostly because of its portability to many platforms. It can be used both for quickly writing small, prototype applications, or (when combined with Tk, a GUI toolkit) fully-fledged, featureful programs.
Various versions of Tcl are available as ports for FreeBSD. The latest version, Tcl 8.7, can be found in lang/tcl87.
2.3.3. Compilers
Compilers are rather different. First of all, you write your code in a file (or files) using an editor. You then run the compiler and see if it accepts your program. If it did not compile, grit your teeth and go back to the editor; if it did compile and gave you a program, you can run it either at a shell command prompt or in a debugger to see if it works properly.[1]
Obviously, this is not quite as direct as using an interpreter. However it allows you to do a lot of things which are very difficult or even impossible with an interpreter, such as writing code which interacts closely with the operating system-or even writing your own operating system! It is also useful if you need to write very efficient code, as the compiler can take its time and optimize the code, which would not be acceptable in an interpreter. Moreover, distributing a program written for a compiler is usually more straightforward than one written for an interpreter-you can just give them a copy of the executable, assuming they have the same operating system as you.
As the edit-compile-run-debug cycle is rather tedious when using separate programs, many commercial compiler makers have produced Integrated Development Environments (IDEs for short). FreeBSD does not include an IDE in the base system, but devel/kdevelop is available in the Ports Collection and many use Emacs for this purpose. Using Emacs as an IDE is discussed in Using Emacs as a Development Environment.
2.4. Compiling with cc
This section deals with the clang compiler for C and C++, as it’s installed with the FreeBSD base system.
Clang is installed as cc; the GNU compiler gcc is available in the Ports Collection.
The details of producing a program with an interpreter vary considerably between interpreters, and are usually well covered in the documentation and on-line help for the interpreter.
Once you have written your masterpiece, the next step is to convert it into something that will (hopefully!) run on FreeBSD. This usually involves several steps, each of which is done by a separate program.
Pre-process your source code to remove comments and do other tricks like expanding macros in C.
Check the syntax of your code to see if you have obeyed the rules of the language. If you have not, it will complain!
Convert the source code into assembly language-this is very close to machine code, but still understandable by humans. Allegedly.
Convert the assembly language into machine code-yep, we are talking bits and bytes, ones and zeros here.
Check that you have used things like functions and global variables in a consistent way. For example, if you have called a non-existent function, it will complain.
If you are trying to produce an executable from several source code files, work out how to fit them all together.
Work out how to produce something that the system’s run-time loader will be able to load into memory and run.
Finally, write the executable on the filesystem.
The word compiling is often used to refer to just steps 1 to 4-the others are referred to as linking. Sometimes step 1 is referred to as pre-processing and steps 3-4 as assembling.
Fortunately, almost all this detail is hidden from you, as cc is a front end that manages calling all these programs with the right arguments for you; simply typing
will cause foobar.c to be compiled by all the steps above. If you have more than one file to compile, just do something like
% cc foo.c bar.cNote that the syntax checking is just that - checking the syntax. It will not check for any logical mistakes you may have made, like putting the program into an infinite loop, or using a bubble sort when you meant to use a binary sort.[2]
There are lots and lots of options for cc, which are all in the manual page.
Here are a few of the most important ones, with examples of how to use them.
-o filenameThe output name of the file. If you do not use this option,
ccwill produce an executable called a.out.[3]% cc foobar.c executable is a.out % cc -o foobar foobar.c executable is foobar-cJust compile the file, do not link it. Useful for toy programs where you just want to check the syntax, or if you are using a Makefile.
% cc -c foobar.cThis will produce an object file (not an executable) called foobar.o. This can be linked together with other object files into an executable.
-gCreate a debug version of the executable. This makes the compiler put information into the executable about which line of which source file corresponds to which function call. A debugger can use this information to show the source code as you step through the program, which is very useful; the disadvantage is that all this extra information makes the program much bigger. Normally, you compile with
-gwhile you are developing a program and then compile a "release version" without-gwhen you are satisfied it works properly.% cc -g foobar.cThis will produce a debug version of the program. [4]
-OCreate an optimized version of the executable. The compiler performs various clever tricks to try to produce an executable that runs faster than normal. You can add a number after the
-Oto specify a higher level of optimization, but this often exposes bugs in the compiler’s optimizer.% cc -O -o foobar foobar.cThis will produce an optimized version of foobar.
The following three flags will force cc to check that your code complies to the relevant international standard,
often referred to as the ANSI standard, though strictly speaking it is an ISO standard.
-WallEnable all the warnings which the authors of
ccbelieve are worthwhile. Despite the name, it will not enable all the warningsccis capable of.-ansiTurn off most, but not all, of the non-ANSI C features provided by
cc. Despite the name, it does not guarantee strictly that your code will comply to the standard.-pedanticTurn off all
cc's non-ANSI C features.
Without these flags, cc will allow you to use some of its non-standard extensions to the standard.
Some of these are very useful, but will not work with other compilers - in fact,
one of the main aims of the standard is to allow people to write code that will work with any compiler on any system.
This is known as portable code.
Generally, you should try to make your code as portable as possible, as otherwise you may have to completely rewrite the program later to get it to work somewhere else - and who knows what you may be using in a few years time?
% cc -Wall -ansi -pedantic -o foobar foobar.cThis will produce an executable foobar after checking foobar.c for standard compliance.
-llibrarySpecify a function library to be used at link time.
The most common example of this is when compiling a program that uses some of the mathematical functions in C. Unlike most other platforms, these are in a separate library from the standard C one and you have to tell the compiler to add it.
The rule is that if the library is called libsomething.a, you give
ccthe argument-lsomething. For example, the math library is libm.a, so you giveccthe argument-lm. A common "gotcha" with the math library is that it has to be the last library on the command line.% cc -o foobar foobar.c -lmThis will link the math library functions into foobar.
If you are compiling C++ code, use c++. c++ can also be invoked as clang++ on FreeBSD.
% c++ -o foobar foobar.ccThis will both produce an executable foobar from the C++ source file foobar.cc.
2.4.1. Common cc Queries and Problems
2.4.1.1. I compiled a file called foobar.c and I cannot find an executable called foobar. Where has it gone?
Remember, cc will call the executable a.out unless you tell it differently.
Use the -o filename option:
% cc -o foobar foobar.c2.4.1.2. OK, I have an executable called foobar, I can see it when I run ls, but when I type in foobar at the command prompt it tells me there is no such file. Why can it not find it?
Unlike MS-DOS®, UNIX® does not look in the current directory when it is trying to find out which executable you want it to run, unless you tell it to.
Type ./foobar, which means "run the file called foobar in the current directory."
2.4.2. I called my executable test, but nothing happens when I run it. What is going on?
Most UNIX® systems have a program called test in /usr/bin and the shell is picking that one up before it gets to checking the current directory.
Either type:
% ./testor choose a better name for your program!
2.4.2.1. I compiled my program and it seemed to run all right at first, then there was an error and it said something about core dumped. What does that mean?
The name core dump dates back to the very early days of UNIX®, when the machines used core memory for storing data. Basically, if the program failed under certain conditions, the system would write the contents of core memory to disk in a file called core, which the programmer could then pore over to find out what went wrong.
2.4.2.2. Fascinating stuff, but what I am supposed to do now?
Use a debugger to analyze the core (see Debugging).
2.4.2.3. When my program dumped core, it said something about a segmentation fault. What is that?
This basically means that your program tried to perform some sort of illegal operation on memory; UNIX® is designed to protect the operating system and other programs from rogue programs.
Common causes for this are:
Trying to write to a NULL pointer, eg
char *foo = NULL;
strcpy(foo, "bang!");
Using a pointer that has not been initialized, eg
char *foo;
strcpy(foo, "bang!");
The pointer will have some random value that, with luck, will point into an area of memory that is not available to your program and the kernel will kill your program before it can do any damage. If you are unlucky, it will point somewhere inside your own program and corrupt one of your data structures, causing the program to fail mysteriously.
Trying to access past the end of an array, eg
int bar[20];
bar[27] = 6;
Trying to store something in read-only memory, eg
char *foo = "My string";
strcpy(foo, "bang!");
UNIX® compilers often put string literals like
"My string"into read-only areas of memory.Doing naughty things with
malloc()andfree(), egchar bar[80]; free(bar);
or
char *foo = malloc(27);
free(foo);
free(foo);
Making one of these mistakes will not always lead to an error, but they are always bad practice. Some systems and compilers are more tolerant than others, which is why programs that run well on one system can crash when you try them on another.
2.4.2.4. Sometimes when I get a core dump it says bus error. It says in my UNIX® book that this means a hardware problem, but the computer still seems to be working. Is this true?
No, fortunately not (unless of course you really do have a hardware problem…). This is usually another way of saying that you accessed memory in a way you should not have.
2.4.2.5. This dumping core business sounds as though it could be quite useful, if I can make it happen when I want to. Can I do this, or do I have to wait until there is an error?
Yes, just go to another console or xterm, do
% psto find out the process ID of your program, and do
% kill -ABRT pidwhere pid is the process ID you looked up.
This is useful if your program has got stuck in an infinite loop, for instance. If your program happens to trap SIGABRT, there are several other signals which have a similar effect.
Alternatively, you can create a core dump from inside your program, by calling the abort() function.
See the manual page of abort(3) to learn more.
If you want to create a core dump from outside your program, but do not want the process to terminate, you can use the gcore program.
See the manual page of gcore(1) for more information.
2.5. Make
2.5.1. What is make?
When you are working on a simple program with only one or two source files, typing in
% cc file1.c file2.cis not too bad, but it quickly becomes very tedious when there are several files-and it can take a while to compile, too.
One way to get around this is to use object files and only recompile the source file if the source code has changed. So we could have something like:
% cc file1.o file2.o … file37.c …if we had changed file37.c, but not any of the others, since the last time we compiled. This may speed up the compilation quite a bit, but does not solve the typing problem.
Or we could write a shell script to solve the typing problem, but it would have to re-compile everything, making it very inefficient on a large project.
What happens if we have hundreds of source files lying about? What if we are working in a team with other people who forget to tell us when they have changed one of their source files that we use?
Perhaps we could put the two solutions together and write something like a shell script that would contain some kind of magic rule saying when a source file needs compiling. Now all we need now is a program that can understand these rules, as it is a bit too complicated for the shell.
This program is called make.
It reads in a file, called a makefile, that tells it how different files depend on each other, and works out which files need to be re-compiled and which ones do not.
For example, a rule could say something like "if fromboz.o is older than fromboz.c, that means someone must have changed fromboz.c, so it needs to be re-compiled."
The makefile also has rules telling make how to re-compile the source file, making it a much more powerful tool.
Makefiles are typically kept in the same directory as the source they apply to, and can be called makefile, Makefile or MAKEFILE. Most programmers use the name Makefile, as this puts it near the top of a directory listing, where it can easily be seen.[5]
2.5.2. Example of Using make
Here is a very simple make file:
foo: foo.c
	cc -o foo foo.c
It consists of two lines, a dependency line and a creation line.
The dependency line here consists of the name of the program (known as the target),
followed by a colon, then whitespace, then the name of the source file.
When make reads this line, it looks to see if foo exists;
if it exists, it compares the time foo was last modified to the time foo.c was last modified.
If foo does not exist, or is older than foo.c, it then looks at the creation line to find out what to do.
In other words, this is the rule for working out when foo.c needs to be re-compiled.
The creation line starts with a tab (press tab) and then the command you would type to create foo if you were doing it at a command prompt.
If foo is out of date, or does not exist, make then executes this command to create it.
In other words, this is the rule which tells make how to re-compile foo.c.
So, when you type make, it will make sure that foo is up to date with respect to your latest changes to foo.c.
This principle can be extended to Makefile's with hundreds of targets-in fact, on FreeBSD,
it is possible to compile the entire operating system just by typing make buildworld buildkernel at the top level directory in the src tree.
Another useful property of makefiles is that the targets do not have to be programs. For instance, we could have a make file that looks like this:
foo: foo.c
	cc -o foo foo.c

install:
	cp foo /home/me
We can tell make which target we want to make by typing:
% make targetmake will then only look at that target and ignore any others.
For example, if we type make foo with the makefile above, make will ignore the install target.
If we just type make on its own, make will always look at the first target and then stop without looking at any others.
So if we typed make here, it will just go to the foo target, re-compile foo if necessary, and then stop without going on to the install target.
Notice that the install target does not actually depend on anything! This means that the command on the following line is always executed when we try to make that target by typing make install.
In this case, it will copy foo into the user’s home directory.
This is often used by application makefiles, so that the application can be installed in the correct directory when it has been correctly compiled.
This is a slightly confusing subject to try to explain.
If you do not quite understand how make works, the best thing to do is to write a simple program like "hello world" and a make file like the one above and experiment.
Then progress to using more than one source file, or having the source file include a header file.
touch is very useful here-it changes the date on a file without you having to edit it.
2.5.3. Make and include-files
C code often starts with a list of files to include, for example stdio.h. Some of these files are system-include files, some of them are from the project you are now working on:
#include <stdio.h>
#include "foo.h"

int main(....
To make sure that this file is recompiled the moment foo.h is changed, you have to add it in your Makefile:
foo: foo.c foo.h
The moment your project is getting bigger and you have more and more own include-files to maintain,
it will be a pain to keep track of all include files and the files which are depending on it.
If you change an include-file but forget to recompile all the files which are depending on it,
the results will be devastating.
clang has an option to analyze your files and to produce a list of include-files and their dependencies: -MM.
If you add this to your Makefile:
depend:
	cc -E -MM *.c > .depend
and run make depend, the file .depend will appear with a list of object-files, C-files and the include-files:
foo.o: foo.c foo.h
If you change foo.h, next time you run make all files depending on foo.h will be recompiled.
Do not forget to run make depend each time you add an include-file to one of your files.
2.5.4. FreeBSD Makefiles
Makefiles can be rather complicated to write. Fortunately, BSD-based systems like FreeBSD come with some very powerful ones as part of the system. One very good example of this is the FreeBSD ports system. Here is the essential part of a typical ports Makefile:
MASTER_SITES=   ftp://freefall.cdrom.com/pub/FreeBSD/LOCAL_PORTS/
DISTFILES=      scheme-microcode+dist-7.3-freebsd.tgz

.include <bsd.port.mk>
Now, if we go to the directory for this port and type make, the following happens:
A check is made to see if the source code for this port is already on the system.
If it is not, an FTP connection to the URL in MASTER_SITES is set up to download the source.
The checksum for the source is calculated and compared it with one for a known, good, copy of the source. This is to make sure that the source was not corrupted while in transit.
Any changes required to make the source work on FreeBSD are applied-this is known as patching.
Any special configuration needed for the source is done. (Many UNIX® program distributions try to work out which version of UNIX® they are being compiled on and which optional UNIX® features are present-this is where they are given the information in the FreeBSD ports scenario).
The source code for the program is compiled. In effect, we change to the directory where the source was unpacked and do
make-the program’s own make file has the necessary information to build the program.We now have a compiled version of the program. If we wish, we can test it now; when we feel confident about the program, we can type
make install. This will cause the program and any supporting files it needs to be copied into the correct location; an entry is also made into apackage database, so that the port can easily be uninstalled later if we change our mind about it.
Now I think you will agree that is rather impressive for a four line script!
The secret lies in the last line, which tells make to look in the system makefile called bsd.port.mk.
It is easy to overlook this line, but this is where all the clever stuff comes from-someone has written a makefile that tells make to do all the things above (plus a couple of other things I did not mention,
including handling any errors that may occur) and anyone can get access to that just by putting a single line in their own make file!
If you want to have a look at these system makefiles, they are in /usr/share/mk, but it is probably best to wait until you have had a bit of practice with makefiles, as they are very complicated (and if you do look at them, make sure you have a flask of strong coffee handy!)
2.5.5. More Advanced Uses of make
Make is a very powerful tool, and can do much more than the simple example above shows.
Unfortunately, there are several different versions of make, and they all differ considerably.
The best way to learn what they can do is probably to read the documentation-hopefully this introduction will have given you a base from which you can do this.
The make(1) manual page offers a comprehensive discussion of variables, arguments, and how to use make.
Many applications in the ports use GNU make, which has a very good set of "info" pages.
If you have installed any of these ports, GNU make will automatically have been installed as gmake.
It is also available as a port and package in its own right.
To view the info pages for GNU make, you will have to edit dir in the /usr/local/info directory to add an entry for it. This involves adding a line like
* Make: (make). The GNU Make utility.
to the file. Once you have done this, you can type info and then select from the menu (or in Emacs, do C-h i).
2.6. Debugging
2.6.1. Introduction to Available Debuggers
Using a debugger allows running the program under more controlled circumstances. Typically, it is possible to step through the program a line at a time, inspect the value of variables, change them, tell the debugger to run up to a certain point and then stop, and so on. It is also possible to attach to a program that is already running, or load a core file to investigate why the program crashed.
This section is intended to be a quick introduction to using debuggers and does not cover specialized topics such as debugging the kernel. For more information about that, refer to Kernel Debugging.
The standard debugger supplied with FreeBSD is called lldb (LLVM debugger).
As it is part of the standard installation for that release, there is no need to do anything special to use it.
It has good command help, accessible via the help command, as well as a web tutorial and documentation.
The |
The other debugger available with FreeBSD is called gdb (GNU debugger).
Unlike lldb, it is not installed by default on FreeBSD;
to use it, install devel/gdb from ports or packages.
It has excellent on-line help, as well as a set of info pages.
The two debuggers have a similar feature set, so which one to use is largely a matter of taste.
If familiar with one only, use that one.
People familiar with neither or both but wanting to use one from inside Emacs will need to use gdb as lldb is unsupported by Emacs.
Otherwise, try both and see which one you prefer.
2.6.2. Using lldb
2.6.2.2. Running a Program with lldb
Compile the program with -g to get the most out of using lldb.
It will work without, but will only display the name of the function currently running, instead of the source code.
If it displays a line like:
Breakpoint 1: where = temp`main, address = …(without an indication of source code filename and line number) when setting a breakpoint, this means that the program was not compiled with -g.
Most |
At the lldb prompt, type breakpoint set -n main.
This will tell the debugger not to display the preliminary set-up code in the program being run and to stop execution at the beginning of the program’s code.
Now type process launch to actually start the program- it will start at the beginning of the set-up code and then get stopped by the debugger when it calls main().
To step through the program a line at a time, type thread step-over.
When the program gets to a function call, step into it by typing thread step-in.
Once in a function call, return from it by typing thread step-out or use up and down to take a quick look at the caller.
Here is a simple example of how to spot a mistake in a program with lldb.
This is our program (with a deliberate mistake):
#include <stdio.h>

int bazz(int anint);

main() {
	int i;

	printf("This is my program\n");
	bazz(i);
	return 0;
}

int bazz(int anint) {
	printf("You gave me %d\n", anint);
	return anint;
}
This program sets i to be 5 and passes it to a function bazz() which prints out the number we gave it.
Compiling and running the program displays
% cc -g -o temp temp.c
% ./temp
This is my program
anint = -5360
That is not what was expected! Time to see what is going on!
% lldb -- temp
(lldb) target create "temp"
Current executable set to 'temp' (x86_64).
(lldb) breakpoint set -n main				Skip the set-up code
Breakpoint 1: where = temp`main + 15 at temp.c:8:2, address = 0x00000000002012ef	lldb puts breakpoint at main()
(lldb) process launch					Run as far as main()
Process 9992 launching
Process 9992 launched: '/home/pauamma/tmp/temp' (x86_64)	Program starts running

Process 9992 stopped
* thread #1, name = 'temp', stop reason = breakpoint 1.1	lldb stops at main()
    frame #0: 0x00000000002012ef temp`main at temp.c:8:2
   5	main() {
   6		int i;
   7
-> 8		printf("This is my program\n");			Indicates the line where it stopped
   9		bazz(i);
   10		return 0;
   11	}
(lldb) thread step-over			Go to next line
This is my program						Program prints out
Process 9992 stopped
* thread #1, name = 'temp', stop reason = step over
    frame #0: 0x0000000000201300 temp`main at temp.c:9:7
   6		int i;
   7
   8		printf("This is my program\n");
-> 9		bazz(i);
   10		return 0;
   11	}
   12
(lldb) thread step-in			step into bazz()
Process 9992 stopped
* thread #1, name = 'temp', stop reason = step in
    frame #0: 0x000000000020132b temp`bazz(anint=-5360) at temp.c:14:29	lldb displays stack frame
   11	}
   12
   13	int bazz(int anint) {
-> 14		printf("You gave me %d\n", anint);
   15		return anint;
   16	}
(lldb)
Hang on a minute! How did anint get to be -5360? Was it not set to 5 in main()? Let us move up to main() and have a look.
(lldb) up		Move up call stack
frame #1: 0x000000000020130b temp`main at temp.c:9:2		lldb displays stack frame
   6		int i;
   7
   8		printf("This is my program\n");
-> 9		bazz(i);
   10		return 0;
   11	}
   12
(lldb) frame variable i			Show us the value of i
(int) i = -5360							lldb displays -5360
Oh dear! Looking at the code, we forgot to initialize i. We meant to put
...
main() {
	int i;

	i = 5;
	printf("This is my program\n");
...
but we left the i=5; line out.
As we did not initialize i, it had whatever number happened to be in that area of memory when the program ran,
which in this case happened to be -5360.
The |
2.6.2.3. Examining a Core File with lldb
A core file is basically a file which contains the complete state of the process when it crashed. In "the good old days", programmers had to print out hex listings of core files and sweat over machine code manuals, but now life is a bit easier. Incidentally, under FreeBSD and other 4.4BSD systems, a core file is called progname.core instead of just core, to make it clearer which program a core file belongs to.
To examine a core file, specify the name of the core file in addition to the program itself.
Instead of starting up lldb in the usual way, type lldb -c progname.core -- progname.
The debugger will display something like this:
% lldb -c progname.core -- progname
(lldb) target create "progname" --core "progname.core"
Core file '/home/pauamma/tmp/progname.core' (x86_64) was loaded.
(lldb)
In this case, the program was called progname, so the core file is called progname.core.
The debugger does not display why the program crashed or where.
For this, use thread backtrace all.
This will also show how the function where the program dumped core was called.
(lldb) thread backtrace all
 thread #1, name = 'progname', stop reason = signal SIGSEGV
   frame #0: 0x0000000000201347 progname`bazz(anint=5) at temp2.c:17:10
    frame #1: 0x0000000000201312 progname`main at temp2.c:10:2
    frame #2: 0x000000000020110f progname`_start(ap=<unavailable>, cleanup=<unavailable>) at crt1.c:76:7
(lldb)
SIGSEGV indicates that the program tried to access memory (run code or read/write data usually) at a location that does not belong to it, but does not give any specifics.
For that, look at the source code at line 10 of file temp2.c, in bazz().
The backtrace also says that in this case, bazz() was called from main().
2.6.2.4. Attaching to a Running Program with lldb
One of the neatest features about lldb is that it can attach to a program that is already running.
Of course, that requires sufficient permissions to do so.
A common problem is stepping through a program that forks and wanting to trace the child, but the debugger will only trace the parent.
To do that, start up another lldb, use ps to find the process ID for the child, and do
(lldb) process attach -p pidin lldb, and then debug as usual.
For that to work well, the code that calls fork to create the child needs to do something like the following (courtesy of the gdb info pages):
...
if ((pid = fork()) < 0)		/* _Always_ check this */
	error();
else if (pid == 0) {		/* child */
	int PauseMode = 1;

	while (PauseMode)
		sleep(10);	/* Wait until someone attaches to us */
	...
} else {			/* parent */
	...
Now all that is needed is to attach to the child, set PauseMode to 0 with expr PauseMode = 0 and wait for the sleep() call to return.
2.6.3. Remote Debugging Using LLDB
The described functionality is available starting with LLDB version 12.0.0. Users of FreeBSD releases containing an earlier LLDB version may wish to use the snapshot available in ports or packages, as devel/llvm-devel. |
Starting with LLDB 12.0.0, remote debugging is supported on FreeBSD.
This means that lldb-server can be started to debug a program on one host, while the interactive lldb client connects to it from another one.
To launch a new process to be debugged remotely, run lldb-server on the remote server by typing
% lldb-server g host:port -- prognameThe process will be stopped immediately after launching, and lldb-server will wait for the client to connect.
Start lldb locally and type the following command to connect to the remote server:
(lldb) gdb-remote host:portlldb-server can also attach to a running process.
To do that, type the following on the remote server:
% lldb-server g host:port --attach pid-or-name2.6.4. Using gdb
2.6.4.1. Starting gdb
Start up gdb by typing
% gdb prognamealthough many people prefer to run it inside Emacs. To do this, type:
M-x gdb RET progname RETFinally, for those finding its text-based command-prompt style off-putting, there is a graphical front-end for it (devel/xxgdb) in the Ports Collection.
2.6.4.2. Running a Program with gdb
Compile the program with -g to get the most out of using gdb.
It will work without, but will only display the name of the function currently running, instead of the source code.
A line like:
... (no debugging symbols found) ...when gdb starts up means that the program was not compiled with -g.
At the gdb prompt, type break main.
This will tell the debugger to skip the preliminary set-up code in the program being run and to stop execution at the beginning of the program’s code.
Now type run to start the program- it will start at the beginning of the set-up code and then get stopped by the debugger when it calls main().
To step through the program a line at a time, press n.
When at a function call, step into it by pressing s.
Once in a function call, return from it by pressing f, or use up and down to take a quick look at the caller.
Here is a simple example of how to spot a mistake in a program with gdb.
This is our program (with a deliberate mistake):
#include <stdio.h>

int bazz(int anint);

main() {
	int i;

	printf("This is my program\n");
	bazz(i);
	return 0;
}

int bazz(int anint) {
	printf("You gave me %d\n", anint);
	return anint;
}
This program sets i to be 5 and passes it to a function bazz() which prints out the number we gave it.
Compiling and running the program displays
% cc -g -o temp temp.c
% ./temp
This is my program
anint = 4231
That was not what we expected! Time to see what is going on!
% gdb temp
GDB is free software and you are welcome to distribute copies of it
 under certain conditions; type "show copying" to see the conditions.
There is absolutely no warranty for GDB; type "show warranty" for details.
GDB 4.13 (i386-unknown-freebsd), Copyright 1994 Free Software Foundation, Inc.
(gdb) break main				Skip the set-up code
Breakpoint 1 at 0x160f: file temp.c, line 9.	gdb puts breakpoint at main()
(gdb) run					Run as far as main()
Starting program: /home/james/tmp/temp		Program starts running

Breakpoint 1, main () at temp.c:9		gdb stops at main()
(gdb) n						Go to next line
This is my program				Program prints out
(gdb) s						step into bazz()
bazz (anint=4231) at temp.c:17			gdb displays stack frame
(gdb)
Hang on a minute! How did anint get to be 4231? Was it not set to 5 in main()? Let us move up to main() and have a look.
(gdb) up					Move up call stack
#1  0x1625 in main () at temp.c:11		gdb displays stack frame
(gdb) p i					Show us the value of i
$1 = 4231					gdb displays 4231
Oh dear! Looking at the code, we forgot to initialize i. We meant to put
...
main() {
	int i;

	i = 5;
	printf("This is my program\n");
...
but we left the i=5; line out.
As we did not initialize i, it had whatever number happened to be in that area of memory when the program ran,
which in this case happened to be 4231.
The |
2.6.4.3. Examining a Core File with gdb
A core file is basically a file which contains the complete state of the process when it crashed. In "the good old days", programmers had to print out hex listings of core files and sweat over machine code manuals, but now life is a bit easier. Incidentally, under FreeBSD and other 4.4BSD systems, a core file is called progname.core instead of just core, to make it clearer which program a core file belongs to.
To examine a core file, start up gdb in the usual way.
Instead of typing break or run, type
(gdb) core progname.coreIf the core file is not in the current directory, type dir /path/to/core/file first.
The debugger should display something like this:
% gdb progname
GDB is free software and you are welcome to distribute copies of it
 under certain conditions; type "show copying" to see the conditions.
There is absolutely no warranty for GDB; type "show warranty" for details.
GDB 4.13 (i386-unknown-freebsd), Copyright 1994 Free Software Foundation, Inc.
(gdb) core progname.core
Core was generated by `progname'.
Program terminated with signal 11, Segmentation fault.
Cannot access memory at address 0x7020796d.
#0  0x164a in bazz (anint=0x5) at temp.c:17
(gdb)
In this case, the program was called progname, so the core file is called progname.core.
We can see that the program crashed due to trying to access an area in memory that was not available to it in a function called bazz.
Sometimes it is useful to be able to see how a function was called,
as the problem could have occurred a long way up the call stack in a complex program.
bt causes gdb to print out a back-trace of the call stack:
(gdb) bt
#0  0x164a in bazz (anint=0x5) at temp.c:17
#1  0xefbfd888 in end ()
#2  0x162c in main () at temp.c:11
(gdb)
The end() function is called when a program crashes;
in this case, the bazz() function was called from main().
2.6.4.4. Attaching to a Running Program with gdb
One of the neatest features about gdb is that it can attach to a program that is already running.
Of course, that requires sufficient permissions to do so.
A common problem is stepping through a program that forks and wanting to trace the child, but the debugger will only trace the parent.
To do that, start up another gdb, use ps to find the process ID for the child, and do
(gdb) attach pidin gdb, and then debug as usual.
For that to work well, the code that calls fork to create the child needs to do something like the following (courtesy of the gdb info pages):
...
if ((pid = fork()) < 0)		/* _Always_ check this */
	error();
else if (pid == 0) {		/* child */
	int PauseMode = 1;

	while (PauseMode)
		sleep(10);	/* Wait until someone attaches to us */
	...
} else {			/* parent */
	...
Now all that is needed is to attach to the child, set PauseMode to 0, and wait for the sleep() call to return!
2.7. Using Emacs as a Development Environment
2.7.1. Emacs
Emacs is a highly customizable editor-indeed, it has been customized to the point where it is more like an operating system than an editor! Many developers and sysadmins do in fact spend practically all their time working inside Emacs, leaving it only to log out.
It is impossible even to summarize everything Emacs can do here, but here are some of the features of interest to developers:
Very powerful editor, allowing search-and-replace on both strings and regular expressions (patterns), jumping to start/end of block expression, etc, etc.
Pull-down menus and online help.
Language-dependent syntax highlighting and indentation.
Completely customizable.
You can compile and debug programs within Emacs.
On a compilation error, you can jump to the offending line of source code.
Friendly-ish front-end to the
infoprogram used for reading GNU hypertext documentation, including the documentation on Emacs itself.Friendly front-end to
gdb, allowing you to look at the source code as you step through your program.
And doubtless many more that have been overlooked.
Emacs can be installed on FreeBSD using the editors/emacs port.
Once it is installed, start it up and do C-h t to read an Emacs tutorial-that means hold down control, press h, let go of control, and then press t.
(Alternatively, you can use the mouse to select from the Help menu.)
Although Emacs does have menus, it is well worth learning the key bindings, as it is much quicker when you are editing something to press a couple of keys than to try to find the mouse and then click on the right place. And, when you are talking to seasoned Emacs users, you will find they often casually throw around expressions like “M-x replace-s RET foo RET bar RET” so it is useful to know what they mean. And in any case, Emacs has far too many useful functions for them to all fit on the menu bars.
Fortunately, it is quite easy to pick up the key-bindings, as they are displayed next to the menu item. My advice is to use the menu item for, say, opening a file until you understand how it works and feel confident with it, then try doing C-x C-f. When you are happy with that, move on to another menu command.
If you cannot remember what a particular combination of keys does, select from the Help menu and type it in-Emacs will tell you what it does. You can also use the menu item to find out all the commands which contain a particular word in them, with the key binding next to it.
By the way, the expression above means hold down the Meta key, press x, release the Meta key, type replace-s (short for replace-string-another feature of Emacs is that you can abbreviate commands), press the return key, type foo (the string you want replaced), press the return key, type bar (the string you want to replace foo with) and press return again.
Emacs will then do the search-and-replace operation you have just requested.
If you are wondering what on earth Meta is, it is a special key that many UNIX® workstations have. Unfortunately, PC’s do not have one, so it is usually alt (or if you are unlucky, the escape key).
Oh, and to get out of Emacs, do C-x C-c (that means hold down the control key, press x, press c and release the control key).
If you have any unsaved files open, Emacs will ask you if you want to save them.
(Ignore the bit in the documentation where it says C-z is the usual way to leave Emacs-that leaves Emacs hanging around in the background, and is only really useful if you are on a system which does not have virtual terminals).
2.7.2. Configuring Emacs
Emacs does many wonderful things; some of them are built in, some of them need to be configured.
Instead of using a proprietary macro language for configuration, Emacs uses a version of Lisp specially adapted for editors, known as Emacs Lisp. Working with Emacs Lisp can be quite helpful if you want to go on and learn something like Common Lisp. Emacs Lisp has many features of Common Lisp, although it is considerably smaller (and thus easier to master).
The best way to learn Emacs Lisp is to read the online Emacs Reference manual.
However, there is no need to actually know any Lisp to get started with configuring Emacs, as I have included a sample .emacs, which should be enough to get you started. Just copy it into your home directory and restart Emacs if it is already running; it will read the commands from the file and (hopefully) give you a useful basic setup.
2.7.3. A Sample .emacs
Unfortunately, there is far too much here to explain it in detail; however there are one or two points worth mentioning.
Everything beginning with a
;is a comment and is ignored by Emacs.In the first line, the
-- Emacs-Lisp --is so that we can edit .emacs itself within Emacs and get all the fancy features for editing Emacs Lisp. Emacs usually tries to guess this based on the filename, and may not get it right for .emacs.The tab key is bound to an indentation function in some modes, so when you press the tab key, it will indent the current line of code. If you want to put a tab character in whatever you are writing, hold the control key down while you are pressing the tab key.
This file supports syntax highlighting for C, C++, Perl, Lisp and Scheme, by guessing the language from the filename.
Emacs already has a pre-defined function called
next-error. In a compilation output window, this allows you to move from one compilation error to the next by doingM-n; we define a complementary function,previous-error, that allows you to go to a previous error by doingM-p. The nicest feature of all is thatC-c C-cwill open up the source file in which the error occurred and jump to the appropriate line.We enable Emacs’s ability to act as a server, so that if you are doing something outside Emacs and you want to edit a file, you can just type in
% emacsclient filenameand then you can edit the file in your Emacs![6]
Example 1. A Sample .emacs
;; -*-Emacs-Lisp-*-

;; This file is designed to be re-evaled; use the variable first-time
;; to avoid any problems with this.
(defvar first-time t
  "Flag signifying this is the first time that .emacs has been evaled")

;; Meta
(global-set-key "\M- " 'set-mark-command)
(global-set-key "\M-\C-h" 'backward-kill-word)
(global-set-key "\M-\C-r" 'query-replace)
(global-set-key "\M-r" 'replace-string)
(global-set-key "\M-g" 'goto-line)
(global-set-key "\M-h" 'help-command)

;; Function keys
(global-set-key [f1] 'manual-entry)
(global-set-key [f2] 'info)
(global-set-key [f3] 'repeat-complex-command)
(global-set-key [f4] 'advertised-undo)
(global-set-key [f5] 'eval-current-buffer)
(global-set-key [f6] 'buffer-menu)
(global-set-key [f7] 'other-window)
(global-set-key [f8] 'find-file)
(global-set-key [f9] 'save-buffer)
(global-set-key [f10] 'next-error)
(global-set-key [f11] 'compile)
(global-set-key [f12] 'grep)
(global-set-key [C-f1] 'compile)
(global-set-key [C-f2] 'grep)
(global-set-key [C-f3] 'next-error)
(global-set-key [C-f4] 'previous-error)
(global-set-key [C-f5] 'display-faces)
(global-set-key [C-f8] 'dired)
(global-set-key [C-f10] 'kill-compilation)

;; Keypad bindings
(global-set-key [up] "\C-p")
(global-set-key [down] "\C-n")
(global-set-key [left] "\C-b")
(global-set-key [right] "\C-f")
(global-set-key [home] "\C-a")
(global-set-key [end] "\C-e")
(global-set-key [prior] "\M-v")
(global-set-key [next] "\C-v")
(global-set-key [C-up] "\M-\C-b")
(global-set-key [C-down] "\M-\C-f")
(global-set-key [C-left] "\M-b")
(global-set-key [C-right] "\M-f")
(global-set-key [C-home] "\M-<")
(global-set-key [C-end] "\M->")
(global-set-key [C-prior] "\M-<")
(global-set-key [C-next] "\M->")

;; Mouse
(global-set-key [mouse-3] 'imenu)

;; Misc
(global-set-key [C-tab] "\C-q\t")	; Control tab quotes a tab.
(setq backup-by-copying-when-mismatch t)

;; Treat 'y' or <CR> as yes, 'n' as no.
(fset 'yes-or-no-p 'y-or-n-p)
(define-key query-replace-map [return] 'act)
(define-key query-replace-map [?\C-m] 'act)

;; Load packages
(require 'desktop)
(require 'tar-mode)

;; Pretty diff mode
(autoload 'ediff-buffers "ediff" "Intelligent Emacs interface to diff" t)
(autoload 'ediff-files "ediff" "Intelligent Emacs interface to diff" t)
(autoload 'ediff-files-remote "ediff"
  "Intelligent Emacs interface to diff")

(if first-time
    (setq auto-mode-alist
	  (append '(("\\.cpp$" . c++-mode)
		    ("\\.hpp$" . c++-mode)
		    ("\\.lsp$" . lisp-mode)
		    ("\\.scm$" . scheme-mode)
		    ("\\.pl$" . perl-mode)
		    ) auto-mode-alist)))

;; Auto font lock mode
(defvar font-lock-auto-mode-list
  (list 'c-mode 'c++-mode 'c++-c-mode 'emacs-lisp-mode 'lisp-mode 'perl-mode 'scheme-mode)
  "List of modes to always start in font-lock-mode")

(defvar font-lock-mode-keyword-alist
  '((c++-c-mode . c-font-lock-keywords)
    (perl-mode . perl-font-lock-keywords))
  "Associations between modes and keywords")

(defun font-lock-auto-mode-select ()
  "Automatically select font-lock-mode if the current major mode is in font-lock-auto-mode-list"
  (if (memq major-mode font-lock-auto-mode-list)
      (progn
	(font-lock-mode t))
    )
  )

(global-set-key [M-f1] 'font-lock-fontify-buffer)

;; New dabbrev stuff
;(require 'new-dabbrev)
(setq dabbrev-always-check-other-buffers t)
(setq dabbrev-abbrev-char-regexp "\\sw\\|\\s_")
(add-hook 'emacs-lisp-mode-hook
	  '(lambda ()
	     (set (make-local-variable 'dabbrev-case-fold-search) nil)
	     (set (make-local-variable 'dabbrev-case-replace) nil)))
(add-hook 'c-mode-hook
	  '(lambda ()
	     (set (make-local-variable 'dabbrev-case-fold-search) nil)
	     (set (make-local-variable 'dabbrev-case-replace) nil)))
(add-hook 'text-mode-hook
	  '(lambda ()
	     (set (make-local-variable 'dabbrev-case-fold-search) t)
	     (set (make-local-variable 'dabbrev-case-replace) t)))

;; C++ and C mode...
(defun my-c++-mode-hook ()
  (setq tab-width 4)
  (define-key c++-mode-map "\C-m" 'reindent-then-newline-and-indent)
  (define-key c++-mode-map "\C-ce" 'c-comment-edit)
  (setq c++-auto-hungry-initial-state 'none)
  (setq c++-delete-function 'backward-delete-char)
  (setq c++-tab-always-indent t)
  (setq c-indent-level 4)
  (setq c-continued-statement-offset 4)
  (setq c++-empty-arglist-indent 4))

(defun my-c-mode-hook ()
  (setq tab-width 4)
  (define-key c-mode-map "\C-m" 'reindent-then-newline-and-indent)
  (define-key c-mode-map "\C-ce" 'c-comment-edit)
  (setq c-auto-hungry-initial-state 'none)
  (setq c-delete-function 'backward-delete-char)
  (setq c-tab-always-indent t)
;; BSD-ish indentation style
  (setq c-indent-level 4)
  (setq c-continued-statement-offset 4)
  (setq c-brace-offset -4)
  (setq c-argdecl-indent 0)
  (setq c-label-offset -4))

;; Perl mode
(defun my-perl-mode-hook ()
  (setq tab-width 4)
  (define-key c++-mode-map "\C-m" 'reindent-then-newline-and-indent)
  (setq perl-indent-level 4)
  (setq perl-continued-statement-offset 4))

;; Scheme mode...
(defun my-scheme-mode-hook ()
  (define-key scheme-mode-map "\C-m" 'reindent-then-newline-and-indent))

;; Emacs-Lisp mode...
(defun my-lisp-mode-hook ()
  (define-key lisp-mode-map "\C-m" 'reindent-then-newline-and-indent)
  (define-key lisp-mode-map "\C-i" 'lisp-indent-line)
  (define-key lisp-mode-map "\C-j" 'eval-print-last-sexp))

;; Add all of the hooks...
(add-hook 'c++-mode-hook 'my-c++-mode-hook)
(add-hook 'c-mode-hook 'my-c-mode-hook)
(add-hook 'scheme-mode-hook 'my-scheme-mode-hook)
(add-hook 'emacs-lisp-mode-hook 'my-lisp-mode-hook)
(add-hook 'lisp-mode-hook 'my-lisp-mode-hook)
(add-hook 'perl-mode-hook 'my-perl-mode-hook)

;; Complement to next-error
(defun previous-error (n)
  "Visit previous compilation error message and corresponding source code."
  (interactive "p")
  (next-error (- n)))

;; Misc...
(transient-mark-mode 1)
(setq mark-even-if-inactive t)
(setq visible-bell nil)
(setq next-line-add-newlines nil)
(setq compile-command "make")
(setq suggest-key-bindings nil)
(put 'eval-expression 'disabled nil)
(put 'narrow-to-region 'disabled nil)
(put 'set-goal-column 'disabled nil)
(if (>= emacs-major-version 21)
	(setq show-trailing-whitespace t))

;; Elisp archive searching
(autoload 'format-lisp-code-directory "lispdir" nil t)
(autoload 'lisp-dir-apropos "lispdir" nil t)
(autoload 'lisp-dir-retrieve "lispdir" nil t)
(autoload 'lisp-dir-verify "lispdir" nil t)

;; Font lock mode
(defun my-make-face (face color &optional bold)
  "Create a face from a color and optionally make it bold"
  (make-face face)
  (copy-face 'default face)
  (set-face-foreground face color)
  (if bold (make-face-bold face))
  )

(if (eq window-system 'x)
    (progn
      (my-make-face 'blue "blue")
      (my-make-face 'red "red")
      (my-make-face 'green "dark green")
      (setq font-lock-comment-face 'blue)
      (setq font-lock-string-face 'bold)
      (setq font-lock-type-face 'bold)
      (setq font-lock-keyword-face 'bold)
      (setq font-lock-function-name-face 'red)
      (setq font-lock-doc-string-face 'green)
      (add-hook 'find-file-hooks 'font-lock-auto-mode-select)

      (setq baud-rate 1000000)
      (global-set-key "\C-cmm" 'menu-bar-mode)
      (global-set-key "\C-cms" 'scroll-bar-mode)
      (global-set-key [backspace] 'backward-delete-char)
					;      (global-set-key [delete] 'delete-char)
      (standard-display-european t)
      (load-library "iso-transl")))

;; X11 or PC using direct screen writes
(if window-system
    (progn
      ;;      (global-set-key [M-f1] 'hilit-repaint-command)
      ;;      (global-set-key [M-f2] [?\C-u M-f1])
      (setq hilit-mode-enable-list
	    '(not text-mode c-mode c++-mode emacs-lisp-mode lisp-mode
		  scheme-mode)
	    hilit-auto-highlight nil
	    hilit-auto-rehighlight 'visible
	    hilit-inhibit-hooks nil
	    hilit-inhibit-rebinding t)
      (require 'hilit19)
      (require 'paren))
  (setq baud-rate 2400)			; For slow serial connections
  )

;; TTY type terminal
(if (and (not window-system)
	 (not (equal system-type 'ms-dos)))
    (progn
      (if first-time
	  (progn
	    (keyboard-translate ?\C-h ?\C-?)
	    (keyboard-translate ?\C-? ?\C-h)))))

;; Under UNIX
(if (not (equal system-type 'ms-dos))
    (progn
      (if first-time
	  (server-start))))

;; Add any face changes here
(add-hook 'term-setup-hook 'my-term-setup-hook)
(defun my-term-setup-hook ()
  (if (eq window-system 'pc)
      (progn
;;	(set-face-background 'default "red")
	)))

;; Restore the "desktop" - do this as late as possible
(if first-time
    (progn
      (desktop-load-default)
      (desktop-read)))

;; Indicate that this file has been read at least once
(setq first-time nil)

;; No need to debug anything now

(setq debug-on-error nil)

;; All done
(message "All done, %s%s" (user-login-name) ".")
2.7.4. Extending the Range of Languages Emacs Understands
Now, this is all very well if you only want to program in the languages already catered for in .emacs (C, C++, Perl, Lisp and Scheme), but what happens if a new language called "whizbang" comes out, full of exciting features?
The first thing to do is find out if whizbang comes with any files that tell Emacs about the language. These usually end in .el, short for "Emacs Lisp". For example, if whizbang is a FreeBSD port, we can locate these files by doing
% find /usr/ports/lang/whizbang -name "*.el" -printand install them by copying them into the Emacs site Lisp directory. On FreeBSD, this is /usr/local/share/emacs/site-lisp.
So for example, if the output from the find command was
/usr/ports/lang/whizbang/work/misc/whizbang.elwe would do
# cp /usr/ports/lang/whizbang/work/misc/whizbang.el /usr/local/share/emacs/site-lispNext, we need to decide what extension whizbang source files have. Let us say for the sake of argument that they all end in .wiz. We need to add an entry to our .emacs to make sure Emacs will be able to use the information in whizbang.el.
Find the auto-mode-alist entry in .emacs and add a line for whizbang, such as:
...
("\\.lsp$" . lisp-mode)
("\\.wiz$" . whizbang-mode)
("\\.scm$" . scheme-mode)
...
This means that Emacs will automatically go into whizbang-mode when you edit a file ending in .wiz.
Just below this, you will find the font-lock-auto-mode-list entry.
Add whizbang-mode to it like so:
;; Auto font lock mode
(defvar font-lock-auto-mode-list
  (list 'c-mode 'c++-mode 'c++-c-mode 'emacs-lisp-mode 'whizbang-mode 'lisp-mode 'perl-mode 'scheme-mode)
  "List of modes to always start in font-lock-mode")
This means that Emacs will always enable font-lock-mode (ie syntax highlighting) when editing a .wiz file.
And that is all that is needed. If there is anything else you want done automatically when you open up .wiz,
you can add a whizbang-mode hook (see my-scheme-mode-hook for a simple example that adds auto-indent).
2.8. Further Reading
For information about setting up a development environment for contributing fixes to FreeBSD itself, please see development(7).
Brian Harvey and Matthew Wright Simply Scheme MIT 1994. ISBN 0-262-08226-8
Randall Schwartz Learning Perl O’Reilly 1993 ISBN 1-56592-042-2
Patrick Henry Winston and Berthold Klaus Paul Horn Lisp (3rd Edition) Addison-Wesley 1989 ISBN 0-201-08319-1
Brian W. Kernighan and Rob Pike The Unix Programming Environment Prentice-Hall 1984 ISBN 0-13-937681-X
Brian W. Kernighan and Dennis M. Ritchie The C Programming Language (2nd Edition) Prentice-Hall 1988 ISBN 0-13-110362-8
Bjarne Stroustrup The C++ Programming Language Addison-Wesley 1991 ISBN 0-201-53992-6
W. Richard Stevens Advanced Programming in the Unix Environment Addison-Wesley 1992 ISBN 0-201-56317-7
W. Richard Stevens Unix Network Programming Prentice-Hall 1990 ISBN 0-13-949876-1
Chapter 3. Secure Programming
3.1. Synopsis
This chapter describes some of the security issues that have plagued UNIX® programmers for decades and some of the new tools available to help programmers avoid writing exploitable code.
3.2. Secure Design Methodology
Writing secure applications takes a very scrutinous and pessimistic outlook on life. Applications should be run with the principle of "least privilege" so that no process is ever running with more than the bare minimum access that it needs to accomplish its function. Previously tested code should be reused whenever possible to avoid common mistakes that others may have already fixed.
One of the pitfalls of the UNIX® environment is how easy it is to make assumptions about the sanity of the environment. Applications should never trust user input (in all its forms), system resources, inter-process communication, or the timing of events. UNIX® processes do not execute synchronously so logical operations are rarely atomic.
3.3. Buffer Overflows
Buffer Overflows have been around since the very beginnings of the von Neumann 1 architecture. They first gained widespread notoriety in 1988 with the Morris Internet worm. Unfortunately, the same basic attack remains effective today. By far the most common type of buffer overflow attack is based on corrupting the stack.
Most modern computer systems use a stack to pass arguments to procedures and to store local variables. A stack is a last in first out (LIFO) buffer in the high memory area of a process image. When a program invokes a function a new "stack frame" is created. This stack frame consists of the arguments passed to the function as well as a dynamic amount of local variable space. The "stack pointer" is a register that holds the current location of the top of the stack. Since this value is constantly changing as new values are pushed onto the top of the stack, many implementations also provide a "frame pointer" that is located near the beginning of a stack frame so that local variables can more easily be addressed relative to this value. 1 The return address for function calls is also stored on the stack, and this is the cause of stack-overflow exploits since overflowing a local variable in a function can overwrite the return address of that function, potentially allowing a malicious user to execute any code he or she wants.
Although stack-based attacks are by far the most common, it would also be possible to overrun the stack with a heap-based (malloc/free) attack.
The C programming language does not perform automatic bounds checking on arrays or pointers as many other languages do. In addition, the standard C library is filled with a handful of very dangerous functions.
| May overflow the dest buffer |
| May overflow the dest buffer |
| May overflow the buf buffer |
| May overflow the s buffer |
| May overflow its arguments. |
| May overflow the path buffer |
| May overflow the str buffer. |
3.3.1. Example Buffer Overflow
The following example code contains a buffer overflow designed to overwrite the return address and skip the instruction immediately following the function call. (Inspired by 4)
#include <stdio.h>

void manipulate(char *buffer) {
  char newbuffer[80];
  strcpy(newbuffer,buffer);
}

int main() {
  char ch,buffer[4096];
  int i=0;

  while ((buffer[i++] = getchar()) != '\n') {};

  i=1;
  manipulate(buffer);
  i=2;
  printf("The value of i is : %d\n",i);
  return 0;
}
Let us examine what the memory image of this process would look like if we were to input 160 spaces into our little program before hitting return.
Obviously more malicious input can be devised to execute actual compiled instructions (such as exec(/bin/sh)).
3.3.2. Avoiding Buffer Overflows
The most straightforward solution to the problem of stack-overflows is to always use length restricted memory and string copy functions.
strncpy and strncat are part of the standard C library.
These functions accept a length value as a parameter which should be no larger than the size of the destination buffer.
These functions will then copy up to 'length' bytes from the source to the destination.
However there are a number of problems with these functions.
Neither function guarantees NUL termination if the size of the input buffer is as large as the destination.
The length parameter is also used inconsistently between strncpy and strncat so it is easy for programmers to get confused as to their proper usage.
There is also a significant performance loss compared to strcpy when copying a short string into a large buffer since strncpy NUL fills up the size specified.
Another memory copy implementation exists to get around these problems.
The strlcpy and strlcat functions guarantee that they will always null terminate the destination string when given a non-zero length argument.
3.3.2.1. Compiler based run-time bounds checking
Unfortunately there is still a very large assortment of code in public use which blindly copies memory around without using any of the bounded copy routines we just discussed. Fortunately, there is a way to help prevent such attacks - run-time bounds checking, which is implemented by several C/C++ compilers.
ProPolice is one such compiler feature, and is integrated into gcc(1) versions 4.1 and later. It replaces and extends the earlier StackGuard gcc(1) extension.
ProPolice helps to protect against stack-based buffer overflows and other attacks by laying pseudo-random numbers in key areas of the stack before calling any function. When a function returns, these "canaries" are checked and if they are found to have been changed the executable is immediately aborted. Thus any attempt to modify the return address or other variable stored on the stack in an attempt to get malicious code to run is unlikely to succeed, as the attacker would have to also manage to leave the pseudo-random canaries untouched.
Recompiling your application with ProPolice is an effective means of stopping most buffer-overflow attacks, but it can still be compromised.
3.3.2.2. Library based run-time bounds checking
Compiler-based mechanisms are completely useless for binary-only software for which you cannot recompile.
For these situations there are a number of libraries which re-implement the unsafe functions of the C-library (strcpy, fscanf, getwd, etc..) and ensure that these functions can never write past the stack pointer.
libsafe
libverify
libparanoia
Unfortunately these library-based defenses have a number of shortcomings. These libraries only protect against a very small set of security related issues and they neglect to fix the actual problem. These defenses may fail if the application was compiled with -fomit-frame-pointer. Also, the LD_PRELOAD and LD_LIBRARY_PATH environment variables can be overwritten/unset by the user.
3.4. SetUID issues
There are at least 6 different IDs associated with any given process, and you must therefore be very careful with the access that your process has at any given time. In particular, all seteuid applications should give up their privileges as soon as it is no longer required.
The real user ID can only be changed by a superuser process. The login program sets this when a user initially logs in and it is seldom changed.
The effective user ID is set by the exec() functions if a program has its seteuid bit set.
An application can call seteuid() at any time to set the effective user ID to either the real user ID or the saved set-user-ID.
When the effective user ID is set by exec() functions, the previous value is saved in the saved set-user-ID.
3.5. Limiting your program’s environment
The traditional method of restricting a process is with the chroot() system call.
This system call changes the root directory from which all other paths are referenced for a process and any child processes.
For this call to succeed the process must have execute (search) permission on the directory being referenced.
The new environment does not actually take effect until you chdir() into your new environment.
It should also be noted that a process can easily break out of a chroot environment if it has root privilege.
This could be accomplished by creating device nodes to read kernel memory, attaching a debugger to a process outside of the chroot(8) environment, or in many other creative ways.
The behavior of the chroot() system call can be controlled somewhat with the kern.chroot_allow_open_directories sysctl variable.
When this value is set to 0, chroot() will fail with EPERM if there are any directories open.
If set to the default value of 1, then chroot() will fail with EPERM if there are any directories open and the process is already subject to a chroot() call.
For any other value, the check for open directories will be bypassed completely.
3.5.1. FreeBSD’s jail functionality
The concept of a Jail extends upon the chroot() by limiting the powers of the superuser to create a true `virtual server'.
Once a prison is set up all network communication must take place through the specified IP address, and the power of "root privilege" in this jail is severely constrained.
While in a prison, any tests of superuser power within the kernel using the suser() call will fail.
However, some calls to suser() have been changed to a new interface suser_xxx().
This function is responsible for recognizing or denying access to superuser power for imprisoned processes.
A superuser process within a jailed environment has the power to:
Manipulate credential with
setuid,seteuid,setgid,setegid,setgroups,setreuid,setregid,setloginSet resource limits with
setrlimitModify some sysctl nodes (kern.hostname)
chroot()Set flags on a vnode:
chflags,fchflagsSet attributes of a vnode such as file permission, owner, group, size, access time, and modification time.
Bind to privileged ports in the Internet domain (ports < 1024)
Jail is a very useful tool for running applications in a secure environment but it does have some shortcomings.
Currently, the IPC mechanisms have not been converted to the suser_xxx so applications such as MySQL cannot be run within a jail.
Superuser access may have a very limited meaning within a jail, but there is no way to specify exactly what "very limited" means.
3.5.2. POSIX®.1e Process Capabilities
POSIX® has released a working draft that adds event auditing, access control lists, fine grained privileges, information labeling, and mandatory access control.
This is a work in progress and is the focus of the TrustedBSD project. Some of the initial work has been committed to FreeBSD-CURRENT (cap_set_proc(3)).
3.6. Trust
An application should never assume that anything about the users environment is sane. This includes (but is certainly not limited to): user input, signals, environment variables, resources, IPC, mmaps, the filesystem working directory, file descriptors, the # of open files, etc.
You should never assume that you can catch all forms of invalid input that a user might supply. Instead, your application should use positive filtering to only allow a specific subset of inputs that you deem safe. Improper data validation has been the cause of many exploits, especially with CGI scripts on the world wide web. For filenames you need to be extra careful about paths ("../", "/"), symbolic links, and shell escape characters.
Perl has a really cool feature called "Taint" mode which can be used to prevent scripts from using data derived outside the program in an unsafe way.
This mode will check command line arguments, environment variables, locale information, the results of certain syscalls (readdir(), readlink(), getpwxxx()), and all file input.
3.7. Race Conditions
A race condition is anomalous behavior caused by the unexpected dependence on the relative timing of events. In other words, a programmer incorrectly assumed that a particular event would always happen before another.
Some of the common causes of race conditions are signals, access checks, and file opens.
Signals are asynchronous events by nature so special care must be taken in dealing with them.
Checking access with access(2) then open(2) is clearly non-atomic.
Users can move files in between the two calls.
Instead, privileged applications should seteuid() and then call open() directly.
Along the same lines, an application should always set a proper umask before open() to obviate the need for spurious chmod() calls.
Chapter 4. Localization and Internationalization - L10N and I18N
4.1. Programming I18N Compliant Applications
To make your application more useful for speakers of other languages, we hope that you will program I18N compliant. The GNU gcc compiler and GUI libraries like QT and GTK support I18N through special handling of strings. Making a program I18N compliant is very easy. It allows contributors to port your application to other languages quickly. Refer to the library specific I18N documentation for more details.
In contrast with common perception, I18N compliant code is easy to write. Usually, it only involves wrapping your strings with library specific functions. In addition, please be sure to allow for wide or multibyte character support.
4.1.1. A Call to Unify the I18N Effort
It has come to our attention that the individual I18N/L10N efforts for each country has been repeating each others' efforts. Many of us have been reinventing the wheel repeatedly and inefficiently. We hope that the various major groups in I18N could congregate into a group effort similar to the Core Team’s responsibility.
Currently, we hope that, when you write or port I18N programs, you would send it out to each country’s related FreeBSD mailing list for testing. In the future, we hope to create applications that work in all the languages out-of-the-box without dirty hacks.
The FreeBSD internationalization mailing list has been established. If you are an I18N/L10N developer, please send your comments, ideas, questions, and anything you deem related to it.
4.2. Localized Messages with POSIX.1 Native Language Support (NLS)
Beyond the basic I18N functions, like supporting various input encodings or supporting national conventions, such as the different decimal separators, at a higher level of I18N, it is possible to localize the messages written to the output by the various programs. A common way of doing this is using the POSIX.1 NLS functions, which are provided as a part of the FreeBSD base system.
4.2.1. Organizing Localized Messages into Catalog Files
POSIX.1 NLS is based on catalog files, which contain the localized messages in the desired encoding.
The messages are organized into sets and each message is identified by an integer number in the containing set.
The catalog files are conventionally named after the locale they contain localized messages for, followed by the .msg extension.
For instance, the Hungarian messages for ISO8859-2 encoding should be stored in a file called hu_HU.ISO8859-2.
These catalog files are common text files that contain the numbered messages.
It is possible to write comments by starting the line with a $ sign.
Set boundaries are also separated by special comments, where the keyword set must directly follow the $ sign.
The set keyword is then followed by the set number. For example:
$set 1
The actual message entries start with the message number and followed by the localized message. The well-known modifiers from printf(3) are accepted:
15 "File not found: %s\n"
The language catalog files have to be compiled into a binary form before they can be opened from the program. This conversion is done with the gencat(1) utility. Its first argument is the filename of the compiled catalog and its further arguments are the input catalogs. The localized messages can also be organized into more catalog files and then all of them can be processed with gencat(1).
4.2.2. Using the Catalog Files from the Source Code
Using the catalog files is simple.
To use the related functions, nl_types.h must be included.
Before using a catalog, it has to be opened with catopen(3).
The function takes two arguments.
The first parameter is the name of the installed and compiled catalog.
Usually, the name of the program is used, such as grep.
This name will be used when looking for the compiled catalog file.
The catopen(3) call looks for this file in /usr/share/nls/locale/catname and in /usr/local/share/nls/locale/catname, where locale is the locale set and catname is the catalog name being discussed.
The second parameter is a constant, which can have two values:
NL_CAT_LOCALE, which means that the used catalog file will be based onLC_MESSAGES.0, which means thatLANGhas to be used to open the proper catalog.
The catopen(3) call returns a catalog identifier of type nl_catd.
Please refer to the manual page for a list of possible returned error codes.
After opening a catalog catgets(3) can be used to retrieve a message. The first parameter is the catalog identifier returned by catopen(3), the second one is the number of the set, the third one is the number of the messages, and the fourth one is a fallback message, which will be returned if the requested message cannot be retrieved from the catalog file.
After using the catalog file, it must be closed by calling catclose(3), which has one argument, the catalog id.
4.2.3. A Practical Example
The following example will demonstrate an easy solution on how to use NLS catalogs in a flexible way.
The below lines need to be put into a common header file of the program, which is included into all source files where localized messages are necessary:
#ifdef WITHOUT_NLS
#define getstr(n)	 nlsstr[n]
#else
#include <nl_types.h>

extern nl_catd		 catalog;
#define getstr(n)	 catgets(catalog, 1, n, nlsstr[n])
#endif

extern char		*nlsstr[];
Next, put these lines into the global declaration part of the main source file:
#ifndef WITHOUT_NLS
#include <nl_types.h>
nl_catd	 catalog;
#endif

/*
 * Default messages to use when NLS is disabled or no catalog
 * is found.
 */
char    *nlsstr[] = {
        "",
/* 1*/  "some random message",
/* 2*/  "some other message"
};
Next come the real code snippets, which open, read, and close the catalog:
#ifndef WITHOUT_NLS
	catalog = catopen("myapp", NL_CAT_LOCALE);
#endif

...

printf(getstr(1));

...

#ifndef WITHOUT_NLS
	catclose(catalog);
#endif
4.2.3.1. Reducing Strings to Localize
There is a good way of reducing the strings that need to be localized by using libc error messages. This is also useful to just avoid duplication and provide consistent error messages for the common errors that can be encountered by a great many of programs.
First, here is an example that does not use libc error messages:
#include <err.h>
...
if (!S_ISDIR(st.st_mode))
	errx(1, "argument is not a directory");
This can be transformed to print an error message by reading errno and printing an error message accordingly:
#include <err.h>
#include <errno.h>
...
if (!S_ISDIR(st.st_mode)) {
	errno = ENOTDIR;
	err(1, NULL);
}
In this example, the custom string is eliminated, thus translators will have less work when localizing the program and users will see the usual "Not a directory" error message when they encounter this error.
This message will probably seem more familiar to them.
Please note that it was necessary to include errno.h in order to directly access errno.
It is worth to note that there are cases when errno is set automatically by a preceding call, so it is not necessary to set it explicitly:
#include <err.h>
...
if ((p = malloc(size)) == NULL)
	err(1, NULL);
4.2.4. Making use of bsd.nls.mk
Using the catalog files requires few repeatable steps, such as compiling the catalogs and installing them to the proper location. In order to simplify this process even more, bsd.nls.mk introduces some macros. It is not necessary to include bsd.nls.mk explicitly, it is pulled in from the common Makefiles, such as bsd.prog.mk or bsd.lib.mk.
Usually it is enough to define NLSNAME, which should have the catalog name mentioned as the first argument of catopen(3) and list the catalog files in NLS without their .msg extension.
Here is an example, which makes it possible to disable NLS when used with the code examples before.
The WITHOUT_NLS make(1) variable has to be defined in order to build the program without NLS support.
.if !defined(WITHOUT_NLS)
NLS=	es_ES.ISO8859-1
NLS+=	hu_HU.ISO8859-2
NLS+=	pt_BR.ISO8859-1
.else
CFLAGS+=	-DWITHOUT_NLS
.endif
Conventionally, the catalog files are placed under the nls subdirectory and this is the default behavior of bsd.nls.mk.
It is possible, though to override the location of the catalogs with the NLSSRCDIR make(1) variable.
The default name of the precompiled catalog files also follow the naming convention mentioned before.
It can be overridden by setting the NLSNAME variable.
There are other options to fine tune the processing of the catalog files but usually it is not needed, thus they are not described here.
For further information on bsd.nls.mk, please refer to the file itself, it is short and easy to understand.
Chapter 5. Source Tree Guidelines and Policies
This chapter documents various guidelines and policies in force for the FreeBSD source tree.
5.1. Style Guidelines
Consistent coding style is extremely important, particularly with large projects like FreeBSD. Code should follow the FreeBSD coding styles described in style(9) and style.Makefile(5).
5.2. MAINTAINER on Makefiles
If a particular portion of the FreeBSD src/ distribution is being maintained by a person or group of persons, this is communicated through an entry in src/MAINTAINERS.
Maintainers of ports within the Ports Collection express their maintainership to the world by adding a MAINTAINER line to the Makefile of the port in question:
MAINTAINER= email-addresses
For other parts of the repository, or for sections not listed as having a maintainer, or when you are unsure who the active maintainer is, try looking at the recent commit history of the relevant parts of the source tree. It is quite often the case that a maintainer is not explicitly named, but the people who are actively working in a part of the source tree for, say, the last couple of years are interested in reviewing changes. Even if this is not specifically mentioned in the documentation or the source itself, asking for a review as a form of courtesy is a very reasonable thing to do. |
The role of the maintainer is as follows:
The maintainer owns and is responsible for that code. This means that he or she is responsible for fixing bugs and answering problem reports pertaining to that piece of the code, and in the case of contributed software, for tracking new versions, as appropriate.
Changes to directories which have a maintainer defined shall be sent to the maintainer for review before being committed. Only if the maintainer does not respond for an unacceptable period of time, to several emails, will it be acceptable to commit changes without review by the maintainer. However, it is suggested that you try to have the changes reviewed by someone else if at all possible.
It is of course not acceptable to add a person or group as maintainer unless they agree to assume this duty. On the other hand it does not have to be a committer and it can easily be a group of people.
5.3. Contributed Software
Some parts of the FreeBSD distribution consist of software that is actively being maintained outside the FreeBSD project. For historical reasons, we call this contributed software. Some examples are LLVM, zlib(3), and awk(1).
The accepted procedure for managing contributed software involves creating a vendor branch, where the software can be imported cleanly (without modification) and updates can be tracked in a versioned manner. Then, the content of the vendor branch is applied to the source tree, possibly with local modifications. FreeBSD-specific build glue is maintained in the source tree, not in the vendor branch.
Depending on their needs and complexity, individual software projects may deviate from this procedure, at the discretion of the maintainer.
The exact steps required to update a particular piece of contributed software should be recorded in a file named FREEBSD-upgrade;
for example, libarchive’s FREEBSD-upgrade file.
Contributed software is usually placed in the contrib/ subdirectory of the source tree, with some exceptions. Contributed software used only by the kernel lives under sys/contrib/.
Because it makes it harder to import future versions minor, trivial and/or cosmetic changes are strongly discouraged on files that are still tracking the vendor branch. |
5.3.1. Vendor Imports
The standard process for managing contributed software and vendor branches is described in detail by the Committer’s Guide.
5.4. Encumbered Files
It might occasionally be necessary to include an encumbered file in the FreeBSD source tree. For example, if a device requires a small piece of binary code to be loaded to it before the device will operate, and we do not have the source to that code, then the binary file is said to be encumbered. The following policies apply to including encumbered files in the FreeBSD source tree.
Any file which is interpreted or executed by the system CPU(s) and not in source format is encumbered.
Any file with a license more restrictive than BSD or GNU is encumbered.
A file which contains downloadable binary data for use by the hardware is not encumbered, unless (1) or (2) apply to it.
Any encumbered file requires specific approval from the Core Team before it is added to the repository.
Encumbered files go in src/contrib or src/sys/contrib.
The entire module should be kept together. There is no point in splitting it, unless there is code-sharing with non-encumbered code.
In the past binary files were typically uuencoded, and named arch/filename.o.uu. This is no longer necessary, and binary files may be added to the repository unchanged.
Kernel files:
User-land files:
The Core team decides if the code should be part of the installed base system.
The Release Engineering decides if it goes into the release.
5.5. Shared Libraries
If you are adding shared library support to a port or other piece of software that does not have one, the version numbers should follow these rules. Generally, the resulting numbers will have nothing to do with the release version of the software.
For ports:
Prefer using the number already selected by upstream
If upstream provides symbol versioning, ensure that we use their script
For the base system:
Start library version from 1
It is strongly recommended to add symbol versioning to the new library
If there is an incompatible change, handle it with symbol versioning, maintaining backward ABI compatibility
If this is impossible, or the library does not use symbol versioning, bump the library version
Before even considering bumping library version for symbol-versioned library, consult with Release Engineering team, providing reasons why the change is so important that it should be allowed despite breaking the ABI
For instance, added functions and bugfixes not changing the interfaces are fine, while deleted functions, changed function call syntax, etc. should either provide backward-compat symbols, or will force the major version number to change.
It is the duty of the committer making the change to handle library versioning.
The ELF dynamic linker matches library names literally.
There is a popular convention where library version is written in the form libexample.so.x.y, where x is the major version, and y is minor.
Common practice is to set the library' soname (DT_SONAME ELF tag) to libexample.so.x, and set up symlinks libexample.so.x→libexample.so.x.y, libexample.so→libexample.so.x on library installation for the latest minor version y.
Then, since the static linker searches for libexample.so when the -lexample command line option is specified, objects linked with libexample get a dependency on the right library.
Almost all popular build systems use this scheme automatically.
Chapter 6. Regression and Performance Testing
Regression tests are used to exercise a particular bit of the system to check that it works as expected, and to make sure that old bugs are not reintroduced.
The FreeBSD regression testing tools can be found in the FreeBSD source tree in the directory src/tools/regression.
6.1. Micro Benchmark Checklist
This section contains hints for doing proper micro-benchmarking on FreeBSD or of FreeBSD itself.
It is not possible to use all of the suggestions below every single time, but the more used, the better the benchmark’s ability to test small differences will be.
Disable APM and any other kind of clock fiddling (ACPI ?).
Run in single user mode. E.g., cron(8), and other daemons only add noise. The sshd(8) daemon can also cause problems. If ssh access is required during testing either disable the SSHv1 key regeneration, or kill the parent
sshddaemon during the tests.Do not run ntpd(8).
If syslog(3) events are generated, run syslogd(8) with an empty /etc/syslogd.conf, otherwise, do not run it.
Minimize disk-I/O, avoid it entirely if possible.
Do not mount file systems that are not needed.
Mount /, /usr, and any other file system as read-only if possible. This removes atime updates to disk (etc.) from the I/O picture.
Reinitialize the read/write test file system with newfs(8) and populate it from a tar(1) or dump(8) file before every run. Unmount and mount it before starting the test. This results in a consistent file system layout. For a worldstone test this would apply to /usr/obj (just reinitialize with
newfsand mount). To get 100% reproducibility, populate the file system from a dd(1) file (i.e.:dd if=myimage of=/dev/ad0s1h bs=1m)Use malloc backed or preloaded md(4) partitions.
Reboot between individual iterations of the test, this gives a more consistent state.
Remove all non-essential device drivers from the kernel. For instance if USB is not needed for the test, do not put USB in the kernel. Drivers which attach often have timeouts ticking away.
Unconfigure hardware that are not in use. Detach disks with atacontrol(8) and camcontrol(8) if the disks are not used for the test.
Do not configure the network unless it is being tested, or wait until after the test has been performed to ship the results off to another computer.
Disable "Turbo-modes" because they make the clock frequency explicitly depend on the environment. This means that benchmark runs on 100% identical code, may depend on time of day, coffee vs. soda or even how many other people are in the office.
If the system must be connected to a public network, watch out for spikes of broadcast traffic. Even though it is hardly noticeable, it will take up CPU cycles. Multicast has similar caveats. * Put each file system on its own disk. This minimizes jitter from head-seek optimizations. * Minimize output to serial or VGA consoles. Running output into files gives less jitter. (Serial consoles easily become a bottleneck.) Do not touch keyboard while the test is running, even space or back-space shows up in the numbers. * Make sure the test is long enough, but not too long. If the test is too short, timestamping is a problem. If it is too long temperature changes and drift will affect the frequency of the quartz crystals in the computer. Rule of thumb: more than a minute, less than an hour. * Try to keep the temperature as stable as possible around the machine. This affects both quartz crystals and disk drive algorithms. To get real stable clock, consider stabilized clock injection. E.g., get a OCXO + PLL, inject output into clock circuits instead of motherboard xtal. Contact Poul-Henning Kamp <phk@FreeBSD.org> for more information about this. * Run the test at least 3 times but it is better to run more than 20 times both for "before" and "after" code. Try to interleave if possible (i.e.: do not run 20 times before then 20 times after), this makes it possible to spot environmental effects. Do not interleave 1:1, but 3:3, this makes it possible to spot interaction effects.
+
A good pattern is: bababa{bbbaaa}*.
This gives hint after the first 1+1 runs (so it is possible to stop the test if it goes entirely the wrong way), a standard deviation after the first 3+3 (gives a good indication if it is going to be worth a long run) and trending and interaction numbers later on.
* Use ministat(1) to see if the numbers are significant. Consider buying "Cartoon guide to statistics" ISBN: 0062731025, highly recommended, if you have forgotten or never learned about standard deviation and Student’s T.
* Do not use background fsck(8) unless the test is a benchmark of background fsck. Also, disable background_fsck in /etc/rc.conf unless the benchmark is not started at least 60+"fsck runtime" seconds after the boot, as rc(8) wakes up and checks if fsck needs to run on any file systems when background fsck is enabled. Likewise, make sure there are no snapshots lying around unless the benchmark is a test with snapshots.
* If the benchmark show unexpected bad performance, check for things like high interrupt volume from an unexpected source. Some versions of ACPI have been reported to "misbehave" and generate excess interrupts. To help diagnose odd test results, take a few snapshots of vmstat -i and look for anything unusual.
* Make sure to be careful about optimization parameters for kernel and userspace, likewise debugging. It is easy to let something slip through and realize later the test was not comparing the same thing.
* Do not ever benchmark with the WITNESS and INVARIANTS kernel options enabled unless the test is interested to benchmarking those features. WITNESS can cause 400%+ drops in performance. Likewise, userspace malloc(3) parameters default differently in -CURRENT from the way they ship in production releases.
6.2. The FreeBSD Source Tinderbox
The source Tinderbox consists of:
A build script, tinderbox, that automates checking out a specific version of the FreeBSD source tree and building it.
A supervisor script, tbmaster, that monitors individual Tinderbox instances, logs their output, and emails failure notices.
A CGI script named index.cgi that reads a set of tbmaster logs and presents an easy-to-read HTML summary of them.
A set of build servers that continually test the tip of the most important FreeBSD code branches.
A webserver that keeps a complete set of Tinderbox logs and displays an up-to-date summary.
The scripts are maintained and were developed by Dag-Erling Smørgrav <des@FreeBSD.org>, and are now written in Perl, a move on from their original incarnation as shell scripts. All scripts and configuration files are kept in /projects/tinderbox/.
For more information about the tinderbox and tbmaster scripts at this stage, see their respective man pages: tinderbox(1) and tbmaster(1).
6.3. The index.cgi Script
The index.cgi script generates the HTML summary of tinderbox and tbmaster logs. Although originally intended to be used as a CGI script, as indicated by its name, this script can also be run from the command line or from a cron(8) job, in which case it will look for logs in the directory where the script is located. It will automatically detect context, generating HTTP headers when it is run as a CGI script. It conforms to XHTML standards and is styled using CSS.
The script starts in the main() block by attempting to verify that it is running on the official Tinderbox website.
If it is not, a page indicating it is not an official website is produced, and a URL to the official site is provided.
Next, it scans the log directory to get an inventory of configurations, branches and architectures for which log files exist, to avoid hard-coding a list into the script and potentially ending up with blank rows or columns. This information is derived from the names of the log files matching the following pattern:
tinderbox-$config-$branch-$arch-$machine.{brief,full}The configurations used on the official Tinderbox build servers are named for the branches they build.
For example, the releng_8 configuration is used to build RELENG_8 as well as all still-supported release branches.
Once all of this startup procedure has been successfully completed, do_config() is called for each configuration.
The do_config() function generates HTML for a single Tinderbox configuration.
It works by first generating a header row, then iterating over each branch build with the specified configuration, producing a single row of results for each in the following manner:
For each item:
For each machine within that architecture:
If a brief log file exists, then:
Call
success()to determine the outcome of the build.Output the modification size.
Output the size of the brief log file with a link to the log file itself.
If a full log file also exists, then:
Output the size of the full log file with a link to the log file itself.
Otherwise:
No output.
The success() function mentioned above scans a brief log file for the string "tinderbox run completed" in order to determine whether the build was successful.
Configurations and branches are sorted according to their branch rank. This is computed as follows:
HEADandCURRENThave rank 9999.RELENG_xhas rankxx99.RELENG_x_yhas rank xxyy.
This means that HEAD always ranks highest, and RELENG branches are ranked in numerical order, with each STABLE branch ranking higher than the release branches forked off of it.
For instance, for FreeBSD 8, the order from highest to lowest would be:
RELENG_8(branch rank 899).RELENG_8_3(branch rank 803).RELENG_8_2(branch rank 802).RELENG_8_1(branch rank 801).RELENG_8_0(branch rank 800).
The colors that Tinderbox uses for each cell in the table are defined by CSS. Successful builds are displayed with green text; unsuccessful builds are displayed with red text. The color fades as time passes since the corresponding build, with every half an hour bringing the color closer to grey.
6.4. Official Build Servers
The official Tinderbox build servers are hosted by Sentex Data Communications, who also host the FreeBSD Netperf Cluster.
Three build servers currently exist:
freebsd-current.sentex.ca builds:
HEADfor amd64, arm, i386, i386/pc98, ia64, mips, powerpc, powerpc64, and sparc64.RELENG_9and supported 9.X branches for amd64, arm, i386, i386/pc98, ia64, mips, powerpc, powerpc64, and sparc64.
freebsd-stable.sentex.ca builds:
RELENG_8and supported 8.X branches for amd64, i386, i386/pc98, ia64, mips, powerpc and sparc64.
freebsd-legacy.sentex.ca builds:
RELENG_7and supported 7.X branches for amd64, i386, i386/pc98, ia64, powerpc, and sparc64.
6.5. Official Summary Site
Summaries and logs from the official build servers are available online at http://tinderbox.FreeBSD.org, hosted by Dag-Erling Smørgrav <des@FreeBSD.org> and set up as follows:
Part II: Interprocess Communication
Chapter 7. Sockets
7.1. Synopsis
BSD sockets take interprocess communications to a new level. It is no longer necessary for the communicating processes to run on the same machine. They still can, but they do not have to.
Not only do these processes not have to run on the same machine, they do not have to run under the same operating system. Thanks to BSD sockets, your FreeBSD software can smoothly cooperate with a program running on a Macintosh®, another one running on a Sun™ workstation, yet another one running under Windows® 2000, all connected with an Ethernet-based local area network.
But your software can equally well cooperate with processes running in another building, or on another continent, inside a submarine, or a space shuttle.
It can also cooperate with processes that are not part of a computer (at least not in the strict sense of the word), but of such devices as printers, digital cameras, medical equipment. Just about anything capable of digital communications.
7.2. Networking and Diversity
We have already hinted on the diversity of networking. Many different systems have to talk to each other. And they have to speak the same language. They also have to understand the same language the same way.
People often think that body language is universal. But it is not. Back in my early teens, my father took me to Bulgaria. We were sitting at a table in a park in Sofia, when a vendor approached us trying to sell us some roasted almonds.
I had not learned much Bulgarian by then, so, instead of saying no, I shook my head from side to side, the "universal" body language for no. The vendor quickly started serving us some almonds.
I then remembered I had been told that in Bulgaria shaking your head sideways meant yes. Quickly, I started nodding my head up and down. The vendor noticed, took his almonds, and walked away. To an uninformed observer, I did not change the body language: I continued using the language of shaking and nodding my head. What changed was the meaning of the body language. At first, the vendor and I interpreted the same language as having completely different meaning. I had to adjust my own interpretation of that language so the vendor would understand.
It is the same with computers: The same symbols may have different, even outright opposite meaning. Therefore, for two computers to understand each other, they must not only agree on the same language, but on the same interpretation of the language.
7.3. Protocols
While various programming languages tend to have complex syntax and use a number of multi-letter reserved words (which makes them easy for the human programmer to understand), the languages of data communications tend to be very terse. Instead of multi-byte words, they often use individual bits. There is a very convincing reason for it: While data travels inside your computer at speeds approaching the speed of light, it often travels considerably slower between two computers.
As the languages used in data communications are so terse, we usually refer to them as protocols rather than languages.
As data travels from one computer to another, it always uses more than one protocol. These protocols are layered. The data can be compared to the inside of an onion: You have to peel off several layers of "skin" to get to the data. This is best illustrated with a picture:
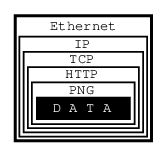
Figure 1. Protocol Layers
In this example, we are trying to get an image from a web page we are connected to via an Ethernet.
The image consists of raw data, which is simply a sequence of RGB values that our software can process, i.e., convert into an image and display on our monitor.
Alas, our software has no way of knowing how the raw data is organized: Is it a sequence of RGB values, or a sequence of grayscale intensities, or perhaps of CMYK encoded colors? Is the data represented by 8-bit quanta, or are they 16 bits in size, or perhaps 4 bits? How many rows and columns does the image consist of? Should certain pixels be transparent?
I think you get the picture…
To inform our software how to handle the raw data, it is encoded as a PNG file. It could be a GIF, or a JPEG, but it is a PNG.
And PNG is a protocol.
At this point, I can hear some of you yelling, "No, it is not! It is a file format!"
Well, of course it is a file format. But from the perspective of data communications, a file format is a protocol: The file structure is a language, a terse one at that, communicating to our process how the data is organized. Ergo, it is a protocol.
Alas, if all we received was the PNG file, our software would be facing a serious problem: How is it supposed to know the data is representing an image, as opposed to some text, or perhaps a sound, or what not? Secondly, how is it supposed to know the image is in the PNG format as opposed to GIF, or JPEG, or some other image format?
To obtain that information, we are using another protocol: HTTP. This protocol can tell us exactly that the data represents an image, and that it uses the PNG protocol. It can also tell us some other things, but let us stay focused on protocol layers here.
So, now we have some data wrapped in the PNG protocol, wrapped in the HTTP protocol. How did we get it from the server?
By using TCP/IP over Ethernet, that is how. Indeed, that is three more protocols. Instead of continuing inside out, I am now going to talk about Ethernet, simply because it is easier to explain the rest that way.
Ethernet is an interesting system of connecting computers in a local area network (LAN). Each computer has a network interface card (NIC), which has a unique 48-bit ID called its address. No two Ethernet NICs in the world have the same address.
These NICs are all connected with each other. Whenever one computer wants to communicate with another in the same Ethernet LAN, it sends a message over the network. Every NIC sees the message. But as part of the Ethernet protocol, the data contains the address of the destination NIC (among other things). So, only one of all the network interface cards will pay attention to it, the rest will ignore it.
But not all computers are connected to the same network. Just because we have received the data over our Ethernet does not mean it originated in our own local area network. It could have come to us from some other network (which may not even be Ethernet based) connected with our own network via the Internet.
All data is transferred over the Internet using IP, which stands for Internet Protocol. Its basic role is to let us know where in the world the data has arrived from, and where it is supposed to go to. It does not guarantee we will receive the data, only that we will know where it came from if we do receive it.
Even if we do receive the data, IP does not guarantee we will receive various chunks of data in the same order the other computer has sent it to us. So, we can receive the center of our image before we receive the upper left corner and after the lower right, for example.
It is TCP (Transmission Control Protocol) that asks the sender to resend any lost data and that places it all into the proper order.
All in all, it took five different protocols for one computer to communicate to another what an image looks like. We received the data wrapped into the PNG protocol, which was wrapped into the HTTP protocol, which was wrapped into the TCP protocol, which was wrapped into the IP protocol, which was wrapped into the Ethernet protocol.
Oh, and by the way, there probably were several other protocols involved somewhere on the way. For example, if our LAN was connected to the Internet through a dial-up call, it used the PPP protocol over the modem which used one (or several) of the various modem protocols, et cetera, et cetera, et cetera…
As a developer you should be asking by now, "How am I supposed to handle it all?"
Luckily for you, you are not supposed to handle it all. You are supposed to handle some of it, but not all of it. Specifically, you need not worry about the physical connection (in our case Ethernet and possibly PPP, etc). Nor do you need to handle the Internet Protocol, or the Transmission Control Protocol.
In other words, you do not have to do anything to receive the data from the other computer. Well, you do have to ask for it, but that is almost as simple as opening a file.
Once you have received the data, it is up to you to figure out what to do with it. In our case, you would need to understand the HTTP protocol and the PNG file structure.
To use an analogy, all the internetworking protocols become a gray area: Not so much because we do not understand how it works, but because we are no longer concerned about it. The sockets interface takes care of this gray area for us:
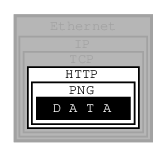
Figure 2. Sockets Covered Protocol Layers
We only need to understand any protocols that tell us how to interpret the data, not how to receive it from another process, nor how to send it to another process.
7.4. The Sockets Model
BSD sockets are built on the basic UNIX® model: Everything is a file. In our example, then, sockets would let us receive an HTTP file, so to speak. It would then be up to us to extract the PNG file from it.
Due to the complexity of internetworking, we cannot just use the open system call, or the open() C function.
Instead, we need to take several steps to "opening" a socket.
Once we do, however, we can start treating the socket the same way we treat any file descriptor:
We can read from it, write to it, pipe it, and, eventually, close it.
7.5. Essential Socket Functions
While FreeBSD offers different functions to work with sockets, we only need four to "open" a socket. And in some cases we only need two.
7.5.1. The Client-Server Difference
Typically, one of the ends of a socket-based data communication is a server, the other is a client.
7.5.1.1. The Common Elements
7.5.1.1.1. socket
The one function used by both, clients and servers, is socket(2). It is declared this way:
int socket(int domain, int type, int protocol);
The return value is of the same type as that of open, an integer.
FreeBSD allocates its value from the same pool as that of file handles.
That is what allows sockets to be treated the same way as files.
The domain argument tells the system what protocol family you want it to use.
Many of them exist, some are vendor specific, others are very common.
They are declared in sys/socket.h.
Use PF_INET for UDP, TCP and other Internet protocols (IPv4).
Five values are defined for the type argument, again, in sys/socket.h.
All of them start with “SOCK_”.
The most common one is SOCK_STREAM, which tells the system you are asking for a reliable stream delivery service (which is TCP when used with PF_INET).
If you asked for SOCK_DGRAM, you would be requesting a connectionless datagram delivery service (in our case, UDP).
If you wanted to be in charge of the low-level protocols (such as IP), or even network interfaces (e.g., the Ethernet), you would need to specify SOCK_RAW.
Finally, the protocol argument depends on the previous two arguments, and is not always meaningful.
In that case, use 0 for its value.
The Unconnected Socket Nowhere, in the This is on purpose: To use a telephone analogy, we have just attached a modem to the phone line. We have neither told the modem to make a call, nor to answer if the phone rings. |
7.5.1.1.2. sockaddr
Various functions of the sockets family expect the address of (or pointer to, to use C terminology) a small area of the memory.
The various C declarations in the sys/socket.h refer to it as struct sockaddr.
This structure is declared in the same file:
/*
 * Structure used by kernel to store most
 * addresses.
 */
struct sockaddr {
	unsigned char	sa_len;		/* total length */
	sa_family_t	sa_family;	/* address family */
	char		sa_data[14];	/* actually longer; address value */
};
#define	SOCK_MAXADDRLEN	255		/* longest possible addresses */
Please note the vagueness with which the sa_data field is declared, just as an array of 14 bytes,
with the comment hinting there can be more than 14 of them.
This vagueness is quite deliberate. Sockets is a very powerful interface. While most people perhaps think of it as nothing more than the Internet interface-and most applications probably use it for that nowadays-sockets can be used for just about any kind of interprocess communications, of which the Internet (or, more precisely, IP) is only one.
The sys/socket.h refers to the various types of protocols sockets will handle as address families,
and lists them right before the definition of sockaddr:
/*
 * Address families.
 */
#define	AF_UNSPEC	0		/* unspecified */
#define	AF_LOCAL	1		/* local to host (pipes, portals) */
#define	AF_UNIX		AF_LOCAL	/* backward compatibility */
#define	AF_INET		2		/* internetwork: UDP, TCP, etc. */
#define	AF_IMPLINK	3		/* arpanet imp addresses */
#define	AF_PUP		4		/* pup protocols: e.g. BSP */
#define	AF_CHAOS	5		/* mit CHAOS protocols */
#define	AF_NS		6		/* XEROX NS protocols */
#define	AF_ISO		7		/* ISO protocols */
#define	AF_OSI		AF_ISO
#define	AF_ECMA		8		/* European computer manufacturers */
#define	AF_DATAKIT	9		/* datakit protocols */
#define	AF_CCITT	10		/* CCITT protocols, X.25 etc */
#define	AF_SNA		11		/* IBM SNA */
#define AF_DECnet	12		/* DECnet */
#define AF_DLI		13		/* DEC Direct data link interface */
#define AF_LAT		14		/* LAT */
#define	AF_HYLINK	15		/* NSC Hyperchannel */
#define	AF_APPLETALK	16		/* Apple Talk */
#define	AF_ROUTE	17		/* Internal Routing Protocol */
#define	AF_LINK		18		/* Link layer interface */
#define	pseudo_AF_XTP	19		/* eXpress Transfer Protocol (no AF) */
#define	AF_COIP		20		/* connection-oriented IP, aka ST II */
#define	AF_CNT		21		/* Computer Network Technology */
#define pseudo_AF_RTIP	22		/* Help Identify RTIP packets */
#define	AF_IPX		23		/* Novell Internet Protocol */
#define	AF_SIP		24		/* Simple Internet Protocol */
#define	pseudo_AF_PIP	25		/* Help Identify PIP packets */
#define	AF_ISDN		26		/* Integrated Services Digital Network*/
#define	AF_E164		AF_ISDN		/* CCITT E.164 recommendation */
#define	pseudo_AF_KEY	27		/* Internal key-management function */
#define	AF_INET6	28		/* IPv6 */
#define	AF_NATM		29		/* native ATM access */
#define	AF_ATM		30		/* ATM */
#define pseudo_AF_HDRCMPLT 31		/* Used by BPF to not rewrite headers
					 * in interface output routine
					 */
#define	AF_NETGRAPH	32		/* Netgraph sockets */
#define	AF_SLOW		33		/* 802.3ad slow protocol */
#define	AF_SCLUSTER	34		/* Sitara cluster protocol */
#define	AF_ARP		35
#define	AF_BLUETOOTH	36		/* Bluetooth sockets */
#define	AF_MAX		37
The one used for IP is AF_INET.
It is a symbol for the constant 2.
It is the address family listed in the sa_family field of sockaddr that decides how exactly the vaguely named bytes of sa_data will be used.
Specifically, whenever the address family is AF_INET, we can use struct sockaddr_in found in netinet/in.h, wherever sockaddr is expected:
/*
 * Socket address, internet style.
 */
struct sockaddr_in {
	uint8_t		sin_len;
	sa_family_t	sin_family;
	in_port_t	sin_port;
	struct	in_addr sin_addr;
	char	sin_zero[8];
};
We can visualize its organization this way:

Figure 3. sockaddr_in structure
The three important fields are sin_family, which is byte 1 of the structure, sin_port, a 16-bit value found in bytes 2 and 3, and sin_addr, a 32-bit integer representation of the IP address, stored in bytes 4-7.
Now, let us try to fill it out.
Let us assume we are trying to write a client for the daytime protocol, which simply states that its server will write a text string representing the current date and time to port 13.
We want to use TCP/IP, so we need to specify AF_INET in the address family field.
AF_INET is defined as 2.
Let us use the IP address of 132.163.96.1, which is the time server of US federal government (time.nist.gov).
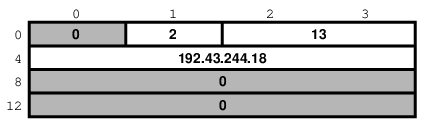
Figure 4. Specific example of sockaddr_in
By the way the sin_addr field is declared as being of the struct in_addr type, which is defined in netinet/in.h:
/*
 * Internet address (a structure for historical reasons)
 */
struct in_addr {
	in_addr_t s_addr;
};
In addition, in_addr_t is a 32-bit integer.
The 132.163.96.1 is just a convenient notation of expressing a 32-bit integer by listing all of its 8-bit bytes, starting with the most significant one.
So far, we have viewed sockaddr as an abstraction.
Our computer does not store short integers as a single 16-bit entity, but as a sequence of 2 bytes.
Similarly, it stores 32-bit integers as a sequence of 4 bytes.
Suppose we coded something like this:
sa.sin_family      = AF_INET;
sa.sin_port        = 13;
sa.sin_addr.s_addr = (((((132 << 8) | 163) << 8) | 96) << 8) | 1;
What would the result look like?
Well, that depends, of course. On a Pentium®, or other x86, based computer, it would look like this:
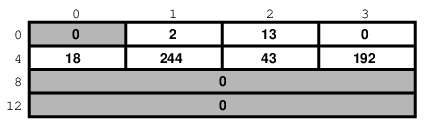
Figure 5. sockaddr_in on an Intel system
On a different system, it might look like this:
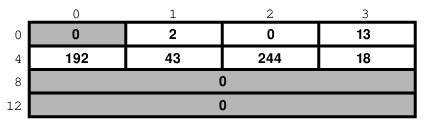
Figure 6. sockaddr_in on an MSB system
And on a PDP it might look different yet. But the above two are the most common ways in use today.
Ordinarily, wanting to write portable code, programmers pretend that these differences do not exist. And they get away with it (except when they code in assembly language). Alas, you cannot get away with it that easily when coding for sockets.
Why?
Because when communicating with another computer, you usually do not know whether it stores data most significant byte (MSB) or least significant byte (LSB) first.
You might be wondering, "So, will sockets not handle it for me?"
It will not.
While that answer may surprise you at first, remember that the general sockets interface only understands the sa_len and sa_family fields of the sockaddr structure.
You do not have to worry about the byte order there (of course, on FreeBSD sa_family is only 1 byte anyway, but many other UNIX® systems do not have sa_len and use 2 bytes for sa_family, and expect the data in whatever order is native to the computer).
But the rest of the data is just sa_data[14] as far as sockets goes.
Depending on the address family, sockets just forwards that data to its destination.
Indeed, when we enter a port number, it is because we want the other computer to know what service we are asking for. And, when we are the server, we read the port number so we know what service the other computer is expecting from us. Either way, sockets only has to forward the port number as data. It does not interpret it in any way.
Similarly, we enter the IP address to tell everyone on the way where to send our data to. Sockets, again, only forwards it as data.
That is why, we (the programmers, not the sockets) have to distinguish between the byte order used by our computer and a conventional byte order to send the data in to the other computer.
We will call the byte order our computer uses the host byte order, or just the host order.
There is a convention of sending the multi-byte data over IP MSB first. This, we will refer to as the network byte order, or simply the network order.
Now, if we compiled the above code for an Intel based computer, our host byte order would produce:
Figure 7. Host byte order on an Intel system
But the network byte order requires that we store the data MSB first:
Figure 8. Network byte order
Unfortunately, our host order is the exact opposite of the network order.
We have several ways of dealing with it. One would be to reverse the values in our code:
sa.sin_family      = AF_INET;
sa.sin_port        = 13 << 8;
sa.sin_addr.s_addr = (((((1 << 8) | 96) << 8) | 163) << 8) | 132;
This will trick our compiler into storing the data in the network byte order. In some cases, this is exactly the way to do it (e.g., when programming in assembly language). In most cases, however, it can cause a problem.
Suppose, you wrote a sockets-based program in C. You know it is going to run on a Pentium®, so you enter all your constants in reverse and force them to the network byte order. It works well.
Then, some day, your trusted old Pentium® becomes a rusty old Pentium®. You replace it with a system whose host order is the same as the network order. You need to recompile all your software. All of your software continues to perform well, except the one program you wrote.
You have since forgotten that you had forced all of your constants to the opposite of the host order. You spend some quality time tearing out your hair, calling the names of all gods you ever heard of (and some you made up), hitting your monitor with a nerf bat, and performing all the other traditional ceremonies of trying to figure out why something that has worked so well is suddenly not working at all.
Eventually, you figure it out, say a couple of swear words, and start rewriting your code.
Luckily, you are not the first one to face the problem.
Someone else has created the htons(3) and htonl(3) C functions to convert a short and long respectively from the host byte order to the network byte order, and the ntohs(3) and ntohl(3) C functions to go the other way.
On MSB-first systems these functions do nothing. On LSB-first systems they convert values to the proper order.
So, regardless of what system your software is compiled on, your data will end up in the correct order if you use these functions.
7.5.1.2. Client Functions
Typically, the client initiates the connection to the server. The client knows which server it is about to call: It knows its IP address, and it knows the port the server resides at. It is akin to you picking up the phone and dialing the number (the address), then, after someone answers, asking for the person in charge of wingdings (the port).
7.5.1.2.1. connect
Once a client has created a socket, it needs to connect it to a specific port on a remote system. It uses connect(2):
int connect(int s, const struct sockaddr *name, socklen_t namelen);
The s argument is the socket, i.e., the value returned by the socket function.
The name is a pointer to sockaddr, the structure we have talked about extensively.
Finally, namelen informs the system how many bytes are in our sockaddr structure.
If connect is successful, it returns 0.
Otherwise it returns -1 and stores the error code in errno.
There are many reasons why connect may fail.
For example, with an attempt to an Internet connection, the IP address may not exist, or it may be down, or just too busy, or it may not have a server listening at the specified port.
Or it may outright refuse any request for specific code.
7.5.1.2.2. Our First Client
We now know enough to write a very simple client, one that will get current time from 132.163.96.1 and print it to stdout.
/*
 * daytime.c
 *
 * Programmed by G. Adam Stanislav
 */
#include <stdio.h>
#include <string.h>
#include <sys/types.h>
#include <sys/socket.h>
#include <netinet/in.h>
#include <unistd.h>

int main() {
  int s, bytes;
  struct sockaddr_in sa;
  char buffer[BUFSIZ+1];

  if ((s = socket(PF_INET, SOCK_STREAM, 0)) < 0) {
    perror("socket");
    return 1;
  }

  memset(&sa, '\0', sizeof(sa));

  sa.sin_family = AF_INET;
  sa.sin_port = htons(13);
  sa.sin_addr.s_addr = htonl((((((132 << 8) | 163) << 8) | 96) << 8) | 1);
  if (connect(s, (struct sockaddr *)&sa, sizeof sa) < 0) {
    perror("connect");
    close(s);
    return 2;
  }

  while ((bytes = read(s, buffer, BUFSIZ)) > 0)
    write(1, buffer, bytes);

  close(s);
  return 0;
}
Go ahead, enter it in your editor, save it as daytime.c, then compile and run it:
% cc -O3 -o daytime daytime.c
% ./daytime

52079 01-06-19 02:29:25 50 0 1 543.9 UTC(NIST) *
%
In this case, the date was June 19, 2001, the time was 02:29:25 UTC. Naturally, your results will vary.
7.5.1.3. Server Functions
The typical server does not initiate the connection. Instead, it waits for a client to call it and request services. It does not know when the client will call, nor how many clients will call. It may be just sitting there, waiting patiently, one moment, The next moment, it can find itself swamped with requests from a number of clients, all calling in at the same time.
The sockets interface offers three basic functions to handle this.
7.5.1.3.1. bind
Ports are like extensions to a phone line: After you dial a number, you dial the extension to get to a specific person or department.
There are 65535 IP ports, but a server usually processes requests that come in on only one of them. It is like telling the phone room operator that we are now at work and available to answer the phone at a specific extension. We use bind(2) to tell sockets which port we want to serve.
int bind(int s, const struct sockaddr *addr, socklen_t addrlen);
Beside specifying the port in addr, the server may include its IP address.
However, it can just use the symbolic constant INADDR_ANY to indicate it will serve all requests to the specified port regardless of what its IP address is.
This symbol, along with several similar ones, is declared in netinet/in.h
#define INADDR_ANY (u_int32_t)0x00000000
Suppose we were writing a server for the daytime protocol over TCP/IP.
Recall that it uses port 13.
Our sockaddr_in structure would look like this:
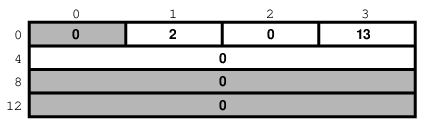
Figure 9. Example Server sockaddr_in
7.5.1.3.2. listen
To continue our office phone analogy, after you have told the phone central operator what extension you will be at, you now walk into your office, and make sure your own phone is plugged in and the ringer is turned on. Plus, you make sure your call waiting is activated, so you can hear the phone ring even while you are talking to someone.
The server ensures all of that with the listen(2) function.
int listen(int s, int backlog);
In here, the backlog variable tells sockets how many incoming requests to accept while you are busy processing the last request.
In other words, it determines the maximum size of the queue of pending connections.
7.5.1.3.3. accept
After you hear the phone ringing, you accept the call by answering the call. You have now established a connection with your client. This connection remains active until either you or your client hang up.
The server accepts the connection by using the accept(2) function.
int accept(int s, struct sockaddr *addr, socklen_t *addrlen);
Note that this time addrlen is a pointer.
This is necessary because in this case it is the socket that fills out addr, the sockaddr_in structure.
The return value is an integer.
Indeed, the accept returns a new socket.
You will use this new socket to communicate with the client.
What happens to the old socket? It continues to listen for more requests (remember the backlog variable we passed to listen?) until we close it.
Now, the new socket is meant only for communications.
It is fully connected.
We cannot pass it to listen again, trying to accept additional connections.
7.5.1.3.4. Our First Server
Our first server will be somewhat more complex than our first client was: Not only do we have more sockets functions to use, but we need to write it as a daemon.
This is best achieved by creating a child process after binding the port. The main process then exits and returns control to the shell (or whatever program invoked it).
The child calls listen, then starts an endless loop, which accepts a connection, serves it, and eventually closes its socket.
/*
 * daytimed - a port 13 server
 *
 * Programmed by G. Adam Stanislav
 * June 19, 2001
 */
#include <stdio.h>
#include <string.h>
#include <time.h>
#include <unistd.h>
#include <sys/types.h>
#include <sys/socket.h>
#include <netinet/in.h>

#define BACKLOG 4

int main() {
    int s, c;
    socklen_t b;
    struct sockaddr_in sa;
    time_t t;
    struct tm *tm;
    FILE *client;

    if ((s = socket(PF_INET, SOCK_STREAM, 0)) < 0) {
        perror("socket");
        return 1;
    }

    memset(&sa, '\0', sizeof(sa));

    sa.sin_family = AF_INET;
    sa.sin_port   = htons(13);

    if (INADDR_ANY)
        sa.sin_addr.s_addr = htonl(INADDR_ANY);

    if (bind(s, (struct sockaddr *)&sa, sizeof sa) < 0) {
        perror("bind");
        return 2;
    }

    switch (fork()) {
        case -1:
            perror("fork");
            return 3;
        default:
            close(s);
            return 0;
        case 0:
            break;
    }

    listen(s, BACKLOG);

    for (;;) {
        b = sizeof sa;

        if ((c = accept(s, (struct sockaddr *)&sa, &b)) < 0) {
            perror("daytimed accept");
            return 4;
        }

        if ((client = fdopen(c, "w")) == NULL) {
            perror("daytimed fdopen");
            return 5;
        }

        if ((t = time(NULL)) < 0) {
            perror("daytimed time");
            return 6;
        }

        tm = gmtime(&t);
        fprintf(client, "%.4i-%.2i-%.2iT%.2i:%.2i:%.2iZ\n",
            tm->tm_year + 1900,
            tm->tm_mon + 1,
            tm->tm_mday,
            tm->tm_hour,
            tm->tm_min,
            tm->tm_sec);

        fclose(client);
    }
}
We start by creating a socket.
Then we fill out the sockaddr_in structure in sa.
Note the conditional use of INADDR_ANY:
if (INADDR_ANY)
        sa.sin_addr.s_addr = htonl(INADDR_ANY);
Its value is 0.
Since we have just used memset to set zeroes on the entire structure, it would be redundant to set it to 0 again.
But if we port our code to some other system where INADDR_ANY is perhaps not a zero, we need to assign it to sa.sin_addr.s_addr.
Most modern C compilers are clever enough to notice that INADDR_ANY is a constant.
As long as it is a zero, they will optimize the entire conditional statement out of the code.
After we have called bind successfully, we are ready to become a daemon: We use fork to create a child process.
In both, the parent and the child, the s variable is our socket.
The parent process will not need it, so it calls close, then it returns 0 to inform its own parent it had terminated successfully.
Meanwhile, the child process continues working in the background.
It calls listen and sets its backlog to 4.
It does not need a large value here because daytime is not a protocol many clients request all the time,
and because it can process each request instantly anyway.
Finally, the daemon starts an endless loop, which performs the following steps:
Call
accept. It waits here until a client contacts it. At that point, it receives a new socket,c, which it can use to communicate with this particular client.It uses the C function
fdopento turn the socket from a low-level file descriptor to a C-styleFILEpointer. This will allow the use offprintflater on.It checks the time, and prints it in the ISO 8601 format to the
client"file". It then usesfcloseto close the file. That will automatically close the socket as well.
We can generalize this, and use it as a model for many other servers:
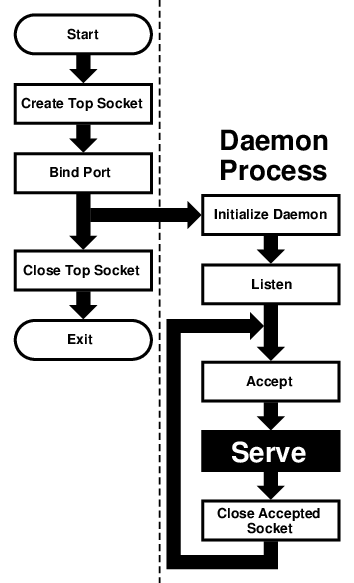
Figure 10. Sequential Server
This flowchart is good for sequential servers, i.e., servers that can serve one client at a time, just as we were able to with our daytime server. This is only possible whenever there is no real "conversation" going on between the client and the server: As soon as the server detects a connection to the client, it sends out some data and closes the connection. The entire operation may take nanoseconds, and it is finished.
The advantage of this flowchart is that, except for the brief moment after the parent forks and before it exits,
there is always only one process active: Our server does not take up much memory and other system resources.
Note that we have added initialize daemon in our flowchart.
We did not need to initialize our own daemon, but this is a good place in the flow of the program to set up any signal handlers,
open any files we may need, etc.
Just about everything in the flow chart can be used literally on many different servers. The serve entry is the exception. We think of it as a "black box", i.e., something you design specifically for your own server, and just "plug it into the rest."
Not all protocols are that simple. Many receive a request from the client, reply to it, then receive another request from the same client. As a result, they do not know in advance how long they will be serving the client. Such servers usually start a new process for each client. While the new process is serving its client, the daemon can continue listening for more connections.
Now, go ahead, save the above source code as daytimed.c (it is customary to end the names of daemons with the letter d).
After you have compiled it, try running it:
% ./daytimed
bind: Permission denied
%
What happened here? As you will recall, the daytime protocol uses port 13. But all ports below 1024 are reserved to the superuser (otherwise, anyone could start a daemon pretending to serve a commonly used port, while causing a security breach).
Try again, this time as the superuser:
# ./daytimed
#What… Nothing? Let us try again:
# ./daytimed

bind: Address already in use
#
Every port can only be bound by one program at a time. Our first attempt was indeed successful: It started the child daemon and returned quietly. It is still running and will continue to run until you either kill it, or any of its system calls fail, or you reboot the system.
Fine, we know it is running in the background. But is it working? How do we know it is a proper daytime server? Simple:
% telnet localhost 13

Trying ::1...
telnet: connect to address ::1: Connection refused
Trying 127.0.0.1...
Connected to localhost.
Escape character is '^]'.
2001-06-19T21:04:42Z
Connection closed by foreign host.
%
telnet tried the new IPv6, and failed. It retried with IPv4 and succeeded. The daemon works.
If you have access to another UNIX® system via telnet, you can use it to test accessing the server remotely. My computer does not have a static IP address, so this is what I did:
% who

whizkid          ttyp0   Jun 19 16:59   (216.127.220.143)
xxx              ttyp1   Jun 19 16:06   (xx.xx.xx.xx)
% telnet 216.127.220.143 13

Trying 216.127.220.143...
Connected to r47.bfm.org.
Escape character is '^]'.
2001-06-19T21:31:11Z
Connection closed by foreign host.
%
Again, it worked. Will it work using the domain name?
% telnet r47.bfm.org 13

Trying 216.127.220.143...
Connected to r47.bfm.org.
Escape character is '^]'.
2001-06-19T21:31:40Z
Connection closed by foreign host.
%
By the way, telnet prints the Connection closed by foreign host message after our daemon has closed the socket.
This shows us that, indeed, using fclose(client); in our code works as advertised.
7.6. Helper Functions
FreeBSD C library contains many helper functions for sockets programming.
For example, in our sample client we hard coded the time.nist.gov IP address.
But we do not always know the IP address.
Even if we do, our software is more flexible if it allows the user to enter the IP address, or even the domain name.
7.6.1. gethostbyname
While there is no way to pass the domain name directly to any of the sockets functions, the FreeBSD C library comes with the gethostbyname(3) and gethostbyname2(3) functions, declared in netdb.h.
struct hostent * gethostbyname(const char *name);
struct hostent * gethostbyname2(const char *name, int af);
Both return a pointer to the hostent structure, with much information about the domain.
For our purposes, the h_addr_list[0] field of the structure points at h_length bytes of the correct address, already stored in the network byte order.
This allows us to create a much more flexible-and much more useful-version of our daytime program:
/*
 * daytime.c
 *
 * Programmed by G. Adam Stanislav
 * 19 June 2001
 */
#include <stdio.h>
#include <string.h>
#include <unistd.h>
#include <sys/types.h>
#include <sys/socket.h>
#include <netinet/in.h>
#include <netdb.h>

int main(int argc, char *argv[]) {
  int s, bytes;
  struct sockaddr_in sa;
  struct hostent *he;
  char buf[BUFSIZ+1];
  char *host;

  if ((s = socket(PF_INET, SOCK_STREAM, 0)) < 0) {
    perror("socket");
    return 1;
  }

  memset(&sa, '\0', sizeof(sa));

  sa.sin_family = AF_INET;
  sa.sin_port = htons(13);

  host = (argc > 1) ? argv[1] : "time.nist.gov";

  if ((he = gethostbyname(host)) == NULL) {
    herror(host);
    return 2;
  }

  memcpy(&sa.sin_addr, he->h_addr_list[0], he->h_length);

  if (connect(s, (struct sockaddr *)&sa, sizeof sa) < 0) {
    perror("connect");
    return 3;
  }

  while ((bytes = read(s, buf, BUFSIZ)) > 0)
    write(1, buf, bytes);

  close(s);
  return 0;
}
We now can type a domain name (or an IP address, it works both ways) on the command line, and the program will try to connect to its daytime server.
Otherwise, it will still default to time.nist.gov.
However, even in this case we will use gethostbyname rather than hard coding 132.163.96.1.
That way, even if its IP address changes in the future, we will still find it.
Since it takes virtually no time to get the time from your local server, you could run daytime twice in a row:
First to get the time from time.nist.gov, the second time from your own system.
You can then compare the results and see how exact your system clock is:
% daytime ; daytime localhost

52080 01-06-20 04:02:33 50 0 0 390.2 UTC(NIST) *
2001-06-20T04:02:35Z
%
As you can see, my system was two seconds ahead of the NIST time.
7.6.2. getservbyname
Sometimes you may not be sure what port a certain service uses. The getservbyname(3) function, also declared in netdb.h comes in very handy in those cases:
struct servent * getservbyname(const char *name, const char *proto);
The servent structure contains the s_port, which contains the proper port, already in network byte order.
Had we not known the correct port for the daytime service, we could have found it this way:
struct servent *se;
  ...
  if ((se = getservbyname("daytime", "tcp")) == NULL {
    fprintf(stderr, "Cannot determine which port to use.\n");
    return 7;
  }
  sa.sin_port = se->s_port;
You usually do know the port.
But if you are developing a new protocol, you may be testing it on an unofficial port.
Some day, you will register the protocol and its port (if nowhere else, at least in your /etc/services, which is where getservbyname looks).
Instead of returning an error in the above code, you just use the temporary port number.
Once you have listed the protocol in /etc/services, your software will find its port without you having to rewrite the code.
7.7. Concurrent Servers
Unlike a sequential server, a concurrent server has to be able to serve more than one client at a time. For example, a chat server may be serving a specific client for hours-it cannot wait till it stops serving a client before it serves the next one.
This requires a significant change in our flowchart:
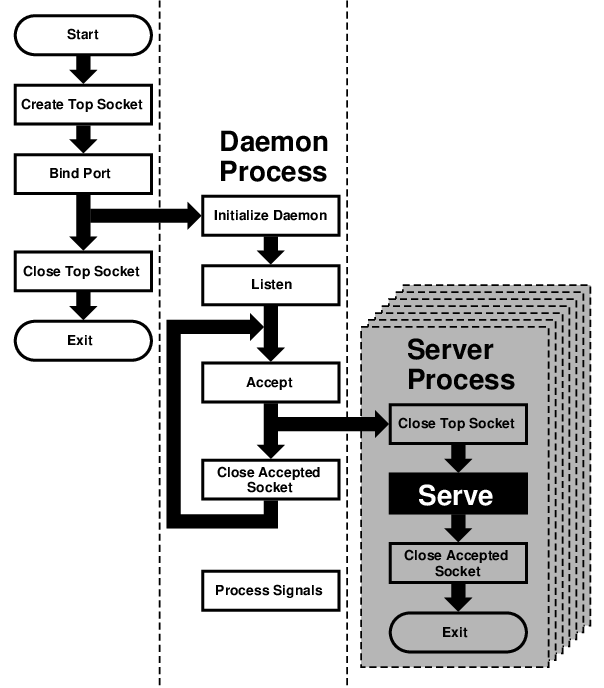
Figure 11. Concurrent Server
We moved the serve from the daemon process to its own server process.
However, because each child process inherits all open files (and a socket is treated just like a file), the new process inherits not only the "accepted handle," i.e., the socket returned by the accept call, but also the top socket, i.e., the one opened by the top process right at the beginning.
However, the server process does not need this socket and should close it immediately.
Similarly, the daemon process no longer needs the accepted socket, and not only should, but must close it-otherwise, it will run out of available file descriptors sooner or later.
After the server process is done serving, it should close the accepted socket.
Instead of returning to accept, it now exits.
Under UNIX®, a process does not really exit.
Instead, it returns to its parent.
Typically, a parent process waits for its child process, and obtains a return value.
However, our daemon process cannot simply stop and wait.
That would defeat the whole purpose of creating additional processes.
But if it never does wait, its children will become zombies-no longer functional but still roaming around.
For that reason, the daemon process needs to set signal handlers in its initialize daemon phase. At least a SIGCHLD signal has to be processed, so the daemon can remove the zombie return values from the system and release the system resources they are taking up.
That is why our flowchart now contains a process signals box, which is not connected to any other box. By the way, many servers also process SIGHUP, and typically interpret as the signal from the superuser that they should reread their configuration files. This allows us to change settings without having to kill and restart these servers.
Chapter 8. IPv6 Internals
8.1. IPv6/IPsec Implementation
This section should explain IPv6 and IPsec related implementation internals. These functionalities are derived from KAME project
8.1.1. IPv6
8.1.1.1. Conformance
The IPv6 related functions conforms, or tries to conform to the latest set of IPv6 specifications. For future reference we list some of the relevant documents below (NOTE: this is not a complete list - this is too hard to maintain…).
For details please refer to specific chapter in the document, RFCs, manual pages, or comments in the source code.
Conformance tests have been performed on the KAME STABLE kit at TAHI project. Results can be viewed at http://www.tahi.org/report/KAME/. We also attended University of New Hampshire IOL tests (http://www.iol.unh.edu/) in the past, with our past snapshots.
RFC1639: FTP Operation Over Big Address Records (FOOBAR)
RFC2428 is preferred over RFC1639. FTP clients will first try RFC2428, then RFC1639 if failed.
RFC1886: DNS Extensions to support IPv6
RFC1933: Transition Mechanisms for IPv6 Hosts and Routers
IPv4 compatible address is not supported.
automatic tunneling (described in 4.3 of this RFC) is not supported.
gif(4) interface implements IPv[46]-over-IPv[46] tunnel in a generic way, and it covers "configured tunnel" described in the spec. See Generic Tunnel Interface in this document for details.
RFC1981: Path MTU Discovery for IPv6
RFC2080: RIPng for IPv6
usr.sbin/route6d support this.
RFC2292: Advanced Sockets API for IPv6
For supported library functions/kernel APIs, see sys/netinet6/ADVAPI.
RFC2362: Protocol Independent Multicast-Sparse Mode (PIM-SM)
RFC2362 defines packet formats for PIM-SM. draft-ietf-pim-ipv6-01.txt is written based on this.
RFC2373: IPv6 Addressing Architecture
supports node required addresses, and conforms to the scope requirement.
RFC2374: An IPv6 Aggregatable Global Unicast Address Format
supports 64-bit length of Interface ID.
RFC2375: IPv6 Multicast Address Assignments
Userland applications use the well-known addresses assigned in the RFC.
RFC2428: FTP Extensions for IPv6 and NATs
RFC2428 is preferred over RFC1639. FTP clients will first try RFC2428, then RFC1639 if failed.
RFC2460: IPv6 specification
RFC2461: Neighbor discovery for IPv6
See Neighbor Discovery in this document for details.
RFC2462: IPv6 Stateless Address Autoconfiguration
See Plug and Play in this document for details.
RFC2463: ICMPv6 for IPv6 specification
See ICMPv6 in this document for details.
RFC2464: Transmission of IPv6 Packets over Ethernet Networks
RFC2465: MIB for IPv6: Textual Conventions and General Group
Necessary statistics are gathered by the kernel. Actual IPv6 MIB support is provided as a patchkit for ucd-snmp.
RFC2466: MIB for IPv6: ICMPv6 group
Necessary statistics are gathered by the kernel. Actual IPv6 MIB support is provided as patchkit for ucd-snmp.
RFC2467: Transmission of IPv6 Packets over FDDI Networks
RFC2497: Transmission of IPv6 packet over ARCnet Networks
RFC2553: Basic Socket Interface Extensions for IPv6
IPv4 mapped address (3.7) and special behavior of IPv6 wildcard bind socket (3.8) are supported. See IPv4 Mapped Address and IPv6 Wildcard Socket in this document for details.
RFC2675: IPv6 Jumbograms
See Jumbo Payload in this document for details.
RFC2710: Multicast Listener Discovery for IPv6
RFC2711: IPv6 router alert option
draft-ietf-ipngwg-router-renum-08: Router renumbering for IPv6
draft-ietf-ipngwg-icmp-namelookups-02: IPv6 Name Lookups Through ICMP
draft-ietf-ipngwg-icmp-name-lookups-03: IPv6 Name Lookups Through ICMP
draft-ietf-pim-ipv6-01.txt: PIM for IPv6
draft-itojun-ipv6-tcp-to-anycast-00: Disconnecting TCP connection toward IPv6 anycast address
draft-yamamoto-wideipv6-comm-model-00
See Source Address Selection in this document for details.
draft-ietf-ipngwg-scopedaddr-format-00.txt: An Extension of Format for IPv6 Scoped Addresses
8.1.1.2. Neighbor Discovery
Neighbor Discovery is fairly stable. Currently Address Resolution, Duplicated Address Detection, and Neighbor Unreachability Detection are supported. In the near future we will be adding Proxy Neighbor Advertisement support in the kernel and Unsolicited Neighbor Advertisement transmission command as admin tool.
If DAD fails, the address will be marked "duplicated" and message will be generated to syslog (and usually to console). The "duplicated" mark can be checked with ifconfig(8). It is administrators' responsibility to check for and recover from DAD failures. The behavior should be improved in the near future.
Some of the network driver loops multicast packets back to itself, even if instructed not to do so (especially in promiscuous mode). In such cases DAD may fail, because DAD engine sees inbound NS packet (actually from the node itself) and considers it as a sign of duplicate. You may want to look at #if condition marked "heuristics" in sys/netinet6/nd6_nbr.c:nd6_dad_timer() as workaround (note that the code fragment in "heuristics" section is not spec conformant).
Neighbor Discovery specification (RFC2461) does not talk about neighbor cache handling in the following cases:
when there was no neighbor cache entry, node received unsolicited RS/NS/NA/redirect packet without link-layer address
neighbor cache handling on medium without link-layer address (we need a neighbor cache entry for IsRouter bit)
For first case, we implemented workaround based on discussions on IETF ipngwg mailing list. For more details, see the comments in the source code and email thread started from (IPng 7155), dated Feb 6 1999.
IPv6 on-link determination rule (RFC2461) is quite different from assumptions in BSD network code. At this moment, no on-link determination rule is supported where default router list is empty (RFC2461, section 5.2, last sentence in 2nd paragraph - note that the spec misuse the word "host" and "node" in several places in the section).
To avoid possible DoS attacks and infinite loops, only 10 options on ND packet is accepted now. Therefore, if you have 20 prefix options attached to RA, only the first 10 prefixes will be recognized. If this troubles you, please ask it on FREEBSD-CURRENT mailing list and/or modify nd6_maxndopt in sys/netinet6/nd6.c. If there are high demands we may provide sysctl knob for the variable.
8.1.1.3. Scope Index
IPv6 uses scoped addresses. Therefore, it is very important to specify scope index (interface index for link-local address, or site index for site-local address) with an IPv6 address. Without scope index, scoped IPv6 address is ambiguous to the kernel, and kernel will not be able to determine the outbound interface for a packet.
Ordinary userland applications should use advanced API (RFC2292) to specify scope index, or interface index. For similar purpose, sin6_scope_id member in sockaddr_in6 structure is defined in RFC2553. However, the semantics for sin6_scope_id is rather vague. If you care about portability of your application, we suggest you to use advanced API rather than sin6_scope_id.
In the kernel, an interface index for link-local scoped address is embedded into 2nd 16bit-word (3rd and 4th byte) in IPv6 address. For example, you may see something like:
fe80:1::200:f8ff:fe01:6317in the routing table and interface address structure (struct in6_ifaddr). The address above is a link-local unicast address which belongs to a network interface whose interface identifier is 1. The embedded index enables us to identify IPv6 link local addresses over multiple interfaces effectively and with only a little code change.
Routing daemons and configuration programs, like route6d(8) and ifconfig(8), will need to manipulate the "embedded" scope index. These programs use routing sockets and ioctls (like SIOCGIFADDR_IN6) and the kernel API will return IPv6 addresses with 2nd 16bit-word filled in. The APIs are for manipulating kernel internal structure. Programs that use these APIs have to be prepared about differences in kernels anyway.
When you specify scoped address to the command line, NEVER write the embedded form (such as ff02:1::1 or fe80:2::fedc).
This is not supposed to work.
Always use standard form, like ff02::1 or fe80::fedc, with command line option for specifying interface (like ping -6 -I ne0 ff02::1).
In general, if a command does not have command line option to specify outgoing interface, that command is not ready to accept scoped address.
This may seem to be opposite from IPv6’s premise to support "dentist office" situation.
We believe that specifications need some improvements for this.
Some of the userland tools support extended numeric IPv6 syntax, as documented in draft-ietf-ipngwg-scopedaddr-format-00.txt. You can specify outgoing link, by using name of the outgoing interface like "fe80::1%ne0". This way you will be able to specify link-local scoped address without much trouble.
To use this extension in your program, you will need to use getaddrinfo(3), and getnameinfo(3) with NI_WITHSCOPEID. The implementation currently assumes 1-to-1 relationship between a link and an interface, which is stronger than what specs say.
8.1.1.4. Plug and Play
Most of the IPv6 stateless address autoconfiguration is implemented in the kernel. Neighbor Discovery functions are implemented in the kernel as a whole. Router Advertisement (RA) input for hosts is implemented in the kernel. Router Solicitation (RS) output for endhosts, RS input for routers, and RA output for routers are implemented in the userland.
8.1.1.4.1. Assignment of link-local, and special addresses
IPv6 link-local address is generated from IEEE802 address (Ethernet MAC address). Each of interface is assigned an IPv6 link-local address automatically, when the interface becomes up (IFF_UP). Also, direct route for the link-local address is added to routing table.
Here is an output of netstat command:
Internet6:
Destination                   Gateway                   Flags      Netif Expire
fe80:1::%ed0/64               link#1                    UC          ed0
fe80:2::%ep0/64               link#2                    UC          ep0
Interfaces that has no IEEE802 address (pseudo interfaces like tunnel interfaces, or ppp interfaces) will borrow IEEE802 address from other interfaces, such as Ethernet interfaces, whenever possible. If there is no IEEE802 hardware attached, a last resort pseudo-random value, MD5(hostname), will be used as source of link-local address. If it is not suitable for your usage, you will need to configure the link-local address manually.
If an interface is not capable of handling IPv6 (such as lack of multicast support), link-local address will not be assigned to that interface. See section 2 for details.
Each interface joins the solicited multicast address and the link-local all-nodes multicast addresses (e.g., fe80::1:ff01:6317 and ff02::1, respectively, on the link the interface is attached). In addition to a link-local address, the loopback address (::1) will be assigned to the loopback interface. Also, ::1/128 and ff01::/32 are automatically added to routing table, and loopback interface joins node-local multicast group ff01::1.
8.1.1.4.2. Stateless address autoconfiguration on Hosts
In IPv6 specification, nodes are separated into two categories: routers and hosts. Routers forward packets addressed to others, hosts does not forward the packets. net.inet6.ip6.forwarding defines whether this node is router or host (router if it is 1, host if it is 0).
When a host hears Router Advertisement from the router, a host may autoconfigure itself by stateless address autoconfiguration. This behavior can be controlled by net.inet6.ip6.accept_rtadv (host autoconfigures itself if it is set to 1). By autoconfiguration, network address prefix for the receiving interface (usually global address prefix) is added. Default route is also configured. Routers periodically generate Router Advertisement packets. To request an adjacent router to generate RA packet, a host can transmit Router Solicitation. To generate a RS packet at any time, use the rtsol command. rtsold(8) daemon is also available. rtsold(8) generates Router Solicitation whenever necessary, and it works great for nomadic usage (notebooks/laptops). If one wishes to ignore Router Advertisements, use sysctl to set net.inet6.ip6.accept_rtadv to 0.
To generate Router Advertisement from a router, use the rtadvd(8) daemon.
Note that, IPv6 specification assumes the following items, and nonconforming cases are left unspecified:
Only hosts will listen to router advertisements
Hosts have single network interface (except loopback)
Therefore, this is unwise to enable net.inet6.ip6.accept_rtadv on routers, or multi-interface host. A misconfigured node can behave strange (nonconforming configuration allowed for those who would like to do some experiments).
To summarize the sysctl knob:
	accept_rtadv	forwarding	role of the node
	---		---		---
	0		0		host (to be manually configured)
	0		1		router
	1		0		autoconfigured host
					(spec assumes that host has single
					interface only, autoconfigured host
					with multiple interface is
					out-of-scope)
	1		1		invalid, or experimental
					(out-of-scope of spec)
RFC2462 has validation rule against incoming RA prefix information option, in 5.5.3 (e). This is to protect hosts from malicious (or misconfigured) routers that advertise very short prefix lifetime. There was an update from Jim Bound to ipngwg mailing list (look for "(ipng 6712)" in the archive) and it is implemented Jim’s update.
See Neighbor Discovery in the document for relationship between DAD and autoconfiguration.
8.1.1.5. Generic Tunnel Interface
GIF (Generic InterFace) is a pseudo interface for configured tunnel. Details are described in gif(4). Currently
v6 in v6
v6 in v4
v4 in v6
v4 in v4
are available. Use gifconfig(8) to assign physical (outer) source and destination address to gif interfaces. Configuration that uses same address family for inner and outer IP header (v4 in v4, or v6 in v6) is dangerous. It is very easy to configure interfaces and routing tables to perform infinite level of tunneling. Please be warned.
gif can be configured to be ECN-friendly. See ECN Consideration on IPsec Tunnels for ECN-friendliness of tunnels, and gif(4) for how to configure.
If you would like to configure an IPv4-in-IPv6 tunnel with gif interface, read gif(4) carefully. You will need to remove IPv6 link-local address automatically assigned to the gif interface.
8.1.1.6. Source Address Selection
Current source selection rule is scope oriented (there are some exceptions - see below). For a given destination, a source IPv6 address is selected by the following rule:
If the source address is explicitly specified by the user (e.g., via the advanced API), the specified address is used.
If there is an address assigned to the outgoing interface (which is usually determined by looking up the routing table) that has the same scope as the destination address, the address is used.
This is the most typical case.
If there is no address that satisfies the above condition, choose a global address assigned to one of the interfaces on the sending node.
If there is no address that satisfies the above condition, and destination address is site local scope, choose a site local address assigned to one of the interfaces on the sending node.
If there is no address that satisfies the above condition, choose the address associated with the routing table entry for the destination. This is the last resort, which may cause scope violation.
For instance, ::1 is selected for ff01::1, fe80:1::200:f8ff:fe01:6317 for fe80:1::2a0:24ff:feab:839b (note that embedded interface index - described in Scope Index - helps us choose the right source address. Those embedded indices will not be on the wire). If the outgoing interface has multiple address for the scope, a source is selected longest match basis (rule 3). Suppose 2001:0DB8:808:1:200:f8ff:fe01:6317 and 2001:0DB8:9:124:200:f8ff:fe01:6317 are given to the outgoing interface. 2001:0DB8:808:1:200:f8ff:fe01:6317 is chosen as the source for the destination 2001:0DB8:800::1.
Note that the above rule is not documented in the IPv6 spec. It is considered "up to implementation" item. There are some cases where we do not use the above rule. One example is connected TCP session, and we use the address kept in tcb as the source. Another example is source address for Neighbor Advertisement. Under the spec (RFC2461 7.2.2) NA’s source should be the target address of the corresponding NS’s target. In this case we follow the spec rather than the above longest-match rule.
For new connections (when rule 1 does not apply), deprecated addresses (addresses with preferred lifetime = 0) will not be chosen as source address if other choices are available. If no other choices are available, deprecated address will be used as a last resort. If there are multiple choice of deprecated addresses, the above scope rule will be used to choose from those deprecated addresses. If you would like to prohibit the use of deprecated address for some reason, configure net.inet6.ip6.use_deprecated to 0. The issue related to deprecated address is described in RFC2462 5.5.4 (NOTE: there is some debate underway in IETF ipngwg on how to use "deprecated" address).
8.1.1.7. Jumbo Payload
The Jumbo Payload hop-by-hop option is implemented and can be used to send IPv6 packets with payloads longer than 65,535 octets. But currently no physical interface whose MTU is more than 65,535 is supported, so such payloads can be seen only on the loopback interface (i.e., lo0).
If you want to try jumbo payloads, you first have to reconfigure the kernel so that the MTU of the loopback interface is more than 65,535 bytes; add the following to the kernel configuration file:
options "LARGE_LOMTU" #To test jumbo payload
and recompile the new kernel.
Then you can test jumbo payloads by the ping(8) command with -6, -b and -s options. The -b option must be specified to enlarge the size of the socket buffer and the -s option specifies the length of the packet, which should be more than 65,535. For example, type as follows:
% ping -6 -b 70000 -s 68000 ::1The IPv6 specification requires that the Jumbo Payload option must not be used in a packet that carries a fragment header. If this condition is broken, an ICMPv6 Parameter Problem message must be sent to the sender. specification is followed, but you cannot usually see an ICMPv6 error caused by this requirement.
When an IPv6 packet is received, the frame length is checked and compared to the length specified in the payload length field of the IPv6 header or in the value of the Jumbo Payload option, if any. If the former is shorter than the latter, the packet is discarded and statistics are incremented. You can see the statistics as output of netstat(8) command with `-s -p ip6' option:
% netstat -s -p ip6
	  ip6:
		(snip)
		1 with data size < data length
So, kernel does not send an ICMPv6 error unless the erroneous packet is an actual Jumbo Payload, that is, its packet size is more than 65,535 bytes. As described above, currently no physical interface with such a huge MTU is supported, so it rarely returns an ICMPv6 error.
TCP/UDP over jumbogram is not supported at this moment. This is because we have no medium (other than loopback) to test this. Contact us if you need this.
IPsec does not work on jumbograms. This is due to some specification twists in supporting AH with jumbograms (AH header size influences payload length, and this makes it real hard to authenticate inbound packet with jumbo payload option as well as AH).
There are fundamental issues in *BSD support for jumbograms. We would like to address those, but we need more time to finalize these. To name a few:
mbuf pkthdr.len field is typed as "int" in 4.4BSD, so it will not hold jumbogram with len > 2G on 32bit architecture CPUs. If we would like to support jumbogram properly, the field must be expanded to hold 4G + IPv6 header + link-layer header. Therefore, it must be expanded to at least int64_t (u_int32_t is NOT enough).
We mistakingly use "int" to hold packet length in many places. We need to convert them into larger integral type. It needs a great care, as we may experience overflow during packet length computation.
We mistakingly check for ip6_plen field of IPv6 header for packet payload length in various places. We should be checking mbuf pkthdr.len instead. ip6_input() will perform sanity check on jumbo payload option on input, and we can safely use mbuf pkthdr.len afterwards.
TCP code needs a careful update in bunch of places, of course.
8.1.1.8. Loop Prevention in Header Processing
IPv6 specification allows arbitrary number of extension headers to be placed onto packets. If we implement IPv6 packet processing code in the way BSD IPv4 code is implemented, kernel stack may overflow due to long function call chain. sys/netinet6 code is carefully designed to avoid kernel stack overflow, so sys/netinet6 code defines its own protocol switch structure, as "struct ip6protosw" (see netinet6/ip6protosw.h). There is no such update to IPv4 part (sys/netinet) for compatibility, but small change is added to its pr_input() prototype. So "struct ipprotosw" is also defined. As a result, if you receive IPsec-over-IPv4 packet with massive number of IPsec headers, kernel stack may blow up. IPsec-over-IPv6 is okay. (Of-course, for those all IPsec headers to be processed, each such IPsec header must pass each IPsec check. So an anonymous attacker will not be able to do such an attack.)
8.1.1.9. ICMPv6
After RFC2463 was published, IETF ipngwg has decided to disallow ICMPv6 error packet against ICMPv6 redirect, to prevent ICMPv6 storm on a network medium. This is already implemented into the kernel.
8.1.1.10. Applications
For userland programming, we support IPv6 socket API as specified in RFC2553, RFC2292 and upcoming Internet drafts.
8.1.1.11. Kernel Internals
While ip_forward() calls ip_output(), ip6_forward() directly calls if_output() since routers must not divide IPv6 packets into fragments.
ICMPv6 should contain the original packet as long as possible up to 1280. UDP6/IP6 port unreach, for instance, should contain all extension headers and the unchanged UDP6 and IP6 headers. So, all IP6 functions except TCP never convert network byte order into host byte order, to save the original packet.
tcp_input(), udp6_input() and icmp6_input() can not assume that IP6 header is preceding the transport headers due to extension headers. So, in6_cksum() was implemented to handle packets whose IP6 header and transport header is not continuous. TCP/IP6 nor UDP6/IP6 header structures do not exist for checksum calculation.
To process IP6 header, extension headers and transport headers easily, network drivers are now required to store packets in one internal mbuf or one or more external mbufs. A typical old driver prepares two internal mbufs for 96 - 204 bytes data, however, now such packet data is stored in one external mbuf.
netstat -s -p ip6 tells you whether or not your driver conforms such requirement.
In the following example, "cce0" violates the requirement.
(For more information, refer to Section 2.)
Mbuf statistics:
                317 one mbuf
                two or more mbuf::
                        lo0 = 8
			cce0 = 10
                3282 one ext mbuf
                0 two or more ext mbuf
Each input function calls IP6_EXTHDR_CHECK in the beginning to check if the region between IP6 and its header is continuous. IP6_EXTHDR_CHECK calls m_pullup() only if the mbuf has M_LOOP flag, that is, the packet comes from the loopback interface. m_pullup() is never called for packets coming from physical network interfaces.
Both IP and IP6 reassemble functions never call m_pullup().
8.1.1.12. IPv4 Mapped Address and IPv6 Wildcard Socket
RFC2553 describes IPv4 mapped address (3.7) and special behavior of IPv6 wildcard bind socket (3.8). The spec allows you to:
Accept IPv4 connections by AF_INET6 wildcard bind socket.
Transmit IPv4 packet over AF_INET6 socket by using special form of the address like ::ffff:10.1.1.1.
but the spec itself is very complicated and does not specify how the socket layer should behave. Here we call the former one "listening side" and the latter one "initiating side", for reference purposes.
You can perform wildcard bind on both of the address families, on the same port.
The following table show the behavior of FreeBSD 4.x.
listening side          initiating side
                (AF_INET6 wildcard      (connection to ::ffff:10.1.1.1)
                socket gets IPv4 conn.)
                ---                     ---
FreeBSD 4.x     configurable            supported
                default: enabled
The following sections will give you more details, and how you can configure the behavior.
Comments on listening side:
It looks that RFC2553 talks too little on wildcard bind issue, especially on the port space issue, failure mode and relationship between AF_INET/INET6 wildcard bind. There can be several separate interpretation for this RFC which conform to it but behaves differently. So, to implement portable application you should assume nothing about the behavior in the kernel. Using getaddrinfo(3) is the safest way. Port number space and wildcard bind issues were discussed in detail on ipv6imp mailing list, in mid March 1999 and it looks that there is no concrete consensus (means, up to implementers). You may want to check the mailing list archives.
If a server application would like to accept IPv4 and IPv6 connections, there will be two alternatives.
One is using AF_INET and AF_INET6 socket (you will need two sockets). Use getaddrinfo(3) with AI_PASSIVE into ai_flags, and socket(2) and bind(2) to all the addresses returned. By opening multiple sockets, you can accept connections onto the socket with proper address family. IPv4 connections will be accepted by AF_INET socket, and IPv6 connections will be accepted by AF_INET6 socket.
Another way is using one AF_INET6 wildcard bind socket. Use getaddrinfo(3) with AI_PASSIVE into ai_flags and with AF_INET6 into ai_family, and set the 1st argument hostname to NULL. And socket(2) and bind(2) to the address returned. (should be IPv6 unspecified addr). You can accept either of IPv4 and IPv6 packet via this one socket.
To support only IPv6 traffic on AF_INET6 wildcard binded socket portably, always check the peer address when a connection is made toward AF_INET6 listening socket. If the address is IPv4 mapped address, you may want to reject the connection. You can check the condition by using IN6_IS_ADDR_V4MAPPED() macro.
To resolve this issue more easily, there is system dependent setsockopt(2) option, IPV6_BINDV6ONLY, used like below.
	int on;

	setsockopt(s, IPPROTO_IPV6, IPV6_BINDV6ONLY,
		   (char *)&on, sizeof (on)) < 0));
When this call succeed, then this socket only receive IPv6 packets.
Comments on initiating side:
Advise to application implementers: to implement a portable IPv6 application (which works on multiple IPv6 kernels), we believe that the following is the key to the success:
NEVER hardcode AF_INET nor AF_INET6.
Use getaddrinfo(3) and getnameinfo(3) throughout the system. Never use gethostby*(), getaddrby*(), inet_*() or getipnodeby*(). (To update existing applications to be IPv6 aware easily, sometime getipnodeby*() will be useful. But if possible, try to rewrite the code to use getaddrinfo(3) and getnameinfo(3).)
If you would like to connect to destination, use getaddrinfo(3) and try all the destination returned, like telnet(1) does.
Some of the IPv6 stack is shipped with buggy getaddrinfo(3). Ship a minimal working version with your application and use that as last resort.
If you would like to use AF_INET6 socket for both IPv4 and IPv6 outgoing connection, you will need to use getipnodebyname(3). When you would like to update your existing application to be IPv6 aware with minimal effort, this approach might be chosen. But please note that it is a temporal solution, because getipnodebyname(3) itself is not recommended as it does not handle scoped IPv6 addresses at all. For IPv6 name resolution, getaddrinfo(3) is the preferred API. So you should rewrite your application to use getaddrinfo(3), when you get the time to do it.
When writing applications that make outgoing connections, story goes much simpler if you treat AF_INET and AF_INET6 as totally separate address family. {set,get}sockopt issue goes simpler, DNS issue will be made simpler. We do not recommend you to rely upon IPv4 mapped address.
8.1.1.12.1. unified tcp and inpcb code
FreeBSD 4.x uses shared tcp code between IPv4 and IPv6 (from sys/netinet/tcp*) and separate udp4/6 code. It uses unified inpcb structure.
The platform can be configured to support IPv4 mapped address. Kernel configuration is summarized as follows:
By default, AF_INET6 socket will grab IPv4 connections in certain condition, and can initiate connection to IPv4 destination embedded in IPv4 mapped IPv6 address.
You can disable it on entire system with sysctl like below.
sysctl net.inet6.ip6.mapped_addr=0
Each socket can be configured to support special AF_INET6 wildcard bind (enabled by default). You can disable it on each socket basis with setsockopt(2) like below.
	int on;

	setsockopt(s, IPPROTO_IPV6, IPV6_BINDV6ONLY,
		   (char *)&on, sizeof (on)) < 0));
Wildcard AF_INET6 socket grabs IPv4 connection if and only if the following conditions are satisfied:
there is no AF_INET socket that matches the IPv4 connection
the AF_INET6 socket is configured to accept IPv4 traffic, i.e., getsockopt(IPV6_BINDV6ONLY) returns 0.
There is no problem with open/close ordering.
8.1.1.13. sockaddr_storage
When RFC2553 was about to be finalized, there was discussion on how struct sockaddr_storage members are named. One proposal is to prepend "" to the members (like "ss_len") as they should not be touched. The other proposal was not to prepend it (like "ss_len") as we need to touch those members directly. There was no clear consensus on it.
As a result, RFC2553 defines struct sockaddr_storage as follows:
	struct sockaddr_storage {
		u_char	__ss_len;	/* address length */
		u_char	__ss_family;	/* address family */
		/* and bunch of padding */
	};
On the contrary, XNET draft defines as follows:
	struct sockaddr_storage {
		u_char	ss_len;		/* address length */
		u_char	ss_family;	/* address family */
		/* and bunch of padding */
	};
In December 1999, it was agreed that RFC2553bis should pick the latter (XNET) definition.
Current implementation conforms to XNET definition, based on RFC2553bis discussion.
If you look at multiple IPv6 implementations, you will be able to see both definitions. As an userland programmer, the most portable way of dealing with it is to:
ensure ss_family and/or ss_len are available on the platform, by using GNU autoconf,
have -Dss_family=ss_family to unify all occurrences (including header file) into ss_family, or
never touch __ss_family. cast to sockaddr * and use sa_family like:
	struct sockaddr_storage ss;
	family = ((struct sockaddr *)&ss)->sa_family
8.1.2. Network Drivers
Now following two items are required to be supported by standard drivers:
mbuf clustering requirement. In this stable release, we changed MINCLSIZE into MHLEN+1 for all the operating systems in order to make all the drivers behave as we expect.
multicast. If ifmcstat(8) yields no multicast group for a interface, that interface has to be patched.
If any of the drivers do not support the requirements, then the drivers cannot be used for IPv6 and/or IPsec communication. If you find any problem with your card using IPv6/IPsec, then, please report it to the FreeBSD problem reports mailing list.
(NOTE: In the past we required all PCMCIA drivers to have a call to in6_ifattach(). We have no such requirement any more)
8.1.3. Translator
We categorize IPv4/IPv6 translator into 4 types:
Translator A --- It is used in the early stage of transition to make it possible to establish a connection from an IPv6 host in an IPv6 island to an IPv4 host in the IPv4 ocean.
Translator B --- It is used in the early stage of transition to make it possible to establish a connection from an IPv4 host in the IPv4 ocean to an IPv6 host in an IPv6 island.
Translator C --- It is used in the late stage of transition to make it possible to establish a connection from an IPv4 host in an IPv4 island to an IPv6 host in the IPv6 ocean.
Translator D --- It is used in the late stage of transition to make it possible to establish a connection from an IPv6 host in the IPv6 ocean to an IPv4 host in an IPv4 island.
8.1.4. IPsec
IPsec is mainly organized by three components.
Policy Management
Key Management
AH and ESP handling
8.1.4.1. Policy Management
The kernel implements experimental policy management code. There are two way to manage security policy. One is to configure per-socket policy using setsockopt(2). In this cases, policy configuration is described in ipsec_set_policy(3). The other is to configure kernel packet filter-based policy using PF_KEY interface, via setkey(8).
The policy entry is not re-ordered with its indexes, so the order of entry when you add is very significant.
8.1.4.2. Key Management
The key management code implemented in this kit (sys/netkey) is a home-brew PFKEY v2 implementation. This conforms to RFC2367.
The home-brew IKE daemon, "racoon" is included in the kit (kame/kame/racoon).
Basically you will need to run racoon as daemon, then set up a policy to require keys (like ping -P 'out ipsec esp/transport//use').
The kernel will contact racoon daemon as necessary to exchange keys.
8.1.4.3. AH and ESP Handling
IPsec module is implemented as "hooks" to the standard IPv4/IPv6 processing. When sending a packet, ip{,6}_output() checks if ESP/AH processing is required by checking if a matching SPD (Security Policy Database) is found. If ESP/AH is needed, {esp,ah}{4,6}_output() will be called and mbuf will be updated accordingly. When a packet is received, {esp,ah}4_input() will be called based on protocol number, i.e., (*inetsw[proto])(). {esp,ah}4_input() will decrypt/check authenticity of the packet, and strips off daisy-chained header and padding for ESP/AH. It is safe to strip off the ESP/AH header on packet reception, since we will never use the received packet in "as is" form.
By using ESP/AH, TCP4/6 effective data segment size will be affected by extra daisy-chained headers inserted by ESP/AH. Our code takes care of the case.
Basic crypto functions can be found in directory "sys/crypto". ESP/AH transform are listed in {esp,ah}_core.c with wrapper functions. If you wish to add some algorithm, add wrapper function in {esp,ah}_core.c, and add your crypto algorithm code into sys/crypto.
Tunnel mode is partially supported in this release, with the following restrictions:
IPsec tunnel is not combined with GIF generic tunneling interface. It needs a great care because we may create an infinite loop between ip_output() and tunnelifp→if_output(). Opinion varies if it is better to unify them, or not.
MTU and Don’t Fragment bit (IPv4) considerations need more checking, but basically works fine.
Authentication model for AH tunnel must be revisited. We will need to improve the policy management engine, eventually.
8.1.4.4. Conformance to RFCs and IDs
The IPsec code in the kernel conforms (or, tries to conform) to the following standards:
"old IPsec" specification documented in rfc182[5-9].txt
"new IPsec" specification documented in rfc240[1-6].txt, rfc241[01].txt, rfc2451.txt and draft-mcdonald-simple-ipsec-api-01.txt (draft expired, but you can take from ftp://ftp.kame.net/pub/internet-drafts/). (NOTE: IKE specifications, rfc241[7-9].txt are implemented in userland, as "racoon" IKE daemon)
Currently supported algorithms are:
old IPsec AH
null crypto checksum (no document, just for debugging)
keyed MD5 with 128bit crypto checksum (rfc1828.txt)
keyed SHA1 with 128bit crypto checksum (no document)
HMAC MD5 with 128bit crypto checksum (rfc2085.txt)
HMAC SHA1 with 128bit crypto checksum (no document)
old IPsec ESP
null encryption (no document, similar to rfc2410.txt)
DES-CBC mode (rfc1829.txt)
new IPsec AH
null crypto checksum (no document, just for debugging)
keyed MD5 with 96bit crypto checksum (no document)
keyed SHA1 with 96bit crypto checksum (no document)
HMAC MD5 with 96bit crypto checksum (rfc2403.txt)
HMAC SHA1 with 96bit crypto checksum (rfc2404.txt)
new IPsec ESP
null encryption (rfc2410.txt)
DES-CBC with derived IV (draft-ietf-ipsec-ciph-des-derived-01.txt, draft expired)
DES-CBC with explicit IV (rfc2405.txt)
3DES-CBC with explicit IV (rfc2451.txt)
BLOWFISH CBC (rfc2451.txt)
CAST128 CBC (rfc2451.txt)
RC5 CBC (rfc2451.txt)
each of the above can be combined with:
ESP authentication with HMAC-MD5(96bit)
ESP authentication with HMAC-SHA1(96bit)
The following algorithms are NOT supported:
old IPsec AH
HMAC MD5 with 128bit crypto checksum + 64bit replay prevention (rfc2085.txt)
keyed SHA1 with 160bit crypto checksum + 32bit padding (rfc1852.txt)
IPsec (in kernel) and IKE (in userland as "racoon") has been tested at several interoperability test events, and it is known to interoperate with many other implementations well. Also, current IPsec implementation as quite wide coverage for IPsec crypto algorithms documented in RFC (we cover algorithms without intellectual property issues only).
8.1.4.5. ECN Consideration on IPsec Tunnels
ECN-friendly IPsec tunnel is supported as described in draft-ipsec-ecn-00.txt.
Normal IPsec tunnel is described in RFC2401. On encapsulation, IPv4 TOS field (or, IPv6 traffic class field) will be copied from inner IP header to outer IP header. On decapsulation outer IP header will be simply dropped. The decapsulation rule is not compatible with ECN, since ECN bit on the outer IP TOS/traffic class field will be lost.
To make IPsec tunnel ECN-friendly, we should modify encapsulation and decapsulation procedure. This is described in http://www.aciri.org/floyd/papers/draft-ipsec-ecn-00.txt, chapter 3.
IPsec tunnel implementation can give you three behaviors, by setting net.inet.ipsec.ecn (or net.inet6.ipsec6.ecn) to some value:
RFC2401: no consideration for ECN (sysctl value -1)
ECN forbidden (sysctl value 0)
ECN allowed (sysctl value 1)
Note that the behavior is configurable in per-node manner, not per-SA manner (draft-ipsec-ecn-00 wants per-SA configuration, but it looks too much for me).
The behavior is summarized as follows (see source code for more detail):
encapsulate                     decapsulate
                ---                             ---
RFC2401         copy all TOS bits               drop TOS bits on outer
                from inner to outer.            (use inner TOS bits as is)

ECN forbidden   copy TOS bits except for ECN    drop TOS bits on outer
                (masked with 0xfc) from inner   (use inner TOS bits as is)
                to outer.  set ECN bits to 0.

ECN allowed     copy TOS bits except for ECN    use inner TOS bits with some
                CE (masked with 0xfe) from      change.  if outer ECN CE bit
                inner to outer.                 is 1, enable ECN CE bit on
                set ECN CE bit to 0.            the inner.
General strategy for configuration is as follows:
if both IPsec tunnel endpoint are capable of ECN-friendly behavior, you should better configure both end to "ECN allowed" (sysctl value 1).
if the other end is very strict about TOS bit, use "RFC2401" (sysctl value -1).
in other cases, use "ECN forbidden" (sysctl value 0).
The default behavior is "ECN forbidden" (sysctl value 0).
For more information, please refer to:
http://www.aciri.org/floyd/papers/draft-ipsec-ecn-00.txt, RFC2481 (Explicit Congestion Notification), src/sys/netinet6/{ah,esp}_input.c
(Thanks goes to Kenjiro Cho kjc@csl.sony.co.jp for detailed analysis)
8.1.4.6. Interoperability
Here are (some of) platforms that KAME code have tested IPsec/IKE interoperability in the past. Note that both ends may have modified their implementation, so use the following list just for reference purposes.
Altiga, Ashley-laurent (vpcom.com), Data Fellows (F-Secure), Ericsson ACC, FreeS/WAN, HITACHI, IBM AIX®, IIJ, Intel, Microsoft® Windows NT®, NIST (linux IPsec + plutoplus), Netscreen, OpenBSD, RedCreek, Routerware, SSH, Secure Computing, Soliton, Toshiba, VPNet, Yamaha RT100i
Part III: Kernel
Chapter 9. Building and Installing a FreeBSD Kernel
Being a kernel developer requires understanding of the kernel build process. To debug the FreeBSD kernel it is required to be able to build one. There are two known ways to do so:
The supported procedure to build and install a kernel is documented in the Building and Installing a Custom Kernel chapter of the FreeBSD Handbook.
It is supposed that the reader of this chapter is familiar with the information described in the Building and Installing a Custom Kernel chapter of the FreeBSD Handbook. If this is not the case, please read through the above mentioned chapter to understand how the build process works. |
9.1. Building the Faster but Brittle Way
Building the kernel this way may be useful when working on the kernel code and it may actually be faster than the documented procedure when only a single option or two were tweaked in the kernel configuration file. On the other hand, it might lead to unexpected kernel build breakage.
Chapter 10. Kernel Debugging
10.1. Obtaining a Kernel Crash Dump
When running a development kernel (e.g., FreeBSD-CURRENT), such as a kernel under extreme conditions (e.g., very high load averages, tens of thousands of connections, exceedingly high number of concurrent users, hundreds of jail(8)s, etc.), or using a new feature or device driver on FreeBSD-STABLE (e.g., PAE), sometimes a kernel will panic. In the event that it does, this chapter will demonstrate how to extract useful information out of a crash.
A system reboot is inevitable once a kernel panics. Once a system is rebooted, the contents of a system’s physical memory (RAM) is lost, as well as any bits that are on the swap device before the panic. To preserve the bits in physical memory, the kernel makes use of the swap device as a temporary place to store the bits that are in RAM across a reboot after a crash. In doing this, when FreeBSD boots after a crash, a kernel image can now be extracted and debugging can take place.
A swap device that has been configured as a dump device still acts as a swap device. Dumps to non-swap devices (such as tapes or CDRWs, for example) are not supported at this time. A "swap device" is synonymous with a "swap partition." |
Several types of kernel crash dumps are available:
- Full memory dumps
Hold the complete contents of physical memory.
- Minidumps
Hold only memory pages in use by the kernel.
- Textdumps
Hold captured, scripted, or interactive debugger output.
Minidumps are the default dump type, and in most cases will capture all necessary information present in a full memory dump, as most problems can be isolated only using kernel state.
10.1.1. Configuring the Dump Device
Before the kernel will dump the contents of its physical memory to a dump device, a dump device must be configured.
A dump device is specified by using the dumpon(8) command to tell the kernel where to save kernel crash dumps.
The dumpon(8) program must be called after the swap partition has been configured with swapon(8).
This is normally handled by setting the dumpdev variable in rc.conf(5) to the path of the swap device (the recommended way to extract a kernel dump) or AUTO to use the first configured swap device.
The default for dumpdev is AUTO in HEAD, and changed to NO on RELENG_* branches (except for RELENG_7, which was left set to AUTO).
On FreeBSD 9.0-RELEASE and later versions, bsdinstall will ask whether crash dumps should be enabled on the target system during the install process.
Check /etc/fstab or swapinfo(8) for a list of swap devices. |
Make sure the Also, remember that the contents of /var/crash is sensitive and very likely contains confidential information such as passwords. |
10.1.2. Extracting a Kernel Dump
Once a dump has been written to a dump device, the dump must be extracted before the swap device is mounted.
To extract a dump from a dump device, use the savecore(8) program.
If dumpdev has been set in rc.conf(5), savecore(8) will be called automatically on the first multi-user boot after the crash and before the swap device is mounted.
The location of the extracted core is placed in the rc.conf(5) value dumpdir, by default /var/crash and will be named vmcore.0.
In the event that there is already a file called vmcore.0 in /var/crash (or whatever dumpdir is set to), the kernel will increment the trailing number for every crash to avoid overwriting an existing vmcore (e.g., vmcore.1).
savecore(8) will always create a symbolic link to named vmcore.last in /var/crash after a dump is saved.
This symbolic link can be used to locate the name of the most recent dump.
The crashinfo(8) utility generates a text file containing a summary of information from a full memory dump or minidump.
If dumpdev has been set in rc.conf(5), crashinfo(8) will be invoked automatically after savecore(8).
The output is saved to a file in dumpdir named core.txt.N.
If you are testing a new kernel but need to boot a different one in order to get your system up and running again,
boot it only into single user mode using the This instructs savecore(8) to extract a kernel dump from /dev/ad0s1b and place the contents in /var/crash. Do not forget to make sure the destination directory /var/crash has enough space for the dump. Also, do not forget to specify the correct path to your swap device as it is likely different than /dev/ad0s1b! |
10.1.3. Testing Kernel Dump Configuration
The kernel includes a sysctl(8) node that requests a kernel panic. This can be used to verify that your system is properly configured to save kernel crash dumps. You may wish to remount existing file systems as read-only in single user mode before triggering the crash to avoid data loss.
# shutdown now
...
Enter full pathname of shell or RETURN for /bin/sh:
# mount -a -u -r
# sysctl debug.kdb.panic=1
debug.kdb.panic:panic: kdb_sysctl_panic
...
After rebooting, your system should save a dump in /var/crash along with a matching summary from crashinfo(8).
10.2. Debugging a Kernel Crash Dump with kgdb
To enter into the debugger and begin getting information from the dump, start kgdb:
# kgdb -n NWhere N is the suffix of the vmcore.N to examine. To open the most recent dump use:
# kgdb -n lastNormally, kgdb(1) should be able to locate the kernel running at the time the dump was generated. If it is not able to locate the correct kernel, pass the pathname of the kernel and dump as two arguments to kgdb:
# kgdb /boot/kernel/kernel /var/crash/vmcore.0You can debug the crash dump using the kernel sources just like you can for any other program.
This dump is from a 5.2-BETA kernel and the crash comes from deep within the kernel.
The output below has been modified to include line numbers on the left.
This first trace inspects the instruction pointer and obtains a back trace.
The address that is used on line 41 for the list command is the instruction pointer and can be found on line 17.
Most developers will request having at least this information sent to them if you are unable to debug the problem yourself.
If, however, you do solve the problem, make sure that your patch winds its way into the source tree via a problem report, mailing lists, or by being able to commit it!
 1:# cd /usr/obj/usr/src/sys/KERNCONF
 2:# kgdb kernel.debug /var/crash/vmcore.0
 3:GNU gdb 5.2.1 (FreeBSD)
 4:Copyright 2002 Free Software Foundation, Inc.
 5:GDB is free software, covered by the GNU General Public License, and you are
 6:welcome to change it and/or distribute copies of it under certain conditions.
 7:Type "show copying" to see the conditions.
 8:There is absolutely no warranty for GDB.  Type "show warranty" for details.
 9:This GDB was configured as "i386-undermydesk-freebsd"...
10:panic: page fault
11:panic messages:
12:---
13:Fatal trap 12: page fault while in kernel mode
14:cpuid = 0; apic id = 00
15:fault virtual address   = 0x300
16:fault code:             = supervisor read, page not present
17:instruction pointer     = 0x8:0xc0713860
18:stack pointer           = 0x10:0xdc1d0b70
19:frame pointer           = 0x10:0xdc1d0b7c
20:code segment            = base 0x0, limit 0xfffff, type 0x1b
21:                        = DPL 0, pres 1, def32 1, gran 1
22:processor eflags        = resume, IOPL = 0
23:current process         = 14394 (uname)
24:trap number             = 12
25:panic: page fault
26      cpuid = 0;
27:Stack backtrace:
28
29:syncing disks, buffers remaining... 2199 2199 panic: mi_switch: switch in a critical section
30:cpuid = 0;
31:Uptime: 2h43m19s
32:Dumping 255 MB
33: 16 32 48 64 80 96 112 128 144 160 176 192 208 224 240
34:---
35:Reading symbols from /boot/kernel/snd_maestro3.ko...done.
36:Loaded symbols for /boot/kernel/snd_maestro3.ko
37:Reading symbols from /boot/kernel/snd_pcm.ko...done.
38:Loaded symbols for /boot/kernel/snd_pcm.ko
39:#0  doadump () at /usr/src/sys/kern/kern_shutdown.c:240
40:240             dumping++;
41:(kgdb) list *0xc0713860
42:0xc0713860 is in lapic_ipi_wait (/usr/src/sys/i386/i386/local_apic.c:663).
43:658                     incr = 0;
44:659                     delay = 1;
45:660             } else
46:661                     incr = 1;
47:662             for (x = 0; x < delay; x += incr) {
48:663                     if ((lapic->icr_lo & APIC_DELSTAT_MASK) == APIC_DELSTAT_IDLE)
49:664                             return (1);
50:665                     ia32_pause();
51:666             }
52:667             return (0);
53:(kgdb) backtrace
54:#0  doadump () at /usr/src/sys/kern/kern_shutdown.c:240
55:#1  0xc055fd9b in boot (howto=260) at /usr/src/sys/kern/kern_shutdown.c:372
56:#2  0xc056019d in panic () at /usr/src/sys/kern/kern_shutdown.c:550
57:#3  0xc0567ef5 in mi_switch () at /usr/src/sys/kern/kern_synch.c:470
58:#4  0xc055fa87 in boot (howto=256) at /usr/src/sys/kern/kern_shutdown.c:312
59:#5  0xc056019d in panic () at /usr/src/sys/kern/kern_shutdown.c:550
60:#6  0xc0720c66 in trap_fatal (frame=0xdc1d0b30, eva=0)
61:    at /usr/src/sys/i386/i386/trap.c:821
62:#7  0xc07202b3 in trap (frame=
63:      {tf_fs = -1065484264, tf_es = -1065484272, tf_ds = -1065484272, tf_edi = 1, tf_esi = 0, tf_ebp = -602076292, tf_isp = -602076324, tf_ebx = 0, tf_edx = 0, tf_ecx = 1000000, tf_eax = 243, tf_trapno = 12, tf_err = 0, tf_eip = -1066321824, tf_cs = 8, tf_eflags = 65671, tf_esp = 243, tf_ss = 0})
64:    at /usr/src/sys/i386/i386/trap.c:250
65:#8  0xc070c9f8 in calltrap () at {standard input}:94
66:#9  0xc07139f3 in lapic_ipi_vectored (vector=0, dest=0)
67:    at /usr/src/sys/i386/i386/local_apic.c:733
68:#10 0xc0718b23 in ipi_selected (cpus=1, ipi=1)
69:    at /usr/src/sys/i386/i386/mp_machdep.c:1115
70:#11 0xc057473e in kseq_notify (ke=0xcc05e360, cpu=0)
71:    at /usr/src/sys/kern/sched_ule.c:520
72:#12 0xc0575cad in sched_add (td=0xcbcf5c80)
73:    at /usr/src/sys/kern/sched_ule.c:1366
74:#13 0xc05666c6 in setrunqueue (td=0xcc05e360)
75:    at /usr/src/sys/kern/kern_switch.c:422
76:#14 0xc05752f4 in sched_wakeup (td=0xcbcf5c80)
77:    at /usr/src/sys/kern/sched_ule.c:999
78:#15 0xc056816c in setrunnable (td=0xcbcf5c80)
79:    at /usr/src/sys/kern/kern_synch.c:570
80:#16 0xc0567d53 in wakeup (ident=0xcbcf5c80)
81:    at /usr/src/sys/kern/kern_synch.c:411
82:#17 0xc05490a8 in exit1 (td=0xcbcf5b40, rv=0)
83:    at /usr/src/sys/kern/kern_exit.c:509
84:#18 0xc0548011 in sys_exit () at /usr/src/sys/kern/kern_exit.c:102
85:#19 0xc0720fd0 in syscall (frame=
86:      {tf_fs = 47, tf_es = 47, tf_ds = 47, tf_edi = 0, tf_esi = -1, tf_ebp = -1077940712, tf_isp = -602075788, tf_ebx = 672411944, tf_edx = 10, tf_ecx = 672411600, tf_eax = 1, tf_trapno = 12, tf_err = 2, tf_eip = 671899563, tf_cs = 31, tf_eflags = 642, tf_esp = -1077940740, tf_ss = 47})
87:    at /usr/src/sys/i386/i386/trap.c:1010
88:#20 0xc070ca4d in Xint0x80_syscall () at {standard input}:136
89:---Can't read userspace from dump, or kernel process---
90:(kgdb) quit
If your system is crashing regularly and you are running out of disk space, deleting old vmcore files in /var/crash could save a considerable amount of disk space! |
10.3. On-Line Kernel Debugging Using DDB
While kgdb as an off-line debugger provides a very high level of user interface, there are some things it cannot do.
The most important ones being breakpointing and single-stepping kernel code.
If you need to do low-level debugging on your kernel, there is an on-line debugger available called DDB.
It allows setting of breakpoints, single-stepping kernel functions, examining and changing kernel variables, etc.
However, it cannot access kernel source files, and only has access to the global and static symbols, not to the full debug information like kgdb does.
To configure your kernel to include DDB, add the options
options KDB
options DDB
to your config file, and rebuild. (See The FreeBSD Handbook for details on configuring the FreeBSD kernel).
Once your DDB kernel is running, there are several ways to enter DDB.
The first, and earliest way is to use the boot flag -d.
The kernel will start up in debug mode and enter DDB prior to any device probing.
Hence you can even debug the device probe/attach functions.
To use this, exit the loader’s boot menu and enter boot -d at the loader prompt.
The second scenario is to drop to the debugger once the system has booted. There are two simple ways to accomplish this. If you would like to break to the debugger from the command prompt, simply type the command:
# sysctl debug.kdb.enter=1Alternatively, if you are at the system console, you may use a hot-key on the keyboard.
The default break-to-debugger sequence is Ctrl+Alt+ESC.
For syscons, this sequence can be remapped and some of the distributed maps out there do this, so check to make sure you know the right sequence to use.
There is an option available for serial consoles that allows the use of a serial line BREAK on the console line to enter DDB (options BREAK_TO_DEBUGGER in the kernel config file).
It is not the default since there are a lot of serial adapters around that gratuitously generate a BREAK condition, for example when pulling the cable.
The third way is that any panic condition will branch to DDB if the kernel is configured to use it. For this reason, it is not wise to configure a kernel with DDB for a machine running unattended.
To obtain the unattended functionality, add:
options KDB_UNATTENDED
to the kernel configuration file and rebuild/reinstall.
The DDB commands roughly resemble some gdb commands.
The first thing you probably need to do is to set a breakpoint:
break function-name addressNumbers are taken hexadecimal by default, but to make them distinct from symbol names;
hexadecimal numbers starting with the letters a-f need to be preceded with 0x (this is optional for other numbers).
Simple expressions are allowed, for example: function-name + 0x103.
To exit the debugger and continue execution, type:
continueTo get a stack trace of the current thread, use:
traceTo get a stack trace of an arbitrary thread, specify a process ID or thread ID as a second argument to trace.
If you want to remove a breakpoint, use
 del
 del address-expression
The first form will be accepted immediately after a breakpoint hit, and deletes the current breakpoint. The second form can remove any breakpoint, but you need to specify the exact address; this can be obtained from:
show bor:
show breakTo single-step the kernel, try:
sThis will step into functions, but you can make DDB trace them until the matching return statement is reached by:
nThis is different from |
To examine data from memory, use (for example):
 x/wx 0xf0133fe0,40
 x/hd db_symtab_space
 x/bc termbuf,10
 x/s stringbuf
for word/halfword/byte access, and hexadecimal/decimal/character/ string display. The number after the comma is the object count. To display the next 0x10 items, simply use:
x ,10Similarly, use
x/ia foofunc,10to disassemble the first 0x10 instructions of foofunc, and display them along with their offset from the beginning of foofunc.
To modify memory, use the write command:
 w/b termbuf 0xa 0xb 0
 w/w 0xf0010030 0 0
The command modifier (b/h/w) specifies the size of the data to be written,
the first following expression is the address to write to and the remainder is interpreted as data to write to successive memory locations.
If you need to know the current registers, use:
show regAlternatively, you can display a single register value by e.g.
p $eaxand modify it by:
set $eax new-valueShould you need to call some kernel functions from DDB, simply say:
call func(arg1, arg2, ...)The return value will be printed.
For a ps(1) style summary of all running processes, use:
psNow you have examined why your kernel failed, and you wish to reboot. Remember that, depending on the severity of previous malfunctioning, not all parts of the kernel might still be working as expected. Perform one of the following actions to shut down and reboot your system:
panicThis will cause your kernel to dump core and reboot, so you can later analyze the core on a higher level with kgdb(1).
call boot(0)Might be a good way to cleanly shut down the running system, sync() all disks, and finally, in some cases, reboot.
As long as the disk and filesystem interfaces of the kernel are not damaged, this could be a good way for an almost clean shutdown.
resetThis is the final way out of disaster and almost the same as hitting the Big Red Button.
If you need a short command summary, simply type:
helpIt is highly recommended to have a printed copy of the ddb(4) manual page ready for a debugging session. Remember that it is hard to read the on-line manual while single-stepping the kernel.
10.4. On-Line Kernel Debugging Using Remote GDB
The FreeBSD kernel provides a second KDB backend for on-line debugging: gdb(4).
GDB has supported remote debugging for a long time. This is done using a very simple protocol along a serial line. Unlike the other debugging methods described above, you will need two machines for doing this. One is the host providing the debugging environment, including all the sources, and a copy of the kernel binary with all the symbols in it. The other is the target machine that runs a copy of the very same kernel (optionally stripped of the debugging information).
In order to use remote GDB, ensure that the following options are present in your kernel configuration:
makeoptions     DEBUG=-g
options         KDB
options         GDB
Note that the GDB option is turned off by default in GENERIC kernels on -STABLE and -RELEASE branches, but enabled on -CURRENT.
Once built, copy the kernel to the target machine, and boot it. Connect the serial line of the target machine that has "flags 080" set on its uart device to any serial line of the debugging host. See uart(4) for information on how to set the flags on a uart device.
The target machine must be made to enter the GDB backend, either due to a panic or by taking a purposeful trap into the debugger. Before doing this, select the GDB debugger backend:
# sysctl debug.kdb.current=gdb
debug.kdb.current: ddb -> gdb
The supported backends can be listed by the |
Then, force entry to the debugger:
# sysctl debug.kdb.enter=1
debug.kdb.enter: 0KDB: enter: sysctl debug.kdb.enter
The target machine now awaits connection from a remote GDB client.
On the debugging machine, go to the compile directory of the target kernel, and start gdb:
# cd /usr/obj/usr/src/amd64.amd64/sys/GENERIC/
# kgdb kernel
GNU gdb (GDB) 10.2 [GDB v10.2 for FreeBSD]
Copyright (C) 2021 Free Software Foundation, Inc.
...
Reading symbols from kernel...
Reading symbols from /usr/obj/usr/src/amd64.amd64/sys/GENERIC/kernel.debug...
(kgdb)
Initialize the remote debugging session (assuming the first serial port is being used) by:
(kgdb) target remote /dev/cuau0Your hosting GDB will now gain control over the target kernel:
Remote debugging using /dev/cuau0
kdb_enter (why=<optimized out>, msg=<optimized out>) at /usr/src/sys/kern/subr_kdb.c:506
506                     kdb_why = KDB_WHY_UNSET;
(kgdb)
Depending on the compiler used, some local variables may appear as |
You can use this session almost as any other GDB session, including full access to the source, running it in gud-mode inside an Emacs window (which gives you an automatic source code display in another Emacs window), etc.
10.5. Debugging a Console Driver
Since you need a console driver to run DDB on, things are more complicated if the console driver itself is failing.
You might remember the use of a serial console (either with modified boot blocks, or by specifying -h at the Boot: prompt),
and hook up a standard terminal onto your first serial port.
DDB works on any configured console driver, including a serial console.
10.6. Debugging Deadlocks
You may experience so called deadlocks, a situation where a system stops doing useful work.
To provide a helpful bug report in this situation, use ddb(4) as described in the previous section.
Include the output of ps and trace for suspected processes in the report.
If possible, consider doing further investigation. The recipe below is especially useful if you suspect that a deadlock occurs in the VFS layer. Add these options to the kernel configuration file.
makeoptions 	DEBUG=-g
options 	INVARIANTS
options 	INVARIANT_SUPPORT
options 	WITNESS
options 	WITNESS_SKIPSPIN
options 	DEBUG_LOCKS
options 	DEBUG_VFS_LOCKS
options 	DIAGNOSTIC
When a deadlock occurs, in addition to the output of the ps command, provide information from the show pcpu, show allpcpu, show locks, show alllocks, show lockedvnods and alltrace.
To obtain meaningful backtraces for threaded processes, use thread thread-id to switch to the thread stack, and do a backtrace with where.
10.7. Kernel debugging with Dcons
dcons(4) is a very simple console driver that is not directly connected with any physical devices. It just reads and writes characters from and to a buffer in a kernel or loader. Due to its simple nature, it is very useful for kernel debugging, especially with a FireWire® device. Currently, FreeBSD provides two ways to interact with the buffer from outside of the kernel using dconschat(8).
10.7.1. Dcons over FireWire®
Most FireWire® (IEEE1394) host controllers are based on the OHCI specification that supports physical access to the host memory. This means that once the host controller is initialized, we can access the host memory without the help of software (kernel). We can exploit this facility for interaction with dcons(4). dcons(4) provides similar functionality as a serial console. It emulates two serial ports, one for the console and DDB, the other for GDB. Since remote memory access is fully handled by the hardware, the dcons(4) buffer is accessible even when the system crashes.
FireWire® devices are not limited to those integrated into motherboards. PCI cards exist for desktops, and a cardbus interface can be purchased for laptops.
10.7.1.1. Enabling FireWire® and Dcons support on the target machine
To enable FireWire® and Dcons support in the kernel of the target machine:
Make sure your kernel supports
dcons,dcons_cromandfirewire.Dconsshould be statically linked with the kernel. Fordcons_cromandfirewire, modules should be OK.Make sure physical DMA is enabled. You may need to add
hw.firewire.phydma_enable=1to /boot/loader.conf.Add options for debugging.
Add
dcons_gdb=1in /boot/loader.conf if you use GDB over FireWire®.Enable
dconsin /etc/ttys.Optionally, to force
dconsto be the high-level console, addhw.firewire.dcons_crom.force_console=1to loader.conf.
To enable FireWire® and Dcons support in loader(8) on i386 or amd64:
Add LOADER_FIREWIRE_SUPPORT=YES in /etc/make.conf and rebuild loader(8):
# cd /sys/boot/i386 && make clean && make && make installTo enable dcons(4) as an active low-level console, add boot_multicons="YES" to /boot/loader.conf.
Here are a few configuration examples. A sample kernel configuration file would contain:
device dcons
device dcons_crom
options KDB
options DDB
options GDB
options ALT_BREAK_TO_DEBUGGER
And a sample /boot/loader.conf would contain:
dcons_crom_load="YES"
dcons_gdb=1
boot_multicons="YES"
hw.firewire.phydma_enable=1
hw.firewire.dcons_crom.force_console=1
10.7.1.2. Enabling FireWire® and Dcons support on the host machine
To enable FireWire® support in the kernel on the host machine:
# kldload firewireFind out the EUI64 (the unique 64 bit identifier) of the FireWire® host controller, and use fwcontrol(8) or dmesg to find the EUI64 of the target machine.
Run dconschat(8), with:
# dconschat -e \# -br -G 12345 -t 00-11-22-33-44-55-66-77The following key combinations can be used once dconschat(8) is running:
~+. | Disconnect |
~ | ALT BREAK |
~ | RESET target |
~ | Suspend dconschat |
Attach remote GDB by starting kgdb(1) with a remote debugging session:
kgdb -r :12345 kernel10.7.1.3. Some general tips
Here are some general tips:
To take full advantage of the speed of FireWire®, disable other slow console drivers:
# conscontrol delete ttyd0	     # serial console
# conscontrol delete consolectl	# video/keyboard
There exists a GDB mode for emacs(1); this is what you will need to add to your .emacs:
(setq gud-gdba-command-name "kgdb -a -a -a -r :12345")
(setq gdb-many-windows t)
(xterm-mouse-mode 1)
M-x gdba10.8. Glossary of Kernel Options for Debugging
This section provides a brief glossary of compile-time kernel options used for debugging:
options KDB: compiles in the kernel debugger framework. Required foroptions DDBandoptions GDB. Little or no performance overhead. By default, the debugger will be entered on panic instead of an automatic reboot.options KDB_UNATTENDED: change the default value of thedebug.debugger_on_panicsysctl to 0, which controls whether the debugger is entered on panic. Whenoptions KDBis not compiled into the kernel, the behavior is to automatically reboot on panic; when it is compiled into the kernel, the default behavior is to drop into the debugger unlessoptions KDB_UNATTENDEDis compiled in. If you want to leave the kernel debugger compiled into the kernel but want the system to come back up unless you’re on-hand to use the debugger for diagnostics, use this option.options KDB_TRACE: change the default value of thedebug.trace_on_panicsysctl to 1, which controls whether the debugger automatically prints a stack trace on panic. Especially if running withoptions KDB_UNATTENDED, this can be helpful to gather basic debugging information on the serial or firewire console while still rebooting to recover.options DDB: compile in support for the console debugger, DDB. This interactive debugger runs on whatever the active low-level console of the system is, which includes the video console, serial console, or firewire console. It provides basic integrated debugging facilities, such as stack tracing, process and thread listing, dumping of lock state, VM state, file system state, and kernel memory management. DDB does not require software running on a second machine or being able to generate a core dump or full debugging kernel symbols, and provides detailed diagnostics of the kernel at run-time. Many bugs can be fully diagnosed using only DDB output. This option depends onoptions KDB.options GDB: compile in support for the remote debugger, GDB, which can operate over serial cable or firewire. When the debugger is entered, GDB may be attached to inspect structure contents, generate stack traces, etc. Some kernel state is more awkward to access than in DDB, which is able to generate useful summaries of kernel state automatically, such as automatically walking lock debugging or kernel memory management structures, and a second machine running the debugger is required. On the other hand, GDB combines information from the kernel source and full debugging symbols, and is aware of full data structure definitions, local variables, and is scriptable. This option is not required to run GDB on a kernel core dump. This option depends onoptions KDB.options BREAK_TO_DEBUGGER,options ALT_BREAK_TO_DEBUGGER: allow a break signal or alternative signal on the console to enter the debugger. If the system hangs without a panic, this is a useful way to reach the debugger. Due to the current kernel locking, a break signal generated on a serial console is significantly more reliable at getting into the debugger, and is generally recommended. This option has little or no performance impact.options INVARIANTS: compile into the kernel a large number of run-time assertion checks and tests, which constantly test the integrity of kernel data structures and the invariants of kernel algorithms. These tests can be expensive, so are not compiled in by default, but help provide useful "fail stop" behavior, in which certain classes of undesired behavior enter the debugger before kernel data corruption occurs, making them easier to debug. Tests include memory scrubbing and use-after-free testing, which is one of the more significant sources of overhead. This option depends onoptions INVARIANT_SUPPORT.options INVARIANT_SUPPORT: many of the tests present inoptions INVARIANTSrequire modified data structures or additional kernel symbols to be defined.options WITNESS: this option enables run-time lock order tracking and verification, and is an invaluable tool for deadlock diagnosis. WITNESS maintains a graph of acquired lock orders by lock type, and checks the graph at each acquire for cycles (implicit or explicit). If a cycle is detected, a warning and stack trace are generated to the console, indicating that a potential deadlock might have occurred. WITNESS is required in order to use theshow locks,show witnessandshow alllocksDDB commands. This debug option has significant performance overhead, which may be somewhat mitigated through the use ofoptions WITNESS_SKIPSPIN. Detailed documentation may be found in witness(4).options WITNESS_SKIPSPIN: disable run-time checking of spinlock lock order with WITNESS. As spin locks are acquired most frequently in the scheduler, and scheduler events occur often, this option can significantly speed up systems running with WITNESS. This option depends onoptions WITNESS.options WITNESS_KDB: change the default value of thedebug.witness.kdbsysctl to 1, which causes WITNESS to enter the debugger when a lock order violation is detected, rather than simply printing a warning. This option depends onoptions WITNESS.options SOCKBUF_DEBUG: perform extensive run-time consistency checking on socket buffers, which can be useful for debugging both socket bugs and race conditions in protocols and device drivers that interact with sockets. This option significantly impacts network performance, and may change the timing in device driver races.options DEBUG_VFS_LOCKS: track lock acquisition points for lockmgr/vnode locks, expanding the amount of information displayed byshow lockedvnodsin DDB. This option has a measurable performance impact.options DEBUG_MEMGUARD: a replacement for the malloc(9) kernel memory allocator that uses the VM system to detect reads or writes from allocated memory after free. Details may be found in memguard(9). This option has a significant performance impact, but can be very helpful in debugging kernel memory corruption bugs.options DIAGNOSTIC: enable additional, more expensive diagnostic tests along the lines ofoptions INVARIANTS.options KASAN: enable the Kernel Address Sanitizer. This enables compiler instrumentation which can be used to detect invalid memory accesses in the kernel, such as use-after-frees and buffer overflows. This largely supersedesoptions DEBUG_MEMGUARD. See kasan(9) for details, and for the currently supported platforms.options KMSAN: enable the Kernel Memory Sanitizer. This enables compiler instrumentation which can be used to detect uses of uninitialized memory. See kmsan(9) for details, and for the currently supported platforms.
Part IV: Appendices
Appendix A: Bibliography
[1] Dave A Patterson and John L Hennessy. Copyright® 1998 Morgan Kaufmann Publishers, Inc. 1-55860-428-6. Morgan Kaufmann Publishers, Inc. Computer Organization and Design. The Hardware / Software Interface. 1-2.
[2] W. Richard Stevens. Copyright® 1993 Addison Wesley Longman, Inc. 0-201-56317-7. Addison Wesley Longman, Inc. Advanced Programming in the Unix Environment. 1-2.
[3] Marshall Kirk McKusick and George Neville-Neil. Copyright® 2004 Addison-Wesley. 0-201-70245-2. Addison-Wesley. The Design and Implementation of the FreeBSD Operating System. 1-2.
1. If you run it in the shell, you may get a core dump.
2. In case you did not know, a binary sort is an efficient way of sorting things into order and a bubble sort is not.
3. The reasons for this are buried in the mists of history.
4. Note, we did not use the -o flag to specify the executable name, so we will get an executable called a.out. Producing a debug version called foobar is left as an exercise for the reader!
5. They do not use the MAKEFILE form as block capitals are often used for documentation files like README.
6. Many Emacs users set their EDITOR environment to emacsclient so this happens every time they need to edit a file.
Last modified on: May 19, 2026 by Mitchell Horne