
Primary Mirror Sites
E:\> tools\fdimage floppies\kern.flp A:This translation may be out of date. To help with the translations please access the FreeBSD translations instance.
FreeBSD is a registered trademark of the FreeBSD Foundation.
IBM, AIX, OS/2, PowerPC, PS/2, S/390, and ThinkPad are trademarks of International Business Machines Corporation in the United States, other countries, or both.
IEEE, POSIX, and 802 are registered trademarks of Institute of Electrical and Electronics Engineers, Inc. in the United States.
Red Hat, RPM, are trademarks or registered trademarks of Red Hat, Inc. in the United States and other countries.
3Com and HomeConnect are registered trademarks of 3Com Corporation.
Adobe, Acrobat, Acrobat Reader, Flash and PostScript are either registered trademarks or trademarks of Adobe Systems Incorporated in the United States and/or other countries.
Apple, AirPort, FireWire, iMac, iPhone, iPad, Mac, Macintosh, Mac OS, Quicktime, and TrueType are trademarks of Apple Inc., registered in the U.S. and other countries.
Intel, Celeron, Centrino, Core, EtherExpress, i386, i486, Itanium, Pentium, and Xeon are trademarks or registered trademarks of Intel Corporation or its subsidiaries in the United States and other countries.
Linux is a registered trademark of Linus Torvalds.
Microsoft, IntelliMouse, MS-DOS, Outlook, Windows, Windows Media and Windows NT are either registered trademarks or trademarks of Microsoft Corporation in the United States and/or other countries.
Motif, OSF/1, and UNIX are registered trademarks and IT DialTone and The Open Group are trademarks of The Open Group in the United States and other countries.
Sun, Sun Microsystems, Java, Java Virtual Machine, JDK, JRE, JSP, JVM, Netra, OpenJDK, Solaris, StarOffice, SunOS and VirtualBox are trademarks or registered trademarks of Sun Microsystems, Inc. in the United States and other countries.
RealNetworks, RealPlayer, and RealAudio are the registered trademarks of RealNetworks, Inc.
Oracle is a registered trademark of Oracle Corporation.
3ware is a registered trademark of 3ware Inc.
ARM is a registered trademark of ARM Limited.
Adaptec is a registered trademark of Adaptec, Inc.
Android is a trademark of Google Inc.
Heidelberg, Helvetica, Palatino, and Times Roman are either registered trademarks or trademarks of Heidelberger Druckmaschinen AG in the U.S. and other countries.
Intuit and Quicken are registered trademarks and/or registered service marks of Intuit Inc., or one of its subsidiaries, in the United States and other countries.
LSI Logic, AcceleRAID, eXtremeRAID, MegaRAID and Mylex are trademarks or registered trademarks of LSI Logic Corp.
MATLAB is a registered trademark of The MathWorks, Inc.
SpeedTouch is a trademark of Thomson.
VMware is a trademark of VMware, Inc.
Mathematica is a registered trademark of Wolfram Research, Inc.
Ogg Vorbis and Xiph.Org are trademarks of Xiph.Org.
XFree86 is a trademark of The XFree86 Project, Inc.
Many of the designations used by manufacturers and sellers to distinguish their products are claimed as trademarks. Where those designations appear in this document, and the FreeBSD Project was aware of the trademark claim, the designations have been followed by the “™” or the “®” symbol.
Abstrakt
Witamy w świecie FreeBSD! Zadaniem niniejszego podręcznika jest opisanie procesu instalacji i czynności związanych z codziennym użytkowaniem systemu FreeBSD w wersji 11.2-RELEASE oraz 12.0-RELEASE. Prace nad tym podręcznikiem trwają cały czas. Stanowi on dzieło wielu osób z całego świata. Tym nie mniej mamy świadomość, iż wiele rozdziałów wciąż nie zostało napisanych, a niektóre spośród istniejących wymagają aktualizacji. Jeśli jesteś zainteresowany pomocą w rozwoju projektu wyślij email na adres FreeBSD documentation project mailing list. Najnowsza wersja anglojęzyczna niniejszego dokumentu jest zawsze dostępna na stronie domowej FreeBSD (wersje wcześniejsze dostępne są pod adresem http://docs.FreeBSD.org/doc/). Podręcznik dostępny jest również w innych formatach dokumentów oraz w postaci skompresowanej z serwera FTP Projektu FreeBSD bądź jednego z wielu serwerów lustrzanych. Dla osób zainteresowanych, drukowaną wersję podręcznika (język ang.) można nabyć wprost z witryny FreeBSD Mall. Dostępne jest również przeszukiwanie podręcznika.
Osoba poznająca dopiero system FreeBSD odnajdzie w pierwszej części niniejszej książki szereg porad prowadzących użytkownika przez proces instalacji i delikatnie prezentujących pewne koncepcje i konwencje stojące u podstaw systemów UNIX®. Przebrnięcie przez tę część wymaga niewiele więcej niż chęć poznania i umiejętność przyswajania sobie nowych koncepcji w miarę jak będą one prezentowane.
Po dotrwaniu do drugiej, zdecydowanie obszerniejszej części Podręcznika, czytelnik będzie miał do dyspozycji pełną wiedzę z zakresu wszystkich zagadnień znajdujacych się w polu zainteresowań administratorów systemów FreeBSD. Niektóre z zawartych tutaj rozdziałów mogą wymagać wcześniejszego zapoznania się z odpowiednią literaturą. W takich przypadkach, będzie to wyszczególnione w streszczeniu na początku każdego rozdziału.
Bibliography zawiera listę dodatkowych źródeł informacji.
Niniejsze trzecie wydanie stanowi punkt kulminacyjny przeszło dwuletniej pracy oddanych członków Projektu Dokumentacji FreeBSD. Główne zmiany jakie w tym okresie zostały dokonane to:
Configuration and Tuning, Konfiguracja i dostrajanie został poszerzony o nowe informacje o zarządzaniu mocą i zasobami APCI, opis narzędzia cron i kolejną porcję opcji dostrajania jądra.
Security, Bezpieczeństwo, został poszerzony o nowe informacje odnośnie wirtualnych sieci prywatnych (VPN), list kontroli dostępu do systemu plików, i biuletynach bezpieczeństwa.
Mandatory Access Control, Mandatory Access Control (MAC), is a new chapter with this edition. It explains what MAC is and how this mechanism can be used to secure a FreeBSD system.
Storage, Storage, has been expanded with new information about USB storage devices, file system snapshots, file system quotas, file and network backed filesystems, and encrypted disk partitions.
The Vinum Volume Manager, Vinum, is a new chapter with this edition. It describes how to use Vinum, a logical volume manager which provides device-independent logical disks, and software RAID-0, RAID-1 and RAID-5.
A troubleshooting section has been added to PPP, PPP and SLIP.
Electronic Mail, Electronic Mail, has been expanded with new information about using alternative transport agents, SMTP authentication, UUCP, fetchmail, procmail, and other advanced topics.
Network Servers, Network Servers, is all new with this edition. This chapter includes information about setting up the Apache HTTP Server, FTPd, and setting up a server for Microsoft Windows clients with Samba. Some sections from Advanced Networking, Advanced Networking, were moved here to improve the presentation.
Advanced Networking, Advanced Networking, has been expanded with new information about using Bluetooth devices with FreeBSD, setting up wireless networks, and Asynchronous Transfer Mode (ATM) networking.
Definicje i wykorzystywane w książce terminy techniczne zostały zebrane razem w formie leksykonu.
Dokonano wielu estetycznych poprawek tabel i rysunków.
Wydanie drugie stanowiło punkt kulminacyjny przeszło dwuletniej pracy oddanych członków Projektu Dokumentacji FreeBSD. Główne zmiany jakie w tym okresie zostały dokonane to:
Dodano indeks.
Wszystkie diagramy ASCII zostały zastąpione rysunkami graficznymi.
Dodano standardowe streszczenie do wszystkich rozdziałów, informujące jakie informacje rozdział zawiera i co powinien wiedzieć czytelnik nim przystąpi do czytania.
Zawartość podręcznika została zreorganizowana w trzy logiczne części: "Pierwsze kroki", "Administracja systemem" oraz "Dodatki".
Instalacja FreeBSD ("Instalacja FreeBSD") został całkowicie przepisany na nowo.Dołączono wiele zrzutów ekranu, by ułatwić nowym użytkownikom przyswojenie tekstu.
Podstawy Uniksa ("Podstawy Uniksa") został poszerzony o dodatkow informacje o procesach, demonach i sygnałach.
Instalacja programów. pakiety i porty ("Instalacja programów") został poszerzony o dodatkowe informacje o zarządzaniu pakietami binarnymi.
System okien X ("System okien X") został w całkości napisany od nowa kładąc nacisk na współczesne środowiska graficzne we XFree86TM 4.X, takie jak KDE i GNOME.
The FreeBSD Booting Process ("Proces uruchamiania FreeBSD") został poszerzony.
Storage ("Pamięć") został napisany na podstawie rozdziałów "Dyski" oraz "Kopie zapasowe". Uważamy, że zagadnienia te łatwiej jest zrozumieć, gdy są przedstawiane jako jeden rozdział. Dodano również podrozdział traktujący o RAID (zarówno sprzętowym jak i programowym).
Serial Communications ("Komunikacja szeregowa") został całkowicie zreorganizowany i zaktualizowany dla FreeBSD 4.X/5.X.
PPP and SLIP ("PPP i SLIP") zostały zasadniczo zaktualizowane.
Advanced Networking ("Advanced Networking") został zaktualizowany.
Electronic Mail ("Poczta elektroniczna") został rozszerzony materiały traktujące o konfiguracji programu sendmail.
Linux® Binary Compatibility ("Kompatybilność z Linuksem") został poszerzony o informacje o instalacji bazy Oracle® oraz SAP® R/3®.
W drugim wydaniu dodano nowe rozdziały:
Konfiguracja i dostrajanie (Configuration and Tuning).
Multimedia (Multimedia)
Niniejsza książka została podzielona na pięć logicznych części. Część pierwsza, Pierwsze kroki, opisuje proces instalacji oraz podstawy użytkowania systemu FreeBSD. Zaleca się aby czytelnik zapoznał się z tymi rozdziałami kolejno, pomijając jedynie znane tematy. Część druga, Codzienne czynności, prezentuje niektóre z najczęściej wykorzystywanych funkcji FreeBSD. Ta część, wraz kolejnymi, może być czytania bez określonej kolejności. Każdy z wchodzących w jej skład rozdziałów zaczyna się od zwięzłego strzeszczenia zawartości i przedstawienia co czytelnik powinien już wiedzieć. Celem takiego układu jest pozwolenie zwykłemu czytelnikowi pominąć pewne rozdziały, by prejść od razu do najbardziej interesujących. Część trzecia, Administracja Systemem, opisuje zagadnienia administracyjne. Część czwarta, Komunikacja sieciowa, zawiera tematy związane z pracą w sieci oraz obsługą serwerów. Część piąta zawiera dodatki.
Wprowadza nowego użytkownika w świat FreeBSD. Streszcza historię Projektu FreeBSD, stawiane przed nim cele oraz model rozwoju.
Przeprowadza użytkownika przez cały proces instalacji. Opisuje również kilka zaawansowanych zagadnień, jak np. instalację przez konsolę szeregową.
Przedstawia podstawowe polecenie i funkcje systemu operacyjnego FreeBSD. Jeśli pracowaliśmy w Linuksie bądź w innym systemie typu UNIX® najprawdopodobniej możemy pominąć ten rozdział.
Opisuje metody instalacji dodatkowego oprogramowania we FreeBSD za pomocą systemu "Kolekcji portów" oraz typowych pakietów binarnych.
Opisuje ogólnie System okien X oraz wykorzystanie X11 we FreeBSD. Ponadto, przedstawia typowe środowiska graficzne jak np. KDE czy GNOME.
Lists some common desktop applications, such as web browsers and productivity suites, and describes how to install them on FreeBSD.
Shows how to set up sound and video playback support for your system. Also describes some sample audio and video applications.
Explains why you might need to configure a new kernel and provides detailed instructions for configuring, building, and installing a custom kernel.
Describes managing printers on FreeBSD, including information about banner pages, printer accounting, and initial setup.
Describes the Linux® compatibility features of FreeBSD. Also provides detailed installation instructions for many popular Linux® applications such as Oracle® and Mathematica®.
Describes the parameters available for system administrators to tune a FreeBSD system for optimum performance. Also describes the various configuration files used in FreeBSD and where to find them.
Describes the FreeBSD boot process and explains how to control this process with configuration options.
Describes the creation and manipulation of user accounts. Also discusses resource limitations that can be set on users and other account management tasks.
Describes many different tools available to help keep your FreeBSD system secure, including Kerberos, IPsec and OpenSSH.
Describes the jails framework, and the improvements of jails over the traditional chroot support of FreeBSD.
Explains what Mandatory Access Control (MAC) is and how this mechanism can be used to secure a FreeBSD system.
Describes what FreeBSD Event Auditing is, how it can be installed, configured, and how audit trails can be inspected or monitored.
Describes how to manage storage media and filesystems with FreeBSD. This includes physical disks, RAID arrays, optical and tape media, memory-backed disks, and network filesystems.
Describes what the GEOM framework in FreeBSD is and how to configure various supported RAID levels.
Examines support of non-native file systems in FreeBSD, like the Z File System from Sun™.
Describes what virtualization systems offer, and how they can be used with FreeBSD.
Describes how to use FreeBSD in languages other than English. Covers both system and application level localization.
Explains the differences between FreeBSD-STABLE, FreeBSD-CURRENT, and FreeBSD releases. Describes which users would benefit from tracking a development system and outlines that process. Covers the methods users may take to update their system to the latest security release.
Describes how to configure and use the DTrace tool from Sun™ in FreeBSD. Dynamic tracing can help locate performance issues, by performing real time system analysis.
Explains how to connect terminals and modems to your FreeBSD system for both dial in and dial out connections.
Describes how to use PPP to connect to remote systems with FreeBSD.
Explains the different components of an email server and dives into simple configuration topics for the most popular mail server software: sendmail.
Provides detailed instructions and example configuration files to set up your FreeBSD machine as a network filesystem server, domain name server, network information system server, or time synchronization server.
Explains the philosophy behind software-based firewalls and provides detailed information about the configuration of the different firewalls available for FreeBSD.
Describes many networking topics, including sharing an Internet connection with other computers on your LAN, advanced routing topics, wireless networking, Bluetooth®, ATM, IPv6, and much more.
Lists different sources for obtaining FreeBSD media on CDROM or DVD as well as different sites on the Internet that allow you to download and install FreeBSD.
This book touches on many different subjects that may leave you hungry for a more detailed explanation. The bibliography lists many excellent books that are referenced in the text.
Describes the many forums available for FreeBSD users to post questions and engage in technical conversations about FreeBSD.
Lists the PGP fingerprints of several FreeBSD Developers.
W celu utrzymania jednolitości i łatwości czytania niniejszego tekstu w książce zastosowane zostały następujące konwencje.
Czcionka pochyła stosowana jest do wskazania plików, adresów URL, szczególnie akcentowanych fragmentów i pierwszego zastosowania zwrotów technicznych.
Stała szerokośćCzcionka o stałej szerokości stosowana jest do przedstawienia komunikatów o błędach, poleceń, zmiennych środowiskowych, nazw portów, nazw komputerów, nazw użytkowników i grup, nazw urządzeń, zmiennych i fragmentów kodu.
Czcionka pogrubiona stosowana jest do nazw programów, poleceń i klawiszy.
Zgodnie z konwencją typograficzną, klawisze, które ma nacisnąć użytkownik w trakcie pracy z opisywanym programem, zostały oznaczone pogrubieniem by wyróżniały się z reszty tekstu. Kombinacje klawiszy, które należy nacisnąć jednocześnie zawierają znak + pomiędzy, np.:
Ctrl+Alt+Del
Oznacza, że użytkownik powinien nacisnąć Ctrl, Alt i Del jednocześnie.
Klawisze, które należy nacisnąć kolejno będą oddzielone przecinkiem, np.:
Ctrl+X, Ctrl+S
Co oznacza, że użytkownik powinien nacisnąć klawisze Ctrl i X jednocześnie, a następnie Ctrl i S.
Przykłady zaczynające się od E:\> wskazują polecenie systemu MS-DOS®. Jeśli nie jest wyraźnie zaznaczone, że jest inaczej, polecenia te mogą być wprowadzane bezpośrednio w oknie "Linii poleceń" w środowisku Microsoft® Windows®.
E:\> tools\fdimage floppies\kern.flp A:Przykłady zaczynające się od # wskazują polecenie, które musi być wprowadzone przez użytkownika z uprawnieniami administratora systemu FreeBSD. Możesz zalogować się jako root i wprowadzić polecenie, bądź zalogować jako zwykły użytkownik i wykorzystać su(1) by uzyskać prawa administratora.
# dd if=kern.flp of=/dev/fd0Przykłady zaczynające się od % wskazują, iż polecenie powinno być wprowadzone przez zwykłego użytkownika. Jeśli nie jest inaczej zaznaczone, stosowana jest składnia powłoki C (csh) do ustawiania zmiennych środowiskowych i uruchamiania innych poleceń powłoki.
% topNiniejsza książka jest efektem pracy setek ludzi z całego świata. Niezależnie czy przysłali poprawkę literówki czy cały rozdział, każdy wkład jest doceniany.
Kilka firm wsparło rozwój tego dokumentu opłacając autorów, by mogli pracować nad nią w pełnym wymiarze czasowym, finansując publikację w formie papierowej, itd. Pragniemy wymienić przede wszystkim BSDi (przejęte później przez Wind River Systems), które opłaciło pracę członków Projektu Dokumentacji FreeBSD nad korektami książki, przygotowując ją do pierwszej publikacji drukowanej w Marcu 2000 r. (ISBN 1-57176-241-8). Następnie, Wind River Systems sfinansowało pracę kolejnych osób przygotowujących nowe rozdziały, a także format wydruku. Kulminacją ich pracy jest drugie wydanie, które ujrzało światło dzienne w Listopadzie 2001 r. (ISBN 1-57176-303-1). W latach 2003-2004, FreeBSD Mall, Inc sfinansowało prace nad korektą Podręcznika, przygotowywanego do trzeciego wydania w postaci drukowanej.
Ta część Podręcznika FreeBSD adresowana jest do użytkowników i administratorów, który nie mieli dotychczas kontaktu z systemem FreeBSD. Niniejsze rozdziały mają za zadanie:
Zaprezentować system FreeBSD.
Przeprowadzić przez proces instalacji.
Nauczyć podstaw systemu UNIX®.
Pokazać jak zainstalować programy innych autorów, dostępne w ogromnej ilości dla systemu FreeBSD.
Przedstawić system X - system okien UNIX®, oraz szczegółowo wyjaśnić jak prawidłowo skonfigurować środowisko graficzne, tak by zwiększyć efektywność swej pracy.
Staraliśmy się sprowadzić liczbę odnośników wewnątrz tekstu do możliwie najmniejszej, tak by zminimalizować ilość "przeskoków" i ułatwić czytanie Podręcznika od deski do deski.
Dziękujemy za zainteresowanie FreeBSD! W niniejszym rozdziale opisane zostaną różne aspekty Projektu FreeBSD, takie jak jego historia, obrany cel, czy model rozwoju.
Czytając ten rozdział poznamy:
Zależności istniejące między FreeBSD i innymi systemami operacyjnymi.
Historię Projektu FreeBSD.
Cele stawiane przed Projektem FreeBSD.
Podstawowe zagadnienia związane z modelem rozwoju otwartego oprogramowania (ang. open source) FreeBSD.
I oczywiście, dowiemy się skąd pochodzi nazwa "FreeBSD".
FreeBSD jest systemem operacyjnym bazującym na 4.4BSD-Lite, a przeznaczonym dla komputerów pracujących na platformach Intela (x86 i Itanium®), AMD64, Alpha™ oraz Sun UltraSPARC®. Przygotowywane są również wersje dla innych platform. Więcej informacji dostępnych jest w historii FreeBSD bądź w nocie o aktualnym wydaniu. Jeśli chciałbyś wspomóc rozwój Projektu (np. kod źródłowy, sprzęt, nieoznakowane banknoty) przeczytaj artykuł o współpracy z Projektem FreeBSD (ang.).
FreeBSD posiada mnóstwo zalet. Oto niektóre z nich:
Wielozadaniowość z wywłaszczaniem, wraz z dynamiczną regulacją priorytetów, by zapewnić sprawne i bezkonfliktowe współdzielenie zasobów komputera przez aplikacje oraz użytkowników, nawet w sytuacjach największego obciążenia systemu.
Wieloużytkownikowość pozwalająca na jednoczesne wykorzystanie komputera z systemem FreeBSD przez wielu użytkowników. Oznacza to, np. prawidłowe dzielenie dostępu do urządzeń zewnętrznych jak np. do drukarki, pomiędzy wszystkich użytkowników lokalnych jak i sieciowych. Ograniczenia dostępu do zasobów mogą być definiowane dla konkretnych użytkowników bądź grup użytkowników, co z kolei pozwala na zabezpieczenie krytycznych zasobów systemowych przed nadużyciami.
Pełna obsługa sieci TCP/IP, oraz innych sieciowych standardów jak SLIP, PPP, NFS, DHCP czy NIS. Oznacza to, że twój system FreeBSD może bez problemów współpracować z dowolnymi innymi systemami operacyjnymi, jak również pracować w roli serwera w przedsiębiorstwie, dostarczając niezbędnych funkcji jak np. NFS (zdalny dostęp do plików) wraz z obsługą emaila, bądź pozwoli na umieszczenie internetowej wizytówki twojej organizacji na stronie WWW czy dokumentów na serwerze FTP. Może również realizować przekierowywanie (ruting) pakietów, a także pełnić rolę zapory ogniowej (firewall).
Ochrona pamięci gwarantuje, że programy (bądź użytkownicy) nie mogą ingerować w pracę innych aplikacji. Innymi słowy, awaria danego programu w żaden sposób nie wpływa na działanie pozostałych.
FreeBSD jest 32-bitowym systemem operacyjnym (64-bitowym na platformach Alpha, Itanium®, AMD64 i UltraSPARC®) i właśnie jako taki projektowany był od początku.
Obecnie standardowy System okien X (X11R6; X Window System) dostarcza interfejsu graficznego (GUI) w cenie zwykłej karty VGA i monitora. Ponadto dostępny jest z pełnym kodem źródłowym.
Zgodność binarną z wieloma systemami typu UNIX®. FreeBSD posiada możliwość uruchamiania programów skompilowanych dla Linuksa, SCO, SVR4, BSDI i NetBSD.
Tysiące aplikacji gotowych do pracy, dostępnych z kolekcji portów i pakietów FreeBSD. Czemu szukać w sieci, skoro wszystko można znaleźć właśnie tutaj?
Tysiące dodatkowych i łatwych do przeniesienia programów dostępnych w Internecie. FreeBSD jest zgodny z wieloma popularnymi, nawet komercyjnymi systemami typu UNIX® i tym samym większość programów wymaga zaledwie kilku, jeśli w ogóle, zmian w kodzie aby poprawnie skompilować i uruchomić.
Stronicowana pamięć wirtualna oraz współdzielona pamięć podręczna "VM/buffer cache" zaprojektowane by efektywnie zaspokajać potrzeby aplikacji z dużym apetytem na pamięć, przy jednoczesnym zapewnieniu ciągłej interakcji systemu z użytkownikami.
Wsparcie dla technologii SMP, dla maszyn z wieloma procesorami.
Kompletne środowiska programistyczne dla języków C, C++ i Fortran. FreeBSD posiada również wiele dodatkowych środowisk dla innych języków programowania dostępnych w kolekcji portów i pakietów.
Dostępność kodu źródłowego dla całego systemu oznacza, iż to właśnie ty posiadasz największą kontrolę nad swoim środowiskiem pracy. Czemu zamykać się w kręgu rozwiązań własnościowych i być skazanym na łaskę dostarczyciela systemu, kiedy można mieć prawdziwie otwarty system?
Obszerną dokumentację dostępną w Internecie..
I wiele więcej!
FreeBSD jest oparty na systemie 4.4BSD-Lite pochodzącym z Computer Systems Research Group (CSRG) z Uniwersytetu Kalifornijskiego w Berkeley. Podtrzymuje dostojną tradycję trendu rozwojowego systemów BSD. Oprócz doskonałej pracy wykonanej przez CSRG również programiści z Projektu FreeBSD spędzili dodatkowe tysiące godzin, aby udoskonalić go i przygotować na trudne, życiowe sytuacje. W czasie gdy wielu z komercyjnych gigantów branży komputerów PC stara się wyposażyć swoje systemy operacyjne w podobne cechy, by osiągnąć takie same wyniki i poziom niezawodności, FreeBSD oferuje to już teraz!
Liczba aplikacji z którymi może współpracować FreeBSD jest ograniczona jedynie przez naszą wyobraźnię. Od projektów programistycznych, poprzez automatyzację produkcji w fabrykach, kontrolę stanu magazynów, po regulację azymutu anteny satelitarnej; jeśli jest to możliwe w komercyjnych systemach UNIX jest to więcej niż prawdopodobne, że możesz to zrobić również we FreeBSD! On sam korzysta z dosłownie tysięcy doskonale dopracowanych aplikacji, nierzadko pochodzących z komercyjnych centrów projektowych bądź laboratoriów uniwersyteckich, dostępnych niemalże bądź całkowicie za darmo. Dostępne jest również oprogramowanie komercyjne, którego liczba rośnie równie szybko, jak oprogramowania bezpłatnego.
Jako, że kod źródłowy FreeBSD jest publicznie dostępny, system może zostać dostosowany do wielu specjalistycznych projektów oraz zastosowań, co jest niemożliwe w przypadku wielu systemów komercyjnych. Oto krótka lista aplikacji, z którymi najczęściej używany jest FreeBSD:
Usługi internetowe: doskonała obsługa TCP/IP wbudowana we FreeBSD, czyni go idealną platformą dla szeregu usług internetowych, na przykład:
Serwery FTP
Serwery witryn WWW (standardowe bądź zabezpieczone [SSL])
Zapory ogniowe i bramy NAT ("maskarada IP")
Serwery poczty elektronicznej
Serwery USENET bądź systemy Forum
I więcej…
Wraz z FreeBSD możesz zacząć świadczyć usługi internetowe już na niedrogim komputerze PC klasy 386 i rozwijać bazę sprzętową swojego przedsiębiorstwa aż do cztero-procesorowego Xeona z macierzą RAID.
Edukacja: jesteś studentem informatyki bądź pokrewnej dziedziny techniki? Nie ma lepszego sposobu na poznanie systemu operacyjnego, architektury komputerów oraz zagadnień sieciowych niż poprzez doświadczenie, które daje praca z FreeBSD. Duża liczba darmowych programów typu CAD, matematycznych czy graficznych będzie wysoce użyteczna dla tych, których głównym zainteresowaniem w komputerach jest aby zmusić je do pracy za nas!
Badania: oferując dostęp do kodu źródłowego całego systemu, FreeBSD stanowi doskonałą platformę dla prowadzenia badań nad systemami operacyjnymi oraz innymi dziedzinami nauk komputerowych. Idea otwartego źródła wspomaga także całe grupy współpracujące zdalnie nad różnymi zadaniami, pomagając zapomnieć im o problemach związanych ze specjalnymi warunkami licencyjnymi oraz ograniczeniami.
Sieć: potrzebujesz nowego rutera? Serwera nazw (DNS)? Zapory ogniowej (firewalla), by wystrzec się niepowołanych użytkowników w swojej sieci wewnętrznej? FreeBSD może w łatwy sposób zamienić bezużytecznego 486 lub nawet 386, stojącego w kącie, w zaawansowany router z wyszukanymi opcjami filtrowania pakietów.
Środowisko graficzne: FreeBSD stanowi dobre rozwiązanie dla niedrogiego terminala graficznego. W tym celu można wykorzystać dostępny serwer X11, bądź jeden z doskonałych komercyjnych serwerów Xi Graphics. W przeciwieństwie do typowych terminali graficznych, FreeBSD pozwala na uruchamianie wielu aplikacji lokalnie jeśli zajdzie taka potrzeba, odciążając tym samym główny serwer. FreeBSD może być również uruchamiany w systemach "bezdyskowych" zmniejszając tym samym cenę komputerów służących za terminale.
Programowanie: system FreeBSD zaopatrzony jest w pełen zestaw narzędzi programistycznych, włączając w to sławny kompilator oraz debugger GNU C/C++.
FreeBSD jest dostępny zarówno w postaci kodu źródłowego jak i skompilowanych binariów dostępnych na płytach CDROM, DVD i poprzez anonimowy serwer FTP. Obtaining FreeBSD zawiera więcej informacji nt. sposobów uzyskania FreeBSD.
Niniejszy podrozdział zawiera podstawowe informacje o projekcie, m.in. krótką historię, cele stawiane przed projektem i stosowany model rozwoju.
Genezy projektu FreeBSD należy doszukiwać się w pierwszej połowie roku 1993. Wyrósł on częściowo z "Nieoficjalnego zestawu łat dla 386BSD" (patchkit). Stworzony został przez trzech ostatnich koordynatorów zestawu: Nate’a Williamsa, Roda Grimesa i mnie.
Naszym pierwotnym celem było przygotowanie migawki z rozwoju 386BSD, wprowadzającej szereg poprawek, których mechanizm zestawu łat nie był w stanie zrealizować. Niektórzy z czytających mogą pamiętać wczesną nazwę projektu "386BSD 0.5" bądź "386BSD Interim".
386BSD był systemem operacyjnym Billa Jolitza, cierpiącym w tym okresie z powodu przeszło rocznego zastoju. W wyniku puchnięcia zestawu łat z dnia na dzień coraz bardziej, jednomyślnie postanowiliśmy spróbować naprawić sytuację. Zdecydowaliśmy się wspomóc Billa dostarczając owej "porządkującej" migawki. Niestety plan spalił na panewce gdy Bill Jolitz nagle zdecydował cofnąć swoje poparcie dla projektu, nie informując co zamierza wprowadzić w jego miejsce.
Szybko stwierdziliśmy, że rozpoczęte zadanie jest warte świeczki nawet bez wsparcia Billa. Tym samym przyjęliśmy nazwę "FreeBSD" ukutą przez Davida Greenmana. Cele projektu zostały wstępnie określone po rozmowach z ówczesnymi użytkownikami systemu. Gdy stało się jasne, że projekt zmierza w kierunku stania się rzeczywistością, skontaktowałem się z firmą Walnut Creek CDROM w celu usprawnienia metod dystrybucji FreeBSD, szczególnie z myślą o tych nieszczęśnikach, którzy mieli utrudniony dostęp do Internetu. Walnut Creek CDROM nie tylko wsparł pomysł dystrybucji FreeBSD na płytach CD, ale również wyszedł nam na przeciw oferując projektowi maszynę do pracy i szybkie łącze z Internetem. Jest mało prawdopodobne, że projekt zaszedł by aż tak daleko bez niespotykanej wręcz wiary Walnut Creek CDROM w kompletnie mało znany projekt, którym w owym czasie był FreeBSD.
Pierwszą wersją rozprowadzaną na płytach CD (a także w Internecie) był FreeBSD 1.0, wydany w grudniu 1993 r. Oparty był on bezpośrednio na 4.3BSD-Lite ("Net/2") z Uniwersytetu Kalifornijskiego w Berkeley. Zawierał również wiele dodatkowych aplikacji pochodzących z 386BSD oraz Free Software Foundation. Można przyjąć, iż osiągnał on całkiem rozsądny sukces jak na pierwszą wersję. Następujące po nim wydanie FreeBSD 1.1 w maju 1994 r. było pełnym sukcesem.
Mniej więcej w tym właśnie czasie czarne chmury niespodzianie pojawiły się nad horyzontem. Powodem tego była ugoda w przeciągającym się procesie pomiędzy Novellem i Uniwersytetem w Berkeley odnośnie legalności kalifornijskiego Net/2. Jednym z warunków ugody było ustępstwo Berkeley stwierdzające, iż znaczne części kodu Net/2 zostały "powielone" z kodu systemu UNIX®, będącego własnością Novella, który z kolei nabył go wcześniej od AT&T. W zamian Berkley uzyskało "błogosławieństwo" Novella w pracach nad 4.4BSD-Lite i zapewnienie, że gdy się w końcu pojawi nie będzie określane jako kopia kodu Novella. Ponadto wszyscy użytkownicy Net/2 mieli być gorąco zachęciani do aktualizacji systemu. Ugoda ta dotyczyła również FreeBSD, bowiem projekt miał wstrzymać dystrybucję swoich produktów bazujących na Net/2 do końca lipca 1994 r. Zgodnie z warunkami porozumienia, pozwolono projektowi na jedno ostatnie wydanie przed tym terminem. Było to FreeBSD 1.1.5.1.
Rozpoczęła się żmudna praca nad ponownym stworzeniem FreeBSD z części całkowicie nowego i raczej niekompletnego 4.4BSD-Lite. Wydanie "Lite" było w rzeczy samej "lekkie"; częściowo w wyniku usunięcia przez CSRG Uniwersytetu w Berkeley wielkich partii kodu (z uwagi na pewne wymogi prawne), które odpowiadały za przygotowanie samodzielnie uruchamiającego się systemu, oraz z faktu, że wersja 4.4 nie była jeszcze gotowa na platformę Intela. Prace potrwały do listopada 1994 r., kiedy to wydany został FreeBSD 2.0, rozprowadzany zarówno przez sieć jak i na płytach CD (w późnym grudniu). Pomimo kilku niedociągnięć wydanie osiągnęło znaczący sukces. Przy czym już w styczniu 1995 r. zostało zastąpione stabilniejszym i łatwiejszym w instalacji FreeBSD 2.0.5.
FreeBSD 2.1.5 wydaliśmy w sierpniu 1996. Wersja ta zyskała popularność szczególnie pośród dostawców usług internetowych (ISP) oraz szerokopojętej społeczności komercyjnej. Docenione zostało również kolejne wydanie w gałęzi 2.1-STABLE. Mowa tu o FreeBSD 2.1.7.1, wydanym w lutym 1997 r., a zamykającym główne prace nad 2.1-STABLE. Od tej pory trwały jedynie prace nad utrzymaniem gałęzi (RELENG_2_1_0); dodawane były łaty bezpieczeństwa i naprawiane krytyczne luki.
Z głównego nurtu rozwoju ("-CURRENT") w listopadzie 1996 r. odgałęził się FreeBSD 2.2 jako gałąź RELENG_2_2. Pierwsze pełne wydanie (2.2.1) pojawiło się w kwietniu 1997 r. Kolejne wydania z gałęzi 2.2 ujrzały światło dzienne w lecie i na jesieni 1997 r., przy czym ostatnie (2.2.8) pojawiło się w listopadzie 1998 r. Pierwsze oficjalne wydanie 3.0 pochodzi z października 1998 r. i stanowiło początek końca gałęzi 2.2.
Drzewo ewolucji FreeBSD ponownie rozdzieliło się 20 stycznia 1999 r., prowadząc do 4.0-CURRENT i 3.X-STABLE. Wersja 3.1 z 3.X-STABLE wydana została 15 lutego 1999, wersja 3.2 dnia 15 maja 1999, 3.3 w dniu 16 września 1999, 3.4 - 20 grudnia 1999 oraz 3.5 dnia 24 stycznia 2000. Wkrótce pojawiło się również pomniejsze wydanie 3.5.1, które zawierało kilka poprawek z ostatniej chwili do systemu Kerberos. Było to ostatnie wydanie gałęzi 3.X.
Kolejne rozgałęzienie miało miejsce 13 marca 2000 r. w wyniku czego pojawiła się gałąź 4.X-STABLE: 4.0-RELEASE w marcu 2000 i ostatnie wydanie 4.11-RELEASE w styczniu 2005.
Pojawienie się długo oczekiwanej gałęzi 5.0-RELEASE zostało ogłoszone 19 stycznia 2003 r. Stanowiła ona punkt kulminacyjny prawie trzyletniego wysiłku. Wydanie te wprowadziło FreeBSD na ścieżkę ku współpracy z komputerami multiprocesorowymi oraz zaawansowanej obsługi wątków aplikacji. Oferowała również wsparcie dla platform UltraSPARC® i ia64. Wydanie 5.1 pojawiło się w czerwcu 2003 r. Ostatnie wydanie 5.X z gałęzi -CURRENT stanowiło 5.2.1-RELEASE, wprowadzone w lutym 2004.
Gałąź RELENG_5 powstała w sierpniu 2004 r., a także wydanie 5.3-RELEASE, stanowi początek wydań gałęzi 5-STABLE. Najnowsze wydanie 11.2-RELEASE pojawiło się w maju 2006. Wydawane będą wciąż kolejne wersje z gałęzi RELENG_5.
Kolejne rozgałęzienie nastąpiło w czerwcu 2005: powstała gałąź RELENG_6. Wydanie 6.0-RELEASE, pierwsze z gałęzi 6.X, pojawiło się w listopadzie 2005. Najnowsze wydanie 12.0-RELEASE ujrzało światło dzienne w maju 2006 r. Będą pojawiać się również kolejne wydania z gałęzi RELENG_6.
Na chwilę obecną projekty długoterminowe prowadzone są w gałęzi 7.X-CURRENT. Migawki wydań 7.X, obrazujące postęp prac, są cały czas dostępne z serwera migawkowego jak również na płytach CD.
Głównym celem Projektu FreeBSD jest dostarczanie oprogramowania, które może być wykorzystane w dowolny sposób i bez dodatkowych zobowiązań. Wielu z nas ma duży wkład w tworzenie kodu (i rozwój projektu w ogóle) i z pewnością nie miałoby nic przeciw drobnemu wsparciu finansowemu. Tym nie mniej nie wywieramy żadnego nacisku. Wierzymy, że naszą pierwszą i najważniejszą "misją" jest dostarczanie kodu wszystkim tym, którzy go potrzebują bez względu na to do czego go wykorzystają, by zyskał on możliwie najszerszą bazę użytkowników dostarczając możliwie największych korzyści. W moim przekonaniu jest to jeden z najbardziej fundamentalnych celów stawianych przed całym Wolnym Oprogramowaniem, a przez nas entuzjastycznie wspierany.
Te części kodu w naszym drzewie źródłowym, które udostępniane są na licencji GNU General Public License (GPL) bądź Library General Public License (LGPL) posiadają kilka dodatkowych zobowiązań, choć związanych raczej z wymogiem udostępnienia kodu źródłowego. Z uwagi na dodatkowe komplikacje, które mogą pojawić się w przypadku komercyjnego zastosowania aplikacji na licencji GPL, osobiście skłaniamy się - kiedy jest to możliwe - ku oprogramowaniu dystrybuowanemu przy wykorzystaniu mniej restrykcyjnej licencji BSD.
Rozwój FreeBSD jest otwartym i elastycznym procesem realizowanym przez setki ludzi na całym świecie (patrz Lista współpracowników). Infrastruktura systemu rozwoju FreeBSD pozwala tymże setkom projektantów współpracować przez Internet. Tym nie mniej nieustannie poszukujemy nowych projektantów, a także nowych pomysłów. Osoby zainteresowane nawiązaniem bliższej współpracy z projektem mogą kontaktować się z nami bezpośrednio poprzez FreeBSD technical discussions mailing list. Natomiast FreeBSD announcements mailing list jest również dostępna dla osób chcących poinformować innych użytkowników FreeBSD o głównych obszarach prowadzonych prac.
Oto garść informacji o projekcie FreeBSD i jego procesie rozwoju, przydatnych zarówno niezależnym projektantom jak i bliskim współpracownikom:
Główne drzewo źródłowe FreeBSD utrzymywane jest w systemie CVS (Concurrent Versions System) - wolnodostępnym narzędziu kontroli wersji kodu źródłowego, dostępnym we FreeBSD. Podstawowe repozytorium CVS znajduje się na maszynie zlokalizowanej w Santa Clara w Kalifornii, USA, skąd replikowane jest na serwery lustrzane, rozrzucone po całym świecie. Główne drzewo CVS, zawierające zarówno drzewo -CURRENT jak i -STABLE, można łatwo skopiować również na swój własny komputer. Proces ten został dokładniej opisany w podrozdziale Synchronizacja własnego drzewa kodu źródłowego.
Twórcy są ludźmi, którzy posiadają prawa zapisu do drzewa CVS i posiadają upoważnienie do wprowadzania modyfikacji do kodu źródłowego FreeBSD. Angielski odpowiednik terminu "twórca" (ang. committer) pochodzi od polecenia commit systemu cvs(1), stosowanego do wprowadzania zmian do repozytorium CVS. Najlepszym sposobem przedstawienia własnych propozycji na liście dyskusyjnej twórców jest wykorzystanie polecenia send-pr(1). Jeśli system sprawia wrażenie zablokowanego można również wysłać e-mail bezpośrednio na Listę dyskusyjną twórców FreeBSD.
Porównując Projekt FreeBSD z przedsiębiorstwem, zespół główny należałoby porównać z zarządem firmy. Podstawowym zadaniem tejże grupy jest czuwanie nad prawidłowym rozwojem projektu jako całości. Jedną z funkcji grupy jest zapraszanie oddanych i odpowiedzialnych projektantów w szeregi twórców systemu, podobnie jak przyjmowanie w szeregi samej grupy. Obecna grupa została wybrana spośród wszystkich twórców w czerwcu 2004 r. Wybory mają miejsce co dwa lata.
Niektórzy z członków grupy posiadają również dodatkowy zakres obowiązków, tj. czuwają nad zapewnieniem poprawnego funkcjonowania wybranych części systemu. Pełna lista projektantów FreeBSD i ich obowiązków dostępna jest w artykule Lista współpracowników.
Większość członków grupy jest ochotnikami, jeśli chodzi o rozwój FreeBSD, i nie otrzymują żadnego wynagrodzenia finansowego z projektu. Nie należy zatem błędnie interpretować "współpracy" z projektem jako "gwarancji wsparcia". W tym świetle, powyższe porównanie z "zarządem" nie jest do końca celne. Bardziej odpowiednim byłoby powiedzieć, że są to ludzie, którzy z własnego wyboru oddali swój wolny czas dla FreeBSD! |
Co prawda jako ostatnia, ale zdecydowanie nie jako najmniej istotna, omówiona zostanie grupa współpracowników zewnętrznych, czyli samych użytkowników, którzy dostarczają na bieżąco informacji o funkcjonowaniu systemu oraz poprawek wykrytych błędów. Najlepszym sposobem na udział w rozwoju FreeBSD jest subskrypcja FreeBSD technical discussions mailing list. Resources on the Internet zawiera więcej informacji o różnorodnych listach dyskusyjnych FreeBSD.
Lista współpracowników FreeBSD cały czas rośnie. Czemu by nie dołączyć do listy pomagając w pracy nad FreeBSD już dzisiaj?
Pisanie kodu nie jest jedyną formą współpracy z projektem: kompletna lista rzeczy, które trzeba zrobić dostępna jest na stronie Projektu FreeBSD.
Reasumując, nasz model rozwoju zorganizowany jest jako niezależne, współcentryczne okręgi. Scentralizowany model ma za zadanie ułatwić użytkownikom FreeBSD śledzenie zmian w kodzie. Odstraszanie potencjalnych współpracowników nie jest naszym celem! Pragniemy dostarczać stabilny system operacyjny z dużą bazą łatwych do instalacji i wykorzystania programów - ten model doskonale się w tym spisuje.
Jedyne o co prosimy tych, którzy mieliby wstąpić w szeregi projektantów FreeBSD, jest oddanie takie same jakie cechuje ich obecnych twórców.
FreeBSD jest łatwo dostępnym systemem operacyjnym, bazującym na kodzie 4.4BSD-Lite, dla następujących platform sprzętowych: Intel i386™, i486™, Pentium®, Pentium® Pro, Celeron®, Pentium® II, Pentium® III, Pentium® 4 (bądź inny zgodny), Xeon™, DEC Alpha™ oraz Sun UltraSPARC®. Opiera się on przede wszystkim na oprogramowaniu grupy CSRG z Uniwersytetu Kalifornijskiego w Berkeley, rozszerzonym o dodatkowe elementy z NetBSD, OpenBSD, 386BSD i Free Software Foundation.
Począwszy od wydania FreeBSD 2.0 w końcu 1994 r., nastąpiła dramatyczna poprawa wydajności, możliwości i stabilności systemu. Największą zmianą była całkowita reformacja systemu wirtualnej pamięci wraz ze współdzieloną pamięcią podręczną "VM/buffer cache", która nie tylko wpłynęła na wzrost wydajności ale również zmniejszenie minimalnego miejsca zajmowanego w pamięci przez FreeBSD - 5 MB jest już akceptowalnym minimum. Inne rozszerzenia to m.in. kompletna obsługa klienta i serwera NIS, wsparcie dla transakcji TCP, wdzwanianie na żądanie PPP, zintegrowana obsługa DHCP, usprawniony podsystem SCSI, obsługa ISDN, ATM, FDDI, Fast i Gigabit Ethernet (100 i 1000 Mbit). Usprawniona obsługa najnowszych kontrolerów Adaptec i tysiące poprawionych błędów.
Oprócz podstawowej grupy aplikacji dystrybuowanych wraz z systemem, FreeBSD oferuje kolekcję tysięcy dodatkowych programów. W momencie pisania niniejszego tekstu ich lista obejmuje ponad 36000 pozycji! Od serwerów http (WWW) poprzez gry po edytory i prawie wszystko pomiędzy. Cała Kolekcja Portów zajmuje około 3 GB na dysku, przy czym każdy port to zaledwie ułamek oryginalnej objętości źródeł. Takie rozwiązanie ułatwia man aktualizację portów i zdecydowanie zmniejsza zajmowaną przestrzeń na dysku. Kompilacja portu sprowadza się do zmiany katalogu na zawierający port wybranego programu i wpisanie make install. Resztą zajmuje się system. Oryginalne pakiety źródeł dla każdego kompilowanego portu pobierane są dynamicznie z płyty CDROM bądź lokalnego serwera FTP. Wystarczy zadbać o dostateczną ilość wolnego miejsca na dysku. Dla osób nie mających ochoty kompilować programów własnoręcznie, większość portów jest również dostępna w skompilowanej postaci jako "pakiety", które mogą być instalowane przy pomocy prostego polecenia pkg_add. Więcej informacji o systemie pakietów i portów zawiera Instalacja programów. pakiety i porty.
Dodatkowe dokumenty pomocne przy instalacji i użytkowaniu FreeBSD znajdują się również w katalogu /usr/shared/doc na maszynach z najnowszymi wersjami FreeBSD. Mogą być przeglądane lokalnie za pomocą przeglądarki internetowej przy wykorzystaniu poniższych odnośników:
Główne i najczęściej aktualizowane wersje dokumentów dostępne są na stronie http://www.FreeBSD.org/.
Wraz z FreeBSD rozpowszechniany jest prosty w użyciu program instalacyjny, działający w trybie tekstowym, o nazwie sysinstall. Jest on domyślnym programem instalacyjnym FreeBSD, jednakże dystrybutorzy systemu mogą zastąpić go własnym odpowiednikiem. W niniejszym rozdziale zawarto opis instalacji FreeBSD przy pomocy sysinstall.
Po przeczytaniu rozdziału będziemy wiedzieć:
W jaki sposób tworzy się dyskietki instalacyjne FreeBSD.
Jak FreeBSD odwołuje się do dysku i jak go dzieli.
Jak uruchamia się sysinstall.
Jakie pytania zadaje sysinstall, o co w nich chodzi i jak na nie odpowiedzieć.
Przed przeczytaniem rozdziału powinniśmy:
Zapoznać się z listą obsługiwanego sprzętu dołączoną do instalowanej wersji FreeBSD, by upewnić się, że posiadany sprzęt będzie działać.
Opis instalacji dotyczy generalnie komputerów opartych na architekturze i386™ ("zgodny z PC"). W stosownych przypadkach podawane będą informacje odnoszące się do innych platform (na przykład Alpha). Pomimo starań o utrzymanie niniejszego opisu aktualnym, możliwe jest zaistnienie drobnych różnic pomiędzy instalatorem a zawartością tego rozdziału. Zaleca się, aby traktować niniejszy teksty jako ogólny przewodnik, niż raczej dosłowny podręcznik instalacji. |
Przed instalacją FreeBSD powinniśmy zapoznać się z komponentami naszego komputera. W czasie instalacji FreeBSD pokaże listę urządzeń (dyski, karty sieciowe, napędy CD-ROM, itd.) wraz z informacjami o producentach i numerach modeli. FreeBSD postara się także ustalić prawidłową konfigurację każdego z nich, m.in. ustawienia przerwań IRQ i portów we/wy. Ze względu na "kaprysy" pecetowego sprzętu może się okazać, że konfiguracja wykryta przez FreeBSD nie jest w pełni prawidłowa i trzeba będzie samodzielnie ją poprawić.
Jeżeli na komputerze jest już zainstalowany inny system operacyjny, na przykład Windows® lub Linux, warto jest skorzystać z dostępnych w nim narzędzi do sprawdzenia bieżącej konfiguracji sprzętowej. Kiedy zupełnie nie wiadomo jak skonfigurowana powinna być dana karta, wymagane informacje mogą znajdować się bezpośrednio na niej samej. Często spotykane numery przerwań IRQ to 3, 5 i 7, a adresy portów we/wy są zwykle zapisywane w postaci liczb szesnastkowych, na przykład 0x330.
Zalecamy by zebrane informacje wydrukować lub zapisać na kartce przed rozpoczęciem instalacji FreeBSD. Można je zestawić w postaci tabeli, np.:
| Nazwa urządzenia | IRQ | Port(y) we/wy | Uwagi |
|---|---|---|---|
Pierwszy dysk twardy | brak | brak | 40 GB, firmy Seagate, IDE 1 master |
CDROM | brak | brak | IDE 1 slave |
Drugi dysk twardy | brak | brak | 20 GB, firmy IBM, IDE 2 master |
Kontroler IDE | 14 | 0x1f0 | |
Karta sieciowa | brak | brak | Intel® 10/100 |
Modem | brak | brak | 3Com® 56K faxmodem na COM1 |
… | … | … | … |
Jeśli komputer, na którym będzie przeprowadzana instalacja zawiera cenne dane, powinniśmy koniecznie przygotować ich kopię zapasową, oraz sprawdzić stan tychże kopii przed instalacją FreeBSD. Podczas instalacji kilkakrotnie pojawi się prośba o potwierdzenie przed zapisaniem czegokolwiek na dysku, jednak gdy już się to rozpocznie, nie będzie możliwości odwrotu.
Jeżeli masz zamiar przeznaczyć cały dysk na FreeBSD, to omawiane poniżej zagadnienia nie będą cię dotyczyć - możesz pominąć tę część.
W przypadku, gdy zamierzamy zainstalować FreeBSD obok innych systemów operacyjnych, warto zapoznać się z podstawowymi informacjami o sposobie przechowywania danych na dysku.
Dysk komputera typu PC można podzielić na oddzielne porcje, zwane partycjami. Komputery PC potrafią obsłużyć maksymalnie cztery partycje na jednym dysku. Partycje te nazywane są partycjami podstawowymi. W celu ominięcia tego ograniczenia i umożliwienia stworzenia większej liczby partycji, wymyślono nowy typ partycji - partycje rozszerzone. Na dysku może znajdować się tylko jedna taka partycja. Natomiast wewnątrz niej można utworzyć specjalne partycje, zwane partycjami logicznymi.
Wszystkie partycje posiadają własny identyfikator partycji, tj. numer określający typ przechowywanych na niej danych. Partycje FreeBSD oznaczone są identyfikatorem 165.
Każdy ze stosowanych systemów operacyjnych identyfikuje partycje w określony sposób. Dla przykładu, DOS i jego następcy, w tym Windows®, przypisują każdej partycji podstawowej i logicznej literę dysku, zaczynając od C:.
FreeBSD musi być zainstalowane na partycji podstawowej. Wszystkie własne dane, w tym pliki tworzone przez użytkowników, może przechowywać na jednej partycji. Jednakże, jeśli masz do dyspozycji kilka dysków, możesz utworzyć partycję FreeBSD na każdym z nich bądź jedynie na wybranych. Tym nie mniej na potrzeb instalacji wymagane jest posiadanie jednej partycji. Może to być świeżo utworzona, pusta partycja, lub też partycja zawierająca dane, które nie są już potrzebne.
W przypadku, gdy wszystkie dostępne partycje na dysku są już wykorzystywane, będziesz musiał zwolnić jedną z nich, korzystając z narzędzi dostępnych w wykorzystywanym systemie operacyjnym (np. fdisk w DOS lub Windows®).
Jeśli dysponujesz wolną partycją, możesz ją wykorzystać. Może się jednak okazać, że zajdzie potrzeba zmniejszenia rozmiarów niektórych z pozostałych partycji.
Minimalna instalacja FreeBSD zajmuje jedynie 100 MB miejsca na dysku. Jest to jednakże bardzo minimalna instalacja, praktycznie nie pozostawiająca miejsca na pliki użytkowników. Zdecydowanie bardziej realnym minimum jest 250 MB, o ile nie planujemy wykorzystania środowiska graficznego, bądź co najmniej 350 MB z graficznym interfejsem. Instalowanie wielu dodatkowych programów wymaga więcej wolnego miejsca na dysku.
W celu przygotowania miejsca dla FreeBSD można wykorzystać narzędzia komercyjne pokroju PartitionMagic® bądź darmowe jak GParted. Dwa darmowe programy służące do tego samego celu, tj. FIPS i PResizer, dostępne są na płycie CD w katalogu tools. W tym samym katalogu znajduje się również ich dokumentacja. Zarówno FIPS, PResizer jak i PartitionMagic® potrafią rozszerzać partycje typu FAT16 i FAT32 - wykorzystywane w MS-DOS® aż po Windows® ME. System plików NTFS potrafią obsługiwać PartitionMagic® i GParted.
Niewłaściwe korzystanie z tych narzędzi może doprowadzić do utraty danych. Przed ich zastosowaniem należy się upewnić, że przygotowaliśmy aktualne kopie zapasowe. |
Przyjmijmy, że mamy do dyspozycji komputer wyposażony w dysk o pojemności 4 GB, z zainstalowanym systemem Windows®. Dysk jest podzielony na dwie części oznaczone literami C: i D:, o rozmiarze 2 GB każda. Na C: mamy 1 GB danych, a na D: 0,5 GB danych.
Mamy więc dysk o dwóch partycjach, z których każda oznaczona jest literą dysku. Możemy skopiować dane z D: na C:, dzięki czemu druga partycja stanie się wolna i będzie można zainstalować na niej FreeBSD.
Przyjmijmy tym razem, że na dysku o pojemności 4 GB zainstalowany jest system Windows® na jednej dużej partycji. Partycja dostępna jest jako dysk C: o rozmiarze 4 GB. Mamy na nim 1,5 GB danych i chcielibyśmy udostępnić dla FreeBSD 2 GB.
Możemy wybrać jedno z poniższych rozwiązań:
Przygotować kopię danych, następnie na nowo zainstalować Windows®, tworząc podczas instalacji partycję o rozmiarze 2 GB.
Skorzystać z jednego ze wspomnianych wcześniej narzędzi, np. PartitionMagic®, w celu zmniejszenia rozmiaru partycji Windows®.
W przypadku architektury Alpha na FreeBSD trzeba będzie przeznaczyć cały dysk. Nie ma obecnie możliwości wspólnego korzystania z dysku przez kilka systemów operacyjnych. W zależności od konkretnego modelu komputera Alpha, możemy wykorzystać dysk SCSI lub IDE, o ile komputer umożliwia załadowanie z niego systemu operacyjnego.
Zgodnie z konwencją stosowaną w podręcznikach Digital / Compaq wszystkie polecenia SRM pisane są wielkimi literami. SRM nie rozróżnia małych i dużych liter.
By wyświetlić nazwy i rodzaje zainstalowanych w komputerze dysków, posługujemy się poleceniem SHOW DEVICE w konsoli SRM:
>>>SHOW DEVICE
dka0.0.0.4.0               DKA0           TOSHIBA CD-ROM XM-57  3476
dkc0.0.0.1009.0            DKC0                       RZ1BB-BS  0658
dkc100.1.0.1009.0          DKC100             SEAGATE ST34501W  0015
dva0.0.0.0.1               DVA0
ewa0.0.0.3.0               EWA0              00-00-F8-75-6D-01
pkc0.7.0.1009.0            PKC0                  SCSI Bus ID 7  5.27
pqa0.0.0.4.0               PQA0                       PCI EIDE
pqb0.0.1.4.0               PQB0                       PCI EIDE
Powyższy przykład pochodzi z komputera Digital Personal Workstation 433au i pokazuje trzy dyski. Pierwszym z nich jest CDROM opisany nazwą DKA0, natomiast dwa pozostałe to twarde dyski o nazwach DKC0 i DKC100.
Dyski o nazwach typu DKx są dyskami SCSI. Dla przykładu DKA100 oznacza dysk SCSI o identyfikatorze 1 na pierwszej szynie SCSI (A), natomiast DKC300 oznacza dysk o identyfikatorze 3 na trzeciej szynie SCSI ©. Nazwa PKx oznacza kontroler SCSI. Jak pokazuje przykład z SHOW DEVICE, napędy CDROM SCSI traktowane są tak samo jak dyski twarde SCSI.
Nazwy dysków IDE mają postać DQx, a nazwa PQx oznacza kontroler IDE.
Jeśli podczas instalacji będziemy korzystać z połączenia z siecią (np. FreeBSD instalowane będzie z serwera FTP lub serwera NFS), będziemy musieli znać konfigurację sieci. W trakcie instalacji pojawi się prośba o wpisanie tej konfiguracji, by umożliwić FreeBSD połączenie się z siecią i kontynuowanie instalacji.
W przypadku komputera podłączonego do sieci Ethernet lub połączonego z Internetem przez modem kablowy lub DSL, potrzebne będą następujące informacje:
Adres IP
Adres IP domyśnej bramy
Nazwa stacji
Adresy IP serwerów DNS
Maska podsieci
Informacje te możemy uzyskać od administratora systemu lub dostawcy usług sieciowych. Może się okazać, że konfiguracja odbywa się automatycznie, przy użyciu DHCP. Jeśli tak jest, należy o tym fakcie pamiętać.
Instalacja FreeBSD przez Internet możliwa jest także w przypadku połączenia modemowego, jednakże będzie to trwało bardzo długo.
Niezbędne informacje:
Numer telefonu do dostawcy usług internetowych
Numer portu COM, do którego podłączony jest modem
Nazwa użytkownika i hasło konta u dostawcy usług
W pracy nad FreeBSD podejmowane są wszelkie starania, aby każde wydanie FreeBSD było jak najbardziej niezawodne, jednakże od czasu do czasu zdarzają się błędy. W pewnych bardzo rzadkich przypadkach mogą mieć one wpływ na proces instalacji systemu. Błędy te po wykryciu i naprawieniu są opisywane w erracie zamieszczonej na stronie FreeBSD Errata (ang.). Przed instalacją warto jest sprawdzić, czy w erracie nie wspomniano o problemach, które mogą zakłócić instalację.
Informacje o wszystkich wydaniach systemu, jak również erraty do każdego z nich, znaleźć można na stronie WWW FreeBSD w części poświęconej wydaniom.
Pliki potrzebne do rozpoczęcia instalacji systemu mogą pochodzić z jednego z wymienionych poniżej źródeł:
Płyta CDROM lub DVD
Partycja DOS-owa na tym samym komputerze
Pamięć taśmowa QIC lub SCSI
Dyskietki
Serwer FTP, także przez firewall lub proxy HTTP, zależnie od potrzeb
Serwer NFS
Dedykowane połączenie równoległe lub szeregowe
Posiadając FreeBSD na CD lub DVD, mamy już wszystko, co potrzeba, możemy zatem przejść do następnej części (Przygotowanie dyskietek do instalacji).
Jeśli nie mamy plików instalacyjnych FreeBSD, Przygotowanie własnego nośnika instalacji zawiera opis instalacji FreeBSD z dowolnego z wymienionych wcześniej źródeł. Następnie powróćmy do Przygotowanie dyskietek do instalacji.
Instalacja FreeBSD rozpoczyna się uruchomieniem programu instalacyjnego podczas startu komputera - nie jest to program, który można uruchomić w innym systemie operacyjnym. Zwykle przy uruchamianiu komputera ładowany jest system zainstalowany na dysku twardym, jednak można także uruchomić system z dyskietki "startowej". Do tego celu może także posłużyć CDROM, jeśli komputer daje taką możliwość.
Jeśli posiadamy FreeBSD na płytach CDROM lub DVD (kupionych lub przygotowanych samodzielnie), a nasz komputer pozwala na uruchomienie z płyty (zwykle dzięki ustawieniu opcji BIOS-u zwanej "Boot Order" lub podobnej), możemy nie czytać niniejszej części. Płyty CDROM i DVD zawierające FreeBSD mogą być użyte jako dyski startowe bez dodatkowego przygotowania. |
By utworzyć zestaw dyskietek startowych, należy:
Zdobyć obrazy dyskietek startowych
Dyskietki startowe znaleźć można wśród plików instalacyjnych w katalogu floppies/ bądź pobrać z serwera ftp://ftp.FreeBSD.org/pub/FreeBSD/releases/<arch>/<version>-RELEASE/floppies/ zamieniając odpowiednio <arch> i <wersja> właściwą architekturą naszego sprzętu i wybraną wersją FreeBSD. Przykładowo, obrazy dyskietek dla FreeBSD 12.0-RELEASE na architekturę i386™ dostępne są pod adresem ftp://ftp.FreeBSD.org/pub/FreeBSD/releases/i386/12.0-RELEASE/floppies/.
Obrazy dyskietek mają rozszerzenie .flp. Katalog floppies/ zawiera kilka różnych obrazów, a to, które z nich będą potrzebne, zależy od wersji FreeBSD, która będzie instalowana, a czasem również od sprzętu na którym system ma być zainstalowany. Z reguły potrzebne będą trzy dyskietki boot.flp, kern1.flp i kern2.flp. Warto jednak dla pewności przeczytać znajdujący się w tym samym katalogu plik README.TXT.
Systemy gałęzi 5.X starsze od FreeBSD 5.3 mogą wymagać dodatkowych sterowników urządzeń. Znaleźć je można w obrazie dyskietki drivers.flp. |
Pobierając pliki przez FTP należy koniecznie używać trybu binarnego. Wiadomo jest, że w niektórych przeglądarkach stosowany jest tryb tekstowy (zwany też ASCII), przez co dyskietki startowe mogą się okazać niezdatne do użycia. |
Przygotować dyskietki startowe
Dla każdego pliku z obrazem przygotowujemy jedną dyskietkę. Dyskietki nie mogą być w jakikolwiek sposób uszkodzone. Najprostszym sposobem samodzielnego sprawdzenia, czy dyskietka nie jest wadliwa, jest jej sformatowanie. Nie powinniśmy ufać dyskietkom formatowanym fabrycznie. Narzędzie formatujące dostępne w systemie Windows® nie poinformuje o istnieniu uszkodzonych bloków, po prostu oznaczy je jako "uszkodzone" i zignoruje. Zaleca się używanie fabrycznie nowych dyskietek.
Gdy podczas instalacji FreeBSD program instalacyjny wskaże błąd, zastygnie lub zachowa się w dziwny sposób, jednymi z pierwszych podejrzanych powinny być dyskietki. Trzeba wówczas nagrać pliki obrazów na inne dyskietki i spróbować ponownie. |
Nagrać pliki obrazów na dyskietki
Pliki .flp nie są zwyczajnymi plikami, które można nagrać na dyskietkę. Są natomiast obrazami całkowitej zawartości dyskietek. Oznacza to, że nie można zapisać tych plików po prostu kopiując z jednego dysku na drugi. Skorzystamy ze specjalnego oprogramowania, by bezpośrednio zapisać obrazy na dyskietkach.
Jeśli dyskietki nagrywamy na komputerze z MS-DOS®/Windows®, to możemy skorzystać z dołączonego do FreeBSD narzędzia fdimage.
W przypadku, gdy wykorzystujemy obrazy dyskietek z płyty CDROM dostępnego jako dysk E:, posłużymy się poleceniem:
E:\> tools\fdimage floppies\kern.flp A:Powtarzamy je dla każdego z plików .flp, za każdym razem zmieniając dyskietkę. Najlepiej jest też napisać na dyskietce nazwę skopiowanego na nią pliku. Powyższe polecenie może potrzebować pewnych modyfikacji, w zależności od miejsca, w którym znajdują się pliki .flp. Jeżeli nie dysponujemy płytą CD, możemy pobrać fdimage z katalogu tools na serwerze FTP FreeBSD.
Jeżeli natomiast dyskietki nagrywamy w systemie uniksowym (na przykład w innym FreeBSD), do zapisania plików obrazów na dyskietkach możemy wykorzystać polecenie dd(1). We FreeBSD wpisalibyśmy:
# dd if=kern.flp of=/dev/fd0W systemie FreeBSD /dev/fd0 odpowiada pierwszej stacji dyskietek (napędowi A:). /dev/fd1 odpowiadałoby B: i tak dalej. W innych odmianach systemów UNIX® mogą być stosowane inne nazwy stacji dyskietek, konieczne może więc być zapoznanie się z dokumentacją danego systemu.
W tej chwili jesteśmy już przygotowani do instalacji FreeBSD.
Z założenia, podczas instalacji dane na dysku (lub dyskach) nie ulegną żadnym zmianom przed pojawieniem się następującego komunikatu: Last Chance: Are you SURE you want continue the installation? If you're running this on a disk with data you wish to save then WE STRONGLY ENCOURAGE YOU TO MAKE PROPER BACKUPS before proceeding! We can take no responsibility for lost disk contents! Instalację można przerwać w dowolnej chwili przed powyższym ostrzeżeniem, mając pewność, że dane na dysku pozostają nietknięte. Jeśli będziemy się obawiać, że coś niewłaściwie skonfigurowaliśmy, możemy po prostu wyłączyć komputer i nic złego się nie stanie. |
Na początku komputer powinien być wyłączony.
Włączamy komputer. Po chwili powinna pojawić się możliwość przejścia do menu systemowego, lub BIOS-u, najczęściej poprzez naciśnięcie klawisza F2, F10, Del bądź Alt+S. Wciskamy odpowiedni klawisz zgodnie z informacją na ekranie. Niekiedy komputer podczas uruchamiania pokazuje jakiś obrazek. Zwykle wciskając Esc możemy pozbyć się obrazka, aby mieć możliwość przeczytania komunikatów.
Wśród opcji odnajdujemy tę, która decyduje o kolejności ładowania systemu z poszczególnych urządzeń. Zwykle ma ona postać listy urządzeń, takich jak Floppy, CDROM, First Hard Disk, itd.
Jeżeli wcześniej przygotowaliśmy dyskietki startowe, wybieramy stację dyskietek. Jeśli natomiast korzystamy z płyty CD, wybieramy właśnie CDROM. Wątpliwości możemy rozstrzygnąć zaglądając do instrukcji dołączonej do komputera i jego płyty głównej.
Wprowadzone zmiany muszą być zapisane przed opuszczeniem menu systemowego. Komputer powinien ponownie się uruchomić.
Jeżeli korzystamy z dyskietek startowych, o których traktuje Przygotowanie dyskietek do instalacji, to jedna z nich będzie pierwszą dyskietką startową, najprawdopodobniej będzie to dyskietka zawierająca kern.flp. Ją właśnie wkładamy do stacji.
W przypadku korzystania z płyty CD wystarczy po prostu włączyć komputer i włożyć płytę do napędu.
Jeżeli komputer uruchomi się jak zwykle i załaduje już zainstalowany system operacyjny, może to oznaczać, że: .. Dyskietka lub płyta zostały włożone za późno. Powinniśmy spróbować uruchomić komputer bez wyjmowania dyskietki bądź płyty. .. Zmiany w ustawieniach BIOS-u nie zadziałały prawidłowo. Spróbujmy wprowadzić je ponownie, aż do osiągnięcia zamierzonego efektu. .. Nasza wersja BIOS-u nie pozwala na uruchomienie systemu z wybranego nośnika.
Rozpocznie się ładowanie FreeBSD. Podczas ładowania z płyty CD pojawi się tekst podobny do poniższego (pominięto informacje o wersji)::
Verifying DMI Pool Data ........
Boot from ATAPI CD-ROM :
 1. FD 2.88MB  System Type-(00)
Uncompressing ... done

BTX loader 1.00 BTX version is 1.01
Console: internal video/keyboard
BIOS drive A: is disk0
BIOS drive B: is disk1
BIOS drive C: is disk2
BIOS drive D: is disk3
BIOS 639kB/261120kB available memory

FreeBSD/i386 bootstrap loader, Revision 0.8

/kernel text=0x277391 data=0x3268c+0x332a8 |

|
Hit [Enter] to boot immediately, or any other key for command prompt.
Booting [kernel] in 9 seconds... _
Natomiast ładując z dyskietki, zobaczymy tekst w rodzaju (pominięto informacje o wersji):
Verifying DMI Pool Data ........

BTX loader 1.00  BTX version is 1.01
Console: internal video/keyboard
BIOS drive A: is disk0
BIOS drive C: is disk1
BIOS 639kB/261120kB available memory

FreeBSD/i386 bootstrap loader, Revision 0.8

/kernel text=0x277391 data=0x3268c+0x332a8 |

Please insert MFS root floppy and press enter:
Postępując zgodnie z instrukcją na ekranie, wyjmujemy dyskietkę kern.flp, wkładamy mfsroot.flp i naciskamy Enter. We FreeBSD 5.3 i późniejszych dostępne są również inne dyskietki opisane w poprzednim podrozdziale. Należy uruchomić system z pierwszej dyskietki, następnie wkładać kolejne zgodnie z pojawiającymi się komunikatami.
Niezależnie, czy uruchamiamy komputer z dyskietki czy z płyty, podczas ładowania ujrzymy komunikat:
Hit [Enter] to boot immediately, or any other key for command prompt.
Booting [kernel] in 9 seconds... _
Albo czekamy dziesięć sekund, albo wciskamy Enter.
Na początku komputer powinien być wyłączony.
Włączamy komputer i czekamy na znak zachęty boot monitora.
Jeżeli korzystamy z dyskietek startowych opisanych w Przygotowanie dyskietek do instalacji, to jedna z nich będzie pierwszą dyskietką startową, najprawdopodobniej będzie to dyskietka zawierająca kern.flp. Ją właśnie wkładamy do stacji i wpisujemy następujące polecenie, aby uruchomić komputer z dyskietki (zmieniając nazwę napędu dyskietek, jeżeli będzie to konieczne):
>>>BOOT DVA0 -FLAGS '' -FILE ''W przypadku korzystania z płyty CD, wkładamy ją do napędu i rozpoczynamy instalację wpisując następujące polecenie (wstawiając inną nazwę napędu CDROM, jeżeli będzie to konieczne):
>>>BOOT DKA0 -FLAGS '' -FILE ''Rozpocznie się ładowanie FreeBSD. Podczas ładowania z dyskietki, zobaczymy tekst w rodzaju:
Please insert MFS root floppy and press enter:Postępując zgodnie z instrukcją na ekranie, wyjmujemy dyskietkę kern.flp, wkładamy mfsroot.flp i naciskamy Enter.
Niezależnie, czy uruchamiamy komputer z dyskietki czy z płyty, podczas ładowania ujrzymy komunikat:
Hit [Enter] to boot immediately, or any other key for command prompt.
Booting [kernel] in 9 seconds... _
Czekamy dziesięć sekund, albo wciskamy Enter. Przejdziemy do menu konfiguracyjnego jądra.
Kilkaset ostatnio wyświetlonych na ekranie linii jest zapisywanych i można je przeglądać.
By przejrzeć bufor, naciskamy Scroll Lock. Włączamy w ten sposób tryb przewijania ekranu. Można teraz przeglądać wyniki rozpoznania urządzeń przy użyciu klawiszy kursora, lub PageUp i PageDown. Tryb przewijania wyłącza się wciskając ponownie Scroll Lock.
Zróbmy to, aby przejrzeć tekst, który został przewinięty poza ekran, gdy jądro dokonywało rozpoznawania urządzeń. Tekst będzie mieć treść podobną do przedstawionej na Przykład wyników rozpoznania urządzeń, jednakże dokładna treść zależy od zainstalowanych w komputerze urządzeń.
avail memory = 253050880 (247120K bytes)
Preloaded elf kernel "kernel" at 0xc0817000.
Preloaded mfs_root "/mfsroot" at 0xc0817084.
md0: Preloaded image </mfsroot> 4423680 bytes at 0xc03ddcd4

md1: Malloc disk
Using $PIR table, 4 entries at 0xc00fde60
npx0: <math processor> on motherboard
npx0: INT 16 interface
pcib0: <Host to PCI bridge> on motherboard
pci0: <PCI bus> on pcib0
pcib1:<VIA 82C598MVP (Apollo MVP3) PCI-PCI (AGP) bridge> at device 1.0 on pci0
pci1: <PCI bus> on pcib1
pci1: <Matrox MGA G200 AGP graphics accelerator> at 0.0 irq 11
isab0: <VIA 82C586 PCI-ISA bridge> at device 7.0 on pci0
isa0: <iSA bus> on isab0
atapci0: <VIA 82C586 ATA33 controller> port 0xe000-0xe00f at device 7.1 on pci0
ata0: at 0x1f0 irq 14 on atapci0
ata1: at 0x170 irq 15 on atapci0
uhci0 <VIA 83C572 USB controller> port 0xe400-0xe41f irq 10 at device 7.2 on pci
0
usb0: <VIA 83572 USB controller> on uhci0
usb0: USB revision 1.0
uhub0: VIA UHCI root hub, class 9/0, rev 1.00/1.00, addr1
uhub0: 2 ports with 2 removable, self powered
pci0: <unknown card> (vendor=0x1106, dev=0x3040) at 7.3
dc0: <ADMtek AN985 10/100BaseTX> port 0xe800-0xe8ff mem 0xdb000000-0xeb0003ff ir
q 11 at device 8.0 on pci0
dc0: Ethernet address: 00:04:5a:74:6b:b5
miibus0: <MII bus> on dc0
ukphy0: <Generic IEEE 802.3u media interface> on miibus0
ukphy0: 10baseT, 10baseT-FDX, 100baseTX, 100baseTX-FDX, auto
ed0: <NE2000 PCI Ethernet (RealTek 8029)> port 0xec00-0xec1f irq 9 at device 10.
0 on pci0
ed0 address 52:54:05:de:73:1b, type NE2000 (16 bit)
isa0: too many dependant configs (8)
isa0: unexpected small tag 14
orm0: <Option ROM> at iomem 0xc0000-0xc7fff on isa0
fdc0: <NEC 72065B or clone> at port 0x3f0-0x3f5,0x3f7 irq 6 drq2 on isa0
fdc0: FIFO enabled, 8 bytes threshold
fd0: <1440-KB 3.5" drive> on fdc0 drive 0
atkbdc0: <Keyboard controller (i8042)> at port 0x60,0x64 on isa0
atkbd0: <AT Keyboard> flags 0x1 irq1 on atkbdc0
kbd0 at atkbd0
psm0: <PS/2 Mouse> irq 12 on atkbdc0
psm0: model Generic PS/@ mouse, device ID 0
vga0: <Generic ISA VGA> at port 0x3c0-0x3df iomem 0xa0000-0xbffff on isa0
sc0: <System console> at flags 0x100 on isa0
sc0: VGA <16 virtual consoles, flags=0x300>
sio0 at port 0x3f8-0x3ff irq 4 flags 0x10 on isa0
sio0: type 16550A
sio1 at port 0x2f8-0x2ff irq 3 on isa0
sio1: type 16550A
ppc0: <Parallel port> at port 0x378-0x37f irq 7 on isa0
pppc0: SMC-like chipset (ECP/EPP/PS2/NIBBLE) in COMPATIBLE mode
ppc0: FIFO with 16/16/15 bytes threshold
plip0: <PLIP network interface> on ppbus0
ad0: 8063MB <IBM-DHEA-38451> [16383/16/63] at ata0-master UDMA33
acd0: CD-RW <LITE-ON LTR-1210B> at ata1-slave PIO4
Mounting root from ufs:/dev/md0c
/stand/sysinstall running as init on vty0
Warto jest uważnie przejrzeć wyniki, by mieć pewność, że wszystkie spodziewane urządzenia zostały wykryte. Brak urządzenia na liście oznacza, że nie zostało ono wykryte. Jeśli sterownik wymagał skonfigurowania IRQ i adresu portu, to powinniśmy sprawdzić, czy prawidłowo je wpisaliśmy.
Jeśli trzeba będzie zmienić ustawienia rozpoznawania urządzeń, możemy łatwo opuścić program sysinstall i zacząć od nowa. Dzięki temu można również lepiej poznać cały proces.
Korzystając z klawiszy kursora, wybieramy z głównego menu . Ukaże się następujący komunikat:
                      User Confirmation Requested
         Are you sure you wish to exit? The system will reboot
           (be sure to remove any floppies from the drives).

                            [ Yes ]    No
Instalacja ponownie zacznie się od początku, jeśli wybierzemy yes, pozostawiając płytę CD w napędzie.
Jeśli instalujemy z dyskietek, przed ponownym uruchomieniem komputera powinniśmy wyjąć dyskietkę mfsroot.flp i włożyć kern.flp.
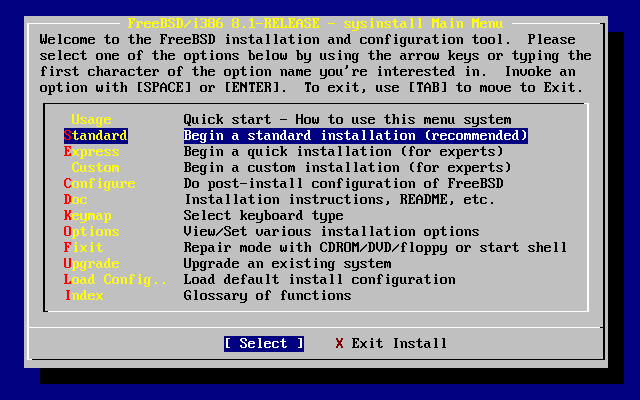
Sysinstall jest aplikacją instalacyjną przygotowaną w ramach Projektu FreeBSD. Jest to program konsolowy podzielony na szereg pomniejszych menu i ekranów, służących do konfiguracji i zarządzania procesem instalacji.
Menu sysinstall obsługiwane jest klawiszami kursora, klawiszem Enter, Spacją i innymi. Dokładny opis działania poszczególnych klawiszy znaleźć można w części poświęconej posługiwaniu się sysinstall.
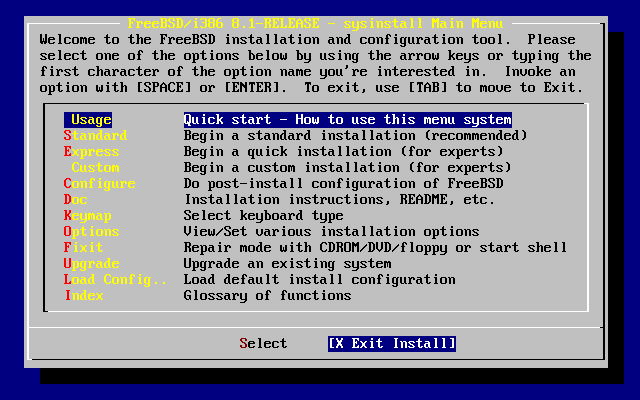
Dostęp do tych informacji możliwy jest poprzez podświetlenie pozycji i wybranie przycisku Select, a następnie wciśnięcie klawisza Enter, zgodnie z Wyświetlenie z głównego menu instrukcji obsługi sysinstall.
Wyświetlone zostaną zostaną wskazówki odnośnie posługiwania się systemem menu. Po ich przeczytaniu powrót do głównego menu możliwy jest poprzez naciśnięcie klawisza Enter.
Korzystając z klawiszy kursora, w głównym menu wybieramy i wciskamy Enter.
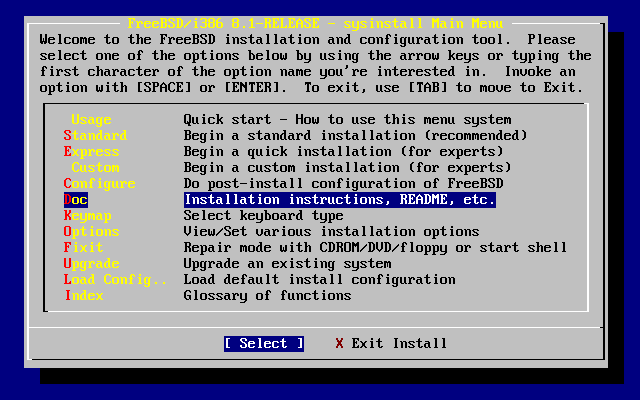
Spowoduje to wyświetlenie menu dokumentacji.

Warto przeczytać dostępne tu dokumenty.
By wyświetlić konkretny dokument, wybieramy go klawiszami kursora, a następnie wciskamy Enter. Po przeczytaniu klawiszem Enter możemy powrócić do menu dokumentacji.
Do głównego menu instalacji powracamy wybierając klawiszami kursora , a następnie wciskając Enter.
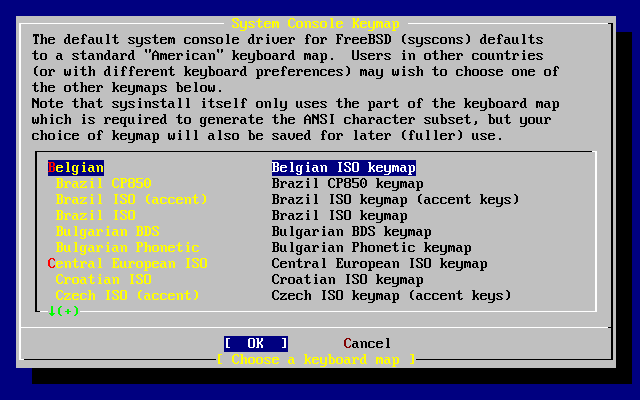
Aby zmienić mapowanie klawiatury klawiszami kursora wybieramy z menu pozycję i wciskamy Enter. Zmiana mapowania klawiatury wymagana jest jedynie gdy używamy klawiatury innej niż standardowej amerykańskiej.
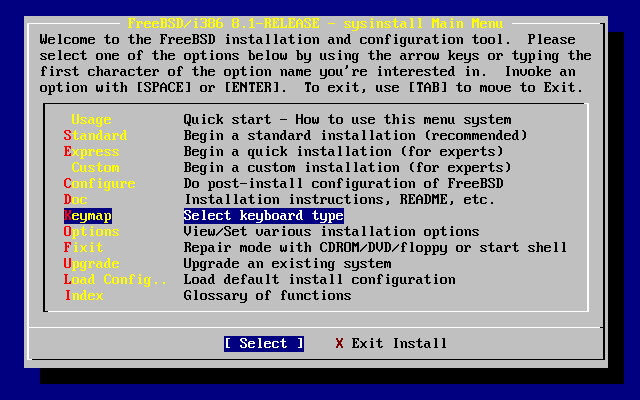
Wyboru mapowania klawiatury dokonujemy poprzez wskazanie odpowiedniej pozycji z listy przy pomocy klawiszy kursora, oraz wciśnięcie Spacji. Ponowne naciśnięcie Spacji cofa wybór. Po wybraniu odpowiedniego mapowania wskazujemy klawiszami kursora OK i wciskamy Enter.
Na poniższym rysunku przedstawiona jest tylko część listy. Wybranie Cancel spowoduje przyjęcie domyślnego mapowania klawiatury i powrót do głównego menu.
Wybieramy i naciskamy Enter.

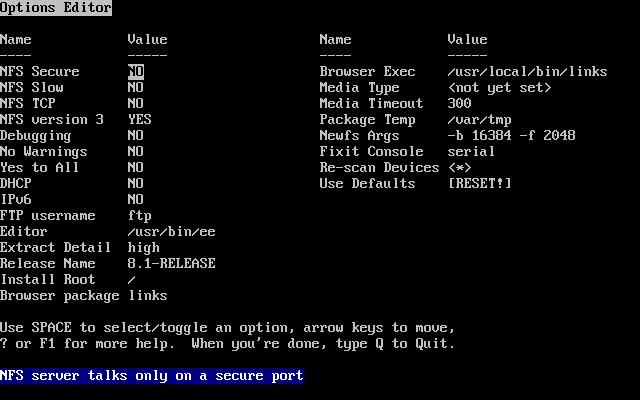
Wartości domyślne są zwykle odpowiednie dla większości użytkowników i nie ma potrzeby ich zmiany. Nazwa wydania może być inna w zależności od instalowanej wersji systemu.
Po wybraniu jednej z opcji, na dole ekranu ukaże się jej opis podświetlony na niebiesko. Opcja (użyj domyślnych) przywraca wszystkim opcjom wartości domyślne.
Naciskając F1 przechodzimy do ekranu pomocy, gdzie możemy przeczytać o poszczególnych opcjach.
Naciskając Q powracamy do głównego menu.
Zaczynamy od przydzielenia FreeBSD przestrzeni dyskowej, oraz oznaczenia tej przestrzeni w taki sposób, by sysinstall mógł ją przygotować. Do tego potrzebna nam będzie wiedza na temat sposobu, w jaki FreeBSD znajduje informacje zapisane na dysku.
Przed instalacją i konfiguracją FreeBSD powinniśmy zapoznać się z pewnym ważnym zagadnieniem, szczególnie istotnym dla posiadaczy dwóch lub więcej twardych dysków.
W komputerze typu PC wyposażonym w zależny od BIOS-u system operacyjny, jak na przykład MS-DOS® lub Microsoft® Windows®, BIOS może zmienić rzeczywistą kolejność dysków, a system operacyjny tę zmianę zaakceptuje. Dzięki temu system może zostać uruchomiony z dysku innego niż tzw. "primary master". Jest to szczególnie wygodne dla tych użytkowników, którzy za najprostszą i najtańszą metodę tworzenia kopii zapasowej uważają kupno identycznego drugiego twardego dysku i kopiowanie zawartości pierwszego dysku przy użyciu Ghost lub XCOPY. W przypadku uszkodzenia pierwszego dysku, ataku wirusa lub awarii systemu operacyjnego, dane mogą być z łatwością odzyskane poprzez zamianę logicznej kolejności dysków w BIOS-ie. To tak, jakby zamienić przewody dysków, ale bez konieczności otwierania obudowy.
Droższe maszyny wyposażone w kontrolery SCSI mają często rozszerzenia BIOS-u pozwalające zamieniać kolejność dysków SCSI na podobnej zasadzie, obsługując do siedmiu dysków.
Użytkowników przyzwyczajonych do korzystania z tego typu rozwiązań może spotkać niespodzianka, gdy we FreeBSD rezultaty odbiegają od oczekiwań. FreeBSD nie korzysta z BIOS-u, jak również nie zna "logicznej kolejności dysków BIOS-u". W efekcie może to prowadzić do kłopotliwych sytuacji, szczególnie wtedy, gdy dyski są identyczne pod względem geometrii, oraz zawierają takie same dane.
Planując używanie FreeBSD, powinniśmy ustawić w BIOS-ie rzeczywistą kolejność dysków przed instalacją systemu, i tę kolejność pozostawić. Jeśli chcemy koniecznie zamienić dyski, to możemy to zrobić sprzętowo, otwierając obudowę i zamieniając odpowiednie zworki i przewody.
Dokonywane tutaj zmiany nie zostaną zapisane na dysku. Jeżeli będziemy podejrzewać, że coś zrobiliśmy źle, możemy wybrać w menu wyjście z programu sysinstall i spróbować jeszcze raz od początku, bądź wcisnąć U by skorzystać z opcji (cofnij). W ostateczności, jeżeli całkiem stracimy orientację, możemy po prostu wyłączyć komputer. |
Po wybraniu standardowej instalacji w sysinstall zostanie wyświetlony następujący komunikat:
                                 Message
 In the next menu, you will need to set up a DOS-style ("fdisk")
 partitioning scheme for your hard disk. If you simply wish to devote
 all disk space to FreeBSD (overwriting anything else that might be on
 the disk(s) selected) then use the (A)ll command to select the default
 partitioning scheme followed by a (Q)uit. If you wish to allocate only
 free space to FreeBSD, move to a partition marked "unused" and use the
 (C)reate command.
                                [  OK  ]

                      [ Press enter or space ]
Zgodnie z poleceniem naciskamy Enter. Zobaczymy teraz listę twardych dysków znalezionych przez jądro podczas rozpoznawania urządzeń. Wybór dysku FDisk-a przedstawia przykład komputera z dwoma dyskami IDE, o nazwach ad0 i ad2.
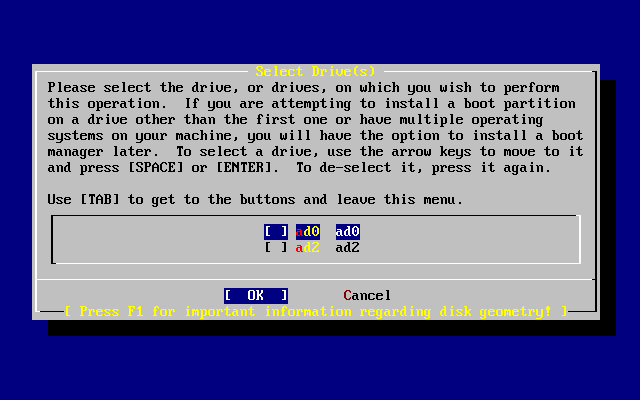
Można się zastanawiać, dlaczego na liście brakuje ad1. Co spowodowało, że został pominięty?
Przyjmijmy przykładowo, że mamy dwa dyski IDE, jeden jako master na pierwszym kontrolerze IDE, drugi jako master na drugim kontrolerze IDE. Gdyby we FreeBSD zostały one ponumerowane w takiej kolejności, w jakiej zostały wykryte, czyli ad0 i ad1, wszystko działałoby jak należy.
Gdybyśmy jednak zainstalowali potem jeszcze jeden dysk, jako slave na pierwszym kontrolerze IDE, to ten właśnie dysk zostałby nowym ad1, a wcześniejszy ad1 zmieniłby się w ad2. Ponieważ systemy plików odnajdywane są według nazw urządzeń (np. ad1s1a), mogłoby się nagle okazać, że niektóre systemy plików nie działają poprawnie. Aby to poprawić, musielibyśmy zmienić konfigurację systemu.
Aby zapobiec takim sytuacjom, jądro FreeBSD może być skonfigurowane tak, by przydzielać dyskom IDE numery zgodne z ich rzeczywistym umiejscowieniem, niezależnie od kolejności wykrywania. Tym sposobem dysk podłączony jako master na drugim kontrolerze IDE zawsze będzie mieć nazwę ad2, nawet w sytuacji, gdy ad0 i ad1 nie są w ogóle obecne.
Jądro FreeBSD domyślnie skonfigurowane jest właśnie w ten sposób, dlatego też na ekranie mamy ad0 i ad2. Komputer, z którego ten rysunek pochodzi, miał dwa dyski IDE podłączone jako master do obu kontrolerów IDE, nie miał natomiast dysków podłączonych jako slave.
Wybieramy dysk, na którym chcemy zainstalować FreeBSD i wybieramy OK. Zostanie uruchomiony FDisk, pokazując na ekranie obraz podobny do Układ partycji w FDisk-u przed zmianami.
Ekran FDisk-a podzielony jest na trzy części.
Część pierwsza, obejmująca pierwsze dwie linie ekranu, zawiera informacje o wybranym dysku, w tym jego oznaczenie we FreeBSD, geometrię oraz całkowity rozmiar dysku.k.
Druga część pokazuje informacje o istniejących na dysku segmentach: gdzie się one zaczynają oraz kończą, jaki jest ich rozmiar, jaka nazwa została im nadana przez FreeBSD ich opis oraz typ. Na rysunku przykładowym widać dwa niewielkie nieużywane segmenty, obecne ze względu na stosowany w architekturze PC podział dysku. Prócz tego widać duży segment FAT, który prawie na pewno jest dyskiem C: w MS-DOS® / Windows®, oraz segment rozszerzony, zawierający być może dyski MS-DOS® / Windows® oznaczone kolejnymi literami.
W trzeciej części znajduje się lista dostępnych w FDisk-u poleceń.
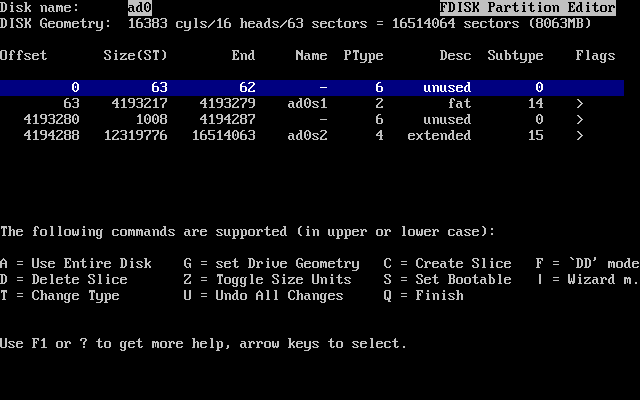
Dalej postępować będziemy w zależności od tego, jak chcemy podzielić nasz dysk na segmenty.
Jeżeli chcemy, by FreeBSD zajęło cały dysk (co wiąże się z usunięciem z niego wszelkich innych danych, gdy potwierdzimy to w sysinstall na późniejszym etapie instalacji), naciskamy A, co odpowiada opcji (wykorzystaj cały dysk). Istniejące segmenty zostaną usunięte, a w ich miejsce pojawi się mały obszar opisany jako unused (nieużywany; znów jest to następstwem pecetowego układu dysku), oraz duży segment przeznaczony dla FreeBSD. Jeżeli decydujemy się na tę opcję, powinniśmy w następnej kolejności wskazać nowoutworzony segment FreeBSD przy użyciu klawiszy kursora i wcisnąć S, by umożliwić ładowanie systemu z tego segmentu. Ekran będzie wyglądać podobnie do przedstawionego na Partycja w FDisk-u obejmująca cały dysk. Zwróćmy uwagę na literę A w kolumnie Flags, oznacza ona, że segment jest aktywny i będzie z niego ładowany system.
Jeśli chcemy usunąć istniejący segment by zwolnić miejsce dla FreeBSD, wskazujemy segment korzystając z klawiszy kursora i naciskamy D. Następnie możemy nacisnąć C i w odpowiedzi na pytanie o rozmiar segmentu, który chcemy utworzyć, wpisać odpowiednią wartość i wcisnąć Enter. Wartość domyślna stanowi największy możliwy rozmiar segmentu, czyli np. wolną przestrzeń na dysku bądź całą pojemność dysku twardego.
Wolne miejsce dla FreeBSD mogliśmy także przygotować wcześniej (na przykład przy użyciu programu PartitionMagic®), w takim wypadku po prostu wciskamy C by utworzyć nowy segment. W tym przypadku również zostaniemy zapytani o rozmiar segmentu, który zamierzamy stworzyć.

Na koniec naciskamy Q. Dokonane zmiany zostaną zapamiętane przez sysinstall, ale nie będą jeszcze zapisane na dysku.
W kolejnym kroku instalacji będziemy mieć możliwość zainstalowania programu ładującego (ang. boot manager). Mówiąc ogólnie, powinniśmy instalować program ładujący FreeBSD jeżeli:
Mamy dwa lub więcej dysków, a FreeBSD instalujemy na dysku innym niż pierwszy.
Instalujemy FreeBSD obok innego systemu operacyjnego na tym samym dysku, i chcemy mieć możliwość wybrania systemu operacyjnego podczas uruchamiania komputera.
Jeśli FreeBSD będzie jedynym systemem operacyjnym na danym komputerze i zostanie zainstalowany na pierwszym dysku twardym, wówczas wystarczy wykorzystać program ładujący. Natomiast jeśli wykorzystujemy już inny program potrafiący uruchomić FreeBSD powinnyśmy wybrać opcję (żaden).
Dokonany wybór potwierdzamy naciskając Enter.
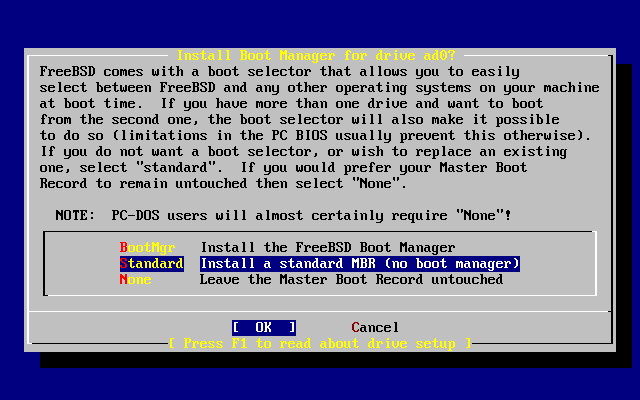
Ekran pomocy, wyświetlany po naciśnięciu F1, opisuje problemy z jakimi można się spotkać, gdy planuje się mieć kilka systemów operacyjnych na jednym dysku.
Jeżeli mamy więcej dysków, po wyborze programu ładującego ponownie ukaże się ekran wyboru dysku. Chcąc zainstalować FreeBSD na kilku dyskach, wybieramy tutaj kolejny dysk i ponownie korzystając z programu FDisk tworzymy na nim segmenty.
Jeśli instalujemy FreeBSD na innym dysku niż pierwszy, wówczas program ładujący FreeBSD musi zostać zainstalowany na obydwu dyskach. |

Klawisz Tab przełącza pomiędzy ostatnio wybranym dyskiem oraz przyciskami OK, i Cancel.
Wciskamy Tab jeden raz, by wybrać OK, następnie naciskamy Enter aby przejść do kolejnego etapu instalacji.
W nowoutworzonych segmentach musimy stworzyć kilka partycji. Pamiętajmy, że każda partycja oznaczona jest literą od a do h, a partycje b, c i d rządzą się specjalnymi zasadami, których należy przestrzegać.
Niektóre aplikacje mogą skorzystać na stosowaniu określonych schematów podziału na partycje, szczególnie, gdy partycje rozłożone są na kilku dyskach. Na razie jednak, ponieważ jest to nasza pierwsza instalacja FreeBSD, nie powinniśmy zbytnio przejmować się podziałem dysku na partycje. Ważniejszym jest, byśmy zainstalowali FreeBSD i zaczęli się uczyć, jak go używać. Kiedy już nabierzemy pewnej wprawy, możemy zainstalować system ponownie i zmienić sposób podziału na partycje.
Poniższy schemat przedstawia cztery partycje - jedną dla przestrzeni wymiany, oraz trzy dla systemów plików.
| Partycja | System plików | Rozmiar | Opis |
|---|---|---|---|
| / | 100 MB | Będzie to główny system plików. Wszystkie inne systemy plików będą zamontowane gdzieś wewnątrz niego. 100 MB jest dość rozsądnym rozmiarem dla tego celu. Nie będzie tu przechowywane zbyt wiele danych, zwykle po instalacji FreeBSD umieszcza tu około 40 MB danych. Pozostałe miejsce jest dla danych tymczasowych, oraz służy jako zapas, gdyby kolejne wersje FreeBSD potrzebowały więcej miejsca w /. |
| brak | 2-3 x RAM | Partycja ta służy jako przestrzeń wymiany. Wybór jej odpowiedniego rozmiaru nie jest sprawą banalną. Możemy przyjąć, że przestrzeń wymiany powinna być dwu- lub trzykrotnie większa niż ilość pamięci fizycznej (RAM). Prócz tego powinniśmy mieć co najmniej 64 MB przestrzeni wymiany, więc jeżeli nasz komputer ma mniej niż 32 MB pamięci, ustawmy rozmiar przestrzeni wymiany na 64 MB. Jeśli dysponujemy kilkoma dyskami, możemy na każdym z nich umieścić przestrzeń wymiany. FreeBSD będzie w procesie wymiany wykorzystywać każdy z dysków, dzięki czemu wymiana będzie się odbywać szybciej. W takim przypadku przyjmujemy całkowity rozmiar potrzebnej przestrzeni wymiany (np. 128 MB) i dzielimy go przez liczbę posiadanych dysków (np. dwa dyski), otrzymując w wyniku rozmiar przestrzeni wymiany dla jednego dysku. W naszym przykładzie będzie to 64 MB na każdy dysk. |
| /var | 50 MB | W katalogu /var przechowywane są pliki o zmiennych rozmiarach; pliki dzienników systemowych i inne pliki administracyjne. Podczas codziennej pracy FreeBSD na wielu z tych plików dokonywane są częste operacje odczytu lub zapisu. Dzięki umieszczeniu ich w oddzielnym systemie plików FreeBSD może dokonać optymalizacji dostępu do nich, nie wywierając jednocześnie wpływu na inne pliki, do których dostęp przebiega inaczej. |
| /usr | Reszta dysku | Inne pliki będą zwykle przechowywane w katalogu /usr i jego podkatalogach. |
Jeżeli instalujemy FreeBSD na dwóch lub więcej dyskach, musimy utworzyć partycje także w innych przygotowanych segmentach. Najłatwiej jest po prostu przygotować na każdym z kolejnych dysków dwie partycje, jedną na przestrzeń wymiany, drugą na system plików.
| Partycja | System plików | Rozmiar | Opis |
|---|---|---|---|
| brak | Patrz: opis | Jak już powiedzieliśmy, przestrzeń wymiany możemy dzielić między kilka dysków. Mimo, iż mamy do dyspozycji partycję |
| /dyskn | Reszta dysku | Pozostała część dysku zajmowana jest przez jedną dużą partycję. Mogłaby to z powodzeniem być partycja |
Po podjęciu decyzji jak ma wyglądać układ partycji, pora wprowadzić go w życie używając sysinstall. Na ekranie ukaże się następujący komunikat:
                                 Message
 Now, you need to create BSD partitions inside of the fdisk
 partition(s) just created. If you have a reasonable amount of disk
 space (200MB or more) and don't have any special requirements, simply
 use the (A)uto command to allocate space automatically. If you have
 more specific needs or just don't care for the layout chosen by
 (A)uto, press F1 for more information on manual layout.

                                [  OK  ]
                          [ Press enter or space ]
Naciskamy Enter by przejść do edytora partycji FreeBSD, zwanego Disklabel.
Edytor Disklabel przedstawia ekran zaraz po uruchomieniu Disklabel. Jest on podzielony na trzy części.
W kilku pierwszych wierszach widoczna jest nazwa wybranego aktualnie dysku, oraz nazwa segmentu, w którym tworzymy partycje (Disklabel używa tutaj nazwy Partition name, czyli nazwa partycji, a nie nazwa segmentu). Jest tu również zawarta informacja o rozmiarze wolnej przestrzeni wewnątrz segmentu, czyli przestrzeni nie przydzielonej jeszcze partycjom.
Środek ekranu zajmuje lista utworzonych partycji, wraz z nazwami przechowywanych na nich systemów plików, ich rozmiarami oraz pewnymi opcjami związanymi z tworzeniem systemu plików.
W dolnej części przedstawiona jest lista dostępnych w Disklabel poleceń.
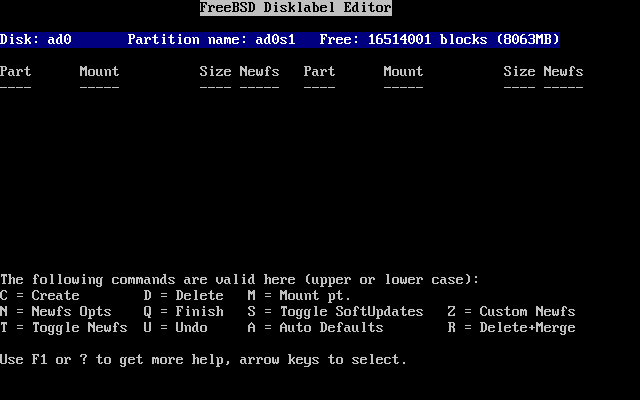
Disklabel potrafi automatycznie utworzyć partycje i nadać im domyślne rozmiary. Wypróbujmy tę możliwość naciskając A. Na ekranie ukaże się obraz podobny do Edytor disklabel z automatycznymi ustawieniami. Ustawienia automatyczne mogą być właściwe lub nie, w zależności od rozmiaru dysku. Nie ma to jednak większego znaczenia, ponieważ nie trzeba ich koniecznie akceptować.
Katalog /tmp jest domyślnie umieszczany na własnej partycji, zamiast być częścią partycji /. Dzięki temu można uniknąć zapełnienia partycji / plikami tymczasowymi. |
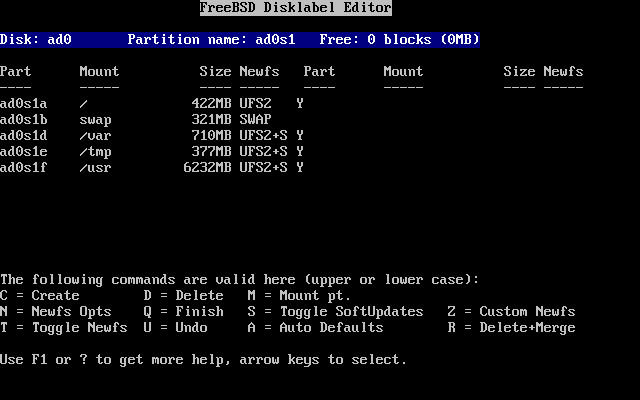
By usunąć zaproponowane partycje i zastąpić je utworzonymi własnoręcznie, wybieramy klawiszami kursora pierwszą partycję i naciskamy D. Tak samo postępujemy z pozostałymi partycjami.
Teraz, aby stworzyć pierwszą partycję (a, zamontowaną jako /), wybieramy informacje o dysku w górnej części ekranu i wciskamy C. Pojawi się okienko z pytaniem o rozmiar nowej partycji (Wolne miejsce dla głównej partycji). Wybrany rozmiar podać możemy w blokach, albo w wygodniejszej formie w postaci liczby megabajtów, gigabajtów lub cylindrów, odpowiednio z przyrostkiem M, G lub C.
Począwszy od FreeBSD 5.X użytkownicy mogą: wybrać system plików UFS2 (domyślny system we FreeBSD 5.1 i późniejszych) wykorzystując opcję |
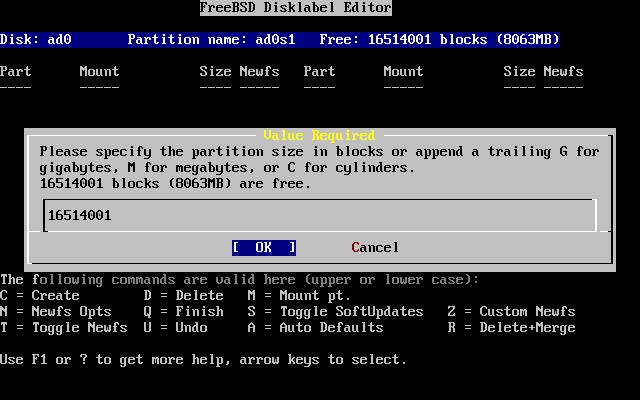
Wybierając domyślnie zaproponowany rozmiar utworzymy partycję obejmującą pozostałe miejsce w segmencie. Jeżeli zamierzamy stworzyć partycje o takich rozmiarach, jak wcześniej opisywaliśmy, wówczas kasujemy zaproponowaną wartość klawiszem Backspace, i wpisujemy 64M, Zmiana rozmiaru głównej partycji. Następnie wybieramy OK.
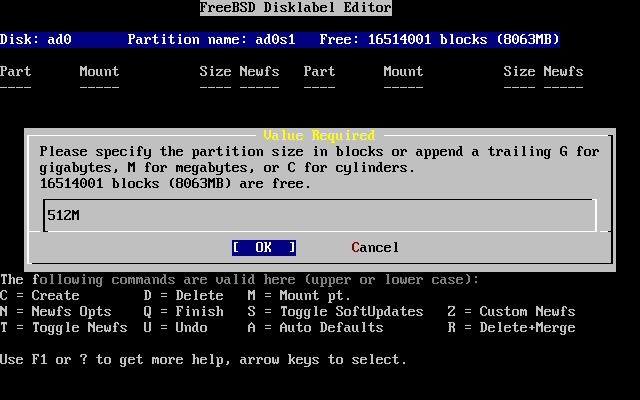
Po wybraniu rozmiaru partycji pojawi się pytanie, czy partycja zawierać będzie system plików, czy przestrzeń wymiany. Okienko z tym pytaniem pokazane jest na Wybór typu głównej partycji. Pierwsza partycja zawierać będzie system plików, wybieramy więc i naciskamy Enter.
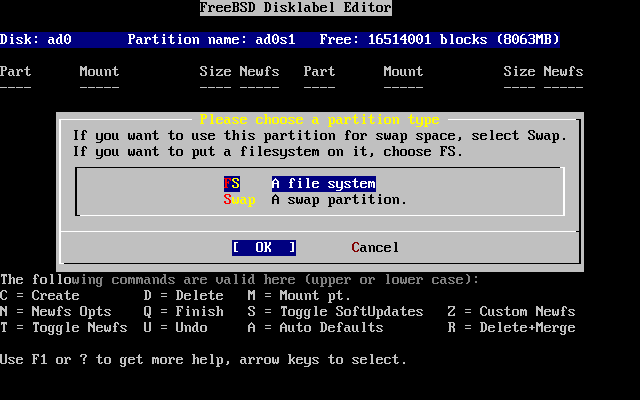
Ponieważ na partycji znajdować się będzie system plików, Disklabel musi wiedzieć, gdzie będzie on zamontowany. Wybór miejsca montowania głównego systemu plików przedstawia okienko z prośbą o podanie tej informacji. Główny system plików montowany jest jako /, wpisujemy więc / i wciskamy Enter.

Na ekranie pojawi się informacja o nowo utworzonej partycji. Powinniśmy teraz powtórzyć całą procedurę dla kolejnych partycji. Tworząc partycję wymiany nie będziemy pytani o miejsce jej zamontowania, ponieważ partycje wymiany nie są montowane. Gdy będziemy tworzyć ostatnią partycję, /usr, możemy przyjąć proponowany rozmiar domyślny, aby przeznaczyć na tę partycję resztę segmentu.
Ostatecznie ekran edytora Disklabel będzie wyglądać podobnie do Edytor Disklabel, choć wybrane przez nas wartości mogą być inne. By zakończyć pracę z Disklabel, wciskamy Q.
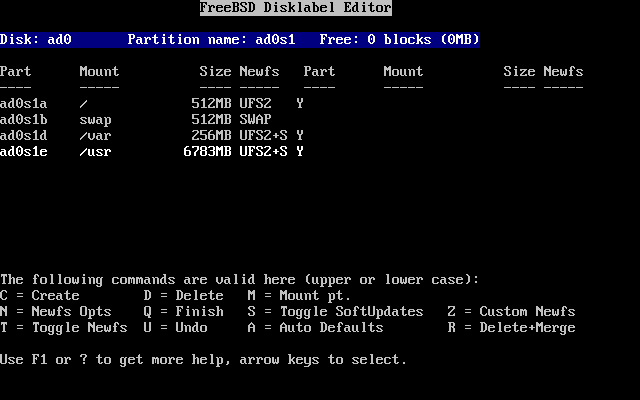
Decyzja o tym, jaki zestaw komponentów zainstalujemy, zależy w dużej mierze od planowanych zastosowań systemu i ilości wolnego miejsca na dysku. Dostępne warianty pozwalają zarówno na instalację najmniejszej konfiguracji, jak i na instalację wszystkiego. Początkujący użytkownicy systemów UNIX® i FreeBSD powinni wybrać jeden z przygotowanych wariantów. Dla bardziej doświadczonych użytkowników istnieje możliwość ułożenia własnego zestawu komponentów.
Więcej informacji o zestawach komponentów i ich zawartości możemy uzyskać naciskając F1. Po przejrzeniu tych informacji naciskamy Enter, aby powrócić do menu wyboru komponentów.
Jeśli planujemy korzystać z graficznego interfejsu użytkownika powinniśmy wybrać jeden z zestawów o nazwie rozpoczynającej się literą X. Po instalacji zajmiemy się konfigurowaniem serwera graficznego i wyborem menedżera okien. Szczegółowe informacje na ten temat zawiera rozdział System okien X.
To, która wersja systemu X11 jest domyślnie instalowana, zależy od instalowanej wersji FreeBSD. Wydania wcześniejsze od 5.3 domyślnie instalują XFree86™ 4.X. Natomiast FreeBSD 5.3 i późniejsze instalują Xorg.
Jeżeli planujemy samodzielne kompilowanie jądra, powinniśmy wybrać wariant zawierający kod źródłowy. Konfiguracja jądra FreeBSD zawiera informacje, dlaczego powinno się budować niestandardowe jądro i jak to zrobić.
Oczywiście najbardziej wszechstronny jest system zawierający wszystkie komponenty. Jeśli mamy wystarczająco dużo miejsca na dysku, wybieramy klawiszami kursora , Wybór komponentów, i naciskamy Enter. Jeżeli jednak miejsca na dysku mogłoby nie wystarczyć, wybierzmy wariant najlepiej odpowiadający obecnym potrzebom. Kolejne komponenty mogą być dodawane po zainstalowaniu systemu.
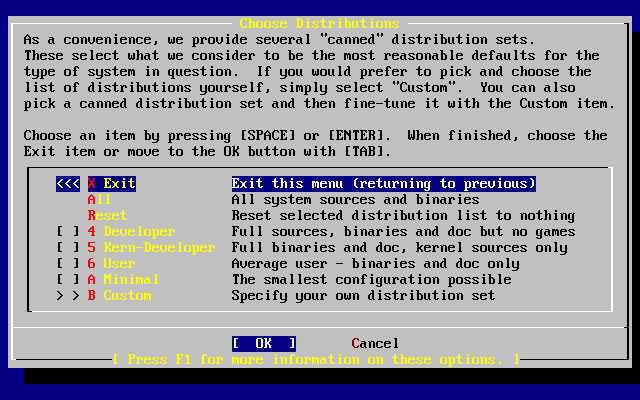
Po wyborze komponentów będziemy mieć możliwość zainstalowania kolekcji portów FreeBSD. Kolekcja portów umożliwia łatwe i wygodne instalowanie oprogramowania. Nie zawiera ona kodów źródłowych programów. W skład kolekcji portów wchodzą pliki umożliwiające automatyczne pobieranie programów, oraz ich kompilowanie i instalowanie. Instalacja programów. pakiety i porty opisuje sposób korzystanie z kolekcji portów.
Program instalacyjny nie sprawdza, czy mamy odpowiednio dużo wolnego miejsca na dysku. Kolekcję portów powinniśmy instalować tylko pod warunkiem, że miejsca faktycznie wystarczy. We FreeBSD 12.0 kolekcja zajmuje około 3 GB.
                         User Confirmation Requested
 Would you like to install the FreeBSD ports collection?

 This will give you ready access to over 24,000 ported software packages,
 at a cost of around 500 MB of disk space when "clean" and possibly much
 more than that if a lot of the distribution tarballs are loaded
 (unless you have the extra CDs from a FreeBSD CD/DVD distribution
 available and can mount it on /cdrom, in which case this is far less
 of a problem).

 The Ports Collection is a very valuable resource and well worth having
 on your /usr partition, so it is advisable to say Yes to this option.

 For more information on the Ports Collection & the latest ports,
 visit:
     http://www.FreeBSD.org/ports

                              [ Yes ]     No
Klawiszami kursora wybieramy yes, aby zainstalować kolekcję portów, lub no, by z niej zrezygnować. Wybór zatwierdzamy klawiszem Enter. Ponownie pojawi się menu wyboru komponentów.

Jeżeli odpowiadają nam wybrane komponenty, przy pomocy klawiszy kursora wybieramy , zaznaczamy OK i naciskamy Enter, przechodząc do kolejnego etapu instalacji.
W przypadku, gdy instalujemy z płyty CD bądź DVD, klawiszami kursora wybieramy pozycję (instalacja z CD/DVD). Upewniwszy się, że zaznaczone jest OK, naciskamy Enter przechodząc do następnego etapu instalacji.
Jeżeli stosujemy inną metodę instalacji, wybieramy odpowiednią pozycję i postępujemy zgodnie ze wskazówkami.
Klawiszem F1 możemy włączyć pomoc. Do menu wyboru nośnika powracamy naciskając Enter.

Tryby instalacji przez FTP Można wybrać jeden z trzech trybów instalacji przez FTP: aktywne FTP, pasywne FTP lub pośrednio przez HTTP proxy.
Korzystając z pośredniczącego serwera FTP proxy, zwykle podajemy nazwę serwera docelowego jako część nazwy użytkownika, po znaku "@". Serwer proxy "udaje" wówczas serwer docelowy. Załóżmy, dla przykładu, że chcemy zainstalować system z W takiej sytuacji przechodzimy do menu opcji, jako nazwę użytkownika FTP wpisujemy Ze względu na to, że /pub/FreeBSD z |
Możemy teraz rozpocząć właściwą instalację, a zarazem mamy ostatnią szansę na rezygnację z instalacji bez zmiany zawartości dysku twardego.
                       User Confirmation Requested
 Last Chance! Are you SURE you want to continue the installation?

 If you're running this on a disk with data you wish to save then WE
 STRONGLY ENCOURAGE YOU TO MAKE PROPER BACKUPS before proceeding!

 We can take no responsibility for lost disk contents!

                             [ Yes ]    No
Wybieramy yes i wciskamy Enter, by rozpocząć instalację.
Czas trwania instalacji zależy od wybranych komponentów, używanego nośnika instalacji oraz prędkości komputera. Szereg komunikatów informować będzie o przebiegu procesu instalacji.
Po zakończeniu instalacji wyświetlony zostanie następujący komunikat:
                               Message

Congratulations! You now have FreeBSD installed on your system.

We will now move on to the final configuration questions.
For any option you do not wish to configure, simply select No.

If you wish to re-enter this utility after the system is up, you may
do so by typing: /stand/sysinstall .

                                 [ OK ]

                      [  Press enter to continue  ]
Po naciśnięciu klawisza Enter zajmiemy się przygotowaniem wstępnej konfiguracji systemu.
Jeśli wybierzemy no i naciśniemy Enter instalacja zostanie przerwana, bez dokonywania jakichkolwiek zmian. Pojawi się komunikat o treści:
                                Message
Installation complete with some errors.  You may wish to scroll
through the debugging messages on VTY1 with the scroll-lock feature.
You can also choose "No" at the next prompt and go back into the
installation menus to retry whichever operations have failed.

                                 [ OK ]
Powyższy komunikat pojawia się, ponieważ nic nie zostało zainstalowane. Naciskając Enter możemy powrócić do głównego menu i opuścić program instalacyjny.
Po pomyślnie zakończonej instalacji zajmiemy się wstępną konfiguracją systemu. Wszelkich zmian w ustawieniach możemy dokonać przed uruchomieniem nowo zainstalowanego systemu FreeBSD lub też po zakończeniu instalacji, korzystając z sysinstall (we FreeBSD starszych niż 5.2 /stand/sysinstall) i jego opcji .
Jeśli wcześniej skonfigurowaliśmy PPP na potrzeby instalacji przez FTP, konfiguracja urządzeń sieciowych zostanie pominięta. Będziemy mogli zająć się nią później.
Szczegółowe informacje na temat sieci lokalnych (LAN) oraz konfiguracji FreeBSD w roli bramy lub rutera znaleźć można w rozdziale Zaawansowana konfiguracja sieciowa.
                      User Confirmation Requested
   Would you like to configure any Ethernet or SLIP/PPP network devices?

                             [ Yes ]   No
Jeśli chcemy skonfigurować urządzenie sieciowe, wybieramy yes i wciskamy Enter. W przeciwnym wypadku wybieramy no.
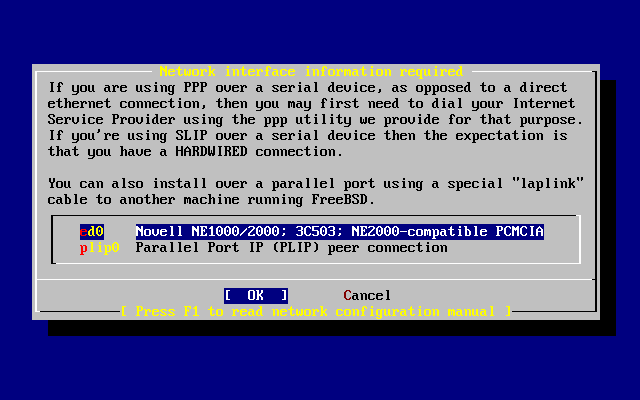
Klawiszami kursora wybieramy interfejs, który będziemy konfigurować i wciskamy Enter.
                      User Confirmation Requested
       Do you want to try IPv6 configuration of the interface?

                              Yes   [ No ]
Dla przykładu, w sieci lokalnej w zupełności wystarcza obecny protokół Internetu (IPv4), wybieramy więc klawiszami kursora no i naciskamy Enter.
Jeśli chcemy wypróbować nowy protokół Internetu (IPv6), wybieramy yes i naciskamy Enter. Przez chwilę będzie się odbywać poszukiwanie serwerów RA.
                             User Confirmation Requested
        Do you want to try DHCP configuration of the interface?

                              Yes   [ No ]
Jeżeli nie wykorzystujemy DHCP (Dynamic Host Configuration Protocol), wybieramy klawiszami kursora no i wciskamy Enter.
Wybranie yes spowoduje uruchomienie dhclient i jeśli wszystko przebiegnie prawidłowo, konfiguracja sieci zostanie rozpoznana automatycznie. Automatic Network Configuration (DHCP) zawiera szczegółowe informacje na ten temat.
Przedstawiony poniżej ekran konfiguracji sieci (Network Configuration) przedstawia konfigurację karty sieciowej komputera, który będzie służył jako brama w sieci lokalnej.
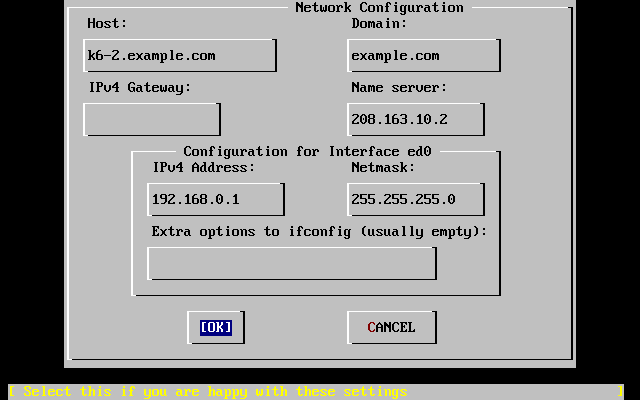
Klawiszem Tab wybieramy poszczególne pola, w których wpisujemy odpowiednie informacje:
Pełna nazwa stacji, w powyższym przykładzie k6-2.example.com.
Nazwa domeny, do której należy stacja, w przykładzie jest to example.com.
Adres IP stacji przekazującej pakiety do odbiorców spoza sieci lokalnej. Musi być podany, jeśli komputer jest węzłem w sieci. Jeżeli komputer pełni rolę bramy do Internetu w sieci lokalnej, pole to należy pozostawić puste.
Adres IP lokalnego serwera DNS. W przykładowej sieci lokalnej nie ma serwera DNS, wpisany więc został adres serwera DNS dostawcy Internetu (208.163.10.2).
W przykładzie temu interfejsowi przypisano adres 192.168.0.1.
W sieci lokalnej użyty został dla przykładu blok adresów klasy C (192.168.0.0 - 192.168.0.255). Maska podsieci jest maską sieci klasy C (255.255.255.0).
Tu wpisywane są dodatkowe opcje dla ifconfig charakterystyczne dla interfejsu. W pokazanym przykładzie nie było takowych opcji.
Gdy konfiguracja będzie gotowa, klawiszem Tab wybieramy OK i naciskamy Enter.
                      User Confirmation Requested
        Would you like to Bring Up the ed0 interface right now?

                             [ Yes ]   No
Jeśli wybierzemy yes i wciśniemy Enter, komputer zostanie aktywowany do pracy w sieci.
                       User Confirmation Requested
       Do you want this machine to function as a network gateway?

                              [ Yes ]    No
Jeśli komputer będzie w sieci lokalnej pełnić rolę bramy, czyli będzie przekazywać pakiety pomiędzy innymi komputerami, wybieramy opcję yes i naciskamy Enter. Jeżeli natomiast komputer będzie węzłem w sieci, wybieramy no i również wciskamy Enter.
                      User Confirmation Requested
Do you want to configure inetd and the network services that it provides?

                               Yes   [ No ]
Wybranie no spowoduje, że wiele usług (jak np. telnetd) będą wyłączone. Oznacza to, że zdalni użytkownicy nie będą mogli połączyć się z naszym komputerem za pomocą telnetu. Użytkownicy lokalni będą natomiast mogli łączyć się z odległymi komputerami korzystając z telnetu.
Usługi możemy włączyć po zainstalowaniu systemu, aby to zrobić, modyfikujemy plik /etc/inetd.conf za pomocą edytora tekstu. Więcej informacji znaleźć można w Sekcji 25.2.1. Overview.
Jeśli wolelibyśmy skonfigurować usługi internetowe podczas instalacji, wybieramy yes. Zostaniemy poproszeni o dodatkowe potwierdzenie:
                      User Confirmation Requested
The Internet Super Server (inetd) allows a number of simple Internet
services to be enabled, including finger, ftp and telnetd.  Enabling
these services may increase risk of security problems by increasing
the exposure of your system.

With this in mind, do you wish to enable inetd?

                             [ Yes ]   No
Wybieramy yes, by przejść dalej.
                      User Confirmation Requested
inetd(8) relies on its configuration file, /etc/inetd.conf, to determine
which of its Internet services will be available.  The default FreeBSD
inetd.conf(5) leaves all services disabled by default, so they must be
specifically enabled in the configuration file before they will
function, even once inetd(8) is enabled.  Note that services for
IPv6 must be separately enabled from IPv4 services.

Select [Yes] now to invoke an editor on /etc/inetd.conf, or [No] to
use the current settings.

                             [ Yes ]   No
Wybranie yes pozwoli na włączanie poszczególnych usług poprzez usunięcie znaku # na początku właściwego wiersza.
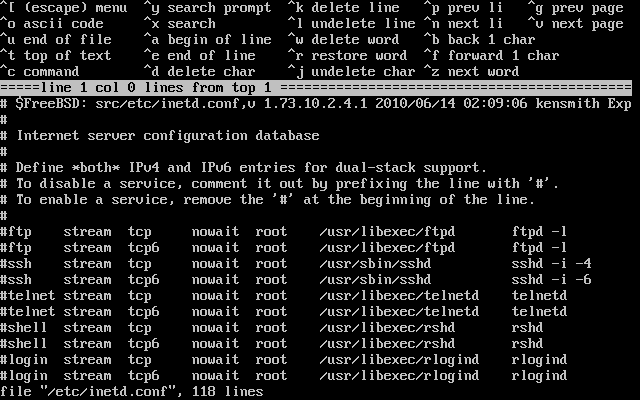
Gdy włączymy wybrane usługi, naciskamy Esc by przejść do menu, w którym będziemy mogli zakończyć modyfikowanie pliku i zapisać zmiany.
                      User Confirmation Requested
 Do you want to have anonymous FTP access to this machine?

Yes [ No ]Wybranie zaznaczonego domyślnie no pozwoli na dostęp do komputera poprzez FTP tylko tym użytkownikom, którzy mają własne konta chronione hasłem.
Włączenie anonimowego FTP oznacza, że każdy będzie mógł uzyskać dostęp do komputera. Zanim się na to zdecydujemy, powinniśmy być świadomi niebezpieczeństwa, które się z tym wiąże. Security zawiera więcej informacji na temat bezpieczeństwa.
Aby włączyć anonimowe FTP, klawiszami kursora wybieramy yes i naciskamy Enter. Ekran będzie wyglądać jak na poniższym rysunku (lub podobnie):

Możemy nacisnąć F1, by uzyskać pomoc:
This screen allows you to configure the anonymous FTP user.

The following configuration values are editable:

UID:     The user ID you wish to assign to the anonymous FTP user.
         All files uploaded will be owned by this ID.

Group:   Which group you wish the anonymous FTP user to be in.

Comment: String describing this user in /etc/passwd

FTP Root Directory:

        Where files available for anonymous FTP will be kept.

Upload subdirectory:

        Where files uploaded by anonymous FTP users will go.
Główny katalog ftp jest domyślnie umieszczany w /var. Jeżeli nie mamy tam wystarczająco dużo miejsca dla przewidywanych potrzeb FTP, możemy wybrać w zamian katalog /usr, jako główny katalog FTP (FTP Root Directory) wpisując /usr/ftp.
Po wybraniu odpowiadających nam ustawień naciskamy Enter.
                          User Confirmation Requested
         Create a welcome message file for anonymous FTP users?

                              [ Yes ]    No
Jeżeli wybierzemy yes i wciśniemy Enter, automatycznie zostanie uruchomiony edytor, w którym będziemy mogli napisać komunikat powitalny dla użytkowników anonimowego FTP.
Używanym tutaj edytorem tekstu jest ee. Postępując zgodnie z przedstawionymi na ekranie wskazówkami możemy wprowadzić treść komunikatu, lub też możemy zrobić to później, korzystając z dowolnego edytora. W tym celu warto jest zapisać nazwę i lokalizację pliku pokazywaną na dole ekranu.
Gdy naciśniemy Esc pokazane zostanie menu z domyślnie zaznaczoną opcją . (opuszczenie edytora). Wybieramy ją naciskając Enter. Ponowne naciśnięcie Enter spowoduje zapisanie zmian jeśli jakichś dokonaliśmy.
Sieciowe usługi plikowe (Network File Services - NFS) pozwalają na współdzielony dostęp do plików przez sieć. Komputer możemy skonfigurować jako serwer, klient, lub oba naraz. Więcej informacji na ten temat można znaleźć w Network File System (NFS).
                       User Confirmation Requested
 Do you want to configure this machine as an NFS server?

                              Yes    [ No ]
Jeśli nie zamierzamy korzystać z serwera NFS, wybieramy no i wciskamy Enter.
W przeciwnym wypadku, gdy wybierzemy yes, zostanie pokazany komunikat o konieczności stworzenia pliku exports.
                               Message
Operating as an NFS server means that you must first configure an
/etc/exports file to indicate which hosts are allowed certain kinds of
access to your local filesystems.
Press [Enter] now to invoke an editor on /etc/exports
                               [ OK ]
Naciskamy Enter. Zostanie uruchomiony edytor tekstu, w którym będziemy mogli przygotować plik exports.
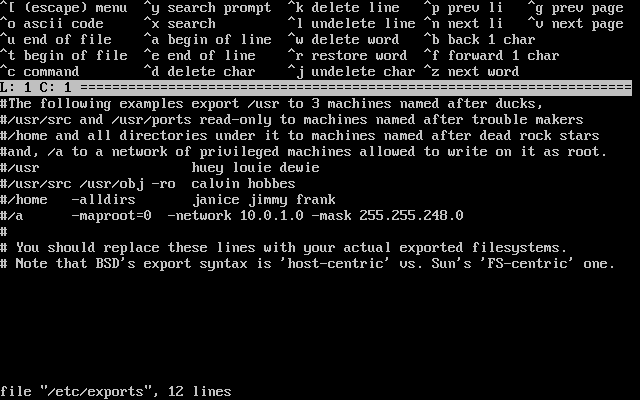
Zgodnie ze wskazówkami dopisujemy udostępniane systemy plików. Możemy także zrobić to później, korzystając z preferowanego przez nas edytora tekstu. W tym celu warto zapisać sobie pokazywaną na dole ekranu nazwę i lokalizację pliku.
Gdy naciśniemy Esc, pokazane zostanie menu z domyślnie zaznaczoną opcją (opuszczenie edytora). Wybieramy ją naciskając Enter.
"Profil zabezpieczeń" to zestaw opcji konfiguracyjnych, mający zapewnić określony poziom bezpieczeństwa poprzez włączenie i wyłączenie pewnych programów i ustawień. Im surowszy profil zabezpieczeń, tym mniej programów będzie domyślnie uruchamianych. Odpowiada to jednej z podstawowych zasad bezpieczeństwa: należy wyłączać wszystko, co nie musi być włączone.
Pamiętajmy, że profil zabezpieczeń to tylko domyślne ustawienia. Poszczególne programy można włączać i wyłączać już po zainstalowaniu FreeBSD, poprzez modyfikację lub dodanie odpowiednich wpisów w pliku /etc/rc.conf. Dalsze informacje na ten temat znaleźć można w dokumentacji systemowej rc.conf(5).
Poniższa tabela pokazuje, jaki jest efekt stosowania każdego z profili zabezpieczeń. Kolumny odpowiadają profilom, które można wybrać, natomiast w kolejnych wierszach wymienione są poszczególne programy lub funkcje włączone lub wyłączone w danym profilu.
| Extreme | Medium | |
|---|---|---|
NIE | TAK | |
NIE | TAK | |
NIE | MOŻE (Portmapper jest włączony, jeśli na wcześniejszym etapie instalacji komputer został skonfigurowany jako klient lub serwer NFS.) | |
serwer NFS | NIE | TAK |
TAK (Wybierając profil zabezpieczeń, który powoduje ustawienie securelevel na "Extreme" lub "High", powinniśmy pamiętać o konsekwencjach. Warto przeczytać dokumentację systemową init(8) i zwrócić szczególną uwagę na znaczenie poziomów bezpieczeństwa, by uniknąć późniejszych kłopotów!) | NIE |
                       User Confirmation Requested
 Do you want to select a default security profile for this host (select
 No for "medium" security)?

                            [ Yes ]    No
Jeżeli wybierzemy no i naciśniemy Enter, zostanie ustawiony średni profil zabezpieczeń.
Chcąc wybrać inny profil zabezpieczeń, wybieramy yes i wciskamy Enter.

Aby uzyskać pomoc, wciskamy F1. Naciskając Enter wracamy do menu.
Klawiszami kursora wybieramy , chyba, że jesteśmy pewni, że będziemy potrzebować innego poziomu bezpieczeństwa. Wskazujemy następnie OK i wciskamy Enter.
Zostanie wyświetlony komunikat potwierdzający wybór profilu zabezpieczeń.
                                 Message

Moderate security settings have been selected.

Sendmail and SSHd have been enabled, securelevels are
disabled, and NFS server setting have been left intact.
PLEASE NIETE that this still does not save you from having
to properly secure your system in other ways or exercise
due diligence in your administration, this simply picks
a standard set of out-of-box defaults to start with.

To change any of these settings later, edit /etc/rc.conf

                                  [OK]
Message
Extreme security settings have been selected.
Sendmail, SSHd, and NFS services have been disabled, and
securelevels have been enabled.
PLEASE NIETE that this still does not save you from having
to properly secure your system in other ways or exercise
due diligence in your administration, this simply picks
a more secure set of out-of-box defaults to start with.
To change any of these settings later, edit /etc/rc.conf
[OK]Naciskamy Enter, aby przejść do kolejnego etapu konfiguracji.
Profil zabezpieczeń nie jest cudownym lekarstwem! Nawet, jeśli wybraliśmy najbardziej bezpieczny profil, musimy na bieżąco interesować się sprawami bezpieczeństwa systemu, czytając poświęcone im listy dyskusyjne (Mailing Lists),, stosując dobre hasła i przestrzegając ogólnych zasad bezpieczeństwa. Profil jest tylko wygodnym sposobem na przygotowanie podstawowych zabezpieczeń. |
Kilka opcji służy do konfiguracji konsoli systemowej.
                      User Confirmation Requested
       Would you like to customize your system console settings?

                              [ Yes ]  No
Aby zobaczyć i zmienić ustawienia, wybieramy yes i wciskamy Enter.
Często stosowaną opcją jest wygaszacz ekranu (screen saver). Klawiszami kursora wybieramy i naciskamy Enter.
Za pomocą klawiszy kursora wybieramy odpowiadający nam wygaszacz i wciskamy Enter. Ponownie pojawi się menu konfiguracji konsoli systemowej.
Przyjmowany domyślnie przedział czasu wynosi 300 sekund. Aby go zmienić, ponownie wybieramy . W menu opcji wygaszacza ekranu klawiszami kursora wybieramy i naciskamy Enter. Pojawi się okienko:
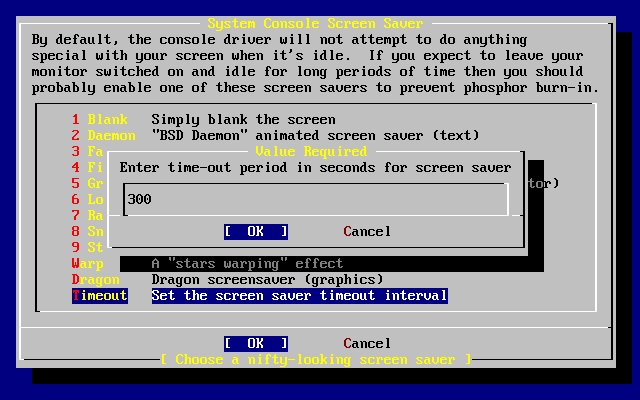
Wartość możemy zmienić, po czym wybieramy OK i wciskamy Enter, by wrócić do menu konfiguracji konsoli.
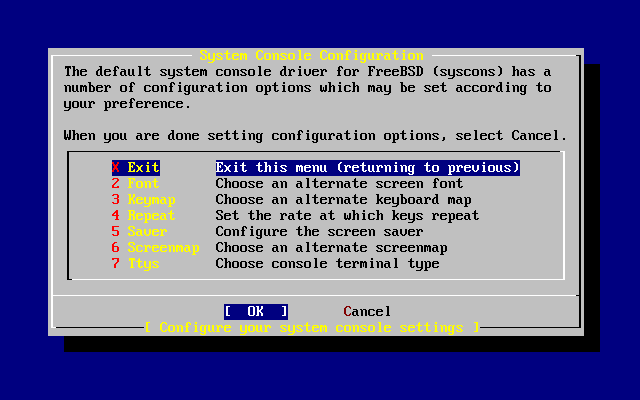
Wybieramy i naciskamy Enter, przechodząc do kolejnego etapu konfiguracji.
Dzięki ustawieniu strefy czasowej komputer będzie mógł automatycznie ustawiać zegar w przypadku zmiany czasu, jak również będzie prawidłowo wykonywać inne czynności związane ze strefą czasową.
W przykładzie mamy do czynienia z komputerem znajdującym się we wschodniej strefie czasowej Stanów Zjednoczonych. Rzeczywiste ustawienia będą zależeć od naszego położenia geograficznego.
                      User Confirmation Requested
          Would you like to set this machine's time zone now?

                            [ Yes ]   No
By ustawić strefę czasową, wybieramy yes i naciskamy Enter.
                       User Confirmation Requested
 Is this machine's CMOS clock set to UTC? If it is set to local time
 or you don't know, please choose NIE here!

                              Yes   [ No ]
Wybieramy yes lub no, w zależności od ustawienia zegara komputera, następnie wciskamy Enter.
Klawiszami kursora wybieramy odpowiedni region, po czym naciskamy Enter.
Przy użyciu klawiszy kursora wybieramy odpowiedni kraj i naciskamy Enter.
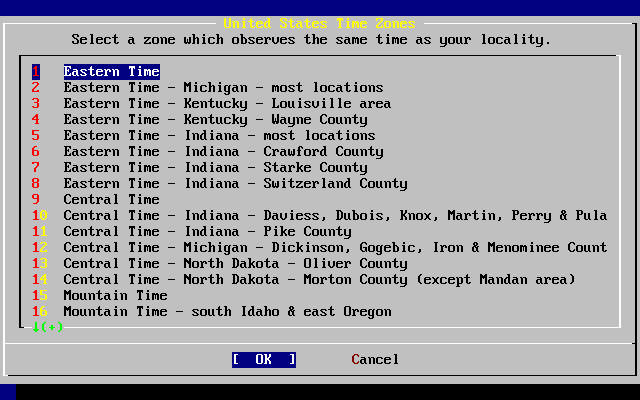
Klawiszami kursora wybieramy właściwą strefę czasową i wciskamy Enter.
                            Confirmation
            Does the abbreviation 'EDT' look reasonable?

                            [ Yes ]   No
Zostaniemy zapytani, czy skrót nazwy strefy czasowej jest prawidłowy. Jeśli tak, naciskamy Enter i przechodzimy do kolejnego etapu konfiguracji.
                      User Confirmation Requested
          Would you like to enable Linux binary compatibility?

                            [ Yes ]   No
Wybranie yes i naciśnięcie Enter pozwoli uruchamiać programy linuksowe we FreeBSD. Program instalacyjny dołączy pakiety obsługujące kompatybilność z Linuksem.
Jeśli instalujemy system przez FTP, komputer będzie potrzebować łączności z Internetem. Może się zdarzyć, że na serwerze ftp będzie brakowało pewnych składników, na przykład obsługujących kompatybilność z Linuksem. Można je jednak zainstalować później.
                      User Confirmation Requested
         Does this system have a non-USB mouse attached to it?

                            [ Yes ]    No
Wybieramy no, jeśli myszka podłączona jest przez USB, lub yes w przeciwnym wypadku i naciskamy Enter.
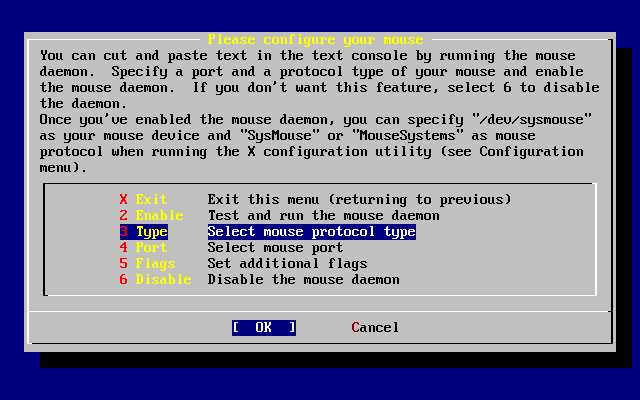
Klawiszami kursora wskazujemy i naciskamy Enter.
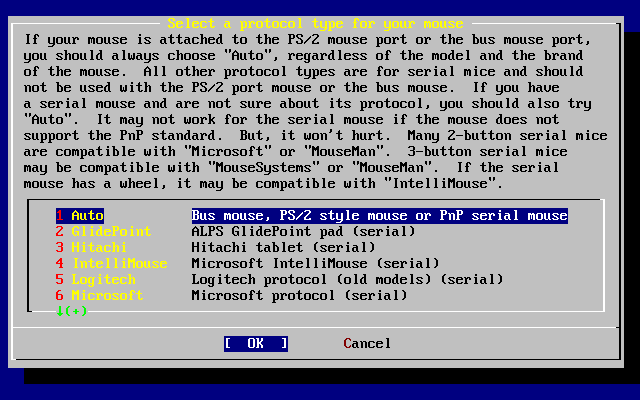
Myszka używana w przykładzie jest typu PS/2, wybrano więc domyślną opcję . Inny protokół wybieramy wskazując odpowiednią opcję klawiszami kursora. Upewniwszy się, że OK jest zaznaczone, naciskamy Enter i wracamy do poprzedniego menu.
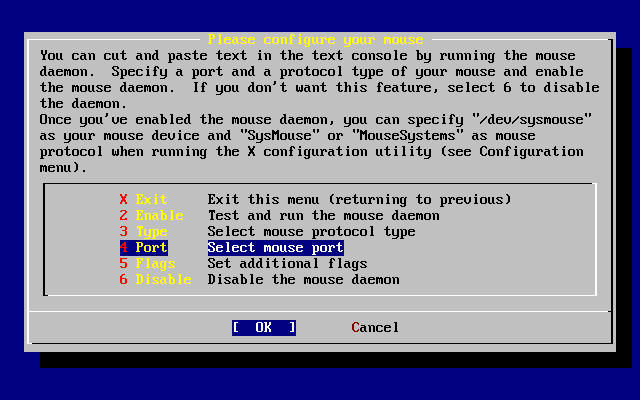
Za pomocą klawiszy kursora wybieramy i wciskamy Enter.
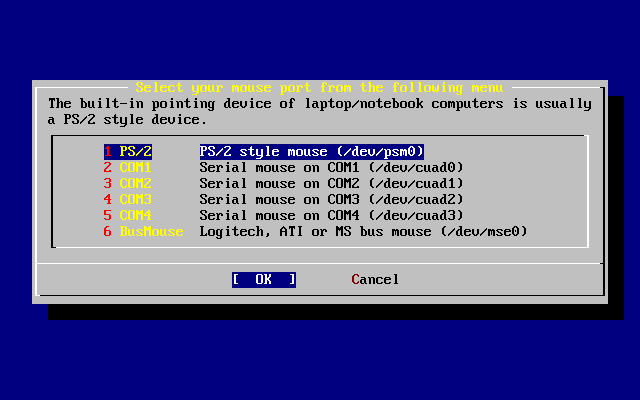
Ponieważ przykładowa myszka jest typu PS/2, zaznaczona została domyślna opcja . Klawiszami kursora możemy wybrać port, następnie naciskamy Enter.
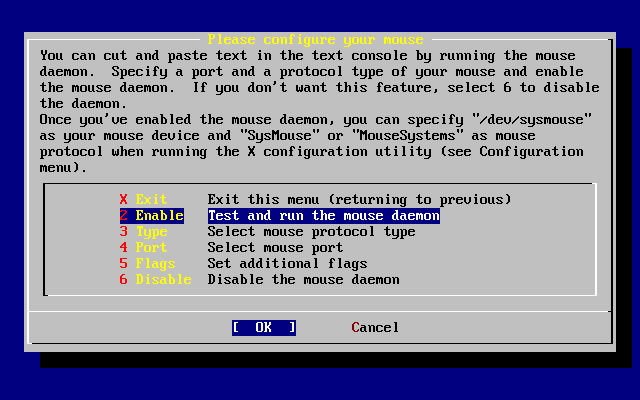
Na koniec wybieramy i naciskamy Enter by włączyć demona myszki i go przetestować.
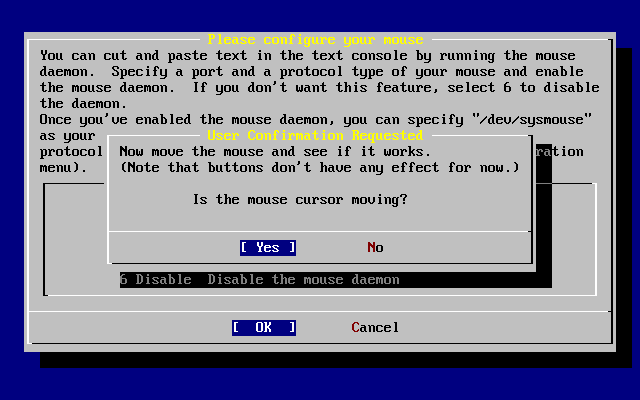
Następnie musimy poruszyć myszką i sprawdzić czy kursor porusza się we właściwy sposób po ekranie. Jeśli tak to wybieramy yes i wciskamy Enter. Jeśli nie myszka nie została właściwie skonfigurowana - wybieramy no i próbujemy innych ustawień myszy.
Wybieramy i wciskamy Enter, by zakończyć ten etap konfiguracji.
Konfiguracja usług sieciowych może być nużącym zadaniem dla początkujących użytkowników, szczególnie jeśli brak im wiedzy w tym zakresie. Możliwość pracy w sieci - także w Internecie - jest kluczowym elementem wszystkich współczesnych systemów operacyjnych, w tym również FreeBSD. Stąd też jest bardzo pomocnym mieć pojęcie o możliwościach pracy w sieci jakie oferuje FreeBSD. Poznanie tych jego możliwości już w trakcie instalacji pozwoli użytkownikom zrozumieć różne aspekty funkcjonowania usług sieciowych.
Usługi sieciowe są programami potrafiącymi przyjmować dane z dowolnej lokalizacji w sieci. Dlatego właśnie dokładanych jest wiele starań, by zagwarantować, że programy te nie uczynią nic "szkodliwego". Niestety, programiści nie są doskonali. W przeszłości zdarzały się sytuacje, w których atakujący wykorzystywali błędy w oprogramowaniu by wyrządzić szkodę systemowi. Stąd też jest bardzo istotnym by włączać tylko te usługi sieciowe, które są nam potrzebne. Jeśli nie jesteśmy pewni, najlepiej jest nie włączać danej usługi nim nie dowiemy się czy rzeczywiście jej potrzebujemy. Zawsze możemy ją aktywować później uruchamiając ponownie sysinstall bądź edytując plik /etc/rc.conf.
Wybranie opcji Networking spowoduje wyświetlenie menu zbliżonego do poniższego:
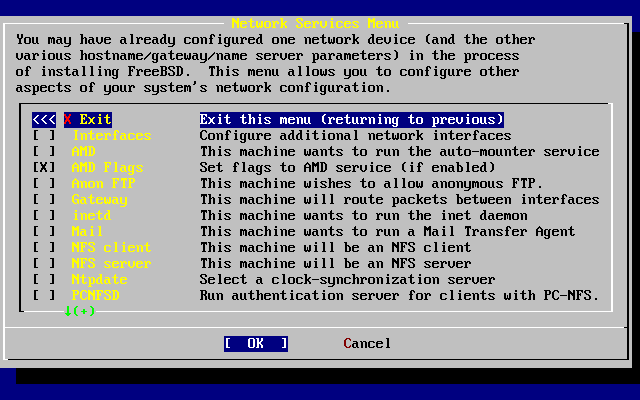
Pierwszą z dostępnych opcji - - opisuje bliżej Konfiguracja urządzeń sieciowych, dlatego też możemy ją teraz pominąć.
Wybór opcji włączy wsparcie dla narzędzia automatycznego montowania BSD (ang. Automatic Mount Utility). Opcja ta najczęściej jest wykorzystywana z protokołem NFS (patrz poniżej) do automatycznego montowania zdalnych systemów plików. Nie wymaga dodatkowej konfiguracji.
Kolejną opcją jest . Po jej wybraniu pojawi się menu, gdzie należy wprowadzić specyficzne flagi AMD. Menu zawiera już domyślne wartości:
-a /.amd_mnt -l syslog /host /etc/amd.map /net /etc/amd.mapFlaga -a określa domyślny punkt montowania, w tym wypadku /.amd_mnt. Flaga -l definiuje domyślny plik log dziennika systemowego; jeśli w systemie wykorzystywany jest demon syslogd, wówczas wszystkie komunikaty będą wysyłane właśnie do niego. Katalog /host jest wykorzystywany do montowania systemów plików wyeksportowanych ze zdalnej maszyny, podczas gdy katalog /net do montowania systemów plików z adresu IP. Plik /etc/amd.map zawiera domyślne wartości flag dla zasobów eksportowanych przez AMD.
Wybór opcji zezwala na anonimowe połączenia FTP, tym samym tworząc z naszego komputera anonimowy serwer FTP. Należy mieć jednak świadomość niebezpieczeństw jakie pociąga za sobą taka konfiguracja. Po wybraniu tej opcji pojawi się kolejne okienko wyjaśniające związane z nią niebezpieczeństwa oraz umożliwiające szczegółową konfigurację.
Menu pozwala skonfigurować naszą maszynę jako bramę, co zostało opisane wcześniej. Może być również wykorzystane do wyłączenia tej opcji jeśli przypadkowo została ona aktywowana w trakcie instalacji.
Opcja pozwala skonfigurować bądź całkowicie wyłączyć demonona inetd(8), który również został opisany wcześniej.
Opcja wykorzystywana jest do konfiguracji domyślnego systemowego serwera poczty MTA (ang. Mail Transfer Agent). Wybór tej opcji spowoduje wyświetlenie następującego menu:
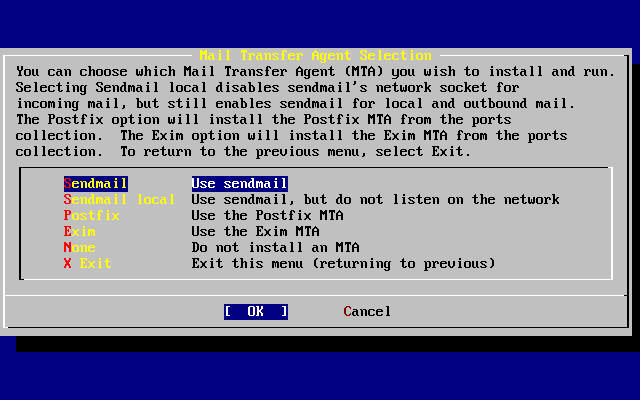
W menu tym mamy możliwość wyboru, który MTA zostanie zainstalowany jako domyślny. W praktyce MTA nie jest niczym więcej jak serwerem, który dostarcza pocztę elektroniczną do użytkowników lokalnego systemu bądź wysyła ją do Internetu.
Wybór opcji spowoduje instalację popularnego serwera sendmail. Serwer ten jest domyślnym serwerem we FreeBSD. Opcja również spowoduje wybór sendmail jako domyślnego MTA, jednakże bez możliwości odbierania poczty przychodzącej z Internetu. Pozostałe opcje i dają efekt analogiczny do - obydwa rozwiązania dostarczają pocztę. Tym nie mniej, niektórzy użytkownicy preferują te serwery jako alternatywę dla MTAsendmail.
Po wybraniu MTA, bądź pominięciu tego kroku, pojawi się ponownie okno konfiguracji sieci z kolejną opcją: .
Opcja pozwala skonfigurować system do komunikacji z serwerem za pomocą NFS. Serwer NFS udostępnia systemy plików innym maszynom w sieci za pomocą protokołu NFS. Jeśli nasza maszyna nie będzie pracowała w sieci można tą opcję pominąć. System może później wymagać dalszej konfiguracji. Network File System (NFS) zawiera szczegółowe informacje o konfiguracji klienta i serwera NFS.
Poniżej znajduje się opcja umożliwiająca skonfigurowanie systemu jako serwer NFS. Dodatkowo konfiguruje ona wymagane parametry dla usług RPC. RPC koordynuje połączenia pomiędzy maszynami i programami.
Kolejna opcja to , odpowiadająca za synchronizację czasu systemowego. Po wybraniu jej pojawi się następujące menu:
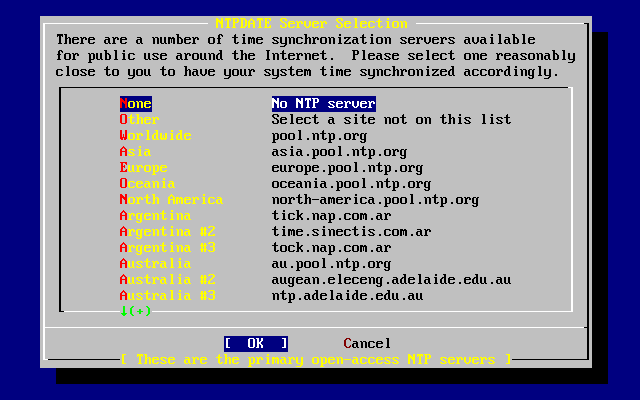
Z menu wybieramy najbliższy nam serwer. Wybór pobliskiego serwera gwarantuje dokładniejszą synchronizację czasu, z uwagi na fakt, że w komunikacji z bardziej oddalony serwerem mogą występować większe opóźnienia.
Kolejnym elementem jest wybór PCNFSD. Opcja ta zainstaluje net/pcnfsd z Kolekcji portów. Jest to przydatne narzędzie umożliwiające uwierzytelnianie NFS systemom operacyjnym, które same nie potrafią się uwierzytelnić, jak np. MS-DOS®.
Przewijając w dół pojawią się kolejne opcje:
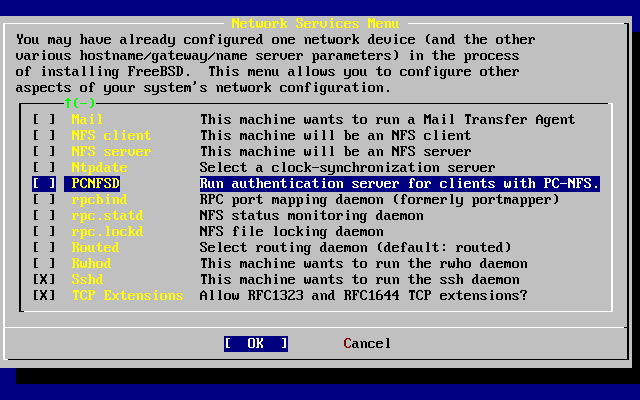
Programy rpcbind(8), rpc.statd(8) i rpc.lockd(8) wykorzystywane są przy połączeniach RPC (Remote Procedure Call). rpcbind zarządza komunikacją pomiędzy serwerem NFS i klientami, tym samym jest wymagany do poprawnego funkcjonowania serwera NFS. Demon rpc.statd wykorzystywany jest do komunikacji z innymi demonami rpc.statd w sieci, w celu monitorowania stanu maszyn, na których one pracują. Uzyskane w ten sposób informacje przechowywane są z reguły w pliku /var/db/statd.status. Kolejnym elementem jest , który udostępnia usługi blokowania plików. Z reguły, wykorzystywany jest w parze z rpc.statd do śledzenia, które maszyny wymagają blokowania i jak często. O ile dwie ostatnie usługi są idealne do debugowania, nie są one wymagane do poprawnego działania serwera NFS.
Kolejnym elementem na liście jest demon rutowania - . routed(8) zarządza tablicami rutingu sieci, wyszukuje rutery multicast i udostępnia na żądanie kopię tablic rutingu każdej maszynie w sieci. Wykorzystywany jest on z reguły na komputerach pracujących jako bramy dla sieci lokalnej. Po jego wybraniu pojawi się dodatkowe menu, w którym należy określić jego domyślną lokalizację. Wartość domyślna jest zdefiniowana i zostanie wybrana po naciśnięciu klawisza Enter. Następnie pojawi się kolejne menu, tym razem w celu ustawienia flag. Domyślną jest -q i powinna pojawić się na ekranie.
Kolejną opcją jest , której wybór włączy demona rwhod(8) w trakcie uruchamiania systemu. rwhod jest narzędziem, które regularnie rozsyła w sieci komunikaty systemowe bądź - w trybie "konsumenta" - zbiera je. Więcej informacji dostępnych jest w podręcznikach systemowych ruptime(1) i rwho(1).
Przedostatnim elementem na liście jest demon sshd(8). Jest to serwer OpenSSH, którego wykorzystanie jest zalecane w zamiast telnetu czy serwerów FTP. Serwer sshd jest wykorzystywany do zestawiania bezpiecznego połączenia pomiędzy dwoma maszynami wykorzystując połączenia szyfrowane.
Ostatnią na liście jest opcja Rozszerzeń TCP (). Włączenie jej umożliwia korzystanie z rozszerzeń TCP zdefiniowanych w RFC 1323 i RFC 1644. O ile na wielu komputerach pozwoli to na przyspieszenie komunikacji, o tyle może również spowodować odrzucanie niektórych połączeń. Stosowanie tej opcji nie jest zalecane dla serwerów, chodź może się okazać korzystne dla stacji roboczych.
Skończywszy konfigurację usług sieciowych możemy przewinąć do samej góry ekranu, do opcji i przejść do kolejnej części konfiguracji.
Począwszy od wersji FreeBSD 5.3-RELEASE, opcje konfiguracji serwera X zostały usunięte z sysinstall. Serwer X musimy zainstalować i skonfigurować po skończonej instalacji systemu. System okien X zawiera szczegółowe informacje odnośnie instalacji i konfiguracji serwera X. Jeśli nie instalujemy wersji wcześniejszej niż FreeBSD 5.3-RELEASE, możemy pomiąć tą sekcję. |
Chcąc korzystać z graficznego interfejsu użytkownika w rodzaju KDE, GNIEME lub innego, trzeba skonfigurować serwer X.
By uruchomić XFree86™ z poziomu użytkownika innego niż |
Aby sprawdzić, czy nasza karta graficzna jest obsługiwana, możemy zajrzeć na stronę WWW XFree86™.
                      User Confirmation Requested
        Would you like to configure your X server at this time?

                            [ Yes ]   No
Należy koniecznie znać dane techniczne monitora i karty graficznej. Nieprawidłowe ustawienia mogą spowodować uszkodzenie sprzętu. Jeśli nie dysponujemy tymi danymi, wybierzmy no i przystąpmy do konfiguracji serwera X po zainstalowaniu systemu, gdy już zaopatrzymy się w niezbędne dane. Do tego celu możemy wykorzystać |
Jeśli mamy dane techniczne karty graficznej i monitora, wybieramy yes i wciskamy Enter, rozpoczynając konfigurację serwera X.
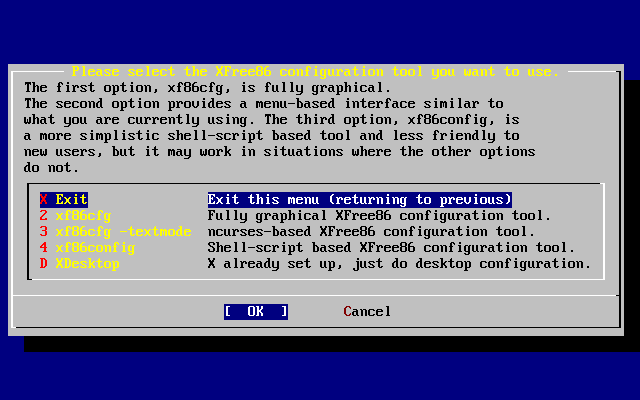
Serwer X można konfigurować na kilka sposobów. Wybieramy jedną z metod przy pomocy klawiszy kursora i naciskamy Enter. Pamiętajmy o uważnym czytaniu wszelkich poleceń pojawiających się na ekranie.
Wybór xf86cfg i xf86cfg -textmode może spowodować, że ekran stanie się ciemny, a uruchomienie może zająć kilka sekund. Bądźmy cierpliwi.
W poniższym przykładzie przedstawione będzie korzystanie z programu konfiguracyjnego xf86config. Wybierane przez nas opcje zależeć będą od wyposażenia naszego komputera, będą się więc zapewne różnić od opcji pokazanych w przykładzie:
                                Message
 You have configured and been running the mouse daemon.
 Choose "/dev/sysmouse" as the mouse port and "SysMouse" or
 "MouseSystems" as the mouse protocol in the X configuration utility.

                                 [ OK ]

                      [ Press enter to continue ]
Komunikat ten informuje o wykryciu skonfigurowanego wcześniej demona myszki. Naciskamy Enter, by przejść dalej.
Po uruchomieniu, xf86config wyświetli krótkie wprowadzenie:
This program will create a basic XF86Config file, based on menu selections you
make.

The XF86Config file usually resides in /usr/X11R6/etc/X11 or /etc/X11. A sample
XF86Config file is supplied with XFree86; it is configured for a standard
VGA card and monitor with 640x480 resolution. This program will ask for a
pathname when it is ready to write the file.

You can either take the sample XF86Config as a base and edit it for your
configuration, or let this program produce a base XF86Config file for your
configuration and fine-tune it.

Before continuing with this program, make sure you know what video card
you have, and preferably also the chipset it uses and the amount of video
memory on your video card. SuperProbe may be able to help with this.

Press enter to continue, or ctrl-c to abort.
Po naciśnięciu Enter przejdziemy do konfiguracji myszki. Pamiętajmy, by uważnie czytać polecenia i wybrać właściwy protokół myszki "Mouse Systems" i port myszki /dev/sysmouse, nawet jeśli w przykładzie wybierana jest myszka PS/2.
First specify a mouse protocol type. Choose one from the following list:

 1.  Microsoft compatible (2-button protocol)
 2.  Mouse Systems (3-button protocol) & FreeBSD moused protocol
 3.  Bus Mouse
 4.  PS/2 Mouse
 5.  Logitech Mouse (serial, old type, Logitech protocol)
 6.  Logitech MouseMan (Microsoft compatible)
 7.  MM Series
 8.  MM HitTablet
 9.  Microsoft IntelliMouse

If you have a two-button mouse, it is most likely of type 1, and if you have
a three-button mouse, it can probably support both protocol 1 and 2. There are
two main varieties of the latter type: mice with a switch to select the
protocol, and mice that default to 1 and require a button to be held at
boot-time to select protocol 2. Some mice can be convinced to do 2 by sending
a special sequence to the serial port (see the ClearDTR/ClearRTS options).

Enter a protocol number: 2

You have selected a Mouse Systems protocol mouse. If your mouse is normally
in Microsoft-compatible mode, enabling the ClearDTR and ClearRTS options
may cause it to switch to Mouse Systems mode when the server starts.

Please answer the following question with either 'y' or 'n'.
Do you want to enable ClearDTR and ClearRTS? n

You have selected a three-button mouse protocol. It is recommended that you
do not enable Emulate3Buttons, unless the third button doesn't work.

Please answer the following question with either 'y' or 'n'.
Do you want to enable Emulate3Buttons? y

Now give the full device name that the mouse is connected to, for example
/dev/tty00. Just pressing enter will use the default, /dev/mouse.
On FreeBSD, the default is /dev/sysmouse.

Mouse device: /dev/sysmouse
Kolejnym krokiem jest konfiguracja klawiatury. W przykładzie wybrana została typowa klawiatura o 101 klawiszach. Jako wariant nazwy możemy wybrać dowolną nazwę, lub po prostu nacisnąć Enter, akceptując proponowaną nazwę domyślną.
Please select one of the following keyboard types that is the better
description of your keyboard. If nothing really matches,
choose 1 (Generic 101-key PC)

  1  Generic 101-key PC
  2  Generic 102-key (Intl) PC
  3  Generic 104-key PC
  4  Generic 105-key (Intl) PC
  5  Dell 101-key PC
  6  Everex STEPnote
  7  Keytronic FlexPro
  8  Microsoft Natural
  9  Northgate OmniKey 101
 10  Winbook Model XP5
 11  Japanese 106-key
 12  PC-98xx Series
 13  Brazilian ABNT2
 14  HP Internet
 15  Logitech iTouch
 16  Logitech Cordless Desktop Pro
 17  Logitech Internet Keyboard
 18  Logitech Internet Navigator Keyboard
 19  Compaq Internet
 20  Microsoft Natural Pro
 21  Genius Comfy KB-16M
 22  IBM Rapid Access
 23  IBM Rapid Access II
 24  Chicony Internet Keyboard
 25  Dell Internet Keyboard

Enter a number to choose the keyboard.

1

Please select the layout corresponding to your keyboard

  1  U.S. English
  2  U.S. English w/ ISO9995-3
  3  U.S. English w/ deadkeys
  4  Albanian
  5  Arabic
  6  Armenian
  7  Azerbaidjani
  8  Belarusian
  9  Belgian
 10  Bengali
 11  Brazilian
 12  Bulgarian
 13  Burmese
 14  Canadian
 15  Croatian
 16  Czech
 17  Czech (qwerty)
 18  Danish

Enter a number to choose the country.
Press enter for the next page

1

Please enter a variant name for 'us' layout. Or just press enter
for default variant

us

Please answer the following question with either 'y' or 'n'.
Do you want to select additional XKB options (group switcher,
group indicator, etc.)? n
Następnie przystępujemy do konfiguracji monitora. Pamiętajmy, by nie przekroczyć dopuszczalnych wartości częstotliwości, ponieważ może to spowodować uszkodzenie monitora. W razie jakichkolwiek wątpliwości, odłóżmy konfigurację monitora do czasu, gdy będziemy już mieć niezbędne informacje.
Now we want to set the specifications of the monitor. The two critical
parameters are the vertical refresh rate, which is the rate at which the
whole screen is refreshed, and most importantly the horizontal sync rate,
which is the rate at which scanlines are displayed.

The valid range for horizontal sync and vertical sync should be documented
in the manual of your monitor. If in doubt, check the monitor database
/usr/X11R6/lib/X11/doc/Monitors to see if your monitor is there.

Press enter to continue, or ctrl-c to abort.

You must indicate the horizontal sync range of your monitor. You can either
select one of the predefined ranges below that correspond to industry-
standard monitor types, or give a specific range.

It is VERY IMPORTANT that you do not specify a monitor type with a horizontal
sync range that is beyond the capabilities of your monitor. If in doubt,
choose a conservative setting.

    hsync in kHz; monitor type with characteristic modes
 1  31.5; Standard VGA, 640x480 @ 60 Hz
 2  31.5 - 35.1; Super VGA, 800x600 @ 56 Hz
 3  31.5, 35.5; 8514 Compatible, 1024x768 @ 87 Hz interlaced (no 800x600)
 4  31.5, 35.15, 35.5; Super VGA, 1024x768 @ 87 Hz interlaced, 800x600 @ 56 Hz
 5  31.5 - 37.9; Extended Super VGA, 800x600 @ 60 Hz, 640x480 @ 72 Hz
 6  31.5 - 48.5; Non-Interlaced SVGA, 1024x768 @ 60 Hz, 800x600 @ 72 Hz
 7  31.5 - 57.0; High Frequency SVGA, 1024x768 @ 70 Hz
 8  31.5 - 64.3; Monitor that can do 1280x1024 @ 60 Hz
 9  31.5 - 79.0; Monitor that can do 1280x1024 @ 74 Hz
10  31.5 - 82.0; Monitor that can do 1280x1024 @ 76 Hz
11  Enter your own horizontal sync range

Enter your choice (1-11): 6

You must indicate the vertical sync range of your monitor. You can either
select one of the predefined ranges below that correspond to industry-
standard monitor types, or give a specific range. For interlaced modes,
the number that counts is the high one (e.g. 87 Hz rather than 43 Hz).

 1  50-70
 2  50-90
 3  50-100
 4  40-150
 5  Enter your own vertical sync range

Enter your choice: 2

You must now enter a few identification/description strings, namely an
identifier, a vendor name, and a model name. Just pressing enter will fill
in default names.

The strings are free-form, spaces are allowed.
Enter an identifier for your monitor definition: Hitachi
W kolejnym etapie wybieramy z listy sterownik karty graficznej. Jeśli przewijając listę niechcący ominiemy naszą kartę, naciskajmy dalej Enter, a lista zostanie powtórzona. W przykładzie pokazujemy tylko fragment listy:
Now we must configure video card specific settings. At this point you can
choose to make a selection out of a database of video card definitions.
Because there can be variation in Ramdacs and clock generators even
between cards of the same model, it is not sensible to blindly copy
the settings (e.g. a Device section). For this reason, after you make a
selection, you will still be asked about the components of the card, with
the settings from the chosen database entry presented as a strong hint.

The database entries include information about the chipset, what driver to
run, the Ramdac and ClockChip, and comments that will be included in the
Device section. However, a lot of definitions only hint about what driver
to run (based on the chipset the card uses) and are untested.

If you can't find your card in the database, there's nothing to worry about.
You should only choose a database entry that is exactly the same model as
your card; choosing one that looks similar is just a bad idea (e.g. a
GemStone Snail 64 may be as different from a GemStone Snail 64+ in terms of
hardware as can be).

Do you want to look at the card database? y

288  Matrox Millennium G200 8MB                        mgag200
289  Matrox Millennium G200 SD 16MB                    mgag200
290  Matrox Millennium G200 SD 4MB                     mgag200
291  Matrox Millennium G200 SD 8MB                     mgag200
292  Matrox Millennium G400                            mgag400
293  Matrox Millennium II 16MB                         mga2164w
294  Matrox Millennium II 4MB                          mga2164w
295  Matrox Millennium II 8MB                          mga2164w
296  Matrox Mystique                                   mga1064sg
297  Matrox Mystique G200 16MB                         mgag200
298  Matrox Mystique G200 4MB                          mgag200
299  Matrox Mystique G200 8MB                          mgag200
300  Matrox Productiva G100 4MB                        mgag100
301  Matrox Productiva G100 8MB                        mgag100
302  MediaGX                                           mediagx
303  MediaVision Proaxcel 128                          ET6000
304  Mirage Z-128                                      ET6000
305  Miro CRYSTAL VRX                                  Verite 1000

Enter a number to choose the corresponding card definition.
Press enter for the next page, q to continue configuration.

288

Your selected card definition:

Identifier: Matrox Millennium G200 8MB
Chipset:    mgag200
Driver:     mga
Do NIET probe clocks or use any Clocks line.

Press enter to continue, or ctrl-c to abort.

Now you must give information about your video card. This will be used for
the "Device" section of your video card in XF86Config.

You must indicate how much video memory you have. It is probably a good
idea to use the same approximate amount as that detected by the server you
intend to use. If you encounter problems that are due to the used server
not supporting the amount memory you have (e.g. ATI Mach64 is limited to
1024K with the SVGA server), specify the maximum amount supported by the
server.

How much video memory do you have on your video card:

 1  256K
 2  512K
 3  1024K
 4  2048K
 5  4096K
 6  Other

Enter your choice: 6

Amount of video memory in Kbytes: 8192

You must now enter a few identification/description strings, namely an
identifier, a vendor name, and a model name. Just pressing enter will fill
in default names (possibly from a card definition).

Your card definition is Matrox Millennium G200 8MB.

The strings are free-form, spaces are allowed.
Enter an identifier for your video card definition:
Następnie wybieramy tryby graficzne dla preferowanych rozdzielczości. Najczęściej używane są tryby 640x480, 800x600 i 1024x768, wybór zależy jednak od możliwości karty graficznej, rozmiarów monitora i oczekiwanej wygody pracy. Gdy będziemy wybierać głębię koloru, wybierzmy najwyższą wartość, którą obsługuje karta.
For each depth, a list of modes (resolutions) is defined. The default
resolution that the server will start-up with will be the first listed
mode that can be supported by the monitor and card.
Currently it is set to:

"640x480" "800x600" "1024x768" "1280x1024" for 8-bit
"640x480" "800x600" "1024x768" "1280x1024" for 16-bit
"640x480" "800x600" "1024x768" "1280x1024" for 24-bit

Modes that cannot be supported due to monitor or clock constraints will
be automatically skipped by the server.

 1  Change the modes for 8-bit (256 colors)
 2  Change the modes for 16-bit (32K/64K colors)
 3  Change the modes for 24-bit (24-bit color)
 4  The modes are OK, continue.

Enter your choice: 2

Select modes from the following list:

 1  "640x400"
 2  "640x480"
 3  "800x600"
 4  "1024x768"
 5  "1280x1024"
 6  "320x200"
 7  "320x240"
 8  "400x300"
 9  "1152x864"
 a  "1600x1200"
 b  "1800x1400"
 c  "512x384"

Please type the digits corresponding to the modes that you want to select.
For example, 432 selects "1024x768" "800x600" "640x480", with a
default mode of 1024x768.

Which modes? 432

You can have a virtual screen (desktop), which is screen area that is larger
than the physical screen and which is panned by moving the mouse to the edge
of the screen. If you don't want virtual desktop at a certain resolution,
you cannot have modes listed that are larger. Each color depth can have a
differently-sized virtual screen

Please answer the following question with either 'y' or 'n'.
Do you want a virtual screen that is larger than the physical screen? n

For each depth, a list of modes (resolutions) is defined. The default
resolution that the server will start-up with will be the first listed
mode that can be supported by the monitor and card.
Currently it is set to:

"640x480" "800x600" "1024x768" "1280x1024" for 8-bit
"1024x768" "800x600" "640x480" for 16-bit
"640x480" "800x600" "1024x768" "1280x1024" for 24-bit

Modes that cannot be supported due to monitor or clock constraints will
be automatically skipped by the server.

 1  Change the modes for 8-bit (256 colors)
 2  Change the modes for 16-bit (32K/64K colors)
 3  Change the modes for 24-bit (24-bit color)
 4  The modes are OK, continue.

Enter your choice: 4

Please specify which color depth you want to use by default:

  1  1 bit (monochrome)
  2  4 bits (16 colors)
  3  8 bits (256 colors)
  4  16 bits (65536 colors)
  5  24 bits (16 million colors)

Enter a number to choose the default depth.

4
Przygotowaną konfigurację należy zachować. Upewnijmy się, że konfiguracja zostanie zapisana w pliku o nazwie /etc/X11/XF86Config.
I am going to write the XF86Config file now. Make sure you don't accidently
overwrite a previously configured one.

Shall I write it to /etc/X11/XF86Config? y
Jeśli z jakichś przyczyn konfiguracja nie powiedzie się, możemy zacząć ją od początku, wybierając yes, gdy pojawi się następujący komunikat:
          User Confirmation Requested
The XFree86 configuration process seems to have
failed.  Would you like to try again?

             [ Yes ]         No
Jeżeli konfiguracja XFree86™ sprawia problemy, wybierzmy no i naciśnijmy Enter, by kontynuować instalację. Po jej zakończeniu będziemy mogli uruchomić program konfiguracyjny poleceniem xf86cfg -textmode lub xf86config, wydanym jako root. System okien X prezentuje inną metodę konfiguracji XFree86™ . Jeśli zdecydujemy się pominąć na razie konfigurację XFree86™, kolejnym krokiem będzie wybór pakietów.
Domyślnie serwer X może zostać unicestwiony kombinacją klawiszy Ctrl+Alt+Backspace. Możemy z niej skorzystać, jeśli coś jest nie w porządku z ustawieniami serwera i chcemy uniknąć uszkodzenia sprzętu.
Podczas pracy serwera X można zmieniać tryb graficzny, używając kombinacji klawiszy Ctrl+Alt++ lub Ctrl+Alt+-.
Po zakończeniu instalacji można wyregulować wysokość, szerokość i położenie obrazu przy użyciu xvidtune, po uruchomieniu XFree86™.
Zwracajmy uwagę na ostrzeżenia o możliwości uszkodzenia sprzętu poprzez niewłaściwe ustawienia. Nie róbmy niczego, czego nie jesteśmy pewni. Zamiast używać xvidtune, możemy dostroić ekran X Window korzystając z regulatorów monitora. Mogą się pojawić pewne różnice w wyświetlaniu obrazu przy powraceniu do trybu tekstowego, lepsze to jednak niż uszkodzenie sprzętu.
Przed dokonaniem jakichkolwiek zmian zapoznajmy się z dokumentacją xvidtune(1).
Jeżeli konfiguracja XFree86™ przebiegła pomyślnie, przejdziemy do kolejnego etapu, w którym wybierzemy menedżera okien.
Począwszy od wersji FreeBSD 5.3-RELEASE, opcje wyboru środowiska graficznego zostały usunięte z sysinstall. Musimy je skonfigurować po skończonej instalacji systemu. System okien X zawiera szczegółowe informacje odnośnie instalacji i konfiguracji środowiska graficznego. Jeśli nie instalujemy wersji wcześniejszej niż FreeBSD 5.3-RELEASE, możemy pomiąć tą sekcję. |
Dostepnych jest wiele różnych menedżerów okien, poczynając od najprostszych, zapewniających jedynie podstawowe funkcje, do rozbudowanych środowisk wyposażonych w pokaźny zestaw oprogramowania. Niektórym wystarczy nieznaczna przestrzeń na dysku i niewiele pamięci, inne natomiast mogą mieć znacznie większe wymagania. Dobrze jest wypróbować kilka różnych menedżerów i wybrać spośród nich ten, który najbardziej nam odpowiada. Są one dostępne w Kolekcji portów lub w postaci pakietów, można je więc instalować po zainstalowaniu systemu.
Możemy wybrać jeden z popularnych menedżerów okien i zainstalować go jako domyślny. Dzięki temu będziemy mieć możliwość uruchomienia go zaraz po zakończeniu instalacji.
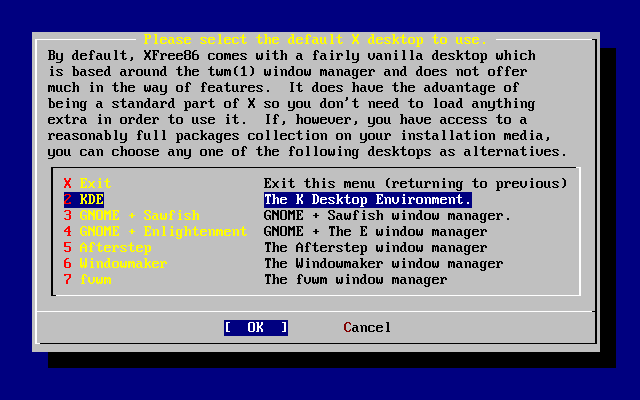
Klawiszami kursora wybieramy jedną z opcji i wciskamy Enter. Wybrany menedżer okien zostanie zainstalowany.
Pakiety to skompilowane programy, które można w łatwy sposób instalować.
W poniższym przykładzie pokazana jest instalacja jednego pakietu. Możemy oczywiście zainstalować więcej pakietów. Gdy system będzie już zainstalowany, kolejne pakiety będzie można dodawać przy użyciu sysinstall (/stand/sysinstall w wersjach FreeBSD wcześniejszych niż 5.2).
                     User Confirmation Requested
 The FreeBSD package collection is a collection of hundreds of
 ready-to-run applications, from text editors to games to WEB servers
 and more. Would you like to browse the collection now?

                            [ Yes ]   No
Jeśli wybierzemy yes i naciśniemy Enter, przejdziemy do ekranu wyboru pakietów:
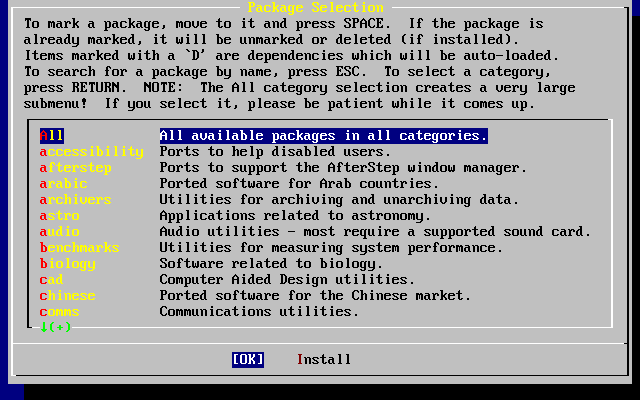
W danej chwili dostępne do instalacji są jedynie pakiety z bieżącego nośnika.
Możemy wybrać jedną z kategorii pakietów albo , by wyświetlone zostały wszystkie dostępne pakiety. Wybraną opcję wskazujemy przy użyciu klawiszy kursora i wciskamy Enter.
Pokazana zostanie lista pakietów dostępnych w wybranej kategorii:
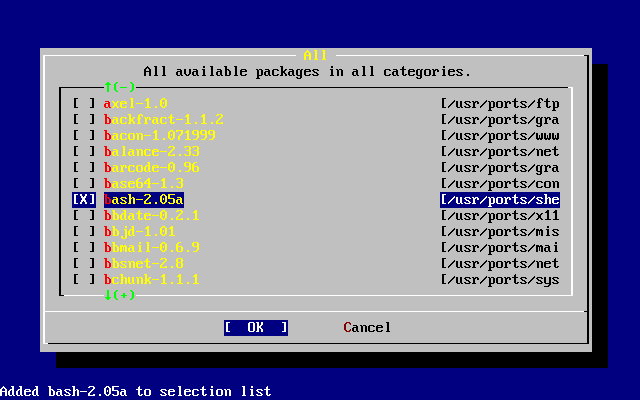
Dla przykładu zaznaczona została powłoka bash. Możemy wybrać tyle pakietów, ile nam się podoba, zaznaczając każdy z nich Space. Krótki opis pakietu wyświetlany jest w lewym dolnym rogu ekranu.
Klawiszem Tab możemy przełączać się między ostatnio wybranym pakietem, przyciskami OK i Cancel.
Po zaznaczeniu wszystkich wybranych pakietów naciskamy Tab, by zaznaczyć OK i naciskamy Enter, powracając w ten sposób do menu wyboru pakietów.
Do przełączania się między OK i Cancel mogą również służyć klawisze kursora. Za ich pomocą możemy wybrać OK, a następnie nacisnąć Enter, by wrócić do menu wyboru pakietów.

Klawiszami kursora i Tab wybieramy Install i wciskamy Enter. Pojawi się prośba o potwierdzenie chęci zainstalowania pakietów:
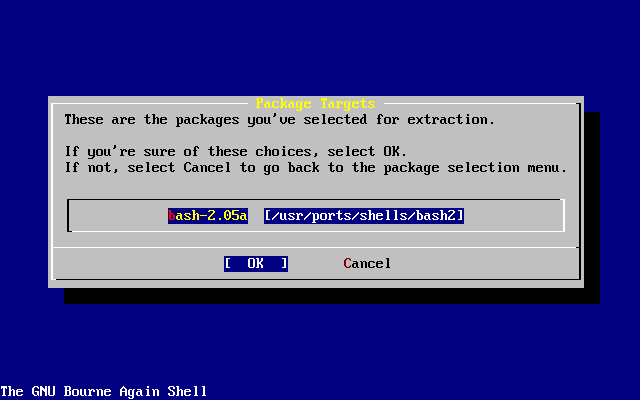
Gdy wybierzemy OK i naciśniemy Enter, rozpocznie się instalacja pakietów. Aż do jej zakończenia będą pokazywane komunikaty o przebiegu instalacji. Jeżeli pojawią się informacje o jakichkolwiek problemach, zanotujmy je.
Po zainstalowaniu pakietów wracamy do konfiguracji systemu. Nawet jeśli nie wybraliśmy żadnych pakietów i chcemy wrócić do końcowej konfiguracji wybieramy opcję Install.
Powinniśmy założyć przynajmniej jedno konto użytkownika, by móc korzystać z systemu nie będąc zalogowanym jako root. Główna partycja jest zwykle niewielka, więc korzystanie z aplikacji jako root może ją szybko zapełnić. Inny powód wymieniony został w poniższym komunikacie:
                     User Confirmation Requested
 Would you like to add any initial user accounts to the system? Adding
 at least one account for yourself at this stage is suggested since
 working as the "root" user is dangerous (it is easy to do things which
 adversely affect the entire system).

                            [ Yes ]   No
Wybieramy yes i naciskamy Enter, by dodać użytkownika.
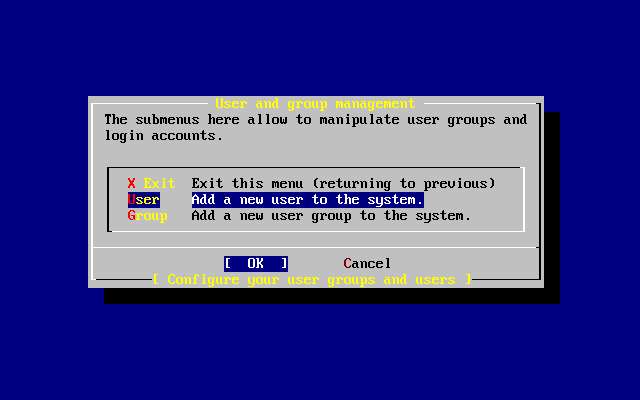
Klawiszamy kursora wybieramy (użytkownik) i wciskamy Enter.
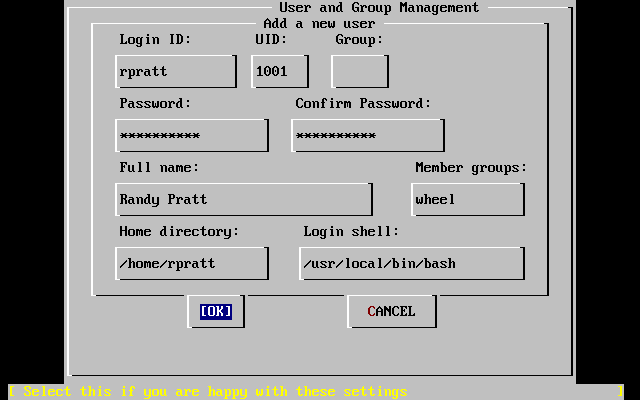
Kolejne pola wybieramy klawiszem Tab. W dolnej części ekranu pojawiać się będą następujące opisy, pomocne przy wprowadzaniu poszczególnych danych:
Nazwa nowego użytkownika (obowiązkowa).
Numer będący identyfikatorem użytkownika (wypełniany automatycznie, jeśli pole pozostanie puste).
Nazwa podstawowej grupy użytkownika (wybierana automatycznie, jeśli pole pozostanie puste).
Hasło użytkownika (wpisujmy je uważnie!).
Nazwisko użytkownika (komentarz).
Grupy, których członkiem będzie użytkownik (czyli dostanie ich uprawnienia).
Domowy katalog użytkownika (wpisywany automatycznie, jeśli pole pozostanie puste).
Powłoka uruchamiana po zalogowaniu się (wybierana automatycznie, jeśli pole pozostanie puste, np. /bin/sh).
W przykładzie powłoka została zmieniona z /bin/sh na /usr/local/bin/bash, aby korzystać z powłoki bash zainstalowanej wcześniej jako pakiet. Nie wpisujmy tu powłoki, która nie istnieje, gdyż uniemożliwi to zalogowanie się. Najpopularniejszą powłoką w świecie BSD jest powłoka C, czyli /bin/tcsh.
Użytkownik został dopisany do grupy wheel, dzięki czemu będzie mógł uzyskiwać uprawnienia użytkownika root.
Gdy skończymy, wybieramy OK. Ponownie pojawi się menu zarządzania użytkownikami i grupami:
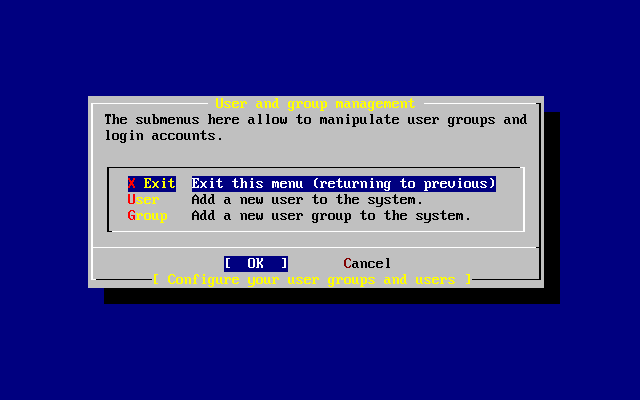
W podobny sposób możemy od razu utworzyć dodatkowe grupy, jeśli zajdzie taka potrzeba. Gdy system będzie już zainstalowany, będziemy mogli dodawać grupy przy użyciu sysinstall (/stand/sysinstall w wersjach FreeBSD starszych niż 5.2).
Gdy skończymy dodawanie użytkowników wybieramy klawiszami kursora i wciskamy Enter, by kontynuować instalację.
root Message
Now you must set the system manager's password.
This is the password you'll use to log in as "root".
[ OK ]
[ Press enter to continue ]Wciskamy Enter, aby ustawić hasło roota.
Hasło musi być prawidłowo podane dwukrotnie. Rzecz jasna, powinniśmy zadbać o to, by łatwo odnaleźć hasło, gdy zdarzy się nam je zapomnieć. Zwróćmy uwagę, że w trakcie wpisywania hasła nie pojawią się żadne znaki, nawet gwiazdki.
Changing local password for root.
New password :
Retype new password :
Po pomyślnym wprowadzeniu hasła przejdziemy do kolejnego etapu instalacji.
Jeżeli będziemy chcieli skonfigurować dodatkowe urządzenia sieciowe, lub wprowadzić inne zmiany w konfiguracji systemu, możemy to zrobić w tym właśnie momencie, lub też po zakończeniu instalacji za pośrednictwem sysinstall (/stand/sysinstall w wersjach FreeBSD wcześniejszych niż 5.2).
                     User Confirmation Requested
 Visit the general configuration menu for a chance to set any last
 options?

                              Yes   [ No ]
Wybieramy klawiszami kursora no i wciskamy Enter, by powrócić do głównego menu instalacji.
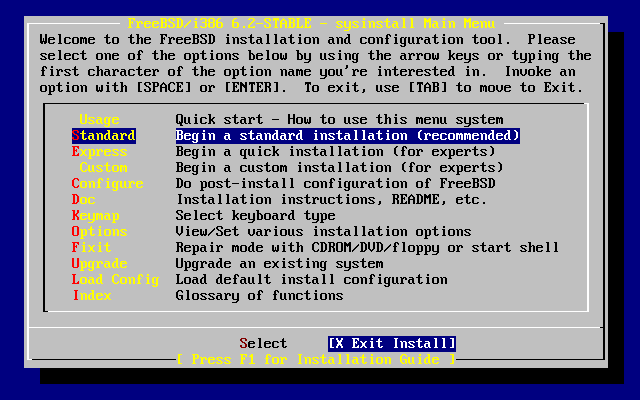
Przy pomocy klawiszy kursora wybieramy X Exit Install i naciskamy Enter. Pojawi się prośba o potwierdzenie chęci zakończenia instalacji:
                     User Confirmation Requested
 Are you sure you wish to exit? The system will reboot (be sure to
 remove any floppies from the drives).

                            [ Yes ]   No
Wybieramy yes. Jeżeli uruchamialiśmy komputer z dyskietki, wyjmujemy ją. Napęd CDROM będzie zablokowany aż do chwili, gdy komputer zacznie się ponownie uruchamiać. Wtedy napęd zostanie odblokowany i będzie można wyjąć z niego płytę (szybko).
Komputer zostanie ponownie uruchomiony. Zwróćmy uwagę na ewentualne komunikaty o błędach.
Jeżeli wszystko przebiegło prawidłowo, na ekranie zobaczymy serię kolejno pojawiających się komunikatów, a na koniec będziemy mogli się zalogować. Komunikaty możemy przeczytać naciskając Scroll-Lock, następnie przewijając ekran klawiszami PgUp i PgDn. Ponownie naciskając Scroll-Lock powracamy do komunikatu logowania.
Być może nie będziemy mogli zobaczyć wszystkich komunikatów (ograniczony rozmiar bufora), jednak można je przejrzeć po zalogowaniu się, wpisując dmesg w linii poleceń.
Zalogujmy się, wpisując nazwę użytkownika i hasło wybrane podczas instalacji (w naszym przykładzie rpratt). Jako root powinniśmy logować się tylko wtedy, gdy jest to konieczne.
Typowe komunikaty pokazywane podczas uruchamiania systemu (pominięto informacje o wersji):
Copyright (c) 1992-2002 The FreeBSD Project.
Copyright (c) 1979, 1980, 1983, 1986, 1988, 1989, 1991, 1992, 1993, 1994
        The Regents of the University of California. All rights reserved.

Timecounter "i8254"  frequency 1193182 Hz
CPU: AMD-K6(tm) 3D processor (300.68-MHz 586-class CPU)
  Origin = "AuthenticAMD"  Id = 0x580  Stepping = 0
  Features=0x8001bf<FPU,VME,DE,PSE,TSC,MSR,MCE,CX8,MMX>
  AMD Features=0x80000800<SYSCALL,3DNow!>
real memory  = 268435456 (262144K bytes)
config> di sn0
config> di lnc0
config> di le0
config> di ie0
config> di fe0
config> di cs0
config> di bt0
config> di aic0
config> di aha0
config> di adv0
config> q
avail memory = 256311296 (250304K bytes)
Preloaded elf kernel "kernel" at 0xc0491000.
Preloaded userconfig_script "/boot/kernel.conf" at 0xc049109c.
md0: Malloc disk
Using $PIR table, 4 entries at 0xc00fde60
npx0: <math processor> on motherboard
npx0: INT 16 interface
pcib0: <Host to PCI bridge> on motherboard
pci0: <PCI bus> on pcib0
pcib1: <VIA 82C598MVP (Apollo MVP3) PCI-PCI (AGP) bridge> at device 1.0 on pci0
pci1: <PCI bus> on pcib1
pci1: <Matrox MGA G200 AGP graphics accelerator> at 0.0 irq 11
isab0: <VIA 82C586 PCI-ISA bridge> at device 7.0 on pci0
isa0: <ISA bus> on isab0
atapci0: <VIA 82C586 ATA33 controller> port 0xe000-0xe00f at device 7.1 on pci0
ata0: at 0x1f0 irq 14 on atapci0
ata1: at 0x170 irq 15 on atapci0
uhci0: <VIA 83C572 USB controller> port 0xe400-0xe41f irq 10 at device 7.2 on pci0
usb0: <VIA 83C572 USB controller> on uhci0
usb0: USB revision 1.0
uhub0: VIA UHCI root hub, class 9/0, rev 1.00/1.00, addr 1
uhub0: 2 ports with 2 removable, self powered
chip1: <VIA 82C586B ACPI interface> at device 7.3 on pci0
ed0: <NE2000 PCI Ethernet (RealTek 8029)> port 0xe800-0xe81f irq 9 at
device 10.0 on pci0
ed0: address 52:54:05:de:73:1b, type NE2000 (16 bit)
isa0: too many dependant configs (8)
isa0: unexpected small tag 14
fdc0: <NEC 72065B or clone> at port 0x3f0-0x3f5,0x3f7 irq 6 drq 2 on isa0
fdc0: FIFO enabled, 8 bytes threshold
fd0: <1440-KB 3.5" drive> on fdc0 drive 0
atkbdc0: <keyboard controller (i8042)> at port 0x60-0x64 on isa0
atkbd0: <AT Keyboard> flags 0x1 irq 1 on atkbdc0
kbd0 at atkbd0
psm0: <PS/2 Mouse> irq 12 on atkbdc0
psm0: model Generic PS/2 mouse, device ID 0
vga0: <Generic ISA VGA> at port 0x3c0-0x3df iomem 0xa0000-0xbffff on isa0
sc0: <System console> at flags 0x1 on isa0
sc0: VGA <16 virtual consoles, flags=0x300>
sio0 at port 0x3f8-0x3ff irq 4 flags 0x10 on isa0
sio0: type 16550A
sio1 at port 0x2f8-0x2ff irq 3 on isa0
sio1: type 16550A
ppc0: <Parallel port> at port 0x378-0x37f irq 7 on isa0
ppc0: SMC-like chipset (ECP/EPP/PS2/NIBBLE) in COMPATIBLE mode
ppc0: FIFO with 16/16/15 bytes threshold
ppbus0: IEEE1284 device found /NIBBLE
Probing for PnP devices on ppbus0:
plip0: <PLIP network interface> on ppbus0
lpt0: <Printer> on ppbus0
lpt0: Interrupt-driven port
ppi0: <Parallel I/O> on ppbus0
ad0: 8063MB <IBM-DHEA-38451> [16383/16/63] at ata0-master using UDMA33
ad2: 8063MB <IBM-DHEA-38451> [16383/16/63] at ata1-master using UDMA33
acd0: CDROM <DELTA OTC-H101/ST3 F/W by OIPD> at ata0-slave using PIO4
Mounting root from ufs:/dev/ad0s1a
swapon: adding /dev/ad0s1b as swap device
Automatic boot in progress...
/dev/ad0s1a: FILESYSTEM CLEAN; SKIPPING CHECKS
/dev/ad0s1a: clean, 48752 free (552 frags, 6025 blocks, 0.9% fragmentation)
/dev/ad0s1f: FILESYSTEM CLEAN; SKIPPING CHECKS
/dev/ad0s1f: clean, 128997 free (21 frags, 16122 blocks, 0.0% fragmentation)
/dev/ad0s1g: FILESYSTEM CLEAN; SKIPPING CHECKS
/dev/ad0s1g: clean, 3036299 free (43175 frags, 374073 blocks, 1.3% fragmentation)
/dev/ad0s1e: filesystem CLEAN; SKIPPING CHECKS
/dev/ad0s1e: clean, 128193 free (17 frags, 16022 blocks, 0.0% fragmentation)
Doing initial network setup: hostname.
ed0: flags=8843<UP,BROADCAST,RUNNING,SIMPLEX,MULTICAST> mtu 1500
        inet 192.168.0.1 netmask 0xffffff00 broadcast 192.168.0.255
        inet6 fe80::5054::5ff::fede:731b%ed0 prefixlen 64 tentative scopeid 0x1
        ether 52:54:05:de:73:1b
lo0: flags=8049<UP,LOOPBACK,RUNNING,MULTICAST> mtu 16384
        inet6 fe80::1%lo0 prefixlen 64 scopeid 0x8
        inet6 ::1 prefixlen 128
        inet 127.0.0.1 netmask 0xff000000
Additional routing options: IP gateway=TAK TCP keepalive=TAK
routing daemons:.
additional daemons: syslogd.
Doing additional network setup:.
Starting final network daemons: creating ssh RSA host key
Generating public/private rsa1 key pair.
Your identification has been saved in /etc/ssh/ssh_host_key.
Your public key has been saved in /etc/ssh/ssh_host_key.pub.
The key fingerprint is:
cd:76:89:16:69:0e:d0:6e:f8:66:d0:07:26:3c:7e:2d root@k6-2.example.com
 creating ssh DSA host key
Generating public/private dsa key pair.
Your identification has been saved in /etc/ssh/ssh_host_dsa_key.
Your public key has been saved in /etc/ssh/ssh_host_dsa_key.pub.
The key fingerprint is:
f9:a1:a9:47:c4:ad:f9:8d:52:b8:b8:ff:8c:ad:2d:e6 root@k6-2.example.com.
setting ELF ldconfig path: /usr/lib /usr/lib/compat /usr/X11R6/lib
/usr/local/lib
a.out ldconfig path: /usr/lib/aout /usr/lib/compat/aout /usr/X11R6/lib/aout
starting standard daemons: inetd cron sshd usbd sendmail.
Initial rc.i386 initialization:.
rc.i386 configuring syscons: blank_time screensaver moused.
Additional ABI support: linux.
Local package initialization:.
Additional TCP options:.

FreeBSD/i386 (k6-2.example.com) (ttyv0)

login: rpratt
Password:
Generowanie kluczy RSA i DSA na niezbyt szybkich komputerach może zająć nieco czasu. Dzieje się to tylko podczas pierwszego uruchomienia nowo zainstalowanego systemu. Następne ładowanie systemu będzie już odbywać się szybciej.
Jeśli skonfigurowaliśmy serwer X i wybraliśmy menedżera okien, możemy uruchomić go wpisując startx w linii poleceń.
Po zakończeniu instalacji będziemy mogli uruchomić FreeBSD, wpisując następujące polecenie w konsoli SRM:
>>>BOOT DKC0Nakazuje ono oprogramowaniu sprzętowemu uruchomić system z określonego dysku. By FreeBSD było automatycznie uruchamiane przy włączeniu komputera, wpisujemy poniższe polecenia:
>>> SET BOOT_OSFLAGS A
>>> SET BOOT_FILE ''
>>> SET BOOTDEF_DEV DKC0
>>> SET AUTO_ACTION BOOT
Komunikaty pokazywane podczas ładowania systemu będą podobne (choć nie identyczne) do komunikatów pokazywanych na i386™.
Właściwe wyłączenie systemu operacyjnego jest istotną sprawą. Nie należy po prostu wyłączać komputera. Powinniśmy najpierw uzyskać prawa administratora, wpisując w linii poleceń su i podając hasło roota; może to zrobić tylko użytkownik należący do grupy wheel. Możemy także po prostu zalogować się jako root. Następnie wydajemy polecenie shutdown -h now.
The operating system has halted.
Please press any key to reboot.
Po takim wyłączeniu systemu i pojawieniu się komunikatu "Please press any key to reboot" (Naciśnij dowolny klawisz by ponownie uruchomić system), można już wyłączyć komputer. Naciśnięcie dowolnego klawisza spowoduje ponownie uruchomienie systemu.
Inny sposobem ponownego uruchomienia systemu jest kombinacja klawiszy Ctrl+Alt+Del, jednak w normalnych warunkach korzystanie z niej nie jest zalecane.
W obecnej chwili FreeBSD działa na komputerach z magistralami ISA, VLB, EISA i PCI wyposażonych w procesory Intel, AMD, Cyrix lub NexGen "x86", jak również na komputerach z procesorem Compaq Alpha. Obsługiwane są także dyski IDE i ESDI, rozmaite kontrolery SCSI, karty PCMCIA, urządzenia USB oraz karty sieciowe i szeregowe. FreeBSD pracuje także z szyną microchannel (MCA) firmy IBM.
Lista obsługiwanych urządzeń dołączona jest do każdego wydania FreeBSD w dokumencie FreeBSD Hardware Notes. Można go zwykle znaleźć w pliku HARDWARE.TXT, umieszczonym bezpośrednio w głównym katalogu płyty CDROM lub na serwerze FTP, bądź w menu dokumentacji sysinstall. Na liście zebrano urządzenia, które poprawnie współpracują z FreeBSD. Kopie tej listy dla różnych wydań systemu i różnych architektur można także znaleźć na podstronie Release Information na stronie WWW FreeBSD.
W tej części opisujemy, jak radzić sobie z podstawowymi problemami spotykanymi podczas instalacji. W kilku pytaniach i odpowiedziach omawiamy także możliwość uruchamiania FreeBSD i MS-DOS® na tym samym komputerze.
Ze względu na rozmaite ograniczenia architektury PC, rozpoznawanie urządzeń może niekiedy sprawiać problemy. Można jednak spróbować sobie z nimi poradzić
Zapoznajmy się z dokumentem Hardware Notes, by mieć pewność, że nasze urządzenia są obsługiwane przez FreeBSD.
Jeśli wciąż występują problemy, mimo, że nasz sprzęt jest obsługiwany, powinniśmy ponownie uruchomić komputer i wybrać opcję wizualnej konfiguracji jądra (visual kernel configuration). Będziemy mieć możliwość przejrzenia naszych urządzeń i podania systemowi informacji o nich. Jądro uruchamiane z dyskietki startowej zakłada, że większość urządzeń skonfigurowanych jest z fabrycznymi ustawieniami IRQ, portów we/wy i kanałów DMA. Jeśli konfiguracja naszego sprzętu jest odmienna, zapewne będziemy musieli poinformować o tym FreeBSD, odpowiednio modyfikując konfigurację.
Może się zdarzyć, że próba rozpoznania urządzenia nieistniejącego spowoduje kłopoty z późniejszym rozpoznawaniem urządzeń rzeczywiście zainstalowanych w komputerze. W takim wypadku powinniśmy wyłączyć sterowniki powodujące konflikty.
Pewnych problemów z instalacją można uniknąć dzięki instalacji nowszego oprogramowania sprzętowego (ang. firmware) urządzenia, zwykle płyty głównej. Oprogramowanie sprzętowe płyty głównej znane jest pod nazwą BIOS. Większość producentów płyt głównych lub komputerów umieszcza informacje o nowych wersjach oprogramowania na swoich stronach WWW. Producenci zwykle stanowczo odradzają instalowanie nowego BIOS-u, oprócz sytuacji, w których jest to uzasadnione, na przykład w przypadku wykrycia poważnego błędu. Instalacja nowszej wersji może się nie udać, powodując trwałe uszkodzenie układu BIOS. |
Nie należy wyłączać sterowników potrzebnych podczas instalacji, na przykład sterownika ekranu (sc0). Jeżeli po zakończeniu konfiguracji jądra instalacja w tajemniczy sposób zastyga lub przerywa pracę, zapewne usunęliśmy lub zmodyfikowaliśmy coś, co nie powinno być ruszane. Musimy ponownie uruchomić komputer i spróbować jeszcze raz. |
Podczas konfiguracji możemy:
Przejrzeć listę sterowników zainstalowanych w jądrze.
Wyłączyć sterowniki urządzeń, których nie ma w komputerze.
Zmienić ustawienia IRQ, DRQ i portów we/wy używanych przez sterowniki.
Po dostosowaniu konfiguracji jądra do naszego sprzętu, wpisujemy Q, by ponownie uruchomić komputer z nowymi ustawieniami. Zmiany konfiguracji są trwałe i będą obowiązywać również po zakończeniu instalacji, nie będzie więc trzeba konfigurować jądra na nowo przy każdym uruchamianiu systemu. Jest jednak bardzo prawdopodobne, że będziemy chcieli zbudować niestandardowe jądro.
Wielu użytkowników instaluje FreeBSD na komputerach PC z systemem operacyjnym z rodziny Microsoft®. Specjalnie dla tych użytkowników przygotowany został program FIPS. Narzędzie to znajduje się na płycie instalacyjnej w katalogu\ tools. Można je również pobrać z wielu serwerów lustrzanych FreeBSD.
FIPS umożliwia podzielenie istniejącej partycji MS-DOS® na dwie części, zachowując pierwotną partycję i pozwalając na instalację FreeBSD na wolnej drugiej częsci. Wpierw należy wykonać defragmentację partycji MS-DOS® za pomocą dostępnego w Windows® narzędzia (w Eksploratorze nacisnąć prawym przyciskiem myszki na dysku twardym, następnie wybrać opcję defragmentacji dysku), albo Norton Disk Tools. Następnie należy uruchomić FIPS. Program zapyta o potrzebne mu informacje. Potem można ponownie uruchomić komputer i zainstalować FreeBSD na nowym wolnym segmencie. W menu można dowiedzieć się, ile miejsca na dysku będzie w przybliżeniu potrzebne.
Jest także bardzo użyteczny program firmy PowerQuest (http://www.powerquest.com), o nazwie PartitionMagic®. Ma on znacznie większe możliwości niż FIPS i stosowanie go jest zalecane, jeśli planuje się częste instalowanie i usuwanie systemów operacyjnych. Nie jest on jednak za darmo; jeśli FreeBSD ma być zainstalowane raz na dobre, FIPS zapewne w zupełności wystarczy.
W chwili obecnej FreeBSD nie obsługuje systemów plików skompresowanych za pomocą programu Double Space™. Tym samym musimy wpierw rozkompresować system plików nim FreeBSD będzie mógł odczytać zapisane w nim dane. Można do tego wykorzystać Agenta kompresji z menu > > .
FreeBSD obsługuje systemy plików MS-DOS®. By je zamontować należy wykorzystać polecenie mount_msdosfs(8) z odpowiednimi parametrami. Typowa forma polecenia wygląda następująco:
# mount_msdosfs /dev/ad0s1 /mntW tym przykładzie system plików MS-DOS® zlokalizowany jest na pierwszej partycji pierwszego dysku twardego. By sprawdzić jak jest w naszym przypadku należy sprawdzić wynik poleceń dmesg oraz mount. Powinno to pozwolić nam zorientować się w układzie partycji na dysku.
Rozszerzone partycje MS-DOS® odwzorowywane są na końcu pozostałych "segmentów" we FreeBSD. Przykładowo, pierwsza partycja MS-DOS® może znajdować sie na /dev/ad0s1, partycja FreeBSD na /dev/ad0s2, natomiast rozszerzona partycja MS-DOS® na /dev/ad0s3. Może to być mylące na początku. |
Analogicznie można montować partycje NTFS wykorzystując polecenie mount_ntfs(8).
Oto niektóre z najczęściej zadawanych pytań dotyczących instalowania FreeBSD na komputerach Alpha.
W tej części omówiona została instalacja FreeBSD w sytuacjach wyjątkowych.
Ten rodzaj instalacji zwany jest "instalacją bez głowy", ponieważ komputer, na którym FreeBSD będzie instalowane nie ma podłączonego monitora, lub nawet nie ma wyjścia VGA. Jak to możliwe? Dzięki konsoli szeregowej. W roli konsoli szeregowej używa się zwykle innego komputera, który pełni rolę ekranu i klawiatury dla pozbawionego tych urządzeń komputera. By zainstalować system tą metodą, musimy przygotować dyskietki instalacyjne zgodnie z opisem w Przygotowanie dyskietek do instalacji.
By zmodyfikować dyskietki do pracy z konsolą szeregową należy wykonać następujące kroki:
Włączenie konsoli szeregowej na dyskietce startowej
Jeśli spróbowalibyśmy uruchomić komputer korzystając z utworzonych właśnie dyskietek startowych, zostałaby uruchomiona zwykła instalacja FreeBSD. My jednak chcemy, by podczas instalacji używana była konsola szeregowa. By to skonfigurować, montujemy dyskietkę kern.flp we FreeBSD przy użyciu polecenia mount(8).
# mount /dev/fd0 /mntPo zamontowaniu dyskietki, wchodzimy do katalogu /mnt:
# cd /mntTeraz włączymy na dyskietce konsolę szeregową. Musimy stworzyć plik boot.config zawierający wiersz /boot/loader -h. Jego zadaniem jest po prostu nakazanie programowi ładującemu system, by używał konsoli szeregowej.
# echo "/boot/loader -h" > boot.configPo prawidłowym skonfigurowaniu dyskietki odmontowujemy ją poleceniem umount(8):
# cd /
# umount /mnt
Możemy wyjąć dyskietkę ze stacji dyskietek.
Podłączenie kabla null-modem
Dwa komputery łączymy kablem null-modem. Po prostu podłączamy kabel do portów szeregowych w jednym i drugim komputerze. Zwykły kabel szeregowy nie nadaje się do tego celu, potrzebny jest kabel null-modem, ponieważ jego przewody są odpowiednio skrzyżowane.
Uruchomienie instalacji
Możemy już uruchomić instalację. Do stacji dyskietek "bezgłowego" komputera, na którym ma być zainstalowane FreeBSD, wkładamy dyskietkę kern.flp i włączamy komputer.
Połączenie z "bezgłowym" komputerem
Z komputerem łączymy się korzystając z cu(1):
# cu -l /dev/cuaa0Gotowe! Powinniśmy być w stanie kontrolować "bezgłowy" komputer poprzez sesję cu. Zostaniemy poproszeni o włożenie dyskietki mfsroot.flp, nastepnie o wybranie typu terminala. Wybieramy kolorową konsolę FreeBSD (FreeBSD color console) i kontynuujemy instalację.
Dla uproszczenia, w niniejszej części "dysk FreeBSD" oznaczać będzie płytę CDROM lub DVD z FreeBSD, który zakupiliśmy lub przygotowaliśmy samodzielnie. |
Może się zdarzyć sytuacja, w której będziemy musieli przygotować własny nośnik lub źródło dla instalacji FreeBSD. Może to być nośnik fizyczny, na przykład taśma, albo inne źródło z którego sysinstall będzie mógł pobrać pliki, na przykład lokalny serwer FTP lub partycja MS-DOS®.
Oto przykład:
Mamy wiele komputerów w sieci lokalnej i jeden dysk FreeBSD. Chcemy przygotować lokalny serwer FTP z zawartością dysku FreeBSD, aby komputery mogły z niego korzystać zamiast łączyć się z Internetem.
Mamy dysk FreeBSD, jednak FreeBSD nie obsługuje naszego napędu CD/DVD. Napęd jest natomiast prawidłowo obsługiwany w MS-DOS®/Windows®. Chcemy skopiować pliki instalacyjne FreeBSD na partycję DOS i wykorzystać ją do zainstalowania FreeBSD.
Komputer, na którym chcemy zainstalować system nie ma napędu CD/DVD ani karty sieciowej. Jest inny komputer, który ma napęd CD/DVD lub kartę sieciową i możemy połączyć się z nim kablem szeregowym lub równoległym.
Chcemy przygotować taśmę, przy pomocy której będzie można zainstalować FreeBSD.
W ramach każdego wydania systemu Projekt FreeBSD udostępnia pięć obrazów płyt CD ("obrazów ISO"). Jeśli dysponujemy nagrywarką CD, możemy je nagrać ("wypalić") na płytach, otrzymując zestaw płyt, które mogą posłużyć do zainstalowania systemu. Jest to najprostszy sposób instalacji FreeBSD w przypadku, gdy mamy nagrywarkę i tanie połączenie z Internetem.
Pobranie obrazów ISO
Obrazy ISO każdego z wydań systemu można pobrać z ftp://ftp.FreeBSD.org/pub/FreeBSD/ISO-IMAGES-arch/version lub z najbliższego serwera lustrzanego. W miejscu arch i version wstawiamy odpowiednią nazwę architektury i wersję.
Wspomniany katalog zawiera zwykle następujące obrazy:
| Nazwa pliku | Zawartość |
|---|---|
version-RELEASE-arch-miniinst.iso | Wszystko, co jest potrzebne do zainstalowania FreeBSD. |
version-RELEASE-arch-disc1.iso | Wszystko, co jest potrzebne do zainstalowania FreeBSD, i tyle dodatkowych pakietów, ile zmieściło się na płycie. |
version-RELEASE-arch-disc2.iso | "Żywy system plików", używany wraz z dostępną w sysinstall funkcją "Repair" (naprawa). Kopia drzewa CVS FreeBSD. Dodatkowe pakiety o charakterze niezależnym. |
| Nazwa pliku | Zawartość |
|---|---|
version-RELEASE-arch-bootonly.iso | Wszystko co jest niezbędne by uruchomić jądro FreeBSD i rozpocząć instalację. Pliki instalacyjne zostaną probrane z serwera FTP bądź innego źródła. |
version-RELEASE-arch-miniinst.iso | Wszystko, co jest potrzebne do zainstalowania FreeBSD. |
version-RELEASE-arch-disc1.iso | Wszystko co jest potrzebne by zainstalować FreeBSD jako "żywy system plików" używany wraz z dostępną w sysinstall funkcją "Repair" (naprawa). |
version-RELEASE-arch-disc2.iso | Dokumentacja FreeBSD i tyle dodatkowych pakietów, ile zmieściło się na płycie. |
Musimy pobrać albo obraz ISO mini, albo obraz pierwszej płyty. Nie ma sensu pobierać obydwu, ponieważ obraz pierwszej płyty zawiera wszystko to, co obraz mini.
Obraz ISO mini dostępny jest tylko dla wydań starszych niż FreeBSD 5.4-RELEASE. |
Z obrazu ISO miniinst warto jest skorzystać, gdy mamy niedrogi dostęp do Internetu. Za jego pomocą możemy zainstalować FreeBSD, natomiast niezależne oprogramowanie instalujemy przez Internet, przy pomocy systemu portów i pakietów (patrz: Instalacja programów. pakiety i porty).
Płytę pierwszą wybieramy wtedy, gdy oprócz zainstalowania systemu chcemy skorzystać z zestawu wybranych pakietów oprogramowania.
Pozostałe płyty są przydatne, lecz nie niezbędne, szczególnie, gdy dysponujemy szybkim dostępem do Internetu.
Nagranie płyt CD
Pliki obrazów należy nagrać na płyty. Jeśli zamierzamy robić to w systemie FreeBSD, informacje na ten temat znajdziemy w Creating and Using Optical Media (CDs) (w szczególności burncd oraz cdrecord).
Jeżeli płyty nagrywać będziemy w innym systemie, do tego celu możemy posłużyć się dowolnymi dostępnymi programami obsługującymi nagrywarkę płyt CD. ISO jest standardowym formatem obrazu płyt obsługiwanym w wielu aplikacjach nagrywających.
Zainteresowanych przygotowaniem własnych wydań FreeBSD odsyłamy do artykułu Release Engineering(ang.). |
Układ plików na dysku FreeBSD jest taki sam, jak układ plików na serwerze FTP. Dzięki temu łatwo możemy przygotować lokalny serwer FTP, który może być wykorzystany przez inne komputery w sieci do instalacji FreeBSD.
Na komputerze, który będzie służyć jako serwer FTP, umieszczamy CDROM w napędzie i montujemy go w katalogu /cdrom.
# mount /cdromZakładamy konto dla anonimowego użytkownika FTP w /etc/passwd. Plik /etc/passwd modyfikujemy przy użyciu vipw(8). Dodajemy następujący wiersz:
ftp:*:99:99::0:0:FTP:/cdrom:/nonexistent
Na koniec upewniamy się, że usługa FTP jest włączona w /etc/inetd.conf.
Od tej chwili każdy, kto jest w stanie nawiązać połączenie z naszym komputerem, może podczas instalacji FreeBSD wybrać jako źródło serwer FTP, w menu wyboru serwera FTP wybrać opcję "Other" (inny) i wpisać ftp://nasz.komputer.
Jeśli nośnik, z którego uruchamiamy instalator (najczęściej dyskietka), nie pochodzi z dokładnie tej samej wersji co pliki na naszym serwerze FTP, to sysinstall nie pozwoli nam kontynuować instalacji. By pominąć tą blokadę należy w menu Options zmienić nazwę dystrybucji na . |
Ta metoda może być z powodzeniem stosowana na komputerze w sieci lokalnej, chronionym przez zaporę ogniową. Udostępnianie serwera FTP innym użytkownikom Internetu (a nie tylko sieci lokalnej) naraża nasz komputer na ataki włamywaczy i inne problemy. Decydując się na to należy koniecznie przestrzegać zasad bezpieczeństwa. |
Jeżeli koniecznie chcemy instalować system z dyskietek (co nie jest zalecane), na przykład z powodu nieobsługiwanego urządzenia lub po prostu z zamiłowania do utrudnień, musimy najpierw przygotować dyskietki instalacyjne.
Będziemy potrzebować co najmniej tylu dyskietek 1.44 MB lub 1.2 MB, by zmieściły się na nich wszystkie pliki z katalogu bin (binarne pliki dystrybucyjne). Jeśli dyskietki przygotowujemy w DOS-ie, to muszą one być sformatowane przy pomocy DOS-owego polecenia FORMAT. W Windows® do sformatowania dyskietek możemy użyć Explorera (klikamy prawym przyciskiem myszy na stacji A: i wybieramy "Format").
Nie ufajmy dyskietkom sformatowanym fabrycznie. Dla pewności sformatujmy je jeszcze raz samodzielnie. W przeszłości wiele problemów zgłaszanych przez użytkowników spowodowanych było korzystaniem z nieprawidłowo sformatowanych dyskietek, dlatego też zwracamy na to uwagę.
Jeżeli do przygotowania dyskietek służy nam komputer z FreeBSD, również powinniśmy je sformatować. Dyskietki nie muszą być formatowane w DOS-owym systemie plików. Możemy utworzyć na nich system plików UFS, za pomocą poleceń bsdlabel i newfs, wywołanych w następujący sposób (na przykładzie dyskietek 3.5" 1.44 MB):
# fdformat -f 1440 fd0.1440
# bsdlabel -w -r fd0.1440 floppy3
# newfs -t 2 -u 18 -l 1 -i 65536 /dev/fd0
W przypadku dyskietek 5.25" 1.2 MB, wpisalibyśmy odpowiednio |
Po takiej operacji dyskietki będzie można zamontować i zapisywać na nich dane tak samo, jak na innych systemach plików.
Po sformatowaniu dyskietek należy skopiować na nie pliki. Pliki dystrybucyjne podzielone są na kawałki o wygodnych rozmiarach, tak aby pięć z nich mieściło się na typowej dyskietce 1.44 MB. Umieśćmy na każdej z dyskietek tyle plików, ile się zmieści, aż wszystkie pliki dystrybucyjne znajdą się na dyskietkach. Pliki powinny być umieszczone w odpowiednim katalogu na dyskietce, np.: a:\bin\bin.aa, a:\bin\bin.ab, itd.
Podczas instalacji, gdy pojawi się ekran wyboru nośnika (Media), wybieramy (dyskietki). Dalej poprowadzi nas program instalacyjny.
By można było zainstalować FreeBSD z partycji MS-DOS®, kopiujemy pliki dystrybucyjne do katalogu freebsd w głównym katalogu partycji - na przykład c:\freebsd. Wewnątrz tego katalogu musi być częściowo zachowana struktura katalogów płyty CDROM lub serwera FTP, jeśli więc kopiujemy pliki z płyty CD, dobrze jest skorzystać z DOS-owego polecenia xcopy. Dla przykładu, poniższe polecenia przygotują minimalną instalację FreeBSD:
C:\> md c:\freebsd
C:\> xcopy e:\bin c:\freebsd\bin\ /s
C:\> xcopy e:\manpages c:\freebsd\manpages\ /s
W przykładzie założyliśmy, że miejsce dla FreeBSD mamy na dysku C:, a napęd CDROM dostępny jest jako dysk E:.
Jeśli nie dysponujemy napędem CDROM, pliki dystrybucyjne możemy pobrać z ftp.FreeBSD.org. Każdy zestaw plików umieszczony jest w oddzielnym katalogu; na przykład zestaw base znajduje się w katalogu 12.0/base/.
Zestawy plików, które chcemy instalować z partycji MS-DOS® (i dla których jest na niej odpowiednio dużo wolnego miejsca), umieszczamy w katalogu c:\freebsd. Na potrzeby instalacji minimalnej wystarczy zestaw BIN.
Instalacja z taśmy jest jedną z najprostszych metod, obok instalacji przez FTP i instalacji z płyty CD. Program instalacyjny zakłada, że taśma po prostu zawiera pliki w postaci archiwum tar. Interesujące nas pliki dystrybucyjne archiwizujemy na taśmie:
# cd /freebsd/distdir
# tar cvf /dev/rwt0 dist1 ... dist2
Przeprowadzając instalację powinniśmy upewnić się, że dysponujemy odpowiednią ilością wolnego miejsca w jakimś katalogu tymczasowym (będziemy mieć możliwość wyboru tego katalogu), by pomieścić pełną zawartość przygotowanej wcześniej taśmy. Ze względu na to, że dostęp do danych na taśmie nie jest swobodny, taki rodzaj instalacji będzie wymagać dość sporej przestrzeni tymczasowej. Można założyć, że potrzeba będzie tyle przestrzeni, ile zajmują dane zapisane na taśmie.
Rozpoczynając instalację pamiętajmy, by taśma była umieszczona w napędzie przed uruchomieniem komputera z dyskietki startowej. W przeciwnym razie napęd taśmowy może nie zostać wykryty podczas rozpoznawania urządzeń. |
Są trzy możliwości instalacji przez sieć: port szeregowy (SLIP lub PPP), port równoległy (PLIP (kabel laplink)) lub Ethernet (typowa karta sieciowa Ethernet (także PCMCIA)).
Obsługa protokołu SLIP jest dosyć prymitywna i ogranicza się do bezpośrednich połączeń, jak choćby kabel łączący komputer przenośny z innym komputerem. Połączenie musi być bezpośrednie, ponieważ instalacja za pośrednictwem SLIP nie umożliwia dzwonienia; jest to możliwe w przypadku PPP, dlatego też powinno się używać PPP zamiast SLIP, o ile to możliwe.
Jeżeli korzystamy z modemu, to PPP jest najprawdopodobniej jedyną możliwością. Zawczasu przygotujmy sobie informacje od dostawcy usług sieciowych, ponieważ będą nam one potrzebne na wczesnym etapie instalacji.
Jeśli łącząc się z dostawcą usług sieciowych używamy PAP lub CHAP (innymi słowy, jeśli w Windows® możemy uzyskać połączenie bez korzystania ze skryptu), wówczas wystarczy, że w linii poleceń ppp wpiszemy dial. W przeciwnym razie będziemy musieli połączyć się z dostawcą usług sieciowych za pomocą "poleceń AT", zależnych od typu modemu, gdyż do dyspozycji będziemy mieć jedynie uproszczony emulator terminala. Więcej informacji znajdziemy w poświęconych user-ppp częściach Podręcznika i FAQ. Jeśli wystąpią problemy, możemy posłużyć się poleceniem set log local …, by komunikaty były pokazywane na ekranie.
Jeżeli dysponujemy bezpośrednim połączeniem z innym komputerem z FreeBSD (w wersji 2.0-R lub późniejszej), wówczas mamy również możliwość instalacji przez port równoległy. Prędkość transmisji danych portem równoległym jest zwykle znacznie wyższa niż prędkość przesyłania portem szeregowym (do 50 kilobajtów/sekundę), dzięki czemu instalacja przebiega szybciej.
Najszybszym wariantem instalacji poprzez sieć jest wykorzystanie karty sieciowej Ethernet. FreeBSD obsługuje większość popularnych kart sieciowych; lista obsługiwanych kart (wraz z ich ustawieniami) znajduje się w dokumencie Hardware Notes, dołączonym do każdego wydania FreeBSD. Jeżeli korzystamy z karty sieciowej PCMCIA, pamiętajmy o tym, by była ona włożona przed włączeniem komputera. Niestety, jak dotąd FreeBSD nie obsługuje wkładania kart PCMCIA w trakcie instalacji.
Będziemy musieli znać nasz adres IP, maskę podsieci, oraz nazwę naszego komputera. Jeśli instalujemy za pośrednictwem PPP i nie mamy statycznego adresu IP, nie musimy się przejmować, gdyż adres IP może być przydzielony dynamicznie przez dostawcę usług. Administrator sieci może nam podpowiedzieć, jakie parametry podać podczas konfiguracji sieci. Jeśli do połączeń z innymi stacjami będziemy używać ich nazw, a nie adresów IP, to dodatkowo będziemy musieli znać adres serwera nazw i prawdopodobnie adres bramy (w przypadku PPP jest to adres IP dostawcy). Jeżeli mamy zamiar instalować za pośrednictwem FTP i proxy HTTP, będzie nam ponadto potrzebny adres proxy. Skontaktujmy się z administratorem sieci lub dostawcą usług sieciowych przed rozpoczęciem instalacji, jeśli nie znamy któregoś z wymienionych powyżej adresów.
Instalacja przez NFS jest raczej mało skomplikowana. Wystarczy po prostu skopiować wybrane pliki dystrybucyjne na serwer, następnie podczas instalacji wybrać NFS jako nośnik i wskazać serwer.
Jeżeli serwer wymaga stosowania "uprzywilejowanego portu" (zwykle jest tak w przypadku stacji roboczych Sun), musimy to zaznaczyć w menu Options (opcja NFS Secure), zanim rozpoczniemy instalację.
Jeśli nasza karta sieciowa jest niezbyt dobrej jakości i nie grzeszy prędkością, możemy włączyć opcję NFS Slow.
Instalacja przez NFS wymaga, by serwer obsługiwał montowanie podkatalogów, na przykład jeśli katalog dystrybucyjny FreeBSD 12.0 znajduje się w: ziggy:/usr/archive/stuff/FreeBSD, to serwer ziggy musi umożliwiać bezpośrednie montowanie katalogu /usr/archive/stuff/FreeBSD, a nie tylko /usr, lub /usr/archive/stuff.
We FreeBSD w pliku /etc/exports możliwość montowania podkatalogów włącza się opcją -alldirs. W innych serwerach NFS może być inaczej. Jeśli otrzymujemy od serwera komunikaty o treści "permission denied" (odmowa dostępu), prawdopodobnie jest to spowodowane właśnie nieprawidłowym ustawieniem wspomnianej opcji.
W niniejszym rozdziale omówione zostaną podstawowe polecenia i możliwości systemu operacyjnego FreeBSD. Wiele informacji dotyczyć będzie ogółem systemów typu UNIX®. Czytelnikom zaznajomionym z tą tematyką w zupełności wystarczy pobieżne przejrzenie rozdziału. Natomiast ci, którzy dopiero rozpoczynają swoją przygodę z FreeBSD, powinni przeczytać go bardzo uważnie.
Po przeczytaniu tego rozdziału będziemy wiedzieć:
Jak korzystać z "konsol wirtualnych" FreeBSD.
Jak działają prawa dostępu do plików i flagi plików we FreeBSD.
Jaki jest domyślny układ systemu plików FreeBSD.
Jaka jest organizacja dysku we FreeBSD.
Jak montować i odmontowywać systemy plików.
Czym są procesy, demony i sygnały.
Co to jest powłoka, oraz jak można zmienić własne środowisko pracy.
Jak posługiwać się prostymi edytorami tekstu.
Jaki jest związek pomiędzy urządzeniami i plikami węzłowymi urządzeń.
Jaki format binarny jest wykorzystywany we FreeBSD.
W jaki sposób korzystać z dokumentacji systemowej w poszukiwaniu dodatkowych informacji.
Z systemu FreeBSD korzystać można na różne sposoby; jednym z nich jest wpisywanie poleceń w terminalu tekstowym. Większość systemów operacyjnych typu UNIX® dostępna jest właśnie poprzez polecenia. W niniejszej części dowiemy się, czym są "terminale" i "konsole", oraz jak się nimi posługiwać we FreeBSD.
Jeśli konfigurując FreeBSD nie wybraliśmy, by przy uruchamianiu systemu było automatycznie ładowane środowisko graficzne, to po uruchomieniu i wykonaniu skryptów startowych system przywita nas komunikatem logowania się do systemu. Zobaczymy mniej więcej coś takiego:
Additional ABI support:.
Local package initialization:.
Additional TCP options:.

Fri Sep 20 13:01:06 EEST 2002

FreeBSD/i386 (pc3.example.org) (ttyv0)

login:
Na różnych komputerach komunikat ten może wyglądać nieco inaczej, jednak z pewnością będzie podobny. W tej chwili interesują nas jego dwa ostatnie wiersze. Wiersz drugi od końca ma postać:
FreeBSD/i386 (pc3.example.org) (ttyv0)
Widać tu kilka informacji o systemie, który właśnie został uruchomiony. Mamy przed oczami konsolę "FreeBSD", działającą na komputerze z procesorem firmy Intel (lub kompatybilnym) z rodziny x86. Komputer ten został nazwany (każdy komputer uniksowy ma nazwę) pc3.example.org i w tej chwili widoczna jest jego konsola systemowa - terminal ttyv0.
Ostatni wiersz ma zawsze taką postać:
login:
Tu wpisujemy "nazwę użytkownika", by zalogować się do systemu. Opis tej czynności przedstawiony jest w kolejnej części.
FreeBSD jest systemem wieloużytkownikowym i wielozadaniowym. Tak oficjalnie określa się system, z którego na jednym komputerze może korzystać wiele różnych osób, uruchamiając jednocześnie wiele programów.
Każdy system wieloużytkownikowy musi mieć możliwość odróżnienia jednego "użytkownika" od pozostałych. FreeBSD (i wszystkie systemy uniksopodobne) wymaga, aby użytkownik "zalogował się" do systemu, zanim będzie mógł uruchamiać programy. Każdy użytkownik ma niepowtarzalną nazwę ("nazwę użytkownika") oraz sobie tylko znany klucz ("hasło"). FreeBSD wymaga wpisania jednego i drugiego, zanim zezwoli użytkownikowi na uruchamianie jakichkolwiek programów.
Zaraz po załadowaniu systemu i zakończeniu uruchamiania skryptów startowych, FreeBSD wyświetli komunikat z prośbą o podanie nazwy użytkownika:
login:Dla przykładu załóżmy, że nasz użytkownik nazywa się janek. Wpisujemy tutaj janek i naciskamy Enter. Powinniśmy zostać poproszeni o podanie "hasła":
login: janek
Password:
Następnie wpisujemy hasło janka, i naciskamy Enter. Hasło nie pojawia się! Na razie nie będziemy się tym zajmować. Wystarczy wiedzieć, że dzieje się tak ze względów bezpieczeństwa.
Jeśli podaliśmy prawidłowe hasło, powinniśmy być już zalogowani do FreeBSD, i gotowi do eksperymentowania z dostępnymi poleceniami.
Powinniśmy zobaczyć wiadomość dnia (ang. message of the day MOTD) oraz znak zachęty (#, $ bądź %). Oznacza to, że udało nam się zalogować do FreeBSD.
Polecenia uniksowe można z powodzeniem wpisywać na jednej konsoli, jednak FreeBSD potrafi wykonywać wiele programów jednocześnie. Korzystanie z jednej konsoli do wydawania poleceń zakrawa na marnotrawstwo, ponieważ system zdolny jest obsłużyć w jednej chwili całe mnóstwo programów. W wykorzystaniu tej możliwości bardzo pomocne są "konsole wirtualne".
Konfigurując FreeBSD możemy uaktywnić wiele konsol wirtualnych. Z dowolnej z nich możemy się przełączyć na inną naciskając odpowiednią kombinację klawiszy. Każda konsola ma własny kanał wyjściowy, FreeBSD zajmuje się odpowiednim przekazywaniem informacji wprowadzanych z klawiatury i wypisywanych na ekranie, gdy dochodzi do przełączenia konsoli na inną.
Pewne kombinacje klawiszy używane są do przechodzenia między konsolami. Kombinacje Alt+F1, Alt+F2, aż do Alt+F8 służą do przełączania na kolejną konsolę wirtualną.
Przechodząc z jednej konsoli na inną, FreeBSD zajmuje się zachowaniem i odtworzeniem wyglądu ekranu. W efekcie otrzymujemy "złudzenie" posiadania wielu "wirtualnych" ekranów i klawiatur, które mogą służyć do wydawania poleceń systemowi FreeBSD. Programy uruchomione na jednej z konsol nie przerywają swej pracy, gdy ta konsola przestaje być widoczna - po przejściu na inną konsolę wirtualną programy kontynuują swoje działanie.
Zgodnie z domyślną konfiguracją FreeBSD uruchamia osiem konsol wirtualnych. Nie jest to jednak permanentne ustawienie, i może być w łatwy sposób zmienione, aby konsol wirtualnych było więcej lub mniej. Plik /etc/ttys odpowiedzialny jest za liczbę konsol wirtualnych i ich konfigurację.
Modyfikując plik /etc/ttys możemy zmieniać konfigurację konsol wirtualnych FreeBSD. Każdy nie będący komentarzem wiersz tego pliku (czyli wiersz nie rozpoczynający się znakiem #) zawiera ustawienia jednego z terminali lub konsoli wirtualnej. W domyślnej wersji tego pliku występującej we FreeBSD skonfigurowanych jest 9 konsol wirtualnych, przy czym 8 z nich jest włączonych. Za ich konfigurację odpowiadają wiersze rozpoczynające się symbolem ttyv:
# name  getty                           type    status          comments
#
ttyv0   "/usr/libexec/getty Pc"         cons25  on  secure
# Virtual terminals
ttyv1   "/usr/libexec/getty Pc"         cons25  on  secure
ttyv2   "/usr/libexec/getty Pc"         cons25  on  secure
ttyv3   "/usr/libexec/getty Pc"         cons25  on  secure
ttyv4   "/usr/libexec/getty Pc"         cons25  on  secure
ttyv5   "/usr/libexec/getty Pc"         cons25  on  secure
ttyv6   "/usr/libexec/getty Pc"         cons25  on  secure
ttyv7   "/usr/libexec/getty Pc"         cons25  on  secure
ttyv8   "/usr/X11R6/bin/xdm -nodaemon"  xterm   off secure
Dokładny opis poszczególnych kolumn tego pliku i opcji, za pomocą których konfiguruje się konsole wirtualne, znaleźć można w dokumentacji systemowej ttys(5).
"Tryb jednego użytkownika" szczegółowo opisuje Single-User Mode. Istotne jest, że w trybie jednego użytkownika dostępna jest tylko jedna konsola. Nie jest możliwe korzystanie z konsol wirtualnych. Konfiguracja konsoli trybu jednego użytkownika również znajduje się w pliku /etc/ttys. Odpowiada jej wiersz rozpoczynający się słowem console:
# name  getty                           type    status          comments
#
# If console is marked "insecure", then init will ask for the root password
# when going to single-user mode.
console none                            unknown off secure
Zgodnie z informacją zawartą w komentarzu nad wierszem Zachowajmy jednak ostrożność, jeśli wpisujemy tu |
FreeBSD, będąc bezpośrednim potomkiem systemu UNIX® BSD, oparte jest na kilku kluczowych założeniach Uniksa. Najbardziej widocznym z nich jest fakt, że FreeBSD jest systemem wieloużytkownikowym - potrafi jednocześnie obsługiwać wielu użytkowników pracujących niezależnie od siebie. System jest odpowiedzialny za właściwe zarządzanie odwołaniami do sprzętu, pamięci i czasu procesora, po równo dla każdego z użytkowników.
Ze względu na obsługę wielu użytkowników, zasoby, którymi zarządza system, mają przypisane prawa dostępu określające, kto może czytać, zapisywać i uruchamiać dany zasób. Prawa dostępu przechowywane są w postaci dwóch oktetów podzielonych na trzy części, z których pierwsza odnosi sie do właściciela pliku, druga do grupy posiadającej plik, a trzecia do innych użytkowników. W postaci numerycznej zapisuje się to następująco:
| Wartość | Uprawnienia | Symbol |
|---|---|---|
0 | Odczyt: nie, zapis: nie, wykonywanie: nie |
|
1 | Odczyt: nie, zapis: nie, wykonywanie: tak |
|
2 | Odczyt: nie, zapis: tak, wykonywanie: nie |
|
3 | Odczyt: nie, zapis: tak, wykonywanie: tak |
|
4 | Odczyt: tak, zapis: nie, wykonywanie: nie |
|
5 | Odczyt: tak, zapis: nie, wykonywanie: tak |
|
6 | Odczyt: tak, zapis: tak, wykonywanie: nie |
|
7 | Odczyt: tak, zapis: tak, wykonywanie: tak |
|
Korzystając z polecenia ls(1) możemy posłużyć się opcją -l, by zawartość katalogu została pokazana w formie szczegółowej, z uwzględnieniem kolumny zawierającej informację o prawach dostępu do pliku dla jego właściciela, grupy, oraz wszystkich innych. Przykładowy wynik polecenia ls -l:
% ls -l
total 530
-rw-r--r--  1 root  wheel     512 Sep  5 12:31 myfile
-rw-r--r--  1 root  wheel     512 Sep  5 12:31 otherfile
-rw-r--r--  1 root  wheel    7680 Sep  5 12:31 email.txt
...
Pierwsza kolumna listy plików po wykonaniu polecenia ls -l ma następującą postać:
-rw-r--r--Pierwszy znak (od lewej) określa, czy plik jest zwyczajnym plikiem, katalogiem, urządzeniem znakowym, gniazdem, czy jakimkolwiek innym urządzeniem pseudo-plikowym. Widoczny w przykładzie znak - oznacza zwykły plik. Kolejne trzy znaki, w przykładzie są to rw-, reprezentują prawa dostępu, którymi dysponuje właściciel pliku. Następne trzy znaki r--, określają prawa dostępu grupy, do której należy plik. Ostatnia trójka r--, oznacza prawa dostępu dla innych. Minus oznacza brak jednego z praw dostępu. Plik przedstawiony w przykładzie może być więc odczytywany i zapisywany przez swojego właściciela, oraz jedynie odczytywany przez grupę i innych. Zgodnie z powyższą tabelą, prawa dostępu do tego pliku mają wartość 644, przy czym każda cyfra reprezentuje trzy części uprawnień.
W porządku, ale w jaki sposób system kontroluje dostęp do urządzeń? Zasadniczo większość urządzeń jest traktowana przez FreeBSD jak pliki, które mogą być otwierane, odczytywane i zapisywane podobnie jak wszystkie inne pliki. Specjalne pliki urządzeń przechowywane są w katalogu /dev.
Również katalogi traktowane są jak pliki - też są im przypisywane prawa odczytu, zapisu i wykonania. Bit wykonania katalogu ma nieco inne znaczenie niż w przypadku pliku. Posiadanie prawa wykonania katalogu oznacza, że można do niego wejść, czyli posłużyć się poleceniem "cd". Ponadto umożliwia to dostęp do zawartych w katalogu plików o znanych nazwach (oczywiście obowiązują także indywidualne prawa dostępu do każdego z plików).
W szczególności, wyświetlenie listy plików katalogu wymaga posiadania prawa do jego odczytu, natomiast do usunięcia pliku o znanej nazwie potrzebne będą prawa do zapisu i wykonania dla katalogu, w którym ów plik się znajduje.
Jest jeszcze kilka innych bitów uprawnień, jednak są one stosowane w specjalnych przypadkach, np. do włączenia atrybutu SUID, lub "lepkiego" bitu dla katlogu. Więcej informacji o prawach dostępu i o ich przydzielaniu można znaleźć w dokumentacji systemowej polecenia chmod(1).
Uprawnienia symboliczne, określane również jako wyrażenia symboliczne, przy określaniu praw dostępu do plików lub katalogów wykorzystują litery w miejsce wartości liczbowych. Wyrażenia symboliczne wykorzystują składnię: (kto) (akcja) (uprawnienia), przy czym dostępne są następujące wartości:
| Opcja | Litera | Znaczenie |
|---|---|---|
(kto) | u | Użytkownik (właściciel) |
(kto) | g | Grupa |
(kto) | o | Inni |
(kto) | a | Wszyscy ("świat") |
(akcja) | + | Dodanie uprawnień |
(akcja) | - | Usunięcie uprawnień |
(akcja) | = | Ustawienie uprawnień |
(uprawnienia) | r | Odczyt |
(uprawnienia) | w | Zapis |
(uprawnienia) | x | Wykonywanie |
(uprawnienia) | t | Bit "lepki" |
(uprawnienia) | s | Ustawienie UID lub GID |
Do ustawienia tych wartości, podobnie jak w przypadku wartości liczbowych, wykorzystywane jest polecenie chmod(1). Przykładowo, by zablokować dostęp innych użytkowników do PLIKU należy wpisać:
% chmod go= PLIKGdy musimy wykonać więcej niż jedną zmianę uprawnień parametry należy oddzielić przecinkami. Na przykład, poniższe polecenie usunie prawa zapisu do PLIKU grupie i innym. Następnie doda wszystkim prawo wykonywania:
% chmod go-w,a+x PLIKDodatkowo, oprócz opisanych wyżej praw dostępu, FreeBSD wykorzystuje również "flagi plików". Flagi te umożliwiają wprowadzenie dodatkowego poziomu ochrony i kontroli plików. Nie dotyczą natomiast katalogów.
Dzięki zwiększonemu poziomowi kontroli plików system może zagwarantować, że w niektórych sytuacjach nawet użytkownik root nie będzie mógł usunąć bądź zmodyfikować plików.
Zmiany flag plików dokonuje się poleceniem chflags(1). Przykładowo, by plikowi plik1 nadać flagę nieusuwalności należy wydać poniższe polecenie:
# chflags sunlink plik1Natomiast, by usunąć flagę nieusuwalności wystarczy wprowadzić takie samo polecenie dodając "no" przed sunlink:
# chflags nosunlink plik1By wyświetlić flagi danego pliku wystarczy wpisać polecenie ls(1) z parametrem -lo:
# ls -lo plik1Wynik powinien być zbliżony do poniższego:
-rw-r--r-- 1 trhodes trhodes sunlnk 0 Mar 1 05:54 plik1
Niektóre z flag mogą być dodawane i usuwane jedynie przez użytkownika root, podczas gdy inne mogą być ustawiane również przez właściciela pliku. Zaleca się aby administratorzy przeczytali strony podręcznika systemowego chflags(1) oraz chflags(2).
Poznanie hierarchii katalogów FreeBSD jest podstawą ogólnego zrozumienia działania systemu. Najważniejszym zagadnieniem jest koncepcja katalogu głównego, "/". Jest on montowany jako pierwszy podczas uruchamiania systemu i zawiera podstawowe pliki niezbędne do przygotowania systemu do pracy w trybie wieloużytkownikowym. Ponadto w katalogu głównym znajdują się punkty montowania innych systemów plików, które możemy montować.
Punktem montowania nazywany jest katalog, poprzez który inny system plików może być dołączony do głównego systemu plików. Organizacja dysku zawiera więcej informacji. Przykładem typowego punktu montowania może być /usr, /var, /tmp, /mnt oraz /cdrom. Najczęściej każdemu z takich katalogów odpowiada wpis w pliku /etc/fstab. Plik ten zawiera tabelę systemów plików i ich punktów montowania, z której korzysta system. Większość systemów plików wymienionych w /etc/fstab jest montowana automatycznie przez skrypt rc(8) podczas uruchamiania systemu, wyjątkiem są te wpisy, które mają opcję noauto. Plik fstab zawiera więcej informacji.
Pełny opis struktury systemu plików znajduje się w dokumentacji systemowej hier(7). Tu ograniczymy się do pobieżnego zapoznania się z najważniejszymi katalogami.
| Katalog | Opis |
|---|---|
/ | Główny katalog systemu plików. |
/bin/ | Programy użytkowe wykorzystywane zarówno w trybie jednego użytkownika, jak i w trybie wielu użytkowników. |
/boot/ | Programy i pliki konfiguracyjne używane podczas uruchamiania systemu. |
/boot/defaults/ | Pliki z domyślną konfiguracją uruchamiania systemu; patrz loader.conf(5). |
/dev/ | Pliki urządzeń; patrz intro(4). |
/etc/ | Pliki i skrypty konfiguracyjne. |
/etc/defaults/ | Pliki z domyślną konfiguracją systemu; patrz rc(8). |
/etc/mail/ | Pliki konfiguracyjne dla serwerów poczty, na przykład sendmail(8). |
/etc/namedb/ | Pliki konfiguracyjne programu |
/etc/periodic/ | Skrypty uruchamiane raz dziennie, raz na tydzień i raz na miesiąc za pośrednictwem cron(8); patrz periodic(8). |
/etc/ppp/ | Pliki konfiguracyjne |
/mnt/ | Pusty katalog, najczęściej wykorzystywany przez administratorów jako tymczasowy punkt montowania.. |
/proc/ | System plików procesów, patrz procfs(5), mount_procfs(8). |
/rescue/ | Katalog zawierający programy przydatne w przypadku awarii; patrz rescue(8). |
/root/ | Katalog domowy użytkownika |
/sbin/ | Programy i narzędzia administracyjne wykorzystywane zarówno w trybie jednego użytkownika, jak i w trybie wielu użytkowników. |
/stand/ | Programy używane w samodzielnym środowisku. |
/tmp/ | Pliki tymczasowe. Zawartość katalogu /tmp NIE JEST zachowywana przy ponownym uruchamianiu systemu. Również pamięciowy system plików jest często montowany w katalogu /tmp. Proces ten może zostać zautomatyzowany wykorzystując zmienne rc.conf(5) związane z tmpmfs (bądź za pomocą wpisu w /etc/fstab; patrz mdmfs(8)). |
/usr/ | Większość programów i aplikacji wykorzystywanych przez użytkowników. |
/usr/bin/ | Najczęściej używane programy, narzędzia programistyczne, aplikacje. |
/usr/include/ | Pliki nagłówkowe C. |
/usr/lib/ | Biblioteki. |
/usr/libdata/ | Pliki danych różnych programów użytkowych. |
/usr/libexec/ | Demony i programy systemowe (uruchamiane przez inne programy). |
/usr/local/ | Lokalne programy, biblioteki, itp. Ponadto jest to domyślny katalog dla instalowanych portów. Ogólna struktura katalogów wewnątrz /usr/local powinna odpowiadać strukturze /usr opisanej w dokumentacji hier(7). Wyjątkiem jest katalog man, umieszczony bezpośrednio w /usr/local, a nie w /usr/local/share, oraz dokumentacja portów, znajdująca się w share/doc/port. |
/usr/obj/ | Pliki zależne od architektury komputera, tworzone w procesie budowania drzewa /usr/src. |
/usr/ports | Kolekcja portów FreeBSD (opcjonalna). |
/usr/sbin/ | Demony i programy systemowe (dostępne dla użytkowników). |
/usr/shared/ | Pliki niezależne od architektury systemu. |
/usr/src/ | Pliki źródłowe BSD, lokalne pliki źródłowe. |
/usr/X11R6/ | Pliki wykonywalne, biblioteki, i inne pliki dystrybucji X11R6 (opcjonalnie). |
/var/ | Rozmaite pliki dzienników systemowych, pliki tymczasowe, pliki kolejek. Również pamięciowy system plików jest często montowany w tym katalogu. Proces ten może zostać zautomatyzowany wykorzystując zmienne rc.conf(5) związane z varmfs (bądź za pomocą wpisu w /etc/fstab; patrz mdmfs(8)). |
/var/log/ | Pliki dzienników systemowych. |
/var/mail/ | Skrzynki pocztowe użytkowników. |
/var/spool/ | Katalogi kolejek systemu drukowania i poczty. |
/var/tmp/ | Pliki tymczasowe nie usuwane przy ponownym uruchamianiu systemu. |
/var/yp | Mapy usługi NIS. |
Najmniejszą jednostką organizacji dysku używaną przez FreeBSD do odnajdywania plików jest nazwa pliku. W nazwach plików rozróżniane są duże i małe litery, tak więc readme.txt i README.TXT to dwa różne pliki. FreeBSD nie wykorzystuje rozszerzeń nazw plików (.txt) do określenia, czy plik jest programem, dokumentem, czy innym zbiorem danych.
Pliki przechowywane są w katalogach. Katalog może być pusty, lub może zawierać setki plików. Może również zawierać inne katalogi, dzięki czemu mamy możliwość zbudowania hierarchicznej struktury katalogów. Pozwala to na łatwą organizację danych.
Dostęp do plików i katalogów uzyskuje się podając nazwę pliku lub katalogu, poprzedzoną ukośnikiem / i innymi wymaganymi nazwami katalogów. Jeśli mamy katalog foo, a w nim katalog bar, w którym znajduje się plik readme.txt, wówczas pełną nazwą, bądź ścieżką dostępu do pliku jest foo/bar/readme.txt.
Katalogi i pliki przechowywane są w systemie plików. Każdy system plików ma jeden katalog najwyższego poziomu, zwany katalogiem głównym systemu plików. W katalogu głównym mogą być umieszczone następne katalogi.
To, o czym mówimy, jest zapewne podobne do innych systemów operacyjnych, z którymi być może zetknęliśmy się wcześniej. Są jednak różnice; na przykład w systemie MS-DOS® nazwy plików i katalogów oddzielane są znakiem \, w Mac OS® natomiast znakiem :.
We FreeBSD nie są używane litery dysków, lub inne nazwy dysków w ścieżce. Nie spotkamy się w FreeBSD z czymś takim jak c:/foo/bar/readme.txt.
Jest natomiast jeden system plików pełniący rolę głównego systemu plików. Zawiera on katalog główny dostępny jako /. Każdy inny system plików jest montowany w głównym systemie plików. Niezależnie od tego, ile dysków mamy w komputerze, we FreeBSD każdy katalog wydaje się być częścią tego samego dysku.
Załóżmy, że mamy trzy systemy plików, nazwane A, B i C. Każdy z nich ma katalog główny, zawierający dwa katalogi o nazwach A1, A2 (oraz odpowiednio B1, B2 i C1, C2).
Niech A będzie głównym systemem plików. Gdybyśmy sprawdzili jego zawartość poleceniem ls, zobaczylibyśmy dwa podkatalogi A1 i A2. Drzewo katalogów wygląda następująco:
System plików musi być montowany w katalogu innego systemu plików. Przyjmijmy teraz, że montujemy system plików B w katalogu A1. Główny katalog B zastąpi A1, a podkatalogi B pojawią się w odpowiednim miejscu:
Do plików znajdujących się w katalogach B1 i B2 można się dostać posługując się ścieżką /A1/B1 lub /A1/B2. Pliki poprzednio obecne w katalogu /A1 są tymczasowo ukryte. Pojawią się ponownie po odmontowaniuB z A.
Gdyby zamontować B w A2, drzewo katalogów wyglądałoby tak:
ścieżki natomiast miałyby postać /A2/B1 i /A2/B2.
Systemy plików mogą być montowane jeden na drugim. Rozwijając poprzedni przykład, możemy zamontować system plików C w katalogu B1 systemu plików B, otrzymując następującą postać drzewa katalogów:
Można równie dobrze zamontować C bezpośrednio w systemie plików A, w katalogu A1:
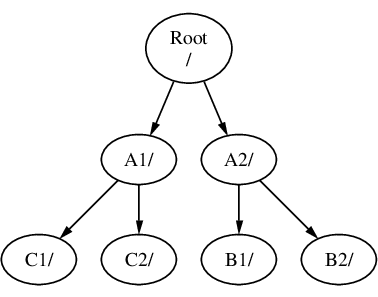
Znającym system MS-DOS® może to przypominać polecenie join, choć nie jest to to samo.
Zwykle nie trzeba zajmować się opisanymi powyżej rzeczami. Najczęściej tworzymy systemy plików podczas instalacji FreeBSD, wybieramy miejsce ich zamontowania i nie wprowadzamy później żadnych zmian, chyba, że zainstalujemy nowy dysk.
Można utworzyć jeden obszerny główny system plików i nie tworzyć żadnych innych. Takie podejście ma kilka wad i jedną zaletę.
Odrębne systemy plików mogą mieć różne opcje montowania (mount options). Na przykład, przy odpowiednim przygotowaniu, główny system plików może być zamontowany tylko do odczytu, przez co niemożliwe będzie przypadkowe usunięcie lub zmiana ważnego pliku. Oddzielenie systemów plików dostępnych do zapisu dla użytkowników, jak np. /home, od innych pozwala również na montowanie ich z opcją nosuid; co z kolei pozwala zwiększyć bezpieczeństwo systemu uniemożliwiając wykorzystanie bitów suid/guid.
FreeBSD automatycznie optymalizuje układ plików w systemie plików, w zależności od tego, jak ów system jest wykorzystywany. System plików zawierający wiele często zapisywanych małych plików będzie optymalizowany inaczej niż taki, w którym przechowywane jest mniej plików o dużych rozmiarach. W przypadku jednego dużego systemu plików taka optymalizacja nie zadziała.
Systemy plików FreeBSD są odporne na awarie zasilania. W niesprzyjających okolicznościach może się jednak zdarzyć, że przerwa w dostawie prądu w krytycznym momencie spowoduje uszkodzenie struktury systemu plików. Przechowywanie danych w kilku systemach plików zwiększa szansę, że system uruchomi się ponownie, dzięki czemu łatwiej będzie odzyskać dane z kopii zapasowej.
Systemy plików mają stały rozmiar. Podczas instalacji FreeBSD tworzymy system plików o zadanym rozmiarze; później może się okazać, że trzeba powiększyć partycję. Niełatwo jest to zrobić inaczej, niż przez przygotowanie zapasowej kopii danych, utworzenie na nowo systemu plików o większych rozmiarach, oraz skopiowanie danych z powrotem.
We FreeBSD dostępne jest polecenie growfs(8), które pozwala na zwiększenie rozmiaru systemu plików w locie, pomijając wspomniane ograniczenie. |
Systemy plików przechowywane są na partycjach. Pojęcie partycji ma tu inne znaczenie niż popularnie stosowane (np. partycja systemu MS-DOS®), ze względu na uniksowy rodowód FreeBSD. Każda z partycji oznaczana jest literą, od a do h. Pojedyncza partycja może zawierać jeden system plików, dlatego też do systemów plików często odwołuje się albo poprzez miejsce ich zamontowania w głównym systemie plików, albo przez literowe oznaczenie partycji, na której dany system plików się znajduje.
Przestrzeń dyskowa jest również używana we FreeBSD jako przestrzeń wymiany, pełniąc w ten sposób rolę pamięci wirtualnej. Komputer może dzięki temu dysponować większą ilością pamięci, niż ma w rzeczywistości. Kiedy pamięci zaczyna brakować, FreeBSD odsyła niektóre nieużywane dane do przestrzeni wymiany, a gdy znów okażą się potrzebne, przenosi je z powrotem (odsyłając jednocześnie inne dane).
Z niektórymi partycjami związane są pewne konwencje dotyczące ich zastosowania.
| Patrycja | Konwencja |
|---|---|
| Zwykle zawiera główny system plików |
| Zwykle zawiera przestrzeń wymiany |
| Zwykle jest tego samego rozmiaru, co obejmujący ją segment. Dzięki temu programy działające na całym segmencie (na przykład wykrywające uszkodzone obszary dysku) mogą działać na partycji |
| Swego czasu partycja |
Każda partycja zawierająca system plików przechowywana jest na czymś, co we FreeBSD nosi nazwę segmentu. Jest to określenie tego, co wcześniej zwane było partycją, i ponownie jest to konsekwencją uniksowych korzeni FreeBSD. Segmenty są oznaczane liczbami od 1 do 4.
Numery segmentów, wraz z przedrostkiem s, poprzedzone są nazwą urządzenia. Tak więc "da0_s1_" jest pierwszym segmentem na pierwszym dysku SCSI. Na dysku mogą być najwyżej cztery fizyczne segmenty, można jednak tworzyć segmenty logiczne wewnątrz segmentów fizycznych specjalnego typu. Powstałe w ten sposób segmenty rozszerzone mają numery od 5 wzwyż, zatem "ad0_s5_" odpowiada pierwszemu rozszerzonemu segmentowi na dysku IDE. Urządzenia te są wykorzystywane przez systemy plików, które zajmują cały segment.
Segmenty, dyski "niebezpiecznie dedykowane" i inne dyski zawierają partycje, oznaczane literami od a do h. Litera dopisywana jest do nazwy urządzenia, więc "da0_a_" odpowiadać będzie partycji a na pierwszym dysku da, "niebezpiecznie dedykowanym". Z kolei "ad1s3_e_" oznacza piątą partycję w trzecim segmencie drugiego dysku IDE.
Własne oznaczenie ma także każdy dysk. Nazwa dysku składa się z symbolu określającego typ dysku, oraz numeru, określającego który to dysk. Dyski, inaczej niż segmenty, numerowane są od zera. Oznaczenia dysków zawiera najczęściej spotykane zwykle oznaczenia.
Gdy odwołujemy się do partycji, FreeBSD wymaga, byśmy podali również nazwę obejmującego ją segmentu i dysku. Z kolei gdy odwołujemy się do segmentu, podajemy również nazwę dysku. Kolejno podajemy więc nazwę dysku, s, numer segmentu, a na koniec literę partycji; patrz Przykładowe nazwy dysków, segmentów i partycji.
Schematyczny model dysku pokazuje schematyczny model dysku, z pomocą którego łatwiej będzie zrozumieć pewne rzeczy.
Gdy instalujemy FreeBSD, w pierwszej kolejności musimy przygotować segmenty na dysku, następnie w segmencie przeznaczonym dla FreeBSD utworzyć partycje, następnie wewnątrz partycji stworzyć system plików (lub przestrzeń wymiany) i określić miejsce jego montowania.
| Oznaczenie | Znaczenie |
|---|---|
ad | Dysk ATAPI (IDE) |
da | Dysk SCSI o dostępie bezpośrednim |
acd | CDROM ATAPI (IDE) |
cd | CDROM SCSI |
fd | Stacja dyskietek |
| Nazwa | Znaczenie |
|---|---|
| Pierwsza partycja ( |
| Piąta partycja |
Rysunek przedstawia pierwszy dysk IDE z punktu widzenia FreeBSD. Zakładamy, że dysk ma rozmiar 4 GB i jest podzielony na dwa segmenty (partycje w MS-DOS®) o rozmiarze po 2 GB. Pierwszy segment zawiera DOS-owy dysk C:, natomiast w drugim segmencie znajduje się przykładowa instalacja FreeBSD, z trzema partycjami oraz partycją wymiany.
Każda z trzech partycji przechowuje system plików. Na partycji a umieszczony jest główny system plików, na e znajduje się katalog /var, a na f katalog /usr.
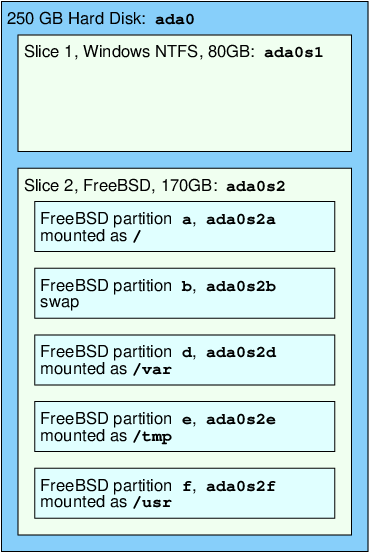
System plików można sobie wyobrazić jako drzewo, którego korzeniem jest /. /dev, /usr i inne podkatalogi katalogu głównego są gałęziami, z których mogą wyrastać kolejne gałęzie, na przykład /usr/local, itd.
Jest kilka powodów, dla których warto jest trzymać niektóre katalogi w oddzielnych systemach plików. W katalogu /var znajdują się podkatalogi log/ i spool/ oraz rozmaite pliki tymczasowe, z tego powodu może się on zapełnić. Zapełnienie głównego systemu plików jest raczej niepożądane, więc często zaleca się oddzielenie /var od /.
Często niektóre katalogi umieszczane są na odrębnych systemach plików ze względu na to, że znajdują się na osobnych dyskach fizycznych lub dyskach wirtualnych, jak na przykład pliki udostępniane poprzez Network File System lub napędy CDROM.
Systemy plików wymienione w pliku /etc/fstab są automatycznie montowane podczas ładowania systemu (prócz oznaczonych opcją noauto).
Wpisy w pliku /etc/fstab są następującej postaci:
urządzenie /punkt-montowania typ opcje archiwizacja nr-przebiegu
urządzenieNazwa pliku urządzenia (istniejącego), zgodnie z opisem w Device Names.
punkt-montowaniaKatalog (istniejący), w którym system plików ma być zamontowany.
typTyp systemu plików przekazywany poleceniu mount(8). We FreeBSD domyślnie jest to ufs.
opcjePierwszą opcją jest rw, jeśli w systemie plików ma być możliwy odczyt i zapis, albo ro, jeżeli dozwolony ma być tylko odczyt. W następnej kolejności podawane są inne opcje. Często stosowana jest opcja noauto, która zapobiega automatycznemu montowaniu systemu plików podczas uruchamiania systemu. Pozostałe opcje opisane są w dokumentacji systemowej mount(8).
archiwizacjaNa podstawie tej informacji program dump(8) stwierdza, które systemy plików mają być archiwizowane. Jeśli pole to zostanie pominięte, domyślnie przyjmowana jest wartość zero.
nr-przebieguNa podstawie tego pola wyznaczana jest kolejność, w jakiej systemy plików poddawane są sprawdzaniu. Systemy plików, które nie mają być sprawdzane, powinny mieć nr-przebiegu ustawiony na zero. Główny system plików (powinien być sprawdzony jako pierwszy) powinien mieć nr-przebiegu o wartości jeden, a inne systemy plików powinny mieć wpisaną wartość większą od jednego. Jeśli dwa lub więcej systemów plików będzie miało taki sam nr-przebiegu, wówczas fsck(8), o ile będzie to możliwe, podejmie próbę równoległego sprawdzenia tych systemów plików.
Więcej informacji o formacie pliku /etc/fstab oraz definiowanych w nim opcji dostępnych w podręczniku systemowym fstab(5)
mountPolecenie mount(8) jest głównym poleceniem używanym do montowania systemów plików.
W najprostszej postaci, używa się go następująco:
# mount urządzenie punkt-montowaniaPolecenie to ma mnóstwo opcji wymienionych w dokumentacji systemowej mount(8). Do najczęściej stosowanych należą:
-aMontowanie wszystkich systemów plików wymienionych w /etc/fstab. Nie są montowane systemy plików z opcją "noauto" oraz wykluczone przez opcję -t, jak również systemy plików już zamontowane.
-dWykonanie wszystkiego, oprócz faktycznego wywołania funkcji systemowej montowania. W połączeniu z opcją -v można w ten sposób sprawdzić, co tak naprawdę mount(8) stara się zrobić.
-fWymuszenie montowania nieuporządkowanego systemu plików (niebezpieczne), lub wymuszenie odebrania prawa do zapisu przy zmianie trybu montowania systemu plików z trybu "odczyt i zapis" na "tylko do odczytu".
-rMontowanie systemu plików w trybie tylko do odczytu. Taki sam efekt ma zastosowanie opcji -o z argumentem ro (bądź rdonly w wersjach FreeBSD wcześniejszych niż 5.2).
-t typMontowanie systemu plików o określonym typie. Przy zastosowaniu opcji -a montowane są tylko systemy plików podanego typu.
Domyślnym typem systemu plików jest "ufs".
-uUaktualnienie opcji montowania systemu plików.
-vPokazywanie dodatkowych komunikatów.
-wMontowanie w trybie odczytu i zapisu.
Opcji -o towarzyszy lista oddzielonych przecinkami parametrów, oto niektóre z nich:
Ignorowanie obecnych w systemie plików urządzeń specjalnych. Przydatna opcja, jeśli chodzi o bezpieczeństwo.
Wyłączenie uruchamiania programów wykonywalnych na systemie plików. Również służy bezpieczeństwu.
Ignorowanie bitów setuid i setgid w systemie plików. Kolejna opcja służąca bezpieczeństwu.
umount CommandPoleceniu umount(8) należy podać jako parametr punkt montowania, nazwę urządzenia bądź opcję -a lub -A.
Każdej z form wywołania polecenia można podać opcję -f, która nakazuje dokonać bezwarunkowego odmontowania, oraz opcję -v, powodującą wypisywanie dodatkowych komunikatów. Należy mieć na uwadze, że raczej nie zaleca się korzystania z -f. Bezwarunkowe odmontowywanie systemu plików może doprowadzić do awarii systemu lub uszkodzenia danych znajdujących się w danym systemie plików.
Opcje -a oraz -A służą do odmontowania wszystkich zamontowanych systemów plików, lub systemów plików wybranych typów, określonych w opcji -t. Opcja -A nie dokonuje próby odmontowania głównego systemu plików.
FreeBSD jest wielozadaniowym systemem operacyjnym. Oznacza to, że korzystając z systemu mamy wrażenie, że wiele programów działa jednocześnie. Działający w danej chwili program nazywany jest procesem. Po wydaniu dowolnego polecenia uruchamiany jest przynajmniej jeden proces. Są również procesy systemowe, które działają nieprzerwanie, zapewniając prawidłowe funkcjonowanie systemu.
Każdemu procesowi przypisany jest jednoznaczny numer zwany identyfikatorem procesu, lub po prostu PID. Podobnie jak plik, również każdy proces ma swojego właściciela i grupę. Na podstawie informacji o właścicielu i grupie system operacyjny przydziela procesowi prawa do otwierania plików i urządzeń, przy zastosowaniu opisanych wcześniej praw dostępu. Większość procesów ma swój proces macierzysty; jest to proces, który uruchomił dany proces. Przykładowo, kiedy wydajemy polecenia w powłoce, to zarówno powłoka jest procesem, jak i każde z wykonanych poleceń. Procesem macierzystym każdego uruchomionego w ten sposób procesu będzie powłoka. Wyjątkiem jest specjalny proces zwany init(8). init jest pierwszym procesem, więc jego PID jest zawsze równy 1. Proces init uruchamiany jest przez jądro systemu podczas ładowania FreeBSD.
Są dwa bardzo przydatne polecenia, które pozwalają zobaczyć, jakie procesy są uruchomione: ps(1) i top(1). Polecenie ps pokazuje statyczną listę działających w danej chwili procesów, uwzględniając informacje takie jak PID-y procesów, zużywaną pamięć, wydane do uruchomienia procesów polecenia, itd. Polecenie top wyświetla listę uruchomionych procesów, która jest co kilka sekund uaktualniana, dzięki czemu możemy na bieżąco śledzić, czym zajmuje się komputer.
Domyślnie ps pokazuje tylko działające procesy należące do użytkownika wydającego polecenie. Na przykład:
% ps
  PID  TT  STAT      TIME COMMAND
  298  p0  Ss     0:01.10 tcsh
 7078  p0  S      2:40.88 xemacs mdoc.xsl (xemacs-21.1.14)
37393  p0  I      0:03.11 xemacs freebsd.dsl (xemacs-21.1.14)
48630  p0  S      2:50.89 /usr/local/lib/netscape-linux/navigator-linux-4.77.bi
48730  p0  IW     0:00.00 (dns helper) (navigator-linux-)
72210  p0  R+     0:00.00 ps
  390  p1  Is     0:01.14 tcsh
 7059  p2  Is+    1:36.18 /usr/local/bin/mutt -y
 6688  p3  IWs    0:00.00 tcsh
10735  p4  IWs    0:00.00 tcsh
20256  p5  IWs    0:00.00 tcsh
  262  v0  IWs    0:00.00 -tcsh (tcsh)
  270  v0  IW+    0:00.00 /bin/sh /usr/X11R6/bin/startx -- -bpp 16
  280  v0  IW+    0:00.00 xinit /home/nik/.xinitrc -- -bpp 16
  284  v0  IW     0:00.00 /bin/sh /home/nik/.xinitrc
  285  v0  S      0:38.45 /usr/X11R6/bin/sawfish
Jak widzimy, ps(1) wyświetla informacje w kilku kolumnach. W kolumnie PID pokazywany jest omówiony wcześniej identyfikator procesu. PID-y są przydzielane po kolei od 1 do 99999 i znów od początku, gdy się skończą. Kolumna TT pokazuje terminal, na którym działa program - na razie nie będziemy się tym zajmować. W kolumnie STAT przedstawiony jest stan procesu, jego także na razie nie będziemy omawiać. TIME pokazuje czas wykorzystywania procesora przez dany proces, niekoniecznie odpowiada on czasowi, jaki upłynął od uruchomienia programu, ponieważ wiele programów przez długi czas oczekuje na jakieś zdarzenie, a dopiero potem wykorzystuje procesor. Ostatnia kolumna, COMMAND, pokazuje polecenie, którym uruchomiony został program.
ps(1) ma wiele rozmaitych opcji, które mają wpływ na wyświetlane informacje. Jedną z najbardziej przydatnych kombinacji opcji jest auxww. Opcja a pokazuje informacje o wszystkich działających procesach, również nie należących do nas. u pokazuje nazwę użytkownika, do którego należy proces, jak również wykorzystanie pamięci. x pokazuje informacje o procesach - demonach. Opcja ww nakazuje, by polecenie ps(1) wyświetlało pełną linię polecenia, nie obcinając jej, by zmieściła się na ekranie.
Informacje pokazywane przez top(1) wyglądają podobnie. Oto przykład:
% top
last pid: 72257;  load averages:  0.13,  0.09,  0.03    up 0+13:38:33  22:39:10
47 processes:  1 running, 46 sleeping
CPU states: 12.6% user,  0.0% nice,  7.8% system,  0.0% interrupt, 79.7% idle
Mem: 36M Active, 5256K Inact, 13M Wired, 6312K Cache, 15M Buf, 408K Free
Swap: 256M Total, 38M Used, 217M Free, 15% Inuse

  PID USERNAME PRI NICE  SIZE    RES STATE    TIME   WCPU    CPU COMMAND
72257 nik       28   0  1960K  1044K RUN      0:00 14.86%  1.42% top
 7078 nik        2   0 15280K 10960K select   2:54  0.88%  0.88% xemacs-21.1.14
  281 nik        2   0 18636K  7112K select   5:36  0.73%  0.73% XF86_SVGA
  296 nik        2   0  3240K  1644K select   0:12  0.05%  0.05% xterm
48630 nik        2   0 29816K  9148K select   3:18  0.00%  0.00% navigator-linu
  175 root       2   0   924K   252K select   1:41  0.00%  0.00% syslogd
 7059 nik        2   0  7260K  4644K poll     1:38  0.00%  0.00% mutt
...
Informacje podzielone są na dwie części. Nagłówek (pierwsze pięć wierszy) zawiera PID ostatnio uruchomionego procesu, średnie obciążenie systemu (miara zapracowania systemu), czas działania systemu (od ostatniego uruchomienia) oraz aktualny czas. Inne liczby w nagłówku informują o liczbie działających procesów (w przykładzie 47), jak dużo pamięci i przestrzeni wymiany jest zajęte, oraz ile czasu system przebywa w różnych stanach procesora.
Pod nagłówkiem w kilku kolumnach pokazane są informacje zbliżone do przedstawianych przez ps(1). Podobnie można tu znaleźć PID procesu, nazwę użytkownika, czas zajmowania procesora, oraz polecenie, którym uruchomiono proces. top(1) pokazuje domyślnie także rozmiar pamięci zajmowanej przez proces. Ta ostatnia informacja podzielona jest na dwie kolumny; jedna odpowiada całkowitemu rozmiarowi, druga rozmiarowi rezydentnemu. Całkowity rozmiar oznacza, ile pamięci było potrzebne programowi, z kolei rozmiar rezydentny informuje, ile pamięci wykorzystuje program w danej chwili. W przykładzie widać, że getenv(3) potrzebował prawie 30 MB pamięci RAM, jednak obecnie wykorzystuje tylko 9 MB.
top(1) automatycznie aktualizuje wyświetlane informacje co dwie sekundy; można to zmienić opcją s.
Kiedy korzystamy z edytora tekstu, możemy go w prosty sposób obsługiwać, wczytywać pliki, itp. Jest to możliwe dzięki cechom samego edytora oraz dzięki temu, że edytor jest podłączony do terminala. Jednakże, niektóre programy pracują bez ciągłej komunikacji z użytkownikiem, są więc odłączone od terminala. Przykładem takiego programu może być serwer WWW, nieustannie odpowiadający na żądania pochodzące z sieci, bez potrzeby komunikacji z użytkownikiem. Inny przykład to programy przesyłające emaile pomiędzy komputerami.
Takie programy nazywane są demonami (ang. daemons). Demony to postaci z mitologii greckiej - niewielkie usłużne istoty, ani dobre, ani złe, które w rozmaity sposób pomagały ludziom. Podobnie pomagają dzisiejsze serwery pocztowe i serwery WWW. Dlatego właśnie od długiego czasu maskotką BSD jest wesoły demon z widłami i w
Przyjęto, iż programy uruchamiane jako demony mają nazwy zakończone literą "d". BIND (Berkeley Internet Name Daemon) jest serwerem nazw uruchamianym przez program named, serwer WWW Apache nosi nazwę httpd, demon kolejkowania drukarki (line printer spooling daemon) to lpd, itd. Nie jest to sztywna reguła, lecz przyjęta konwencja; na przykład główny demon pocztowy programu Sendmail nazywa się sendmail, a nie jak można by przypuszczać maild.
Niekiedy istnieje potrzeba komunikacji z procesem - demonem. Odbywa się ona poprzez sygnały, to znaczy możemy porozumieć się z demonem (lub jakimkolwiek działającym procesem) wysyłając mu sygnał. Są różne rodzaje sygnałów, które możemy wysłać - niektóre z nich mają określone znaczenie, inne są odpowiednio interpretowane przez aplikację, co powinno być opisane w dokumentacji aplikacji. Sygnał możemy wysłać tylko do procesu, którego jesteśmy właścicielem. Wysłanie sygnału do procesu należącego do kogoś innego za pośrednictwem kill(1) lub kill(2) spowoduje odmowę dostępu. Wyjątkiem jest użytkownik root, który może wysyłać sygnały do dowolnego procesu, niezależnie od jego właściciela.
Zdarza się, że samo FreeBSD również wysyła aplikacjom sygnały. Jeżeli niewłaściwie napisany program próbuje dostać się do niedostępnego dla niego obszaru pamięci, FreeBSD wysyła procesowi sygnał Segmentation Violation (SIGSEGV). Aplikacja może skorzystać z funkcji systemowej alarm(3), wówczas po upłynięciu pewnego czasu zostanie do niej wysłany sygnał Alarm (SIGALRM). I tak dalej.
Do zatrzymania procesu można wykorzystać dwa sygnały: SIGTERM i SIGKILL. Pierwszy z nich jest łagodnym sposobem unicestwienia procesu; proces może przechwycić ten sygnał, następnie zakończyć swoją pracę, np. zamykając pliki, które otworzył. Czasami proces może zignorować sygnał SIGTERM, jeśli akurat zajmuje się czymś, co nie powinno być przerywane.
Sygnał SIGKILL nie może zostać zignorowany. Działa według zasady "Nie obchodzi mnie, co robisz, w tej chwili przestań". Wysłanie procesowi sygnału SIGKILL powoduje, iż FreeBSD natychmiast go wstrzymuje.
Inne użyteczne sygnały to SIGHUP, SIGUSR1 i SIGUSR2. Są to sygnały ogólnego przeznaczenia, różne aplikacje reagują na nie w różny sposób.
Powiedzmy, że dokonaliśmy zmiany w pliku konfiguracji serwera WWW, i chcemy nakazać serwerowi, aby konfiguracja została ponownie wczytana. Moglibyśmy zatrzymać i ponownie uruchomić httpd, ale ubocznym efektem takiego postępowania byłaby chwilowa przerwa w pracy serwera, co jest raczej niepożądane. Większość demonów działa w taki sposób, iż po otrzymaniu sygnału SIGHUP dokonują ponownego przeczytania swojego pliku konfiguracyjnego. Dzięki temu zamiast unicestwiania i ponownego uruchamiania httpd możemy wysłać mu sygnał SIGHUP. Nie jest jednoznacznie określone, jak procesy reagują na sygnał SIGHUP, dlatego różne demony mogą zachowywać się w różny sposób - w razie niepewności warto zapoznać się z dokumentacją konkretnego demona.
Sygnały wysyłane są przy użyciu polecenia kill(1), jak w poniższym przykładzie.
Procedure: Wysyłanie sygnału do procesu
W tym przykładzie zaprezentowano wysyłanie sygnału do inetd(8). Plik konfiguracyjny dla inetd to /etc/inetd.conf. Wysłanie sygnału SIGHUP spowoduje ponowne przeczytanie tego pliku.
Trzeba ustalić PID procesu, do którego wysyłać będziemy sygnał - do tego celu posłużą polecenia ps(1) i grep(1). Polecenia grep(1) używamy do odnalezienia podanego ciągu znaków. Ponieważ polecenia wydajemy jako zwykły użytkownik, a inetd(8) działa jako root, polecenie ps(1) musimy wywołać z opcją ax.
% ps -ax | grep inetd
198 ?? IWs 0:00.00 inetd -wWSygnał wysyłamy przy pomocy polecenia kill(1). Najpierw skorzystamy jednak z polecenia su(1) by stać się rootem, gdyż inetd(8) działa jako root.
% su

# /bin/kill -s HUP 198
Podobnie jak wiele poleceń w systemach UNIX®, kill(1) nie wyświetla żadnego komunikatu w przypadku powodzenia. Jeżeli natomiast sygnał został wysłany do procesu, którego nie jest się właścicielem, pojawi się informacja: kill: PID: Operation not permitted (niedozwolona operacja). Błędne wpisanie PID-u spowoduje albo wysłanie sygnału do niewłaściwego procesu, co może skończyć się źle, albo też wysłanie sygnału do PID-u, który nie jest w danej chwili wykorzystywany - pojawi się wówczas komunikat kill: PID: No such process (nie ma takiego procesu).
Dlaczego warto korzystać z /bin/kill?W wielu powłokach polecenie |
Inne sygnały wysyła się tą samą metodą, wystarczy zastąpić TERM lub KILL w odpowiedni sposób.
W codziennej pracy z FreeBSD bardzo często wykorzystywany jest interfejs linii poleceń, zwany powłoką (ang. shell). Podstawowym zadaniem powłoki jest przyjmowanie poleceń i wykonywanie ich. Wiele powłok wyposażonych jest także w dodatkowe funkcje ułatwiające pracę, np. usprawnienia zarządzania plikami, dopasowywanie nazw plików, ułatwienia korzystania z linii poleceń, makropolecenia i zmienne środowiskowe. We FreeBSD dostępnych jest kilka powłok, np. Bourne Shell sh i ulepszony C-shell tcsh. Wiele innych powłok, jak choćby zsh czy bash, można znaleźć w kolekcji portów FreeBSD.
Której z powłok najlepiej jest używać? To właściwie kwestia gustu. Dla programistów C najwygodniejsze mogą być powłoki o składni wzorowanej na języku C, np. tcsh. Użytkownikom Linuksa i tym, dla których interfejs linii poleceń systemów 8unix; jest nowością, można polecić bash. Do wyboru jest wiele powłok, każda z nich ma pewne charakterystyczne tylko dla niej właściwości, które niekoniecznie będą działać w każdych warunkach.
Często spotykanym udogodnieniem powłoki jest uzupełnianie nazw plików. Po wpisaniu kilku pierwszych liter polecenia lub nazwy pliku powłoka potrafi zwykle uzupełnić dalszy ciąg polecenia lub nazwy, dzieje się to po wciśnięciu klawisza Tab. Przyjmijmy przykładowo, że istnieją dwa pliki o nazwach foobar i foo.bar. Chcemy usunąć plik foo.bar. Możemy więc wydać polecenie: rm fo[Tab].[Tab].
Powłoka wyświetli: rm foo[BIIP].bar.
Napis [BIIP] oznacza sygnał dźwiękowy, będący informacją od powłoki, że uzupełnienie nazwy pliku nie było możliwe, ponieważ można dopasować więcej niż jedną nazwę. Zarówno foobar jak i foo.bar zaczynają się od fo. Powłoka mogła jednakże uzupełnić początek, czyli foo. Teraz można wpisać kropkę . i ponownie wcisnąć Tab, tym razem powłoka uzupełni nazwę do końca.
Inną cechą powłoki są zmienne środowiskowe. Przechowywane są one w przestrzeni środowiska powłoki w postaci par "nazwa = wartość". Przestrzeń środowiska jest widoczna dla każdego programu uruchamianego przez powłokę, dlatego też przechowuje się tam wiele parametrów konfiguracyjnych dla programów. Oto najczęściej spotykane zmienne środowiskowe wraz z krótkim opisem:
| Zmienna | Opis |
|---|---|
| Nazwa aktualnie zalogowanego użytkownika. |
| Lista katalogów zawierających pliki wykonywalne oddzielona przecinkami. |
| Nazwa ekranu X11, jeśli takowy jest dostępny. |
| Wykorzystywana powłoka. |
| Nazwa terminala użytkownika, wykorzystywana do określenia właściwości terminala. |
| Zapis z bazy termcap zawierający sekwencje kodów odpowiadających różnym funkcjom terminala. |
| Typ systemu operacyjnego, np. FreeBSD. |
| Architektura sprzętowa, na jakiej działa system. |
| Preferowany przez użytkownika edytor tekstu. |
| Preferowany przez użytkownika program wyświetlający pliki tekstowe. |
| Lista katalogów zawierających dokumentację systemową oddzielona przecinkami. |
Sposób odczytywania i ustawiania zmiennych środowiskowych zależy od rodzaju używanej powłoki. Na przykład w powłokach wzorowanych na C, jak tcsh i csh, do ustawiania i przeglądania zmiennych środowiskowych służy polecenie setenv, natomiast w powłokach Bourne’a, czyli sh i bash, do tych celów wykorzystywane jest polecenie export. Przykładowo, aby zmienić zmienną środowiskową EDITOR na /usr/local/bin/emacs w powłoce csh lub tcsh, należy wydać polecenie:
% setenv EDITOR /usr/local/bin/emacsA w powłokach Bourne’a:
% export EDITOR="/usr/local/bin/emacs"W większości powłok można wyświetlić wartość zmiennej środowiskowej przez poprzedzenie jej nazwy znakiem $. Dla przykładu, polecenie echo $TERM pokaże wartość zmiennej $TERM, ponieważ powłoka zastępuje wyrażenie $TERM wartością zmiennej i przekazuje ją do echo.
Wiele znaków, zwanych meta-znakami, traktowanych jest przez powłoki w specjalny sposób. Najczęściej wykorzystywanym jest *, oznaczający dowolny ciąg znaków w nazwie pliku, umożliwiający wykonywanie operacji na wielu plikach. Przykładowo, wywołanie echo * jest prawie identyczne z wywołaniem ls, ponieważ powłoka przekazuje do echo nazwy wszystkich plików pasujących *.
Jeśli potrzeba, by powłoka nie interpretowała znaku jako znak specjalny, należy go poprzedzić znakiem ukośnika (\). Wywołanie echo $TERM powoduje wypisanie ustawionego typu terminala, podczas gdy efektem polecenia echo \$TERM jest po prostu napis $TERM.
Najłatwiej jest zmienić powłokę przy użyciu polecenia chsh. Wywołanie tego polecenia uruchomi edytor wskazany przez zmienną EDITOR, lub edytor vi, jeśli nie jest ona zdefiniowana. Następnie należy zmienić nazwę powłoki w wierszu "Shell:".
Można też skorzystać z chsh z opcją -s, która automatycznie zmieni powłokę, bez uruchamiania edytora. Poniżej przedstawiono wywołanie zmieniające powłokę na bash:
% chsh -s /usr/local/bin/bashWybrana powłoka musi być wymieniona w pliku /etc/shells. Jeśli powłokę zainstalowano z kolekcji portów powinna zostać dopisana automatycznie. Jeśli natomiast przeprowadzono ręczną instalację powłoki, trzeba to zrobić samemu. Dla przykładu, jeśli powłoka Oraz uruchomić |
Konfiguracja FreeBSD polega głównie na edytowaniu plików tekstowych. Z tego właśnie powodu, dobrze byłoby zapoznać się z edytorami tekstu. FreeBSD posiada ich kilka, a kolejne można doinstalować z drzewa portów.
Najłatwiejszym do nauki i w użyciu jest edytor ee, co jest skrótem od Easy Editor (ang. Łatwy Edytor). Aby uruchomić ee, należy użyć polecenia ee plik, gdzie plik jest to, co chcemy edytować. Na przykład, aby wyedytować plik /etc/rc.conf, napiszemy ee /etc/rc.conf. Gdy już jesteśmy w ee, możemy zauważyć, że wszystkie niezbędne komendy są wypisane u góry ekranu. Znak ^ oznacza wciśnięty klawisz Ctrl. Innymi słowy ^e oznacza, że należy trzymać Ctrl i wcisnąć klawisz e. Aby wyjść z ee, wciśnij Esc, następnie wybierz leave editor (opuść edytor). Edytor zapyta, czy zachować zmiany, jeśli plik został zmodyfikowany.
FreeBSD w swoich zasobach ma także potężny edytor tekstu, jakim jest vi. W kolekcji portów dostępny jest także Emacs, czy vim (editors/emacs i editors/vim). Edytory te oferują dużo większą funkcjonalność, ale oczekują w zamian większego obeznania użytkownika z zasadami ich działania, ponadto ich obsługa jest trudniejsza do nauki. Jednakże, jeśli planujesz edytować wiele tekstu, nauka Emacs lub vim zwróci się w długim okresie w postaci zaoszczędzonego czasu.
Mianem urządzeń określa się komponenty komputera, takie jak dysk, drukarka, karta graficzna czy klawiatura. Podczas ładowania systemu FreeBSD większość wyświetlanych komunikatów dotyczy wykrywanych urządzeń. Komunikaty startowe dostępne są do późniejszego przeglądania w pliku /var/run/dmesg.boot.
Przykładowo, acd0 odpowiada pierwszemu napędowi CDROM IDE, natomiast kbd0 oznacza klawiaturę.
Dostęp do większości urządzeń w systemie operacyjnym UNIX® odbywa się poprzez specjalne pliki, zwane plikami urządzeń, znajdujące się w katalogu /dev.
Kiedy wyposażamy komputer w nowe urządzenie, lub kompilujemy jądro z obsługą dodatkowych urządzeń, konieczne może okazać się utworzenie nowych plików urządzeń.
DEVFS (DEVice File System)System plików urządzeń, zwany DEVFS, udostępnia przestrzeń nazw urządzeń jądra jako część przestrzeni nazw głównego systemu plików. DEVFS zajmuje się obsługą systemu plików urządzeń, dzięki czemu nie trzeba samodzielnie tworzyć bądź modyfikować plików urządzeń.
Więcej informacji znaleźć można w dokumentacji systemowej devfs(5).
By zrozumieć czemu FreeBSD używa formatu elf(5), musimy wpierw poznać trzy obecnie "dominujace" formaty plików wykonywalnych w systemach UNIX®:
Najstarszy i najbardziej "klasyczny" format w Uniksie. Wykorzystuje krótki nagłówek z magicznym numerem na samym początku, często wykorzystywanym do określenia rodzaju pliku (szczegółowy opis dostępny jest w a.out(5)). Na plik składają się trzy segmenty: .text, .data i .bss oraz tablice symboli i ciągów tekstowych.
COFF
Format obiektowy pochodzący z SVR3. W tym formacie sekcja tablic w wchodzi już w skład nagłówka, tak więc możliwe jest zawarcie w pliku więcej sekcji niż tylko .text, .data i .bss.
Następca COFF zawierający wiele dodatkowych sekcji o 32- bądź nawet 64-bitowych wartościach. Jednym, acz wielkim minusem jest fakt, iż przy projektowaniu formatu ELF również założono, że na każdą architekturę sprzętową będzie istniał tylko jeden interfejs ABI. Okazało się natomiast, iż takie założenie jest błędne nawet w świecie komercyjnych SYSV (z którego pochodzą przynajmniej trzy ABI: SVR4, Solaris i SCO).
Sposobem na rozwiązanie tego problemu we FreeBSD są narzędzia do metkowania plików wykonywalnych ELF informacjami, z którymi ABI jest on zgodny. Więcej informacji dostępnych jest w podręczniku systemowym brandelf(1).
System FreeBSD pochodzi z "klasycznego" obozu. Wykorzystywał on zatem format a.out(5) - technologię wypróbowaną w wielu pokoleniach systemów BSD i z powodzeniem stosowaną aż do gałęzi 3.X. Mimo, że skompilowanie i uruchomienie w sposób natywny plików binarnych ELF (a także jądra) było możliwe we FreeBSD już od pewnego czasu, Projekt oficjalnie opierał się przed migracją do formatu ELF jako podstawowego. Dlaczego? Otóż, gdy obóz linuksowy wykonał ten bolesny krok ku ELF nie udało się tak łatwo uciec od formatu a.out. Wynikało to przede wszystkim z faktu, iż niezbyt elastyczny plan migracji bazował na mechanizmie współdzielonych bibliotek, których modyfikacja nastręczała wielu trudności zarówno producentom sprzętu jak i projektantom. Dopiero od momentu gdy narzędzia dostępne dla ELF zaoferowały sposób rozwiązania problemu ze współdzielonymi bibliotekami, zaczęły być postrzegane ogólnie jako "droga do przodu", a tym samym koszty migracji mogły zostać uznane za niezbędne do poniesienia. Mechanizm współdzielonych bibliotek FreeBSD w dużej mierze przypomina mechanizm z SunOS™ Sun’a i jako taki jest bardzo łatwy w użyciu.
Skąd więc tyle różnych formatów?
W zamierzchłych czasach do dyspozycji był prosty sprzęt komputerowy. Ów prosty sprzęt obsługiwał mały, prosty system. Stąd też format a.out był całkowicie odpowiednim do prezentacji plików binarnych w tym prostym systemie (PDP-11). Gdy UNIX® został przeniesiony z tego prostego systemu na platformy typu Motorola 68k czy VAXen, zachowany został format a.out, zdecydowanie wystarcząjacy dla wczesnych wersji Uniksa.
Pewien czas później, jakiś bystry inżynier sprzętowy stwierdził że gdyby potrafił zmusić oprogramowanie do robienia kilku obskurnych sztuczek, wówczas mógłby pozbyć się kilku bramek z układu scalonego i zmusić CPU do szybszej pracy. Pomimo, że format a.out potrafił współpracować z tym nowym rodzajem sprzętu (zwanego wówczas RISC) to mimo wszystko nie był najlepszym do tego formatem. Dlatego też rozpoczęto prace nad innymi formatami binarnymi, które miały osiągnąć lepsze wyniki niż ograniczony, prosty a.out mógł zaoferować. Stworzone zostały COFF, ECOFF oraz kilka mniej znanych formatów, nim powstał ELF.
Kolejnym problemem okazał się wzrost rozmiarów programów przy względnie małej pojemności dysków oraz pamięci fizycznych, a także zwiększeniu stopnia skomplikowania pamięci wirtualnej VM. Tak też narodziła się koncepcja współdzielonych bibliotek. Mimo, że ów postęp osiągnięty był przy pomocy formatu a.out zakres jego przydatności był stale rozciągany, wraz z każdą nową funkcją. Pojawiła się konieczność dynamicznego wczytywanie pewnych rzeczy już w trakcie uruchamiania programu czy zapisywania części programu zaraz po wykonaniu kodu init w pamięci lub przestrzeni wymiany. Również języki programowania stawały się coraz bardziej wyrafinowane. Wiele poprawek wprowadzonych do formatu a.out umożliwiały realizację kolejnych funkcji, przy czym z reguły działały one tylko przez pewien czas. Niestety, format a.out stał się z czasem niezdolny do rozwiązywania wszystkich problemów bez wciąż rozrastającego się narzutu w kodzie i poziomu skomplikowania. Mimo, że ELF potrafił rozwiązać wiele z ówczesnych problemów, zmiana formatu binarnego, który generalnie działał, wciąż była wielką uciążliwością. Dlatego też ELF musiał poczekać aż bardziej bolesnym okazało się pozostanie przy a.out niż przejście do ELF.
Wraz z upływem czasu, narzędzia kompilacyjne, z których FreeBSD wywodzi własne narzędzia (przede wszystkim assembler i loader), wyewoluowały w dwa równoległe projekty. Odmiana FreeBSD dała współdzielone biblioteki oraz poprawki kilku błędów. Ludzie z GNU, którzy oryginalnie napisali te programy, przepisali je na nowo i dodali proste kompilatory wskrośne, pozwalające na pracę w różnych formatach. Nowy pakiet narzędzi GNU (binutils) wspiera kompilowanie wskrośne, format ELF, współdzielone biblioteki, rozszerzenia C++, itp. Dodatkowo, wielu producentów sprzętu przygotowuje binaria ELF. Jest to zatem dobra rzecz dla FreeBSD, że je obsługuje.
Format ELF oferuje większą rozszerzalność niz a.out. Narzędzia ELF są lepiej przygotowywane i oferują kompilację wskrośną, co jest istotne dla wielu programistów. Co prawda ELF może być trochę wolniejszy niż a.out, jednakże próba pomiaru może być trudna. Istnieje również wiele innych szczegółów różnych dla obydwu formatów, m.in. sposób mapowania stron, obsługi kodu init itp. Co prawda, żadne z nich nie jest istotne, jednakże różnice istnieją. Z czasem, wsparcie dla a.out zostanie wstrzymane z jadra GENERIC i ostatecznie usunięte z jądra gdy tylko zniknie potrzeba obsługi programów a.out.
Najdokładniejszą dokumentacją we FreeBSD jest dokumentacja systemowa. Dla prawie każdego dostępnego w systemie programu przygotowana jest krótka instrukcja obsługi, omawiająca podstawy jego działania i rozmaite opcje. Dokumentację możemy przeglądać przy pomocy polecenia man. Korzystanie z tego polecenia jest bardzo proste:
% man poleceniepolecenie jest nazwą polecenia, o którym chcemy uzyskać informacje. Na przykład, aby dowiedzieć się czegoś na temat polecenia ls wpisujemy:
% man lsDokumentacja systemowa podzielona jest na ponumerowane części:
Polecenia dostępne dla użytkowników.
Funkcje systemowe i kody błędów.
Funkcje z bibliotek języka C.
Sterowniki urządzeń.
Formaty plików.
Gry i inne rozrywki.
Różne informacje.
Polecenia służące do zarządzania systemem.
Informacje dla programistów jądra.
Niekiedy takie samo zagadnienie może pojawić się w kilku częściach dokumentacji. Na przykład istnieje polecenie chmod, oraz funkcja systemowa chmod(). W taki wypadku możemy wybrać interesującą nas część dokumentacji, podając jej numer jako parametr polecenia man:
% man 1 chmodW efekcie pokazana zostanie dokumentacja polecenia chmod. Zgodnie z przyjętą konwencją, numer odpowiedniej części dokumentacji podawany jest w nawiasach, tak więc chmod(1) odpowiada poleceniu chmod, natomiast chmod(2) odpowiada funkcji systemowej.
W opisany powyżej sposób możemy dowiedzieć się, jak korzystać z danego polecenia, jeśli znamy jego nazwę. Co zrobić, jeśli nie możemy sobie przypomnieć nazwy polecenia? Otóż, man potrafi również wyszukiwać wybranych słów kluczowych w opisach poleceń, służy do tego opcja -k:
% man -k mailWpisanie takiego polecenia spowoduje wyświetlenie listy poleceń, których opisy zawierają słowo kluczowe "mail". Takie działanie jest równoważne skorzystaniu z polecenia apropos.
Jeśli więc, przeglądając zawartość katalogu /usr/bin, zastanawiamy się, do czego właściwie służą znajdujące się tam polecenia, możemy wpisać:
% cd /usr/bin
% man -f *
lub
% cd /usr/bin
% whatis *
W obu przypadkach efekt będzie taki sam.
Do FreeBSD dołączonych jest wiele programów i narzędzi stworzonych przez Free Software Foundation (FSF). Prócz dokumentacji systemowej, do tych programów dołączone są bardziej rozbudowane dokumenty hipertekstowe, zwane plikami info. Można je przeglądać poleceniem info, lub trybem info emacsa, o ile emacs został zainstalowany.
By skorzystać z polecenia info(1), wpisujemy:
% infoKrótkie wprowadzenie pojawia się po wpisaniu h. Spis poleceń jest dostępny po wpisaniu ?.
System FreeBSD rozprowadzany jest wraz z bogatą kolekcją narzędzi systemowych. Tym nie mniej, stanowi to absolutne minimum. Szybko pojawia się bowiem potrzeba zainstalowania dodatkowego oprogramowania, by móc rozpocząć prawdziwą pracę z systemem. FreeBSD dostarcza dwóch dopełniających się metod instalacji oprogramowania: kolekcję portów FreeBSD (kompilacja programów ze źródeł) i system pakietów (instalacja z gotowych binariów). Każda z tych metod może zostać wykorzystana do instalacji najnowszych wersji ulubionego oprogramowania z lokalnych nośników bądź bezpośrednio z sieci.
Przeczytawszy ten rozdział dowiemy się:
Jak instalować oprogramowanie innych producentów dostarczane w postaci binarnej.
Jak kompilować oprogramowanie innych producentów z wykorzystaniem kolekcji portów.
Jak usunąć poprzednio zainstalowane pakiety bądź porty.
Jak zmienić domyślne wartości wykorzystywane przy kompilacji portów.
Jak odnaleźć właściwe oprogramowanie.
Jak zaktualizować wykorzystywane aplikacje.
Osoby, które już wcześniej pracowały z systemami UNIX® wiedzą, że typowy proces instalacji oprogramowania sprowadza się mniej więcej do następujących punktów:
Pobranie programu, który może być rozprowadzany w postaci kodu źródłowego bądź binarnej.
Rozpakowania programu z formatu w jakim jest rozprowadzany (najczęściej jest to plik tar skompresowany za pomocą compress(1), gzip(1) lub bzip2(1)).
Odnalezienie dokumentacji (najczęściej plik INSTALL lub README bądź pliki w podkatalogu doc/) i zapoznanie się z instrukcjami instalacji programu.
Kompilacja programu, jeśli rozprowadzany jest w postaci źródłowej. Może to wymagać również wykonania dodatkowych czynności, jak np. edycji pliku Makefile bądź uruchomienia skryptu configure.
Weryfikacja i instalacja aplikacji.
Wszystko to przy założeniu, że w między czasie nie pojawiły się żadne trudności. Instalacja oprogramowania, które nie było przygotowywane z myślą o FreeBSD może wymagać nawet modyfikacji kodu źródłowego nim zacznie poprawnie funkcjonować.
Oczywiście, we FreeBSD można instalować oprogramowanie "tradycyjnym" sposobem. Jednakże system ten posiada dwa rozwiązania, które potrafią zaoszczędzić mnóstwo czasu i trudu: pakiety i porty. W chwili pisania tego tekstu, dostępnych za pomocą tych systemów jest przeszło 36000 aplikacji.
Dla każdego programu dostępny jest do pobrania pojedynczy pakiet, który zawiera skompilowane kopie plików aplikacji, zarówno plików uruchomieniowych jak i konfiguracyjnych czy dokumentacji. Pobranym plikiem można manipulować za pomocą poleceń pkg_add(1), pkg_delete(1), pkg_info(1), itp. Nowe programy można instalować za pomocą zaledwie jednego polecenia.
Port natomiast, jest zbiorem plików mających za zadanie zautomatyzować proces kompilacji danego programu z kodu źródłowego.
O ile typowa kompilacja programu składa się z wielu czynności wykonywanych przez użytkownika, o tyle pliki składające się na port zawierają dostateczną ilość informacji aby pozwolić systemowi zrobić to za nas. Wystarczy wprowadzić kilka prostych poleceń a system automatycznie pobierze kod źródłowy programu, rozpakuje, nałoży łatki, skompiluje i zainstaluje za nas.
Ponadto system portów może również posłużyć do przygotowania pakietów, którymi następnie można manipulować za pomocą pkg_add i innymi poleceniami zarządzających pakietami.
Obydwa systemy potrafią analizować zależności występujące pomiędzy aplikacjami. Załóżmy, że chcemy zainstalować program, który zależy od pewnej biblioteki. Zarówno program jak i biblioteka dostępne są w systemach portów i pakietów FreeBSD. Niezależnie od tego czy wykorzystamy polecenie pkg_add czy porty, by zainstalować program, to obydwa systemy spostrzegą, że biblioteka nie została zainstalowana i automatycznie zainstalują najpierw bibliotekę.
Można by się zastanawiać dlaczego FreeBSD wykorzystuje obydwa systemy, skoro ich działanie jest tak bardzo podobne. Tak pakiety jak i porty posiadają pewne zalety. Który system wykorzystamy zależy od naszych własnych upodobań.
Skompresowany plik pakietu zajmuje z reguły mniej miejsca niż skompresowany plik zawierający kod źródłowy.
Instalacja pakietów nie wymaga dodatkowej kompilacji. W przypadku dużych aplikacji, jak np. Mozilla, KDE czy GNOME może to być istotne. Szczególnie gdy pracuje się na dość wolnej maszynie.
Stosowanie pakietów nie wymaga żadnej wiedzy o procesie kompilowania oprogramowania w systemie FreeBSD.
Pakiety są z reguły kompilowane z dość typowymi opcjami, ponieważ powinny być przydatne do wykorzystania na maksymalnej liczbie komputerów. Instalując programy z portów mamy możliwość "podkręcenia" opcji kompilacji, by (przykładowo) skompilować program zoptymalizowany dla procesorów Pentium IV lub Athlon.
Niektóre aplikacje posiadają pewne opcje kompilacji związane z zadaniami, które maja realizować. Przykładowo Apache może zostać skompilowany z wieloma różnorodnymi opcjami. Kompilując go z portów nie musimy zgadzać się na domyślne opcje mogąc samemu dokonać wyboru.
W niektórych przypadkach dostępnych jest kilka pakietów tej samej aplikacji skompilowanych z różnymi parametrami. Na przykład program Ghostscript dostępny jest jako pakiet ghostscript oraz ghostscript-nox11, zależnie od tego czy mamy zainstalowany serwer X11. O ile tego typu rozwiązania są teoretycznie możliwe do zrealizowania w systemie pakietów, o tyle staje się to praktycznie niemożliwe gdy aplikacja posiada więcej niż kilka różnych opcji kompilacji.
Warunki licencji niektórych aplikacji zabraniają rozprowadzania w postaci binarnej. Muszą być zatem rozprowadzane jako kod źródłowy.
Niektórzy nie ufają pakietom binarnym. W przypadku kodu źródłowego można (przynajmniej w teorii) przejrzeć go i samemu poszukać potencjalnych luk.
Jeśli posiadamy własne łaty będziemy potrzebowali kodu źródłowego aby je nanieść do programu.
Jeszcze inni po prostu lubią mieć pod ręką kod źródłowy, by móc go poczytać gdy się nudzą, zmodyfikować czy zapożyczyć pewne rozwiązania (o ile pozwala na to licencja), itd.
Najlepszym sposobem śledzenia zmian dokonywanych w systemie portów jest zapisanie się na FreeBSD ports mailing list oraz FreeBSD ports bugs mailing list.
Przed instalacją jakiejkolwiek aplikacji należy sprawdzić na stronie http://vuxml.freebsd.org/ czy w danym programie istnieją luki związane bezpieczeństwem. Alternatywnie możemy zainstalować security/portaudit, który automatycznie sprawdza wszystkie instalowane programy pod względem znanych luk bezpieczeństwa; weryfikowane są również porty przed kompilacją. W między czasie można wykorzystać polecenie |
Pozostała część niniejszego rozdziału ma za zadanie wyjaśnić jak z wykorzystaniem systemu pakietów i portów instalować w systemie FreeBSD oprogramowanie innych producentów.
Nim przystąpimy do instalacji programów musimy wiedzieć co chcemy zainstalować i jak się nazywa.
Lista dostępnych we FreeBSD programów rośnie cały czas. Na szczęście jest wiele sposobów na odnalezienie tego czego szukamy:
Na stronie internetowej FreeBSD pod adresem http://www.FreeBSD.org/ports/ znajduje jest aktualna lista dostępnych programów. Listę można dowolnie przeszukiwać według kilku kryteriów, np. nazwy (jeśli ją znamy). Możliwe jest również przejrzenie spisu wszystkich aplikacji znajdujących się w danej kategorii.
Dzięki stronie FreshPorts (http://www.FreshPorts.org/) prowadzonej przez Dana Langille’a możliwe jest bieżące śledzenie zmian aplikacji w drzewie portów. Witryna umożliwia otrzymywanie informacji drogą emailową o zmianach w wybranych portach.
Jeśli nie znamy nazwy programu, który chcemy zainstalować, warto poszukać go na stronach pokroju FreshMeat (http://www.freshmeat.net/) a następnie sprawdzić na stronie FreeBSD czy został przygotowany odpowiedni port.
Jeśli znamy dokładną nazwę portu a chcemy sprawdzić z jakiej pochodzi kategorii, można skorzystać z polecenia whereis(1). Wystarczy wpisać whereis plik, gdzie plik jest nazwą programu, którego poszukujemy. Otrzymany wynik będzie postaci:
# whereis lsof
lsof: /usr/ports/sysutils/lsof
Przykład ten informuje nas, że program lsof (narzędzie systemowe) znajduje się w katalogu /usr/ports/sysutils/lsof.
Jeszcze innym sposobem na odnalezienie danego portu jest wykorzystanie mechanizmu przeszukiwania kolekcji portów. By skorzystać z tej funkcji należy przejść do katalogu /usr/ports. Następnie wpisać make search name=nazwa-programu, gdzie program-name jest nazwą poszukiwanej aplikacji. Przykładowo, szukając lsof:
# cd /usr/ports
# make search name=lsof
Port:   lsof-4.56.4
Path:   /usr/ports/sysutils/lsof
Info:   Lists information about open files (similar to fstat(1))
Maint:  obrien@FreeBSD.org
Index:  sysutils
B-deps:
R-deps:
Część wyniku, która nas interesuje to wiersz zaczynający się od "Path:", a określający lokalizację portu. Pozostałe z uzyskanych w ten sposób informacji nie zostaną tutaj opisane, gdyż nie są potrzebne do instalacji programu.
Szersze przeszukanie kolekcji portów możliwe jest wykorzystując make search key=zwrot, gdzie zwrot jest dowolnym wyrazem. Opcja ta przeszukuje nazwy portów, komentarze, opisy i listy zależności. Może być wykorzystana do odnalezienia portów związanych z danym zagadnieniem gdy nie znamy nazwy poszukiwanego programu.
W obydwu przypadkach nie są rozróżniane małe i duże litery w poszukiwanym ciągu. Szukając zatem "LSOF" oraz "lsof" otrzymamy takie same wyniki.
Programu pkg_add(1) można użyć do instalacji programów zarówno z dysku lokalnego, jak i z sieci.
# ftp -a ftp2.FreeBSD.org
Connected to ftp2.FreeBSD.org.
220 ftp2.FreeBSD.org FTP server (Version 6.00LS) ready.
331 Guest login ok, send your email address as password.
230-
230-     This machine is in Vienna, VA, USA, hosted by Verio.
230-         Questions? E-mail freebsd@vienna.verio.net.
230-
230-
230 Guest login ok, access restrictions apply.
Remote system type is UNIX.
Using binary mode to transfer files.
ftp> cd /pub/FreeBSD/ports/packages/sysutils/
250 CWD command successful.
ftp> get lsof-4.56.4.tgz
local: lsof-4.56.4.tgz remote: lsof-4.56.4.tgz
200 PORT command successful.
150 Opening BINARY mode data connection for 'lsof-4.56.4.tgz' (92375 bytes).
100% |**************************************************| 92375       00:00 ETA
226 Transfer complete.
92375 bytes received in 5.60 seconds (16.11 KB/s)
ftp> exit
# pkg_add lsof-4.56.4.tgz
Jeśli nie posiadamy lokalnego źródła programów (np na płytach CD FreeBSD), będzie Ci prawdopodobnie łatwiej użyć komendy pkg_add(1) z opcją -r. Spowoduje to, że program samodzielnie określi odpowiednią wersję oprogramowania dla naszej wersji systemu. Następnie pobierze odpowiedni plik z sieci oraz go zainstaluje.
# pkg_add -r lsofW powyższym przykładzie program pobierze właściwy pakiet i zainstaluje go bez jakiejkolwiek dalszej ingerencji użytkownika. Jeśli chcemy wskazać programowi alternatywny serwer lustrzany, należy odpowiednio zdefiniować zmienną środowiskową PACKAGESITE. Program pkg_add(1) do pobierania plików z serwerów wykorzystuje fetch(3), który z kolei wykorzystuje różnorodne zmienne środowiskowe, m.in. FTP_PASSIVE_MODE, FTP_PROXY oraz FTP_PASSWORD. Może się okazać, że będziemy musieli zdefiniować niektóre z nich jeśli nasz komputer znajduje się za zaporą ogniową, bądź musi korzystać z serwera pośredniczącego FTP/HTTP proxy. Więcej informacji znaleźć można w podręczniku systemowym programu fetch(3). Warto zauważyć, iż w powyższym przykładzie jako nazwę pakietu podano jedynie lsof zamiast lsof-4.56.4. Przy zdalnym pobieraniu pakietów nie należy podawać numeru wersji pakietu. Program pkg_add(1) automatycznie pobierze najnowszą wersję aplikacji.
Program pkg_add(1) pobierze najnowszą wersję aplikacji jedynie, gdy wykorzystujemy FreeBSD-CURRENT albo FreeBSD-STABLE. W przypadku -RELEASE pobrana zostanie wersja pakietu zbudowana dla danego wydania. Ograniczenie to można obejść modyfikując zmienną środowiskową |
Pakiety rozpowszechniane są w formacie .tgz oraz .tbz. Możemy je pobrać z ftp://ftp.FreeBSD.org/pub/FreeBSD/ports/packages/, w Polsce z ftp://ftp.pl.FreeBSD.org/pub/FreeBSD/ports/packages/, bądź odnaleźć na płytach CDROM FreeBSD. Każda płyta z cztero płytowej dystrybucji (także PowerPak’a itp) zawiera pakiety w katalogu /packages. Struktura katalogu podobna jest do drzewa portów /usr/ports. Każda kategoria ma swój własny katalog, ponadto każdy pakiet może zostać odnaleziony w katalogu All (Wszystkie).
Struktura katalogów pakietów jest identyczna względem struktury katalogów portów. Porty i pakiety kooperują za sobą, tworząc wspólnie cały system pakietów/portów.
Narzędziem służącym do przedstawienia informacji o zainstalowanych pakietach oraz wyświetlającym ich krótki opis jest pkg_info(1).
# pkg_info
cvsup-16.1          A general network file distribution system optimized for CV
docbook-1.2         Meta-port for the different versions of the DocBook DTD
...
Program pkg_version(1) jest natomiast narzędziem, które podsumowuje wersje wszystkich zainstalowanych pakietów. Porównuje je następnie z tymi które znajdują się w drzewie portów.
# pkg_version
cvsup                       =
docbook                     =
...
Symbol w drugiej kolumnie określa wiek zainstalowanej wersji oprogramowania względem wersji odnalezionej w portach.
| Symbol | Znaczenie |
|---|---|
= | Wersja odnaleziona w portach jest identyczna. |
< | Wersja jest starsza, niż ta odnaleziona w portach. |
> | Zainstalowana wersja jest nowsza, niż znaleziona w portach. (Prawdopodobnie lokalne drzewo portów nie zostało zaktualizowane.) |
? | Zainstalowany pakiet nie może zostać odnaleziony w drzewie portów. (Może to mieć miejsce np. w sytuacji gdy zainstalowany port został usunięty z kolekcji portów, bądź zmienił nazwę.) |
* | Istnieje wiele wersji tego programu. |
Aby usunąć uprzednio zainstalowane oprogramowanie użyj pkg_delete(1).
# pkg_delete xchat-1.7.1Poniższy podrozdział dostarcza podstawowych informacji z zakresu używania kolekcji portów, w stopniu umożliwiającym instalowanie lub odinstalowywanie programów z własnego systemu. Szczegółowy opis parametrów polecenia make i zmiennych środowiskowych dostępny jest w podręczniku systemowym ports(7).
Zanim zainstalujemy jakikolwiek port, musimy pobrać kolekcję portów, która w zasadzie jest zestawem plików Makefiles, łat i opisowych. Kolekcja znajduje się w katalogu /usr/ports.
W trakcie instalacji FreeBSD, sysinstall zapytał czy chcemy zainstalować kolekcję portów. Jeśli wybraliśmy nie, poniższe instrukcje pomogą nam własnoręcznie zainstalować kolekcję portów:
Procedure: Metoda CVSup
Jest to prosta i szybka metoda pobrania kolekcji portów wykorzystująca system CVSup. Więcej informacji o CVSup dostępnych jest w podrozdziale Korzystanie z CVSup.
Bardzo ważnym jest, aby upewnić się, że katalog /usr/ports jest pusty nim po raz pierwszy uruchomimy CVSup! Jeśli posiadamy już kolekcję portów pozyskaną z innego źródła CVSup nie usunie nieużywanych plików łat.
Zainstaluj pakiet net/cvsup-without-gui:
# pkg_add -r cvsup-without-guiWięcej informacji w podrozdziale Instalacja CVSup (Installation).
Uruchom cvsup:
# cvsup -L 2 -h cvsup.FreeBSD.org /usr/shared/examples/cvsup/ports-supfileWarto zastąpić cvsup.FreeBSD.org adresem serwera CVSup zlokalizowanego bliżej nas. Kompletna lista serwerów lustrzanych dostępna jest w podrozdziale Serwery lustrzane CVSup (CVSup Sites).
Można wykorzystać własny plik ports-supfile, by np. uniknąć konieczności podawania adresu serwera CVSup z linii poleceń.
|
Późniejsze wpisanie polecenia cvsup(1) spowoduje sprawdzenie zmian dokonanych w kolekcji portów i aktualizację lokalnej wersji. Nie spowoduje to natomiast automatycznie ponownego skompilowania wykorzystywanych przez nas portów.
Procedure: Metoda Portsnap
Portsnap jest alternatywnym systemem dystrybucji kolekcji portów. Po raz pierwszy został dołączony do FreeBSD 6.0. W starszych wersjach może zostać zainstalowany z pakietu sysutils/portsnap:
# pkg_add -r portsnapSzczegółowe informacje o możliwościach programu dostępne są w podrozdziale Korzystanie z Portsnap.
Ten punkt możemy pominąć jeśli posiadamy FreeBSD 6.1-RELEASE bądź najnowszą wersję programu Portsnap. Przy pierwszym uruchomieniu programu portsnap(8) zostanie automatycznie utworzony katalog /usr/ports. W starszych wersjach programu wymagane jest własnoręczne utworzenie katalogu:
# mkdir /usr/portsPobierz skompresowaną migawkę kolekcji portów do katalogu /var/db/portsnap. Można następnie zakończyć połączenie z Internetem, jeśli jest taka potrzeba.
# portsnap fetchJeśli uruchamiany Portsnap po raz pierwszy należy rozpakować migawkę do katalogu /usr/ports:
# portsnap extractJeśli posiadamy już kolekcję portów w /usr/ports i jedynie ją aktualizujemy, wpisujemy polecenie:
# portsnap updateProcedure: Metoda sysinstall
Metoda ta instaluje kolekcję portów z lokalnego nośnika posługując się programem sysinstall. Zainstalowana zostanie kopia kolekcji z dnia, w którym przygotowana została dana wersja FreeBSD. Jeśli dysponujemy połączeniem z Internetem powinniśmy zawsze stosować jedną z metod opisanych powyżej.
Uruchom sysinstall jako użytkownik root (/stand/sysinstall w wersjach FreeBSD starszych niż 5.2):
# sysinstallPrzejdź w dół, wybierz , i naciśnij Enter.
Przejdź w dół, wybierz i naciśnij Enter.
Przejdź w dół do opcji i naciśnij Spację.
Przejdź do góry do opcji i naciśnij Enter.
Ustaw wybrany przez siebie typ medium instalacji, jak np. płytę CDROM, serwer FTP, itd.
Przejdź do góry do opcji i naciśnij Enter.
Naciśni X by wyjść z programu sysinstall.
Pierwsza rzecz o jakiej należy wspomnieć omawiając kolekcję portów, jest "szkielet". Mówiąc w skrócie, szkielet portu jest minimalnym zestawem plików, które informują FreeBSD, jak poprawnie skompilować i zainstalować program. Każdy szkielet portu zawiera:
Plik Makefile. Plik ten zawiera różne dane określające jak skompilować aplikację oraz gdzie ją zainstalować w systemie.
Plik distinfo Plik ten zawiera informacje dotyczące plików, które muszą zostać pobrane, by skompilować port. Ponadto zawiera sumy kontrolne, na podstawie których md5(1) potrafi sprawdzić, czy pliki nie uległy uszkodzeniu w trakcie pobierania z sieci.
Katalog files, który zawiera łaty pozwalające skompilować i zainstalować program w naszym systemie FreeBSD. Łaty są małymi plikami, w których określone są zmiany dotyczące konkretnych plików. Są to pliki tekstowe i po prostu mówią "Usuń linię 10" lub "Zmień linię 26 na to: …". Łatki są także znane jako "diffs" (ang. skrót od różnice) ponieważ są generowane przez program diff(1).
Ten katalog może zawierać także inne pliki używane do kompilacji portu.
Plik opisu pkg-descr. Jest to bardziej szczegółowy, nierzadko wieloliniowy opis programu.
Plik listy pkg-plist. Jest to lista wszystkich plików, które zostaną zainstalowane przez port. Jest to także lista plików, które należy usunąć w przypadku odinstalowywania.
Niekiedy porty zawierają również inne pliki, jak na przykład pkg-message (message-wiadomość). System portów używa tych plików w specjalnych sytuacjach. Jeśli potrzebujesz więcej informacji na temat tych plików i portów w ogóle, zajrzyj do podręcznika FreeBSD Porter’s Handbook.
Jak już raz powiedziano, porty zawierają instrukcje odnośnie kompilacji programów z kodu źródłowego. Jednakże nie zawierają one samego kodu. Kod pobrać można z płyty CD bądź z Internetu. Rozprowadzany może być w dowolnej postaci jaką wybierze sobie jego producent, przy czym najczęściej jest to spakowany plik tar skompresowany dodatkowo gzipem. Kod źródłowy programu nazywany jest "distfile". Poniżej przedstawione zostały dwie metody instalacji portów we FreeBSD.
By móc zainstalować port musimy być zalogowania jako użytkownik |
Przed instalacją jakiegokolwiek portu należy upewnić się, że dysponujemy aktualną kolekcją portów oraz sprawdzić potencjalne luki bezpieczeństwa związane z danym portem na stronie http://vuxml.freebsd.org/. Istnieje możliwość zautomatyzowania procesu weryfikacji potencjalnych luk bezpieczeństwa przed instalacją portu. Do tego celu można wykorzystać program portaudit, dostępny również w kolekcji portów (security/portaudit). Wydanie polecenia |
Sposób funkcjonowania kolekcji portów wiąże się z założeniem, że posiadamy połączenie z Internetem. Jeśli nie, będziemy musieli ręcznie pobierać kod źródłowy "distfile" i umieszczać w katalogu /usr/ports/distfiles dla każdego instalowanego portu.
By rozpocząć instalację należy przejść do katalogu wybranego portu:
# cd /usr/ports/sysutils/lsofWewnątrz katalogu lsof znajduje się szkielet portu. Następnym krokiem jest kompilacja programu, co sprowadza się do wpisania polecenia make. Efekt działania polecenia powinien być zbliżony do:
# make
>> lsof_4.57D.freebsd.tar.gz doesn't seem to exist in /usr/ports/distfiles/.
>> Attempting to fetch from ftp://lsof.itap.purdue.edu/pub/tools/unix/lsof/.
===>  Extracting for lsof-4.57
...
[extraction output snipped]
...
>> Checksum OK for lsof_4.57D.freebsd.tar.gz.
===>  Patching for lsof-4.57
===>  Applying FreeBSD patches for lsof-4.57
===>  Configuring for lsof-4.57
...
[configure output snipped]
...
===>  Building for lsof-4.57
...
[compilation output snipped]
...
#
Po skończeniu kompilacji powracamy do linii poleceń. Kolejnym krokiem jest instalacja portu poprzez wpisanie polecenia make wraz ze słowem install:
# make install
===>  Installing for lsof-4.57
...
[installation output snipped]
...
===>   Generating temporary packing list
===>   Compressing manual pages for lsof-4.57
===>   Registering installation for lsof-4.57
===>  SECURITY NOTE:
      This port has installed the following binaries which execute with
      increased privileges.
#
Gdy ponownie powrócimy do linii poleceń, powinniśmy być już w stanie uruchomić właśnie zainstalowaną aplikację. Ostrzeżenie jakie pojawi się na ekranie związane jest z faktem, że lsof jest programem pracującym ze zwiększonymi przywilejami. W trakcie kompilacji i instalacji portów powinniśmy zwracać uwagę na wszystkie pojawiające się ostrzeżenia.
Dobrym pomysłem, jest również usunięcie podkatalogu zawierającego wszystkie tymczasowe pliki wykorzystywane w trakcie kompilacji. Nie tylko dlatego, że niepotrzebnie zajmuje miejsce na dysku, ale również dlatego, że może być przyczyną problemów podczas aktualizacji programu do nowszej wersji.
# make clean
===>  Cleaning for lsof-4.57
#
Można sobie oszczędzić dwóch naddatkowych kroków wpisując od razu |
Niektóre powłoki utrzymują bufor listy poleceń z katalogów znajdujących się w zmiennej środowiskowej |
Niektóre wydawnictwa na płytach DVD-ROM, jak np. FreeBSD Toolkit z FreeBSD Mall, zawierają źródła distfile. Mogą być one wykorzystane z kolekcją portów. Wystarczy zamontować płytę DVD w /cdrom. Jeśli natomiast używamy innego punktu montowania dla płyt musimy zmodyfikować zmienną CD_MOUNTPTS by wskazywała na właściwe miejsce. Niezbędne źródła distfile zostaną automatycznie wykorzystane jeśli znajdują się na płycie.
Mimo wszystko należy mieć w pamięci, że licencje nielicznych portów nie zezwalają na załączenie ich na płycie CD-ROM. Może to być np. z powodu konieczności wcześniejszej rejestracji przed pobraniem źródeł bądź ich redystrybucja nie jest dozwolona. Jeśli chcemy zainstalować port, który nie znajduje się na płycie CD musimy mieć połączenie z Internetem. |
System portów do pobierania plików wykorzystuje program fetch(1), który z kolei potrafi korzystać z wielu zmiennych środowiskowych, m.in. FTP_PASSIVE_MODE, FTP_PROXY czy FTP_PASSWORD. Jeśli znajdujemy się za zaporą ogniową, bądź musimy korzystać z serwera pośredniczącego FTP/HTTP proxy, może się okazać, że będziemy musieli ustawić niektóre z tych zmiennych. Kompletna lista wykorzystywanych zmiennych dostępna jest w podręczniku systemowym fetch(3).
Dla użytkowników nie mogących być cały czas połączonych z Internetem dostępne jest polecenie make fetch. Wystarczy wpisać to polecenie znajdując się w głównym katalogu drzewa portów (/usr/ports) a wymagane pliki zostaną automatycznie pobrane. Polecenie to będzie również funkcjonować w podkatalogach, np. /usr/ports/net. Jednakże, w takiej sytuacji nie zostaną automatycznie pobrane źródła bibliotek, od których zależy dany port. Zamieniając parametr fetch na fetch-recursive spowodujemy pobranie również źródeł wszystkich portów, od których zależy instalowany program.
Możliwe jest kompilowanie każdego portu z osobna w danej kategorii, bądź wszystkich na raz poprzez polecenie |
W naprawdę żadkich przypadkach, użytkownicy mogą pozyskać pliki distfile z innego źródła niż MASTER_SITES (miejsce skąd je pobiera system portów). Opcję MASTER_SITES można zastąpić za pomocą następującego polecenia:
# cd /usr/ports/directory
# make MASTER_SITE_OVERRIDE= \
ftp://ftp.FreeBSD.org/pub/FreeBSD/ports/distfiles/ fetch
W tym przykładzie zastąpiliśmy opcję MASTER_SITES adresem ftp.FreeBSD.org/pub/FreeBSD/ports/distfiles/.
Niektóre porty umożliwiają (a nawet wymagają) podanie pewnych opcji kompilacji, które mogą włączyć bądź wyłączyć nie potrzebne części aplikacji, pewne opcje bezpieczeństwa i inne parametry. Z przychodzących na myśl tego typu programów to www/mozilla, security/gpgme oraz mail/sylpheed-claws. Za każdym razem gdy dostępne będą tego typu opcje wyświetlony zostanie komunikat. |
Czasami okazuje się być przydatne (a nawet wymagane) by skorzystać z innych katalogów tymczasowych i docelowych. Domyślne katalogi można zastąpić wykorzystując zmienne WRKDIRPREFIX i PREFIX. Na przykład:
# make WRKDIRPREFIX=/usr/home/example/ports installspowoduje skompilowanie portu w katalogu /usr/home/example/ports i instalację w podkatalogach /usr/local.
# make PREFIX=/usr/home/example/local installspowoduje natomiast kompilację w katalogu /usr/ports oraz instalację w podkatalogach /usr/home/example/local.
I oczywiście,
# make WRKDIRPREFIX=../ports PREFIX=../local installspowoduje połącznie obydwu powyższych ustawień (jest to za długie by całkowicie zmieściło się na stronie, ale powinno dać ogólne wyobrażenie).
Alternatywnie, obydwie zmienne mogą być również określone jako zmienne środowiskowe. Informacje o definiowaniu zmiennych środowiskowych dostępne są w podręczniku systemowym naszej powłoki.
imakeNiektóre porty wykorzystujące imake (część Systemu okien X) nie współpracują ze zmienną PREFIX i mimo wszystko będą instalowały programy w /usr/X11R6. Podobnie niektóre z portów napisanych w języku Perl ignorują zmienną PREFIX i instalują programy w głównym drzewie Perla. Zmuszenie tych portów do współpracy ze zmienną PREFIX jest niezmiernie trudne, albo wręcz niemożliwe.
Teraz, gdy wiesz już jak instalować porty, zastanawiasz się prawdopodobnie jak je usuwać, na przykład w wypadku, gdy zainstalowaliśmy port, ale okazało się jednak, że to nie był ten którego szukaliśmy. W ramach przykładu usuniemy port, który instalowaliśmy poprzednio (dla tych którzy nie uważają, był to lsof). Podobnie jak w przypadku pakietów (szerzej opisane w podrozdziale traktującym o pakietach), również porty usuwane są za pomocą polecenia pkg_delete(1):
# pkg_delete lsof-4.57Na wstępie musimy wyświetlić zdezaktualizowane porty w kolekcji. Wykorzystamy do tego polecenie pkg_version(1):
# pkg_version -vPo zaktualizowaniu kolekcji, a przed próbą aktualizacji jakichkolwiek portów, należy zapoznać się z zawartością pliku /usr/ports/UPDATING. Plik ten opisuje różne zagadnienia i dodatkowe kroki, na które można natknąć się i będzie trzeba wykonać podczas aktualizacji, np. zmiany formatu plików czy zmiany w lokalizacji plików konfiguracyjnych.
Jeśli opis w pliku UPDATING mówi coś innego niż ten tekst, należy zastosować się do opisu.
Program portupgrade został zaprojektowany by ułatwić aktualizację zainstalowanych w systemie portów. Dostępny jest z portu sysutils/portupgrade. Jego instalacja przebiega dokładnie tak samo, jak każdego innego portu, wykorzystując polecenie make install clean command:
# cd /usr/ports/sysutils/portupgrade
# make install clean
Przeskanujmy następnie listę zainstalowanych portów za pomocą polecenia pkgdb -F i usuńmy wszystkie niezgodności jakie nam zwróci skanowanie. Regularne skanowanie przed każdą aktualizacją jest zdecydowanie dobrym pomysłem.
Wydanie polecenia portupgrade -a spowoduje, że program portupgrade rozpocznie aktualizację wszystkich przedawnionych portów zainstalowanych w naszym systemie. Parametr -i pozwoli przejść w tryb interaktywny, gdzie będziemy musieli potwierdzić aktualizację każdego portu.
# portupgrade -aiBy zaktualizować jedynie wybraną aplikację zamiast wszystkich portów należy wykorzystać polecenie portupgrade nazwa_programu. Opcja -R oznacza, że portupgrade powinien najpierw zaktualizować wszystkie porty, od których zależy dany program.
# portupgrade -R firefoxBy do instalacji wykorzystać pakiety zamiast portów należy dodać parametr -P. Wówczas portupgrade przeszuka katalogi zawarte w zmiennej PKG_PATH. Jeśli pakiet nie zostanie odnaleziony lokalnie zostanie pobrany z Internetu. Jeśli nie będzie możliwe żadne z powyższych, wówczas portupgrade wykorzysta do aktualizacji porty. By temu zapobiec należy zastosować parametr -PP.
# portupgrade -PR gnome2Aby pobrać jedynie pliki źródłowe distfiles (bądź pakiety, gdy wykorzystamy opcję -P) bez kompilacji czy instalacji czegokolwiek należy użyć parametru -F. Więcej informacji dostępnych jest w portupgrade(1).
Kolejnym narzędziem ułatwiającym aktualizację zainstalowanych portów jest Portmanager, dostępny z portu sysutils/portmanager:
# cd /usr/ports/sysutils/portmanager
# make install clean
Wszystkie zainstalowane porty mogą zostać zaktualizowane za pomocą polecenia:
# portmanager -uWykorzystując parametr -ui przechodzimy w tryb interaktywny, gdzie będziemy pytani o potwierdzenie każdej operacji wykonywanej przez Portmanager. Program ten może być z równym powodzeniem wykorzystywany do instalacji nowych portów w systemie. W przeciwieństwie do polecenia make install clean program Portmanager zaktualizuje wszystkie zależności nim skompiluje i zainstaluje wybrany port.
# portmanager x11/gnome2Gdy wystąpią problemy z zależnościami wybranego portu można wykorzystać Portmanagera, by ponownie skompilował je we właściwej kolejności. Na koniec zostanie również ponownie skompilowany port stwarzający problemy.
# portmanager graphics/gimp -fWięcej informacji dostępnych jest na stronach podręcznika systemowego Portmanagera.
Korzystanie z kolekcji portów z czasem odbije się na wolnym miejscu na dysku. Dlatego też zawsze po skompilowaniu i zainstalowaniu programu z portu powinniśmy pamiętać o usunięciu tymczasowych katalogów roboczych (ang. work directories) wykorzystując do tego polecenie make clean. Całą kolekcję natomiast można oczyścić wpisujące polecenie:
# portsclean -CZ czasem uzbiera nam się wiele katalogów distfiles, które będą jedynie zajmować przestrzeń na dysku. Możemy je ręcznie usuwać bądź posłużyć się następującym poleceniem, by usunąć wszystkie katalogi distfiles nie powiązane aktualnie z żadnym portem:
# portsclean -DBadź, by usunąć wszystkie katalogi disftiles, do których nie odnosi się żaden z aktualnie zainstalowanych portów w naszym systemie:
# portsclean -DDProgram |
Pamiętajmy również o usuwaniu instalowanych portów gdy już ich nie potrzebujemy. Przydatne narzędzie pozwalające zautomatyzować te czynności znajduje się w sysutils/pkg_cutleaves.
Po zainstalowaniu nowego programu z reguły chcemy zapoznać się z dostarczoną z nim dokumentacją, zmodyfikować wymagane pliki konfiguracyjne, upewnić się, że program (jeśli jest to demon) będzie uruchamiany w trakcie ładowania systemu, itp.
Oczywiście, szczegółowe kroki jakie należy podjąć konfigurując każdą aplikację będą różne. Tym nie mniej, jeśli właśnie zainstalowaliśmy nowy program i zastanawiamy się "Co dalej?" poniższe uwagi mogą okazać się pomocne:
Za pomocą pkg_info(1) możemy sprawdzić gdzie i jakie pliki zostały zainstalowane. Na przykład, jeśli zainstalowaliśmy wersję 1.0.0 pakietu FooPackage, polecenie
# pkg_info -L foopackage-1.0.0 | lesswyświetli nam wszystkie pliki zainstalowane z pakietu. Szczególną uwagę warto zwrócić na pliki zainstalowane w katalogach: man/ zawierającym strony podręcznika systemowego, etc/ zawierającym pliki konfiguracyjne, oraz doc/, gdzie znajdować się będzie dużo obszerniejsza dokumentacja.
Jeśli nie jesteśmy pewni, którą wersją programu zainstalowaliśmy, polecenie
# pkg_info | grep -i foopackagewyświetli wszystkie zainstalowane pakiety zawierające foopackage w nazwie. Oczywiście foopackage należy zastąpić nazwą poszukiwanego pakietu.
Gdy już udało się ustalić jakie strony podręcznika systemowego zostały zainstalowane przez dany pakiet, można je przeczytać za pomocą polecenia man(1). Warto również obejrzeć przykładowe pliki konfiguracyjne i wszelką dodatkową dokumentację.
Jeśli dana aplikacja posiada własną witrynę internetową warto jest również tam poszukać dodatkowej dokumentacji czy odpowiedzi na często zadawane pytania (FAQ). Jeśli nie znamy właściwego adresu internetowego może być on podany w wyniku polecenia
# pkg_info foopackage-1.0.0Wiersz WWW:, jeśli w ogóle jest podany, powinien zawierać informacje o adresie witryny.
Programy, które powinny być uruchamiane podczas ładowania systemu (np. serwery internetowe) z reguły instalują przykładowy skrypt w /usr/local/etc/rc.d. Powinniśmy sprawdzić zawartość tego skryptu oraz w razie potrzeby zmodyfikować go bądź zmienić nazwę. Szczegółowe informacje dostępne są w podrozdziale Uruchamianie usług.
Jeśli natknęliśmy się na port, który z jakichś powodów nie działa na naszym komputerze, możemy zrobić kilka następujących rzeczy:
Sprawdzić w bazie danych zgłoszonych problemów czy jest przygotowywana poprawka dla danego portu. Jeśli tak, może uda się nam zastosować tę poprawkę.
Poprosić o pomoc opiekuna danego portu. Adres email opiekuna można znaleźć przeglądająć plik Makefile w katalogu portu bądź wpisująć polecenie make maintainer. Wysyłając wiadomość pamiętajmy o zawarciu informacji o nazwie i wersji portu (najlepiej jest zawrzeć cały wiersz z pliku Makefile zaczynający się od $FreeBSD:), oraz opis błędu i wynik działania programu w momencie zaistnienia błędu.
Niektóre porty nie są przygotowywane przez pojedyncze osoby, ale raczej przez grupy dyskusyjne. Wiele adresów takich grup, choć nie wszystkie, ma postać freebsd-listname@FreeBSD.org. Należy mieć również to na uwadze formułując swoje pytania. Porty przygotowywane przez freebsd-ports@FreeBSD.org w rzeczywistości nie posiadają żadnego konkretnego opiekuna, ani grupy opiekunów. Poprawki i pomoc dla takich portów przygotowują osoby zapisane na tę listę dyskusyjną. Nowi ochotnicy są zawsze mile widziani! |
W przypadku braku odpowiedzi można również przesłać zgłoszenie błędu poprzez send-pr(1) (szczegóły w artykule Writing FreeBSD Problem Reports).
Naprawić błąd samemu! Podręcznik Porter’s Handbook (ang.) zawiera szczegółowe informacje o strukturze "Portów", dzięki czemu można samemu naprawić błąd lub przygotować własny port!
Pobrać pakiet z najbliższego serwera FTP. "Główne" repozytorium pakietów znajduje się na serwerze ftp.FreeBSD.org w katalogu packages. Tym nie mniej warto jest najpierw odszukać lokalny serwer lustrzany. Szanse na to, że gotowe pakiety będą działać poprawnie są większe niż w przypadku kompilowania programów. Pakiety można zainstalować za pomocą programu pkg_add(1).
Środowisko graficzne dostępne we FreeBSD korzysta z zaawansowanego serwera graficznego X11 - implementacji open-source Systemu okien X obejmującej zarówno Xorg jak i XFree86™. FreeBSD 5.2.1-RELEASE oraz wcześniejsze wydania wykorzystują XFree86™, serwer X11 opracowany przez The XFree86™ Project, Inc. Od wersji FreeBSD 5.3-RELEASE podstawową i oficjalną odmianą X11 jest Xorg, serwer przygotowywany przez X.Org Foundation, rozprowadzany na licencji bardzo zbliżonej do wykorzystywanej przez FreeBSD. Dostępne są również komercyjne serwery X dla FreeBSD.
Niniejszy rozdział omawia zagadnienia związane z instalacją i konfiguracją X11 kładąc szczególny nacisk na serwer Xorg. Informacje o konfiguracji XFree86™ (np. w starszych wersjach FreeBSD gdzie XFree86™ był domyślnym serwerem X11) zawsze znaleźć można w archiwalnych wersjach Podręcznika FreeBSD (ang.) na stronie http://docs.FreeBSD.org/doc/.
Informacje odnośnie obsługiwanego przez X11 sprzętu dostępne są na stronie internetowej projektu Xorg.
Po przeczytaniu tego rozdziału będziemy wiedzieć:
Jakie elementy wchodzą w skład Systemu okien X i jakie są ich wzajemne relacje.
Jak zainstalować i skonfigurować X11.
Jak instalować i korzystać z róźnych menadżerów okien.
Jak korzystać z czcionek TrueType® w X11.
Jak skonfigurować system do logowania graficznego (XDM).
Przed przeczytaniem tego rozdziału powinniśmy wiedzieć:
Jak instalować dodatkowe oprogramowanie (Instalacja programów: pakiety i porty).
Korzystanie z X pierwszy raz może być niejakim szokiem dla osób, które dotychczas korzystały z innych środowisk graficznych, jak np. Microsoft® Windows® czy Mac OS®.
O ile nie jest wymagane znać wszystkie detale wielu elementów X i jak one ze sobą współpracują, o tyle podstawowa wiedza w tym zakresie pozwoli nam w pełni wykorzystać możliwości X-ów.
X nie jest pierwszym systemem okienkowym napisanym dla systemów typu UNIX®, lecz jest on najbardziej popularnym. Grupa projektantów, która przygotowała X, pracowała wcześniej nad innym systemem. System ten nazywał się "W" (od "Window"). X była po prostu kolejną literą w rzymskim alfabecie.
System X może być nazywany po prostu "X", "System okien X", "X11" oraz jeszcze na wiele innych sposobów. Może się również okazać, że stosowanie terminu "X Windows" w odniesieniu do X11 jest traktowane jako obraźliwe przez niektóre osoby. Więcej informacji dostępnych jest w X(7).
Od samego początku System X zorientowany był na pracę w sieci, stąd też wykorzystanie modelu "klient-serwer".
W modelu systemu X, "serwer X" pracuje na komputerze wyposażonym w klawiaturę, monitor i myszkę. Do zadań serwera należy m.in. zarządzanie wyświetlaniem, czy obsługa sygnałów z klawiatury. Każda aplikacja graficzna (jak np. XTerm czy getenv(3)) jest "klientem". Klient wysyła komunikaty do serwera typu "Proszę w tym miejscu narysować okienko". Serwer natomiast: "Użytkownik właśnie kliknął przycisk OK".
W warunkach domowych czy w małym biurze serwer i klienci pracują z reguły na tym samym komputerze. Tym nie mniej istnieje możliwość uruchomienia serwera X na słabszej maszynie a aplikacje (klienci) na np. potężnej i drogiej maszynie obsługującej całe biuro. W takim wypadku komunikacja pomiędzy klientami a serwerem odbywa się za pomocą sieci.
Bywa to mylące, gdyż terminologia stosowana w systemie X jest dokładnie odwrotna do tego czego należałoby się spodziewać w typowym modelu "klient-serwer", czyli "serwera X" pracującego na mocniejszej maszynie oraz "klienta X" na komputerze biurkowym.
Stąd też należy pamiętać, że serwer X jest komputerem z monitorem i klawiaturą, podczas gdy klienci X są programami wyświetlającymi okienka.
Protokół X11 w żaden sposób nie zmusza ani klientów ani serwera, by obydwa działały na tym samym systemie operacyjnym, czy nawet typie komputera. Możliwe jest zatem uruchomienie serwera X w systemie Microsoft® Windows® czy Mac OS® firmy Apple za pomocą dostępnych darmowych i komercyjnych narzędzi.
Filozofia systemu X jest bardzo zbliżona do filozofii Uniksa: "narzędzia, nie reguły". Oznacza to, że X nie stara się narzucać jak ma zostać wykonane zadanie, dostarcza jedynie narzędzi pozostawiając użytkownikowi decyzję o sposobie ich wykorzystania.
Stąd też X nie wymusza jak powinny wyglądać okienka, jak je przesuwać po ekranie za pomocą myszki, jakie skróty klawiaturowe wykorzystać by przełączać pomiędzy okienkami (np. Alt+Tab w w przypadku Microsoft® Windows®), jak powinny wyglądać nagłówki okienek, itd.
Serwer X oddelegowuje tą odpowiedzialność do aplikacji nazywanej "Menedżerem okien". Istnieje całe mnóstwo menedżerów okien dla systemu X: AfterStep, Blackbox, ctwm, Enlightenment, fvwm, Sawfish, twm, Window Maker i wiele więcej. Każdy z nich oferuje inny wygląd i sposób obsługi; niektóre obsługują "wirtualne pulpity"; inne umożliwiają definiować własne skróty klawiszowych do zarządzania pulpitem; jeszcze inne posiadają przycisk "Start" bądź podobne rozwiązanie; w niektórych można zmieniać dowolnie motywy graficzne, pozwalając na całkowitą zmianę wyglądu i zachowania przy uruchamianiu nowego motywu. Te menedżery i wiele innych dostępne są w kategorii x11-wm w Kolekcji portów.
Ponadto, również środowiska graficzne KDE oraz GNOME posiadają w pełni zintegrowane, własne menedżery okien.
Każdy menedżer okien posiada również odrębny mechanizm konfiguracyjny; niektóre wykorzystują ręcznie modyfikowane pliki konfiguracyjne, inne dysponują narzędziami graficznymi, a przynajmniej jeden (Sawfish) wykorzystuje plik konfiguracyjny napisany w języku Lisp.
Sposób uaktywniania Kolejną funkcją realizowaną przez menedżera okien jest "sposób uaktywniania" okien za pomocą myszy. Każdy system okienkowy potrzebuje pewnego sposobu wyboru okna, które będzie aktywnie przyjmować sygnały z klawiatury i powinno wskazywać, które okno jest aktywne. Znanym wszystkim sposobem uaktywniania jest zapewne "kliknij-by-uaktywnić". Jest to metoda wykorzystywana w systemie Microsoft® Windows®, w której okno zostaje uaktywnione po otrzymaniu kliknięcia myszką. X nie obsługuje żadnego sposobu uaktywniania sam z siebie. To właśnie menedżer okien kontroluje, które okno jest aktywne w danych czasie. Różne menedżery wspierają różne metody uaktywniania. Wszystkie z nich obsługują kliknij-by-uaktywnić a większość z nich obsługuje również kilka innych. Najczęściej spotykane sposoby uaktywniania:
Wiele menedżerów okien wspiera również inne metody, podobnie jak wariacje powyższych. Najlepiej jest sprawdzić dokumentację danego menedżera. |
Podejście Systemu X do dostarczania narzędzi a nie reguł dotyczy również elementów interfejsu graficznego widocznych na ekranie w każdej uruchomionej aplikacji.
Pod pojęciem "elementu interfejsu graficznego" (ang. widget) kryją się wszystkie elementy, które można kliknąć bądź w inny sposób nimi manipulować; przyciski, pola wyboru, przyciski opcji, ikony, listy, itd. W systemach Microsoft® Windows® nazywają się one "formantkami" (ang. controls).
Zarówno Microsoft® Windows® jak i Apple Mac OS® stosują bardzo rygorystyczne podejście do elementów interfejsu graficznego. Od twórców programów wymaga się by ich aplikacje wyglądały jednakowo. Natomiast przy tworzeniu X, nie uznano za rozsądne narzucanie jednego stylu graficznego czy zestawu elementów interfejsu, do którego miałyby być dostosowane wszystkie programy.
W rezultacie nie należy się spodziewać, że aplikacje graficzne będą posiadały jednakowy wygląd czy sposób obsługiwania. Istnieje kilka popularnych zestawów elementów interfejsu graficznego i ich wariacji, włączając w to oryginalny zestaw Athena z MIT, Motif® (na podstawie którego został przygotowany zestaw elementów interfejsu graficznego Microsoft® Windows®; wszystkie krawędzie fazowane, trzy odcienie szarości), OpenLook i inne.
Większość nowszych programów graficznych będzie zapewne wykorzystywać jeden ze współczesnych zestawów elementów interfejsu, jak np. Qt, wykorzystywany w KDE, bądź GTK+, stosowany w projekcie GNOME. Pod tym względem, istnieje pewne podobieństwo w wyglądzie i zachowaniu środowisk graficznych w systemach typu UNIX®, co z pewnością ułatwi pracę z systemem początkującym użytkownikom.
Domyślną implementacją serwera X11 dla FreeBSD jest Xorg. Jest on serwerem graficznym o otwartym kodzie (open source) Systemu okien X przygotowanym przez X.Org Foundation. Bazuje on na kodzie XFree86™ 4.4RC2 i X11R6.6. Wersją Xorg dostępną aktualnie z kolekcji portów FreeBSD jest 7.7.
By skompilować i zainstalować Xorg z kolekcji portów wpisujemy:
# cd /usr/ports/x11/xorg
# make install clean
Nim zaczniemy upewnijmy się, że dysponujemy 4 GB wolnej przestrzeni na dysku na potrzeby kompilacji. |
Alternatywnie, X11 może zostać zainstalowany z pakietów binarnych za pomocą pkg_add(1). W przypadku wykorzystania opcji zdalnego pobierania pakietów z sieci przez pkg_add(1) należy pominąć numer wersji pakietu. Program pkg_add(1) automatycznie pobierze najnowszą wersję aplikacji.
Zatem, by pobrać i zainstalować pakiet Xorg wystarczy wpisać:
# pkg_add -r xorgPowyższe polecenia zainstalują kompletne środowisko X11 zawierające serwery, klienty, czcionki itd. Dostępne są również osobne pakiety i porty elementów X11. |
Pozostała część niniejszego rozdziału wyjaśnia jak skonfigurować serwer X11 oraz jak skonfigurować wspomagające efektywność naszej pracy środowisko pulpitowe.
Przed rozpoczęciem konfiguracji X11 potrzebne nam będą następujące informacje o docelowym systemie:
Parametry monitora
Rodzaj chipsetu karty graficznej
Rozmiar pamięci karty graficznej
Parametry monitora są wykorzystywane przez X11 do określenia rozdzielczości i częstotliwości odświeżania ekranu, na jakich ma pracować. Parametry te można z reguły odczytać z dokumentacji dostarczonej wraz z monitorem bądź ze strony producenta. Potrzebne są dwa przedziały liczbowe: częstotliwość odchylania poziomego oraz częstotliwość synchronizacji pionowej.
Od rodzaju chipsetu karty graficznej zależy który moduł X11 wykorzysta do komunikacji z kartą graficzną. W większości przypadków możliwe jest automatyczne wykrycie rodzaju chipsetu. Tym nie mniej warto jest go znać, na wypadek gdyby autodetekcja nie powiodła się.
Rozmiar pamięci karty graficznej wpływa bezpośrednio na rozdzielczość i głębię kolorów, przy których system będzie pracował. Informacja ta jest istotna, by użytkownik znał ograniczenia systemu w tym zakresie.
Konfiguracja X11 jest procesem składającym się z kilku kroków. Pierwszym z nich jest przygotowanie wstępnego pliku konfiguracyjnego. Wystarczy jako użytkownik root wpisać:
# Xorg -configureWygeneruje to szkielet konfiguracji X11 w katalogu /root, w pliku o nazwie xorg.conf.new (niezależnie czy skorzystaliśmy z su(1) czy zalogowaliśmy się bezpośrednio na konto, plik zostanie utworzony w katalogu zdefiniowanym w zmiennej $HOME dla użytkownika root). X11 spróbuje wykryć parametry sprzętu graficznego zainstalowanego w komputerze i zapisać plik konfiguracyjny, by przy starcie serwera X były ładowane właściwe sterowniki dla wykrytego sprzętu.
Kolejnym krokiem jest przetestowanie konfiguracji i sprawdzenie czy Xorg jest w stanie współpracować ze sprzętem graficznym w systemie. W tym celu należy wpisać:
# Xorg -config xorg.conf.newJeśli na ekranie pojawi się siatka złożona z czarnych i szarych elementów, a także kursor myszy w kształcie litery X, oznaczać to będzie, że X11 został skonfigurowany poprawnie. By wyłączyć ekran testowy wystarczy wcisnąć kombinację klawiszy Ctrl+Alt+Backspace.
Jeśli okaże się, że kursor nie reaguje na ruchy myszy będziemy musieli wpierw ją skonfigurować. Ustawienia myszki rozdziału "Instalacja FreeBSD" zawiera szczegółowe informacje na ten temat. |
Następnym krokiem jest dostrojenie konfiguracji pliku xorg.conf.new do naszych upodobań. Otwórzmy plik w edytorze tekstu, np. w emacs(1) bądź ee(1). Wpierw powinniśmy dodać częstotliwości z jakimi może pracować nasz monitor. Z reguły określane są jako częstotliwości synchronizacji pionowej i poziomej. Wartości te są dodawane do pliku xorg.conf.new w sekcji "Monitor":
Section "Monitor"
        Identifier   "Monitor0"
        VendorName   "Monitor Vendor"
        ModelName    "Monitor Model"
        HorizSync    30-107
        VertRefresh  48-120
EndSection
Słów kluczowych HorizSync i VertRefresh może brakować w pliku konfiguracyjnym. Jeśli tak jest, można je śmiało dodać wpisując właściwą wartość częstotliwości odchylania poziomego zaraz po HorizSync oraz wartość częstotliwości synchronizacji pionowej po VertRefresh. W powyższym przykładzie wartości te zostały wpisane.
X umożliwia również korzystanie z funkcji DPMS (Energy Star), jeśli dysponujemy monitorem zgodnym z tym standardem. Program xset(1) kontroluje limity czasowe i może wymusić tryb oczekiwania, zawieszenia czy tryby wyłączania. Jeśli chcemy włączyć funkcje DPMS dla naszego monitora, musimy dodać poniższy wiersz w sekcji monitora:
Option "DPMS"
Mając wciąż otwarty w edytorze plik xorg.conf.new wybierzmy domyślną rozdzielczość i głębię kolorów. Parametry te definiowane są w sekcji "Screen":
Section "Screen"
        Identifier "Screen0"
        Device     "Card0"
        Monitor    "Monitor0"
        DefaultDepth 24
        SubSection "Display"
                Viewport  0 0
                Depth     24
                Modes     "1024x768"
        EndSubSection
EndSection
Słowo kluczowe DefaultDepth odnosi się do domyślnej głębi kolorów. Opcja ta może być zmieniona za pomocą parametru -depth polecenia Xorg(1). Słowo kluczowe Modes odnosi się do rozdzielczości, w której ma pracować serwer X dla danej głębi kolorów. Należy zwrócić uwagę, iż dostępne są jedynie standardowe tryby VESA, zgodne ze sprzętem graficznym instalowanym w danym systemie. W powyższym przykładzie, domyślna głębia kolorów to dwadzieścia cztery bity na piksel. Przy tej głębi dostępna jest rozdzielczość 1024 na 768 pikseli.
Możemy w końcu zapisać plik konfiguracyjny i sprawdzić go wykorzystując podany powyżej tryb testowy.
Jednym z pomocnych narzędzi w radzeniu sobie z problemami są pliki dzienników X11, zawierające informacje odnośnie każdego urządzenia, do którego jest podłączony serwer X11. Nazwy plików dzienników Xorg wykorzystują format /var/log/Xorg.0.log. Dokładna nazwa pliku dziennika może być różna w zakresie od Xorg.0.log do Xorg.8.log. |
Jeśli test wypadł dobrze, należy zainstalować plik konfiguracyjny w miejscu gdzie Xorg(1) będzie w stanie go znaleźć. Z reguły jest to /etc/X11/xorg.conf lub /usr/X11R6/etc/X11/xorg.conf.
# cp xorg.conf.new /etc/X11/xorg.confProces konfiguracji X11 dobiegł końca. Xorg można uruchomić za pomocą pomocą polecenia startx(1). Serwer X11 może być również uruchamiany wykorzystując xdm(1).
Dostępny jest również graficzny konfigurator - xorgcfg(1) - dostarczany razem z dystrybucją X11. Pozwala on nam interaktywnie zdefiniować naszą konfigurację wybierając odpowiednie sterowniki i ustawienia. Program ten można uruchomić z konsoli wpisując polecenie Istnieje również, jako alternatywa, program xorgconfig(1), będący aplikacją konsolową, mniej przyjazną dla początkujących użytkowników, jednakże przydatną w sytuacjach gdy inne narzędzia nie działają poprawnie. |
Konfiguracja ze zintegrowanym chipsetem Intel® i810 wymaga wykorzystania interfejsu programowego AGP agpgart do obsługi karty w X11. Więcej informacji można znaleźć w podręczniku systemowym sterownika agp(4).
Pozwoli to nam skonfigurować naszą kartę graficzną jak każdą inną. W tym momencie należy zwrócić uwagę na fakt, iż w systemach bez agp(4) wkompilowanego w jądro, próba załadowania modułu za pomocą kldload(8) nie powiedzie się. Sterownik ten musi być obecny w jądrze w trakcie uruchamiania systemu poprzez wkompilowanie go bądź załadowanie za pomocą /boot/loader.conf.
Sekcja ta zakłada, że posiadamy odrobinę wiedzy o zaawansowanej konfiguracji X11. Jeśli próby wykorzystania opisanych wyżej standardowych narzędzi konfiguracyjnych nie powiodły się, w plikach dzienników znajdziemy dostateczną ilość informacji pomocnych w uruchomieniu X z monitorem szerokokątnym. Będziemy musieli wykorzystać dowolny edytor teksu.
Obecne formaty szerokokątne (WSXGA, WSXGA+, WUXGA, WXGA, WXGA+, itd.) obsługują formaty 16:10 oraz 10:9 bądź o innych proporcjach obrazu, które mogą stworzyć problemy w trakcie konfiguracji X. Niektórymi z powszechnie wykorzystywanych rozdzielczości ekranu dla proporcji 16:10 są:
2560x1600
1920x1200
1680x1050
1440x900
1280x800
W pewnym momencie będzie to tak proste jak dodanie którejś z tych rozdzielczości jako możliwych trybów Mode w Section "Screen", jak np.:
Section "Screen"
Identifier "Screen0"
Device     "Card0"
Monitor    "Monitor0"
DefaultDepth 24
SubSection "Display"
        Viewport  0 0
        Depth     24
        Modes     "1680x1050"
EndSubSection
EndSection
Tym nie mniej Xorg jest na tyle sprytny, że potrafić pozyskać informacje o rozdzielczości ekranu monitora szerokokątnego za pomocą I2C/DDC w taki sposób, że wie jakie rozdzielczości potrafi obsłużyć monitor w kwestii częstotliwości i rozdzielczość.
Jeśli odpowiednie wpisy ModeLine nie istnieją w sterownikach, będziemy musieli podpowiedzieć co nieco serwerowi Xorg. Z pliku /var/log/Xorg.0.log możemy wydobyć dostateczną ilość informacji, by móc ręcznie stworzyć poprawnie obsługiwany ModeLine. Wystarczy odnaleźć zapis podobny do:
(II) MGA(0): Supported additional Video Mode:
(II) MGA(0): clock: 146.2 MHz   Image Size:  433 x 271 mm
(II) MGA(0): h_active: 1680  h_sync: 1784  h_sync_end 1960 h_blank_end 2240 h_border: 0
(II) MGA(0): v_active: 1050  v_sync: 1053  v_sync_end 1059 v_blanking: 1089 v_border: 0
(II) MGA(0): Ranges: V min: 48  V max: 85 Hz, H min: 30  H max: 94 kHz, PixClock max 170 MHz
Jest to tzw. informacja EDID. Stworzenie na jej podstawie ModeLine jest zaledwie kwestią wpisania we właściwej kolejności kilku liczb:
ModeLine <name> <clock> <4 horiz. timings> <4 vert. timings>
Tak więc wpis ModeLine w Section "Monitor" dla tego przykładu wyglądałby następująco:
Section "Monitor"
Identifier      "Monitor1"
VendorName      "Bigname"
ModelName       "BestModel"
ModeLine        "1680x1050" 146.2 1680 1784 1960 2240 1050 1053 1059 1089
Option          "DPMS"
EndSection
Po tych kilku prostych zmianach X powinien zacząć działać poprawnie z naszym szerokokątnym monitorem.
Czcionki dostarczane razem z X11 są dalekie od idealnych dla typowych aplikacji biurowych. Duże czcionki sprawiają wrażenie postrzępionych i mało profesjonalnych. Natomiast, małe czcionki w getenv(3) są całkowicie nieczytelne. Tym nie mniej, dostępnych jest kilka darmowych, wysokiej jakości czcionek Type1 (PostScript®), gotowych do użycia z X11. Na przykład, kolekcja czcionek URW (x11-fonts/urwfonts) zawiera wysokiej jakości wersje standardowych czcionek type1 (Times Roman™, Helvetica™, Palatino™ i innych). Kolekcja Freefonts (x11-fonts/freefonts) to wiele dodatkowych czcionek, przy czym większość z nich przewidzianych jest do użycia z oprogramowaniem graficznym, jak np. Gimp, tym samym nie są przygotowane do wykorzystania jako czcionki do aplikacji. Dodatkowo, przy minimum wysiłku, można skonfigurować X11, by korzystał z czcionek TrueType®. Więcej szczegółów znaleźć można w podręczniku systemowym X(7) lub w części poświęconej czcionkom TrueType®.
By zainstalować kolekcje czcionek Type1 z portów, należy wpisać następujące polecenia:
# cd /usr/ports/x11-fonts/urwfonts
# make install clean
Analogicznie postępujemy z czcionkami freefont bądź innymi kolekcjami. Aby serwer X wykrył zainstalowane czcionki, należy dodać odpowiedni wpis do pliku konfiguracji serwera (/etc/X11/xorg.conf) postaci:
FontPath "/usr/X11R6/lib/X11/fonts/URW/"
Alternatywną metodą jest wpisanie w trakcie sesji X:
% xset fp+ /usr/X11R6/lib/X11/fonts/URW
% xset fp rehash
O ile rozwiązanie to również przyniesie pożądany efekt, o tyle dokonane w ten sposób zmiany zostaną stracone po zakończeniu sesji X. Oczywiście powyższe polecenia można dodać do pliku startowego (~/.xinitrc dla typowej sesji startx bądź pliku ~/.xsession przy logowaniu się za pomocą graficznego menedżera logowania, jak np. XDM). Trzecią metodą jest skorzystanie z nowego pliku /usr/X11R6/etc/fonts/local.conf: szczegóły w części poświęconej wygładzaniu.
Xorg posiada wbudowaną obsługę czcionek TrueType®. Istnieją dwa moduły, które mogą aktywować tę funkcję. W przykładzie wykorzystany został moduł freetype, z uwagi na większą spójność z innymi wewnętrznymi elementami wyświetlającymi czcionki. By włączyć moduł freetype, wystarczy dodać poniższy wiersz do sekcji "Module" pliku /etc/X11/xorg.conf.
Load "freetype"
Teraz musimy utworzyć katalog dla czcionek TrueType® (na przykład /usr/X11R6/lib/X11/fonts/TrueType) i skopiować wszystkie czcionki do tego katalogu. Należy pamiętać, że czcionki TrueType® nie mogą być bezpośrednio skopiowane z systemu Macintosh®, by możliwe było wykorzystanie ich z X11; muszą być w formacie UNIX®/MS-DOS®/Windows®. Po skopiowaniu plików należy wykorzystać ttmkfdir do stworzenia pliku fonts.dir, by poinformować X, że zostały zainstalowane nowe czcionki. Program ttmkfdir dostępny jest z kolekcji portów FreeBSD jako x11-fonts/ttmkfdir.
# cd /usr/X11R6/lib/X11/fonts/TrueType
# ttmkfdir -o fonts.dir
Na koniec musimy dodać katalog TrueType® do ścieżki czcionek. Robimy to analogicznie jak w przypadku czcionek Type1, za pomocą polecenia
% xset fp+ /usr/X11R6/lib/X11/fonts/TrueType
% xset fp rehash
bądź dodając wiersz FontPath do pliku xorg.conf.
Gotowe. Teraz getenv(3), Gimp, StarOffice™ i wszystkie inne aplikacje X powinny rozpoznawać zainstalowane czcionki TrueType®. Bardzo małe czcionki (jak np. tekst na stronie WWW przy ustawionej wysokiej rozdzielczości ekranu) oraz bardzo duże (w StarOffice™) będą wyglądały zdecydowanie lepiej.
Wygładzanie (anti-aliasing) dostępne było w X11 od XFree86™ 4.0.2. Jednakże konfiguracja czcionek była niezmiernie nieporęczna do ukazania się XFree86™ 4.3.0. Począwszy od tej właśnie wersji, wszystkie czcionki w X11 dostępne w katalogach /usr/X11R6/lib/X11/fonts/ oraz ~/.fonts/ są automatycznie dostępne dla aplikacji korzystających z wygładzania Xft. Nie wszystkie aplikacje potrafią korzystać z Xft, lecz wiele z czasem otrzymało wsparcie Xft. Przykładami aplikacji korzystających z Xft są Qt 2.3 i późniejsze (pakiet narzędzi graficznych dla środowiska KDE), GTK+ 2.0 i późniejsze (pakiet narzędzi graficznych dla środowiska GNOME desktop) oraz Mozilla 1.2 i późniejsze.
By móc kontrolować, które czcionki będą wygładzane bądź skonfigurować właściwości wygładzania, należy stworzyć (bądź zmodyfikować, jeśli istnieje) plik /usr/X11R6/etc/fonts/local.conf. Wykorzystując ten plik możemy dostroić kilka zaawansowanych opcji systemu czcionek Xft, jednakże rozdział ten skupia się jedynie na kilku podstawowych funkcjach. Więcej szczegółów znaleźć można w podręczniku systemowym fonts-conf(5).
W pliku tym stosowany jest format kodu XML. Przy jego edycji należy pamiętać o właściwym zamykaniu wszystkich znaczników. Zaczyna się on od typowego nagłówka XML oraz definicji DOCTYPE. Następnym w kolejności jest znacznik <fontconfig>:
      <?xml version="1.0"?>
      <!DOCTYPE fontconfig SYSTEM "fonts.dtd">
      <fontconfig>
Jak już to zostało wcześniej powiedziane, wszystkie czcionki w katalogach /usr/X11R6/lib/X11/fonts/ oraz ~/.fonts/ są automatycznie dostępne dla aplikacji korzystających z Xft. Jeśli natomiast chcemy dodać inny katalog nie będący podkatalogiem żadnego z powyższych, musimy dodać do pliku /usr/X11R6/etc/fonts/local.conf wiersz podobny do poniższego:
<dir>/ścieżka/do/moich/czcionek</dir>
Po dodaniu nowych czcionek, a szczególnie nowych katalogów, powinniśmy uruchomić poniższe polecenie, by przebudować bufor informacji o czcionkach:
# fc-cache -fWygładzanie sprawia, że brzegi czcionek stają się lekko zamazane, dzięki czemu małe litery są bardziej czytelne, a duże pozbawione efektu "schodków". Może jednak prowadzić do zmęczenia oczu gdy zostanie użyte w stosunku do liter o normalnej wiekości. By wyłączyć wygładzanie czcionek o rozmiarze mniejszym niż 14 punktów, należy dodać poniższe wiersze do pliku konfiguracyjnego:
        <match target="font">
            <test name="size" compare="less">
                <double>14</double>
            </test>
            <edit name="antialias" mode="assign">
                <bool>false</bool>
            </edit>
        </match>
        <match target="font">
            <test name="pixelsize" compare="less" qual="any">
                <double>14</double>
            </test>
            <edit mode="assign" name="antialias">
                <bool>false</bool>
            </edit>
        </match>
Korzystając z wygładzania może się okazać, iż również odstępy pomiędzy literami niektórych czcionek o stałej szerokości są niewłaściwe. Ma to miejsce szczególnie w przypadku KDE. Jedynym rozwiązaniem tego problemu jest wymuszenie stałego odstępu o wartości 100 dla danych czcionek. W tym celu musimy wpisać:
       <match target="pattern" name="family">
           <test qual="any" name="family">
               <string>fixed</string>
           </test>
           <edit name="family" mode="assign">
               <string>mono</string>
           </edit>
        </match>
        <match target="pattern" name="family">
            <test qual="any" name="family">
                <string>console</string>
            </test>
            <edit name="family" mode="assign">
                <string>mono</string>
            </edit>
        </match>
(powyższe deklaruje inne typowe nazwy czcionek o stałej szerokości jako "mono"), a następnie:
         <match target="pattern" name="family">
             <test qual="any" name="family">
                 <string>mono</string>
             </test>
             <edit name="spacing" mode="assign">
                 <int>100</int>
             </edit>
         </match>
Niektóre czcionki, jak np. Helvetica, mogą stwarzać problemy jeśli zostaną poddane wygładzaniu. Z reguły daje to efekt czcionki przeciętej pionowo na pół. W najgorszym wypadku, może prowadzić to do załamania aplikacji typu Mozilla. By tego uniknąć, warto dodać poniższe do pliku local.conf:
         <match target="pattern" name="family">
             <test qual="any" name="family">
                 <string>Helvetica</string>
             </test>
             <edit name="family" mode="assign">
                 <string>sans-serif</string>
             </edit>
         </match>
Skończywszy edycję local.conf upewnijmy się, że plik kończy się znacznikiem </fontconfig>. Bez tego może się okazać, że nasze zmiany zostaną zignorowane.
Korzystanie z domyślnego zestawu czcionek, dostępnego wraz z X11, nie jest wskazane jeśli chodzi o wygładzanie. Zdecydowanie lepszy zestaw domyślnych czcionek zawiera port x11-fonts/bitstream-vera. Port ten zainstaluje również plik /usr/X11R6/etc/fonts/local.conf jeśli jeszcze go nie mamy. Jeśli natomiast istnieje już taki plik w systemie, stworzony zostanie plik /usr/X11R6/etc/fonts/local.conf-vera. Wystarczy dołączyć zawartość tego pliku do /usr/X11R6/etc/fonts/local.conf, by czcionki Bitstream automatycznie zastąpiły domyślne czcionki X11 Serif, Sans Serif i Monospaced.
Na koniec, użytkownicy mogą dodać swoją konfigurację poprzez własny plik .fonts.conf. W tym celu każdy użytkownik może stworzyć i zmodyfikować plik ~/.fonts.conf. Również ten plik wykorzystuje format XML.
Ostatnia rzecz: osoby korzystające z monitorów LCD mogą pragnąć zastosować wygładzanie podpikselowe. W skrócie, w metodzie tej czerwone, zielone i niebieskie komponenty (oddzielone w płaszczyźnie poziomej) traktowane są oddzielnie, co poprawia rozdzielczość poziomą i przynosi radykalne efekty. By włączyć wygładzanie podpikselowe należy dodać poniższy wiersz do pliku local.conf:
         <match target="font">
             <test qual="all" name="rgba">
                 <const>unknown</const>
             </test>
             <edit name="rgba" mode="assign">
                 <const>rgb</const>
             </edit>
         </match>
Zależnie od typu monitora, może się okazać, że będziemy musieli zastąpić |
Wygładzanie powinno być aktywne przy następnym uruchomieniu serwera X. Tym nie mniej, programy muszą zostać poinformowane, by z niego korzystać. W chwili obecnej pakiet narzędzi Qt korzysta z wygładzania czcionek, tym samym również i całe środowisko KDE. GTK+ oraz GNOME również można skonfigurować do pracy z wygładzanymi czcionkami poprzez aplet "Font" (Wygładzane czcionki w GNOME zawiera szczegółowy opis). Domyślnie, Mozilla 1.2 i późniejsze będą automatycznie korzystać z wygładzania. By wyłączyć tę opcję, należy ponownie skompilować program z parametrem -DWITHOUT_XFT.
Menedżer pulpitów X (ang. X Display Manager XDM) jest opcjonalną częścią Systemu okien X, wykorzystywaną do zarządzania sesjami logowania. Znajduje on zastosowanie w kilku typach sytuacji, włączając w to zarówno minimalistyczne "Terminale X", komputery prywatne, jak również ogromne sieciowe serwery graficzne. Z uwagi na fakt, iż System okien X jest niezależny od wykorzystywanej sieci jak i protokołu, istnieje wiele możliwych konfiguracji klientów i serwerów na różnych maszynach połączonych ze sobą za pomocą sieci. XDM dostarcza graficznego interfejsu pozwalającego wybrać, z którym serwerem się połączymy, jak i przeprowadzić autoryzację, np. za pomocą kombinacji loginu i hasła.
XDM można postrzegać jako narzędzie dostarczające użytkownikowi takich samych funkcjonalności jak getty(8) (szczegółowy opis zawiera Configuration). Oznacza to, że to właśnie menedżer pulpitów w imieniu użytkownika dokonuje logowania do systemu i uruchamia menedżera sesji (z reguły menedżera okien). Następnie, XDM oczekuje aż program zakończy działanie, sygnalizując tym samym, że użytkownik skończył pracę i menedżer pulpitów powinien go wylogować z systemu. W tym momencie XDM może ponownie wyświetlić ekran logowania i wyboru środowiska graficznego oczekująć na kolejnego użytkownika.
Demon XDM znajduje się w /usr/X11R6/bin/xdm. Program ten może zostać uruchomiony w dowolnej chwili przez użytkownika root i od razu rozpocznie zarządzanie ekranami X w lokalnym systemie. Jeśli jednak XDM ma być uruchamiany przy każdym starcie systemu, najlepszym rozwiązaniem jest dodanie odpowiedniego wpisu do pliku /etc/ttys. Adding an Entry to /etc/ttys zawiera więcej informacji odnośnie formatu i wykorzystania tego pliku. W domyślnej wersji plik /etc/ttys zawiera wiersz uruchamiający demona XDM w wirtualnym terminalu:
ttyv8 "/usr/X11R6/bin/xdm -nodaemon" xterm off secureDomyślnie, wiersz ten jest nieaktywny. By go uaktywnić należy zmienić zawartość 5 kolumny z off na on i ponownie uruchomić init(8) wykorzystująć wskazówki z Force init to Reread /etc/ttys. Pierwsza kolumna - nazwa terminala, którym będzie zarządzał dany program - to ttyv8. Oznacza to, że XDM będzie pracował na dziewiątny wirtualnym terminalu.
W katalogu /usr/X11R6/lib/X11/xdm znajdują się pliki konfiguracyjne XDM. Pliki te można wykorzystać do zmiany zachowania i wyglądu menedżera ekranów. Z reguły są to następujące pliki:
| Plik | Opis |
|---|---|
Xaccess | Zestaw reguł autoryzacji klientów. |
Xresources | Domyślne wartości zasobów X. |
Xservers | Lista zdalnych i lokalnych ekranów do zarządzania. |
Xsession | Domyślny skrypt sesji logowania. |
Xsetup_* | Skrypt uruchamiający aplikacje przed interfejsem logowania. |
xdm-config | Konfiguracja globalna dla wszystkich ekranów danej maszynie. |
xdm-errors | Błędy generowane przez program serwera. |
xdm-pid | Identyfikator procesu aktualnie działającego XDM. |
W tym katalogu znajduje się również kilka skryptów i programów wykorzystywanych do konfiguracji pulpitów w trakcie działania XDM. Zadanie każdego z tych plików zostanie pokrótce omówione. Dokładna składnia i wykorzystanie wszystkich tych plików znajduje się w xdm(1).
W domyślnej konfiguracji pojawi się prostokątne okno logowania z nazwą maszyny wypisaną dużą czcionką na samej górze, wraz z polami "Login:" i "Password:". Jest to dobry punkt wyjściowy do modyfikacji wyglądu i zachowania ekranów XDM.
Protokół wykorzystywany do łączenia z puplitami obsługiwanymi przez XDM nosi nazwę X Display Manager Connection Protocol (XDMCP). Plik ten jest zestawem reguł do kontroli połączeń XDMCP ze zdalnych maszyn. Z reguły jest on ignorowany, chyba że w pliku xdm-config zostanie włączona opcja nasłuchiwania zdalnych połączeń. Domyślnie nie zezwala się na połączenia z innych klientów.
Jest to plik domyślnej konfiguracji programu wyboru puplitu i ekranu logowania. W tym właśnie pliku można modyfikować ich wygląd. Format pliku jest identyczny z formatem app-defaults opisanym w dokumentacji X11.
Domyślny skrypt sesji XDM uruchamiany po zalogowaniu się użytkownika. Z reguły każdy użytkownik posiada zmodyfikowany według własnego upodobania skrypt sesji w pliku ~/.xsession, uruchamiany zamiast tego skryptu.
Skrypty te zostaną automatycznie uruchomione przed wyświetleniem interfejsu logowania i wyboru pulpitu. Dla każdego wykorzystywanego ekranu znajduje się tu plik o nazwie Xsetup_ wraz z numerem lokalnego ekranu (na przykład Xsetup_0). Z reguły skrypty te uruchamiają jeden bądź dwa programy w tle, jak np. xconsole.
Plik ustawień w formacie app-defaults, mający zastosowanie do wszystkich puplitów zarządzanych przez menedżera.
Plik ten zawiera wydruki wyjściowe serwerów X, które XDM stara się uruchomić. Jeśli w trakcie uruchamiania pulpitu z jakiegoś powodu proces ten zawiesi się, najlepszym miejscem poszukiwania komunikatów błędów jest właśnie ten plik. Komunikaty te są również umieszczane w pliku ~/.xsession-errors użytkownika dla danej sesji.
By umożliwić innym klientom łączenie się z serwerem graficznym, należy zmodyfikować reguły kontroli dostępu i włączyć opcję nasłuchiwania połączeń. Domyślnie opcja ta jest nie aktywna. Jej aktywacja polega na odkomentowaniu poniższej linii w pliku xdm-config:
! SECURITY: do not listen for XDMCP or Chooser requests
! Comment out this line if you want to manage X terminals with xdm
DisplayManager.requestPort:     0
Następnie należy ponownie uruchomić XDM. Pamiętajmy, że komentarze w plikach app-defaults rozpoczynają się od znaku "!" zamiast typowego "#". Lektura przykładowego pliku Xaccess oraz podręcznika systemowego xdm(1) może nam pomóc gdy będziemy potrzebować bardziej surowej kontroli dostępu.
Dostępnych jest kilka alternatyw dla domyślnego menedżera XDM. Jeden z nich - kdm (dostarczany razem z KDE) - został bliżej opisany w tym w dalszej części rozdziału. Menedżer kdm oferuje wiele wizualnych usprawnień i kosmetycznych dodaktów, jak również możliwość wyboru menedżera okien przed zalogowaniem do systemu.
Niniejsza sekcja opisuje różne typy środowisk graficznych dostępnych dla X we FreeBSD. Termin "środowisko graficzne" może oznaczać wszystko, od prostego menedżera okien po kompletny zestaw aplikacji puplitu, jak KDE czy GNOME.
GNOME jest przyjaznym użytkownikowi środowiskiem graficznym, umożliwiającym łatwą konfigurację i proste korzystanie z komputera. GNOME posiada panel (do uruchamiania aplikacji i wyświetlania ich statusu), puplit (gdzie można umieszczać dane i aplikacje), zestaw standardowych narzędzi biurowych i aplikacji oraz zestaw pewnych konwencji ułatwiających współpracę miedzy aplikacjami i zachowanie wzajemnej spójności. Użytkownicy innych systemów operacyjnych powinni czuć się jak w domu korzystając z potężnego środowiska graficznego dostarczanego przez GNOME. Więcej informacji odnośnie środowiska GNOME we FreeBSD dostępnych jest na stronie WWW projektu FreeBSD GNOME Project. Strona ta zawiera również w miarę zrozumiałe FAQ traktujące o instalacji, konfiguracji i zarządzaniu GNOME.
Najprostszym sposobem instalacji GNOME jest poprzez menu "Desktop Configuration" w trakcie instalacji FreeBSD, co omawia Wybór menedżera okien rozdziału 2. Możliwa jest również instalacja z pakietu bądź kolekcji portów:
By zainstalować pakiet GNOME z sieci, wystarczy wpisać:
# pkg_add -r gnome2By skompilować GNOME ze źródeł najlepiej jest skorzystać z portu:
# cd /usr/ports/x11/gnome2
# make install clean
Mając już zainstalowanego GNOME musimy poinformować serwer X, by uruchamiał właśnie jego w miejsce domyślnego menedżera okien.
Najprostszą metodą uruchomienia GNOME jest wykorzystanie GDM - menedżera pulpitów GNOME (ang. GNOME Display Manager). GDM jest instalowany jako część środowiska GNOME, jednakże jest on domyślnie wyłączony. By go włączyć, należy dodać wiersz gdm_enable="YES" do pliku /etc/rc.conf. Po ponownym uruchomieniu systemu, GNOME zostanie automatycznie włączony zaraz po zalogowaniu się - nie wymagana jest dodatkowa konfiguracja.
Oczywiście, GNOME można uruchomić również bezpośrednio z linii poleceń poprawnie konfigurując plik .xinitrc w katalogu domowym. Jeśli plik ten już istnieje wystarczy zastąpić wiersz odpowiadający za uruchomienie aktualnego menedżera okien na wiersz uruchamiający /usr/X11R6/bin/gnome-session. Jeśli w pliku nie dokonywaliśmy żadnych istotnych zmian, najprościej będzie po prostu wpisać:
% echo "/usr/X11R6/bin/gnome-session" > ~/.xinitrcNastępnie wpisujemy startx, co spowoduje uruchomienie środowiska GNOME.
Jeśli wykorzystujemy starszego menedżera okien, jak np. XDM, powyższe rozwiązanie nie zadziała. W takiej sytuacji musimy stworzyć plik wykonywalny .xsession zawierający powyższe polecenie. W tym celu należy zmodyfikować ten plik i zastąpić polecenie uruchamiające aktualnego menedżera poleceniem /usr/X11R6/bin/gnome-session: |
% echo "#!/bin/sh" > ~/.xsession
% echo "/usr/X11R6/bin/gnome-session" >> ~/.xsession
% chmod +x ~/.xsession
Jeszcze jedną metodą jest skonfigurowanie menedżera pulpitów tak, by umożliwiał wybór menedżera okien w trakcie logowania. Sekcja Więcej informacji o KDE wyjaśnia jak to zrobić w kdm - menedżerze puplitów KDE.
X11 obsługuje wygładzanie czcionek (anti-aliasing) za pomocą rozszerzenia "RENDER". GTK+ w wersji 2.0 i późniejszych (pakiet narzędzi graficznych wykorzystywany przez GNOME) potrafi korzystać z tej funkcji. Konfigurację wygładzania czcionek opisuje Wygładzane czcionki. Zatem, wykorzystując najnowsze oprogramowanie, możliwe jest wygładzanie czcionek w środowisku GNOME. Wystarczy przejść do menu i wybrać jedną z opcji: Best shapes (najlepsze kształty), Best contrast (najlepszy kontrast) lub Subpixel smoothing (LCDs) (wygładzanie podpikselowe). Natomiast dla aplikacji GTK+ nie będących częścią środowiska GNOME, należy ustawić zmienną środowiskową GDK_USE_XFT na 1 przed uruchomieniem programu.
KDE jest prostym w użyciu współczesnym środowiskiem graficznym, zawierającym między innymi:
Ładnie wyglądający puplit
Pulpit odznaczający się całkowitą przezroczystością sieci
Zintegrowany system pomocy, udostępniający w prosty sposób informacje o korzystaniu ze środowiska KDE i jego aplikacji
Jednakowy wygląd i zachowanie wszystkich aplikacji KDE
Standardowe menu i paski narzędzi, skróty klawiaturowe, schematy kolorów, itp.
Internacjonalizacja: KDE jest dostępny w ponad 40 językach
Scentralizowaną i spójną konfigurację środowiska
Całą masę przydanych aplikacji
KDE posiada własną przeglądarkę internetową - Konqueror, która stanowi poważną konkurencję dla innych przeglądarek z systemów UNIX®. Więcej informacji o KDE znaleźć można na stronie KDE. Natomiast informacje o jego współpracy z FreeBSD dostępne są na stronie FreeBSD-KDE team.
Podobnie jak w przypadku GNOME czy dowolnego innego środowiska graficznego, najprostszym sposobem instalacji KDE jest skorzystanie z menu "Desktop Configuration" w procesie instalacji FreeBSD, co omawia Wybór menedżera okien rozdziału 2. Ponownie, również KDE można zainstalować z pakietu bądź z kolekcji portów:
By zainstalować pakiet KDE z sieci, wystarczy wpisać:
# pkg_add -r kdepkg_add(1) automatycznie pobierze najnowszą wersję aplikacji.
By skompilować KDE ze źródeł najlepiej jest skorzystać z portu:
# cd /usr/ports/x11/kde3
# make install clean
Po instalacji KDE należy poinformować serwer X, by uruchamiał go w miejsce domyślnego menedżera okien. W tym celu należy zmodyfikować plik .xinitrc:
% echo "exec startkde" > ~/.xinitrcOd tej pory, za każdym razem gdy uruchomimy System okien X za pomocą polecenia startx, uruchomione zostanie środowisko KDE.
Jeśli wykorzystujemy starszego menedżera okien, jak np. XDM, wymagana jest odmienna konfiguracja. Opis konfiguracji kdm znajduje się w dalszej części tego rozdziału.
Skoro zainstalowaliśmy już KDE, większość informacji można odnaleźć w systemie pomocy, bądź po prostu klikając w dowolne menu. Użytkownicy systemów Windows® czy Mac® powinni czuć się jak w domu.
Najlepszym źródłem informacji o KDE jest dostępna w sieci dokumentacja. KDE zawiera własną przeglądarkę internetową - Konqueror, masę przydatnych aplikacji i obszerną dokumentację. Pozostała część tego rozdziału skupi się na technicznych zagadnieniach, trudnych do nauczenia się poprzez dość losowe poznawanie środowiska.
Administratorzy systemów wieloużytkownikowych mogą chcieć skorzystać z graficznego ekranu logowania. W tym celu można zastosować XDM, jak to zostało opisane wcześniej. Można również wykorzystać alternatywne rozwiązanie dostępne razem z KDE - kdm - wyglądające zdecydowanie bardziej atrakcyjnie oraz posiadające wiele dodatkowych opcji logowania. W szczególności, użytkownicy mogą w prosty sposób wybrać (poprzez menu), które środowisko graficzne uruchomić po zalogowaniu (KDE, GNOME, bądź inne).
By aktywować kdm, należy zmodyfikować wpis dla ttyv8 w pliku /etc/ttys. Wiersz ten powinien wyglądać następująco:
ttyv8 "/usr/local/bin/kdm -nodaemon" xterm on secure
XFce jest środowiskiem graficznym wykorzystującym pakiet narzędzi GTK+, podobnie jak GNOME, lecz jest zdecydowanie lżejsze i przeznaczone dla osób poszukujących prostego i efektywnego środowiska, lecz również łatwego w obsłudze i konfiguracji. Wyglądem bardzo przypomina CDE, często dostępne w komercyjnych systemach UNIX®. Niektóre z cech XFce:
Prosty i łatwy w obsłudze pulpit
Możliwość konfiguracji wszystkich elementów za pomocą myszki, metody przeciągnij i upuść, itp.
Główny panel podobny do CDE z wieloma opcjami menu, apletami i programami wywołującymi
Zintegrowane menedżery okien, plików, dźwięku, moduł zgodności GNOME i inne dodatki
Możliwość stosowania motywów (skoro wykorzystuje GTK+)
Szybkie, lekkie i wydajne: idealny dla starszych/wolniejszych maszyn lub z ograniczonym zasobem pamięci
Więcej informacji dostępnych jest na stronie XFce.
W chwili pisania niniejszego tekstu dostępny jest pakiet binarny. By z niego zainstalować XFce, wystarczy wpisać:
# pkg_add -r xfce4Oczywiście, można również skompilować go ze źródeł przy pomocy kolekcji portów:
# cd /usr/ports/x11-wm/xfce4
# make install clean
Pozostaje jeszcze poinformować serwer X by uruchamiał XFce przy kolejnych uruchomieniach X. Wystarczy wpisać:
% echo "/usr/X11R6/bin/startxfce4" > ~/.xinitrcPrzy kolejnym uruchomieniu X jako środowisko graficzne zostanie wykorzystane XFce. Podobnie jak wcześniej, tak i teraz należy stworzyć plik .xsession gdy korzystamy z XDM, co zostało umówione w części poświęconej GNOME, wpisując polecenie /usr/X11R6/bin/startxfce4. Alternatywnie, należy skonfigurować menedżera pulpitów, by pozwalał na wybór środowiska graficznego w trakcie logowania, zgodnie z opisem z sekcji poświęconej kdm.
Skoro podstawy zostały już omówione, ta część Podręcznika zajmie się kilkoma z najczęściej wykorzystywanych funkcji FreeBSD. Niniejsze rozdziały:
Przedstawią popularne i przydatne aplikacje biurowe: przeglądarki, edytory dokumentów, itp.
Przedstawią narzędzia multimedialne dostępne dla FreeBSD.
Wyjaśnią proces kompilacji własnego jądra FreeBSD w celu włączenia dodatkowych funkcji w systemie.
Opiszą szczegółowo system wydruku, zarówno dla drukarek podłączonych lokalnie jak i drukarek sieciowych.
Pokarzą jak uruchomić aplikacje Linuksowe w systemie FreeBSD.
Niektóre z poniższych rozdziałów zalecają lekturę dodatkowych materiałów, co zostanie wskazane w streszczeniu na początku każdego rozdziału.
Podobnie jak we wszystkich współczesnych systemach operacyjnych, również i we FreeBSD możemy uruchamiać szereg aplikacji biurowych, jak np. przeglądarki czy procesory tekstu. Większość z nich dostępnych jest zarówno w postaci pakietów jak i portów. Rozdział ten zaprezentuje jak bez większego wysiłku można je zainstalować zarówno z odpowiednich pakietów jak też wprost z kolekcji portów.
Pamiętajmy, że instalacja programów z portów obejmuje również ich kompilację ze źródeł. Stąd też proces ten może zająć dużo czasu, zależnie od tego co kompilujemy, oraz od mocy obliczeniowej naszej maszyny. Jeśli kompilacja ze źródeł jest dla nas zbyt czasochłonnym zadaniem, większość programów dostępnych w kolekcji portów możemy zainstalować również z prekompilowanych pakietów.
Jako, że FreeBSD umożliwia tzw. tryb zgodności binarnej z Linuksem, wiele aplikacji pisanych pod Linuksa dostępnych jest również we FreeBSD. Jednakże, przed instalacją jakiegokolwiek programu linuksowego zalecamy przeczytać Rozdział 10, Linux Binary Compatibility niniejszego Podręcznika. Nazwy wielu portów wykorzystujących zgodność binarną z Linuksem rozpoczynają się od "linux-", o czym warto pamiętać poszukując właściwego portu, np. za pomocą polecenia whereis(1). W dalszej części rozdziału założono, że przed instalacją jakiejkolwiek linuksowej aplikacji w naszym komputerze został włączony tryb zgodności z Linuksem.
Programy omówione w tym rozdziale zostały podzielone na następujące kategorie:
Przeglądarki internetowe (takie jak Mozilla, Opera, Firefox czy Konqueror)
Programy codziennego użytku (jak np. KOffice, AbiWord, The GIMP oraz OpenOffice.org)
Przeglądarki dokumentów (takie jak Acrobat Reader®, gv, Xpdf i GQview)
Finanse (jak np. GnuCash, Gnumeric, Abacus)
Przed przeczytaniem tego rozdziału, powinniśmy:
Wiedzieć jak instalować dodatkowe programy (Instalacja programów. pakiety i porty).
Wiedzieć, jak instalować programy linuksowe (Linux Binary Compatibility).
Multimedia zawiera informacje odnośnie instalacji środowiska multimedialnego. Natomiast Rozdział 24, Electronic Mail zawiera wskazówki jak skonfigurować i korzystać z poczty elektronicznej.
FreeBSD z definicji nie posiada zainstalowanej żadnej przeglądarki internetowej. W zamian katalog www kolekcji portów zawiera całą masę przeglądarek gotowych do instalacji. Jeśli nie mamy czasu na kompilację (co w niektórych przypadkach może zająć naprawdę dużo czasu), wiele z nich udostępnionych zostało również w postaci pakietów.
KDE i GNOME dysponują własnymi przeglądarkami internetowymi. “Środowiska graficzne” zawiera szczegółowe informacje odnośnie instalacji tych środowisk graficznych.
Jeśli szukamy lekkich przeglądarek internetowych, powinniśmy zainteresować sie www/dillo2, www/links, lub www/w3m.
Niniejsza sekcja omawia następujące programy:
| Nazwa aplikacji | Wykorzystanie zasobów | Instalacja z portów | Główne zależności |
|---|---|---|---|
Mozilla | duże | długa | Gtk+ |
Opera | małe | krótka | Dostępne są wersje dla FreeBSD i Linuksa. Wersja dla Linuksa wymaga trybu zgodności binarnej z Linuksem oraz linux-openmotif. |
Firefox | średnie | długa | Gtk+ |
Konqueror | średnie | długa | Biblioteki KDE |
Mozilla jest nowoczesną, stabilną przeglądarką w całości przeniesioną na FreeBSD. Zawiera w pełni zgodny ze standardami mechanizm wyświetlania kodu HTML, jak również klienta poczty elektronicznej i grup dyskusyjnych. Dysponuje nawet edytorem HTML, jeśli sami chcemy pisać strony internetowe. Użytkownicy Netscape® z pewnością dostrzegą podobieństwo do pakietu Communicator, gdyż obydwie przeglądarki mają te same pochodzenie.
Na wolnych maszynach, z procesorem wolniejszym niż 233MHz bądź z pojemnością pamięci RAM mniejszą niż 64MB, Mozilla może okazać się zbyt "zasobo-żerna". W tej sytuacji możemy zainteresować się np. przeglądarką Opera, opisaną w dalszej części tego rozdziału.
Jeśli nie możemy bądź z dowolnego powodu nie chcemy kompilować przeglądarki Mozilla, grupa FreeBSD GNOME zrobiła to za nas. Wystarczy zainstalować pakiet bezpośrednio z sieci za pomocą:
# pkg_add -r mozillaJeśli z jakichś powodów pakiet nie jest dostępny, a my dysponujemy czasem i miejscem na dysku, możemy pobrać źródła, skompilować je i zainstalować w naszym systemie. W tym celu wystarczy wpisać:
# cd /usr/ports/www/mozilla
# make install clean
Port ten przygotowany został w sposób zapewniający właściwą inicjalizację poprzez uruchamianie rejestru konfiguracji z uprawnieniami użytkownika root, w momencie gdy pracujemy na koncie zwykłego użytkownika. Tym nie mniej, jeśli chcemy poprawnie zainstalować dodatkowe składniki, musimy uruchomić program Mozilla jako root.
By uruchomić przeglądarkę należy wpisać poniższe polecenie. Poza procesem instalacji, przeglądarka nie wymaga korzystania z konta root.
% mozillaUruchomienie jej bezpośrednio w trybie klienta poczty i grup dyskusyjnych możliwe jest za pomocą polecenia:
% mozilla -mailFirefox jest nowoczesną przeglądarką, opartą o kod przeglądarki Mozilla. O ile Mozilla stanowi kompletny pakiet aplikacji - zawiera m.in. przeglądarkę, klienta poczty, czy grup dyskusyjnych, o tyle Firefox jest jedynie przeglądarką, dzięki czemu jest zdecydowanie mniejszy i szybszy.
By zainstalować go z pakietu wystarczy wpisać:
# pkg_add -r firefoxJeśli preferujemy kompilację programów wprost z kodu źródłowego, możemy skorzystać z kolekcji portów:
# cd /usr/ports/www/firefox
# make install cleanW tej i następnej sekcji założono, że mamy już zainstalowaną przeglądarkę Firefox lub Mozilla. |
Fundacja FreeBSD posiada licencję Sun Microsystems na dystrybucję plików binarnych FreeBSD dla środowisk Java Runtime Environment (JRETM) oraz Java Development Kit (JDKTM). Pakiety binarne dla FreeBSD dostępne są na stronie WWW Fundacji FreeBSD.
By do przeglądarki Firefox lub Mozilla dodać obsługę JavaTM, musimy wpierw zainstalować port java/javavmwrapper, a następnie pobrać pakiet Diablo JRETM ze strony http://www.freebsdfoundation.org/downloads/java.shtml, i zainstalować go za pomocą pkg_add(1).
Po ponownym uruchomieniu przeglądarki, wpisaniu w pasku adresu about:plugins i wciśnięciu Enter, wyświetlona zostanie strona informująca o zainstalowanych modułach. Wymieniony powinien zostać również moduł JavaTM.
Moduł Macromedia® Flash® niestety nie jest dostępny dla FreeBSD. Tym nie mniej, istnieje interfejs programowy (ang. wrapper) do uruchamiania linuksowej wersji modułu. Interfejs ten obsługuje również moduły Adobe® Acrobat®, RealPlayer i wiele innych.
By zainstalować port www/linuxpluginwrapper, musimy wpierw zainstalować emulators/linux_base, który jest obszernym portem. W trakcie instalacji należy zwrócić szczególną uwagę na informacje o właściwej konfiguracji pliku /etc/libmap.conf! Przykładowe pliki konfiguracyjne znaleźć można w katalogu /usr/local/shared/examples/linuxpluginwrapper/.
Kolejnym krokiem jest instalacja portu www/linux-flashplugin7. Po zainstalowaniu modułu możemy sprawdzić listę aktualnie dostępnych modułów uruchamiając przeglądarkę, wpisując w pasku adresu about:plugins i wciskając Enter..
Jeśli na powyższej liście brak jest modułu Flash®, najczęstszą przyczyną jest brak odpowiedniego dowiązania symbolicznego. W takiej sytuacji należy jako użytkownik root uruchomić następujące polecenia:
# ln -s /usr/local/lib/npapi/linux-flashplugin/libflashplayer.so \
  /usr/X11R6/lib/browser_plugins/
# ln -s /usr/local/lib/npapi/linux-flashplugin/flashplayer.xpt \
  /usr/X11R6/lib/browser_plugins/
Po ponownym uruchomieniu przeglądarki, moduł powinien zostać wyświetlony na wspomnianej liście. Może się również zdażyć, że nasza przeglądarka ulegenie awarii w trakcie odtwarzania animacji Flash®. W takim przypadku będziemy musieli nałożyć odpowiednią łatę (ang. patch):
# cd /usr/src
# fetch http://people.FreeBSD.org/~nork/rtld_dlsym_hack.diff
# patch < rtld_dlsym_hack.diff
# cd libexec/rtld-elf/
# make clean
# make obj
# make depend
# make && make install
Po czym musimy ponownie uruchomić komputer.
Port linuxpluginwrapper działa poprawnie jedynie na maszynach o architekturze i386™. |
Opera jest nowoczesną, zgodną ze standardami przeglądarką internetową. Posiada również klienta poczty elektronicznej i grup dyskusyjnych, klienta sieci IRC, czytnik wiadomości RSS/Atom i wiele innych. Mimo to Opera jest stosunkowo lekką i bardzo szybką przeglądarką. Dostępne są dwie wersje: wersja przeznaczona dla FreeBSD oraz wersja uruchamiana w trybie emulacji Linuksa.
By móc przeglądać zasoby sieci WWW za pomocą wersji dla FreeBSD, musimy zainstalować odpowiedni pakiet:
# cd /usr/ports/www/firefox
# make install clean
Niektóre serwery FTP nie zawierają wszystkich pakietów, lecz ten sam efekt możemy otrzymać wykorzystując kolekcję portów:
# cd /usr/ports/www/firefox
# make install clean
By zainstalować wersję linuksową należy w powyższych przykładach zmienić nazwę opera na linux-opera. Wersja linuksowa przydatna jest w sytuacjach wymagających modułów dostępnych tylko dla Linuksa, jak np. Adobe Acrobat Reader®. Pod każdym innym względem wersje dla FreeBSD i Linuksa zdają się być funkcjonalnie identyczne.
Konqueror jest częścią środowiska graficznego KDE, lecz może być również wykorzystywane poza nim poprzez zainstalowanie x11/kdebase3. Konqueror jest więcej niż przeglądarką internetową, jest również menedżerem plików i przeglądarką plików multimedialnych.
Konqueror dostępny jest również z pakietem modułów, z portu misc/konq-plugins.
Również Konqueror obsługuje technologię Flash®. Dokument opisujący instalację modułu dostępny jest pod adresem http://freebsd.kde.org/howto.php.
Jeśli chodzi o programy codziennego użytku, pierwszą rzeczą, której często poszukuje wielu nowych użytkowników, jest dobry pakiet biurowy bądź po prostu procesor tekstu. Pomimo, że niektóre środowiska graficzne, jak np. KDE, dysponują własnym pakietem biurowym, nie istnieje żadna domyślna aplikacja. Niezależnie od wykorzystywanego środowiska graficznego, FreeBSD dysponuje wszystkim czego możemy potrzebować.
Sekcja ta omawia następujące aplikacje:
| Nazwa aplikacji | Wykorzystanie zasobów | Instalacja z portów | Główne zależności |
|---|---|---|---|
KOffice | małe | długa | KDE |
AbiWord | małe | krótka | Gtk+ bądź GNOME |
The Gimp | małe | długa | Gtk+ |
OpenOffice.org | duże | długa | JDK™ 1.4, Mozilla |
Społeczność KDE udostępnia swoje środowisko graficzne wraz z pakietem biurowym, z którego można korzystać zarówno w KDE jak i poza nim. Zawiera cztery standardowe komponenty, które można odnaleźć również w innych pakietach biurowych: procesor tekstu KWord, arkusz kalkulacyjny KSpread, menedżer prezentacji multimedialnych KPresenter oraz program do tworzenia graficznych dokumentów - Kontour.
Przed instalacją najnowszej wersji pakietu KOffice, powinniśmy się upewnić, że dysponujemy również najnowszą wersją KDE.
By zainstalować KOffice z pakietu, należy wpisać następujące polecenie:
# pkg_add -r kofficeJeśli pakiet nie jest dostępny, możemy wykorzystać kolekcję portów. Na przykład, by zainstalować KOffice dla KDE3, należy wpisać:
# cd /usr/ports/editors/koffice-kde3
# make install cleanAbiWord jest darmowym procesorem tekstu pod względem wyglądu i obsługi podobnym do Microsoft® Word. Za jego pomocą możemy pisać artykuły, listy, raporty, notatki itp. Jest on bardzo szybki, bogaty w różnorodne funkcje i przyjazny użytkownikowi.
AbiWord potrafi importować z i eksportować do wielu formatów plików, w tym również niektórych własnościowych formatów, jak np. Microsoft .doc.
AbiWord dostępny jest w postaci pakietu. By go zainstalować wystarczy wpisać:
# pkg_add -r abiwordJeśli pakiet nie jest dostępny, możemy skompilować program wprost z kolekcji portów:
# cd /usr/ports/editors/abiword
# make install cleanThe GIMP jest wyrafinowanym programem przetwarzającym obraz. Wykorzystywany może być zarówno jako prosty program malujący jak i zaawansowny pakiet do retuszu fotografii. Obsługuje on dużą liczbę dodatkowych modułów, jak również udostępnia odpowiedni interfejs dla skryptów. The GIMP potrafi odczytywać i zapisywać wiele formatów plików. Obsługuje również interfejsy skanerów i tabletów.
Możemy zainstalować go z pakietu, za pomocą polecenia:
# pkg_add -r gimpJeśli wykorzystywany serwer FTP nie dysponuje odpowiednim pakietem, możemy wykorzystać kolekcję portów. Katalog graphics zawiera oprócz samego programu, również podręcznik The Gimp Manual. Oto przykładowa metoda instalacji:
# cd /usr/ports/graphics/gimp
# make install clean
# cd /usr/ports/graphics/gimp-manual-pdf
# make install clean
Wspomniany katalog graphics kolekcji portów zawiera również wersję rozwojową aplikacji The GIMP pod nazwą graphics/gimp-devel. Wersja HTML podręcznika The Gimp Manual dostępna jest z portu graphics/gimp-manual-html. |
OpenOffice.org zawiera wszystkie aplikacje, które powinny znaleźć się w kompletnym pakiecie biurowym: procesor tekstu, arkusz kalkulacyjny, menedżer prezentacji i program do rysowania. Jego interfejs jest zbliżony do interfejsów innych pakietów biurowych. Może on importować i eksportować wiele popularnych formatów plików. Dostępny jest w wielu wersjach językowych interfejsu, narzędzi sprawdzania pisowni i słowników.
Procesor tekstu pakietu OpenOffice.org wykorzystuje format pliku XML, by tym sposobem zwiększyć przenośność i elastyczność dokumentów. Arkusz kalkulacyjny oferuje język makr, jak również obsługę interfejsów do zewnętrznych baz danych. OpenOffice.org jest stabilną aplikacją, dostępną dla platform Windows®, SolarisTM, Linux, FreeBSD, i Mac OS® X. Więcej informacji o pakiecie OpenOffice.org znaleźć można na stronie openoffice.org. Informacje odnośnie wersji dla FreeBSD oraz możliwości bezpośredniego pobrania pakietów dostępne są na stronie WWW FreeBSD OpenOffice.org Porting Team.
By zainstalować OpenOffice.org, wystarczy:
# pkg_add -r openoffice.orgMetoda ta przewidzana jest dla wydań FreeBSD gałęzi -RELEASE. W innym przypadku możemy być zmuszeni odwiedzić wspomnianą wyżej stronę WWW FreeBSD OpenOffice.org Porting Team, by pobrać a następnie zainstalować właściwy pakiet za pomocą pkg_add(1). Dostępna jest zarówno wersja bieżąca jak i rozwojow |
Mając zainstalowany pakiety, wystarczy wpisać następujące polecenie by uruchomić OpenOffice.org:
% openoffice.orgPrzy pierwszym uruchomieniu będziemy poproszeni o udzielenie kilku odpowiedzi. po czym w naszym katalogu macierzystym zostanie utworzony katalog .openoffice.org2. |
Jeśli pakiety OpenOffice.org nie są dostępne, wciąż mamy możliwość skompilowania portu. Miejmy jednakże w pamięci, że wymaga do dużej ilości wolnej przestrzeni na dysku oraz zajmuje dość dużo czasu.
# cd /usr/ports/editors/openoffice.org-2
# make install clean
Jeśli chcemy skompilować pakiet w naszej wersji językowej, należy powyższe polecenie zastąpić następującym: Opcję |
Skończywszy instalację, możemy uruchomić OpenOffice.org za pomocą polecenia:
% openoffice.orgOstatnio na popularności zyskały niektóre z pośród nowych formatów dokumentów, przy czym niezbędne przeglądarki mogą nie być dostępne w podstawowej konfiguracji systemu. W tej sekcji opiszemy jak je zainstalować.
Niniejsza sekcja omawia następujące programy:
| Nazwa aplikacji | Wykorzystanie zasobów | Instalacja z portów | Główne zależności |
|---|---|---|---|
Acrobat Reader® | małe | krótka | Tryb zgodności binarnej z Linuksem |
gv | małe | krótka | Xaw3d |
Xpdf | małe | krótka | FreeType |
GQview | małe | krótka | Gtk+ lub GNOME |
Obecnie wiele dokumentów publikowanych jest w postaci plików PDF (ang. Portable Document Format). Jedną z zalecanych przeglądarek do tego typu dokumentów jest Acrobat Reader®, wydany przez firmę Adobe na platformę linuksową. We FreeBSD możemy uruchomić ją dzięki trybowi zgodności binarnej z Linuksem.
By zainstalować Acrobat Reader® 7 wprost z kolekcji portów, należy wpisać:
# cd /usr/ports/print/acroread7
# make install clean
Z uwagi na ograniczenia licencyjne, Acrobat Reader® nie jest dostępny w postaci pakietu.
gv jest przeglądarką dokumentów PostScript® i PDF. Bazuje ona bezpośrednio na ghostview, lecz dzięki bibliotece Xaw3d wygląda zdecydowanie lepiej. gv jest szybką przeglądarką o przejrzystym interfejsie. Posiada wiele funkcji, jak np. możliwość ustawienia orientacji tekstu, rozmiaru papieru, skali czy wygładzania czcionek. Prawie każdą czynność można wykonać za pomocą klawiatury bądź myszki.
By zainstalować gv z pakietu, wystarczy wpisać:
# pkg_add -r gvJeśli nie możemy pobrać pakietu, możemy zawsze wykorzystać kolekcję portów:
# cd /usr/ports/print/gv
# make install cleanJeśli potrzebujemy małej przeglądarki dokumentów PDF, Xpdf stanowi lekkie i wydajne rozwiązanie. Wymaga ona małej ilości zasobów i jest bardzo stabilna. Do pracy wykorzystuje standardowe czcionki X i nie wymaga Motif®, ani żadnego innego pakietu narzędzi X.
By zainstalować pakiet Xpdf, należy wykorzystać następujące polecenie:
# pkg_add -r xpdfJeśli pakiet nie jest dostępny bądź wolimy wykorzystać kolekcję portów, wystarczy wpisać:
# cd /usr/ports/graphics/xpdf
# make install clean
Zakończywszy instalację, możemy uruchomić Xpdf. Menu dostępne jest za pomocą prawego przycisku myszki.
GQview jest menedżerem i przeglądarką obrazów. Za pomocą jednego kliknięcia możemy przeglądać pliki graficzne, uruchomić zewnętrzny edytor, uzyskać podgląd miniatur i wiele więcej. Mamy również dostęp do trybu pokazu slajdów oraz kilku podstawowych operacji na plikach. Możemy łatwo zarządzać kolekcjami obrazów i odnajdywać powtarzające się pliki. GQview udostępnia również tryb pełnoekranowy oraz obsługę wielu języków.
By zainstalować pakiet GQview, wystarczy wpisać:
# pkg_add -r gqviewJeśli pakiet nie jest dostępny bądź wolimy skorzystać z kolekcji portów, możemy wpisać:
# cd /usr/ports/graphics/gqview
# make install cleanJeśli z jakiegoś powodu chcielibyśmy zarządzać naszym domowym budżetem we FreeBSD, dostępnych mamy kilka rozbudowanych i łatwych w obsłudze aplikacji. Niektóre z nich są zgodne z szeroko rozpowszechnionymi formatami plików jak np. dokumenty Quicken czy Excel.
Sekcja ta omawia następujące aplikacje:
| Nazwa aplikacji | Wykorzystanie zasobów | Instalacja z portów | Główne zależności |
|---|---|---|---|
GnuCash | małe | długa | GNOME |
Gnumeric | małe | długa | GNOME |
Abacus | małe | krótka | Tcl/Tk |
GnuCash jest efektem usilnych starań środowiska GNOME by dostarczać końcowym użytkownikom przyjazne i rozbudowane aplikacje. Za pomocą GnuCash możemy śledzić nasze przychody i wydatki, stan konta bankowego czy papierów wartościowych. Posiada on intuicyjny interfejs pozostając wciąż zaawansowanym narzędziem.
GnuCash zawiera inteligentny rejestr, hierarchiczny system kont, wiele skrótów klawiaturowych i metody autouzupełniania wprowadzanych danych. Umożliwia rozbicie pojedynczych transakcji na kilka bardziej szczegółowych części. GnuCash potrafi także importować i dołączać dane z plików QIF programu Quicken. Obsługuje również większość międzynarodowych formatów dat i waluty.
By zainstalować GnuCash należy wpisać:
# pkg_add -r gnucashJeśli pakiet nie jest dostępny, możemy wykorzystać kolekcję portów:
# cd /usr/ports/finance/gnucash
# make install cleanGnumeric jest arkuszem kalkulacyjnym, dostępnym jako część środowiska GNOME. Dysponuje wygodnym systemem automatycznego "zgadywania" wprowadzanych danych zależnie od formatu komórki oraz automatycznego uzupełniania różnych sekwencji. Potrafi importować pliki z wielu popularnych formatów, jak np. Excel, Lotus 1-2-3 lub Quattro Pro. Gnumeric pozwala również na kreślenie grafów za pomocą program math/guppi. Ponadto, posiada on wiele wbudowanych funkcji oraz wszystkie typowe formaty komórek jak liczby, waluty, daty, czas i wiele innych.
By zainstalować Gnumeric z pakietu, należy wpisać:
# pkg_add -r gnumericJeśli pakiet nie jest dostępny, możemy skorzystać z kolekcji portów:
# cd /usr/ports/math/gnumeric
# make install cleanAbacus jest małym i prostym w użyciu arkuszem kalkulacyjnym. Zawiera on wiele wbudowanych funkcji przydatnych w takich dziedzinach jak statystyka, finanse czy matematyka. Potrafi importować z- i eksportować do formatu plików Excel, jak również przygotować pliki PostScript®.
By zainstalować Abacus z pakietu, należy:
# pkg_add -r abacusJeśli pakiet nie jest dostępny, możemy wykorzystać kolekcję portów:
# cd /usr/ports/deskutils/abacus
# make install cleanO ile FreeBSD jest popularnym systemem operacyjnym przede wszystkim wśród dostawców usług internetowych, ze względu na swą wydajność i stabilność, o tyle jest on już gotowy do codziennego użytku jako system biurkowy. Dzięki dostępności kilku tysięcy aplikacji w postaci pakietów bądź portów, możemy przygotować doskonałe środowisko pracy, w pełni odpowiadające naszym potrzebom.
Mając już zainstalowany system możemy zrobić o jeden krok dalej i wykorzystać misc/instant-workstation. Ten "meta-port" pozwala nam skompilować typowy zestaw portów wykorzystywanych w stacjach roboczych. Możemy dopasować go do własnych potrzeb modyfikując plik /usr/ports/misc/instant-workstation/Makefile. Przy dodawaniu i usuwaniu portów należy zachować składnię pliku przedstawioną w domyślnej konfiguracji. Ostatecznie kompilacja przebiega według standardowej procedury. W ten sposób będziemy w stanie przygotować duży pakiet odpowiadający naszemu własnemu środowisku pracy i instalować go na innych stacjach roboczych!
Poniżej znajduje się krótka charakterystyka wszystkich aplikacji biurowych omówionych w tym rozdziale:
| Nazwa aplikacji | Nazwa pakietu | Nazwa portu |
|---|---|---|
Mozilla |
| |
Opera |
| |
Firefox |
| |
KOffice |
| |
AbiWord |
| |
The GIMP |
| |
OpenOffice.org |
| |
Acrobat Reader® |
| |
gv |
| |
Xpdf |
| |
GQview |
| |
GnuCash |
| |
Gnumeric |
| |
Abacus |
|
FreeBSD supports a wide variety of sound cards, allowing users to enjoy high fidelity output from a FreeBSD system. This includes the ability to record and play back audio in the MPEG Audio Layer 3 (MP3), Waveform Audio File (WAV), Ogg Vorbis, and other formats. The FreeBSD Ports Collection contains many applications for editing recorded audio, adding sound effects, and controlling attached MIDI devices.
FreeBSD also supports the playback of video files and DVDs. The FreeBSD Ports Collection contains applications to encode, convert, and playback various video media.
This chapter describes how to configure sound cards, video playback, TV tuner cards, and scanners on FreeBSD. It also describes some of the applications which are available for using these devices.
After reading this chapter, you will know how to:
Configure a sound card on FreeBSD.
Troubleshoot the sound setup.
Playback and encode MP3s and other audio.
Prepare a FreeBSD system for video playback.
Play DVDs, .mpg, and .avi files.
Rip CD and DVD content into files.
Configure a TV card.
Install and setup MythTV on FreeBSD
Configure an image scanner.
Configure a Bluetooth headset.
Before reading this chapter, you should:
Know how to install applications as described in Installing Applications: Packages and Ports.
Before beginning the configuration, determine the model of the sound card and the chip it uses. FreeBSD supports a wide variety of sound cards. Check the supported audio devices list of the Hardware Notes to see if the card is supported and which FreeBSD driver it uses.
In order to use the sound device, its device driver must be loaded. The easiest way is to load a kernel module for the sound card with kldload(8). This example loads the driver for a built-in audio chipset based on the Intel specification:
# kldload snd_hdaTo automate the loading of this driver at boot time, add the driver to /boot/loader.conf. The line for this driver is:
snd_hda_load="YES"
Other available sound modules are listed in /boot/defaults/loader.conf. When unsure which driver to use, load the snd_driver module:
# kldload snd_driverThis is a metadriver which loads all of the most common sound drivers and can be used to speed up the search for the correct driver. It is also possible to load all sound drivers by adding the metadriver to /boot/loader.conf.
To determine which driver was selected for the sound card after loading the snd_driver metadriver, type cat /dev/sndstat.
This section is for users who prefer to statically compile in support for the sound card in a custom kernel. For more information about recompiling a kernel, refer to Configuring the FreeBSD Kernel.
When using a custom kernel to provide sound support, make sure that the audio framework driver exists in the custom kernel configuration file:
device sound
Next, add support for the sound card. To continue the example of the built-in audio chipset based on the Intel specification from the previous section, use the following line in the custom kernel configuration file:
device snd_hda
Be sure to read the manual page of the driver for the device name to use for the driver.
Non-PnP ISA sound cards may require the IRQ and I/O port settings of the card to be added to /boot/device.hints. During the boot process, loader(8) reads this file and passes the settings to the kernel. For example, an old Creative SoundBlaster® 16 ISA non-PnP card will use the snd_sbc(4) driver in conjunction with snd_sb16. For this card, the following lines must be added to the kernel configuration file:
device snd_sbc
device snd_sb16
If the card uses the 0x220 I/O port and IRQ 5, these lines must also be added to /boot/device.hints:
hint.sbc.0.at="isa"
hint.sbc.0.port="0x220"
hint.sbc.0.irq="5"
hint.sbc.0.drq="1"
hint.sbc.0.flags="0x15"
The syntax used in /boot/device.hints is described in sound(4) and the manual page for the driver of the sound card.
The settings shown above are the defaults. In some cases, the IRQ or other settings may need to be changed to match the card. Refer to snd_sbc(4) for more information about this card.
After loading the required module or rebooting into the custom kernel, the sound card should be detected. To confirm, run dmesg | grep pcm. This example is from a system with a built-in Conexant CX20590 chipset:
pcm0: <NVIDIA (0x001c) (HDMI/DP 8ch)> at nid 5 on hdaa0
pcm1: <NVIDIA (0x001c) (HDMI/DP 8ch)> at nid 6 on hdaa0
pcm2: <Conexant CX20590 (Analog 2.0+HP/2.0)> at nid 31,25 and 35,27 on hdaa1
The status of the sound card may also be checked using this command:
# cat /dev/sndstat
FreeBSD Audio Driver (newpcm: 64bit 2009061500/amd64)
Installed devices:
pcm0: <NVIDIA (0x001c) (HDMI/DP 8ch)> (play)
pcm1: <NVIDIA (0x001c) (HDMI/DP 8ch)> (play)
pcm2: <Conexant CX20590 (Analog 2.0+HP/2.0)> (play/rec) default
The output will vary depending upon the sound card. If no pcm devices are listed, double-check that the correct device driver was loaded or compiled into the kernel. The next section lists some common problems and their solutions.
If all goes well, the sound card should now work in FreeBSD. If the CD or DVD drive is properly connected to the sound card, one can insert an audio CD in the drive and play it with cdcontrol(1):
% cdcontrol -f /dev/acd0 play 1Audio |
Various applications, such as audio/workman, provide a friendlier interface. The audio/mpg123 port can be installed to listen to MP3 audio files.
Another quick way to test the card is to send data to /dev/dsp:
% cat filename > /dev/dspwhere filename can be any type of file. This command should produce some noise, confirming that the sound card is working.
The /dev/dsp* device nodes will be created automatically as needed. When not in use, they do not exist and will not appear in the output of ls(1). |
Connecting to a Bluetooth device is out of scope for this chapter. Refer to “Bluetooth” for more information.
To get Bluetooth sound sink working with FreeBSD’s sound system, users have to install audio/virtual_oss first:
# pkg install virtual_ossaudio/virtual_oss requires cuse to be loaded into the kernel:
# kldload cuseTo load cuse during system startup, run this command:
# sysrc -f /boot/loader.conf cuse_load=yesTo use headphones as a sound sink with audio/virtual_oss, users need to create a virtual device after connecting to a Bluetooth audio device:
# virtual_oss -C 2 -c 2 -r 48000 -b 16 -s 768 -R /dev/null -P /dev/bluetooth/headphones -d dspheadphones in this example is a hostname from /etc/bluetooth/hosts. |
Refer to virtual_oss(8) for more information.
Common Error Messages lists some common error messages and their solutions:
| Error | Solution |
|---|---|
| The I/O port is not set correctly. |
| The IRQ is set incorrectly. Make sure that the set IRQ and the sound IRQ are the same. |
| There is not enough available memory to use the device. |
| Type |
Modern graphics cards often come with their own sound driver for use with HDMI. This sound device is sometimes enumerated before the sound card meaning that the sound card will not be used as the default playback device. To check if this is the case, run dmesg and look for pcm. The output looks something like this:
...
hdac0: HDA Driver Revision: 20100226_0142
hdac1: HDA Driver Revision: 20100226_0142
hdac0: HDA Codec #0: NVidia (Unknown)
hdac0: HDA Codec #1: NVidia (Unknown)
hdac0: HDA Codec #2: NVidia (Unknown)
hdac0: HDA Codec #3: NVidia (Unknown)
pcm0: <HDA NVidia (Unknown) PCM #0 DisplayPort> at cad 0 nid 1 on hdac0
pcm1: <HDA NVidia (Unknown) PCM #0 DisplayPort> at cad 1 nid 1 on hdac0
pcm2: <HDA NVidia (Unknown) PCM #0 DisplayPort> at cad 2 nid 1 on hdac0
pcm3: <HDA NVidia (Unknown) PCM #0 DisplayPort> at cad 3 nid 1 on hdac0
hdac1: HDA Codec #2: Realtek ALC889
pcm4: <HDA Realtek ALC889 PCM #0 Analog> at cad 2 nid 1 on hdac1
pcm5: <HDA Realtek ALC889 PCM #1 Analog> at cad 2 nid 1 on hdac1
pcm6: <HDA Realtek ALC889 PCM #2 Digital> at cad 2 nid 1 on hdac1
pcm7: <HDA Realtek ALC889 PCM #3 Digital> at cad 2 nid 1 on hdac1
...
In this example, the graphics card (NVidia) has been enumerated before the sound card (Realtek ALC889). To use the sound card as the default playback device, change hw.snd.default_unit to the unit that should be used for playback:
# sysctl hw.snd.default_unit=nwhere n is the number of the sound device to use. In this example, it should be 4. Make this change permanent by adding the following line to /etc/sysctl.conf:
hw.snd.default_unit=4
It is often desirable to have multiple sources of sound that are able to play simultaneously. FreeBSD uses "Virtual Sound Channels" to multiplex the sound card’s playback by mixing sound in the kernel.
Three sysctl(8) knobs are available for configuring virtual channels:
# sysctl dev.pcm.0.play.vchans=4
# sysctl dev.pcm.0.rec.vchans=4
# sysctl hw.snd.maxautovchans=4
This example allocates four virtual channels, which is a practical number for everyday use. Both dev.pcm.0.play.vchans=4 and dev.pcm.0.rec.vchans=4 are configurable after a device has been attached and represent the number of virtual channels pcm0 has for playback and recording. Since the pcm module can be loaded independently of the hardware drivers, hw.snd.maxautovchans indicates how many virtual channels will be given to an audio device when it is attached. Refer to pcm(4) for more information.
The number of virtual channels for a device cannot be changed while it is in use. First, close any programs using the device, such as music players or sound daemons. |
The correct pcm device will automatically be allocated transparently to a program that requests /dev/dsp0.
The default values for the different mixer channels are hardcoded in the source code of the pcm(4) driver. While sound card mixer levels can be changed using mixer(8) or third-party applications and daemons, this is not a permanent solution. To instead set default mixer values at the driver level, define the appropriate values in /boot/device.hints, as seen in this example:
hint.pcm.0.vol="50"
This will set the volume channel to a default value of 50 when the pcm(4) module is loaded.
This section describes some MP3 players available for FreeBSD, how to rip audio CD tracks, and how to encode and decode MP3s.
A popular graphical MP3 player is Audacious. It supports Winamp skins and additional plugins. The interface is intuitive, with a playlist, graphic equalizer, and more. Those familiar with Winamp will find Audacious simple to use. On FreeBSD, Audacious can be installed from the multimedia/audacious port or package. Audacious is a descendant of XMMS.
The audio/mpg123 package or port provides an alternative, command-line MP3 player. Once installed, specify the MP3 file to play on the command line. If the system has multiple audio devices, the sound device can also be specified:
# mpg123 -a /dev/dsp1.0 Foobar-GreatestHits.mp3
High Performance MPEG 1.0/2.0/2.5 Audio Player for Layers 1, 2 and 3
        version 1.18.1; written and copyright by Michael Hipp and others
        free software (LGPL) without any warranty but with best wishes

Playing MPEG stream from Foobar-GreatestHits.mp3 ...
MPEG 1.0 layer III, 128 kbit/s, 44100 Hz joint-stereo
Additional MP3 players are available in the FreeBSD Ports Collection.
CD Audio TracksBefore encoding a CD or CD track to MP3, the audio data on the CD must be ripped to the hard drive. This is done by copying the raw CD Digital Audio (CDDA) data to WAV files.
The cdda2wav tool, which is installed with the sysutils/cdrtools suite, can be used to rip audio information from CDs.
With the audio CD in the drive, the following command can be issued as root to rip an entire CD into individual, per track, WAV files:
# cdda2wav -D 0,1,0 -BIn this example, the -D 0,1,0 indicates the SCSI device 0,1,0 containing the CD to rip. Use cdrecord -scanbus to determine the correct device parameters for the system.
To rip individual tracks, use -t to specify the track:
# cdda2wav -D 0,1,0 -t 7To rip a range of tracks, such as track one to seven, specify a range:
# cdda2wav -D 0,1,0 -t 1+7To rip from an ATAPI (IDE) CDROM drive, specify the device name in place of the SCSI unit numbers. For example, to rip track 7 from an IDE drive:
# cdda2wav -D /dev/acd0 -t 7Alternately, dd can be used to extract audio tracks on ATAPI drives, as described in “Duplicating Audio CDs”.
Lame is a popular MP3 encoder which can be installed from the audio/lame port. Due to patent issues, a package is not available.
The following command will convert the ripped WAV file audio01.wav to audio01.mp3:
# lame -h -b 128 --tt "Foo Song Title" --ta "FooBar Artist" --tl "FooBar Album" \
--ty "2014" --tc "Ripped and encoded by Foo" --tg "Genre" audio01.wav audio01.mp3
The specified 128 kbits is a standard MP3 bitrate while the 160 and 192 bitrates provide higher quality. The higher the bitrate, the larger the size of the resulting MP3. The -h turns on the "higher quality but a little slower" mode. The options beginning with --t indicate ID3 tags, which usually contain song information, to be embedded within the MP3 file. Additional encoding options can be found in the lame manual page.
In order to burn an audio CD from MP3s, they must first be converted to a non-compressed file format. XMMS can be used to convert to the WAV format, while mpg123 can be used to convert to the raw Pulse-Code Modulation (PCM) audio data format.
To convert audio01.mp3 using mpg123, specify the name of the PCM file:
# mpg123 -s audio01.mp3 > audio01.pcmTo use XMMS to convert a MP3 to WAV format, use these steps:
WAV Format in XMMSLaunch XMMS.
Right-click the window to bring up the XMMS menu.
Select Preferences under Options.
Change the Output Plugin to "Disk Writer Plugin".
Press Configure.
Enter or browse to a directory to write the uncompressed files to.
Load the MP3 file into XMMS as usual, with volume at 100% and EQ settings turned off.
Press Play. The XMMS will appear as if it is playing the MP3, but no music will be heard. It is actually playing the MP3 to a file.
When finished, be sure to set the default Output Plugin back to what it was before in order to listen to MP3s again.
Both the WAV and PCM formats can be used with cdrecord. When using WAV files, there will be a small tick sound at the beginning of each track. This sound is the header of the WAV file. The audio/sox port or package can be used to remove the header:
% sox -t wav -r 44100 -s -w -c 2 track.wav track.rawRefer to “Creating and Using CD Media” for more information on using a CD burner in FreeBSD.
Before configuring video playback, determine the model and chipset of the video card. While Xorg supports a wide variety of video cards, not all provide good playback performance. To obtain a list of extensions supported by the Xorg server using the card, run xdpyinfo while Xorg is running.
It is a good idea to have a short MPEG test file for evaluating various players and options. Since some DVD applications look for DVD media in /dev/dvd by default, or have this device name hardcoded in them, it might be useful to make a symbolic link to the proper device:
# ln -sf /dev/cd0 /dev/dvdDue to the nature of devfs(5), manually created links will not persist after a system reboot. In order to recreate the symbolic link automatically when the system boots, add the following line to /etc/devfs.conf:
link cd0 dvd
DVD decryption invokes certain functions that require write permission to the DVD device.
To enhance the shared memory Xorg interface, it is recommended to increase the values of these sysctl(8) variables:
kern.ipc.shmmax=67108864
kern.ipc.shmall=32768
There are several possible ways to display video under Xorg and what works is largely hardware dependent. Each method described below will have varying quality across different hardware.
Common video interfaces include:
Xorg: normal output using shared memory.
XVideo: an extension to the Xorg interface which allows video to be directly displayed in drawable objects through a special acceleration. This extension provides good quality playback even on low-end machines. The next section describes how to determine if this extension is running.
SDL: the Simple Directmedia Layer is a porting layer for many operating systems, allowing cross-platform applications to be developed which make efficient use of sound and graphics. SDL provides a low-level abstraction to the hardware which can sometimes be more efficient than the Xorg interface. On FreeBSD, SDL can be installed using the devel/sdl20 package or port.
DGA: the Direct Graphics Access is an Xorg extension which allows a program to bypass the Xorg server and directly alter the framebuffer. Because it relies on a low level memory mapping, programs using it must be run as root. The DGA extension can be tested and benchmarked using dga(1). When dga is running, it changes the colors of the display whenever a key is pressed. To quit, press q.
SVGAlib: a low level console graphics layer.
To check whether this extension is running, use xvinfo:
% xvinfoXVideo is supported for the card if the result is similar to:
X-Video Extension version 2.2
  screen #0
  Adaptor #0: "Savage Streams Engine"
    number of ports: 1
    port base: 43
    operations supported: PutImage
    supported visuals:
      depth 16, visualID 0x22
      depth 16, visualID 0x23
    number of attributes: 5
      "XV_COLORKEY" (range 0 to 16777215)
              client settable attribute
              client gettable attribute (current value is 2110)
      "XV_BRIGHTNESS" (range -128 to 127)
              client settable attribute
              client gettable attribute (current value is 0)
      "XV_CONTRAST" (range 0 to 255)
              client settable attribute
              client gettable attribute (current value is 128)
      "XV_SATURATION" (range 0 to 255)
              client settable attribute
              client gettable attribute (current value is 128)
      "XV_HUE" (range -180 to 180)
              client settable attribute
              client gettable attribute (current value is 0)
    maximum XvImage size: 1024 x 1024
    Number of image formats: 7
      id: 0x32595559 (YUY2)
        guid: 59555932-0000-0010-8000-00aa00389b71
        bits per pixel: 16
        number of planes: 1
        type: YUV (packed)
      id: 0x32315659 (YV12)
        guid: 59563132-0000-0010-8000-00aa00389b71
        bits per pixel: 12
        number of planes: 3
        type: YUV (planar)
      id: 0x30323449 (I420)
        guid: 49343230-0000-0010-8000-00aa00389b71
        bits per pixel: 12
        number of planes: 3
        type: YUV (planar)
      id: 0x36315652 (RV16)
        guid: 52563135-0000-0000-0000-000000000000
        bits per pixel: 16
        number of planes: 1
        type: RGB (packed)
        depth: 0
        red, green, blue masks: 0x1f, 0x3e0, 0x7c00
      id: 0x35315652 (RV15)
        guid: 52563136-0000-0000-0000-000000000000
        bits per pixel: 16
        number of planes: 1
        type: RGB (packed)
        depth: 0
        red, green, blue masks: 0x1f, 0x7e0, 0xf800
      id: 0x31313259 (Y211)
        guid: 59323131-0000-0010-8000-00aa00389b71
        bits per pixel: 6
        number of planes: 3
        type: YUV (packed)
      id: 0x0
        guid: 00000000-0000-0000-0000-000000000000
        bits per pixel: 0
        number of planes: 0
        type: RGB (packed)
        depth: 1
        red, green, blue masks: 0x0, 0x0, 0x0
The formats listed, such as YUV2 and YUV12, are not present with every implementation of XVideo and their absence may hinder some players.
If the result instead looks like:
X-Video Extension version 2.2
screen #0
no adaptors present
XVideo is probably not supported for the card. This means that it will be more difficult for the display to meet the computational demands of rendering video, depending on the video card and processor.
This section introduces some of the software available from the FreeBSD Ports Collection which can be used for video playback.
MPlayer is a command-line video player with an optional graphical interface which aims to provide speed and flexibility. Other graphical front-ends to MPlayer are available from the FreeBSD Ports Collection.
MPlayer can be installed using the multimedia/mplayer package or port. Several compile options are available and a variety of hardware checks occur during the build process. For these reasons, some users prefer to build the port rather than install the package.
When compiling the port, the menu options should be reviewed to determine the type of support to compile into the port. If an option is not selected, MPlayer will not be able to display that type of video format. Use the arrow keys and spacebar to select the required formats. When finished, press Enter to continue the port compile and installation.
By default, the package or port will build the mplayer command line utility and the gmplayer graphical utility. To encode videos, compile the multimedia/mencoder port. Due to licensing restrictions, a package is not available for MEncoder.
The first time MPlayer is run, it will create ~/.mplayer in the user’s home directory. This subdirectory contains default versions of the user-specific configuration files.
This section describes only a few common uses. Refer to mplayer(1) for a complete description of its numerous options.
To play the file testfile.avi, specify the video interfaces with -vo, as seen in the following examples:
% mplayer -vo xv testfile.avi% mplayer -vo sdl testfile.avi% mplayer -vo x11 testfile.avi# mplayer -vo dga testfile.avi# mplayer -vo 'sdl:dga' testfile.aviIt is worth trying all of these options, as their relative performance depends on many factors and will vary significantly with hardware.
To play a DVD, replace testfile.avi with dvd://N -dvd-device DEVICE, where N is the title number to play and DEVICE is the device node for the DVD. For example, to play title 3 from /dev/dvd:
# mplayer -vo xv dvd://3 -dvd-device /dev/dvdThe default |
To stop, pause, advance, and so on, use a keybinding. To see the list of keybindings, run mplayer -h or read mplayer(1).
Additional playback options include -fs -zoom, which engages fullscreen mode, and -framedrop, which helps performance.
Each user can add commonly used options to their ~/.mplayer/config like so:
vo=xv
fs=yes
zoom=yes
mplayer can be used to rip a DVD title to a .vob. To dump the second title from a DVD:
# mplayer -dumpstream -dumpfile out.vob dvd://2 -dvd-device /dev/dvdThe output file, out.vob, will be in MPEG format.
Anyone wishing to obtain a high level of expertise with UNIX® video should consult mplayerhq.hu/DOCS as it is technically informative. This documentation should be considered as required reading before submitting any bug reports.
Before using mencoder, it is a good idea to become familiar with the options described at mplayerhq.hu/DOCS/HTML/en/mencoder.html. There are innumerable ways to improve quality, lower bitrate, and change formats, and some of these options may make the difference between good or bad performance. Improper combinations of command line options can yield output files that are unplayable even by mplayer.
Here is an example of a simple copy:
% mencoder input.avi -oac copy -ovc copy -o output.aviTo rip to a file, use -dumpfile with mplayer.
To convert input.avi to the MPEG4 codec with MPEG3 audio encoding, first install the audio/lame port. Due to licensing restrictions, a package is not available. Once installed, type:
% mencoder input.avi -oac mp3lame -lameopts br=192 \
	 -ovc lavc -lavcopts vcodec=mpeg4:vhq -o output.avi
This will produce output playable by applications such as mplayer and xine.
input.avi can be replaced with dvd://1 -dvd-device /dev/dvd and run as root to re-encode a DVD title directly. Since it may take a few tries to get the desired result, it is recommended to instead dump the title to a file and to work on the file.
xine is a video player with a reusable base library and a modular executable which can be extended with plugins. It can be installed using the multimedia/xine package or port.
In practice, xine requires either a fast CPU with a fast video card, or support for the XVideo extension. The xine video player performs best on XVideo interfaces.
By default, the xine player starts a graphical user interface. The menus can then be used to open a specific file.
Alternatively, xine may be invoked from the command line by specifying the name of the file to play:
% xine -g -p mymovie.aviRefer to xine-project.org/faq for more information and troubleshooting tips.
Transcode provides a suite of tools for re-encoding video and audio files. Transcode can be used to merge video files or repair broken files using command line tools with stdin/stdout stream interfaces.
In FreeBSD, Transcode can be installed using the multimedia/transcode package or port. Many users prefer to compile the port as it provides a menu of compile options for specifying the support and codecs to compile in. If an option is not selected, Transcode will not be able to encode that format. Use the arrow keys and spacebar to select the required formats. When finished, press Enter to continue the port compile and installation.
This example demonstrates how to convert a DivX file into a PAL MPEG-1 file (PAL VCD):
% transcode -i input.avi -V --export_prof vcd-pal -o output_vcd
% mplex -f 1 -o output_vcd.mpg output_vcd.m1v output_vcd.mpa
The resulting MPEG file, output_vcd.mpg, is ready to be played with MPlayer. The file can be burned on a CD media to create a video CD using a utility such as multimedia/vcdimager or sysutils/cdrdao.
In addition to the manual page for transcode, refer to transcoding.org/cgi-bin/transcode for further information and examples.
TV cards can be used to watch broadcast or cable TV on a computer. Most cards accept composite video via an RCA or S-video input and some cards include a FM radio tuner.
FreeBSD provides support for PCI-based TV cards using a Brooktree Bt848/849/878/879 video capture chip with the bktr(4) driver. This driver supports most Pinnacle PCTV video cards. Before purchasing a TV card, consult bktr(4) for a list of supported tuners.
In order to use the card, the bktr(4) driver must be loaded. To automate this at boot time, add the following line to /boot/loader.conf:
bktr_load="YES"
Alternatively, one can statically compile support for the TV card into a custom kernel. In that case, add the following lines to the custom kernel configuration file:
device	 bktr
device	iicbus
device	iicbb
device	smbus
These additional devices are necessary as the card components are interconnected via an I2C bus. Then, build and install a new kernel.
To test that the tuner is correctly detected, reboot the system. The TV card should appear in the boot messages, as seen in this example:
bktr0: <BrookTree 848A> mem 0xd7000000-0xd7000fff irq 10 at device 10.0 on pci0
iicbb0: <I2C bit-banging driver> on bti2c0
iicbus0: <Philips I2C bus> on iicbb0 master-only
iicbus1: <Philips I2C bus> on iicbb0 master-only
smbus0: <System Management Bus> on bti2c0
bktr0: Pinnacle/Miro TV, Philips SECAM tuner.
The messages will differ according to the hardware. If necessary, it is possible to override some of the detected parameters using sysctl(8) or custom kernel configuration options. For example, to force the tuner to a Philips SECAM tuner, add the following line to a custom kernel configuration file:
options OVERRIDE_TUNER=6
or, use sysctl(8):
# sysctl hw.bt848.tuner=6To use the TV card, install one of the following applications:
multimedia/fxtv provides TV-in-a-window and image/audio/video capture capabilities.
multimedia/xawtv is another TV application with similar features.
audio/xmradio provides an application for using the FM radio tuner of a TV card.
More applications are available in the FreeBSD Ports Collection.
If any problems are encountered with the TV card, check that the video capture chip and the tuner are supported by bktr(4) and that the right configuration options were used. For more support or to ask questions about supported TV cards, refer to the FreeBSD multimedia mailing list mailing list.
MythTV is a popular, open source Personal Video Recorder (PVR) application. This section demonstrates how to install and setup MythTV on FreeBSD. Refer to mythtv.org/wiki for more information on how to use MythTV.
MythTV requires a frontend and a backend. These components can either be installed on the same system or on different machines.
The frontend can be installed on FreeBSD using the multimedia/mythtv-frontend package or port. Xorg must also be installed and configured as described in The X Window System. Ideally, this system has a video card that supports X-Video Motion Compensation (XvMC) and, optionally, a Linux Infrared Remote Control (LIRC)-compatible remote.
To install both the backend and the frontend on FreeBSD, use the multimedia/mythtv package or port. A MySQL™ database server is also required and should automatically be installed as a dependency. Optionally, this system should have a tuner card and sufficient storage to hold recorded data.
MythTV uses Video for Linux (V4L) to access video input devices such as encoders and tuners. In FreeBSD, MythTV works best with USB DVB-S/C/T cards as they are well supported by the multimedia/webcamd package or port which provides a V4L userland application. Any Digital Video Broadcasting (DVB) card supported by webcamd should work with MythTV. A list of known working cards can be found at wiki.freebsd.org/WebcamCompat. Drivers are also available for Hauppauge cards in the multimedia/pvr250 and multimedia/pvrxxx ports, but they provide a non-standard driver interface that does not work with versions of MythTV greater than 0.23. Due to licensing restrictions, no packages are available and these two ports must be compiled.
The wiki.freebsd.org/HTPC page contains a list of all available DVB drivers.
To install MythTV using binary packages:
# pkg install mythtvAlternatively, to install from the Ports Collection:
# cd /usr/ports/multimedia/mythtv
# make install
Once installed, set up the MythTV database:
# mysql -uroot -p < /usr/local/shared/mythtv/database/mc.sqlThen, configure the backend:
# mythtv-setupFinally, start the backend:
# sysrc mythbackend_enable=yes
# service mythbackend startIn FreeBSD, access to image scanners is provided by SANE (Scanner Access Now Easy), which is available in the FreeBSD Ports Collection. SANE will also use some FreeBSD device drivers to provide access to the scanner hardware.
FreeBSD supports both SCSI and USB scanners. Depending upon the scanner interface, different device drivers are required. Be sure the scanner is supported by SANE prior to performing any configuration. Refer to http://www.sane-project.org/sane-supported-devices.html for more information about supported scanners.
This chapter describes how to determine if the scanner has been detected by FreeBSD. It then provides an overview of how to configure and use SANE on a FreeBSD system.
The GENERIC kernel includes the device drivers needed to support USB scanners. Users with a custom kernel should ensure that the following lines are present in the custom kernel configuration file:
device usb
device uhci
device ohci
device ehci
device xhci
To determine if the USB scanner is detected, plug it in and use dmesg to determine whether the scanner appears in the system message buffer. If it does, it should display a message similar to this:
ugen0.2: <EPSON> at usbus0In this example, an EPSON Perfection® 1650 USB scanner was detected on /dev/ugen0.2.
If the scanner uses a SCSI interface, it is important to know which SCSI controller board it will use. Depending upon the SCSI chipset, a custom kernel configuration file may be needed. The GENERIC kernel supports the most common SCSI controllers. Refer to /usr/src/sys/conf/NOTES to determine the correct line to add to a custom kernel configuration file. In addition to the SCSI adapter driver, the following lines are needed in a custom kernel configuration file:
device scbus
device pass
Verify that the device is displayed in the system message buffer:
pass2 at aic0 bus 0 target 2 lun 0
pass2: <AGFA SNAPSCAN 600 1.10> Fixed Scanner SCSI-2 device
pass2: 3.300MB/s transfers
If the scanner was not powered-on at system boot, it is still possible to manually force detection by performing a SCSI bus scan with camcontrol:
# camcontrol rescan all
Re-scan of bus 0 was successful
Re-scan of bus 1 was successful
Re-scan of bus 2 was successful
Re-scan of bus 3 was successful
The scanner should now appear in the SCSI devices list:
# camcontrol devlist
<IBM DDRS-34560 S97B>              at scbus0 target 5 lun 0 (pass0,da0)
<IBM DDRS-34560 S97B>              at scbus0 target 6 lun 0 (pass1,da1)
<AGFA SNAPSCAN 600 1.10>           at scbus1 target 2 lun 0 (pass3)
<PHILIPS CDD3610 CD-R/RW 1.00>     at scbus2 target 0 lun 0 (pass2,cd0)
Refer to scsi(4) and camcontrol(8) for more details about SCSI devices on FreeBSD.
The SANE system provides the access to the scanner via backends (graphics/sane-backends). Refer to http://www.sane-project.org/sane-supported-devices.html to determine which backend supports the scanner. A graphical scanning interface is provided by third party applications like Kooka (graphics/kooka) or XSane (graphics/xsane). SANE’s backends are enough to test the scanner.
To install the backends from binary package:
# pkg install sane-backendsAlternatively, to install from the Ports Collection
# cd /usr/ports/graphics/sane-backends
# make install clean
After installing the graphics/sane-backends port or package, use sane-find-scanner to check the scanner detection by the SANE system:
# sane-find-scanner -q
found SCSI scanner "AGFA SNAPSCAN 600 1.10" at /dev/pass3
The output should show the interface type of the scanner and the device node used to attach the scanner to the system. The vendor and the product model may or may not appear.
Some |
Next, check if the scanner will be identified by a scanning frontend. The SANE backends include scanimage which can be used to list the devices and perform an image acquisition. Use -L to list the scanner devices. The first example is for a SCSI scanner and the second is for a USB scanner:
# scanimage -L
device `snapscan:/dev/pass3' is a AGFA SNAPSCAN 600 flatbed scanner

# scanimage -L
device 'epson2:libusb:000:002' is a Epson GT-8200 flatbed scanner
In this second example, epson2 is the backend name and libusb:000:002 means /dev/ugen0.2 is the device node used by the scanner.
If scanimage is unable to identify the scanner, this message will appear:
# scanimage -L
No scanners were identified. If you were expecting something different,
check that the scanner is plugged in, turned on and detected by the
sane-find-scanner tool (if appropriate). Please read the documentation
which came with this software (README, FAQ, manpages).
If this happens, edit the backend configuration file in /usr/local/etc/sane.d/ and define the scanner device used. For example, if the undetected scanner model is an EPSON Perfection® 1650 and it uses the epson2 backend, edit /usr/local/etc/sane.d/epson2.conf. When editing, add a line specifying the interface and the device node used. In this case, add the following line:
usb /dev/ugen0.2
Save the edits and verify that the scanner is identified with the right backend name and the device node:
# scanimage -L
device 'epson2:libusb:000:002' is a Epson GT-8200 flatbed scanner
Once scanimage -L sees the scanner, the configuration is complete and the scanner is now ready to use.
While scanimage can be used to perform an image acquisition from the command line, it is often preferable to use a graphical interface to perform image scanning. Applications like Kooka or XSane are popular scanning frontends. They offer advanced features such as various scanning modes, color correction, and batch scans. XSane is also usable as a GIMP plugin.
In order to have access to the scanner, a user needs read and write permissions to the device node used by the scanner. In the previous example, the USB scanner uses the device node /dev/ugen0.2 which is really a symlink to the real device node /dev/usb/0.2.0. The symlink and the device node are owned, respectively, by the wheel and operator groups. While adding the user to these groups will allow access to the scanner, it is considered insecure to add a user to wheel. A better solution is to create a group and make the scanner device accessible to members of this group.
This example creates a group called usb:
# pw groupadd usbThen, make the /dev/ugen0.2 symlink and the /dev/usb/0.2.0 device node accessible to the usb group with write permissions of 0660 or 0664 by adding the following lines to /etc/devfs.rules:
[system=5]
add path ugen0.2 mode 0660 group usb
add path usb/0.2.0 mode 0666 group usb
It happens the device node changes with the addition or removal of devices, so one may want to give access to all USB devices using this ruleset instead: [system=5] add path 'ugen*' mode 0660 group usb add path 'usb/*' mode 0666 group usb |
Refer to devfs.rules(5) for more information about this file.
Next, enable the ruleset in /etc/rc.conf:
devfs_system_ruleset="system"
And, restart the devfs(8) system:
# service devfs restartFinally, add the users to usb in order to allow access to the scanner:
# pw groupmod usb -m joeFor more details refer to pw(8).
Rdzeniem systemu operacyjnego FreeBSD jest jądro. Odpowiedzialne jest za zarządzanie pamięcią, wymuszanie kontroli bezpieczeństwa, sieć, dostęp do dysków i wiele innych. Podczas, gdy coraz więcej elementów FreeBSD jest konfigurowanych dynamicznie, czasem jeszcze może zajść potrzeba przekonfigurowania i rekompilowania jądra.
Po przeczytaniu tego rozdziału będziemy wiedzieć:
Dlaczego możemy potrzebować indywidualnego jądra.
Jak napisać plik konfiguracyjny lub dostroić istniejący.
Jak wykorzystać plik konfiguracyjny jądra do przygotowania i kompilacji nowego jądra.
Jak zainstalować nowe jądro.
Jak się ratować, jeśli coś pójdzie nie tak.
Wszystkie przykładowe polecenia przedstawione w niniejszym rozdziale powinny być uruchamiane jako użytkownik root.
Tradycyjnie, system FreeBSD miał coś, co zwie się "monolitycznym" jądrem. Był to jeden duży program, wspierający ustaloną liczbą urządzeń. Jeśli zaszła potrzeba zmiany zachowania jądra, należało skompilować nowe jądro i uruchomić z nim ponownie komputer.
W dzisiejszych czasach, FreeBSD bardzo szybko przechodzi do modelu, w którym funkcjonalność jądra zawiera się w modułach, które można dynamicznie aplikować, lub usuwać, w miarę potrzeb. Umożliwia to jądru szybkie przystosowywanie się zaraz po rozpoznaniu nowego sprzętu (jak karty PCMCIA w laptopach). Pozwala też zwiększyć funkcjonalność, której nie miało oryginalne jądro (któremu nie były dane funkcje potrzebne). Potocznie mówi się o jądrze modularnym.
Pomimo tego, czasem trzeba wprowadzić do jądra statyczne zmiany. Na przykład w sytuacjach, gdy kluczowe funkcje jądra zostają zmieniane, nie jest możliwym załadowanie dynamicznie ładowalnego modułu. Możliwe też, że jeszcze odpowiedni, dynamicznie ładowalny moduł, nie został napisany.
Budowanie indywidualnego jądra jest jednym z najważniejszych rytuałów, których podczas użytkowania systemu BSD trzeba doświadczyć. Ten czasochłonny proces przyniesie naszemu systemowi wiele korzyści. Inaczej niż w przypadku jądra GENERIC [podstawowego, domyślnego], które musi wspierać wiele rodzajów sprzętu, nasze jądro będzie wspierało tylko nasz sprzęt PC. Ma to wiele zalet:
Szybszy czas uruchamiania systemu. Od kiedy jądro będzie sprawdzało tylko sprzęt który mamy, czas uruchamiania znacząco się zmniejszy.
Mniejsze zużycie pamięci. Indywidualne jądro często zużywa mniej pamięci niż jądro GENERIC, co jest istotnym faktem, gdyż jądro przez cały czas musi być w pamięci obecne. Z tych powodów, budowanie indywidualnego jądra jest szczególnie przydatne przy pracy z maszynami o małej ilości pamięci RAM’u.
Więcej wspieranego sprzętu. Indywidualne jądro może zawierać obsługę np. kart muzycznych, które nie są wspierane przez domyślne jądro GENERIC.
Omówmy pokrótce katalog kompilacji jądra. Wszystkie wspomniane za chwilę katalogi będą relatywnymi względem /usr/src/sys, do którego można także dojść przez /sys. Można tam znaleźć wiele różnych podkatalogów, jednak dla nas najważniejszym będzie arch/conf. W nim właśnie dokonamy edycji pliku konfiguracyjnego jądra oraz je skompilujemy, będą to kolejne etapy w całym procesie budowy. arch oznacza architekturę, do wyboru: i386, alpha, amd64, ia64, powerpc, sparc64, lub pc98 (alternatywna gałąź sprzętu PC, popularna w Japonii). Wszystko, co znajduje się w katalogu danej architektury dotyczy ściśle tylko jej. Reszta źródeł jest dla wszystkich architektur taka sama. Zwróćmy uwagę na logiczną strukturę katalogów z każdym wspieranym urządzeniem, systemem plików, opcjami dodatkowymi - wszystko posiada swój własny podkatalog.
Przykłady w niniejszym rozdziale zakładają, że wykorzystujemy architekturę i386. Jeśli tak nie jest, będziemy musieli dokonać odpowiednich zmian w nazwach ścieżek dostępu dla architektury naszego systemu.
Jeśli nie mamy katalogu /usr/src/sys, oznacza to, że nie dysponujemy zainstalowanymi źródłami jądra. Najprostszym sposobem na zainstalowanie jest uruchomienie jako `root sysinstall’a, wybranie , następnie , później , a na końcu . Jeśli jednak jesteśmy osobami mającymi awersję do konfiguratorów możemy zainstalować źródła jądra ręcznie. W poniższym przykładzie instalacja z "oficjalnej" płyty CD FreeBSD: |
Następnie wchodzimy do katalogu arch/conf i kopiujemy domyślny plik konfiguracyjny o nazwie GENERIC tworząc plik z nazwą jaką chcemy nadać swojemu jądru. Na przykład:
# cd /usr/src/sys/i386/conf
# cp GENERIC MYKERNEL
Tradycyjnie nazwa jądra pisana jest wielkimi literami. Dodatkowo dobrym pomysłem jest, by nazywać jądra tak jak komputery, co pomaga rozróżnić jądra, gdy mamy wiele komputerów z różnym sprzętem. Dla potrzeb tego przykładu nazwiemy jądro MYKERNEL.
Nie jest najlepszym pomysłem trzymanie pliku konfiguracyjnego jądra bezpośrednio w katalogu /usr/src. Jeśli podczas kompilacji mamy kłopot, czasem może się okazać kuszącym pomysłem po prostu wykasować cały katalog /usr/src i rozpocząć od początku. Wtedy zwykle, kilka sekund po usunięciu katalogu, przypomina nam się, że usunęliśmy także plik konfiguracyjny jądra. Podobnie, nie powinniśmy edytować bezpośrednio GENERIC, gdyż może zostać nadpisany przy kolejnej aktualizacji naszego drzewa źródeł i zmiany, które wprowadziliśmy zostaną utracone. Możemy chcieć trzymać plik konfiguracyjny jądra gdziekolwiek, a następnie utworzyć symboliczne dowiązanie do pliku w katalogu i386. Przykładowo: |
Przyszedł czas na edycję pliku konfiguracyjnego jądra. W przykładzie nazywa się on MYKERNEL. Jeśli dopiero zainstalowaliśmy system, jedynym z dostępnych edytorów może być vi. Mimo, że jest dobrze udokumentowany, opisany w wielu książkach, dla początkujących wydaje się on nieco zbyt skomplikowany. FreeBSD zaopatrzony jest również w drugi edytor, znacznie prostszy w obsłudze, o nazwie ee. Jeśli dopiero zaczynamy, ee powinien być naszym wyborem. Nie krępujmy się i zmieńmy wartości na górze pliku, szczególnie te, odróżniające nasz własny plik od GENERIC.
Jeśli już kompilowaliśmy jądro w SunOS™ lub innych systemach BSD, duża część pliku konfiguracyjnego powinna być nam znajoma. Jeśli natomiast jesteśmy lepiej zaznajomieni z systemami typu DOS, plik konfiguracyjny może wydać się nam nieco obcy. W tym przypadku przeczytajmy uważnie każdą opcję oraz komentarz w pliku konfiguracyjnym.
Jeśli synchronizujemy nasze drzewo źródłowe z najnowszymi źródłami projektu FreeBSD, należy zawsze, nim rozpoczniemy jakiekolwiek działania aktualizujące, zapoznać się z zawartością pliku /usr/src/UPDATING. W pliku tym zapisane są wszelkie niezbędne zagadnienia związane z aktualizacją FreeBSD. Plik /usr/src/UPDATING zawsze pasuje do źródła naszej wersji FreeBSD, jest przez to bardziej odpowiednim źródłem informacji niż Podręcznik. |
Musimy teraz skompilować kod źródłowy jądra. Istnieją dwie procedury, za pomocą których można tego dokonać. Wybór zależeć będzie od tego w jakim celu kompilujemy jądro oraz od wykorzystywanej wersji FreeBSD.
Jeśli zainstalowaliśmy tylko źródła jądra, wykorzystamy procedurę 1.
Jeśli budujemy nowe jądro, bez aktualizowania źródeł (na przykład, by dodać dodatkowe opcje, np. IPFIREWALL), możemy użyć dowolnej z procedur.
Jeśli przebudowujemy jądro jako część procesu make buildworld, powinniśmy użyć procedury 2.
Jeśli nie aktualizowaliśmy naszych źródeł w żaden sposób od ostatniego, zakończonego powodzeniem cyklu buildworld-installworld (nie uruchamialiśmy CVSup, CTM, ani nie korzystaliśmy z anoncvs), wówczas bezpiecznym jest skorzystać z sekwencji config, make depend, make i make install.
Procedura. Budowanie jądra w "tradycyjny" sposób.
By wygenerować kod źródłowy jądra, należy uruchomić config(8).
# /usr/sbin/config MYKERNELNastępnie, przenieśmy się do katalogu w którym dokonuje się budowy. Po ponownym uruchomieniu config(8) wyświetlona zostanie nazwa katalogu.
# cd ../compile/MYKERNELSkompilujmy jądro.
# make depend
# make
Zainstalujmy nowe jądro.
# make installProcedura. Budowanie jądra w "nowy" sposób.
Wejdźmy do katalogu /usr/src.
# cd /usr/srcSkompilujmy jądro.
# make buildkernel KERNCONF=MYKERNELZainstalujmy nowe jądro.
# make installkernel KERNCONF=MYKERNELTa metoda kompilacji jądra wymaga wszystkich plików źródłowych. Jeśli zainstalowaliśmy jedynie źródła jądra, powinniśmy skorzystać z opisanej powyżej metody tradycyjnej. |
Domyślnie, podczas kompilacji indywidualnego jądra, wszystkie moduły jądra zostaną również zrekompilowane. Jeśli chcemy zaktualizować jądro szybciej bądź zbudować tylko własne moduły, powinniśmy przed rozpoczęciem kompilacji jądra zmodyfikować plik /etc/make.conf: MODULES_OVERRIDE = linux acpi sound/sound sound/driver/ds1 ntfs Zmienna ta definiuje listę modułów do kompilacji zamiast wszystkich. Inne zmienne przydatne w procesie kompilacji jądra opisane zostały w podręczniku systemowym make.conf(5). |
Nowe jądro zostanie skopiowane do katalogu /boot/kernel jako /boot/kernel/kernel , a dotychczasowe zostanie przeniesione do /boot/kernel.old/kernel. Teraz należy ponownie uruchomić komputer. W razie jakby coś poszło źle, na końcu tego rozdziału przedstawionych zostało kilka awaryjnych rozwiązań. Przeczytajmy również rozdziały opisujące co zrobić w razie, gdy system nie chce się ponownie uruchomić.
Inne pliki związane z procesem uruchamiania, np. takie jak loader(8) czy pliki konfiguracyjne są przechowywane w katalogu /boot. Własne moduły jak i moduły innych producentów, można umieszczać w katalogu /boot/kernel, jednakże użytkownicy powinni być świadomi, iż synchronizacja modułów ze skompilowanym jądrem jest bardzo ważna. Moduły nie przygotowane do pracy z danym jądrem mogą doprowadzić do niestabilności czy błędów. |
Ogólny format pliku konfiguracyjnego jest całkiem prosty. Każda linia zawiera słowo kluczowe i jeden lub więcej argumentów. Dla ułatwienia większość linii zawiera tylko jeden argument. Cokolwiek poprzedzone znakiem # jest uważane za komentarz i jest ignorowane. Ten rozdział opisuje każde słowo kluczowe w ogólnym porządku jaki zawiera plik GENERIC. Wyczerpująca lista opcji i więcej szczegółowych objaśnień zależnych od architektury znaleźć można w pliku NOTES, znajdującym się w tym samym katalogu co GENERIC. Opis opcji niezależnych od architektury znajduje się w pliku /usr/src/sys/conf/NOTES.
By skompilować plik zawierający wszystkie dostępne opcje, jak się z reguły robi do celów testowych, należy wpisać jako |
Poniżej opisany został przykład pliku konfiguracyjnego GENERIC z licznymi dodatkowymi komentarzami, tam gdzie są potrzebne objaśnienia. Przykład ten powinien odpowiadać naszej kopii pliku /usr/src/sys/i386/conf/GENERIC.
machine i386
Jest to architektura komputera. Musi być którymś z: alpha, amd64, i386, ia64, pc98, powerpc, lub sparc64.
cpu          I486_CPU
cpu          I586_CPU
cpu          I686_CPU
Powyższe wpisy określają typ CPU jaki posiadamy w swoim systemie. Możemy mieć kilka różnych wpisów (np. jeśli nie jesteśmy pewni czy mamy I586_CPU czy I686_CPU), jednak kiedy konfigurujemy jądro najlepiej pozostawić CPU jakie mamy. Jeśli nie jesteśmy pewni swojego procesora, możemy sprawdzić zawartość pliku /var/run/dmesg.boot, aby przejrzeć komunikaty startowe.
ident GENERIC
Jest to identyfikator jądra. Możemy go zmienić na taki jak nazwaliśmy swoje jądro, w naszym poprzednim przykładzie MYKERNEL. Wartość jaką pozostawimy we wpisie ident będzie wyświetlana podczas startu, więc korzystnie jest dać nowemu jądru inną nazwę, jeśli chcemy go odróżnić od jądra, którego używamy na co dzień (np. chcemy zbudować eksperymentalne jądro).
#To statically compile in device wiring instead of /boot/device.hints
#hints          "GENERIC.hints"         # Default places to look for devices.
device.hints(5) jest wykorzystywany do konfiguracji opcji sterowników urządzeń. Domyślną lokacją sprawdzaną przez loader(8) w trakcie uruchamiania systemu jest /boot/device.hints. Wykorzystując opcję hints możemy wkompilować je statycznie w jądro. Tym samym nie będzie potrzeby tworzyć pliku device.hints w katalogu /boot.
makeoptions DEBUG=-g # Build kernel with gdb(1) debug symbols
Typowy proces kompilacji FreeBSD wyświetla również informacje diagnostyczne w trakcie budowy jądra z użyciem opcji -g, która włącza wyświetlanie informacji diagnostycznych w gcc(1). Ten sam efekt można również osiągnąć poprzez opcję -g w config(8) przy korzystaniu z "tradycyjnej" metody kompilacji jądra (Budowanie i instalowanie indywidualnego jądra zawiera więcej informacji na temat budowy jądra).
options SCHED_4BSD # 4BSD scheduler
Tradycyjny i domyślny systemowy zarządca procesów FreeBSD. Nie zmieniajmy tego.
options PREEMPTION # Enable kernel thread preemption
Pozwala na wywłaszczanie wątków w jądrze przez wątki o wyższym priorytecie. Pozwala to na interaktywność i przerywanie wątków, by ukończyć pewne czynności wcześniej i uniknąć oczekiwania.
options INET # InterNETworking
Obsługa sieci. Należ pozostawić ten wpis, nawet jeśli nie planujemy podłączyć się do sieci. Większość programów wymaga przynajmniej urządzenia pętli zwrotnej loopback (np. tworzenie połączeń sieciowych wewnątrz naszego PC), więc jest to wpis bardzo istotny.
options INET6 # IPv6 communications protocols
Umożliwia to obsługę protokołu komunikacyjnego IPv6.
options FFS # Berkeley Fast Filesystem
Jest to podstawowy dyskowy system plików. Należy go pozostawić, jeśli startujemy system z dysku twardego.
options SOFTUPDATES # Enable FFS Soft Updates support
Opcja ta umożliwia tzw. Soft Updates w jądrze, co potrafi przyspieszyć czas dostępu do dysku przy zapisie. Jednakże, nawet jeśli funkcja ta jest włączona w jądrze, musi zostać aktywowana dla wybranych dysków. Czy opcja ta jest włączona możemy sprawdzić w wyniku polecenia mount(8). Jeśli przy naszym dysku nie ma oznaczenia soft-updates oznacza to, że musimy ją włączyć wykorzystując polecenie tunefs(8) (dla istniejących systemów plików) bądź newfs(8) (dla nowych systemów plików).
options UFS_ACL # Support for access control lists
Opcja ta włącza w jądrze obsługę list kontroli dostępu do systemu plików. Polega to na wykorzystaniu rozszerzonych atrybutów oraz systemu plików UFS2. File System Access Control Lists opisuje dokładniej tę funkcjonalność. Domyślnie listy ACL są włączone i nie powinny być wyłączane w jądrze jeśli były wcześniej wykorzystywane w systemie plików, gdyż usunie to listy kontroli dostępu zmieniając metodę ochrony plików w nieprzewidywalny sposób.
options UFS_DIRHASH # Improve performance on big directories
Opcja ta zawiera kod szybszej obsługi dużych katalogów kosztem zużycia dodatkowej pamięci. Możemy pozostawić tę opcję dla dużych serwerów lub dla interaktywnej stacji roboczej, a zablokować ją kiedy system jest mało obciążony i posiada mało pamięci, a dostęp do dysków nie jest taki ważny, np. serwer z zaporą ogniową.
options MD_ROOT # MD is a potential root device
Opcja ta włącza obsługę wirtualnego dysku w pamięci RAM, wykorzystywanego jako główne urządzenie.
options          NFSCLIENT         # Network Filesystem Client
options          NFSSERVER         # Network Filesystem Server
options          NFS_ROOT          # NFS usable as /, requires NFSCLIENT
Sieciowy system plików. Jeżeli nie planujemy montowania partycji z serwera UNIX® poprzez TCP/IP, możemy zablokować te linie.
options MSDOSFS # MSDOS Filesystem
System plików MS-DOS®. Jeśli nie planujemy montowania dysków lub partycji sformatowanych pod DOS-em podczas startowania systemu, dla bezpieczeństwa zablokujmy tę linię. Automatycznie MSDOSFS będzie ładowane kiedy pierwszy raz zamontujemy DOSową partycje jak opisano powyżej. Również wyśmienity program emulators/mtools umożliwia dostęp do dyskietek DOSowych bez potrzeby ich montowania i odmontowywania (i bynajmniej nie jest potrzebny MSDOSFS).
options CD9660 # ISO 9660 Filesystem
System plików ISO 9660 dla płyt CDROM. Jeśli nie posiadamy napędu CDROM możemy zablokować tę linię, lub gdy montujesz dane z CD okazjonalnie (od kiedy zamontujemy dane z CD po raz pierwszy, CD9660 będzie ładowany automatycznie). Płyty audio CD nie potrzebuje tego systemu plików.
options PROCFS # Process filesystem (requires PSEUDOFS)
System plików procesów. Jest to system plików "na niby" montowany w /proc, który dla takich programów jak ps(1) posiada więcej informacji o tym jakie procesy są właśnie uruchomione. W większości przypadków wykorzystanie PROCFS nie jest wymagane, gdyż większość narzędzi diagnostycznych i monitorujących zostało zaadaptowanych do pracy bez PROCFS: Domyślne instalacje nie montują tego systemu plików.
options PSEUDOFS # Pseudo-filesystem framework
Jądra 6.X wykorzystujące PROCFS muszą również zawierać obsługę PSEUDOFS.
options GEOM_GPT # GUID Partition Tables.
Opcja ta umożliwia tworzenie dużej ilości partycji na pojedynczym dysku.
options COMPAT_43 # Compatible with BSD 4.3 [KEEP THIS!]
Kompatybilność z systemem 4.3BSD. Należy pozostawić ten wpis; niektóre programy będą zachowywać się dziwnie jeśli zablokujemy tę opcję.
options COMPAT_FREEBSD4 # Compatible with FreeBSD4
Opcja ta potrzebna jest w systemach FreeBSD 5.X i386™ i Alpha do obsługi aplikacji skompilowanych w starszych wersjach FreeBSD, wykorzystujących stary interfejs wywołań systemowych. Zaleca się by wykorzystywać tę opcję we wszystkich systemach i386™ i Alpha, w których mogą wykorzystywane starsze aplikacje; platformy wspierane dopiero od wersji 5.X, jak np. ia64 i sparc64, nie wymagają ten opcji.
options SCSI_DELAY=5000 # Delay (in ms) before probing SCSI
Sprawi to, że jądro zatrzyma się na 5 sekund przed rozpoczęciem rozpoznawania w naszym systemie każdego urządzenia SCSI. Jeśli jednak posiadamy tylko urządzenia IDE, możemy ten wpis zignorować. W innym przypadku możemy zmniejszyć tę wartość i w ten sposób przyspieszyć start systemu. Gdy to zrobimy a FreeBSD będzie miał kłopoty z rozpoznawaniem urządzeń SCSI będziemy musieli zmienić tę wartość na większą.
options KTRACE # ktrace(1) support
Śledzenie procesów przez jądro, które jest użyteczne w diagnozowaniu.
options SYSVSHM # SYSV-style shared memory
Daje to systemom z rodziny V mechanizm współdzielenia pamięci. W działaniu ma to wiele wspólnego z mechanizmem XSHM w X-ach. Znaczna ilość programów obciążająca system graficzny zyska automatycznie na prędkości. Jeśli jesteśmy użytkownikiem X-ów koniecznie pozostawmy tę opcję.
options SYSVMSG # SYSV-style message queues
Wsparcie dla mechanizmu komunkatów w Systemach V. Opcja ta dodaje zaledwie kilkaset bajtów do jądra.
options SYSVSEM # SYSV-style semaphores
Wsparcie dla mechanizmu semaforów w Systemach V. Mniej przydatne w użyciu ale również dodaje tylko kilkaset bajtów do jądra.
Parametr |
options _KPOSIX_PRIORITY_SCHEDULING # POSIX P1003_1B real-time extensions
Rozszerzenia czasu rzeczywistego dodane w 1993 do POSIX®. Pewne aplikacje z kolekcji portów używają tego mechanizmu (jak np. StarOffice™).
options KBD_INSTALL_CDEV # install a CDEV entry in /dev
Opcja ta związana jest z obsługą klawiatury. Dodaje ona wpis CDEV w /dev.
options          AHC_REG_PRETTY_PRINT     # Print register bitfields in debug
                                          # output.  Adds ~128k to driver.
options          AHD_REG_PRETTY_PRINT     # Print register bitfields in debug
                                          # output.  Adds ~215k to driver.
Pomaga to w diagnozowaniu, wypisując łatwiejsze do odczytania definicje rejestrów.
options ADAPTIVE_GIANT # Giant mutex is adaptive.
Giant jest nazwą mechanizmu wzajemnego wykluczania (uśpiony mutex) chroniącego znaczną grupę zasobów jądra. Obecnie mechanizm ten stanowi niedopuszczalnie wąskie gardło w wydajności systemu, które jest zastępowane przez blokady zabezpieczające indywidualne zasoby. Opcja ADAPTIVE_GIANT powoduje, że Giant jest dołączany do zestawu adaptacyjnie zapętlanych muteksów. Co oznacza, że w momencie gdy wątek chce zablokować mutex Giant, który jest już zablokowany przez inny wątek bądź procesor, pierwszy wątek będzie pracował i oczekiwał na zwolnienie blokady. Normalnie, wątek przeszedłby do stanu uśpienia i oczekiwał na kolejną okazję uruchomienia. Jeśli nie jesteśmy przekonani, pozostawmy tę opcję włączoną.
device apic # I/O APIC
Urządzenie apic pozwala na wykorzystanie we/wy APIC do dostarczania przerwań. Urządzenie apic może być wykorzystywane zarówno w jądrach UP jak i SMP, przy czym wymagane jest jedynie w przypadku tych drugich. By włączyć obsługę wielu procesorów należy dodać wiersz options SMP.
device eisa
Należy włączyć to jeśli posiadamy płytę główną typu EISA. Umożliwia to autodetekcję i konfigurację dla wszystkich urządzeń pracujących na magistrali EISA.
device pci
Włączmy to jeśli posiadamy płyte główną typu PCI. Umożliwia to autodetekcję kart PCI i przesyłanie z magistrali PCI do ISA.
# Floppy drives
device          fdc
Kontroler stacji dyskietek.
# ATA and ATAPI devices
device          ata
Sterownik ten obsługuje wszystkie urządzenia ATA i ATAPI. Potrzebujemy tylko tej jednej linijki, aby jądro wykrywało wszystkie urządzenia na współczesnych maszynach.
device atadisk # ATA disk drives
Potrzebne jest to razem z device ata dla dysków ATA.
device ataraid # ATA RAID drives
Potrzebne jest to razem z device ata dla dysków ATA RAID.
device atapicd # ATAPI CDROM drives
Potrzebne jest to razem z device ata dla napędów CDROM ATAPI.
device atapifd # ATAPI floppy drives
Potrzebne jest to razem z device ata dla stacji dyskietek ATAPI.
device atapist # ATAPI tape drives
Potrzebne jest to razem z device ata dla urządzeń taśmowych ATAPI.
options ATA_STATIC_ID # Static device numbering
Powoduje to przydzielanie przez kontroler statycznego numeru, inaczej liczba dyskowa będzie przydzielana dynamicznie.
# SCSI Controllers
device          ahb        # EISA AHA1742 family
device          ahc        # AHA2940 and onboard AIC7xxx devices
device          ahd        # AHA39320/29320 and onboard AIC79xx devices
device          amd        # AMD 53C974 (Teckram DC-390(T))
device          isp        # Qlogic family
#device         ispfw      # Firmware for QLogic HBAs- normally a module
device          mpt        # LSI-Logic MPT-Fusion
#device         ncr        # NCR/Symbios Logic
device          sym        # NCR/Symbios Logic (newer chipsets)
device          trm        # Tekram DC395U/UW/F DC315U adapters

device          adv        # Advansys SCSI adapters
device          adw        # Advansys wide SCSI adapters
device          aha        # Adaptec 154x SCSI adapters
device          aic        # Adaptec 15[012]x SCSI adapters, AIC-6[23]60.
device          bt         # Buslogic/Mylex MultiMaster SCSI adapters

device          ncv        # NCR 53C500
device          nsp        # Workbit Ninja SCSI-3
device          stg        # TMC 18C30/18C50
Kontrolery SCSI. Należy zablokować te kontrolery, których nie posiadamy w naszym systemie. Jeśli mamy system oparty tylko na IDE możemy pozbyć się całej listy.
# SCSI peripherals
device          scbus      # SCSI bus (required for SCSI)
device          ch         # SCSI media changers
device          da         # Direct Access (disks)
device          sa         # Sequential Access (tape etc)
device          cd         # CD
device          pass       # Passthrough device (direct SCSI access)
device          ses        # SCSI Environmental Services (and SAF-TE)
Peryferia SCSI. Ponownie, jeśli nie posiadamy takowych możemy je wyłączyć lub jeśli posiadamy tylko sprzęt IDE możemy wszystkie powyższe wpisy usunąć.
Sterownik USB umass(4) i kilka innych sterowników wykorzystuje podsystem SCSI chociaż nie są one prawdziwymi urządzeniami SCSI. Tym samym musimy pamiętać by nie usunąć całkowicie obsługi SCSI jeśli którykolwiek z tego typu sterowników został uwzględniony w konfiguracji jądra. |
# RAID controllers interfaced to the SCSI subsystem
device          amr        # AMI MegaRAID
device          arcmsr     # Areca SATA II RAID
device          asr        # DPT SmartRAID V, VI and Adaptec SCSI RAID
device          ciss       # Compaq Smart RAID 5*
device          dpt        # DPT Smartcache III, IV - See NOTES for options
device          hptmv      # Highpoint RocketRAID 182x
device          rr232x     # Highpoint RocketRAID 232x
device          iir        # Intel Integrated RAID
device          ips        # IBM (Adaptec) ServeRAID
device          mly        # Mylex AcceleRAID/eXtremeRAID
device          twa        # 3ware 9000 series PATA/SATA RAID

# RAID controllers
device          aac        # Adaptec FSA RAID
device          aacp       # SCSI passthrough for aac (requires CAM)
device          ida        # Compaq Smart RAID
device          mfi        # LSI MegaRAID SAS
device          mlx        # Mylex DAC960 family
device          pst        # Promise Supertrak SX6000
device          twe        # 3ware ATA RAID
Obsługa kontrolerów RAID. Jeśli nie posiadamy żadnych kontrolerów RAID, możemy te wpisy zablokować lub usunąć.
# atkbdc0 controls both the keyboard and the PS/2 mouse
device          atkbdc     # AT keyboard controller
Sterownik klawiatury (atkbdc) obsługujący porty we/wy dla klawiatur AT i dla urządzeń wskazujących PS/2. Wymagany jest przez sterownik klawiatur (atkbd) i PS/2 (psm).
device atkbd # AT keyboard
Sterownik atkbd razem z kontrolerem atkbdc umożliwiają dostęp do klawiatury AT84 lub do rozszerzonej klawiatury, które podłączone są do kontrolera AT.
device psm # PS/2 mouse
Urządzenie to należy wykorzystać jeśli nasza myszka jest podłączona do portu PS/2.
device kbdmux # keyboard multiplexer
Podstawowa obsługa multipleksacji klawiatury.
device vga # VGA video card driver
Sterownik kart video.
device splash # Splash screen and screen saver support
Obraz tytułowy w trakcie startu! Wymagany również przez wygaszacze ekranu.
# syscons is the default console driver, resembling an SCO console
device          sc
sc jest domyślnym sterownikiem konsoli, przypominający konsolę SCO. Wiele programów pracujących w trybie pełnoekranowym uzyskują dostęp do konsoli poprzez biblioteki bazy danych terminala takie jak termcap, nie powinno więc być istotne czy używamy właśnie jego czy vt, sterownika zgodnego z VT220. Kiedy logujemy się, a nasz program ma kłopoty podczas uruchamiania spod konsoli, należy ustawić zmienną TERM na scoansi.
# Enable this for the pcvt (VT220 compatible) console driver
#device          vt
#options         XSERVER          # support for X server on a vt console
#options         FAT_CURSOR       # start with block cursor
Sterowniki konsoli kompatybilnej z VT220 i z wcześniejszymi VT100/102. Dobrze pracują na niektórych laptopach nie posiadających sprzętu kompatybilnego z sc. Również w takim przypadku należy zmodyfikować zmienną TERM na vt100 lub vt220, kiedy się logujemy. Sterownik ten może być również użyteczny kiedy łączymy się z dużą liczbą różnorodnych maszyn w sieci, gdzie termcap lub terminfo często nie posiadają wpisów dla urządzeń sc - wówczas vt100 powinien być dostępny praktycznie na wszystkich platformach.
device agp
Należy włączyć tę opcję jeśli posiadamy kartę AGP w systemie. Włączy to obsługę AGP i AGP GART dla płyt głównych obsługujących te funkcje.
# Power management support (see NOTES for more options)
#device          apm
Zaawansowane zarządzanie energią. Użyteczne dla laptopów, chociaż we FreeBSD 5.X i późniejszych opcja ta jest domyślnie wyłączona w jądrze GENERIC.
# Add suspend/resume support for the i8254.
device           pmtimer
Sterownik urządzenia regulatora czasowego dla zarządzania energią, jak np. APM i ACPI.
# PCCARD (PCMCIA) support
# PCMCIA and cardbus bridge support
device          cbb               # cardbus (yenta) bridge
device          pccard            # PC Card (16-bit) bus
device          cardbus           # CardBus (32-bit) bus
Obsługa kart PCMCIA. Potrzebna dla laptopów.
# Serial (COM) ports
device          sio               # 8250, 16[45]50 based serial ports
Są to porty szeregowe nazywane w terminologii MS-DOS®/Windows® COM.
Jeśli posiadamy wewnętrzny modem na COM4 oraz port szeregowy COM2, należy zmienić IRQ modemu na 2 (z technicznych pobudek IRQ2 = IRQ9) bo takiej kolejności wymaga FreeBSD. Jeśli posiadamy wieloportową kartę szeregową musimy odwołać się do podręcznika systemowego sio(4) po więcej informacji o właściwych ustawieniach w pliku /boot/device.hints. Niektóre karty wideo (zwłaszcza te bazujące na chipie S3) używają adresów we/wy w postaci Każdy port szeregowy wymaga unikalnego IRQ (z wyjątkiem multiportów gdzie współdzielenie przerwania jest obsługiwane) zatem domyślne IRQ dla COM3 i COM4 nie mają zastosowania. |
# Parallel port
device          ppc
Interfejs portu równoległego na magistrali ISA.
device ppbus # Parallel port bus (required)
Umożliwia obsługę portów równoległych.
device lpt # Printer
Obsługa drukarek na porcie równoległym.
Powyższe trzy wpisy są wymagane, by było możliwe korzystanie z drukarek na porcie równoległym. |
device plip # TCP/IP over parallel
Sterownik dla równoległego interfejsu sieciowego.
device ppi # Parallel port interface device
Uniwersalny port we/wy + IEEE1284.
#device vpo # Requires scbus and da
Napęd ZIP firmy Iomega. Wymagane sterowniki scbus i da. Najlepszą wydajność można osiągnąć wykorzystując porty w trybie EPP 1.9.
#device puc
Opcję tę należy odblokować jeśli posiadamy "niemą" szeregową lub równoległa kartę PCI, obsługiwaną przez sterownik puc(4).
# PCI Ethernet NICs.
device          de         # DEC/Intel DC21x4x (Tulip)
device          em         # Intel PRO/1000 adapter Gigabit Ethernet Card
device          ixgb       # Intel PRO/10GbE Ethernet Card
device          txp        # 3Com 3cR990 (Typhoon)
device          vx         # 3Com 3c590, 3c595 (Vortex)
Różne karty sieciowe na złączu PCI. Należy zablokować lub usunąć te z nich, które nie są obecne w naszym systemie.
# PCI Ethernet NICs that use the common MII bus controller code.
# NOTE: Be sure to keep the 'device miibus' line in order to use these NICs!
device          miibus     # MII bus support
Obsługa szyny MII wymagana dla wielu kart sieciowych 10/100 na złączu PCI, wykorzystujących nadajniki-odbiorniki zgodne z MII lub mają wbudowany nadbiornik pracujący jak MII. Dodanie device miibus do jądra pozwoli na obsługę miibus API i wszystkich sterowników PHY, włączając te, które nie wymagają indywidualnych ustawień i sterowników.
device          bce        # Broadcom BCM5706/BCM5708 Gigabit Ethernet
device          bfe        # Broadcom BCM440x 10/100 Ethernet
device          bge        # Broadcom BCM570xx Gigabit Ethernet
device          dc         # DEC/Intel 21143 and various workalikes
device          fxp        # Intel EtherExpress PRO/100B (82557, 82558)
device          lge        # Level 1 LXT1001 gigabit ethernet
device          nge        # NatSemi DP83820 gigabit ethernet
device          nve        # nVidia nForce MCP on-board Ethernet Networking
device          pcn        # AMD Am79C97x PCI 10/100 (precedence over 'lnc')
device          re         # RealTek 8139C+/8169/8169S/8110S
device          rl         # RealTek 8129/8139
device          sf         # Adaptec AIC-6915 (Starfire)
device          sis        # Silicon Integrated Systems SiS 900/SiS 7016
device          sk         # SysKonnect SK-984x & SK-982x gigabit Ethernet
device          ste        # Sundance ST201 (D-Link DFE-550TX)
device          ti         # Alteon Networks Tigon I/II gigabit Ethernet
device          tl         # Texas Instruments ThunderLAN
device          tx         # SMC EtherPower II (83c170 EPIC)
device          vge        # VIA VT612x gigabit ethernet
device          vr         # VIA Rhine, Rhine II
device          wb         # Winbond W89C840F
device          xl         # 3Com 3c90x (Boomerang, Cyclone)
Sterowniki wykorzystujące szynę MII.
# ISA Ethernet NICs.  pccard NICs included.
device          cs         # Crystal Semiconductor CS89x0 NIC
# 'device ed' requires 'device miibus'
device          ed         # NE[12]000, SMC Ultra, 3c503, DS8390 cards
device          ex         # Intel EtherExpress Pro/10 and Pro/10+
device          ep         # Etherlink III based cards
device          fe         # Fujitsu MB8696x based cards
device          ie         # EtherExpress 8/16, 3C507, StarLAN 10 etc.
device          lnc        # NE2100, NE32-VL Lance Ethernet cards
device          sn         # SMC's 9000 series of Ethernet chips
device          xe         # Xircom pccard Ethernet

# ISA devices that use the old ISA shims
#device         le
Sterowniki ISA Ethernet. Plik /usr/src/sys/i386/conf/NOTES zawiera szczegółowy opis, która karta jest obsługiwana przez dany sterownik.
# Wireless NIC cards
device          wlan       # 802.11 support
device          an         # Aironet 4500/4800 802.11 wireless NICs.
device          awi        # BayStack 660 and others
device          ral        # Ralink Technology RT2500 wireless NICs.
device          wi         # WaveLAN/Intersil/Symbol 802.11 wireless NICs.
#device         wl         # Older non 802.11 Wavelan wireless NIC.
Obsługa różnych kart bezprzewodowych.
# Pseudo devices
device   loop          # Network loopback
Standardowe urządzenie pętli zwrotnej dla TCP/IP. Jeśli łączymy się z localhost (a.k.a. 127.0.0.1) za pomocą telnetu bądź FTP, połączenie powróci do nas za pomocą tego urządzenia. Obecność tego wpisu w konfiguracji jądra jest niezbędna.
device random # Entropy device
Bezpieczny z kryptograficznego punktu widzenia generator liczb losowych.
device ether # Ethernet support
ether jest wymagany tylko wówczas, gdy posiadamy kartę Ethernet. Zawiera podstawowy kod protokołu Ethernet.
device sl # Kernel SLIP
sl służy do obsługi SLIP. Zostało prawie całkowicie wyparte przez PPP, które jest łatwiejsze w obsłudze, lepiej przystosowane do połączeń modem - modem i posiada więcej możliwości.
device ppp # Kernel PPP
Wsparcie jądra dla PPP przy połączeniach wdzwanianych. Jest również w niej zaimplementowana wersja PPP, dla wielu aplikacji używających tun, oferująca większą elastyczność i funkcjonalności takie jak np. połączenie na żądanie (demand dialing).
device tun # Packet tunnel.
Używane przez rodzinę aplikacji korzystających z PPP. Więcej informacji na ten temat zawiera rozdział niniejszego Podręcznika poświęcony właśnie PPP.
device pty # Pseudo-ttys (telnet etc)
Jest to "pseudo-terminal" wykorzystywany przez przychodzące sesje telnet i rlogin, xterm oraz kilka innych aplikacji, jak np. Emacs.
device md # Memory disks
Pseudo urządzenie memory-disk.
device gif # IPv6 and IPv4 tunneling
Implementacja tunelowania IPv6 przez IPv4, IPv4 przez IPv6, IPv4 przez IPv4 oraz IPv6 przez IPv6. Urządzenie gif posiada cechę "auto-klonowania", co umożliwia tworzenie wymaganych plików urządzeń.
device faith # IPv6-to-IPv4 relaying (translation)
To pseudo-urządzenie wyłapuje przesłane do niego pakiety i przekazuje je do demona translacji IPv4/IPv6.
# The `bpf' device enables the Berkeley Packet Filter.
# Be aware of the administrative consequences of enabling this!
# Note that 'bpf' is required for DHCP.
device   bpf           # Berkeley packet filter
Filtr pakietów rodem z Berkeley. To pseudo-urządzenie pozwala interfejsom sieciowym pracować w trybie nasłuchiwania, wyłapując każdy pakiet wysłany w sieci (np w sieci Ethernet). Pakiety te mogą zostać zapisane na dysku i/lub sprawdzane programem tcpdump(1).
Urządzenie bpf(4) jest również wykorzystywane przez dhclient(8), by uzyskać adres IP domyślnego rutera (bramki) itp. Jeśli używamy DHCP pozostawmy ten wpis. |
# USB support
device          uhci          # UHCI PCI->USB interface
device          ohci          # OHCI PCI->USB interface
#device         ehci          # EHCI PCI->USB interface (USB 2.0)
device          usb           # USB Bus (required)
#device         udbp          # USB Double Bulk Pipe devices
device          ugen          # Generic
device          uhid          # Human Interface Devices
device          ukbd          # Keyboard
device          ulpt          # Printer
device          umass         # Disks/Mass storage - Requires scbus and da
device          ums           # Mouse
device          urio          # Diamond Rio 500 MP3 player
device          uscanner      # Scanners
# USB Ethernet, requires mii
device          aue           # ADMtek USB Ethernet
device          axe           # ASIX Electronics USB Ethernet
device          cdce          # Generic USB over Ethernet
device          cue           # CATC USB Ethernet
device          kue           # Kawasaki LSI USB Ethernet
device          rue           # RealTek RTL8150 USB Ethernet
Obsługa wielu urządzeń USB.
# FireWire support
device          firewire      # FireWire bus code
device          sbp           # SCSI over FireWire (Requires scbus and da)
device          fwe           # Ethernet over FireWire (non-standard!)
Obsługa różnorodnych urządzeń Firewire.
Więcej informacji o wymienionych oraz dodatkowych urządzeniach obsługiwanych przez FreeBSD znaleźć można w pliku /usr/src/sys/i386/conf/NOTES.
Maszyny dużego rozmiaru pamięci wymagają dostępu do większej ilości pamięci niż 4 gigabajty, do których ograniczona jest przestrzeń wirtualnych adresów użytkowników+jądra (ang. User+Kernel Virtual Address, KVA). Z tego właśnie powodu Intel dodał w procesorach serii Pentium® Pro i późniejszych obsługę 36-bitowej przestrzeni adresów pamięci fizycznej.
Rozszerzenie PAE (ang. Physical Address Extension) procesorów Intel® Pentium® Pro i późniejszych pozwala na instalację do 64 gigabajtów pamięci. FreeBSD potrafi obsługiwać te rozszerzenie poprzez opcję konfiguracji jądra PAE, dostępną we wszystkich bieżących wersjach. Z uwagi na ograniczenia występujące w architekturze pamięci Intela, nie istnieje rozróżnienie pomiędzy rozmiarem pamięci poniżej i powyżej 4 gigabajtów. Pamięć znajdująca się powyżej jest po prostu dodawana do puli dostępnej pamięci.
By aktywować obsługę PAE w jądrze, wystarczy dodać poniższy wiersz do pliku konfiguracyjnego naszego jądra:
options PAE
Obsługa PAE jest dostępna we FreeBSD jedynie dla procesorów Intel® IA-32. Należy również zwrócić uwagę, iż obsługa PAE we FreeBSD nie została szeroko przetestowana i powinna być traktowana jako drugiej jakości w porównaniu z innymi stabilnymi funkcjami FreeBSD. |
Obsługa PAE we FreeBSD posiada również pewne ograniczenia:
Dany proces nie ma dostępu do więcej jak 4 gigabajtów przestrzeni pamięci wirtualnej VM.
Moduły KLD nie mogą być ładowane do jądra z włączoną opcją PAE, z uwagi na różnice w strukturze skompilowanego modułu i jądra.
Sterowniki urządzeń nie wykorzystujące interfejsu bus_dma(9) spowodują utratę danych w jądrze z włączoną opcją PAE. Tym samym odradza się ich stosowanie. Z tego właśnie powodu plik konfiguracyjny jądra z opcją PAE jest dostarczany w wersji FreeBSD nie zawierającej żadnych ze sterowników, o których nie wiadomo, że współpracują poprawnie z jądrem z włączoną opcją PAE.
Niektóre narzędzia dostrajania systemu określają wykorzystanie zasobów pamięci na podstawie ilości dostępnej pamięci fizycznej. Takie programy mogą niepotrzebnie przydzielać więcej pamięci niż powinny, z uwag na naturę dużego rozmiaru pamięci systemu PAE. Przykładem może być opcja sysctl kern.maxvnodes, która kontroluje maksymalną liczbę dopuszczalnych węzłów w jądrze. Zaleca się modyfikację tych i innych parametrów do rozsądnych wartości.
Może być potrzebnym zwiększenie rozmiaru przestrzeni adresów KVA bądź redukcja ilości specyficznych zasobów jądra często wykorzystywanych (patrz wyżej) w celu uniknięcia wyczerpania KVA. Do zwiększenia przestrzeni KVA może być wykorzystania opcja jądra KVA_PAGES.
Istnieje pięć kategorii problemów, które możemy napotkać budując jądro. Oto one:
configJeśli program config(8) zgłosił błąd podczas przetwarzania naszego pliku konfiguracyjnego, najprawdopodobniej popełniliśmy mały błąd w postaci literówki. Na szczęście config(8) wyświetli linię, z którą miał problem, dzięki czemu będziemy mogli szybko do niej dotrzeć. Na przykład, jeśli widzimy:
config: line 17: syntax errorUpewnijmy się, że słowo kluczowe zostało poprawnie wprowadzone, porównując z oryginalnym plikiem GENERIC lub z innym wiarygodnym źródłem.
makeJeśli pojawił się błąd podczas wykonywania polecenia make, zwykle wskazuje to na błąd w naszym opisie jądra. Nie jest to jednak błąd na tyle wyraźny, aby wykazał go config(8). Jak poprzednio, musimy przejrzeć plik konfiguracyjny jądra. Jeśli w dalszym ciągu nie możemy rozwiązać problemu, możemy wysłać nasz plik konfiguracyjny na FreeBSD general questions mailing list gdzie nasz problem zostanie rozwiązany bardzo szybko.
Jeśli nasze nowe jądro nie uruchamia się ponownie, bądź nie potrafi rozpoznać urządzeń, nie panikujmy! Na szczęście, FreeBSD jest wyposażone we wspaniały mechanizm przywracania po instalacji niekompatybilnego jądra. Po prostu musimy wybrać w loaderze jądro, które chcemy uruchomić. Możemy to zrobić, gdy system odlicza od 10 w dół. Wybieramy opcję numer sześć: "Escape to a loader prompt". Wpisujemy unload kernel a następnie boot /boot/kernel.old/kernel, lub jakąkolwiek inną nazwę jądra, które uruchomi się poprawnie. Jeśli rekonfigurujemy jądro, jedno sprawne powinniśmy mieć zawsze pod ręką.
Po uruchomieniu z dobrym jądrem, możemy sprawdzić nasz plik konfiguracyjny, a następnie spróbować zbudować je ponownie. Pomocny jest plik /var/log/messages, w którym, pośród innych rzeczy, znajdują się również zapisy z uruchomień jądra. Ponadto również dmesg(8) wyświetla informacje z jądra, pochodzące z bieżącego uruchomienia.
Jeśli mamy problemy ze zbudowaniem jądra, upewnijmy się, że posiadamy jądro GENERIC lub inne działające jądro nazwane tak, by nie zostało nadpisane po kolejnym procesie budowy. Nie możemy polegać na kernel.old, ponieważ gdy instalujemy nowe jądro, kernel.old jest nadpisywane przez ostatnio zainstalowane jądro, które może być niedziałające. Ponadto, powinniśmy tak szybko, jak to tylko możliwe, przenieść działające jądro do właściwej lokalizacji /boot/kernel, albo komendy takie jak ps(1) nie będą działały poprawnie. By to zrobić wystarczy zmienić nazwę katalogu zawierającego właściwe jądro: |
Jeśli zainstalowaliśmy inną wersję jądra, niż tą, z którą były budowane narzędzia systemowe, na przykład jądro -CURRENT na systemie -RELEASE, wiele poleceń pokazujących stan systemu, jak ps(1), czy vmstat(8) nie będzie działało. Musimy dokonać rekompilacji i instalacji world zbudowanych na podstawie tej samej wersji źródeł co nasze jądro. Jest to jeden z powodów, przez które nie jest najlepszym pomysłem instalowanie różnych wersji jądra i systemu operacyjnego.
Putting information on paper is a vital function, despite many attempts to eliminate it. Printing has two basic components. The data must be delivered to the printer, and must be in a form that the printer can understand.
Basic printing can be set up quickly. The printer must be capable of printing plain ASCII text. For printing to other types of files, see Filters.
Printers are connected to computer systems in a variety of ways. Small desktop printers are usually connected directly to a computer’s USB port. Older printers are connected to a parallel or "printer" port. Some printers are directly connected to a network, making it easy for multiple computers to share them. A few printers use a rare serial port connection.
FreeBSD can communicate with all of these types of printers.
USBUSB printers can be connected to any available USB port on the computer.
When FreeBSD detects a USB printer, two device entries are created: /dev/ulpt0 and /dev/unlpt0. Data sent to either device will be relayed to the printer. After each print job, ulpt0 resets the USB port. Resetting the port can cause problems with some printers, so the unlpt0 device is usually used instead. unlpt0 does not reset the USB port at all.
IEEE-1284)The parallel port device is /dev/lpt0. This device appears whether a printer is attached or not, it is not autodetected.
Vendors have largely moved away from these "legacy" ports, and many computers no longer have them. Adapters can be used to connect a parallel printer to a USB port. With such an adapter, the printer can be treated as if it were actually a USB printer. Devices called print servers can also be used to connect parallel printers directly to a network.
Serial ports are another legacy port, rarely used for printers except in certain niche applications. Cables, connectors, and required wiring vary widely.
For serial ports built into a motherboard, the serial device name is /dev/cuau0 or /dev/cuau1. Serial USB adapters can also be used, and these will appear as /dev/cuaU0.
Several communication parameters must be known to communicate with a serial printer. The most important are baud rate or BPS (Bits Per Second) and parity. Values vary, but typical serial printers use a baud rate of 9600 and no parity.
Network printers are connected directly to the local computer network.
The DNS hostname of the printer must be known. If the printer is assigned a dynamic address by DHCP, DNS should be dynamically updated so that the host name always has the correct IP address. Network printers are often given static IP addresses to avoid this problem.
Most network printers understand print jobs sent with the LPD protocol. A print queue name can also be specified. Some printers process data differently depending on which queue is used. For example, a raw queue prints the data unchanged, while the text queue adds carriage returns to plain text.
Many network printers can also print data sent directly to port 9100.
Wired network connections are usually the easiest to set up and give the fastest printing. For direct connection to the computer, USB is preferred for speed and simplicity. Parallel connections work but have limitations on cable length and speed. Serial connections are more difficult to configure. Cable wiring differs between models, and communication parameters like baud rate and parity bits must add to the complexity. Fortunately, serial printers are rare.
Data sent to a printer must be in a language that the printer can understand. These languages are called Page Description Languages, or PDLs.
ASCIIPlain ASCII text is the simplest way to send data to a printer. Characters correspond one to one with what will be printed: an A in the data prints an A on the page. Very little formatting is available. There is no way to select a font or proportional spacing. The forced simplicity of plain ASCII means that text can be printed straight from the computer with little or no encoding or translation. The printed output corresponds directly with what was sent.
Some inexpensive printers cannot print plain ASCII text. This makes them more difficult to set up, but it is usually still possible.
PostScript® is almost the opposite of ASCII. Rather than simple text, a PostScript® program is a set of instructions that draw the final document. Different fonts and graphics can be used. However, this power comes at a price. The program that draws the page must be written. Usually this program is generated by application software, so the process is invisible to the user.
Inexpensive printers sometimes leave out PostScript® compatibility as a cost-saving measure.
PCL (Printer Command Language)PCL is an extension of ASCII, adding escape sequences for formatting, font selection, and printing graphics. Many printers provide PCL5 support. Some support the newer PCL6 or PCLXL. These later versions are supersets of PCL5 and can provide faster printing.
Manufacturers can reduce the cost of a printer by giving it a simple processor and very little memory. These printers are not capable of printing plain text. Instead, bitmaps of text and graphics are drawn by a driver on the host computer and then sent to the printer. These are called host-based printers.
Communication between the driver and a host-based printer is often through proprietary or undocumented protocols, making them functional only on the most common operating systems.
Many applications from the Ports Collection and FreeBSD utilities produce PostScript® output. This table shows the utilities available to convert that into other common PDLs:
| Output PDL | Generated By | Notes |
|---|---|---|
|
| |
|
| |
|
| |
|
For the easiest printing, choose a printer that supports PostScript®. Printers that support PCL are the next preferred. With print/ghostscript9-base, these printers can be used as if they understood PostScript® natively. Printers that support PostScript® or PCL directly almost always support direct printing of plain ASCII text files also.
Line-based printers like typical inkjets usually do not support PostScript® or PCL. They often can print plain ASCII text files. print/ghostscript9-base supports the PDLs used by some of these printers. However, printing an entire graphic-based page on these printers is often very slow due to the large amount of data to be transferred and printed.
Host-based printers are often more difficult to set up. Some cannot be used at all because of proprietary PDLs. Avoid these printers when possible.
Descriptions of many PDLs can be found at http://www.undocprint.org/formats/page_description_languages. The particular PDL used by various models of printers can be found at http://www.openprinting.org/printers.
For occasional printing, files can be sent directly to a printer device without any setup. For example, a file called sample.txt can be sent to a USB printer:
# cp sample.txt /dev/unlpt0Direct printing to network printers depends on the abilities of the printer, but most accept print jobs on port 9100, and nc(1) can be used with them. To print the same file to a printer with the DNS hostname of netlaser:
# nc netlaser 9100 < sample.txtPrinting a file in the background is called spooling. A spooler allows the user to continue with other programs on the computer without waiting for the printer to slowly complete the print job.
A directory for storing print jobs is created, ownership is set, and the permissions are set to prevent other users from viewing the contents of those files:
# mkdir -p /var/spool/lpd/lp
# chown daemon:daemon /var/spool/lpd/lp
# chmod 770 /var/spool/lpd/lpPrinters are defined in /etc/printcap. An entry for each printer includes details like a name, the port where it is attached, and various other settings. Create /etc/printcap with these contents:
lp:\				(1)
	:lp=/dev/unlpt0:\	(2)
	:sh:\			(3)
	:mx#0:\			(4)
	:sd=/var/spool/lpd/lp:\	(5)
	:lf=/var/log/lpd-errs:	(6)
| 1 | The name of this printer. lpr(1) sends print jobs to the lp printer unless another printer is specified with -P, so the default printer should be named lp. |
| 2 | The device where the printer is connected. Replace this line with the appropriate one for the connection type shown here. |
| 3 | Suppress the printing of a header page at the start of a print job. |
| 4 | Do not limit the maximum size of a print job. |
| 5 | The path to the spooling directory for this printer. Each printer uses its own spooling directory. |
| 6 | The log file where errors on this printer will be reported. |
After creating /etc/printcap, use chkprintcap(8) to test it for errors:
# chkprintcapFix any reported problems before continuing.
Enable lpd(8) in /etc/rc.conf:
lpd_enable="YES"
Start the service:
# service lpd startDocuments are sent to the printer with lpr. A file to be printed can be named on the command line or piped into lpr. These two commands are equivalent, sending the contents of doc.txt to the default printer:
% lpr doc.txt
% cat doc.txt | lpr
Printers can be selected with -P. To print to a printer called laser:
% lpr -Plaser doc.txtThe examples shown so far have sent the contents of a text file directly to the printer. As long as the printer understands the content of those files, output will be printed correctly.
Some printers are not capable of printing plain text, and the input file might not even be plain text.
Filters allow files to be translated or processed. The typical use is to translate one type of input, like plain text, into a form that the printer can understand, like PostScript® or PCL. Filters can also be used to provide additional features, like adding page numbers or highlighting source code to make it easier to read.
The filters discussed here are input filters or text filters. These filters convert the incoming file into different forms. Use su(1) to become root before creating the files.
Filters are specified in /etc/printcap with the if= identifier. To use /usr/local/libexec/lf2crlf as a filter, modify /etc/printcap like this:
lp:\
	:lp=/dev/unlpt0:\
	:sh:\
	:mx#0:\
	:sd=/var/spool/lpd/lp:\
	:if=/usr/local/libexec/lf2crlf:\   (1)
	:lf=/var/log/lpd-errs:
| 1 | if= identifies the input filter that will be used on incoming text. |
The backslash line continuation characters at the end of the lines in printcap entries reveal that an entry for a printer is really just one long line with entries delimited by colon characters. An earlier example can be rewritten as a single less-readable line: lp:lp=/dev/unlpt0:sh:mx#0:sd=/var/spool/lpd/lp:if=/usr/local/libexec/lf2crlf:lf=/var/log/lpd-errs: |
Typical FreeBSD text files contain only a single line feed character at the end of each line. These lines will "stairstep" on a standard printer:
A printed file looks
                    like the steps of a staircase
                                                 scattered by the wind
A filter can convert the newline characters into carriage returns and newlines. The carriage returns make the printer return to the left after each line. Create /usr/local/libexec/lf2crlf with these contents:
#!/bin/sh
CR=$'\r'
/usr/bin/sed -e "s/$/${CR}/g"
Set the permissions and make it executable:
# chmod 555 /usr/local/libexec/lf2crlfModify /etc/printcap to use the new filter:
:if=/usr/local/libexec/lf2crlf:\
Test the filter by printing the same plain text file. The carriage returns will cause each line to start at the left side of the page.
GNUEnscript converts plain text files into nicely-formatted PostScript® for printing on PostScript® printers. It adds page numbers, wraps long lines, and provides numerous other features to make printed text files easier to read. Depending on the local paper size, install either print/enscript-letter or print/enscript-a4 from the Ports Collection.
Create /usr/local/libexec/enscript with these contents:
#!/bin/sh
/usr/local/bin/enscript -o -
Set the permissions and make it executable:
# chmod 555 /usr/local/libexec/enscriptModify /etc/printcap to use the new filter:
:if=/usr/local/libexec/enscript:\
Test the filter by printing a plain text file.
PCL PrintersMany programs produce PostScript® documents. However, inexpensive printers often only understand plain text or PCL. This filter converts PostScript® files to PCL before sending them to the printer.
Install the Ghostscript PostScript® interpreter, print/ghostscript9-base, from the Ports Collection.
Create /usr/local/libexec/ps2pcl with these contents:
#!/bin/sh
/usr/local/bin/gs -dSAFER -dNOPAUSE -dBATCH -q -sDEVICE=ljet4 -sOutputFile=- -
Set the permissions and make it executable:
# chmod 555 /usr/local/libexec/ps2pclPostScript® input sent to this script will be rendered and converted to PCL before being sent on to the printer.
Modify /etc/printcap to use this new input filter:
:if=/usr/local/libexec/ps2pcl:\
Test the filter by sending a small PostScript® program to it:
% printf "%%\!PS \n /Helvetica findfont 18 scalefont setfont \
72 432 moveto (PostScript printing successful.) show showpage \004" | lprA filter that detects the type of input and automatically converts it to the correct format for the printer can be very convenient. The first two characters of a PostScript® file are usually %!. A filter can detect those two characters. PostScript® files can be sent on to a PostScript® printer unchanged. Text files can be converted to PostScript® with Enscript as shown earlier. Create /usr/local/libexec/psif with these contents:
#!/bin/sh
#
#  psif - Print PostScript or plain text on a PostScript printer
#
IFS="" read -r first_line
first_two_chars=`expr "$first_line" : '\(..\)'`

case "$first_two_chars" in
%!)
    # %! : PostScript job, print it.
    echo "$first_line" && cat && exit 0
    exit 2
    ;;
*)
    # otherwise, format with enscript
    ( echo "$first_line"; cat ) | /usr/local/bin/enscript -o - && exit 0
    exit 2
    ;;
esac
Set the permissions and make it executable:
# chmod 555 /usr/local/libexec/psifModify /etc/printcap to use this new input filter:
:if=/usr/local/libexec/psif:\
Test the filter by printing PostScript® and plain text files.
The entries in /etc/printcap are really definitions of queues. There can be more than one queue for a single printer. When combined with filters, multiple queues provide users more control over how their jobs are printed.
As an example, consider a networked PostScript® laser printer in an office. Most users want to print plain text, but a few advanced users want to be able to print PostScript® files directly. Two entries can be created for the same printer in /etc/printcap:
textprinter:\
	:lp=9100@officelaser:\
	:sh:\
	:mx#0:\
	:sd=/var/spool/lpd/textprinter:\
	:if=/usr/local/libexec/enscript:\
	:lf=/var/log/lpd-errs:

psprinter:\
	:lp=9100@officelaser:\
	:sh:\
	:mx#0:\
	:sd=/var/spool/lpd/psprinter:\
	:lf=/var/log/lpd-errs:
Documents sent to textprinter will be formatted by the /usr/local/libexec/enscript filter shown in an earlier example. Advanced users can print PostScript® files on psprinter, where no filtering is done.
This multiple queue technique can be used to provide direct access to all kinds of printer features. A printer with a duplexer could use two queues, one for ordinary single-sided printing, and one with a filter that sends the command sequence to enable double-sided printing and then sends the incoming file.
Several utilities are available to monitor print jobs and check and control printer operation.
lpq(1) shows the status of a user’s print jobs. Print jobs from other users are not shown.
Show the current user’s pending jobs on a single printer:
% lpq -Plp
Rank   Owner      Job  Files                                 Total Size
1st    jsmith     0    (standard input)                      12792 bytes
Show the current user’s pending jobs on all printers:
% lpq -a
lp:
Rank   Owner      Job  Files                                 Total Size
1st    jsmith     1    (standard input)                      27320 bytes

laser:
Rank   Owner      Job  Files                                 Total Size
1st jsmith 287 (standard input) 22443 byteslprm(1) is used to remove print jobs. Normal users are only allowed to remove their own jobs. root can remove any or all jobs.
Remove all pending jobs from a printer:
# lprm -Plp -
dfA002smithy dequeued
cfA002smithy dequeued
dfA003smithy dequeued
cfA003smithy dequeued
dfA004smithy dequeued
cfA004smithy dequeued
Remove a single job from a printer. lpq(1) is used to find the job number.
% lpq
Rank   Owner      Job  Files                                 Total Size
1st    jsmith     5    (standard input)                      12188 bytes

% lprm -Plp 5
dfA005smithy dequeued
cfA005smithy dequeuedlpc(8) is used to check and modify printer status. lpc is followed by a command and an optional printer name. all can be used instead of a specific printer name, and the command will be applied to all printers. Normal users can view status with lpc(8). Only root can use commands which modify printer status.
Show the status of all printers:
% lpc status all
lp:
queuing is enabled
printing is enabled
1 entry in spool area
printer idle
laser:
queuing is enabled
printing is enabled
1 entry in spool area
waiting for laser to come upPrevent a printer from accepting new jobs, then begin accepting new jobs again:
# lpc disable lp
lp:
queuing disabled
# lpc enable lp
lp:
queuing enabledStop printing, but continue to accept new jobs. Then begin printing again:
# lpc stop lp
lp:
printing disabled
# lpc start lp
lp:
printing enabled
daemon startedRestart a printer after some error condition:
# lpc restart lp
lp:
no daemon to abort
printing enabled
daemon restartedTurn the print queue off and disable printing, with a message to explain the problem to users:
# lpc down lp Repair parts will arrive on Monday
lp:
printer and queuing disabled
status message is now: Repair parts will arrive on MondayRe-enable a printer that is down:
# lpc up lp
lp:
printing enabled
daemon startedSee lpc(8) for more commands and options.
Printers are often shared by multiple users in businesses and schools. Additional features are provided to make sharing printers more convenient.
The printer name is set in the first line of the entry in /etc/printcap. Additional names, or aliases, can be added after that name. Aliases are separated from the name and each other by vertical bars:
lp|repairsprinter|salesprinter:\
Aliases can be used in place of the printer name. For example, users in the Sales department print to their printer with
% lpr -Psalesprinter sales-report.txtUsers in the Repairs department print to their printer with
% lpr -Prepairsprinter repairs-report.txtAll of the documents print on that single printer. When the Sales department grows enough to need their own printer, the alias can be removed from the shared printer entry and used as the name of a new printer. Users in both departments continue to use the same commands, but the Sales documents are sent to the new printer.
It can be difficult for users to locate their documents in the stack of pages produced by a busy shared printer. Header pages were created to solve this problem. A header page with the user name and document name is printed before each print job. These pages are also sometimes called banner or separator pages.
Enabling header pages differs depending on whether the printer is connected directly to the computer with a USB, parallel, or serial cable, or is connected remotely over a network.
Header pages on directly-connected printers are enabled by removing the :sh:\ (Suppress Header) line from the entry in /etc/printcap. These header pages only use line feed characters for new lines. Some printers will need the /usr/shared/examples/printing/hpif filter to prevent stairstepped text. The filter configures PCL printers to print both carriage returns and line feeds when a line feed is received.
Header pages for network printers must be configured on the printer itself. Header page entries in /etc/printcap are ignored. Settings are usually available from the printer front panel or a configuration web page accessible with a web browser.
Several other printing systems are available in addition to the built-in lpd(8). These systems offer support for other protocols or additional features.
CUPS is a popular printing system available on many operating systems. Using CUPS on FreeBSD is documented in a separate article: CUPS
Hewlett Packard provides a printing system that supports many of their inkjet and laser printers. The port is print/hplip. The main web page is at http://hplipopensource.com/hplip-web/index.html. The port handles all the installation details on FreeBSD. Configuration information is shown at http://hplipopensource.com/hplip-web/install/manual/hp_setup.html.
LPRng was developed as an enhanced alternative to lpd(8). The port is sysutils/LPRng. For details and documentation, see https://lprng.sourceforge.net/.
FreeBSD provides binary compatibility with Linux®, allowing users to install and run most Linux® binaries on a FreeBSD system without having to first modify the binary. It has even been reported that, in some situations, Linux® binaries perform better on FreeBSD than they do on Linux®.
However, some Linux®-specific operating system features are not supported under FreeBSD. For example, Linux® binaries will not work on FreeBSD if they overly use i386™ specific calls, such as enabling virtual 8086 mode.
Support for 64-bit binary compatibility with Linux® was added in FreeBSD 10.3. |
After reading this chapter, you will know:
How to enable Linux® binary compatibility on a FreeBSD system.
How to install additional Linux® shared libraries.
How to install Linux® applications on a FreeBSD system.
The implementation details of Linux® compatibility in FreeBSD.
Before reading this chapter, you should:
Know how to install additional third-party software.
By default, Linux® libraries are not installed and Linux® binary compatibility is not enabled. Linux® libraries can either be installed manually or from the FreeBSD Ports Collection.
Before attempting to build the port, load the Linux® kernel module, otherwise the build will fail:
# kldload linuxFor 64-bit compatibility:
# kldload linux64To verify that the module is loaded:
% kldstat
Id Refs Address Size Name
1 2 0xc0100000 16bdb8 kernel
7 1 0xc24db000 d000 linux.koThe emulators/linux_base-c7 package or port is the easiest way to install a base set of Linux® libraries and binaries on a FreeBSD system. To install the port:
# pkg install emulators/linux_base-c7For Linux® compatibility to be enabled at boot time, add this line to /etc/rc.conf:
linux_enable="YES"
On 64-bit machines, /etc/rc.d/abi will automatically load the module for 64-bit emulation.
Since the Linux® binary compatibility layer has gained support for running both 32- and 64-bit Linux® binaries (on 64-bit x86 hosts), it is no longer possible to link the emulation functionality statically into a custom kernel.
If a Linux® application complains about missing shared libraries after configuring Linux® binary compatibility, determine which shared libraries the Linux® binary needs and install them manually.
From a Linux® system, ldd can be used to determine which shared libraries the application needs. For example, to check which shared libraries linuxdoom needs, run this command from a Linux® system that has Doom installed:
% ldd linuxdoom
libXt.so.3 (DLL Jump 3.1) => /usr/X11/lib/libXt.so.3.1.0
libX11.so.3 (DLL Jump 3.1) => /usr/X11/lib/libX11.so.3.1.0
libc.so.4 (DLL Jump 4.5pl26) => /lib/libc.so.4.6.29Then, copy all the files in the last column of the output from the Linux® system into /compat/linux on the FreeBSD system. Once copied, create symbolic links to the names in the first column. This example will result in the following files on the FreeBSD system:
/compat/linux/usr/X11/lib/libXt.so.3.1.0
/compat/linux/usr/X11/lib/libXt.so.3 -> libXt.so.3.1.0
/compat/linux/usr/X11/lib/libX11.so.3.1.0
/compat/linux/usr/X11/lib/libX11.so.3 -> libX11.so.3.1.0
/compat/linux/lib/libc.so.4.6.29
/compat/linux/lib/libc.so.4 -> libc.so.4.6.29If a Linux® shared library already exists with a matching major revision number to the first column of the ldd output, it does not need to be copied to the file named in the last column, as the existing library should work. It is advisable to copy the shared library if it is a newer version, though. The old one can be removed, as long as the symbolic link points to the new one.
For example, these libraries already exist on the FreeBSD system:
/compat/linux/lib/libc.so.4.6.27
/compat/linux/lib/libc.so.4 -> libc.so.4.6.27and ldd indicates that a binary requires a later version:
libc.so.4 (DLL Jump 4.5pl26) -> libc.so.4.6.29Since the existing library is only one or two versions out of date in the last digit, the program should still work with the slightly older version. However, it is safe to replace the existing libc.so with the newer version:
/compat/linux/lib/libc.so.4.6.29
/compat/linux/lib/libc.so.4 -> libc.so.4.6.29Generally, one will need to look for the shared libraries that Linux® binaries depend on only the first few times that a Linux® program is installed on FreeBSD. After a while, there will be a sufficient set of Linux® shared libraries on the system to be able to run newly installed Linux® binaries without any extra work.
ELF binaries sometimes require an extra step. When an unbranded ELF binary is executed, it will generate an error message:
% ./my-linux-elf-binary
ELF binary type not known
AbortTo help the FreeBSD kernel distinguish between a FreeBSD ELF binary and a Linux® binary, use brandelf(1):
% brandelf -t Linux my-linux-elf-binarySince the GNU toolchain places the appropriate branding information into ELF binaries automatically, this step is usually not necessary.
To install a Linux® RPM-based application, first install the archivers/rpm4 package or port. Once installed, root can use this command to install a .rpm:
# cd /compat/linux
# rpm2cpio < /path/to/linux.archive.rpm | cpio -idIf necessary, brandelf the installed ELF binaries. Note that this will prevent a clean uninstall.
If DNS does not work or this error appears:
resolv+: "bind" is an invalid keyword resolv+:
"hosts" is an invalid keywordconfigure /compat/linux/etc/host.conf as follows:
order hosts, bind multi on
This specifies that /etc/hosts is searched first and DNS is searched second. When /compat/linux/etc/host.conf does not exist, Linux® applications use /etc/host.conf and complain about the incompatible FreeBSD syntax. Remove bind if a name server is not configured using /etc/resolv.conf.
This section describes how Linux® binary compatibility works and is based on an email written to FreeBSD chat mailing list by Terry Lambert tlambert@primenet.com (Message ID: <199906020108.SAA07001@usr09.primenet.com>).
FreeBSD has an abstraction called an "execution class loader". This is a wedge into the execve(2) system call.
Historically, the UNIX® loader examined the magic number (generally the first 4 or 8 bytes of the file) to see if it was a binary known to the system, and if so, invoked the binary loader.
If it was not the binary type for the system, the execve(2) call returned a failure, and the shell attempted to start executing it as shell commands. The assumption was a default of "whatever the current shell is".
Later, a hack was made for sh(1) to examine the first two characters, and if they were :\n, it invoked the csh(1) shell instead.
FreeBSD has a list of loaders, instead of a single loader, with a fallback to the #! loader for running shell interpreters or shell scripts.
For the Linux® ABI support, FreeBSD sees the magic number as an ELF binary. The ELF loader looks for a specialized brand, which is a comment section in the ELF image, and which is not present on SVR4/Solaris™ ELF binaries.
For Linux® binaries to function, they must be branded as type Linux using brandelf(1):
# brandelf -t Linux fileWhen the ELF loader sees the Linux brand, the loader replaces a pointer in the proc structure. All system calls are indexed through this pointer. In addition, the process is flagged for special handling of the trap vector for the signal trampoline code, and several other (minor) fix-ups that are handled by the Linux® kernel module.
The Linux® system call vector contains, among other things, a list of sysent[] entries whose addresses reside in the kernel module.
When a system call is called by the Linux® binary, the trap code dereferences the system call function pointer off the proc structure, and gets the Linux®, not the FreeBSD, system call entry points.
Linux® mode dynamically reroots lookups. This is, in effect, equivalent to union to file system mounts. First, an attempt is made to lookup the file in /compat/linux/original-path. If that fails, the lookup is done in /original-path. This makes sure that binaries that require other binaries can run. For example, the Linux® toolchain can all run under Linux® ABI support. It also means that the Linux® binaries can load and execute FreeBSD binaries, if there are no corresponding Linux® binaries present, and that a uname(1) command can be placed in the /compat/linux directory tree to ensure that the Linux® binaries cannot tell they are not running on Linux®.
In effect, there is a Linux® kernel in the FreeBSD kernel. The various underlying functions that implement all of the services provided by the kernel are identical to both the FreeBSD system call table entries, and the Linux® system call table entries: file system operations, virtual memory operations, signal delivery, and System V IPC. The only difference is that FreeBSD binaries get the FreeBSD glue functions, and Linux® binaries get the Linux® glue functions. The FreeBSD glue functions are statically linked into the kernel, and the Linux® glue functions can be statically linked, or they can be accessed via a kernel module.
Technically, this is not really emulation, it is an ABI implementation. It is sometimes called "Linux® emulation" because the implementation was done at a time when there was no other word to describe what was going on. Saying that FreeBSD ran Linux® binaries was not true, since the code was not compiled in.
Pozostałe rozdziały Podręcznika omawiają wszystkie aspekty administracji systemem FreeBSD. Każdy z nich rozpoczyna się on wyjaśnienia czego nauczymy się przeczytawszy dany rozdział, a także co powinniśmy wiedzieć przed przystąpieniem do jego lektury.
Rozdziały zostały tak napisane, by móc sięgnąć po nie gdy potrzebujemy danych informacji. Nie ma przymusu czytania ich w żadnej określonej kolejności, ani też przeczytania wszystkich przed rozpoczęciem pracy z FreeBSD.
One of the important aspects of FreeBSD is proper system configuration. This chapter explains much of the FreeBSD configuration process, including some of the parameters which can be set to tune a FreeBSD system.
After reading this chapter, you will know:
The basics of rc.conf configuration and /usr/local/etc/rc.d startup scripts.
How to configure and test a network card.
How to configure virtual hosts on network devices.
How to use the various configuration files in /etc.
How to tune FreeBSD using sysctl(8) variables.
How to tune disk performance and modify kernel limitations.
Before reading this chapter, you should:
Understand UNIX® and FreeBSD basics (FreeBSD Basics).
Be familiar with the basics of kernel configuration and compilation (Configuring the FreeBSD Kernel).
Many users install third party software on FreeBSD from the Ports Collection and require the installed services to be started upon system initialization. Services, such as mail/postfix or www/apache22 are just two of the many software packages which may be started during system initialization. This section explains the procedures available for starting third party software.
In FreeBSD, most included services, such as cron(8), are started through the system startup scripts.
Now that FreeBSD includes rc.d, configuration of application startup is easier and provides more features. Using the key words discussed in Managing Services in FreeBSD, applications can be set to start after certain other services and extra flags can be passed through /etc/rc.conf in place of hard coded flags in the startup script. A basic script may look similar to the following:
#!/bin/sh
#
# PROVIDE: utility
# REQUIRE: DAEMON
# KEYWORD: shutdown
. /etc/rc.subr
name=utility
rcvar=utility_enable
command="/usr/local/sbin/utility"
load_rc_config $name
#
# DO NOT CHANGE THESE DEFAULT VALUES HERE
# SET THEM IN THE /etc/rc.conf FILE
#
utility_enable=${utility_enable-"NO"}
pidfile=${utility_pidfile-"/var/run/utility.pid"}
run_rc_command "$1"This script will ensure that the provided utility will be started after the DAEMON pseudo-service. It also provides a method for setting and tracking the process ID (PID).
This application could then have the following line placed in /etc/rc.conf:
utility_enable="YES"
This method allows for easier manipulation of command line arguments, inclusion of the default functions provided in /etc/rc.subr, compatibility with rcorder(8), and provides for easier configuration via rc.conf.
Other services can be started using inetd(8). Working with inetd(8) and its configuration is described in depth in “The inetd Super-Server”.
In some cases, it may make more sense to use cron(8) to start system services. This approach has a number of advantages as cron(8) runs these processes as the owner of the crontab(5). This allows regular users to start and maintain their own applications.
One of the most useful utilities in FreeBSD is cron. This utility runs in the background and regularly checks /etc/crontab for tasks to execute and searches /var/cron/tabs for custom crontab files. These files are used to schedule tasks which cron runs at the specified times. Each entry in a crontab defines a task to run and is known as a cron job.
Two different types of configuration files are used: the system crontab, which should not be modified, and user crontabs, which can be created and edited as needed. The format used by these files is documented in crontab(5). The format of the system crontab, /etc/crontab includes a who column which does not exist in user crontabs. In the system crontab, cron runs the command as the user specified in this column. In a user crontab, all commands run as the user who created the crontab.
User crontabs allow individual users to schedule their own tasks. The root user can also have a user crontab which can be used to schedule tasks that do not exist in the system crontab.
Here is a sample entry from the system crontab, /etc/crontab:
# /etc/crontab - root's crontab for FreeBSD # # $FreeBSD$ (1) SHELL=/bin/sh PATH=/etc:/bin:/sbin:/usr/bin:/usr/sbin (2) # #minute hour mday month wday who command (3) # */5 * * * * root /usr/libexec/atrun (4)
| 1 | Lines that begin with the # character are comments. A comment can be placed in the file as a reminder of what and why a desired action is performed. Comments cannot be on the same line as a command or else they will be interpreted as part of the command; they must be on a new line. Blank lines are ignored. |
| 2 | The equals (=) character is used to define any environment settings. In this example, it is used to define the SHELL and PATH. If the SHELL is omitted, cron will use the default Bourne shell. If the PATH is omitted, the full path must be given to the command or script to run. |
| 3 | This line defines the seven fields used in a system crontab: minute, hour, mday, month, wday, who, and command. The minute field is the time in minutes when the specified command will be run, the hour is the hour when the specified command will be run, the mday is the day of the month, month is the month, and wday is the day of the week. These fields must be numeric values, representing the twenty-four hour clock, or a *, representing all values for that field. The who field only exists in the system crontab and specifies which user the command should be run as. The last field is the command to be executed. |
| 4 | This entry defines the values for this cron job. The */5, followed by several more * characters, specifies that /usr/libexec/atrun is invoked by root every five minutes of every hour, of every day and day of the week, of every month.Commands can include any number of switches. However, commands which extend to multiple lines need to be broken with the backslash "\" continuation character. |
To create a user crontab, invoke crontab in editor mode:
% crontab -eThis will open the user’s crontab using the default text editor. The first time a user runs this command, it will open an empty file. Once a user creates a crontab, this command will open that file for editing.
It is useful to add these lines to the top of the crontab file in order to set the environment variables and to remember the meanings of the fields in the crontab:
SHELL=/bin/sh PATH=/etc:/bin:/sbin:/usr/bin:/usr/sbin # Order of crontab fields # minute hour mday month wday command
Then add a line for each command or script to run, specifying the time to run the command. This example runs the specified custom Bourne shell script every day at two in the afternoon. Since the path to the script is not specified in PATH, the full path to the script is given:
0 14 * * * /usr/home/dru/bin/mycustomscript.sh
Before using a custom script, make sure it is executable and test it with the limited set of environment variables set by cron. To replicate the environment that would be used to run the above cron entry, use: env -i SHELL=/bin/sh PATH=/etc:/bin:/sbin:/usr/bin:/usr/sbin HOME=/home/dru LOGNAME=dru /usr/home/dru/bin/mycustomscript.sh The environment set by cron is discussed in crontab(5). Checking that scripts operate correctly in a cron environment is especially important if they include any commands that delete files using wildcards. |
When finished editing the crontab, save the file. It will automatically be installed and cron will read the crontab and run its cron jobs at their specified times. To list the cron jobs in a crontab, use this command:
% crontab -l
0 14 * * * /usr/home/dru/bin/mycustomscript.shTo remove all of the cron jobs in a user crontab:
% crontab -r
remove crontab for dru? yFreeBSD uses the rc(8) system of startup scripts during system initialization and for managing services. The scripts listed in /etc/rc.d provide basic services which can be controlled with the start, stop, and restart options to service(8). For instance, sshd(8) can be restarted with the following command:
# service sshd restartThis procedure can be used to start services on a running system. Services will be started automatically at boot time as specified in rc.conf(5). For example, to enable natd(8) at system startup, add the following line to /etc/rc.conf:
natd_enable="YES"
If a natd_enable="NO" line is already present, change the NO to YES. The rc(8) scripts will automatically load any dependent services during the next boot, as described below.
Since the rc(8) system is primarily intended to start and stop services at system startup and shutdown time, the start, stop and restart options will only perform their action if the appropriate /etc/rc.conf variable is set. For instance, sshd restart will only work if sshd_enable is set to YES in /etc/rc.conf. To start, stop or restart a service regardless of the settings in /etc/rc.conf, these commands should be prefixed with "one". For instance, to restart sshd(8) regardless of the current /etc/rc.conf setting, execute the following command:
# service sshd onerestartTo check if a service is enabled in /etc/rc.conf, run the appropriate rc(8) script with rcvar. This example checks to see if sshd(8) is enabled in /etc/rc.conf:
# service sshd rcvar
# sshd
#
sshd_enable="YES"
# (default: "")The |
To determine whether or not a service is running, use status. For instance, to verify that sshd(8) is running:
# service sshd status
sshd is running as pid 433.In some cases, it is also possible to reload a service. This attempts to send a signal to an individual service, forcing the service to reload its configuration files. In most cases, this means sending the service a SIGHUP signal. Support for this feature is not included for every service.
The rc(8) system is used for network services and it also contributes to most of the system initialization. For instance, when the /etc/rc.d/bgfsck script is executed, it prints out the following message:
Starting background file system checks in 60 seconds.This script is used for background file system checks, which occur only during system initialization.
Many system services depend on other services to function properly. For example, yp(8) and other RPC-based services may fail to start until after the rpcbind(8) service has started. To resolve this issue, information about dependencies and other meta-data is included in the comments at the top of each startup script. The rcorder(8) program is used to parse these comments during system initialization to determine the order in which system services should be invoked to satisfy the dependencies.
The following key word must be included in all startup scripts as it is required by rc.subr(8) to "enable" the startup script:
PROVIDE: Specifies the services this file provides.
The following key words may be included at the top of each startup script. They are not strictly necessary, but are useful as hints to rcorder(8):
REQUIRE: Lists services which are required for this service. The script containing this key word will run after the specified services.
BEFORE: Lists services which depend on this service. The script containing this key word will run before the specified services.
By carefully setting these keywords for each startup script, an administrator has a fine-grained level of control of the startup order of the scripts, without the need for "runlevels" used by some UNIX® operating systems.
Additional information can be found in rc(8) and rc.subr(8). Refer to this article for instructions on how to create custom rc(8) scripts.
The principal location for system configuration information is /etc/rc.conf. This file contains a wide range of configuration information and it is read at system startup to configure the system. It provides the configuration information for the rc* files.
The entries in /etc/rc.conf override the default settings in /etc/defaults/rc.conf. The file containing the default settings should not be edited. Instead, all system-specific changes should be made to /etc/rc.conf.
A number of strategies may be applied in clustered applications to separate site-wide configuration from system-specific configuration in order to reduce administration overhead. The recommended approach is to place system-specific configuration into /etc/rc.conf.local. For example, these entries in /etc/rc.conf apply to all systems:
sshd_enable="YES" keyrate="fast" defaultrouter="10.1.1.254"
Whereas these entries in /etc/rc.conf.local apply to this system only:
hostname="node1.example.org" ifconfig_fxp0="inet 10.1.1.1/8"
Distribute /etc/rc.conf to every system using an application such as rsync or puppet, while /etc/rc.conf.local remains unique.
Upgrading the system will not overwrite /etc/rc.conf, so system configuration information will not be lost.
Both /etc/rc.conf and /etc/rc.conf.local are parsed by sh(1). This allows system operators to create complex configuration scenarios. Refer to rc.conf(5) for further information on this topic. |
Adding and configuring a network interface card (NIC) is a common task for any FreeBSD administrator.
First, determine the model of the NIC and the chip it uses. FreeBSD supports a wide variety of NICs. Check the Hardware Compatibility List for the FreeBSD release to see if the NIC is supported.
If the NIC is supported, determine the name of the FreeBSD driver for the NIC. Refer to /usr/src/sys/conf/NOTES and /usr/src/sys/arch/conf/NOTES for the list of NIC drivers with some information about the supported chipsets. When in doubt, read the manual page of the driver as it will provide more information about the supported hardware and any known limitations of the driver.
The drivers for common NICs are already present in the GENERIC kernel, meaning the NIC should be probed during boot. The system’s boot messages can be viewed by typing more /var/run/dmesg.boot and using the spacebar to scroll through the text. In this example, two Ethernet NICs using the dc(4) driver are present on the system:
dc0: <82c169 PNIC 10/100BaseTX> port 0xa000-0xa0ff mem 0xd3800000-0xd38
000ff irq 15 at device 11.0 on pci0
miibus0: <MII bus> on dc0
bmtphy0: <BCM5201 10/100baseTX PHY> PHY 1 on miibus0
bmtphy0: 10baseT, 10baseT-FDX, 100baseTX, 100baseTX-FDX, auto
dc0: Ethernet address: 00:a0:cc:da:da:da
dc0: [ITHREAD]
dc1: <82c169 PNIC 10/100BaseTX> port 0x9800-0x98ff mem 0xd3000000-0xd30
000ff irq 11 at device 12.0 on pci0
miibus1: <MII bus> on dc1
bmtphy1: <BCM5201 10/100baseTX PHY> PHY 1 on miibus1
bmtphy1: 10baseT, 10baseT-FDX, 100baseTX, 100baseTX-FDX, auto
dc1: Ethernet address: 00:a0:cc:da:da:db
dc1: [ITHREAD]If the driver for the NIC is not present in GENERIC, but a driver is available, the driver will need to be loaded before the NIC can be configured and used. This may be accomplished in one of two ways:
The easiest way is to load a kernel module for the NIC using kldload(8). To also automatically load the driver at boot time, add the appropriate line to /boot/loader.conf. Not all NIC drivers are available as modules.
Alternatively, statically compile support for the NIC into a custom kernel. Refer to /usr/src/sys/conf/NOTES, /usr/src/sys/arch/conf/NOTES and the manual page of the driver to determine which line to add to the custom kernel configuration file. For more information about recompiling the kernel, refer to Configuring the FreeBSD Kernel. If the NIC was detected at boot, the kernel does not need to be recompiled.
Unfortunately, there are still many vendors that do not provide schematics for their drivers to the open source community because they regard such information as trade secrets. Consequently, the developers of FreeBSD and other operating systems are left with two choices: develop the drivers by a long and pain-staking process of reverse engineering or using the existing driver binaries available for Microsoft® Windows® platforms.
FreeBSD provides "native" support for the Network Driver Interface Specification (NDIS). It includes ndisgen(8) which can be used to convert a Windows® XP driver into a format that can be used on FreeBSD. Because the ndis(4) driver uses a Windows® XP binary, it only runs on i386™ and amd64 systems. PCI, CardBus, PCMCIA, and USB devices are supported.
To use ndisgen(8), three things are needed:
FreeBSD kernel sources.
A Windows® XP driver binary with a .SYS extension.
A Windows® XP driver configuration file with a .INF extension.
Download the .SYS and .INF files for the specific NIC. Generally, these can be found on the driver CD or at the vendor’s website. The following examples use W32DRIVER.SYS and W32DRIVER.INF.
The driver bit width must match the version of FreeBSD. For FreeBSD/i386, use a Windows® 32-bit driver. For FreeBSD/amd64, a Windows® 64-bit driver is needed.
The next step is to compile the driver binary into a loadable kernel module. As root, use ndisgen(8):
# ndisgen /path/to/W32DRIVER.INF /path/to/W32DRIVER.SYSThis command is interactive and prompts for any extra information it requires. A new kernel module will be generated in the current directory. Use kldload(8) to load the new module:
# kldload ./W32DRIVER_SYS.koIn addition to the generated kernel module, the ndis.ko and if_ndis.ko modules must be loaded. This should happen automatically when any module that depends on ndis(4) is loaded. If not, load them manually, using the following commands:
# kldload ndis
# kldload if_ndisThe first command loads the ndis(4) miniport driver wrapper and the second loads the generated NIC driver.
Check dmesg(8) to see if there were any load errors. If all went well, the output should be similar to the following:
ndis0: <Wireless-G PCI Adapter> mem 0xf4100000-0xf4101fff irq 3 at device 8.0 on pci1
ndis0: NDIS API version: 5.0
ndis0: Ethernet address: 0a:b1:2c:d3:4e:f5
ndis0: 11b rates: 1Mbps 2Mbps 5.5Mbps 11Mbps
ndis0: 11g rates: 6Mbps 9Mbps 12Mbps 18Mbps 36Mbps 48Mbps 54MbpsFrom here, ndis0 can be configured like any other NIC.
To configure the system to load the ndis(4) modules at boot time, copy the generated module, W32DRIVER_SYS.ko, to /boot/modules. Then, add the following line to /boot/loader.conf:
W32DRIVER_SYS_load="YES"
Once the right driver is loaded for the NIC, the card needs to be configured. It may have been configured at installation time by bsdinstall(8).
To display the NIC configuration, enter the following command:
% ifconfig
dc0: flags=8843<UP,BROADCAST,RUNNING,SIMPLEX,MULTICAST> metric 0 mtu 1500
options=80008<VLAN_MTU,LINKSTATE>
ether 00:a0:cc:da:da:da
inet 192.168.1.3 netmask 0xffffff00 broadcast 192.168.1.255
media: Ethernet autoselect (100baseTX <full-duplex>)
status: active
dc1: flags=8802<UP,BROADCAST,RUNNING,SIMPLEX,MULTICAST> metric 0 mtu 1500
options=80008<VLAN_MTU,LINKSTATE>
ether 00:a0:cc:da:da:db
inet 10.0.0.1 netmask 0xffffff00 broadcast 10.0.0.255
media: Ethernet 10baseT/UTP
status: no carrier
lo0: flags=8049<UP,LOOPBACK,RUNNING,MULTICAST> metric 0 mtu 16384
options=3<RXCSUM,TXCSUM>
inet6 fe80::1%lo0 prefixlen 64 scopeid 0x4
inet6 ::1 prefixlen 128
inet 127.0.0.1 netmask 0xff000000
nd6 options=3<PERFORMNUD,ACCEPT_RTADV>In this example, the following devices were displayed:
dc0: The first Ethernet interface.
dc1: The second Ethernet interface.
lo0: The loopback device.
FreeBSD uses the driver name followed by the order in which the card is detected at boot to name the NIC. For example, sis2 is the third NIC on the system using the sis(4) driver.
In this example, dc0 is up and running. The key indicators are:
UP means that the card is configured and ready.
The card has an Internet (inet) address, 192.168.1.3.
It has a valid subnet mask (netmask), where 0xffffff00 is the same as 255.255.255.0.
It has a valid broadcast address, 192.168.1.255.
The MAC address of the card (ether) is 00:a0:cc:da:da:da.
The physical media selection is on autoselection mode (media: Ethernet autoselect (100baseTX <full-duplex>)). In this example, dc1 is configured to run with 10baseT/UTP media. For more information on available media types for a driver, refer to its manual page.
The status of the link (status) is active, indicating that the carrier signal is detected. For dc1, the status: no carrier status is normal when an Ethernet cable is not plugged into the card.
If the ifconfig(8) output had shown something similar to:
dc0: flags=8843<BROADCAST,SIMPLEX,MULTICAST> metric 0 mtu 1500
options=80008<VLAN_MTU,LINKSTATE>
ether 00:a0:cc:da:da:da
media: Ethernet autoselect (100baseTX <full-duplex>)
status: activeit would indicate the card has not been configured.
The card must be configured as root. The NIC configuration can be performed from the command line with ifconfig(8) but will not persist after a reboot unless the configuration is also added to /etc/rc.conf. If a DHCP server is present on the LAN, just add this line:
ifconfig_dc0="DHCP"
Replace dc0 with the correct value for the system.
The line added, then, follow the instructions given in Testing and Troubleshooting.
If the network was configured during installation, some entries for the NIC(s) may be already present. Double check /etc/rc.conf before adding any lines. |
If there is no DHCP server, the NIC(s) must be configured manually. Add a line for each NIC present on the system, as seen in this example:
ifconfig_dc0="inet 192.168.1.3 netmask 255.255.255.0" ifconfig_dc1="inet 10.0.0.1 netmask 255.255.255.0 media 10baseT/UTP"
Replace dc0 and dc1 and the IP address information with the correct values for the system. Refer to the man page for the driver, ifconfig(8), and rc.conf(5) for more details about the allowed options and the syntax of /etc/rc.conf.
If the network is not using DNS, edit /etc/hosts to add the names and IP addresses of the hosts on the LAN, if they are not already there. For more information, refer to hosts(5) and to /usr/shared/examples/etc/hosts.
If there is no DHCP server and access to the Internet is needed, manually configure the default gateway and the nameserver: |
Once the necessary changes to /etc/rc.conf are saved, a reboot can be used to test the network configuration and to verify that the system restarts without any configuration errors. Alternatively, apply the settings to the networking system with this command:
# service netif restartIf a default gateway has been set in /etc/rc.conf, also issue this command: |
Once the networking system has been relaunched, test the NICs.
To verify that an Ethernet card is configured correctly, ping(8) the interface itself, and then ping(8) another machine on the LAN:
% ping -c5 192.168.1.3
PING 192.168.1.3 (192.168.1.3): 56 data bytes
64 bytes from 192.168.1.3: icmp_seq=0 ttl=64 time=0.082 ms
64 bytes from 192.168.1.3: icmp_seq=1 ttl=64 time=0.074 ms
64 bytes from 192.168.1.3: icmp_seq=2 ttl=64 time=0.076 ms
64 bytes from 192.168.1.3: icmp_seq=3 ttl=64 time=0.108 ms
64 bytes from 192.168.1.3: icmp_seq=4 ttl=64 time=0.076 ms
--- 192.168.1.3 ping statistics ---
5 packets transmitted, 5 packets received, 0% packet loss
round-trip min/avg/max/stddev = 0.074/0.083/0.108/0.013 ms% ping -c5 192.168.1.2
PING 192.168.1.2 (192.168.1.2): 56 data bytes
64 bytes from 192.168.1.2: icmp_seq=0 ttl=64 time=0.726 ms
64 bytes from 192.168.1.2: icmp_seq=1 ttl=64 time=0.766 ms
64 bytes from 192.168.1.2: icmp_seq=2 ttl=64 time=0.700 ms
64 bytes from 192.168.1.2: icmp_seq=3 ttl=64 time=0.747 ms
64 bytes from 192.168.1.2: icmp_seq=4 ttl=64 time=0.704 ms
--- 192.168.1.2 ping statistics ---
5 packets transmitted, 5 packets received, 0% packet loss
round-trip min/avg/max/stddev = 0.700/0.729/0.766/0.025 msTo test network resolution, use the host name instead of the IP address. If there is no DNS server on the network, /etc/hosts must first be configured. To this purpose, edit /etc/hosts to add the names and IP addresses of the hosts on the LAN, if they are not already there. For more information, refer to hosts(5) and to /usr/shared/examples/etc/hosts.
When troubleshooting hardware and software configurations, check the simple things first. Is the network cable plugged in? Are the network services properly configured? Is the firewall configured correctly? Is the NIC supported by FreeBSD? Before sending a bug report, always check the Hardware Notes, update the version of FreeBSD to the latest STABLE version, check the mailing list archives, and search the Internet.
If the card works, yet performance is poor, read through tuning(7). Also, check the network configuration as incorrect network settings can cause slow connections.
Some users experience one or two device timeout messages, which is normal for some cards. If they continue, or are bothersome, determine if the device is conflicting with another device. Double check the cable connections. Consider trying another card.
To resolve watchdog timeout errors, first check the network cable. Many cards require a PCI slot which supports bus mastering. On some old motherboards, only one PCI slot allows it, usually slot 0. Check the NIC and the motherboard documentation to determine if that may be the problem.
No route to host messages occur if the system is unable to route a packet to the destination host. This can happen if no default route is specified or if a cable is unplugged. Check the output of netstat -rn and make sure there is a valid route to the host. If there is not, read “Gateways and Routes”.
ping: sendto: Permission denied error messages are often caused by a misconfigured firewall. If a firewall is enabled on FreeBSD but no rules have been defined, the default policy is to deny all traffic, even ping(8). Refer to Firewalls for more information.
Sometimes performance of the card is poor or below average. In these cases, try setting the media selection mode from autoselect to the correct media selection. While this works for most hardware, it may or may not resolve the issue. Again, check all the network settings, and refer to tuning(7).
A common use of FreeBSD is virtual site hosting, where one server appears to the network as many servers. This is achieved by assigning multiple network addresses to a single interface.
A given network interface has one "real" address, and may have any number of "alias" addresses. These aliases are normally added by placing alias entries in /etc/rc.conf, as seen in this example:
ifconfig_fxp0_alias0="inet xxx.xxx.xxx.xxx netmask xxx.xxx.xxx.xxx"
Alias entries must start with alias0 using a sequential number such as alias0, alias1, and so on. The configuration process will stop at the first missing number.
The calculation of alias netmasks is important. For a given interface, there must be one address which correctly represents the network’s netmask. Any other addresses which fall within this network must have a netmask of all 1s, expressed as either 255.255.255.255 or 0xffffffff.
For example, consider the case where the fxp0 interface is connected to two networks: 10.1.1.0 with a netmask of 255.255.255.0 and 202.0.75.16 with a netmask of 255.255.255.240. The system is to be configured to appear in the ranges 10.1.1.1 through 10.1.1.5 and 202.0.75.17 through 202.0.75.20. Only the first address in a given network range should have a real netmask. All the rest (10.1.1.2 through 10.1.1.5 and 202.0.75.18 through 202.0.75.20) must be configured with a netmask of 255.255.255.255.
The following /etc/rc.conf entries configure the adapter correctly for this scenario:
ifconfig_fxp0="inet 10.1.1.1 netmask 255.255.255.0" ifconfig_fxp0_alias0="inet 10.1.1.2 netmask 255.255.255.255" ifconfig_fxp0_alias1="inet 10.1.1.3 netmask 255.255.255.255" ifconfig_fxp0_alias2="inet 10.1.1.4 netmask 255.255.255.255" ifconfig_fxp0_alias3="inet 10.1.1.5 netmask 255.255.255.255" ifconfig_fxp0_alias4="inet 202.0.75.17 netmask 255.255.255.240" ifconfig_fxp0_alias5="inet 202.0.75.18 netmask 255.255.255.255" ifconfig_fxp0_alias6="inet 202.0.75.19 netmask 255.255.255.255" ifconfig_fxp0_alias7="inet 202.0.75.20 netmask 255.255.255.255"
A simpler way to express this is with a space-separated list of IP address ranges. The first address will be given the indicated subnet mask and the additional addresses will have a subnet mask of 255.255.255.255.
ifconfig_fxp0_aliases="inet 10.1.1.1-5/24 inet 202.0.75.17-20/28"
Generating and reading system logs is an important aspect of system administration. The information in system logs can be used to detect hardware and software issues as well as application and system configuration errors. This information also plays an important role in security auditing and incident response. Most system daemons and applications will generate log entries.
FreeBSD provides a system logger, syslogd, to manage logging. By default, syslogd is started when the system boots. This is controlled by the variable syslogd_enable in /etc/rc.conf. There are numerous application arguments that can be set using syslogd_flags in /etc/rc.conf. Refer to syslogd(8) for more information on the available arguments.
This section describes how to configure the FreeBSD system logger for both local and remote logging and how to perform log rotation and log management.
The configuration file, /etc/syslog.conf, controls what syslogd does with log entries as they are received. There are several parameters to control the handling of incoming events. The facility describes which subsystem generated the message, such as the kernel or a daemon, and the level describes the severity of the event that occurred. This makes it possible to configure if and where a log message is logged, depending on the facility and level. It is also possible to take action depending on the application that sent the message, and in the case of remote logging, the hostname of the machine generating the logging event.
This configuration file contains one line per action, where the syntax for each line is a selector field followed by an action field. The syntax of the selector field is facility.level which will match log messages from facility at level level or higher. It is also possible to add an optional comparison flag before the level to specify more precisely what is logged. Multiple selector fields can be used for the same action, and are separated with a semicolon (;). Using * will match everything. The action field denotes where to send the log message, such as to a file or remote log host. As an example, here is the default syslog.conf from FreeBSD:
# $FreeBSD$ # # Spaces ARE valid field separators in this file. However, # other *nix-like systems still insist on using tabs as field # separators. If you are sharing this file between systems, you # may want to use only tabs as field separators here. # Consult the syslog.conf(5) manpage. *.err;kern.warning;auth.notice;mail.crit /dev/console *.notice;authpriv.none;kern.debug;lpr.info;mail.crit;news.err /var/log/messages security.* /var/log/security auth.info;authpriv.info /var/log/auth.log mail.info /var/log/maillog lpr.info /var/log/lpd-errs ftp.info /var/log/xferlog cron.* /var/log/cron !-devd *.=debug /var/log/debug.log *.emerg * # uncomment this to log all writes to /dev/console to /var/log/console.log #console.info /var/log/console.log # uncomment this to enable logging of all log messages to /var/log/all.log # touch /var/log/all.log and chmod it to mode 600 before it will work #*.* /var/log/all.log # uncomment this to enable logging to a remote loghost named loghost #*.* @loghost # uncomment these if you're running inn # news.crit /var/log/news/news.crit # news.err /var/log/news/news.err # news.notice /var/log/news/news.notice # Uncomment this if you wish to see messages produced by devd # !devd # *.>=info !ppp *.* /var/log/ppp.log !*
In this example:
Line 8 matches all messages with a level of err or higher, as well as kern.warning, auth.notice and mail.crit, and sends these log messages to the console (/dev/console).
Line 12 matches all messages from the mail facility at level info or above and logs the messages to /var/log/maillog.
Line 17 uses a comparison flag (=) to only match messages at level debug and logs them to /var/log/debug.log.
Line 33 is an example usage of a program specification. This makes the rules following it only valid for the specified program. In this case, only the messages generated by ppp are logged to /var/log/ppp.log.
The available levels, in order from most to least critical are emerg, alert, crit, err, warning, notice, info, and debug.
The facilities, in no particular order, are auth, authpriv, console, cron, daemon, ftp, kern, lpr, mail, mark, news, security, syslog, user, uucp, and local0 through local7. Be aware that other operating systems might have different facilities.
To log everything of level notice and higher to /var/log/daemon.log, add the following entry:
daemon.notice /var/log/daemon.log
For more information about the different levels and facilities, refer to syslog(3) and syslogd(8). For more information about /etc/syslog.conf, its syntax, and more advanced usage examples, see syslog.conf(5).
Log files can grow quickly, taking up disk space and making it more difficult to locate useful information. Log management attempts to mitigate this. In FreeBSD, newsyslog is used to manage log files. This built-in program periodically rotates and compresses log files, and optionally creates missing log files and signals programs when log files are moved. The log files may be generated by syslogd or by any other program which generates log files. While newsyslog is normally run from cron(8), it is not a system daemon. In the default configuration, it runs every hour.
To know which actions to take, newsyslog reads its configuration file, /etc/newsyslog.conf. This file contains one line for each log file that newsyslog manages. Each line states the file owner, permissions, when to rotate that file, optional flags that affect log rotation, such as compression, and programs to signal when the log is rotated. Here is the default configuration in FreeBSD:
# configuration file for newsyslog # $FreeBSD$ # # Entries which do not specify the '/pid_file' field will cause the # syslogd process to be signalled when that log file is rotated. This # action is only appropriate for log files which are written to by the # syslogd process (ie, files listed in /etc/syslog.conf). If there # is no process which needs to be signalled when a given log file is # rotated, then the entry for that file should include the 'N' flag. # # The 'flags' field is one or more of the letters: BCDGJNUXZ or a '-'. # # Note: some sites will want to select more restrictive protections than the # defaults. In particular, it may be desirable to switch many of the 644 # entries to 640 or 600. For example, some sites will consider the # contents of maillog, messages, and lpd-errs to be confidential. In the # future, these defaults may change to more conservative ones. # # logfilename [owner:group] mode count size when flags [/pid_file] [sig_num] /var/log/all.log 600 7 * @T00 J /var/log/amd.log 644 7 100 * J /var/log/auth.log 600 7 100 @0101T JC /var/log/console.log 600 5 100 * J /var/log/cron 600 3 100 * JC /var/log/daily.log 640 7 * @T00 JN /var/log/debug.log 600 7 100 * JC /var/log/kerberos.log 600 7 100 * J /var/log/lpd-errs 644 7 100 * JC /var/log/maillog 640 7 * @T00 JC /var/log/messages 644 5 100 @0101T JC /var/log/monthly.log 640 12 * $M1D0 JN /var/log/pflog 600 3 100 * JB /var/run/pflogd.pid /var/log/ppp.log root:network 640 3 100 * JC /var/log/devd.log 644 3 100 * JC /var/log/security 600 10 100 * JC /var/log/sendmail.st 640 10 * 168 B /var/log/utx.log 644 3 * @01T05 B /var/log/weekly.log 640 5 1 $W6D0 JN /var/log/xferlog 600 7 100 * JC
Each line starts with the name of the log to be rotated, optionally followed by an owner and group for both rotated and newly created files. The mode field sets the permissions on the log file and count denotes how many rotated log files should be kept. The size and when fields tell newsyslog when to rotate the file. A log file is rotated when either its size is larger than the size field or when the time in the when field has passed. An asterisk (*) means that this field is ignored. The flags field gives further instructions, such as how to compress the rotated file or to create the log file if it is missing. The last two fields are optional and specify the name of the Process ID (PID) file of a process and a signal number to send to that process when the file is rotated.
For more information on all fields, valid flags, and how to specify the rotation time, refer to newsyslog.conf(5). Since newsyslog is run from cron(8), it cannot rotate files more often than it is scheduled to run from cron(8).
Monitoring the log files of multiple hosts can become unwieldy as the number of systems increases. Configuring centralized logging can reduce some of the administrative burden of log file administration.
In FreeBSD, centralized log file aggregation, merging, and rotation can be configured using syslogd and newsyslog. This section demonstrates an example configuration, where host A, named logserv.example.com, will collect logging information for the local network. Host B, named logclient.example.com, will be configured to pass logging information to the logging server.
A log server is a system that has been configured to accept logging information from other hosts. Before configuring a log server, check the following:
If there is a firewall between the logging server and any logging clients, ensure that the firewall ruleset allows UDP port 514 for both the clients and the server.
The logging server and all client machines must have forward and reverse entries in the local DNS. If the network does not have a DNS server, create entries in each system’s /etc/hosts. Proper name resolution is required so that log entries are not rejected by the logging server.
On the log server, edit /etc/syslog.conf to specify the name of the client to receive log entries from, the logging facility to be used, and the name of the log to store the host’s log entries. This example adds the hostname of B, logs all facilities, and stores the log entries in /var/log/logclient.log.
+logclient.example.com *.* /var/log/logclient.log
When adding multiple log clients, add a similar two-line entry for each client. More information about the available facilities may be found in syslog.conf(5).
Next, configure /etc/rc.conf:
syslogd_enable="YES" syslogd_flags="-a logclient.example.com -v -v"
The first entry starts syslogd at system boot. The second entry allows log entries from the specified client. The -v -v increases the verbosity of logged messages. This is useful for tweaking facilities as administrators are able to see what type of messages are being logged under each facility.
Multiple -a options may be specified to allow logging from multiple clients. IP addresses and whole netblocks may also be specified. Refer to syslogd(8) for a full list of possible options.
Finally, create the log file:
# touch /var/log/logclient.logAt this point, syslogd should be restarted and verified:
# service syslogd restart
# pgrep syslogIf a PID is returned, the server restarted successfully, and client configuration can begin. If the server did not restart, consult /var/log/messages for the error.
A logging client sends log entries to a logging server on the network. The client also keeps a local copy of its own logs.
Once a logging server has been configured, edit /etc/rc.conf on the logging client:
syslogd_enable="YES" syslogd_flags="-s -v -v"
The first entry enables syslogd on boot up. The second entry prevents logs from being accepted by this client from other hosts (-s) and increases the verbosity of logged messages.
Next, define the logging server in the client’s /etc/syslog.conf. In this example, all logged facilities are sent to a remote system, denoted by the @ symbol, with the specified hostname:
*.* @logserv.example.com
After saving the edit, restart syslogd for the changes to take effect:
# service syslogd restartTo test that log messages are being sent across the network, use logger(1) on the client to send a message to syslogd:
# logger "Test message from logclient"This message should now exist both in /var/log/messages on the client and /var/log/logclient.log on the log server.
If no messages are being received on the log server, the cause is most likely a network connectivity issue, a hostname resolution issue, or a typo in a configuration file. To isolate the cause, ensure that both the logging server and the logging client are able to ping each other using the hostname specified in their /etc/rc.conf. If this fails, check the network cabling, the firewall ruleset, and the hostname entries in the DNS server or /etc/hosts on both the logging server and clients. Repeat until the ping is successful from both hosts.
If the ping succeeds on both hosts but log messages are still not being received, temporarily increase logging verbosity to narrow down the configuration issue. In the following example, /var/log/logclient.log on the logging server is empty and /var/log/messages on the logging client does not indicate a reason for the failure. To increase debugging output, edit the syslogd_flags entry on the logging server and issue a restart:
syslogd_flags="-d -a logclient.example.com -v -v"
# service syslogd restartDebugging data similar to the following will flash on the console immediately after the restart:
logmsg: pri 56, flags 4, from logserv.example.com, msg syslogd: restart
syslogd: restarted
logmsg: pri 6, flags 4, from logserv.example.com, msg syslogd: kernel boot file is /boot/kernel/kernel
Logging to FILE /var/log/messages
syslogd: kernel boot file is /boot/kernel/kernel
cvthname(192.168.1.10)
validate: dgram from IP 192.168.1.10, port 514, name logclient.example.com;
rejected in rule 0 due to name mismatch.In this example, the log messages are being rejected due to a typo which results in a hostname mismatch. The client’s hostname should be logclient, not logclien. Fix the typo, issue a restart, and verify the results:
# service syslogd restart
logmsg: pri 56, flags 4, from logserv.example.com, msg syslogd: restart
syslogd: restarted
logmsg: pri 6, flags 4, from logserv.example.com, msg syslogd: kernel boot file is /boot/kernel/kernel
syslogd: kernel boot file is /boot/kernel/kernel
logmsg: pri 166, flags 17, from logserv.example.com,
msg Dec 10 20:55:02 <syslog.err> logserv.example.com syslogd: exiting on signal 2
cvthname(192.168.1.10)
validate: dgram from IP 192.168.1.10, port 514, name logclient.example.com;
accepted in rule 0.
logmsg: pri 15, flags 0, from logclient.example.com, msg Dec 11 02:01:28 trhodes: Test message 2
Logging to FILE /var/log/logclient.log
Logging to FILE /var/log/messagesAt this point, the messages are being properly received and placed in the correct file.
As with any network service, security requirements should be considered before implementing a logging server. Log files may contain sensitive data about services enabled on the local host, user accounts, and configuration data. Network data sent from the client to the server will not be encrypted or password protected. If a need for encryption exists, consider using security/stunnel, which will transmit the logging data over an encrypted tunnel.
Local security is also an issue. Log files are not encrypted during use or after log rotation. Local users may access log files to gain additional insight into system configuration. Setting proper permissions on log files is critical. The built-in log rotator, newsyslog, supports setting permissions on newly created and rotated log files. Setting log files to mode 600 should prevent unwanted access by local users. Refer to newsyslog.conf(5) for additional information.
There are a number of directories in which configuration information is kept. These include:
/etc | Generic system-specific configuration information. |
/etc/defaults | Default versions of system configuration files. |
/etc/mail | Extra sendmail(8) configuration and other MTA configuration files. |
/etc/ppp | Configuration for both user- and kernel-ppp programs. |
/usr/local/etc | Configuration files for installed applications. May contain per-application subdirectories. |
/usr/local/etc/rc.d | rc(8) scripts for installed applications. |
/var/db | Automatically generated system-specific database files, such as the package database and the locate(1) database. |
How a FreeBSD system accesses the Internet Domain Name System (DNS) is controlled by resolv.conf(5).
The most common entries to /etc/resolv.conf are:
| The IP address of a name server the resolver should query. The servers are queried in the order listed with a maximum of three. |
| Search list for hostname lookup. This is normally determined by the domain of the local hostname. |
| The local domain name. |
A typical /etc/resolv.conf looks like this:
search example.com nameserver 147.11.1.11 nameserver 147.11.100.30
Only one of the |
When using DHCP, dhclient(8) usually rewrites /etc/resolv.conf with information received from the DHCP server.
/etc/hosts is a simple text database which works in conjunction with DNS and NIS to provide host name to IP address mappings. Entries for local computers connected via a LAN can be added to this file for simplistic naming purposes instead of setting up a named(8) server. Additionally, /etc/hosts can be used to provide a local record of Internet names, reducing the need to query external DNS servers for commonly accessed names.
# $FreeBSD$ # # # Host Database # # This file should contain the addresses and aliases for local hosts that # share this file. Replace 'my.domain' below with the domainname of your # machine. # # In the presence of the domain name service or NIS, this file may # not be consulted at all; see /etc/nsswitch.conf for the resolution order. # # ::1 localhost localhost.my.domain 127.0.0.1 localhost localhost.my.domain # # Imaginary network. #10.0.0.2 myname.my.domain myname #10.0.0.3 myfriend.my.domain myfriend # # According to RFC 1918, you can use the following IP networks for # private nets which will never be connected to the Internet: # # 10.0.0.0 - 10.255.255.255 # 172.16.0.0 - 172.31.255.255 # 192.168.0.0 - 192.168.255.255 # # In case you want to be able to connect to the Internet, you need # real official assigned numbers. Do not try to invent your own network # numbers but instead get one from your network provider (if any) or # from your regional registry (ARIN, APNIC, LACNIC, RIPE NCC, or AfriNIC.) #
The format of /etc/hosts is as follows:
[Internet address] [official hostname] [alias1] [alias2] ...
For example:
10.0.0.1 myRealHostname.example.com myRealHostname foobar1 foobar2
Consult hosts(5) for more information.
sysctl(8) is used to make changes to a running FreeBSD system. This includes many advanced options of the TCP/IP stack and virtual memory system that can dramatically improve performance for an experienced system administrator. Over five hundred system variables can be read and set using sysctl(8).
At its core, sysctl(8) serves two functions: to read and to modify system settings.
To view all readable variables:
% sysctl -aTo read a particular variable, specify its name:
% sysctl kern.maxproc
kern.maxproc: 1044To set a particular variable, use the variable=value syntax:
# sysctl kern.maxfiles=5000
kern.maxfiles: 2088 -> 5000Settings of sysctl variables are usually either strings, numbers, or booleans, where a boolean is 1 for yes or 0 for no.
To automatically set some variables each time the machine boots, add them to /etc/sysctl.conf. For more information, refer to sysctl.conf(5) and sysctl.conf.
The configuration file for sysctl(8), /etc/sysctl.conf, looks much like /etc/rc.conf. Values are set in a variable=value form. The specified values are set after the system goes into multi-user mode. Not all variables are settable in this mode.
For example, to turn off logging of fatal signal exits and prevent users from seeing processes started by other users, the following tunables can be set in /etc/sysctl.conf:
# Do not log fatal signal exits (e.g., sig 11) kern.logsigexit=0 # Prevent users from seeing information about processes that # are being run under another UID. security.bsd.see_other_uids=0
In some cases it may be desirable to modify read-only sysctl(8) values, which will require a reboot of the system.
For instance, on some laptop models the cardbus(4) device will not probe memory ranges and will fail with errors similar to:
cbb0: Could not map register memory
device_probe_and_attach: cbb0 attach returned 12The fix requires the modification of a read-only sysctl(8) setting. Add hw.pci.allow_unsupported_io_range=1 to /boot/loader.conf and reboot. Now cardbus(4) should work properly.
The following section will discuss various tuning mechanisms and options which may be applied to disk devices. In many cases, disks with mechanical parts, such as SCSI drives, will be the bottleneck driving down the overall system performance. While a solution is to install a drive without mechanical parts, such as a solid state drive, mechanical drives are not going away anytime in the near future. When tuning disks, it is advisable to utilize the features of the iostat(8) command to test various changes to the system. This command will allow the user to obtain valuable information on system IO.
vfs.vmiodirenableThe vfs.vmiodirenable sysctl(8) variable may be set to either 0 (off) or 1 (on). It is set to 1 by default. This variable controls how directories are cached by the system. Most directories are small, using just a single fragment (typically 1 K) in the file system and typically 512 bytes in the buffer cache. With this variable turned off, the buffer cache will only cache a fixed number of directories, even if the system has a huge amount of memory. When turned on, this sysctl(8) allows the buffer cache to use the VM page cache to cache the directories, making all the memory available for caching directories. However, the minimum in-core memory used to cache a directory is the physical page size (typically 4 K) rather than 512 bytes. Keeping this option enabled is recommended if the system is running any services which manipulate large numbers of files. Such services can include web caches, large mail systems, and news systems. Keeping this option on will generally not reduce performance, even with the wasted memory, but one should experiment to find out.
vfs.write_behindThe vfs.write_behind sysctl(8) variable defaults to 1 (on). This tells the file system to issue media writes as full clusters are collected, which typically occurs when writing large sequential files. This avoids saturating the buffer cache with dirty buffers when it would not benefit I/O performance. However, this may stall processes and under certain circumstances should be turned off.
vfs.hirunningspaceThe vfs.hirunningspace sysctl(8) variable determines how much outstanding write I/O may be queued to disk controllers system-wide at any given instance. The default is usually sufficient, but on machines with many disks, try bumping it up to four or five megabytes. Setting too high a value which exceeds the buffer cache’s write threshold can lead to bad clustering performance. Do not set this value arbitrarily high as higher write values may add latency to reads occurring at the same time.
There are various other buffer cache and VM page cache related sysctl(8) values. Modifying these values is not recommended as the VM system does a good job of automatically tuning itself.
vm.swap_idle_enabledThe vm.swap_idle_enabled sysctl(8) variable is useful in large multi-user systems with many active login users and lots of idle processes. Such systems tend to generate continuous pressure on free memory reserves. Turning this feature on and tweaking the swapout hysteresis (in idle seconds) via vm.swap_idle_threshold1 and vm.swap_idle_threshold2 depresses the priority of memory pages associated with idle processes more quickly then the normal pageout algorithm. This gives a helping hand to the pageout daemon. Only turn this option on if needed, because the tradeoff is essentially pre-page memory sooner rather than later which eats more swap and disk bandwidth. In a small system this option will have a determinable effect, but in a large system that is already doing moderate paging, this option allows the VM system to stage whole processes into and out of memory easily.
hw.ata.wcTurning off IDE write caching reduces write bandwidth to IDE disks, but may sometimes be necessary due to data consistency issues introduced by hard drive vendors. The problem is that some IDE drives lie about when a write completes. With IDE write caching turned on, IDE hard drives write data to disk out of order and will sometimes delay writing some blocks indefinitely when under heavy disk load. A crash or power failure may cause serious file system corruption. Check the default on the system by observing the hw.ata.wc sysctl(8) variable. If IDE write caching is turned off, one can set this read-only variable to 1 in /boot/loader.conf in order to enable it at boot time.
For more information, refer to ata(4).
SCSI_DELAY (kern.cam.scsi_delay)The SCSI_DELAY kernel configuration option may be used to reduce system boot times. The defaults are fairly high and can be responsible for 15 seconds of delay in the boot process. Reducing it to 5 seconds usually works with modern drives. The kern.cam.scsi_delay boot time tunable should be used. The tunable and kernel configuration option accept values in terms of milliseconds and not seconds.
To fine-tune a file system, use tunefs(8). This program has many different options. To toggle Soft Updates on and off, use:
# tunefs -n enable /filesystem
# tunefs -n disable /filesystemA file system cannot be modified with tunefs(8) while it is mounted. A good time to enable Soft Updates is before any partitions have been mounted, in single-user mode.
Soft Updates is recommended for UFS file systems as it drastically improves meta-data performance, mainly file creation and deletion, through the use of a memory cache. There are two downsides to Soft Updates to be aware of. First, Soft Updates guarantee file system consistency in the case of a crash, but could easily be several seconds or even a minute behind updating the physical disk. If the system crashes, unwritten data may be lost. Secondly, Soft Updates delay the freeing of file system blocks. If the root file system is almost full, performing a major update, such as make installworld, can cause the file system to run out of space and the update to fail.
Meta-data updates are updates to non-content data like inodes or directories. There are two traditional approaches to writing a file system’s meta-data back to disk.
Historically, the default behavior was to write out meta-data updates synchronously. If a directory changed, the system waited until the change was actually written to disk. The file data buffers (file contents) were passed through the buffer cache and backed up to disk later on asynchronously. The advantage of this implementation is that it operates safely. If there is a failure during an update, meta-data is always in a consistent state. A file is either created completely or not at all. If the data blocks of a file did not find their way out of the buffer cache onto the disk by the time of the crash, fsck(8) recognizes this and repairs the file system by setting the file length to 0. Additionally, the implementation is clear and simple. The disadvantage is that meta-data changes are slow. For example, rm -r touches all the files in a directory sequentially, but each directory change will be written synchronously to the disk. This includes updates to the directory itself, to the inode table, and possibly to indirect blocks allocated by the file. Similar considerations apply for unrolling large hierarchies using tar -x.
The second approach is to use asynchronous meta-data updates. This is the default for a UFS file system mounted with mount -o async. Since all meta-data updates are also passed through the buffer cache, they will be intermixed with the updates of the file content data. The advantage of this implementation is there is no need to wait until each meta-data update has been written to disk, so all operations which cause huge amounts of meta-data updates work much faster than in the synchronous case. This implementation is still clear and simple, so there is a low risk for bugs creeping into the code. The disadvantage is that there is no guarantee for a consistent state of the file system. If there is a failure during an operation that updated large amounts of meta-data, like a power failure or someone pressing the reset button, the file system will be left in an unpredictable state. There is no opportunity to examine the state of the file system when the system comes up again as the data blocks of a file could already have been written to the disk while the updates of the inode table or the associated directory were not. It is impossible to implement a fsck(8) which is able to clean up the resulting chaos because the necessary information is not available on the disk. If the file system has been damaged beyond repair, the only choice is to reformat it and restore from backup.
The usual solution for this problem is to implement dirty region logging, which is also referred to as journaling. Meta-data updates are still written synchronously, but only into a small region of the disk. Later on, they are moved to their proper location. Because the logging area is a small, contiguous region on the disk, there are no long distances for the disk heads to move, even during heavy operations, so these operations are quicker than synchronous updates. Additionally, the complexity of the implementation is limited, so the risk of bugs being present is low. A disadvantage is that all meta-data is written twice, once into the logging region and once to the proper location, so performance "pessimization" might result. On the other hand, in case of a crash, all pending meta-data operations can be either quickly rolled back or completed from the logging area after the system comes up again, resulting in a fast file system startup.
Kirk McKusick, the developer of Berkeley FFS, solved this problem with Soft Updates. All pending meta-data updates are kept in memory and written out to disk in a sorted sequence ("ordered meta-data updates"). This has the effect that, in case of heavy meta-data operations, later updates to an item "catch" the earlier ones which are still in memory and have not already been written to disk. All operations are generally performed in memory before the update is written to disk and the data blocks are sorted according to their position so that they will not be on the disk ahead of their meta-data. If the system crashes, an implicit "log rewind" causes all operations which were not written to the disk appear as if they never happened. A consistent file system state is maintained that appears to be the one of 30 to 60 seconds earlier. The algorithm used guarantees that all resources in use are marked as such in their blocks and inodes. After a crash, the only resource allocation error that occurs is that resources are marked as "used" which are actually "free". fsck(8) recognizes this situation, and frees the resources that are no longer used. It is safe to ignore the dirty state of the file system after a crash by forcibly mounting it with mount -f. In order to free resources that may be unused, fsck(8) needs to be run at a later time. This is the idea behind the background fsck(8): at system startup time, only a snapshot of the file system is recorded and fsck(8) is run afterwards. All file systems can then be mounted "dirty", so the system startup proceeds in multi-user mode. Then, background fsck(8) is scheduled for all file systems where this is required, to free resources that may be unused. File systems that do not use Soft Updates still need the usual foreground fsck(8).
The advantage is that meta-data operations are nearly as fast as asynchronous updates and are faster than logging, which has to write the meta-data twice. The disadvantages are the complexity of the code, a higher memory consumption, and some idiosyncrasies. After a crash, the state of the file system appears to be somewhat "older". In situations where the standard synchronous approach would have caused some zero-length files to remain after the fsck(8), these files do not exist at all with Soft Updates because neither the meta-data nor the file contents have been written to disk. Disk space is not released until the updates have been written to disk, which may take place some time after running rm(1). This may cause problems when installing large amounts of data on a file system that does not have enough free space to hold all the files twice.
kern.maxfilesThe kern.maxfiles sysctl(8) variable can be raised or lowered based upon system requirements. This variable indicates the maximum number of file descriptors on the system. When the file descriptor table is full, file: table is full will show up repeatedly in the system message buffer, which can be viewed using dmesg(8).
Each open file, socket, or fifo uses one file descriptor. A large-scale production server may easily require many thousands of file descriptors, depending on the kind and number of services running concurrently.
In older FreeBSD releases, the default value of kern.maxfiles is derived from maxusers in the kernel configuration file. kern.maxfiles grows proportionally to the value of maxusers. When compiling a custom kernel, consider setting this kernel configuration option according to the use of the system. From this number, the kernel is given most of its pre-defined limits. Even though a production machine may not have 256 concurrent users, the resources needed may be similar to a high-scale web server.
The read-only sysctl(8) variable kern.maxusers is automatically sized at boot based on the amount of memory available in the system, and may be determined at run-time by inspecting the value of kern.maxusers. Some systems require larger or smaller values of kern.maxusers and values of 64, 128, and 256 are not uncommon. Going above 256 is not recommended unless a huge number of file descriptors is needed. Many of the tunable values set to their defaults by kern.maxusers may be individually overridden at boot-time or run-time in /boot/loader.conf. Refer to loader.conf(5) and /boot/defaults/loader.conf for more details and some hints.
In older releases, the system will auto-tune maxusers if it is set to 0. [1]. When setting this option, set maxusers to at least 4, especially if the system runs Xorg or is used to compile software. The most important table set by maxusers is the maximum number of processes, which is set to 20 + 16 * maxusers. If maxusers is set to 1, there can only be 36 simultaneous processes, including the 18 or so that the system starts up at boot time and the 15 or so used by Xorg. Even a simple task like reading a manual page will start up nine processes to filter, decompress, and view it. Setting maxusers to 64 allows up to 1044 simultaneous processes, which should be enough for nearly all uses. If, however, the error is displayed when trying to start another program, or a server is running with a large number of simultaneous users, increase the number and rebuild.
|
kern.ipc.soacceptqueueThe kern.ipc.soacceptqueue sysctl(8) variable limits the size of the listen queue for accepting new TCP connections. The default value of 128 is typically too low for robust handling of new connections on a heavily loaded web server. For such environments, it is recommended to increase this value to 1024 or higher. A service such as sendmail(8), or Apache may itself limit the listen queue size, but will often have a directive in its configuration file to adjust the queue size. Large listen queues do a better job of avoiding Denial of Service (DoS) attacks.
The NMBCLUSTERS kernel configuration option dictates the amount of network Mbufs available to the system. A heavily-trafficked server with a low number of Mbufs will hinder performance. Each cluster represents approximately 2 K of memory, so a value of 1024 represents 2 megabytes of kernel memory reserved for network buffers. A simple calculation can be done to figure out how many are needed. A web server which maxes out at 1000 simultaneous connections where each connection uses a 6 K receive and 16 K send buffer, requires approximately 32 MB worth of network buffers to cover the web server. A good rule of thumb is to multiply by 2, so 2x32 MB / 2 KB = 64 MB / 2 kB = 32768. Values between 4096 and 32768 are recommended for machines with greater amounts of memory. Never specify an arbitrarily high value for this parameter as it could lead to a boot time crash. To observe network cluster usage, use -m with netstat(1).
The kern.ipc.nmbclusters loader tunable should be used to tune this at boot time. Only older versions of FreeBSD will require the use of the NMBCLUSTERS kernel config(8) option.
For busy servers that make extensive use of the sendfile(2) system call, it may be necessary to increase the number of sendfile(2) buffers via the NSFBUFS kernel configuration option or by setting its value in /boot/loader.conf (see loader(8) for details). A common indicator that this parameter needs to be adjusted is when processes are seen in the sfbufa state. The sysctl(8) variable kern.ipc.nsfbufs is read-only. This parameter nominally scales with kern.maxusers, however it may be necessary to tune accordingly.
Even though a socket has been marked as non-blocking, calling sendfile(2) on the non-blocking socket may result in the sendfile(2) call blocking until enough |
net.inet.ip.portrange.*The net.inet.ip.portrange.* sysctl(8) variables control the port number ranges automatically bound to TCP and UDP sockets. There are three ranges: a low range, a default range, and a high range. Most network programs use the default range which is controlled by net.inet.ip.portrange.first and net.inet.ip.portrange.last, which default to 1024 and 5000, respectively. Bound port ranges are used for outgoing connections and it is possible to run the system out of ports under certain circumstances. This most commonly occurs when running a heavily loaded web proxy. The port range is not an issue when running a server which handles mainly incoming connections, such as a web server, or has a limited number of outgoing connections, such as a mail relay. For situations where there is a shortage of ports, it is recommended to increase net.inet.ip.portrange.last modestly. A value of 10000, 20000 or 30000 may be reasonable. Consider firewall effects when changing the port range. Some firewalls may block large ranges of ports, usually low-numbered ports, and expect systems to use higher ranges of ports for outgoing connections. For this reason, it is not recommended that the value of net.inet.ip.portrange.first be lowered.
TCP Bandwidth Delay ProductTCP bandwidth delay product limiting can be enabled by setting the net.inet.tcp.inflight.enable sysctl(8) variable to 1. This instructs the system to attempt to calculate the bandwidth delay product for each connection and limit the amount of data queued to the network to just the amount required to maintain optimum throughput.
This feature is useful when serving data over modems, Gigabit Ethernet, high speed WAN links, or any other link with a high bandwidth delay product, especially when also using window scaling or when a large send window has been configured. When enabling this option, also set net.inet.tcp.inflight.debug to 0 to disable debugging. For production use, setting net.inet.tcp.inflight.min to at least 6144 may be beneficial. Setting high minimums may effectively disable bandwidth limiting, depending on the link. The limiting feature reduces the amount of data built up in intermediate route and switch packet queues and reduces the amount of data built up in the local host’s interface queue. With fewer queued packets, interactive connections, especially over slow modems, will operate with lower Round Trip Times. This feature only effects server side data transmission such as uploading. It has no effect on data reception or downloading.
Adjusting net.inet.tcp.inflight.stab is not recommended. This parameter defaults to 20, representing 2 maximal packets added to the bandwidth delay product window calculation. The additional window is required to stabilize the algorithm and improve responsiveness to changing conditions, but it can also result in higher ping(8) times over slow links, though still much lower than without the inflight algorithm. In such cases, try reducing this parameter to 15, 10, or 5 and reducing net.inet.tcp.inflight.min to a value such as 3500 to get the desired effect. Reducing these parameters should be done as a last resort only.
kern.maxvnodesA vnode is the internal representation of a file or directory. Increasing the number of vnodes available to the operating system reduces disk I/O. Normally, this is handled by the operating system and does not need to be changed. In some cases where disk I/O is a bottleneck and the system is running out of vnodes, this setting needs to be increased. The amount of inactive and free RAM will need to be taken into account.
To see the current number of vnodes in use:
# sysctl vfs.numvnodes
vfs.numvnodes: 91349To see the maximum vnodes:
# sysctl kern.maxvnodes
kern.maxvnodes: 100000If the current vnode usage is near the maximum, try increasing kern.maxvnodes by a value of 1000. Keep an eye on the number of vfs.numvnodes. If it climbs up to the maximum again, kern.maxvnodes will need to be increased further. Otherwise, a shift in memory usage as reported by top(1) should be visible and more memory should be active.
Sometimes a system requires more swap space. This section describes two methods to increase swap space: adding swap to an existing partition or new hard drive, and creating a swap file on an existing partition.
For information on how to encrypt swap space, which options exist, and why it should be done, refer to “Encrypting Swap”.
Adding a new hard drive for swap gives better performance than using a partition on an existing drive. Setting up partitions and hard drives is explained in “Adding Disks” while “Designing the Partition Layout” discusses partition layouts and swap partition size considerations.
Use swapon to add a swap partition to the system. For example:
# swapon /dev/ada1s1bIt is possible to use any partition not currently mounted, even if it already contains data. Using |
To automatically add this swap partition on boot, add an entry to /etc/fstab:
/dev/ada1s1b none swap sw 0 0
These examples create a 512M swap file called /usr/swap0 instead of using a partition.
Using swap files requires that the module needed by md(4) has either been built into the kernel or has been loaded before swap is enabled. See Configuring the FreeBSD Kernel for information about building a custom kernel.
Create the swap file:
# dd if=/dev/zero of=/usr/swap0 bs=1m count=512Set the proper permissions on the new file:
# chmod 0600 /usr/swap0Inform the system about the swap file by adding a line to /etc/fstab:
md99 none swap sw,file=/usr/swap0,late 0 0
The md(4) device md99 is used, leaving lower device numbers available for interactive use.
Swap space will be added on system startup. To add swap space immediately, use swapon(8):
# swapon -aLIt is important to utilize hardware resources in an efficient manner. Power and resource management allows the operating system to monitor system limits and to possibly provide an alert if the system temperature increases unexpectedly. An early specification for providing power management was the Advanced Power Management (APM) facility. APM controls the power usage of a system based on its activity. However, it was difficult and inflexible for operating systems to manage the power usage and thermal properties of a system. The hardware was managed by the BIOS and the user had limited configurability and visibility into the power management settings. The APMBIOS is supplied by the vendor and is specific to the hardware platform. An APM driver in the operating system mediates access to the APM Software Interface, which allows management of power levels.
There are four major problems in APM. First, power management is done by the vendor-specific BIOS, separate from the operating system. For example, the user can set idle-time values for a hard drive in the APMBIOS so that, when exceeded, the BIOS spins down the hard drive without the consent of the operating system. Second, the APM logic is embedded in the BIOS, and it operates outside the scope of the operating system. This means that users can only fix problems in the APMBIOS by flashing a new one into the ROM, which is a dangerous procedure with the potential to leave the system in an unrecoverable state if it fails. Third, APM is a vendor-specific technology, meaning that there is a lot of duplication of efforts and bugs found in one vendor’s BIOS may not be solved in others. Lastly, the APMBIOS did not have enough room to implement a sophisticated power policy or one that can adapt well to the purpose of the machine.
The Plug and Play BIOS (PNPBIOS) was unreliable in many situations. PNPBIOS is 16-bit technology, so the operating system has to use 16-bit emulation in order to interface with PNPBIOS methods. FreeBSD provides an APM driver as APM should still be used for systems manufactured at or before the year 2000. The driver is documented in apm(4).
The successor to APM is the Advanced Configuration and Power Interface (ACPI). ACPI is a standard written by an alliance of vendors to provide an interface for hardware resources and power management. It is a key element in Operating System-directed configuration and Power Management as it provides more control and flexibility to the operating system.
This chapter demonstrates how to configure ACPI on FreeBSD. It then offers some tips on how to debug ACPI and how to submit a problem report containing debugging information so that developers can diagnosis and fix ACPI issues.
In FreeBSD the acpi(4) driver is loaded by default at system boot and should not be compiled into the kernel. This driver cannot be unloaded after boot because the system bus uses it for various hardware interactions. However, if the system is experiencing problems, ACPI can be disabled altogether by rebooting after setting hint.acpi.0.disabled="1" in /boot/loader.conf or by setting this variable at the loader prompt, as described in “Stage Three”.
ACPI and APM cannot coexist and should be used separately. The last one to load will terminate if the driver notices the other is running. |
ACPI can be used to put the system into a sleep mode with acpiconf, the -s flag, and a number from 1 to 5. Most users only need 1 (quick suspend to RAM) or 3 (suspend to RAM). Option 5 performs a soft-off which is the same as running halt -p.
Other options are available using sysctl. Refer to acpi(4) and acpiconf(8) for more information.
ACPI is present in all modern computers that conform to the ia32 (x86) and amd64 (AMD) architectures. The full standard has many features including CPU performance management, power planes control, thermal zones, various battery systems, embedded controllers, and bus enumeration. Most systems implement less than the full standard. For instance, a desktop system usually only implements bus enumeration while a laptop might have cooling and battery management support as well. Laptops also have suspend and resume, with their own associated complexity.
An ACPI-compliant system has various components. The BIOS and chipset vendors provide various fixed tables, such as FADT, in memory that specify things like the APIC map (used for SMP), config registers, and simple configuration values. Additionally, a bytecode table, the Differentiated System Description Table DSDT, specifies a tree-like name space of devices and methods.
The ACPI driver must parse the fixed tables, implement an interpreter for the bytecode, and modify device drivers and the kernel to accept information from the ACPI subsystem. For FreeBSD, Intel® has provided an interpreter (ACPI-CA) that is shared with Linux® and NetBSD. The path to the ACPI-CA source code is src/sys/contrib/dev/acpica. The glue code that allows ACPI-CA to work on FreeBSD is in src/sys/dev/acpica/Osd. Finally, drivers that implement various ACPI devices are found in src/sys/dev/acpica.
For ACPI to work correctly, all the parts have to work correctly. Here are some common problems, in order of frequency of appearance, and some possible workarounds or fixes. If a fix does not resolve the issue, refer to Getting and Submitting Debugging Info for instructions on how to submit a bug report.
In some cases, resuming from a suspend operation will cause the mouse to fail. A known work around is to add hint.psm.0.flags="0x3000" to /boot/loader.conf.
ACPI has three suspend to RAM (STR) states, S1-S3, and one suspend to disk state (STD), called S4. STD can be implemented in two separate ways. The S4BIOS is a BIOS-assisted suspend to disk and S4OS is implemented entirely by the operating system. The normal state the system is in when plugged in but not powered up is "soft off" (S5).
Use sysctl hw.acpi to check for the suspend-related items. These example results are from a Thinkpad:
hw.acpi.supported_sleep_state: S3 S4 S5
hw.acpi.s4bios: 0Use acpiconf -s to test S3, S4, and S5. An s4bios of one (1) indicates S4BIOS support instead of S4 operating system support.
When testing suspend/resume, start with S1, if supported. This state is most likely to work since it does not require much driver support. No one has implemented S2, which is similar to S1. Next, try S3. This is the deepest STR state and requires a lot of driver support to properly reinitialize the hardware.
A common problem with suspend/resume is that many device drivers do not save, restore, or reinitialize their firmware, registers, or device memory properly. As a first attempt at debugging the problem, try:
# sysctl debug.bootverbose=1
# sysctl debug.acpi.suspend_bounce=1
# acpiconf -s 3This test emulates the suspend/resume cycle of all device drivers without actually going into S3 state. In some cases, problems such as losing firmware state, device watchdog time out, and retrying forever, can be captured with this method. Note that the system will not really enter S3 state, which means devices may not lose power, and many will work fine even if suspend/resume methods are totally missing, unlike real S3 state.
Harder cases require additional hardware, such as a serial port and cable for debugging through a serial console, a Firewire port and cable for using dcons(4), and kernel debugging skills.
To help isolate the problem, unload as many drivers as possible. If it works, narrow down which driver is the problem by loading drivers until it fails again. Typically, binary drivers like nvidia.ko, display drivers, and USB will have the most problems while Ethernet interfaces usually work fine. If drivers can be properly loaded and unloaded, automate this by putting the appropriate commands in /etc/rc.suspend and /etc/rc.resume. Try setting hw.acpi.reset_video to 1 if the display is messed up after resume. Try setting longer or shorter values for hw.acpi.sleep_delay to see if that helps.
Try loading a recent Linux® distribution to see if suspend/resume works on the same hardware. If it works on Linux®, it is likely a FreeBSD driver problem. Narrowing down which driver causes the problem will assist developers in fixing the problem. Since the ACPI maintainers rarely maintain other drivers, such as sound or ATA, any driver problems should also be posted to the FreeBSD-CURRENT mailing list and mailed to the driver maintainer. Advanced users can include debugging printf(3)s in a problematic driver to track down where in its resume function it hangs.
Finally, try disabling ACPI and enabling APM instead. If suspend/resume works with APM, stick with APM, especially on older hardware (pre-2000). It took vendors a while to get ACPI support correct and older hardware is more likely to have BIOS problems with ACPI.
Most system hangs are a result of lost interrupts or an interrupt storm. Chipsets may have problems based on boot, how the BIOS configures interrupts before correctness of the APIC (MADT) table, and routing of the System Control Interrupt (SCI).
Interrupt storms can be distinguished from lost interrupts by checking the output of vmstat -i and looking at the line that has acpi0. If the counter is increasing at more than a couple per second, there is an interrupt storm. If the system appears hung, try breaking to DDB (CTRL+ALT+ESC on console) and type show interrupts.
When dealing with interrupt problems, try disabling APIC support with hint.apic.0.disabled="1" in /boot/loader.conf.
Panics are relatively rare for ACPI and are the top priority to be fixed. The first step is to isolate the steps to reproduce the panic, if possible, and get a backtrace. Follow the advice for enabling options DDB and setting up a serial console in “Entering the DDB Debugger from the Serial Line” or setting up a dump partition. To get a backtrace in DDB, use tr. When handwriting the backtrace, get at least the last five and the top five lines in the trace.
Then, try to isolate the problem by booting with ACPI disabled. If that works, isolate the ACPI subsystem by using various values of debug.acpi.disable. See acpi(4) for some examples.
First, try setting hw.acpi.disable_on_poweroff="0" in /boot/loader.conf. This keeps ACPI from disabling various events during the shutdown process. Some systems need this value set to 1 (the default) for the same reason. This usually fixes the problem of a system powering up spontaneously after a suspend or poweroff.
Some BIOS vendors provide incorrect or buggy bytecode. This is usually manifested by kernel console messages like this:
ACPI-1287: *** Error: Method execution failed [\\_SB_.PCI0.LPC0.FIGD._STA] \\
(Node 0xc3f6d160), AE_NOT_FOUNDOften, these problems may be resolved by updating the BIOS to the latest revision. Most console messages are harmless, but if there are other problems, like the battery status is not working, these messages are a good place to start looking for problems.
The BIOS bytecode, known as ACPI Machine Language (AML), is compiled from a source language called ACPI Source Language (ASL). The AML is found in the table known as the Differentiated System Description Table (DSDT).
The goal of FreeBSD is for everyone to have working ACPI without any user intervention. Workarounds are still being developed for common mistakes made by BIOS vendors. The Microsoft® interpreter (acpi.sys and acpiec.sys) does not strictly check for adherence to the standard, and thus many BIOS vendors who only test ACPI under Windows® never fix their ASL. FreeBSD developers continue to identify and document which non-standard behavior is allowed by Microsoft®'s interpreter and replicate it so that FreeBSD can work without forcing users to fix the ASL.
To help identify buggy behavior and possibly fix it manually, a copy can be made of the system’s ASL. To copy the system’s ASL to a specified file name, use acpidump with -t, to show the contents of the fixed tables, and -d, to disassemble the AML:
# acpidump -td > my.aslSome AML versions assume the user is running Windows®. To override this, set hw.acpi.osname="Windows 2009" in /boot/loader.conf, using the most recent Windows® version listed in the ASL.
Other workarounds may require my.asl to be customized. If this file is edited, compile the new ASL using the following command. Warnings can usually be ignored, but errors are bugs that will usually prevent ACPI from working correctly.
# iasl -f my.aslIncluding -f forces creation of the AML, even if there are errors during compilation. Some errors, such as missing return statements, are automatically worked around by the FreeBSD interpreter.
The default output filename for iasl is DSDT.aml. Load this file instead of the BIOS’s buggy copy, which is still present in flash memory, by editing /boot/loader.conf as follows:
acpi_dsdt_load="YES" acpi_dsdt_name="/boot/DSDT.aml"
Be sure to copy DSDT.aml to /boot, then reboot the system. If this fixes the problem, send a diff(1) of the old and new ASL to FreeBSD ACPI mailing list so that developers can work around the buggy behavior in acpica.
The ACPI driver has a flexible debugging facility. A set of subsystems and the level of verbosity can be specified. The subsystems to debug are specified as layers and are broken down into components (ACPI_ALL_COMPONENTS) and ACPI hardware support (ACPI_ALL_DRIVERS). The verbosity of debugging output is specified as the level and ranges from just report errors (ACPI_LV_ERROR) to everything (ACPI_LV_VERBOSE). The level is a bitmask so multiple options can be set at once, separated by spaces. In practice, a serial console should be used to log the output so it is not lost as the console message buffer flushes. A full list of the individual layers and levels is found in acpi(4).
Debugging output is not enabled by default. To enable it, add options ACPI_DEBUG to the custom kernel configuration file if ACPI is compiled into the kernel. Add ACPI_DEBUG=1 to /etc/make.conf to enable it globally. If a module is used instead of a custom kernel, recompile just the acpi.ko module as follows:
# cd /sys/modules/acpi/acpi && make clean && make ACPI_DEBUG=1Copy the compiled acpi.ko to /boot/kernel and add the desired level and layer to /boot/loader.conf. The entries in this example enable debug messages for all ACPI components and hardware drivers and output error messages at the least verbose level:
debug.acpi.layer="ACPI_ALL_COMPONENTS ACPI_ALL_DRIVERS" debug.acpi.level="ACPI_LV_ERROR"
If the required information is triggered by a specific event, such as a suspend and then resume, do not modify /boot/loader.conf. Instead, use sysctl to specify the layer and level after booting and preparing the system for the specific event. The variables which can be set using sysctl are named the same as the tunables in /boot/loader.conf.
Once the debugging information is gathered, it can be sent to FreeBSD ACPI mailing list so that it can be used by the FreeBSD ACPI maintainers to identify the root cause of the problem and to develop a solution.
Before submitting debugging information to this mailing list, ensure the latest BIOS version is installed and, if available, the embedded controller firmware version. |
When submitting a problem report, include the following information:
Description of the buggy behavior, including system type, model, and anything that causes the bug to appear. Note as accurately as possible when the bug began occurring if it is new.
The output of dmesg after running boot -v, including any error messages generated by the bug.
The dmesg output from boot -v with ACPI disabled, if disabling ACPI helps to fix the problem.
Output from sysctl hw.acpi. This lists which features the system offers.
The URL to a pasted version of the system’s ASL. Do not send the ASL directly to the list as it can be very large. Generate a copy of the ASL by running this command:
# acpidump -dt > name-system.aslSubstitute the login name for name and manufacturer/model for system. For example, use njl-FooCo6000.asl.
Most FreeBSD developers watch the FreeBSD-CURRENT mailing list, but one should submit problems to FreeBSD ACPI mailing list to be sure it is seen. Be patient when waiting for a response. If the bug is not immediately apparent, submit a bug report. When entering a PR, include the same information as requested above. This helps developers to track the problem and resolve it. Do not send a PR without emailing FreeBSD ACPI mailing list first as it is likely that the problem has been reported before.
More information about ACPI may be found in the following locations:
The FreeBSD ACPI Mailing List Archives (https://lists.freebsd.org/pipermail/freebsd-acpi/)
acpi(4), acpi_thermal(4), acpidump(8), iasl(8), and acpidb(8)
The process of starting a computer and loading the operating system is referred to as "the bootstrap process", or "booting". FreeBSD’s boot process provides a great deal of flexibility in customizing what happens when the system starts, including the ability to select from different operating systems installed on the same computer, different versions of the same operating system, or a different installed kernel.
This chapter details the configuration options that can be set. It demonstrates how to customize the FreeBSD boot process, including everything that happens until the FreeBSD kernel has started, probed for devices, and started init(8). This occurs when the text color of the boot messages changes from bright white to grey.
After reading this chapter, you will recognize:
The components of the FreeBSD bootstrap system and how they interact.
The options that can be passed to the components in the FreeBSD bootstrap in order to control the boot process.
How to configure a customized boot splash screen.
The basics of setting device hints.
How to boot into single- and multi-user mode and how to properly shut down a FreeBSD system.
This chapter only describes the boot process for FreeBSD running on x86 and amd64 systems. |
Turning on a computer and starting the operating system poses an interesting dilemma. By definition, the computer does not know how to do anything until the operating system is started. This includes running programs from the disk. If the computer can not run a program from the disk without the operating system, and the operating system programs are on the disk, how is the operating system started?
This problem parallels one in the book The Adventures of Baron Munchausen. A character had fallen part way down a manhole, and pulled himself out by grabbing his bootstraps and lifting. In the early days of computing, the term bootstrap was applied to the mechanism used to load the operating system. It has since become shortened to "booting".
On x86 hardware, the Basic Input/Output System (BIOS) is responsible for loading the operating system. The BIOS looks on the hard disk for the Master Boot Record (MBR), which must be located in a specific place on the disk. The BIOS has enough knowledge to load and run the MBR, and assumes that the MBR can then carry out the rest of the tasks involved in loading the operating system, possibly with the help of the BIOS.
FreeBSD provides for booting from both the older MBR standard, and the newer GUID Partition Table (GPT). GPT partitioning is often found on computers with the Unified Extensible Firmware Interface (UEFI). However, FreeBSD can boot from GPT partitions even on machines with only a legacy BIOS with gptboot(8). Work is under way to provide direct UEFI booting. |
The code within the MBR is typically referred to as a boot manager, especially when it interacts with the user. The boot manager usually has more code in the first track of the disk or within the file system. Examples of boot managers include the standard FreeBSD boot manager boot0, also called Boot Easy, and Grub, which is used by many Linux® distributions.
If only one operating system is installed, the MBR searches for the first bootable (active) slice on the disk, and then runs the code on that slice to load the remainder of the operating system. When multiple operating systems are present, a different boot manager can be installed to display a list of operating systems so the user can select one to boot.
The remainder of the FreeBSD bootstrap system is divided into three stages. The first stage knows just enough to get the computer into a specific state and run the second stage. The second stage can do a little bit more, before running the third stage. The third stage finishes the task of loading the operating system. The work is split into three stages because the MBR puts limits on the size of the programs that can be run at stages one and two. Chaining the tasks together allows FreeBSD to provide a more flexible loader.
The kernel is then started and begins to probe for devices and initialize them for use. Once the kernel boot process is finished, the kernel passes control to the user process init(8), which makes sure the disks are in a usable state, starts the user-level resource configuration which mounts file systems, sets up network cards to communicate on the network, and starts the processes which have been configured to run at startup.
This section describes these stages in more detail and demonstrates how to interact with the FreeBSD boot process.
The boot manager code in the MBR is sometimes referred to as stage zero of the boot process. By default, FreeBSD uses the boot0 boot manager.
The MBR installed by the FreeBSD installer is based on /boot/boot0. The size and capability of boot0 is restricted to 446 bytes due to the slice table and 0x55AA identifier at the end of the MBR. If boot0 and multiple operating systems are installed, a message similar to this example will be displayed at boot time:
F1 Win
F2 FreeBSD
Default: F2Other operating systems will overwrite an existing MBR if they are installed after FreeBSD. If this happens, or to replace the existing MBR with the FreeBSD MBR, use the following command:
# fdisk -B -b /boot/boot0 devicewhere device is the boot disk, such as ad0 for the first IDE disk, ad2 for the first IDE disk on a second IDE controller, or da0 for the first SCSI disk. To create a custom configuration of the MBR, refer to boot0cfg(8).
Conceptually, the first and second stages are part of the same program on the same area of the disk. Because of space constraints, they have been split into two, but are always installed together. They are copied from the combined /boot/boot by the FreeBSD installer or bsdlabel.
These two stages are located outside file systems, in the first track of the boot slice, starting with the first sector. This is where boot0, or any other boot manager, expects to find a program to run which will continue the boot process.
The first stage, boot1, is very simple, since it can only be 512 bytes in size. It knows just enough about the FreeBSD bsdlabel, which stores information about the slice, to find and execute boot2.
Stage two, boot2, is slightly more sophisticated, and understands the FreeBSD file system enough to find files. It can provide a simple interface to choose the kernel or loader to run. It runs loader, which is much more sophisticated and provides a boot configuration file. If the boot process is interrupted at stage two, the following interactive screen is displayed:
>> FreeBSD/i386 BOOT
Default: 0:ad(0,a)/boot/loader
boot:To replace the installed boot1 and boot2, use bsdlabel, where diskslice is the disk and slice to boot from, such as ad0s1 for the first slice on the first IDE disk:
# bsdlabel -B disksliceIf just the disk name is used, such as ad0, |
The loader is the final stage of the three-stage bootstrap process. It is located on the file system, usually as /boot/loader.
The loader is intended as an interactive method for configuration, using a built-in command set, backed up by a more powerful interpreter which has a more complex command set.
During initialization, loader will probe for a console and for disks, and figure out which disk it is booting from. It will set variables accordingly, and an interpreter is started where user commands can be passed from a script or interactively.
The loader will then read /boot/loader.rc, which by default reads in /boot/defaults/loader.conf which sets reasonable defaults for variables and reads /boot/loader.conf for local changes to those variables. loader.rc then acts on these variables, loading whichever modules and kernel are selected.
Finally, by default, loader issues a 10 second wait for key presses, and boots the kernel if it is not interrupted. If interrupted, the user is presented with a prompt which understands the command set, where the user may adjust variables, unload all modules, load modules, and then finally boot or reboot. Loader Built-In Commands lists the most commonly used loader commands. For a complete discussion of all available commands, refer to loader(8).
| Variable | Description |
|---|---|
autoboot seconds | Proceeds to boot the kernel if not interrupted within the time span given, in seconds. It displays a countdown, and the default time span is 10 seconds. |
boot [ | Immediately proceeds to boot the kernel, with any specified options or kernel name. Providing a kernel name on the command-line is only applicable after an |
boot-conf | Goes through the same automatic configuration of modules based on specified variables, most commonly |
help [ | Shows help messages read from /boot/loader.help. If the topic given is |
include | Reads the specified file and interprets it line by line. An error immediately stops the |
load [-t | Loads the kernel, kernel module, or file of the type given, with the specified filename. Any arguments after filename are passed to the file. If filename is not qualified, it will be searched under /boot/kernel and /boot/modules. |
ls [-l] [ | Displays a listing of files in the given path, or the root directory, if the path is not specified. If |
lsdev [ | Lists all of the devices from which it may be possible to load modules. If |
lsmod [ | Displays loaded modules. If |
more | Displays the files specified, with a pause at each |
reboot | Immediately reboots the system. |
set | Sets the specified environment variables. |
unload | Removes all loaded modules. |
Here are some practical examples of loader usage. To boot the usual kernel in single-user mode :
boot -sTo unload the usual kernel and modules and then load the previous or another, specified kernel:
unload
load kernel.oldUse kernel.GENERIC to refer to the default kernel that comes with an installation, or kernel.old, to refer to the previously installed kernel before a system upgrade or before configuring a custom kernel.
Use the following to load the usual modules with another kernel:
unload
set kernel="kernel.old"
boot-confTo load an automated kernel configuration script:
load -t userconfig_script /boot/kernel.confOnce the kernel is loaded by either loader or by boot2, which bypasses loader, it examines any boot flags and adjusts its behavior as necessary. Kernel Interaction During Boot lists the commonly used boot flags. Refer to boot(8) for more information on the other boot flags.
| Option | Description |
|---|---|
| During kernel initialization, ask for the device to mount as the root file system. |
| Boot the root file system from a CDROM. |
| Boot into single-user mode. |
| Be more verbose during kernel startup. |
Once the kernel has finished booting, it passes control to the user process init(8), which is located at /sbin/init, or the program path specified in the init_path variable in loader. This is the last stage of the boot process.
The boot sequence makes sure that the file systems available on the system are consistent. If a UFS file system is not, and fsck cannot fix the inconsistencies, init drops the system into single-user mode so that the system administrator can resolve the problem directly. Otherwise, the system boots into multi-user mode.
A user can specify this mode by booting with -s or by setting the boot_single variable in loader. It can also be reached by running shutdown now from multi-user mode. Single-user mode begins with this message:
Enter full pathname of shell or RETURN for /bin/sh:
If the user presses Enter, the system will enter the default Bourne shell. To specify a different shell, input the full path to the shell.
Single-user mode is usually used to repair a system that will not boot due to an inconsistent file system or an error in a boot configuration file. It can also be used to reset the root password when it is unknown. These actions are possible as the single-user mode prompt gives full, local access to the system and its configuration files. There is no networking in this mode.
While single-user mode is useful for repairing a system, it poses a security risk unless the system is in a physically secure location. By default, any user who can gain physical access to a system will have full control of that system after booting into single-user mode.
If the system console is changed to insecure in /etc/ttys, the system will first prompt for the root password before initiating single-user mode. This adds a measure of security while removing the ability to reset the root password when it is unknown.
# name getty type status comments # # If console is marked "insecure", then init will ask for the root password # when going to single-user mode. console none unknown off insecure
An insecure console means that physical security to the console is considered to be insecure, so only someone who knows the root password may use single-user mode.
If init finds the file systems to be in order, or once the user has finished their commands in single-user mode and has typed exit to leave single-user mode, the system enters multi-user mode, in which it starts the resource configuration of the system.
The resource configuration system reads in configuration defaults from /etc/defaults/rc.conf and system-specific details from /etc/rc.conf. It then proceeds to mount the system file systems listed in /etc/fstab. It starts up networking services, miscellaneous system daemons, then the startup scripts of locally installed packages.
To learn more about the resource configuration system, refer to rc(8) and examine the scripts located in /etc/rc.d.
Typically when a FreeBSD system boots, it displays its progress as a series of messages at the console. A boot splash screen creates an alternate boot screen that hides all of the boot probe and service startup messages. A few boot loader messages, including the boot options menu and a timed wait countdown prompt, are displayed at boot time, even when the splash screen is enabled. The display of the splash screen can be turned off by hitting any key on the keyboard during the boot process.
There are two basic environments available in FreeBSD. The first is the default legacy virtual console command line environment. After the system finishes booting, a console login prompt is presented. The second environment is a configured graphical environment. Refer to The X Window System for more information on how to install and configure a graphical display manager and a graphical login manager.
Once the system has booted, the splash screen defaults to being a screen saver. After a time period of non-use, the splash screen will display and will cycle through steps of changing intensity of the image, from bright to very dark and over again. The configuration of the splash screen saver can be overridden by adding a saver= line to /etc/rc.conf. Several built-in screen savers are available and described in splash(4). The saver= option only applies to virtual consoles and has no effect on graphical display managers.
By installing the sysutils/bsd-splash-changer package or port, a random splash image from a collection will display at boot. The splash screen function supports 256-colors in the bitmap (.bmp), ZSoft PCX (.pcx), or TheDraw (.bin) formats. The .bmp, .pcx, or .bin image has to be placed on the root partition, for example in /boot. The splash image files must have a resolution of 320 by 200 pixels or less in order to work on standard VGA adapters. For the default boot display resolution of 256-colors and 320 by 200 pixels or less, add the following lines to /boot/loader.conf. Replace splash.bmp with the name of the bitmap file to use:
splash_bmp_load="YES" bitmap_load="YES" bitmap_name="/boot/splash.bmp"
To use a PCX file instead of a bitmap file:
splash_pcx_load="YES" bitmap_load="YES" bitmap_name="/boot/splash.pcx"
To instead use ASCII art in the https://en.wikipedia.org/wiki/TheDraw format:
splash_txt="YES" bitmap_load="YES" bitmap_name="/boot/splash.bin"
Other interesting loader.conf options include:
beastie_disable="YES"This will stop the boot options menu from being displayed, but the timed wait count down prompt will still be present. Even with the display of the boot options menu disabled, entering an option selection at the timed wait count down prompt will enact the corresponding boot option.
loader_logo="beastie"This will replace the default words "FreeBSD", which are displayed to the right of the boot options menu, with the colored beastie logo.
For more information, refer to splash(4), loader.conf(5), and vga(4).
During initial system startup, the boot loader(8) reads device.hints(5). This file stores kernel boot information known as variables, sometimes referred to as "device hints". These "device hints" are used by device drivers for device configuration.
Device hints may also be specified at the Stage 3 boot loader prompt, as demonstrated in Stage Three. Variables can be added using set, removed with unset, and viewed show. Variables set in /boot/device.hints can also be overridden. Device hints entered at the boot loader are not permanent and will not be applied on the next reboot.
Once the system is booted, kenv(1) can be used to dump all of the variables.
The syntax for /boot/device.hints is one variable per line, using the hash "#" as comment markers. Lines are constructed as follows:
hint.driver.unit.keyword="value"The syntax for the Stage 3 boot loader is:
set hint.driver.unit.keyword=valuewhere driver is the device driver name, unit is the device driver unit number, and keyword is the hint keyword. The keyword may consist of the following options:
at: specifies the bus which the device is attached to.
port: specifies the start address of the I/O to be used.
irq: specifies the interrupt request number to be used.
drq: specifies the DMA channel number.
maddr: specifies the physical memory address occupied by the device.
flags: sets various flag bits for the device.
disabled: if set to 1 the device is disabled.
Since device drivers may accept or require more hints not listed here, viewing a driver’s manual page is recommended. For more information, refer to device.hints(5), kenv(1), loader.conf(5), and loader(8).
Upon controlled shutdown using shutdown(8), init(8) will attempt to run the script /etc/rc.shutdown, and then proceed to send all processes the TERM signal, and subsequently the KILL signal to any that do not terminate in a timely manner.
To power down a FreeBSD machine on architectures and systems that support power management, use shutdown -p now to turn the power off immediately. To reboot a FreeBSD system, use shutdown -r now. One must be root or a member of operator in order to run shutdown(8). One can also use halt(8) and reboot(8). Refer to their manual pages and to shutdown(8) for more information.
Modify group membership by referring to “Users and Basic Account Management”.
Power management requires acpi(4) to be loaded as a module or statically compiled into a custom kernel. |
Security, whether physical or virtual, is a topic so broad that an entire industry has evolved around it. Hundreds of standard practices have been authored about how to secure systems and networks, and as a user of FreeBSD, understanding how to protect against attacks and intruders is a must.
In this chapter, several fundamentals and techniques will be discussed. The FreeBSD system comes with multiple layers of security, and many more third party utilities may be added to enhance security.
After reading this chapter, you will know:
Basic FreeBSD system security concepts.
The various crypt mechanisms available in FreeBSD.
How to set up one-time password authentication.
How to configure TCP Wrapper for use with inetd(8).
How to set up Kerberos on FreeBSD.
How to configure IPsec and create a VPN.
How to configure and use OpenSSH on FreeBSD.
How to use file system ACLs.
How to use pkg to audit third party software packages installed from the Ports Collection.
How to utilize FreeBSD security advisories.
What Process Accounting is and how to enable it on FreeBSD.
How to control user resources using login classes or the resource limits database.
Before reading this chapter, you should:
Understand basic FreeBSD and Internet concepts.
Additional security topics are covered elsewhere in this Handbook. For example, Mandatory Access Control is discussed in Mandatory Access Control and Internet firewalls are discussed in Firewalls.
Security is everyone’s responsibility. A weak entry point in any system could allow intruders to gain access to critical information and cause havoc on an entire network. One of the core principles of information security is the CIA triad, which stands for the Confidentiality, Integrity, and Availability of information systems.
The CIA triad is a bedrock concept of computer security as customers and users expect their data to be protected. For example, a customer expects that their credit card information is securely stored (confidentiality), that their orders are not changed behind the scenes (integrity), and that they have access to their order information at all times (availablility).
To provide CIA, security professionals apply a defense in depth strategy. The idea of defense in depth is to add several layers of security to prevent one single layer failing and the entire security system collapsing. For example, a system administrator cannot simply turn on a firewall and consider the network or system secure. One must also audit accounts, check the integrity of binaries, and ensure malicious tools are not installed. To implement an effective security strategy, one must understand threats and how to defend against them.
What is a threat as it pertains to computer security? Threats are not limited to remote attackers who attempt to access a system without permission from a remote location. Threats also include employees, malicious software, unauthorized network devices, natural disasters, security vulnerabilities, and even competing corporations.
Systems and networks can be accessed without permission, sometimes by accident, or by remote attackers, and in some cases, via corporate espionage or former employees. As a user, it is important to prepare for and admit when a mistake has led to a security breach and report possible issues to the security team. As an administrator, it is important to know of the threats and be prepared to mitigate them.
When applying security to systems, it is recommended to start by securing the basic accounts and system configuration, and then to secure the network layer so that it adheres to the system policy and the organization’s security procedures. Many organizations already have a security policy that covers the configuration of technology devices. The policy should include the security configuration of workstations, desktops, mobile devices, phones, production servers, and development servers. In many cases, standard operating procedures (SOPs) already exist. When in doubt, ask the security team.
The rest of this introduction describes how some of these basic security configurations are performed on a FreeBSD system. The rest of this chapter describes some specific tools which can be used when implementing a security policy on a FreeBSD system.
In securing a system, a good starting point is an audit of accounts. Ensure that root has a strong password and that this password is not shared. Disable any accounts that do not need login access.
To deny login access to accounts, two methods exist. The first is to lock the account. This example locks the toor account:
# pw lock toorThe second method is to prevent login access by changing the shell to /usr/sbin/nologin. Only the superuser can change the shell for other users:
# chsh -s /usr/sbin/nologin toorThe /usr/sbin/nologin shell prevents the system from assigning a shell to the user when they attempt to login.
In some cases, system administration needs to be shared with other users. FreeBSD has two methods to handle this. The first one, which is not recommended, is a shared root password used by members of the wheel group. With this method, a user types su and enters the password for wheel whenever superuser access is needed. The user should then type exit to leave privileged access after finishing the commands that required administrative access. To add a user to this group, edit /etc/group and add the user to the end of the wheel entry. The user must be separated by a comma character with no space.
The second, and recommended, method to permit privilege escalation is to install the security/sudo package or port. This software provides additional auditing, more fine-grained user control, and can be configured to lock users into running only the specified privileged commands.
After installation, use visudo to edit /usr/local/etc/sudoers. This example creates a new webadmin group, adds the trhodes account to that group, and configures that group access to restart apache24:
# pw groupadd webadmin -M trhodes -g 6000
# visudo
%webadmin ALL=(ALL) /usr/sbin/service apache24 *Passwords are a necessary evil of technology. When they must be used, they should be complex and a powerful hash mechanism should be used to encrypt the version that is stored in the password database. FreeBSD supports the DES, MD5, SHA256, SHA512, and Blowfish hash algorithms in its crypt() library. The default of SHA512 should not be changed to a less secure hashing algorithm, but can be changed to the more secure Blowfish algorithm.
Blowfish is not part of AES and is not considered compliant with any Federal Information Processing Standards (FIPS). Its use may not be permitted in some environments. |
To determine which hash algorithm is used to encrypt a user’s password, the superuser can view the hash for the user in the FreeBSD password database. Each hash starts with a symbol which indicates the type of hash mechanism used to encrypt the password. If DES is used, there is no beginning symbol. For MD5, the symbol is $. For SHA256 and SHA512, the symbol is $6$. For Blowfish, the symbol is $2a$. In this example, the password for dru is hashed using the default SHA512 algorithm as the hash starts with $6$. Note that the encrypted hash, not the password itself, is stored in the password database:
# grep dru /etc/master.passwd
dru:$6$pzIjSvCAn.PBYQBA$PXpSeWPx3g5kscj3IMiM7tUEUSPmGexxta.8Lt9TGSi2lNQqYGKszsBPuGME0:1001:1001::0:0:dru:/usr/home/dru:/bin/cshThe hash mechanism is set in the user’s login class. For this example, the user is in the default login class and the hash algorithm is set with this line in /etc/login.conf:
:passwd_format=sha512:\
To change the algorithm to Blowfish, modify that line to look like this:
:passwd_format=blf:\
Then run cap_mkdb /etc/login.conf as described in Configuring Login Classes. Note that this change will not affect any existing password hashes. This means that all passwords should be re-hashed by asking users to run passwd in order to change their password.
For remote logins, two-factor authentication should be used. An example of two-factor authentication is "something you have", such as a key, and "something you know", such as the passphrase for that key. Since OpenSSH is part of the FreeBSD base system, all network logins should be over an encrypted connection and use key-based authentication instead of passwords. For more information, refer to OpenSSH. Kerberos users may need to make additional changes to implement OpenSSH in their network. These changes are described in Kerberos.
Enforcing a strong password policy for local accounts is a fundamental aspect of system security. In FreeBSD, password length, password strength, and password complexity can be implemented using built-in Pluggable Authentication Modules (PAM).
This section demonstrates how to configure the minimum and maximum password length and the enforcement of mixed characters using the pam_passwdqc.so module. This module is enforced when a user changes their password.
To configure this module, become the superuser and uncomment the line containing pam_passwdqc.so in /etc/pam.d/passwd. Then, edit that line to match the password policy:
password requisite pam_passwdqc.so min=disabled,disabled,disabled,12,10 similar=deny retry=3 enforce=users
This example sets several requirements for new passwords. The min setting controls the minimum password length. It has five values because this module defines five different types of passwords based on their complexity. Complexity is defined by the type of characters that must exist in a password, such as letters, numbers, symbols, and case. The types of passwords are described in pam_passwdqc(8). In this example, the first three types of passwords are disabled, meaning that passwords that meet those complexity requirements will not be accepted, regardless of their length. The 12 sets a minimum password policy of at least twelve characters, if the password also contains characters with three types of complexity. The 10 sets the password policy to also allow passwords of at least ten characters, if the password contains characters with four types of complexity.
The similar setting denies passwords that are similar to the user’s previous password. The retry setting provides a user with three opportunities to enter a new password.
Once this file is saved, a user changing their password will see a message similar to the following:
% passwd
Changing local password for trhodes
Old Password:
You can now choose the new password.
A valid password should be a mix of upper and lower case letters,
digits and other characters. You can use a 12 character long
password with characters from at least 3 of these 4 classes, or
a 10 character long password containing characters from all the
classes. Characters that form a common pattern are discarded by
the check.
Alternatively, if no one else can see your terminal now, you can
pick this as your password: "trait-useful&knob".
Enter new password:If a password that does not match the policy is entered, it will be rejected with a warning and the user will have an opportunity to try again, up to the configured number of retries.
Most password policies require passwords to expire after so many days. To set a password age time in FreeBSD, set passwordtime for the user’s login class in /etc/login.conf. The default login class contains an example:
# :passwordtime=90d:\
So, to set an expiry of 90 days for this login class, remove the comment symbol (#), save the edit, and run cap_mkdb /etc/login.conf.
To set the expiration on individual users, pass an expiration date or the number of days to expiry and a username to pw:
# pw usermod -p 30-apr-2015 -n trhodesAs seen here, an expiration date is set in the form of day, month, and year. For more information, see pw(8).
A rootkit is any unauthorized software that attempts to gain root access to a system. Once installed, this malicious software will normally open up another avenue of entry for an attacker. Realistically, once a system has been compromised by a rootkit and an investigation has been performed, the system should be reinstalled from scratch. There is tremendous risk that even the most prudent security or systems engineer will miss something an attacker left behind.
A rootkit does do one thing useful for administrators: once detected, it is a sign that a compromise happened at some point. But, these types of applications tend to be very well hidden. This section demonstrates a tool that can be used to detect rootkits, security/rkhunter.
After installation of this package or port, the system may be checked using the following command. It will produce a lot of information and will require some manual pressing of ENTER:
# rkhunter -cAfter the process completes, a status message will be printed to the screen. This message will include the amount of files checked, suspect files, possible rootkits, and more. During the check, some generic security warnings may be produced about hidden files, the OpenSSH protocol selection, and known vulnerable versions of installed software. These can be handled now or after a more detailed analysis has been performed.
Every administrator should know what is running on the systems they are responsible for. Third-party tools like rkhunter and sysutils/lsof, and native commands such as netstat and ps, can show a great deal of information on the system. Take notes on what is normal, ask questions when something seems out of place, and be paranoid. While preventing a compromise is ideal, detecting a compromise is a must.
Verification of system files and binaries is important because it provides the system administration and security teams information about system changes. A software application that monitors the system for changes is called an Intrusion Detection System (IDS).
FreeBSD provides native support for a basic IDS system. While the nightly security emails will notify an administrator of changes, the information is stored locally and there is a chance that a malicious user could modify this information in order to hide their changes to the system. As such, it is recommended to create a separate set of binary signatures and store them on a read-only, root-owned directory or, preferably, on a removable USB disk or remote rsync server.
The built-in mtree utility can be used to generate a specification of the contents of a directory. A seed, or a numeric constant, is used to generate the specification and is required to check that the specification has not changed. This makes it possible to determine if a file or binary has been modified. Since the seed value is unknown by an attacker, faking or checking the checksum values of files will be difficult to impossible. The following example generates a set of SHA256 hashes, one for each system binary in /bin, and saves those values to a hidden file in root's home directory, /root/.bin_chksum_mtree:
# mtree -s 3483151339707503 -c -K cksum,sha256digest -p /bin > /root/.bin_chksum_mtree
# mtree: /bin checksum: 3427012225The 3483151339707503 represents the seed. This value should be remembered, but not shared.
Viewing /root/.bin_cksum_mtree should yield output similar to the following:
# user: root
# machine: dreadnaught
# tree: /bin
# date: Mon Feb 3 10:19:53 2014
# .
/set type=file uid=0 gid=0 mode=0555 nlink=1 flags=none
. type=dir mode=0755 nlink=2 size=1024 \
time=1380277977.000000000
\133 nlink=2 size=11704 time=1380277977.000000000 \
cksum=484492447 \
sha256digest=6207490fbdb5ed1904441fbfa941279055c3e24d3a4049aeb45094596400662a
cat size=12096 time=1380277975.000000000 cksum=3909216944 \
sha256digest=65ea347b9418760b247ab10244f47a7ca2a569c9836d77f074e7a306900c1e69
chflags size=8168 time=1380277975.000000000 cksum=3949425175 \
sha256digest=c99eb6fc1c92cac335c08be004a0a5b4c24a0c0ef3712017b12c89a978b2dac3
chio size=18520 time=1380277975.000000000 cksum=2208263309 \
sha256digest=ddf7c8cb92a58750a675328345560d8cc7fe14fb3ccd3690c34954cbe69fc964
chmod size=8640 time=1380277975.000000000 cksum=2214429708 \
sha256digest=a435972263bf814ad8df082c0752aa2a7bdd8b74ff01431ccbd52ed1e490bbe7The machine’s hostname, the date and time the specification was created, and the name of the user who created the specification are included in this report. There is a checksum, size, time, and SHA256 digest for each binary in the directory.
To verify that the binary signatures have not changed, compare the current contents of the directory to the previously generated specification, and save the results to a file. This command requires the seed that was used to generate the original specification:
# mtree -s 3483151339707503 -p /bin < /root/.bin_chksum_mtree >> /root/.bin_chksum_output
# mtree: /bin checksum: 3427012225This should produce the same checksum for /bin that was produced when the specification was created. If no changes have occurred to the binaries in this directory, the /root/.bin_chksum_output output file will be empty. To simulate a change, change the date on /bin/cat using touch and run the verification command again:
# touch /bin/cat
# mtree -s 3483151339707503 -p /bin < /root/.bin_chksum_mtree >> /root/.bin_chksum_output
# more /root/.bin_chksum_output
cat changed
modification time expected Fri Sep 27 06:32:55 2013 found Mon Feb 3 10:28:43 2014It is recommended to create specifications for the directories which contain binaries and configuration files, as well as any directories containing sensitive data. Typically, specifications are created for /bin, /sbin, /usr/bin, /usr/sbin, /usr/local/bin, /etc, and /usr/local/etc.
More advanced IDS systems exist, such as security/aide. In most cases, mtree provides the functionality administrators need. It is important to keep the seed value and the checksum output hidden from malicious users. More information about mtree can be found in mtree(8).
In FreeBSD, many system features can be tuned using sysctl. A few of the security features which can be tuned to prevent Denial of Service (DoS) attacks will be covered in this section. More information about using sysctl, including how to temporarily change values and how to make the changes permanent after testing, can be found in “Tuning with sysctl(8)”.
Any time a setting is changed with |
By default, the FreeBSD kernel boots with a security level of -1. This is called "insecure mode" because immutable file flags may be turned off and all devices may be read from or written to. The security level will remain at -1 unless it is altered through sysctl or by a setting in the startup scripts. The security level may be increased during system startup by setting kern_securelevel_enable to YES in /etc/rc.conf, and the value of kern_securelevel to the desired security level. See security(7) and init(8) for more information on these settings and the available security levels.
Increasing the |
The net.inet.tcp.blackhole and net.inet.udp.blackhole settings can be used to drop incoming SYN packets on closed ports without sending a return RST response. The default behavior is to return an RST to show a port is closed. Changing the default provides some level of protection against ports scans, which are used to determine which applications are running on a system. Set net.inet.tcp.blackhole to 2 and net.inet.udp.blackhole to 1. Refer to blackhole(4) for more information about these settings.
The net.inet.icmp.drop_redirect and net.inet.ip.redirect settings help prevent against redirect attacks. A redirect attack is a type of DoS which sends mass numbers of ICMP type 5 packets. Since these packets are not required, set net.inet.icmp.drop_redirect to 1 and set net.inet.ip.redirect to 0.
Source routing is a method for detecting and accessing non-routable addresses on the internal network. This should be disabled as non-routable addresses are normally not routable on purpose. To disable this feature, set net.inet.ip.sourceroute and net.inet.ip.accept_sourceroute to 0.
When a machine on the network needs to send messages to all hosts on a subnet, an ICMP echo request message is sent to the broadcast address. However, there is no reason for an external host to perform such an action. To reject all external broadcast requests, set net.inet.icmp.bmcastecho to 0.
Some additional settings are documented in security(7).
By default, FreeBSD includes support for One-time Passwords In Everything (OPIE). OPIE is designed to prevent replay attacks, in which an attacker discovers a user’s password and uses it to access a system. Since a password is only used once in OPIE, a discovered password is of little use to an attacker. OPIE uses a secure hash and a challenge/response system to manage passwords. The FreeBSD implementation uses the MD5 hash by default.
OPIE uses three different types of passwords. The first is the usual UNIX® or Kerberos password. The second is the one-time password which is generated by opiekey. The third type of password is the "secret password" which is used to generate one-time passwords. The secret password has nothing to do with, and should be different from, the UNIX® password.
There are two other pieces of data that are important to OPIE. One is the "seed" or "key", consisting of two letters and five digits. The other is the "iteration count", a number between 1 and 100. OPIE creates the one-time password by concatenating the seed and the secret password, applying the MD5 hash as many times as specified by the iteration count, and turning the result into six short English words which represent the one-time password. The authentication system keeps track of the last one-time password used, and the user is authenticated if the hash of the user-provided password is equal to the previous password. Because a one-way hash is used, it is impossible to generate future one-time passwords if a successfully used password is captured. The iteration count is decremented after each successful login to keep the user and the login program in sync. When the iteration count gets down to 1, OPIE must be reinitialized.
There are a few programs involved in this process. A one-time password, or a consecutive list of one-time passwords, is generated by passing an iteration count, a seed, and a secret password to opiekey(1). In addition to initializing OPIE, opiepasswd(1) is used to change passwords, iteration counts, or seeds. The relevant credential files in /etc/opiekeys are examined by opieinfo(1) which prints out the invoking user’s current iteration count and seed.
This section describes four different sorts of operations. The first is how to set up one-time-passwords for the first time over a secure connection. The second is how to use opiepasswd over an insecure connection. The third is how to log in over an insecure connection. The fourth is how to generate a number of keys which can be written down or printed out to use at insecure locations.
To initialize OPIE for the first time, run this command from a secure location:
% opiepasswd -c
Adding unfurl:
Only use this method from the console; NEVER from remote. If you are using
telnet, xterm, or a dial-in, type ^C now or exit with no password.
Then run opiepasswd without the -c parameter.
Using MD5 to compute responses.
Enter new secret pass phrase:
Again new secret pass phrase:
ID unfurl OTP key is 499 to4268
MOS MALL GOAT ARM AVID COEDThe -c sets console mode which assumes that the command is being run from a secure location, such as a computer under the user’s control or a SSH session to a computer under the user’s control.
When prompted, enter the secret password which will be used to generate the one-time login keys. This password should be difficult to guess and should be different than the password which is associated with the user’s login account. It must be between 10 and 127 characters long. Remember this password.
The ID line lists the login name (unfurl), default iteration count (499), and default seed (to4268). When logging in, the system will remember these parameters and display them, meaning that they do not have to be memorized. The last line lists the generated one-time password which corresponds to those parameters and the secret password. At the next login, use this one-time password.
To initialize or change the secret password on an insecure system, a secure connection is needed to some place where opiekey can be run. This might be a shell prompt on a trusted machine. An iteration count is needed, where 100 is probably a good value, and the seed can either be specified or the randomly-generated one used. On the insecure connection, the machine being initialized, use opiepasswd(1):
% opiepasswd
Updating unfurl:
You need the response from an OTP generator.
Old secret pass phrase:
otp-md5 498 to4268 ext
Response: GAME GAG WELT OUT DOWN CHAT
New secret pass phrase:
otp-md5 499 to4269
Response: LINE PAP MILK NELL BUOY TROY
ID mark OTP key is 499 gr4269
LINE PAP MILK NELL BUOY TROYTo accept the default seed, press Return. Before entering an access password, move over to the secure connection and give it the same parameters:
% opiekey 498 to4268
Using the MD5 algorithm to compute response.
Reminder: Do not use opiekey from telnet or dial-in sessions.
Enter secret pass phrase:
GAME GAG WELT OUT DOWN CHATSwitch back over to the insecure connection, and copy the generated one-time password over to the relevant program.
After initializing OPIE and logging in, a prompt like this will be displayed:
% telnet example.com
Trying 10.0.0.1...
Connected to example.com
Escape character is '^]'.
FreeBSD/i386 (example.com) (ttypa)
login: <username>
otp-md5 498 gr4269 ext
Password:The OPIE prompts provides a useful feature. If Return is pressed at the password prompt, the prompt will turn echo on and display what is typed. This can be useful when attempting to type in a password by hand from a printout.
At this point, generate the one-time password to answer this login prompt. This must be done on a trusted system where it is safe to run opiekey(1). There are versions of this command for Windows®, Mac OS® and FreeBSD. This command needs the iteration count and the seed as command line options. Use cut-and-paste from the login prompt on the machine being logged in to.
On the trusted system:
% opiekey 498 to4268
Using the MD5 algorithm to compute response.
Reminder: Do not use opiekey from telnet or dial-in sessions.
Enter secret pass phrase:
GAME GAG WELT OUT DOWN CHATOnce the one-time password is generated, continue to log in.
Sometimes there is no access to a trusted machine or secure connection. In this case, it is possible to use opiekey(1) to generate a number of one-time passwords beforehand. For example:
% opiekey -n 5 30 zz99999
Using the MD5 algorithm to compute response.
Reminder: Do not use opiekey from telnet or dial-in sessions.
Enter secret pass phrase: <secret password>
26: JOAN BORE FOSS DES NAY QUIT
27: LATE BIAS SLAY FOLK MUCH TRIG
28: SALT TIN ANTI LOON NEAL USE
29: RIO ODIN GO BYE FURY TIC
30: GREW JIVE SAN GIRD BOIL PHIThe -n 5 requests five keys in sequence, and 30 specifies what the last iteration number should be. Note that these are printed out in reverse order of use. The really paranoid might want to write the results down by hand; otherwise, print the list. Each line shows both the iteration count and the one-time password. Scratch off the passwords as they are used.
OPIE can restrict the use of UNIX® passwords based on the IP address of a login session. The relevant file is /etc/opieaccess, which is present by default. Refer to opieaccess(5) for more information on this file and which security considerations to be aware of when using it.
Here is a sample opieaccess:
permit 192.168.0.0 255.255.0.0
This line allows users whose IP source address (which is vulnerable to spoofing) matches the specified value and mask, to use UNIX® passwords at any time.
If no rules in opieaccess are matched, the default is to deny non-OPIE logins.
TCP Wrapper is a host-based access control system which extends the abilities of “The inetd Super-Server”. It can be configured to provide logging support, return messages, and connection restrictions for the server daemons under the control of inetd. Refer to tcpd(8) for more information about TCP Wrapper and its features.
TCP Wrapper should not be considered a replacement for a properly configured firewall. Instead, TCP Wrapper should be used in conjunction with a firewall and other security enhancements in order to provide another layer of protection in the implementation of a security policy.
To enable TCP Wrapper in FreeBSD, add the following lines to /etc/rc.conf:
inetd_enable="YES" inetd_flags="-Ww"
Then, properly configure /etc/hosts.allow.
Unlike other implementations of TCP Wrapper, the use of hosts.deny is deprecated in FreeBSD. All configuration options should be placed in /etc/hosts.allow. |
In the simplest configuration, daemon connection policies are set to either permit or block, depending on the options in /etc/hosts.allow. The default configuration in FreeBSD is to allow all connections to the daemons started with inetd.
Basic configuration usually takes the form of daemon : address : action, where daemon is the daemon which inetd started, address is a valid hostname, IP address, or an IPv6 address enclosed in brackets ([ ]), and action is either allow or deny. TCP Wrapper uses a first rule match semantic, meaning that the configuration file is scanned from the beginning for a matching rule. When a match is found, the rule is applied and the search process stops.
For example, to allow POP3 connections via the mail/qpopper daemon, the following lines should be appended to hosts.allow:
# This line is required for POP3 connections: qpopper : ALL : allow
Whenever this file is edited, restart inetd:
# service inetd restartTCP Wrapper provides advanced options to allow more control over the way connections are handled. In some cases, it may be appropriate to return a comment to certain hosts or daemon connections. In other cases, a log entry should be recorded or an email sent to the administrator. Other situations may require the use of a service for local connections only. This is all possible through the use of configuration options known as wildcards, expansion characters, and external command execution.
Suppose that a situation occurs where a connection should be denied yet a reason should be sent to the host who attempted to establish that connection. That action is possible with twist. When a connection attempt is made, twist executes a shell command or script. An example exists in hosts.allow:
# The rest of the daemons are protected. ALL : ALL \ : severity auth.info \ : twist /bin/echo "You are not welcome to use %d from %h."
In this example, the message "You are not allowed to use daemon name from hostname." will be returned for any daemon not configured in hosts.allow. This is useful for sending a reply back to the connection initiator right after the established connection is dropped. Any message returned must be wrapped in quote (") characters.
It may be possible to launch a denial of service attack on the server if an attacker floods these daemons with connection requests. |
Another possibility is to use spawn. Like twist, spawn implicitly denies the connection and may be used to run external shell commands or scripts. Unlike twist, spawn will not send a reply back to the host who established the connection. For example, consider the following configuration:
# We do not allow connections from example.com: ALL : .example.com \ : spawn (/bin/echo %a from %h attempted to access %d >> \ /var/log/connections.log) \ : deny
This will deny all connection attempts from *.example.com and log the hostname, IP address, and the daemon to which access was attempted to /var/log/connections.log. This example uses the substitution characters %a and %h. Refer to hosts_access(5) for the complete list.
To match every instance of a daemon, domain, or IP address, use ALL. Another wildcard is PARANOID which may be used to match any host which provides an IP address that may be forged because the IP address differs from its resolved hostname. In this example, all connection requests to Sendmail which have an IP address that varies from its hostname will be denied:
# Block possibly spoofed requests to sendmail: sendmail : PARANOID : deny
Using the |
To learn more about wildcards and their associated functionality, refer to hosts_access(5).
When adding new configuration lines, make sure that any unneeded entries for that daemon are commented out in hosts.allow. |
Kerberos is a network authentication protocol which was originally created by the Massachusetts Institute of Technology (MIT) as a way to securely provide authentication across a potentially hostile network. The Kerberos protocol uses strong cryptography so that both a client and server can prove their identity without sending any unencrypted secrets over the network. Kerberos can be described as an identity-verifying proxy system and as a trusted third-party authentication system. After a user authenticates with Kerberos, their communications can be encrypted to assure privacy and data integrity.
The only function of Kerberos is to provide the secure authentication of users and servers on the network. It does not provide authorization or auditing functions. It is recommended that Kerberos be used with other security methods which provide authorization and audit services.
The current version of the protocol is version 5, described in RFC 4120. Several free implementations of this protocol are available, covering a wide range of operating systems. MIT continues to develop their Kerberos package. It is commonly used in the US as a cryptography product, and has historically been subject to US export regulations. In FreeBSD, MITKerberos is available as the security/krb5 package or port. The Heimdal Kerberos implementation was explicitly developed outside of the US to avoid export regulations. The Heimdal Kerberos distribution is included in the base FreeBSD installation, and another distribution with more configurable options is available as security/heimdal in the Ports Collection.
In Kerberos users and services are identified as "principals" which are contained within an administrative grouping, called a "realm". A typical user principal would be of the form user@REALM (realms are traditionally uppercase).
This section provides a guide on how to set up Kerberos using the Heimdal distribution included in FreeBSD.
For purposes of demonstrating a Kerberos installation, the name spaces will be as follows:
The DNS domain (zone) will be example.org.
The Kerberos realm will be EXAMPLE.ORG.
Use real domain names when setting up Kerberos, even if it will run internally. This avoids DNS problems and assures inter-operation with other Kerberos realms. |
The Key Distribution Center (KDC) is the centralized authentication service that Kerberos provides, the "trusted third party" of the system. It is the computer that issues Kerberos tickets, which are used for clients to authenticate to servers. Because the KDC is considered trusted by all other computers in the Kerberos realm, it has heightened security concerns. Direct access to the KDC should be limited.
While running a KDC requires few computing resources, a dedicated machine acting only as a KDC is recommended for security reasons.
To begin, install the security/heimdal package as follows:
# pkg install heimdalNext, update /etc/rc.conf using sysrc as follows:
# sysrc kdc_enable=yes
# sysrc kadmind_enable=yesNext, edit /etc/krb5.conf as follows:
[libdefaults]
default_realm = EXAMPLE.ORG
[realms]
EXAMPLE.ORG = {
kdc = kerberos.example.org
admin_server = kerberos.example.org
}
[domain_realm]
.example.org = EXAMPLE.ORGIn this example, the KDC will use the fully-qualified hostname kerberos.example.org. The hostname of the KDC must be resolvable in the DNS.
Kerberos can also use the DNS to locate KDCs, instead of a [realms] section in /etc/krb5.conf. For large organizations that have their own DNS servers, the above example could be trimmed to:
[libdefaults]
default_realm = EXAMPLE.ORG
[domain_realm]
.example.org = EXAMPLE.ORGWith the following lines being included in the example.org zone file:
_kerberos._udp IN SRV 01 00 88 kerberos.example.org. _kerberos._tcp IN SRV 01 00 88 kerberos.example.org. _kpasswd._udp IN SRV 01 00 464 kerberos.example.org. _kerberos-adm._tcp IN SRV 01 00 749 kerberos.example.org. _kerberos IN TXT EXAMPLE.ORG
In order for clients to be able to find the Kerberos services, they must have either a fully configured /etc/krb5.conf or a minimally configured /etc/krb5.confand a properly configured DNS server. |
Next, create the Kerberos database which contains the keys of all principals (users and hosts) encrypted with a master password. It is not required to remember this password as it will be stored in /var/heimdal/m-key; it would be reasonable to use a 45-character random password for this purpose. To create the master key, run kstash and enter a password:
# kstash
Master key: xxxxxxxxxxxxxxxxxxxxxxx
Verifying password - Master key: xxxxxxxxxxxxxxxxxxxxxxxOnce the master key has been created, the database should be initialized. The Kerberos administrative tool kadmin(8) can be used on the KDC in a mode that operates directly on the database, without using the kadmind(8) network service, as kadmin -l. This resolves the chicken-and-egg problem of trying to connect to the database before it is created. At the kadmin prompt, use init to create the realm’s initial database:
# kadmin -l
kadmin> init EXAMPLE.ORG
Realm max ticket life [unlimited]:Lastly, while still in kadmin, create the first principal using add. Stick to the default options for the principal for now, as these can be changed later with modify. Type ? at the prompt to see the available options.
kadmin> add tillman
Max ticket life [unlimited]:
Max renewable life [unlimited]:
Principal expiration time [never]:
Password expiration time [never]:
Attributes []:
Password: xxxxxxxx
Verifying password - Password: xxxxxxxxNext, start the KDC services by running:
# service kdc start
# service kadmind startWhile there will not be any kerberized daemons running at this point, it is possible to confirm that the KDC is functioning by obtaining a ticket for the principal that was just created:
% kinit tillman
tillman@EXAMPLE.ORG's Password:Confirm that a ticket was successfully obtained using klist:
% klist
Credentials cache: FILE:/tmp/krb5cc_1001
Principal: tillman@EXAMPLE.ORG
Issued Expires Principal
Aug 27 15:37:58 2013 Aug 28 01:37:58 2013 krbtgt/EXAMPLE.ORG@EXAMPLE.ORGThe temporary ticket can be destroyed when the test is finished:
% kdestroyThe first step in configuring a server to use Kerberos authentication is to ensure that it has the correct configuration in /etc/krb5.conf. The version from the KDC can be used as-is, or it can be regenerated on the new system.
Next, create /etc/krb5.keytab on the server. This is the main part of "Kerberizing" a service - it corresponds to generating a secret shared between the service and the KDC. The secret is a cryptographic key, stored in a "keytab". The keytab contains the server’s host key, which allows it and the KDC to verify each others' identity. It must be transmitted to the server in a secure fashion, as the security of the server can be broken if the key is made public. Typically, the keytab is generated on an administrator’s trusted machine using kadmin, then securely transferred to the server, e.g., with scp(1); it can also be created directly on the server if that is consistent with the desired security policy. It is very important that the keytab is transmitted to the server in a secure fashion: if the key is known by some other party, that party can impersonate any user to the server! Using kadmin on the server directly is convenient, because the entry for the host principal in the KDC database is also created using kadmin.
Of course, kadmin is a kerberized service; a Kerberos ticket is needed to authenticate to the network service, but to ensure that the user running kadmin is actually present (and their session has not been hijacked), kadmin will prompt for the password to get a fresh ticket. The principal authenticating to the kadmin service must be permitted to use the kadmin interface, as specified in /var/heimdal/kadmind.acl. See the section titled "Remote administration" in info heimdal for details on designing access control lists. Instead of enabling remote kadmin access, the administrator could securely connect to the KDC via the local console or ssh(1), and perform administration locally using kadmin -l.
After installing /etc/krb5.conf, use add --random-key in kadmin. This adds the server’s host principal to the database, but does not extract a copy of the host principal key to a keytab. To generate the keytab, use ext to extract the server’s host principal key to its own keytab:
# kadmin
kadmin> add --random-key host/myserver.example.org
Max ticket life [unlimited]:
Max renewable life [unlimited]:
Principal expiration time [never]:
Password expiration time [never]:
Attributes []:
kadmin> ext_keytab host/myserver.example.org
kadmin> exitNote that ext_keytab stores the extracted key in /etc/krb5.keytab by default. This is good when being run on the server being kerberized, but the --keytab path/to/file argument should be used when the keytab is being extracted elsewhere:
# kadmin
kadmin> ext_keytab --keytab=/tmp/example.keytab host/myserver.example.org
kadmin> exitThe keytab can then be securely copied to the server using scp(1) or a removable media. Be sure to specify a non-default keytab name to avoid inserting unneeded keys into the system’s keytab.
At this point, the server can read encrypted messages from the KDC using its shared key, stored in krb5.keytab. It is now ready for the Kerberos-using services to be enabled. One of the most common such services is sshd(8), which supports Kerberos via the GSS-API. In /etc/ssh/sshd_config, add the line:
GSSAPIAuthentication yes
After making this change, sshd(8) must be restarted for the new configuration to take effect: service sshd restart.
As it was for the server, the client requires configuration in /etc/krb5.conf. Copy the file in place (securely) or re-enter it as needed.
Test the client by using kinit, klist, and kdestroy from the client to obtain, show, and then delete a ticket for an existing principal. Kerberos applications should also be able to connect to Kerberos enabled servers. If that does not work but obtaining a ticket does, the problem is likely with the server and not with the client or the KDC. In the case of kerberized ssh(1), GSS-API is disabled by default, so test using ssh -o GSSAPIAuthentication=yes hostname.
When testing a Kerberized application, try using a packet sniffer such as tcpdump to confirm that no sensitive information is sent in the clear.
Various Kerberos client applications are available. With the advent of a bridge so that applications using SASL for authentication can use GSS-API mechanisms as well, large classes of client applications can use Kerberos for authentication, from Jabber clients to IMAP clients.
Users within a realm typically have their Kerberos principal mapped to a local user account. Occasionally, one needs to grant access to a local user account to someone who does not have a matching Kerberos principal. For example, tillman@EXAMPLE.ORG may need access to the local user account webdevelopers. Other principals may also need access to that local account.
The .k5login and .k5users files, placed in a user’s home directory, can be used to solve this problem. For example, if the following .k5login is placed in the home directory of webdevelopers, both principals listed will have access to that account without requiring a shared password:
tillman@example.org jdoe@example.org
Refer to ksu(1) for more information about .k5users.
The major difference between the MIT and Heimdal implementations is that kadmin has a different, but equivalent, set of commands and uses a different protocol. If the KDC is MIT, the Heimdal version of kadmin cannot be used to administer the KDC remotely, and vice versa.
Client applications may also use slightly different command line options to accomplish the same tasks. Following the instructions at http://web.mit.edu/Kerberos/www/ is recommended. Be careful of path issues: the MIT port installs into /usr/local/ by default, and the FreeBSD system applications run instead of the MIT versions if PATH lists the system directories first.
When using MIT Kerberos as a KDC on FreeBSD, the following edits should also be made to rc.conf:
kdc_program="/usr/local/sbin/kdc" kadmind_program="/usr/local/sbin/kadmind" kdc_flags="" kdc_enable="YES" kadmind_enable="YES"
When configuring and troubleshooting Kerberos, keep the following points in mind:
When using either Heimdal or MITKerberos from ports, ensure that the PATH lists the port’s versions of the client applications before the system versions.
If all the computers in the realm do not have synchronized time settings, authentication may fail. “Clock Synchronization with NTP” describes how to synchronize clocks using NTP.
If the hostname is changed, the host/ principal must be changed and the keytab updated. This also applies to special keytab entries like the HTTP/ principal used for Apache’s www/mod_auth_kerb.
All hosts in the realm must be both forward and reverse resolvable in DNS or, at a minimum, exist in /etc/hosts. CNAMEs will work, but the A and PTR records must be correct and in place. The error message for unresolvable hosts is not intuitive: Kerberos5 refuses authentication because Read req failed: Key table entry not found.
Some operating systems that act as clients to the KDC do not set the permissions for ksu to be setuid root. This means that ksu does not work. This is a permissions problem, not a KDC error.
With MITKerberos, to allow a principal to have a ticket life longer than the default lifetime of ten hours, use modify_principal at the kadmin(8) prompt to change the maxlife of both the principal in question and the krbtgt principal. The principal can then use kinit -l to request a ticket with a longer lifetime.
When running a packet sniffer on the KDC to aid in troubleshooting while running kinit from a workstation, the Ticket Granting Ticket (TGT) is sent immediately, even before the password is typed. This is because the Kerberos server freely transmits a TGT to any unauthorized request. However, every TGT is encrypted in a key derived from the user’s password. When a user types their password, it is not sent to the KDC, it is instead used to decrypt the TGT that kinit already obtained. If the decryption process results in a valid ticket with a valid time stamp, the user has valid Kerberos credentials. These credentials include a session key for establishing secure communications with the Kerberos server in the future, as well as the actual TGT, which is encrypted with the Kerberos server’s own key. This second layer of encryption allows the Kerberos server to verify the authenticity of each TGT.
Host principals can have a longer ticket lifetime. If the user principal has a lifetime of a week but the host being connected to has a lifetime of nine hours, the user cache will have an expired host principal and the ticket cache will not work as expected.
When setting up krb5.dict to prevent specific bad passwords from being used as described in kadmind(8), remember that it only applies to principals that have a password policy assigned to them. The format used in krb5.dict is one string per line. Creating a symbolic link to /usr/shared/dict/words might be useful.
Since Kerberos is an all or nothing approach, every service enabled on the network must either be modified to work with Kerberos or be otherwise secured against network attacks. This is to prevent user credentials from being stolen and re-used. An example is when Kerberos is enabled on all remote shells but the non-Kerberized POP3 mail server sends passwords in plain text.
The KDC is a single point of failure. By design, the KDC must be as secure as its master password database. The KDC should have absolutely no other services running on it and should be physically secure. The danger is high because Kerberos stores all passwords encrypted with the same master key which is stored as a file on the KDC.
A compromised master key is not quite as bad as one might fear. The master key is only used to encrypt the Kerberos database and as a seed for the random number generator. As long as access to the KDC is secure, an attacker cannot do much with the master key.
If the KDC is unavailable, network services are unusable as authentication cannot be performed. This can be alleviated with a single master KDC and one or more slaves, and with careful implementation of secondary or fall-back authentication using PAM.
Kerberos allows users, hosts and services to authenticate between themselves. It does not have a mechanism to authenticate the KDC to the users, hosts, or services. This means that a trojanned kinit could record all user names and passwords. File system integrity checking tools like security/tripwire can alleviate this.
OpenSSL is an open source implementation of the SSL and TLS protocols. It provides an encryption transport layer on top of the normal communications layer, allowing it to be intertwined with many network applications and services.
The version of OpenSSL included in FreeBSD supports the Secure Sockets Layer 3.0 (SSLv3) and Transport Layer Security 1.0/1.1/1.2 (TLSv1/TLSv1.1/TLSv1.2) network security protocols and can be used as a general cryptographic library. In FreeBSD 12.0-RELEASE and above, OpenSSL also supports Transport Layer Security 1.3 (TLSv1.3).
OpenSSL is often used to encrypt authentication of mail clients and to secure web based transactions such as credit card payments. Some ports, such as www/apache24 and databases/postgresql11-server, include a compile option for building with OpenSSL. If selected, the port will add support using OpenSSL from the base system. To instead have the port compile against OpenSSL from the security/openssl port, add the following to /etc/make.conf:
DEFAULT_VERSIONS+= ssl=openssl
Another common use of OpenSSL is to provide certificates for use with software applications. Certificates can be used to verify the credentials of a company or individual. If a certificate has not been signed by an external Certificate Authority (CA), such as http://www.verisign.com, the application that uses the certificate will produce a warning. There is a cost associated with obtaining a signed certificate and using a signed certificate is not mandatory as certificates can be self-signed. However, using an external authority will prevent warnings and can put users at ease.
This section demonstrates how to create and use certificates on a FreeBSD system. Refer to “Configuring an LDAP Server” for an example of how to create a CA for signing one’s own certificates.
For more information about SSL, read the free OpenSSL Cookbook.
To generate a certificate that will be signed by an external CA, issue the following command and input the information requested at the prompts. This input information will be written to the certificate. At the Common Name prompt, input the fully qualified name for the system that will use the certificate. If this name does not match the server, the application verifying the certificate will issue a warning to the user, rendering the verification provided by the certificate as useless.
# openssl req -new -nodes -out req.pem -keyout cert.key -sha256 -newkey rsa:2048
Generating a 2048 bit RSA private key
..................+++
.............................................................+++
writing new private key to 'cert.key'
-----
You are about to be asked to enter information that will be incorporated
into your certificate request.
What you are about to enter is what is called a Distinguished Name or a DN.
There are quite a few fields but you can leave some blank
For some fields there will be a default value,
If you enter '.', the field will be left blank.
-----
Country Name (2 letter code) [AU]:US
State or Province Name (full name) [Some-State]:PA
Locality Name (eg, city) []:Pittsburgh
Organization Name (eg, company) [Internet Widgits Pty Ltd]:My Company
Organizational Unit Name (eg, section) []:Systems Administrator
Common Name (eg, YOUR name) []:localhost.example.org
Email Address []:trhodes@FreeBSD.org
Please enter the following 'extra' attributes
to be sent with your certificate request
A challenge password []:
An optional company name []:Another NameOther options, such as the expire time and alternate encryption algorithms, are available when creating a certificate. A complete list of options is described in openssl(1).
This command will create two files in the current directory. The certificate request, req.pem, can be sent to a CA who will validate the entered credentials, sign the request, and return the signed certificate. The second file, cert.key, is the private key for the certificate and should be stored in a secure location. If this falls in the hands of others, it can be used to impersonate the user or the server.
Alternately, if a signature from a CA is not required, a self-signed certificate can be created. First, generate the RSA key:
# openssl genrsa -rand -genkey -out cert.key 2048
0 semi-random bytes loaded
Generating RSA private key, 2048 bit long modulus
.............................................+++
.................................................................................................................+++
e is 65537 (0x10001)Use this key to create a self-signed certificate. Follow the usual prompts for creating a certificate:
# openssl req -new -x509 -days 365 -key cert.key -out cert.crt -sha256
You are about to be asked to enter information that will be incorporated
into your certificate request.
What you are about to enter is what is called a Distinguished Name or a DN.
There are quite a few fields but you can leave some blank
For some fields there will be a default value,
If you enter '.', the field will be left blank.
-----
Country Name (2 letter code) [AU]:US
State or Province Name (full name) [Some-State]:PA
Locality Name (eg, city) []:Pittsburgh
Organization Name (eg, company) [Internet Widgits Pty Ltd]:My Company
Organizational Unit Name (eg, section) []:Systems Administrator
Common Name (e.g. server FQDN or YOUR name) []:localhost.example.org
Email Address []:trhodes@FreeBSD.orgThis will create two new files in the current directory: a private key file cert.key, and the certificate itself, cert.crt. These should be placed in a directory, preferably under /etc/ssl/, which is readable only by root. Permissions of 0700 are appropriate for these files and can be set using chmod.
One use for a certificate is to encrypt connections to the Sendmail mail server in order to prevent the use of clear text authentication.
Some mail clients will display an error if the user has not installed a local copy of the certificate. Refer to the documentation included with the software for more information on certificate installation. |
In FreeBSD 10.0-RELEASE and above, it is possible to create a self-signed certificate for Sendmail automatically. To enable this, add the following lines to /etc/rc.conf:
sendmail_enable="YES" sendmail_cert_create="YES" sendmail_cert_cn="localhost.example.org"
This will automatically create a self-signed certificate, /etc/mail/certs/host.cert, a signing key, /etc/mail/certs/host.key, and a CA certificate, /etc/mail/certs/cacert.pem. The certificate will use the Common Name specified in sendmail_cert_cn. After saving the edits, restart Sendmail:
# service sendmail restartIf all went well, there will be no error messages in /var/log/maillog. For a simple test, connect to the mail server’s listening port using telnet:
# telnet example.com 25
Trying 192.0.34.166...
Connected to example.com.
Escape character is '^]'.
220 example.com ESMTP Sendmail 8.14.7/8.14.7; Fri, 18 Apr 2014 11:50:32 -0400 (EDT)
ehlo example.com
250-example.com Hello example.com [192.0.34.166], pleased to meet you
250-ENHANCEDSTATUSCODES
250-PIPELINING
250-8BITMIME
250-SIZE
250-DSN
250-ETRN
250-AUTH LOGIN PLAIN
250-STARTTLS
250-DELIVERBY
250 HELP
quit
221 2.0.0 example.com closing connection
Connection closed by foreign host.If the STARTTLS line appears in the output, everything is working correctly.
Internet Protocol Security (IPsec) is a set of protocols which sit on top of the Internet Protocol (IP) layer. It allows two or more hosts to communicate in a secure manner by authenticating and encrypting each IP packet of a communication session. The FreeBSD IPsec network stack is based on the http://www.kame.net/ implementation and supports both IPv4 and IPv6 sessions.
IPsec is comprised of the following sub-protocols:
Encapsulated Security Payload (ESP): this protocol protects the IP packet data from third party interference by encrypting the contents using symmetric cryptography algorithms such as Blowfish and 3DES.
Authentication Header (AH): this protocol protects the IP packet header from third party interference and spoofing by computing a cryptographic checksum and hashing the IP packet header fields with a secure hashing function. This is then followed by an additional header that contains the hash, to allow the information in the packet to be authenticated.
IP Payload Compression Protocol (IPComp): this protocol tries to increase communication performance by compressing the IP payload in order to reduce the amount of data sent.
These protocols can either be used together or separately, depending on the environment.
IPsec supports two modes of operation. The first mode, Transport Mode, protects communications between two hosts. The second mode, Tunnel Mode, is used to build virtual tunnels, commonly known as Virtual Private Networks (VPNs). Consult ipsec(4) for detailed information on the IPsec subsystem in FreeBSD.
IPsec support is enabled by default on FreeBSD 11 and later. For previous versions of FreeBSD, add these options to a custom kernel configuration file and rebuild the kernel using the instructions in Configuring the FreeBSD Kernel:
options IPSEC IP security
device cryptoIf IPsec debugging support is desired, the following kernel option should also be added:
options IPSEC_DEBUG debug for IP securityThis rest of this chapter demonstrates the process of setting up an IPsecVPN between a home network and a corporate network. In the example scenario:
Both sites are connected to the Internet through a gateway that is running FreeBSD.
The gateway on each network has at least one external IP address. In this example, the corporate LAN’s external IP address is 172.16.5.4 and the home LAN’s external IP address is 192.168.1.12.
The internal addresses of the two networks can be either public or private IP addresses. However, the address space must not collide. For example, both networks cannot use 192.168.1.x. In this example, the corporate LAN’s internal IP address is 10.246.38.1 and the home LAN’s internal IP address is 10.0.0.5.
To begin, security/ipsec-tools must be installed from the Ports Collection. This software provides a number of applications which support the configuration.
The next requirement is to create two gif(4) pseudo-devices which will be used to tunnel packets and allow both networks to communicate properly. As root, run the following commands, replacing internal and external with the real IP addresses of the internal and external interfaces of the two gateways:
# ifconfig gif0 create
# ifconfig gif0 internal1 internal2
# ifconfig gif0 tunnel external1 external2Verify the setup on each gateway, using ifconfig. Here is the output from Gateway 1:
gif0: flags=8051 mtu 1280 tunnel inet 172.16.5.4 --> 192.168.1.12 inet6 fe80::2e0:81ff:fe02:5881%gif0 prefixlen 64 scopeid 0x6 inet 10.246.38.1 --> 10.0.0.5 netmask 0xffffff00
Here is the output from Gateway 2:
gif0: flags=8051 mtu 1280 tunnel inet 192.168.1.12 --> 172.16.5.4 inet 10.0.0.5 --> 10.246.38.1 netmask 0xffffff00 inet6 fe80::250:bfff:fe3a:c1f%gif0 prefixlen 64 scopeid 0x4
Once complete, both internal IP addresses should be reachable using ping(8):
priv-net# ping 10.0.0.5 PING 10.0.0.5 (10.0.0.5): 56 data bytes 64 bytes from 10.0.0.5: icmp_seq=0 ttl=64 time=42.786 ms 64 bytes from 10.0.0.5: icmp_seq=1 ttl=64 time=19.255 ms 64 bytes from 10.0.0.5: icmp_seq=2 ttl=64 time=20.440 ms 64 bytes from 10.0.0.5: icmp_seq=3 ttl=64 time=21.036 ms --- 10.0.0.5 ping statistics --- 4 packets transmitted, 4 packets received, 0% packet loss round-trip min/avg/max/stddev = 19.255/25.879/42.786/9.782 ms corp-net# ping 10.246.38.1 PING 10.246.38.1 (10.246.38.1): 56 data bytes 64 bytes from 10.246.38.1: icmp_seq=0 ttl=64 time=28.106 ms 64 bytes from 10.246.38.1: icmp_seq=1 ttl=64 time=42.917 ms 64 bytes from 10.246.38.1: icmp_seq=2 ttl=64 time=127.525 ms 64 bytes from 10.246.38.1: icmp_seq=3 ttl=64 time=119.896 ms 64 bytes from 10.246.38.1: icmp_seq=4 ttl=64 time=154.524 ms --- 10.246.38.1 ping statistics --- 5 packets transmitted, 5 packets received, 0% packet loss round-trip min/avg/max/stddev = 28.106/94.594/154.524/49.814 ms
As expected, both sides have the ability to send and receive ICMP packets from the privately configured addresses. Next, both gateways must be told how to route packets in order to correctly send traffic from either network. The following commands will achieve this goal:
corp-net# route add 10.0.0.0 10.0.0.5 255.255.255.0
corp-net# route add net 10.0.0.0: gateway 10.0.0.5
priv-net# route add 10.246.38.0 10.246.38.1 255.255.255.0
priv-net# route add host 10.246.38.0: gateway 10.246.38.1At this point, internal machines should be reachable from each gateway as well as from machines behind the gateways. Again, use ping(8) to confirm:
corp-net# ping 10.0.0.8 PING 10.0.0.8 (10.0.0.8): 56 data bytes 64 bytes from 10.0.0.8: icmp_seq=0 ttl=63 time=92.391 ms 64 bytes from 10.0.0.8: icmp_seq=1 ttl=63 time=21.870 ms 64 bytes from 10.0.0.8: icmp_seq=2 ttl=63 time=198.022 ms 64 bytes from 10.0.0.8: icmp_seq=3 ttl=63 time=22.241 ms 64 bytes from 10.0.0.8: icmp_seq=4 ttl=63 time=174.705 ms --- 10.0.0.8 ping statistics --- 5 packets transmitted, 5 packets received, 0% packet loss round-trip min/avg/max/stddev = 21.870/101.846/198.022/74.001 ms priv-net# ping 10.246.38.107 PING 10.246.38.1 (10.246.38.107): 56 data bytes 64 bytes from 10.246.38.107: icmp_seq=0 ttl=64 time=53.491 ms 64 bytes from 10.246.38.107: icmp_seq=1 ttl=64 time=23.395 ms 64 bytes from 10.246.38.107: icmp_seq=2 ttl=64 time=23.865 ms 64 bytes from 10.246.38.107: icmp_seq=3 ttl=64 time=21.145 ms 64 bytes from 10.246.38.107: icmp_seq=4 ttl=64 time=36.708 ms --- 10.246.38.107 ping statistics --- 5 packets transmitted, 5 packets received, 0% packet loss round-trip min/avg/max/stddev = 21.145/31.721/53.491/12.179 ms
Setting up the tunnels is the easy part. Configuring a secure link is a more in depth process. The following configuration uses pre-shared (PSK) RSA keys. Other than the IP addresses, the /usr/local/etc/racoon/racoon.conf on both gateways will be identical and look similar to:
path pre_shared_key "/usr/local/etc/racoon/psk.txt"; #location of pre-shared key file
log debug; #log verbosity setting: set to 'notify' when testing and debugging is complete
padding # options are not to be changed
{
maximum_length 20;
randomize off;
strict_check off;
exclusive_tail off;
}
timer # timing options. change as needed
{
counter 5;
interval 20 sec;
persend 1;
# natt_keepalive 15 sec;
phase1 30 sec;
phase2 15 sec;
}
listen # address [port] that racoon will listen on
{
isakmp 172.16.5.4 [500];
isakmp_natt 172.16.5.4 [4500];
}
remote 192.168.1.12 [500]
{
exchange_mode main,aggressive;
doi ipsec_doi;
situation identity_only;
my_identifier address 172.16.5.4;
peers_identifier address 192.168.1.12;
lifetime time 8 hour;
passive off;
proposal_check obey;
# nat_traversal off;
generate_policy off;
proposal {
encryption_algorithm blowfish;
hash_algorithm md5;
authentication_method pre_shared_key;
lifetime time 30 sec;
dh_group 1;
}
}
sainfo (address 10.246.38.0/24 any address 10.0.0.0/24 any) # address $network/$netmask $type address $network/$netmask $type ( $type being any or esp)
{ # $network must be the two internal networks you are joining.
pfs_group 1;
lifetime time 36000 sec;
encryption_algorithm blowfish,3des;
authentication_algorithm hmac_md5,hmac_sha1;
compression_algorithm deflate;
}For descriptions of each available option, refer to the manual page for racoon.conf.
The Security Policy Database (SPD) needs to be configured so that FreeBSD and racoon are able to encrypt and decrypt network traffic between the hosts.
This can be achieved with a shell script, similar to the following, on the corporate gateway. This file will be used during system initialization and should be saved as /usr/local/etc/racoon/setkey.conf.
flush; spdflush; # To the home network spdadd 10.246.38.0/24 10.0.0.0/24 any -P out ipsec esp/tunnel/172.16.5.4-192.168.1.12/use; spdadd 10.0.0.0/24 10.246.38.0/24 any -P in ipsec esp/tunnel/192.168.1.12-172.16.5.4/use;
Once in place, racoon may be started on both gateways using the following command:
# /usr/local/sbin/racoon -F -f /usr/local/etc/racoon/racoon.conf -l /var/log/racoon.logThe output should be similar to the following:
corp-net# /usr/local/sbin/racoon -F -f /usr/local/etc/racoon/racoon.conf Foreground mode. 2006-01-30 01:35:47: INFO: begin Identity Protection mode. 2006-01-30 01:35:48: INFO: received Vendor ID: KAME/racoon 2006-01-30 01:35:55: INFO: received Vendor ID: KAME/racoon 2006-01-30 01:36:04: INFO: ISAKMP-SA established 172.16.5.4[500]-192.168.1.12[500] spi:623b9b3bd2492452:7deab82d54ff704a 2006-01-30 01:36:05: INFO: initiate new phase 2 negotiation: 172.16.5.4[0]192.168.1.12[0] 2006-01-30 01:36:09: INFO: IPsec-SA established: ESP/Tunnel 192.168.1.12[0]->172.16.5.4[0] spi=28496098(0x1b2d0e2) 2006-01-30 01:36:09: INFO: IPsec-SA established: ESP/Tunnel 172.16.5.4[0]->192.168.1.12[0] spi=47784998(0x2d92426) 2006-01-30 01:36:13: INFO: respond new phase 2 negotiation: 172.16.5.4[0]192.168.1.12[0] 2006-01-30 01:36:18: INFO: IPsec-SA established: ESP/Tunnel 192.168.1.12[0]->172.16.5.4[0] spi=124397467(0x76a279b) 2006-01-30 01:36:18: INFO: IPsec-SA established: ESP/Tunnel 172.16.5.4[0]->192.168.1.12[0] spi=175852902(0xa7b4d66)
To ensure the tunnel is working properly, switch to another console and use tcpdump(1) to view network traffic using the following command. Replace em0 with the network interface card as required:
# tcpdump -i em0 host 172.16.5.4 and dst 192.168.1.12Data similar to the following should appear on the console. If not, there is an issue and debugging the returned data will be required.
01:47:32.021683 IP corporatenetwork.com > 192.168.1.12.privatenetwork.com: ESP(spi=0x02acbf9f,seq=0xa) 01:47:33.022442 IP corporatenetwork.com > 192.168.1.12.privatenetwork.com: ESP(spi=0x02acbf9f,seq=0xb) 01:47:34.024218 IP corporatenetwork.com > 192.168.1.12.privatenetwork.com: ESP(spi=0x02acbf9f,seq=0xc)
At this point, both networks should be available and seem to be part of the same network. Most likely both networks are protected by a firewall. To allow traffic to flow between them, rules need to be added to pass packets. For the ipfw(8) firewall, add the following lines to the firewall configuration file:
ipfw add 00201 allow log esp from any to any ipfw add 00202 allow log ah from any to any ipfw add 00203 allow log ipencap from any to any ipfw add 00204 allow log udp from any 500 to any
The rule numbers may need to be altered depending on the current host configuration. |
pass in quick proto esp from any to any pass in quick proto ah from any to any pass in quick proto ipencap from any to any pass in quick proto udp from any port = 500 to any port = 500 pass in quick on gif0 from any to any pass out quick proto esp from any to any pass out quick proto ah from any to any pass out quick proto ipencap from any to any pass out quick proto udp from any port = 500 to any port = 500 pass out quick on gif0 from any to any
Finally, to allow the machine to start support for the VPN during system initialization, add the following lines to /etc/rc.conf:
ipsec_enable="YES" ipsec_program="/usr/local/sbin/setkey" ipsec_file="/usr/local/etc/racoon/setkey.conf" # allows setting up spd policies on boot racoon_enable="yes"
OpenSSH is a set of network connectivity tools used to provide secure access to remote machines. Additionally, TCP/IP connections can be tunneled or forwarded securely through SSH connections. OpenSSH encrypts all traffic to effectively eliminate eavesdropping, connection hijacking, and other network-level attacks.
OpenSSH is maintained by the OpenBSD project and is installed by default in FreeBSD. It is compatible with both SSH version 1 and 2 protocols.
When data is sent over the network in an unencrypted form, network sniffers anywhere in between the client and server can steal user/password information or data transferred during the session. OpenSSH offers a variety of authentication and encryption methods to prevent this from happening. More information about OpenSSH is available from http://www.openssh.com/.
This section provides an overview of the built-in client utilities to securely access other systems and securely transfer files from a FreeBSD system. It then describes how to configure a SSH server on a FreeBSD system. More information is available in the man pages mentioned in this chapter.
To log into a SSH server, use ssh and specify a username that exists on that server and the IP address or hostname of the server. If this is the first time a connection has been made to the specified server, the user will be prompted to first verify the server’s fingerprint:
# ssh user@example.com
The authenticity of host 'example.com (10.0.0.1)' can't be established.
ECDSA key fingerprint is 25:cc:73:b5:b3:96:75:3d:56:19:49:d2:5c:1f:91:3b.
Are you sure you want to continue connecting (yes/no)? yes
Permanently added 'example.com' (ECDSA) to the list of known hosts.
Password for user@example.com: user_passwordSSH utilizes a key fingerprint system to verify the authenticity of the server when the client connects. When the user accepts the key’s fingerprint by typing yes when connecting for the first time, a copy of the key is saved to .ssh/known_hosts in the user’s home directory. Future attempts to login are verified against the saved key and ssh will display an alert if the server’s key does not match the saved key. If this occurs, the user should first verify why the key has changed before continuing with the connection.
By default, recent versions of OpenSSH only accept SSHv2 connections. By default, the client will use version 2 if possible and will fall back to version 1 if the server does not support version 2. To force ssh to only use the specified protocol, include -1 or -2. Additional options are described in ssh(1).
Use scp(1) to securely copy a file to or from a remote machine. This example copies COPYRIGHT on the remote system to a file of the same name in the current directory of the local system:
# scp user@example.com:/COPYRIGHT COPYRIGHT
Password for user@example.com: *******
COPYRIGHT 100% |*****************************| 4735
00:00
#Since the fingerprint was already verified for this host, the server’s key is automatically checked before prompting for the user’s password.
The arguments passed to scp are similar to cp. The file or files to copy is the first argument and the destination to copy to is the second. Since the file is fetched over the network, one or more of the file arguments takes the form user@host:<path_to_remote_file>. Be aware when copying directories recursively that scp uses -r, whereas cp uses -R.
To open an interactive session for copying files, use sftp. Refer to sftp(1) for a list of available commands while in an sftp session.
Instead of using passwords, a client can be configured to connect to the remote machine using keys. To generate RSA authentication keys, use ssh-keygen. To generate a public and private key pair, specify the type of key and follow the prompts. It is recommended to protect the keys with a memorable, but hard to guess passphrase.
% ssh-keygen -t rsa
Generating public/private rsa key pair.
Enter file in which to save the key (/home/user/.ssh/id_rsa):
Enter passphrase (empty for no passphrase): (1)
Enter same passphrase again: (2)
Your identification has been saved in /home/user/.ssh/id_rsa.
Your public key has been saved in /home/user/.ssh/id_rsa.pub.
The key fingerprint is:
SHA256:54Xm9Uvtv6H4NOo6yjP/YCfODryvUU7yWHzMqeXwhq8 user@host.example.com
The key's randomart image is:
+---[RSA 2048]----+
| |
| |
| |
| . o.. |
| .S*+*o |
| . O=Oo . . |
| = Oo= oo..|
| .oB.* +.oo.|
| =OE**.o..=|
+----[SHA256]-----+| 1 | Type a passphrase here. It can contain spaces and symbols. |
| 2 | Retype the passphrase to verify it. |
The private key is stored in ~/.ssh/id_rsa and the public key is stored in ~/.ssh/id_rsa.pub. The public key must be copied to ~/.ssh/authorized_keys on the remote machine for key-based authentication to work.
Many users believe that keys are secure by design and will use a key without a passphrase. This is dangerous behavior. An administrator can verify that a key pair is protected by a passphrase by viewing the private key manually. If the private key file contains the word |
The options and files vary with different versions of OpenSSH. To avoid problems, consult ssh-keygen(1).
If a passphrase is used, the user is prompted for the passphrase each time a connection is made to the server. To load SSH keys into memory and remove the need to type the passphrase each time, use ssh-agent(1) and ssh-add(1).
Authentication is handled by ssh-agent, using the private keys that are loaded into it. ssh-agent can be used to launch another application like a shell or a window manager.
To use ssh-agent in a shell, start it with a shell as an argument. Add the identity by running ssh-add and entering the passphrase for the private key. The user will then be able to ssh to any host that has the corresponding public key installed. For example:
% ssh-agent csh
% ssh-add
Enter passphrase for key '/usr/home/user/.ssh/id_rsa': (1)
Identity added: /usr/home/user/.ssh/id_rsa (/usr/home/user/.ssh/id_rsa)
%| 1 | Enter the passphrase for the key. |
To use ssh-agent in Xorg, add an entry for it in ~/.xinitrc. This provides the ssh-agent services to all programs launched in Xorg. An example ~/.xinitrc might look like this:
exec ssh-agent startxfce4
This launches ssh-agent, which in turn launches XFCE, every time Xorg starts. Once Xorg has been restarted so that the changes can take effect, run ssh-add to load all of the SSH keys.
OpenSSH has the ability to create a tunnel to encapsulate another protocol in an encrypted session.
The following command tells ssh to create a tunnel for telnet:
% ssh -2 -N -f -L 5023:localhost:23 user@foo.example.com
%This example uses the following options:
-2Forces ssh to use version 2 to connect to the server.
-NIndicates no command, or tunnel only. If omitted, ssh initiates a normal session.
-fForces ssh to run in the background.
-LIndicates a local tunnel in localport:remotehost:remoteport format.
user@foo.example.comThe login name to use on the specified remote SSH server.
An SSH tunnel works by creating a listen socket on localhost on the specified localport. It then forwards any connections received on localport via the SSH connection to the specified remotehost:remoteport. In the example, port 5023 on the client is forwarded to port 23 on the remote machine. Since port 23 is used by telnet, this creates an encrypted telnet session through an SSH tunnel.
This method can be used to wrap any number of insecure TCP protocols such as SMTP, POP3, and FTP, as seen in the following examples.
% ssh -2 -N -f -L 5025:localhost:25 user@mailserver.example.com
user@mailserver.example.com's password: *****
% telnet localhost 5025
Trying 127.0.0.1...
Connected to localhost.
Escape character is '^]'.
220 mailserver.example.com ESMTPThis can be used in conjunction with ssh-keygen and additional user accounts to create a more seamless SSH tunneling environment. Keys can be used in place of typing a password, and the tunnels can be run as a separate user.
In this example, there is an SSH server that accepts connections from the outside. On the same network resides a mail server running a POP3 server. To check email in a secure manner, create an SSH connection to the SSH server and tunnel through to the mail server:
% ssh -2 -N -f -L 2110:mail.example.com:110 user@ssh-server.example.com
user@ssh-server.example.com's password: ******Once the tunnel is up and running, point the email client to send POP3 requests to localhost on port 2110. This connection will be forwarded securely across the tunnel to mail.example.com.
Some firewalls filter both incoming and outgoing connections. For example, a firewall might limit access from remote machines to ports 22 and 80 to only allow SSH and web surfing. This prevents access to any other service which uses a port other than 22 or 80.
The solution is to create an SSH connection to a machine outside of the network’s firewall and use it to tunnel to the desired service:
% ssh -2 -N -f -L 8888:music.example.com:8000 user@unfirewalled-system.example.org
user@unfirewalled-system.example.org's password: *******In this example, a streaming Ogg Vorbis client can now be pointed to localhost port 8888, which will be forwarded over to music.example.com on port 8000, successfully bypassing the firewall.
In addition to providing built-in SSH client utilities, a FreeBSD system can be configured as an SSH server, accepting connections from other SSH clients.
To see if sshd is operating, use the service(8) command:
# service sshd statusIf the service is not running, add the following line to /etc/rc.conf.
sshd_enable="YES"
This will start sshd, the daemon program for OpenSSH, the next time the system boots. To start it now:
# service sshd startThe first time sshd starts on a FreeBSD system, the system’s host keys will be automatically created and the fingerprint will be displayed on the console. Provide users with the fingerprint so that they can verify it the first time they connect to the server.
Refer to sshd(8) for the list of available options when starting sshd and a more complete discussion about authentication, the login process, and the various configuration files.
At this point, the sshd should be available to all users with a username and password on the system.
While sshd is the most widely used remote administration facility for FreeBSD, brute force and drive by attacks are common to any system exposed to public networks. Several additional parameters are available to prevent the success of these attacks and will be described in this section.
It is a good idea to limit which users can log into the SSH server and from where using the AllowUsers keyword in the OpenSSH server configuration file. For example, to only allow root to log in from 192.168.1.32, add this line to /etc/ssh/sshd_config:
AllowUsers root@192.168.1.32
To allow admin to log in from anywhere, list that user without specifying an IP address:
AllowUsers admin
Multiple users should be listed on the same line, like so:
AllowUsers root@192.168.1.32 admin
After making changes to /etc/ssh/sshd_config, tell sshd to reload its configuration file by running:
# service sshd reloadWhen this keyword is used, it is important to list each user that needs to log into this machine. Any user that is not specified in that line will be locked out. Also, the keywords used in the OpenSSH server configuration file are case-sensitive. If the keyword is not spelled correctly, including its case, it will be ignored. Always test changes to this file to make sure that the edits are working as expected. Refer to sshd_config(5) to verify the spelling and use of the available keywords. |
In addition, users may be forced to use two factor authentication via the use of a public and private key. When required, the user may generate a key pair through the use of ssh-keygen(1) and send the administrator the public key. This key file will be placed in the authorized_keys as described above in the client section. To force the users to use keys only, the following option may be configured:
AuthenticationMethods publickey
Do not confuse /etc/ssh/sshd_config with /etc/ssh/ssh_config (note the extra |
Access Control Lists (ACLs) extend the standard UNIX® permission model in a POSIX®.1e compatible way. This permits an administrator to take advantage of a more fine-grained permissions model.
The FreeBSD GENERIC kernel provides ACL support for UFS file systems. Users who prefer to compile a custom kernel must include the following option in their custom kernel configuration file:
options UFS_ACL
If this option is not compiled in, a warning message will be displayed when attempting to mount a file system with ACL support. ACLs rely on extended attributes which are natively supported in UFS2.
This chapter describes how to enable ACL support and provides some usage examples.
ACLs are enabled by the mount-time administrative flag, acls, which may be added to /etc/fstab. The mount-time flag can also be automatically set in a persistent manner using tunefs(8) to modify a superblock ACLs flag in the file system header. In general, it is preferred to use the superblock flag for several reasons:
The superblock flag cannot be changed by a remount using mount -u as it requires a complete umount and fresh mount. This means that ACLs cannot be enabled on the root file system after boot. It also means that ACL support on a file system cannot be changed while the system is in use.
Setting the superblock flag causes the file system to always be mounted with ACLs enabled, even if there is not an fstab entry or if the devices re-order. This prevents accidental mounting of the file system without ACL support.
It is desirable to discourage accidental mounting without ACLs enabled because nasty things can happen if ACLs are enabled, then disabled, then re-enabled without flushing the extended attributes. In general, once ACLs are enabled on a file system, they should not be disabled, as the resulting file protections may not be compatible with those intended by the users of the system, and re-enabling ACLs may re-attach the previous ACLs to files that have since had their permissions changed, resulting in unpredictable behavior. |
File systems with ACLs enabled will show a plus (+) sign in their permission settings:
drwx------ 2 robert robert 512 Dec 27 11:54 private drwxrwx---+ 2 robert robert 512 Dec 23 10:57 directory1 drwxrwx---+ 2 robert robert 512 Dec 22 10:20 directory2 drwxrwx---+ 2 robert robert 512 Dec 27 11:57 directory3 drwxr-xr-x 2 robert robert 512 Nov 10 11:54 public_html
In this example, directory1, directory2, and directory3 are all taking advantage of ACLs, whereas public_html is not.
File system ACLs can be viewed using getfacl. For instance, to view the ACL settings on test:
% getfacl test
#file:test
#owner:1001
#group:1001
user::rw-
group::r--
other::r--To change the ACL settings on this file, use setfacl. To remove all of the currently defined ACLs from a file or file system, include -k. However, the preferred method is to use -b as it leaves the basic fields required for ACLs to work.
% setfacl -k testTo modify the default ACL entries, use -m:
% setfacl -m u:trhodes:rwx,group:web:r--,o::--- testIn this example, there were no pre-defined entries, as they were removed by the previous command. This command restores the default options and assigns the options listed. If a user or group is added which does not exist on the system, an Invalid argument error will be displayed.
Refer to getfacl(1) and setfacl(1) for more information about the options available for these commands.
In recent years, the security world has made many improvements to how vulnerability assessment is handled. The threat of system intrusion increases as third party utilities are installed and configured for virtually any operating system available today.
Vulnerability assessment is a key factor in security. While FreeBSD releases advisories for the base system, doing so for every third party utility is beyond the FreeBSD Project’s capability. There is a way to mitigate third party vulnerabilities and warn administrators of known security issues. A FreeBSD add on utility known as pkg includes options explicitly for this purpose.
pkg polls a database for security issues. The database is updated and maintained by the FreeBSD Security Team and ports developers.
Please refer to instructions for installing pkg.
Installation provides periodic(8) configuration files for maintaining the pkg audit database, and provides a programmatic method of keeping it updated. This functionality is enabled if daily_status_security_pkgaudit_enable is set to YES in periodic.conf(5). Ensure that daily security run emails, which are sent to root's email account, are being read.
After installation, and to audit third party utilities as part of the Ports Collection at any time, an administrator may choose to update the database and view known vulnerabilities of installed packages by invoking:
# pkg audit -Fpkg displays messages any published vulnerabilities in installed packages:
Affected package: cups-base-1.1.22.0_1 Type of problem: cups-base -- HPGL buffer overflow vulnerability. Reference: <https://www.FreeBSD.org/ports/portaudit/40a3bca2-6809-11d9-a9e7-0001020eed82.html> 1 problem(s) in your installed packages found. You are advised to update or deinstall the affected package(s) immediately.
By pointing a web browser to the displayed URL, an administrator may obtain more information about the vulnerability. This will include the versions affected, by FreeBSD port version, along with other web sites which may contain security advisories.
pkg is a powerful utility and is extremely useful when coupled with ports-mgmt/portmaster.
Like many producers of quality operating systems, the FreeBSD Project has a security team which is responsible for determining the End-of-Life (EoL) date for each FreeBSD release and to provide security updates for supported releases which have not yet reached their EoL. More information about the FreeBSD security team and the supported releases is available on the FreeBSD security page.
One task of the security team is to respond to reported security vulnerabilities in the FreeBSD operating system. Once a vulnerability is confirmed, the security team verifies the steps necessary to fix the vulnerability and updates the source code with the fix. It then publishes the details as a "Security Advisory". Security advisories are published on the FreeBSD website and mailed to the FreeBSD security notifications mailing list, FreeBSD security mailing list, and FreeBSD announcements mailing list mailing lists.
This section describes the format of a FreeBSD security advisory.
Here is an example of a FreeBSD security advisory:
=============================================================================
-----BEGIN PGP SIGNED MESSAGE-----
Hash: SHA512
=============================================================================
FreeBSD-SA-14:04.bind Security Advisory
The FreeBSD Project
Topic: BIND remote denial of service vulnerability
Category: contrib
Module: bind
Announced: 2014-01-14
Credits: ISC
Affects: FreeBSD 8.x and FreeBSD 9.x
Corrected: 2014-01-14 19:38:37 UTC (stable/9, 9.2-STABLE)
2014-01-14 19:42:28 UTC (releng/9.2, 9.2-RELEASE-p3)
2014-01-14 19:42:28 UTC (releng/9.1, 9.1-RELEASE-p10)
2014-01-14 19:38:37 UTC (stable/8, 8.4-STABLE)
2014-01-14 19:42:28 UTC (releng/8.4, 8.4-RELEASE-p7)
2014-01-14 19:42:28 UTC (releng/8.3, 8.3-RELEASE-p14)
CVE Name: CVE-2014-0591
For general information regarding FreeBSD Security Advisories,
including descriptions of the fields above, security branches, and the
following sections, please visit <URL:http://security.FreeBSD.org/>.
I. Background
BIND 9 is an implementation of the Domain Name System (DNS) protocols.
The named(8) daemon is an Internet Domain Name Server.
II. Problem Description
Because of a defect in handling queries for NSEC3-signed zones, BIND can
crash with an "INSIST" failure in name.c when processing queries possessing
certain properties. This issue only affects authoritative nameservers with
at least one NSEC3-signed zone. Recursive-only servers are not at risk.
III. Impact
An attacker who can send a specially crafted query could cause named(8)
to crash, resulting in a denial of service.
IV. Workaround
No workaround is available, but systems not running authoritative DNS service
with at least one NSEC3-signed zone using named(8) are not vulnerable.
V. Solution
Perform one of the following:
1) Upgrade your vulnerable system to a supported FreeBSD stable or
release / security branch (releng) dated after the correction date.
2) To update your vulnerable system via a source code patch:
The following patches have been verified to apply to the applicable
FreeBSD release branches.
a) Download the relevant patch from the location below, and verify the
detached PGP signature using your PGP utility.
[FreeBSD 8.3, 8.4, 9.1, 9.2-RELEASE and 8.4-STABLE]
# fetch http://security.FreeBSD.org/patches/SA-14:04/bind-release.patch
# fetch http://security.FreeBSD.org/patches/SA-14:04/bind-release.patch.asc
# gpg --verify bind-release.patch.asc
[FreeBSD 9.2-STABLE]
# fetch http://security.FreeBSD.org/patches/SA-14:04/bind-stable-9.patch
# fetch http://security.FreeBSD.org/patches/SA-14:04/bind-stable-9.patch.asc
# gpg --verify bind-stable-9.patch.asc
b) Execute the following commands as root:
# cd /usr/src
# patch < /path/to/patch
Recompile the operating system using buildworld and installworld as
described in <URL:https://www.FreeBSD.org/handbook/makeworld.html>.
Restart the applicable daemons, or reboot the system.
3) To update your vulnerable system via a binary patch:
Systems running a RELEASE version of FreeBSD on the i386 or amd64
platforms can be updated via the freebsd-update(8) utility:
# freebsd-update fetch
# freebsd-update install
VI. Correction details
The following list contains the correction revision numbers for each
affected branch.
Branch/path Revision
- -------------------------------------------------------------------------
stable/8/ r260646
releng/8.3/ r260647
releng/8.4/ r260647
stable/9/ r260646
releng/9.1/ r260647
releng/9.2/ r260647
- -------------------------------------------------------------------------
To see which files were modified by a particular revision, run the
following command, replacing NNNNNN with the revision number, on a
machine with Subversion installed:
# svn diff -cNNNNNN --summarize svn://svn.freebsd.org/base
Or visit the following URL, replacing NNNNNN with the revision number:
<URL:https://svnweb.freebsd.org/base?view=revision&revision=NNNNNN>
VII. References
<URL:https://kb.isc.org/article/AA-01078>
<URL:http://cve.mitre.org/cgi-bin/cvename.cgi?name=CVE-2014-0591>
The latest revision of this advisory is available at
<URL:http://security.FreeBSD.org/advisories/FreeBSD-SA-14:04.bind.asc>
-----BEGIN PGP SIGNATURE-----
iQIcBAEBCgAGBQJS1ZTYAAoJEO1n7NZdz2rnOvQP/2/68/s9Cu35PmqNtSZVVxVG
ZSQP5EGWx/lramNf9566iKxOrLRMq/h3XWcC4goVd+gZFrvITJSVOWSa7ntDQ7TO
XcinfRZ/iyiJbs/Rg2wLHc/t5oVSyeouyccqODYFbOwOlk35JjOTMUG1YcX+Zasg
ax8RV+7Zt1QSBkMlOz/myBLXUjlTZ3Xg2FXVsfFQW5/g2CjuHpRSFx1bVNX6ysoG
9DT58EQcYxIS8WfkHRbbXKh9I1nSfZ7/Hky/kTafRdRMrjAgbqFgHkYTYsBZeav5
fYWKGQRJulYfeZQ90yMTvlpF42DjCC3uJYamJnwDIu8OhS1WRBI8fQfr9DRzmRua
OK3BK9hUiScDZOJB6OqeVzUTfe7MAA4/UwrDtTYQ+PqAenv1PK8DZqwXyxA9ThHb
zKO3OwuKOVHJnKvpOcr+eNwo7jbnHlis0oBksj/mrq2P9m2ueF9gzCiq5Ri5Syag
Wssb1HUoMGwqU0roS8+pRpNC8YgsWpsttvUWSZ8u6Vj/FLeHpiV3mYXPVMaKRhVm
067BA2uj4Th1JKtGleox+Em0R7OFbCc/9aWC67wiqI6KRyit9pYiF3npph+7D5Eq
7zPsUdDd+qc+UTiLp3liCRp5w6484wWdhZO6wRtmUgxGjNkxFoNnX8CitzF8AaqO
UWWemqWuz3lAZuORQ9KX
=OQzQ
-----END PGP SIGNATURE-----Every security advisory uses the following format:
Each security advisory is signed by the PGP key of the Security Officer. The public key for the Security Officer can be verified at OpenPGP Keys.
The name of the security advisory always begins with FreeBSD-SA- (for FreeBSD Security Advisory), followed by the year in two digit format (14:), followed by the advisory number for that year (04.), followed by the name of the affected application or subsystem (bind). The advisory shown here is the fourth advisory for 2014 and it affects BIND.
The Topic field summarizes the vulnerability.
The Category refers to the affected part of the system which may be one of core, contrib, or ports. The core category means that the vulnerability affects a core component of the FreeBSD operating system. The contrib category means that the vulnerability affects software included with FreeBSD, such as BIND. The ports category indicates that the vulnerability affects software available through the Ports Collection.
The Module field refers to the component location. In this example, the bind module is affected; therefore, this vulnerability affects an application installed with the operating system.
The Announced field reflects the date the security advisory was published. This means that the security team has verified that the problem exists and that a patch has been committed to the FreeBSD source code repository.
The Credits field gives credit to the individual or organization who noticed the vulnerability and reported it.
The Affects field explains which releases of FreeBSD are affected by this vulnerability.
The Corrected field indicates the date, time, time offset, and releases that were corrected. The section in parentheses shows each branch for which the fix has been merged, and the version number of the corresponding release from that branch. The release identifier itself includes the version number and, if appropriate, the patch level. The patch level is the letter p followed by a number, indicating the sequence number of the patch, allowing users to track which patches have already been applied to the system.
The CVE Name field lists the advisory number, if one exists, in the public cve.mitre.org security vulnerabilities database.
The Background field provides a description of the affected module.
The Problem Description field explains the vulnerability. This can include information about the flawed code and how the utility could be maliciously used.
The Impact field describes what type of impact the problem could have on a system.
The Workaround field indicates if a workaround is available to system administrators who cannot immediately patch the system .
The Solution field provides the instructions for patching the affected system. This is a step by step tested and verified method for getting a system patched and working securely.
The Correction Details field displays each affected Subversion branch with the revision number that contains the corrected code.
The References field offers sources of additional information regarding the vulnerability.
Process accounting is a security method in which an administrator may keep track of system resources used and their allocation among users, provide for system monitoring, and minimally track a user’s commands.
Process accounting has both positive and negative points. One of the positives is that an intrusion may be narrowed down to the point of entry. A negative is the amount of logs generated by process accounting, and the disk space they may require. This section walks an administrator through the basics of process accounting.
If more fine-grained accounting is needed, refer to Security Event Auditing. |
Before using process accounting, it must be enabled using the following commands:
# sysrc accounting_enable=yes
# service accounting startThe accounting information is stored in files located in /var/account, which is automatically created, if necessary, the first time the accounting service starts. These files contain sensitive information, including all the commands issued by all users. Write access to the files is limited to root, and read access is limited to root and members of the wheel group. To also prevent members of wheel from reading the files, change the mode of the /var/account directory to allow access only by root.
Once enabled, accounting will begin to track information such as CPU statistics and executed commands. All accounting logs are in a non-human readable format which can be viewed using sa. If issued without any options, sa prints information relating to the number of per-user calls, the total elapsed time in minutes, total CPU and user time in minutes, and the average number of I/O operations. Refer to sa(8) for the list of available options which control the output.
To display the commands issued by users, use lastcomm. For example, this command prints out all usage of ls by trhodes on the ttyp1 terminal:
# lastcomm ls trhodes ttyp1Many other useful options exist and are explained in lastcomm(1), acct(5), and sa(8).
FreeBSD provides several methods for an administrator to limit the amount of system resources an individual may use. Disk quotas limit the amount of disk space available to users. Quotas are discussed in Disk Quotas.
Limits to other resources, such as CPU and memory, can be set using either a flat file or a command to configure a resource limits database. The traditional method defines login classes by editing /etc/login.conf. While this method is still supported, any changes require a multi-step process of editing this file, rebuilding the resource database, making necessary changes to /etc/master.passwd, and rebuilding the password database. This can become time consuming, depending upon the number of users to configure.
rctl can be used to provide a more fine-grained method for controlling resource limits. This command supports more than user limits as it can also be used to set resource constraints on processes and jails.
This section demonstrates both methods for controlling resources, beginning with the traditional method.
In the traditional method, login classes and the resource limits to apply to a login class are defined in /etc/login.conf. Each user account can be assigned to a login class, where default is the default login class. Each login class has a set of login capabilities associated with it. A login capability is a name=value pair, where name is a well-known identifier and value is an arbitrary string which is processed accordingly depending on the name.
Whenever /etc/login.conf is edited, the /etc/login.conf.db must be updated by executing the following command: |
Resource limits differ from the default login capabilities in two ways. First, for every limit, there is a soft and hard limit. A soft limit may be adjusted by the user or application, but may not be set higher than the hard limit. The hard limit may be lowered by the user, but can only be raised by the superuser. Second, most resource limits apply per process to a specific user.
Login Class Resource Limits lists the most commonly used resource limits. All of the available resource limits and capabilities are described in detail in login.conf(5).
| Resource Limit | Description |
|---|---|
coredumpsize | The limit on the size of a core file generated by a program is subordinate to other limits on disk usage, such as |
cputime | The maximum amount of CPU time a user’s process may consume. Offending processes will be killed by the kernel. This is a limit on CPU time consumed, not the percentage of the CPU as displayed in some of the fields generated by |
filesize | The maximum size of a file the user may own. Unlike disk quotas (Disk Quotas), this limit is enforced on individual files, not the set of all files a user owns. |
maxproc | The maximum number of foreground and background processes a user can run. This limit may not be larger than the system limit specified by |
memorylocked | The maximum amount of memory a process may request to be locked into main memory using mlock(2). Some system-critical programs, such as amd(8), lock into main memory so that if the system begins to swap, they do not contribute to disk thrashing. |
memoryuse | The maximum amount of memory a process may consume at any given time. It includes both core memory and swap usage. This is not a catch-all limit for restricting memory consumption, but is a good start. |
openfiles | The maximum number of files a process may have open. In FreeBSD, files are used to represent sockets and IPC channels, so be careful not to set this too low. The system-wide limit for this is defined by |
sbsize | The limit on the amount of network memory a user may consume. This can be generally used to limit network communications. |
stacksize | The maximum size of a process stack. This alone is not sufficient to limit the amount of memory a program may use, so it should be used in conjunction with other limits. |
There are a few other things to remember when setting resource limits:
Processes started at system startup by /etc/rc are assigned to the daemon login class.
Although the default /etc/login.conf is a good source of reasonable values for most limits, they may not be appropriate for every system. Setting a limit too high may open the system up to abuse, while setting it too low may put a strain on productivity.
Xorg takes a lot of resources and encourages users to run more programs simultaneously.
Many limits apply to individual processes, not the user as a whole. For example, setting openfiles to 50 means that each process the user runs may open up to 50 files. The total amount of files a user may open is the value of openfiles multiplied by the value of maxproc. This also applies to memory consumption.
For further information on resource limits and login classes and capabilities in general, refer to cap.mkdb(1), getrlimit(2), and login.conf(5).
The kern.racct.enable tunable must be set to a non-zero value. Custom kernels require specific configuration:
options RACCT options RCTL
Once the system has rebooted into the new kernel, rctl may be used to set rules for the system.
Rule syntax is controlled through the use of a subject, subject-id, resource, and action, as seen in this example rule:
user:trhodes:maxproc:deny=10/user
In this rule, the subject is user, the subject-id is trhodes, the resource, maxproc, is the maximum number of processes, and the action is deny, which blocks any new processes from being created. This means that the user, trhodes, will be constrained to no greater than 10 processes. Other possible actions include logging to the console, passing a notification to devd(8), or sending a sigterm to the process.
Some care must be taken when adding rules. Since this user is constrained to 10 processes, this example will prevent the user from performing other tasks after logging in and executing a screen session. Once a resource limit has been hit, an error will be printed, as in this example:
% man test
/usr/bin/man: Cannot fork: Resource temporarily unavailable
eval: Cannot fork: Resource temporarily unavailableAs another example, a jail can be prevented from exceeding a memory limit. This rule could be written as:
# rctl -a jail:httpd:memoryuse:deny=2G/jailRules will persist across reboots if they have been added to /etc/rctl.conf. The format is a rule, without the preceding command. For example, the previous rule could be added as:
# Block jail from using more than 2G memory: jail:httpd:memoryuse:deny=2G/jail
To remove a rule, use rctl to remove it from the list:
# rctl -r user:trhodes:maxproc:deny=10/userA method for removing all rules is documented in rctl(8). However, if removing all rules for a single user is required, this command may be issued:
# rctl -r user:trhodesMany other resources exist which can be used to exert additional control over various subjects. See rctl(8) to learn about them.
System administrators often need the ability to grant enhanced permissions to users so they may perform privileged tasks. The idea that team members are provided access to a FreeBSD system to perform their specific tasks opens up unique challenges to every administrator. These team members only need a subset of access beyond normal end user levels; however, they almost always tell management they are unable to perform their tasks without superuser access. Thankfully, there is no reason to provide such access to end users because tools exist to manage this exact requirement.
Up to this point, the security chapter has covered permitting access to authorized users and attempting to prevent unauthorized access. Another problem arises once authorized users have access to the system resources. In many cases, some users may need access to application startup scripts, or a team of administrators need to maintain the system. Traditionally, the standard users and groups, file permissions, and even the su(1) command would manage this access. And as applications required more access, as more users needed to use system resources, a better solution was required. The most used application is currently Sudo.
Sudo allows administrators to configure more rigid access to system commands and provide for some advanced logging features. As a tool, it is available from the Ports Collection as security/sudo or by use of the pkg(8) utility. To use the pkg(8) tool:
# pkg install sudoAfter the installation is complete, the installed visudo will open the configuration file with a text editor. Using visudo is highly recommended as it comes with a built in syntax checker to verify there are no errors before the file is saved.
The configuration file is made up of several small sections which allow for extensive configuration. In the following example, web application maintainer, user1, needs to start, stop, and restart the web application known as webservice. To grant this user permission to perform these tasks, add this line to the end of /usr/local/etc/sudoers:
user1 ALL=(ALL) /usr/sbin/service webservice *
The user may now start webservice using this command:
% sudo /usr/sbin/service webservice startWhile this configuration allows a single user access to the webservice service; however, in most organizations, there is an entire web team in charge of managing the service. A single line can also give access to an entire group. These steps will create a web group, add a user to this group, and allow all members of the group to manage the service:
# pw groupadd -g 6001 -n webteamUsing the same pw(8) command, the user is added to the webteam group:
# pw groupmod -m user1 -n webteamFinally, this line in /usr/local/etc/sudoers allows any member of the webteam group to manage webservice:
%webteam ALL=(ALL) /usr/sbin/service webservice *
Unlike su(1), Sudo only requires the end user password. This adds an advantage where users will not need shared passwords, a finding in most security audits and just bad all the way around.
Users permitted to run applications with Sudo only enter their own passwords. This is more secure and gives better control than su(1), where the root password is entered and the user acquires all root permissions.
Most organizations are moving or have moved toward a two factor authentication model. In these cases, the user may not have a password to enter. Sudo provides for these cases with the %webteam ALL=(ALL) NOPASSWD: /usr/sbin/service webservice * |
An advantage to implementing Sudo is the ability to enable session logging. Using the built in log mechanisms and the included sudoreplay command, all commands initiated through Sudo are logged for later verification. To enable this feature, add a default log directory entry, this example uses a user variable. Several other log filename conventions exist, consult the manual page for sudoreplay for additional information.
Defaults iolog_dir=/var/log/sudo-io/%{user}This directory will be created automatically after the logging is configured. It is best to let the system create directory with default permissions just to be safe. In addition, this entry will also log administrators who use the sudoreplay command. To change this behavior, read and uncomment the logging options inside sudoers. |
Once this directive has been added to the sudoers file, any user configuration can be updated with the request to log access. In the example shown, the updated webteam entry would have the following additional changes:
%webteam ALL=(ALL) NOPASSWD: LOG_INPUT: LOG_OUTPUT: /usr/sbin/service webservice *
From this point on, all webteam members altering the status of the webservice application will be logged. The list of previous and current sessions can be displayed with:
# sudoreplay -lIn the output, to replay a specific session, search for the TSID= entry, and pass that to sudoreplay with no other options to replay the session at normal speed. For example:
# sudoreplay user1/00/00/02While sessions are logged, any administrator is able to remove sessions and leave only a question of why they had done so. It is worthwhile to add a daily check through an intrusion detection system (IDS) or similar software so that other administrators are alerted to manual alterations. |
The sudoreplay is extremely extendable. Consult the documentation for more information.
Since system administration is a difficult task, many tools have been developed to make life easier for the administrator. These tools often enhance the way systems are installed, configured, and maintained. One of the tools which can be used to enhance the security of a FreeBSD system is jails. Jails have been available since FreeBSD 4.X and continue to be enhanced in their usefulness, performance, reliability, and security.
Jails build upon the chroot(2) concept, which is used to change the root directory of a set of processes. This creates a safe environment, separate from the rest of the system. Processes created in the chrooted environment can not access files or resources outside of it. For that reason, compromising a service running in a chrooted environment should not allow the attacker to compromise the entire system. However, a chroot has several limitations. It is suited to easy tasks which do not require much flexibility or complex, advanced features. Over time, many ways have been found to escape from a chrooted environment, making it a less than ideal solution for securing services.
Jails improve on the concept of the traditional chroot environment in several ways. In a traditional chroot environment, processes are only limited in the part of the file system they can access. The rest of the system resources, system users, running processes, and the networking subsystem are shared by the chrooted processes and the processes of the host system. Jails expand this model by virtualizing access to the file system, the set of users, and the networking subsystem. More fine-grained controls are available for tuning the access of a jailed environment. Jails can be considered as a type of operating system-level virtualization.
A jail is characterized by four elements:
A directory subtree: the starting point from which a jail is entered. Once inside the jail, a process is not permitted to escape outside of this subtree.
A hostname: which will be used by the jail.
An IP address: which is assigned to the jail. The IP address of a jail is often an alias address for an existing network interface.
A command: the path name of an executable to run inside the jail. The path is relative to the root directory of the jail environment.
Jails have their own set of users and their own root account which are limited to the jail environment. The root account of a jail is not allowed to perform operations to the system outside of the associated jail environment.
This chapter provides an overview of the terminology and commands for managing FreeBSD jails. Jails are a powerful tool for both system administrators, and advanced users.
After reading this chapter, you will know:
What a jail is and what purpose it may serve in FreeBSD installations.
How to build, start, and stop a jail.
The basics of jail administration, both from inside and outside the jail.
Jails are a powerful tool, but they are not a security panacea. While it is not possible for a jailed process to break out on its own, there are several ways in which an unprivileged user outside the jail can cooperate with a privileged user inside the jail to obtain elevated privileges in the host environment. Most of these attacks can be mitigated by ensuring that the jail root is not accessible to unprivileged users in the host environment. As a general rule, untrusted users with privileged access to a jail should not be given access to the host environment. |
To facilitate better understanding of parts of the FreeBSD system related to jails, their internals and the way they interact with the rest of FreeBSD, the following terms are used further in this chapter:
Utility, which uses chroot(2) FreeBSD system call to change the root directory of a process and all its descendants.
The environment of processes running in a "chroot". This includes resources such as the part of the file system which is visible, user and group IDs which are available, network interfaces and other IPC mechanisms, etc.
The system administration utility which allows launching of processes within a jail environment.
The controlling system of a jail environment. The host system has access to all the hardware resources available, and can control processes both outside of and inside a jail environment. One of the important differences of the host system from a jail is that the limitations which apply to superuser processes inside a jail are not enforced for processes of the host system.
A process, user or other entity, whose access to resources is restricted by a FreeBSD jail.
Some administrators divide jails into the following two types: "complete" jails, which resemble a real FreeBSD system, and "service" jails, dedicated to one application or service, possibly running with privileges. This is only a conceptual division and the process of building a jail is not affected by it. When creating a "complete" jail there are two options for the source of the userland: use prebuilt binaries (such as those supplied on an install media) or build from source.
The bsdinstall(8) tool can be used to fetch and install the binaries needed for a jail. This will walk through the picking of a mirror, which distributions will be installed into the destination directory, and some basic configuration of the jail:
# bsdinstall jail /here/is/the/jailOnce the command is complete, the next step is configuring the host to run the jail.
To install the userland from installation media, first create the root directory for the jail. This can be done by setting the DESTDIR variable to the proper location.
Start a shell and define DESTDIR:
# sh
# export DESTDIR=/here/is/the/jailMount the install media as covered in mdconfig(8) when using the install ISO:
# mount -t cd9660 /dev/`mdconfig -f cdimage.iso` /mnt
# cd /mnt/usr/freebsd-dist/Extract the binaries from the tarballs on the install media into the declared destination. Minimally, only the base set needs to be extracted, but a complete install can be performed when preferred.
To install just the base system:
# tar -xf base.txz -C $DESTDIRTo install everything except the kernel:
# for set in base ports; do tar -xf $set.txz -C $DESTDIR ; doneThe jail(8) manual page explains the procedure for building a jail:
# setenv D /here/is/the/jail
# mkdir -p $D (1)
# cd /usr/src
# make buildworld (2)
# make installworld DESTDIR=$D (3)
# make distribution DESTDIR=$D (4)
# mount -t devfs devfs $D/dev (5)| 1 | Selecting a location for a jail is the best starting point. This is where the jail will physically reside within the file system of the jail’s host. A good choice can be /usr/jail/jailname, where jailname is the hostname identifying the jail. Usually, /usr/ has enough space for the jail file system, which for "complete" jails is, essentially, a replication of every file present in a default installation of the FreeBSD base system. |
| 2 | If you have already rebuilt your userland using make world or make buildworld, you can skip this step and install your existing userland into the new jail. |
| 3 | This command will populate the directory subtree chosen as jail’s physical location on the file system with the necessary binaries, libraries, manual pages and so on. |
| 4 | The distribution target for make installs every needed configuration file. In simple words, it installs every installable file of /usr/src/etc/ to the /etc directory of the jail environment: $D/etc/. |
| 5 | Mounting the devfs(8) file system inside a jail is not required. On the other hand, any, or almost any application requires access to at least one device, depending on the purpose of the given application. It is very important to control access to devices from inside a jail, as improper settings could permit an attacker to do nasty things in the jail. Control over devfs(8) is managed through rulesets which are described in the devfs(8) and devfs.conf(5) manual pages. |
Once a jail is installed, it can be started by using the jail(8) utility. The jail(8) utility takes four mandatory arguments which are described in the Synopsis. Other arguments may be specified too, e.g., to run the jailed process with the credentials of a specific user. The command argument depends on the type of the jail; for a virtual system, /etc/rc is a good choice, since it will replicate the startup sequence of a real FreeBSD system. For a service jail, it depends on the service or application that will run within the jail.
Jails are often started at boot time and the FreeBSD rc mechanism provides an easy way to do this.
Configure jail parameters in jail.conf:
www {
host.hostname = www.example.org; # Hostname
ip4.addr = 192.168.0.10; # IP address of the jail
path = "/usr/jail/www"; # Path to the jail
devfs_ruleset = "www_ruleset"; # devfs ruleset
mount.devfs; # Mount devfs inside the jail
exec.start = "/bin/sh /etc/rc"; # Start command
exec.stop = "/bin/sh /etc/rc.shutdown"; # Stop command
}Configure jails to start at boot time in rc.conf:
jail_enable="YES" # Set to NO to disable starting of any jails
The default startup of jails configured in jail.conf(5), will run the /etc/rc script of the jail, which assumes the jail is a complete virtual system. For service jails, the default startup command of the jail should be changed, by setting the exec.start option appropriately.
For a full list of available options, please see the jail.conf(5) manual page. |
service(8) can be used to start or stop a jail by hand, if an entry for it exists in jail.conf:
# service jail start www
# service jail stop wwwJails can be shut down with jexec(8). Use jls(8) to identify the jail’s JID, then use jexec(8) to run the shutdown script in that jail.
# jls
JID IP Address Hostname Path
3 192.168.0.10 www /usr/jail/www
# jexec 3 /etc/rc.shutdownMore information about this can be found in the jail(8) manual page.
There are several options which can be set for any jail, and various ways of combining a host FreeBSD system with jails, to produce higher level applications. This section presents:
Some of the options available for tuning the behavior and security restrictions implemented by a jail installation.
Some of the high-level applications for jail management, which are available through the FreeBSD Ports Collection, and can be used to implement overall jail-based solutions.
Fine tuning of a jail’s configuration is mostly done by setting sysctl(8) variables. A special subtree of sysctl exists as a basis for organizing all the relevant options: the security.jail.* hierarchy of FreeBSD kernel options. Here is a list of the main jail-related sysctls, complete with their default value. Names should be self-explanatory, but for more information about them, please refer to the jail(8) and sysctl(8) manual pages.
security.jail.set_hostname_allowed: 1
security.jail.socket_unixiproute_only: 1
security.jail.sysvipc_allowed: 0
security.jail.enforce_statfs: 2
security.jail.allow_raw_sockets: 0
security.jail.chflags_allowed: 0
security.jail.jailed: 0
These variables can be used by the system administrator of the host system to add or remove some of the limitations imposed by default on the root user. Note that there are some limitations which cannot be removed. The root user is not allowed to mount or unmount file systems from within a jail(8). The root inside a jail may not load or unload devfs(8) rulesets, set firewall rules, or do many other administrative tasks which require modifications of in-kernel data, such as setting the securelevel of the kernel.
The base system of FreeBSD contains a basic set of tools for viewing information about the active jails, and attaching to a jail to run administrative commands. The jls(8) and jexec(8) commands are part of the base FreeBSD system, and can be used to perform the following simple tasks:
Print a list of active jails and their corresponding jail identifier (JID), IP address, hostname and path.
Attach to a running jail, from its host system, and run a command inside the jail or perform administrative tasks inside the jail itself. This is especially useful when the root user wants to cleanly shut down a jail. The jexec(8) utility can also be used to start a shell in a jail to do administration in it; for example:
# jexec 1 tcshAmong the many third-party utilities for jail administration, one of the most complete and useful is sysutils/ezjail. It is a set of scripts that contribute to jail(8) management. Please refer to the handbook section on ezjail for more information.
Jails should be kept up to date from the host operating system as attempting to patch userland from within the jail may likely fail as the default behavior in FreeBSD is to disallow the use of chflags(1) in a jail which prevents the replacement of some files. It is possible to change this behavior but it is recommended to use freebsd-update(8) to maintain jails instead. Use -b to specify the path of the jail to be updated.
To update the jail to the latest patch release of the version of FreeBSD it is already running, then execute the following commands on the host:
# freebsd-update -b /here/is/the/jail fetch
# freebsd-update -b /here/is/the/jail installTo upgrade the jail to a new major or minor version, first upgrade the host system as described in “Performing Major and Minor Version Upgrades”. Once the host has been upgraded and rebooted, the jail can then be upgraded. For example to upgrade from 12.0-RELEASE to 12.1-RELEASE, on the host run:
# freebsd-update -b /here/is/the/jail --currently-running 12.0-RELEASE -r 12.1-RELEASE upgrade
# freebsd-update -b /here/is/the/jail install
# service jail restart myjail
# freebsd-update -b /here/is/the/jail installThen, if it was a major version upgrade, reinstall all installed packages and restart the jail again. This is required because the ABI version changes when upgrading between major versions of FreeBSD. From the host:
# pkg -j myjail upgrade -f
# service jail restart myjailThe management of multiple jails can become problematic because every jail has to be rebuilt from scratch whenever it is upgraded. This can be time consuming and tedious if a lot of jails are created and manually updated.
This section demonstrates one method to resolve this issue by safely sharing as much as is possible between jails using read-only mount_nullfs(8) mounts, so that updating is simpler. This makes it more attractive to put single services, such as HTTP, DNS, and SMTP, into individual jails. Additionally, it provides a simple way to add, remove, and upgrade jails.
Simpler solutions exist, such as ezjail, which provides an easier method of administering FreeBSD jails but is less versatile than this setup. ezjail is covered in more detail in Managing Jails with ezjail. |
The goals of the setup described in this section are:
Create a simple and easy to understand jail structure that does not require running a full installworld on each and every jail.
Make it easy to add new jails or remove existing ones.
Make it easy to update or upgrade existing jails.
Make it possible to run a customized FreeBSD branch.
Be paranoid about security, reducing as much as possible the possibility of compromise.
Save space and inodes, as much as possible.
This design relies on a single, read-only master template which is mounted into each jail and one read-write device per jail. A device can be a separate physical disc, a partition, or a vnode backed memory device. This example uses read-write nullfs mounts.
The file system layout is as follows:
The jails are based under the /home partition.
Each jail will be mounted under the /home/j directory.
The template for each jail and the read-only partition for all of the jails is /home/j/mroot.
A blank directory will be created for each jail under the /home/j directory.
Each jail will have a /s directory that will be linked to the read-write portion of the system.
Each jail will have its own read-write system that is based upon /home/j/skel.
The read-write portion of each jail will be created in /home/js.
This section describes the steps needed to create the master template.
It is recommended to first update the host FreeBSD system to the latest -RELEASE branch using the instructions in “Updating FreeBSD from Source”. Additionally, this template uses the sysutils/cpdup package or port and portsnap will be used to download the FreeBSD Ports Collection.
First, create a directory structure for the read-only file system which will contain the FreeBSD binaries for the jails. Then, change directory to the FreeBSD source tree and install the read-only file system to the jail template:
# mkdir /home/j /home/j/mroot
# cd /usr/src
# make installworld DESTDIR=/home/j/mrootNext, prepare a FreeBSD Ports Collection for the jails as well as a FreeBSD source tree, which is required for mergemaster:
# cd /home/j/mroot
# mkdir usr/ports
# portsnap -p /home/j/mroot/usr/ports fetch extract
# cpdup /usr/src /home/j/mroot/usr/srcCreate a skeleton for the read-write portion of the system:
# mkdir /home/j/skel /home/j/skel/home /home/j/skel/usr-X11R6 /home/j/skel/distfiles
# mv etc /home/j/skel
# mv usr/local /home/j/skel/usr-local
# mv tmp /home/j/skel
# mv var /home/j/skel
# mv root /home/j/skelUse mergemaster to install missing configuration files. Then, remove the extra directories that mergemaster creates:
# mergemaster -t /home/j/skel/var/tmp/temproot -D /home/j/skel -i
# cd /home/j/skel
# rm -R bin boot lib libexec mnt proc rescue sbin sys usr devNow, symlink the read-write file system to the read-only file system. Ensure that the symlinks are created in the correct s/ locations as the creation of directories in the wrong locations will cause the installation to fail.
# cd /home/j/mroot
# mkdir s
# ln -s s/etc etc
# ln -s s/home home
# ln -s s/root root
# ln -s ../s/usr-local usr/local
# ln -s ../s/usr-X11R6 usr/X11R6
# ln -s ../../s/distfiles usr/ports/distfiles
# ln -s s/tmp tmp
# ln -s s/var varAs a last step, create a generic /home/j/skel/etc/make.conf containing this line:
WRKDIRPREFIX?= /s/portbuild
This makes it possible to compile FreeBSD ports inside each jail. Remember that the ports directory is part of the read-only system. The custom path for WRKDIRPREFIX allows builds to be done in the read-write portion of every jail.
The jail template can now be used to setup and configure the jails in /etc/rc.conf. This example demonstrates the creation of 3 jails: NS, MAIL and WWW.
Add the following lines to /etc/fstab, so that the read-only template for the jails and the read-write space will be available in the respective jails:
/home/j/mroot /home/j/ns nullfs ro 0 0 /home/j/mroot /home/j/mail nullfs ro 0 0 /home/j/mroot /home/j/www nullfs ro 0 0 /home/js/ns /home/j/ns/s nullfs rw 0 0 /home/js/mail /home/j/mail/s nullfs rw 0 0 /home/js/www /home/j/www/s nullfs rw 0 0
To prevent fsck from checking nullfs mounts during boot and dump from backing up the read-only nullfs mounts of the jails, the last two columns are both set to 0.
Configure the jails in /etc/rc.conf:
jail_enable="YES" jail_set_hostname_allow="NO" jail_list="ns mail www" jail_ns_hostname="ns.example.org" jail_ns_ip="192.168.3.17" jail_ns_rootdir="/usr/home/j/ns" jail_ns_devfs_enable="YES" jail_mail_hostname="mail.example.org" jail_mail_ip="192.168.3.18" jail_mail_rootdir="/usr/home/j/mail" jail_mail_devfs_enable="YES" jail_www_hostname="www.example.org" jail_www_ip="62.123.43.14" jail_www_rootdir="/usr/home/j/www" jail_www_devfs_enable="YES"
The jailnamerootdir variable is set to /usr/home instead of /home because the physical path of /home on a default FreeBSD installation is /usr/home. The jailnamerootdir variable must not be set to a path which includes a symbolic link, otherwise the jails will refuse to start.
Create the required mount points for the read-only file system of each jail:
# mkdir /home/j/ns /home/j/mail /home/j/wwwInstall the read-write template into each jail using sysutils/cpdup:
# mkdir /home/js
# cpdup /home/j/skel /home/js/ns
# cpdup /home/j/skel /home/js/mail
# cpdup /home/j/skel /home/js/wwwIn this phase, the jails are built and prepared to run. First, mount the required file systems for each jail, and then start them:
# mount -a
# service jail startThe jails should be running now. To check if they have started correctly, use jls. Its output should be similar to the following:
# jls
JID IP Address Hostname Path
3 192.168.3.17 ns.example.org /home/j/ns
2 192.168.3.18 mail.example.org /home/j/mail
1 62.123.43.14 www.example.org /home/j/wwwAt this point, it should be possible to log onto each jail, add new users, or configure daemons. The JID column indicates the jail identification number of each running jail. Use the following command to perform administrative tasks in the jail whose JID is 3:
# jexec 3 tcshThe design of this setup provides an easy way to upgrade existing jails while minimizing their downtime. Also, it provides a way to roll back to the older version should a problem occur.
The first step is to upgrade the host system. Then, create a new temporary read-only template in /home/j/mroot2.
# mkdir /home/j/mroot2
# cd /usr/src
# make installworld DESTDIR=/home/j/mroot2
# cd /home/j/mroot2
# cpdup /usr/src usr/src
# mkdir sThe installworld creates a few unnecessary directories, which should be removed:
# chflags -R 0 var
# rm -R etc var root usr/local tmpRecreate the read-write symlinks for the master file system:
# ln -s s/etc etc
# ln -s s/root root
# ln -s s/home home
# ln -s ../s/usr-local usr/local
# ln -s ../s/usr-X11R6 usr/X11R6
# ln -s s/tmp tmp
# ln -s s/var varNext, stop the jails:
# service jail stopUnmount the original file systems as the read-write systems are attached to the read-only system (/s):
# umount /home/j/ns/s
# umount /home/j/ns
# umount /home/j/mail/s
# umount /home/j/mail
# umount /home/j/www/s
# umount /home/j/wwwMove the old read-only file system and replace it with the new one. This will serve as a backup and archive of the old read-only file system should something go wrong. The naming convention used here corresponds to when a new read-only file system has been created. Move the original FreeBSD Ports Collection over to the new file system to save some space and inodes:
# cd /home/j
# mv mroot mroot.20060601
# mv mroot2 mroot
# mv mroot.20060601/usr/ports mroot/usrAt this point the new read-only template is ready, so the only remaining task is to remount the file systems and start the jails:
# mount -a
# service jail startUse jls to check if the jails started correctly. Run mergemaster in each jail to update the configuration files.
Creating and managing multiple jails can quickly become tedious and error-prone. Dirk Engling’s ezjail automates and greatly simplifies many jail tasks. A basejail is created as a template. Additional jails use mount_nullfs(8) to share many of the basejail directories without using additional disk space. Each additional jail takes only a few megabytes of disk space before applications are installed. Upgrading the copy of the userland in the basejail automatically upgrades all of the other jails.
Additional benefits and features are described in detail on the ezjail web site, https://erdgeist.org/arts/software/ezjail/.
Installing ezjail consists of adding a loopback interface for use in jails, installing the port or package, and enabling the service.
To keep jail loopback traffic off the host’s loopback network interface lo0, a second loopback interface is created by adding an entry to /etc/rc.conf:
cloned_interfaces="lo1"
The second loopback interface lo1 will be created when the system starts. It can also be created manually without a restart:
# service netif cloneup
Created clone interfaces: lo1.Jails can be allowed to use aliases of this secondary loopback interface without interfering with the host.
Inside a jail, access to the loopback address 127.0.0.1 is redirected to the first IP address assigned to the jail. To make the jail loopback correspond with the new lo1 interface, that interface must be specified first in the list of interfaces and IP addresses given when creating a new jail.
Give each jail a unique loopback address in the 127.0.0.0/8 netblock.
Install sysutils/ezjail:
# cd /usr/ports/sysutils/ezjail
# make install cleanEnable ezjail by adding this line to /etc/rc.conf:
ezjail_enable="YES"
The service will automatically start on system boot. It can be started immediately for the current session:
# service ezjail startWith ezjail installed, the basejail directory structure can be created and populated. This step is only needed once on the jail host computer.
In both of these examples, -p causes the ports tree to be retrieved with portsnap(8) into the basejail. That single copy of the ports directory will be shared by all the jails. Using a separate copy of the ports directory for jails isolates them from the host. The ezjailFAQ explains in more detail: http://erdgeist.org/arts/software/ezjail/#FAQ.
To Populate the Jail with FreeBSD-RELEASE
For a basejail based on the FreeBSD RELEASE matching that of the host computer, use install. For example, on a host computer running FreeBSD 10-STABLE, the latest RELEASE version of FreeBSD -10 will be installed in the jail):
# ezjail-admin install -pTo Populate the Jail with installworld
The basejail can be installed from binaries created by buildworld on the host with ezjail-admin update.
In this example, FreeBSD 10-STABLE has been built from source. The jail directories are created. Then installworld is executed, installing the host’s /usr/obj into the basejail.
# ezjail-admin update -i -pThe host’s /usr/src is used by default. A different source directory on the host can be specified with -s and a path, or set with ezjail_sourcetree in /usr/local/etc/ezjail.conf.
The basejail’s ports tree is shared by other jails. However, downloaded distfiles are stored in the jail that downloaded them. By default, these files are stored in /var/ports/distfiles within each jail. /var/ports inside each jail is also used as a work directory when building ports. |
The FTP protocol is used by default to download packages for the installation of the basejail. Firewall or proxy configurations can prevent or interfere with FTP transfers. The HTTP protocol works differently and avoids these problems. It can be chosen by specifying a full URL for a particular download mirror in /usr/local/etc/ezjail.conf: ezjail_ftphost=http://ftp.FreeBSD.org See “FTP Sites” for a list of sites. |
New jails are created with ezjail-admin create. In these examples, the lo1 loopback interface is used as described above.
Create the jail, specifying a name and the loopback and network interfaces to use, along with their IP addresses. In this example, the jail is named dnsjail.
# ezjail-admin create dnsjail 'lo1|127.0.1.1,em0|192.168.1.50'Most network services run in jails without problems. A few network services, most notably ping(8), use raw network sockets. In jails, raw network sockets are disabled by default for security. Services that require them will not work. Occasionally, a jail genuinely needs raw sockets. For example, network monitoring applications often use ping(8) to check the availability of other computers. When raw network sockets are actually needed in a jail, they can be enabled by editing the ezjail configuration file for the individual jail, /usr/local/etc/ezjail/jailname. Modify the export jail_jailname_parameters="allow.raw_sockets=1" Do not enable raw network sockets unless services in the jail actually require them. |
Start the jail:
# ezjail-admin start dnsjailUse a console on the jail:
# ezjail-admin console dnsjailThe jail is operating and additional configuration can be completed. Typical settings added at this point include:
Set the root Password
Connect to the jail and set the root user’s password:
# ezjail-admin console dnsjail
# passwd
Changing local password for root
New Password:
Retype New Password:Time Zone Configuration
The jail’s time zone can be set with tzsetup(8). To avoid spurious error messages, the adjkerntz(8) entry in /etc/crontab can be commented or removed. This job attempts to update the computer’s hardware clock with time zone changes, but jails are not allowed to access that hardware.
DNS Servers
Enter domain name server lines in /etc/resolv.conf so DNS works in the jail.
Edit /etc/hosts
Change the address and add the jail name to the localhost entries in /etc/hosts.
Configure /etc/rc.conf
Enter configuration settings in /etc/rc.conf. This is much like configuring a full computer. The host name and IP address are not set here. Those values are already provided by the jail configuration.
With the jail configured, the applications for which the jail was created can be installed.
Some ports must be built with special options to be used in a jail. For example, both of the network monitoring plugin packages net-mgmt/nagios-plugins and net-mgmt/monitoring-plugins have a |
Because the basejail’s copy of the userland is shared by the other jails, updating the basejail automatically updates all of the other jails. Either source or binary updates can be used.
To build the world from source on the host, then install it in the basejail, use:
# ezjail-admin update -bIf the world has already been compiled on the host, install it in the basejail with:
# ezjail-admin update -iBinary updates use freebsd-update(8). These updates have the same limitations as if freebsd-update(8) were being run directly. The most important one is that only -RELEASE versions of FreeBSD are available with this method.
Update the basejail to the latest patched release of the version of FreeBSD on the host. For example, updating from RELEASE-p1 to RELEASE-p2.
# ezjail-admin update -uTo upgrade the basejail to a new version, first upgrade the host system as described in “Performing Major and Minor Version Upgrades”. Once the host has been upgraded and rebooted, the basejail can then be upgraded. freebsd-update(8) has no way of determining which version is currently installed in the basejail, so the original version must be specified. Use file(1) to determine the original version in the basejail:
# file /usr/jails/basejail/bin/sh
/usr/jails/basejail/bin/sh: ELF 64-bit LSB executable, x86-64, version 1 (FreeBSD), dynamically linked (uses shared libs), for FreeBSD 9.3, strippedNow use this information to perform the upgrade from 9.3-RELEASE to the current version of the host system:
# ezjail-admin update -U -s 9.3-RELEASEAfter updating the basejail, mergemaster(8) must be run to update each jail’s configuration files.
How to use mergemaster(8) depends on the purpose and trustworthiness of a jail. If a jail’s services or users are not trusted, then mergemaster(8) should only be run from within that jail:
Delete the link from the jail’s /usr/src into the basejail and create a new /usr/src in the jail as a mountpoint. Mount the host computer’s /usr/src read-only on the jail’s new /usr/src mountpoint:
# rm /usr/jails/jailname/usr/src
# mkdir /usr/jails/jailname/usr/src
# mount -t nullfs -o ro /usr/src /usr/jails/jailname/usr/srcGet a console in the jail:
# ezjail-admin console jailnameInside the jail, run mergemaster. Then exit the jail console:
# cd /usr/src
# mergemaster -U
# exitFinally, unmount the jail’s /usr/src:
# umount /usr/jails/jailname/usr/srcIf the users and services in a jail are trusted, mergemaster(8) can be run from the host:
# mergemaster -U -D /usr/jails/jailnameAfter a major version update it is recommended by sysutils/ezjail to make sure your to upgrade or downgrade to the appropriate version. |
The ports tree in the basejail is shared by the other jails. Updating that copy of the ports tree gives the other jails the updated version also.
The basejail ports tree is updated with portsnap(8):
# ezjail-admin update -Pezjail automatically starts jails when the computer is started. Jails can be manually stopped and restarted with stop and start:
# ezjail-admin stop sambajail
Stopping jails: sambajail.By default, jails are started automatically when the host computer starts. Autostarting can be disabled with config:
# ezjail-admin config -r norun seldomjailThis takes effect the next time the host computer is started. A jail that is already running will not be stopped.
Enabling autostart is very similar:
# ezjail-admin config -r run oftenjailUse archive to create a .tar.gz archive of a jail. The file name is composed from the name of the jail and the current date. Archive files are written to the archive directory, /usr/jails/ezjail_archives. A different archive directory can be chosen by setting ezjail_archivedir in the configuration file.
The archive file can be copied elsewhere as a backup, or an existing jail can be restored from it with restore. A new jail can be created from the archive, providing a convenient way to clone existing jails.
Stop and archive a jail named wwwserver:
# ezjail-admin stop wwwserver
Stopping jails: wwwserver.
# ezjail-admin archive wwwserver
# ls /usr/jails/ezjail-archives/
wwwserver-201407271153.13.tar.gzCreate a new jail named wwwserver-clone from the archive created in the previous step. Use the em1 interface and assign a new IP address to avoid conflict with the original:
# ezjail-admin create -a /usr/jails/ezjail_archives/wwwserver-201407271153.13.tar.gz wwwserver-clone 'lo1|127.0.3.1,em1|192.168.1.51'Putting the BINDDNS server in a jail improves security by isolating it. This example creates a simple caching-only name server.
The jail will be called dns1.
The jail will use IP address 192.168.1.240 on the host’s re0 interface.
The upstream ISP’s DNS servers are at 10.0.0.62 and 10.0.0.61.
The basejail has already been created and a ports tree installed as shown in Initial Setup.
Create a cloned loopback interface by adding a line to /etc/rc.conf:
cloned_interfaces="lo1"
Immediately create the new loopback interface:
# service netif cloneup
Created clone interfaces: lo1.Create the jail:
# ezjail-admin create dns1 'lo1|127.0.2.1,re0|192.168.1.240'Start the jail, connect to a console running on it, and perform some basic configuration:
# ezjail-admin start dns1
# ezjail-admin console dns1
# passwd
Changing local password for root
New Password:
Retype New Password:
# tzsetup
# sed -i .bak -e '/adjkerntz/ s/^/#/' /etc/crontab
# sed -i .bak -e 's/127.0.0.1/127.0.2.1/g; s/localhost.my.domain/dns1.my.domain dns1/' /etc/hostsTemporarily set the upstream DNS servers in /etc/resolv.conf so ports can be downloaded:
nameserver 10.0.0.62 nameserver 10.0.0.61
Still using the jail console, install dns/bind99.
# make -C /usr/ports/dns/bind99 install cleanConfigure the name server by editing /usr/local/etc/namedb/named.conf.
Create an Access Control List (ACL) of addresses and networks that are permitted to send DNS queries to this name server. This section is added just before the options section already in the file:
...
// or cause huge amounts of useless Internet traffic.
acl "trusted" {
192.168.1.0/24;
localhost;
localnets;
};
options {
...Use the jail IP address in the listen-on setting to accept DNS queries from other computers on the network:
listen-on { 192.168.1.240; };A simple caching-only DNS name server is created by changing the forwarders section. The original file contains:
/*
forwarders {
127.0.0.1;
};
*/Uncomment the section by removing the /* and */ lines. Enter the IP addresses of the upstream DNS servers. Immediately after the forwarders section, add references to the trusted ACL defined earlier:
forwarders {
10.0.0.62;
10.0.0.61;
};
allow-query { any; };
allow-recursion { trusted; };
allow-query-cache { trusted; };Enable the service in /etc/rc.conf:
named_enable="YES"
Start and test the name server:
# service named start
wrote key file "/usr/local/etc/namedb/rndc.key"
Starting named.
# /usr/local/bin/dig @192.168.1.240 freebsd.orgA response that includes
;; Got answer;shows that the new DNS server is working. A long delay followed by a response including
;; connection timed out; no servers could be reachedshows a problem. Check the configuration settings and make sure any local firewalls allow the new DNS access to the upstream DNS servers.
The new DNS server can use itself for local name resolution, just like other local computers. Set the address of the DNS server in the client computer’s /etc/resolv.conf:
nameserver 192.168.1.240
A local DHCP server can be configured to provide this address for a local DNS server, providing automatic configuration on DHCP clients.
FreeBSD supports security extensions based on the POSIX®.1e draft. These security mechanisms include file system Access Control Lists (“Access Control Lists”) and Mandatory Access Control (MAC). MAC allows access control modules to be loaded in order to implement security policies. Some modules provide protections for a narrow subset of the system, hardening a particular service. Others provide comprehensive labeled security across all subjects and objects. The mandatory part of the definition indicates that enforcement of controls is performed by administrators and the operating system. This is in contrast to the default security mechanism of Discretionary Access Control (DAC) where enforcement is left to the discretion of users.
This chapter focuses on the MAC framework and the set of pluggable security policy modules FreeBSD provides for enabling various security mechanisms.
After reading this chapter, you will know:
The terminology associated with the MAC framework.
The capabilities of MAC security policy modules as well as the difference between a labeled and non-labeled policy.
The considerations to take into account before configuring a system to use the MAC framework.
Which MAC security policy modules are included in FreeBSD and how to configure them.
How to implement a more secure environment using the MAC framework.
How to test the MAC configuration to ensure the framework has been properly implemented.
Before reading this chapter, you should:
Understand UNIX® and FreeBSD basics (FreeBSD Basics).
Have some familiarity with security and how it pertains to FreeBSD (Security).
Improper MAC configuration may cause loss of system access, aggravation of users, or inability to access the features provided by Xorg. More importantly, MAC should not be relied upon to completely secure a system. The MAC framework only augments an existing security policy. Without sound security practices and regular security checks, the system will never be completely secure. The examples contained within this chapter are for demonstration purposes and the example settings should not be implemented on a production system. Implementing any security policy takes a good deal of understanding, proper design, and thorough testing. |
While this chapter covers a broad range of security issues relating to the MAC framework, the development of new MAC security policy modules will not be covered. A number of security policy modules included with the MAC framework have specific characteristics which are provided for both testing and new module development. Refer to mac_test(4), mac_stub(4) and mac_none(4) for more information on these security policy modules and the various mechanisms they provide.
The following key terms are used when referring to the MAC framework:
compartment: a set of programs and data to be partitioned or separated, where users are given explicit access to specific component of a system. A compartment represents a grouping, such as a work group, department, project, or topic. Compartments make it possible to implement a need-to-know-basis security policy.
integrity: the level of trust which can be placed on data. As the integrity of the data is elevated, so does the ability to trust that data.
level: the increased or decreased setting of a security attribute. As the level increases, its security is considered to elevate as well.
label: a security attribute which can be applied to files, directories, or other items in the system. It could be considered a confidentiality stamp. When a label is placed on a file, it describes the security properties of that file and will only permit access by files, users, and resources with a similar security setting. The meaning and interpretation of label values depends on the policy configuration. Some policies treat a label as representing the integrity or secrecy of an object while other policies might use labels to hold rules for access.
multilabel: this property is a file system option which can be set in single-user mode using tunefs(8), during boot using fstab(5), or during the creation of a new file system. This option permits an administrator to apply different MAC labels on different objects. This option only applies to security policy modules which support labeling.
single label: a policy where the entire file system uses one label to enforce access control over the flow of data. Whenever multilabel is not set, all files will conform to the same label setting.
object: an entity through which information flows under the direction of a subject. This includes directories, files, fields, screens, keyboards, memory, magnetic storage, printers or any other data storage or moving device. An object is a data container or a system resource. Access to an object effectively means access to its data.
subject: any active entity that causes information to flow between objects such as a user, user process, or system process. On FreeBSD, this is almost always a thread acting in a process on behalf of a user.
policy: a collection of rules which defines how objectives are to be achieved. A policy usually documents how certain items are to be handled. This chapter considers a policy to be a collection of rules which controls the flow of data and information and defines who has access to that data and information.
high-watermark: this type of policy permits the raising of security levels for the purpose of accessing higher level information. In most cases, the original level is restored after the process is complete. Currently, the FreeBSD MAC framework does not include this type of policy.
low-watermark: this type of policy permits lowering security levels for the purpose of accessing information which is less secure. In most cases, the original security level of the user is restored after the process is complete. The only security policy module in FreeBSD to use this is mac_lomac(4).
sensitivity: usually used when discussing Multilevel Security (MLS). A sensitivity level describes how important or secret the data should be. As the sensitivity level increases, so does the importance of the secrecy, or confidentiality, of the data.
A MAC label is a security attribute which may be applied to subjects and objects throughout the system. When setting a label, the administrator must understand its implications in order to prevent unexpected or undesired behavior of the system. The attributes available on an object depend on the loaded policy module, as policy modules interpret their attributes in different ways.
The security label on an object is used as a part of a security access control decision by a policy. With some policies, the label contains all of the information necessary to make a decision. In other policies, the labels may be processed as part of a larger rule set.
There are two types of label policies: single label and multi label. By default, the system will use single label. The administrator should be aware of the pros and cons of each in order to implement policies which meet the requirements of the system’s security model.
A single label security policy only permits one label to be used for every subject or object. Since a single label policy enforces one set of access permissions across the entire system, it provides lower administration overhead, but decreases the flexibility of policies which support labeling. However, in many environments, a single label policy may be all that is required.
A single label policy is somewhat similar to DAC as root configures the policies so that users are placed in the appropriate categories and access levels. A notable difference is that many policy modules can also restrict root. Basic control over objects will then be released to the group, but root may revoke or modify the settings at any time.
When appropriate, a multi label policy can be set on a UFS file system by passing multilabel to tunefs(8). A multi label policy permits each subject or object to have its own independent MAC label. The decision to use a multi label or single label policy is only required for policies which implement the labeling feature, such as biba, lomac, and mls. Some policies, such as seeotheruids, portacl and partition, do not use labels at all.
Using a multi label policy on a partition and establishing a multi label security model can increase administrative overhead as everything in that file system has a label. This includes directories, files, and even device nodes.
The following command will set multilabel on the specified UFS file system. This may only be done in single-user mode and is not a requirement for the swap file system:
# tunefs -l enable /Some users have experienced problems with setting the |
Since the multi label policy is set on a per-file system basis, a multi label policy may not be needed if the file system layout is well designed. Consider an example security MAC model for a FreeBSD web server. This machine uses the single label, biba/high, for everything in the default file systems. If the web server needs to run at biba/low to prevent write up capabilities, it could be installed to a separate UFS /usr/local file system set at biba/low.
Virtually all aspects of label policy module configuration will be performed using the base system utilities. These commands provide a simple interface for object or subject configuration or the manipulation and verification of the configuration.
All configuration may be done using setfmac, which is used to set MAC labels on system objects, and setpmac, which is used to set the labels on system subjects. For example, to set the biba MAC label to high on test:
# setfmac biba/high testIf the configuration is successful, the prompt will be returned without error. A common error is Permission denied which usually occurs when the label is being set or modified on a restricted object. Other conditions may produce different failures. For instance, the file may not be owned by the user attempting to relabel the object, the object may not exist, or the object may be read-only. A mandatory policy will not allow the process to relabel the file, maybe because of a property of the file, a property of the process, or a property of the proposed new label value. For example, if a user running at low integrity tries to change the label of a high integrity file, or a user running at low integrity tries to change the label of a low integrity file to a high integrity label, these operations will fail.
The system administrator may use setpmac to override the policy module’s settings by assigning a different label to the invoked process:
# setfmac biba/high test
Permission denied
# setpmac biba/low setfmac biba/high test
# getfmac test
test: biba/highFor currently running processes, such as sendmail, getpmac is usually used instead. This command takes a process ID (PID) in place of a command name. If users attempt to manipulate a file not in their access, subject to the rules of the loaded policy modules, the Operation not permitted error will be displayed.
A few FreeBSD policy modules which support the labeling feature offer three predefined labels: low, equal, and high, where:
low is considered the lowest label setting an object or subject may have. Setting this on objects or subjects blocks their access to objects or subjects marked high.
equal sets the subject or object to be disabled or unaffected and should only be placed on objects considered to be exempt from the policy.
high grants an object or subject the highest setting available in the Biba and MLS policy modules.
Such policy modules include mac_biba(4), mac_mls(4) and mac_lomac(4). Each of the predefined labels establishes a different information flow directive. Refer to the manual page of the module to determine the traits of the generic label configurations.
The Biba and MLS policy modules support a numeric label which may be set to indicate the precise level of hierarchical control. This numeric level is used to partition or sort information into different groups of classification, only permitting access to that group or a higher group level. For example:
biba/10:2+3+6(5:2+3-20:2+3+4+5+6)
may be interpreted as "Biba Policy Label/Grade 10:Compartments 2, 3 and 6: (grade 5 …")
In this example, the first grade would be considered the effective grade with effective compartments, the second grade is the low grade, and the last one is the high grade. In most configurations, such fine-grained settings are not needed as they are considered to be advanced configurations.
System objects only have a current grade and compartment. System subjects reflect the range of available rights in the system, and network interfaces, where they are used for access control.
The grade and compartments in a subject and object pair are used to construct a relationship known as dominance, in which a subject dominates an object, the object dominates the subject, neither dominates the other, or both dominate each other. The "both dominate" case occurs when the two labels are equal. Due to the information flow nature of Biba, a user has rights to a set of compartments that might correspond to projects, but objects also have a set of compartments. Users may have to subset their rights using su or setpmac in order to access objects in a compartment from which they are not restricted.
Users are required to have labels so that their files and processes properly interact with the security policy defined on the system. This is configured in /etc/login.conf using login classes. Every policy module that uses labels will implement the user class setting.
To set the user class default label which will be enforced by MAC, add a label entry. An example label entry containing every policy module is displayed below. Note that in a real configuration, the administrator would never enable every policy module. It is recommended that the rest of this chapter be reviewed before any configuration is implemented.
default:\ :copyright=/etc/COPYRIGHT:\ :welcome=/etc/motd:\ :setenv=MAIL=/var/mail/$,BLOCKSIZE=K:\ :path=~/bin:/sbin:/bin:/usr/sbin:/usr/bin:/usr/local/sbin:/usr/local/bin:\ :manpath=/usr/shared/man /usr/local/man:\ :nologin=/usr/sbin/nologin:\ :cputime=1h30m:\ :datasize=8M:\ :vmemoryuse=100M:\ :stacksize=2M:\ :memorylocked=4M:\ :memoryuse=8M:\ :filesize=8M:\ :coredumpsize=8M:\ :openfiles=24:\ :maxproc=32:\ :priority=0:\ :requirehome:\ :passwordtime=91d:\ :umask=022:\ :ignoretime@:\ :label=partition/13,mls/5,biba/10(5-15),lomac/10[2]:
While users can not modify the default value, they may change their label after they login, subject to the constraints of the policy. The example above tells the Biba policy that a process’s minimum integrity is 5, its maximum is 15, and the default effective label is 10. The process will run at 10 until it chooses to change label, perhaps due to the user using setpmac, which will be constrained by Biba to the configured range.
After any change to login.conf, the login class capability database must be rebuilt using cap_mkdb.
Many sites have a large number of users requiring several different user classes. In depth planning is required as this can become difficult to manage.
Labels may be set on network interfaces to help control the flow of data across the network. Policies using network interface labels function in the same way that policies function with respect to objects. Users at high settings in Biba, for example, will not be permitted to access network interfaces with a label of low.
When setting the MAC label on network interfaces, maclabel may be passed to ifconfig:
# ifconfig bge0 maclabel biba/equalThis example will set the MAC label of biba/equal on the bge0 interface. When using a setting similar to biba/high(low-high), the entire label should be quoted to prevent an error from being returned.
Each policy module which supports labeling has a tunable which may be used to disable the MAC label on network interfaces. Setting the label to equal will have a similar effect. Review the output of sysctl, the policy manual pages, and the information in the rest of this chapter for more information on those tunables.
Before implementing any MAC policies, a planning phase is recommended. During the planning stages, an administrator should consider the implementation requirements and goals, such as:
How to classify information and resources available on the target systems.
Which information or resources to restrict access to along with the type of restrictions that should be applied.
Which MAC modules will be required to achieve this goal.
A trial run of the trusted system and its configuration should occur before a MAC implementation is used on production systems. Since different environments have different needs and requirements, establishing a complete security profile will decrease the need of changes once the system goes live.
Consider how the MAC framework augments the security of the system as a whole. The various security policy modules provided by the MAC framework could be used to protect the network and file systems or to block users from accessing certain ports and sockets. Perhaps the best use of the policy modules is to load several security policy modules at a time in order to provide a MLS environment. This approach differs from a hardening policy, which typically hardens elements of a system which are used only for specific purposes. The downside to MLS is increased administrative overhead.
The overhead is minimal when compared to the lasting effect of a framework which provides the ability to pick and choose which policies are required for a specific configuration and which keeps performance overhead down. The reduction of support for unneeded policies can increase the overall performance of the system as well as offer flexibility of choice. A good implementation would consider the overall security requirements and effectively implement the various security policy modules offered by the framework.
A system utilizing MAC guarantees that a user will not be permitted to change security attributes at will. All user utilities, programs, and scripts must work within the constraints of the access rules provided by the selected security policy modules and control of the MAC access rules is in the hands of the system administrator.
It is the duty of the system administrator to carefully select the correct security policy modules. For an environment that needs to limit access control over the network, the mac_portacl(4), mac_ifoff(4), and mac_biba(4) policy modules make good starting points. For an environment where strict confidentiality of file system objects is required, consider the mac_bsdextended(4) and mac_mls(4) policy modules.
Policy decisions could be made based on network configuration. If only certain users should be permitted access to ssh(1), the mac_portacl(4) policy module is a good choice. In the case of file systems, access to objects might be considered confidential to some users, but not to others. As an example, a large development team might be broken off into smaller projects where developers in project A might not be permitted to access objects written by developers in project B. Yet both projects might need to access objects created by developers in project C. Using the different security policy modules provided by the MAC framework, users could be divided into these groups and then given access to the appropriate objects.
Each security policy module has a unique way of dealing with the overall security of a system. Module selection should be based on a well thought out security policy which may require revision and reimplementation. Understanding the different security policy modules offered by the MAC framework will help administrators choose the best policies for their situations.
The rest of this chapter covers the available modules, describes their use and configuration, and in some cases, provides insight on applicable situations.
Implementing MAC is much like implementing a firewall since care must be taken to prevent being completely locked out of the system. The ability to revert back to a previous configuration should be considered and the implementation of MAC over a remote connection should be done with extreme caution. |
The default FreeBSD kernel includes options MAC. This means that every module included with the MAC framework can be loaded with kldload as a run-time kernel module. After testing the module, add the module name to /boot/loader.conf so that it will load during boot. Each module also provides a kernel option for those administrators who choose to compile their own custom kernel.
FreeBSD includes a group of policies that will cover most security requirements. Each policy is summarized below. The last three policies support integer settings in place of the three default labels.
Module name: mac_seeotheruids.ko
Kernel configuration line: options MAC_SEEOTHERUIDS
Boot option: mac_seeotheruids_load="YES"
The mac_seeotheruids(4) module extends the security.bsd.see_other_uids and security.bsd.see_other_gids sysctl tunables. This option does not require any labels to be set before configuration and can operate transparently with other modules.
After loading the module, the following sysctl tunables may be used to control its features:
security.mac.seeotheruids.enabled enables the module and implements the default settings which deny users the ability to view processes and sockets owned by other users.
security.mac.seeotheruids.specificgid_enabled allows specified groups to be exempt from this policy. To exempt specific groups, use the security.mac.seeotheruids.specificgid=XXX sysctl tunable, replacing XXX with the numeric group ID to be exempted.
security.mac.seeotheruids.primarygroup_enabled is used to exempt specific primary groups from this policy. When using this tunable, security.mac.seeotheruids.specificgid_enabled may not be set.
Module name: mac_bsdextended.ko
Kernel configuration line: options MAC_BSDEXTENDED
Boot option: mac_bsdextended_load="YES"
The mac_bsdextended(4) module enforces a file system firewall. It provides an extension to the standard file system permissions model, permitting an administrator to create a firewall-like ruleset to protect files, utilities, and directories in the file system hierarchy. When access to a file system object is attempted, the list of rules is iterated until either a matching rule is located or the end is reached. This behavior may be changed using security.mac.bsdextended.firstmatch_enabled. Similar to other firewall modules in FreeBSD, a file containing the access control rules can be created and read by the system at boot time using an rc.conf(5) variable.
The rule list may be entered using ugidfw(8) which has a syntax similar to ipfw(8). More tools can be written by using the functions in the libugidfw(3) library.
After the mac_bsdextended(4) module has been loaded, the following command may be used to list the current rule configuration:
# ugidfw list
0 slots, 0 rulesBy default, no rules are defined and everything is completely accessible. To create a rule which blocks all access by users but leaves root unaffected:
# ugidfw add subject not uid root new object not uid root mode nWhile this rule is simple to implement, it is a very bad idea as it blocks all users from issuing any commands. A more realistic example blocks user1 all access, including directory listings, to user2's home directory:
# ugidfw set 2 subject uid user1 object uid user2 mode n
# ugidfw set 3 subject uid user1 object gid user2 mode nInstead of user1, not uid user2 could be used in order to enforce the same access restrictions for all users. However, the root user is unaffected by these rules.
Extreme caution should be taken when working with this module as incorrect use could block access to certain parts of the file system. |
Module name: mac_ifoff.ko
Kernel configuration line: options MAC_IFOFF
Boot option: mac_ifoff_load="YES"
The mac_ifoff(4) module is used to disable network interfaces on the fly and to keep network interfaces from being brought up during system boot. It does not use labels and does not depend on any other MAC modules.
Most of this module’s control is performed through these sysctl tunables:
One of the most common uses of mac_ifoff(4) is network monitoring in an environment where network traffic should not be permitted during the boot sequence. Another use would be to write a script which uses an application such as security/aide to automatically block network traffic if it finds new or altered files in protected directories.
Module name: mac_portacl.ko
Kernel configuration line: MAC_PORTACL
Boot option: mac_portacl_load="YES"
The mac_portacl(4) module is used to limit binding to local TCP and UDP ports, making it possible to allow non-root users to bind to specified privileged ports below 1024.
Once loaded, this module enables the MAC policy on all sockets. The following tunables are available:
security.mac.portacl.enabled enables or disables the policy completely.
security.mac.portacl.port_high sets the highest port number that mac_portacl(4) protects.
security.mac.portacl.suser_exempt, when set to a non-zero value, exempts the root user from this policy.
security.mac.portacl.rules specifies the policy as a text string of the form rule[,rule,…], with as many rules as needed, and where each rule is of the form idtype:id:protocol:port. The idtype is either uid or gid. The protocol parameter can be tcp or udp. The port parameter is the port number to allow the specified user or group to bind to. Only numeric values can be used for the user ID, group ID, and port parameters.
By default, ports below 1024 can only be used by privileged processes which run as root. For mac_portacl(4) to allow non-privileged processes to bind to ports below 1024, set the following tunables as follows:
# sysctl security.mac.portacl.port_high=1023
# sysctl net.inet.ip.portrange.reservedlow=0
# sysctl net.inet.ip.portrange.reservedhigh=0To prevent the root user from being affected by this policy, set security.mac.portacl.suser_exempt to a non-zero value.
# sysctl security.mac.portacl.suser_exempt=1To allow the www user with UID 80 to bind to port 80 without ever needing root privilege:
# sysctl security.mac.portacl.rules=uid:80:tcp:80This next example permits the user with the UID of 1001 to bind to TCP ports 110 (POP3) and 995 (POP3s):
# sysctl security.mac.portacl.rules=uid:1001:tcp:110,uid:1001:tcp:995Module name: mac_partition.ko
Kernel configuration line: options MAC_PARTITION
Boot option: mac_partition_load="YES"
The mac_partition(4) policy drops processes into specific "partitions" based on their MAC label. Most configuration for this policy is done using setpmac(8). One sysctl tunable is available for this policy:
security.mac.partition.enabled enables the enforcement of MAC process partitions.
When this policy is enabled, users will only be permitted to see their processes, and any others within their partition, but will not be permitted to work with utilities outside the scope of this partition. For instance, a user in the insecure class will not be permitted to access top as well as many other commands that must spawn a process.
This example adds top to the label set on users in the insecure class. All processes spawned by users in the insecure class will stay in the partition/13 label.
# setpmac partition/13 topThis command displays the partition label and the process list:
# ps ZaxThis command displays another user’s process partition label and that user’s currently running processes:
# ps -ZU trhodesUsers can see processes in |
Module name: mac_mls.ko
Kernel configuration line: options MAC_MLS
Boot option: mac_mls_load="YES"
The mac_mls(4) policy controls access between subjects and objects in the system by enforcing a strict information flow policy.
In MLS environments, a "clearance" level is set in the label of each subject or object, along with compartments. Since these clearance levels can reach numbers greater than several thousand, it would be a daunting task to thoroughly configure every subject or object. To ease this administrative overhead, three labels are included in this policy: mls/low, mls/equal, and mls/high, where:
Anything labeled with mls/low will have a low clearance level and not be permitted to access information of a higher level. This label also prevents objects of a higher clearance level from writing or passing information to a lower level.
mls/equal should be placed on objects which should be exempt from the policy.
mls/high is the highest level of clearance possible. Objects assigned this label will hold dominance over all other objects in the system; however, they will not permit the leaking of information to objects of a lower class.
MLS provides:
A hierarchical security level with a set of non-hierarchical categories.
Fixed rules of no read up, no write down. This means that a subject can have read access to objects on its own level or below, but not above. Similarly, a subject can have write access to objects on its own level or above, but not beneath.
Secrecy, or the prevention of inappropriate disclosure of data.
A basis for the design of systems that concurrently handle data at multiple sensitivity levels without leaking information between secret and confidential.
The following sysctl tunables are available:
security.mac.mls.enabled is used to enable or disable the MLS policy.
security.mac.mls.ptys_equal labels all pty(4) devices as mls/equal during creation.
security.mac.mls.revocation_enabled revokes access to objects after their label changes to a label of a lower grade.
security.mac.mls.max_compartments sets the maximum number of compartment levels allowed on a system.
To manipulate MLS labels, use setfmac(8). To assign a label to an object:
# setfmac mls/5 testTo get the MLS label for the file test:
# getfmac testAnother approach is to create a master policy file in /etc/ which specifies the MLS policy information and to feed that file to setfmac.
When using the MLS policy module, an administrator plans to control the flow of sensitive information. The default block read up block write down sets everything to a low state. Everything is accessible and an administrator slowly augments the confidentiality of the information.
Beyond the three basic label options, an administrator may group users and groups as required to block the information flow between them. It might be easier to look at the information in clearance levels using descriptive words, such as classifications of Confidential, Secret, and Top Secret. Some administrators instead create different groups based on project levels. Regardless of the classification method, a well thought out plan must exist before implementing a restrictive policy.
Some example situations for the MLS policy module include an e-commerce web server, a file server holding critical company information, and financial institution environments.
Module name: mac_biba.ko
Kernel configuration line: options MAC_BIBA
Boot option: mac_biba_load="YES"
The mac_biba(4) module loads the MAC Biba policy. This policy is similar to the MLS policy with the exception that the rules for information flow are slightly reversed. This is to prevent the downward flow of sensitive information whereas the MLS policy prevents the upward flow of sensitive information.
In Biba environments, an "integrity" label is set on each subject or object. These labels are made up of hierarchical grades and non-hierarchical components. As a grade ascends, so does its integrity.
Supported labels are biba/low, biba/equal, and biba/high, where:
biba/low is considered the lowest integrity an object or subject may have. Setting this on objects or subjects blocks their write access to objects or subjects marked as biba/high, but will not prevent read access.
biba/equal should only be placed on objects considered to be exempt from the policy.
biba/high permits writing to objects set at a lower label, but does not permit reading that object. It is recommended that this label be placed on objects that affect the integrity of the entire system.
Biba provides:
Hierarchical integrity levels with a set of non-hierarchical integrity categories.
Fixed rules are no write up, no read down, the opposite of MLS. A subject can have write access to objects on its own level or below, but not above. Similarly, a subject can have read access to objects on its own level or above, but not below.
Integrity by preventing inappropriate modification of data.
Integrity levels instead of MLS sensitivity levels.
The following tunables can be used to manipulate the Biba policy:
security.mac.biba.enabled is used to enable or disable enforcement of the Biba policy on the target machine.
security.mac.biba.ptys_equal is used to disable the Biba policy on pty(4) devices.
security.mac.biba.revocation_enabled forces the revocation of access to objects if the label is changed to dominate the subject.
To access the Biba policy setting on system objects, use setfmac and getfmac:
# setfmac biba/low test
# getfmac test
test: biba/lowIntegrity, which is different from sensitivity, is used to guarantee that information is not manipulated by untrusted parties. This includes information passed between subjects and objects. It ensures that users will only be able to modify or access information they have been given explicit access to. The mac_biba(4) security policy module permits an administrator to configure which files and programs a user may see and invoke while assuring that the programs and files are trusted by the system for that user.
During the initial planning phase, an administrator must be prepared to partition users into grades, levels, and areas. The system will default to a high label once this policy module is enabled, and it is up to the administrator to configure the different grades and levels for users. Instead of using clearance levels, a good planning method could include topics. For instance, only allow developers modification access to the source code repository, source code compiler, and other development utilities. Other users would be grouped into other categories such as testers, designers, or end users and would only be permitted read access.
A lower integrity subject is unable to write to a higher integrity subject and a higher integrity subject cannot list or read a lower integrity object. Setting a label at the lowest possible grade could make it inaccessible to subjects. Some prospective environments for this security policy module would include a constrained web server, a development and test machine, and a source code repository. A less useful implementation would be a personal workstation, a machine used as a router, or a network firewall.
Module name: mac_lomac.ko
Kernel configuration line: options MAC_LOMAC
Boot option: mac_lomac_load="YES"
Unlike the MAC Biba policy, the mac_lomac(4) policy permits access to lower integrity objects only after decreasing the integrity level to not disrupt any integrity rules.
The Low-watermark integrity policy works almost identically to Biba, with the exception of using floating labels to support subject demotion via an auxiliary grade compartment. This secondary compartment takes the form [auxgrade]. When assigning a policy with an auxiliary grade, use the syntax lomac/10[2], where 2 is the auxiliary grade.
This policy relies on the ubiquitous labeling of all system objects with integrity labels, permitting subjects to read from low integrity objects and then downgrading the label on the subject to prevent future writes to high integrity objects using [auxgrade]. The policy may provide greater compatibility and require less initial configuration than Biba.
Like the Biba and MLS policies, setfmac and setpmac are used to place labels on system objects:
# setfmac /usr/home/trhodes lomac/high[low]
# getfmac /usr/home/trhodes lomac/high[low]The auxiliary grade low is a feature provided only by the MACLOMAC policy.
This example considers a relatively small storage system with fewer than fifty users. Users will have login capabilities and are permitted to store data and access resources.
For this scenario, the mac_bsdextended(4) and mac_seeotheruids(4) policy modules could co-exist and block access to system objects while hiding user processes.
Begin by adding the following line to /boot/loader.conf:
mac_seeotheruids_load="YES"
The mac_bsdextended(4) security policy module may be activated by adding this line to /etc/rc.conf:
ugidfw_enable="YES"
Default rules stored in /etc/rc.bsdextended will be loaded at system initialization. However, the default entries may need modification. Since this machine is expected only to service users, everything may be left commented out except the last two lines in order to force the loading of user owned system objects by default.
Add the required users to this machine and reboot. For testing purposes, try logging in as a different user across two consoles. Run ps aux to see if processes of other users are visible. Verify that running ls(1) on another user’s home directory fails.
Do not try to test with the root user unless the specific sysctls have been modified to block super user access.
When a new user is added, their mac_bsdextended(4) rule will not be in the ruleset list. To update the ruleset quickly, unload the security policy module and reload it again using kldunload(8) and kldload(8). |
This section demonstrates the steps that are needed to implement the Nagios network monitoring system in a MAC environment. This is meant as an example which still requires the administrator to test that the implemented policy meets the security requirements of the network before using in a production environment.
This example requires multilabel to be set on each file system. It also assumes that net-mgmt/nagios-plugins, net-mgmt/nagios, and www/apache22 are all installed, configured, and working correctly before attempting the integration into the MAC framework.
Begin the procedure by adding the following user class to /etc/login.conf:
insecure:\ :copyright=/etc/COPYRIGHT:\ :welcome=/etc/motd:\ :setenv=MAIL=/var/mail/$,BLOCKSIZE=K:\ :path=~/bin:/sbin:/bin:/usr/sbin:/usr/bin:/usr/local/sbin:/usr/local/bin :manpath=/usr/shared/man /usr/local/man:\ :nologin=/usr/sbin/nologin:\ :cputime=1h30m:\ :datasize=8M:\ :vmemoryuse=100M:\ :stacksize=2M:\ :memorylocked=4M:\ :memoryuse=8M:\ :filesize=8M:\ :coredumpsize=8M:\ :openfiles=24:\ :maxproc=32:\ :priority=0:\ :requirehome:\ :passwordtime=91d:\ :umask=022:\ :ignoretime@:\ :label=biba/10(10-10):
Then, add the following line to the default user class section:
:label=biba/high:
Save the edits and issue the following command to rebuild the database:
# cap_mkdb /etc/login.confSet the root user to the default class using:
# pw usermod root -L defaultAll user accounts that are not root will now require a login class. The login class is required, otherwise users will be refused access to common commands. The following sh script should do the trick:
# for x in `awk -F: '($3 >= 1001) && ($3 != 65534) { print $1 }' \
/etc/passwd`; do pw usermod $x -L default; done;Next, drop the nagios and www accounts into the insecure class:
# pw usermod nagios -L insecure
# pw usermod www -L insecureA contexts file should now be created as /etc/policy.contexts:
# This is the default BIBA policy for this system. # System: /var/run(/.*)? biba/equal /dev/(/.*)? biba/equal /var biba/equal /var/spool(/.*)? biba/equal /var/log(/.*)? biba/equal /tmp(/.*)? biba/equal /var/tmp(/.*)? biba/equal /var/spool/mqueue biba/equal /var/spool/clientmqueue biba/equal # For Nagios: /usr/local/etc/nagios(/.*)? biba/10 /var/spool/nagios(/.*)? biba/10 # For apache /usr/local/etc/apache(/.*)? biba/10
This policy enforces security by setting restrictions on the flow of information. In this specific configuration, users, including root, should never be allowed to access Nagios. Configuration files and processes that are a part of Nagios will be completely self contained or jailed.
This file will be read after running setfsmac on every file system. This example sets the policy on the root file system:
# setfsmac -ef /etc/policy.contexts /Next, add these edits to the main section of /etc/mac.conf:
default_labels file ?biba default_labels ifnet ?biba default_labels process ?biba default_labels socket ?biba
To finish the configuration, add the following lines to /boot/loader.conf:
mac_biba_load="YES" mac_seeotheruids_load="YES" security.mac.biba.trust_all_interfaces=1
And the following line to the network card configuration stored in /etc/rc.conf. If the primary network configuration is done via DHCP, this may need to be configured manually after every system boot:
maclabel biba/equal
First, ensure that the web server and Nagios will not be started on system initialization and reboot. Ensure that root cannot access any of the files in the Nagios configuration directory. If root can list the contents of /var/spool/nagios, something is wrong. Instead, a "permission denied" error should be returned.
If all seems well, Nagios, Apache, and Sendmail can now be started:
# cd /etc/mail && make stop && \
setpmac biba/equal make start && setpmac biba/10\(10-10\) apachectl start && \
setpmac biba/10\(10-10\) /usr/local/etc/rc.d/nagios.sh forcestartDouble check to ensure that everything is working properly. If not, check the log files for error messages. If needed, use sysctl(8) to disable the mac_biba(4) security policy module and try starting everything again as usual.
The To block this from happening, force the user into a range using login.conf(5). If setpmac(8) attempts to run a command outside of the compartment’s range, an error will be returned and the command will not be executed. In this case, set root to |
This section discusses common configuration errors and how to resolve them.
multilabel flag does not stay enabled on the root (/) partitionThe following steps may resolve this transient error:
Edit /etc/fstab and set the root partition to ro for read-only.
Reboot into single user mode.
Run tunefs -l enable on /.
Reboot the system.
Run mount -urw/ and change the ro back to rw in /etc/fstab and reboot the system again.
Double-check the output from mount to ensure that multilabel has been properly set on the root file system.
This could be caused by the MAC partition policy or by a mislabeling in one of the MAC labeling policies. To debug, try the following:
Check the error message. If the user is in the insecure class, the partition policy may be the culprit. Try setting the user’s class back to the default class and rebuild the database with cap_mkdb. If this does not alleviate the problem, go to step two.
Double-check that the label policies are set correctly for the user, Xorg, and the /dev entries.
If neither of these resolve the problem, send the error message and a description of the environment to the FreeBSD general questions mailing list.
_secure_path: unable to stat .login_conf error appearsThis error can appear when a user attempts to switch from the root user to another user in the system. This message usually occurs when the user has a higher label setting than that of the user they are attempting to become. For instance, if joe has a default label of biba/low and root has a label of biba/high, root cannot view joe's home directory. This will happen whether or not root has used su to become joe as the Biba integrity model will not permit root to view objects set at a lower integrity level.
rootWhen this occurs, whoami returns 0 and su returns who are you?.
This can happen if a labeling policy has been disabled by sysctl(8) or the policy module was unloaded. If the policy is disabled, the login capabilities database needs to be reconfigured. Double check /etc/login.conf to ensure that all label options have been removed and rebuild the database with cap_mkdb.
This may also happen if a policy restricts access to master.passwd. This is usually caused by an administrator altering the file under a label which conflicts with the general policy being used by the system. In these cases, the user information would be read by the system and access would be blocked as the file has inherited the new label. Disable the policy using sysctl(8) and everything should return to normal.
The FreeBSD operating system includes support for security event auditing. Event auditing supports reliable, fine-grained, and configurable logging of a variety of security-relevant system events, including logins, configuration changes, and file and network access. These log records can be invaluable for live system monitoring, intrusion detection, and postmortem analysis. FreeBSD implements Sun™'s published Basic Security Module (BSM) Application Programming Interface (API) and file format, and is interoperable with the Solaris™ and Mac OS® X audit implementations.
This chapter focuses on the installation and configuration of event auditing. It explains audit policies and provides an example audit configuration.
After reading this chapter, you will know:
What event auditing is and how it works.
How to configure event auditing on FreeBSD for users and processes.
How to review the audit trail using the audit reduction and review tools.
Before reading this chapter, you should:
Understand UNIX® and FreeBSD basics (FreeBSD Basics).
Be familiar with the basics of kernel configuration/compilation (Configuring the FreeBSD Kernel).
Have some familiarity with security and how it pertains to FreeBSD (Security).
The audit facility has some known limitations. Not all security-relevant system events are auditable and some login mechanisms, such as Xorg-based display managers and third-party daemons, do not properly configure auditing for user login sessions. The security event auditing facility is able to generate very detailed logs of system activity. On a busy system, trail file data can be very large when configured for high detail, exceeding gigabytes a week in some configurations. Administrators should take into account the disk space requirements associated with high volume audit configurations. For example, it may be desirable to dedicate a file system to /var/audit so that other file systems are not affected if the audit file system becomes full. |
The following terms are related to security event auditing:
event: an auditable event is any event that can be logged using the audit subsystem. Examples of security-relevant events include the creation of a file, the building of a network connection, or a user logging in. Events are either "attributable", meaning that they can be traced to an authenticated user, or "non-attributable". Examples of non-attributable events are any events that occur before authentication in the login process, such as bad password attempts.
class: a named set of related events which are used in selection expressions. Commonly used classes of events include "file creation" (fc), "exec" (ex), and "login_logout" (lo).
record: an audit log entry describing a security event. Records contain a record event type, information on the subject (user) performing the action, date and time information, information on any objects or arguments, and a success or failure condition.
trail: a log file consisting of a series of audit records describing security events. Trails are in roughly chronological order with respect to the time events completed. Only authorized processes are allowed to commit records to the audit trail.
selection expression: a string containing a list of prefixes and audit event class names used to match events.
preselection: the process by which the system identifies which events are of interest to the administrator. The preselection configuration uses a series of selection expressions to identify which classes of events to audit for which users, as well as global settings that apply to both authenticated and unauthenticated processes.
reduction: the process by which records from existing audit trails are selected for preservation, printing, or analysis. Likewise, the process by which undesired audit records are removed from the audit trail. Using reduction, administrators can implement policies for the preservation of audit data. For example, detailed audit trails might be kept for one month, but after that, trails might be reduced in order to preserve only login information for archival purposes.
User space support for event auditing is installed as part of the base FreeBSD operating system. Kernel support is available in the GENERIC kernel by default, and auditd(8) can be enabled by adding the following line to /etc/rc.conf:
auditd_enable="YES"
Then, start the audit daemon:
# service auditd startUsers who prefer to compile a custom kernel must include the following line in their custom kernel configuration file:
options AUDIT
Selection expressions are used in a number of places in the audit configuration to determine which events should be audited. Expressions contain a list of event classes to match. Selection expressions are evaluated from left to right, and two expressions are combined by appending one onto the other.
Default Audit Event Classes summarizes the default audit event classes:
| Class Name | Description | Action |
|---|---|---|
all | all | Match all event classes. |
aa | authentication and authorization | |
ad | administrative | Administrative actions performed on the system as a whole. |
ap | application | Application defined action. |
cl | file close | Audit calls to the |
ex | exec | Audit program execution. Auditing of command line arguments and environmental variables is controlled via audit_control(5) using the |
fa | file attribute access | Audit the access of object attributes such as stat(1) and pathconf(2). |
fc | file create | Audit events where a file is created as a result. |
fd | file delete | Audit events where file deletion occurs. |
fm | file attribute modify | Audit events where file attribute modification occurs, such as by chown(8), chflags(1), and flock(2). |
fr | file read | Audit events in which data is read or files are opened for reading. |
fw | file write | Audit events in which data is written or files are written or modified. |
io | ioctl | Audit use of the |
ip | ipc | Audit various forms of Inter-Process Communication, including POSIX pipes and System V IPC operations. |
lo | login_logout | |
na | non attributable | Audit non-attributable events. |
no | invalid class | Match no audit events. |
nt | network | Audit events related to network actions such as connect(2) and accept(2). |
ot | other | Audit miscellaneous events. |
pc | process |
These audit event classes may be customized by modifying the audit_class and audit_event configuration files.
Each audit event class may be combined with a prefix indicating whether successful/failed operations are matched, and whether the entry is adding or removing matching for the class and type. Prefixes for Audit Event Classes summarizes the available prefixes:
| Prefix | Action |
|---|---|
+ | Audit successful events in this class. |
- | Audit failed events in this class. |
^ | Audit neither successful nor failed events in this class. |
^+ | Do not audit successful events in this class. |
^- | Do not audit failed events in this class. |
If no prefix is present, both successful and failed instances of the event will be audited.
The following example selection string selects both successful and failed login/logout events, but only successful execution events:
lo,+ex
The following configuration files for security event auditing are found in /etc/security:
audit_class: contains the definitions of the audit classes.
audit_control: controls aspects of the audit subsystem, such as default audit classes, minimum disk space to leave on the audit log volume, and maximum audit trail size.
audit_event: textual names and descriptions of system audit events and a list of which classes each event is in.
audit_user: user-specific audit requirements to be combined with the global defaults at login.
audit_warn: a customizable shell script used by auditd(8) to generate warning messages in exceptional situations, such as when space for audit records is running low or when the audit trail file has been rotated.
Audit configuration files should be edited and maintained carefully, as errors in configuration may result in improper logging of events. |
In most cases, administrators will only need to modify audit_control and audit_user. The first file controls system-wide audit properties and policies and the second file may be used to fine-tune auditing by user.
A number of defaults for the audit subsystem are specified in audit_control:
dir:/var/audit dist:off flags:lo,aa minfree:5 naflags:lo,aa policy:cnt,argv filesz:2M expire-after:10M
The dir entry is used to set one or more directories where audit logs will be stored. If more than one directory entry appears, they will be used in order as they fill. It is common to configure audit so that audit logs are stored on a dedicated file system, in order to prevent interference between the audit subsystem and other subsystems if the file system fills.
If the dist field is set to on or yes, hard links will be created to all trail files in /var/audit/dist.
The flags field sets the system-wide default preselection mask for attributable events. In the example above, successful and failed login/logout events as well as authentication and authorization are audited for all users.
The minfree entry defines the minimum percentage of free space for the file system where the audit trail is stored.
The naflags entry specifies audit classes to be audited for non-attributed events, such as the login/logout process and authentication and authorization.
The policy entry specifies a comma-separated list of policy flags controlling various aspects of audit behavior. The cnt indicates that the system should continue running despite an auditing failure (this flag is highly recommended). The other flag, argv, causes command line arguments to the execve(2) system call to be audited as part of command execution.
The filesz entry specifies the maximum size for an audit trail before automatically terminating and rotating the trail file. A value of 0 disables automatic log rotation. If the requested file size is below the minimum of 512k, it will be ignored and a log message will be generated.
The expire-after field specifies when audit log files will expire and be removed.
The administrator can specify further audit requirements for specific users in audit_user. Each line configures auditing for a user via two fields: the alwaysaudit field specifies a set of events that should always be audited for the user, and the neveraudit field specifies a set of events that should never be audited for the user.
The following example entries audit login/logout events and successful command execution for root and file creation and successful command execution for www. If used with the default audit_control, the lo entry for root is redundant, and login/logout events will also be audited for www.
root:lo,+ex:no www:fc,+ex:no
Since audit trails are stored in the BSM binary format, several built-in tools are available to modify or convert these trails to text. To convert trail files to a simple text format, use praudit. To reduce the audit trail file for analysis, archiving, or printing purposes, use auditreduce. This utility supports a variety of selection parameters, including event type, event class, user, date or time of the event, and the file path or object acted on.
For example, to dump the entire contents of a specified audit log in plain text:
# praudit /var/audit/AUDITFILEWhere AUDITFILE is the audit log to dump.
Audit trails consist of a series of audit records made up of tokens, which praudit prints sequentially, one per line. Each token is of a specific type, such as header (an audit record header) or path (a file path from a name lookup). The following is an example of an execve event:
header,133,10,execve(2),0,Mon Sep 25 15:58:03 2006, + 384 msec exec arg,finger,doug path,/usr/bin/finger attribute,555,root,wheel,90,24918,104944 subject,robert,root,wheel,root,wheel,38439,38032,42086,128.232.9.100 return,success,0 trailer,133
This audit represents a successful execve call, in which the command finger doug has been run. The exec arg token contains the processed command line presented by the shell to the kernel. The path token holds the path to the executable as looked up by the kernel. The attribute token describes the binary and includes the file mode. The subject token stores the audit user ID, effective user ID and group ID, real user ID and group ID, process ID, session ID, port ID, and login address. Notice that the audit user ID and real user ID differ as the user robert switched to the root account before running this command, but it is audited using the original authenticated user. The return token indicates the successful execution and the trailer concludes the record.
XML output format is also supported and can be selected by including -x.
Since audit logs may be very large, a subset of records can be selected using auditreduce. This example selects all audit records produced for the user trhodes stored in AUDITFILE:
# auditreduce -u trhodes /var/audit/AUDITFILE | prauditMembers of the audit group have permission to read audit trails in /var/audit. By default, this group is empty, so only the root user can read audit trails. Users may be added to the audit group in order to delegate audit review rights. As the ability to track audit log contents provides significant insight into the behavior of users and processes, it is recommended that the delegation of audit review rights be performed with caution.
Audit pipes are cloning pseudo-devices which allow applications to tap the live audit record stream. This is primarily of interest to authors of intrusion detection and system monitoring applications. However, the audit pipe device is a convenient way for the administrator to allow live monitoring without running into problems with audit trail file ownership or log rotation interrupting the event stream. To track the live audit event stream:
# praudit /dev/auditpipeBy default, audit pipe device nodes are accessible only to the root user. To make them accessible to the members of the audit group, add a devfs rule to /etc/devfs.rules:
add path 'auditpipe*' mode 0440 group audit
See devfs.rules(5) for more information on configuring the devfs file system.
It is easy to produce audit event feedback cycles, in which the viewing of each audit event results in the generation of more audit events. For example, if all network I/O is audited, and |
Audit trails are written to by the kernel and managed by the audit daemon, auditd(8). Administrators should not attempt to use newsyslog.conf(5) or other tools to directly rotate audit logs. Instead, audit should be used to shut down auditing, reconfigure the audit system, and perform log rotation. The following command causes the audit daemon to create a new audit log and signal the kernel to switch to using the new log. The old log will be terminated and renamed, at which point it may then be manipulated by the administrator:
# audit -nIf auditd(8) is not currently running, this command will fail and an error message will be produced.
Adding the following line to /etc/crontab will schedule this rotation every twelve hours:
0 */12 * * * root /usr/sbin/audit -n
The change will take effect once /etc/crontab is saved.
Automatic rotation of the audit trail file based on file size is possible using filesz in audit_control as described in The audit_control File.
As audit trail files can become very large, it is often desirable to compress or otherwise archive trails once they have been closed by the audit daemon. The audit_warn script can be used to perform customized operations for a variety of audit-related events, including the clean termination of audit trails when they are rotated. For example, the following may be added to /etc/security/audit_warn to compress audit trails on close:
#
# Compress audit trail files on close.
#
if [ "$1" = closefile ]; then
gzip -9 $2
fiOther archiving activities might include copying trail files to a centralized server, deleting old trail files, or reducing the audit trail to remove unneeded records. This script will be run only when audit trail files are cleanly terminated, so will not be run on trails left unterminated following an improper shutdown.
This chapter covers the use of disks and storage media in FreeBSD. This includes SCSI and IDE disks, CD and DVD media, memory-backed disks, and USB storage devices.
After reading this chapter, you will know:
How to add additional hard disks to a FreeBSD system.
How to grow the size of a disk’s partition on FreeBSD.
How to configure FreeBSD to use USB storage devices.
How to use CD and DVD media on a FreeBSD system.
How to use the backup programs available under FreeBSD.
How to set up memory disks.
What file system snapshots are and how to use them efficiently.
How to use quotas to limit disk space usage.
How to encrypt disks and swap to secure them against attackers.
How to configure a highly available storage network.
Before reading this chapter, you should:
Know how to configure and install a new FreeBSD kernel.
This section describes how to add a new SATA disk to a machine that currently only has a single drive. First, turn off the computer and install the drive in the computer following the instructions of the computer, controller, and drive manufacturers. Reboot the system and become root.
Inspect /var/run/dmesg.boot to ensure the new disk was found. In this example, the newly added SATA drive will appear as ada1.
For this example, a single large partition will be created on the new disk. The GPT partitioning scheme will be used in preference to the older and less versatile MBR scheme.
If the disk to be added is not blank, old partition information can be removed with |
The partition scheme is created, and then a single partition is added. To improve performance on newer disks with larger hardware block sizes, the partition is aligned to one megabyte boundaries:
# gpart create -s GPT ada1
# gpart add -t freebsd-ufs -a 1M ada1Depending on use, several smaller partitions may be desired. See gpart(8) for options to create partitions smaller than a whole disk.
The disk partition information can be viewed with gpart show:
% gpart show ada1
=> 34 1465146988 ada1 GPT (699G)
34 2014 - free - (1.0M)
2048 1465143296 1 freebsd-ufs (699G)
1465145344 1678 - free - (839K)A file system is created in the new partition on the new disk:
# newfs -U /dev/ada1p1An empty directory is created as a mountpoint, a location for mounting the new disk in the original disk’s file system:
# mkdir /newdiskFinally, an entry is added to /etc/fstab so the new disk will be mounted automatically at startup:
/dev/ada1p1 /newdisk ufs rw 2 2
The new disk can be mounted manually, without restarting the system:
# mount /newdiskA disk’s capacity can increase without any changes to the data already present. This happens commonly with virtual machines, when the virtual disk turns out to be too small and is enlarged. Sometimes a disk image is written to a USB memory stick, but does not use the full capacity. Here we describe how to resize or grow disk contents to take advantage of increased capacity.
Determine the device name of the disk to be resized by inspecting /var/run/dmesg.boot. In this example, there is only one SATA disk in the system, so the drive will appear as ada0.
List the partitions on the disk to see the current configuration:
# gpart show ada0
=> 34 83886013 ada0 GPT (48G) [CORRUPT]
34 128 1 freebsd-boot (64k)
162 79691648 2 freebsd-ufs (38G)
79691810 4194236 3 freebsd-swap (2G)
83886046 1 - free - (512B)If the disk was formatted with the GPT partitioning scheme, it may show as "corrupted" because the GPT backup partition table is no longer at the end of the drive. Fix the backup partition table with |
Now the additional space on the disk is available for use by a new partition, or an existing partition can be expanded:
# gpart show ada0
=> 34 102399933 ada0 GPT (48G)
34 128 1 freebsd-boot (64k)
162 79691648 2 freebsd-ufs (38G)
79691810 4194236 3 freebsd-swap (2G)
83886046 18513921 - free - (8.8G)Partitions can only be resized into contiguous free space. Here, the last partition on the disk is the swap partition, but the second partition is the one that needs to be resized. Swap partitions only contain temporary data, so it can safely be unmounted, deleted, and then recreate the third partition after resizing the second partition.
Disable the swap partition:
# swapoff /dev/ada0p3Delete the third partition, specified by the -i flag, from the disk ada0.
# gpart delete -i 3 ada0
ada0p3 deleted
# gpart show ada0
=> 34 102399933 ada0 GPT (48G)
34 128 1 freebsd-boot (64k)
162 79691648 2 freebsd-ufs (38G)
79691810 22708157 - free - (10G)There is risk of data loss when modifying the partition table of a mounted file system. It is best to perform the following steps on an unmounted file system while running from a live CD-ROM or USB device. However, if absolutely necessary, a mounted file system can be resized after disabling GEOM safety features: |
Resize the partition, leaving room to recreate a swap partition of the desired size. The partition to resize is specified with -i, and the new desired size with -s. Optionally, alignment of the partition is controlled with -a. This only modifies the size of the partition. The file system in the partition will be expanded in a separate step.
# gpart resize -i 2 -s 47G -a 4k ada0
ada0p2 resized
# gpart show ada0
=> 34 102399933 ada0 GPT (48G)
34 128 1 freebsd-boot (64k)
162 98566144 2 freebsd-ufs (47G)
98566306 3833661 - free - (1.8G)Recreate the swap partition and activate it. If no size is specified with -s, all remaining space is used:
# gpart add -t freebsd-swap -a 4k ada0
ada0p3 added
# gpart show ada0
=> 34 102399933 ada0 GPT (48G)
34 128 1 freebsd-boot (64k)
162 98566144 2 freebsd-ufs (47G)
98566306 3833661 3 freebsd-swap (1.8G)
# swapon /dev/ada0p3Grow the UFS file system to use the new capacity of the resized partition:
# growfs /dev/ada0p2
Device is mounted read-write; resizing will result in temporary write suspension for /.
It's strongly recommended to make a backup before growing the file system.
OK to grow file system on /dev/ada0p2, mounted on /, from 38GB to 47GB? [Yes/No] Yes
super-block backups (for fsck -b #) at:
80781312, 82063552, 83345792, 84628032, 85910272, 87192512, 88474752,
89756992, 91039232, 92321472, 93603712, 94885952, 96168192, 97450432If the file system is ZFS, the resize is triggered by running the online subcommand with -e:
# zpool online -e zroot /dev/ada0p2Both the partition and the file system on it have now been resized to use the newly-available disk space.
Many external storage solutions, such as hard drives, USB thumbdrives, and CD and DVD burners, use the Universal Serial Bus (USB). FreeBSD provides support for USB 1.x, 2.0, and 3.0 devices.
USB 3.0 support is not compatible with some hardware, including Haswell (Lynx point) chipsets. If FreeBSD boots with a |
Support for USB storage devices is built into the GENERIC kernel. For a custom kernel, be sure that the following lines are present in the kernel configuration file:
device scbus # SCSI bus (required for ATA/SCSI) device da # Direct Access (disks) device pass # Passthrough device (direct ATA/SCSI access) device uhci # provides USB 1.x support device ohci # provides USB 1.x support device ehci # provides USB 2.0 support device xhci # provides USB 3.0 support device usb # USB Bus (required) device umass # Disks/Mass storage - Requires scbus and da device cd # needed for CD and DVD burners
FreeBSD uses the umass(4) driver which uses the SCSI subsystem to access USB storage devices. Since any USB device will be seen as a SCSI device by the system, if the USB device is a CD or DVD burner, do not include device atapicam in a custom kernel configuration file.
The rest of this section demonstrates how to verify that a USB storage device is recognized by FreeBSD and how to configure the device so that it can be used.
To test the USB configuration, plug in the USB device. Use dmesg to confirm that the drive appears in the system message buffer. It should look something like this:
umass0: <STECH Simple Drive, class 0/0, rev 2.00/1.04, addr 3> on usbus0
umass0: SCSI over Bulk-Only; quirks = 0x0100
umass0:4:0:-1: Attached to scbus4
da0 at umass-sim0 bus 0 scbus4 target 0 lun 0
da0: <STECH Simple Drive 1.04> Fixed Direct Access SCSI-4 device
da0: Serial Number WD-WXE508CAN263
da0: 40.000MB/s transfers
da0: 152627MB (312581808 512 byte sectors: 255H 63S/T 19457C)
da0: quirks=0x2<NO_6_BYTE>The brand, device node (da0), speed, and size will differ according to the device.
Since the USB device is seen as a SCSI one, camcontrol can be used to list the USB storage devices attached to the system:
# camcontrol devlist
<STECH Simple Drive 1.04> at scbus4 target 0 lun 0 (pass3,da0)Alternately, usbconfig can be used to list the device. Refer to usbconfig(8) for more information about this command.
# usbconfig
ugen0.3: <Simple Drive STECH> at usbus0, cfg=0 md=HOST spd=HIGH (480Mbps) pwr=ON (2mA)If the device has not been formatted, refer to Adding Disks for instructions on how to format and create partitions on the USB drive. If the drive comes with a file system, it can be mounted by root using the instructions in “Mounting and Unmounting File Systems”.
Allowing untrusted users to mount arbitrary media, by enabling |
To make the device mountable as a normal user, one solution is to make all users of the device a member of the operator group using pw(8). Next, ensure that operator is able to read and write the device by adding these lines to /etc/devfs.rules:
[localrules=5] add path 'da*' mode 0660 group operator
If internal SCSI disks are also installed in the system, change the second line as follows: add path 'da[3-9]*' mode 0660 group operator This will exclude the first three SCSI disks (da0 to da2)from belonging to the |
Next, enable the ruleset in /etc/rc.conf:
devfs_system_ruleset="localrules"
Then, instruct the system to allow regular users to mount file systems by adding the following line to /etc/sysctl.conf:
vfs.usermount=1
Since this only takes effect after the next reboot, use sysctl to set this variable now:
# sysctl vfs.usermount=1
vfs.usermount: 0 -> 1The final step is to create a directory where the file system is to be mounted. This directory needs to be owned by the user that is to mount the file system. One way to do that is for root to create a subdirectory owned by that user as /mnt/username. In the following example, replace username with the login name of the user and usergroup with the user’s primary group:
# mkdir /mnt/username
# chown username:usergroup /mnt/usernameSuppose a USB thumbdrive is plugged in, and a device /dev/da0s1 appears. If the device is formatted with a FAT file system, the user can mount it using:
% mount -t msdosfs -o -m=644,-M=755 /dev/da0s1 /mnt/usernameBefore the device can be unplugged, it must be unmounted first:
% umount /mnt/usernameAfter device removal, the system message buffer will show messages similar to the following:
umass0: at uhub3, port 2, addr 3 (disconnected)
da0 at umass-sim0 bus 0 scbus4 target 0 lun 0
da0: <STECH Simple Drive 1.04> s/n WD-WXE508CAN263 detached
(da0:umass-sim0:0:0:0): Periph destroyedUSB devices can be automatically mounted by uncommenting this line in /etc/auto_master:
/media -media -nosuidThen add these lines to /etc/devd.conf:
notify 100 {
match "system" "GEOM";
match "subsystem" "DEV";
action "/usr/sbin/automount -c";
};# service automount restart
# service devd restartautofs(5) can be set to start at boot by adding this line to /etc/rc.conf:
autofs_enable="YES"
Start the services immediately with:
# service automount start
# service automountd start
# service autounmountd start
# service devd startEach file system that can be automatically mounted appears as a directory in /media/. The directory is named after the file system label. If the label is missing, the directory is named after the device node.
The file system is transparently mounted on the first access, and unmounted after a period of inactivity. Automounted drives can also be unmounted manually:
# automount -fuThis mechanism is typically used for memory cards and USB memory sticks. It can be used with any block device, including optical drives or iSCSILUNs.
Compact Disc (CD) media provide a number of features that differentiate them from conventional disks. They are designed so that they can be read continuously without delays to move the head between tracks. While CD media do have tracks, these refer to a section of data to be read continuously, and not a physical property of the disk. The ISO 9660 file system was designed to deal with these differences.
The FreeBSD Ports Collection provides several utilities for burning and duplicating audio and data CDs. This chapter demonstrates the use of several command line utilities. For CD burning software with a graphical utility, consider installing the sysutils/xcdroast or sysutils/k3b packages or ports.
The GENERIC kernel provides support for SCSI, USB, and ATAPICD readers and burners. If a custom kernel is used, the options that need to be present in the kernel configuration file vary by the type of device.
For a SCSI burner, make sure these options are present:
device scbus # SCSI bus (required for ATA/SCSI) device da # Direct Access (disks) device pass # Passthrough device (direct ATA/SCSI access) device cd # needed for CD and DVD burners
For a USB burner, make sure these options are present:
device scbus # SCSI bus (required for ATA/SCSI) device da # Direct Access (disks) device pass # Passthrough device (direct ATA/SCSI access) device cd # needed for CD and DVD burners device uhci # provides USB 1.x support device ohci # provides USB 1.x support device ehci # provides USB 2.0 support device xhci # provides USB 3.0 support device usb # USB Bus (required) device umass # Disks/Mass storage - Requires scbus and da
For an ATAPI burner, make sure these options are present:
device ata # Legacy ATA/SATA controllers device scbus # SCSI bus (required for ATA/SCSI) device pass # Passthrough device (direct ATA/SCSI access) device cd # needed for CD and DVD burners
On FreeBSD versions prior to 10.x, this line is also needed in the kernel configuration file if the burner is an ATAPI device: device atapicam Alternately, this driver can be loaded at boot time by adding the following line to /boot/loader.conf: atapicam_load="YES" This will require a reboot of the system as this driver can only be loaded at boot time. |
To verify that FreeBSD recognizes the device, run dmesg and look for an entry for the device. On systems prior to 10.x, the device name in the first line of the output will be acd0 instead of cd0.
% dmesg | grep cd
cd0 at ahcich1 bus 0 scbus1 target 0 lun 0
cd0: <HL-DT-ST DVDRAM GU70N LT20> Removable CD-ROM SCSI-0 device
cd0: Serial Number M3OD3S34152
cd0: 150.000MB/s transfers (SATA 1.x, UDMA6, ATAPI 12bytes, PIO 8192bytes)
cd0: Attempt to query device size failed: NOT READY, Medium not present - tray closedIn FreeBSD, cdrecord can be used to burn CDs. This command is installed with the sysutils/cdrtools package or port.
While cdrecord has many options, basic usage is simple. Specify the name of the ISO file to burn and, if the system has multiple burner devices, specify the name of the device to use:
# cdrecord dev=device imagefile.isoTo determine the device name of the burner, use -scanbus which might produce results like this:
# cdrecord -scanbus
ProDVD-ProBD-Clone 3.00 (amd64-unknown-freebsd10.0) Copyright (C) 1995-2010 Jörg Schilling
Using libscg version 'schily-0.9'
scsibus0:
0,0,0 0) 'SEAGATE ' 'ST39236LW ' '0004' Disk
0,1,0 1) 'SEAGATE ' 'ST39173W ' '5958' Disk
0,2,0 2) *
0,3,0 3) 'iomega ' 'jaz 1GB ' 'J.86' Removable Disk
0,4,0 4) 'NEC ' 'CD-ROM DRIVE:466' '1.26' Removable CD-ROM
0,5,0 5) *
0,6,0 6) *
0,7,0 7) *
scsibus1:
1,0,0 100) *
1,1,0 101) *
1,2,0 102) *
1,3,0 103) *
1,4,0 104) *
1,5,0 105) 'YAMAHA ' 'CRW4260 ' '1.0q' Removable CD-ROM
1,6,0 106) 'ARTEC ' 'AM12S ' '1.06' Scanner
1,7,0 107) *Locate the entry for the CD burner and use the three numbers separated by commas as the value for dev. In this case, the Yamaha burner device is 1,5,0, so the appropriate input to specify that device is dev=1,5,0. Refer to the manual page for cdrecord for other ways to specify this value and for information on writing audio tracks and controlling the write speed.
Alternately, run the following command to get the device address of the burner:
# camcontrol devlist
<MATSHITA CDRW/DVD UJDA740 1.00> at scbus1 target 0 lun 0 (cd0,pass0)Use the numeric values for scbus, target, and lun. For this example, 1,0,0 is the device name to use.
In order to produce a data CD, the data files that are going to make up the tracks on the CD must be prepared before they can be burned to the CD. In FreeBSD, sysutils/cdrtools installs mkisofs, which can be used to produce an ISO 9660 file system that is an image of a directory tree within a UNIX® file system. The simplest usage is to specify the name of the ISO file to create and the path to the files to place into the ISO 9660 file system:
# mkisofs -o imagefile.iso /path/to/treeThis command maps the file names in the specified path to names that fit the limitations of the standard ISO 9660 file system, and will exclude files that do not meet the standard for ISO file systems.
A number of options are available to overcome the restrictions imposed by the standard. In particular, -R enables the Rock Ridge extensions common to UNIX® systems and -J enables Joliet extensions used by Microsoft® systems.
For CDs that are going to be used only on FreeBSD systems, -U can be used to disable all filename restrictions. When used with -R, it produces a file system image that is identical to the specified FreeBSD tree, even if it violates the ISO 9660 standard.
The last option of general use is -b. This is used to specify the location of a boot image for use in producing an "El Torito" bootable CD. This option takes an argument which is the path to a boot image from the top of the tree being written to the CD. By default, mkisofs creates an ISO image in "floppy disk emulation" mode, and thus expects the boot image to be exactly 1200, 1440 or 2880 KB in size. Some boot loaders, like the one used by the FreeBSD distribution media, do not use emulation mode. In this case, -no-emul-boot should be used. So, if /tmp/myboot holds a bootable FreeBSD system with the boot image in /tmp/myboot/boot/cdboot, this command would produce /tmp/bootable.iso:
# mkisofs -R -no-emul-boot -b boot/cdboot -o /tmp/bootable.iso /tmp/mybootThe resulting ISO image can be mounted as a memory disk with:
# mdconfig -a -t vnode -f /tmp/bootable.iso -u 0
# mount -t cd9660 /dev/md0 /mntOne can then verify that /mnt and /tmp/myboot are identical.
There are many other options available for mkisofs to fine-tune its behavior. Refer to mkisofs(8) for details.
It is possible to copy a data CD to an image file that is functionally equivalent to the image file created with The resulting image file can be burned to CD as described in Burning a CD. |
Once an ISO has been burned to a CD, it can be mounted by specifying the file system type, the name of the device containing the CD, and an existing mount point:
# mount -t cd9660 /dev/cd0 /mntSince mount assumes that a file system is of type ufs, a Incorrect super block error will occur if -t cd9660 is not included when mounting a data CD.
While any data CD can be mounted this way, disks with certain ISO 9660 extensions might behave oddly. For example, Joliet disks store all filenames in two-byte Unicode characters. If some non-English characters show up as question marks, specify the local charset with -C. For more information, refer to mount_cd9660(8).
In order to do this character conversion with the help of cd9660_iconv_load="YES" and then rebooting the machine, or by directly loading the module with |
Occasionally, Device not configured will be displayed when trying to mount a data CD. This usually means that the CD drive has not detected a disk in the tray, or that the drive is not visible on the bus. It can take a couple of seconds for a CD drive to detect media, so be patient.
Sometimes, a SCSICD drive may be missed because it did not have enough time to answer the bus reset. To resolve this, a custom kernel can be created which increases the default SCSI delay. Add the following option to the custom kernel configuration file and rebuild the kernel using the instructions in “Building and Installing a Custom Kernel”:
options SCSI_DELAY=15000
This tells the SCSI bus to pause 15 seconds during boot, to give the CD drive every possible chance to answer the bus reset.
It is possible to burn a file directly to CD, without creating an ISO 9660 file system. This is known as burning a raw data CD and some people do this for backup purposes. This type of disk can not be mounted as a normal data CD. In order to retrieve the data burned to such a CD, the data must be read from the raw device node. For example, this command will extract a compressed tar file located on the second CD device into the current working directory: In order to mount a data CD, the data must be written using |
To duplicate an audio CD, extract the audio data from the CD to a series of files, then write these files to a blank CD.
Procedure: Duplicating an Audio CD describes how to duplicate and burn an audio CD. If the FreeBSD version is less than 10.0 and the device is ATAPI, the atapicam module must be first loaded using the instructions in Supported Devices.
The sysutils/cdrtools package or port installs cdda2wav. This command can be used to extract all of the audio tracks, with each track written to a separate WAV file in the current working directory:
% cdda2wav -vall -B -OwavA device name does not need to be specified if there is only one CD device on the system. Refer to the cdda2wav manual page for instructions on how to specify a device and to learn more about the other options available for this command.
Use cdrecord to write the .wav files:
% cdrecord -v dev=2,0 -dao -useinfo *.wavMake sure that 2,0 is set appropriately, as described in Burning a CD.
Compared to the CD, the DVD is the next generation of optical media storage technology. The DVD can hold more data than any CD and is the standard for video publishing.
Five physical recordable formats can be defined for a recordable DVD:
DVD-R: This was the first DVD recordable format available. The DVD-R standard is defined by the DVD Forum. This format is write once.
DVD-RW: This is the rewritable version of the DVD-R standard. A DVD-RW can be rewritten about 1000 times.
DVD-RAM: This is a rewritable format which can be seen as a removable hard drive. However, this media is not compatible with most DVD-ROM drives and DVD-Video players as only a few DVD writers support the DVD-RAM format. Refer to Using a DVD-RAM for more information on DVD-RAM use.
DVD+RW: This is a rewritable format defined by the DVD+RW Alliance. A DVD+RW can be rewritten about 1000 times.
DVD+R: This format is the write once variation of the DVD+RW format.
A single layer recordable DVD can hold up to 4,700,000,000 bytes which is actually 4.38 GB or 4485 MB as 1 kilobyte is 1024 bytes.
A distinction must be made between the physical media and the application. For example, a DVD-Video is a specific file layout that can be written on any recordable DVD physical media such as DVD-R, DVD+R, or DVD-RW. Before choosing the type of media, ensure that both the burner and the DVD-Video player are compatible with the media under consideration. |
To perform DVD recording, use growisofs(1). This command is part of the sysutils/dvd+rw-tools utilities which support all DVD media types.
These tools use the SCSI subsystem to access the devices, therefore ATAPI/CAM support must be loaded or statically compiled into the kernel. This support is not needed if the burner uses the USB interface. Refer to USB Storage Devices for more details on USB device configuration.
DMA access must also be enabled for ATAPI devices, by adding the following line to /boot/loader.conf:
hw.ata.atapi_dma="1"
Before attempting to use dvd+rw-tools, consult the Hardware Compatibility Notes.
For a graphical user interface, consider using sysutils/k3b which provides a user friendly interface to growisofs(1) and many other burning tools. |
Since growisofs(1) is a front-end to mkisofs, it will invoke mkisofs(8) to create the file system layout and perform the write on the DVD. This means that an image of the data does not need to be created before the burning process.
To burn to a DVD+R or a DVD-R the data in /path/to/data, use the following command:
# growisofs -dvd-compat -Z /dev/cd0 -J -R /path/to/dataIn this example, -J -R is passed to mkisofs(8) to create an ISO 9660 file system with Joliet and Rock Ridge extensions. Refer to mkisofs(8) for more details.
For the initial session recording, -Z is used for both single and multiple sessions. Replace /dev/cd0, with the name of the DVD device. Using -dvd-compat indicates that the disk will be closed and that the recording will be unappendable. This should also provide better media compatibility with DVD-ROM drives.
To burn a pre-mastered image, such as imagefile.iso, use:
# growisofs -dvd-compat -Z /dev/cd0=imagefile.isoThe write speed should be detected and automatically set according to the media and the drive being used. To force the write speed, use -speed=. Refer to growisofs(1) for example usage.
In order to support working files larger than 4.38GB, an UDF/ISO-9660 hybrid file system must be created by passing To create this type of ISO file: To burn files directly to a disk: When an ISO image already contains large files, no additional options are required for growisofs(1) to burn that image on a disk. Be sure to use an up-to-date version of sysutils/cdrtools, which contains mkisofs(8), as an older version may not contain large files support. If the latest version does not work, install sysutils/cdrtools-devel and read its mkisofs(8). |
A DVD-Video is a specific file layout based on the ISO 9660 and micro-UDF (M-UDF) specifications. Since DVD-Video presents a specific data structure hierarchy, a particular program such as multimedia/dvdauthor is needed to author the DVD.
If an image of the DVD-Video file system already exists, it can be burned in the same way as any other image. If dvdauthor was used to make the DVD and the result is in /path/to/video, the following command should be used to burn the DVD-Video:
# growisofs -Z /dev/cd0 -dvd-video /path/to/video-dvd-video is passed to mkisofs(8) to instruct it to create a DVD-Video file system layout. This option implies the -dvd-compat growisofs(1) option.
Unlike CD-RW, a virgin DVD+RW needs to be formatted before first use. It is recommended to let growisofs(1) take care of this automatically whenever appropriate. However, it is possible to use dvd+rw-format to format the DVD+RW:
# dvd+rw-format /dev/cd0Only perform this operation once and keep in mind that only virgin DVD+RW medias need to be formatted. Once formatted, the DVD+RW can be burned as usual.
To burn a totally new file system and not just append some data onto a DVD+RW, the media does not need to be blanked first. Instead, write over the previous recording like this:
# growisofs -Z /dev/cd0 -J -R /path/to/newdataThe DVD+RW format supports appending data to a previous recording. This operation consists of merging a new session to the existing one as it is not considered to be multi-session writing. growisofs(1) will grow the ISO 9660 file system present on the media.
For example, to append data to a DVD+RW, use the following:
# growisofs -M /dev/cd0 -J -R /path/to/nextdataThe same mkisofs(8) options used to burn the initial session should be used during next writes.
Use |
To blank the media, use:
# growisofs -Z /dev/cd0=/dev/zeroA DVD-RW accepts two disc formats: incremental sequential and restricted overwrite. By default, DVD-RW discs are in sequential format.
A virgin DVD-RW can be directly written without being formatted. However, a non-virgin DVD-RW in sequential format needs to be blanked before writing a new initial session.
To blank a DVD-RW in sequential mode:
# dvd+rw-format -blank=full /dev/cd0A full blanking using Since growisofs(1) automatically attempts to detect fast blanked media and engage DAO write, One should instead use restricted overwrite mode with any DVD-RW as this format is more flexible than the default of incremental sequential. |
To write data on a sequential DVD-RW, use the same instructions as for the other DVD formats:
# growisofs -Z /dev/cd0 -J -R /path/to/dataTo append some data to a previous recording, use -M with growisofs(1). However, if data is appended on a DVD-RW in incremental sequential mode, a new session will be created on the disc and the result will be a multi-session disc.
A DVD-RW in restricted overwrite format does not need to be blanked before a new initial session. Instead, overwrite the disc with -Z. It is also possible to grow an existing ISO 9660 file system written on the disc with -M. The result will be a one-session DVD.
To put a DVD-RW in restricted overwrite format, the following command must be used:
# dvd+rw-format /dev/cd0To change back to sequential format, use:
# dvd+rw-format -blank=full /dev/cd0Few DVD-ROM drives support multi-session DVDs and most of the time only read the first session. DVD+R, DVD-R and DVD-RW in sequential format can accept multiple sessions. The notion of multiple sessions does not exist for the DVD+RW and the DVD-RW restricted overwrite formats.
Using the following command after an initial non-closed session on a DVD+R, DVD-R, or DVD-RW in sequential format, will add a new session to the disc:
# growisofs -M /dev/cd0 -J -R /path/to/nextdataUsing this command with a DVD+RW or a DVD-RW in restricted overwrite mode will append data while merging the new session to the existing one. The result will be a single-session disc. Use this method to add data after an initial write on these types of media.
Since some space on the media is used between each session to mark the end and start of sessions, one should add sessions with a large amount of data to optimize media space. The number of sessions is limited to 154 for a DVD+R, about 2000 for a DVD-R, and 127 for a DVD+R Double Layer. |
To obtain more information about a DVD, use dvd+rw-mediainfo /dev/cd0 while the disc in the specified drive.
More information about dvd+rw-tools can be found in growisofs(1), on the dvd+rw-tools web site, and in the cdwrite mailing list archives.
When creating a problem report related to the use of dvd+rw-tools, always include the output of |
DVD-RAM writers can use either a SCSI or ATAPI interface. For ATAPI devices, DMA access has to be enabled by adding the following line to /boot/loader.conf:
hw.ata.atapi_dma="1"
A DVD-RAM can be seen as a removable hard drive. Like any other hard drive, the DVD-RAM must be formatted before it can be used. In this example, the whole disk space will be formatted with a standard UFS2 file system:
# dd if=/dev/zero of=/dev/acd0 bs=2k count=1
# bsdlabel -Bw acd0
# newfs /dev/acd0The DVD device, acd0, must be changed according to the configuration.
Once the DVD-RAM has been formatted, it can be mounted as a normal hard drive:
# mount /dev/acd0 /mntOnce mounted, the DVD-RAM will be both readable and writeable.
This section explains how to format a 3.5 inch floppy disk in FreeBSD.
Procedure: Steps to Format a Floppy
A floppy disk needs to be low-level formatted before it can be used. This is usually done by the vendor, but formatting is a good way to check media integrity. To low-level format the floppy disk on FreeBSD, use fdformat(1). When using this utility, make note of any error messages, as these can help determine if the disk is good or bad.
To format the floppy, insert a new 3.5 inch floppy disk into the first floppy drive and issue:
# /usr/sbin/fdformat -f 1440 /dev/fd0After low-level formatting the disk, create a disk label as it is needed by the system to determine the size of the disk and its geometry. The supported geometry values are listed in /etc/disktab.
To write the disk label, use bsdlabel(8):
# /sbin/bsdlabel -B -w /dev/fd0 fd1440The floppy is now ready to be high-level formatted with a file system. The floppy’s file system can be either UFS or FAT, where FAT is generally a better choice for floppies.
To format the floppy with FAT, issue:
# /sbin/newfs_msdos /dev/fd0The disk is now ready for use. To use the floppy, mount it with mount_msdosfs(8). One can also install and use emulators/mtools from the Ports Collection.
Implementing a backup plan is essential in order to have the ability to recover from disk failure, accidental file deletion, random file corruption, or complete machine destruction, including destruction of on-site backups.
The backup type and schedule will vary, depending upon the importance of the data, the granularity needed for file restores, and the amount of acceptable downtime. Some possible backup techniques include:
Archives of the whole system, backed up onto permanent, off-site media. This provides protection against all of the problems listed above, but is slow and inconvenient to restore from, especially for non-privileged users.
File system snapshots, which are useful for restoring deleted files or previous versions of files.
Copies of whole file systems or disks which are synchronized with another system on the network using a scheduled net/rsync.
Hardware or software RAID, which minimizes or avoids downtime when a disk fails.
Typically, a mix of backup techniques is used. For example, one could create a schedule to automate a weekly, full system backup that is stored off-site and to supplement this backup with hourly ZFS snapshots. In addition, one could make a manual backup of individual directories or files before making file edits or deletions.
This section describes some of the utilities which can be used to create and manage backups on a FreeBSD system.
The traditional UNIX® programs for backing up a file system are dump(8), which creates the backup, and restore(8), which restores the backup. These utilities work at the disk block level, below the abstractions of the files, links, and directories that are created by file systems. Unlike other backup software, dump backs up an entire file system and is unable to backup only part of a file system or a directory tree that spans multiple file systems. Instead of writing files and directories, dump writes the raw data blocks that comprise files and directories.
If |
When used to restore data, restore stores temporary files in /tmp/ by default. When using a recovery disk with a small /tmp, set TMPDIR to a directory with more free space in order for the restore to succeed.
When using dump, be aware that some quirks remain from its early days in Version 6 of AT&T UNIX®,circa 1975. The default parameters assume a backup to a 9-track tape, rather than to another type of media or to the high-density tapes available today. These defaults must be overridden on the command line.
It is possible to backup a file system across the network to a another system or to a tape drive attached to another computer. While the rdump(8) and rrestore(8) utilities can be used for this purpose, they are not considered to be secure.
Instead, one can use dump and restore in a more secure fashion over an SSH connection. This example creates a full, compressed backup of /usr and sends the backup file to the specified host over a SSH connection.
dump over ssh# /sbin/dump -0uan -f - /usr | gzip -2 | ssh -c blowfish \
targetuser@targetmachine.example.com dd of=/mybigfiles/dump-usr-l0.gzThis example sets RSH in order to write the backup to a tape drive on a remote system over a SSH connection:
dump over ssh with RSH Set# env RSH=/usr/bin/ssh /sbin/dump -0uan -f targetuser@targetmachine.example.com:/dev/sa0 /usrSeveral built-in utilities are available for backing up and restoring specified files and directories as needed.
A good choice for making a backup of all of the files in a directory is tar(1). This utility dates back to Version 6 of AT&T UNIX® and by default assumes a recursive backup to a local tape device. Switches can be used to instead specify the name of a backup file.
This example creates a compressed backup of the current directory and saves it to /tmp/mybackup.tgz. When creating a backup file, make sure that the backup is not saved to the same directory that is being backed up.
tar# tar czvf /tmp/mybackup.tgz .To restore the entire backup, cd into the directory to restore into and specify the name of the backup. Note that this will overwrite any newer versions of files in the restore directory. When in doubt, restore to a temporary directory or specify the name of the file within the backup to restore.
tar# tar xzvf /tmp/mybackup.tgzThere are dozens of available switches which are described in tar(1). This utility also supports the use of exclude patterns to specify which files should not be included when backing up the specified directory or restoring files from a backup.
To create a backup using a specified list of files and directories, cpio(1) is a good choice. Unlike tar, cpio does not know how to walk the directory tree and it must be provided the list of files to backup.
For example, a list of files can be created using ls or find. This example creates a recursive listing of the current directory which is then piped to cpio in order to create an output backup file named /tmp/mybackup.cpio.
ls and cpio to Make a Recursive Backup of the Current Directory# ls -R | cpio -ovF /tmp/mybackup.cpioA backup utility which tries to bridge the features provided by tar and cpio is pax(1). Over the years, the various versions of tar and cpio became slightly incompatible. POSIX® created pax which attempts to read and write many of the various cpio and tar formats, plus new formats of its own.
The pax equivalent to the previous examples would be:
pax# pax -wf /tmp/mybackup.pax .While tape technology has continued to evolve, modern backup systems tend to combine off-site backups with local removable media. FreeBSD supports any tape drive that uses SCSI, such as LTO or DAT. There is limited support for SATA and USB tape drives.
For SCSI tape devices, FreeBSD uses the sa(4) driver and the /dev/sa0, /dev/nsa0, and /dev/esa0 devices. The physical device name is /dev/sa0. When /dev/nsa0 is used, the backup application will not rewind the tape after writing a file, which allows writing more than one file to a tape. Using /dev/esa0 ejects the tape after the device is closed.
In FreeBSD, mt is used to control operations of the tape drive, such as seeking through files on a tape or writing tape control marks to the tape. For example, the first three files on a tape can be preserved by skipping past them before writing a new file:
# mt -f /dev/nsa0 fsf 3This utility supports many operations. Refer to mt(1) for details.
To write a single file to tape using tar, specify the name of the tape device and the file to backup:
# tar cvf /dev/sa0 fileTo recover files from a tar archive on tape into the current directory:
# tar xvf /dev/sa0To backup a UFS file system, use dump. This examples backs up /usr without rewinding the tape when finished:
# dump -0aL -b64 -f /dev/nsa0 /usrTo interactively restore files from a dump file on tape into the current directory:
# restore -i -f /dev/nsa0The FreeBSD Ports Collection provides many third-party utilities which can be used to schedule the creation of backups, simplify tape backup, and make backups easier and more convenient. Many of these applications are client/server based and can be used to automate the backups of a single system or all of the computers in a network.
Popular utilities include Amanda, Bacula, rsync, and duplicity.
In addition to regular backups, it is recommended to perform the following steps as part of an emergency preparedness plan.
Create a print copy of the output of the following commands:
gpart show
more /etc/fstab
dmesg
Store this printout and a copy of the installation media in a secure location. Should an emergency restore be needed, boot into the installation media and select Live CD to access a rescue shell. This rescue mode can be used to view the current state of the system, and if needed, to reformat disks and restore data from backups.
The installation media for FreeBSD/i386 11.2-RELEASE does not include a rescue shell. For this version, instead download and burn a Livefs CD image from ftp://ftp.FreeBSD.org/pub/FreeBSD/releases/i386/ISO-IMAGES/11.2/FreeBSD-11.2-RELEASE-i386-livefs.iso. |
Next, test the rescue shell and the backups. Make notes of the procedure. Store these notes with the media, the printouts, and the backups. These notes may prevent the inadvertent destruction of the backups while under the stress of performing an emergency recovery.
For an added measure of security, store the latest backup at a remote location which is physically separated from the computers and disk drives by a significant distance.
In addition to physical disks, FreeBSD also supports the creation and use of memory disks. One possible use for a memory disk is to access the contents of an ISO file system without the overhead of first burning it to a CD or DVD, then mounting the CD/DVD media.
In FreeBSD, the md(4) driver is used to provide support for memory disks. The GENERIC kernel includes this driver. When using a custom kernel configuration file, ensure it includes this line:
device md
To mount an existing file system image, use mdconfig to specify the name of the ISO file and a free unit number. Then, refer to that unit number to mount it on an existing mount point. Once mounted, the files in the ISO will appear in the mount point. This example attaches diskimage.iso to the memory device /dev/md0 then mounts that memory device on /mnt:
# mdconfig -f diskimage.iso -u 0
# mount -t cd9660 /dev/md0 /mntNotice that -t cd9660 was used to mount an ISO format. If a unit number is not specified with -u, mdconfig will automatically allocate an unused memory device and output the name of the allocated unit, such as md4. Refer to mdconfig(8) for more details about this command and its options.
When a memory disk is no longer in use, its resources should be released back to the system. First, unmount the file system, then use mdconfig to detach the disk from the system and release its resources. To continue this example:
# umount /mnt
# mdconfig -d -u 0To determine if any memory disks are still attached to the system, type mdconfig -l.
FreeBSD also supports memory disks where the storage to use is allocated from either a hard disk or an area of memory. The first method is commonly referred to as a file-backed file system and the second method as a memory-backed file system. Both types can be created using mdconfig.
To create a new memory-backed file system, specify a type of swap and the size of the memory disk to create. Then, format the memory disk with a file system and mount as usual. This example creates a 5M memory disk on unit 1. That memory disk is then formatted with the UFS file system before it is mounted:
# mdconfig -a -t swap -s 5m -u 1
# newfs -U md1
/dev/md1: 5.0MB (10240 sectors) block size 16384, fragment size 2048
using 4 cylinder groups of 1.27MB, 81 blks, 192 inodes.
with soft updates
super-block backups (for fsck -b #) at:
160, 2752, 5344, 7936
# mount /dev/md1 /mnt
# df /mnt
Filesystem 1K-blocks Used Avail Capacity Mounted on
/dev/md1 4718 4 4338 0% /mntTo create a new file-backed memory disk, first allocate an area of disk to use. This example creates an empty 5MB file named newimage:
# dd if=/dev/zero of=newimage bs=1k count=5k
5120+0 records in
5120+0 records outNext, attach that file to a memory disk, label the memory disk and format it with the UFS file system, mount the memory disk, and verify the size of the file-backed disk:
# mdconfig -f newimage -u 0
# bsdlabel -w md0 auto
# newfs -U md0a
/dev/md0a: 5.0MB (10224 sectors) block size 16384, fragment size 2048
using 4 cylinder groups of 1.25MB, 80 blks, 192 inodes.
super-block backups (for fsck -b #) at:
160, 2720, 5280, 7840
# mount /dev/md0a /mnt
# df /mnt
Filesystem 1K-blocks Used Avail Capacity Mounted on
/dev/md0a 4710 4 4330 0% /mntIt takes several commands to create a file- or memory-backed file system using mdconfig. FreeBSD also comes with mdmfs which automatically configures a memory disk, formats it with the UFS file system, and mounts it. For example, after creating newimage with dd, this one command is equivalent to running the bsdlabel, newfs, and mount commands shown above:
# mdmfs -F newimage -s 5m md0 /mntTo instead create a new memory-based memory disk with mdmfs, use this one command:
# mdmfs -s 5m md1 /mntIf the unit number is not specified, mdmfs will automatically select an unused memory device. For more details about mdmfs, refer to mdmfs(8).
FreeBSD offers a feature in conjunction with Soft Updates: file system snapshots.
UFS snapshots allow a user to create images of specified file systems, and treat them as a file. Snapshot files must be created in the file system that the action is performed on, and a user may create no more than 20 snapshots per file system. Active snapshots are recorded in the superblock so they are persistent across unmount and remount operations along with system reboots. When a snapshot is no longer required, it can be removed using rm(1). While snapshots may be removed in any order, all the used space may not be acquired because another snapshot will possibly claim some of the released blocks.
The un-alterable snapshot file flag is set by mksnap_ffs(8) after initial creation of a snapshot file. unlink(1) makes an exception for snapshot files since it allows them to be removed.
Snapshots are created using mount(8). To place a snapshot of /var in the file /var/snapshot/snap, use the following command:
# mount -u -o snapshot /var/snapshot/snap /varAlternatively, use mksnap_ffs(8) to create the snapshot:
# mksnap_ffs /var /var/snapshot/snapOne can find snapshot files on a file system, such as /var, using find(1):
# find /var -flags snapshotOnce a snapshot has been created, it has several uses:
Some administrators will use a snapshot file for backup purposes, because the snapshot can be transferred to CDs or tape.
The file system integrity checker, fsck(8), may be run on the snapshot. Assuming that the file system was clean when it was mounted, this should always provide a clean and unchanging result.
Running dump(8) on the snapshot will produce a dump file that is consistent with the file system and the timestamp of the snapshot. dump(8) can also take a snapshot, create a dump image, and then remove the snapshot in one command by using -L.
The snapshot can be mounted as a frozen image of the file system. To mount(8) the snapshot /var/snapshot/snap run:
# mdconfig -a -t vnode -o readonly -f /var/snapshot/snap -u 4
# mount -r /dev/md4 /mntThe frozen /var is now available through /mnt. Everything will initially be in the same state it was during the snapshot creation time. The only exception is that any earlier snapshots will appear as zero length files. To unmount the snapshot, use:
# umount /mnt
# mdconfig -d -u 4For more information about softupdates and file system snapshots, including technical papers, visit Marshall Kirk McKusick’s website at http://www.mckusick.com/.
Disk quotas can be used to limit the amount of disk space or the number of files a user or members of a group may allocate on a per-file system basis. This prevents one user or group of users from consuming all of the available disk space.
This section describes how to configure disk quotas for the UFS file system. To configure quotas on the ZFS file system, refer to Dataset, User, and Group Quotas
To determine if the FreeBSD kernel provides support for disk quotas:
% sysctl kern.features.ufs_quota
kern.features.ufs_quota: 1In this example, the 1 indicates quota support. If the value is instead 0, add the following line to a custom kernel configuration file and rebuild the kernel using the instructions in Configuring the FreeBSD Kernel:
options QUOTA
Next, enable disk quotas in /etc/rc.conf:
quota_enable="YES"
Normally on bootup, the quota integrity of each file system is checked by quotacheck(8). This program insures that the data in the quota database properly reflects the data on the file system. This is a time consuming process that will significantly affect the time the system takes to boot. To skip this step, add this variable to /etc/rc.conf:
check_quotas="NO"
Finally, edit /etc/fstab to enable disk quotas on a per-file system basis. To enable per-user quotas on a file system, add userquota to the options field in the /etc/fstab entry for the file system to enable quotas on. For example:
/dev/da1s2g /home ufs rw,userquota 1 2
To enable group quotas, use groupquota instead. To enable both user and group quotas, separate the options with a comma:
/dev/da1s2g /home ufs rw,userquota,groupquota 1 2
By default, quota files are stored in the root directory of the file system as quota.user and quota.group. Refer to fstab(5) for more information. Specifying an alternate location for the quota files is not recommended.
Once the configuration is complete, reboot the system and /etc/rc will automatically run the appropriate commands to create the initial quota files for all of the quotas enabled in /etc/fstab.
In the normal course of operations, there should be no need to manually run quotacheck(8), quotaon(8), or quotaoff(8). However, one should read these manual pages to be familiar with their operation.
To verify that quotas are enabled, run:
# quota -vThere should be a one line summary of disk usage and current quota limits for each file system that quotas are enabled on.
The system is now ready to be assigned quota limits with edquota.
Several options are available to enforce limits on the amount of disk space a user or group may allocate, and how many files they may create. Allocations can be limited based on disk space (block quotas), number of files (inode quotas), or a combination of both. Each limit is further broken down into two categories: hard and soft limits.
A hard limit may not be exceeded. Once a user reaches a hard limit, no further allocations can be made on that file system by that user. For example, if the user has a hard limit of 500 kbytes on a file system and is currently using 490 kbytes, the user can only allocate an additional 10 kbytes. Attempting to allocate an additional 11 kbytes will fail.
Soft limits can be exceeded for a limited amount of time, known as the grace period, which is one week by default. If a user stays over their limit longer than the grace period, the soft limit turns into a hard limit and no further allocations are allowed. When the user drops back below the soft limit, the grace period is reset.
In the following example, the quota for the test account is being edited. When edquota is invoked, the editor specified by EDITOR is opened in order to edit the quota limits. The default editor is set to vi.
# edquota -u test
Quotas for user test:
/usr: kbytes in use: 65, limits (soft = 50, hard = 75)
inodes in use: 7, limits (soft = 50, hard = 60)
/usr/var: kbytes in use: 0, limits (soft = 50, hard = 75)
inodes in use: 0, limits (soft = 50, hard = 60)There are normally two lines for each file system that has quotas enabled. One line represents the block limits and the other represents the inode limits. Change the value to modify the quota limit. For example, to raise the block limit on /usr to a soft limit of 500 and a hard limit of 600, change the values in that line as follows:
/usr: kbytes in use: 65, limits (soft = 500, hard = 600)
The new quota limits take effect upon exiting the editor.
Sometimes it is desirable to set quota limits on a range of users. This can be done by first assigning the desired quota limit to a user. Then, use -p to duplicate that quota to a specified range of user IDs (UIDs). The following command will duplicate those quota limits for UIDs 10,000 through 19,999:
# edquota -p test 10000-19999For more information, refer to edquota(8).
To check individual user or group quotas and disk usage, use quota(1). A user may only examine their own quota and the quota of a group they are a member of. Only the superuser may view all user and group quotas. To get a summary of all quotas and disk usage for file systems with quotas enabled, use repquota(8).
Normally, file systems that the user is not using any disk space on will not show in the output of quota, even if the user has a quota limit assigned for that file system. Use -v to display those file systems. The following is sample output from quota -v for a user that has quota limits on two file systems.
Disk quotas for user test (uid 1002):
Filesystem usage quota limit grace files quota limit grace
/usr 65* 50 75 5days 7 50 60
/usr/var 0 50 75 0 50 60In this example, the user is currently 15 kbytes over the soft limit of 50 kbytes on /usr and has 5 days of grace period left. The asterisk * indicates that the user is currently over the quota limit.
Quotas are enforced by the quota subsystem on the NFS server. The rpc.rquotad(8) daemon makes quota information available to quota on NFS clients, allowing users on those machines to see their quota statistics.
On the NFS server, enable rpc.rquotad by removing the # from this line in /etc/inetd.conf:
rquotad/1 dgram rpc/udp wait root /usr/libexec/rpc.rquotad rpc.rquotad
Then, restart inetd:
# service inetd restartFreeBSD offers excellent online protections against unauthorized data access. File permissions and Mandatory Access Control (MAC) help prevent unauthorized users from accessing data while the operating system is active and the computer is powered up. However, the permissions enforced by the operating system are irrelevant if an attacker has physical access to a computer and can move the computer’s hard drive to another system to copy and analyze the data.
Regardless of how an attacker may have come into possession of a hard drive or powered-down computer, the GEOM-based cryptographic subsystems built into FreeBSD are able to protect the data on the computer’s file systems against even highly-motivated attackers with significant resources. Unlike encryption methods that encrypt individual files, the built-in gbde and geli utilities can be used to transparently encrypt entire file systems. No cleartext ever touches the hard drive’s platter.
This chapter demonstrates how to create an encrypted file system on FreeBSD. It first demonstrates the process using gbde and then demonstrates the same example using geli.
The objective of the gbde(4) facility is to provide a formidable challenge for an attacker to gain access to the contents of a cold storage device. However, if the computer is compromised while up and running and the storage device is actively attached, or the attacker has access to a valid passphrase, it offers no protection to the contents of the storage device. Thus, it is important to provide physical security while the system is running and to protect the passphrase used by the encryption mechanism.
This facility provides several barriers to protect the data stored in each disk sector. It encrypts the contents of a disk sector using 128-bit AES in CBC mode. Each sector on the disk is encrypted with a different AES key. For more information on the cryptographic design, including how the sector keys are derived from the user-supplied passphrase, refer to gbde(4).
FreeBSD provides a kernel module for gbde which can be loaded with this command:
# kldload geom_bdeIf using a custom kernel configuration file, ensure it contains this line:
options GEOM_BDE
The following example demonstrates adding a new hard drive to a system that will hold a single encrypted partition that will be mounted as /private.
Add the New Hard Drive
Install the new drive to the system as explained in Adding Disks. For the purposes of this example, a new hard drive partition has been added as /dev/ad4s1c and /dev/ad0s1* represents the existing standard FreeBSD partitions.
# ls /dev/ad*
/dev/ad0 /dev/ad0s1b /dev/ad0s1e /dev/ad4s1
/dev/ad0s1 /dev/ad0s1c /dev/ad0s1f /dev/ad4s1c
/dev/ad0s1a /dev/ad0s1d /dev/ad4Create a Directory to Hold gbde Lock Files
# mkdir /etc/gbdeThe gbde lock file contains information that gbde requires to access encrypted partitions. Without access to the lock file, gbde will not be able to decrypt the data contained in the encrypted partition without significant manual intervention which is not supported by the software. Each encrypted partition uses a separate lock file.
Initialize the gbde Partition
A gbde partition must be initialized before it can be used. This initialization needs to be performed only once. This command will open the default editor, in order to set various configuration options in a template. For use with the UFS file system, set the sector_size to 2048:
# gbde init /dev/ad4s1c -i -L /etc/gbde/ad4s1c.lock
# $FreeBSD: src/sbin/gbde/template.txt,v 1.1.36.1 2009/08/03 08:13:06 kensmith Exp $
#
# Sector size is the smallest unit of data which can be read or written.
# Making it too small decreases performance and decreases available space.
# Making it too large may prevent filesystems from working. 512 is the
# minimum and always safe. For UFS, use the fragment size
#
sector_size = 2048
[...]Once the edit is saved, the user will be asked twice to type the passphrase used to secure the data. The passphrase must be the same both times. The ability of gbde to protect data depends entirely on the quality of the passphrase. For tips on how to select a secure passphrase that is easy to remember, see http://world.std.com/~reinhold/diceware.htm.
This initialization creates a lock file for the gbde partition. In this example, it is stored as /etc/gbde/ad4s1c.lock. Lock files must end in ".lock" in order to be correctly detected by the /etc/rc.d/gbde start up script.
Lock files must be backed up together with the contents of any encrypted partitions. Without the lock file, the legitimate owner will be unable to access the data on the encrypted partition. |
Attach the Encrypted Partition to the Kernel
# gbde attach /dev/ad4s1c -l /etc/gbde/ad4s1c.lockThis command will prompt to input the passphrase that was selected during the initialization of the encrypted partition. The new encrypted device will appear in /dev as /dev/device_name.bde:
# ls /dev/ad*
/dev/ad0 /dev/ad0s1b /dev/ad0s1e /dev/ad4s1
/dev/ad0s1 /dev/ad0s1c /dev/ad0s1f /dev/ad4s1c
/dev/ad0s1a /dev/ad0s1d /dev/ad4 /dev/ad4s1c.bdeCreate a File System on the Encrypted Device
Once the encrypted device has been attached to the kernel, a file system can be created on the device. This example creates a UFS file system with soft updates enabled. Be sure to specify the partition which has a *.bde extension:
# newfs -U /dev/ad4s1c.bdeMount the Encrypted Partition
Create a mount point and mount the encrypted file system:
# mkdir /private
# mount /dev/ad4s1c.bde /privateVerify That the Encrypted File System is Available
The encrypted file system should now be visible and available for use:
% df -H
Filesystem Size Used Avail Capacity Mounted on
/dev/ad0s1a 1037M 72M 883M 8% /
/devfs 1.0K 1.0K 0B 100% /dev
/dev/ad0s1f 8.1G 55K 7.5G 0% /home
/dev/ad0s1e 1037M 1.1M 953M 0% /tmp
/dev/ad0s1d 6.1G 1.9G 3.7G 35% /usr
/dev/ad4s1c.bde 150G 4.1K 138G 0% /privateAfter each boot, any encrypted file systems must be manually re-attached to the kernel, checked for errors, and mounted, before the file systems can be used. To configure these steps, add the following lines to /etc/rc.conf:
gbde_autoattach_all="YES" gbde_devices="ad4s1c" gbde_lockdir="/etc/gbde"
This requires that the passphrase be entered at the console at boot time. After typing the correct passphrase, the encrypted partition will be mounted automatically. Additional gbde boot options are available and listed in rc.conf(5).
sysinstall is incompatible with gbde-encrypted devices. All *.bde devices must be detached from the kernel before starting sysinstall or it will crash during its initial probing for devices. To detach the encrypted device used in the example, use the following command: |
geliAn alternative cryptographic GEOM class is available using geli. This control utility adds some features and uses a different scheme for doing cryptographic work. It provides the following features:
Utilizes the crypto(9) framework and automatically uses cryptographic hardware when it is available.
Supports multiple cryptographic algorithms such as AES, Blowfish, and 3DES.
Allows the root partition to be encrypted. The passphrase used to access the encrypted root partition will be requested during system boot.
Allows the use of two independent keys.
It is fast as it performs simple sector-to-sector encryption.
Allows backup and restore of master keys. If a user destroys their keys, it is still possible to get access to the data by restoring keys from the backup.
Allows a disk to attach with a random, one-time key which is useful for swap partitions and temporary file systems.
More features and usage examples can be found in geli(8).
The following example describes how to generate a key file which will be used as part of the master key for the encrypted provider mounted under /private. The key file will provide some random data used to encrypt the master key. The master key will also be protected by a passphrase. The provider’s sector size will be 4kB. The example describes how to attach to the geli provider, create a file system on it, mount it, work with it, and finally, how to detach it.
geliLoad geli Support
Support for geli is available as a loadable kernel module. To configure the system to automatically load the module at boot time, add the following line to /boot/loader.conf:
geom_eli_load="YES"
To load the kernel module now:
# kldload geom_eliFor a custom kernel, ensure the kernel configuration file contains these lines:
options GEOM_ELI device crypto
Generate the Master Key
The following commands generate a master key that all data will be encrypted with. This key can never be changed. Rather than using it directly, it is encrypted with one or more user keys. The user keys are made up of an optional combination of random bytes from a file, /root/da2.key, and/or a passphrase. In this case, the data source for the key file is /dev/random. This command also configures the sector size of the provider (/dev/da2.eli) as 4kB, for better performance:
# dd if=/dev/random of=/root/da2.key bs=64 count=1
# geli init -K /root/da2.key -s 4096 /dev/da2
Enter new passphrase:
Reenter new passphrase:It is not mandatory to use both a passphrase and a key file as either method of securing the master key can be used in isolation.
If the key file is given as "-", standard input will be used. For example, this command generates three key files:
# cat keyfile1 keyfile2 keyfile3 | geli init -K - /dev/da2Attach the Provider with the Generated Key
To attach the provider, specify the key file, the name of the disk, and the passphrase:
# geli attach -k /root/da2.key /dev/da2
Enter passphrase:This creates a new device with an .eli extension:
# ls /dev/da2*
/dev/da2 /dev/da2.eliCreate the New File System
Next, format the device with the UFS file system and mount it on an existing mount point:
# dd if=/dev/random of=/dev/da2.eli bs=1m
# newfs /dev/da2.eli
# mount /dev/da2.eli /privateThe encrypted file system should now be available for use:
# df -H
Filesystem Size Used Avail Capacity Mounted on
/dev/ad0s1a 248M 89M 139M 38% /
/devfs 1.0K 1.0K 0B 100% /dev
/dev/ad0s1f 7.7G 2.3G 4.9G 32% /usr
/dev/ad0s1d 989M 1.5M 909M 0% /tmp
/dev/ad0s1e 3.9G 1.3G 2.3G 35% /var
/dev/da2.eli 150G 4.1K 138G 0% /privateOnce the work on the encrypted partition is done, and the /private partition is no longer needed, it is prudent to put the device into cold storage by unmounting and detaching the geli encrypted partition from the kernel:
# umount /private
# geli detach da2.eliA rc.d script is provided to simplify the mounting of geli-encrypted devices at boot time. For this example, add these lines to /etc/rc.conf:
geli_devices="da2" geli_da2_flags="-k /root/da2.key"
This configures /dev/da2 as a geli provider with a master key of /root/da2.key. The system will automatically detach the provider from the kernel before the system shuts down. During the startup process, the script will prompt for the passphrase before attaching the provider. Other kernel messages might be shown before and after the password prompt. If the boot process seems to stall, look carefully for the password prompt among the other messages. Once the correct passphrase is entered, the provider is attached. The file system is then mounted, typically by an entry in /etc/fstab. Refer to “Mounting and Unmounting File Systems” for instructions on how to configure a file system to mount at boot time.
Like the encryption of disk partitions, encryption of swap space is used to protect sensitive information. Consider an application that deals with passwords. As long as these passwords stay in physical memory, they are not written to disk and will be cleared after a reboot. However, if FreeBSD starts swapping out memory pages to free space, the passwords may be written to the disk unencrypted. Encrypting swap space can be a solution for this scenario.
This section demonstrates how to configure an encrypted swap partition using gbde(8) or geli(8) encryption. It assumes that /dev/ada0s1b is the swap partition.
Swap partitions are not encrypted by default and should be cleared of any sensitive data before continuing. To overwrite the current swap partition with random garbage, execute the following command:
# dd if=/dev/random of=/dev/ada0s1b bs=1mTo encrypt the swap partition using gbde(8), add the .bde suffix to the swap line in /etc/fstab:
# Device Mountpoint FStype Options Dump Pass# /dev/ada0s1b.bde none swap sw 0 0
To instead encrypt the swap partition using geli(8), use the .eli suffix:
# Device Mountpoint FStype Options Dump Pass# /dev/ada0s1b.eli none swap sw 0 0
By default, geli(8) uses the AES algorithm with a key length of 128 bits. Normally the default settings will suffice. If desired, these defaults can be altered in the options field in /etc/fstab. The possible flags are:
Data integrity verification algorithm used to ensure that the encrypted data has not been tampered with. See geli(8) for a list of supported algorithms.
Encryption algorithm used to protect the data. See geli(8) for a list of supported algorithms.
The length of the key used for the encryption algorithm. See geli(8) for the key lengths that are supported by each encryption algorithm.
The size of the blocks data is broken into before it is encrypted. Larger sector sizes increase performance at the cost of higher storage overhead. The recommended size is 4096 bytes.
This example configures an encrypted swap partition using the Blowfish algorithm with a key length of 128 bits and a sectorsize of 4 kilobytes:
# Device Mountpoint FStype Options Dump Pass# /dev/ada0s1b.eli none swap sw,ealgo=blowfish,keylen=128,sectorsize=4096 0 0
Once the system has rebooted, proper operation of the encrypted swap can be verified using swapinfo.
If gbde(8) is being used:
% swapinfo
Device 1K-blocks Used Avail Capacity
/dev/ada0s1b.bde 542720 0 542720 0If geli(8) is being used:
% swapinfo
Device 1K-blocks Used Avail Capacity
/dev/ada0s1b.eli 542720 0 542720 0High availability is one of the main requirements in serious business applications and highly-available storage is a key component in such environments. In FreeBSD, the Highly Available STorage (HAST) framework allows transparent storage of the same data across several physically separated machines connected by a TCP/IP network. HAST can be understood as a network-based RAID1 (mirror), and is similar to the DRBD® storage system used in the GNU/Linux® platform. In combination with other high-availability features of FreeBSD like CARP, HAST makes it possible to build a highly-available storage cluster that is resistant to hardware failures.
The following are the main features of HAST:
Can be used to mask I/O errors on local hard drives.
File system agnostic as it works with any file system supported by FreeBSD.
Efficient and quick resynchronization as only the blocks that were modified during the downtime of a node are synchronized.
Can be used in an already deployed environment to add additional redundancy.
Together with CARP, Heartbeat, or other tools, it can be used to build a robust and durable storage system.
After reading this section, you will know:
What HAST is, how it works, and which features it provides.
How to set up and use HAST on FreeBSD.
How to integrate CARP and devd(8) to build a robust storage system.
Before reading this section, you should:
Understand UNIX® and FreeBSD basics (FreeBSD Basics).
Know how to configure network interfaces and other core FreeBSD subsystems (Configuration and Tuning).
Have a good understanding of FreeBSD networking (Network Communication).
The HAST project was sponsored by The FreeBSD Foundation with support from http://www.omc.net/ and http://www.transip.nl/.
HAST provides synchronous block-level replication between two physical machines: the primary, also known as the master node, and the secondary, or slave node. These two machines together are referred to as a cluster.
Since HAST works in a primary-secondary configuration, it allows only one of the cluster nodes to be active at any given time. The primary node, also called active, is the one which will handle all the I/O requests to HAST-managed devices. The secondary node is automatically synchronized from the primary node.
The physical components of the HAST system are the local disk on primary node, and the disk on the remote, secondary node.
HAST operates synchronously on a block level, making it transparent to file systems and applications. HAST provides regular GEOM providers in /dev/hast/ for use by other tools or applications. There is no difference between using HAST-provided devices and raw disks or partitions.
Each write, delete, or flush operation is sent to both the local disk and to the remote disk over TCP/IP. Each read operation is served from the local disk, unless the local disk is not up-to-date or an I/O error occurs. In such cases, the read operation is sent to the secondary node.
HAST tries to provide fast failure recovery. For this reason, it is important to reduce synchronization time after a node’s outage. To provide fast synchronization, HAST manages an on-disk bitmap of dirty extents and only synchronizes those during a regular synchronization, with an exception of the initial sync.
There are many ways to handle synchronization. HAST implements several replication modes to handle different synchronization methods:
memsync: This mode reports a write operation as completed when the local write operation is finished and when the remote node acknowledges data arrival, but before actually storing the data. The data on the remote node will be stored directly after sending the acknowledgement. This mode is intended to reduce latency, but still provides good reliability. This mode is the default.
fullsync: This mode reports a write operation as completed when both the local write and the remote write complete. This is the safest and the slowest replication mode.
async: This mode reports a write operation as completed when the local write completes. This is the fastest and the most dangerous replication mode. It should only be used when replicating to a distant node where latency is too high for other modes.
The HAST framework consists of several components:
The hastd(8) daemon which provides data synchronization. When this daemon is started, it will automatically load geom_gate.ko.
The userland management utility, hastctl(8).
The hast.conf(5) configuration file. This file must exist before starting hastd.
Users who prefer to statically build GEOM_GATE support into the kernel should add this line to the custom kernel configuration file, then rebuild the kernel using the instructions in Configuring the FreeBSD Kernel:
options GEOM_GATE
The following example describes how to configure two nodes in master-slave/primary-secondary operation using HAST to replicate the data between the two. The nodes will be called hasta, with an IP address of 172.16.0.1, and hastb, with an IP address of 172.16.0.2. Both nodes will have a dedicated hard drive /dev/ad6 of the same size for HAST operation. The HAST pool, sometimes referred to as a resource or the GEOM provider in /dev/hast/, will be called test.
Configuration of HAST is done using /etc/hast.conf. This file should be identical on both nodes. The simplest configuration is:
resource test {
on hasta {
local /dev/ad6
remote 172.16.0.2
}
on hastb {
local /dev/ad6
remote 172.16.0.1
}
}For more advanced configuration, refer to hast.conf(5).
It is also possible to use host names in the |
Once the configuration exists on both nodes, the HAST pool can be created. Run these commands on both nodes to place the initial metadata onto the local disk and to start hastd(8):
# hastctl create test
# service hastd onestartIt is not possible to use GEOM providers with an existing file system or to convert an existing storage to a HAST-managed pool. This procedure needs to store some metadata on the provider and there will not be enough required space available on an existing provider. |
A HAST node’s primary or secondary role is selected by an administrator, or software like Heartbeat, using hastctl(8). On the primary node, hasta, issue this command:
# hastctl role primary testRun this command on the secondary node, hastb:
# hastctl role secondary testVerify the result by running hastctl on each node:
# hastctl status testCheck the status line in the output. If it says degraded, something is wrong with the configuration file. It should say complete on each node, meaning that the synchronization between the nodes has started. The synchronization completes when hastctl status reports 0 bytes of dirty extents.
The next step is to create a file system on the GEOM provider and mount it. This must be done on the primary node. Creating the file system can take a few minutes, depending on the size of the hard drive. This example creates a UFS file system on /dev/hast/test:
# newfs -U /dev/hast/test
# mkdir /hast/test
# mount /dev/hast/test /hast/testOnce the HAST framework is configured properly, the final step is to make sure that HAST is started automatically during system boot. Add this line to /etc/rc.conf:
hastd_enable="YES"
The goal of this example is to build a robust storage system which is resistant to the failure of any given node. If the primary node fails, the secondary node is there to take over seamlessly, check and mount the file system, and continue to work without missing a single bit of data.
To accomplish this task, the Common Address Redundancy Protocol (CARP) is used to provide for automatic failover at the IP layer. CARP allows multiple hosts on the same network segment to share an IP address. Set up CARP on both nodes of the cluster according to the documentation available in “Common Address Redundancy Protocol (CARP)”. In this example, each node will have its own management IP address and a shared IP address of 172.16.0.254. The primary HAST node of the cluster must be the master CARP node.
The HAST pool created in the previous section is now ready to be exported to the other hosts on the network. This can be accomplished by exporting it through NFS or Samba, using the shared IP address 172.16.0.254. The only problem which remains unresolved is an automatic failover should the primary node fail.
In the event of CARP interfaces going up or down, the FreeBSD operating system generates a devd(8) event, making it possible to watch for state changes on the CARP interfaces. A state change on the CARP interface is an indication that one of the nodes failed or came back online. These state change events make it possible to run a script which will automatically handle the HAST failover.
To catch state changes on the CARP interfaces, add this configuration to /etc/devd.conf on each node:
notify 30 {
match "system" "IFNET";
match "subsystem" "carp0";
match "type" "LINK_UP";
action "/usr/local/sbin/carp-hast-switch master";
};
notify 30 {
match "system" "IFNET";
match "subsystem" "carp0";
match "type" "LINK_DOWN";
action "/usr/local/sbin/carp-hast-switch slave";
};If the systems are running FreeBSD 10 or higher, replace carp0 with the name of the CARP-configured interface. |
Restart devd(8) on both nodes to put the new configuration into effect:
# service devd restartWhen the specified interface state changes by going up or down , the system generates a notification, allowing the devd(8) subsystem to run the specified automatic failover script, /usr/local/sbin/carp-hast-switch. For further clarification about this configuration, refer to devd.conf(5).
Here is an example of an automated failover script:
#!/bin/sh
# Original script by Freddie Cash <fjwcash@gmail.com>
# Modified by Michael W. Lucas <mwlucas@BlackHelicopters.org>
# and Viktor Petersson <vpetersson@wireload.net>
# The names of the HAST resources, as listed in /etc/hast.conf
resources="test"
# delay in mounting HAST resource after becoming master
# make your best guess
delay=3
# logging
log="local0.debug"
name="carp-hast"
# end of user configurable stuff
case "$1" in
master)
logger -p $log -t $name "Switching to primary provider for ${resources}."
sleep ${delay}
# Wait for any "hastd secondary" processes to stop
for disk in ${resources}; do
while $( pgrep -lf "hastd: ${disk} \(secondary\)" > /dev/null 2>&1 ); do
sleep 1
done
# Switch role for each disk
hastctl role primary ${disk}
if [ $? -ne 0 ]; then
logger -p $log -t $name "Unable to change role to primary for resource ${disk}."
exit 1
fi
done
# Wait for the /dev/hast/* devices to appear
for disk in ${resources}; do
for I in $( jot 60 ); do
[ -c "/dev/hast/${disk}" ] && break
sleep 0.5
done
if [ ! -c "/dev/hast/${disk}" ]; then
logger -p $log -t $name "GEOM provider /dev/hast/${disk} did not appear."
exit 1
fi
done
logger -p $log -t $name "Role for HAST resources ${resources} switched to primary."
logger -p $log -t $name "Mounting disks."
for disk in ${resources}; do
mkdir -p /hast/${disk}
fsck -p -y -t ufs /dev/hast/${disk}
mount /dev/hast/${disk} /hast/${disk}
done
;;
slave)
logger -p $log -t $name "Switching to secondary provider for ${resources}."
# Switch roles for the HAST resources
for disk in ${resources}; do
if ! mount | grep -q "^/dev/hast/${disk} on "
then
else
umount -f /hast/${disk}
fi
sleep $delay
hastctl role secondary ${disk} 2>&1
if [ $? -ne 0 ]; then
logger -p $log -t $name "Unable to switch role to secondary for resource ${disk}."
exit 1
fi
logger -p $log -t $name "Role switched to secondary for resource ${disk}."
done
;;
esacIn a nutshell, the script takes these actions when a node becomes master:
Promotes the HAST pool to primary on the other node.
Checks the file system under the HAST pool.
Mounts the pool.
When a node becomes secondary:
Unmounts the HAST pool.
Degrades the HAST pool to secondary.
This is just an example script which serves as a proof of concept. It does not handle all the possible scenarios and can be extended or altered in any way, for example, to start or stop required services. |
For this example, a standard UFS file system was used. To reduce the time needed for recovery, a journal-enabled UFS or ZFS file system can be used instead. |
More detailed information with additional examples can be found at http://wiki.FreeBSD.org/HAST.
HAST should generally work without issues. However, as with any other software product, there may be times when it does not work as supposed. The sources of the problems may be different, but the rule of thumb is to ensure that the time is synchronized between the nodes of the cluster.
When troubleshooting HAST, the debugging level of hastd(8) should be increased by starting hastd with -d. This argument may be specified multiple times to further increase the debugging level. Consider also using -F, which starts hastd in the foreground.
Split-brain occurs when the nodes of the cluster are unable to communicate with each other, and both are configured as primary. This is a dangerous condition because it allows both nodes to make incompatible changes to the data. This problem must be corrected manually by the system administrator.
The administrator must either decide which node has more important changes, or perform the merge manually. Then, let HAST perform full synchronization of the node which has the broken data. To do this, issue these commands on the node which needs to be resynchronized:
# hastctl role init test
# hastctl create test
# hastctl role secondary testIn FreeBSD, the GEOM framework permits access and control to classes, such as Master Boot Records and BSD labels, through the use of providers, or the disk devices in /dev. By supporting various software RAID configurations, GEOM transparently provides access to the operating system and operating system utilities.
This chapter covers the use of disks under the GEOM framework in FreeBSD. This includes the major RAID control utilities which use the framework for configuration. This chapter is not a definitive guide to RAID configurations and only GEOM-supported RAID classifications are discussed.
After reading this chapter, you will know:
What type of RAID support is available through GEOM.
How to use the base utilities to configure, maintain, and manipulate the various RAID levels.
How to mirror, stripe, encrypt, and remotely connect disk devices through GEOM.
How to troubleshoot disks attached to the GEOM framework.
Before reading this chapter, you should:
Understand how FreeBSD treats disk devices (Storage).
Know how to configure and install a new kernel (Configuring the FreeBSD Kernel).
Striping combines several disk drives into a single volume. Striping can be performed through the use of hardware RAID controllers. The GEOM disk subsystem provides software support for disk striping, also known as RAID0, without the need for a RAID disk controller.
In RAID0, data is split into blocks that are written across all the drives in the array. As seen in the following illustration, instead of having to wait on the system to write 256k to one disk, RAID0 can simultaneously write 64k to each of the four disks in the array, offering superior I/O performance. This performance can be enhanced further by using multiple disk controllers.

Each disk in a RAID0 stripe must be of the same size, since I/O requests are interleaved to read or write to multiple disks in parallel.
RAID0 does not provide any redundancy. This means that if one disk in the array fails, all of the data on the disks is lost. If the data is important, implement a backup strategy that regularly saves backups to a remote system or device. |
The process for creating a software, GEOM-based RAID0 on a FreeBSD system using commodity disks is as follows. Once the stripe is created, refer to gstripe(8) for more information on how to control an existing stripe.
RAID1, or mirroring, is the technique of writing the same data to more than one disk drive. Mirrors are usually used to guard against data loss due to drive failure. Each drive in a mirror contains an identical copy of the data. When an individual drive fails, the mirror continues to work, providing data from the drives that are still functioning. The computer keeps running, and the administrator has time to replace the failed drive without user interruption.
Two common situations are illustrated in these examples. The first creates a mirror out of two new drives and uses it as a replacement for an existing single drive. The second example creates a mirror on a single new drive, copies the old drive’s data to it, then inserts the old drive into the mirror. While this procedure is slightly more complicated, it only requires one new drive.
Traditionally, the two drives in a mirror are identical in model and capacity, but gmirror(8) does not require that. Mirrors created with dissimilar drives will have a capacity equal to that of the smallest drive in the mirror. Extra space on larger drives will be unused. Drives inserted into the mirror later must have at least as much capacity as the smallest drive already in the mirror.
The mirroring procedures shown here are non-destructive, but as with any major disk operation, make a full backup first. |
Many disk systems store metadata at the end of each disk. Old metadata should be erased before reusing the disk for a mirror. Most problems are caused by two particular types of leftover metadata: GPT partition tables and old metadata from a previous mirror.
GPT metadata can be erased with gpart(8). This example erases both primary and backup GPT partition tables from disk ada8:
# gpart destroy -F ada8A disk can be removed from an active mirror and the metadata erased in one step using gmirror(8). Here, the example disk ada8 is removed from the active mirror gm4:
# gmirror remove gm4 ada8If the mirror is not running, but old mirror metadata is still on the disk, use gmirror clear to remove it:
# gmirror clear ada8gmirror(8) stores one block of metadata at the end of the disk. Because GPT partition schemes also store metadata at the end of the disk, mirroring entire GPT disks with gmirror(8) is not recommended. MBR partitioning is used here because it only stores a partition table at the start of the disk and does not conflict with the mirror metadata.
In this example, FreeBSD has already been installed on a single disk, ada0. Two new disks, ada1 and ada2, have been connected to the system. A new mirror will be created on these two disks and used to replace the old single disk.
The geom_mirror.ko kernel module must either be built into the kernel or loaded at boot- or run-time. Manually load the kernel module now:
# gmirror loadCreate the mirror with the two new drives:
# gmirror label -v gm0 /dev/ada1 /dev/ada2gm0 is a user-chosen device name assigned to the new mirror. After the mirror has been started, this device name appears in /dev/mirror/.
MBR and bsdlabel partition tables can now be created on the mirror with gpart(8). This example uses a traditional file system layout, with partitions for /, swap, /var, /tmp, and /usr. A single / and a swap partition will also work.
Partitions on the mirror do not have to be the same size as those on the existing disk, but they must be large enough to hold all the data already present on ada0.
# gpart create -s MBR mirror/gm0
# gpart add -t freebsd -a 4k mirror/gm0
# gpart show mirror/gm0
=> 63 156301423 mirror/gm0 MBR (74G)
63 63 - free - (31k)
126 156301299 1 freebsd (74G)
156301425 61 - free - (30k)# gpart create -s BSD mirror/gm0s1
# gpart add -t freebsd-ufs -a 4k -s 2g mirror/gm0s1
# gpart add -t freebsd-swap -a 4k -s 4g mirror/gm0s1
# gpart add -t freebsd-ufs -a 4k -s 2g mirror/gm0s1
# gpart add -t freebsd-ufs -a 4k -s 1g mirror/gm0s1
# gpart add -t freebsd-ufs -a 4k mirror/gm0s1
# gpart show mirror/gm0s1
=> 0 156301299 mirror/gm0s1 BSD (74G)
0 2 - free - (1.0k)
2 4194304 1 freebsd-ufs (2.0G)
4194306 8388608 2 freebsd-swap (4.0G)
12582914 4194304 4 freebsd-ufs (2.0G)
16777218 2097152 5 freebsd-ufs (1.0G)
18874370 137426928 6 freebsd-ufs (65G)
156301298 1 - free - (512B)Make the mirror bootable by installing bootcode in the MBR and bsdlabel and setting the active slice:
# gpart bootcode -b /boot/mbr mirror/gm0
# gpart set -a active -i 1 mirror/gm0
# gpart bootcode -b /boot/boot mirror/gm0s1Format the file systems on the new mirror, enabling soft-updates.
# newfs -U /dev/mirror/gm0s1a
# newfs -U /dev/mirror/gm0s1d
# newfs -U /dev/mirror/gm0s1e
# newfs -U /dev/mirror/gm0s1fFile systems from the original ada0 disk can now be copied onto the mirror with dump(8) and restore(8).
# mount /dev/mirror/gm0s1a /mnt
# dump -C16 -b64 -0aL -f - / | (cd /mnt && restore -rf -)
# mount /dev/mirror/gm0s1d /mnt/var
# mount /dev/mirror/gm0s1e /mnt/tmp
# mount /dev/mirror/gm0s1f /mnt/usr
# dump -C16 -b64 -0aL -f - /var | (cd /mnt/var && restore -rf -)
# dump -C16 -b64 -0aL -f - /tmp | (cd /mnt/tmp && restore -rf -)
# dump -C16 -b64 -0aL -f - /usr | (cd /mnt/usr && restore -rf -)Edit /mnt/etc/fstab to point to the new mirror file systems:
# Device Mountpoint FStype Options Dump Pass# /dev/mirror/gm0s1a / ufs rw 1 1 /dev/mirror/gm0s1b none swap sw 0 0 /dev/mirror/gm0s1d /var ufs rw 2 2 /dev/mirror/gm0s1e /tmp ufs rw 2 2 /dev/mirror/gm0s1f /usr ufs rw 2 2
If the geom_mirror.ko kernel module has not been built into the kernel, /mnt/boot/loader.conf is edited to load the module at boot:
geom_mirror_load="YES"
Reboot the system to test the new mirror and verify that all data has been copied. The BIOS will see the mirror as two individual drives rather than a mirror. Because the drives are identical, it does not matter which is selected to boot.
See Troubleshooting if there are problems booting. Powering down and disconnecting the original ada0 disk will allow it to be kept as an offline backup.
In use, the mirror will behave just like the original single drive.
In this example, FreeBSD has already been installed on a single disk, ada0. A new disk, ada1, has been connected to the system. A one-disk mirror will be created on the new disk, the existing system copied onto it, and then the old disk will be inserted into the mirror. This slightly complex procedure is required because gmirror needs to put a 512-byte block of metadata at the end of each disk, and the existing ada0 has usually had all of its space already allocated.
Load the geom_mirror.ko kernel module:
# gmirror loadCheck the media size of the original disk with diskinfo:
# diskinfo -v ada0 | head -n3
/dev/ada0
512 # sectorsize
1000204821504 # mediasize in bytes (931G)Create a mirror on the new disk. To make certain that the mirror capacity is not any larger than the original ada0 drive, gnop(8) is used to create a fake drive of the exact same size. This drive does not store any data, but is used only to limit the size of the mirror. When gmirror(8) creates the mirror, it will restrict the capacity to the size of gzero.nop, even if the new ada1 drive has more space. Note that the 1000204821504 in the second line is equal to ada0's media size as shown by diskinfo above.
# geom zero load
# gnop create -s 1000204821504 gzero
# gmirror label -v gm0 gzero.nop ada1
# gmirror forget gm0Since gzero.nop does not store any data, the mirror does not see it as connected. The mirror is told to "forget" unconnected components, removing references to gzero.nop. The result is a mirror device containing only a single disk, ada1.
After creating gm0, view the partition table on ada0. This output is from a 1 TB drive. If there is some unallocated space at the end of the drive, the contents may be copied directly from ada0 to the new mirror.
However, if the output shows that all of the space on the disk is allocated, as in the following listing, there is no space available for the 512-byte mirror metadata at the end of the disk.
# gpart show ada0
=> 63 1953525105 ada0 MBR (931G)
63 1953525105 1 freebsd [active] (931G)In this case, the partition table must be edited to reduce the capacity by one sector on mirror/gm0. The procedure will be explained later.
In either case, partition tables on the primary disk should be first copied using gpart backup and gpart restore.
# gpart backup ada0 > table.ada0
# gpart backup ada0s1 > table.ada0s1These commands create two files, table.ada0 and table.ada0s1. This example is from a 1 TB drive:
# cat table.ada0
MBR 4
1 freebsd 63 1953525105 [active]# cat table.ada0s1
BSD 8
1 freebsd-ufs 0 4194304
2 freebsd-swap 4194304 33554432
4 freebsd-ufs 37748736 50331648
5 freebsd-ufs 88080384 41943040
6 freebsd-ufs 130023424 838860800
7 freebsd-ufs 968884224 984640881If no free space is shown at the end of the disk, the size of both the slice and the last partition must be reduced by one sector. Edit the two files, reducing the size of both the slice and last partition by one. These are the last numbers in each listing.
# cat table.ada0
MBR 4
1 freebsd 63 1953525104 [active]# cat table.ada0s1
BSD 8
1 freebsd-ufs 0 4194304
2 freebsd-swap 4194304 33554432
4 freebsd-ufs 37748736 50331648
5 freebsd-ufs 88080384 41943040
6 freebsd-ufs 130023424 838860800
7 freebsd-ufs 968884224 984640880If at least one sector was unallocated at the end of the disk, these two files can be used without modification.
Now restore the partition table into mirror/gm0:
# gpart restore mirror/gm0 < table.ada0
# gpart restore mirror/gm0s1 < table.ada0s1Check the partition table with gpart show. This example has gm0s1a for /, gm0s1d for /var, gm0s1e for /usr, gm0s1f for /data1, and gm0s1g for /data2.
# gpart show mirror/gm0
=> 63 1953525104 mirror/gm0 MBR (931G)
63 1953525042 1 freebsd [active] (931G)
1953525105 62 - free - (31k)
# gpart show mirror/gm0s1
=> 0 1953525042 mirror/gm0s1 BSD (931G)
0 2097152 1 freebsd-ufs (1.0G)
2097152 16777216 2 freebsd-swap (8.0G)
18874368 41943040 4 freebsd-ufs (20G)
60817408 20971520 5 freebsd-ufs (10G)
81788928 629145600 6 freebsd-ufs (300G)
710934528 1242590514 7 freebsd-ufs (592G)
1953525042 63 - free - (31k)Both the slice and the last partition must have at least one free block at the end of the disk.
Create file systems on these new partitions. The number of partitions will vary to match the original disk, ada0.
# newfs -U /dev/mirror/gm0s1a
# newfs -U /dev/mirror/gm0s1d
# newfs -U /dev/mirror/gm0s1e
# newfs -U /dev/mirror/gm0s1f
# newfs -U /dev/mirror/gm0s1gMake the mirror bootable by installing bootcode in the MBR and bsdlabel and setting the active slice:
# gpart bootcode -b /boot/mbr mirror/gm0
# gpart set -a active -i 1 mirror/gm0
# gpart bootcode -b /boot/boot mirror/gm0s1Adjust /etc/fstab to use the new partitions on the mirror. Back up this file first by copying it to /etc/fstab.orig.
# cp /etc/fstab /etc/fstab.origEdit /etc/fstab, replacing /dev/ada0 with mirror/gm0.
# Device Mountpoint FStype Options Dump Pass# /dev/mirror/gm0s1a / ufs rw 1 1 /dev/mirror/gm0s1b none swap sw 0 0 /dev/mirror/gm0s1d /var ufs rw 2 2 /dev/mirror/gm0s1e /usr ufs rw 2 2 /dev/mirror/gm0s1f /data1 ufs rw 2 2 /dev/mirror/gm0s1g /data2 ufs rw 2 2
If the geom_mirror.ko kernel module has not been built into the kernel, edit /boot/loader.conf to load it at boot:
geom_mirror_load="YES"
File systems from the original disk can now be copied onto the mirror with dump(8) and restore(8). Each file system dumped with dump -L will create a snapshot first, which can take some time.
# mount /dev/mirror/gm0s1a /mnt
# dump -C16 -b64 -0aL -f - / | (cd /mnt && restore -rf -)
# mount /dev/mirror/gm0s1d /mnt/var
# mount /dev/mirror/gm0s1e /mnt/usr
# mount /dev/mirror/gm0s1f /mnt/data1
# mount /dev/mirror/gm0s1g /mnt/data2
# dump -C16 -b64 -0aL -f - /usr | (cd /mnt/usr && restore -rf -)
# dump -C16 -b64 -0aL -f - /var | (cd /mnt/var && restore -rf -)
# dump -C16 -b64 -0aL -f - /data1 | (cd /mnt/data1 && restore -rf -)
# dump -C16 -b64 -0aL -f - /data2 | (cd /mnt/data2 && restore -rf -)Restart the system, booting from ada1. If everything is working, the system will boot from mirror/gm0, which now contains the same data as ada0 had previously. See Troubleshooting if there are problems booting.
At this point, the mirror still consists of only the single ada1 disk.
After booting from mirror/gm0 successfully, the final step is inserting ada0 into the mirror.
When ada0 is inserted into the mirror, its former contents will be overwritten by data from the mirror. Make certain that mirror/gm0 has the same contents as ada0 before adding ada0 to the mirror. If the contents previously copied by dump(8) and restore(8) are not identical to what was on ada0, revert /etc/fstab to mount the file systems on ada0, reboot, and start the whole procedure again. |
# gmirror insert gm0 ada0
GEOM_MIRROR: Device gm0: rebuilding provider ada0Synchronization between the two disks will start immediately. Use gmirror status to view the progress.
# gmirror status
Name Status Components
girror/gm0 DEGRADED ada1 (ACTIVE)
ada0 (SYNCHRONIZING, 64%)After a while, synchronization will finish.
GEOM_MIRROR: Device gm0: rebuilding provider ada0 finished.
# gmirror status
Name Status Components
mirror/gm0 COMPLETE ada1 (ACTIVE)
ada0 (ACTIVE)mirror/gm0 now consists of the two disks ada0 and ada1, and the contents are automatically synchronized with each other. In use, mirror/gm0 will behave just like the original single drive.
If the system no longer boots, BIOS settings may have to be changed to boot from one of the new mirrored drives. Either mirror drive can be used for booting, as they contain identical data.
If the boot stops with this message, something is wrong with the mirror device:
Mounting from ufs:/dev/mirror/gm0s1a failed with error 19.
Loader variables:
vfs.root.mountfrom=ufs:/dev/mirror/gm0s1a
vfs.root.mountfrom.options=rw
Manual root filesystem specification:
<fstype>:<device> [options]
Mount <device> using filesystem <fstype>
and with the specified (optional) option list.
eg. ufs:/dev/da0s1a
zfs:tank
cd9660:/dev/acd0 ro
(which is equivalent to: mount -t cd9660 -o ro /dev/acd0 /)
? List valid disk boot devices
. Yield 1 second (for background tasks)
<empty line> Abort manual input
mountroot>Forgetting to load the geom_mirror.ko module in /boot/loader.conf can cause this problem. To fix it, boot from a FreeBSD installation media and choose Shell at the first prompt. Then load the mirror module and mount the mirror device:
# gmirror load
# mount /dev/mirror/gm0s1a /mntEdit /mnt/boot/loader.conf, adding a line to load the mirror module:
geom_mirror_load="YES"
Save the file and reboot.
Other problems that cause error 19 require more effort to fix. Although the system should boot from ada0, another prompt to select a shell will appear if /etc/fstab is incorrect. Enter ufs:/dev/ada0s1a at the boot loader prompt and press Enter. Undo the edits in /etc/fstab then mount the file systems from the original disk (ada0) instead of the mirror. Reboot the system and try the procedure again.
Enter full pathname of shell or RETURN for /bin/sh:
# cp /etc/fstab.orig /etc/fstab
# rebootThe benefit of disk mirroring is that an individual disk can fail without causing the mirror to lose any data. In the above example, if ada0 fails, the mirror will continue to work, providing data from the remaining working drive, ada1.
To replace the failed drive, shut down the system and physically replace the failed drive with a new drive of equal or greater capacity. Manufacturers use somewhat arbitrary values when rating drives in gigabytes, and the only way to really be sure is to compare the total count of sectors shown by diskinfo -v. A drive with larger capacity than the mirror will work, although the extra space on the new drive will not be used.
After the computer is powered back up, the mirror will be running in a "degraded" mode with only one drive. The mirror is told to forget drives that are not currently connected:
# gmirror forget gm0Any old metadata should be cleared from the replacement disk using the instructions in Metadata Issues. Then the replacement disk, ada4 for this example, is inserted into the mirror:
# gmirror insert gm0 /dev/ada4Resynchronization begins when the new drive is inserted into the mirror. This process of copying mirror data to a new drive can take a while. Performance of the mirror will be greatly reduced during the copy, so inserting new drives is best done when there is low demand on the computer.
Progress can be monitored with gmirror status, which shows drives that are being synchronized and the percentage of completion. During resynchronization, the status will be DEGRADED, changing to COMPLETE when the process is finished.
RAID3 is a method used to combine several disk drives into a single volume with a dedicated parity disk. In a RAID3 system, data is split up into a number of bytes that are written across all the drives in the array except for one disk which acts as a dedicated parity disk. This means that disk reads from a RAID3 implementation access all disks in the array. Performance can be enhanced by using multiple disk controllers. The RAID3 array provides a fault tolerance of 1 drive, while providing a capacity of 1 - 1/n times the total capacity of all drives in the array, where n is the number of hard drives in the array. Such a configuration is mostly suitable for storing data of larger sizes such as multimedia files.
At least 3 physical hard drives are required to build a RAID3 array. Each disk must be of the same size, since I/O requests are interleaved to read or write to multiple disks in parallel. Also, due to the nature of RAID3, the number of drives must be equal to 3, 5, 9, 17, and so on, or 2^n + 1.
This section demonstrates how to create a software RAID3 on a FreeBSD system.
While it is theoretically possible to boot from a RAID3 array on FreeBSD, that configuration is uncommon and is not advised. |
In FreeBSD, support for RAID3 is implemented by the graid3(8) GEOM class. Creating a dedicated RAID3 array on FreeBSD requires the following steps.
First, load the geom_raid3.ko kernel module by issuing one of the following commands:
# graid3 loador:
# kldload geom_raid3Ensure that a suitable mount point exists. This command creates a new directory to use as the mount point:
# mkdir /multimediaDetermine the device names for the disks which will be added to the array, and create the new RAID3 device. The final device listed will act as the dedicated parity disk. This example uses three unpartitioned ATA drives: ada1 and ada2 for data, and ada3 for parity.
# graid3 label -v gr0 /dev/ada1 /dev/ada2 /dev/ada3
Metadata value stored on /dev/ada1.
Metadata value stored on /dev/ada2.
Metadata value stored on /dev/ada3.
Done.Partition the newly created gr0 device and put a UFS file system on it:
# gpart create -s GPT /dev/raid3/gr0
# gpart add -t freebsd-ufs /dev/raid3/gr0
# newfs -j /dev/raid3/gr0p1Many numbers will glide across the screen, and after a bit of time, the process will be complete. The volume has been created and is ready to be mounted:
# mount /dev/raid3/gr0p1 /multimedia/The RAID3 array is now ready to use.
Additional configuration is needed to retain this setup across system reboots.
The geom_raid3.ko module must be loaded before the array can be mounted. To automatically load the kernel module during system initialization, add the following line to /boot/loader.conf:
geom_raid3_load="YES"
The following volume information must be added to /etc/fstab in order to automatically mount the array’s file system during the system boot process:
/dev/raid3/gr0p1 /multimedia ufs rw 2 2
Some motherboards and expansion cards add some simple hardware, usually just a ROM, that allows the computer to boot from a RAID array. After booting, access to the RAID array is handled by software running on the computer’s main processor. This "hardware-assisted software RAID" gives RAID arrays that are not dependent on any particular operating system, and which are functional even before an operating system is loaded.
Several levels of RAID are supported, depending on the hardware in use. See graid(8) for a complete list.
graid(8) requires the geom_raid.ko kernel module, which is included in the GENERIC kernel starting with FreeBSD 9.1. If needed, it can be loaded manually with graid load.
Software RAID devices often have a menu that can be entered by pressing special keys when the computer is booting. The menu can be used to create and delete RAID arrays. graid(8) can also create arrays directly from the command line.
graid label is used to create a new array. The motherboard used for this example has an Intel software RAID chipset, so the Intel metadata format is specified. The new array is given a label of gm0, it is a mirror (RAID1), and uses drives ada0 and ada1.
Some space on the drives will be overwritten when they are made into a new array. Back up existing data first! |
# graid label Intel gm0 RAID1 ada0 ada1
GEOM_RAID: Intel-a29ea104: Array Intel-a29ea104 created.
GEOM_RAID: Intel-a29ea104: Disk ada0 state changed from NONE to ACTIVE.
GEOM_RAID: Intel-a29ea104: Subdisk gm0:0-ada0 state changed from NONE to ACTIVE.
GEOM_RAID: Intel-a29ea104: Disk ada1 state changed from NONE to ACTIVE.
GEOM_RAID: Intel-a29ea104: Subdisk gm0:1-ada1 state changed from NONE to ACTIVE.
GEOM_RAID: Intel-a29ea104: Array started.
GEOM_RAID: Intel-a29ea104: Volume gm0 state changed from STARTING to OPTIMAL.
Intel-a29ea104 created
GEOM_RAID: Intel-a29ea104: Provider raid/r0 for volume gm0 created.A status check shows the new mirror is ready for use:
# graid status
Name Status Components
raid/r0 OPTIMAL ada0 (ACTIVE (ACTIVE))
ada1 (ACTIVE (ACTIVE))The array device appears in /dev/raid/. The first array is called r0. Additional arrays, if present, will be r1, r2, and so on.
The BIOS menu on some of these devices can create arrays with special characters in their names. To avoid problems with those special characters, arrays are given simple numbered names like r0. To show the actual labels, like gm0 in the example above, use sysctl(8):
# sysctl kern.geom.raid.name_format=1Some software RAID devices support more than one volume on an array. Volumes work like partitions, allowing space on the physical drives to be split and used in different ways. For example, Intel software RAID devices support two volumes. This example creates a 40 G mirror for safely storing the operating system, followed by a 20 G RAID0 (stripe) volume for fast temporary storage:
# graid label -S 40G Intel gm0 RAID1 ada0 ada1
# graid add -S 20G gm0 RAID0Volumes appear as additional rX entries in /dev/raid/. An array with two volumes will show r0 and r1.
See graid(8) for the number of volumes supported by different software RAID devices.
Under certain specific conditions, it is possible to convert an existing single drive to a graid(8) array without reformatting. To avoid data loss during the conversion, the existing drive must meet these minimum requirements:
The drive must be partitioned with the MBR partitioning scheme. GPT or other partitioning schemes with metadata at the end of the drive will be overwritten and corrupted by the graid(8) metadata.
There must be enough unpartitioned and unused space at the end of the drive to hold the graid(8) metadata. This metadata varies in size, but the largest occupies 64 M, so at least that much free space is recommended.
If the drive meets these requirements, start by making a full backup. Then create a single-drive mirror with that drive:
# graid label Intel gm0 RAID1 ada0 NONEgraid(8) metadata was written to the end of the drive in the unused space. A second drive can now be inserted into the mirror:
# graid insert raid/r0 ada1Data from the original drive will immediately begin to be copied to the second drive. The mirror will operate in degraded status until the copy is complete.
Drives can be inserted into an array as replacements for drives that have failed or are missing. If there are no failed or missing drives, the new drive becomes a spare. For example, inserting a new drive into a working two-drive mirror results in a two-drive mirror with one spare drive, not a three-drive mirror.
In the example mirror array, data immediately begins to be copied to the newly-inserted drive. Any existing information on the new drive will be overwritten.
# graid insert raid/r0 ada1
GEOM_RAID: Intel-a29ea104: Disk ada1 state changed from NONE to ACTIVE.
GEOM_RAID: Intel-a29ea104: Subdisk gm0:1-ada1 state changed from NONE to NEW.
GEOM_RAID: Intel-a29ea104: Subdisk gm0:1-ada1 state changed from NEW to REBUILD.
GEOM_RAID: Intel-a29ea104: Subdisk gm0:1-ada1 rebuild start at 0.Individual drives can be permanently removed from a from an array and their metadata erased:
# graid remove raid/r0 ada1
GEOM_RAID: Intel-a29ea104: Disk ada1 state changed from ACTIVE to OFFLINE.
GEOM_RAID: Intel-a29ea104: Subdisk gm0:1-[unknown] state changed from ACTIVE to NONE.
GEOM_RAID: Intel-a29ea104: Volume gm0 state changed from OPTIMAL to DEGRADED.An array can be stopped without removing metadata from the drives. The array will be restarted when the system is booted.
# graid stop raid/r0Array status can be checked at any time. After a drive was added to the mirror in the example above, data is being copied from the original drive to the new drive:
# graid status
Name Status Components
raid/r0 DEGRADED ada0 (ACTIVE (ACTIVE))
ada1 (ACTIVE (REBUILD 28%))Some types of arrays, like RAID0 or CONCAT, may not be shown in the status report if disks have failed. To see these partially-failed arrays, add -ga:
# graid status -ga
Name Status Components
Intel-e2d07d9a BROKEN ada6 (ACTIVE (ACTIVE))Arrays are destroyed by deleting all of the volumes from them. When the last volume present is deleted, the array is stopped and metadata is removed from the drives:
# graid delete raid/r0Drives may unexpectedly contain graid(8) metadata, either from previous use or manufacturer testing. graid(8) will detect these drives and create an array, interfering with access to the individual drive. To remove the unwanted metadata:
Boot the system. At the boot menu, select 2 for the loader prompt. Enter:
OK set kern.geom.raid.enable=0
OK bootThe system will boot with graid(8) disabled.
Back up all data on the affected drive.
As a workaround, graid(8) array detection can be disabled by adding
kern.geom.raid.enable=0
to /boot/loader.conf.
To permanently remove the graid(8) metadata from the affected drive, boot a FreeBSD installation CD-ROM or memory stick, and select Shell. Use status to find the name of the array, typically raid/r0:
# graid status
Name Status Components
raid/r0 OPTIMAL ada0 (ACTIVE (ACTIVE))
ada1 (ACTIVE (ACTIVE))Delete the volume by name:
# graid delete raid/r0If there is more than one volume shown, repeat the process for each volume. After the last array has been deleted, the volume will be destroyed.
Reboot and verify data, restoring from backup if necessary. After the metadata has been removed, the kern.geom.raid.enable=0 entry in /boot/loader.conf can also be removed.
GEOM provides a simple mechanism for providing remote access to devices such as disks, CDs, and file systems through the use of the GEOM Gate network daemon, ggated. The system with the device runs the server daemon which handles requests made by clients using ggatec. The devices should not contain any sensitive data as the connection between the client and the server is not encrypted.
Similar to NFS, which is discussed in Network File System (NFS), ggated is configured using an exports file. This file specifies which systems are permitted to access the exported resources and what level of access they are offered. For example, to give the client 192.168.1.5 read and write access to the fourth slice on the first SCSI disk, create /etc/gg.exports with this line:
192.168.1.5 RW /dev/da0s4d
Before exporting the device, ensure it is not currently mounted. Then, start ggated:
# ggatedSeveral options are available for specifying an alternate listening port or changing the default location of the exports file. Refer to ggated(8) for details.
To access the exported device on the client machine, first use ggatec to specify the IP address of the server and the device name of the exported device. If successful, this command will display a ggate device name to mount. Mount that specified device name on a free mount point. This example connects to the /dev/da0s4d partition on 192.168.1.1, then mounts /dev/ggate0 on /mnt:
# ggatec create -o rw 192.168.1.1 /dev/da0s4d
ggate0
# mount /dev/ggate0 /mntThe device on the server may now be accessed through /mnt on the client. For more details about ggatec and a few usage examples, refer to ggatec(8).
The mount will fail if the device is currently mounted on either the server or any other client on the network. If simultaneous access is needed to network resources, use NFS instead. |
When the device is no longer needed, unmount it with umount so that the resource is available to other clients.
During system initialization, the FreeBSD kernel creates device nodes as devices are found. This method of probing for devices raises some issues. For instance, what if a new disk device is added via USB? It is likely that a flash device may be handed the device name of da0 and the original da0 shifted to da1. This will cause issues mounting file systems if they are listed in /etc/fstab which may also prevent the system from booting.
One solution is to chain SCSI devices in order so a new device added to the SCSI card will be issued unused device numbers. But what about USB devices which may replace the primary SCSI disk? This happens because USB devices are usually probed before the SCSI card. One solution is to only insert these devices after the system has been booted. Another method is to use only a single ATA drive and never list the SCSI devices in /etc/fstab.
A better solution is to use glabel to label the disk devices and use the labels in /etc/fstab. Because glabel stores the label in the last sector of a given provider, the label will remain persistent across reboots. By using this label as a device, the file system may always be mounted regardless of what device node it is accessed through.
|
Permanent labels can be a generic or a file system label. Permanent file system labels can be created with tunefs(8) or newfs(8). These types of labels are created in a sub-directory of /dev, and will be named according to the file system type. For example, UFS2 file system labels will be created in /dev/ufs. Generic permanent labels can be created with glabel label. These are not file system specific and will be created in /dev/label.
Temporary labels are destroyed at the next reboot. These labels are created in /dev/label and are suited to experimentation. A temporary label can be created using glabel create.
To create a permanent label for a UFS2 file system without destroying any data, issue the following command:
# tunefs -L home /dev/da3A label should now exist in /dev/ufs which may be added to /etc/fstab:
/dev/ufs/home /home ufs rw 2 2
The file system must not be mounted while attempting to run |
Now the file system may be mounted:
# mount /homeFrom this point on, so long as the geom_label.ko kernel module is loaded at boot with /boot/loader.conf or the GEOM_LABEL kernel option is present, the device node may change without any ill effect on the system.
File systems may also be created with a default label by using the -L flag with newfs. Refer to newfs(8) for more information.
The following command can be used to destroy the label:
# glabel destroy homeThe following example shows how to label the partitions of a boot disk.
By permanently labeling the partitions on the boot disk, the system should be able to continue to boot normally, even if the disk is moved to another controller or transferred to a different system. For this example, it is assumed that a single ATA disk is used, which is currently recognized by the system as ad0. It is also assumed that the standard FreeBSD partition scheme is used, with /, /var, /usr and /tmp, as well as a swap partition.
Reboot the system, and at the loader(8) prompt, press 4 to boot into single user mode. Then enter the following commands:
# glabel label rootfs /dev/ad0s1a
GEOM_LABEL: Label for provider /dev/ad0s1a is label/rootfs
# glabel label var /dev/ad0s1d
GEOM_LABEL: Label for provider /dev/ad0s1d is label/var
# glabel label usr /dev/ad0s1f
GEOM_LABEL: Label for provider /dev/ad0s1f is label/usr
# glabel label tmp /dev/ad0s1e
GEOM_LABEL: Label for provider /dev/ad0s1e is label/tmp
# glabel label swap /dev/ad0s1b
GEOM_LABEL: Label for provider /dev/ad0s1b is label/swap
# exitThe system will continue with multi-user boot. After the boot completes, edit /etc/fstab and replace the conventional device names, with their respective labels. The final /etc/fstab will look like this:
# Device Mountpoint FStype Options Dump Pass# /dev/label/swap none swap sw 0 0 /dev/label/rootfs / ufs rw 1 1 /dev/label/tmp /tmp ufs rw 2 2 /dev/label/usr /usr ufs rw 2 2 /dev/label/var /var ufs rw 2 2
The system can now be rebooted. If everything went well, it will come up normally and mount will show:
# mount
/dev/label/rootfs on / (ufs, local)
devfs on /dev (devfs, local)
/dev/label/tmp on /tmp (ufs, local, soft-updates)
/dev/label/usr on /usr (ufs, local, soft-updates)
/dev/label/var on /var (ufs, local, soft-updates)The glabel(8) class supports a label type for UFS file systems, based on the unique file system id, ufsid. These labels may be found in /dev/ufsid and are created automatically during system startup. It is possible to use ufsid labels to mount partitions using /etc/fstab. Use glabel status to receive a list of file systems and their corresponding ufsid labels:
% glabel status
Name Status Components
ufsid/486b6fc38d330916 N/A ad4s1d
ufsid/486b6fc16926168e N/A ad4s1fIn the above example, ad4s1d represents /var, while ad4s1f represents /usr. Using the ufsid values shown, these partitions may now be mounted with the following entries in /etc/fstab:
/dev/ufsid/486b6fc38d330916 /var ufs rw 2 2 /dev/ufsid/486b6fc16926168e /usr ufs rw 2 2
Any partitions with ufsid labels can be mounted in this way, eliminating the need to manually create permanent labels, while still enjoying the benefits of device name independent mounting.
Support for journals on UFS file systems is available on FreeBSD. The implementation is provided through the GEOM subsystem and is configured using gjournal. Unlike other file system journaling implementations, the gjournal method is block based and not implemented as part of the file system. It is a GEOM extension.
Journaling stores a log of file system transactions, such as changes that make up a complete disk write operation, before meta-data and file writes are committed to the disk. This transaction log can later be replayed to redo file system transactions, preventing file system inconsistencies.
This method provides another mechanism to protect against data loss and inconsistencies of the file system. Unlike Soft Updates, which tracks and enforces meta-data updates, and snapshots, which create an image of the file system, a log is stored in disk space specifically for this task. For better performance, the journal may be stored on another disk. In this configuration, the journal provider or storage device should be listed after the device to enable journaling on.
The GENERIC kernel provides support for gjournal. To automatically load the geom_journal.ko kernel module at boot time, add the following line to /boot/loader.conf:
geom_journal_load="YES"
If a custom kernel is used, ensure the following line is in the kernel configuration file:
options GEOM_JOURNAL
Once the module is loaded, a journal can be created on a new file system using the following steps. In this example, da4 is a new SCSI disk:
# gjournal load
# gjournal label /dev/da4This will load the module and create a /dev/da4.journal device node on /dev/da4.
A UFS file system may now be created on the journaled device, then mounted on an existing mount point:
# newfs -O 2 -J /dev/da4.journal
# mount /dev/da4.journal /mntIn the case of several slices, a journal will be created for each individual slice. For instance, if ad4s1 and ad4s2 are both slices, then |
Journaling may also be enabled on current file systems by using tunefs. However, always make a backup before attempting to alter an existing file system. In most cases, gjournal will fail if it is unable to create the journal, but this does not protect against data loss incurred as a result of misusing tunefs. Refer to gjournal(8) and tunefs(8) for more information about these commands.
It is possible to journal the boot disk of a FreeBSD system. Refer to the article Implementing UFS Journaling on a Desktop PC for detailed instructions.
The Z File System, or ZFS, is an advanced file system designed to overcome many of the major problems found in previous designs.
Originally developed at Sun™, ongoing open source ZFS development has moved to the OpenZFS Project.
ZFS has three major design goals:
Data integrity: All data includes a checksum of the data. When data is written, the checksum is calculated and written along with it. When that data is later read back, the checksum is calculated again. If the checksums do not match, a data error has been detected. ZFS will attempt to automatically correct errors when data redundancy is available.
Pooled storage: physical storage devices are added to a pool, and storage space is allocated from that shared pool. Space is available to all file systems, and can be increased by adding new storage devices to the pool.
Performance: multiple caching mechanisms provide increased performance. ARC is an advanced memory-based read cache. A second level of disk-based read cache can be added with L2ARC, and disk-based synchronous write cache is available with ZIL.
A complete list of features and terminology is shown in ZFS Features and Terminology.
ZFS is significantly different from any previous file system because it is more than just a file system. Combining the traditionally separate roles of volume manager and file system provides ZFS with unique advantages. The file system is now aware of the underlying structure of the disks. Traditional file systems could only be created on a single disk at a time. If there were two disks then two separate file systems would have to be created. In a traditional hardware RAID configuration, this problem was avoided by presenting the operating system with a single logical disk made up of the space provided by a number of physical disks, on top of which the operating system placed a file system. Even in the case of software RAID solutions like those provided by GEOM, the UFS file system living on top of the RAID transform believed that it was dealing with a single device. ZFS’s combination of the volume manager and the file system solves this and allows the creation of many file systems all sharing a pool of available storage. One of the biggest advantages to ZFS’s awareness of the physical layout of the disks is that existing file systems can be grown automatically when additional disks are added to the pool. This new space is then made available to all of the file systems. ZFS also has a number of different properties that can be applied to each file system, giving many advantages to creating a number of different file systems and datasets rather than a single monolithic file system.
There is a startup mechanism that allows FreeBSD to mount ZFS pools during system initialization. To enable it, add this line to /etc/rc.conf:
zfs_enable="YES"
Then start the service:
# service zfs startThe examples in this section assume three SCSI disks with the device names da0, da1, and da2. Users of SATA hardware should instead use ada device names.
To create a simple, non-redundant pool using a single disk device:
# zpool create example /dev/da0To view the new pool, review the output of df:
# df
Filesystem 1K-blocks Used Avail Capacity Mounted on
/dev/ad0s1a 2026030 235230 1628718 13% /
devfs 1 1 0 100% /dev
/dev/ad0s1d 54098308 1032846 48737598 2% /usr
example 17547136 0 17547136 0% /exampleThis output shows that the example pool has been created and mounted. It is now accessible as a file system. Files can be created on it and users can browse it:
# cd /example
# ls
# touch testfile
# ls -al
total 4
drwxr-xr-x 2 root wheel 3 Aug 29 23:15 .
drwxr-xr-x 21 root wheel 512 Aug 29 23:12 ..
-rw-r--r-- 1 root wheel 0 Aug 29 23:15 testfileHowever, this pool is not taking advantage of any ZFS features. To create a dataset on this pool with compression enabled:
# zfs create example/compressed
# zfs set compression=gzip example/compressedThe example/compressed dataset is now a ZFS compressed file system. Try copying some large files to /example/compressed.
Compression can be disabled with:
# zfs set compression=off example/compressedTo unmount a file system, use zfs umount and then verify with df:
# zfs umount example/compressed
# df
Filesystem 1K-blocks Used Avail Capacity Mounted on
/dev/ad0s1a 2026030 235232 1628716 13% /
devfs 1 1 0 100% /dev
/dev/ad0s1d 54098308 1032864 48737580 2% /usr
example 17547008 0 17547008 0% /exampleTo re-mount the file system to make it accessible again, use zfs mount and verify with df:
# zfs mount example/compressed
# df
Filesystem 1K-blocks Used Avail Capacity Mounted on
/dev/ad0s1a 2026030 235234 1628714 13% /
devfs 1 1 0 100% /dev
/dev/ad0s1d 54098308 1032864 48737580 2% /usr
example 17547008 0 17547008 0% /example
example/compressed 17547008 0 17547008 0% /example/compressedThe pool and file system may also be observed by viewing the output from mount:
# mount
/dev/ad0s1a on / (ufs, local)
devfs on /dev (devfs, local)
/dev/ad0s1d on /usr (ufs, local, soft-updates)
example on /example (zfs, local)
example/compressed on /example/compressed (zfs, local)After creation, ZFS datasets can be used like any file systems. However, many other features are available which can be set on a per-dataset basis. In the example below, a new file system called data is created. Important files will be stored here, so it is configured to keep two copies of each data block:
# zfs create example/data
# zfs set copies=2 example/dataIt is now possible to see the data and space utilization by issuing df:
# df
Filesystem 1K-blocks Used Avail Capacity Mounted on
/dev/ad0s1a 2026030 235234 1628714 13% /
devfs 1 1 0 100% /dev
/dev/ad0s1d 54098308 1032864 48737580 2% /usr
example 17547008 0 17547008 0% /example
example/compressed 17547008 0 17547008 0% /example/compressed
example/data 17547008 0 17547008 0% /example/dataNotice that each file system on the pool has the same amount of available space. This is the reason for using df in these examples, to show that the file systems use only the amount of space they need and all draw from the same pool. ZFS eliminates concepts such as volumes and partitions, and allows multiple file systems to occupy the same pool.
To destroy the file systems and then destroy the pool as it is no longer needed:
# zfs destroy example/compressed
# zfs destroy example/data
# zpool destroy exampleDisks fail. One method of avoiding data loss from disk failure is to implement RAID. ZFS supports this feature in its pool design. RAID-Z pools require three or more disks but provide more usable space than mirrored pools.
This example creates a RAID-Z pool, specifying the disks to add to the pool:
# zpool create storage raidz da0 da1 da2Sun™ recommends that the number of devices used in a RAID-Z configuration be between three and nine. For environments requiring a single pool consisting of 10 disks or more, consider breaking it up into smaller RAID-Z groups. If only two disks are available and redundancy is a requirement, consider using a ZFS mirror. Refer to zpool(8) for more details. |
The previous example created the storage zpool. This example makes a new file system called home in that pool:
# zfs create storage/homeCompression and keeping extra copies of directories and files can be enabled:
# zfs set copies=2 storage/home
# zfs set compression=gzip storage/homeTo make this the new home directory for users, copy the user data to this directory and create the appropriate symbolic links:
# cp -rp /home/* /storage/home
# rm -rf /home /usr/home
# ln -s /storage/home /home
# ln -s /storage/home /usr/homeUsers data is now stored on the freshly-created /storage/home. Test by adding a new user and logging in as that user.
Try creating a file system snapshot which can be rolled back later:
# zfs snapshot storage/home@08-30-08Snapshots can only be made of a full file system, not a single directory or file.
The @ character is a delimiter between the file system name or the volume name. If an important directory has been accidentally deleted, the file system can be backed up, then rolled back to an earlier snapshot when the directory still existed:
# zfs rollback storage/home@08-30-08To list all available snapshots, run ls in the file system’s .zfs/snapshot directory. For example, to see the previously taken snapshot:
# ls /storage/home/.zfs/snapshotIt is possible to write a script to perform regular snapshots on user data. However, over time, snapshots can consume a great deal of disk space. The previous snapshot can be removed using the command:
# zfs destroy storage/home@08-30-08After testing, /storage/home can be made the real /home using this command:
# zfs set mountpoint=/home storage/homeRun df and mount to confirm that the system now treats the file system as the real /home:
# mount
/dev/ad0s1a on / (ufs, local)
devfs on /dev (devfs, local)
/dev/ad0s1d on /usr (ufs, local, soft-updates)
storage on /storage (zfs, local)
storage/home on /home (zfs, local)
# df
Filesystem 1K-blocks Used Avail Capacity Mounted on
/dev/ad0s1a 2026030 235240 1628708 13% /
devfs 1 1 0 100% /dev
/dev/ad0s1d 54098308 1032826 48737618 2% /usr
storage 26320512 0 26320512 0% /storage
storage/home 26320512 0 26320512 0% /homeThis completes the RAID-Z configuration. Daily status updates about the file systems created can be generated as part of the nightly periodic(8) runs. Add this line to /etc/periodic.conf:
daily_status_zfs_enable="YES"
Every software RAID has a method of monitoring its state. The status of RAID-Z devices may be viewed with this command:
# zpool status -xIf all pools are Online and everything is normal, the message shows:
all pools are healthyIf there is an issue, perhaps a disk is in the Offline state, the pool state will look similar to:
pool: storage
state: DEGRADED
status: One or more devices has been taken offline by the administrator.
Sufficient replicas exist for the pool to continue functioning in a
degraded state.
action: Online the device using 'zpool online' or replace the device with
'zpool replace'.
scrub: none requested
config:
NAME STATE READ WRITE CKSUM
storage DEGRADED 0 0 0
raidz1 DEGRADED 0 0 0
da0 ONLINE 0 0 0
da1 OFFLINE 0 0 0
da2 ONLINE 0 0 0
errors: No known data errorsThis indicates that the device was previously taken offline by the administrator with this command:
# zpool offline storage da1Now the system can be powered down to replace da1. When the system is back online, the failed disk can replaced in the pool:
# zpool replace storage da1From here, the status may be checked again, this time without -x so that all pools are shown:
# zpool status storage
pool: storage
state: ONLINE
scrub: resilver completed with 0 errors on Sat Aug 30 19:44:11 2008
config:
NAME STATE READ WRITE CKSUM
storage ONLINE 0 0 0
raidz1 ONLINE 0 0 0
da0 ONLINE 0 0 0
da1 ONLINE 0 0 0
da2 ONLINE 0 0 0
errors: No known data errorsIn this example, everything is normal.
ZFS uses checksums to verify the integrity of stored data. These are enabled automatically upon creation of file systems.
Checksums can be disabled, but it is not recommended! Checksums take very little storage space and provide data integrity. Many ZFS features will not work properly with checksums disabled. There is no noticeable performance gain from disabling these checksums. |
Checksum verification is known as scrubbing. Verify the data integrity of the storage pool with this command:
# zpool scrub storageThe duration of a scrub depends on the amount of data stored. Larger amounts of data will take proportionally longer to verify. Scrubs are very I/O intensive, and only one scrub is allowed to run at a time. After the scrub completes, the status can be viewed with status:
# zpool status storage
pool: storage
state: ONLINE
scrub: scrub completed with 0 errors on Sat Jan 26 19:57:37 2013
config:
NAME STATE READ WRITE CKSUM
storage ONLINE 0 0 0
raidz1 ONLINE 0 0 0
da0 ONLINE 0 0 0
da1 ONLINE 0 0 0
da2 ONLINE 0 0 0
errors: No known data errorsThe completion date of the last scrub operation is displayed to help track when another scrub is required. Routine scrubs help protect data from silent corruption and ensure the integrity of the pool.
zpool AdministrationZFS administration is divided between two main utilities. The zpool utility controls the operation of the pool and deals with adding, removing, replacing, and managing disks. The zfs utility deals with creating, destroying, and managing datasets, both file systems and volumes.
Creating a ZFS storage pool (zpool) involves making a number of decisions that are relatively permanent because the structure of the pool cannot be changed after the pool has been created. The most important decision is what types of vdevs into which to group the physical disks. See the list of vdev types for details about the possible options. After the pool has been created, most vdev types do not allow additional disks to be added to the vdev. The exceptions are mirrors, which allow additional disks to be added to the vdev, and stripes, which can be upgraded to mirrors by attaching an additional disk to the vdev. Although additional vdevs can be added to expand a pool, the layout of the pool cannot be changed after pool creation. Instead, the data must be backed up and the pool destroyed and recreated.
Create a simple mirror pool:
# zpool create mypool mirror /dev/ada1 /dev/ada2
# zpool status
pool: mypool
state: ONLINE
scan: none requested
config:
NAME STATE READ WRITE CKSUM
mypool ONLINE 0 0 0
mirror-0 ONLINE 0 0 0
ada1 ONLINE 0 0 0
ada2 ONLINE 0 0 0
errors: No known data errorsMultiple vdevs can be created at once. Specify multiple groups of disks separated by the vdev type keyword, mirror in this example:
# zpool create mypool mirror /dev/ada1 /dev/ada2 mirror /dev/ada3 /dev/ada4
pool: mypool
state: ONLINE
scan: none requested
config:
NAME STATE READ WRITE CKSUM
mypool ONLINE 0 0 0
mirror-0 ONLINE 0 0 0
ada1 ONLINE 0 0 0
ada2 ONLINE 0 0 0
mirror-1 ONLINE 0 0 0
ada3 ONLINE 0 0 0
ada4 ONLINE 0 0 0
errors: No known data errorsPools can also be constructed using partitions rather than whole disks. Putting ZFS in a separate partition allows the same disk to have other partitions for other purposes. In particular, partitions with bootcode and file systems needed for booting can be added. This allows booting from disks that are also members of a pool. There is no performance penalty on FreeBSD when using a partition rather than a whole disk. Using partitions also allows the administrator to under-provision the disks, using less than the full capacity. If a future replacement disk of the same nominal size as the original actually has a slightly smaller capacity, the smaller partition will still fit, and the replacement disk can still be used.
Create a RAID-Z2 pool using partitions:
# zpool create mypool raidz2 /dev/ada0p3 /dev/ada1p3 /dev/ada2p3 /dev/ada3p3 /dev/ada4p3 /dev/ada5p3
# zpool status
pool: mypool
state: ONLINE
scan: none requested
config:
NAME STATE READ WRITE CKSUM
mypool ONLINE 0 0 0
raidz2-0 ONLINE 0 0 0
ada0p3 ONLINE 0 0 0
ada1p3 ONLINE 0 0 0
ada2p3 ONLINE 0 0 0
ada3p3 ONLINE 0 0 0
ada4p3 ONLINE 0 0 0
ada5p3 ONLINE 0 0 0
errors: No known data errorsA pool that is no longer needed can be destroyed so that the disks can be reused. Destroying a pool involves first unmounting all of the datasets in that pool. If the datasets are in use, the unmount operation will fail and the pool will not be destroyed. The destruction of the pool can be forced with -f, but this can cause undefined behavior in applications which had open files on those datasets.
There are two cases for adding disks to a zpool: attaching a disk to an existing vdev with zpool attach, or adding vdevs to the pool with zpool add. Only some vdev types allow disks to be added to the vdev after creation.
A pool created with a single disk lacks redundancy. Corruption can be detected but not repaired, because there is no other copy of the data. The copies property may be able to recover from a small failure such as a bad sector, but does not provide the same level of protection as mirroring or RAID-Z. Starting with a pool consisting of a single disk vdev, zpool attach can be used to add an additional disk to the vdev, creating a mirror. zpool attach can also be used to add additional disks to a mirror group, increasing redundancy and read performance. If the disks being used for the pool are partitioned, replicate the layout of the first disk on to the second. gpart backup and gpart restore can be used to make this process easier.
Upgrade the single disk (stripe) vdev ada0p3 to a mirror by attaching ada1p3:
# zpool status
pool: mypool
state: ONLINE
scan: none requested
config:
NAME STATE READ WRITE CKSUM
mypool ONLINE 0 0 0
ada0p3 ONLINE 0 0 0
errors: No known data errors
# zpool attach mypool ada0p3 ada1p3
Make sure to wait until resilver is done before rebooting.
If you boot from pool 'mypool', you may need to update
boot code on newly attached disk 'ada1p3'.
Assuming you use GPT partitioning and 'da0' is your new boot disk
you may use the following command:
gpart bootcode -b /boot/pmbr -p /boot/gptzfsboot -i 1 da0
# gpart bootcode -b /boot/pmbr -p /boot/gptzfsboot -i 1 ada1
bootcode written to ada1
# zpool status
pool: mypool
state: ONLINE
status: One or more devices is currently being resilvered. The pool will
continue to function, possibly in a degraded state.
action: Wait for the resilver to complete.
scan: resilver in progress since Fri May 30 08:19:19 2014
527M scanned out of 781M at 47.9M/s, 0h0m to go
527M resilvered, 67.53% done
config:
NAME STATE READ WRITE CKSUM
mypool ONLINE 0 0 0
mirror-0 ONLINE 0 0 0
ada0p3 ONLINE 0 0 0
ada1p3 ONLINE 0 0 0 (resilvering)
errors: No known data errors
# zpool status
pool: mypool
state: ONLINE
scan: resilvered 781M in 0h0m with 0 errors on Fri May 30 08:15:58 2014
config:
NAME STATE READ WRITE CKSUM
mypool ONLINE 0 0 0
mirror-0 ONLINE 0 0 0
ada0p3 ONLINE 0 0 0
ada1p3 ONLINE 0 0 0
errors: No known data errorsWhen adding disks to the existing vdev is not an option, as for RAID-Z, an alternative method is to add another vdev to the pool. Additional vdevs provide higher performance, distributing writes across the vdevs. Each vdev is responsible for providing its own redundancy. It is possible, but discouraged, to mix vdev types, like mirror and RAID-Z. Adding a non-redundant vdev to a pool containing mirror or RAID-Z vdevs risks the data on the entire pool. Writes are distributed, so the failure of the non-redundant disk will result in the loss of a fraction of every block that has been written to the pool.
Data is striped across each of the vdevs. For example, with two mirror vdevs, this is effectively a RAID 10 that stripes writes across two sets of mirrors. Space is allocated so that each vdev reaches 100% full at the same time. There is a performance penalty if the vdevs have different amounts of free space, as a disproportionate amount of the data is written to the less full vdev.
When attaching additional devices to a boot pool, remember to update the bootcode.
Attach a second mirror group (ada2p3 and ada3p3) to the existing mirror:
# zpool status
pool: mypool
state: ONLINE
scan: resilvered 781M in 0h0m with 0 errors on Fri May 30 08:19:35 2014
config:
NAME STATE READ WRITE CKSUM
mypool ONLINE 0 0 0
mirror-0 ONLINE 0 0 0
ada0p3 ONLINE 0 0 0
ada1p3 ONLINE 0 0 0
errors: No known data errors
# zpool add mypool mirror ada2p3 ada3p3
# gpart bootcode -b /boot/pmbr -p /boot/gptzfsboot -i 1 ada2
bootcode written to ada2
# gpart bootcode -b /boot/pmbr -p /boot/gptzfsboot -i 1 ada3
bootcode written to ada3
# zpool status
pool: mypool
state: ONLINE
scan: scrub repaired 0 in 0h0m with 0 errors on Fri May 30 08:29:51 2014
config:
NAME STATE READ WRITE CKSUM
mypool ONLINE 0 0 0
mirror-0 ONLINE 0 0 0
ada0p3 ONLINE 0 0 0
ada1p3 ONLINE 0 0 0
mirror-1 ONLINE 0 0 0
ada2p3 ONLINE 0 0 0
ada3p3 ONLINE 0 0 0
errors: No known data errorsCurrently, vdevs cannot be removed from a pool, and disks can only be removed from a mirror if there is enough remaining redundancy. If only one disk in a mirror group remains, it ceases to be a mirror and reverts to being a stripe, risking the entire pool if that remaining disk fails.
Remove a disk from a three-way mirror group:
# zpool status
pool: mypool
state: ONLINE
scan: scrub repaired 0 in 0h0m with 0 errors on Fri May 30 08:29:51 2014
config:
NAME STATE READ WRITE CKSUM
mypool ONLINE 0 0 0
mirror-0 ONLINE 0 0 0
ada0p3 ONLINE 0 0 0
ada1p3 ONLINE 0 0 0
ada2p3 ONLINE 0 0 0
errors: No known data errors
# zpool detach mypool ada2p3
# zpool status
pool: mypool
state: ONLINE
scan: scrub repaired 0 in 0h0m with 0 errors on Fri May 30 08:29:51 2014
config:
NAME STATE READ WRITE CKSUM
mypool ONLINE 0 0 0
mirror-0 ONLINE 0 0 0
ada0p3 ONLINE 0 0 0
ada1p3 ONLINE 0 0 0
errors: No known data errorsPool status is important. If a drive goes offline or a read, write, or checksum error is detected, the corresponding error count increases. The status output shows the configuration and status of each device in the pool and the status of the entire pool. Actions that need to be taken and details about the last scrub are also shown.
# zpool status
pool: mypool
state: ONLINE
scan: scrub repaired 0 in 2h25m with 0 errors on Sat Sep 14 04:25:50 2013
config:
NAME STATE READ WRITE CKSUM
mypool ONLINE 0 0 0
raidz2-0 ONLINE 0 0 0
ada0p3 ONLINE 0 0 0
ada1p3 ONLINE 0 0 0
ada2p3 ONLINE 0 0 0
ada3p3 ONLINE 0 0 0
ada4p3 ONLINE 0 0 0
ada5p3 ONLINE 0 0 0
errors: No known data errorsWhen an error is detected, the read, write, or checksum counts are incremented. The error message can be cleared and the counts reset with zpool clear mypool. Clearing the error state can be important for automated scripts that alert the administrator when the pool encounters an error. Further errors may not be reported if the old errors are not cleared.
There are a number of situations where it may be desirable to replace one disk with a different disk. When replacing a working disk, the process keeps the old disk online during the replacement. The pool never enters a degraded state, reducing the risk of data loss. zpool replace copies all of the data from the old disk to the new one. After the operation completes, the old disk is disconnected from the vdev. If the new disk is larger than the old disk, it may be possible to grow the zpool, using the new space. See Growing a Pool.
Replace a functioning device in the pool:
# zpool status
pool: mypool
state: ONLINE
scan: none requested
config:
NAME STATE READ WRITE CKSUM
mypool ONLINE 0 0 0
mirror-0 ONLINE 0 0 0
ada0p3 ONLINE 0 0 0
ada1p3 ONLINE 0 0 0
errors: No known data errors
# zpool replace mypool ada1p3 ada2p3
Make sure to wait until resilver is done before rebooting.
If you boot from pool 'zroot', you may need to update
boot code on newly attached disk 'ada2p3'.
Assuming you use GPT partitioning and 'da0' is your new boot disk
you may use the following command:
gpart bootcode -b /boot/pmbr -p /boot/gptzfsboot -i 1 da0
# gpart bootcode -b /boot/pmbr -p /boot/gptzfsboot -i 1 ada2
# zpool status
pool: mypool
state: ONLINE
status: One or more devices is currently being resilvered. The pool will
continue to function, possibly in a degraded state.
action: Wait for the resilver to complete.
scan: resilver in progress since Mon Jun 2 14:21:35 2014
604M scanned out of 781M at 46.5M/s, 0h0m to go
604M resilvered, 77.39% done
config:
NAME STATE READ WRITE CKSUM
mypool ONLINE 0 0 0
mirror-0 ONLINE 0 0 0
ada0p3 ONLINE 0 0 0
replacing-1 ONLINE 0 0 0
ada1p3 ONLINE 0 0 0
ada2p3 ONLINE 0 0 0 (resilvering)
errors: No known data errors
# zpool status
pool: mypool
state: ONLINE
scan: resilvered 781M in 0h0m with 0 errors on Mon Jun 2 14:21:52 2014
config:
NAME STATE READ WRITE CKSUM
mypool ONLINE 0 0 0
mirror-0 ONLINE 0 0 0
ada0p3 ONLINE 0 0 0
ada2p3 ONLINE 0 0 0
errors: No known data errorsWhen a disk in a pool fails, the vdev to which the disk belongs enters the degraded state. All of the data is still available, but performance may be reduced because missing data must be calculated from the available redundancy. To restore the vdev to a fully functional state, the failed physical device must be replaced. ZFS is then instructed to begin the resilver operation. Data that was on the failed device is recalculated from available redundancy and written to the replacement device. After completion, the vdev returns to online status.
If the vdev does not have any redundancy, or if multiple devices have failed and there is not enough redundancy to compensate, the pool enters the faulted state. If a sufficient number of devices cannot be reconnected to the pool, the pool becomes inoperative and data must be restored from backups.
When replacing a failed disk, the name of the failed disk is replaced with the GUID of the device. A new device name parameter for zpool replace is not required if the replacement device has the same device name.
Replace a failed disk using zpool replace:
# zpool status
pool: mypool
state: DEGRADED
status: One or more devices could not be opened. Sufficient replicas exist for
the pool to continue functioning in a degraded state.
action: Attach the missing device and online it using 'zpool online'.
see: http://illumos.org/msg/ZFS-8000-2Q
scan: none requested
config:
NAME STATE READ WRITE CKSUM
mypool DEGRADED 0 0 0
mirror-0 DEGRADED 0 0 0
ada0p3 ONLINE 0 0 0
316502962686821739 UNAVAIL 0 0 0 was /dev/ada1p3
errors: No known data errors
# zpool replace mypool 316502962686821739 ada2p3
# zpool status
pool: mypool
state: DEGRADED
status: One or more devices is currently being resilvered. The pool will
continue to function, possibly in a degraded state.
action: Wait for the resilver to complete.
scan: resilver in progress since Mon Jun 2 14:52:21 2014
641M scanned out of 781M at 49.3M/s, 0h0m to go
640M resilvered, 82.04% done
config:
NAME STATE READ WRITE CKSUM
mypool DEGRADED 0 0 0
mirror-0 DEGRADED 0 0 0
ada0p3 ONLINE 0 0 0
replacing-1 UNAVAIL 0 0 0
15732067398082357289 UNAVAIL 0 0 0 was /dev/ada1p3/old
ada2p3 ONLINE 0 0 0 (resilvering)
errors: No known data errors
# zpool status
pool: mypool
state: ONLINE
scan: resilvered 781M in 0h0m with 0 errors on Mon Jun 2 14:52:38 2014
config:
NAME STATE READ WRITE CKSUM
mypool ONLINE 0 0 0
mirror-0 ONLINE 0 0 0
ada0p3 ONLINE 0 0 0
ada2p3 ONLINE 0 0 0
errors: No known data errorsIt is recommended that pools be scrubbed regularly, ideally at least once every month. The scrub operation is very disk-intensive and will reduce performance while running. Avoid high-demand periods when scheduling scrub or use vfs.zfs.scrub_delay to adjust the relative priority of the scrub to prevent it interfering with other workloads.
# zpool scrub mypool
# zpool status
pool: mypool
state: ONLINE
scan: scrub in progress since Wed Feb 19 20:52:54 2014
116G scanned out of 8.60T at 649M/s, 3h48m to go
0 repaired, 1.32% done
config:
NAME STATE READ WRITE CKSUM
mypool ONLINE 0 0 0
raidz2-0 ONLINE 0 0 0
ada0p3 ONLINE 0 0 0
ada1p3 ONLINE 0 0 0
ada2p3 ONLINE 0 0 0
ada3p3 ONLINE 0 0 0
ada4p3 ONLINE 0 0 0
ada5p3 ONLINE 0 0 0
errors: No known data errorsIn the event that a scrub operation needs to be cancelled, issue zpool scrub -s mypool.
The checksums stored with data blocks enable the file system to self-heal. This feature will automatically repair data whose checksum does not match the one recorded on another device that is part of the storage pool. For example, a mirror with two disks where one drive is starting to malfunction and cannot properly store the data any more. This is even worse when the data has not been accessed for a long time, as with long term archive storage. Traditional file systems need to run algorithms that check and repair the data like fsck(8). These commands take time, and in severe cases, an administrator has to manually decide which repair operation must be performed. When ZFS detects a data block with a checksum that does not match, it tries to read the data from the mirror disk. If that disk can provide the correct data, it will not only give that data to the application requesting it, but also correct the wrong data on the disk that had the bad checksum. This happens without any interaction from a system administrator during normal pool operation.
The next example demonstrates this self-healing behavior. A mirrored pool of disks /dev/ada0 and /dev/ada1 is created.
# zpool create healer mirror /dev/ada0 /dev/ada1
# zpool status healer
pool: healer
state: ONLINE
scan: none requested
config:
NAME STATE READ WRITE CKSUM
healer ONLINE 0 0 0
mirror-0 ONLINE 0 0 0
ada0 ONLINE 0 0 0
ada1 ONLINE 0 0 0
errors: No known data errors
# zpool list
NAME SIZE ALLOC FREE CKPOINT EXPANDSZ FRAG CAP DEDUP HEALTH ALTROOT
healer 960M 92.5K 960M - - 0% 0% 1.00x ONLINE -Some important data that have to be protected from data errors using the self-healing feature are copied to the pool. A checksum of the pool is created for later comparison.
# cp /some/important/data /healer
# zfs list
NAME SIZE ALLOC FREE CAP DEDUP HEALTH ALTROOT
healer 960M 67.7M 892M 7% 1.00x ONLINE -
# sha1 /healer > checksum.txt
# cat checksum.txt
SHA1 (/healer) = 2753eff56d77d9a536ece6694bf0a82740344d1fData corruption is simulated by writing random data to the beginning of one of the disks in the mirror. To prevent ZFS from healing the data as soon as it is detected, the pool is exported before the corruption and imported again afterwards.
This is a dangerous operation that can destroy vital data. It is shown here for demonstrational purposes only and should not be attempted during normal operation of a storage pool. Nor should this intentional corruption example be run on any disk with a different file system on it. Do not use any other disk device names other than the ones that are part of the pool. Make certain that proper backups of the pool are created before running the command! |
# zpool export healer
# dd if=/dev/random of=/dev/ada1 bs=1m count=200
200+0 records in
200+0 records out
209715200 bytes transferred in 62.992162 secs (3329227 bytes/sec)
# zpool import healerThe pool status shows that one device has experienced an error. Note that applications reading data from the pool did not receive any incorrect data. ZFS provided data from the ada0 device with the correct checksums. The device with the wrong checksum can be found easily as the CKSUM column contains a nonzero value.
# zpool status healer
pool: healer
state: ONLINE
status: One or more devices has experienced an unrecoverable error. An
attempt was made to correct the error. Applications are unaffected.
action: Determine if the device needs to be replaced, and clear the errors
using 'zpool clear' or replace the device with 'zpool replace'.
see: http://illumos.org/msg/ZFS-8000-4J
scan: none requested
config:
NAME STATE READ WRITE CKSUM
healer ONLINE 0 0 0
mirror-0 ONLINE 0 0 0
ada0 ONLINE 0 0 0
ada1 ONLINE 0 0 1
errors: No known data errorsThe error was detected and handled by using the redundancy present in the unaffected ada0 mirror disk. A checksum comparison with the original one will reveal whether the pool is consistent again.
# sha1 /healer >> checksum.txt
# cat checksum.txt
SHA1 (/healer) = 2753eff56d77d9a536ece6694bf0a82740344d1f
SHA1 (/healer) = 2753eff56d77d9a536ece6694bf0a82740344d1fThe two checksums that were generated before and after the intentional tampering with the pool data still match. This shows how ZFS is capable of detecting and correcting any errors automatically when the checksums differ. Note that this is only possible when there is enough redundancy present in the pool. A pool consisting of a single device has no self-healing capabilities. That is also the reason why checksums are so important in ZFS and should not be disabled for any reason. No fsck(8) or similar file system consistency check program is required to detect and correct this and the pool was still available during the time there was a problem. A scrub operation is now required to overwrite the corrupted data on ada1.
# zpool scrub healer
# zpool status healer
pool: healer
state: ONLINE
status: One or more devices has experienced an unrecoverable error. An
attempt was made to correct the error. Applications are unaffected.
action: Determine if the device needs to be replaced, and clear the errors
using 'zpool clear' or replace the device with 'zpool replace'.
see: http://illumos.org/msg/ZFS-8000-4J
scan: scrub in progress since Mon Dec 10 12:23:30 2012
10.4M scanned out of 67.0M at 267K/s, 0h3m to go
9.63M repaired, 15.56% done
config:
NAME STATE READ WRITE CKSUM
healer ONLINE 0 0 0
mirror-0 ONLINE 0 0 0
ada0 ONLINE 0 0 0
ada1 ONLINE 0 0 627 (repairing)
errors: No known data errorsThe scrub operation reads data from ada0 and rewrites any data with an incorrect checksum on ada1. This is indicated by the (repairing) output from zpool status. After the operation is complete, the pool status changes to:
# zpool status healer
pool: healer
state: ONLINE
status: One or more devices has experienced an unrecoverable error. An
attempt was made to correct the error. Applications are unaffected.
action: Determine if the device needs to be replaced, and clear the errors
using 'zpool clear' or replace the device with 'zpool replace'.
see: http://illumos.org/msg/ZFS-8000-4J
scan: scrub repaired 66.5M in 0h2m with 0 errors on Mon Dec 10 12:26:25 2012
config:
NAME STATE READ WRITE CKSUM
healer ONLINE 0 0 0
mirror-0 ONLINE 0 0 0
ada0 ONLINE 0 0 0
ada1 ONLINE 0 0 2.72K
errors: No known data errorsAfter the scrub operation completes and all the data has been synchronized from ada0 to ada1, the error messages can be cleared from the pool status by running zpool clear.
# zpool clear healer
# zpool status healer
pool: healer
state: ONLINE
scan: scrub repaired 66.5M in 0h2m with 0 errors on Mon Dec 10 12:26:25 2012
config:
NAME STATE READ WRITE CKSUM
healer ONLINE 0 0 0
mirror-0 ONLINE 0 0 0
ada0 ONLINE 0 0 0
ada1 ONLINE 0 0 0
errors: No known data errorsThe pool is now back to a fully working state and all the errors have been cleared.
The usable size of a redundant pool is limited by the capacity of the smallest device in each vdev. The smallest device can be replaced with a larger device. After completing a replace or resilver operation, the pool can grow to use the capacity of the new device. For example, consider a mirror of a 1 TB drive and a 2 TB drive. The usable space is 1 TB. When the 1 TB drive is replaced with another 2 TB drive, the resilvering process copies the existing data onto the new drive. Because both of the devices now have 2 TB capacity, the mirror’s available space can be grown to 2 TB.
Expansion is triggered by using zpool online -e on each device. After expansion of all devices, the additional space becomes available to the pool.
Pools are exported before moving them to another system. All datasets are unmounted, and each device is marked as exported but still locked so it cannot be used by other disk subsystems. This allows pools to be imported on other machines, other operating systems that support ZFS, and even different hardware architectures (with some caveats, see zpool(8)). When a dataset has open files, zpool export -f can be used to force the export of a pool. Use this with caution. The datasets are forcibly unmounted, potentially resulting in unexpected behavior by the applications which had open files on those datasets.
Export a pool that is not in use:
# zpool export mypoolImporting a pool automatically mounts the datasets. This may not be the desired behavior, and can be prevented with zpool import -N. zpool import -o sets temporary properties for this import only. zpool import altroot= allows importing a pool with a base mount point instead of the root of the file system. If the pool was last used on a different system and was not properly exported, an import might have to be forced with zpool import -f. zpool import -a imports all pools that do not appear to be in use by another system.
List all available pools for import:
# zpool import
pool: mypool
id: 9930174748043525076
state: ONLINE
action: The pool can be imported using its name or numeric identifier.
config:
mypool ONLINE
ada2p3 ONLINEImport the pool with an alternative root directory:
# zpool import -o altroot=/mnt mypool
# zfs list
zfs list
NAME USED AVAIL REFER MOUNTPOINT
mypool 110K 47.0G 31K /mnt/mypoolAfter upgrading FreeBSD, or if a pool has been imported from a system using an older version of ZFS, the pool can be manually upgraded to the latest version of ZFS to support newer features. Consider whether the pool may ever need to be imported on an older system before upgrading. Upgrading is a one-way process. Older pools can be upgraded, but pools with newer features cannot be downgraded.
Upgrade a v28 pool to support Feature Flags:
# zpool status
pool: mypool
state: ONLINE
status: The pool is formatted using a legacy on-disk format. The pool can
still be used, but some features are unavailable.
action: Upgrade the pool using 'zpool upgrade'. Once this is done, the
pool will no longer be accessible on software that does not support feat
flags.
scan: none requested
config:
NAME STATE READ WRITE CKSUM
mypool ONLINE 0 0 0
mirror-0 ONLINE 0 0 0
ada0 ONLINE 0 0 0
ada1 ONLINE 0 0 0
errors: No known data errors
# zpool upgrade
This system supports ZFS pool feature flags.
The following pools are formatted with legacy version numbers and can
be upgraded to use feature flags. After being upgraded, these pools
will no longer be accessible by software that does not support feature
flags.
VER POOL
--- ------------
28 mypool
Use 'zpool upgrade -v' for a list of available legacy versions.
Every feature flags pool has all supported features enabled.
# zpool upgrade mypool
This system supports ZFS pool feature flags.
Successfully upgraded 'mypool' from version 28 to feature flags.
Enabled the following features on 'mypool':
async_destroy
empty_bpobj
lz4_compress
multi_vdev_crash_dumpThe newer features of ZFS will not be available until zpool upgrade has completed. zpool upgrade -v can be used to see what new features will be provided by upgrading, as well as which features are already supported.
Upgrade a pool to support additional feature flags:
# zpool status
pool: mypool
state: ONLINE
status: Some supported features are not enabled on the pool. The pool can
still be used, but some features are unavailable.
action: Enable all features using 'zpool upgrade'. Once this is done,
the pool may no longer be accessible by software that does not support
the features. See zpool-features(7) for details.
scan: none requested
config:
NAME STATE READ WRITE CKSUM
mypool ONLINE 0 0 0
mirror-0 ONLINE 0 0 0
ada0 ONLINE 0 0 0
ada1 ONLINE 0 0 0
errors: No known data errors
# zpool upgrade
This system supports ZFS pool feature flags.
All pools are formatted using feature flags.
Some supported features are not enabled on the following pools. Once a
feature is enabled the pool may become incompatible with software
that does not support the feature. See zpool-features(7) for details.
POOL FEATURE
---------------
zstore
multi_vdev_crash_dump
spacemap_histogram
enabled_txg
hole_birth
extensible_dataset
bookmarks
filesystem_limits
# zpool upgrade mypool
This system supports ZFS pool feature flags.
Enabled the following features on 'mypool':
spacemap_histogram
enabled_txg
hole_birth
extensible_dataset
bookmarks
filesystem_limitsThe boot code on systems that boot from a pool must be updated to support the new pool version. Use For legacy boot using GPT, use the following command: For systems using EFI to boot, execute the following command: Apply the bootcode to all bootable disks in the pool. See gpart(8) for more information. |
Commands that modify the pool are recorded. Recorded actions include the creation of datasets, changing properties, or replacement of a disk. This history is useful for reviewing how a pool was created and which user performed a specific action and when. History is not kept in a log file, but is part of the pool itself. The command to review this history is aptly named zpool history:
# zpool history
History for 'tank':
2013-02-26.23:02:35 zpool create tank mirror /dev/ada0 /dev/ada1
2013-02-27.18:50:58 zfs set atime=off tank
2013-02-27.18:51:09 zfs set checksum=fletcher4 tank
2013-02-27.18:51:18 zfs create tank/backupThe output shows zpool and zfs commands that were executed on the pool along with a timestamp. Only commands that alter the pool in some way are recorded. Commands like zfs list are not included. When no pool name is specified, the history of all pools is displayed.
zpool history can show even more information when the options -i or -l are provided. -i displays user-initiated events as well as internally logged ZFS events.
# zpool history -i
History for 'tank':
2013-02-26.23:02:35 [internal pool create txg:5] pool spa 28; zfs spa 28; zpl 5;uts 9.1-RELEASE 901000 amd64
2013-02-27.18:50:53 [internal property set txg:50] atime=0 dataset = 21
2013-02-27.18:50:58 zfs set atime=off tank
2013-02-27.18:51:04 [internal property set txg:53] checksum=7 dataset = 21
2013-02-27.18:51:09 zfs set checksum=fletcher4 tank
2013-02-27.18:51:13 [internal create txg:55] dataset = 39
2013-02-27.18:51:18 zfs create tank/backupMore details can be shown by adding -l. History records are shown in a long format, including information like the name of the user who issued the command and the hostname on which the change was made.
# zpool history -l
History for 'tank':
2013-02-26.23:02:35 zpool create tank mirror /dev/ada0 /dev/ada1 [user 0 (root) on :global]
2013-02-27.18:50:58 zfs set atime=off tank [user 0 (root) on myzfsbox:global]
2013-02-27.18:51:09 zfs set checksum=fletcher4 tank [user 0 (root) on myzfsbox:global]
2013-02-27.18:51:18 zfs create tank/backup [user 0 (root) on myzfsbox:global]The output shows that the root user created the mirrored pool with disks /dev/ada0 and /dev/ada1. The hostname myzfsbox is also shown in the commands after the pool’s creation. The hostname display becomes important when the pool is exported from one system and imported on another. The commands that are issued on the other system can clearly be distinguished by the hostname that is recorded for each command.
Both options to zpool history can be combined to give the most detailed information possible for any given pool. Pool history provides valuable information when tracking down the actions that were performed or when more detailed output is needed for debugging.
A built-in monitoring system can display pool I/O statistics in real time. It shows the amount of free and used space on the pool, how many read and write operations are being performed per second, and how much I/O bandwidth is currently being utilized. By default, all pools in the system are monitored and displayed. A pool name can be provided to limit monitoring to just that pool. A basic example:
# zpool iostat
capacity operations bandwidth
pool alloc free read write read write
---------- ----- ----- ----- ----- ----- -----
data 288G 1.53T 2 11 11.3K 57.1KTo continuously monitor I/O activity, a number can be specified as the last parameter, indicating a interval in seconds to wait between updates. The next statistic line is printed after each interval. Press Ctrl+C to stop this continuous monitoring. Alternatively, give a second number on the command line after the interval to specify the total number of statistics to display.
Even more detailed I/O statistics can be displayed with -v. Each device in the pool is shown with a statistics line. This is useful in seeing how many read and write operations are being performed on each device, and can help determine if any individual device is slowing down the pool. This example shows a mirrored pool with two devices:
# zpool iostat -v
capacity operations bandwidth
pool alloc free read write read write
----------------------- ----- ----- ----- ----- ----- -----
data 288G 1.53T 2 12 9.23K 61.5K
mirror 288G 1.53T 2 12 9.23K 61.5K
ada1 - - 0 4 5.61K 61.7K
ada2 - - 1 4 5.04K 61.7K
----------------------- ----- ----- ----- ----- ----- -----A pool consisting of one or more mirror vdevs can be split into two pools. Unless otherwise specified, the last member of each mirror is detached and used to create a new pool containing the same data. The operation should first be attempted with -n. The details of the proposed operation are displayed without it actually being performed. This helps confirm that the operation will do what the user intends.
zfs AdministrationThe zfs utility is responsible for creating, destroying, and managing all ZFS datasets that exist within a pool. The pool is managed using zpool.
Unlike traditional disks and volume managers, space in ZFS is not preallocated. With traditional file systems, after all of the space is partitioned and assigned, there is no way to add an additional file system without adding a new disk. With ZFS, new file systems can be created at any time. Each dataset has properties including features like compression, deduplication, caching, and quotas, as well as other useful properties like readonly, case sensitivity, network file sharing, and a mount point. Datasets can be nested inside each other, and child datasets will inherit properties from their parents. Each dataset can be administered, delegated, replicated, snapshotted, jailed, and destroyed as a unit. There are many advantages to creating a separate dataset for each different type or set of files. The only drawbacks to having an extremely large number of datasets is that some commands like zfs list will be slower, and the mounting of hundreds or even thousands of datasets can slow the FreeBSD boot process.
Create a new dataset and enable LZ4 compression on it:
# zfs list
NAME USED AVAIL REFER MOUNTPOINT
mypool 781M 93.2G 144K none
mypool/ROOT 777M 93.2G 144K none
mypool/ROOT/default 777M 93.2G 777M /
mypool/tmp 176K 93.2G 176K /tmp
mypool/usr 616K 93.2G 144K /usr
mypool/usr/home 184K 93.2G 184K /usr/home
mypool/usr/ports 144K 93.2G 144K /usr/ports
mypool/usr/src 144K 93.2G 144K /usr/src
mypool/var 1.20M 93.2G 608K /var
mypool/var/crash 148K 93.2G 148K /var/crash
mypool/var/log 178K 93.2G 178K /var/log
mypool/var/mail 144K 93.2G 144K /var/mail
mypool/var/tmp 152K 93.2G 152K /var/tmp
# zfs create -o compress=lz4 mypool/usr/mydataset
# zfs list
NAME USED AVAIL REFER MOUNTPOINT
mypool 781M 93.2G 144K none
mypool/ROOT 777M 93.2G 144K none
mypool/ROOT/default 777M 93.2G 777M /
mypool/tmp 176K 93.2G 176K /tmp
mypool/usr 704K 93.2G 144K /usr
mypool/usr/home 184K 93.2G 184K /usr/home
mypool/usr/mydataset 87.5K 93.2G 87.5K /usr/mydataset
mypool/usr/ports 144K 93.2G 144K /usr/ports
mypool/usr/src 144K 93.2G 144K /usr/src
mypool/var 1.20M 93.2G 610K /var
mypool/var/crash 148K 93.2G 148K /var/crash
mypool/var/log 178K 93.2G 178K /var/log
mypool/var/mail 144K 93.2G 144K /var/mail
mypool/var/tmp 152K 93.2G 152K /var/tmpDestroying a dataset is much quicker than deleting all of the files that reside on the dataset, as it does not involve scanning all of the files and updating all of the corresponding metadata.
Destroy the previously-created dataset:
# zfs list
NAME USED AVAIL REFER MOUNTPOINT
mypool 880M 93.1G 144K none
mypool/ROOT 777M 93.1G 144K none
mypool/ROOT/default 777M 93.1G 777M /
mypool/tmp 176K 93.1G 176K /tmp
mypool/usr 101M 93.1G 144K /usr
mypool/usr/home 184K 93.1G 184K /usr/home
mypool/usr/mydataset 100M 93.1G 100M /usr/mydataset
mypool/usr/ports 144K 93.1G 144K /usr/ports
mypool/usr/src 144K 93.1G 144K /usr/src
mypool/var 1.20M 93.1G 610K /var
mypool/var/crash 148K 93.1G 148K /var/crash
mypool/var/log 178K 93.1G 178K /var/log
mypool/var/mail 144K 93.1G 144K /var/mail
mypool/var/tmp 152K 93.1G 152K /var/tmp
# zfs destroy mypool/usr/mydataset
# zfs list
NAME USED AVAIL REFER MOUNTPOINT
mypool 781M 93.2G 144K none
mypool/ROOT 777M 93.2G 144K none
mypool/ROOT/default 777M 93.2G 777M /
mypool/tmp 176K 93.2G 176K /tmp
mypool/usr 616K 93.2G 144K /usr
mypool/usr/home 184K 93.2G 184K /usr/home
mypool/usr/ports 144K 93.2G 144K /usr/ports
mypool/usr/src 144K 93.2G 144K /usr/src
mypool/var 1.21M 93.2G 612K /var
mypool/var/crash 148K 93.2G 148K /var/crash
mypool/var/log 178K 93.2G 178K /var/log
mypool/var/mail 144K 93.2G 144K /var/mail
mypool/var/tmp 152K 93.2G 152K /var/tmpIn modern versions of ZFS, zfs destroy is asynchronous, and the free space might take several minutes to appear in the pool. Use zpool get freeing poolname to see the freeing property, indicating how many datasets are having their blocks freed in the background. If there are child datasets, like snapshots or other datasets, then the parent cannot be destroyed. To destroy a dataset and all of its children, use -r to recursively destroy the dataset and all of its children. Use -n -v to list datasets and snapshots that would be destroyed by this operation, but do not actually destroy anything. Space that would be reclaimed by destruction of snapshots is also shown.
A volume is a special type of dataset. Rather than being mounted as a file system, it is exposed as a block device under /dev/zvol/poolname/dataset. This allows the volume to be used for other file systems, to back the disks of a virtual machine, or to be exported using protocols like iSCSI or HAST.
A volume can be formatted with any file system, or used without a file system to store raw data. To the user, a volume appears to be a regular disk. Putting ordinary file systems on these zvols provides features that ordinary disks or file systems do not normally have. For example, using the compression property on a 250 MB volume allows creation of a compressed FAT file system.
# zfs create -V 250m -o compression=on tank/fat32
# zfs list tank
NAME USED AVAIL REFER MOUNTPOINT
tank 258M 670M 31K /tank
# newfs_msdos -F32 /dev/zvol/tank/fat32
# mount -t msdosfs /dev/zvol/tank/fat32 /mnt
# df -h /mnt | grep fat32
Filesystem Size Used Avail Capacity Mounted on
/dev/zvol/tank/fat32 249M 24k 249M 0% /mnt
# mount | grep fat32
/dev/zvol/tank/fat32 on /mnt (msdosfs, local)Destroying a volume is much the same as destroying a regular file system dataset. The operation is nearly instantaneous, but it may take several minutes for the free space to be reclaimed in the background.
The name of a dataset can be changed with zfs rename. The parent of a dataset can also be changed with this command. Renaming a dataset to be under a different parent dataset will change the value of those properties that are inherited from the parent dataset. When a dataset is renamed, it is unmounted and then remounted in the new location (which is inherited from the new parent dataset). This behavior can be prevented with -u.
Rename a dataset and move it to be under a different parent dataset:
# zfs list
NAME USED AVAIL REFER MOUNTPOINT
mypool 780M 93.2G 144K none
mypool/ROOT 777M 93.2G 144K none
mypool/ROOT/default 777M 93.2G 777M /
mypool/tmp 176K 93.2G 176K /tmp
mypool/usr 704K 93.2G 144K /usr
mypool/usr/home 184K 93.2G 184K /usr/home
mypool/usr/mydataset 87.5K 93.2G 87.5K /usr/mydataset
mypool/usr/ports 144K 93.2G 144K /usr/ports
mypool/usr/src 144K 93.2G 144K /usr/src
mypool/var 1.21M 93.2G 614K /var
mypool/var/crash 148K 93.2G 148K /var/crash
mypool/var/log 178K 93.2G 178K /var/log
mypool/var/mail 144K 93.2G 144K /var/mail
mypool/var/tmp 152K 93.2G 152K /var/tmp
# zfs rename mypool/usr/mydataset mypool/var/newname
# zfs list
NAME USED AVAIL REFER MOUNTPOINT
mypool 780M 93.2G 144K none
mypool/ROOT 777M 93.2G 144K none
mypool/ROOT/default 777M 93.2G 777M /
mypool/tmp 176K 93.2G 176K /tmp
mypool/usr 616K 93.2G 144K /usr
mypool/usr/home 184K 93.2G 184K /usr/home
mypool/usr/ports 144K 93.2G 144K /usr/ports
mypool/usr/src 144K 93.2G 144K /usr/src
mypool/var 1.29M 93.2G 614K /var
mypool/var/crash 148K 93.2G 148K /var/crash
mypool/var/log 178K 93.2G 178K /var/log
mypool/var/mail 144K 93.2G 144K /var/mail
mypool/var/newname 87.5K 93.2G 87.5K /var/newname
mypool/var/tmp 152K 93.2G 152K /var/tmpSnapshots can also be renamed like this. Due to the nature of snapshots, they cannot be renamed into a different parent dataset. To rename a recursive snapshot, specify -r, and all snapshots with the same name in child datasets with also be renamed.
# zfs list -t snapshot
NAME USED AVAIL REFER MOUNTPOINT
mypool/var/newname@first_snapshot 0 - 87.5K -
# zfs rename mypool/var/newname@first_snapshot new_snapshot_name
# zfs list -t snapshot
NAME USED AVAIL REFER MOUNTPOINT
mypool/var/newname@new_snapshot_name 0 - 87.5K -Each ZFS dataset has a number of properties that control its behavior. Most properties are automatically inherited from the parent dataset, but can be overridden locally. Set a property on a dataset with zfs set property=value dataset. Most properties have a limited set of valid values, zfs get will display each possible property and valid values. Most properties can be reverted to their inherited values using zfs inherit.
User-defined properties can also be set. They become part of the dataset configuration and can be used to provide additional information about the dataset or its contents. To distinguish these custom properties from the ones supplied as part of ZFS, a colon (:) is used to create a custom namespace for the property.
# zfs set custom:costcenter=1234 tank
# zfs get custom:costcenter tank
NAME PROPERTY VALUE SOURCE
tank custom:costcenter 1234 localTo remove a custom property, use zfs inherit with -r. If the custom property is not defined in any of the parent datasets, it will be removed completely (although the changes are still recorded in the pool’s history).
# zfs inherit -r custom:costcenter tank
# zfs get custom:costcenter tank
NAME PROPERTY VALUE SOURCE
tank custom:costcenter - -
# zfs get all tank | grep custom:costcenter
#Two commonly used and useful dataset properties are the NFS and SMB share options. Setting these define if and how ZFS datasets may be shared on the network. At present, only setting sharing via NFS is supported on FreeBSD. To get the current status of a share, enter:
# zfs get sharenfs mypool/usr/home
NAME PROPERTY VALUE SOURCE
mypool/usr/home sharenfs on local
# zfs get sharesmb mypool/usr/home
NAME PROPERTY VALUE SOURCE
mypool/usr/home sharesmb off localTo enable sharing of a dataset, enter:
# zfs set sharenfs=on mypool/usr/homeIt is also possible to set additional options for sharing datasets through NFS, such as -alldirs, -maproot and -network. To set additional options to a dataset shared through NFS, enter:
# zfs set sharenfs="-alldirs,-maproot=root,-network=192.168.1.0/24" mypool/usr/homeSnapshots are one of the most powerful features of ZFS. A snapshot provides a read-only, point-in-time copy of the dataset. With Copy-On-Write (COW), snapshots can be created quickly by preserving the older version of the data on disk. If no snapshots exist, space is reclaimed for future use when data is rewritten or deleted. Snapshots preserve disk space by recording only the differences between the current dataset and a previous version. Snapshots are allowed only on whole datasets, not on individual files or directories. When a snapshot is created from a dataset, everything contained in it is duplicated. This includes the file system properties, files, directories, permissions, and so on. Snapshots use no additional space when they are first created, only consuming space as the blocks they reference are changed. Recursive snapshots taken with -r create a snapshot with the same name on the dataset and all of its children, providing a consistent moment-in-time snapshot of all of the file systems. This can be important when an application has files on multiple datasets that are related or dependent upon each other. Without snapshots, a backup would have copies of the files from different points in time.
Snapshots in ZFS provide a variety of features that even other file systems with snapshot functionality lack. A typical example of snapshot use is to have a quick way of backing up the current state of the file system when a risky action like a software installation or a system upgrade is performed. If the action fails, the snapshot can be rolled back and the system has the same state as when the snapshot was created. If the upgrade was successful, the snapshot can be deleted to free up space. Without snapshots, a failed upgrade often requires a restore from backup, which is tedious, time consuming, and may require downtime during which the system cannot be used. Snapshots can be rolled back quickly, even while the system is running in normal operation, with little or no downtime. The time savings are enormous with multi-terabyte storage systems and the time required to copy the data from backup. Snapshots are not a replacement for a complete backup of a pool, but can be used as a quick and easy way to store a copy of the dataset at a specific point in time.
Snapshots are created with zfs snapshot dataset@snapshotname. Adding -r creates a snapshot recursively, with the same name on all child datasets.
Create a recursive snapshot of the entire pool:
# zfs list -t all
NAME USED AVAIL REFER MOUNTPOINT
mypool 780M 93.2G 144K none
mypool/ROOT 777M 93.2G 144K none
mypool/ROOT/default 777M 93.2G 777M /
mypool/tmp 176K 93.2G 176K /tmp
mypool/usr 616K 93.2G 144K /usr
mypool/usr/home 184K 93.2G 184K /usr/home
mypool/usr/ports 144K 93.2G 144K /usr/ports
mypool/usr/src 144K 93.2G 144K /usr/src
mypool/var 1.29M 93.2G 616K /var
mypool/var/crash 148K 93.2G 148K /var/crash
mypool/var/log 178K 93.2G 178K /var/log
mypool/var/mail 144K 93.2G 144K /var/mail
mypool/var/newname 87.5K 93.2G 87.5K /var/newname
mypool/var/newname@new_snapshot_name 0 - 87.5K -
mypool/var/tmp 152K 93.2G 152K /var/tmp
# zfs snapshot -r mypool@my_recursive_snapshot
# zfs list -t snapshot
NAME USED AVAIL REFER MOUNTPOINT
mypool@my_recursive_snapshot 0 - 144K -
mypool/ROOT@my_recursive_snapshot 0 - 144K -
mypool/ROOT/default@my_recursive_snapshot 0 - 777M -
mypool/tmp@my_recursive_snapshot 0 - 176K -
mypool/usr@my_recursive_snapshot 0 - 144K -
mypool/usr/home@my_recursive_snapshot 0 - 184K -
mypool/usr/ports@my_recursive_snapshot 0 - 144K -
mypool/usr/src@my_recursive_snapshot 0 - 144K -
mypool/var@my_recursive_snapshot 0 - 616K -
mypool/var/crash@my_recursive_snapshot 0 - 148K -
mypool/var/log@my_recursive_snapshot 0 - 178K -
mypool/var/mail@my_recursive_snapshot 0 - 144K -
mypool/var/newname@new_snapshot_name 0 - 87.5K -
mypool/var/newname@my_recursive_snapshot 0 - 87.5K -
mypool/var/tmp@my_recursive_snapshot 0 - 152K -Snapshots are not shown by a normal zfs list operation. To list snapshots, -t snapshot is appended to zfs list. -t all displays both file systems and snapshots.
Snapshots are not mounted directly, so no path is shown in the MOUNTPOINT column. There is no mention of available disk space in the AVAIL column, as snapshots cannot be written to after they are created. Compare the snapshot to the original dataset from which it was created:
# zfs list -rt all mypool/usr/home
NAME USED AVAIL REFER MOUNTPOINT
mypool/usr/home 184K 93.2G 184K /usr/home
mypool/usr/home@my_recursive_snapshot 0 - 184K -Displaying both the dataset and the snapshot together reveals how snapshots work in COW fashion. They save only the changes (delta) that were made and not the complete file system contents all over again. This means that snapshots take little space when few changes are made. Space usage can be made even more apparent by copying a file to the dataset, then making a second snapshot:
# cp /etc/passwd /var/tmp
# zfs snapshot mypool/var/tmp@after_cp
# zfs list -rt all mypool/var/tmp
NAME USED AVAIL REFER MOUNTPOINT
mypool/var/tmp 206K 93.2G 118K /var/tmp
mypool/var/tmp@my_recursive_snapshot 88K - 152K -
mypool/var/tmp@after_cp 0 - 118K -The second snapshot contains only the changes to the dataset after the copy operation. This yields enormous space savings. Notice that the size of the snapshot mypool/var/tmp@my_recursive_snapshot also changed in the USED column to indicate the changes between itself and the snapshot taken afterwards.
ZFS provides a built-in command to compare the differences in content between two snapshots. This is helpful when many snapshots were taken over time and the user wants to see how the file system has changed over time. For example, zfs diff lets a user find the latest snapshot that still contains a file that was accidentally deleted. Doing this for the two snapshots that were created in the previous section yields this output:
# zfs list -rt all mypool/var/tmp
NAME USED AVAIL REFER MOUNTPOINT
mypool/var/tmp 206K 93.2G 118K /var/tmp
mypool/var/tmp@my_recursive_snapshot 88K - 152K -
mypool/var/tmp@after_cp 0 - 118K -
# zfs diff mypool/var/tmp@my_recursive_snapshot
M /var/tmp/
+ /var/tmp/passwdThe command lists the changes between the specified snapshot (in this case mypool/var/tmp@my_recursive_snapshot) and the live file system. The first column shows the type of change:
+ | The path or file was added. |
- | The path or file was deleted. |
M | The path or file was modified. |
R | The path or file was renamed. |
Comparing the output with the table, it becomes clear that passwd was added after the snapshot mypool/var/tmp@my_recursive_snapshot was created. This also resulted in a modification to the parent directory mounted at /var/tmp.
Comparing two snapshots is helpful when using the ZFS replication feature to transfer a dataset to a different host for backup purposes.
Compare two snapshots by providing the full dataset name and snapshot name of both datasets:
# cp /var/tmp/passwd /var/tmp/passwd.copy
# zfs snapshot mypool/var/tmp@diff_snapshot
# zfs diff mypool/var/tmp@my_recursive_snapshot mypool/var/tmp@diff_snapshot
M /var/tmp/
+ /var/tmp/passwd
+ /var/tmp/passwd.copy
# zfs diff mypool/var/tmp@my_recursive_snapshot mypool/var/tmp@after_cp
M /var/tmp/
+ /var/tmp/passwdA backup administrator can compare two snapshots received from the sending host and determine the actual changes in the dataset. See the Replication section for more information.
When at least one snapshot is available, it can be rolled back to at any time. Most of the time this is the case when the current state of the dataset is no longer required and an older version is preferred. Scenarios such as local development tests have gone wrong, botched system updates hampering the system’s overall functionality, or the requirement to restore accidentally deleted files or directories are all too common occurrences. Luckily, rolling back a snapshot is just as easy as typing zfs rollback snapshotname. Depending on how many changes are involved, the operation will finish in a certain amount of time. During that time, the dataset always remains in a consistent state, much like a database that conforms to ACID principles is performing a rollback. This is happening while the dataset is live and accessible without requiring a downtime. Once the snapshot has been rolled back, the dataset has the same state as it had when the snapshot was originally taken. All other data in that dataset that was not part of the snapshot is discarded. Taking a snapshot of the current state of the dataset before rolling back to a previous one is a good idea when some data is required later. This way, the user can roll back and forth between snapshots without losing data that is still valuable.
In the first example, a snapshot is rolled back because of a careless rm operation that removes too much data than was intended.
# zfs list -rt all mypool/var/tmp
NAME USED AVAIL REFER MOUNTPOINT
mypool/var/tmp 262K 93.2G 120K /var/tmp
mypool/var/tmp@my_recursive_snapshot 88K - 152K -
mypool/var/tmp@after_cp 53.5K - 118K -
mypool/var/tmp@diff_snapshot 0 - 120K -
# ls /var/tmp
passwd passwd.copy vi.recover
# rm /var/tmp/passwd*
# ls /var/tmp
vi.recoverAt this point, the user realized that too many files were deleted and wants them back. ZFS provides an easy way to get them back using rollbacks, but only when snapshots of important data are performed on a regular basis. To get the files back and start over from the last snapshot, issue the command:
# zfs rollback mypool/var/tmp@diff_snapshot
# ls /var/tmp
passwd passwd.copy vi.recoverThe rollback operation restored the dataset to the state of the last snapshot. It is also possible to roll back to a snapshot that was taken much earlier and has other snapshots that were created after it. When trying to do this, ZFS will issue this warning:
# zfs list -rt snapshot mypool/var/tmp
AME USED AVAIL REFER MOUNTPOINT
mypool/var/tmp@my_recursive_snapshot 88K - 152K -
mypool/var/tmp@after_cp 53.5K - 118K -
mypool/var/tmp@diff_snapshot 0 - 120K -
# zfs rollback mypool/var/tmp@my_recursive_snapshot
cannot rollback to 'mypool/var/tmp@my_recursive_snapshot': more recent snapshots exist
use '-r' to force deletion of the following snapshots:
mypool/var/tmp@after_cp
mypool/var/tmp@diff_snapshotThis warning means that snapshots exist between the current state of the dataset and the snapshot to which the user wants to roll back. To complete the rollback, these snapshots must be deleted. ZFS cannot track all the changes between different states of the dataset, because snapshots are read-only. ZFS will not delete the affected snapshots unless the user specifies -r to indicate that this is the desired action. If that is the intention, and the consequences of losing all intermediate snapshots is understood, the command can be issued:
# zfs rollback -r mypool/var/tmp@my_recursive_snapshot
# zfs list -rt snapshot mypool/var/tmp
NAME USED AVAIL REFER MOUNTPOINT
mypool/var/tmp@my_recursive_snapshot 8K - 152K -
# ls /var/tmp
vi.recoverThe output from zfs list -t snapshot confirms that the intermediate snapshots were removed as a result of zfs rollback -r.
Snapshots are mounted in a hidden directory under the parent dataset: .zfs/snapshots/snapshotname. By default, these directories will not be displayed even when a standard ls -a is issued. Although the directory is not displayed, it is there nevertheless and can be accessed like any normal directory. The property named snapdir controls whether these hidden directories show up in a directory listing. Setting the property to visible allows them to appear in the output of ls and other commands that deal with directory contents.
# zfs get snapdir mypool/var/tmp
NAME PROPERTY VALUE SOURCE
mypool/var/tmp snapdir hidden default
# ls -a /var/tmp
. .. passwd vi.recover
# zfs set snapdir=visible mypool/var/tmp
# ls -a /var/tmp
. .. .zfs passwd vi.recoverIndividual files can easily be restored to a previous state by copying them from the snapshot back to the parent dataset. The directory structure below .zfs/snapshot has a directory named exactly like the snapshots taken earlier to make it easier to identify them. In the next example, it is assumed that a file is to be restored from the hidden .zfs directory by copying it from the snapshot that contained the latest version of the file:
# rm /var/tmp/passwd
# ls -a /var/tmp
. .. .zfs vi.recover
# ls /var/tmp/.zfs/snapshot
after_cp my_recursive_snapshot
# ls /var/tmp/.zfs/snapshot/after_cp
passwd vi.recover
# cp /var/tmp/.zfs/snapshot/after_cp/passwd /var/tmpWhen ls .zfs/snapshot was issued, the snapdir property might have been set to hidden, but it would still be possible to list the contents of that directory. It is up to the administrator to decide whether these directories will be displayed. It is possible to display these for certain datasets and prevent it for others. Copying files or directories from this hidden .zfs/snapshot is simple enough. Trying it the other way around results in this error:
# cp /etc/rc.conf /var/tmp/.zfs/snapshot/after_cp/
cp: /var/tmp/.zfs/snapshot/after_cp/rc.conf: Read-only file systemThe error reminds the user that snapshots are read-only and cannot be changed after creation. Files cannot be copied into or removed from snapshot directories because that would change the state of the dataset they represent.
Snapshots consume space based on how much the parent file system has changed since the time of the snapshot. The written property of a snapshot tracks how much space is being used by the snapshot.
Snapshots are destroyed and the space reclaimed with zfs destroy dataset@snapshot. Adding -r recursively removes all snapshots with the same name under the parent dataset. Adding -n -v to the command displays a list of the snapshots that would be deleted and an estimate of how much space would be reclaimed without performing the actual destroy operation.
A clone is a copy of a snapshot that is treated more like a regular dataset. Unlike a snapshot, a clone is not read only, is mounted, and can have its own properties. Once a clone has been created using zfs clone, the snapshot it was created from cannot be destroyed. The child/parent relationship between the clone and the snapshot can be reversed using zfs promote. After a clone has been promoted, the snapshot becomes a child of the clone, rather than of the original parent dataset. This will change how the space is accounted, but not actually change the amount of space consumed. The clone can be mounted at any point within the ZFS file system hierarchy, not just below the original location of the snapshot.
To demonstrate the clone feature, this example dataset is used:
# zfs list -rt all camino/home/joe
NAME USED AVAIL REFER MOUNTPOINT
camino/home/joe 108K 1.3G 87K /usr/home/joe
camino/home/joe@plans 21K - 85.5K -
camino/home/joe@backup 0K - 87K -A typical use for clones is to experiment with a specific dataset while keeping the snapshot around to fall back to in case something goes wrong. Since snapshots cannot be changed, a read/write clone of a snapshot is created. After the desired result is achieved in the clone, the clone can be promoted to a dataset and the old file system removed. This is not strictly necessary, as the clone and dataset can coexist without problems.
# zfs clone camino/home/joe@backup camino/home/joenew
# ls /usr/home/joe*
/usr/home/joe:
backup.txz plans.txt
/usr/home/joenew:
backup.txz plans.txt
# df -h /usr/home
Filesystem Size Used Avail Capacity Mounted on
usr/home/joe 1.3G 31k 1.3G 0% /usr/home/joe
usr/home/joenew 1.3G 31k 1.3G 0% /usr/home/joenewAfter a clone is created it is an exact copy of the state the dataset was in when the snapshot was taken. The clone can now be changed independently from its originating dataset. The only connection between the two is the snapshot. ZFS records this connection in the property origin. Once the dependency between the snapshot and the clone has been removed by promoting the clone using zfs promote, the origin of the clone is removed as it is now an independent dataset. This example demonstrates it:
# zfs get origin camino/home/joenew
NAME PROPERTY VALUE SOURCE
camino/home/joenew origin camino/home/joe@backup -
# zfs promote camino/home/joenew
# zfs get origin camino/home/joenew
NAME PROPERTY VALUE SOURCE
camino/home/joenew origin - -After making some changes like copying loader.conf to the promoted clone, for example, the old directory becomes obsolete in this case. Instead, the promoted clone can replace it. This can be achieved by two consecutive commands: zfs destroy on the old dataset and zfs rename on the clone to name it like the old dataset (it could also get an entirely different name).
# cp /boot/defaults/loader.conf /usr/home/joenew
# zfs destroy -f camino/home/joe
# zfs rename camino/home/joenew camino/home/joe
# ls /usr/home/joe
backup.txz loader.conf plans.txt
# df -h /usr/home
Filesystem Size Used Avail Capacity Mounted on
usr/home/joe 1.3G 128k 1.3G 0% /usr/home/joeThe cloned snapshot is now handled like an ordinary dataset. It contains all the data from the original snapshot plus the files that were added to it like loader.conf. Clones can be used in different scenarios to provide useful features to ZFS users. For example, jails could be provided as snapshots containing different sets of installed applications. Users can clone these snapshots and add their own applications as they see fit. Once they are satisfied with the changes, the clones can be promoted to full datasets and provided to end users to work with like they would with a real dataset. This saves time and administrative overhead when providing these jails.
Keeping data on a single pool in one location exposes it to risks like theft and natural or human disasters. Making regular backups of the entire pool is vital. ZFS provides a built-in serialization feature that can send a stream representation of the data to standard output. Using this technique, it is possible to not only store the data on another pool connected to the local system, but also to send it over a network to another system. Snapshots are the basis for this replication (see the section on ZFS snapshots). The commands used for replicating data are zfs send and zfs receive.
These examples demonstrate ZFS replication with these two pools:
# zpool list
NAME SIZE ALLOC FREE CKPOINT EXPANDSZ FRAG CAP DEDUP HEALTH ALTROOT
backup 960M 77K 896M - - 0% 0% 1.00x ONLINE -
mypool 984M 43.7M 940M - - 0% 4% 1.00x ONLINE -The pool named mypool is the primary pool where data is written to and read from on a regular basis. A second pool, backup is used as a standby in case the primary pool becomes unavailable. Note that this fail-over is not done automatically by ZFS, but must be manually done by a system administrator when needed. A snapshot is used to provide a consistent version of the file system to be replicated. Once a snapshot of mypool has been created, it can be copied to the backup pool. Only snapshots can be replicated. Changes made since the most recent snapshot will not be included.
# zfs snapshot mypool@backup1
# zfs list -t snapshot
NAME USED AVAIL REFER MOUNTPOINT
mypool@backup1 0 - 43.6M -Now that a snapshot exists, zfs send can be used to create a stream representing the contents of the snapshot. This stream can be stored as a file or received by another pool. The stream is written to standard output, but must be redirected to a file or pipe or an error is produced:
# zfs send mypool@backup1
Error: Stream can not be written to a terminal.
You must redirect standard output.To back up a dataset with zfs send, redirect to a file located on the mounted backup pool. Ensure that the pool has enough free space to accommodate the size of the snapshot being sent, which means all of the data contained in the snapshot, not just the changes from the previous snapshot.
# zfs send mypool@backup1 > /backup/backup1
# zpool list
NAME SIZE ALLOC FREE CKPOINT EXPANDSZ FRAG CAP DEDUP HEALTH ALTROOT
backup 960M 63.7M 896M - - 0% 6% 1.00x ONLINE -
mypool 984M 43.7M 940M - - 0% 4% 1.00x ONLINE -The zfs send transferred all the data in the snapshot called backup1 to the pool named backup. Creating and sending these snapshots can be done automatically with a cron(8) job.
Instead of storing the backups as archive files, ZFS can receive them as a live file system, allowing the backed up data to be accessed directly. To get to the actual data contained in those streams, zfs receive is used to transform the streams back into files and directories. The example below combines zfs send and zfs receive using a pipe to copy the data from one pool to another. The data can be used directly on the receiving pool after the transfer is complete. A dataset can only be replicated to an empty dataset.
# zfs snapshot mypool@replica1
# zfs send -v mypool@replica1 | zfs receive backup/mypool
send from @ to mypool@replica1 estimated size is 50.1M
total estimated size is 50.1M
TIME SENT SNAPSHOT
# zpool list
NAME SIZE ALLOC FREE CKPOINT EXPANDSZ FRAG CAP DEDUP HEALTH ALTROOT
backup 960M 63.7M 896M - - 0% 6% 1.00x ONLINE -
mypool 984M 43.7M 940M - - 0% 4% 1.00x ONLINE -zfs send can also determine the difference between two snapshots and send only the differences between the two. This saves disk space and transfer time. For example:
# zfs snapshot mypool@replica2
# zfs list -t snapshot
NAME USED AVAIL REFER MOUNTPOINT
mypool@replica1 5.72M - 43.6M -
mypool@replica2 0 - 44.1M -
# zpool list
NAME SIZE ALLOC FREE CKPOINT EXPANDSZ FRAG CAP DEDUP HEALTH ALTROOT
backup 960M 61.7M 898M - - 0% 6% 1.00x ONLINE -
mypool 960M 50.2M 910M - - 0% 5% 1.00x ONLINE -A second snapshot called replica2 was created. This second snapshot contains only the changes that were made to the file system between now and the previous snapshot, replica1. Using zfs send -i and indicating the pair of snapshots generates an incremental replica stream containing only the data that has changed. This can only succeed if the initial snapshot already exists on the receiving side.
# zfs send -v -i mypool@replica1 mypool@replica2 | zfs receive /backup/mypool
send from @replica1 to mypool@replica2 estimated size is 5.02M
total estimated size is 5.02M
TIME SENT SNAPSHOT
# zpool list
NAME SIZE ALLOC FREE CKPOINT EXPANDSZ FRAG CAP DEDUP HEALTH ALTROOT
backup 960M 80.8M 879M - - 0% 8% 1.00x ONLINE -
mypool 960M 50.2M 910M - - 0% 5% 1.00x ONLINE -
# zfs list
NAME USED AVAIL REFER MOUNTPOINT
backup 55.4M 240G 152K /backup
backup/mypool 55.3M 240G 55.2M /backup/mypool
mypool 55.6M 11.6G 55.0M /mypool
# zfs list -t snapshot
NAME USED AVAIL REFER MOUNTPOINT
backup/mypool@replica1 104K - 50.2M -
backup/mypool@replica2 0 - 55.2M -
mypool@replica1 29.9K - 50.0M -
mypool@replica2 0 - 55.0M -The incremental stream was successfully transferred. Only the data that had changed was replicated, rather than the entirety of replica1. Only the differences were sent, which took much less time to transfer and saved disk space by not copying the complete pool each time. This is useful when having to rely on slow networks or when costs per transferred byte must be considered.
A new file system, backup/mypool, is available with all of the files and data from the pool mypool. If -P is specified, the properties of the dataset will be copied, including compression settings, quotas, and mount points. When -R is specified, all child datasets of the indicated dataset will be copied, along with all of their properties. Sending and receiving can be automated so that regular backups are created on the second pool.
Sending streams over the network is a good way to keep a remote backup, but it does come with a drawback. Data sent over the network link is not encrypted, allowing anyone to intercept and transform the streams back into data without the knowledge of the sending user. This is undesirable, especially when sending the streams over the internet to a remote host. SSH can be used to securely encrypt data send over a network connection. Since ZFS only requires the stream to be redirected from standard output, it is relatively easy to pipe it through SSH. To keep the contents of the file system encrypted in transit and on the remote system, consider using PEFS.
A few settings and security precautions must be completed first. Only the necessary steps required for the zfs send operation are shown here. For more information on SSH, see OpenSSH.
This configuration is required:
Passwordless SSH access between sending and receiving host using SSH keys
Normally, the privileges of the root user are needed to send and receive streams. This requires logging in to the receiving system as root. However, logging in as root is disabled by default for security reasons. The ZFS Delegation system can be used to allow a non-root user on each system to perform the respective send and receive operations.
On the sending system:
# zfs allow -u someuser send,snapshot mypoolTo mount the pool, the unprivileged user must own the directory, and regular users must be allowed to mount file systems. On the receiving system:
# sysctl vfs.usermount=1
vfs.usermount: 0 -> 1
# echo vfs.usermount=1 >> /etc/sysctl.conf
# zfs create recvpool/backup
# zfs allow -u someuser create,mount,receive recvpool/backup
# chown someuser /recvpool/backupThe unprivileged user now has the ability to receive and mount datasets, and the home dataset can be replicated to the remote system:
% zfs snapshot -r mypool/home@monday
% zfs send -R mypool/home@monday | ssh someuser@backuphost zfs recv -dvu recvpool/backupA recursive snapshot called monday is made of the file system dataset home that resides on the pool mypool. Then it is sent with zfs send -R to include the dataset, all child datasets, snapshots, clones, and settings in the stream. The output is piped to the waiting zfs receive on the remote host backuphost through SSH. Using a fully qualified domain name or IP address is recommended. The receiving machine writes the data to the backup dataset on the recvpool pool. Adding -d to zfs recv overwrites the name of the pool on the receiving side with the name of the snapshot. -u causes the file systems to not be mounted on the receiving side. When -v is included, more detail about the transfer is shown, including elapsed time and the amount of data transferred.
Dataset quotas are used to restrict the amount of space that can be consumed by a particular dataset. Reference Quotas work in very much the same way, but only count the space used by the dataset itself, excluding snapshots and child datasets. Similarly, user and group quotas can be used to prevent users or groups from using all of the space in the pool or dataset.
The following examples assume that the users already exist in the system. Before adding a user to the system, make sure to create their home dataset first and set the mountpoint to /home/bob. Then, create the user and make the home directory point to the dataset’s mountpoint location. This will properly set owner and group permissions without shadowing any pre-existing home directory paths that might exist.
To enforce a dataset quota of 10 GB for storage/home/bob:
# zfs set quota=10G storage/home/bobTo enforce a reference quota of 10 GB for storage/home/bob:
# zfs set refquota=10G storage/home/bobTo remove a quota of 10 GB for storage/home/bob:
# zfs set quota=none storage/home/bobThe general format is userquota@user=size, and the user’s name must be in one of these formats:
POSIX compatible name such as joe.
POSIX numeric ID such as 789.
SID name such as joe.bloggs@example.com.
SID numeric ID such as S-1-123-456-789.
For example, to enforce a user quota of 50 GB for the user named joe:
# zfs set userquota@joe=50GTo remove any quota:
# zfs set userquota@joe=noneUser quota properties are not displayed by |
The general format for setting a group quota is: groupquota@group=size.
To set the quota for the group firstgroup to 50 GB, use:
# zfs set groupquota@firstgroup=50GTo remove the quota for the group firstgroup, or to make sure that one is not set, instead use:
# zfs set groupquota@firstgroup=noneAs with the user quota property, non-root users can only see the quotas associated with the groups to which they belong. However, root or a user with the groupquota privilege can view and set all quotas for all groups.
To display the amount of space used by each user on a file system or snapshot along with any quotas, use zfs userspace. For group information, use zfs groupspace. For more information about supported options or how to display only specific options, refer to zfs(1).
Users with sufficient privileges, and root, can list the quota for storage/home/bob using:
# zfs get quota storage/home/bobReservations guarantee a minimum amount of space will always be available on a dataset. The reserved space will not be available to any other dataset. This feature can be especially useful to ensure that free space is available for an important dataset or log files.
The general format of the reservation property is reservation=size, so to set a reservation of 10 GB on storage/home/bob, use:
# zfs set reservation=10G storage/home/bobTo clear any reservation:
# zfs set reservation=none storage/home/bobThe same principle can be applied to the refreservation property for setting a Reference Reservation, with the general format refreservation=size.
This command shows any reservations or refreservations that exist on storage/home/bob:
# zfs get reservation storage/home/bob
# zfs get refreservation storage/home/bobZFS provides transparent compression. Compressing data at the block level as it is written not only saves space, but can also increase disk throughput. If data is compressed by 25%, but the compressed data is written to the disk at the same rate as the uncompressed version, resulting in an effective write speed of 125%. Compression can also be a great alternative to Deduplication because it does not require additional memory.
ZFS offers several different compression algorithms, each with different trade-offs. With the introduction of LZ4 compression in ZFS v5000, it is possible to enable compression for the entire pool without the large performance trade-off of other algorithms. The biggest advantage to LZ4 is the early abort feature. If LZ4 does not achieve at least 12.5% compression in the first part of the data, the block is written uncompressed to avoid wasting CPU cycles trying to compress data that is either already compressed or uncompressible. For details about the different compression algorithms available in ZFS, see the Compression entry in the terminology section.
The administrator can monitor the effectiveness of compression using a number of dataset properties.
# zfs get used,compressratio,compression,logicalused mypool/compressed_dataset
NAME PROPERTY VALUE SOURCE
mypool/compressed_dataset used 449G -
mypool/compressed_dataset compressratio 1.11x -
mypool/compressed_dataset compression lz4 local
mypool/compressed_dataset logicalused 496G -The dataset is currently using 449 GB of space (the used property). Without compression, it would have taken 496 GB of space (the logicalused property). This results in the 1.11:1 compression ratio.
Compression can have an unexpected side effect when combined with User Quotas. User quotas restrict how much space a user can consume on a dataset, but the measurements are based on how much space is used after compression. So if a user has a quota of 10 GB, and writes 10 GB of compressible data, they will still be able to store additional data. If they later update a file, say a database, with more or less compressible data, the amount of space available to them will change. This can result in the odd situation where a user did not increase the actual amount of data (the logicalused property), but the change in compression caused them to reach their quota limit.
Compression can have a similar unexpected interaction with backups. Quotas are often used to limit how much data can be stored to ensure there is sufficient backup space available. However since quotas do not consider compression, more data may be written than would fit with uncompressed backups.
When enabled, deduplication uses the checksum of each block to detect duplicate blocks. When a new block is a duplicate of an existing block, ZFS writes an additional reference to the existing data instead of the whole duplicate block. Tremendous space savings are possible if the data contains many duplicated files or repeated information. Be warned: deduplication requires an extremely large amount of memory, and most of the space savings can be had without the extra cost by enabling compression instead.
To activate deduplication, set the dedup property on the target pool:
# zfs set dedup=on poolOnly new data being written to the pool will be deduplicated. Data that has already been written to the pool will not be deduplicated merely by activating this option. A pool with a freshly activated deduplication property will look like this example:
# zpool list
NAME SIZE ALLOC FREE CKPOINT EXPANDSZ FRAG CAP DEDUP HEALTH ALTROOT
pool 2.84G 2.19M 2.83G - - 0% 0% 1.00x ONLINE -The DEDUP column shows the actual rate of deduplication for the pool. A value of 1.00x shows that data has not been deduplicated yet. In the next example, the ports tree is copied three times into different directories on the deduplicated pool created above.
# for d in dir1 dir2 dir3; do
> mkdir $d && cp -R /usr/ports $d &
> doneRedundant data is detected and deduplicated:
# zpool list
NAME SIZE ALLOC FREE CKPOINT EXPANDSZ FRAG CAP DEDUP HEALTH ALTROOT
pool 2.84G 20.9M 2.82G - - 0% 0% 3.00x ONLINE -The DEDUP column shows a factor of 3.00x. Multiple copies of the ports tree data was detected and deduplicated, using only a third of the space. The potential for space savings can be enormous, but comes at the cost of having enough memory to keep track of the deduplicated blocks.
Deduplication is not always beneficial, especially when the data on a pool is not redundant. ZFS can show potential space savings by simulating deduplication on an existing pool:
# zdb -S pool
Simulated DDT histogram:
bucket allocated referenced
______ ______________________________ ______________________________
refcnt blocks LSIZE PSIZE DSIZE blocks LSIZE PSIZE DSIZE
------ ------ ----- ----- ----- ------ ----- ----- -----
1 2.58M 289G 264G 264G 2.58M 289G 264G 264G
2 206K 12.6G 10.4G 10.4G 430K 26.4G 21.6G 21.6G
4 37.6K 692M 276M 276M 170K 3.04G 1.26G 1.26G
8 2.18K 45.2M 19.4M 19.4M 20.0K 425M 176M 176M
16 174 2.83M 1.20M 1.20M 3.33K 48.4M 20.4M 20.4M
32 40 2.17M 222K 222K 1.70K 97.2M 9.91M 9.91M
64 9 56K 10.5K 10.5K 865 4.96M 948K 948K
128 2 9.50K 2K 2K 419 2.11M 438K 438K
256 5 61.5K 12K 12K 1.90K 23.0M 4.47M 4.47M
1K 2 1K 1K 1K 2.98K 1.49M 1.49M 1.49M
Total 2.82M 303G 275G 275G 3.20M 319G 287G 287G
dedup = 1.05, compress = 1.11, copies = 1.00, dedup * compress / copies = 1.16After zdb -S finishes analyzing the pool, it shows the space reduction ratio that would be achieved by activating deduplication. In this case, 1.16 is a very poor space saving ratio that is mostly provided by compression. Activating deduplication on this pool would not save any significant amount of space, and is not worth the amount of memory required to enable deduplication. Using the formula ratio = dedup * compress / copies, system administrators can plan the storage allocation, deciding whether the workload will contain enough duplicate blocks to justify the memory requirements. If the data is reasonably compressible, the space savings may be very good. Enabling compression first is recommended, and compression can also provide greatly increased performance. Only enable deduplication in cases where the additional savings will be considerable and there is sufficient memory for the DDT.
zfs jail and the corresponding jailed property are used to delegate a ZFS dataset to a Jail. zfs jail jailid attaches a dataset to the specified jail, and zfs unjail detaches it. For the dataset to be controlled from within a jail, the jailed property must be set. Once a dataset is jailed, it can no longer be mounted on the host because it may have mount points that would compromise the security of the host.
A comprehensive permission delegation system allows unprivileged users to perform ZFS administration functions. For example, if each user’s home directory is a dataset, users can be given permission to create and destroy snapshots of their home directories. A backup user can be given permission to use replication features. A usage statistics script can be allowed to run with access only to the space utilization data for all users. It is even possible to delegate the ability to delegate permissions. Permission delegation is possible for each subcommand and most properties.
zfs allow someuser create mydataset gives the specified user permission to create child datasets under the selected parent dataset. There is a caveat: creating a new dataset involves mounting it. That requires setting the FreeBSD vfs.usermount sysctl(8) to 1 to allow non-root users to mount a file system. There is another restriction aimed at preventing abuse: non-root users must own the mountpoint where the file system is to be mounted.
zfs allow someuser allow mydataset gives the specified user the ability to assign any permission they have on the target dataset, or its children, to other users. If a user has the snapshot permission and the allow permission, that user can then grant the snapshot permission to other users.
There are a number of tunables that can be adjusted to make ZFS perform best for different workloads.
vfs.zfs.arc_max - Maximum size of the ARC. The default is all RAM but 1 GB, or 5/8 of all RAM, whichever is more. However, a lower value should be used if the system will be running any other daemons or processes that may require memory. This value can be adjusted at runtime with sysctl(8) and can be set in /boot/loader.conf or /etc/sysctl.conf.
vfs.zfs.arc_meta_limit - Limit the portion of the ARC that can be used to store metadata. The default is one fourth of vfs.zfs.arc_max. Increasing this value will improve performance if the workload involves operations on a large number of files and directories, or frequent metadata operations, at the cost of less file data fitting in the ARC. This value can be adjusted at runtime with sysctl(8) and can be set in /boot/loader.conf or /etc/sysctl.conf.
vfs.zfs.arc_min - Minimum size of the ARC. The default is one half of vfs.zfs.arc_meta_limit. Adjust this value to prevent other applications from pressuring out the entire ARC. This value can be adjusted at runtime with sysctl(8) and can be set in /boot/loader.conf or /etc/sysctl.conf.
vfs.zfs.vdev.cache.size - A preallocated amount of memory reserved as a cache for each device in the pool. The total amount of memory used will be this value multiplied by the number of devices. This value can only be adjusted at boot time, and is set in /boot/loader.conf.
vfs.zfs.min_auto_ashift - Minimum ashift (sector size) that will be used automatically at pool creation time. The value is a power of two. The default value of 9 represents 2^9 = 512, a sector size of 512 bytes. To avoid write amplification and get the best performance, set this value to the largest sector size used by a device in the pool.
Many drives have 4 KB sectors. Using the default ashift of 9 with these drives results in write amplification on these devices. Data that could be contained in a single 4 KB write must instead be written in eight 512-byte writes. ZFS tries to read the native sector size from all devices when creating a pool, but many drives with 4 KB sectors report that their sectors are 512 bytes for compatibility. Setting vfs.zfs.min_auto_ashift to 12 (2^12 = 4096) before creating a pool forces ZFS to use 4 KB blocks for best performance on these drives.
Forcing 4 KB blocks is also useful on pools where disk upgrades are planned. Future disks are likely to use 4 KB sectors, and ashift values cannot be changed after a pool is created.
In some specific cases, the smaller 512-byte block size might be preferable. When used with 512-byte disks for databases, or as storage for virtual machines, less data is transferred during small random reads. This can provide better performance, especially when using a smaller ZFS record size.
vfs.zfs.prefetch_disable - Disable prefetch. A value of 0 is enabled and 1 is disabled. The default is 0, unless the system has less than 4 GB of RAM. Prefetch works by reading larger blocks than were requested into the ARC in hopes that the data will be needed soon. If the workload has a large number of random reads, disabling prefetch may actually improve performance by reducing unnecessary reads. This value can be adjusted at any time with sysctl(8).
vfs.zfs.vdev.trim_on_init - Control whether new devices added to the pool have the TRIM command run on them. This ensures the best performance and longevity for SSDs, but takes extra time. If the device has already been secure erased, disabling this setting will make the addition of the new device faster. This value can be adjusted at any time with sysctl(8).
vfs.zfs.vdev.max_pending - Limit the number of pending I/O requests per device. A higher value will keep the device command queue full and may give higher throughput. A lower value will reduce latency. This value can be adjusted at any time with sysctl(8).
vfs.zfs.top_maxinflight - Maxmimum number of outstanding I/Os per top-level vdev. Limits the depth of the command queue to prevent high latency. The limit is per top-level vdev, meaning the limit applies to each mirror, RAID-Z, or other vdev independently. This value can be adjusted at any time with sysctl(8).
vfs.zfs.l2arc_write_max - Limit the amount of data written to the L2ARC per second. This tunable is designed to extend the longevity of SSDs by limiting the amount of data written to the device. This value can be adjusted at any time with sysctl(8).
vfs.zfs.l2arc_write_boost - The value of this tunable is added to vfs.zfs.l2arc_write_max and increases the write speed to the SSD until the first block is evicted from the L2ARC. This "Turbo Warmup Phase" is designed to reduce the performance loss from an empty L2ARC after a reboot. This value can be adjusted at any time with sysctl(8).
vfs.zfs.scrub_delay - Number of ticks to delay between each I/O during a scrub. To ensure that a scrub does not interfere with the normal operation of the pool, if any other I/O is happening the scrub will delay between each command. This value controls the limit on the total IOPS (I/Os Per Second) generated by the scrub. The granularity of the setting is determined by the value of kern.hz which defaults to 1000 ticks per second. This setting may be changed, resulting in a different effective IOPS limit. The default value is 4, resulting in a limit of: 1000 ticks/sec / 4 = 250 IOPS. Using a value of 20 would give a limit of: 1000 ticks/sec / 20 = 50 IOPS. The speed of scrub is only limited when there has been recent activity on the pool, as determined by vfs.zfs.scan_idle. This value can be adjusted at any time with sysctl(8).
vfs.zfs.resilver_delay - Number of milliseconds of delay inserted between each I/O during a resilver. To ensure that a resilver does not interfere with the normal operation of the pool, if any other I/O is happening the resilver will delay between each command. This value controls the limit of total IOPS (I/Os Per Second) generated by the resilver. The granularity of the setting is determined by the value of kern.hz which defaults to 1000 ticks per second. This setting may be changed, resulting in a different effective IOPS limit. The default value is 2, resulting in a limit of: 1000 ticks/sec / 2 = 500 IOPS. Returning the pool to an Online state may be more important if another device failing could Fault the pool, causing data loss. A value of 0 will give the resilver operation the same priority as other operations, speeding the healing process. The speed of resilver is only limited when there has been other recent activity on the pool, as determined by vfs.zfs.scan_idle. This value can be adjusted at any time with sysctl(8).
vfs.zfs.scan_idle - Number of milliseconds since the last operation before the pool is considered idle. When the pool is idle the rate limiting for scrub and resilver are disabled. This value can be adjusted at any time with sysctl(8).
vfs.zfs.txg.timeout - Maximum number of seconds between transaction groups. The current transaction group will be written to the pool and a fresh transaction group started if this amount of time has elapsed since the previous transaction group. A transaction group my be triggered earlier if enough data is written. The default value is 5 seconds. A larger value may improve read performance by delaying asynchronous writes, but this may cause uneven performance when the transaction group is written. This value can be adjusted at any time with sysctl(8).
Some of the features provided by ZFS are memory intensive, and may require tuning for maximum efficiency on systems with limited RAM.
As a bare minimum, the total system memory should be at least one gigabyte. The amount of recommended RAM depends upon the size of the pool and which ZFS features are used. A general rule of thumb is 1 GB of RAM for every 1 TB of storage. If the deduplication feature is used, a general rule of thumb is 5 GB of RAM per TB of storage to be deduplicated. While some users successfully use ZFS with less RAM, systems under heavy load may panic due to memory exhaustion. Further tuning may be required for systems with less than the recommended RAM requirements.
Due to the address space limitations of the i386™ platform, ZFS users on the i386™ architecture must add this option to a custom kernel configuration file, rebuild the kernel, and reboot:
options KVA_PAGES=512
This expands the kernel address space, allowing the vm.kvm_size tunable to be pushed beyond the currently imposed limit of 1 GB, or the limit of 2 GB for PAE. To find the most suitable value for this option, divide the desired address space in megabytes by four. In this example, it is 512 for 2 GB.
The kmem address space can be increased on all FreeBSD architectures. On a test system with 1 GB of physical memory, success was achieved with these options added to /boot/loader.conf, and the system restarted:
vm.kmem_size="330M" vm.kmem_size_max="330M" vfs.zfs.arc_max="40M" vfs.zfs.vdev.cache.size="5M"
For a more detailed list of recommendations for ZFS-related tuning, see https://wiki.freebsd.org/ZFSTuningGuide.
ZFS is a fundamentally different file system because it is more than just a file system. ZFS combines the roles of file system and volume manager, enabling additional storage devices to be added to a live system and having the new space available on all of the existing file systems in that pool immediately. By combining the traditionally separate roles, ZFS is able to overcome previous limitations that prevented RAID groups being able to grow. Each top level device in a pool is called a vdev, which can be a simple disk or a RAID transformation such as a mirror or RAID-Z array. ZFS file systems (called datasets) each have access to the combined free space of the entire pool. As blocks are allocated from the pool, the space available to each file system decreases. This approach avoids the common pitfall with extensive partitioning where free space becomes fragmented across the partitions.
A storage pool is the most basic building block of ZFS. A pool is made up of one or more vdevs, the underlying devices that store the data. A pool is then used to create one or more file systems (datasets) or block devices (volumes). These datasets and volumes share the pool of remaining free space. Each pool is uniquely identified by a name and a GUID. The features available are determined by the ZFS version number on the pool. | |||||
A pool is made up of one or more vdevs, which themselves can be a single disk or a group of disks, in the case of a RAID transform. When multiple vdevs are used, ZFS spreads data across the vdevs to increase performance and maximize usable space.
| |||||
Transaction Groups are the way changed blocks are grouped together and eventually written to the pool. Transaction groups are the atomic unit that ZFS uses to assert consistency. Each transaction group is assigned a unique 64-bit consecutive identifier. There can be up to three active transaction groups at a time, one in each of these three states: * Open - When a new transaction group is created, it is in the open state, and accepts new writes. There is always a transaction group in the open state, however the transaction group may refuse new writes if it has reached a limit. Once the open transaction group has reached a limit, or the | |||||
ZFS uses an Adaptive Replacement Cache (ARC), rather than a more traditional Least Recently Used (LRU) cache. An LRU cache is a simple list of items in the cache, sorted by when each object was most recently used. New items are added to the top of the list. When the cache is full, items from the bottom of the list are evicted to make room for more active objects. An ARC consists of four lists; the Most Recently Used (MRU) and Most Frequently Used (MFU) objects, plus a ghost list for each. These ghost lists track recently evicted objects to prevent them from being added back to the cache. This increases the cache hit ratio by avoiding objects that have a history of only being used occasionally. Another advantage of using both an MRU and MFU is that scanning an entire file system would normally evict all data from an MRU or LRU cache in favor of this freshly accessed content. With ZFS, there is also an MFU that only tracks the most frequently used objects, and the cache of the most commonly accessed blocks remains. | |||||
L2ARC is the second level of the ZFS caching system. The primary ARC is stored in RAM. Since the amount of available RAM is often limited, ZFS can also use cache vdevs. Solid State Disks (SSDs) are often used as these cache devices due to their higher speed and lower latency compared to traditional spinning disks. L2ARC is entirely optional, but having one will significantly increase read speeds for files that are cached on the SSD instead of having to be read from the regular disks. L2ARC can also speed up deduplication because a DDT that does not fit in RAM but does fit in the L2ARC will be much faster than a DDT that must be read from disk. The rate at which data is added to the cache devices is limited to prevent prematurely wearing out SSDs with too many writes. Until the cache is full (the first block has been evicted to make room), writing to the L2ARC is limited to the sum of the write limit and the boost limit, and afterwards limited to the write limit. A pair of sysctl(8) values control these rate limits. | |||||
ZIL accelerates synchronous transactions by using storage devices like SSDs that are faster than those used in the main storage pool. When an application requests a synchronous write (a guarantee that the data has been safely stored to disk rather than merely cached to be written later), the data is written to the faster ZIL storage, then later flushed out to the regular disks. This greatly reduces latency and improves performance. Only synchronous workloads like databases will benefit from a ZIL. Regular asynchronous writes such as copying files will not use the ZIL at all. | |||||
Unlike a traditional file system, when data is overwritten on ZFS, the new data is written to a different block rather than overwriting the old data in place. Only when this write is complete is the metadata then updated to point to the new location. In the event of a shorn write (a system crash or power loss in the middle of writing a file), the entire original contents of the file are still available and the incomplete write is discarded. This also means that ZFS does not require a fsck(8) after an unexpected shutdown. | |||||
Dataset is the generic term for a ZFS file system, volume, snapshot or clone. Each dataset has a unique name in the format poolname/path@snapshot. The root of the pool is technically a dataset as well. Child datasets are named hierarchically like directories. For example, mypool/home, the home dataset, is a child of mypool and inherits properties from it. This can be expanded further by creating mypool/home/user. This grandchild dataset will inherit properties from the parent and grandparent. Properties on a child can be set to override the defaults inherited from the parents and grandparents. Administration of datasets and their children can be delegated. | |||||
A ZFS dataset is most often used as a file system. Like most other file systems, a ZFS file system is mounted somewhere in the systems directory hierarchy and contains files and directories of its own with permissions, flags, and other metadata. | |||||
In addition to regular file system datasets, ZFS can also create volumes, which are block devices. Volumes have many of the same features, including copy-on-write, snapshots, clones, and checksumming. Volumes can be useful for running other file system formats on top of ZFS, such as UFS virtualization, or exporting iSCSI extents. | |||||
The copy-on-write (COW) design of ZFS allows for nearly instantaneous, consistent snapshots with arbitrary names. After taking a snapshot of a dataset, or a recursive snapshot of a parent dataset that will include all child datasets, new data is written to new blocks, but the old blocks are not reclaimed as free space. The snapshot contains the original version of the file system, and the live file system contains any changes made since the snapshot was taken. No additional space is used. As new data is written to the live file system, new blocks are allocated to store this data. The apparent size of the snapshot will grow as the blocks are no longer used in the live file system, but only in the snapshot. These snapshots can be mounted read only to allow for the recovery of previous versions of files. It is also possible to rollback a live file system to a specific snapshot, undoing any changes that took place after the snapshot was taken. Each block in the pool has a reference counter which keeps track of how many snapshots, clones, datasets, or volumes make use of that block. As files and snapshots are deleted, the reference count is decremented. When a block is no longer referenced, it is reclaimed as free space. Snapshots can also be marked with a hold. When a snapshot is held, any attempt to destroy it will return an | |||||
Snapshots can also be cloned. A clone is a writable version of a snapshot, allowing the file system to be forked as a new dataset. As with a snapshot, a clone initially consumes no additional space. As new data is written to a clone and new blocks are allocated, the apparent size of the clone grows. When blocks are overwritten in the cloned file system or volume, the reference count on the previous block is decremented. The snapshot upon which a clone is based cannot be deleted because the clone depends on it. The snapshot is the parent, and the clone is the child. Clones can be promoted, reversing this dependency and making the clone the parent and the previous parent the child. This operation requires no additional space. Because the amount of space used by the parent and child is reversed, existing quotas and reservations might be affected. | |||||
Every block that is allocated is also checksummed. The checksum algorithm used is a per-dataset property, see * | |||||
Each dataset has a compression property, which defaults to off. This property can be set to one of a number of compression algorithms. This will cause all new data that is written to the dataset to be compressed. Beyond a reduction in space used, read and write throughput often increases because fewer blocks are read or written. * LZ4 - Added in ZFS pool version 5000 (feature flags), LZ4 is now the recommended compression algorithm. LZ4 compresses approximately 50% faster than LZJB when operating on compressible data, and is over three times faster when operating on uncompressible data. LZ4 also decompresses approximately 80% faster than LZJB. On modern CPUs, LZ4 can often compress at over 500 MB/s, and decompress at over 1.5 GB/s (per single CPU core).
* LZJB - The default compression algorithm. Created by Jeff Bonwick (one of the original creators of ZFS). LZJB offers good compression with less CPU overhead compared to GZIP. In the future, the default compression algorithm will likely change to LZ4.
* GZIP - A popular stream compression algorithm available in ZFS. One of the main advantages of using GZIP is its configurable level of compression. When setting the | |||||
When set to a value greater than 1, the | |||||
Checksums make it possible to detect duplicate blocks of data as they are written. With deduplication, the reference count of an existing, identical block is increased, saving storage space. To detect duplicate blocks, a deduplication table (DDT) is kept in memory. The table contains a list of unique checksums, the location of those blocks, and a reference count. When new data is written, the checksum is calculated and compared to the list. If a match is found, the existing block is used. The SHA256 checksum algorithm is used with deduplication to provide a secure cryptographic hash. Deduplication is tunable. If | |||||
Instead of a consistency check like fsck(8), ZFS has | |||||
ZFS provides very fast and accurate dataset, user, and group space accounting in addition to quotas and space reservations. This gives the administrator fine grained control over how space is allocated and allows space to be reserved for critical file systems. ZFS supports different types of quotas: the dataset quota, the reference quota (refquota), the user quota, and the group quota. Quotas limit the amount of space that a dataset and all of its descendants, including snapshots of the dataset, child datasets, and the snapshots of those datasets, can consume.
| |||||
A reference quota limits the amount of space a dataset can consume by enforcing a hard limit. However, this hard limit includes only space that the dataset references and does not include space used by descendants, such as file systems or snapshots. | |||||
User quotas are useful to limit the amount of space that can be used by the specified user. | |||||
The group quota limits the amount of space that a specified group can consume. | |||||
The Reservations of any sort are useful in many situations, such as planning and testing the suitability of disk space allocation in a new system, or ensuring that enough space is available on file systems for audio logs or system recovery procedures and files. | |||||
The | |||||
When a disk fails and is replaced, the new disk must be filled with the data that was lost. The process of using the parity information distributed across the remaining drives to calculate and write the missing data to the new drive is called resilvering. | |||||
A pool or vdev in the | |||||
Individual devices can be put in an | |||||
A pool or vdev in the | |||||
A pool or vdev in the |
File systems are an integral part of any operating system. They allow users to upload and store files, provide access to data, and make hard drives useful. Different operating systems differ in their native file system. Traditionally, the native FreeBSD file system has been the Unix File System UFS which has been modernized as UFS2. Since FreeBSD 7.0, the Z File System (ZFS) is also available as a native file system. See The Z File System (ZFS) for more information.
In addition to its native file systems, FreeBSD supports a multitude of other file systems so that data from other operating systems can be accessed locally, such as data stored on locally attached USB storage devices, flash drives, and hard disks. This includes support for the Linux® Extended File System (EXT).
There are different levels of FreeBSD support for the various file systems. Some require a kernel module to be loaded and others may require a toolset to be installed. Some non-native file system support is full read-write while others are read-only.
After reading this chapter, you will know:
The difference between native and supported file systems.
Which file systems are supported by FreeBSD.
How to enable, configure, access, and make use of non-native file systems.
Before reading this chapter, you should:
Understand UNIX® and FreeBSD basics.
Be familiar with the basics of kernel configuration and compilation.
Feel comfortable installing software in FreeBSD.
Have some familiarity with disks, storage, and device names in FreeBSD.
FreeBSD provides built-in support for several Linux® file systems. This section demonstrates how to load support for and how to mount the supported Linux® file systems.
Kernel support for ext2 file systems has been available since FreeBSD 2.2. In FreeBSD 8.x and earlier, the code is licensed under the GPL. Since FreeBSD 9.0, the code has been rewritten and is now BSD licensed.
The ext2fs(5) driver allows the FreeBSD kernel to both read and write to ext2 file systems.
This driver can also be used to access ext3 and ext4 file systems. The ext2fs(5) filesystem has full read and write support for ext4 as of FreeBSD 12.0-RELEASE. Additionally, extended attributes and ACLs are also supported, while journalling and encryption are not. Starting with FreeBSD 12.1-RELEASE, a DTrace provider will be available as well. Prior versions of FreeBSD can access ext4 in read and write mode using sysutils/fusefs-ext2. |
To access an ext file system, first load the kernel loadable module:
# kldload ext2fsThen, mount the ext volume by specifying its FreeBSD partition name and an existing mount point. This example mounts /dev/ad1s1 on /mnt:
# mount -t ext2fs /dev/ad1s1 /mntVirtualization software allows multiple operating systems to run simultaneously on the same computer. Such software systems for PCs often involve a host operating system which runs the virtualization software and supports any number of guest operating systems.
After reading this chapter, you will know:
The difference between a host operating system and a guest operating system.
How to install FreeBSD on an Intel®-based Apple® Mac® computer.
How to install FreeBSD on Microsoft® Windows® with Virtual PC.
How to install FreeBSD as a guest in bhyve.
How to tune a FreeBSD system for best performance under virtualization.
Before reading this chapter, you should:
Understand the basics of UNIX® and FreeBSD.
Know how to install FreeBSD.
Know how to set up a network connection.
Know how to install additional third-party software.
Parallels Desktop for Mac® is a commercial software product available for Intel® based Apple® Mac® computers running Mac OS® 10.4.6 or higher. FreeBSD is a fully supported guest operating system. Once Parallels has been installed on Mac OS® X, the user must configure a virtual machine and then install the desired guest operating system.
The first step in installing FreeBSD on Parallels is to create a new virtual machine for installing FreeBSD. Select as the Guest OS Type when prompted:
Choose a reasonable amount of disk and memory depending on the plans for this virtual FreeBSD instance. 4GB of disk space and 512MB of RAM work well for most uses of FreeBSD under Parallels:
Select the type of networking and a network interface:
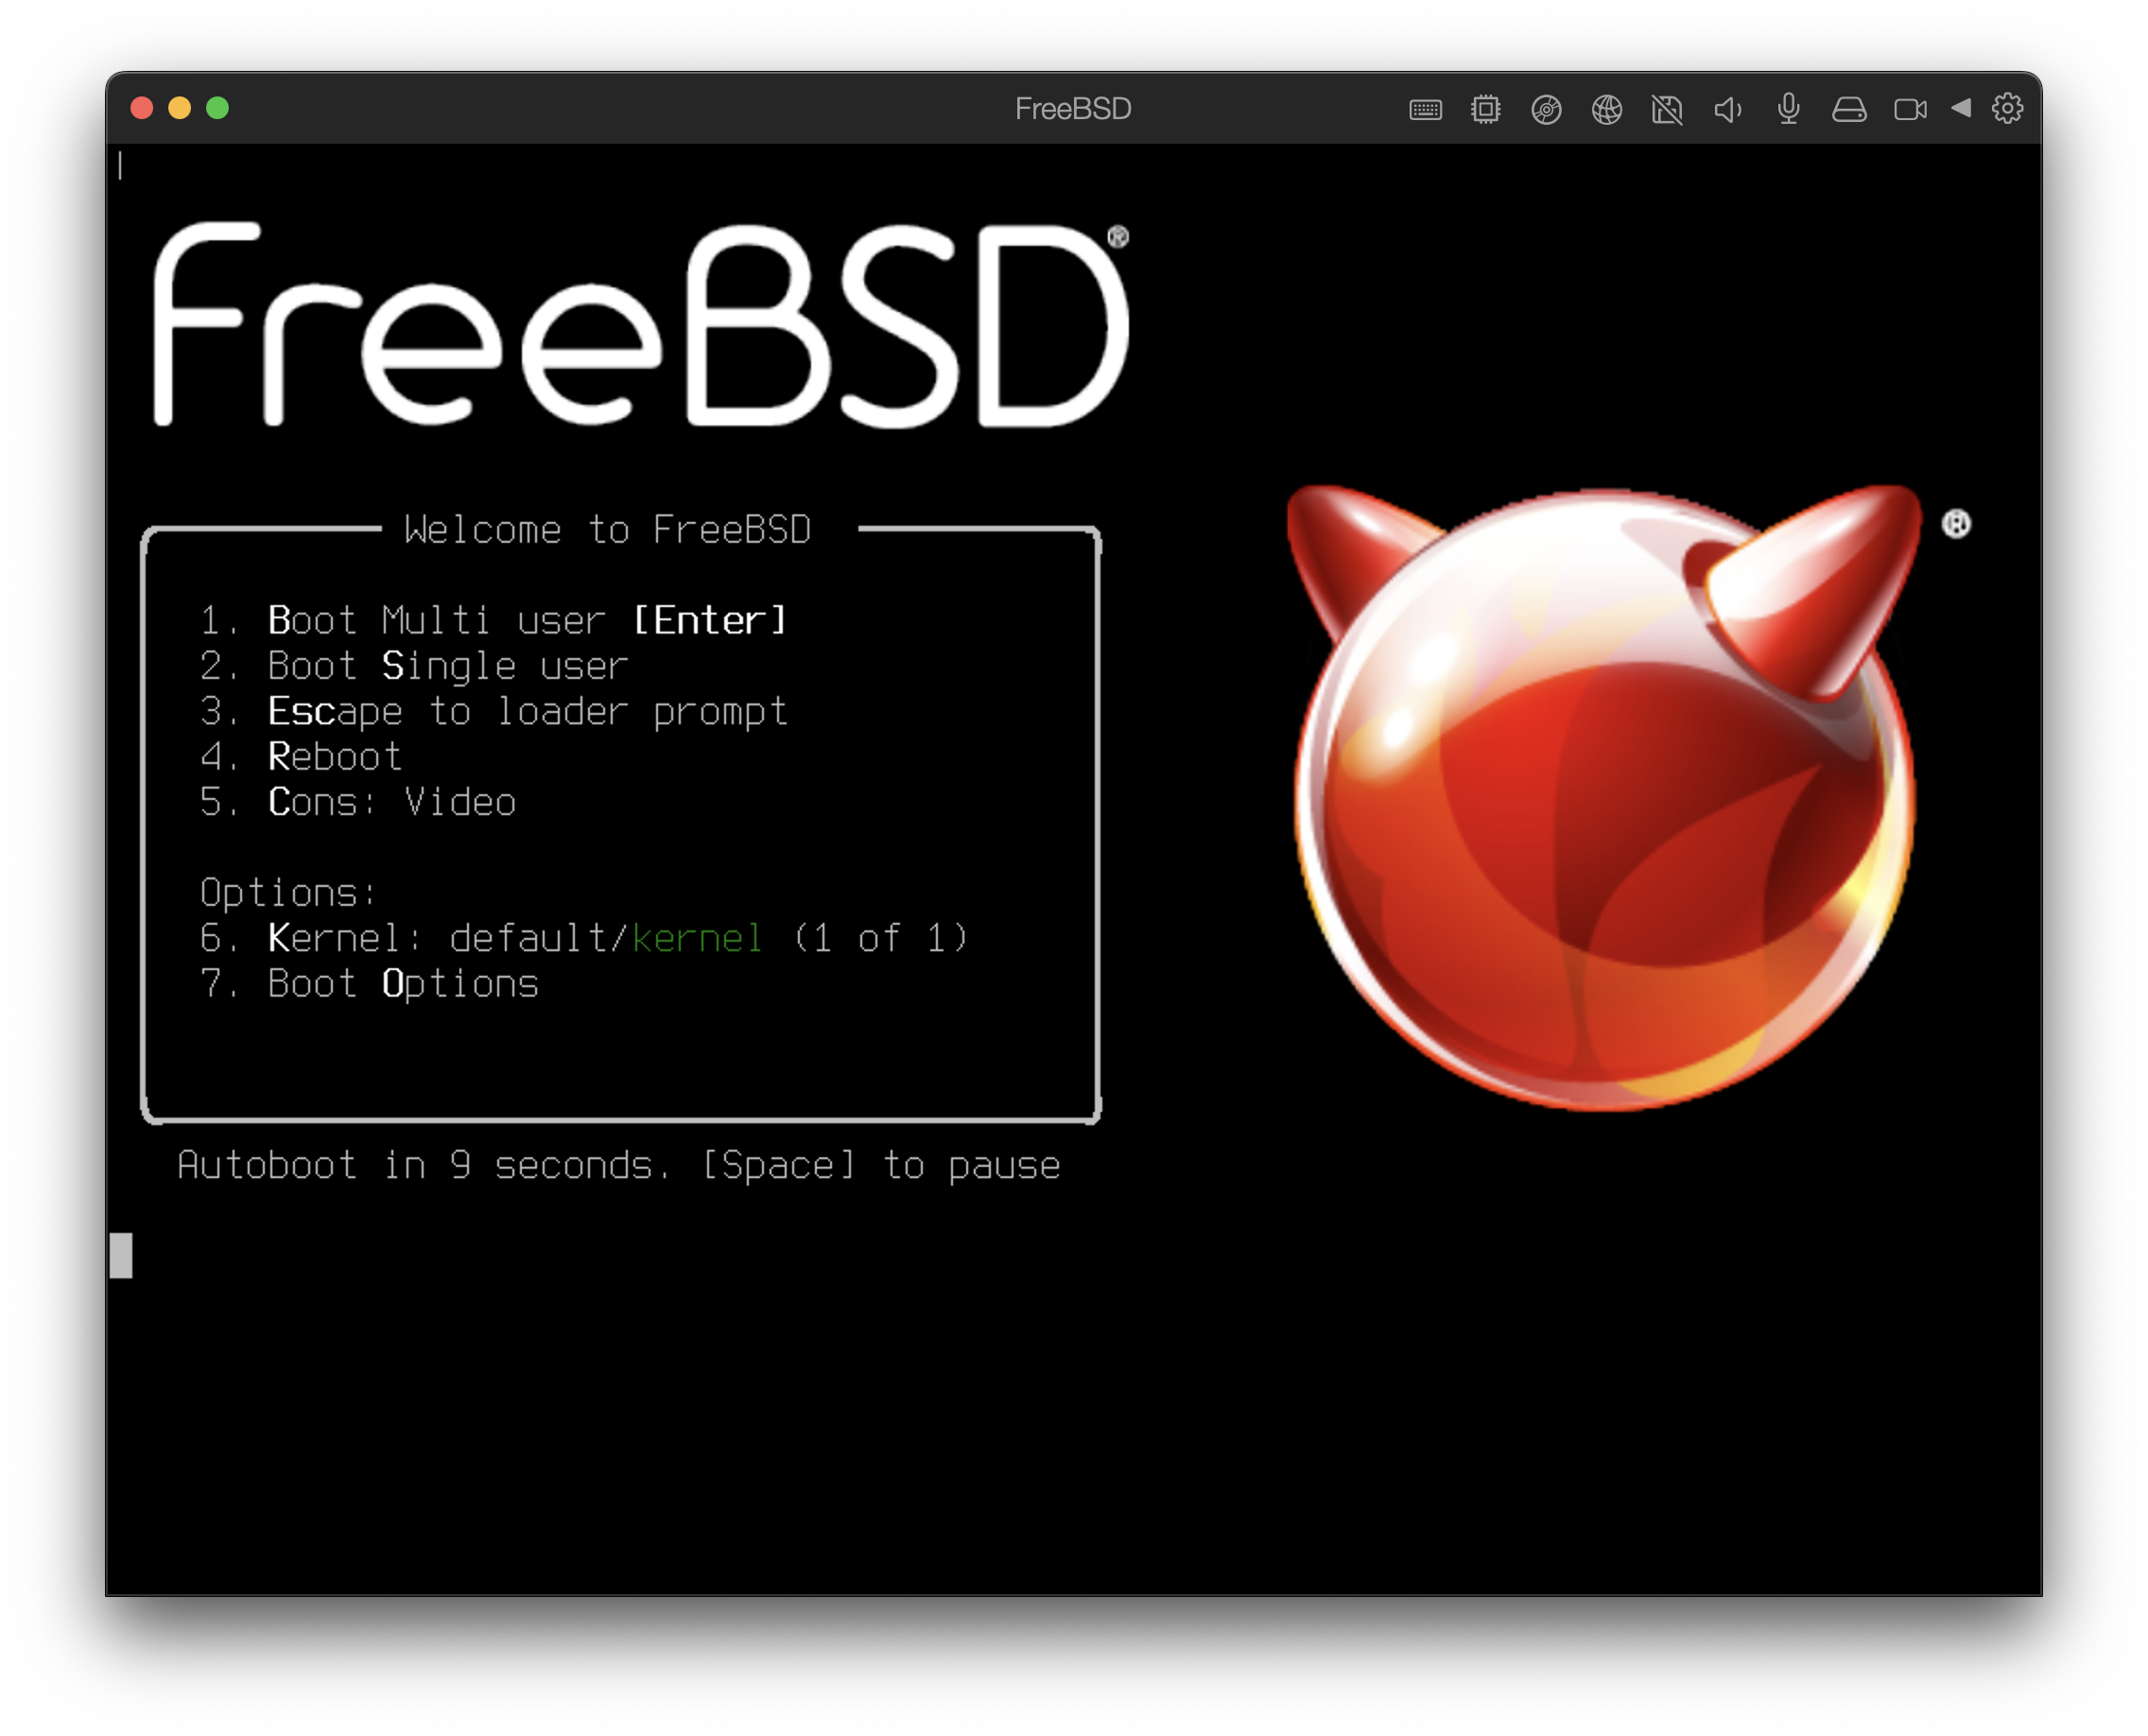
Save and finish the configuration:

After the FreeBSD virtual machine has been created, FreeBSD can be installed on it. This is best done with an official FreeBSD CD/DVD or with an ISO image downloaded from an official FTP site. Copy the appropriate ISO image to the local Mac® filesystem or insert a CD/DVD in the Mac®'s CD-ROM drive. Click on the disc icon in the bottom right corner of the FreeBSD Parallels window. This will bring up a window that can be used to associate the CD-ROM drive in the virtual machine with the ISO file on disk or with the real CD-ROM drive.
Once this association with the CD-ROM source has been made, reboot the FreeBSD virtual machine by clicking the reboot icon. Parallels will reboot with a special BIOS that first checks if there is a CD-ROM.
In this case it will find the FreeBSD installation media and begin a normal FreeBSD installation. Perform the installation, but do not attempt to configure Xorg at this time.
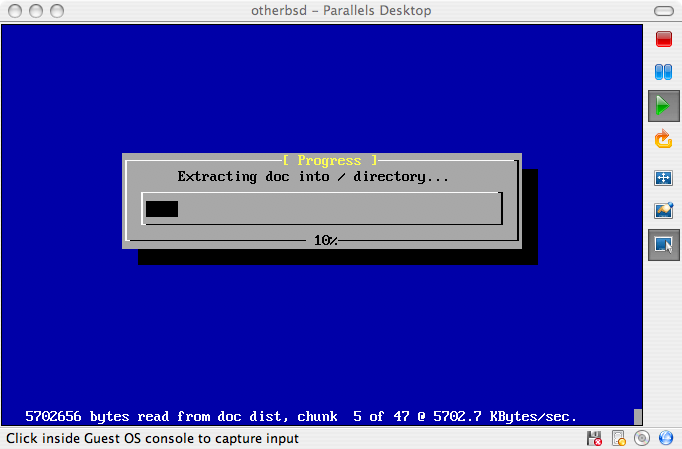
When the installation is finished, reboot into the newly installed FreeBSD virtual machine.
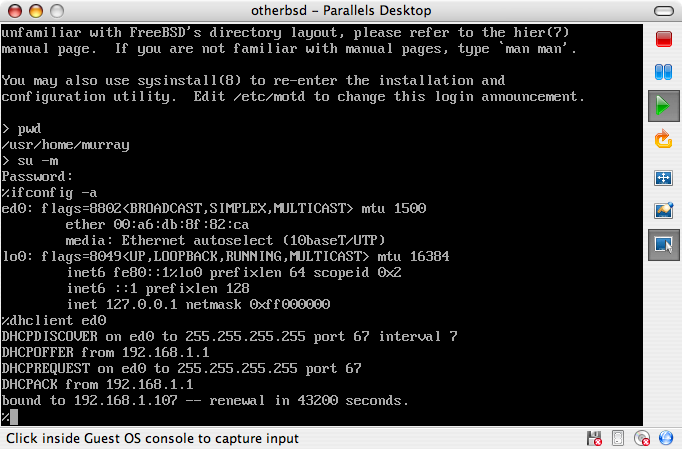
After FreeBSD has been successfully installed on Mac OS® X with Parallels, there are a number of configuration steps that can be taken to optimize the system for virtualized operation.
Set Boot Loader Variables
The most important step is to reduce the kern.hz tunable to reduce the CPU utilization of FreeBSD under the Parallels environment. This is accomplished by adding the following line to /boot/loader.conf:
kern.hz=100
Without this setting, an idle FreeBSD Parallels guest will use roughly 15% of the CPU of a single processor iMac®. After this change the usage will be closer to 5%.
Create a New Kernel Configuration File
Configure Networking
The most basic networking setup uses DHCP to connect the virtual machine to the same local area network as the host Mac®. This can be accomplished by adding ifconfig_ed0="DHCP" to /etc/rc.conf. More advanced networking setups are described in Advanced Networking.
Virtual PC for Windows® is a Microsoft® software product available for free download. See this website for the system requirements. Once Virtual PC has been installed on Microsoft® Windows®, the user can configure a virtual machine and then install the desired guest operating system.
The first step in installing FreeBSD on Virtual PC is to create a new virtual machine for installing FreeBSD. Select when prompted:
Select as the when prompted:
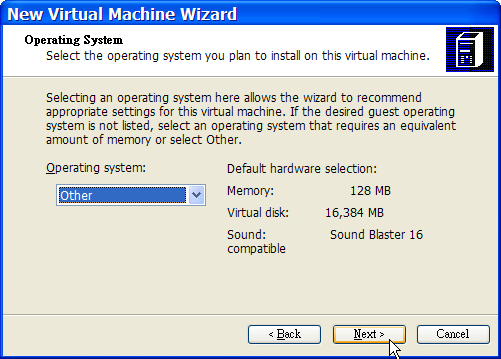
Then, choose a reasonable amount of disk and memory depending on the plans for this virtual FreeBSD instance. 4GB of disk space and 512MB of RAM work well for most uses of FreeBSD under Virtual PC:
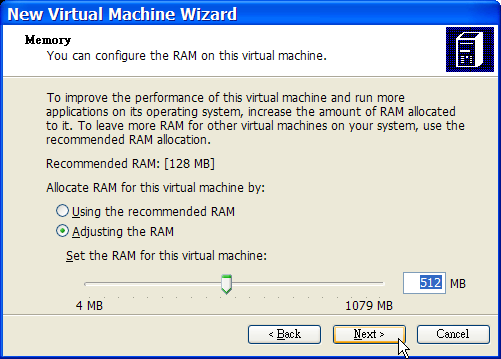
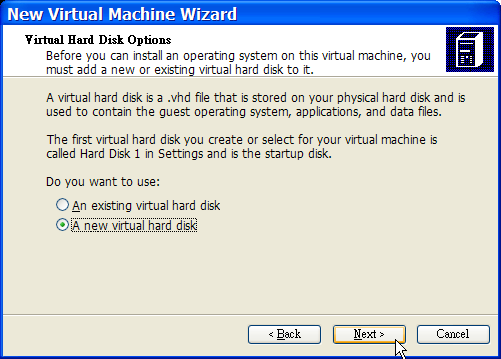
Save and finish the configuration:

Select the FreeBSD virtual machine and click Settings, then set the type of networking and a network interface:
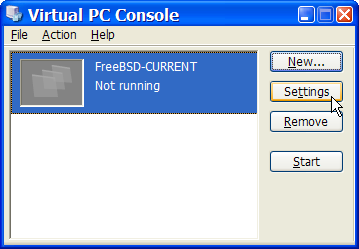
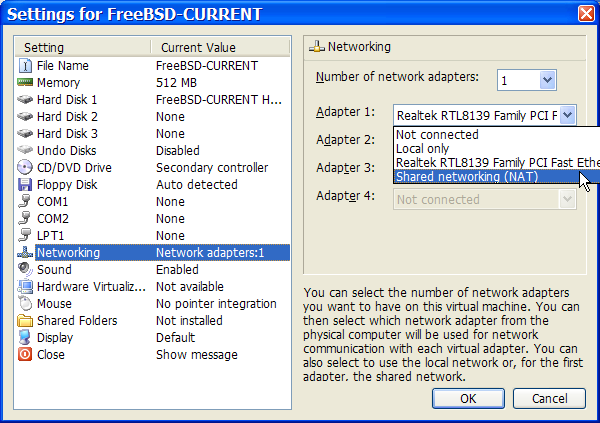
After the FreeBSD virtual machine has been created, FreeBSD can be installed on it. This is best done with an official FreeBSD CD/DVD or with an ISO image downloaded from an official FTP site. Copy the appropriate ISO image to the local Windows® filesystem or insert a CD/DVD in the CD drive, then double click on the FreeBSD virtual machine to boot. Then, click CD and choose Capture ISO Image… on the Virtual PC window. This will bring up a window where the CD-ROM drive in the virtual machine can be associated with an ISO file on disk or with the real CD-ROM drive.
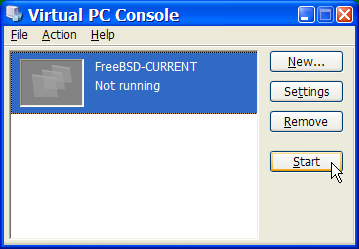
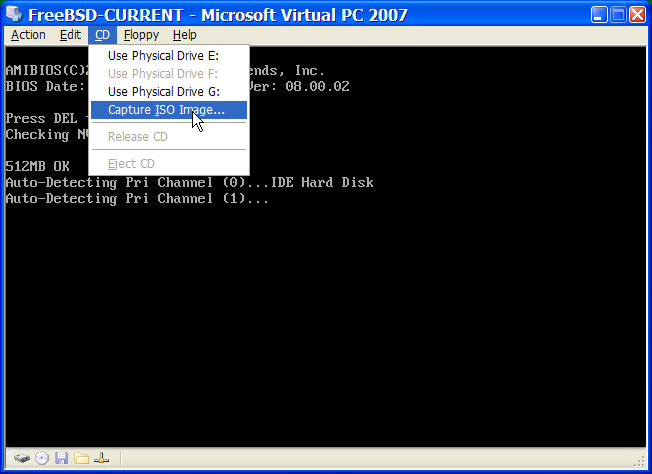
Once this association with the CD-ROM source has been made, reboot the FreeBSD virtual machine by clicking Action and Reset. Virtual PC will reboot with a special BIOS that first checks for a CD-ROM.
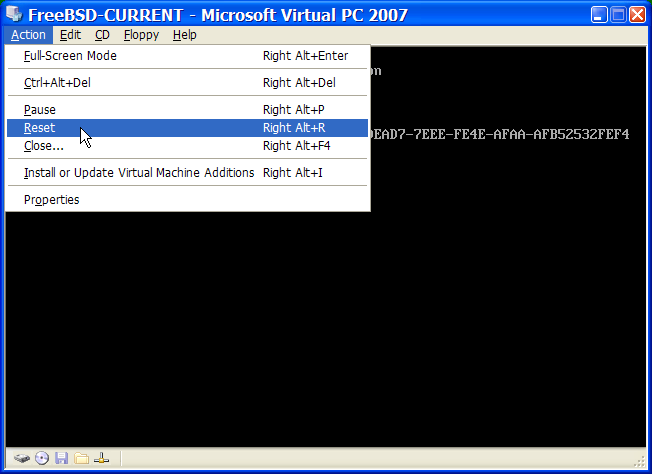
In this case it will find the FreeBSD installation media and begin a normal FreeBSD installation. Continue with the installation, but do not attempt to configure Xorg at this time.
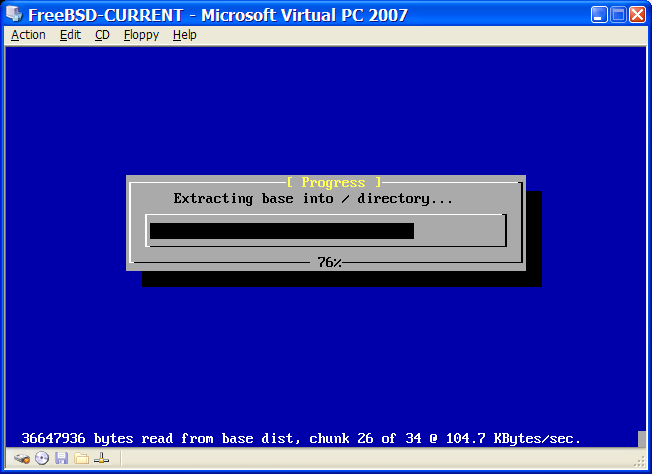
When the installation is finished, remember to eject the CD/DVD or release the ISO image. Finally, reboot into the newly installed FreeBSD virtual machine.
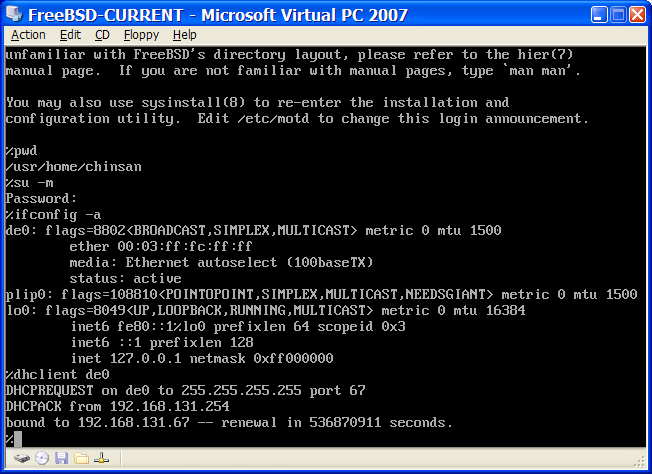
After FreeBSD has been successfully installed on Microsoft® Windows® with Virtual PC, there are a number of configuration steps that can be taken to optimize the system for virtualized operation.
Set Boot Loader Variables
The most important step is to reduce the kern.hz tunable to reduce the CPU utilization of FreeBSD under the Virtual PC environment. This is accomplished by adding the following line to /boot/loader.conf:
kern.hz=100
Without this setting, an idle FreeBSD Virtual PC guest OS will use roughly 40% of the CPU of a single processor computer. After this change, the usage will be closer to 3%.
Create a New Kernel Configuration File
Configure Networking
The most basic networking setup uses DHCP to connect the virtual machine to the same local area network as the Microsoft® Windows® host. This can be accomplished by adding ifconfig_de0="DHCP" to /etc/rc.conf. More advanced networking setups are described in Advanced Networking.
VMware Fusion for Mac® is a commercial software product available for Intel® based Apple® Mac® computers running Mac OS® 10.4.9 or higher. FreeBSD is a fully supported guest operating system. Once VMware Fusion has been installed on Mac OS® X, the user can configure a virtual machine and then install the desired guest operating system.
The first step is to start VMware Fusion which will load the Virtual Machine Library. Click to create the virtual machine:
This will load the New Virtual Machine Assistant. Click to proceed:
Select as the and either or , as the Version when prompted:

Choose the name of the virtual machine and the directory where it should be saved:
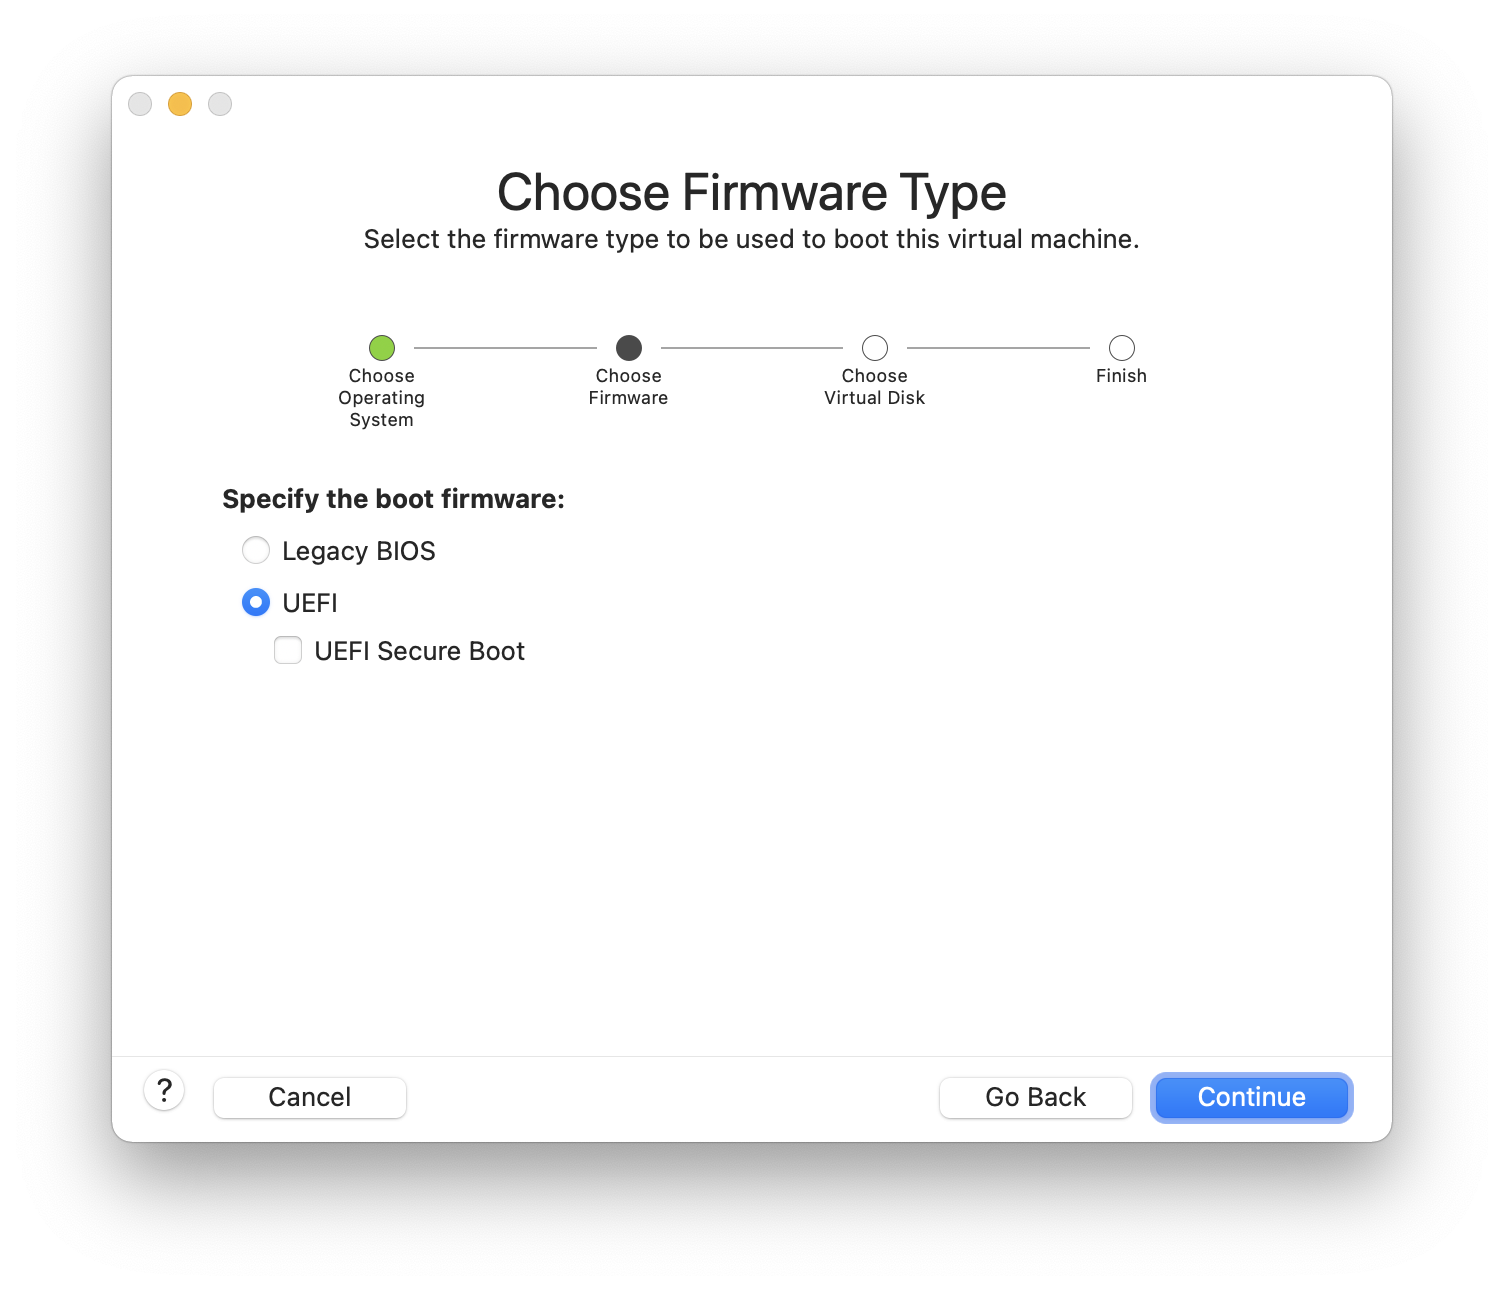
Choose the size of the Virtual Hard Disk for the virtual machine:
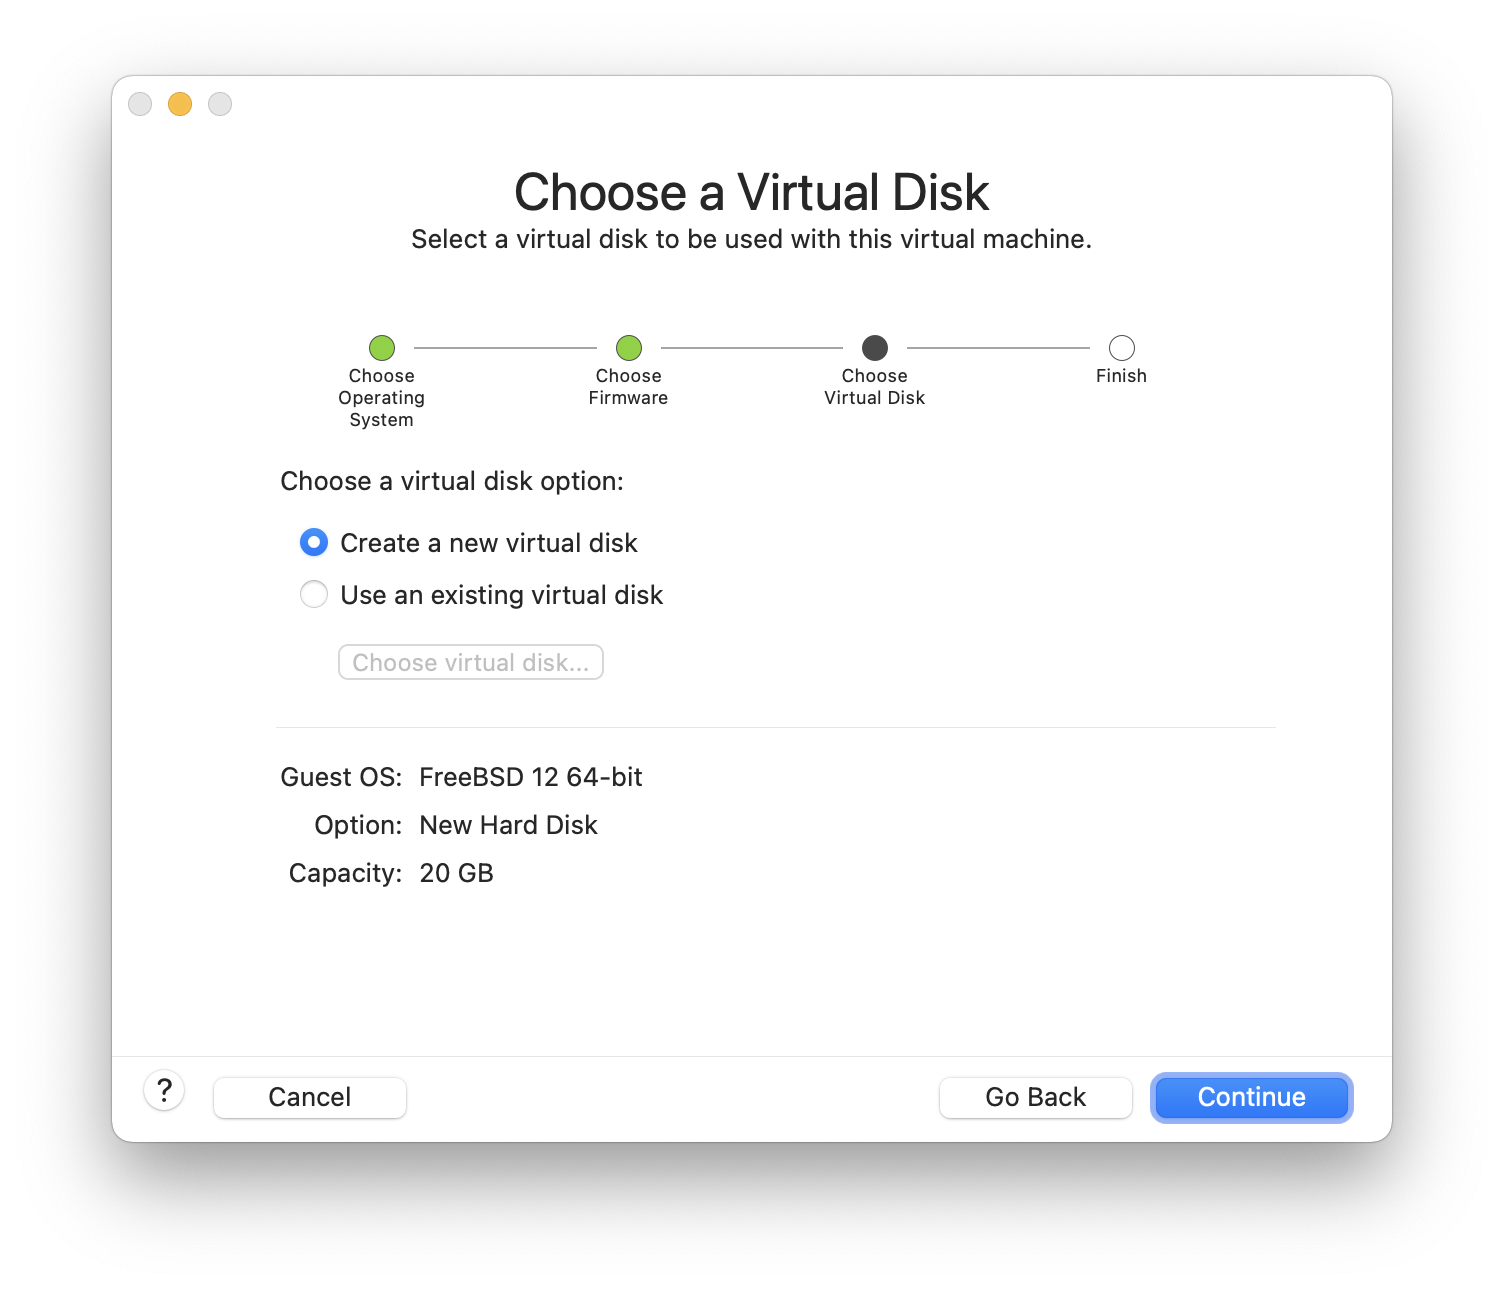
Choose the method to install the virtual machine, either from an ISO image or from a CD/DVD:
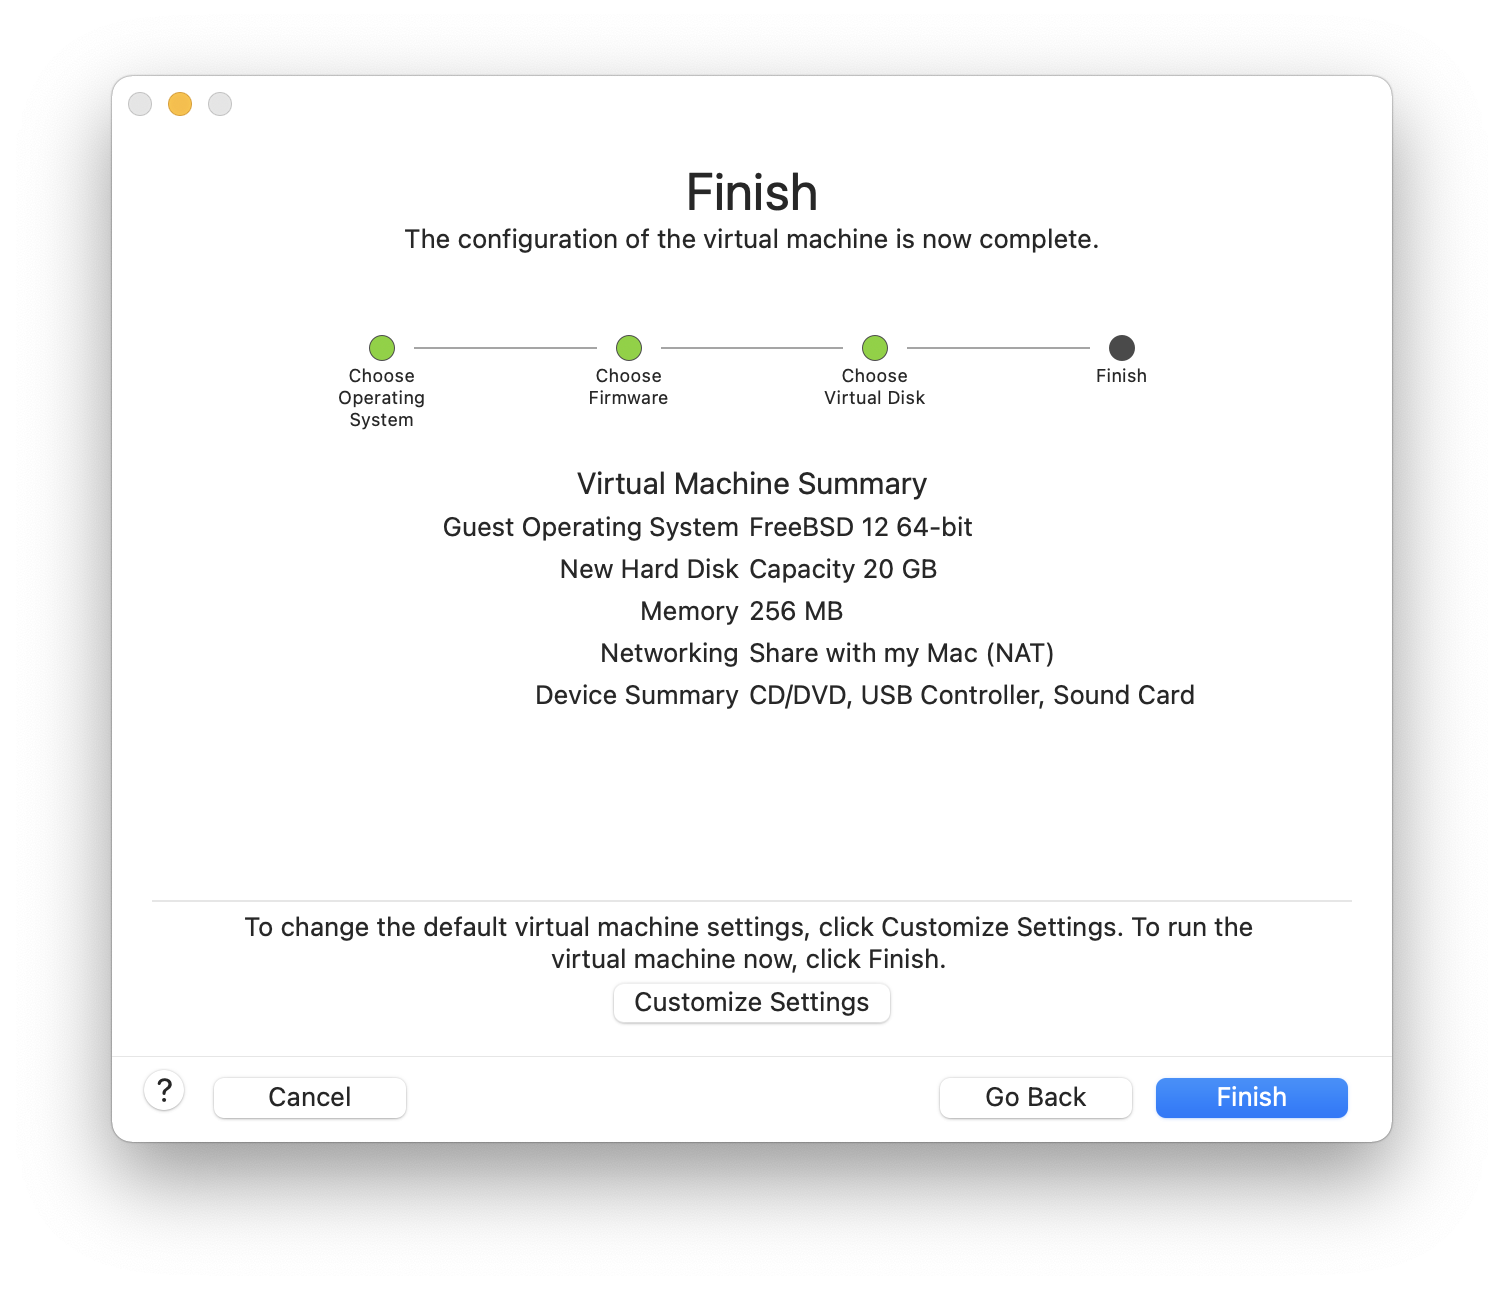
Click and the virtual machine will boot:
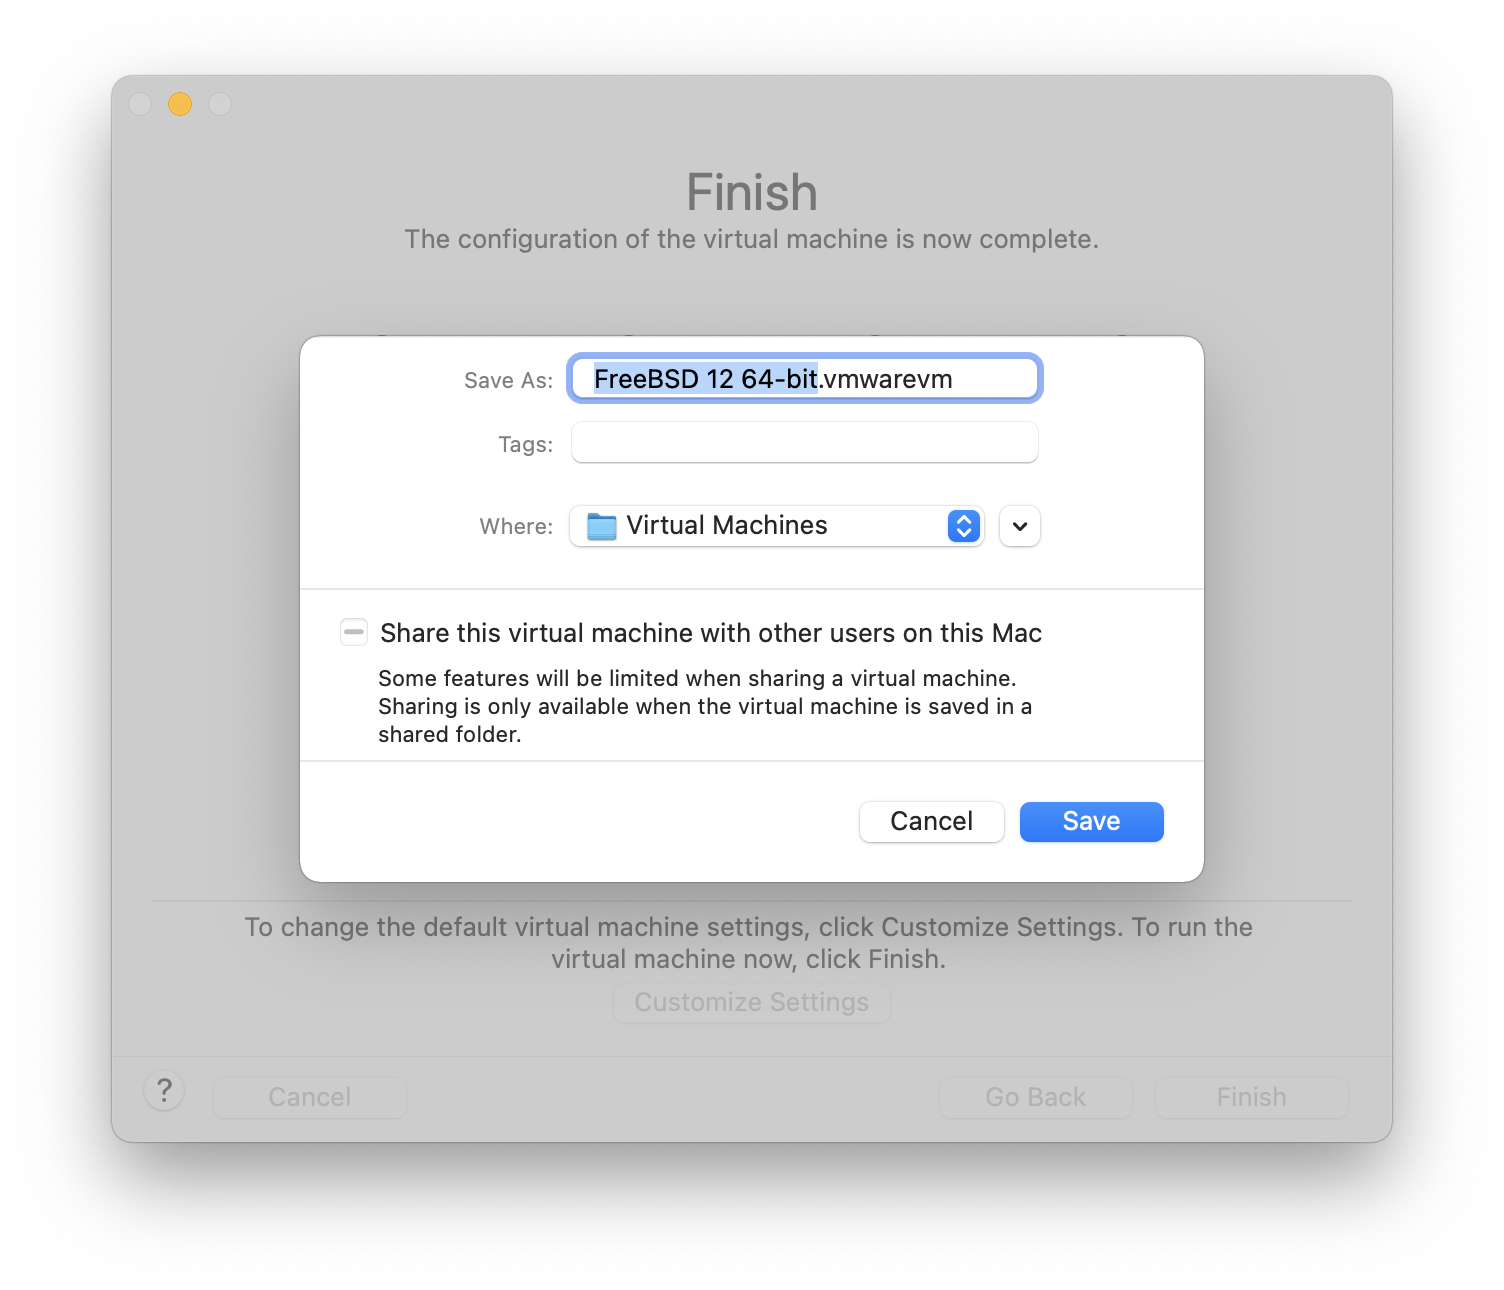
Install FreeBSD as usual:
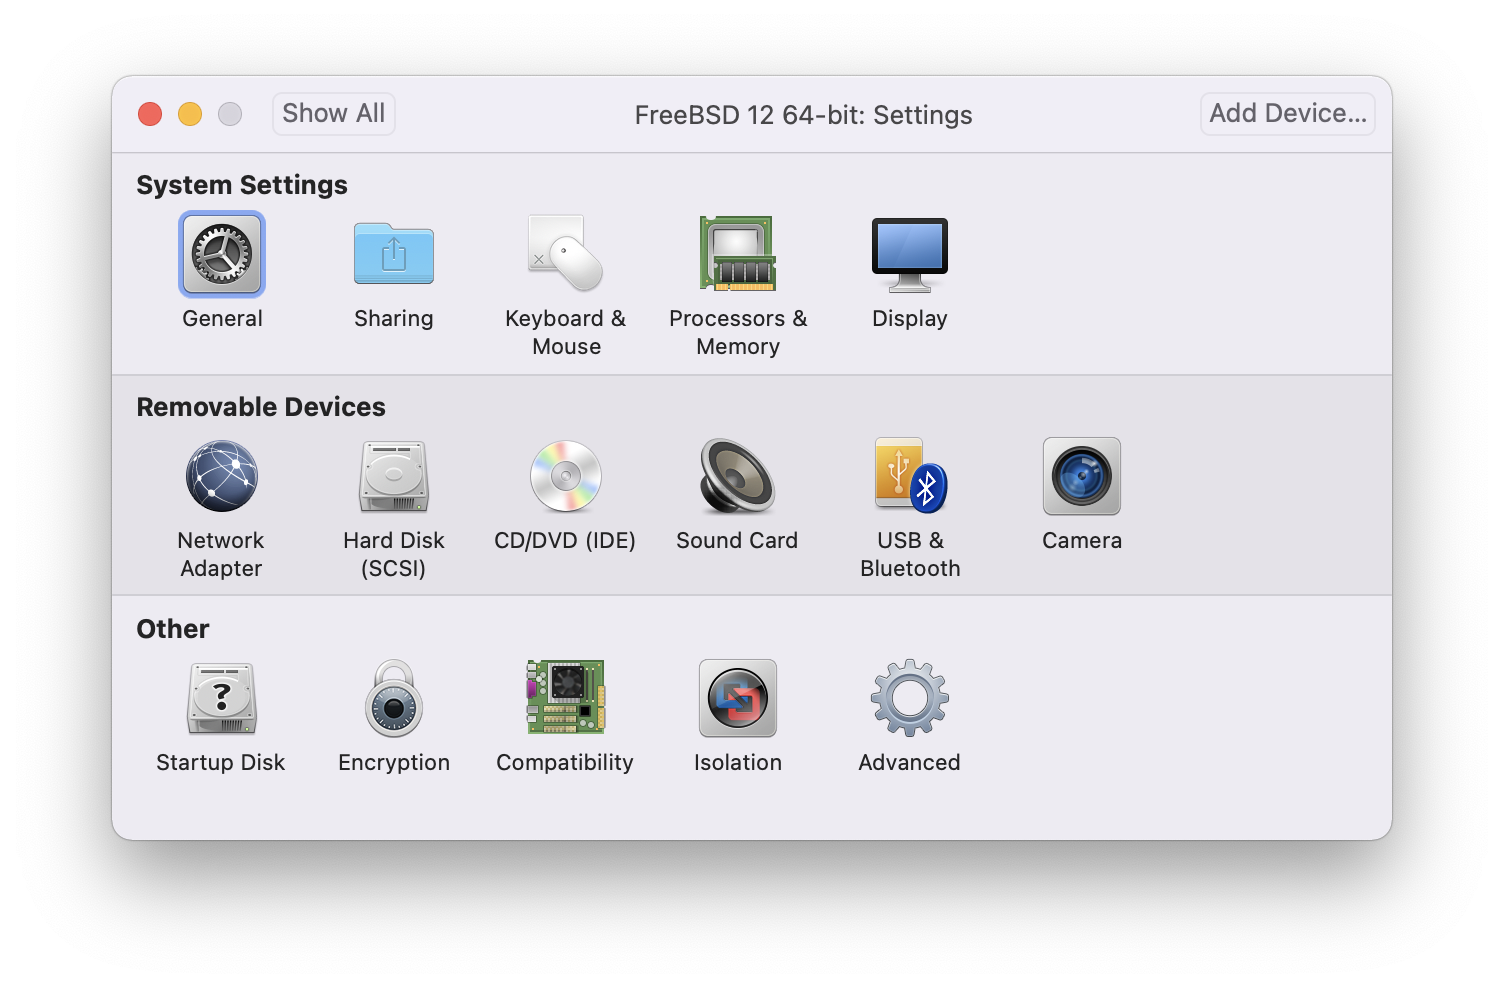
Once the install is complete, the settings of the virtual machine can be modified, such as memory usage:
The System Hardware settings of the virtual machine cannot be modified while the virtual machine is running. |
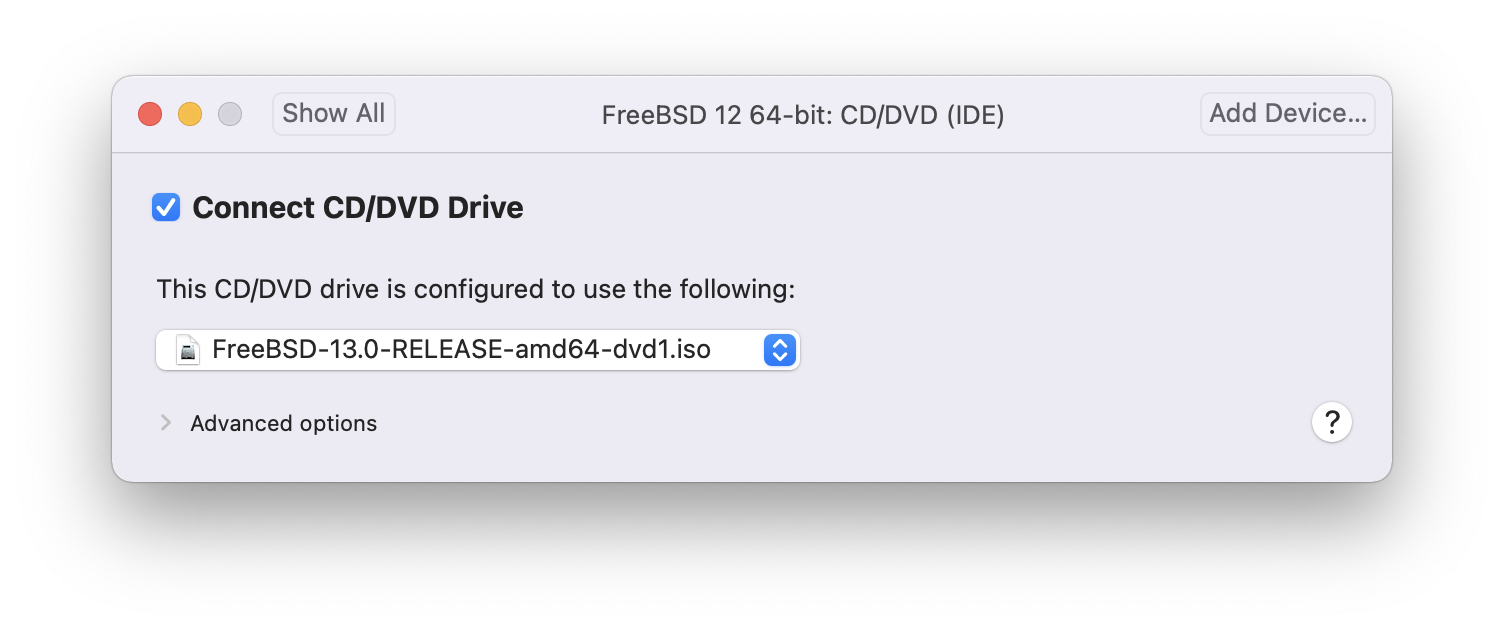
The number of CPUs the virtual machine will have access to:
The status of the CD-ROM device. Normally the CD/DVD/ISO is disconnected from the virtual machine when it is no longer needed.

The last thing to change is how the virtual machine will connect to the network. To allow connections to the virtual machine from other machines besides the host, choose . Otherwise, is preferred so that the virtual machine can have access to the Internet, but the network cannot access the virtual machine.
After modifying the settings, boot the newly installed FreeBSD virtual machine.
After FreeBSD has been successfully installed on Mac OS® X with VMware Fusion, there are a number of configuration steps that can be taken to optimize the system for virtualized operation.
Set Boot Loader Variables
The most important step is to reduce the kern.hz tunable to reduce the CPU utilization of FreeBSD under the VMware Fusion environment. This is accomplished by adding the following line to /boot/loader.conf:
kern.hz=100
Without this setting, an idle FreeBSD VMware Fusion guest will use roughly 15% of the CPU of a single processor iMac®. After this change, the usage will be closer to 5%.
Create a New Kernel Configuration File
Configure Networking
The most basic networking setup uses DHCP to connect the virtual machine to the same local area network as the host Mac®. This can be accomplished by adding ifconfig_em0="DHCP" to /etc/rc.conf. More advanced networking setups are described in Advanced Networking.
FreeBSD works well as a guest in VirtualBox™. The virtualization software is available for most common operating systems, including FreeBSD itself.
The VirtualBox™ guest additions provide support for:
Clipboard sharing.
Mouse pointer integration.
Host time synchronization.
Window scaling.
Seamless mode.
These commands are run in the FreeBSD guest. |
First, install the emulators/virtualbox-ose-additions package or port in the FreeBSD guest. This will install the port:
# cd /usr/ports/emulators/virtualbox-ose-additions && make install cleanAdd these lines to /etc/rc.conf:
vboxguest_enable="YES" vboxservice_enable="YES"
If ntpd(8) or ntpdate(8) is used, disable host time synchronization:
vboxservice_flags="--disable-timesync"
Xorg will automatically recognize the vboxvideo driver. It can also be manually entered in /etc/X11/xorg.conf:
Section "Device" Identifier "Card0" Driver "vboxvideo" VendorName "InnoTek Systemberatung GmbH" BoardName "VirtualBox Graphics Adapter" EndSection
To use the vboxmouse driver, adjust the mouse section in /etc/X11/xorg.conf:
Section "InputDevice" Identifier "Mouse0" Driver "vboxmouse" EndSection
HAL users should create the following /usr/local/etc/hal/fdi/policy/90-vboxguest.fdi or copy it from /usr/local/shared/hal/fdi/policy/10osvendor/90-vboxguest.fdi:
<?xml version="1.0" encoding="utf-8"?>
<!--
# Sun VirtualBox
# Hal driver description for the vboxmouse driver
# $Id: chapter.xml,v 1.33 2012-03-17 04:53:52 eadler Exp $
Copyright (C) 2008-2009 Sun Microsystems, Inc.
This file is part of VirtualBox Open Source Edition (OSE, as
available from http://www.virtualbox.org. This file is free software;
you can redistribute it and/or modify it under the terms of the GNU
General Public License (GPL) as published by the Free Software
Foundation, in version 2 as it comes in the "COPYING" file of the
VirtualBox OSE distribution. VirtualBox OSE is distributed in the
hope that it will be useful, but WITHOUT ANY WARRANTY of any kind.
Please contact Sun Microsystems, Inc., 4150 Network Circle, Santa
Clara, CA 95054 USA or visit http://www.sun.com if you need
additional information or have any questions.
-->
<deviceinfo version="0.2">
<device>
<match key="info.subsystem" string="pci">
<match key="info.product" string="VirtualBox guest Service">
<append key="info.capabilities" type="strlist">input</append>
<append key="info.capabilities" type="strlist">input.mouse</append>
<merge key="input.x11_driver" type="string">vboxmouse</merge>
<merge key="input.device" type="string">/dev/vboxguest</merge>
</match>
</match>
</device>
</deviceinfo>Shared folders for file transfers between host and VM are accessible by mounting them using mount_vboxvfs. A shared folder can be created on the host using the VirtualBox GUI or via vboxmanage. For example, to create a shared folder called myshare under /mnt/bsdboxshare for the VM named BSDBox, run:
# vboxmanage sharedfolder add 'BSDBox' --name myshare --hostpath /mnt/bsdboxshareNote that the shared folder name must not contain spaces. Mount the shared folder from within the guest system like this:
# mount_vboxvfs -w myshare /mntVirtualBox™ is an actively developed, complete virtualization package, that is available for most operating systems including Windows®, Mac OS®, Linux® and FreeBSD. It is equally capable of running Windows® or UNIX®-like guests. It is released as open source software, but with closed-source components available in a separate extension pack. These components include support for USB 2.0 devices. More information may be found on the Downloads page of the VirtualBox™ wiki. Currently, these extensions are not available for FreeBSD.
VirtualBox™ is available as a FreeBSD package or port in emulators/virtualbox-ose. The port can be installed using these commands:
# cd /usr/ports/emulators/virtualbox-ose
# make install cleanOne useful option in the port’s configuration menu is the GuestAdditions suite of programs. These provide a number of useful features in guest operating systems, like mouse pointer integration (allowing the mouse to be shared between host and guest without the need to press a special keyboard shortcut to switch) and faster video rendering, especially in Windows® guests. The guest additions are available in the Devices menu, after the installation of the guest is finished.
A few configuration changes are needed before VirtualBox™ is started for the first time. The port installs a kernel module in /boot/modules which must be loaded into the running kernel:
# kldload vboxdrvTo ensure the module is always loaded after a reboot, add this line to /boot/loader.conf:
vboxdrv_load="YES"
To use the kernel modules that allow bridged or host-only networking, add this line to /etc/rc.conf and reboot the computer:
vboxnet_enable="YES"
The vboxusers group is created during installation of VirtualBox™. All users that need access to VirtualBox™ will have to be added as members of this group. pw can be used to add new members:
# pw groupmod vboxusers -m yourusernameThe default permissions for /dev/vboxnetctl are restrictive and need to be changed for bridged networking:
# chown root:vboxusers /dev/vboxnetctl
# chmod 0660 /dev/vboxnetctlTo make this permissions change permanent, add these lines to /etc/devfs.conf:
own vboxnetctl root:vboxusers perm vboxnetctl 0660
To launch VirtualBox™, type from a Xorg session:
% VirtualBoxFor more information on configuring and using VirtualBox™, refer to the official website. For FreeBSD-specific information and troubleshooting instructions, refer to the relevant page in the FreeBSD wiki.
VirtualBox™ can be configured to pass USB devices through to the guest operating system. The host controller of the OSE version is limited to emulating USB 1.1 devices until the extension pack supporting USB 2.0 and 3.0 devices becomes available on FreeBSD.
For VirtualBox™ to be aware of USB devices attached to the machine, the user needs to be a member of the operator group.
# pw groupmod operator -m yourusernameThen, add the following to /etc/devfs.rules, or create this file if it does not exist yet:
[system=10] add path 'usb/*' mode 0660 group operator
To load these new rules, add the following to /etc/rc.conf:
devfs_system_ruleset="system"
Then, restart devfs:
# service devfs restartRestart the login session and VirtualBox™ for these changes to take effect, and create USB filters as necessary.
Access to the host DVD/CD drives from guests is achieved through the sharing of the physical drives. Within VirtualBox™, this is set up from the Storage window in the Settings of the virtual machine. If needed, create an empty IDECD/DVD device first. Then choose the Host Drive from the popup menu for the virtual CD/DVD drive selection. A checkbox labeled Passthrough will appear. This allows the virtual machine to use the hardware directly. For example, audio CDs or the burner will only function if this option is selected.
HAL needs to run for VirtualBox™DVD/CD functions to work, so enable it in /etc/rc.conf and start it if it is not already running:
hald_enable="YES"
# service hald startIn order for users to be able to use VirtualBox™DVD/CD functions, they need access to /dev/xpt0, /dev/cdN, and /dev/passN. This is usually achieved by making the user a member of operator. Permissions to these devices have to be corrected by adding these lines to /etc/devfs.conf:
perm cd* 0660 perm xpt0 0660 perm pass* 0660
# service devfs restartThe bhyveBSD-licensed hypervisor became part of the base system with FreeBSD 10.0-RELEASE. This hypervisor supports a number of guests, including FreeBSD, OpenBSD, and many Linux® distributions. By default, bhyve provides access to serial console and does not emulate a graphical console. Virtualization offload features of newer CPUs are used to avoid the legacy methods of translating instructions and manually managing memory mappings.
The bhyve design requires a processor that supports Intel® Extended Page Tables (EPT) or AMD® Rapid Virtualization Indexing (RVI) or Nested Page Tables (NPT). Hosting Linux® guests or FreeBSD guests with more than one vCPU requires VMX unrestricted mode support (UG). Most newer processors, specifically the Intel® Core™ i3/i5/i7 and Intel® Xeon™ E3/E5/E7, support these features. UG support was introduced with Intel’s Westmere micro-architecture. For a complete list of Intel® processors that support EPT, refer to https://ark.intel.com/content/www/us/en/ark/search/featurefilter.html?productType=873&0_ExtendedPageTables=True. RVI is found on the third generation and later of the AMD Opteron™ (Barcelona) processors. The easiest way to tell if a processor supports bhyve is to run dmesg or look in /var/run/dmesg.boot for the POPCNT processor feature flag on the Features2 line for AMD® processors or EPT and UG on the VT-x line for Intel® processors.
The first step to creating a virtual machine in bhyve is configuring the host system. First, load the bhyve kernel module:
# kldload vmmThen, create a tap interface for the network device in the virtual machine to attach to. In order for the network device to participate in the network, also create a bridge interface containing the tap interface and the physical interface as members. In this example, the physical interface is igb0:
# ifconfig tap0 create
# sysctl net.link.tap.up_on_open=1
net.link.tap.up_on_open: 0 -> 1
# ifconfig bridge0 create
# ifconfig bridge0 addm igb0 addm tap0
# ifconfig bridge0 upCreate a file to use as the virtual disk for the guest machine. Specify the size and name of the virtual disk:
# truncate -s 16G guest.imgDownload an installation image of FreeBSD to install:
# fetch ftp://ftp.freebsd.org/pub/FreeBSD/releases/ISO-IMAGES/10.3/FreeBSD-10.3-RELEASE-amd64-bootonly.iso
FreeBSD-10.3-RELEASE-amd64-bootonly.iso 100% of 230 MB 570 kBps 06m17sFreeBSD comes with an example script for running a virtual machine in bhyve. The script will start the virtual machine and run it in a loop, so it will automatically restart if it crashes. The script takes a number of options to control the configuration of the machine: -c controls the number of virtual CPUs, -m limits the amount of memory available to the guest, -t defines which tap device to use, -d indicates which disk image to use, -i tells bhyve to boot from the CD image instead of the disk, and -I defines which CD image to use. The last parameter is the name of the virtual machine, used to track the running machines. This example starts the virtual machine in installation mode:
# sh /usr/shared/examples/bhyve/vmrun.sh -c 1 -m 1024M -t tap0 -d guest.img -i -I FreeBSD-10.3-RELEASE-amd64-bootonly.iso guestnameThe virtual machine will boot and start the installer. After installing a system in the virtual machine, when the system asks about dropping in to a shell at the end of the installation, choose Yes.
Reboot the virtual machine. While rebooting the virtual machine causes bhyve to exit, the vmrun.sh script runs bhyve in a loop and will automatically restart it. When this happens, choose the reboot option from the boot loader menu in order to escape the loop. Now the guest can be started from the virtual disk:
# sh /usr/shared/examples/bhyve/vmrun.sh -c 4 -m 1024M -t tap0 -d guest.img guestnameIn order to boot operating systems other than FreeBSD, the sysutils/grub2-bhyve port must be first installed.
Next, create a file to use as the virtual disk for the guest machine:
# truncate -s 16G linux.imgStarting a virtual machine with bhyve is a two step process. First a kernel must be loaded, then the guest can be started. The Linux® kernel is loaded with sysutils/grub2-bhyve. Create a device.map that grub will use to map the virtual devices to the files on the host system:
(hd0) ./linux.img (cd0) ./somelinux.iso
Use sysutils/grub2-bhyve to load the Linux® kernel from the ISO image:
# grub-bhyve -m device.map -r cd0 -M 1024M linuxguestThis will start grub. If the installation CD contains a grub.cfg, a menu will be displayed. If not, the vmlinuz and initrd files must be located and loaded manually:
grub> ls
(hd0) (cd0) (cd0,msdos1) (host)
grub> ls (cd0)/isolinux
boot.cat boot.msg grub.conf initrd.img isolinux.bin isolinux.cfg memtest
splash.jpg TRANS.TBL vesamenu.c32 vmlinuz
grub> linux (cd0)/isolinux/vmlinuz
grub> initrd (cd0)/isolinux/initrd.img
grub> bootNow that the Linux® kernel is loaded, the guest can be started:
# bhyve -A -H -P -s 0:0,hostbridge -s 1:0,lpc -s 2:0,virtio-net,tap0 -s 3:0,virtio-blk,./linux.img \
-s 4:0,ahci-cd,./somelinux.iso -l com1,stdio -c 4 -m 1024M linuxguestThe system will boot and start the installer. After installing a system in the virtual machine, reboot the virtual machine. This will cause bhyve to exit. The instance of the virtual machine needs to be destroyed before it can be started again:
# bhyvectl --destroy --vm=linuxguestNow the guest can be started directly from the virtual disk. Load the kernel:
# grub-bhyve -m device.map -r hd0,msdos1 -M 1024M linuxguest
grub> ls
(hd0) (hd0,msdos2) (hd0,msdos1) (cd0) (cd0,msdos1) (host)
(lvm/VolGroup-lv_swap) (lvm/VolGroup-lv_root)
grub> ls (hd0,msdos1)/
lost+found/ grub/ efi/ System.map-2.6.32-431.el6.x86_64 config-2.6.32-431.el6.x
86_64 symvers-2.6.32-431.el6.x86_64.gz vmlinuz-2.6.32-431.el6.x86_64
initramfs-2.6.32-431.el6.x86_64.img
grub> linux (hd0,msdos1)/vmlinuz-2.6.32-431.el6.x86_64 root=/dev/mapper/VolGroup-lv_root
grub> initrd (hd0,msdos1)/initramfs-2.6.32-431.el6.x86_64.img
grub> bootBoot the virtual machine:
# bhyve -A -H -P -s 0:0,hostbridge -s 1:0,lpc -s 2:0,virtio-net,tap0 \
-s 3:0,virtio-blk,./linux.img -l com1,stdio -c 4 -m 1024M linuxguestLinux® will now boot in the virtual machine and eventually present you with the login prompt. Login and use the virtual machine. When you are finished, reboot the virtual machine to exit bhyve. Destroy the virtual machine instance:
# bhyvectl --destroy --vm=linuxguestIn addition to bhyveload and grub-bhyve, the bhyve hypervisor can also boot virtual machines using the UEFI userspace firmware. This option may support guest operating systems that are not supported by the other loaders.
In order to make use of the UEFI support in bhyve, first obtain the UEFI firmware images. This can be done by installing sysutils/bhyve-firmware port or package.
With the firmware in place, add the flags -l bootrom,/path/to/firmware to your bhyve command line. The actual bhyve command may look like this:
# bhyve -AHP -s 0:0,hostbridge -s 1:0,lpc \
-s 2:0,virtio-net,tap1 -s 3:0,virtio-blk,./disk.img \
-s 4:0,ahci-cd,./install.iso -c 4 -m 1024M \
-l bootrom,/usr/local/shared/uefi-firmware/BHYVE_UEFI.fd \
guestsysutils/bhyve-firmware also contains a CSM-enabled firmware, to boot guests with no UEFI support in legacy BIOS mode:
# bhyve -AHP -s 0:0,hostbridge -s 1:0,lpc \
-s 2:0,virtio-net,tap1 -s 3:0,virtio-blk,./disk.img \
-s 4:0,ahci-cd,./install.iso -c 4 -m 1024M \
-l bootrom,/usr/local/shared/uefi-firmware/BHYVE_UEFI_CSM.fd \
guestThe UEFI firmware support is particularly useful with predominantly graphical guest operating systems such as Microsoft Windows®.
Support for the UEFI-GOP framebuffer may also be enabled with the -s 29,fbuf,tcp=0.0.0.0:5900 flags. The framebuffer resolution may be configured with w=800 and h=600, and bhyve can be instructed to wait for a VNC connection before booting the guest by adding wait. The framebuffer may be accessed from the host or over the network via the VNC protocol. Additionally, -s 30,xhci,tablet can be added to achieve precise mouse cursor synchronization with the host.
The resulting bhyve command would look like this:
# bhyve -AHP -s 0:0,hostbridge -s 31:0,lpc \
-s 2:0,virtio-net,tap1 -s 3:0,virtio-blk,./disk.img \
-s 4:0,ahci-cd,./install.iso -c 4 -m 1024M \
-s 29,fbuf,tcp=0.0.0.0:5900,w=800,h=600,wait \
-s 30,xhci,tablet \
-l bootrom,/usr/local/shared/uefi-firmware/BHYVE_UEFI.fd \
guestNote, in BIOS emulation mode, the framebuffer will cease receiving updates once control is passed from firmware to guest operating system.
If ZFS is available on the host machine, using ZFS volumes instead of disk image files can provide significant performance benefits for the guest VMs. A ZFS volume can be created by:
# zfs create -V16G -o volmode=dev zroot/linuxdisk0When starting the VM, specify the ZFS volume as the disk drive:
# bhyve -A -H -P -s 0:0,hostbridge -s 1:0,lpc -s 2:0,virtio-net,tap0 -s3:0,virtio-blk,/dev/zvol/zroot/linuxdisk0 \
-l com1,stdio -c 4 -m 1024M linuxguestIt is advantageous to wrap the bhyve console in a session management tool such as sysutils/tmux or sysutils/screen in order to detach and reattach to the console. It is also possible to have the console of bhyve be a null modem device that can be accessed with cu. To do this, load the nmdm kernel module and replace -l com1,stdio with -l com1,/dev/nmdm0A. The /dev/nmdm devices are created automatically as needed, where each is a pair, corresponding to the two ends of the null modem cable (/dev/nmdm0A and /dev/nmdm0B). See nmdm(4) for more information.
# kldload nmdm
# bhyve -A -H -P -s 0:0,hostbridge -s 1:0,lpc -s 2:0,virtio-net,tap0 -s 3:0,virtio-blk,./linux.img \
-l com1,/dev/nmdm0A -c 4 -m 1024M linuxguest
# cu -l /dev/nmdm0B
Connected
Ubuntu 13.10 handbook ttyS0
handbook login:A device node is created in /dev/vmm for each virtual machine. This allows the administrator to easily see a list of the running virtual machines:
# ls -al /dev/vmm
total 1
dr-xr-xr-x 2 root wheel 512 Mar 17 12:19 ./
dr-xr-xr-x 14 root wheel 512 Mar 17 06:38 ../
crw------- 1 root wheel 0x1a2 Mar 17 12:20 guestname
crw------- 1 root wheel 0x19f Mar 17 12:19 linuxguest
crw------- 1 root wheel 0x1a1 Mar 17 12:19 otherguestA specified virtual machine can be destroyed using bhyvectl:
# bhyvectl --destroy --vm=guestnameIn order to configure the system to start bhyve guests at boot time, the following configurations must be made in the specified files:
/etc/sysctl.conf
net.link.tap.up_on_open=1
/etc/rc.conf
cloned_interfaces="bridge0 tap0" ifconfig_bridge0="addm igb0 addm tap0" kld_list="nmdm vmm"
Xen is a GPLv2-licensed type 1 hypervisor for Intel® and ARM® architectures. FreeBSD has included i386™ and AMD® 64-Bit DomU and Amazon EC2 unprivileged domain (virtual machine) support since FreeBSD 8.0 and includes Dom0 control domain (host) support in FreeBSD 11.0. Support for para-virtualized (PV) domains has been removed from FreeBSD 11 in favor of hardware virtualized (HVM) domains, which provides better performance.
Xen™ is a bare-metal hypervisor, which means that it is the first program loaded after the BIOS. A special privileged guest called the Domain-0 (Dom0 for short) is then started. The Dom0 uses its special privileges to directly access the underlying physical hardware, making it a high-performance solution. It is able to access the disk controllers and network adapters directly. The Xen™ management tools to manage and control the Xen™ hypervisor are also used by the Dom0 to create, list, and destroy VMs. Dom0 provides virtual disks and networking for unprivileged domains, often called DomU. Xen™ Dom0 can be compared to the service console of other hypervisor solutions, while the DomU is where individual guest VMs are run.
Xen™ can migrate VMs between different Xen™ servers. When the two xen hosts share the same underlying storage, the migration can be done without having to shut the VM down first. Instead, the migration is performed live while the DomU is running and there is no need to restart it or plan a downtime. This is useful in maintenance scenarios or upgrade windows to ensure that the services provided by the DomU are still provided. Many more features of Xen™ are listed on the Xen Wiki Overview page. Note that not all features are supported on FreeBSD yet.
To run the Xen™ hypervisor on a host, certain hardware functionality is required. Hardware virtualized domains require Extended Page Table (EPT) and Input/Output Memory Management Unit (IOMMU) support in the host processor.
In order to run a FreeBSD Xen™ Dom0 the box must be booted using legacy boot (BIOS). |
Users of FreeBSD 11 should install the emulators/xen-kernel47 and sysutils/xen-tools47 packages that are based on Xen version 4.7. Systems running on FreeBSD-12.0 or newer can use Xen 4.11 provided by emulators/xen-kernel411 and sysutils/xen-tools411, respectively.
Configuration files must be edited to prepare the host for the Dom0 integration after the Xen packages are installed. An entry to /etc/sysctl.conf disables the limit on how many pages of memory are allowed to be wired. Otherwise, DomU VMs with higher memory requirements will not run.
# echo 'vm.max_wired=-1' >> /etc/sysctl.confAnother memory-related setting involves changing /etc/login.conf, setting the memorylocked option to unlimited. Otherwise, creating DomU domains may fail with Cannot allocate memory errors. After making the change to /etc/login.conf, run cap_mkdb to update the capability database. See Resource Limits for details.
# sed -i '' -e 's/memorylocked=64K/memorylocked=unlimited/' /etc/login.conf
# cap_mkdb /etc/login.confAdd an entry for the Xen™ console to /etc/ttys:
# echo 'xc0 "/usr/libexec/getty Pc" xterm onifconsole secure' >> /etc/ttysSelecting a Xen™ kernel in /boot/loader.conf activates the Dom0. Xen™ also requires resources like CPU and memory from the host machine for itself and other DomU domains. How much CPU and memory depends on the individual requirements and hardware capabilities. In this example, 8 GB of memory and 4 virtual CPUs are made available for the Dom0. The serial console is also activated and logging options are defined.
The following command is used for Xen 4.7 packages:
# sysrc -f /boot/loader.conf hw.pci.mcfg=0
# sysrc -f /boot/loader.conf if_tap_load="YES"
# sysrc -f /boot/loader.conf xen_kernel="/boot/xen"
# sysrc -f /boot/loader.conf xen_cmdline="dom0_mem=8192M dom0_max_vcpus=4 dom0pvh=1 console=com1,vga com1=115200,8n1 guest_loglvl=all loglvl=all"For Xen versions 4.11 and higher, the following command should be used instead:
# sysrc -f /boot/loader.conf if_tap_load="YES"
# sysrc -f /boot/loader.conf xen_kernel="/boot/xen"
# sysrc -f /boot/loader.conf xen_cmdline="dom0_mem=8192M dom0_max_vcpus=4 dom0=pvh console=com1,vga com1=115200,8n1 guest_loglvl=all loglvl=all"Log files that Xen™ creates for the DomU VMs are stored in /var/log/xen. Please be sure to check the contents of that directory if experiencing issues. |
Activate the xencommons service during system startup:
# sysrc xencommons_enable=yesThese settings are enough to start a Dom0-enabled system. However, it lacks network functionality for the DomU machines. To fix that, define a bridged interface with the main NIC of the system which the DomU VMs can use to connect to the network. Replace em0 with the host network interface name.
# sysrc cloned_interfaces="bridge0"
# sysrc ifconfig_bridge0="addm em0 SYNCDHCP"
# sysrc ifconfig_em0="up"Restart the host to load the Xen™ kernel and start the Dom0.
# rebootAfter successfully booting the Xen™ kernel and logging into the system again, the Xen™ management tool xl is used to show information about the domains.
# xl list
Name ID Mem VCPUs State Time(s)
Domain-0 0 8192 4 r----- 962.0The output confirms that the Dom0 (called Domain-0) has the ID 0 and is running. It also has the memory and virtual CPUs that were defined in /boot/loader.conf earlier. More information can be found in the Xen™ Documentation. DomU guest VMs can now be created.
Unprivileged domains consist of a configuration file and virtual or physical hard disks. Virtual disk storage for the DomU can be files created by truncate(1) or ZFS volumes as described in “Creating and Destroying Volumes”. In this example, a 20 GB volume is used. A VM is created with the ZFS volume, a FreeBSD ISO image, 1 GB of RAM and two virtual CPUs. The ISO installation file is retrieved with fetch(1) and saved locally in a file called freebsd.iso.
# fetch ftp://ftp.freebsd.org/pub/FreeBSD/releases/ISO-IMAGES/12.0/FreeBSD-12.0-RELEASE-amd64-bootonly.iso -o freebsd.isoA ZFS volume of 20 GB called xendisk0 is created to serve as the disk space for the VM.
# zfs create -V20G -o volmode=dev zroot/xendisk0The new DomU guest VM is defined in a file. Some specific definitions like name, keymap, and VNC connection details are also defined. The following freebsd.cfg contains a minimum DomU configuration for this example:
# cat freebsd.cfg
builder = "hvm" (1)
name = "freebsd" (2)
memory = 1024 (3)
vcpus = 2 (4)
vif = [ 'mac=00:16:3E:74:34:32,bridge=bridge0' ] (5)
disk = [
'/dev/zvol/tank/xendisk0,raw,hda,rw', (6)
'/root/freebsd.iso,raw,hdc:cdrom,r' (7)
]
vnc = 1 (8)
vnclisten = "0.0.0.0"
serial = "pty"
usbdevice = "tablet"These lines are explained in more detail:
| 1 | This defines what kind of virtualization to use. hvm refers to hardware-assisted virtualization or hardware virtual machine. Guest operating systems can run unmodified on CPUs with virtualization extensions, providing nearly the same performance as running on physical hardware. generic is the default value and creates a PV domain. |
| 2 | Name of this virtual machine to distinguish it from others running on the same Dom0. Required. |
| 3 | Quantity of RAM in megabytes to make available to the VM. This amount is subtracted from the hypervisor’s total available memory, not the memory of the Dom0. |
| 4 | Number of virtual CPUs available to the guest VM. For best performance, do not create guests with more virtual CPUs than the number of physical CPUs on the host. |
| 5 | Virtual network adapter. This is the bridge connected to the network interface of the host. The mac parameter is the MAC address set on the virtual network interface. This parameter is optional, if no MAC is provided Xen™ will generate a random one. |
| 6 | Full path to the disk, file, or ZFS volume of the disk storage for this VM. Options and multiple disk definitions are separated by commas. |
| 7 | Defines the Boot medium from which the initial operating system is installed. In this example, it is the ISO imaged downloaded earlier. Consult the Xen™ documentation for other kinds of devices and options to set. |
| 8 | Options controlling VNC connectivity to the serial console of the DomU. In order, these are: active VNC support, define IP address on which to listen, device node for the serial console, and the input method for precise positioning of the mouse and other input methods. keymap defines which keymap to use, and is english by default. |
After the file has been created with all the necessary options, the DomU is created by passing it to xl create as a parameter.
# xl create freebsd.cfgEach time the Dom0 is restarted, the configuration file must be passed to |
The output of xl list confirms that the DomU has been created.
# xl list
Name ID Mem VCPUs State Time(s)
Domain-0 0 8192 4 r----- 1653.4
freebsd 1 1024 1 -b---- 663.9To begin the installation of the base operating system, start the VNC client, directing it to the main network address of the host or to the IP address defined on the vnclisten line of freebsd.cfg. After the operating system has been installed, shut down the DomU and disconnect the VNC viewer. Edit freebsd.cfg, removing the line with the cdrom definition or commenting it out by inserting a # character at the beginning of the line. To load this new configuration, it is necessary to remove the old DomU with xl destroy, passing either the name or the id as the parameter. Afterwards, recreate it using the modified freebsd.cfg.
# xl destroy freebsd
# xl create freebsd.cfgThe machine can then be accessed again using the VNC viewer. This time, it will boot from the virtual disk where the operating system has been installed and can be used as a virtual machine.
This section contains basic information in order to help troubleshoot issues found when using FreeBSD as a Xen™ host or guest.
Please note that the following troubleshooting tips are intended for Xen™ 4.11 or newer. If you are still using Xen™ 4.7 and having issues consider migrating to a newer version of Xen™.
In order to troubleshoot host boot issues you will likely need a serial cable, or a debug USB cable. Verbose Xen™ boot output can be obtained by adding options to the xen_cmdline option found in loader.conf. A couple of relevant debug options are:
iommu=debug: can be used to print additional diagnostic information about the iommu.
dom0=verbose: can be used to print additional diagnostic information about the dom0 build process.
sync_console: flag to force synchronous console output. Useful for debugging to avoid losing messages due to rate limiting. Never use this option in production environments since it can allow malicious guests to perform DoS attacks against Xen™ using the console.
FreeBSD should also be booted in verbose mode in order to identify any issues. To activate verbose booting, run this command:
# sysrc -f /boot/loader.conf boot_verbose="YES"If none of these options help solving the problem, please send the serial boot log to freebsd-xen@FreeBSD.org and xen-devel@lists.xenproject.org for further analysis.
Issues can also arise when creating guests, the following attempts to provide some help for those trying to diagnose guest creation issues.
The most common cause of guest creation failures is the xl command spitting some error and exiting with a return code different than 0. If the error provided is not enough to help identify the issue, more verbose output can also be obtained from xl by using the v option repeatedly.
# xl -vvv create freebsd.cfg
Parsing config from freebsd.cfg
libxl: debug: libxl_create.c:1693:do_domain_create: Domain 0:ao 0x800d750a0: create: how=0x0 callback=0x0 poller=0x800d6f0f0
libxl: debug: libxl_device.c:397:libxl__device_disk_set_backend: Disk vdev=xvda spec.backend=unknown
libxl: debug: libxl_device.c:432:libxl__device_disk_set_backend: Disk vdev=xvda, using backend phy
libxl: debug: libxl_create.c:1018:initiate_domain_create: Domain 1:running bootloader
libxl: debug: libxl_bootloader.c:328:libxl__bootloader_run: Domain 1:not a PV/PVH domain, skipping bootloader
libxl: debug: libxl_event.c:689:libxl__ev_xswatch_deregister: watch w=0x800d96b98: deregister unregistered
domainbuilder: detail: xc_dom_allocate: cmdline="", features=""
domainbuilder: detail: xc_dom_kernel_file: filename="/usr/local/lib/xen/boot/hvmloader"
domainbuilder: detail: xc_dom_malloc_filemap : 326 kB
libxl: debug: libxl_dom.c:988:libxl__load_hvm_firmware_module: Loading BIOS: /usr/local/shared/seabios/bios.bin
...If the verbose output does not help diagnose the issue there are also QEMU and Xen™ toolstack logs in /var/log/xen. Note that the name of the domain is appended to the log name, so if the domain is named freebsd you should find a /var/log/xen/xl-freebsd.log and likely a /var/log/xen/qemu-dm-freebsd.log. Both log files can contain useful information for debugging. If none of this helps solve the issue, please send the description of the issue you are facing and as much information as possible to freebsd-xen@FreeBSD.org and xen-devel@lists.xenproject.org in order to get help.
FreeBSD is a distributed project with users and contributors located all over the world. As such, FreeBSD supports localization into many languages, allowing users to view, input, or process data in non-English languages. One can choose from most of the major languages, including, but not limited to: Chinese, German, Japanese, Korean, French, Russian, and Vietnamese.
The term internationalization has been shortened to i18n, which represents the number of letters between the first and the last letters of internationalization. L10n uses the same naming scheme, but from localization. The i18n/L10n methods, protocols, and applications allow users to use languages of their choice.
This chapter discusses the internationalization and localization features of FreeBSD. After reading this chapter, you will know:
How locale names are constructed.
How to set the locale for a login shell.
How to configure the console for non-English languages.
How to configure Xorg for different languages.
How to find i18n-compliant applications.
Where to find more information for configuring specific languages.
Before reading this chapter, you should:
Know how to install additional third-party applications.
Localization settings are based on three components: the language code, country code, and encoding. Locale names are constructed from these parts as follows:
LanguageCode_CountryCode.Encoding
The LanguageCode and CountryCode are used to determine the country and the specific language variation. Common Language and Country Codes provides some examples of LanguageCode_CountryCode:
| LanguageCode_Country Code | Description |
|---|---|
en_US | English, United States |
ru_RU | Russian, Russia |
zh_TW | Traditional Chinese, Taiwan |
A complete listing of available locales can be found by typing:
% locale -a | moreTo determine the current locale setting:
% localeLanguage specific character sets, such as ISO8859-1, ISO8859-15, KOI8-R, and CP437, are described in multibyte(3). The active list of character sets can be found at the IANA Registry.
Some languages, such as Chinese or Japanese, cannot be represented using ASCII characters and require an extended language encoding using either wide or multibyte characters. Examples of wide or multibyte encodings include EUC and Big5. Older applications may mistake these encodings for control characters while newer applications usually recognize these characters. Depending on the implementation, users may be required to compile an application with wide or multibyte character support, or to configure it correctly.
FreeBSD uses Xorg-compatible locale encodings. |
The rest of this section describes the various methods for configuring the locale on a FreeBSD system. The next section will discuss the considerations for finding and compiling applications with i18n support.
Locale settings are configured either in a user’s ~/.login_conf or in the startup file of the user’s shell: ~/.profile, ~/.bashrc, or ~/.cshrc.
Two environment variables should be set:
LANG, which sets the locale
MM_CHARSET, which sets the MIME character set used by applications
In addition to the user’s shell configuration, these variables should also be set for specific application configuration and Xorg configuration.
Two methods are available for making the needed variable assignments: the login class method, which is the recommended method, and the startup file method. The next two sections demonstrate how to use both methods.
This first method is the recommended method as it assigns the required environment variables for locale name and MIME character sets for every possible shell. This setup can either be performed by each user or it can be configured for all users by the superuser.
This minimal example sets both variables for Latin-1 encoding in the .login_conf of an individual user’s home directory:
me:\ :charset=ISO-8859-1:\ :lang=de_DE.ISO8859-1:
Here is an example of a user’s ~/.login_conf that sets the variables for Traditional Chinese in BIG-5 encoding. More variables are needed because some applications do not correctly respect locale variables for Chinese, Japanese, and Korean:
#Users who do not wish to use monetary units or time formats #of Taiwan can manually change each variable me:\ :lang=zh_TW.Big5:\ :setenv=LC_ALL=zh_TW.Big5,LC_COLLATE=zh_TW.Big5,LC_CTYPE=zh_TW.Big5,LC_MESSAGES=zh_TW.Big5,LC_MONETARY=zh_TW.Big5,LC_NUMERIC=zh_TW.Big5,LC_TIME=zh_TW.Big5:\ :charset=big5:\ :xmodifiers="@im=gcin": #Set gcin as the XIM Input Server
Alternately, the superuser can configure all users of the system for localization. The following variables in /etc/login.conf are used to set the locale and MIME character set:
language_name|Account Type Description:\ :charset=MIME_charset:\ :lang=locale_name:\ :tc=default:
So, the previous Latin-1 example would look like this:
german|German Users Accounts:\ :charset=ISO-8859-1:\ :lang=de_DE.ISO8859-1:\ :tc=default:
See login.conf(5) for more details about these variables. Note that it already contains pre-defined russian class.
Whenever /etc/login.conf is edited, remember to execute the following command to update the capability database:
# cap_mkdb /etc/login.confIn addition to manually editing /etc/login.conf, several utilities are available for setting the locale for newly created users.
When using vipw to add new users, specify the language to set the locale:
user:password:1111:11:language:0:0:User Name:/home/user:/bin/sh
When using adduser to add new users, the default language can be pre-configured for all new users or specified for an individual user.
If all new users use the same language, set defaultclass=language in /etc/adduser.conf.
To override this setting when creating a user, either input the required locale at this prompt:
Enter login class: default []:or specify the locale to set when invoking adduser:
# adduser -class languageIf pw is used to add new users, specify the locale as follows:
# pw useradd user_name -L languageTo change the login class of an existing user, chpass can be used. Invoke it as superuser and provide the username to edit as the argument.
# chpass user_nameThis second method is not recommended as each shell that is used requires manual configuration, where each shell has a different configuration file and differing syntax. As an example, to set the German language for the sh shell, these lines could be added to ~/.profile to set the shell for that user only. These lines could also be added to /etc/profile or /usr/shared/skel/dot.profile to set that shell for all users:
LANG=de_DE.ISO8859-1; export LANG MM_CHARSET=ISO-8859-1; export MM_CHARSET
However, the name of the configuration file and the syntax used differs for the csh shell. These are the equivalent settings for ~/.csh.login, /etc/csh.login, or /usr/shared/skel/dot.login:
setenv LANG de_DE.ISO8859-1 setenv MM_CHARSET ISO-8859-1
To complicate matters, the syntax needed to configure Xorg in ~/.xinitrc also depends upon the shell. The first example is for the sh shell and the second is for the csh shell:
LANG=de_DE.ISO8859-1; export LANG
setenv LANG de_DE.ISO8859-1
Several localized fonts are available for the console. To see a listing of available fonts, type ls /usr/shared/syscons/fonts. To configure the console font, specify the font_name, without the .fnt suffix, in /etc/rc.conf:
font8x16=font_name font8x14=font_name font8x8=font_name
The keymap and screenmap can be set by adding the following to /etc/rc.conf:
scrnmap=screenmap_name keymap=keymap_name keychange="fkey_number sequence"
To see the list of available screenmaps, type ls /usr/shared/syscons/scrnmaps. Do not include the .scm suffix when specifying screenmap_name. A screenmap with a corresponding mapped font is usually needed as a workaround for expanding bit 8 to bit 9 on a VGA adapter’s font character matrix so that letters are moved out of the pseudographics area if the screen font uses a bit 8 column.
To see the list of available keymaps, type ls /usr/shared/syscons/keymaps. When specifying the keymap_name, do not include the .kbd suffix. To test keymaps without rebooting, use kbdmap(1).
The keychange entry is usually needed to program function keys to match the selected terminal type because function key sequences cannot be defined in the keymap.
Next, set the correct console terminal type in /etc/ttys for all virtual terminal entries. Defined Terminal Types for Character Sets summarizes the available terminal types.:
| Character Set | Terminal Type |
|---|---|
ISO8859-1 or ISO8859-15 |
|
ISO8859-2 |
|
ISO8859-7 |
|
KOI8-R |
|
KOI8-U |
|
CP437 (VGA default) |
|
US-ASCII |
|
For languages with wide or multibyte characters, install a console for that language from the FreeBSD Ports Collection. The available ports are summarized in Available Console from Ports Collection. Once installed, refer to the port’s pkg-message or man pages for configuration and usage instructions.
| Language | Port Location |
|---|---|
Traditional Chinese (BIG-5) | |
Chinese/Japanese/Korean | |
Chinese/Japanese/Korean | |
Japanese | |
Japanese | |
Japanese |
If moused is enabled in /etc/rc.conf, additional configuration may be required. By default, the mouse cursor of the syscons(4) driver occupies the 0xd0-0xd3 range in the character set. If the language uses this range, move the cursor’s range by adding the following line to /etc/rc.conf:
mousechar_start=3
The X Window System describes how to install and configure Xorg. When configuring Xorg for localization, additional fonts and input methods are available from the FreeBSD Ports Collection. Application specific i18n settings such as fonts and menus can be tuned in ~/.Xresources and should allow users to view their selected language in graphical application menus.
The X Input Method (XIM) protocol is an Xorg standard for inputting non-English characters. Available Input Methods summarizes the input method applications which are available in the FreeBSD Ports Collection. Additional Fcitx and Uim applications are also available.
| Language | Input Method |
|---|---|
Chinese | |
Chinese | |
Chinese | |
Chinese | |
Chinese | |
Chinese | |
Chinese | |
Japanese | |
Japanese | |
Japanese | |
Japanese | |
Japanese | |
Japanese | |
Japanese | |
Japanese | |
Japanese | |
Japanese | |
Japanese | |
Japanese | |
Japanese | |
Japanese | |
Japanese | |
Japanese | |
Japanese | |
Japanese | |
Korean | |
Korean | |
Korean | |
Korean | |
Korean | |
Vietnamese | |
Vietnamese |
i18n applications are programmed using i18n kits under libraries. These allow developers to write a simple file and translate displayed menus and texts to each language.
The FreeBSD Ports Collection contains many applications with built-in support for wide or multibyte characters for several languages. Such applications include i18n in their names for easy identification. However, they do not always support the language needed.
Some applications can be compiled with the specific charset. This is usually done in the port’s Makefile or by passing a value to configure. Refer to the i18n documentation in the respective FreeBSD port’s source for more information on how to determine the needed configure value or the port’s Makefile to determine which compile options to use when building the port.
This section provides configuration examples for localizing a FreeBSD system for the Russian language. It then provides some additional resources for localizing other languages.
This section shows the specific settings needed to localize a FreeBSD system for the Russian language. Refer to Using Localization for a more complete description of each type of setting.
To set this locale for the login shell, add the following lines to each user’s ~/.login_conf:
me:My Account:\ :charset=KOI8-R:\ :lang=ru_RU.KOI8-R:
To configure the console, add the following lines to /etc/rc.conf:
keymap="ru.utf-8" scrnmap="utf-82cp866" font8x16="cp866b-8x16" font8x14="cp866-8x14" font8x8="cp866-8x8" mousechar_start=3
For each ttyv entry in /etc/ttys, use cons25r as the terminal type.
To configure printing, a special output filter is needed to convert from KOI8-R to CP866 since most printers with Russian characters come with hardware code page CP866. FreeBSD includes a default filter for this purpose, /usr/libexec/lpr/ru/koi2alt. To use this filter, add this entry to /etc/printcap:
lp|Russian local line printer:\ :sh:of=/usr/libexec/lpr/ru/koi2alt:\ :lp=/dev/lpt0:sd=/var/spool/output/lpd:lf=/var/log/lpd-errs:
Refer to printcap(5) for a more detailed explanation.
To configure support for Russian filenames in mounted MS-DOS® file systems, include -L and the locale name when adding an entry to /etc/fstab:
/dev/ad0s2 /dos/c msdos rw,-Lru_RU.KOI8-R 0 0
Refer to mount_msdosfs(8) for more details.
To configure Russian fonts for Xorg, install the x11-fonts/xorg-fonts-cyrillic package. Then, check the "Files" section in /etc/X11/xorg.conf. The following line must be added before any other FontPath entries:
FontPath "/usr/local/lib/X11/fonts/cyrillic"
Additional Cyrillic fonts are available in the Ports Collection.
To activate a Russian keyboard, add the following to the "Keyboard" section of /etc/xorg.conf:
Option "XkbLayout" "us,ru" Option "XkbOptions" "grp:toggle"
Make sure that XkbDisable is commented out in that file.
For grp:toggle use Right Alt, for grp:ctrl_shift_toggle use Ctrl+Shift. For grp:caps_toggle use CapsLock. The old CapsLock function is still available in LAT mode only using Shift+CapsLock. grp:caps_toggle does not work in Xorg for some unknown reason.
If the keyboard has "Windows®" keys, and some non-alphabetical keys are mapped incorrectly, add the following line to /etc/xorg.conf:
Option "XkbVariant" ",winkeys"
The Russian XKB keyboard may not work with non-localized applications. Minimally localized applications should call a |
See http://koi8.pp.ru/xwin.html for more instructions on localizing Xorg applications. For more general information about KOI8-R encoding, refer to http://koi8.pp.ru/.
This section lists some additional resources for configuring other locales.
The FreeBSD-Taiwan Project has a Chinese HOWTO for FreeBSD at http://netlab.cse.yzu.edu.tw/~statue/freebsd/zh-tut/.
A complete article on Greek support in FreeBSD is available here, in Greek only, as part of the official FreeBSD Greek documentation.
For Japanese, refer to http://www.jp.FreeBSD.org/, and for Korean, refer to http://www.kr.FreeBSD.org/.
Some FreeBSD contributors have translated parts of the FreeBSD documentation to other languages. They are available through links on the FreeBSD web site or in /usr/shared/doc.
FreeBSD is under constant development between releases. Some people prefer to use the officially released versions, while others prefer to keep in sync with the latest developments. However, even official releases are often updated with security and other critical fixes. Regardless of the version used, FreeBSD provides all the necessary tools to keep the system updated, and allows for easy upgrades between versions. This chapter describes how to track the development system and the basic tools for keeping a FreeBSD system up-to-date.
After reading this chapter, you will know:
How to keep a FreeBSD system up-to-date with freebsd-update or Subversion.
How to compare the state of an installed system against a known pristine copy.
How to keep the installed documentation up-to-date with Subversion or documentation ports.
The difference between the two development branches: FreeBSD-STABLE and FreeBSD-CURRENT.
How to rebuild and reinstall the entire base system.
Before reading this chapter, you should:
Properly set up the network connection (Advanced Networking).
Know how to install additional third-party software (Installing Applications: Packages and Ports).
Throughout this chapter, |
Applying security patches in a timely manner and upgrading to a newer release of an operating system are important aspects of ongoing system administration. FreeBSD includes a utility called freebsd-update which can be used to perform both these tasks.
This utility supports binary security and errata updates to FreeBSD, without the need to manually compile and install the patch or a new kernel. Binary updates are available for all architectures and releases currently supported by the security team. The list of supported releases and their estimated end-of-life dates are listed at https://www.FreeBSD.org/security/.
This utility also supports operating system upgrades to minor point releases as well as upgrades to another release branch. Before upgrading to a new release, review its release announcement as it contains important information pertinent to the release. Release announcements are available from https://www.FreeBSD.org/releases/.
If a |
This section describes the configuration file used by freebsd-update, demonstrates how to apply a security patch and how to upgrade to a minor or major operating system release, and discusses some of the considerations when upgrading the operating system.
The default configuration file for freebsd-update works as-is. Some users may wish to tweak the default configuration in /etc/freebsd-update.conf, allowing better control of the process. The comments in this file explain the available options, but the following may require a bit more explanation:
# Components of the base system which should be kept updated. Components world kernel
This parameter controls which parts of FreeBSD will be kept up-to-date. The default is to update the entire base system and the kernel. Individual components can instead be specified, such as src/base or src/sys. However, the best option is to leave this at the default as changing it to include specific items requires every needed item to be listed. Over time, this could have disastrous consequences as source code and binaries may become out of sync.
# Paths which start with anything matching an entry in an IgnorePaths # statement will be ignored. IgnorePaths /boot/kernel/linker.hints
To leave specified directories, such as /bin or /sbin, untouched during the update process, add their paths to this statement. This option may be used to prevent freebsd-update from overwriting local modifications.
# Paths which start with anything matching an entry in an UpdateIfUnmodified # statement will only be updated if the contents of the file have not been # modified by the user (unless changes are merged; see below). UpdateIfUnmodified /etc/ /var/ /root/ /.cshrc /.profile
This option will only update unmodified configuration files in the specified directories. Any changes made by the user will prevent the automatic updating of these files. There is another option, KeepModifiedMetadata, which will instruct freebsd-update to save the changes during the merge.
# When upgrading to a new FreeBSD release, files which match MergeChanges # will have any local changes merged into the version from the new release. MergeChanges /etc/ /var/named/etc/ /boot/device.hints
List of directories with configuration files that freebsd-update should attempt to merge. The file merge process is a series of diff(1) patches similar to mergemaster(8), but with fewer options. Merges are either accepted, open an editor, or cause freebsd-update to abort. When in doubt, backup /etc and just accept the merges. See mergemaster(8) for more information about mergemaster.
# Directory in which to store downloaded updates and temporary # files used by FreeBSD Update. # WorkDir /var/db/freebsd-update
This directory is where all patches and temporary files are placed. In cases where the user is doing a version upgrade, this location should have at least a gigabyte of disk space available.
# When upgrading between releases, should the list of Components be # read strictly (StrictComponents yes) or merely as a list of components # which *might* be installed of which FreeBSD Update should figure out # which actually are installed and upgrade those (StrictComponents no)? # StrictComponents no
When this option is set to yes, freebsd-update will assume that the Components list is complete and will not attempt to make changes outside of the list. Effectively, freebsd-update will attempt to update every file which belongs to the Components list.
The process of applying FreeBSD security patches has been simplified, allowing an administrator to keep a system fully patched using freebsd-update. More information about FreeBSD security advisories can be found in FreeBSD Security Advisories.
FreeBSD security patches may be downloaded and installed using the following commands. The first command will determine if any outstanding patches are available, and if so, will list the files that will be modifed if the patches are applied. The second command will apply the patches.
# freebsd-update fetch
# freebsd-update installIf the update applies any kernel patches, the system will need a reboot in order to boot into the patched kernel. If the patch was applied to any running binaries, the affected applications should be restarted so that the patched version of the binary is used.
Usually, the user needs to be prepared to reboot the system. To know if a reboot is required by a kernel update, execute the commands |
The system can be configured to automatically check for updates once every day by adding this entry to /etc/crontab:
@daily root freebsd-update cron
If patches exist, they will automatically be downloaded but will not be applied. The root user will be sent an email so that the patches may be reviewed and manually installed with freebsd-update install.
If anything goes wrong, freebsd-update has the ability to roll back the last set of changes with the following command:
# freebsd-update rollback
Uninstalling updates... done.Again, the system should be restarted if the kernel or any kernel modules were modified and any affected binaries should be restarted.
Only the GENERIC kernel can be automatically updated by freebsd-update. If a custom kernel is installed, it will have to be rebuilt and reinstalled after freebsd-update finishes installing the updates. The default kernel name is GENERIC. The uname(1) command may be used to verify its installation.
Always keep a copy of the GENERIC kernel in /boot/GENERIC. It will be helpful in diagnosing a variety of problems and in performing version upgrades. Refer to Custom Kernels with FreeBSD 9.X and Later for instructions on how to get a copy of the GENERIC kernel. |
Unless the default configuration in /etc/freebsd-update.conf has been changed, freebsd-update will install the updated kernel sources along with the rest of the updates. Rebuilding and reinstalling a new custom kernel can then be performed in the usual way.
The updates distributed by freebsd-update do not always involve the kernel. It is not necessary to rebuild a custom kernel if the kernel sources have not been modified by freebsd-update install. However, freebsd-update will always update /usr/src/sys/conf/newvers.sh. The current patch level, as indicated by the -p number reported by uname -r, is obtained from this file. Rebuilding a custom kernel, even if nothing else changed, allows uname to accurately report the current patch level of the system. This is particularly helpful when maintaining multiple systems, as it allows for a quick assessment of the updates installed in each one.
Upgrades from one minor version of FreeBSD to another, like from FreeBSD 9.0 to FreeBSD 9.1, are called minor version upgrades. Major version upgrades occur when FreeBSD is upgraded from one major version to another, like from FreeBSD 9.X to FreeBSD 10.X. Both types of upgrades can be performed by providing freebsd-update with a release version target.
If the system is running a custom kernel, make sure that a copy of the GENERIC kernel exists in /boot/GENERIC before starting the upgrade. Refer to Custom Kernels with FreeBSD 9.X and Later for instructions on how to get a copy of the GENERIC kernel. |
The following command, when run on a FreeBSD 9.0 system, will upgrade it to FreeBSD 9.1:
# freebsd-update -r 9.1-RELEASE upgradeAfter the command has been received, freebsd-update will evaluate the configuration file and current system in an attempt to gather the information necessary to perform the upgrade. A screen listing will display which components have and have not been detected. For example:
Looking up update.FreeBSD.org mirrors... 1 mirrors found.
Fetching metadata signature for 9.0-RELEASE from update1.FreeBSD.org... done.
Fetching metadata index... done.
Inspecting system... done.
The following components of FreeBSD seem to be installed:
kernel/smp src/base src/bin src/contrib src/crypto src/etc src/games
src/gnu src/include src/krb5 src/lib src/libexec src/release src/rescue
src/sbin src/secure src/share src/sys src/tools src/ubin src/usbin
world/base world/info world/lib32 world/manpages
The following components of FreeBSD do not seem to be installed:
kernel/generic world/catpages world/dict world/doc world/games
world/proflibs
Does this look reasonable (y/n)? yAt this point, freebsd-update will attempt to download all files required for the upgrade. In some cases, the user may be prompted with questions regarding what to install or how to proceed.
When using a custom kernel, the above step will produce a warning similar to the following:
WARNING: This system is running a "MYKERNEL" kernel, which is not a
kernel configuration distributed as part of FreeBSD 9.0-RELEASE.
This kernel will not be updated: you MUST update the kernel manually
before running "/usr/sbin/freebsd-update install"This warning may be safely ignored at this point. The updated GENERIC kernel will be used as an intermediate step in the upgrade process.
Once all the patches have been downloaded to the local system, they will be applied. This process may take a while, depending on the speed and workload of the machine. Configuration files will then be merged. The merging process requires some user intervention as a file may be merged or an editor may appear on screen for a manual merge. The results of every successful merge will be shown to the user as the process continues. A failed or ignored merge will cause the process to abort. Users may wish to make a backup of /etc and manually merge important files, such as master.passwd or group at a later time.
The system is not being altered yet as all patching and merging is happening in another directory. Once all patches have been applied successfully, all configuration files have been merged and it seems the process will go smoothly, the changes can be committed to disk by the user using the following command: |
The kernel and kernel modules will be patched first. If the system is running with a custom kernel, use nextboot(8) to set the kernel for the next boot to the updated /boot/GENERIC:
# nextboot -k GENERICBefore rebooting with the GENERIC kernel, make sure it contains all the drivers required for the system to boot properly and connect to the network, if the machine being updated is accessed remotely. In particular, if the running custom kernel contains built-in functionality usually provided by kernel modules, make sure to temporarily load these modules into the GENERIC kernel using the /boot/loader.conf facility. It is recommended to disable non-essential services as well as any disk and network mounts until the upgrade process is complete. |
The machine should now be restarted with the updated kernel:
# shutdown -r nowOnce the system has come back online, restart freebsd-update using the following command. Since the state of the process has been saved, freebsd-update will not start from the beginning, but will instead move on to the next phase and remove all old shared libraries and object files.
# freebsd-update installDepending upon whether any library version numbers were bumped, there may only be two install phases instead of three. |
The upgrade is now complete. If this was a major version upgrade, reinstall all ports and packages as described in Upgrading Packages After a Major Version Upgrade.
Before using freebsd-update, ensure that a copy of the GENERIC kernel exists in /boot/GENERIC. If a custom kernel has only been built once, the kernel in /boot/kernel.old is the GENERIC kernel. Simply rename this directory to /boot/kernel.
If a custom kernel has been built more than once or if it is unknown how many times the custom kernel has been built, obtain a copy of the GENERIC kernel that matches the current version of the operating system. If physical access to the system is available, a copy of the GENERIC kernel can be installed from the installation media:
# mount /cdrom
# cd /cdrom/usr/freebsd-dist
# tar -C/ -xvf kernel.txz boot/kernel/kernelAlternately, the GENERIC kernel may be rebuilt and installed from source:
# cd /usr/src
# make kernel __MAKE_CONF=/dev/null SRCCONF=/dev/nullFor this kernel to be identified as the GENERIC kernel by freebsd-update, the GENERIC configuration file must not have been modified in any way. It is also suggested that the kernel is built without any other special options.
Rebooting into the GENERIC kernel is not required as freebsd-update only needs /boot/GENERIC to exist.
Generally, installed applications will continue to work without problems after minor version upgrades. Major versions use different Application Binary Interfaces (ABIs), which will break most third-party applications. After a major version upgrade, all installed packages and ports need to be upgraded. Packages can be upgraded using pkg upgrade. To upgrade installed ports, use a utility such as ports-mgmt/portmaster.
A forced upgrade of all installed packages will replace the packages with fresh versions from the repository even if the version number has not increased. This is required because of the ABI version change when upgrading between major versions of FreeBSD. The forced upgrade can be accomplished by performing:
# pkg-static upgrade -fA rebuild of all installed applications can be accomplished with this command:
# portmaster -afThis command will display the configuration screens for each application that has configurable options and wait for the user to interact with those screens. To prevent this behavior, and use only the default options, include -G in the above command.
Once the software upgrades are complete, finish the upgrade process with a final call to freebsd-update in order to tie up all the loose ends in the upgrade process:
# freebsd-update installIf the GENERIC kernel was temporarily used, this is the time to build and install a new custom kernel using the instructions in Configuring the FreeBSD Kernel.
Reboot the machine into the new FreeBSD version. The upgrade process is now complete.
The state of the installed FreeBSD version against a known good copy can be tested using freebsd-update IDS. This command evaluates the current version of system utilities, libraries, and configuration files and can be used as a built-in Intrusion Detection System (IDS).
This command is not a replacement for a real IDS such as security/snort. As |
To begin the comparison, specify the output file to save the results to:
# freebsd-update IDS >> outfile.idsThe system will now be inspected and a lengthy listing of files, along with the SHA256 hash values for both the known value in the release and the current installation, will be sent to the specified output file.
The entries in the listing are extremely long, but the output format may be easily parsed. For instance, to obtain a list of all files which differ from those in the release, issue the following command:
# cat outfile.ids | awk '{ print $1 }' | more
/etc/master.passwd
/etc/motd
/etc/passwd
/etc/pf.confThis sample output has been truncated as many more files exist. Some files have natural modifications. For example, /etc/passwd will be modified if users have been added to the system. Kernel modules may differ as freebsd-update may have updated them. To exclude specific files or directories, add them to the IDSIgnorePaths option in /etc/freebsd-update.conf.
Documentation is an integral part of the FreeBSD operating system. While an up-to-date version of the FreeBSD documentation is always available on the FreeBSD web site (https://www.freebsd.org/doc/), it can be handy to have an up-to-date, local copy of the FreeBSD website, handbooks, FAQ, and articles.
This section describes how to use either source or the FreeBSD Ports Collection to keep a local copy of the FreeBSD documentation up-to-date.
For information on editing and submitting corrections to the documentation, refer to the FreeBSD Documentation Project Primer for New Contributors (FreeBSD Documentation Project Primer for New Contributors).
Rebuilding the FreeBSD documentation from source requires a collection of tools which are not part of the FreeBSD base system. The required tools can be installed from the textproc/docproj package or port developed by the FreeBSD Documentation Project.
Once installed, use svnlite to fetch a clean copy of the documentation source:
# svnlite checkout https://svn.FreeBSD.org/doc/head /usr/docThe initial download of the documentation sources may take a while. Let it run until it completes.
Future updates of the documentation sources may be fetched by running:
# svnlite update /usr/docOnce an up-to-date snapshot of the documentation sources has been fetched to /usr/doc, everything is ready for an update of the installed documentation.
A full update of all available languages may be performed by typing:
# cd /usr/doc
# make install cleanIf an update of only a specific language is desired, make can be invoked in a language-specific subdirectory of /usr/doc:
# cd /usr/doc/en_US.ISO8859-1
# make install cleanAn alternative way of updating the documentation is to run this command from /usr/doc or the desired language-specific subdirectory:
# make updateThe output formats that will be installed may be specified by setting FORMATS:
# cd /usr/doc
# make FORMATS='html html-split' install cleanSeveral options are available to ease the process of updating only parts of the documentation, or the build of specific translations. These options can be set either as system-wide options in /etc/make.conf, or as command-line options passed to make.
The options include:
DOC_LANGThe list of languages and encodings to build and install, such as en_US.ISO8859-1 for English documentation.
FORMATSA single format or a list of output formats to be built. Currently, html, html-split, txt, ps, and pdf are supported.
DOCDIRWhere to install the documentation. It defaults to /usr/shared/doc.
For more make variables supported as system-wide options in FreeBSD, refer to make.conf(5).
The previous section presented a method for updating the FreeBSD documentation from sources. This section describes an alternative method which uses the Ports Collection and makes it possible to:
Install pre-built packages of the documentation, without having to locally build anything or install the documentation toolchain.
Build the documentation sources through the ports framework, making the checkout and build steps a bit easier.
This method of updating the FreeBSD documentation is supported by a set of documentation ports and packages which are updated by the Documentation Engineering Team <doceng@FreeBSD.org> on a monthly basis. These are listed in the FreeBSD Ports Collection, under the docs category (http://www.freshports.org/docs/).
Organization of the documentation ports is as follows:
The misc/freebsd-doc-en package or port installs all of the English documentation.
The misc/freebsd-doc-all meta-package or port installs all documentation in all available languages.
There is a package and port for each translation, such as misc/freebsd-doc-hu for the Hungarian documentation.
When binary packages are used, the FreeBSD documentation will be installed in all available formats for the given language. For example, the following command will install the latest package of the Hungarian documentation:
# pkg install hu-freebsd-docPackages use a format that differs from the corresponding port’s name: |
To specify the format of the documentation, build the port instead of installing the package. For example, to build and install the English documentation:
# cd /usr/ports/misc/freebsd-doc-en
# make install cleanThe port provides a configuration menu where the format to build and install can be specified. By default, split HTML, similar to the format used on http://www.FreeBSD.org, and PDF are selected.
Alternately, several make options can be specified when building a documentation port, including:
WITH_HTMLBuilds the HTML format with a single HTML file per document. The formatted documentation is saved to a file called article.html, or book.html.
WITH_PDFThe formatted documentation is saved to a file called article.pdf or book.pdf.
DOCBASESpecifies where to install the documentation. It defaults to /usr/local/shared/doc/freebsd.
This example uses variables to install the Hungarian documentation as a PDF in the specified directory:
# cd /usr/ports/misc/freebsd-doc-hu
# make -DWITH_PDF DOCBASE=share/doc/freebsd/hu install cleanDocumentation packages or ports can be updated using the instructions in Installing Applications: Packages and Ports. For example, the following command updates the installed Hungarian documentation using ports-mgmt/portmaster by using packages only:
# portmaster -PP hu-freebsd-docFreeBSD has two development branches: FreeBSD-CURRENT and FreeBSD-STABLE.
This section provides an explanation of each branch and its intended audience, as well as how to keep a system up-to-date with each respective branch.
FreeBSD-CURRENT is the "bleeding edge" of FreeBSD development and FreeBSD-CURRENT users are expected to have a high degree of technical skill. Less technical users who wish to track a development branch should track FreeBSD-STABLE instead.
FreeBSD-CURRENT is the very latest source code for FreeBSD and includes works in progress, experimental changes, and transitional mechanisms that might or might not be present in the next official release. While many FreeBSD developers compile the FreeBSD-CURRENT source code daily, there are short periods of time when the source may not be buildable. These problems are resolved as quickly as possible, but whether or not FreeBSD-CURRENT brings disaster or new functionality can be a matter of when the source code was synced.
FreeBSD-CURRENT is made available for three primary interest groups:
Members of the FreeBSD community who are actively working on some part of the source tree.
Members of the FreeBSD community who are active testers. They are willing to spend time solving problems, making topical suggestions on changes and the general direction of FreeBSD, and submitting patches.
Users who wish to keep an eye on things, use the current source for reference purposes, or make the occasional comment or code contribution.
FreeBSD-CURRENT should not be considered a fast-track to getting new features before the next release as pre-release features are not yet fully tested and most likely contain bugs. It is not a quick way of getting bug fixes as any given commit is just as likely to introduce new bugs as to fix existing ones. FreeBSD-CURRENT is not in any way "officially supported".
To track FreeBSD-CURRENT:
Join the FreeBSD-CURRENT mailing list and the SVN commit messages for the src tree for head/-current lists. This is essential in order to see the comments that people are making about the current state of the system and to receive important bulletins about the current state of FreeBSD-CURRENT.
The SVN commit messages for the src tree for head/-current list records the commit log entry for each change as it is made, along with any pertinent information on possible side effects.
To join these lists, go to FreeBSD list server, click on the list to subscribe to, and follow the instructions. In order to track changes to the whole source tree, not just the changes to FreeBSD-CURRENT, subscribe to the SVN commit messages for the entire src tree (except for user and "projects").
Synchronize with the FreeBSD-CURRENT sources. Typically, svnlite is used to check out the -CURRENT code from the head branch of one of the Subversion mirror sites listed in “Subversion Mirror Sites”.
Due to the size of the repository, some users choose to only synchronize the sections of source that interest them or which they are contributing patches to. However, users that plan to compile the operating system from source must download all of FreeBSD-CURRENT, not just selected portions.
Before compiling FreeBSD-CURRENT , read /usr/src/Makefile very carefully and follow the instructions in Updating FreeBSD from Source. Read the FreeBSD-CURRENT mailing list and /usr/src/UPDATING to stay up-to-date on other bootstrapping procedures that sometimes become necessary on the road to the next release.
Be active! FreeBSD-CURRENT users are encouraged to submit their suggestions for enhancements or bug fixes. Suggestions with accompanying code are always welcome.
FreeBSD-STABLE is the development branch from which major releases are made. Changes go into this branch at a slower pace and with the general assumption that they have first been tested in FreeBSD-CURRENT. This is still a development branch and, at any given time, the sources for FreeBSD-STABLE may or may not be suitable for general use. It is simply another engineering development track, not a resource for end-users. Users who do not have the resources to perform testing should instead run the most recent release of FreeBSD.
Those interested in tracking or contributing to the FreeBSD development process, especially as it relates to the next release of FreeBSD, should consider following FreeBSD-STABLE.
While the FreeBSD-STABLE branch should compile and run at all times, this cannot be guaranteed. Since more people run FreeBSD-STABLE than FreeBSD-CURRENT, it is inevitable that bugs and corner cases will sometimes be found in FreeBSD-STABLE that were not apparent in FreeBSD-CURRENT. For this reason, one should not blindly track FreeBSD-STABLE. It is particularly important not to update any production servers to FreeBSD-STABLE without thoroughly testing the code in a development or testing environment.
To track FreeBSD-STABLE:
Join the FreeBSD-STABLE; mailing list in order to stay informed of build dependencies that may appear in FreeBSD-STABLE or any other issues requiring special attention. Developers will also make announcements in this mailing list when they are contemplating some controversial fix or update, giving the users a chance to respond if they have any issues to raise concerning the proposed change.
Join the relevant svn list for the branch being tracked. For example, users tracking the 9-STABLE branch should join the SVN commit messages for only the 9-stable src tree. This list records the commit log entry for each change as it is made, along with any pertinent information on possible side effects.
To join these lists, go to FreeBSD list server, click on the list to subscribe to, and follow the instructions. In order to track changes for the whole source tree, subscribe to SVN commit messages for the entire src tree (except for user and "projects").
To install a new FreeBSD-STABLE system, install the most recent FreeBSD-STABLE release from the FreeBSD mirror sites or use a monthly snapshot built from FreeBSD-STABLE. Refer to www.freebsd.org/snapshots for more information about snapshots.
To compile or upgrade to an existing FreeBSD system to FreeBSD-STABLE, use svn to check out the source for the desired branch. Branch names, such as stable/9, are listed at www.freebsd.org/releng.
Before compiling or upgrading to FreeBSD-STABLE , read /usr/src/Makefile carefully and follow the instructions in Updating FreeBSD from Source. Read the FreeBSD-STABLE; mailing list and /usr/src/UPDATING to keep up-to-date on other bootstrapping procedures that sometimes become necessary on the road to the next release.
Updating FreeBSD by compiling from source offers several advantages over binary updates. Code can be built with options to take advantage of specific hardware. Parts of the base system can be built with non-default settings, or left out entirely where they are not needed or desired. The build process takes longer to update a system than just installing binary updates, but allows complete customization to produce a tailored version of FreeBSD.
This is a quick reference for the typical steps used to update FreeBSD by building from source. Later sections describe the process in more detail.
Update and Build
# svnlite update /usr/src (1)
check /usr/src/UPDATING (2)
# cd /usr/src (3)
# make -j4 buildworld (4)
# make -j4 kernel (5)
# shutdown -r now (6)
# cd /usr/src (7)
# make installworld (8)
# mergemaster -Ui (9)
# shutdown -r now 1(10)| 1 | Get the latest version of the source. See Updating the Source for more information on obtaining and updating source. |
| 2 | Check /usr/src/UPDATING for any manual steps required before or after building from source. |
| 3 | Go to the source directory. |
| 4 | Compile the world, everything except the kernel. |
| 5 | Compile and install the kernel. This is equivalent to make buildkernel installkernel. |
| 6 | Reboot the system to the new kernel. |
| 7 | Go to the source directory. |
| 8 | Install the world. |
| 9 | Update and merge configuration files in /etc/. |
| 10 | Restart the system to use the newly-built world and kernel. |
Read /usr/src/UPDATING. Any manual steps that must be performed before or after an update are described in this file.
FreeBSD source code is located in /usr/src/. The preferred method of updating this source is through the Subversion version control system. Verify that the source code is under version control:
# svnlite info /usr/src
Path: /usr/src
Working Copy Root Path: /usr/src
...This indicates that /usr/src/ is under version control and can be updated with svnlite(1):
# svnlite update /usr/srcThe update process can take some time if the directory has not been updated recently. After it finishes, the source code is up to date and the build process described in the next section can begin.
Obtaining the Source: If the output says
Determine which version of FreeBSD is being used with uname(1): Based on FreeBSD Versions and Repository Paths, the source used to update
|
The world, or all of the operating system except the kernel, is compiled. This is done first to provide up-to-date tools to build the kernel. Then the kernel itself is built:
# cd /usr/src
# make buildworld
# make buildkernelThe compiled code is written to /usr/obj.
These are the basic steps. Additional options to control the build are described below.
Some versions of the FreeBSD build system leave previously-compiled code in the temporary object directory, /usr/obj. This can speed up later builds by avoiding recompiling code that has not changed. To force a clean rebuild of everything, use cleanworld before starting a build:
# make cleanworldIncreasing the number of build jobs on multi-core processors can improve build speed. Determine the number of cores with sysctl hw.ncpu. Processors vary, as do the build systems used with different versions of FreeBSD, so testing is the only sure method to tell how a different number of jobs affects the build speed. For a starting point, consider values between half and double the number of cores. The number of jobs is specified with -j.
Building the world and kernel with four jobs:
# make -j4 buildworld buildkernelA buildworld must be completed if the source code has changed. After that, a buildkernel to build a kernel can be run at any time. To build just the kernel:
# cd /usr/src
# make buildkernelThe standard FreeBSD kernel is based on a kernel config file called GENERIC. The GENERIC kernel includes the most commonly-needed device drivers and options. Sometimes it is useful or necessary to build a custom kernel, adding or removing device drivers or options to fit a specific need.
For example, someone developing a small embedded computer with severely limited RAM could remove unneeded device drivers or options to make the kernel slightly smaller.
Kernel config files are located in /usr/src/sys/arch/conf/, where arch is the output from uname -m. On most computers, that is amd64, giving a config file directory of /usr/src/sys/amd64/conf/.
/usr/src can be deleted or recreated, so it is preferable to keep custom kernel config files in a separate directory, like /root. Link the kernel config file into the conf directory. If that directory is deleted or overwritten, the kernel config can be re-linked into the new one. |
A custom config file can be created by copying the GENERIC config file. In this example, the new custom kernel is for a storage server, so is named STORAGESERVER:
# cp /usr/src/sys/amd64/conf/GENERIC /root/STORAGESERVER
# cd /usr/src/sys/amd64/conf
# ln -s /root/STORAGESERVER ./root/STORAGESERVER is then edited, adding or removing devices or options as shown in config(5).
The custom kernel is built by setting KERNCONF to the kernel config file on the command line:
# make buildkernel KERNCONF=STORAGESERVERAfter the buildworld and buildkernel steps have been completed, the new kernel and world are installed:
# cd /usr/src
# make installkernel
# shutdown -r now
# cd /usr/src
# make installworld
# shutdown -r nowIf a custom kernel was built, KERNCONF must also be set to use the new custom kernel:
# cd /usr/src
# make installkernel KERNCONF=STORAGESERVER
# shutdown -r now
# cd /usr/src
# make installworld
# shutdown -r nowA few final tasks complete the update. Any modified configuration files are merged with the new versions, outdated libraries are located and removed, then the system is restarted.
mergemaster(8) provides an easy way to merge changes that have been made to system configuration files with new versions of those files.
With -Ui, mergemaster(8) automatically updates files that have not been user-modified and installs new files that are not already present:
# mergemaster -UiIf a file must be manually merged, an interactive display allows the user to choose which portions of the files are kept. See mergemaster(8) for more information.
Some obsolete files or directories can remain after an update. These files can be located:
# make check-oldand deleted:
# make delete-oldSome obsolete libraries can also remain. These can be detected with:
# make check-old-libsand deleted with
# make delete-old-libsPrograms which were still using those old libraries will stop working when the library has been deleted. These programs must be rebuilt or replaced after deleting the old libraries.
When all the old files or directories are known to be safe to delete, pressing y and Enter to delete each file can be avoided by setting |
When multiple machines need to track the same source tree, it is a waste of disk space, network bandwidth, and CPU cycles to have each system download the sources and rebuild everything. The solution is to have one machine do most of the work, while the rest of the machines mount that work via NFS. This section outlines a method of doing so. For more information about using NFS, refer to Network File System (NFS).
First, identify a set of machines which will run the same set of binaries, known as a build set. Each machine can have a custom kernel, but will run the same userland binaries. From that set, choose a machine to be the build machine that the world and kernel are built on. Ideally, this is a fast machine that has sufficient spare CPU to run make buildworld and make buildkernel.
Select a machine to be the test machine, which will test software updates before they are put into production. This must be a machine that can afford to be down for an extended period of time. It can be the build machine, but need not be.
All the machines in this build set need to mount /usr/obj and /usr/src from the build machine via NFS. For multiple build sets, /usr/src should be on one build machine, and NFS mounted on the rest.
Ensure that /etc/make.conf and /etc/src.conf on all the machines in the build set agree with the build machine. That means that the build machine must build all the parts of the base system that any machine in the build set is going to install. Also, each build machine should have its kernel name set with KERNCONF in /etc/make.conf, and the build machine should list them all in its KERNCONF, listing its own kernel first. The build machine must have the kernel configuration files for each machine in its /usr/src/sys/arch/conf.
On the build machine, build the kernel and world as described in Updating FreeBSD from Source, but do not install anything on the build machine. Instead, install the built kernel on the test machine. On the test machine, mount /usr/src and /usr/obj via NFS. Then, run shutdown now to go to single-user mode in order to install the new kernel and world and run mergemaster as usual. When done, reboot to return to normal multi-user operations.
After verifying that everything on the test machine is working properly, use the same procedure to install the new software on each of the other machines in the build set.
The same methodology can be used for the ports tree. The first step is to share /usr/ports via NFS to all the machines in the build set. To configure /etc/make.conf to share distfiles, set DISTDIR to a common shared directory that is writable by whichever user root is mapped to by the NFS mount. Each machine should set WRKDIRPREFIX to a local build directory, if ports are to be built locally. Alternately, if the build system is to build and distribute packages to the machines in the build set, set PACKAGES on the build system to a directory similar to DISTDIR.
DTrace, also known as Dynamic Tracing, was developed by Sun™ as a tool for locating performance bottlenecks in production and pre-production systems. In addition to diagnosing performance problems, DTrace can be used to help investigate and debug unexpected behavior in both the FreeBSD kernel and in userland programs.
DTrace is a remarkable profiling tool, with an impressive array of features for diagnosing system issues. It may also be used to run pre-written scripts to take advantage of its capabilities. Users can author their own utilities using the DTrace D Language, allowing them to customize their profiling based on specific needs.
The FreeBSD implementation provides full support for kernel DTrace and experimental support for userland DTrace. Userland DTrace allows users to perform function boundary tracing for userland programs using the pid provider, and to insert static probes into userland programs for later tracing. Some ports, such as databases/postgresql12-server and lang/php74 have a DTrace option to enable static probes.
The official guide to DTrace is maintained by the Illumos project at DTrace Guide.
After reading this chapter, you will know:
What DTrace is and what features it provides.
Differences between the Solaris™ DTrace implementation and the one provided by FreeBSD.
How to enable and use DTrace on FreeBSD.
Before reading this chapter, you should:
Understand UNIX® and FreeBSD basics (FreeBSD Basics).
Have some familiarity with security and how it pertains to FreeBSD (Security).
While the DTrace in FreeBSD is similar to that found in Solaris™, differences do exist. The primary difference is that in FreeBSD, DTrace is implemented as a set of kernel modules and DTrace can not be used until the modules are loaded. To load all of the necessary modules:
# kldload dtraceallBeginning with FreeBSD 10.0-RELEASE, the modules are automatically loaded when dtrace is run.
FreeBSD uses the DDB_CTF kernel option to enable support for loading CTF data from kernel modules and the kernel itself. CTF is the Solaris™ Compact C Type Format which encapsulates a reduced form of debugging information similar to DWARF and the venerable stabs. CTF data is added to binaries by the ctfconvert and ctfmerge build tools. The ctfconvert utility parses DWARF sections from objects into either executables or shared libraries.ELF debug sections created by the compiler and ctfmerge merges CTFELF
Some different providers exist for FreeBSD than for Solaris™. Most notable is the dtmalloc provider, which allows tracing malloc() by type in the FreeBSD kernel. Some of the providers found in Solaris™, such as cpc and mib, are not present in FreeBSD. These may appear in future versions of FreeBSD. Moreover, some of the providers available in both operating systems are not compatible, in the sense that their probes have different argument types. Thus, D scripts written on Solaris™ may or may not work unmodified on FreeBSD, and vice versa.
Due to security differences, only root may use DTrace on FreeBSD. Solaris™ has a few low level security checks which do not yet exist in FreeBSD. As such, the /dev/dtrace/dtrace is strictly limited to root.
DTrace falls under the Common Development and Distribution License (CDDL) license. To view this license on FreeBSD, see /usr/src/cddl/contrib/opensolaris/OPENSOLARIS.LICENSE or view it online at http://opensource.org/licenses/CDDL-1.0. While a FreeBSD kernel with DTrace support is BSD licensed, the CDDL is used when the modules are distributed in binary form or the binaries are loaded.
In FreeBSD 9.2 and 10.0, DTrace support is built into the GENERIC kernel. Users of earlier versions of FreeBSD or who prefer to statically compile in DTrace support should add the following lines to a custom kernel configuration file and recompile the kernel using the instructions in Configuring the FreeBSD Kernel:
options KDTRACE_HOOKS options DDB_CTF makeoptions DEBUG=-g makeoptions WITH_CTF=1
Users of the AMD64 architecture should also add this line:
options KDTRACE_FRAME
This option provides support for FBT. While DTrace will work without this option, there will be limited support for function boundary tracing.
Once the FreeBSD system has rebooted into the new kernel, or the DTrace kernel modules have been loaded using kldload dtraceall, the system will need support for the Korn shell as the DTrace Toolkit has several utilities written in ksh. Make sure that the shells/ksh93 package or port is installed. It is also possible to run these tools under shells/pdksh or shells/mksh.
Finally, install the current DTrace Toolkit, a collection of ready-made scripts for collecting system information. There are scripts to check open files, memory, CPU usage, and a lot more. FreeBSD 10 installs a few of these scripts into /usr/shared/dtrace. On other FreeBSD versions, or to install the full DTrace Toolkit, use the sysutils/dtrace-toolkit package or port.
The scripts found in /usr/shared/dtrace have been specifically ported to FreeBSD. Not all of the scripts found in the DTrace Toolkit will work as-is on FreeBSD and some scripts may require some effort in order for them to work on FreeBSD. |
The DTrace Toolkit includes many scripts in the special language of DTrace. This language is called the D language and it is very similar to C++. An in depth discussion of the language is beyond the scope of this document. It is covered extensively in the Illumos Dynamic Tracing Guide.
DTrace scripts consist of a list of one or more probes, or instrumentation points, where each probe is associated with an action. Whenever the condition for a probe is met, the associated action is executed. For example, an action may occur when a file is opened, a process is started, or a line of code is executed. The action might be to log some information or to modify context variables. The reading and writing of context variables allows probes to share information and to cooperatively analyze the correlation of different events.
To view all probes, the administrator can execute the following command:
# dtrace -l | moreEach probe has an ID, a PROVIDER (dtrace or fbt), a MODULE, and a FUNCTION NAME. Refer to dtrace(1) for more information about this command.
The examples in this section provide an overview of how to use two of the fully supported scripts from the DTrace Toolkit: the hotkernel and procsystime scripts.
The hotkernel script is designed to identify which function is using the most kernel time. It will produce output similar to the following:
# cd /usr/local/share/dtrace-toolkit
# ./hotkernel
Sampling... Hit Ctrl-C to end.As instructed, use the Ctrl+C key combination to stop the process. Upon termination, the script will display a list of kernel functions and timing information, sorting the output in increasing order of time:
kernel`_thread_lock_flags 2 0.0%
0xc1097063 2 0.0%
kernel`sched_userret 2 0.0%
kernel`kern_select 2 0.0%
kernel`generic_copyin 3 0.0%
kernel`_mtx_assert 3 0.0%
kernel`vm_fault 3 0.0%
kernel`sopoll_generic 3 0.0%
kernel`fixup_filename 4 0.0%
kernel`_isitmyx 4 0.0%
kernel`find_instance 4 0.0%
kernel`_mtx_unlock_flags 5 0.0%
kernel`syscall 5 0.0%
kernel`DELAY 5 0.0%
0xc108a253 6 0.0%
kernel`witness_lock 7 0.0%
kernel`read_aux_data_no_wait 7 0.0%
kernel`Xint0x80_syscall 7 0.0%
kernel`witness_checkorder 7 0.0%
kernel`sse2_pagezero 8 0.0%
kernel`strncmp 9 0.0%
kernel`spinlock_exit 10 0.0%
kernel`_mtx_lock_flags 11 0.0%
kernel`witness_unlock 15 0.0%
kernel`sched_idletd 137 0.3%
0xc10981a5 42139 99.3%This script will also work with kernel modules. To use this feature, run the script with -m:
# ./hotkernel -m
Sampling... Hit Ctrl-C to end.
^C
MODULE COUNT PCNT
0xc107882e 1 0.0%
0xc10e6aa4 1 0.0%
0xc1076983 1 0.0%
0xc109708a 1 0.0%
0xc1075a5d 1 0.0%
0xc1077325 1 0.0%
0xc108a245 1 0.0%
0xc107730d 1 0.0%
0xc1097063 2 0.0%
0xc108a253 73 0.0%
kernel 874 0.4%
0xc10981a5 213781 99.6%The procsystime script captures and prints the system call time usage for a given process ID (PID) or process name. In the following example, a new instance of /bin/csh was spawned. Then, procsystime was executed and remained waiting while a few commands were typed on the other incarnation of csh. These are the results of this test:
# ./procsystime -n csh
Tracing... Hit Ctrl-C to end...
^C
Elapsed Times for processes csh,
SYSCALL TIME (ns)
getpid 6131
sigreturn 8121
close 19127
fcntl 19959
dup 26955
setpgid 28070
stat 31899
setitimer 40938
wait4 62717
sigaction 67372
sigprocmask 119091
gettimeofday 183710
write 263242
execve 492547
ioctl 770073
vfork 3258923
sigsuspend 6985124
read 3988049784As shown, the read() system call used the most time in nanoseconds while the getpid() system call used the least amount of time.
This chapter covers the use of USB Device Mode and USB On The Go (USB OTG) in FreeBSD. This includes virtual serial consoles, virtual network interfaces, and virtual USB drives.
When running on hardware that supports USB device mode or USB OTG, like that built into many embedded boards, the FreeBSD USB stack can run in device mode. Device mode makes it possible for the computer to present itself as different kinds of USB device classes, including serial ports, network adapters, and mass storage, or a combination thereof. A USB host like a laptop or desktop computer is able to access them just like physical USB devices. Device mode is sometimes called the "USB gadget mode".
There are two basic ways the hardware can provide the device mode functionality: with a separate "client port", which only supports the device mode, and with a USB OTG port, which can provide both device and host mode. For USB OTG ports, the USB stack switches between host-side and device-side automatically, depending on what is connected to the port. Connecting a USB device like a memory stick to the port causes FreeBSD to switch to host mode. Connecting a USB host like a computer causes FreeBSD to switch to device mode. Single purpose "client ports" always work in device mode.
What FreeBSD presents to the USB host depends on the hw.usb.template sysctl. Some templates provide a single device, such as a serial terminal; others provide multiple ones, which can all be used at the same time. An example is the template 10, which provides a mass storage device, a serial console, and a network interface. See usb_template(4) for the list of available values.
Note that in some cases, depending on the hardware and the hosts operating system, for the host to notice the configuration change, it must be either physically disconnected and reconnected, or forced to rescan the USB bus in a system-specific way. When FreeBSD is running on the host, usbconfig(8) reset can be used. This also must be done after loading usb_template.ko if the USB host was already connected to the USBOTG socket.
After reading this chapter, you will know:
How to set up USB Device Mode functionality on FreeBSD.
How to configure the virtual serial port on FreeBSD.
How to connect to the virtual serial port from various operating systems.
How to configure FreeBSD to provide a virtual USB network interface.
How to configure FreeBSD to provide a virtual USB storage device.
Virtual serial port support is provided by templates number 3, 8, and 10. Note that template 3 works with Microsoft Windows 10 without the need for special drivers and INF files. Other host operating systems work with all three templates. Both usb_template(4) and umodem(4) kernel modules must be loaded.
To enable USB device mode serial ports, add those lines to /etc/ttys:
ttyU0 "/usr/libexec/getty 3wire" vt100 onifconsole secure
ttyU1 "/usr/libexec/getty 3wire" vt100 onifconsole secureThen add these lines to /etc/devd.conf:
notify 100 {
match "system" "DEVFS";
match "subsystem" "CDEV";
match "type" "CREATE";
match "cdev" "ttyU[0-9]+";
action "/sbin/init q";
};Reload the configuration if devd(8) is already running:
# service devd restartMake sure the necessary modules are loaded and the correct template is set at boot by adding those lines to /boot/loader.conf, creating it if it does not already exist:
umodem_load="YES"
hw.usb.template=3To load the module and set the template without rebooting use:
# kldload umodem
# sysctl hw.usb.template=3To connect to a board configured to provide USB device mode serial ports, connect the USB host, such as a laptop, to the boards USB OTG or USB client port. Use pstat -t on the host to list the terminal lines. Near the end of the list you should see a USB serial port, eg "ttyU0". To open the connection, use:
# cu -l /dev/ttyU0After pressing the Enter key a few times you will see a login prompt.
To connect to a board configured to provide USB device mode serial ports, connect the USB host, such as a laptop, to the boards USB OTG or USB client port. To open the connection, use:
# cu -l /dev/cu.usbmodemFreeBSD1To connect to a board configured to provide USB device mode serial ports, connect the USB host, such as a laptop, to the boards USB OTG or USB client port. To open the connection, use:
# minicom -D /dev/ttyACM0To connect to a board configured to provide USB device mode serial ports, connect the USB host, such as a laptop, to the boards USB OTG or USB client port. To open a connection you will need a serial terminal program, such as PuTTY. To check the COM port name used by Windows, run Device Manager, expand "Ports (COM & LPT)". You will see a name similar to "USB Serial Device (COM4)". Run serial terminal program of your choice, for example PuTTY. In the PuTTY dialog set "Connection type" to "Serial", type the COMx obtained from Device Manager in the "Serial line" dialog box and click Open.
Virtual network interfaces support is provided by templates number 1, 8, and 10. Note that none of them works with Microsoft Windows. Other host operating systems work with all three templates. Both usb_template(4) and if_cdce(4) kernel modules must be loaded.
Make sure the necessary modules are loaded and the correct template is set at boot by adding those lines to /boot/loader.conf, creating it if it does not already exist:
if_cdce_load="YES"
hw.usb.template=1To load the module and set the template without rebooting use:
# kldload if_cdce
# sysctl hw.usb.template=1The cfumass(4) driver is a USB device mode driver first available in FreeBSD 12.0. |
Mass Storage target is provided by templates 0 and 10. Both usb_template(4) and cfumass(4) kernel modules must be loaded. cfumass(4) interfaces to the CTL subsystem, the same one that is used for iSCSI or Fibre Channel targets. On the host side, USB Mass Storage initiators can only access a single LUN, LUN 0.
The simplest way to set up a read-only USB storage target is to use the cfumass rc script. To configure it this way, copy the files to be presented to the USB host machine into the /var/cfumass directory, and add this line to /etc/rc.conf:
cfumass_enable="YES"
To configure the target without restarting, run this command:
# service cfumass startDifferently from serial and network functionality, the template should not be set to 0 or 10 in /boot/loader.conf. This is because the LUN must be set up before setting the template. The cfumass startup script sets the correct template number automatically when started.
The rest of this chapter provides detailed description of setting the target without using the cfumass rc file. This is necessary if eg one wants to provide a writeable LUN.
USB Mass Storage does not require the ctld(8) daemon to be running, although it can be used if desired. This is different from iSCSI. Thus, there are two ways to configure the target: ctladm(8), or ctld(8). Both require the cfumass.ko kernel module to be loaded. The module can be loaded manually:
# kldload cfumassIf cfumass.ko has not been built into the kernel, /boot/loader.conf can be set to load the module at boot:
cfumass_load="YES"
A LUN can be created without the ctld(8) daemon:
# ctladm create -b block -o file=/data/target0This presents the contents of the image file /data/target0 as a LUN to the USB host. The file must exist before executing the command. To configure the LUN at system startup, add the command to /etc/rc.local.
ctld(8) can also be used to manage LUNs. Create /etc/ctl.conf, add a line to /etc/rc.conf to make sure ctld(8) is automatically started at boot, and then start the daemon.
This is an example of a simple /etc/ctl.conf configuration file. Refer to ctl.conf(5) for a more complete description of the options.
target naa.50015178f369f092 {
lun 0 {
path /data/target0
size 4G
}
}The example creates a single target with a single LUN. The naa.50015178f369f092 is a device identifier composed of 32 random hexadecimal digits. The path line defines the full path to a file or zvol backing the LUN. That file must exist before starting ctld(8). The second line is optional and specifies the size of the LUN.
To make sure the ctld(8) daemon is started at boot, add this line to /etc/rc.conf:
ctld_enable="YES"
To start ctld(8) now, run this command:
# service ctld startAs the ctld(8) daemon is started, it reads /etc/ctl.conf. If this file is edited after the daemon starts, reload the changes so they take effect immediately:
# service ctld reloadFreeBSD jest jednym z najszerzej rozpowszechnionych systemów operacyjnych wykorzystywanych w wysoko wydajnych serwerach sieciowych. Rozdziały w tej części omawiają:
Komunikację szeregową
PPP oraz PPP over Ethernet
Pocztę elektroniczną
Prowadzenie serwerów sieciowych
Zapory ogniowe
Inne zaawansowane zagadnienia związane z pracą w sieci
Poniższe rozdziały zostały tak napisane, by móc sięgnąć po nie gdy potrzebujemy danych informacji. Nie ma przymusu czytania ich w żadnej określonej kolejności, ani też przeczytania wszystkich przed rozpoczęciem pracy z FreeBSD w środowisku sieciowym.
UNIX® has always had support for serial communications as the very first UNIX® machines relied on serial lines for user input and output. Things have changed a lot from the days when the average terminal consisted of a 10-character-per-second serial printer and a keyboard. This chapter covers some of the ways serial communications can be used on FreeBSD.
After reading this chapter, you will know:
How to connect terminals to a FreeBSD system.
How to use a modem to dial out to remote hosts.
How to allow remote users to login to a FreeBSD system with a modem.
How to boot a FreeBSD system from a serial console.
Before reading this chapter, you should:
Know how to configure and install a custom kernel.
Understand FreeBSD permissions and processes.
Have access to the technical manual for the serial hardware to be used with FreeBSD.
The following terms are often used in serial communications:
Bits per Second (bps) is the rate at which data is transmitted.
Data Terminal Equipment (DTE) is one of two endpoints in a serial communication. An example would be a computer.
Data Communications Equipment (DTE) is the other endpoint in a serial communication. Typically, it is a modem or serial terminal.
The original standard which defined hardware serial communications. It has since been renamed to TIA-232.
When referring to communication data rates, this section does not use the term baud. Baud refers to the number of electrical state transitions made in a period of time, while bps is the correct term to use.
To connect a serial terminal to a FreeBSD system, a serial port on the computer and the proper cable to connect to the serial device are needed. Users who are already familiar with serial hardware and cabling can safely skip this section.
There are several different kinds of serial cables. The two most common types are null-modem cables and standard RS-232 cables. The documentation for the hardware should describe the type of cable required.
These two types of cables differ in how the wires are connected to the connector. Each wire represents a signal, with the defined signals summarized in RS-232C Signal Names. A standard serial cable passes all of the RS-232C signals straight through. For example, the "Transmitted Data" pin on one end of the cable goes to the "Transmitted Data" pin on the other end. This is the type of cable used to connect a modem to the FreeBSD system, and is also appropriate for some terminals.
A null-modem cable switches the "Transmitted Data" pin of the connector on one end with the "Received Data" pin on the other end. The connector can be either a DB-25 or a DB-9.
A null-modem cable can be constructed using the pin connections summarized in DB-25 to DB-25 Null-Modem Cable, DB-9 to DB-9 Null-Modem Cable, and DB-9 to DB-25 Null-Modem Cable. While the standard calls for a straight-through pin 1 to pin 1 "Protective Ground" line, it is often omitted. Some terminals work using only pins 2, 3, and 7, while others require different configurations. When in doubt, refer to the documentation for the hardware.
| Acronyms | Names |
|---|---|
RD | Received Data |
TD | Transmitted Data |
DTR | Data Terminal Ready |
DSR | Data Set Ready |
DCD | Data Carrier Detect |
SG | Signal Ground |
RTS | Request to Send |
CTS | Clear to Send |
| Signal | Pin # | Pin # | Signal | |
|---|---|---|---|---|
SG | 7 | connects to | 7 | SG |
TD | 2 | connects to | 3 | RD |
RD | 3 | connects to | 2 | TD |
RTS | 4 | connects to | 5 | CTS |
CTS | 5 | connects to | 4 | RTS |
DTR | 20 | connects to | 6 | DSR |
DTR | 20 | connects to | 8 | DCD |
DSR | 6 | connects to | 20 | DTR |
DCD | 8 | connects to | 20 | DTR |
| Signal | Pin # | Pin # | Signal | |
|---|---|---|---|---|
RD | 2 | connects to | 3 | TD |
TD | 3 | connects to | 2 | RD |
DTR | 4 | connects to | 6 | DSR |
DTR | 4 | connects to | 1 | DCD |
SG | 5 | connects to | 5 | SG |
DSR | 6 | connects to | 4 | DTR |
DCD | 1 | connects to | 4 | DTR |
RTS | 7 | connects to | 8 | CTS |
CTS | 8 | connects to | 7 | RTS |
| Signal | Pin # | Pin # | Signal | |
|---|---|---|---|---|
RD | 2 | connects to | 2 | TD |
TD | 3 | connects to | 3 | RD |
DTR | 4 | connects to | 6 | DSR |
DTR | 4 | connects to | 8 | DCD |
SG | 5 | connects to | 7 | SG |
DSR | 6 | connects to | 20 | DTR |
DCD | 1 | connects to | 20 | DTR |
RTS | 7 | connects to | 5 | CTS |
CTS | 8 | connects to | 4 | RTS |
When one pin at one end connects to a pair of pins at the other end, it is usually implemented with one short wire between the pair of pins in their connector and a long wire to the other single pin. |
Serial ports are the devices through which data is transferred between the FreeBSD host computer and the terminal. Several kinds of serial ports exist. Before purchasing or constructing a cable, make sure it will fit the ports on the terminal and on the FreeBSD system.
Most terminals have DB-25 ports. Personal computers may have DB-25 or DB-9 ports. A multiport serial card may have RJ-12 or RJ-45/ ports. See the documentation that accompanied the hardware for specifications on the kind of port or visually verify the type of port.
In FreeBSD, each serial port is accessed through an entry in /dev. There are two different kinds of entries:
Call-in ports are named /dev/ttyuN where N is the port number, starting from zero. If a terminal is connected to the first serial port (COM1), use /dev/ttyu0 to refer to the terminal. If the terminal is on the second serial port (COM2), use /dev/ttyu1, and so forth. Generally, the call-in port is used for terminals. Call-in ports require that the serial line assert the "Data Carrier Detect" signal to work correctly.
Call-out ports are named /dev/cuauN on FreeBSD versions 8.X and higher and /dev/cuadN on FreeBSD versions 7.X and lower. Call-out ports are usually not used for terminals, but are used for modems. The call-out port can be used if the serial cable or the terminal does not support the "Data Carrier Detect" signal.
FreeBSD also provides initialization devices (/dev/ttyuN.init and /dev/cuauN.init or /dev/cuadN.init) and locking devices (/dev/ttyuN.lock and /dev/cuauN.lock or /dev/cuadN.lock). The initialization devices are used to initialize communications port parameters each time a port is opened, such as crtscts for modems which use RTS/CTS signaling for flow control. The locking devices are used to lock flags on ports to prevent users or programs changing certain parameters. Refer to termios(4), sio(4), and stty(1) for information on terminal settings, locking and initializing devices, and setting terminal options, respectively.
By default, FreeBSD supports four serial ports which are commonly known as COM1, COM2, COM3, and COM4. FreeBSD also supports dumb multi-port serial interface cards, such as the BocaBoard 1008 and 2016, as well as more intelligent multi-port cards such as those made by Digiboard. However, the default kernel only looks for the standard COM ports.
To see if the system recognizes the serial ports, look for system boot messages that start with uart:
# grep uart /var/run/dmesg.bootIf the system does not recognize all of the needed serial ports, additional entries can be added to /boot/device.hints. This file already contains hint.uart.0.* entries for COM1 and hint.uart.1.* entries for COM2. When adding a port entry for COM3 use 0x3E8, and for COM4 use 0x2E8. Common IRQ addresses are 5 for COM3 and 9 for COM4.
To determine the default set of terminal I/O settings used by the port, specify its device name. This example determines the settings for the call-in port on COM2:
# stty -a -f /dev/ttyu1System-wide initialization of serial devices is controlled by /etc/rc.d/serial. This file affects the default settings of serial devices. To change the settings for a device, use stty. By default, the changed settings are in effect until the device is closed and when the device is reopened, it goes back to the default set. To permanently change the default set, open and adjust the settings of the initialization device. For example, to turn on CLOCAL mode, 8 bit communication, and XON/XOFF flow control for ttyu5, type:
# stty -f /dev/ttyu5.init clocal cs8 ixon ixoffTo prevent certain settings from being changed by an application, make adjustments to the locking device. For example, to lock the speed of ttyu5 to 57600 bps, type:
# stty -f /dev/ttyu5.lock 57600Now, any application that opens ttyu5 and tries to change the speed of the port will be stuck with 57600 bps.
Terminals provide a convenient and low-cost way to access a FreeBSD system when not at the computer’s console or on a connected network. This section describes how to use terminals with FreeBSD.
The original UNIX® systems did not have consoles. Instead, users logged in and ran programs through terminals that were connected to the computer’s serial ports.
The ability to establish a login session on a serial port still exists in nearly every UNIX®-like operating system today, including FreeBSD. By using a terminal attached to an unused serial port, a user can log in and run any text program that can normally be run on the console or in an xterm window.
Many terminals can be attached to a FreeBSD system. An older spare computer can be used as a terminal wired into a more powerful computer running FreeBSD. This can turn what might otherwise be a single-user computer into a powerful multiple-user system.
FreeBSD supports three types of terminals:
Dumb terminals are specialized hardware that connect to computers over serial lines. They are called "dumb" because they have only enough computational power to display, send, and receive text. No programs can be run on these devices. Instead, dumb terminals connect to a computer that runs the needed programs.
There are hundreds of kinds of dumb terminals made by many manufacturers, and just about any kind will work with FreeBSD. Some high-end terminals can even display graphics, but only certain software packages can take advantage of these advanced features.
Dumb terminals are popular in work environments where workers do not need access to graphical applications.
Since a dumb terminal has just enough ability to display, send, and receive text, any spare computer can be a dumb terminal. All that is needed is the proper cable and some terminal emulation software to run on the computer.
This configuration can be useful. For example, if one user is busy working at the FreeBSD system’s console, another user can do some text-only work at the same time from a less powerful personal computer hooked up as a terminal to the FreeBSD system.
There are at least two utilities in the base-system of FreeBSD that can be used to work through a serial connection: cu(1) and tip(1).
For example, to connect from a client system that runs FreeBSD to the serial connection of another system:
# cu -l /dev/cuauNPorts are numbered starting from zero. This means that COM1 is /dev/cuau0.
Additional programs are available through the Ports Collection, such as comms/minicom.
X terminals are the most sophisticated kind of terminal available. Instead of connecting to a serial port, they usually connect to a network like Ethernet. Instead of being relegated to text-only applications, they can display any Xorg application.
This chapter does not cover the setup, configuration, or use of X terminals.
This section describes how to configure a FreeBSD system to enable a login session on a serial terminal. It assumes that the system recognizes the serial port to which the terminal is connected and that the terminal is connected with the correct cable.
In FreeBSD, init reads /etc/ttys and starts a getty process on the available terminals. The getty process is responsible for reading a login name and starting the login program. The ports on the FreeBSD system which allow logins are listed in /etc/ttys. For example, the first virtual console, ttyv0, has an entry in this file, allowing logins on the console. This file also contains entries for the other virtual consoles, serial ports, and pseudo-ttys. For a hardwired terminal, the serial port’s /dev entry is listed without the /dev part. For example, /dev/ttyv0 is listed as ttyv0.
The default /etc/ttys configures support for the first four serial ports, ttyu0 through ttyu3:
ttyu0 "/usr/libexec/getty std.9600" dialup off secure ttyu1 "/usr/libexec/getty std.9600" dialup off secure ttyu2 "/usr/libexec/getty std.9600" dialup off secure ttyu3 "/usr/libexec/getty std.9600" dialup off secure
When attaching a terminal to one of those ports, modify the default entry to set the required speed and terminal type, to turn the device on and, if needed, to change the port’s secure setting. If the terminal is connected to another port, add an entry for the port.
Configuring Terminal Entries configures two terminals in /etc/ttys. The first entry configures a Wyse-50 connected to COM2. The second entry configures an old computer running Procomm terminal software emulating a VT-100 terminal. The computer is connected to the sixth serial port on a multi-port serial card.
ttyu1 "/usr/libexec/getty std.38400" wy50 on insecure ttyu5 "/usr/libexec/getty std.19200" vt100 on insecure
The first field specifies the device name of the serial terminal.
The second field tells getty to initialize and open the line, set the line speed, prompt for a user name, and then execute the login program. The optional getty type configures characteristics on the terminal line, like bps rate and parity. The available getty types are listed in /etc/gettytab. In almost all cases, the getty types that start with std will work for hardwired terminals as these entries ignore parity. There is a std entry for each bps rate from 110 to 115200. Refer to gettytab(5) for more information.When setting the getty type, make sure to match the communications settings used by the terminal. For this example, the Wyse-50 uses no parity and connects at 38400 bps. The computer uses no parity and connects at 19200 bps.
The third field is the type of terminal. For dial-up ports, unknown or dialup is typically used since users may dial up with practically any type of terminal or software. Since the terminal type does not change for hardwired terminals, a real terminal type from /etc/termcap can be specified. For this example, the Wyse-50 uses the real terminal type while the computer running Procomm is set to emulate a VT-100.
The fourth field specifies if the port should be enabled. To enable logins on this port, this field must be set to on.
The final field is used to specify whether the port is secure. Marking a port as secure means that it is trusted enough to allow root to login from that port. Insecure ports do not allow root logins. On an insecure port, users must login from unprivileged accounts and then use su or a similar mechanism to gain superuser privileges, as described in “The Superuser Account”. For security reasons, it is recommended to change this setting to insecure.
After making any changes to /etc/ttys, send a SIGHUP (hangup) signal to the init process to force it to re-read its configuration file:
# kill -HUP 1Since init is always the first process run on a system, it always has a process ID of 1.
If everything is set up correctly, all cables are in place, and the terminals are powered up, a getty process should now be running on each terminal and login prompts should be available on each terminal.
Even with the most meticulous attention to detail, something could still go wrong while setting up a terminal. Here is a list of common symptoms and some suggested fixes.
If no login prompt appears, make sure the terminal is plugged in and powered up. If it is a personal computer acting as a terminal, make sure it is running terminal emulation software on the correct serial port.
Make sure the cable is connected firmly to both the terminal and the FreeBSD computer. Make sure it is the right kind of cable.
Make sure the terminal and FreeBSD agree on the bps rate and parity settings. For a video display terminal, make sure the contrast and brightness controls are turned up. If it is a printing terminal, make sure paper and ink are in good supply.
Use ps to make sure that a getty process is running and serving the terminal. For example, the following listing shows that a getty is running on the second serial port, ttyu1, and is using the std.38400 entry in /etc/gettytab:
# ps -axww|grep ttyu
22189 d1 Is+ 0:00.03 /usr/libexec/getty std.38400 ttyu1If no getty process is running, make sure the port is enabled in /etc/ttys. Remember to run kill -HUP 1 after modifying /etc/ttys.
If the getty process is running but the terminal still does not display a login prompt, or if it displays a prompt but will not accept typed input, the terminal or cable may not support hardware handshaking. Try changing the entry in /etc/ttys from std.38400 to 3wire.38400, then run kill -HUP 1 after modifying /etc/ttys. The 3wire entry is similar to std, but ignores hardware handshaking. The baud rate may need to be reduced or software flow control enabled when using 3wire to prevent buffer overflows.
If garbage appears instead of a login prompt, make sure the terminal and FreeBSD agree on the bps rate and parity settings. Check the getty processes to make sure the correct getty type is in use. If not, edit /etc/ttys and run kill -HUP 1.
If characters appear doubled and the password appears when typed, switch the terminal, or the terminal emulation software, from "half duplex" or "local echo" to "full duplex."
Configuring a FreeBSD system for dial-in service is similar to configuring terminals, except that modems are used instead of terminal devices. FreeBSD supports both external and internal modems.
External modems are more convenient because they often can be configured via parameters stored in non-volatile RAM and they usually provide lighted indicators that display the state of important RS-232 signals, indicating whether the modem is operating properly.
Internal modems usually lack non-volatile RAM, so their configuration may be limited to setting DIP switches. If the internal modem has any signal indicator lights, they are difficult to view when the system’s cover is in place.
When using an external modem, a proper cable is needed. A standard RS-232C serial cable should suffice.
FreeBSD needs the RTS and CTS signals for flow control at speeds above 2400 bps, the CD signal to detect when a call has been answered or the line has been hung up, and the DTR signal to reset the modem after a session is complete. Some cables are wired without all of the needed signals, so if a login session does not go away when the line hangs up, there may be a problem with the cable. Refer to Serial Cables and Ports for more information about these signals.
Like other UNIX®-like operating systems, FreeBSD uses the hardware signals to find out when a call has been answered or a line has been hung up and to hangup and reset the modem after a call. FreeBSD avoids sending commands to the modem or watching for status reports from the modem.
FreeBSD supports the NS8250, NS16450, NS16550, and NS16550A-based RS-232C (CCITT V.24) communications interfaces. The 8250 and 16450 devices have single-character buffers. The 16550 device provides a 16-character buffer, which allows for better system performance. Bugs in plain 16550 devices prevent the use of the 16-character buffer, so use 16550A devices if possible. Because single-character-buffer devices require more work by the operating system than the 16-character-buffer devices, 16550A-based serial interface cards are preferred. If the system has many active serial ports or will have a heavy load, 16550A-based cards are better for low-error-rate communications.
The rest of this section demonstrates how to configure a modem to receive incoming connections, how to communicate with the modem, and offers some troubleshooting tips.
As with terminals, init spawns a getty process for each configured serial port used for dial-in connections. When a user dials the modem’s line and the modems connect, the "Carrier Detect" signal is reported by the modem. The kernel notices that the carrier has been detected and instructs getty to open the port and display a login: prompt at the specified initial line speed. In a typical configuration, if garbage characters are received, usually due to the modem’s connection speed being different than the configured speed, getty tries adjusting the line speeds until it receives reasonable characters. After the user enters their login name, getty executes login, which completes the login process by asking for the user’s password and then starting the user’s shell.
There are two schools of thought regarding dial-up modems. One configuration method is to set the modems and systems so that no matter at what speed a remote user dials in, the dial-in RS-232 interface runs at a locked speed. The benefit of this configuration is that the remote user always sees a system login prompt immediately. The downside is that the system does not know what a user’s true data rate is, so full-screen programs like Emacs will not adjust their screen-painting methods to make their response better for slower connections.
The second method is to configure the RS-232 interface to vary its speed based on the remote user’s connection speed. Because getty does not understand any particular modem’s connection speed reporting, it gives a login: message at an initial speed and watches the characters that come back in response. If the user sees junk, they should press Enter until they see a recognizable prompt. If the data rates do not match, getty sees anything the user types as junk, tries the next speed, and gives the login: prompt again. This procedure normally only takes a keystroke or two before the user sees a good prompt. This login sequence does not look as clean as the locked-speed method, but a user on a low-speed connection should receive better interactive response from full-screen programs.
When locking a modem’s data communications rate at a particular speed, no changes to /etc/gettytab should be needed. However, for a matching-speed configuration, additional entries may be required in order to define the speeds to use for the modem. This example configures a 14.4 Kbps modem with a top interface speed of 19.2 Kbps using 8-bit, no parity connections. It configures getty to start the communications rate for a V.32bis connection at 19.2 Kbps, then cycles through 9600 bps, 2400 bps, 1200 bps, 300 bps, and back to 19.2 Kbps. Communications rate cycling is implemented with the nx= (next table) capability. Each line uses a tc= (table continuation) entry to pick up the rest of the settings for a particular data rate.
#
# Additions for a V.32bis Modem
#
um|V300|High Speed Modem at 300,8-bit:\
:nx=V19200:tc=std.300:
un|V1200|High Speed Modem at 1200,8-bit:\
:nx=V300:tc=std.1200:
uo|V2400|High Speed Modem at 2400,8-bit:\
:nx=V1200:tc=std.2400:
up|V9600|High Speed Modem at 9600,8-bit:\
:nx=V2400:tc=std.9600:
uq|V19200|High Speed Modem at 19200,8-bit:\
:nx=V9600:tc=std.19200:For a 28.8 Kbps modem, or to take advantage of compression on a 14.4 Kbps modem, use a higher communications rate, as seen in this example:
#
# Additions for a V.32bis or V.34 Modem
# Starting at 57.6 Kbps
#
vm|VH300|Very High Speed Modem at 300,8-bit:\
:nx=VH57600:tc=std.300:
vn|VH1200|Very High Speed Modem at 1200,8-bit:\
:nx=VH300:tc=std.1200:
vo|VH2400|Very High Speed Modem at 2400,8-bit:\
:nx=VH1200:tc=std.2400:
vp|VH9600|Very High Speed Modem at 9600,8-bit:\
:nx=VH2400:tc=std.9600:
vq|VH57600|Very High Speed Modem at 57600,8-bit:\
:nx=VH9600:tc=std.57600:For a slow CPU or a heavily loaded system without 16550A-based serial ports, this configuration may produce sio "silo" errors at 57.6 Kbps.
The configuration of /etc/ttys is similar to Configuring Terminal Entries, but a different argument is passed to getty and dialup is used for the terminal type. Replace xxx with the process init will run on the device:
ttyu0 "/usr/libexec/getty xxx" dialup on
The dialup terminal type can be changed. For example, setting vt102 as the default terminal type allows users to use VT102 emulation on their remote systems.
For a locked-speed configuration, specify the speed with a valid type listed in /etc/gettytab. This example is for a modem whose port speed is locked at 19.2 Kbps:
ttyu0 "/usr/libexec/getty std.19200" dialup on
In a matching-speed configuration, the entry needs to reference the appropriate beginning "auto-baud" entry in /etc/gettytab. To continue the example for a matching-speed modem that starts at 19.2 Kbps, use this entry:
ttyu0 "/usr/libexec/getty V19200" dialup on
After editing /etc/ttys, wait until the modem is properly configured and connected before signaling init:
# kill -HUP 1High-speed modems, like V.32, V.32bis, and V.34 modems, use hardware (RTS/CTS) flow control. Use stty to set the hardware flow control flag for the modem port. This example sets the crtscts flag on COM2's dial-in and dial-out initialization devices:
# stty -f /dev/ttyu1.init crtscts
# stty -f /dev/cuau1.init crtsctsThis section provides a few tips for troubleshooting a dial-up modem that will not connect to a FreeBSD system.
Hook up the modem to the FreeBSD system and boot the system. If the modem has status indication lights, watch to see whether the modem’s DTR indicator lights when the login: prompt appears on the system’s console. If it lights up, that should mean that FreeBSD has started a getty process on the appropriate communications port and is waiting for the modem to accept a call.
If the DTR indicator does not light, login to the FreeBSD system through the console and type ps ax to see if FreeBSD is running a getty process on the correct port:
114 ?? I 0:00.10 /usr/libexec/getty V19200 ttyu0If the second column contains a d0 instead of a ?? and the modem has not accepted a call yet, this means that getty has completed its open on the communications port. This could indicate a problem with the cabling or a misconfigured modem because getty should not be able to open the communications port until the carrier detect signal has been asserted by the modem.
If no getty processes are waiting to open the port, double-check that the entry for the port is correct in /etc/ttys. Also, check /var/log/messages to see if there are any log messages from init or getty.
Next, try dialing into the system. Be sure to use 8 bits, no parity, and 1 stop bit on the remote system. If a prompt does not appear right away, or the prompt shows garbage, try pressing Enter about once per second. If there is still no login: prompt, try sending a BREAK. When using a high-speed modem, try dialing again after locking the dialing modem’s interface speed.
If there is still no login: prompt, check /etc/gettytab again and double-check that:
The initial capability name specified in the entry in /etc/ttys matches the name of a capability in /etc/gettytab.
Each nx= entry matches another gettytab capability name.
Each tc= entry matches another gettytab capability name.
If the modem on the FreeBSD system will not answer, make sure that the modem is configured to answer the phone when DTR is asserted. If the modem seems to be configured correctly, verify that the DTR line is asserted by checking the modem’s indicator lights.
If it still does not work, try sending an email to the FreeBSD general questions mailing list describing the modem and the problem.
The following are tips for getting the host to connect over the modem to another computer. This is appropriate for establishing a terminal session with a remote host.
This kind of connection can be helpful to get a file on the Internet if there are problems using PPP. If PPP is not working, use the terminal session to FTP the needed file. Then use zmodem to transfer it to the machine.
A generic Hayes dialer is built into tip. Use at=hayes in /etc/remote.
The Hayes driver is not smart enough to recognize some of the advanced features of newer modems messages like BUSY, NO DIALTONE, or CONNECT 115200. Turn those messages off when using tip with ATX0&W.
The dial timeout for tip is 60 seconds. The modem should use something less, or else tip will think there is a communication problem. Try ATS7=45&W.
AT CommandsCreate a "direct" entry in /etc/remote. For example, if the modem is hooked up to the first serial port, /dev/cuau0, use the following line:
cuau0:dv=/dev/cuau0:br#19200:pa=none
Use the highest bps rate the modem supports in the br capability. Then, type tip cuau0 to connect to the modem.
Or, use cu as root with the following command:
# cu -lline -sspeedline is the serial port, such as /dev/cuau0, and speed is the speed, such as 57600. When finished entering the AT commands, type ~. to exit.
@ Sign Does Not WorkThe @ sign in the phone number capability tells tip to look in /etc/phones for a phone number. But, the @ sign is also a special character in capability files like /etc/remote, so it needs to be escaped with a backslash:
pn=\@
Put a "generic" entry in /etc/remote. For example:
tip115200|Dial any phone number at 115200 bps:\
:dv=/dev/cuau0:br#115200:at=hayes:pa=none:du:
tip57600|Dial any phone number at 57600 bps:\
:dv=/dev/cuau0:br#57600:at=hayes:pa=none:du:This should now work:
# tip -115200 5551234Users who prefer cu over tip, can use a generic cu entry:
cu115200|Use cu to dial any number at 115200bps:\
:dv=/dev/cuau1:br#57600:at=hayes:pa=none:du:and type:
# cu 5551234 -s 115200Put in an entry for tip1200 or cu1200, but go ahead and use whatever bps rate is appropriate with the br capability. tip thinks a good default is 1200 bps which is why it looks for a tip1200 entry. 1200 bps does not have to be used, though.
Rather than waiting until connected and typing CONNECT host each time, use tip's cm capability. For example, these entries in /etc/remote will let you type tip pain or tip muffin to connect to the hosts pain or muffin, and tip deep13 to connect to the terminal server.
pain|pain.deep13.com|Forrester's machine:\
:cm=CONNECT pain\n:tc=deep13:
muffin|muffin.deep13.com|Frank's machine:\
:cm=CONNECT muffin\n:tc=deep13:
deep13:Gizmonics Institute terminal server:\
:dv=/dev/cuau2:br#38400:at=hayes:du:pa=none:pn=5551234:tipThis is often a problem where a university has several modem lines and several thousand students trying to use them.
Make an entry in /etc/remote and use @ for the pn capability:
big-university:\
:pn=\@:tc=dialout
dialout:\
:dv=/dev/cuau3:br#9600:at=courier:du:pa=none:Then, list the phone numbers in /etc/phones:
big-university 5551111 big-university 5551112 big-university 5551113 big-university 5551114
tip will try each number in the listed order, then give up. To keep retrying, run tip in a while loop.
Ctrl+P is the default "force" character, used to tell tip that the next character is literal data. The force character can be set to any other character with the ~s escape, which means "set a variable."
Type ~sforce=single-char followed by a newline. single-char is any single character. If single-char is left out, then the force character is the null character, which is accessed by typing Ctrl+2 or Ctrl+Space. A pretty good value for single-char is Shift+Ctrl+6, which is only used on some terminal servers.
To change the force character, specify the following in ~/.tiprc:
force=single-char
This happens when Ctrl+A is pressed, which is tip's "raise character", specially designed for people with broken caps-lock keys. Use ~s to set raisechar to something reasonable. It can be set to be the same as the force character, if neither feature is used.
Here is a sample ~/.tiprc for Emacs users who need to type Ctrl+2 and Ctrl+A:
force=^^ raisechar=^^
The ^^ is Shift+Ctrl+6.
tipWhen talking to another UNIX®-like operating system, files can be sent and received using ~p (put) and ~t (take). These commands run cat and echo on the remote system to accept and send files. The syntax is:
~p local-file [ remote-file ]
~t remote-file [ local-file ]
There is no error checking, so another protocol, like zmodem, should probably be used.
FreeBSD has the ability to boot a system with a dumb terminal on a serial port as a console. This configuration is useful for system administrators who wish to install FreeBSD on machines that have no keyboard or monitor attached, and developers who want to debug the kernel or device drivers.
As described in The FreeBSD Booting Process, FreeBSD employs a three stage bootstrap. The first two stages are in the boot block code which is stored at the beginning of the FreeBSD slice on the boot disk. The boot block then loads and runs the boot loader as the third stage code.
In order to set up booting from a serial console, the boot block code, the boot loader code, and the kernel need to be configured.
This section provides a fast overview of setting up the serial console. This procedure can be used when the dumb terminal is connected to COM1.
Connect the serial cable to COM1 and the controlling terminal.
To configure boot messages to display on the serial console, issue the following command as the superuser:
# echo 'console="comconsole"' >> /boot/loader.confEdit /etc/ttys and change off to on and dialup to vt100 for the ttyu0 entry. Otherwise, a password will not be required to connect via the serial console, resulting in a potential security hole.
Reboot the system to see if the changes took effect.
If a different configuration is required, see the next section for a more in-depth configuration explanation.
This section provides a more detailed explanation of the steps needed to setup a serial console in FreeBSD.
Prepare a serial cable.
Use either a null-modem cable or a standard serial cable and a null-modem adapter. See Serial Cables and Ports for a discussion on serial cables.
Unplug the keyboard.
Many systems probe for the keyboard during the Power-On Self-Test (POST) and will generate an error if the keyboard is not detected. Some machines will refuse to boot until the keyboard is plugged in.
If the computer complains about the error, but boots anyway, no further configuration is needed.
If the computer refuses to boot without a keyboard attached, configure the BIOS so that it ignores this error. Consult the motherboard’s manual for details on how to do this.
Try setting the keyboard to "Not installed" in the BIOS. This setting tells the BIOS not to probe for a keyboard at power-on so it should not complain if the keyboard is absent. If that option is not present in the BIOS, look for an "Halt on Error" option instead. Setting this to "All but Keyboard" or to "No Errors" will have the same effect. |
If the system has a PS/2® mouse, unplug it as well. PS/2® mice share some hardware with the keyboard and leaving the mouse plugged in can fool the keyboard probe into thinking the keyboard is still there.
While most systems will boot without a keyboard, quite a few will not boot without a graphics adapter. Some systems can be configured to boot with no graphics adapter by changing the "graphics adapter" setting in the BIOS configuration to "Not installed". Other systems do not support this option and will refuse to boot if there is no display hardware in the system. With these machines, leave some kind of graphics card plugged in, even if it is just a junky mono board. A monitor does not need to be attached. |
Plug a dumb terminal, an old computer with a modem program, or the serial port on another UNIX® box into the serial port.
Add the appropriate hint.sio.* entries to /boot/device.hints for the serial port. Some multi-port cards also require kernel configuration options. Refer to sio(4) for the required options and device hints for each supported serial port.
Create boot.config in the root directory of the a partition on the boot drive.
This file instructs the boot block code how to boot the system. In order to activate the serial console, one or more of the following options are needed. When using multiple options, include them all on the same line:
-hToggles between the internal and serial consoles. Use this to switch console devices. For instance, to boot from the internal (video) console, use -h to direct the boot loader and the kernel to use the serial port as its console device. Alternatively, to boot from the serial port, use -h to tell the boot loader and the kernel to use the video display as the console instead.
-DToggles between the single and dual console configurations. In the single configuration, the console will be either the internal console (video display) or the serial port, depending on the state of -h. In the dual console configuration, both the video display and the serial port will become the console at the same time, regardless of the state of -h. However, the dual console configuration takes effect only while the boot block is running. Once the boot loader gets control, the console specified by -h becomes the only console.
-PMakes the boot block probe the keyboard. If no keyboard is found, the -D and -h options are automatically set.
Due to space constraints in the current version of the boot blocks, |
Use either -P to select the console automatically or -h to activate the serial console. Refer to boot(8) and boot.config(5) for more details.
The options, except for -P, are passed to the boot loader. The boot loader will determine whether the internal video or the serial port should become the console by examining the state of -h. This means that if -D is specified but -h is not specified in /boot.config, the serial port can be used as the console only during the boot block as the boot loader will use the internal video display as the console.
Boot the machine.
When FreeBSD starts, the boot blocks echo the contents of /boot.config to the console. For example:
/boot.config: -P
Keyboard: noThe second line appears only if -P is in /boot.config and indicates the presence or absence of the keyboard. These messages go to either the serial or internal console, or both, depending on the option in /boot.config:
| Options | Message goes to |
|---|---|
none | internal console |
| serial console |
| serial and internal consoles |
| serial and internal consoles |
| internal console |
| serial console |
After the message, there will be a small pause before the boot blocks continue loading the boot loader and before any further messages are printed to the console. Under normal circumstances, there is no need to interrupt the boot blocks, but one can do so in order to make sure things are set up correctly.
Press any key, other than Enter, at the console to interrupt the boot process. The boot blocks will then prompt for further action:
>> FreeBSD/i386 BOOT
Default: 0:ad(0,a)/boot/loader
boot:Verify that the above message appears on either the serial or internal console, or both, according to the options in /boot.config. If the message appears in the correct console, press Enter to continue the boot process.
If there is no prompt on the serial terminal, something is wrong with the settings. Enter -h then Enter or Return to tell the boot block (and then the boot loader and the kernel) to choose the serial port for the console. Once the system is up, go back and check what went wrong.
During the third stage of the boot process, one can still switch between the internal console and the serial console by setting appropriate environment variables in the boot loader. See loader(8) for more information.
This line in /boot/loader.conf or /boot/loader.conf.local configures the boot loader and the kernel to send their boot messages to the serial console, regardless of the options in /boot.config: console="comconsole" That line should be the first line of /boot/loader.conf so that boot messages are displayed on the serial console as early as possible. If that line does not exist, or if it is set to At the moment, the boot loader has no option equivalent to |
While it is not required, it is possible to provide a |
By default, the serial port settings are 9600 baud, 8 bits, no parity, and 1 stop bit. To change the default console speed, use one of the following options:
Edit /etc/make.conf and set BOOT_COMCONSOLE_SPEED to the new console speed. Then, recompile and install the boot blocks and the boot loader:
# cd /sys/boot
# make clean
# make
# make installIf the serial console is configured in some other way than by booting with -h, or if the serial console used by the kernel is different from the one used by the boot blocks, add the following option, with the desired speed, to a custom kernel configuration file and compile a new kernel:
options CONSPEED=19200
Add the -S19200 boot option to /boot.config, replacing 19200 with the speed to use.
Add the following options to /boot/loader.conf. Replace 115200 with the speed to use.
boot_multicons="YES" boot_serial="YES" comconsole_speed="115200" console="comconsole,vidconsole"
To configure the ability to drop into the kernel debugger from the serial console, add the following options to a custom kernel configuration file and compile the kernel using the instructions in Configuring the FreeBSD Kernel. Note that while this is useful for remote diagnostics, it is also dangerous if a spurious BREAK is generated on the serial port. Refer to ddb(4) and ddb(8) for more information about the kernel debugger.
options BREAK_TO_DEBUGGER options DDB
FreeBSD supports the Point-to-Point (PPP) protocol which can be used to establish a network or Internet connection using a dial-up modem. This chapter describes how to configure modem-based communication services in FreeBSD.
After reading this chapter, you will know:
How to configure, use, and troubleshoot a PPP connection.
How to set up PPP over Ethernet (PPPoE).
How to set up PPP over ATM (PPPoA).
Before reading this chapter, you should:
Be familiar with basic network terminology.
Understand the basics and purpose of a dial-up connection and PPP.
FreeBSD provides built-in support for managing dial-up PPP connections using ppp(8). The default FreeBSD kernel provides support for tun which is used to interact with a modem hardware. Configuration is performed by editing at least one configuration file, and configuration files containing examples are provided. Finally, ppp is used to start and manage connections.
In order to use a PPP connection, the following items are needed:
A dial-up account with an Internet Service Provider (ISP).
A dial-up modem.
The dial-up number for the ISP.
The login name and password assigned by the ISP.
The IP address of one or more DNS servers. Normally, the ISP provides these addresses. If it did not, FreeBSD can be configured to use DNS negotiation.
If any of the required information is missing, contact the ISP.
The following information may be supplied by the ISP, but is not necessary:
The IP address of the default gateway. If this information is unknown, the ISP will automatically provide the correct value during connection setup. When configuring PPP on FreeBSD, this address is referred to as HISADDR.
The subnet mask. If the ISP has not provided one, 255.255.255.255 will be used in the ppp(8) configuration file.
*
If the ISP has assigned a static IP address and hostname, it should be input into the configuration file. Otherwise, this information will be automatically provided during connection setup.
The rest of this section demonstrates how to configure FreeBSD for common PPP connection scenarios. The required configuration file is /etc/ppp/ppp.conf and additional files and examples are available in /usr/shared/examples/ppp/.
Throughout this section, many of the file examples display line numbers. These line numbers have been added to make it easier to follow the discussion and are not meant to be placed in the actual file. When editing a configuration file, proper indentation is important. Lines that end in a |
In order to configure a PPP connection, first edit /etc/ppp/ppp.conf with the dial-in information for the ISP. This file is described as follows:
1 default: 2 set log Phase Chat LCP IPCP CCP tun command 3 ident user-ppp VERSION 4 set device /dev/cuau0 5 set speed 115200 6 set dial "ABORT BUSY ABORT NO\\sCARRIER TIMEOUT 5 \ 7 \"\" AT OK-AT-OK ATE1Q0 OK \\dATDT\\T TIMEOUT 40 CONNECT" 8 set timeout 180 9 enable dns 10 11 provider: 12 set phone "(123) 456 7890" 13 set authname foo 14 set authkey bar 15 set timeout 300 16 set ifaddr x.x.x.x/0 y.y.y.y/0 255.255.255.255 0.0.0.0 17 add default HISADDR
Identifies the default entry. Commands in this entry (lines 2 through 9) are executed automatically when ppp is run.
Enables verbose logging parameters for testing the connection. Once the configuration is working satisfactorily, this line should be reduced to:
set log phase tun
Displays the version of ppp(8) to the PPP software running on the other side of the connection.
Identifies the device to which the modem is connected, where COM1 is /dev/cuau0 and COM2 is /dev/cuau1.
Sets the connection speed. If 115200 does not work on an older modem, try 38400 instead.
The dial string written as an expect-send syntax. Refer to chat(8) for more information.
Note that this command continues onto the next line for readability. Any command in ppp.conf may do this if the last character on the line is \.
Sets the idle timeout for the link in seconds.
Instructs the peer to confirm the DNS settings. If the local network is running its own DNS server, this line should be commented out, by adding a # at the beginning of the line, or removed.
A blank line for readability. Blank lines are ignored by ppp(8).
Identifies an entry called provider. This could be changed to the name of the ISP so that load ISP can be used to start the connection.
Use the phone number for the ISP. Multiple phone numbers may be specified using the colon (:) or pipe character (|) as a separator. To rotate through the numbers, use a colon. To always attempt to dial the first number first and only use the other numbers if the first number fails, use the pipe character. Always enclose the entire set of phone numbers between quotation marks (") to prevent dialing failures.
Use the user name and password for the ISP.
Sets the default idle timeout in seconds for the connection. In this example, the connection will be closed automatically after 300 seconds of inactivity. To prevent a timeout, set this value to zero.
Sets the interface addresses. The values used depend upon whether a static IP address has been obtained from the ISP or if it instead negotiates a dynamic IP address during connection.
If the ISP has allocated a static IP address and default gateway, replace x.x.x.x with the static IP address and replace y.y.y.y with the IP address of the default gateway. If the ISP has only provided a static IP address without a gateway address, replace y.y.y.y with 10.0.0.2/0.
If the IP address changes whenever a connection is made, change this line to the following value. This tells ppp(8) to use the IP Configuration Protocol (IPCP) to negotiate a dynamic IP address:
set ifaddr 10.0.0.1/0 10.0.0.2/0 255.255.255.255 0.0.0.0
Keep this line as-is as it adds a default route to the gateway. The HISADDR will automatically be replaced with the gateway address specified on line 16. It is important that this line appears after line 16.
Depending upon whether ppp(8) is started manually or automatically, a /etc/ppp/ppp.linkup may also need to be created which contains the following lines. This file is required when running ppp in -auto mode. This file is used after the connection has been established. At this point, the IP address will have been assigned and it is now be possible to add the routing table entries. When creating this file, make sure that provider matches the value demonstrated in line 11 of ppp.conf.
provider:
add default HISADDRThis file is also needed when the default gateway address is "guessed" in a static IP address configuration. In this case, remove line 17 from ppp.conf and create /etc/ppp/ppp.linkup with the above two lines. More examples for this file can be found in /usr/shared/examples/ppp/.
By default, ppp must be run as root. To change this default, add the account of the user who should run ppp to the network group in /etc/group.
Then, give the user access to one or more entries in /etc/ppp/ppp.conf with allow. For example, to give fred and mary permission to only the provider: entry, add this line to the provider: section:
allow users fred mary
To give the specified users access to all entries, put that line in the default section instead.
It is possible to configure PPP to supply DNS and NetBIOS nameserver addresses on demand.
To enable these extensions with PPP version 1.x, the following lines might be added to the relevant section of /etc/ppp/ppp.conf.
enable msext set ns 203.14.100.1 203.14.100.2 set nbns 203.14.100.5
And for PPP version 2 and above:
accept dns set dns 203.14.100.1 203.14.100.2 set nbns 203.14.100.5
This will tell the clients the primary and secondary name server addresses, and a NetBIOS nameserver host.
In version 2 and above, if the set dns line is omitted, PPP will use the values found in /etc/resolv.conf.
Some ISPs set their system up so that the authentication part of the connection is done using either of the PAP or CHAP authentication mechanisms. If this is the case, the ISP will not give a login: prompt at connection, but will start talking PPP immediately.
PAP is less secure than CHAP, but security is not normally an issue here as passwords, although being sent as plain text with PAP, are being transmitted down a serial line only. There is not much room for crackers to "eavesdrop".
The following alterations must be made:
13 set authname MyUserName 14 set authkey MyPassword 15 set login
This line specifies the PAP/CHAP user name. Insert the correct value for MyUserName.
This line specifies the PAP/CHAP password. Insert the correct value for MyPassword. You may want to add an additional line, such as:
16 accept PAP
or
16 accept CHAP
to make it obvious that this is the intention, but PAP and CHAP are both accepted by default.
The ISP will not normally require a login to the server when using PAP or CHAP. Therefore, disable the "set login" string.
PPP has ability to use internal NAT without kernel diverting capabilities. This functionality may be enabled by the following line in /etc/ppp/ppp.conf:
nat enable yes
Alternatively, NAT may be enabled by command-line option -nat. There is also /etc/rc.conf knob named ppp_nat, which is enabled by default.
When using this feature, it may be useful to include the following /etc/ppp/ppp.conf options to enable incoming connections forwarding:
nat port tcp 10.0.0.2:ftp ftp nat port tcp 10.0.0.2:http http
or do not trust the outside at all
nat deny_incoming yes
While ppp is now configured, some edits still need to be made to /etc/rc.conf.
Working from the top down in this file, make sure the hostname= line is set:
hostname="foo.example.com"
If the ISP has supplied a static IP address and name, use this name as the host name.
Look for the network_interfaces variable. To configure the system to dial the ISP on demand, make sure the tun0 device is added to the list, otherwise remove it.
network_interfaces="lo0 tun0" ifconfig_tun0=
The ppp -auto mysystem This script is executed at network configuration time, starting the ppp daemon in automatic mode. If this machine acts as a gateway, consider including |
Make sure that the router program is set to NO with the following line in /etc/rc.conf:
router_enable="NO"
It is important that the routed daemon is not started, as routed tends to delete the default routing table entries created by ppp.
It is probably a good idea to ensure that the sendmail_flags line does not include the -q option, otherwise sendmail will attempt to do a network lookup every now and then, possibly causing your machine to dial out. You may try:
sendmail_flags="-bd"
The downside is that sendmail is forced to re-examine the mail queue whenever the ppp link. To automate this, include !bg in ppp.linkup:
1 provider: 2 delete ALL 3 add 0 0 HISADDR 4 !bg sendmail -bd -q30m
An alternative is to set up a "dfilter" to block SMTP traffic. Refer to the sample files for further details.
pppAll that is left is to reboot the machine. After rebooting, either type:
# pppand then dial provider to start the PPP session, or, to configure ppp to establish sessions automatically when there is outbound traffic and start_if.tun0 does not exist, type:
# ppp -auto providerIt is possible to talk to the ppp program while it is running in the background, but only if a suitable diagnostic port has been set up. To do this, add the following line to the configuration:
set server /var/run/ppp-tun%d DiagnosticPassword 0177
This will tell PPP to listen to the specified UNIX® domain socket, asking clients for the specified password before allowing access. The %d in the name is replaced with the tun device number that is in use.
Once a socket has been set up, the pppctl(8) program may be used in scripts that wish to manipulate the running program.
“Dial-in Service” provides a good description on enabling dial-up services using getty(8).
An alternative to getty is comms/mgetty+sendfax port), a smarter version of getty designed with dial-up lines in mind.
The advantages of using mgetty is that it actively talks to modems, meaning if port is turned off in /etc/ttys then the modem will not answer the phone.
Later versions of mgetty (from 0.99beta onwards) also support the automatic detection of PPP streams, allowing clients scriptless access to the server.
Refer to http://mgetty.greenie.net/doc/mgetty_toc.html for more information on mgetty.
By default the comms/mgetty+sendfax port comes with the AUTO_PPP option enabled allowing mgetty to detect the LCP phase of PPP connections and automatically spawn off a ppp shell. However, since the default login/password sequence does not occur it is necessary to authenticate users using either PAP or CHAP.
This section assumes the user has successfully compiled, and installed the comms/mgetty+sendfax port on his system.
Ensure that /usr/local/etc/mgetty+sendfax/login.config has the following:
/AutoPPP/ - - /etc/ppp/ppp-pap-dialup
This tells mgetty to run ppp-pap-dialup for detected PPP connections.
Create an executable file called /etc/ppp/ppp-pap-dialup containing the following:
#!/bin/sh exec /usr/sbin/ppp -direct pap$IDENT
For each dial-up line enabled in /etc/ttys, create a corresponding entry in /etc/ppp/ppp.conf. This will happily co-exist with the definitions we created above.
pap: enable pap set ifaddr 203.14.100.1 203.14.100.20-203.14.100.40 enable proxy
Each user logging in with this method will need to have a username/password in /etc/ppp/ppp.secret, or alternatively add the following option to authenticate users via PAP from /etc/passwd.
enable passwdauth
To assign some users a static IP number, specify the number as the third argument in /etc/ppp/ppp.secret. See /usr/shared/examples/ppp/ppp.secret.sample for examples.
This section covers a few issues which may arise when using PPP over a modem connection. Some ISPs present the ssword prompt while others present password. If the ppp script is not written accordingly, the login attempt will fail. The most common way to debug ppp connections is by connecting manually as described in this section.
When using a custom kernel, make sure to include the following line in the kernel configuration file:
device uart
The uart device is already included in the GENERIC kernel, so no additional steps are necessary in this case. Just check the dmesg output for the modem device with:
# dmesg | grep uartThis should display some pertinent output about the uart devices. These are the COM ports we need. If the modem acts like a standard serial port, it should be listed on uart1, or COM2. If so, a kernel rebuild is not required. When matching up, if the modem is on uart1, the modem device would be /dev/cuau1.
Connecting to the Internet by manually controlling ppp is quick, easy, and a great way to debug a connection or just get information on how the ISP treats ppp client connections. Lets start PPP from the command line. Note that in all of our examples we will use example as the hostname of the machine running PPP. To start ppp:
# pppppp ON example> set device /dev/cuau1This second command sets the modem device to cuau1.
ppp ON example> set speed 115200This sets the connection speed to 115,200 kbps.
ppp ON example> enable dnsThis tells ppp to configure the resolver and add the nameserver lines to /etc/resolv.conf. If ppp cannot determine the hostname, it can manually be set later.
ppp ON example> termThis switches to "terminal" mode in order to manually control the modem.
deflink: Entering terminal mode on /dev/cuau1 type '~h' for help
at
OK
atdt123456789Use at to initialize the modem, then use atdt and the number for the ISP to begin the dial in process.
CONNECTConfirmation of the connection, if we are going to have any connection problems, unrelated to hardware, here is where we will attempt to resolve them.
ISP Login:myusernameAt this prompt, return the prompt with the username that was provided by the ISP.
ISP Pass:mypasswordAt this prompt, reply with the password that was provided by the ISP. Just like logging into FreeBSD, the password will not echo.
Shell or PPP:pppDepending on the ISP, this prompt might not appear. If it does, it is asking whether to use a shell on the provider or to start ppp. In this example, ppp was selected in order to establish an Internet connection.
Ppp ON example>Notice that in this example the first p has been capitalized. This shows that we have successfully connected to the ISP.
Ppp ON example>We have successfully authenticated with our ISP and are waiting for the assigned IP address.
PPP ON example>We have made an agreement on an IP address and successfully completed our connection.
PPP ON example>add default HISADDRHere we add our default route, we need to do this before we can talk to the outside world as currently the only established connection is with the peer. If this fails due to existing routes, put a bang character ! in front of the add. Alternatively, set this before making the actual connection and it will negotiate a new route accordingly.
If everything went good we should now have an active connection to the Internet, which could be thrown into the background using CTRL+z If PPP returns to ppp then the connection has bee lost. This is good to know because it shows the connection status. Capital P’s represent a connection to the ISP and lowercase p’s show that the connection has been lost.
If a connection cannot be established, turn hardware flow CTS/RTS to off using set ctsrts off. This is mainly the case when connected to some PPP-capable terminal servers, where PPP hangs when it tries to write data to the communication link, and waits for a Clear To Send (CTS) signal which may never come. When using this option, include set accmap as it may be required to defeat hardware dependent on passing certain characters from end to end, most of the time XON/XOFF. Refer to ppp(8) for more information on this option and how it is used.
An older modem may need set parity even. Parity is set at none be default, but is used for error checking with a large increase in traffic, on older modems.
PPP may not return to the command mode, which is usually a negotiation error where the ISP is waiting for negotiating to begin. At this point, using ~p will force ppp to start sending the configuration information.
If a login prompt never appears, PAP or CHAP authentication is most likely required. To use PAP or CHAP, add the following options to PPP before going into terminal mode:
ppp ON example> set authname myusernameWhere myusername should be replaced with the username that was assigned by the ISP.
ppp ON example> set authkey mypasswordWhere mypassword should be replaced with the password that was assigned by the ISP.
If a connection is established, but cannot seem to find any domain name, try to ping(8) an IP address. If there is 100 percent (100%) packet loss, it is likely that a default route was not assigned. Double check that add default HISADDR was set during the connection. If a connection can be made to a remote IP address, it is possible that a resolver address has not been added to /etc/resolv.conf. This file should look like:
domain example.com nameserver x.x.x.x nameserver y.y.y.y
Where x.x.x.x and y.y.y.y should be replaced with the IP address of the ISP’s DNS servers.
To configure syslog(3) to provide logging for the PPP connection, make sure this line exists in /etc/syslog.conf:
!ppp *.* /var/log/ppp.log
This section describes how to set up PPP over Ethernet (PPPoE).
Here is an example of a working ppp.conf:
default: set log Phase tun command # you can add more detailed logging if you wish set ifaddr 10.0.0.1/0 10.0.0.2/0 name_of_service_provider: set device PPPoE:xl1 # replace xl1 with your Ethernet device set authname YOURLOGINNAME set authkey YOURPASSWORD set dial set login add default HISADDR
As root, run:
# ppp -ddial name_of_service_providerAdd the following to /etc/rc.conf:
ppp_enable="YES" ppp_mode="ddial" ppp_nat="YES" # if you want to enable nat for your local network, otherwise NO ppp_profile="name_of_service_provider"
Sometimes it will be necessary to use a service tag to establish the connection. Service tags are used to distinguish between different PPPoE servers attached to a given network.
Any required service tag information should be in the documentation provided by the ISP.
As a last resort, one could try installing the net/rr-pppoe package or port. Bear in mind however, this may de-program your modem and render it useless, so think twice before doing it. Simply install the program shipped with the modem. Then, access the System menu from the program. The name of the profile should be listed there. It is usually ISP.
The profile name (service tag) will be used in the PPPoE configuration entry in ppp.conf as the provider part for set device. Refer to ppp(8) for full details. It should look like this:
set device PPPoE:xl1:ISP
Do not forget to change xl1 to the proper device for the Ethernet card.
Do not forget to change ISP to the profile.
For additional information, refer to Cheaper Broadband with FreeBSD on DSL by Renaud Waldura.
This modem does not follow the PPPoE specification defined in RFC 2516.
In order to make FreeBSD capable of communicating with this device, a sysctl must be set. This can be done automatically at boot time by updating /etc/sysctl.conf:
net.graph.nonstandard_pppoe=1
or can be done immediately with the command:
# sysctl net.graph.nonstandard_pppoe=1Unfortunately, because this is a system-wide setting, it is not possible to talk to a normal PPPoE client or server and a 3Com® HomeConnect™ ADSL Modem at the same time.
The following describes how to set up PPP over ATM (PPPoA). PPPoA is a popular choice among European DSL providers.
The mpd application can be used to connect to a variety of services, in particular PPTP services. It can be installed using the net/mpd5 package or port. Many ADSL modems require that a PPTP tunnel is created between the modem and computer.
Once installed, configure mpd to suit the provider’s settings. The port places a set of sample configuration files which are well documented in /usr/local/etc/mpd/. A complete guide to configure mpd is available in HTML format in /usr/ports/shared/doc/mpd/. Here is a sample configuration for connecting to an ADSL service with mpd. The configuration is spread over two files, first the mpd.conf:
This example mpd.conf only works with mpd 4.x. |
default:
load adsl
adsl:
new -i ng0 adsl adsl
set bundle authname username (1)
set bundle password password (2)
set bundle disable multilink
set link no pap acfcomp protocomp
set link disable chap
set link accept chap
set link keep-alive 30 10
set ipcp no vjcomp
set ipcp ranges 0.0.0.0/0 0.0.0.0/0
set iface route default
set iface disable on-demand
set iface enable proxy-arp
set iface idle 0
open| 1 | The username used to authenticate with your ISP. |
| 2 | The password used to authenticate with your ISP. |
Information about the link, or links, to establish is found in mpd.links. An example mpd.links to accompany the above example is given beneath:
adsl:
set link type pptp
set pptp mode active
set pptp enable originate outcall
set pptp self 10.0.0.1 (1)
set pptp peer 10.0.0.138 (2)| 1 | The IP address of FreeBSD computer running mpd. |
| 2 | The IP address of the ADSL modem. The Alcatel SpeedTouch™ Home defaults to 10.0.0.138. |
It is possible to initialize the connection easily by issuing the following command as root:
# mpd -b adslTo view the status of the connection:
% ifconfig ng0
ng0: flags=88d1<UP,POINTOPOINT,RUNNING,NOARP,SIMPLEX,MULTICAST> mtu 1500
inet 216.136.204.117 --> 204.152.186.171 netmask 0xffffffffUsing mpd is the recommended way to connect to an ADSL service with FreeBSD.
It is also possible to use FreeBSD to connect to other PPPoA services using net/pptpclient.
To use net/pptpclient to connect to a DSL service, install the port or package, then edit /etc/ppp/ppp.conf. An example section of ppp.conf is given below. For further information on ppp.conf options consult ppp(8).
adsl: set log phase chat lcp ipcp ccp tun command set timeout 0 enable dns set authname username (1) set authkey password (2) set ifaddr 0 0 add default HISADDR
| 1 | The username for the DSL provider. |
| 2 | The password for your account. |
Since the account’s password is added to ppp.conf in plain text form, make sure nobody can read the contents of this file: |
This will open a tunnel for a PPP session to the DSL router. Ethernet DSL modems have a preconfigured LAN IP address to connect to. In the case of the Alcatel SpeedTouch™ Home, this address is 10.0.0.138. The router’s documentation should list the address the device uses. To open the tunnel and start a PPP session:
# pptp address adslIf an ampersand ("&") is added to the end of this command, pptp will return the prompt. |
A tun virtual tunnel device will be created for interaction between the pptp and ppp processes. Once the prompt is returned, or the pptp process has confirmed a connection, examine the tunnel:
% ifconfig tun0
tun0: flags=8051<UP,POINTOPOINT,RUNNING,MULTICAST> mtu 1500
inet 216.136.204.21 --> 204.152.186.171 netmask 0xffffff00
Opened by PID 918If the connection fails, check the configuration of the router, which is usually accessible using a web browser. Also, examine the output of pptp and the contents of the log file, /var/log/ppp.log for clues.
"Electronic Mail", better known as email, is one of the most widely used forms of communication today. This chapter provides a basic introduction to running a mail server on FreeBSD, as well as an introduction to sending and receiving email using FreeBSD. For more complete coverage of this subject, refer to the books listed in Bibliography.
After reading this chapter, you will know:
Which software components are involved in sending and receiving electronic mail.
Where basic Sendmail configuration files are located in FreeBSD.
The difference between remote and local mailboxes.
How to block spammers from illegally using a mail server as a relay.
How to install and configure an alternate Mail Transfer Agent, replacing Sendmail.
How to troubleshoot common mail server problems.
How to set up the system to send mail only.
How to use mail with a dialup connection.
How to configure SMTP authentication for added security.
How to install and use a Mail User Agent, such as mutt, to send and receive email.
How to download mail from a remote POP or IMAP server.
How to automatically apply filters and rules to incoming email.
Before reading this chapter, you should:
Properly set up a network connection (Advanced Networking).
Properly set up the DNS information for a mail host (Network Servers).
Know how to install additional third-party software (Installing Applications: Packages and Ports).
There are five major parts involved in an email exchange: the Mail User Agent (MUA), the Mail Transfer Agent (MTA), a mail host, a remote or local mailbox, and DNS. This section provides an overview of these components.
The Mail User Agent (MUA) is an application which is used to compose, send, and receive emails. This application can be a command line program, such as the built-in mail utility or a third-party application from the Ports Collection, such as mutt, alpine, or elm. Dozens of graphical programs are also available in the Ports Collection, including Claws Mail, Evolution, and Thunderbird. Some organizations provide a web mail program which can be accessed through a web browser. More information about installing and using a MUA on FreeBSD can be found in Mail User Agents.
The Mail Transfer Agent (MTA) is responsible for receiving incoming mail and delivering outgoing mail. FreeBSD ships with Sendmail as the default MTA, but it also supports numerous other mail server daemons, including Exim, Postfix, and qmail. Sendmail configuration is described in Sendmail Configuration Files. If another MTA is installed using the Ports Collection, refer to its post-installation message for FreeBSD-specific configuration details and the application’s website for more general configuration instructions.
The mail host is a server that is responsible for delivering and receiving mail for a host or a network. The mail host collects all mail sent to the domain and stores it either in the default mbox or the alternative Maildir format, depending on the configuration. Once mail has been stored, it may either be read locally using a MUA or remotely accessed and collected using protocols such as POP or IMAP. If mail is read locally, a POP or IMAP server does not need to be installed.
To access mailboxes remotely, a POP or IMAP server is required as these protocols allow users to connect to their mailboxes from remote locations. IMAP offers several advantages over POP. These include the ability to store a copy of messages on a remote server after they are downloaded and concurrent updates. IMAP can be useful over low-speed links as it allows users to fetch the structure of messages without downloading them. It can also perform tasks such as searching on the server in order to minimize data transfer between clients and servers.
Several POP and IMAP servers are available in the Ports Collection. These include mail/qpopper, mail/imap-uw, mail/courier-imap, and mail/dovecot2.
It should be noted that both POP and IMAP transmit information, including username and password credentials, in clear-text. To secure the transmission of information across these protocols, consider tunneling sessions over ssh(1) (SSH Tunneling) or using SSL (OpenSSL). |
The Domain Name System (DNS) and its daemon named play a large role in the delivery of email. In order to deliver mail from one site to another, the MTA will look up the remote site in DNS to determine which host will receive mail for the destination. This process also occurs when mail is sent from a remote host to the MTA.
In addition to mapping hostnames to IP addresses, DNS is responsible for storing information specific to mail delivery, known as Mail eXchanger MX records. The MX record specifies which hosts will receive mail for a particular domain.
To view the MX records for a domain, specify the type of record. Refer to host(1), for more details about this command:
% host -t mx FreeBSD.org
FreeBSD.org mail is handled by 10 mx1.FreeBSD.orgRefer to Domain Name System (DNS) for more information about DNS and its configuration.
Sendmail is the default MTA installed with FreeBSD. It accepts mail from MUAs and delivers it to the appropriate mail host, as defined by its configuration. Sendmail can also accept network connections and deliver mail to local mailboxes or to another program.
The configuration files for Sendmail are located in /etc/mail. This section describes these files in more detail.
This access database file defines which hosts or IP addresses have access to the local mail server and what kind of access they have. Hosts listed as OK, which is the default option, are allowed to send mail to this host as long as the mail’s final destination is the local machine. Hosts listed as REJECT are rejected for all mail connections. Hosts listed as RELAY are allowed to send mail for any destination using this mail server. Hosts listed as ERROR will have their mail returned with the specified mail error. If a host is listed as SKIP, Sendmail will abort the current search for this entry without accepting or rejecting the mail. Hosts listed as QUARANTINE will have their messages held and will receive the specified text as the reason for the hold.
Examples of using these options for both IPv4 and IPv6 addresses can be found in the FreeBSD sample configuration, /etc/mail/access.sample:
# $FreeBSD$ # # Mail relay access control list. Default is to reject mail unless the # destination is local, or listed in /etc/mail/local-host-names # ## Examples (commented out for safety) #From:cyberspammer.com ERROR:"550 We don't accept mail from spammers" #From:okay.cyberspammer.com OK #Connect:sendmail.org RELAY #To:sendmail.org RELAY #Connect:128.32 RELAY #Connect:128.32.2 SKIP #Connect:IPv6:1:2:3:4:5:6:7 RELAY #Connect:suspicious.example.com QUARANTINE:Mail from suspicious host #Connect:[127.0.0.3] OK #Connect:[IPv6:1:2:3:4:5:6:7:8] OK
To configure the access database, use the format shown in the sample to make entries in /etc/mail/access, but do not put a comment symbol (#) in front of the entries. Create an entry for each host or network whose access should be configured. Mail senders that match the left side of the table are affected by the action on the right side of the table.
Whenever this file is updated, update its database and restart Sendmail:
# makemap hash /etc/mail/access < /etc/mail/access
# service sendmail restartThis database file contains a list of virtual mailboxes that are expanded to users, files, programs, or other aliases. Here are a few entries to illustrate the file format:
root: localuser ftp-bugs: joe,eric,paul bit.bucket: /dev/null procmail: "|/usr/local/bin/procmail"
The mailbox name on the left side of the colon is expanded to the target(s) on the right. The first entry expands the root mailbox to the localuser mailbox, which is then looked up in the /etc/mail/aliases database. If no match is found, the message is delivered to localuser. The second entry shows a mail list. Mail to ftp-bugs is expanded to the three local mailboxes joe, eric, and paul. A remote mailbox could be specified as user@example.com. The third entry shows how to write mail to a file, in this case /dev/null. The last entry demonstrates how to send mail to a program, /usr/local/bin/procmail, through a UNIX® pipe. Refer to aliases(5) for more information about the format of this file.
Whenever this file is updated, run newaliases to update and initialize the aliases database.
This is the master configuration file for Sendmail. It controls the overall behavior of Sendmail, including everything from rewriting email addresses to printing rejection messages to remote mail servers. Accordingly, this configuration file is quite complex. Fortunately, this file rarely needs to be changed for standard mail servers.
The master Sendmail configuration file can be built from m4(1) macros that define the features and behavior of Sendmail. Refer to /usr/src/contrib/sendmail/cf/README for some of the details.
Whenever changes to this file are made, Sendmail needs to be restarted for the changes to take effect.
This database file maps mail addresses for virtual domains and users to real mailboxes. These mailboxes can be local, remote, aliases defined in /etc/mail/aliases, or files. This allows multiple virtual domains to be hosted on one machine.
FreeBSD provides a sample configuration file in /etc/mail/virtusertable.sample to further demonstrate its format. The following example demonstrates how to create custom entries using that format:
root@example.com root postmaster@example.com postmaster@noc.example.net @example.com joe
This file is processed in a first match order. When an email address matches the address on the left, it is mapped to the local mailbox listed on the right. The format of the first entry in this example maps a specific email address to a local mailbox, whereas the format of the second entry maps a specific email address to a remote mailbox. Finally, any email address from example.com which has not matched any of the previous entries will match the last mapping and be sent to the local mailbox joe. When creating custom entries, use this format and add them to /etc/mail/virtusertable. Whenever this file is edited, update its database and restart Sendmail:
# makemap hash /etc/mail/virtusertable < /etc/mail/virtusertable
# service sendmail restartIn a default FreeBSD installation, Sendmail is configured to only send mail from the host it is running on. For example, if a POP server is available, users will be able to check mail from remote locations but they will not be able to send outgoing emails from outside locations. Typically, a few moments after the attempt, an email will be sent from MAILER-DAEMON with a 5.7 Relaying Denied message.
The most straightforward solution is to add the ISP’s FQDN to /etc/mail/relay-domains. If multiple addresses are needed, add them one per line:
your.isp.example.com other.isp.example.net users-isp.example.org www.example.org
After creating or editing this file, restart Sendmail with service sendmail restart.
Now any mail sent through the system by any host in this list, provided the user has an account on the system, will succeed. This allows users to send mail from the system remotely without opening the system up to relaying SPAM from the Internet.
FreeBSD comes with Sendmail already installed as the MTA which is in charge of outgoing and incoming mail. However, the system administrator can change the system’s MTA. A wide choice of alternative MTAs is available from the mail category of the FreeBSD Ports Collection.
Once a new MTA is installed, configure and test the new software before replacing Sendmail. Refer to the documentation of the new MTA for information on how to configure the software.
Once the new MTA is working, use the instructions in this section to disable Sendmail and configure FreeBSD to use the replacement MTA.
If Sendmail’s outgoing mail service is disabled, it is important that it is replaced with an alternative mail delivery system. Otherwise, system functions such as periodic(8) will be unable to deliver their results by email. Many parts of the system expect a functional MTA. If applications continue to use Sendmail’s binaries to try to send email after they are disabled, mail could go into an inactive Sendmail queue and never be delivered. |
In order to completely disable Sendmail, add or edit the following lines in /etc/rc.conf:
sendmail_enable="NO" sendmail_submit_enable="NO" sendmail_outbound_enable="NO" sendmail_msp_queue_enable="NO"
To only disable Sendmail’s incoming mail service, use only this entry in /etc/rc.conf:
sendmail_enable="NO"
More information on Sendmail’s startup options is available in rc.sendmail(8).
When a new MTA is installed using the Ports Collection, its startup script is also installed and startup instructions are mentioned in its package message. Before starting the new MTA, stop the running Sendmail processes. This example stops all of these services, then starts the Postfix service:
# service sendmail stop
# service postfix startTo start the replacement MTA at system boot, add its configuration line to /etc/rc.conf. This entry enables the Postfix MTA:
postfix_enable="YES"
Some extra configuration is needed as Sendmail is so ubiquitous that some software assumes it is already installed and configured. Check /etc/periodic.conf and make sure that these values are set to NO. If this file does not exist, create it with these entries:
daily_clean_hoststat_enable="NO" daily_status_mail_rejects_enable="NO" daily_status_include_submit_mailq="NO" daily_submit_queuerun="NO"
Some alternative MTAs provide their own compatible implementations of the Sendmail command-line interface in order to facilitate using them as drop-in replacements for Sendmail. However, some MUAs may try to execute standard Sendmail binaries instead of the new MTA’s binaries. FreeBSD uses /etc/mail/mailer.conf to map the expected Sendmail binaries to the location of the new binaries. More information about this mapping can be found in mailwrapper(8).
The default /etc/mail/mailer.conf looks like this:
# $FreeBSD$ # # Execute the "real" sendmail program, named /usr/libexec/sendmail/sendmail # sendmail /usr/libexec/sendmail/sendmail send-mail /usr/libexec/sendmail/sendmail mailq /usr/libexec/sendmail/sendmail newaliases /usr/libexec/sendmail/sendmail hoststat /usr/libexec/sendmail/sendmail purgestat /usr/libexec/sendmail/sendmail
When any of the commands listed on the left are run, the system actually executes the associated command shown on the right. This system makes it easy to change what binaries are executed when these default binaries are invoked.
Some MTAs, when installed using the Ports Collection, will prompt to update this file for the new binaries. For example, Postfix will update the file like this:
# # Execute the Postfix sendmail program, named /usr/local/sbin/sendmail # sendmail /usr/local/sbin/sendmail send-mail /usr/local/sbin/sendmail mailq /usr/local/sbin/sendmail newaliases /usr/local/sbin/sendmail
If the installation of the MTA does not automatically update /etc/mail/mailer.conf, edit this file in a text editor so that it points to the new binaries. This example points to the binaries installed by mail/ssmtp:
sendmail /usr/local/sbin/ssmtp send-mail /usr/local/sbin/ssmtp mailq /usr/local/sbin/ssmtp newaliases /usr/local/sbin/ssmtp hoststat /usr/bin/true purgestat /usr/bin/true
Once everything is configured, it is recommended to reboot the system. Rebooting provides the opportunity to ensure that the system is correctly configured to start the new MTA automatically on boot.
The host may actually be in a different domain. For example, in order for a host in foo.bar.edu to reach a host called mumble in the bar.edu domain, refer to it by the Fully-Qualified Domain Name FQDN, mumble.bar.edu, instead of just mumble.
This is because the version of BIND which ships with FreeBSD no longer provides default abbreviations for non-FQDNs other than the local domain. An unqualified host such as mumble must either be found as mumble.foo.bar.edu, or it will be searched for in the root domain.
In older versions of BIND, the search continued across mumble.bar.edu, and mumble.edu. RFC 1535 details why this is considered bad practice or even a security hole.
As a good workaround, place the line:
search foo.bar.edu bar.edu
instead of the previous:
domain foo.bar.edu
into /etc/resolv.conf. However, make sure that the search order does not go beyond the "boundary between local and public administration", as RFC 1535 calls it.
Connect to a FreeBSD mail gateway on the LAN. The PPP connection is non-dedicated.
One way to do this is to get a full-time Internet server to provide secondary MX services for the domain. In this example, the domain is example.com and the ISP has configured example.net to provide secondary MX services to the domain:
example.com. MX 10 example.com.
MX 20 example.net.Only one host should be specified as the final recipient. For Sendmail, add Cw example.com in /etc/mail/sendmail.cf on example.com.
When the sending MTA attempts to deliver mail, it will try to connect to the system, example.com, over the PPP link. This will time out if the destination is offline. The MTA will automatically deliver it to the secondary MX site at the Internet Service Provider (ISP), example.net. The secondary MX site will periodically try to connect to the primary MX host, example.com.
Use something like this as a login script:
#!/bin/sh # Put me in /usr/local/bin/pppmyisp ( sleep 60 ; /usr/sbin/sendmail -q ) & /usr/sbin/ppp -direct pppmyisp
When creating a separate login script for users, instead use sendmail -qRexample.com in the script above. This will force all mail in the queue for example.com to be processed immediately.
A further refinement of the situation can be seen from this example from the FreeBSD Internet service provider’s mailing list:
> we provide the secondary MX for a customer. The customer connects to > our services several times a day automatically to get the mails to > his primary MX (We do not call his site when a mail for his domains > arrived). Our sendmail sends the mailqueue every 30 minutes. At the > moment he has to stay 30 minutes online to be sure that all mail is > gone to the primary MX. > > Is there a command that would initiate sendmail to send all the mails > now? The user has not root-privileges on our machine of course. In the privacy flags section of sendmail.cf, there is a definition Opgoaway,restrictqrun Remove restrictqrun to allow non-root users to start the queue processing. You might also like to rearrange the MXs. We are the 1st MX for our customers like this, and we have defined: # If we are the best MX for a host, try directly instead of generating # local config error. OwTrue That way a remote site will deliver straight to you, without trying the customer connection. You then send to your customer. Only works for hosts, so you need to get your customer to name their mail machine customer.com as well as hostname.customer.com in the DNS. Just put an A record in the DNS for customer.com.
This section covers more involved topics such as mail configuration and setting up mail for an entire domain.
Out of the box, one can send email to external hosts as long as /etc/resolv.conf is configured or the network has access to a configured DNS server. To have email delivered to the MTA on the FreeBSD host, do one of the following:
Run a DNS server for the domain.
Get mail delivered directly to the FQDN for the machine.
In order to have mail delivered directly to a host, it must have a permanent static IP address, not a dynamic IP address. If the system is behind a firewall, it must be configured to allow SMTP traffic. To receive mail directly at a host, one of these two must be configured:
Make sure that the lowest-numbered MX record in DNS points to the host’s static IP address.
Make sure there is no MX entry in the DNS for the host.
Either of the above will allow mail to be received directly at the host.
Try this:
# hostname
example.FreeBSD.org
# host example.FreeBSD.org
example.FreeBSD.org has address 204.216.27.XXIn this example, mail sent directly to yourlogin@example.FreeBSD.org should work without problems, assuming Sendmail is running correctly on example.FreeBSD.org.
For this example:
# host example.FreeBSD.org
example.FreeBSD.org has address 204.216.27.XX
example.FreeBSD.org mail is handled (pri=10) by nevdull.FreeBSD.orgAll mail sent to example.FreeBSD.org will be collected on hub under the same username instead of being sent directly to your host.
The above information is handled by the DNS server. The DNS record that carries mail routing information is the MX entry. If no MX record exists, mail will be delivered directly to the host by way of its IP address.
The MX entry for freefall.FreeBSD.org at one time looked like this:
freefall MX 30 mail.crl.net freefall MX 40 agora.rdrop.com freefall MX 10 freefall.FreeBSD.org freefall MX 20 who.cdrom.com
freefall had many MX entries. The lowest MX number is the host that receives mail directly, if available. If it is not accessible for some reason, the next lower-numbered host will accept messages temporarily, and pass it along when a lower-numbered host becomes available.
Alternate MX sites should have separate Internet connections in order to be most useful. Your ISP can provide this service.
When configuring a MTA for a network, any mail sent to hosts in its domain should be diverted to the MTA so that users can receive their mail on the master mail server.
To make life easiest, a user account with the same username should exist on both the MTA and the system with the MUA. Use adduser(8) to create the user accounts.
The MTA must be the designated mail exchanger for each workstation on the network. This is done in theDNS configuration with an MX record:
example.FreeBSD.org A 204.216.27.XX ; Workstation MX 10 nevdull.FreeBSD.org ; Mailhost
This will redirect mail for the workstation to the MTA no matter where the A record points. The mail is sent to the MX host.
This must be configured on a DNS server. If the network does not run its own DNS server, talk to the ISP or DNS provider.
The following is an example of virtual email hosting. Consider a customer with the domain customer1.org, where all the mail for customer1.org should be sent to mail.myhost.com. The DNS entry should look like this:
customer1.org MX 10 mail.myhost.com
An A> record is not needed for customer1.org in order to only handle email for that domain. However, running ping against customer1.org will not work unless an A record exists for it.
Tell the MTA which domains and/or hostnames it should accept mail for. Either of the following will work for Sendmail:
Add the hosts to /etc/mail/local-host-names when using the FEATURE(use_cw_file).
Add a Cwyour.host.com line to /etc/sendmail.cf.
There are many instances where one may only want to send mail through a relay. Some examples are:
The computer is a desktop machine that needs to use programs such as mail(1), using the ISP’s mail relay.
The computer is a server that does not handle mail locally, but needs to pass off all mail to a relay for processing.
While any MTA is capable of filling this particular niche, it can be difficult to properly configure a full-featured MTA just to handle offloading mail. Programs such as Sendmail and Postfix are overkill for this use.
Additionally, a typical Internet access service agreement may forbid one from running a "mail server".
The easiest way to fulfill those needs is to install the mail/ssmtp port:
# cd /usr/ports/mail/ssmtp
# make install replace cleanOnce installed, mail/ssmtp can be configured with /usr/local/etc/ssmtp/ssmtp.conf:
root=yourrealemail@example.com mailhub=mail.example.com rewriteDomain=example.com hostname=_HOSTNAME_
Use the real email address for root. Enter the ISP’s outgoing mail relay in place of mail.example.com. Some ISPs call this the "outgoing mail server" or "SMTP server".
Make sure to disable Sendmail, including the outgoing mail service. See Disable Sendmail for details.
mail/ssmtp has some other options available. Refer to the examples in /usr/local/etc/ssmtp or the manual page of ssmtp for more information.
Setting up ssmtp in this manner allows any software on the computer that needs to send mail to function properly, while not violating the ISP’s usage policy or allowing the computer to be hijacked for spamming.
When using a static IP address, one should not need to adjust the default configuration. Set the hostname to the assigned Internet name and Sendmail will do the rest.
When using a dynamically assigned IP address and a dialup PPP connection to the Internet, one usually has a mailbox on the ISP’s mail server. In this example, the ISP’s domain is example.net, the user name is user, the hostname is bsd.home, and the ISP has allowed relay.example.net as a mail relay.
In order to retrieve mail from the ISP’s mailbox, install a retrieval agent from the Ports Collection. mail/fetchmail is a good choice as it supports many different protocols. Usually, the ISP will provide POP. When using user PPP, email can be automatically fetched when an Internet connection is established with the following entry in /etc/ppp/ppp.linkup:
MYADDR: !bg su user -c fetchmail
When using Sendmail to deliver mail to non-local accounts, configure Sendmail to process the mail queue as soon as the Internet connection is established. To do this, add this line after the above fetchmail entry in /etc/ppp/ppp.linkup:
!bg su user -c "sendmail -q"
In this example, there is an account for user on bsd.home. In the home directory of user on bsd.home, create a .fetchmailrc which contains this line:
poll example.net protocol pop3 fetchall pass MySecret
This file should not be readable by anyone except user as it contains the password MySecret.
In order to send mail with the correct from: header, configure Sendmail to use user@example.net rather than user@bsd.home and to send all mail via relay.example.net, allowing quicker mail transmission.
The following .mc should suffice:
VERSIONID(`bsd.home.mc version 1.0') OSTYPE(bsd4.4)dnl FEATURE(nouucp)dnl MAILER(local)dnl MAILER(smtp)dnl Cwlocalhost Cwbsd.home MASQUERADE_AS(`example.net')dnl FEATURE(allmasquerade)dnl FEATURE(masquerade_envelope)dnl FEATURE(nocanonify)dnl FEATURE(nodns)dnl define(`SMART_HOST', `relay.example.net') Dmbsd.home define(`confDOMAIN_NAME',`bsd.home')dnl define(`confDELIVERY_MODE',`deferred')dnl
Refer to the previous section for details of how to convert this file into the sendmail.cf format. Do not forget to restart Sendmail after updating sendmail.cf.
Configuring SMTP authentication on the MTA provides a number of benefits. SMTP authentication adds a layer of security to Sendmail, and provides mobile users who switch hosts the ability to use the same MTA without the need to reconfigure their mail client’s settings each time.
Install security/cyrus-sasl2 from the Ports Collection. This port supports a number of compile-time options. For the SMTP authentication method demonstrated in this example, make sure that LOGIN is not disabled.
After installing security/cyrus-sasl2, edit /usr/local/lib/sasl2/Sendmail.conf, or create it if it does not exist, and add the following line:
pwcheck_method: saslauthd
Next, install security/cyrus-sasl2-saslauthd and add the following line to /etc/rc.conf:
saslauthd_enable="YES"
Finally, start the saslauthd daemon:
# service saslauthd startThis daemon serves as a broker for Sendmail to authenticate against the FreeBSD passwd(5) database. This saves the trouble of creating a new set of usernames and passwords for each user that needs to use SMTP authentication, and keeps the login and mail password the same.
Next, edit /etc/make.conf and add the following lines:
SENDMAIL_CFLAGS=-I/usr/local/include/sasl -DSASL SENDMAIL_LDADD=/usr/local/lib/libsasl2.so
These lines provide Sendmail the proper configuration options for linking to cyrus-sasl2 at compile time. Make sure that cyrus-sasl2 has been installed before recompiling Sendmail.
Recompile Sendmail by executing the following commands:
# cd /usr/src/lib/libsmutil
# make cleandir && make obj && make
# cd /usr/src/lib/libsm
# make cleandir && make obj && make
# cd /usr/src/usr.sbin/sendmail
# make cleandir && make obj && make && make installThis compile should not have any problems if /usr/src has not changed extensively and the shared libraries it needs are available.
After Sendmail has been compiled and reinstalled, edit /etc/mail/freebsd.mc or the local .mc. Many administrators choose to use the output from hostname(1) as the name of .mc for uniqueness. Add these lines:
dnl set SASL options TRUST_AUTH_MECH(`GSSAPI DIGEST-MD5 CRAM-MD5 LOGIN')dnl define(`confAUTH_MECHANISMS', `GSSAPI DIGEST-MD5 CRAM-MD5 LOGIN')dnl
These options configure the different methods available to Sendmail for authenticating users. To use a method other than pwcheck, refer to the Sendmail documentation.
Finally, run make(1) while in /etc/mail. That will run the new .mc and create a .cf named either freebsd.cf or the name used for the local .mc. Then, run make install restart, which will copy the file to sendmail.cf, and properly restart Sendmail. For more information about this process, refer to /etc/mail/Makefile.
To test the configuration, use a MUA to send a test message. For further investigation, set the LogLevel of Sendmail to 13 and watch /var/log/maillog for any errors.
For more information, refer to SMTP authentication.
A MUA is an application that is used to send and receive email. As email "evolves" and becomes more complex, MUAs are becoming increasingly powerful and provide users increased functionality and flexibility. The mail category of the FreeBSD Ports Collection contains numerous MUAs. These include graphical email clients such as Evolution or Balsa and console based clients such as mutt or alpine.
mailmail(1) is the default MUA installed with FreeBSD. It is a console based MUA that offers the basic functionality required to send and receive text-based email. It provides limited attachment support and can only access local mailboxes.
Although mail does not natively support interaction with POP or IMAP servers, these mailboxes may be downloaded to a local mbox using an application such as fetchmail.
In order to send and receive email, run mail:
% mailThe contents of the user’s mailbox in /var/mail are automatically read by mail. Should the mailbox be empty, the utility exits with a message indicating that no mail could be found. If mail exists, the application interface starts, and a list of messages will be displayed. Messages are automatically numbered, as can be seen in the following example:
Mail version 8.1 6/6/93. Type ? for help.
"/var/mail/marcs": 3 messages 3 new
>N 1 root@localhost Mon Mar 8 14:05 14/510 "test"
N 2 root@localhost Mon Mar 8 14:05 14/509 "user account"
N 3 root@localhost Mon Mar 8 14:05 14/509 "sample"Messages can now be read by typing t followed by the message number. This example reads the first email:
& t 1
Message 1:
From root@localhost Mon Mar 8 14:05:52 2004
X-Original-To: marcs@localhost
Delivered-To: marcs@localhost
To: marcs@localhost
Subject: test
Date: Mon, 8 Mar 2004 14:05:52 +0200 (SAST)
From: root@localhost (Charlie Root)
This is a test message, please reply if you receive it.As seen in this example, the message will be displayed with full headers. To display the list of messages again, press h.
If the email requires a reply, press either R or r mail keys. R instructs mail to reply only to the sender of the email, while r replies to all other recipients of the message. These commands can be suffixed with the mail number of the message to reply to. After typing the response, the end of the message should be marked by a single . on its own line. An example can be seen below:
& R 1
To: root@localhost
Subject: Re: test
Thank you, I did get your email.
.
EOTIn order to send a new email, press m, followed by the recipient email address. Multiple recipients may be specified by separating each address with the , delimiter. The subject of the message may then be entered, followed by the message contents. The end of the message should be specified by putting a single . on its own line.
& mail root@localhost
Subject: I mastered mail
Now I can send and receive email using mail ... :)
.
EOTWhile using mail, press ? to display help at any time. Refer to mail(1) for more help on how to use mail.
mail(1) was not designed to handle attachments and thus deals with them poorly. Newer MUAs handle attachments in a more intelligent way. Users who prefer to use |
mutt is a powerful MUA, with many features, including:
The ability to thread messages.
PGP support for digital signing and encryption of email.
MIME support.
Maildir support.
Highly customizable.
Refer to http://www.mutt.org for more information on mutt.
mutt may be installed using the mail/mutt port. After the port has been installed, mutt can be started by issuing the following command:
% muttmutt will automatically read and display the contents of the user mailbox in /var/mail. If no mails are found, mutt will wait for commands from the user. The example below shows mutt displaying a list of messages:
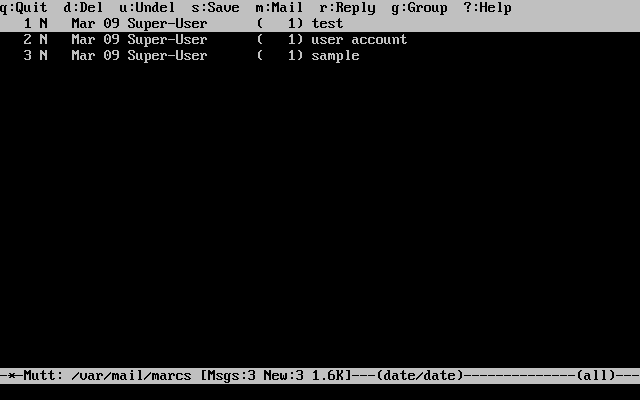
To read an email, select it using the cursor keys and press Enter. An example of mutt displaying email can be seen below:
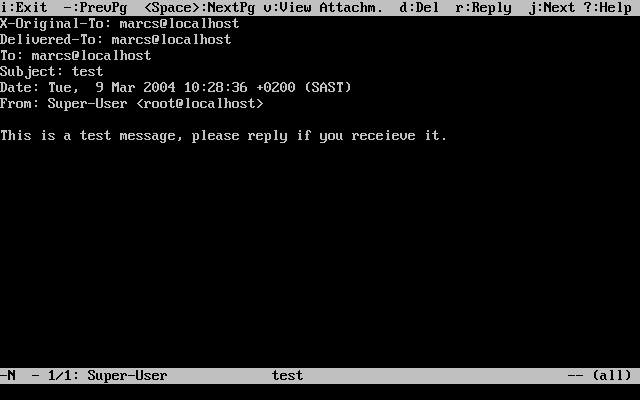
Similar to mail(1), mutt can be used to reply only to the sender of the message as well as to all recipients. To reply only to the sender of the email, press r. To send a group reply to the original sender as well as all the message recipients, press g.
By default, mutt uses the vi(1) editor for creating and replying to emails. Each user can customize this by creating or editing the .muttrc in their home directory and setting the |
To compose a new mail message, press m. After a valid subject has been given, mutt will start vi(1) so the email can be written. Once the contents of the email are complete, save and quit from vi. mutt will resume, displaying a summary screen of the mail that is to be delivered. In order to send the mail, press y. An example of the summary screen can be seen below:
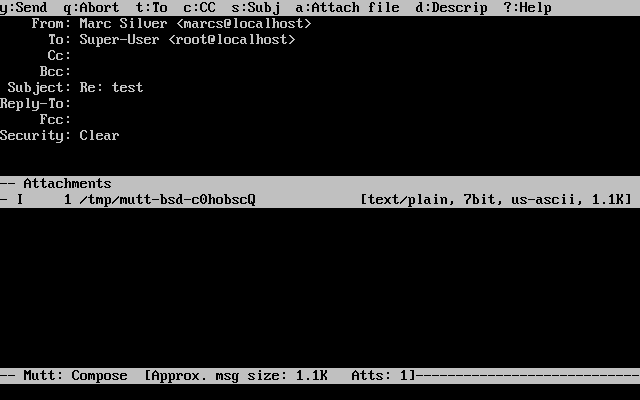
mutt contains extensive help which can be accessed from most of the menus by pressing ?. The top line also displays the keyboard shortcuts where appropriate.
alpine is aimed at a beginner user, but also includes some advanced features.
alpine has had several remote vulnerabilities discovered in the past, which allowed remote attackers to execute arbitrary code as users on the local system, by the action of sending a specially-prepared email. While known problems have been fixed, alpine code is written in an insecure style and the FreeBSD Security Officer believes there are likely to be other undiscovered vulnerabilities. Users install alpine at their own risk. |
The current version of alpine may be installed using the mail/alpine port. Once the port has installed, alpine can be started by issuing the following command:
% alpineThe first time alpine runs, it displays a greeting page with a brief introduction, as well as a request from the alpine development team to send an anonymous email message allowing them to judge how many users are using their client. To send this anonymous message, press Enter. Alternatively, press E to exit the greeting without sending an anonymous message. An example of the greeting page is shown below:
The main menu is then presented, which can be navigated using the cursor keys. This main menu provides shortcuts for the composing new mails, browsing mail directories, and administering address book entries. Below the main menu, relevant keyboard shortcuts to perform functions specific to the task at hand are shown.
The default directory opened by alpine is inbox. To view the message index, press I, or select the option shown below:
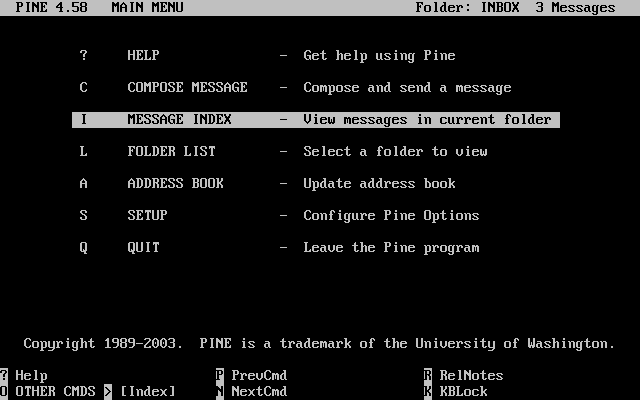
The message index shows messages in the current directory and can be navigated by using the cursor keys. Highlighted messages can be read by pressing Enter.
In the screenshot below, a sample message is displayed by alpine. Contextual keyboard shortcuts are displayed at the bottom of the screen. An example of one of a shortcut is r, which tells the MUA to reply to the current message being displayed.

Replying to an email in alpine is done using the pico editor, which is installed by default with alpine. pico makes it easy to navigate the message and is easier for novice users to use than vi(1) or mail(1). Once the reply is complete, the message can be sent by pressing Ctrl+X. alpine will ask for confirmation before sending the message.
alpine can be customized using the option from the main menu. Consult http://www.washington.edu/alpine/ for more information.
fetchmail is a full-featured IMAP and POP client. It allows users to automatically download mail from remote IMAP and POP servers and save it into local mailboxes where it can be accessed more easily. fetchmail can be installed using the mail/fetchmail port, and offers various features, including:
Support for the POP3, APOP, KPOP, IMAP, ETRN and ODMR protocols.
Ability to forward mail using SMTP, which allows filtering, forwarding, and aliasing to function normally.
May be run in daemon mode to check periodically for new messages.
Can retrieve multiple mailboxes and forward them, based on configuration, to different local users.
This section explains some of the basic features of fetchmail. This utility requires a .fetchmailrc configuration in the user’s home directory in order to run correctly. This file includes server information as well as login credentials. Due to the sensitive nature of the contents of this file, it is advisable to make it readable only by the user, with the following command:
% chmod 600 .fetchmailrcThe following .fetchmailrc serves as an example for downloading a single user mailbox using POP. It tells fetchmail to connect to example.com using a username of joesoap and a password of XXX. This example assumes that the user joesoap exists on the local system.
poll example.com protocol pop3 username "joesoap" password "XXX"
The next example connects to multiple POP and IMAP servers and redirects to different local usernames where applicable:
poll example.com proto pop3: user "joesoap", with password "XXX", is "jsoap" here; user "andrea", with password "XXXX"; poll example2.net proto imap: user "john", with password "XXXXX", is "myth" here;
fetchmail can be run in daemon mode by running it with -d, followed by the interval (in seconds) that fetchmail should poll servers listed in .fetchmailrc. The following example configures fetchmail to poll every 600 seconds:
% fetchmail -d 600More information on fetchmail can be found at http://www.fetchmail.info/.
procmail is a powerful application used to filter incoming mail. It allows users to define "rules" which can be matched to incoming mails to perform specific functions or to reroute mail to alternative mailboxes or email addresses. procmail can be installed using the mail/procmail port. Once installed, it can be directly integrated into most MTAs. Consult the MTA documentation for more information. Alternatively, procmail can be integrated by adding the following line to a .forward in the home directory of the user:
"|exec /usr/local/bin/procmail || exit 75"
The following section displays some basic procmail rules, as well as brief descriptions of what they do. Rules must be inserted into a .procmailrc, which must reside in the user’s home directory.
The majority of these rules can be found in procmailex(5).
To forward all mail from user@example.com to an external address of goodmail@example2.com:
:0 * ^From.*user@example.com ! goodmail@example2.com
To forward all mails shorter than 1000 bytes to an external address of goodmail@example2.com:
:0 * < 1000 ! goodmail@example2.com
To send all mail sent to alternate@example.com to a mailbox called alternate:
:0 * ^TOalternate@example.com alternate
To send all mail with a subject of "Spam" to /dev/null:
:0 ^Subject:.*Spam /dev/null
A useful recipe that parses incoming FreeBSD.org mailing lists and places each list in its own mailbox:
:0
* ^Sender:.owner-freebsd-\/[^@]+@FreeBSD.ORG
{
LISTNAME=${MATCH}
:0
* LISTNAME??^\/[^@]+
FreeBSD-${MATCH}
}This chapter covers some of the more frequently used network services on UNIX® systems. This includes installing, configuring, testing, and maintaining many different types of network services. Example configuration files are included throughout this chapter for reference.
By the end of this chapter, readers will know:
How to manage the inetd daemon.
How to set up the Network File System (NFS).
How to set up the Network Information Server (NIS) for centralizing and sharing user accounts.
How to set FreeBSD up to act as an LDAP server or client
How to set up automatic network settings using DHCP.
How to set up a Domain Name Server (DNS).
How to set up the ApacheHTTP Server.
How to set up a File Transfer Protocol (FTP) server.
How to set up a file and print server for Windows® clients using Samba.
How to synchronize the time and date, and set up a time server using the Network Time Protocol (NTP).
How to set up iSCSI.
This chapter assumes a basic knowledge of:
/etc/rc scripts.
Network terminology.
Installation of additional third-party software (Installing Applications: Packages and Ports).
The inetd(8) daemon is sometimes referred to as a Super-Server because it manages connections for many services. Instead of starting multiple applications, only the inetd service needs to be started. When a connection is received for a service that is managed by inetd, it determines which program the connection is destined for, spawns a process for that program, and delegates the program a socket. Using inetd for services that are not heavily used can reduce system load, when compared to running each daemon individually in stand-alone mode.
Primarily, inetd is used to spawn other daemons, but several trivial protocols are handled internally, such as chargen, auth, time, echo, discard, and daytime.
This section covers the basics of configuring inetd.
Configuration of inetd is done by editing /etc/inetd.conf. Each line of this configuration file represents an application which can be started by inetd. By default, every line starts with a comment (), meaning that inetd is not listening for any applications. To configure inetd to listen for an application’s connections, remove the at the beginning of the line for that application.
After saving your edits, configure inetd to start at system boot by editing /etc/rc.conf:
inetd_enable="YES"
To start inetd now, so that it listens for the service you configured, type:
# service inetd startOnce inetd is started, it needs to be notified whenever a modification is made to /etc/inetd.conf:
# service inetd reloadTypically, the default entry for an application does not need to be edited beyond removing the #. In some situations, it may be appropriate to edit the default entry.
As an example, this is the default entry for ftpd(8) over IPv4:
ftp stream tcp nowait root /usr/libexec/ftpd ftpd -l
The seven columns in an entry are as follows:
service-name
socket-type
protocol
{wait|nowait}[/max-child[/max-connections-per-ip-per-minute[/max-child-per-ip]]]
user[:group][/login-class]
server-program
server-program-argumentswhere:
The service name of the daemon to start. It must correspond to a service listed in /etc/services. This determines which port inetd listens on for incoming connections to that service. When using a custom service, it must first be added to /etc/services.
Either stream, dgram, raw, or seqpacket. Use stream for TCP connections and dgram for UDP services.
Use one of the following protocol names:
| Protocol Name | Explanation |
|---|---|
tcp or tcp4 | TCP IPv4 |
udp or udp4 | UDP IPv4 |
tcp6 | TCP IPv6 |
udp6 | UDP IPv6 |
tcp46 | Both TCP IPv4 and IPv6 |
udp46 | Both UDP IPv4 and IPv6 |
In this field, wait or nowait must be specified. max-child, max-connections-per-ip-per-minute and max-child-per-ip are optional.
wait|nowait indicates whether or not the service is able to handle its own socket. dgram socket types must use wait while stream daemons, which are usually multi-threaded, should use nowait. wait usually hands off multiple sockets to a single daemon, while nowait spawns a child daemon for each new socket.
The maximum number of child daemons inetd may spawn is set by max-child. For example, to limit ten instances of the daemon, place a /10 after nowait. Specifying /0 allows an unlimited number of children.
max-connections-per-ip-per-minute limits the number of connections from any particular IP address per minute. Once the limit is reached, further connections from this IP address will be dropped until the end of the minute. For example, a value of /10 would limit any particular IP address to ten connection attempts per minute. max-child-per-ip limits the number of child processes that can be started on behalf on any single IP address at any moment. These options can limit excessive resource consumption and help to prevent Denial of Service attacks.
An example can be seen in the default settings for fingerd(8):
finger stream tcp nowait/3/10 nobody /usr/libexec/fingerd fingerd -k -s
The username the daemon will run as. Daemons typically run as root, daemon, or nobody.
The full path to the daemon. If the daemon is a service provided by inetd internally, use internal.
Used to specify any command arguments to be passed to the daemon on invocation. If the daemon is an internal service, use internal.
Like most server daemons, inetd has a number of options that can be used to modify its behavior. By default, inetd is started with -wW -C 60. These options enable TCP wrappers for all services, including internal services, and prevent any IP address from requesting any service more than 60 times per minute.
To change the default options which are passed to inetd, add an entry for inetd_flags in /etc/rc.conf. If inetd is already running, restart it with service inetd restart.
The available rate limiting options are:
Specify the default maximum number of simultaneous invocations of each service, where the default is unlimited. May be overridden on a per-service basis by using max-child in /etc/inetd.conf.
Specify the default maximum number of times a service can be invoked from a single IP address per minute. May be overridden on a per-service basis by using max-connections-per-ip-per-minute in /etc/inetd.conf.
Specify the maximum number of times a service can be invoked in one minute, where the default is 256. A rate of 0 allows an unlimited number.
Specify the maximum number of times a service can be invoked from a single IP address at any one time, where the default is unlimited. May be overridden on a per-service basis by using max-child-per-ip in /etc/inetd.conf.
Additional options are available. Refer to inetd(8) for the full list of options.
Many of the daemons which can be managed by inetd are not security-conscious. Some daemons, such as fingerd, can provide information that may be useful to an attacker. Only enable the services which are needed and monitor the system for excessive connection attempts. max-connections-per-ip-per-minute, max-child and max-child-per-ip can be used to limit such attacks.
By default, TCP wrappers is enabled. Consult hosts_access(5) for more information on placing TCP restrictions on various inetd invoked daemons.
FreeBSD supports the Network File System (NFS), which allows a server to share directories and files with clients over a network. With NFS, users and programs can access files on remote systems as if they were stored locally.
NFS has many practical uses. Some of the more common uses include:
Data that would otherwise be duplicated on each client can be kept in a single location and accessed by clients on the network.
Several clients may need access to the /usr/ports/distfiles directory. Sharing that directory allows for quick access to the source files without having to download them to each client.
On large networks, it is often more convenient to configure a central NFS server on which all user home directories are stored. Users can log into a client anywhere on the network and have access to their home directories.
Administration of NFS exports is simplified. For example, there is only one file system where security or backup policies must be set.
Removable media storage devices can be used by other machines on the network. This reduces the number of devices throughout the network and provides a centralized location to manage their security. It is often more convenient to install software on multiple machines from a centralized installation media.
NFS consists of a server and one or more clients. The client remotely accesses the data that is stored on the server machine. In order for this to function properly, a few processes have to be configured and running.
These daemons must be running on the server:
| Daemon | Description |
|---|---|
nfsd | The NFS daemon which services requests from NFS clients. |
mountd | The NFS mount daemon which carries out requests received from nfsd. |
rpcbind | This daemon allows NFS clients to discover which port the NFS server is using. |
Running nfsiod(8) on the client can improve performance, but is not required.
The file systems which the NFS server will share are specified in /etc/exports. Each line in this file specifies a file system to be exported, which clients have access to that file system, and any access options. When adding entries to this file, each exported file system, its properties, and allowed hosts must occur on a single line. If no clients are listed in the entry, then any client on the network can mount that file system.
The following /etc/exports entries demonstrate how to export file systems. The examples can be modified to match the file systems and client names on the reader’s network. There are many options that can be used in this file, but only a few will be mentioned here. See exports(5) for the full list of options.
This example shows how to export /cdrom to three hosts named alpha, bravo, and charlie:
/cdrom -ro alpha bravo charlie
The -ro flag makes the file system read-only, preventing clients from making any changes to the exported file system. This example assumes that the host names are either in DNS or in /etc/hosts. Refer to hosts(5) if the network does not have a DNS server.
The next example exports /home to three clients by IP address. This can be useful for networks without DNS or /etc/hosts entries. The -alldirs flag allows subdirectories to be mount points. In other words, it will not automatically mount the subdirectories, but will permit the client to mount the directories that are required as needed.
/usr/home -alldirs 10.0.0.2 10.0.0.3 10.0.0.4
This next example exports /a so that two clients from different domains may access that file system. The -maproot=root allows root on the remote system to write data on the exported file system as root. If -maproot=root is not specified, the client’s root user will be mapped to the server’s nobody account and will be subject to the access limitations defined for nobody.
/a -maproot=root host.example.com box.example.org
A client can only be specified once per file system. For example, if /usr is a single file system, these entries would be invalid as both entries specify the same host:
# Invalid when /usr is one file system /usr/src client /usr/ports client
The correct format for this situation is to use one entry:
/usr/src /usr/ports client
The following is an example of a valid export list, where /usr and /exports are local file systems:
# Export src and ports to client01 and client02, but only # client01 has root privileges on it /usr/src /usr/ports -maproot=root client01 /usr/src /usr/ports client02 # The client machines have root and can mount anywhere # on /exports. Anyone in the world can mount /exports/obj read-only /exports -alldirs -maproot=root client01 client02 /exports/obj -ro
To enable the processes required by the NFS server at boot time, add these options to /etc/rc.conf:
rpcbind_enable="YES" nfs_server_enable="YES" mountd_enable="YES"
The server can be started now by running this command:
# service nfsd startWhenever the NFS server is started, mountd also starts automatically. However, mountd only reads /etc/exports when it is started. To make subsequent /etc/exports edits take effect immediately, force mountd to reread it:
# service mountd reloadTo enable NFS clients, set this option in each client’s /etc/rc.conf:
nfs_client_enable="YES"
Then, run this command on each NFS client:
# service nfsclient startThe client now has everything it needs to mount a remote file system. In these examples, the server’s name is server and the client’s name is client. To mount /home on server to the /mnt mount point on client:
# mount server:/home /mntThe files and directories in /home will now be available on client, in the /mnt directory.
To mount a remote file system each time the client boots, add it to /etc/fstab:
server:/home /mnt nfs rw 0 0
Refer to fstab(5) for a description of all available options.
Some applications require file locking to operate correctly. To enable locking, add these lines to /etc/rc.conf on both the client and server:
rpc_lockd_enable="YES" rpc_statd_enable="YES"
Then start the applications:
# service lockd start
# service statd startIf locking is not required on the server, the NFS client can be configured to lock locally by including -L when running mount. Refer to mount_nfs(8) for further details.
The autofs(5) facility is a common name for several components that, together, allow for automatic mounting of remote and local filesystems whenever a file or directory within that file system is accessed. It consists of the kernel component, autofs(5), and several userspace applications: automount(8), automountd(8) and autounmountd(8). It serves as an alternative for amd(8) from previous FreeBSD releases. Amd is still provided for backward compatibility purposes, as the two use different map format; the one used by autofs is the same as with other SVR4 automounters, such as the ones in Solaris, MacOS X, and Linux.
The autofs(5) virtual filesystem is mounted on specified mountpoints by automount(8), usually invoked during boot.
Whenever a process attempts to access file within the autofs(5) mountpoint, the kernel will notify automountd(8) daemon and pause the triggering process. The automountd(8) daemon will handle kernel requests by finding the proper map and mounting the filesystem according to it, then signal the kernel to release blocked process. The autounmountd(8) daemon automatically unmounts automounted filesystems after some time, unless they are still being used.
The primary autofs configuration file is /etc/auto_master. It assigns individual maps to top-level mounts. For an explanation of auto_master and the map syntax, refer to auto_master(5).
There is a special automounter map mounted on /net. When a file is accessed within this directory, autofs(5) looks up the corresponding remote mount and automatically mounts it. For instance, an attempt to access a file within /net/foobar/usr would tell automountd(8) to mount the /usr export from the host foobar.
In this example, showmount -e shows the exported file systems that can be mounted from the NFS server, foobar:
% showmount -e foobar
Exports list on foobar:
/usr 10.10.10.0
/a 10.10.10.0
% cd /net/foobar/usrThe output from showmount shows /usr as an export. When changing directories to /host/foobar/usr, automountd(8) intercepts the request and attempts to resolve the hostname foobar. If successful, automountd(8) automatically mounts the source export.
To enable autofs(5) at boot time, add this line to /etc/rc.conf:
autofs_enable="YES"
Then autofs(5) can be started by running:
# service automount start
# service automountd start
# service autounmountd startThe autofs(5) map format is the same as in other operating systems. Information about this format from other sources can be useful, like the Mac OS X document.
Consult the automount(8), automountd(8), autounmountd(8), and auto_master(5) manual pages for more information.
Network Information System (NIS) is designed to centralize administration of UNIX®-like systems such as Solaris™, HP-UX, AIX®, Linux, NetBSD, OpenBSD, and FreeBSD. NIS was originally known as Yellow Pages but the name was changed due to trademark issues. This is the reason why NIS commands begin with yp.
NIS is a Remote Procedure Call (RPC)-based client/server system that allows a group of machines within an NIS domain to share a common set of configuration files. This permits a system administrator to set up NIS client systems with only minimal configuration data and to add, remove, or modify configuration data from a single location.
FreeBSD uses version 2 of the NIS protocol.
Table 28.1 summarizes the terms and important processes used by NIS:
| Term | Description |
|---|---|
NIS domain name | NIS servers and clients share an NIS domain name. Typically, this name does not have anything to do with DNS. |
This service enables RPC and must be running in order to run an NIS server or act as an NIS client. | |
This service binds an NIS client to its NIS server. It will take the NIS domain name and use RPC to connect to the server. It is the core of client/server communication in an NIS environment. If this service is not running on a client machine, it will not be able to access the NIS server. | |
This is the process for the NIS server. If this service stops running, the server will no longer be able to respond to NIS requests so hopefully, there is a slave server to take over. Some non-FreeBSD clients will not try to reconnect using a slave server and the ypbind process may need to be restarted on these clients. | |
This process only runs on NIS master servers. This daemon allows NIS clients to change their NIS passwords. If this daemon is not running, users will have to login to the NIS master server and change their passwords there. |
There are three types of hosts in an NIS environment:
NIS master server
This server acts as a central repository for host configuration information and maintains the authoritative copy of the files used by all of the NIS clients. The passwd, group, and other various files used by NIS clients are stored on the master server. While it is possible for one machine to be an NIS master server for more than one NIS domain, this type of configuration will not be covered in this chapter as it assumes a relatively small-scale NIS environment.
NIS slave servers
NIS slave servers maintain copies of the NIS master’s data files in order to provide redundancy. Slave servers also help to balance the load of the master server as NIS clients always attach to the NIS server which responds first.
NIS clients
NIS clients authenticate against the NIS server during log on.
Information in many files can be shared using NIS. The master.passwd, group, and hosts files are commonly shared via NIS. Whenever a process on a client needs information that would normally be found in these files locally, it makes a query to the NIS server that it is bound to instead.
This section describes a sample NIS environment which consists of 15 FreeBSD machines with no centralized point of administration. Each machine has its own /etc/passwd and /etc/master.passwd. These files are kept in sync with each other only through manual intervention. Currently, when a user is added to the lab, the process must be repeated on all 15 machines.
The configuration of the lab will be as follows:
| Machine name | IP address | Machine role |
|---|---|---|
|
| NIS master |
|
| NIS slave |
|
| Faculty workstation |
|
| Client machine |
|
| Other client machines |
If this is the first time an NIS scheme is being developed, it should be thoroughly planned ahead of time. Regardless of network size, several decisions need to be made as part of the planning process.
When a client broadcasts its requests for info, it includes the name of the NIS domain that it is part of. This is how multiple servers on one network can tell which server should answer which request. Think of the NIS domain name as the name for a group of hosts.
Some organizations choose to use their Internet domain name for their NIS domain name. This is not recommended as it can cause confusion when trying to debug network problems. The NIS domain name should be unique within the network and it is helpful if it describes the group of machines it represents. For example, the Art department at Acme Inc. might be in the "acme-art"NIS domain. This example will use the domain name test-domain.
However, some non-FreeBSD operating systems require the NIS domain name to be the same as the Internet domain name. If one or more machines on the network have this restriction, the Internet domain name must be used as the NIS domain name.
There are several things to keep in mind when choosing a machine to use as a NIS server. Since NIS clients depend upon the availability of the server, choose a machine that is not rebooted frequently. The NIS server should ideally be a stand alone machine whose sole purpose is to be an NIS server. If the network is not heavily used, it is acceptable to put the NIS server on a machine running other services. However, if the NIS server becomes unavailable, it will adversely affect all NIS clients.
The canonical copies of all NIS files are stored on the master server. The databases used to store the information are called NIS maps. In FreeBSD, these maps are stored in /var/yp/[domainname] where [domainname] is the name of the NIS domain. Since multiple domains are supported, it is possible to have several directories, one for each domain. Each domain will have its own independent set of maps.
NIS master and slave servers handle all NIS requests through ypserv(8). This daemon is responsible for receiving incoming requests from NIS clients, translating the requested domain and map name to a path to the corresponding database file, and transmitting data from the database back to the client.
Setting up a master NIS server can be relatively straight forward, depending on environmental needs. Since FreeBSD provides built-in NIS support, it only needs to be enabled by adding the following lines to /etc/rc.conf:
nisdomainname="test-domain" (1) nis_server_enable="YES" (2) nis_yppasswdd_enable="YES" (3)
| 1 | This line sets the NIS domain name to test-domain. |
| 2 | This automates the start up of the NIS server processes when the system boots. |
| 3 | This enables the rpc.yppasswdd(8) daemon so that users can change their NIS password from a client machine. |
Care must be taken in a multi-server domain where the server machines are also NIS clients. It is generally a good idea to force the servers to bind to themselves rather than allowing them to broadcast bind requests and possibly become bound to each other. Strange failure modes can result if one server goes down and others are dependent upon it. Eventually, all the clients will time out and attempt to bind to other servers, but the delay involved can be considerable and the failure mode is still present since the servers might bind to each other all over again.
A server that is also a client can be forced to bind to a particular server by adding these additional lines to /etc/rc.conf:
nis_client_enable="YES" (1) nis_client_flags="-S test-domain,server" (2)
| 1 | This enables running client stuff as well. |
| 2 | This line sets the NIS domain name to test-domain and bind to itself. |
After saving the edits, type /etc/netstart to restart the network and apply the values defined in /etc/rc.conf. Before initializing the NIS maps, start ypserv(8):
# service ypserv startNIS maps are generated from the configuration files in /etc on the NIS master, with one exception: /etc/master.passwd. This is to prevent the propagation of passwords to all the servers in the NIS domain. Therefore, before the NIS maps are initialized, configure the primary password files:
# cp /etc/master.passwd /var/yp/master.passwd
# cd /var/yp
# vi master.passwdIt is advisable to remove all entries for system accounts as well as any user accounts that do not need to be propagated to the NIS clients, such as the root and any other administrative accounts.
Ensure that the /var/yp/master.passwd is neither group or world readable by setting its permissions to |
After completing this task, initialize the NIS maps. FreeBSD includes the ypinit(8) script to do this. When generating maps for the master server, include -m and specify the NIS domain name:
ellington# ypinit -m test-domain
Server Type: MASTER Domain: test-domain
Creating an YP server will require that you answer a few questions.
Questions will all be asked at the beginning of the procedure.
Do you want this procedure to quit on non-fatal errors? [y/n: n] n
Ok, please remember to go back and redo manually whatever fails.
If not, something might not work.
At this point, we have to construct a list of this domains YP servers.
rod.darktech.org is already known as master server.
Please continue to add any slave servers, one per line. When you are
done with the list, type a <control D>.
master server : ellington
next host to add: coltrane
next host to add: ^D
The current list of NIS servers looks like this:
ellington
coltrane
Is this correct? [y/n: y] y
[..output from map generation..]
NIS Map update completed.
ellington has been setup as an YP master server without any errors.This will create /var/yp/Makefile from /var/yp/Makefile.dist. By default, this file assumes that the environment has a single NIS server with only FreeBSD clients. Since test-domain has a slave server, edit this line in /var/yp/Makefile so that it begins with a comment (#):
NOPUSH = "True"
Every time a new user is created, the user account must be added to the master NIS server and the NIS maps rebuilt. Until this occurs, the new user will not be able to login anywhere except on the NIS master. For example, to add the new user jsmith to the test-domain domain, run these commands on the master server:
# pw useradd jsmith
# cd /var/yp
# make test-domainThe user could also be added using adduser jsmith instead of pw useradd smith.
To set up an NIS slave server, log on to the slave server and edit /etc/rc.conf as for the master server. Do not generate any NIS maps, as these already exist on the master server. When running ypinit on the slave server, use -s (for slave) instead of -m (for master). This option requires the name of the NIS master in addition to the domain name, as seen in this example:
coltrane# ypinit -s ellington test-domain
Server Type: SLAVE Domain: test-domain Master: ellington
Creating an YP server will require that you answer a few questions.
Questions will all be asked at the beginning of the procedure.
Do you want this procedure to quit on non-fatal errors? [y/n: n] n
Ok, please remember to go back and redo manually whatever fails.
If not, something might not work.
There will be no further questions. The remainder of the procedure
should take a few minutes, to copy the databases from ellington.
Transferring netgroup...
ypxfr: Exiting: Map successfully transferred
Transferring netgroup.byuser...
ypxfr: Exiting: Map successfully transferred
Transferring netgroup.byhost...
ypxfr: Exiting: Map successfully transferred
Transferring master.passwd.byuid...
ypxfr: Exiting: Map successfully transferred
Transferring passwd.byuid...
ypxfr: Exiting: Map successfully transferred
Transferring passwd.byname...
ypxfr: Exiting: Map successfully transferred
Transferring group.bygid...
ypxfr: Exiting: Map successfully transferred
Transferring group.byname...
ypxfr: Exiting: Map successfully transferred
Transferring services.byname...
ypxfr: Exiting: Map successfully transferred
Transferring rpc.bynumber...
ypxfr: Exiting: Map successfully transferred
Transferring rpc.byname...
ypxfr: Exiting: Map successfully transferred
Transferring protocols.byname...
ypxfr: Exiting: Map successfully transferred
Transferring master.passwd.byname...
ypxfr: Exiting: Map successfully transferred
Transferring networks.byname...
ypxfr: Exiting: Map successfully transferred
Transferring networks.byaddr...
ypxfr: Exiting: Map successfully transferred
Transferring netid.byname...
ypxfr: Exiting: Map successfully transferred
Transferring hosts.byaddr...
ypxfr: Exiting: Map successfully transferred
Transferring protocols.bynumber...
ypxfr: Exiting: Map successfully transferred
Transferring ypservers...
ypxfr: Exiting: Map successfully transferred
Transferring hosts.byname...
ypxfr: Exiting: Map successfully transferred
coltrane has been setup as an YP slave server without any errors.
Remember to update map ypservers on ellington.This will generate a directory on the slave server called /var/yp/test-domain which contains copies of the NIS master server’s maps. Adding these /etc/crontab entries on each slave server will force the slaves to sync their maps with the maps on the master server:
20 * * * * root /usr/libexec/ypxfr passwd.byname 21 * * * * root /usr/libexec/ypxfr passwd.byuid
These entries are not mandatory because the master server automatically attempts to push any map changes to its slaves. However, since clients may depend upon the slave server to provide correct password information, it is recommended to force frequent password map updates. This is especially important on busy networks where map updates might not always complete.
To finish the configuration, run /etc/netstart on the slave server in order to start the NIS services.
An NIS client binds to an NIS server using ypbind(8). This daemon broadcasts RPC requests on the local network. These requests specify the domain name configured on the client. If an NIS server in the same domain receives one of the broadcasts, it will respond to ypbind, which will record the server’s address. If there are several servers available, the client will use the address of the first server to respond and will direct all of its NIS requests to that server. The client will automatically ping the server on a regular basis to make sure it is still available. If it fails to receive a reply within a reasonable amount of time, ypbind will mark the domain as unbound and begin broadcasting again in the hopes of locating another server.
To configure a FreeBSD machine to be an NIS client:
Edit /etc/rc.conf and add the following lines in order to set the NIS domain name and start ypbind(8) during network startup:
nisdomainname="test-domain" nis_client_enable="YES"
To import all possible password entries from the NIS server, use vipw to remove all user accounts except one from /etc/master.passwd. When removing the accounts, keep in mind that at least one local account should remain and this account should be a member of wheel. If there is a problem with NIS, this local account can be used to log in remotely, become the superuser, and fix the problem. Before saving the edits, add the following line to the end of the file:
+:::::::::
This line configures the client to provide anyone with a valid account in the NIS server’s password maps an account on the client. There are many ways to configure the NIS client by modifying this line. One method is described in Using Netgroups. For more detailed reading, refer to the book Managing NFS and NIS, published by O’Reilly Media.
To import all possible group entries from the NIS server, add this line to /etc/group:
+:*::
To start the NIS client immediately, execute the following commands as the superuser:
# /etc/netstart
# service ypbind startAfter completing these steps, running ypcat passwd on the client should show the server’s passwd map.
Since RPC is a broadcast-based service, any system running ypbind within the same domain can retrieve the contents of the NIS maps. To prevent unauthorized transactions, ypserv(8) supports a feature called "securenets" which can be used to restrict access to a given set of hosts. By default, this information is stored in /var/yp/securenets, unless ypserv(8) is started with -p and an alternate path. This file contains entries that consist of a network specification and a network mask separated by white space. Lines starting with # are considered to be comments. A sample securenets might look like this:
# allow connections from local host -- mandatory 127.0.0.1 255.255.255.255 # allow connections from any host # on the 192.168.128.0 network 192.168.128.0 255.255.255.0 # allow connections from any host # between 10.0.0.0 to 10.0.15.255 # this includes the machines in the testlab 10.0.0.0 255.255.240.0
If ypserv(8) receives a request from an address that matches one of these rules, it will process the request normally. If the address fails to match a rule, the request will be ignored and a warning message will be logged. If the securenets does not exist, ypserv will allow connections from any host.
TCP Wrapper is an alternate mechanism for providing access control instead of securenets. While either access control mechanism adds some security, they are both vulnerable to "IP spoofing" attacks. All NIS-related traffic should be blocked at the firewall.
Servers using securenets may fail to serve legitimate NIS clients with archaic TCP/IP implementations. Some of these implementations set all host bits to zero when doing broadcasts or fail to observe the subnet mask when calculating the broadcast address. While some of these problems can be fixed by changing the client configuration, other problems may force the retirement of these client systems or the abandonment of securenets.
The use of TCP Wrapper increases the latency of the NIS server. The additional delay may be long enough to cause timeouts in client programs, especially in busy networks with slow NIS servers. If one or more clients suffer from latency, convert those clients into NIS slave servers and force them to bind to themselves.
In this example, the basie system is a faculty workstation within the NIS domain. The passwd map on the master NIS server contains accounts for both faculty and students. This section demonstrates how to allow faculty logins on this system while refusing student logins.
To prevent specified users from logging on to a system, even if they are present in the NIS database, use vipw to add -username with the correct number of colons towards the end of /etc/master.passwd on the client, where username is the username of a user to bar from logging in. The line with the blocked user must be before the + line that allows NIS users. In this example, bill is barred from logging on to basie:
basie# cat /etc/master.passwd
root:[password]:0:0::0:0:The super-user:/root:/bin/csh
toor:[password]:0:0::0:0:The other super-user:/root:/bin/sh
daemon:*:1:1::0:0:Owner of many system processes:/root:/usr/sbin/nologin
operator:*:2:5::0:0:System &:/:/usr/sbin/nologin
bin:*:3:7::0:0:Binaries Commands and Source,,,:/:/usr/sbin/nologin
tty:*:4:65533::0:0:Tty Sandbox:/:/usr/sbin/nologin
kmem:*:5:65533::0:0:KMem Sandbox:/:/usr/sbin/nologin
games:*:7:13::0:0:Games pseudo-user:/usr/games:/usr/sbin/nologin
news:*:8:8::0:0:News Subsystem:/:/usr/sbin/nologin
man:*:9:9::0:0:Mister Man Pages:/usr/shared/man:/usr/sbin/nologin
bind:*:53:53::0:0:Bind Sandbox:/:/usr/sbin/nologin
uucp:*:66:66::0:0:UUCP pseudo-user:/var/spool/uucppublic:/usr/libexec/uucp/uucico
xten:*:67:67::0:0:X-10 daemon:/usr/local/xten:/usr/sbin/nologin
pop:*:68:6::0:0:Post Office Owner:/nonexistent:/usr/sbin/nologin
nobody:*:65534:65534::0:0:Unprivileged user:/nonexistent:/usr/sbin/nologin
-bill:::::::::
+:::::::::
basie#Barring specified users from logging on to individual systems becomes unscaleable on larger networks and quickly loses the main benefit of NIS: centralized administration.
Netgroups were developed to handle large, complex networks with hundreds of users and machines. Their use is comparable to UNIX® groups, where the main difference is the lack of a numeric ID and the ability to define a netgroup by including both user accounts and other netgroups.
To expand on the example used in this chapter, the NIS domain will be extended to add the users and systems shown in Tables 28.2 and 28.3:
| User Name(s) | Description |
|---|---|
| IT department employees |
| IT department apprentices |
| employees |
| interns |
| Machine Name(s) | Description |
|---|---|
| Only IT employees are allowed to log onto these servers. |
| All members of the IT department are allowed to login onto these servers. |
| Ordinary workstations used by employees. |
| A very old machine without any critical data. Even interns are allowed to use this system. |
When using netgroups to configure this scenario, each user is assigned to one or more netgroups and logins are then allowed or forbidden for all members of the netgroup. When adding a new machine, login restrictions must be defined for all netgroups. When a new user is added, the account must be added to one or more netgroups. If the NIS setup is planned carefully, only one central configuration file needs modification to grant or deny access to machines.
The first step is the initialization of the NIS netgroup map. In FreeBSD, this map is not created by default. On the NIS master server, use an editor to create a map named /var/yp/netgroup.
This example creates four netgroups to represent IT employees, IT apprentices, employees, and interns:
IT_EMP (,alpha,test-domain) (,beta,test-domain)
IT_APP (,charlie,test-domain) (,delta,test-domain)
USERS (,echo,test-domain) (,foxtrott,test-domain) \
(,golf,test-domain)
INTERNS (,able,test-domain) (,baker,test-domain)Each entry configures a netgroup. The first column in an entry is the name of the netgroup. Each set of brackets represents either a group of one or more users or the name of another netgroup. When specifying a user, the three comma-delimited fields inside each group represent:
The name of the host(s) where the other fields representing the user are valid. If a hostname is not specified, the entry is valid on all hosts.
The name of the account that belongs to this netgroup.
The NIS domain for the account. Accounts may be imported from other NIS domains into a netgroup.
If a group contains multiple users, separate each user with whitespace. Additionally, each field may contain wildcards. See netgroup(5) for details.
Netgroup names longer than 8 characters should not be used. The names are case sensitive and using capital letters for netgroup names is an easy way to distinguish between user, machine and netgroup names.
Some non-FreeBSD NIS clients cannot handle netgroups containing more than 15 entries. This limit may be circumvented by creating several sub-netgroups with 15 users or fewer and a real netgroup consisting of the sub-netgroups, as seen in this example:
BIGGRP1 (,joe1,domain) (,joe2,domain) (,joe3,domain) [...] BIGGRP2 (,joe16,domain) (,joe17,domain) [...] BIGGRP3 (,joe31,domain) (,joe32,domain) BIGGROUP BIGGRP1 BIGGRP2 BIGGRP3
Repeat this process if more than 225 (15 times 15) users exist within a single netgroup.
To activate and distribute the new NIS map:
ellington# cd /var/yp
ellington# make
....This will generate the three NIS maps netgroup, netgroup.byhost and netgroup.byuser. Use the map key option of ypcat(1) to check if the new NIS maps are available:
ellington% ypcat -k netgroup
ellington% ypcat -k netgroup.byhost
ellington% ypcat -k netgroup.byuserThe output of the first command should resemble the contents of /var/yp/netgroup. The second command only produces output if host-specific netgroups were created. The third command is used to get the list of netgroups for a user.
To configure a client, use vipw(8) to specify the name of the netgroup. For example, on the server named war, replace this line:
+:::::::::
with
+@IT_EMP:::::::::
This specifies that only the users defined in the netgroup IT_EMP will be imported into this system’s password database and only those users are allowed to login to this system.
This configuration also applies to the ~ function of the shell and all routines which convert between user names and numerical user IDs. In other words, cd ~user will not work, ls -l will show the numerical ID instead of the username, and find . -user joe -print will fail with the message No such user. To fix this, import all user entries without allowing them to login into the servers. This can be achieved by adding an extra line:
+:::::::::/usr/sbin/nologin
This line configures the client to import all entries but to replace the shell in those entries with /usr/sbin/nologin.
Make sure that extra line is placed after +@IT_EMP:::::::::. Otherwise, all user accounts imported from NIS will have /usr/sbin/nologin as their login shell and no one will be able to login to the system.
To configure the less important servers, replace the old +::::::::: on the servers with these lines:
+@IT_EMP::::::::: +@IT_APP::::::::: +:::::::::/usr/sbin/nologin
The corresponding lines for the workstations would be:
+@IT_EMP::::::::: +@USERS::::::::: +:::::::::/usr/sbin/nologin
NIS supports the creation of netgroups from other netgroups which can be useful if the policy regarding user access changes. One possibility is the creation of role-based netgroups. For example, one might create a netgroup called BIGSRV to define the login restrictions for the important servers, another netgroup called SMALLSRV for the less important servers, and a third netgroup called USERBOX for the workstations. Each of these netgroups contains the netgroups that are allowed to login onto these machines. The new entries for the NIS netgroup map would look like this:
BIGSRV IT_EMP IT_APP SMALLSRV IT_EMP IT_APP ITINTERN USERBOX IT_EMP ITINTERN USERS
This method of defining login restrictions works reasonably well when it is possible to define groups of machines with identical restrictions. Unfortunately, this is the exception and not the rule. Most of the time, the ability to define login restrictions on a per-machine basis is required.
Machine-specific netgroup definitions are another possibility to deal with the policy changes. In this scenario, the /etc/master.passwd of each system contains two lines starting with "+". The first line adds a netgroup with the accounts allowed to login onto this machine and the second line adds all other accounts with /usr/sbin/nologin as shell. It is recommended to use the "ALL-CAPS" version of the hostname as the name of the netgroup:
+@BOXNAME::::::::: +:::::::::/usr/sbin/nologin
Once this task is completed on all the machines, there is no longer a need to modify the local versions of /etc/master.passwd ever again. All further changes can be handled by modifying the NIS map. Here is an example of a possible netgroup map for this scenario:
# Define groups of users first IT_EMP (,alpha,test-domain) (,beta,test-domain) IT_APP (,charlie,test-domain) (,delta,test-domain) DEPT1 (,echo,test-domain) (,foxtrott,test-domain) DEPT2 (,golf,test-domain) (,hotel,test-domain) DEPT3 (,india,test-domain) (,juliet,test-domain) ITINTERN (,kilo,test-domain) (,lima,test-domain) D_INTERNS (,able,test-domain) (,baker,test-domain) # # Now, define some groups based on roles USERS DEPT1 DEPT2 DEPT3 BIGSRV IT_EMP IT_APP SMALLSRV IT_EMP IT_APP ITINTERN USERBOX IT_EMP ITINTERN USERS # # And a groups for a special tasks # Allow echo and golf to access our anti-virus-machine SECURITY IT_EMP (,echo,test-domain) (,golf,test-domain) # # machine-based netgroups # Our main servers WAR BIGSRV FAMINE BIGSRV # User india needs access to this server POLLUTION BIGSRV (,india,test-domain) # # This one is really important and needs more access restrictions DEATH IT_EMP # # The anti-virus-machine mentioned above ONE SECURITY # # Restrict a machine to a single user TWO (,hotel,test-domain) # [...more groups to follow]
It may not always be advisable to use machine-based netgroups. When deploying a couple of dozen or hundreds of systems, role-based netgroups instead of machine-based netgroups may be used to keep the size of the NIS map within reasonable limits.
NIS requires that all hosts within an NIS domain use the same format for encrypting passwords. If users have trouble authenticating on an NIS client, it may be due to a differing password format. In a heterogeneous network, the format must be supported by all operating systems, where DES is the lowest common standard.
To check which format a server or client is using, look at this section of /etc/login.conf:
default:\ :passwd_format=des:\ :copyright=/etc/COPYRIGHT:\ [Further entries elided]
In this example, the system is using the DES format. Other possible values are blf for Blowfish and md5 for MD5 encrypted passwords.
If the format on a host needs to be edited to match the one being used in the NIS domain, the login capability database must be rebuilt after saving the change:
# cap_mkdb /etc/login.confThe format of passwords for existing user accounts will not be updated until each user changes their password after the login capability database is rebuilt. |
The Lightweight Directory Access Protocol (LDAP) is an application layer protocol used to access, modify, and authenticate objects using a distributed directory information service. Think of it as a phone or record book which stores several levels of hierarchical, homogeneous information. It is used in Active Directory and OpenLDAP networks and allows users to access to several levels of internal information utilizing a single account. For example, email authentication, pulling employee contact information, and internal website authentication might all make use of a single user account in the LDAP server’s record base.
This section provides a quick start guide for configuring an LDAP server on a FreeBSD system. It assumes that the administrator already has a design plan which includes the type of information to store, what that information will be used for, which users should have access to that information, and how to secure this information from unauthorized access.
LDAP uses several terms which should be understood before starting the configuration. All directory entries consist of a group of attributes. Each of these attribute sets contains a unique identifier known as a Distinguished Name (DN) which is normally built from several other attributes such as the common or Relative Distinguished Name (RDN). Similar to how directories have absolute and relative paths, consider a DN as an absolute path and the RDN as the relative path.
An example LDAP entry looks like the following. This example searches for the entry for the specified user account (uid), organizational unit (ou), and organization (o):
% ldapsearch -xb "uid=trhodes,ou=users,o=example.com"
# extended LDIF
#
# LDAPv3
# base <uid=trhodes,ou=users,o=example.com> with scope subtree
# filter: (objectclass=*)
# requesting: ALL
#
# trhodes, users, example.com
dn: uid=trhodes,ou=users,o=example.com
mail: trhodes@example.com
cn: Tom Rhodes
uid: trhodes
telephoneNumber: (123) 456-7890
# search result
search: 2
result: 0 Success
# numResponses: 2
# numEntries: 1This example entry shows the values for the dn, mail, cn, uid, and telephoneNumber attributes. The cn attribute is the RDN.
More information about LDAP and its terminology can be found at http://www.openldap.org/doc/admin24/intro.html.
FreeBSD does not provide a built-in LDAP server. Begin the configuration by installing net/openldap-server package or port:
# pkg install openldap-serverThere is a large set of default options enabled in the package. Review them by running pkg info openldap-server. If they are not sufficient (for example if SQL support is needed), please consider recompiling the port using the appropriate framework.
The installation creates the directory /var/db/openldap-data to hold the data. The directory to store the certificates must be created:
# mkdir /usr/local/etc/openldap/privateThe next phase is to configure the Certificate Authority. The following commands must be executed from /usr/local/etc/openldap/private. This is important as the file permissions need to be restrictive and users should not have access to these files. More detailed information about certificates and their parameters can be found in OpenSSL. To create the Certificate Authority, start with this command and follow the prompts:
# openssl req -days 365 -nodes -new -x509 -keyout ca.key -out ../ca.crtThe entries for the prompts may be generic except for the Common Name. This entry must be different than the system hostname. If this will be a self signed certificate, prefix the hostname with CA for Certificate Authority.
The next task is to create a certificate signing request and a private key. Input this command and follow the prompts:
# openssl req -days 365 -nodes -new -keyout server.key -out server.csrDuring the certificate generation process, be sure to correctly set the Common Name attribute. The Certificate Signing Request must be signed with the Certificate Authority in order to be used as a valid certificate:
# openssl x509 -req -days 365 -in server.csr -out ../server.crt -CA ../ca.crt -CAkey ca.key -CAcreateserialThe final part of the certificate generation process is to generate and sign the client certificates:
# openssl req -days 365 -nodes -new -keyout client.key -out client.csr
# openssl x509 -req -days 3650 -in client.csr -out ../client.crt -CA ../ca.crt -CAkey ca.keyRemember to use the same Common Name attribute when prompted. When finished, ensure that a total of eight (8) new files have been generated through the proceeding commands.
The daemon running the OpenLDAP server is slapd. Its configuration is performed through slapd.ldif: the old slapd.conf has been deprecated by OpenLDAP.
Configuration examples for slapd.ldif are available and can also be found in /usr/local/etc/openldap/slapd.ldif.sample. Options are documented in slapd-config(5). Each section of slapd.ldif, like all the other LDAP attribute sets, is uniquely identified through a DN. Be sure that no blank lines are left between the dn: statement and the desired end of the section. In the following example, TLS will be used to implement a secure channel. The first section represents the global configuration:
# # See slapd-config(5) for details on configuration options. # This file should NOT be world readable. # dn: cn=config objectClass: olcGlobal cn: config # # # Define global ACLs to disable default read access. # olcArgsFile: /var/run/openldap/slapd.args olcPidFile: /var/run/openldap/slapd.pid olcTLSCertificateFile: /usr/local/etc/openldap/server.crt olcTLSCertificateKeyFile: /usr/local/etc/openldap/private/server.key olcTLSCACertificateFile: /usr/local/etc/openldap/ca.crt #olcTLSCipherSuite: HIGH olcTLSProtocolMin: 3.1 olcTLSVerifyClient: never
The Certificate Authority, server certificate and server private key files must be specified here. It is recommended to let the clients choose the security cipher and omit option olcTLSCipherSuite (incompatible with TLS clients other than openssl). Option olcTLSProtocolMin lets the server require a minimum security level: it is recommended. While verification is mandatory for the server, it is not for the client: olcTLSVerifyClient: never.
The second section is about the backend modules and can be configured as follows:
# # Load dynamic backend modules: # dn: cn=module,cn=config objectClass: olcModuleList cn: module olcModulepath: /usr/local/libexec/openldap olcModuleload: back_mdb.la #olcModuleload: back_bdb.la #olcModuleload: back_hdb.la #olcModuleload: back_ldap.la #olcModuleload: back_passwd.la #olcModuleload: back_shell.la
The third section is devoted to load the needed ldif schemas to be used by the databases: they are essential.
dn: cn=schema,cn=config objectClass: olcSchemaConfig cn: schema include: file:///usr/local/etc/openldap/schema/core.ldif include: file:///usr/local/etc/openldap/schema/cosine.ldif include: file:///usr/local/etc/openldap/schema/inetorgperson.ldif include: file:///usr/local/etc/openldap/schema/nis.ldif
Next, the frontend configuration section:
# Frontend settings
#
dn: olcDatabase={-1}frontend,cn=config
objectClass: olcDatabaseConfig
objectClass: olcFrontendConfig
olcDatabase: {-1}frontend
olcAccess: to * by * read
#
# Sample global access control policy:
# Root DSE: allow anyone to read it
# Subschema (sub)entry DSE: allow anyone to read it
# Other DSEs:
# Allow self write access
# Allow authenticated users read access
# Allow anonymous users to authenticate
#
#olcAccess: to dn.base="" by * read
#olcAccess: to dn.base="cn=Subschema" by * read
#olcAccess: to *
# by self write
# by users read
# by anonymous auth
#
# if no access controls are present, the default policy
# allows anyone and everyone to read anything but restricts
# updates to rootdn. (e.g., "access to * by * read")
#
# rootdn can always read and write EVERYTHING!
#
olcPasswordHash: {SSHA}
# {SSHA} is already the default for olcPasswordHashAnother section is devoted to the configuration backend, the only way to later access the OpenLDAP server configuration is as a global super-user.
dn: olcDatabase={0}config,cn=config
objectClass: olcDatabaseConfig
olcDatabase: {0}config
olcAccess: to * by * none
olcRootPW: {SSHA}iae+lrQZILpiUdf16Z9KmDmSwT77Dj4UThe default administrator username is cn=config. Type slappasswd in a shell, choose a password and use its hash in olcRootPW. If this option is not specified now, before slapd.ldif is imported, no one will be later able to modify the global configuration section.
The last section is about the database backend:
#######################################################################
# LMDB database definitions
#######################################################################
#
dn: olcDatabase=mdb,cn=config
objectClass: olcDatabaseConfig
objectClass: olcMdbConfig
olcDatabase: mdb
olcDbMaxSize: 1073741824
olcSuffix: dc=domain,dc=example
olcRootDN: cn=mdbadmin,dc=domain,dc=example
# Cleartext passwords, especially for the rootdn, should
# be avoided. See slappasswd(8) and slapd-config(5) for details.
# Use of strong authentication encouraged.
olcRootPW: {SSHA}X2wHvIWDk6G76CQyCMS1vDCvtICWgn0+
# The database directory MUST exist prior to running slapd AND
# should only be accessible by the slapd and slap tools.
# Mode 700 recommended.
olcDbDirectory: /var/db/openldap-data
# Indices to maintain
olcDbIndex: objectClass eqThis database hosts the actual contents of the LDAP directory. Types other than mdb are available. Its super-user, not to be confused with the global one, is configured here: a (possibly custom) username in olcRootDN and the password hash in olcRootPW; slappasswd can be used as before.
This repository contains four examples of slapd.ldif. To convert an existing slapd.conf into slapd.ldif, refer to this page (please note that this may introduce some unuseful options).
When the configuration is completed, slapd.ldif must be placed in an empty directory. It is recommended to create it as:
# mkdir /usr/local/etc/openldap/slapd.d/Import the configuration database:
# /usr/local/sbin/slapadd -n0 -F /usr/local/etc/openldap/slapd.d/ -l /usr/local/etc/openldap/slapd.ldifStart the slapd daemon:
# /usr/local/libexec/slapd -F /usr/local/etc/openldap/slapd.d/Option -d can be used for debugging, as specified in slapd(8). To verify that the server is running and working:
# ldapsearch -x -b '' -s base '(objectclass=*)' namingContexts
# extended LDIF
#
# LDAPv3
# base <> with scope baseObject
# filter: (objectclass=*)
# requesting: namingContexts
#
#
dn:
namingContexts: dc=domain,dc=example
# search result
search: 2
result: 0 Success
# numResponses: 2
# numEntries: 1The server must still be trusted. If that has never been done before, follow these instructions. Install the OpenSSL package or port:
# pkg install opensslFrom the directory where ca.crt is stored (in this example, /usr/local/etc/openldap), run:
# c_rehash .Both the CA and the server certificate are now correctly recognized in their respective roles. To verify this, run this command from the server.crt directory:
# openssl verify -verbose -CApath . server.crtIf slapd was running, restart it. As stated in /usr/local/etc/rc.d/slapd, to properly run slapd at boot the following lines must be added to /etc/rc.conf:
lapd_enable="YES" slapd_flags='-h "ldapi://%2fvar%2frun%2fopenldap%2fldapi/ ldap://0.0.0.0/"' slapd_sockets="/var/run/openldap/ldapi" slapd_cn_config="YES"
slapd does not provide debugging at boot. Check /var/log/debug.log, dmesg -a and /var/log/messages for this purpose.
The following example adds the group team and the user john to the domain.example LDAP database, which is still empty. First, create the file domain.ldif:
# cat domain.ldif
dn: dc=domain,dc=example
objectClass: dcObject
objectClass: organization
o: domain.example
dc: domain
dn: ou=groups,dc=domain,dc=example
objectClass: top
objectClass: organizationalunit
ou: groups
dn: ou=users,dc=domain,dc=example
objectClass: top
objectClass: organizationalunit
ou: users
dn: cn=team,ou=groups,dc=domain,dc=example
objectClass: top
objectClass: posixGroup
cn: team
gidNumber: 10001
dn: uid=john,ou=users,dc=domain,dc=example
objectClass: top
objectClass: account
objectClass: posixAccount
objectClass: shadowAccount
cn: John McUser
uid: john
uidNumber: 10001
gidNumber: 10001
homeDirectory: /home/john/
loginShell: /usr/bin/bash
userPassword: secretSee the OpenLDAP documentation for more details. Use slappasswd to replace the plain text password secret with a hash in userPassword. The path specified as loginShell must exist in all the systems where john is allowed to login. Finally, use the mdb administrator to modify the database:
# ldapadd -W -D "cn=mdbadmin,dc=domain,dc=example" -f domain.ldifModifications to the global configuration section can only be performed by the global super-user. For example, assume that the option olcTLSCipherSuite: HIGH:MEDIUM:SSLv3 was initially specified and must now be deleted. First, create a file that contains the following:
# cat global_mod
dn: cn=config
changetype: modify
delete: olcTLSCipherSuiteThen, apply the modifications:
# ldapmodify -f global_mod -x -D "cn=config" -WWhen asked, provide the password chosen in the configuration backend section. The username is not required: here, cn=config represents the DN of the database section to be modified. Alternatively, use ldapmodify to delete a single line of the database, ldapdelete to delete a whole entry.
If something goes wrong, or if the global super-user cannot access the configuration backend, it is possible to delete and re-write the whole configuration:
# rm -rf /usr/local/etc/openldap/slapd.d/slapd.ldif can then be edited and imported again. Please, follow this procedure only when no other solution is available.
This is the configuration of the server only. The same machine can also host an LDAP client, with its own separate configuration.
The Dynamic Host Configuration Protocol (DHCP) allows a system to connect to a network in order to be assigned the necessary addressing information for communication on that network. FreeBSD includes the OpenBSD version of dhclient which is used by the client to obtain the addressing information. FreeBSD does not install a DHCP server, but several servers are available in the FreeBSD Ports Collection. The DHCP protocol is fully described in RFC 2131. Informational resources are also available at isc.org/downloads/dhcp/.
This section describes how to use the built-in DHCP client. It then describes how to install and configure a DHCP server.
In FreeBSD, the bpf(4) device is needed by both the DHCP server and DHCP client. This device is included in the GENERIC kernel that is installed with FreeBSD. Users who prefer to create a custom kernel need to keep this device if DHCP is used. It should be noted that bpf also allows privileged users to run network packet sniffers on that system. |
DHCP client support is included in the FreeBSD installer, making it easy to configure a newly installed system to automatically receive its networking addressing information from an existing DHCP server. Refer to Accounts, Time Zone, Services and Hardening for examples of network configuration.
When dhclient is executed on the client machine, it begins broadcasting requests for configuration information. By default, these requests use UDP port 68. The server replies on UDP port 67, giving the client an IP address and other relevant network information such as a subnet mask, default gateway, and DNS server addresses. This information is in the form of a DHCP"lease" and is valid for a configurable time. This allows stale IP addresses for clients no longer connected to the network to automatically be reused. DHCP clients can obtain a great deal of information from the server. An exhaustive list may be found in dhcp-options(5).
By default, when a FreeBSD system boots, its DHCP client runs in the background, or asynchronously. Other startup scripts continue to run while the DHCP process completes, which speeds up system startup.
Background DHCP works well when the DHCP server responds quickly to the client’s requests. However, DHCP may take a long time to complete on some systems. If network services attempt to run before DHCP has assigned the network addressing information, they will fail. Using DHCP in synchronous mode prevents this problem as it pauses startup until the DHCP configuration has completed.
This line in /etc/rc.conf is used to configure background or asynchronous mode:
ifconfig_fxp0="DHCP"
This line may already exist if the system was configured to use DHCP during installation. Replace the fxp0 shown in these examples with the name of the interface to be dynamically configured, as described in “Setting Up Network Interface Cards”.
To instead configure the system to use synchronous mode, and to pause during startup while DHCP completes, use “SYNCDHCP”:
ifconfig_fxp0="SYNCDHCP"
Additional client options are available. Search for dhclient in rc.conf(5) for details.
The DHCP client uses the following files:
/etc/dhclient.conf
The configuration file used by dhclient. Typically, this file contains only comments as the defaults are suitable for most clients. This configuration file is described in dhclient.conf(5).
/sbin/dhclient
More information about the command itself can be found in dhclient(8).
/sbin/dhclient-script
The FreeBSD-specific DHCP client configuration script. It is described in dhclient-script(8), but should not need any user modification to function properly.
/var/db/dhclient.leases.interface
The DHCP client keeps a database of valid leases in this file, which is written as a log and is described in dhclient.leases(5).
This section demonstrates how to configure a FreeBSD system to act as a DHCP server using the Internet Systems Consortium (ISC) implementation of the DHCP server. This implementation and its documentation can be installed using the net/isc-dhcp44-server package or port.
The installation of net/isc-dhcp44-server installs a sample configuration file. Copy /usr/local/etc/dhcpd.conf.example to /usr/local/etc/dhcpd.conf and make any edits to this new file.
The configuration file is comprised of declarations for subnets and hosts which define the information that is provided to DHCP clients. For example, these lines configure the following:
option domain-name "example.org";(1)
option domain-name-servers ns1.example.org;(2)
option subnet-mask 255.255.255.0;(3)
default-lease-time 600;(4)
max-lease-time 72400;(5)
ddns-update-style none;(6)
subnet 10.254.239.0 netmask 255.255.255.224 {
range 10.254.239.10 10.254.239.20;(7)
option routers rtr-239-0-1.example.org, rtr-239-0-2.example.org;(8)
}
host fantasia {
hardware ethernet 08:00:07:26:c0:a5;(9)
fixed-address fantasia.fugue.com;(10)
}| 1 | This option specifies the default search domain that will be provided to clients. Refer to resolv.conf(5) for more information. |
| 2 | This option specifies a comma separated list of DNS servers that the client should use. They can be listed by their Fully Qualified Domain Names (FQDN), as seen in the example, or by their IP addresses. |
| 3 | The subnet mask that will be provided to clients. |
| 4 | The default lease expiry time in seconds. A client can be configured to override this value. |
| 5 | The maximum allowed length of time, in seconds, for a lease. Should a client request a longer lease, a lease will still be issued, but it will only be valid for max-lease-time. |
| 6 | The default of none disables dynamic DNS updates. Changing this to interim configures the DHCP server to update a DNS server whenever it hands out a lease so that the DNS server knows which IP addresses are associated with which computers in the network. Do not change the default setting unless the DNS server has been configured to support dynamic DNS. |
| 7 | This line creates a pool of available IP addresses which are reserved for allocation to DHCP clients. The range of addresses must be valid for the network or subnet specified in the previous line. |
| 8 | Declares the default gateway that is valid for the network or subnet specified before the opening { bracket. |
| 9 | Specifies the hardware MAC address of a client so that the DHCP server can recognize the client when it makes a request. |
| 10 | Specifies that this host should always be given the same IP address. Using the hostname is correct, since the DHCP server will resolve the hostname before returning the lease information. |
This configuration file supports many more options. Refer to dhcpd.conf(5), installed with the server, for details and examples.
Once the configuration of dhcpd.conf is complete, enable the DHCP server in /etc/rc.conf:
dhcpd_enable="YES" dhcpd_ifaces="dc0"
Replace the dc0 with the interface (or interfaces, separated by whitespace) that the DHCP server should listen on for DHCP client requests.
Start the server by issuing the following command:
# service isc-dhcpd startAny future changes to the configuration of the server will require the dhcpd service to be stopped and then started using service(8).
The DHCP server uses the following files. Note that the manual pages are installed with the server software.
/usr/local/sbin/dhcpd
More information about the dhcpd server can be found in dhcpd(8).
/usr/local/etc/dhcpd.conf
The server configuration file needs to contain all the information that should be provided to clients, along with information regarding the operation of the server. This configuration file is described in dhcpd.conf(5).
/var/db/dhcpd.leases
The DHCP server keeps a database of leases it has issued in this file, which is written as a log. Refer to dhcpd.leases(5), which gives a slightly longer description.
/usr/local/sbin/dhcrelay
This daemon is used in advanced environments where one DHCP server forwards a request from a client to another DHCP server on a separate network. If this functionality is required, install the net/isc-dhcp44-relay package or port. The installation includes dhcrelay(8) which provides more detail.
Domain Name System (DNS) is the protocol through which domain names are mapped to IP addresses, and vice versa. DNS is coordinated across the Internet through a somewhat complex system of authoritative root, Top Level Domain (TLD), and other smaller-scale name servers, which host and cache individual domain information. It is not necessary to run a name server to perform DNS lookups on a system.
The following table describes some of the terms associated with DNS:
| Term | Definition |
|---|---|
Forward DNS | Mapping of hostnames to IP addresses. |
Origin | Refers to the domain covered in a particular zone file. |
Resolver | A system process through which a machine queries a name server for zone information. |
Reverse DNS | Mapping of IP addresses to hostnames. |
Root zone | The beginning of the Internet zone hierarchy. All zones fall under the root zone, similar to how all files in a file system fall under the root directory. |
Zone | An individual domain, subdomain, or portion of the DNS administered by the same authority. |
Examples of zones:
. is how the root zone is usually referred to in documentation.
org. is a Top Level Domain (TLD) under the root zone.
example.org. is a zone under the org. TLD.
1.168.192.in-addr.arpa is a zone referencing all IP addresses which fall under the 192.168.1.* IP address space.
As one can see, the more specific part of a hostname appears to its left. For example, example.org. is more specific than org., as org. is more specific than the root zone. The layout of each part of a hostname is much like a file system: the /dev directory falls within the root, and so on.
Name servers generally come in two forms: authoritative name servers, and caching (also known as resolving) name servers.
An authoritative name server is needed when:
One wants to serve DNS information to the world, replying authoritatively to queries.
A domain, such as example.org, is registered and IP addresses need to be assigned to hostnames under it.
An IP address block requires reverse DNS entries (IP to hostname).
A backup or second name server, called a slave, will reply to queries.
A caching name server is needed when:
A local DNS server may cache and respond more quickly than querying an outside name server.
When one queries for www.FreeBSD.org, the resolver usually queries the uplink ISP’s name server, and retrieves the reply. With a local, caching DNS server, the query only has to be made once to the outside world by the caching DNS server. Additional queries will not have to go outside the local network, since the information is cached locally.
Unbound is provided in the FreeBSD base system. By default, it will provide DNS resolution to the local machine only. While the base system package can be configured to provide resolution services beyond the local machine, it is recommended that such requirements be addressed by installing Unbound from the FreeBSD Ports Collection.
To enable Unbound, add the following to /etc/rc.conf:
local_unbound_enable="YES"
Any existing nameservers in /etc/resolv.conf will be configured as forwarders in the new Unbound configuration.
If any of the listed nameservers do not support DNSSEC, local DNS resolution will fail. Be sure to test each nameserver and remove any that fail the test. The following command will show the trust tree or a failure for a nameserver running on |
% drill -S FreeBSD.org @192.168.1.1Once each nameserver is confirmed to support DNSSEC, start Unbound:
# service local_unbound onestartThis will take care of updating /etc/resolv.conf so that queries for DNSSEC secured domains will now work. For example, run the following to validate the FreeBSD.org DNSSEC trust tree:
% drill -S FreeBSD.org
;; Number of trusted keys: 1
;; Chasing: freebsd.org. A
DNSSEC Trust tree:
freebsd.org. (A)
|---freebsd.org. (DNSKEY keytag: 36786 alg: 8 flags: 256)
|---freebsd.org. (DNSKEY keytag: 32659 alg: 8 flags: 257)
|---freebsd.org. (DS keytag: 32659 digest type: 2)
|---org. (DNSKEY keytag: 49587 alg: 7 flags: 256)
|---org. (DNSKEY keytag: 9795 alg: 7 flags: 257)
|---org. (DNSKEY keytag: 21366 alg: 7 flags: 257)
|---org. (DS keytag: 21366 digest type: 1)
| |---. (DNSKEY keytag: 40926 alg: 8 flags: 256)
| |---. (DNSKEY keytag: 19036 alg: 8 flags: 257)
|---org. (DS keytag: 21366 digest type: 2)
|---. (DNSKEY keytag: 40926 alg: 8 flags: 256)
|---. (DNSKEY keytag: 19036 alg: 8 flags: 257)
;; Chase successfulThe open source Apache HTTP Server is the most widely used web server. FreeBSD does not install this web server by default, but it can be installed from the www/apache24 package or port.
This section summarizes how to configure and start version 2.x of the Apache HTTP Server on FreeBSD. For more detailed information about Apache 2.X and its configuration directives, refer to httpd.apache.org.
In FreeBSD, the main Apache HTTP Server configuration file is installed as /usr/local/etc/apache2x/httpd.conf, where x represents the version number. This ASCII text file begins comment lines with a #. The most frequently modified directives are:
ServerRoot "/usr/local"Specifies the default directory hierarchy for the Apache installation. Binaries are stored in the bin and sbin subdirectories of the server root and configuration files are stored in the etc/apache2x subdirectory.
ServerAdmin you@example.comChange this to the email address to receive problems with the server. This address also appears on some server-generated pages, such as error documents.
ServerName www.example.com:80Allows an administrator to set a hostname which is sent back to clients for the server. For example, www can be used instead of the actual hostname. If the system does not have a registered DNS name, enter its IP address instead. If the server will listen on an alternate report, change 80 to the alternate port number.
DocumentRoot "/usr/local/www/apache2x/data"The directory where documents will be served from. By default, all requests are taken from this directory, but symbolic links and aliases may be used to point to other locations.
It is always a good idea to make a backup copy of the default Apache configuration file before making changes. When the configuration of Apache is complete, save the file and verify the configuration using apachectl. Running apachectl configtest should return Syntax OK.
To launch Apache at system startup, add the following line to /etc/rc.conf:
apache24_enable="YES"
If Apache should be started with non-default options, the following line may be added to /etc/rc.conf to specify the needed flags:
apache24_flags=""
If apachectl does not report configuration errors, start httpd now:
# service apache24 startThe httpd service can be tested by entering http://localhost in a web browser, replacing localhost with the fully-qualified domain name of the machine running httpd. The default web page that is displayed is /usr/local/www/apache24/data/index.html.
The Apache configuration can be tested for errors after making subsequent configuration changes while httpd is running using the following command:
# service apache24 configtestIt is important to note that |
Virtual hosting allows multiple websites to run on one Apache server. The virtual hosts can be IP-based or name-based. IP-based virtual hosting uses a different IP address for each website. Name-based virtual hosting uses the clients HTTP/1.1 headers to figure out the hostname, which allows the websites to share the same IP address.
To setup Apache to use name-based virtual hosting, add a VirtualHost block for each website. For example, for the webserver named www.domain.tld with a virtual domain of www.someotherdomain.tld, add the following entries to httpd.conf:
<VirtualHost *>
ServerName www.domain.tld
DocumentRoot /www/domain.tld
</VirtualHost>
<VirtualHost *>
ServerName www.someotherdomain.tld
DocumentRoot /www/someotherdomain.tld
</VirtualHost>For each virtual host, replace the values for ServerName and DocumentRoot with the values to be used.
For more information about setting up virtual hosts, consult the official Apache documentation at: http://httpd.apache.org/docs/vhosts/.
Apache uses modules to augment the functionality provided by the basic server. Refer to http://httpd.apache.org/docs/current/mod/ for a complete listing of and the configuration details for the available modules.
In FreeBSD, some modules can be compiled with the www/apache24 port. Type make config within /usr/ports/www/apache24 to see which modules are available and which are enabled by default. If the module is not compiled with the port, the FreeBSD Ports Collection provides an easy way to install many modules. This section describes three of the most commonly used modules.
The mod_ssl module uses the OpenSSL library to provide strong cryptography via the Secure Sockets Layer (SSLv3) and Transport Layer Security (TLSv1) protocols. This module provides everything necessary to request a signed certificate from a trusted certificate signing authority to run a secure web server on FreeBSD.
In FreeBSD, mod_ssl module is enabled by default in both the package and the port. The available configuration directives are explained at http://httpd.apache.org/docs/current/mod/mod_ssl.html.
The mod_perl module makes it possible to write Apache modules in Perl. In addition, the persistent interpreter embedded in the server avoids the overhead of starting an external interpreter and the penalty of Perl start-up time.
The mod_perl can be installed using the www/mod_perl2 package or port. Documentation for using this module can be found at http://perl.apache.org/docs/2.0/index.html.
PHP: Hypertext Preprocessor (PHP) is a general-purpose scripting language that is especially suited for web development. Capable of being embedded into HTML, its syntax draws upon C, Java™, and Perl with the intention of allowing web developers to write dynamically generated webpages quickly.
To gain support for PHP5 for the Apache web server, install the www/mod_php56 package or port. This will install and configure the modules required to support dynamic PHP applications. The installation will automatically add this line to /usr/local/etc/apache24/httpd.conf:
LoadModule php5_module libexec/apache24/libphp5.so
Then, perform a graceful restart to load the PHP module:
# apachectl gracefulThe PHP support provided by www/mod_php56 is limited. Additional support can be installed using the lang/php56-extensions port which provides a menu driven interface to the available PHP extensions.
Alternatively, individual extensions can be installed using the appropriate port. For instance, to add PHP support for the MySQL database server, install databases/php56-mysql.
After installing an extension, the Apache server must be reloaded to pick up the new configuration changes:
# apachectl gracefulIn addition to mod_perl and mod_php, other languages are available for creating dynamic web content. These include Django and Ruby on Rails.
Django is a BSD-licensed framework designed to allow developers to write high performance, elegant web applications quickly. It provides an object-relational mapper so that data types are developed as Python objects. A rich dynamic database-access API is provided for those objects without the developer ever having to write SQL. It also provides an extensible template system so that the logic of the application is separated from the HTML presentation.
Django depends on mod_python, and an SQL database engine. In FreeBSD, the www/py-django port automatically installs mod_python and supports the PostgreSQL, MySQL, or SQLite databases, with the default being SQLite. To change the database engine, type make config within /usr/ports/www/py-django, then install the port.
Once Django is installed, the application will need a project directory along with the Apache configuration in order to use the embedded Python interpreter. This interpreter is used to call the application for specific URLs on the site.
To configure Apache to pass requests for certain URLs to the web application, add the following to httpd.conf, specifying the full path to the project directory:
<Location "/">
SetHandler python-program
PythonPath "['/dir/to/the/django/packages/'] + sys.path"
PythonHandler django.core.handlers.modpython
SetEnv DJANGO_SETTINGS_MODULE mysite.settings
PythonAutoReload On
PythonDebug On
</Location>Refer to https://docs.djangoproject.com for more information on how to use Django.
Ruby on Rails is another open source web framework that provides a full development stack. It is optimized to make web developers more productive and capable of writing powerful applications quickly. On FreeBSD, it can be installed using the www/rubygem-rails package or port.
Refer to http://guides.rubyonrails.org for more information on how to use Ruby on Rails.
The File Transfer Protocol (FTP) provides users with a simple way to transfer files to and from an FTP server. FreeBSD includes FTP server software, ftpd, in the base system.
FreeBSD provides several configuration files for controlling access to the FTP server. This section summarizes these files. Refer to ftpd(8) for more details about the built-in FTP server.
The most important configuration step is deciding which accounts will be allowed access to the FTP server. A FreeBSD system has a number of system accounts which should not be allowed FTP access. The list of users disallowed any FTP access can be found in /etc/ftpusers. By default, it includes system accounts. Additional users that should not be allowed access to FTP can be added.
In some cases it may be desirable to restrict the access of some users without preventing them completely from using FTP. This can be accomplished be creating /etc/ftpchroot as described in ftpchroot(5). This file lists users and groups subject to FTP access restrictions.
To enable anonymous FTP access to the server, create a user named ftp on the FreeBSD system. Users will then be able to log on to the FTP server with a username of ftp or anonymous. When prompted for the password, any input will be accepted, but by convention, an email address should be used as the password. The FTP server will call chroot(2) when an anonymous user logs in, to restrict access to only the home directory of the ftp user.
There are two text files that can be created to specify welcome messages to be displayed to FTP clients. The contents of /etc/ftpwelcome will be displayed to users before they reach the login prompt. After a successful login, the contents of /etc/ftpmotd will be displayed. Note that the path to this file is relative to the login environment, so the contents of ~ftp/etc/ftpmotd would be displayed for anonymous users.
Once the FTP server has been configured, set the appropriate variable in /etc/rc.conf to start the service during boot:
ftpd_enable="YES"
To start the service now:
# service ftpd startTest the connection to the FTP server by typing:
% ftp localhostThe ftpd daemon uses syslog(3) to log messages. By default, the system log daemon will write messages related to FTP in /var/log/xferlog. The location of the FTP log can be modified by changing the following line in /etc/syslog.conf:
ftp.info /var/log/xferlog
Be aware of the potential problems involved with running an anonymous FTP server. In particular, think twice about allowing anonymous users to upload files. It may turn out that the FTP site becomes a forum for the trade of unlicensed commercial software or worse. If anonymous FTP uploads are required, then verify the permissions so that these files cannot be read by other anonymous users until they have been reviewed by an administrator. |
Samba is a popular open source software package that provides file and print services using the SMB/CIFS protocol. This protocol is built into Microsoft® Windows® systems. It can be added to non-Microsoft® Windows® systems by installing the Samba client libraries. The protocol allows clients to access shared data and printers. These shares can be mapped as a local disk drive and shared printers can be used as if they were local printers.
On FreeBSD, the Samba client libraries can be installed using the net/samba410 port or package. The client provides the ability for a FreeBSD system to access SMB/CIFS shares in a Microsoft® Windows® network.
A FreeBSD system can also be configured to act as a Samba server by installing the same net/samba410 port or package. This allows the administrator to create SMB/CIFS shares on the FreeBSD system which can be accessed by clients running Microsoft® Windows® or the Samba client libraries.
Samba is configured in /usr/local/etc/smb4.conf. This file must be created before Samba can be used.
A simple smb4.conf to share directories and printers with Windows® clients in a workgroup is shown here. For more complex setups involving LDAP or Active Directory, it is easier to use samba-tool(8) to create the initial smb4.conf.
[global] workgroup = WORKGROUP server string = Samba Server Version %v netbios name = ExampleMachine wins support = Yes security = user passdb backend = tdbsam # Example: share /usr/src accessible only to 'developer' user [src] path = /usr/src valid users = developer writable = yes browsable = yes read only = no guest ok = no public = no create mask = 0666 directory mask = 0755
Settings that describe the network are added in /usr/local/etc/smb4.conf:
workgroupThe name of the workgroup to be served.
netbios nameThe NetBIOS name by which a Samba server is known. By default, it is the same as the first component of the host’s DNS name.
server stringThe string that will be displayed in the output of net view and some other networking tools that seek to display descriptive text about the server.
wins supportWhether Samba will act as a WINS server. Do not enable support for WINS on more than one server on the network.
The most important settings in /usr/local/etc/smb4.conf are the security model and the backend password format. These directives control the options:
securityThe most common settings are security = share and security = user. If the clients use usernames that are the same as their usernames on the FreeBSD machine, user level security should be used. This is the default security policy and it requires clients to first log on before they can access shared resources.
In share level security, clients do not need to log onto the server with a valid username and password before attempting to connect to a shared resource. This was the default security model for older versions of Samba.
passdb backendSamba has several different backend authentication models. Clients may be authenticated with LDAP, NIS+, an SQL database, or a modified password file. The recommended authentication method, tdbsam, is ideal for simple networks and is covered here. For larger or more complex networks, ldapsam is recommended. smbpasswd was the former default and is now obsolete.
FreeBSD user accounts must be mapped to the SambaSAMAccount database for Windows® clients to access the share. Map existing FreeBSD user accounts using pdbedit(8):
# pdbedit -a usernameThis section has only mentioned the most commonly used settings. Refer to the Official Samba Wiki for additional information about the available configuration options.
To enable Samba at boot time, add the following line to /etc/rc.conf:
samba_server_enable="YES"
To start Samba now:
# service samba_server start
Performing sanity check on Samba configuration: OK
Starting nmbd.
Starting smbd.Samba consists of three separate daemons. Both the nmbd and smbd daemons are started by samba_enable. If winbind name resolution is also required, set:
winbindd_enable="YES"
Samba can be stopped at any time by typing:
# service samba_server stopSamba is a complex software suite with functionality that allows broad integration with Microsoft® Windows® networks. For more information about functionality beyond the basic configuration described here, refer to https://www.samba.org.
Over time, a computer’s clock is prone to drift. This is problematic as many network services require the computers on a network to share the same accurate time. Accurate time is also needed to ensure that file timestamps stay consistent. The Network Time Protocol (NTP) is one way to provide clock accuracy in a network.
FreeBSD includes ntpd(8) which can be configured to query other NTP servers to synchronize the clock on that machine or to provide time services to other computers in the network.
This section describes how to configure ntpd on FreeBSD. Further documentation can be found in /usr/shared/doc/ntp/ in HTML format.
On FreeBSD, the built-in ntpd can be used to synchronize a system’s clock. Ntpd is configured using rc.conf(5) variables and /etc/ntp.conf, as detailed in the following sections.
Ntpd communicates with its network peers using UDP packets. Any firewalls between your machine and its NTP peers must be configured to allow UDP packets in and out on port 123.
Ntpd reads /etc/ntp.conf to determine which NTP servers to query. Choosing several NTP servers is recommended in case one of the servers becomes unreachable or its clock proves unreliable. As ntpd receives responses, it favors reliable servers over the less reliable ones. The servers which are queried can be local to the network, provided by an ISP, or selected from an online list of publicly accessible NTP servers. When choosing a public NTP server, select one that is geographically close and review its usage policy. The pool configuration keyword selects one or more servers from a pool of servers. An online list of publicly accessible NTP pools is available, organized by geographic area. In addition, FreeBSD provides a project-sponsored pool, 0.freebsd.pool.ntp.org.
This is a simple example of an ntp.conf file. It can safely be used as-is; it contains the recommended restrict options for operation on a publicly-accessible network connection.
# Disallow ntpq control/query access. Allow peers to be added only # based on pool and server statements in this file. restrict default limited kod nomodify notrap noquery nopeer restrict source limited kod nomodify notrap noquery # Allow unrestricted access from localhost for queries and control. restrict 127.0.0.1 restrict ::1 # Add a specific server. server ntplocal.example.com iburst # Add FreeBSD pool servers until 3-6 good servers are available. tos minclock 3 maxclock 6 pool 0.freebsd.pool.ntp.org iburst # Use a local leap-seconds file. leapfile "/var/db/ntpd.leap-seconds.list"
The format of this file is described in ntp.conf(5). The descriptions below provide a quick overview of just the keywords used in the sample file above.
By default, an NTP server is accessible to any network host. The restrict keyword controls which systems can access the server. Multiple restrict entries are supported, each one refining the restrictions given in previous statements. The values shown in the example grant the local system full query and control access, while allowing remote systems only the ability to query the time. For more details, refer to the Access Control Support subsection of ntp.conf(5).
The server keyword specifies a single server to query. The file can contain multiple server keywords, with one server listed on each line. The pool keyword specifies a pool of servers. Ntpd will add one or more servers from this pool as needed to reach the number of peers specified using the tos minclock value. The iburst keyword directs ntpd to perform a burst of eight quick packet exchanges with a server when contact is first established, to help quickly synchronize system time.
The leapfile keyword specifies the location of a file containing information about leap seconds. The file is updated automatically by periodic(8). The file location specified by this keyword must match the location set in the ntp_db_leapfile variable in /etc/rc.conf.
Set ntpd_enable=YES to start ntpd at boot time. Once ntpd_enable=YES has been added to /etc/rc.conf, ntpd can be started immediately without rebooting the system by typing:
# service ntpd startOnly ntpd_enable must be set to use ntpd. The rc.conf variables listed below may also be set as needed.
Set ntpd_sync_on_start=YES to allow ntpd to step the clock any amount, one time at startup. Normally ntpd will log an error message and exit if the clock is off by more than 1000 seconds. This option is especially useful on systems without a battery-backed realtime clock.
Set ntpd_oomprotect=YES to protect the ntpd daemon from being killed by the system attempting to recover from an Out Of Memory (OOM) condition.
Set ntpd_config= to the location of an alternate ntp.conf file.
Set ntpd_flags= to contain any other ntpd flags as needed, but avoid using these flags which are managed internally by /etc/rc.d/ntpd:
-p (pid file location)
-c (set ntpd_config= instead)
ntpd userNtpd on FreeBSD can start and run as an unpriveleged user. Doing so requires the mac_none(4) policy module. The /etc/rc.d/ntpd startup script first examines the NTP configuration. If possible, it loads the mac_ntpd module, then starts ntpd as unpriveleged user ntpd (user id 123). To avoid problems with file and directory access, the startup script will not automatically start ntpd as ntpd when the configuration contains any file-related options.
The presence of any of the following in ntpd_flags requires manual configuration as described below to run as the ntpd user:
-f or --driftfile
-i or --jaildir
-k or --keyfile
-l or --logfile
-s or --statsdir
The presence of any of the following keywords in ntp.conf requires manual configuration as described below to run as the ntpd user:
crypto
driftfile
key
logdir
statsdir
To manually configure ntpd to run as user ntpd you must:
Ensure that the ntpd user has access to all the files and directories specified in the configuration.
Arrange for the mac_ntpd module to be loaded or compiled into the kernel. See mac_none(4) for details.
Set ntpd_user="ntpd" in /etc/rc.conf
ntpd does not need a permanent connection to the Internet to function properly. However, if a PPP connection is configured to dial out on demand, NTP traffic should be prevented from triggering a dial out or keeping the connection alive. This can be configured with filter directives in /etc/ppp/ppp.conf. For example:
set filter dial 0 deny udp src eq 123 # Prevent NTP traffic from initiating dial out set filter dial 1 permit 0 0 set filter alive 0 deny udp src eq 123 # Prevent incoming NTP traffic from keeping the connection open set filter alive 1 deny udp dst eq 123 # Prevent outgoing NTP traffic from keeping the connection open set filter alive 2 permit 0/0 0/0
For more details, refer to the PACKET FILTERING section in ppp(8) and the examples in /usr/shared/examples/ppp/.
Some Internet access providers block low-numbered ports, preventing NTP from functioning since replies never reach the machine. |
iSCSI is a way to share storage over a network. Unlike NFS, which works at the file system level, iSCSI works at the block device level.
In iSCSI terminology, the system that shares the storage is known as the target. The storage can be a physical disk, or an area representing multiple disks or a portion of a physical disk. For example, if the disk(s) are formatted with ZFS, a zvol can be created to use as the iSCSI storage.
The clients which access the iSCSI storage are called initiators. To initiators, the storage available through iSCSI appears as a raw, unformatted disk known as a LUN. Device nodes for the disk appear in /dev/ and the device must be separately formatted and mounted.
FreeBSD provides a native, kernel-based iSCSI target and initiator. This section describes how to configure a FreeBSD system as a target or an initiator.
To configure an iSCSI target, create the /etc/ctl.conf configuration file, add a line to /etc/rc.conf to make sure the ctld(8) daemon is automatically started at boot, and then start the daemon.
The following is an example of a simple /etc/ctl.conf configuration file. Refer to ctl.conf(5) for a more complete description of this file’s available options.
portal-group pg0 {
discovery-auth-group no-authentication
listen 0.0.0.0
listen [::]
}
target iqn.2012-06.com.example:target0 {
auth-group no-authentication
portal-group pg0
lun 0 {
path /data/target0-0
size 4G
}
}The first entry defines the pg0 portal group. Portal groups define which network addresses the ctld(8) daemon will listen on. The discovery-auth-group no-authentication entry indicates that any initiator is allowed to perform iSCSI target discovery without authentication. Lines three and four configure ctld(8) to listen on all IPv4 (listen 0.0.0.0) and IPv6 (listen [::]) addresses on the default port of 3260.
It is not necessary to define a portal group as there is a built-in portal group called default. In this case, the difference between default and pg0 is that with default, target discovery is always denied, while with pg0, it is always allowed.
The second entry defines a single target. Target has two possible meanings: a machine serving iSCSI or a named group of LUNs. This example uses the latter meaning, where iqn.2012-06.com.example:target0 is the target name. This target name is suitable for testing purposes. For actual use, change com.example to the real domain name, reversed. The 2012-06 represents the year and month of acquiring control of that domain name, and target0 can be any value. Any number of targets can be defined in this configuration file.
The auth-group no-authentication line allows all initiators to connect to the specified target and portal-group pg0 makes the target reachable through the pg0 portal group.
The next section defines the LUN. To the initiator, each LUN will be visible as a separate disk device. Multiple LUNs can be defined for each target. Each LUN is identified by a number, where LUN 0 is mandatory. The path /data/target0-0 line defines the full path to a file or zvol backing the LUN. That path must exist before starting ctld(8). The second line is optional and specifies the size of the LUN.
Next, to make sure the ctld(8) daemon is started at boot, add this line to /etc/rc.conf:
ctld_enable="YES"
To start ctld(8) now, run this command:
# service ctld startAs the ctld(8) daemon is started, it reads /etc/ctl.conf. If this file is edited after the daemon starts, use this command so that the changes take effect immediately:
# service ctld reloadThe previous example is inherently insecure as it uses no authentication, granting anyone full access to all targets. To require a username and password to access targets, modify the configuration as follows:
auth-group ag0 {
chap username1 secretsecret
chap username2 anothersecret
}
portal-group pg0 {
discovery-auth-group no-authentication
listen 0.0.0.0
listen [::]
}
target iqn.2012-06.com.example:target0 {
auth-group ag0
portal-group pg0
lun 0 {
path /data/target0-0
size 4G
}
}The auth-group section defines username and password pairs. An initiator trying to connect to iqn.2012-06.com.example:target0 must first specify a defined username and secret. However, target discovery is still permitted without authentication. To require target discovery authentication, set discovery-auth-group to a defined auth-group name instead of no-authentication.
It is common to define a single exported target for every initiator. As a shorthand for the syntax above, the username and password can be specified directly in the target entry:
target iqn.2012-06.com.example:target0 {
portal-group pg0
chap username1 secretsecret
lun 0 {
path /data/target0-0
size 4G
}
}The iSCSI initiator described in this section is supported starting with FreeBSD 10.0-RELEASE. To use the iSCSI initiator available in older versions, refer to iscontrol(8). |
The iSCSI initiator requires that the iscsid(8) daemon is running. This daemon does not use a configuration file. To start it automatically at boot, add this line to /etc/rc.conf:
iscsid_enable="YES"
To start iscsid(8) now, run this command:
# service iscsid startConnecting to a target can be done with or without an /etc/iscsi.conf configuration file. This section demonstrates both types of connections.
To connect an initiator to a single target, specify the IP address of the portal and the name of the target:
# iscsictl -A -p 10.10.10.10 -t iqn.2012-06.com.example:target0To verify if the connection succeeded, run iscsictl without any arguments. The output should look similar to this:
Target name Target portal State iqn.2012-06.com.example:target0 10.10.10.10 Connected: da0
In this example, the iSCSI session was successfully established, with /dev/da0 representing the attached LUN. If the iqn.2012-06.com.example:target0 target exports more than one LUN, multiple device nodes will be shown in that section of the output:
Connected: da0 da1 da2.Any errors will be reported in the output, as well as the system logs. For example, this message usually means that the iscsid(8) daemon is not running:
Target name Target portal State iqn.2012-06.com.example:target0 10.10.10.10 Waiting for iscsid(8)
The following message suggests a networking problem, such as a wrong IP address or port:
Target name Target portal State iqn.2012-06.com.example:target0 10.10.10.11 Connection refused
This message means that the specified target name is wrong:
Target name Target portal State iqn.2012-06.com.example:target0 10.10.10.10 Not found
This message means that the target requires authentication:
Target name Target portal State iqn.2012-06.com.example:target0 10.10.10.10 Authentication failed
To specify a CHAP username and secret, use this syntax:
# iscsictl -A -p 10.10.10.10 -t iqn.2012-06.com.example:target0 -u user -s secretsecretTo connect using a configuration file, create /etc/iscsi.conf with contents like this:
t0 {
TargetAddress = 10.10.10.10
TargetName = iqn.2012-06.com.example:target0
AuthMethod = CHAP
chapIName = user
chapSecret = secretsecret
}The t0 specifies a nickname for the configuration file section. It will be used by the initiator to specify which configuration to use. The other lines specify the parameters to use during connection. The TargetAddress and TargetName are mandatory, whereas the other options are optional. In this example, the CHAP username and secret are shown.
To connect to the defined target, specify the nickname:
# iscsictl -An t0Alternately, to connect to all targets defined in the configuration file, use:
# iscsictl -AaTo make the initiator automatically connect to all targets in /etc/iscsi.conf, add the following to /etc/rc.conf:
iscsictl_enable="YES" iscsictl_flags="-Aa"
Firewalls make it possible to filter the incoming and outgoing traffic that flows through a system. A firewall can use one or more sets of "rules" to inspect network packets as they come in or go out of network connections and either allows the traffic through or blocks it. The rules of a firewall can inspect one or more characteristics of the packets such as the protocol type, source or destination host address, and source or destination port.
Firewalls can enhance the security of a host or a network. They can be used to do one or more of the following:
Protect and insulate the applications, services, and machines of an internal network from unwanted traffic from the public Internet.
Limit or disable access from hosts of the internal network to services of the public Internet.
Support network address translation (NAT), which allows an internal network to use private IP addresses and share a single connection to the public Internet using either a single IP address or a shared pool of automatically assigned public addresses.
FreeBSD has three firewalls built into the base system: PF, IPFW, and IPFILTER, also known as IPF. FreeBSD also provides two traffic shapers for controlling bandwidth usage: altq(4) and dummynet(4). ALTQ has traditionally been closely tied with PF and dummynet with IPFW. Each firewall uses rules to control the access of packets to and from a FreeBSD system, although they go about it in different ways and each has a different rule syntax.
FreeBSD provides multiple firewalls in order to meet the different requirements and preferences for a wide variety of users. Each user should evaluate which firewall best meets their needs.
After reading this chapter, you will know:
How to define packet filtering rules.
The differences between the firewalls built into FreeBSD.
How to use and configure the PF firewall.
How to use and configure the IPFW firewall.
How to use and configure the IPFILTER firewall.
Before reading this chapter, you should:
Understand basic FreeBSD and Internet concepts.
Since all firewalls are based on inspecting the values of selected packet control fields, the creator of the firewall ruleset must have an understanding of how TCP/IP works, what the different values in the packet control fields are, and how these values are used in a normal session conversation. For a good introduction, refer to Daryl’s TCP/IP Primer. |
A ruleset contains a group of rules which pass or block packets based on the values contained in the packet. The bi-directional exchange of packets between hosts comprises a session conversation. The firewall ruleset processes both the packets arriving from the public Internet, as well as the packets produced by the system as a response to them. Each TCP/IP service is predefined by its protocol and listening port. Packets destined for a specific service originate from the source address using an unprivileged port and target the specific service port on the destination address. All the above parameters can be used as selection criteria to create rules which will pass or block services.
To lookup unknown port numbers, refer to /etc/services. Alternatively, visit http://en.wikipedia.org/wiki/List_of_TCP_and_UDP_port_numbers and do a port number lookup to find the purpose of a particular port number.
Check out this link for port numbers used by Trojans.
FTP has two modes: active mode and passive mode. The difference is in how the data channel is acquired. Passive mode is more secure as the data channel is acquired by the ordinal ftp session requester. For a good explanation of FTP and the different modes, see http://www.slacksite.com/other/ftp.html.
A firewall ruleset can be either "exclusive" or "inclusive". An exclusive firewall allows all traffic through except for the traffic matching the ruleset. An inclusive firewall does the reverse as it only allows traffic matching the rules through and blocks everything else.
An inclusive firewall offers better control of the outgoing traffic, making it a better choice for systems that offer services to the public Internet. It also controls the type of traffic originating from the public Internet that can gain access to a private network. All traffic that does not match the rules is blocked and logged. Inclusive firewalls are generally safer than exclusive firewalls because they significantly reduce the risk of allowing unwanted traffic.
Unless noted otherwise, all configuration and example rulesets in this chapter create inclusive firewall rulesets. |
Security can be tightened further using a "stateful firewall". This type of firewall keeps track of open connections and only allows traffic which either matches an existing connection or opens a new, allowed connection.
Stateful filtering treats traffic as a bi-directional exchange of packets comprising a session. When state is specified on a matching rule the firewall dynamically generates internal rules for each anticipated packet being exchanged during the session. It has sufficient matching capabilities to determine if a packet is valid for a session. Any packets that do not properly fit the session template are automatically rejected.
When the session completes, it is removed from the dynamic state table.
Stateful filtering allows one to focus on blocking/passing new sessions. If the new session is passed, all its subsequent packets are allowed automatically and any impostor packets are automatically rejected. If a new session is blocked, none of its subsequent packets are allowed. Stateful filtering provides advanced matching abilities capable of defending against the flood of different attack methods employed by attackers.
NAT stands for Network Address Translation. NAT function enables the private LAN behind the firewall to share a single ISP-assigned IP address, even if that address is dynamically assigned. NAT allows each computer in the LAN to have Internet access, without having to pay the ISP for multiple Internet accounts or IP addresses.
NAT will automatically translate the private LAN IP address for each system on the LAN to the single public IP address as packets exit the firewall bound for the public Internet. It also performs the reverse translation for returning packets.
According to RFC 1918, the following IP address ranges are reserved for private networks which will never be routed directly to the public Internet, and therefore are available for use with NAT:
10.0.0.0/8.
172.16.0.0/12.
192.168.0.0/16.
When working with the firewall rules, be very careful. Some configurations can lock the administrator out of the server. To be on the safe side, consider performing the initial firewall configuration from the local console rather than doing it remotely over ssh. |
Since FreeBSD 5.3, a ported version of OpenBSD’s PF firewall has been included as an integrated part of the base system. PF is a complete, full-featured firewall that has optional support for ALTQ (Alternate Queuing), which provides Quality of Service (QoS).
The OpenBSD Project maintains the definitive reference for PF in the PF FAQ. Peter Hansteen maintains a thorough PF tutorial at http://home.nuug.no/~peter/pf/.
When reading the PF FAQ, keep in mind that FreeBSD’s version of PF has diverged substantially from the upstream OpenBSD version over the years. Not all features work the same way on FreeBSD as they do in OpenBSD and vice versa. |
The FreeBSD packet filter mailing list is a good place to ask questions about configuring and running the PF firewall. Check the mailing list archives before asking a question as it may have already been answered.
This section of the Handbook focuses on PF as it pertains to FreeBSD. It demonstrates how to enable PF and ALTQ. It also provides several examples for creating rulesets on a FreeBSD system.
To use PF, its kernel module must be first loaded. This section describes the entries that can be added to /etc/rc.conf to enable PF.
Start by adding pf_enable=yes to /etc/rc.conf:
# sysrc pf_enable=yesAdditional options, described in pfctl(8), can be passed to PF when it is started. Add or change this entry in /etc/rc.conf and specify any required flags between the two quotes (""):
pf_flags="" # additional flags for pfctl startup
PF will not start if it cannot find its ruleset configuration file. By default, FreeBSD does not ship with a ruleset and there is no /etc/pf.conf. Example rulesets can be found in /usr/shared/examples/pf/. If a custom ruleset has been saved somewhere else, add a line to /etc/rc.conf which specifies the full path to the file:
pf_rules="/path/to/pf.conf"
Logging support for PF is provided by pflog(4). To enable logging support, add pflog_enable=yes to /etc/rc.conf:
# sysrc pflog_enable=yesThe following lines can also be added to change the default location of the log file or to specify any additional flags to pass to pflog(4) when it is started:
pflog_logfile="/var/log/pflog" # where pflogd should store the logfile pflog_flags="" # additional flags for pflogd startup
Finally, if there is a LAN behind the firewall and packets need to be forwarded for the computers on the LAN, or NAT is required, enable the following option:
gateway_enable="YES" # Enable as LAN gateway
After saving the needed edits, PF can be started with logging support by typing:
# service pf start
# service pflog startBy default, PF reads its configuration rules from /etc/pf.conf and modifies, drops, or passes packets according to the rules or definitions specified in this file. The FreeBSD installation includes several sample files located in /usr/shared/examples/pf/. Refer to the PF FAQ for complete coverage of PF rulesets.
To control PF, use pfctl. Useful pfctl Options summarizes some useful options to this command. Refer to pfctl(8) for a description of all available options:
| Command | Purpose |
|---|---|
| Enable PF. |
| Disable PF. |
| Flush all NAT, filter, state, and table rules and reload /etc/pf.conf. |
| Report on the filter rules, NAT rules, or state table. |
| Check /etc/pf.conf for errors, but do not load ruleset. |
security/sudo is useful for running commands like |
To keep an eye on the traffic that passes through the PF firewall, consider installing the sysutils/pftop package or port. Once installed, pftop can be run to view a running snapshot of traffic in a format which is similar to top(1).
This section demonstrates how to create a customized ruleset. It starts with the simplest of rulesets and builds upon its concepts using several examples to demonstrate real-world usage of PF’s many features.
The simplest possible ruleset is for a single machine that does not run any services and which needs access to one network, which may be the Internet. To create this minimal ruleset, edit /etc/pf.conf so it looks like this:
block in all pass out all keep state
The first rule denies all incoming traffic by default. The second rule allows connections created by this system to pass out, while retaining state information on those connections. This state information allows return traffic for those connections to pass back and should only be used on machines that can be trusted. The ruleset can be loaded with:
# pfctl -e ; pfctl -f /etc/pf.confIn addition to keeping state, PF provides lists and macros which can be defined for use when creating rules. Macros can include lists and need to be defined before use. As an example, insert these lines at the very top of the ruleset:
tcp_services = "{ ssh, smtp, domain, www, pop3, auth, pop3s }"
udp_services = "{ domain }"PF understands port names as well as port numbers, as long as the names are listed in /etc/services. This example creates two macros. The first is a list of seven TCP port names and the second is one UDP port name. Once defined, macros can be used in rules. In this example, all traffic is blocked except for the connections initiated by this system for the seven specified TCP services and the one specified UDP service:
tcp_services = "{ ssh, smtp, domain, www, pop3, auth, pop3s }"
udp_services = "{ domain }"
block all
pass out proto tcp to any port $tcp_services keep state
pass proto udp to any port $udp_services keep stateEven though UDP is considered to be a stateless protocol, PF is able to track some state information. For example, when a UDP request is passed which asks a name server about a domain name, PF will watch for the response to pass it back.
Whenever an edit is made to a ruleset, the new rules must be loaded so they can be used:
# pfctl -f /etc/pf.confIf there are no syntax errors, pfctl will not output any messages during the rule load. Rules can also be tested before attempting to load them:
# pfctl -nf /etc/pf.confIncluding -n causes the rules to be interpreted only, but not loaded. This provides an opportunity to correct any errors. At all times, the last valid ruleset loaded will be enforced until either PF is disabled or a new ruleset is loaded.
Adding |
This section demonstrates how to configure a FreeBSD system running PF to act as a gateway for at least one other machine. The gateway needs at least two network interfaces, each connected to a separate network. In this example, xl0 is connected to the Internet and xl1 is connected to the internal network.
First, enable the gateway to let the machine forward the network traffic it receives on one interface to another interface. This sysctl setting will forward IPv4 packets:
# sysctl net.inet.ip.forwarding=1To forward IPv6 traffic, use:
# sysctl net.inet6.ip6.forwarding=1To enable these settings at system boot, use sysrc(8) to add them to /etc/rc.conf:
# sysrc gateway_enable=yes
# sysrc ipv6_gateway_enable=yesVerify with ifconfig that both of the interfaces are up and running.
Next, create the PF rules to allow the gateway to pass traffic. While the following rule allows stateful traffic from hosts of the internal network to pass to the gateway, the to keyword does not guarantee passage all the way from source to destination:
pass in on xl1 from xl1:network to xl0:network port $ports keep state
That rule only lets the traffic pass in to the gateway on the internal interface. To let the packets go further, a matching rule is needed:
pass out on xl0 from xl1:network to xl0:network port $ports keep state
While these two rules will work, rules this specific are rarely needed. For a busy network admin, a readable ruleset is a safer ruleset. The remainder of this section demonstrates how to keep the rules as simple as possible for readability. For example, those two rules could be replaced with one rule:
pass from xl1:network to any port $ports keep state
The interface:network notation can be replaced with a macro to make the ruleset even more readable. For example, a $localnet macro could be defined as the network directly attached to the internal interface ($xl1:network). Alternatively, the definition of $localnet could be changed to an IP address/netmask notation to denote a network, such as 192.168.100.1/24 for a subnet of private addresses.
If required, $localnet could even be defined as a list of networks. Whatever the specific needs, a sensible $localnet definition could be used in a typical pass rule as follows:
pass from $localnet to any port $ports keep state
The following sample ruleset allows all traffic initiated by machines on the internal network. It first defines two macros to represent the external and internal 3COM interfaces of the gateway.
For dialup users, the external interface will use tun0. For an ADSL connection, specifically those using PPP over Ethernet (PPPoE), the correct external interface is tun0, not the physical Ethernet interface. |
ext_if = "xl0" # macro for external interface - use tun0 for PPPoE
int_if = "xl1" # macro for internal interface
localnet = $int_if:network
# ext_if IP address could be dynamic, hence ($ext_if)
nat on $ext_if from $localnet to any -> ($ext_if)
block all
pass from { lo0, $localnet } to any keep stateThis ruleset introduces the nat rule which is used to handle the network address translation from the non-routable addresses inside the internal network to the IP address assigned to the external interface. The parentheses surrounding the last part of the nat rule ($ext_if) is included when the IP address of the external interface is dynamically assigned. It ensures that network traffic runs without serious interruptions even if the external IP address changes.
Note that this ruleset probably allows more traffic to pass out of the network than is needed. One reasonable setup could create this macro:
client_out = "{ ftp-data, ftp, ssh, domain, pop3, auth, nntp, http, \
https, cvspserver, 2628, 5999, 8000, 8080 }"to use in the main pass rule:
pass inet proto tcp from $localnet to any port $client_out \
flags S/SA keep stateA few other pass rules may be needed. This one enables SSH on the external interface:
pass in inet proto tcp to $ext_if port ssh
This macro definition and rule allows DNS and NTP for internal clients:
udp_services = "{ domain, ntp }"
pass quick inet proto { tcp, udp } to any port $udp_services keep stateNote the quick keyword in this rule. Since the ruleset consists of several rules, it is important to understand the relationships between the rules in a ruleset. Rules are evaluated from top to bottom, in the sequence they are written. For each packet or connection evaluated by PF, the last matching rule in the ruleset is the one which is applied. However, when a packet matches a rule which contains the quick keyword, the rule processing stops and the packet is treated according to that rule. This is very useful when an exception to the general rules is needed.
Configuring working FTP rules can be problematic due to the nature of the FTP protocol. FTP pre-dates firewalls by several decades and is insecure in its design. The most common points against using FTP include:
Passwords are transferred in the clear.
The protocol demands the use of at least two TCP connections (control and data) on separate ports.
When a session is established, data is communicated using randomly selected ports.
All of these points present security challenges, even before considering any potential security weaknesses in client or server software. More secure alternatives for file transfer exist, such as sftp(1) or scp(1), which both feature authentication and data transfer over encrypted connections..
For those situations when FTP is required, PF provides redirection of FTP traffic to a small proxy program called ftp-proxy(8), which is included in the base system of FreeBSD. The role of the proxy is to dynamically insert and delete rules in the ruleset, using a set of anchors, to correctly handle FTP traffic.
To enable the FTP proxy, add this line to /etc/rc.conf:
ftpproxy_enable="YES"
Then start the proxy by running service ftp-proxy start.
For a basic configuration, three elements need to be added to /etc/pf.conf. First, the anchors which the proxy will use to insert the rules it generates for the FTP sessions:
nat-anchor "ftp-proxy/*" rdr-anchor "ftp-proxy/*"
Second, a pass rule is needed to allow FTP traffic in to the proxy.
Third, redirection and NAT rules need to be defined before the filtering rules. Insert this rdr rule immediately after the nat rule:
rdr pass on $int_if proto tcp from any to any port ftp -> 127.0.0.1 port 8021
Finally, allow the redirected traffic to pass:
pass out proto tcp from $proxy to any port ftp
where $proxy expands to the address the proxy daemon is bound to.
Save /etc/pf.conf, load the new rules, and verify from a client that FTP connections are working:
# pfctl -f /etc/pf.confThis example covers a basic setup where the clients in the local network need to contact FTP servers elsewhere. This basic configuration should work well with most combinations of FTP clients and servers. As shown in ftp-proxy(8), the proxy’s behavior can be changed in various ways by adding options to the ftpproxy_flags= line. Some clients or servers may have specific quirks that must be compensated for in the configuration, or there may be a need to integrate the proxy in specific ways such as assigning FTP traffic to a specific queue.
For ways to run an FTP server protected by PF and ftp-proxy(8), configure a separate ftp-proxy in reverse mode, using -R, on a separate port with its own redirecting pass rule.
Many of the tools used for debugging or troubleshooting a TCP/IP network rely on the Internet Control Message Protocol (ICMP), which was designed specifically with debugging in mind.
The ICMP protocol sends and receives control messages between hosts and gateways, mainly to provide feedback to a sender about any unusual or difficult conditions enroute to the target host. Routers use ICMP to negotiate packet sizes and other transmission parameters in a process often referred to as path MTU discovery.
From a firewall perspective, some ICMP control messages are vulnerable to known attack vectors. Also, letting all diagnostic traffic pass unconditionally makes debugging easier, but it also makes it easier for others to extract information about the network. For these reasons, the following rule may not be optimal:
pass inet proto icmp from any to any
One solution is to let all ICMP traffic from the local network through while stopping all probes from outside the network:
pass inet proto icmp from $localnet to any keep state pass inet proto icmp from any to $ext_if keep state
Additional options are available which demonstrate some of PF’s flexibility. For example, rather than allowing all ICMP messages, one can specify the messages used by ping(8) and traceroute(8). Start by defining a macro for that type of message:
icmp_types = "echoreq"
and a rule which uses the macro:
pass inet proto icmp all icmp-type $icmp_types keep state
If other types of ICMP packets are needed, expand icmp_types to a list of those packet types. Type more /usr/src/sbin/pfctl/pfctl_parser.c to see the list of ICMP message types supported by PF. Refer to http://www.iana.org/assignments/icmp-parameters/icmp-parameters.xhtml for an explanation of each message type.
Since Unix traceroute uses UDP by default, another rule is needed to allow Unix traceroute:
# allow out the default range for traceroute(8): pass out on $ext_if inet proto udp from any to any port 33433 >< 33626 keep state
Since TRACERT.EXE on Microsoft Windows systems uses ICMP echo request messages, only the first rule is needed to allow network traces from those systems. Unix traceroute can be instructed to use other protocols as well, and will use ICMP echo request messages if -I is used. Check the traceroute(8) man page for details.
Internet protocols are designed to be device independent, and one consequence of device independence is that the optimal packet size for a given connection cannot always be predicted reliably. The main constraint on packet size is the Maximum Transmission Unit (MTU) which sets the upper limit on the packet size for an interface. Type ifconfig to view the MTUs for a system’s network interfaces.
TCP/IP uses a process known as path MTU discovery to determine the right packet size for a connection. This process sends packets of varying sizes with the "Do not fragment" flag set, expecting an ICMP return packet of "type 3, code 4" when the upper limit has been reached. Type 3 means "destination unreachable", and code 4 is short for "fragmentation needed, but the do-not-fragment flag is set". To allow path MTU discovery in order to support connections to other MTUs, add the destination unreachable type to the icmp_types macro:
icmp_types = "{ echoreq, unreach }"Since the pass rule already uses that macro, it does not need to be modified to support the new ICMP type:
pass inet proto icmp all icmp-type $icmp_types keep state
Some types of data are relevant to filtering and redirection at a given time, but their definition is too long to be included in the ruleset file. PF supports the use of tables, which are defined lists that can be manipulated without needing to reload the entire ruleset, and which can provide fast lookups. Table names are always enclosed within < >, like this:
table <clients> { 192.168.2.0/24, !192.168.2.5 }In this example, the 192.168.2.0/24 network is part of the table, except for the address 192.168.2.5, which is excluded using the ! operator. It is also possible to load tables from files where each item is on a separate line, as seen in this example /etc/clients:
192.168.2.0/24 !192.168.2.5
To refer to the file, define the table like this:
table <clients> persist file "/etc/clients"
Once the table is defined, it can be referenced by a rule:
pass inet proto tcp from <clients> to any port $client_out flags S/SA keep state
A table’s contents can be manipulated live, using pfctl. This example adds another network to the table:
# pfctl -t clients -T add 192.168.1.0/16Note that any changes made this way will take affect now, making them ideal for testing, but will not survive a power failure or reboot. To make the changes permanent, modify the definition of the table in the ruleset or edit the file that the table refers to. One can maintain the on-disk copy of the table using a cron(8) job which dumps the table’s contents to disk at regular intervals, using a command such as pfctl -t clients -T show >/etc/clients. Alternatively, /etc/clients can be updated with the in-memory table contents:
# pfctl -t clients -T replace -f /etc/clientsThose who run SSH on an external interface have probably seen something like this in the authentication logs:
Sep 26 03:12:34 skapet sshd[25771]: Failed password for root from 200.72.41.31 port 40992 ssh2 Sep 26 03:12:34 skapet sshd[5279]: Failed password for root from 200.72.41.31 port 40992 ssh2 Sep 26 03:12:35 skapet sshd[5279]: Received disconnect from 200.72.41.31: 11: Bye Bye Sep 26 03:12:44 skapet sshd[29635]: Invalid user admin from 200.72.41.31 Sep 26 03:12:44 skapet sshd[24703]: input_userauth_request: invalid user admin Sep 26 03:12:44 skapet sshd[24703]: Failed password for invalid user admin from 200.72.41.31 port 41484 ssh2
This is indicative of a brute force attack where somebody or some program is trying to discover the user name and password which will let them into the system.
If external SSH access is needed for legitimate users, changing the default port used by SSH can offer some protection. However, PF provides a more elegant solution. Pass rules can contain limits on what connecting hosts can do and violators can be banished to a table of addresses which are denied some or all access. It is even possible to drop all existing connections from machines which overreach the limits.
To configure this, create this table in the tables section of the ruleset:
table <bruteforce> persist
Then, somewhere early in the ruleset, add rules to block brute access while allowing legitimate access:
block quick from <bruteforce>
pass inet proto tcp from any to $localnet port $tcp_services \
flags S/SA keep state \
(max-src-conn 100, max-src-conn-rate 15/5, \
overload <bruteforce> flush global)The part in parentheses defines the limits and the numbers should be changed to meet local requirements. It can be read as follows:
max-src-conn is the number of simultaneous connections allowed from one host.
max-src-conn-rate is the rate of new connections allowed from any single host (15) per number of seconds (5).
overload <bruteforce> means that any host which exceeds these limits gets its address added to the bruteforce table. The ruleset blocks all traffic from addresses in the bruteforce table.
Finally, flush global says that when a host reaches the limit, that all (global) of that host’s connections will be terminated (flush).
These rules will not block slow bruteforcers, as described in http://home.nuug.no/~peter/hailmary2013/. |
This example ruleset is intended mainly as an illustration. For example, if a generous number of connections in general are wanted, but the desire is to be more restrictive when it comes to ssh, supplement the rule above with something like the one below, early on in the rule set:
pass quick proto { tcp, udp } from any to any port ssh \
flags S/SA keep state \
(max-src-conn 15, max-src-conn-rate 5/3, \
overload <bruteforce> flush global)It May Not be Necessary to Block All Overloaders: It is worth noting that the overload mechanism is a general technique which does not apply exclusively to SSH, and it is not always optimal to entirely block all traffic from offenders. For example, an overload rule could be used to protect a mail service or a web service, and the overload table could be used in a rule to assign offenders to a queue with a minimal bandwidth allocation or to redirect to a specific web page. |
Over time, tables will be filled by overload rules and their size will grow incrementally, taking up more memory. Sometimes an IP address that is blocked is a dynamically assigned one, which has since been assigned to a host who has a legitimate reason to communicate with hosts in the local network.
For situations like these, pfctl provides the ability to expire table entries. For example, this command will remove <bruteforce> table entries which have not been referenced for 86400 seconds:
# pfctl -t bruteforce -T expire 86400Similar functionality is provided by security/expiretable, which removes table entries which have not been accessed for a specified period of time.
Once installed, expiretable can be run to remove <bruteforce> table entries older than a specified age. This example removes all entries older than 24 hours:
/usr/local/sbin/expiretable -v -d -t 24h bruteforce
Not to be confused with the spamd daemon which comes bundled with spamassassin, mail/spamd can be configured with PF to provide an outer defense against SPAM. This spamd hooks into the PF configuration using a set of redirections.
Spammers tend to send a large number of messages, and SPAM is mainly sent from a few spammer friendly networks and a large number of hijacked machines, both of which are reported to blacklists fairly quickly.
When an SMTP connection from an address in a blacklist is received, spamd presents its banner and immediately switches to a mode where it answers SMTP traffic one byte at a time. This technique, which is intended to waste as much time as possible on the spammer’s end, is called tarpitting. The specific implementation which uses one byte SMTP replies is often referred to as stuttering.
This example demonstrates the basic procedure for setting up spamd with automatically updated blacklists. Refer to the man pages which are installed with mail/spamd for more information.
On a typical gateway in front of a mail server, hosts will soon start getting trapped within a few seconds to several minutes.
PF also supports greylisting, which temporarily rejects messages from unknown hosts with 45n codes. Messages from greylisted hosts which try again within a reasonable time are let through. Traffic from senders which are set up to behave within the limits set by RFC 1123 and RFC 2821 are immediately let through.
More information about greylisting as a technique can be found at the greylisting.org web site. The most amazing thing about greylisting, apart from its simplicity, is that it still works. Spammers and malware writers have been very slow to adapt to bypass this technique.
The basic procedure for configuring greylisting is as follows:
Make sure that fdescfs(5) is mounted as described in Step 1 of the previous Procedure.
To run spamd in greylisting mode, add this line to /etc/rc.conf:
spamd_grey="YES" # use spamd greylisting if YES
Refer to the spamd man page for descriptions of additional related parameters.
To complete the greylisting setup:
# service obspamd restart # service obspamlogd start
Behind the scenes, the spamdb database tool and the spamlogd whitelist updater perform essential functions for the greylisting feature. spamdb is the administrator’s main interface to managing the black, grey, and white lists via the contents of the /var/db/spamdb database.
This section describes how block-policy, scrub, and antispoof can be used to make the ruleset behave sanely.
The block-policy is an option which can be set in the options part of the ruleset, which precedes the redirection and filtering rules. This option determines which feedback, if any, PF sends to hosts that are blocked by a rule. The option has two possible values: drop drops blocked packets with no feedback, and return returns a status code such as Connection refused.
If not set, the default policy is drop. To change the block-policy, specify the desired value:
set block-policy return
In PF, scrub is a keyword which enables network packet normalization. This process reassembles fragmented packets and drops TCP packets that have invalid flag combinations. Enabling scrub provides a measure of protection against certain kinds of attacks based on incorrect handling of packet fragments. A number of options are available, but the simplest form is suitable for most configurations:
scrub in all
Some services, such as NFS, require specific fragment handling options. Refer to https://home.nuug.no/~peter/pf/en/scrub.html for more information.
This example reassembles fragments, clears the "do not fragment" bit, and sets the maximum segment size to 1440 bytes:
scrub in all fragment reassemble no-df max-mss 1440
The antispoof mechanism protects against activity from spoofed or forged IP addresses, mainly by blocking packets appearing on interfaces and in directions which are logically not possible.
These rules weed out spoofed traffic coming in from the rest of the world as well as any spoofed packets which originate in the local network:
antispoof for $ext_if antispoof for $int_if
Even with a properly configured gateway to handle network address translation, one may have to compensate for other people’s misconfigurations. A common misconfiguration is to let traffic with non-routable addresses out to the Internet. Since traffic from non-routeable addresses can play a part in several DoS attack techniques, consider explicitly blocking traffic from non-routeable addresses from entering the network through the external interface.
In this example, a macro containing non-routable addresses is defined, then used in blocking rules. Traffic to and from these addresses is quietly dropped on the gateway’s external interface.
martians = "{ 127.0.0.0/8, 192.168.0.0/16, 172.16.0.0/12, \
10.0.0.0/8, 169.254.0.0/16, 192.0.2.0/24, \
0.0.0.0/8, 240.0.0.0/4 }"
block drop in quick on $ext_if from $martians to any
block drop out quick on $ext_if from any to $martiansOn FreeBSD, ALTQ can be used with PF to provide Quality of Service (QOS). Once ALTQ is enabled, queues can be defined in the ruleset which determine the processing priority of outbound packets.
Before enabling ALTQ, refer to altq(4) to determine if the drivers for the network cards installed on the system support it.
ALTQ is not available as a loadable kernel module. If the system’s interfaces support ALTQ, create a custom kernel using the instructions in Configuring the FreeBSD Kernel. The following kernel options are available. The first is needed to enable ALTQ. At least one of the other options is necessary to specify the queueing scheduler algorithm:
options ALTQ options ALTQ_CBQ # Class Based Queuing (CBQ) options ALTQ_RED # Random Early Detection (RED) options ALTQ_RIO # RED In/Out options ALTQ_HFSC # Hierarchical Packet Scheduler (HFSC) options ALTQ_PRIQ # Priority Queuing (PRIQ)
The following scheduler algorithms are available:
Class Based Queuing (CBQ) is used to divide a connection’s bandwidth into different classes or queues to prioritize traffic based on filter rules.
Random Early Detection (RED) is used to avoid network congestion by measuring the length of the queue and comparing it to the minimum and maximum thresholds for the queue. When the queue is over the maximum, all new packets are randomly dropped.
In Random Early Detection In and Out (RIO) mode, RED maintains multiple average queue lengths and multiple threshold values, one for each QOS level.
Hierarchical Fair Service Curve Packet Scheduler (HFSC) is described in http://www-2.cs.cmu.edu/~hzhang/HFSC/main.html.
Priority Queuing (PRIQ) always passes traffic that is in a higher queue first.
More information about the scheduling algorithms and example rulesets are available at the OpenBSD’s web archive.
IPFW is a stateful firewall written for FreeBSD which supports both IPv4 and IPv6. It is comprised of several components: the kernel firewall filter rule processor and its integrated packet accounting facility, the logging facility, NAT, the dummynet(4) traffic shaper, a forward facility, a bridge facility, and an ipstealth facility.
FreeBSD provides a sample ruleset in /etc/rc.firewall which defines several firewall types for common scenarios to assist novice users in generating an appropriate ruleset. IPFW provides a powerful syntax which advanced users can use to craft customized rulesets that meet the security requirements of a given environment.
This section describes how to enable IPFW, provides an overview of its rule syntax, and demonstrates several rulesets for common configuration scenarios.
IPFW is included in the basic FreeBSD install as a kernel loadable module, meaning that a custom kernel is not needed in order to enable IPFW.
For those users who wish to statically compile IPFW support into a custom kernel, see IPFW Kernel Options.
To configure the system to enable IPFW at boot time, add firewall_enable="YES" to /etc/rc.conf:
# sysrc firewall_enable="YES"To use one of the default firewall types provided by FreeBSD, add another line which specifies the type:
# sysrc firewall_type="open"The available types are:
open: passes all traffic.
client: protects only this machine.
simple: protects the whole network.
closed: entirely disables IP traffic except for the loopback interface.
workstation: protects only this machine using stateful rules.
UNKNOWN: disables the loading of firewall rules.
filename: full path of the file containing the firewall ruleset.
If firewall_type is set to either client or simple, modify the default rules found in /etc/rc.firewall to fit the configuration of the system.
Note that the filename type is used to load a custom ruleset.
An alternate way to load a custom ruleset is to set the firewall_script variable to the absolute path of an executable script that includes IPFW commands. The examples used in this section assume that the firewall_script is set to /etc/ipfw.rules:
# sysrc firewall_script="/etc/ipfw.rules"To enable logging through syslogd(8), include this line:
# sysrc firewall_logging="YES"Only firewall rules with the |
There is no /etc/rc.conf variable to set logging limits. To limit the number of times a rule is logged per connection attempt, specify the number using this line in /etc/sysctl.conf:
# echo "net.inet.ip.fw.verbose_limit=5" >> /etc/sysctl.confTo enable logging through a dedicated interface named ipfw0, add this line to /etc/rc.conf instead:
# sysrc firewall_logif="YES"Then use tcpdump to see what is being logged:
# tcpdump -t -n -i ipfw0There is no overhead due to logging unless tcpdump is attached. |
After saving the needed edits, start the firewall. To enable logging limits now, also set the sysctl value specified above:
# service ipfw start
# sysctl net.inet.ip.fw.verbose_limit=5When a packet enters the IPFW firewall, it is compared against the first rule in the ruleset and progresses one rule at a time, moving from top to bottom in sequence. When the packet matches the selection parameters of a rule, the rule’s action is executed and the search of the ruleset terminates for that packet. This is referred to as "first match wins". If the packet does not match any of the rules, it gets caught by the mandatory IPFW default rule number 65535, which denies all packets and silently discards them. However, if the packet matches a rule that contains the count, skipto, or tee keywords, the search continues. Refer to ipfw(8) for details on how these keywords affect rule processing.
When creating an IPFW rule, keywords must be written in the following order. Some keywords are mandatory while other keywords are optional. The words shown in uppercase represent a variable and the words shown in lowercase must precede the variable that follows it. The # symbol is used to mark the start of a comment and may appear at the end of a rule or on its own line. Blank lines are ignored.
CMD RULE_NUMBER set SET_NUMBER ACTION log LOG_AMOUNT PROTO from SRC SRC_PORT to DST DST_PORT OPTIONS
This section provides an overview of these keywords and their options. It is not an exhaustive list of every possible option. Refer to ipfw(8) for a complete description of the rule syntax that can be used when creating IPFW rules.
Every rule must start with ipfw add.
Each rule is associated with a number from 1 to 65534. The number is used to indicate the order of rule processing. Multiple rules can have the same number, in which case they are applied according to the order in which they have been added.
Each rule is associated with a set number from 0 to 31. Sets can be individually disabled or enabled, making it possible to quickly add or delete a set of rules. If a SET_NUMBER is not specified, the rule will be added to set 0.
A rule can be associated with one of the following actions. The specified action will be executed when the packet matches the selection criterion of the rule.
allow | accept | pass | permit: these keywords are equivalent and allow packets that match the rule.
check-state: checks the packet against the dynamic state table. If a match is found, execute the action associated with the rule which generated this dynamic rule, otherwise move to the next rule. A check-state rule does not have selection criterion. If no check-state rule is present in the ruleset, the dynamic rules table is checked at the first keep-state or limit rule.
count: updates counters for all packets that match the rule. The search continues with the next rule.
deny | drop: either word silently discards packets that match this rule.
Additional actions are available. Refer to ipfw(8) for details.
When a packet matches a rule with the log keyword, a message will be logged to syslogd(8) with a facility name of SECURITY. Logging only occurs if the number of packets logged for that particular rule does not exceed a specified LOG_AMOUNT. If no LOG_AMOUNT is specified, the limit is taken from the value of net.inet.ip.fw.verbose_limit. A value of zero removes the logging limit. Once the limit is reached, logging can be re-enabled by clearing the logging counter or the packet counter for that rule, using ipfw resetlog.
Logging is done after all other packet matching conditions have been met, and before performing the final action on the packet. The administrator decides which rules to enable logging on. |
This optional value can be used to specify any protocol name or number found in /etc/protocols.
The from keyword must be followed by the source address or a keyword that represents the source address. An address can be represented by any, me (any address configured on an interface on this system), me6, (any IPv6 address configured on an interface on this system), or table followed by the number of a lookup table which contains a list of addresses. When specifying an IP address, it can be optionally followed by its CIDR mask or subnet mask. For example, 1.2.3.4/25 or 1.2.3.4:255.255.255.128.
An optional source port can be specified using the port number or name from /etc/services.
The to keyword must be followed by the destination address or a keyword that represents the destination address. The same keywords and addresses described in the SRC section can be used to describe the destination.
An optional destination port can be specified using the port number or name from /etc/services.
Several keywords can follow the source and destination. As the name suggests, OPTIONS are optional. Commonly used options include in or out, which specify the direction of packet flow, icmptypes followed by the type of ICMP message, and keep-state.
When a keep-state rule is matched, the firewall will create a dynamic rule which matches bidirectional traffic between the source and destination addresses and ports using the same protocol.
The dynamic rules facility is vulnerable to resource depletion from a SYN-flood attack which would open a huge number of dynamic rules. To counter this type of attack with IPFW, use limit. This option limits the number of simultaneous sessions by checking the open dynamic rules, counting the number of times this rule and IP address combination occurred. If this count is greater than the value specified by limit, the packet is discarded.
Dozens of OPTIONS are available. Refer to ipfw(8) for a description of each available option.
This section demonstrates how to create an example stateful firewall ruleset script named /etc/ipfw.rules. In this example, all connection rules use in or out to clarify the direction. They also use via interface-name to specify the interface the packet is traveling over.
When first creating or testing a firewall ruleset, consider temporarily setting this tunable: net.inet.ip.fw.default_to_accept="1" This sets the default policy of ipfw(8) to be more permissive than the default |
The firewall script begins by indicating that it is a Bourne shell script and flushes any existing rules. It then creates the cmd variable so that ipfw add does not have to be typed at the beginning of every rule. It also defines the pif variable which represents the name of the interface that is attached to the Internet.
#!/bin/sh # Flush out the list before we begin. ipfw -q -f flush # Set rules command prefix cmd="ipfw -q add" pif="dc0" # interface name of NIC attached to Internet
The first two rules allow all traffic on the trusted internal interface and on the loopback interface:
# Change xl0 to LAN NIC interface name $cmd 00005 allow all from any to any via xl0 # No restrictions on Loopback Interface $cmd 00010 allow all from any to any via lo0
The next rule allows the packet through if it matches an existing entry in the dynamic rules table:
$cmd 00101 check-state
The next set of rules defines which stateful connections internal systems can create to hosts on the Internet:
# Allow access to public DNS # Replace x.x.x.x with the IP address of a public DNS server # and repeat for each DNS server in /etc/resolv.conf $cmd 00110 allow tcp from any to x.x.x.x 53 out via $pif setup keep-state $cmd 00111 allow udp from any to x.x.x.x 53 out via $pif keep-state # Allow access to ISP's DHCP server for cable/DSL configurations. # Use the first rule and check log for IP address. # Then, uncomment the second rule, input the IP address, and delete the first rule $cmd 00120 allow log udp from any to any 67 out via $pif keep-state #$cmd 00120 allow udp from any to x.x.x.x 67 out via $pif keep-state # Allow outbound HTTP and HTTPS connections $cmd 00200 allow tcp from any to any 80 out via $pif setup keep-state $cmd 00220 allow tcp from any to any 443 out via $pif setup keep-state # Allow outbound email connections $cmd 00230 allow tcp from any to any 25 out via $pif setup keep-state $cmd 00231 allow tcp from any to any 110 out via $pif setup keep-state # Allow outbound ping $cmd 00250 allow icmp from any to any out via $pif keep-state # Allow outbound NTP $cmd 00260 allow udp from any to any 123 out via $pif keep-state # Allow outbound SSH $cmd 00280 allow tcp from any to any 22 out via $pif setup keep-state # deny and log all other outbound connections $cmd 00299 deny log all from any to any out via $pif
The next set of rules controls connections from Internet hosts to the internal network. It starts by denying packets typically associated with attacks and then explicitly allows specific types of connections. All the authorized services that originate from the Internet use limit to prevent flooding.
# Deny all inbound traffic from non-routable reserved address spaces $cmd 00300 deny all from 192.168.0.0/16 to any in via $pif #RFC 1918 private IP $cmd 00301 deny all from 172.16.0.0/12 to any in via $pif #RFC 1918 private IP $cmd 00302 deny all from 10.0.0.0/8 to any in via $pif #RFC 1918 private IP $cmd 00303 deny all from 127.0.0.0/8 to any in via $pif #loopback $cmd 00304 deny all from 0.0.0.0/8 to any in via $pif #loopback $cmd 00305 deny all from 169.254.0.0/16 to any in via $pif #DHCP auto-config $cmd 00306 deny all from 192.0.2.0/24 to any in via $pif #reserved for docs $cmd 00307 deny all from 204.152.64.0/23 to any in via $pif #Sun cluster interconnect $cmd 00308 deny all from 224.0.0.0/3 to any in via $pif #Class D & E multicast # Deny public pings $cmd 00310 deny icmp from any to any in via $pif # Deny ident $cmd 00315 deny tcp from any to any 113 in via $pif # Deny all Netbios services. $cmd 00320 deny tcp from any to any 137 in via $pif $cmd 00321 deny tcp from any to any 138 in via $pif $cmd 00322 deny tcp from any to any 139 in via $pif $cmd 00323 deny tcp from any to any 81 in via $pif # Deny fragments $cmd 00330 deny all from any to any frag in via $pif # Deny ACK packets that did not match the dynamic rule table $cmd 00332 deny tcp from any to any established in via $pif # Allow traffic from ISP's DHCP server. # Replace x.x.x.x with the same IP address used in rule 00120. #$cmd 00360 allow udp from any to x.x.x.x 67 in via $pif keep-state # Allow HTTP connections to internal web server $cmd 00400 allow tcp from any to me 80 in via $pif setup limit src-addr 2 # Allow inbound SSH connections $cmd 00410 allow tcp from any to me 22 in via $pif setup limit src-addr 2 # Reject and log all other incoming connections $cmd 00499 deny log all from any to any in via $pif
The last rule logs all packets that do not match any of the rules in the ruleset:
# Everything else is denied and logged $cmd 00999 deny log all from any to any
FreeBSD’s IPFW firewall has two implementations of NAT: the userland implementation natd(8), and the more recent in-kernel NAT implementation. Both work in conjunction with IPFW to provide network address translation. This can be used to provide an Internet Connection Sharing solution so that several internal computers can connect to the Internet using a single public IP address.
To do this, the FreeBSD machine connected to the Internet must act as a gateway. This system must have two NICs, where one is connected to the Internet and the other is connected to the internal LAN. Each machine connected to the LAN should be assigned an IP address in the private network space, as defined by RFC 1918.
Some additional configuration is needed in order to enable the in-kernel NAT facility of IPFW. To enable in-kernel NAT support at boot time, the following must be set in /etc/rc.conf:
gateway_enable="YES" firewall_enable="YES" firewall_nat_enable="YES"
When |
When the ruleset contains stateful rules, the positioning of the NAT rule is critical and the skipto action is used. The skipto action requires a rule number so that it knows which rule to jump to. The example below builds upon the firewall ruleset shown in the previous section. It adds some additional entries and modifies some existing rules in order to configure the firewall for in-kernel NAT. It starts by adding some additional variables which represent the rule number to skip to, the keep-state option, and a list of TCP ports which will be used to reduce the number of rules.
#!/bin/sh ipfw -q -f flush cmd="ipfw -q add" skip="skipto 1000" pif=dc0 ks="keep-state" good_tcpo="22,25,37,53,80,443,110"
With in-kernel NAT it is necessary to disable TCP segmentation offloading (TSO) due to the architecture of libalias(3), a library implemented as a kernel module to provide the in-kernel NAT facility of IPFW. TSO can be disabled on a per network interface basis using ifconfig(8) or on a system wide basis using sysctl(8). To disable TSO system wide, the following must be set it /etc/sysctl.conf:
net.inet.tcp.tso="0"
A NAT instance will also be configured. It is possible to have multiple NAT instances each with their own configuration. For this example only one NAT instance is needed, NAT instance number 1. The configuration can take a few options such as: if which indicates the public interface, same_ports which takes care that alliased ports and local port numbers are mapped the same, unreg_only will result in only unregistered (private) address spaces to be processed by the NAT instance, and reset which will help to keep a functioning NAT instance even when the public IP address of the IPFW machine changes. For all possible options that can be passed to a single NAT instance configuration consult ipfw(8). When configuring a stateful NATing firewall, it is neseccary to allow translated packets to be reinjected in the firewall for further processing. This can be achieved by disabling one_pass behavior at the start of the firewall script.
ipfw disable one_pass ipfw -q nat 1 config if $pif same_ports unreg_only reset
The inbound NAT rule is inserted after the two rules which allow all traffic on the trusted and loopback interfaces and after the reassemble rule but before the check-state rule. It is important that the rule number selected for this NAT rule, in this example 100, is higher than the first three rules and lower than the check-state rule. Furthermore, because of the behavior of in-kernel NAT it is advised to place a reassemble rule just before the first NAT rule and after the rules that allow traffic on trusted interface. Normally, IP fragmentation should not happen, but when dealing with IPSEC/ESP/GRE tunneling traffic it might and the reassembling of fragments is necessary before handing the complete packet over to the in-kernel NAT facility.
The reassemble rule was not needed with userland natd(8) because the internal workings of the IPFW The NAT instance and rule number used in this example does not match with the default NAT instance and rule number created by rc.firewall. rc.firewall is a script that sets up the default firewall rules present in FreeBSD. |
$cmd 005 allow all from any to any via xl0 # exclude LAN traffic $cmd 010 allow all from any to any via lo0 # exclude loopback traffic $cmd 099 reass all from any to any in # reassemble inbound packets $cmd 100 nat 1 ip from any to any in via $pif # NAT any inbound packets # Allow the packet through if it has an existing entry in the dynamic rules table $cmd 101 check-state
The outbound rules are modified to replace the allow action with the $skip variable, indicating that rule processing will continue at rule 1000. The seven tcp rules have been replaced by rule 125 as the $good_tcpo variable contains the seven allowed outbound ports.
Remember that IPFW’s performance is largely determined by the number of rules present in the ruleset. |
# Authorized outbound packets $cmd 120 $skip udp from any to x.x.x.x 53 out via $pif $ks $cmd 121 $skip udp from any to x.x.x.x 67 out via $pif $ks $cmd 125 $skip tcp from any to any $good_tcpo out via $pif setup $ks $cmd 130 $skip icmp from any to any out via $pif $ks
The inbound rules remain the same, except for the very last rule which removes the via $pif in order to catch both inbound and outbound rules. The NAT rule must follow this last outbound rule, must have a higher number than that last rule, and the rule number must be referenced by the skipto action. In this ruleset, rule number 1000 handles passing all packets to our configured instance for NAT processing. The next rule allows any packet which has undergone NAT processing to pass.
$cmd 999 deny log all from any to any $cmd 1000 nat 1 ip from any to any out via $pif # skipto location for outbound stateful rules $cmd 1001 allow ip from any to any
In this example, rules 100, 101, 125, 1000, and 1001 control the address translation of the outbound and inbound packets so that the entries in the dynamic state table always register the private LANIP address.
Consider an internal web browser which initializes a new outbound HTTP session over port 80. When the first outbound packet enters the firewall, it does not match rule 100 because it is headed out rather than in. It passes rule 101 because this is the first packet and it has not been posted to the dynamic state table yet. The packet finally matches rule 125 as it is outbound on an allowed port and has a source IP address from the internal LAN. On matching this rule, two actions take place. First, the keep-state action adds an entry to the dynamic state table and the specified action, skipto rule 1000, is executed. Next, the packet undergoes NAT and is sent out to the Internet. This packet makes its way to the destination web server, where a response packet is generated and sent back. This new packet enters the top of the ruleset. It matches rule 100 and has its destination IP address mapped back to the original internal address. It then is processed by the check-state rule, is found in the table as an existing session, and is released to the LAN.
On the inbound side, the ruleset has to deny bad packets and allow only authorized services. A packet which matches an inbound rule is posted to the dynamic state table and the packet is released to the LAN. The packet generated as a response is recognized by the check-state rule as belonging to an existing session. It is then sent to rule 1000 to undergo NAT before being released to the outbound interface.
Transitioning from userland natd(8) to in-kernel NAT might seem seamless at first but there is small catch. When using the GENERIC kernel, IPFW will load the libalias.ko kernel module, when |
The drawback with NAT in general is that the LAN clients are not accessible from the Internet. Clients on the LAN can make outgoing connections to the world but cannot receive incoming ones. This presents a problem if trying to run Internet services on one of the LAN client machines. A simple way around this is to redirect selected Internet ports on the NAT providing machine to a LAN client.
For example, an IRC server runs on client A and a web server runs on client B. For this to work properly, connections received on ports 6667 (IRC) and 80 (HTTP) must be redirected to the respective machines.
With in-kernel NAT all configuration is done in the NAT instance configuration. For a full list of options that an in-kernel NAT instance can use, consult ipfw(8). The IPFW syntax follows the syntax of natd. The syntax for redirect_port is as follows:
redirect_port proto targetIP:targetPORT[-targetPORT] [aliasIP:]aliasPORT[-aliasPORT] [remoteIP[:remotePORT[-remotePORT]]]
To configure the above example setup, the arguments should be:
redirect_port tcp 192.168.0.2:6667 6667 redirect_port tcp 192.168.0.3:80 80
After adding these arguments to the configuration of NAT instance 1 in the above ruleset, the TCP ports will be port forwarded to the LAN client machines running the IRC and HTTP services.
ipfw -q nat 1 config if $pif same_ports unreg_only reset \ redirect_port tcp 192.168.0.2:6667 6667 \ redirect_port tcp 192.168.0.3:80 80
Port ranges over individual ports can be indicated with redirect_port. For example, tcp 192.168.0.2:2000-3000 2000-3000 would redirect all connections received on ports 2000 to 3000 to ports 2000 to 3000 on client A.
Address redirection is useful if more than one IP address is available. Each LAN client can be assigned its own external IP address by ipfw(8), which will then rewrite outgoing packets from the LAN clients with the proper external IP address and redirects all traffic incoming on that particular IP address back to the specific LAN client. This is also known as static NAT. For example, if IP addresses 128.1.1.1, 128.1.1.2, and 128.1.1.3 are available, 128.1.1.1 can be used as the ipfw(8) machine’s external IP address, while 128.1.1.2 and 128.1.1.3 are forwarded back to LAN clients A and B.
The redirect_address syntax is as below, where localIP is the internal IP address of the LAN client, and publicIP the external IP address corresponding to the LAN client.
redirect_address localIP publicIP
In the example, the arguments would read:
redirect_address 192.168.0.2 128.1.1.2 redirect_address 192.168.0.3 128.1.1.3
Like redirect_port, these arguments are placed in a NAT instance configuration. With address redirection, there is no need for port redirection, as all data received on a particular IP address is redirected.
The external IP addresses on the ipfw(8) machine must be active and aliased to the external interface. Refer to rc.conf(5) for details.
Let us start with a statement: the userspace NAT implementation: natd(8), has more overhead than in-kernel NAT. For natd(8) to translate packets, the packets have to be copied from the kernel to userspace and back which brings in extra overhead that is not present with in-kernel NAT.
To enable the userpace NAT daemon natd(8) at boot time, the following is a minimum configuration in /etc/rc.conf. Where natd_interface is set to the name of the NIC attached to the Internet. The rc(8) script of natd(8) will automatically check if a dynamic IP address is used and configure itself to handle that.
gateway_enable="YES" natd_enable="YES" natd_interface="rl0"
In general, the above ruleset as explained for in-kernel NAT can also be used together with natd(8). The exceptions are the configuration of the in-kernel NAT instance (ipfw -q nat 1 config …) which is not needed together with reassemble rule 99 because its functionality is included in the divert action. Rule number 100 and 1000 will have to change sligthly as shown below.
$cmd 100 divert natd ip from any to any in via $pif $cmd 1000 divert natd ip from any to any out via $pif
To configure port or address redirection, a similar syntax as with in-kernel NAT is used. Although, now, instead of specifying the configuration in our ruleset script like with in-kernel NAT, configuration of natd(8) is best done in a configuration file. To do this, an extra flag must be passed via /etc/rc.conf which specifies the path of the configuration file.
natd_flags="-f /etc/natd.conf"
The specified file must contain a list of configuration options, one per line. For more information about the configuration file and possible variables, consult natd(8). Below are two example entries, one per line: redirect_port tcp 192.168.0.2:6667 6667 redirect_address 192.168.0.3 128.1.1.3 |
ipfw can be used to make manual, single rule additions or deletions to the active firewall while it is running. The problem with using this method is that all the changes are lost when the system reboots. It is recommended to instead write all the rules in a file and to use that file to load the rules at boot time and to replace the currently running firewall rules whenever that file changes.
ipfw is a useful way to display the running firewall rules to the console screen. The IPFW accounting facility dynamically creates a counter for each rule that counts each packet that matches the rule. During the process of testing a rule, listing the rule with its counter is one way to determine if the rule is functioning as expected.
To list all the running rules in sequence:
# ipfw listTo list all the running rules with a time stamp of when the last time the rule was matched:
# ipfw -t listThe next example lists accounting information and the packet count for matched rules along with the rules themselves. The first column is the rule number, followed by the number of matched packets and bytes, followed by the rule itself.
# ipfw -a listTo list dynamic rules in addition to static rules:
# ipfw -d listTo also show the expired dynamic rules:
# ipfw -d -e listTo zero the counters:
# ipfw zeroTo zero the counters for just the rule with number NUM:
# ipfw zero NUMEven with the logging facility enabled, IPFW will not generate any rule logging on its own. The firewall administrator decides which rules in the ruleset will be logged, and adds the log keyword to those rules. Normally only deny rules are logged. It is customary to duplicate the "ipfw default deny everything" rule with the log keyword included as the last rule in the ruleset. This way, it is possible to see all the packets that did not match any of the rules in the ruleset.
Logging is a two edged sword. If one is not careful, an over abundance of log data or a DoS attack can fill the disk with log files. Log messages are not only written to syslogd, but also are displayed on the root console screen and soon become annoying.
The IPFIREWALL_VERBOSE_LIMIT=5 kernel option limits the number of consecutive messages sent to syslogd(8), concerning the packet matching of a given rule. When this option is enabled in the kernel, the number of consecutive messages concerning a particular rule is capped at the number specified. There is nothing to be gained from 200 identical log messages. With this option set to five, five consecutive messages concerning a particular rule would be logged to syslogd and the remainder identical consecutive messages would be counted and posted to syslogd with a phrase like the following:
last message repeated 45 times
All logged packets messages are written by default to /var/log/security, which is defined in /etc/syslog.conf.
Most experienced IPFW users create a file containing the rules and code them in a manner compatible with running them as a script. The major benefit of doing this is the firewall rules can be refreshed in mass without the need of rebooting the system to activate them. This method is convenient in testing new rules as the procedure can be executed as many times as needed. Being a script, symbolic substitution can be used for frequently used values to be substituted into multiple rules.
This example script is compatible with the syntax used by the sh(1), csh(1), and tcsh(1) shells. Symbolic substitution fields are prefixed with a dollar sign ($). Symbolic fields do not have the $ prefix. The value to populate the symbolic field must be enclosed in double quotes ("").
Start the rules file like this:
############### start of example ipfw rules script ############# # ipfw -q -f flush # Delete all rules # Set defaults oif="tun0" # out interface odns="192.0.2.11" # ISP's DNS server IP address cmd="ipfw -q add " # build rule prefix ks="keep-state" # just too lazy to key this each time $cmd 00500 check-state $cmd 00502 deny all from any to any frag $cmd 00501 deny tcp from any to any established $cmd 00600 allow tcp from any to any 80 out via $oif setup $ks $cmd 00610 allow tcp from any to $odns 53 out via $oif setup $ks $cmd 00611 allow udp from any to $odns 53 out via $oif $ks ################### End of example ipfw rules script ############
The rules are not important as the focus of this example is how the symbolic substitution fields are populated.
If the above example was in /etc/ipfw.rules, the rules could be reloaded by the following command:
# sh /etc/ipfw.rules/etc/ipfw.rules can be located anywhere and the file can have any name.
The same thing could be accomplished by running these commands by hand:
# ipfw -q -f flush
# ipfw -q add check-state
# ipfw -q add deny all from any to any frag
# ipfw -q add deny tcp from any to any established
# ipfw -q add allow tcp from any to any 80 out via tun0 setup keep-state
# ipfw -q add allow tcp from any to 192.0.2.11 53 out via tun0 setup keep-state
# ipfw -q add 00611 allow udp from any to 192.0.2.11 53 out via tun0 keep-stateIn order to statically compile IPFW support into a custom kernel, refer to the instructions in Configuring the FreeBSD Kernel. The following options are available for the custom kernel configuration file:
options IPFIREWALL # enables IPFW options IPFIREWALL_VERBOSE # enables logging for rules with log keyword to syslogd(8) options IPFIREWALL_VERBOSE_LIMIT=5 # limits number of logged packets per-entry options IPFIREWALL_DEFAULT_TO_ACCEPT # sets default policy to pass what is not explicitly denied options IPFIREWALL_NAT # enables basic in-kernel NAT support options LIBALIAS # enables full in-kernel NAT support options IPFIREWALL_NAT64 # enables in-kernel NAT64 support options IPFIREWALL_NPTV6 # enables in-kernel IPv6 NPT support options IPFIREWALL_PMOD # enables protocols modification module support options IPDIVERT # enables NAT through natd(8)
IPFW can be loaded as a kernel module: options above are built by default as modules or can be set at runtime using tunables. |
IPFILTER, also known as IPF, is a cross-platform, open source firewall which has been ported to several operating systems, including FreeBSD, NetBSD, OpenBSD, and Solaris™.
IPFILTER is a kernel-side firewall and NAT mechanism that can be controlled and monitored by userland programs. Firewall rules can be set or deleted using ipf, NAT rules can be set or deleted using ipnat, run-time statistics for the kernel parts of IPFILTER can be printed using ipfstat, and ipmon can be used to log IPFILTER actions to the system log files.
IPF was originally written using a rule processing logic of "the last matching rule wins" and only used stateless rules. Since then, IPF has been enhanced to include the quick and keep state options.
The IPF FAQ is at http://www.phildev.net/ipf/index.html. A searchable archive of the IPFilter mailing list is available at http://marc.info/?l=ipfilter.
This section of the Handbook focuses on IPF as it pertains to FreeBSD. It provides examples of rules that contain the quick and keep state options.
IPF is included in the basic FreeBSD install as a kernel loadable module, meaning that a custom kernel is not needed in order to enable IPF.
For users who prefer to statically compile IPF support into a custom kernel, refer to the instructions in Configuring the FreeBSD Kernel. The following kernel options are available:
options IPFILTER options IPFILTER_LOG options IPFILTER_LOOKUP options IPFILTER_DEFAULT_BLOCK
where options IPFILTER enables support for IPFILTER, options IPFILTER_LOG enables IPF logging using the ipl packet logging pseudo-device for every rule that has the log keyword, IPFILTER_LOOKUP enables IP pools in order to speed up IP lookups, and options IPFILTER_DEFAULT_BLOCK changes the default behavior so that any packet not matching a firewall pass rule gets blocked.
To configure the system to enable IPF at boot time, add the following entries to /etc/rc.conf. These entries will also enable logging and default pass all. To change the default policy to block all without compiling a custom kernel, remember to add a block all rule at the end of the ruleset.
ipfilter_enable="YES" # Start ipf firewall
ipfilter_rules="/etc/ipf.rules" # loads rules definition text file
ipv6_ipfilter_rules="/etc/ipf6.rules" # loads rules definition text file for IPv6
ipmon_enable="YES" # Start IP monitor log
ipmon_flags="-Ds" # D = start as daemon
# s = log to syslog
# v = log tcp window, ack, seq
# n = map IP & port to namesIf NAT functionality is needed, also add these lines:
gateway_enable="YES" # Enable as LAN gateway ipnat_enable="YES" # Start ipnat function ipnat_rules="/etc/ipnat.rules" # rules definition file for ipnat
Then, to start IPF now:
# service ipfilter start
To load the firewall rules, specify the name of the ruleset file using ipf. The following command can be used to replace the currently running firewall rules:
# ipf -Fa -f /etc/ipf.ruleswhere -Fa flushes all the internal rules tables and -f specifies the file containing the rules to load.
This provides the ability to make changes to a custom ruleset and update the running firewall with a fresh copy of the rules without having to reboot the system. This method is convenient for testing new rules as the procedure can be executed as many times as needed.
Refer to ipf(8) for details on the other flags available with this command.
This section describes the IPF rule syntax used to create stateful rules. When creating rules, keep in mind that unless the quick keyword appears in a rule, every rule is read in order, with the last matching rule being the one that is applied. This means that even if the first rule to match a packet is a pass, if there is a later matching rule that is a block, the packet will be dropped. Sample rulesets can be found in /usr/shared/examples/ipfilter.
When creating rules, a # character is used to mark the start of a comment and may appear at the end of a rule, to explain that rule’s function, or on its own line. Any blank lines are ignored.
The keywords which are used in rules must be written in a specific order, from left to right. Some keywords are mandatory while others are optional. Some keywords have sub-options which may be keywords themselves and also include more sub-options. The keyword order is as follows, where the words shown in uppercase represent a variable and the words shown in lowercase must precede the variable that follows it:
ACTION DIRECTION OPTIONS proto PROTO_TYPE from SRC_ADDR SRC_PORT to DST_ADDR DST_PORT TCP_FLAG|ICMP_TYPE keep state STATE
This section describes each of these keywords and their options. It is not an exhaustive list of every possible option. Refer to ipf(5) for a complete description of the rule syntax that can be used when creating IPF rules and examples for using each keyword.
The action keyword indicates what to do with the packet if it matches that rule. Every rule must have an action. The following actions are recognized:
block: drops the packet.
pass: allows the packet.
log: generates a log record.
count: counts the number of packets and bytes which can provide an indication of how often a rule is used.
auth: queues the packet for further processing by another program.
call: provides access to functions built into IPF that allow more complex actions.
decapsulate: removes any headers in order to process the contents of the packet.
Next, each rule must explicitly state the direction of traffic using one of these keywords:
in: the rule is applied against an inbound packet.
out: the rule is applied against an outbound packet.
all: the rule applies to either direction.
If the system has multiple interfaces, the interface can be specified along with the direction. An example would be in on fxp0.
Options are optional. However, if multiple options are specified, they must be used in the order shown here.
log: when performing the specified ACTION, the contents of the packet’s headers will be written to the ipl(4) packet log pseudo-device.
quick: if a packet matches this rule, the ACTION specified by the rule occurs and no further processing of any following rules will occur for this packet.
on: must be followed by the interface name as displayed by ifconfig(8). The rule will only match if the packet is going through the specified interface in the specified direction.
When using the log keyword, the following qualifiers may be used in this order:
body: indicates that the first 128 bytes of the packet contents will be logged after the headers.
first: if the log keyword is being used in conjunction with a keep state option, this option is recommended so that only the triggering packet is logged and not every packet which matches the stateful connection.
Additional options are available to specify error return messages. Refer to ipf(5) for more details.
The protocol type is optional. However, it is mandatory if the rule needs to specify a SRC_PORT or a DST_PORT as it defines the type of protocol. When specifying the type of protocol, use the proto keyword followed by either a protocol number or name from /etc/protocols. Example protocol names include tcp, udp, or icmp. If PROTO_TYPE is specified but no SRC_PORT or DST_PORT is specified, all port numbers for that protocol will match that rule.
The from keyword is mandatory and is followed by a keyword which represents the source of the packet. The source can be a hostname, an IP address followed by the CIDR mask, an address pool, or the keyword all. Refer to ipf(5) for examples.
There is no way to match ranges of IP addresses which do not express themselves easily using the dotted numeric form / mask-length notation. The net-mgmt/ipcalc package or port may be used to ease the calculation of the CIDR mask. Additional information is available at the utility’s web page: http://jodies.de/ipcalc.
The port number of the source is optional. However, if it is used, it requires PROTO_TYPE to be first defined in the rule. The port number must also be preceded by the proto keyword.
A number of different comparison operators are supported: = (equal to), != (not equal to), < (less than), > (greater than), ⇐ (less than or equal to), and >= (greater than or equal to).
To specify port ranges, place the two port numbers between <> (less than and greater than ), >< (greater than and less than ), or : (greater than or equal to and less than or equal to).
The to keyword is mandatory and is followed by a keyword which represents the destination of the packet. Similar to SRC_ADDR, it can be a hostname, an IP address followed by the CIDR mask, an address pool, or the keyword all.
Similar to SRC_PORT, the port number of the destination is optional. However, if it is used, it requires PROTO_TYPE to be first defined in the rule. The port number must also be preceded by the proto keyword.
If tcp is specified as the PROTO_TYPE, flags can be specified as letters, where each letter represents one of the possible TCP flags used to determine the state of a connection. Possible values are: S (SYN), A (ACK), P (PSH), F (FIN), U (URG), R (RST), C (CWN), and E (ECN).
If icmp is specified as the PROTO_TYPE, the ICMP type to match can be specified. Refer to ipf(5) for the allowable types.
If a pass rule contains keep state, IPF will add an entry to its dynamic state table and allow subsequent packets that match the connection. IPF can track state for TCP, UDP, and ICMP sessions. Any packet that IPF can be certain is part of an active session, even if it is a different protocol, will be allowed.
In IPF, packets destined to go out through the interface connected to the public Internet are first checked against the dynamic state table. If the packet matches the next expected packet comprising an active session conversation, it exits the firewall and the state of the session conversation flow is updated in the dynamic state table. Packets that do not belong to an already active session are checked against the outbound ruleset. Packets coming in from the interface connected to the public Internet are first checked against the dynamic state table. If the packet matches the next expected packet comprising an active session, it exits the firewall and the state of the session conversation flow is updated in the dynamic state table. Packets that do not belong to an already active session are checked against the inbound ruleset.
Several keywords can be added after keep state. If used, these keywords set various options that control stateful filtering, such as setting connection limits or connection age. Refer to ipf(5) for the list of available options and their descriptions.
This section demonstrates how to create an example ruleset which only allows services matching pass rules and blocks all others.
FreeBSD uses the loopback interface (lo0) and the IP address 127.0.0.1 for internal communication. The firewall ruleset must contain rules to allow free movement of these internally used packets:
# no restrictions on loopback interface pass in quick on lo0 all pass out quick on lo0 all
The public interface connected to the Internet is used to authorize and control access of all outbound and inbound connections. If one or more interfaces are cabled to private networks, those internal interfaces may require rules to allow packets originating from the LAN to flow between the internal networks or to the interface attached to the Internet. The ruleset should be organized into three major sections: any trusted internal interfaces, outbound connections through the public interface, and inbound connections through the public interface.
These two rules allow all traffic to pass through a trusted LAN interface named xl0:
# no restrictions on inside LAN interface for private network pass out quick on xl0 all pass in quick on xl0 all
The rules for the public interface’s outbound and inbound sections should have the most frequently matched rules placed before less commonly matched rules, with the last rule in the section blocking and logging all packets for that interface and direction.
This set of rules defines the outbound section of the public interface named dc0. These rules keep state and identify the specific services that internal systems are authorized for public Internet access. All the rules use quick and specify the appropriate port numbers and, where applicable, destination addresses.
# interface facing Internet (outbound) # Matches session start requests originating from or behind the # firewall, destined for the Internet. # Allow outbound access to public DNS servers. # Replace x.x.x. with address listed in /etc/resolv.conf. # Repeat for each DNS server. pass out quick on dc0 proto tcp from any to x.x.x. port = 53 flags S keep state pass out quick on dc0 proto udp from any to xxx port = 53 keep state # Allow access to ISP's specified DHCP server for cable or DSL networks. # Use the first rule, then check log for the IP address of DHCP server. # Then, uncomment the second rule, replace z.z.z.z with the IP address, # and comment out the first rule pass out log quick on dc0 proto udp from any to any port = 67 keep state #pass out quick on dc0 proto udp from any to z.z.z.z port = 67 keep state # Allow HTTP and HTTPS pass out quick on dc0 proto tcp from any to any port = 80 flags S keep state pass out quick on dc0 proto tcp from any to any port = 443 flags S keep state # Allow email pass out quick on dc0 proto tcp from any to any port = 110 flags S keep state pass out quick on dc0 proto tcp from any to any port = 25 flags S keep state # Allow NTP pass out quick on dc0 proto tcp from any to any port = 37 flags S keep state # Allow FTP pass out quick on dc0 proto tcp from any to any port = 21 flags S keep state # Allow SSH pass out quick on dc0 proto tcp from any to any port = 22 flags S keep state # Allow ping pass out quick on dc0 proto icmp from any to any icmp-type 8 keep state # Block and log everything else block out log first quick on dc0 all
This example of the rules in the inbound section of the public interface blocks all undesirable packets first. This reduces the number of packets that are logged by the last rule.
# interface facing Internet (inbound) # Block all inbound traffic from non-routable or reserved address spaces block in quick on dc0 from 192.168.0.0/16 to any #RFC 1918 private IP block in quick on dc0 from 172.16.0.0/12 to any #RFC 1918 private IP block in quick on dc0 from 10.0.0.0/8 to any #RFC 1918 private IP block in quick on dc0 from 127.0.0.0/8 to any #loopback block in quick on dc0 from 0.0.0.0/8 to any #loopback block in quick on dc0 from 169.254.0.0/16 to any #DHCP auto-config block in quick on dc0 from 192.0.2.0/24 to any #reserved for docs block in quick on dc0 from 204.152.64.0/23 to any #Sun cluster interconnect block in quick on dc0 from 224.0.0.0/3 to any #Class D & E multicast # Block fragments and too short tcp packets block in quick on dc0 all with frags block in quick on dc0 proto tcp all with short # block source routed packets block in quick on dc0 all with opt lsrr block in quick on dc0 all with opt ssrr # Block OS fingerprint attempts and log first occurrence block in log first quick on dc0 proto tcp from any to any flags FUP # Block anything with special options block in quick on dc0 all with ipopts # Block public pings and ident block in quick on dc0 proto icmp all icmp-type 8 block in quick on dc0 proto tcp from any to any port = 113 # Block incoming Netbios services block in log first quick on dc0 proto tcp/udp from any to any port = 137 block in log first quick on dc0 proto tcp/udp from any to any port = 138 block in log first quick on dc0 proto tcp/udp from any to any port = 139 block in log first quick on dc0 proto tcp/udp from any to any port = 81
Any time there are logged messages on a rule with the log first option, run ipfstat -hio to evaluate how many times the rule has been matched. A large number of matches may indicate that the system is under attack.
The rest of the rules in the inbound section define which connections are allowed to be initiated from the Internet. The last rule denies all connections which were not explicitly allowed by previous rules in this section.
# Allow traffic in from ISP's DHCP server. Replace z.z.z.z with # the same IP address used in the outbound section. pass in quick on dc0 proto udp from z.z.z.z to any port = 68 keep state # Allow public connections to specified internal web server pass in quick on dc0 proto tcp from any to x.x.x.x port = 80 flags S keep state # Block and log only first occurrence of all remaining traffic. block in log first quick on dc0 all
To enable NAT, add these statements to /etc/rc.conf and specify the name of the file containing the NAT rules:
gateway_enable="YES" ipnat_enable="YES" ipnat_rules="/etc/ipnat.rules"
NAT rules are flexible and can accomplish many different things to fit the needs of both commercial and home users. The rule syntax presented here has been simplified to demonstrate common usage. For a complete rule syntax description, refer to ipnat(5).
The basic syntax for a NAT rule is as follows, where map starts the rule and IF should be replaced with the name of the external interface:
map IF LAN_IP_RANGE -> PUBLIC_ADDRESS
The LAN_IP_RANGE is the range of IP addresses used by internal clients. Usually, it is a private address range such as 192.168.1.0/24. The PUBLIC_ADDRESS can either be the static external IP address or the keyword 0/32 which represents the IP address assigned to IF.
In IPF, when a packet arrives at the firewall from the LAN with a public destination, it first passes through the outbound rules of the firewall ruleset. Then, the packet is passed to the NAT ruleset which is read from the top down, where the first matching rule wins. IPF tests each NAT rule against the packet’s interface name and source IP address. When a packet’s interface name matches a NAT rule, the packet’s source IP address in the private LAN is checked to see if it falls within the IP address range specified in LAN_IP_RANGE. On a match, the packet has its source IP address rewritten with the public IP address specified by PUBLIC_ADDRESS. IPF posts an entry in its internal NAT table so that when the packet returns from the Internet, it can be mapped back to its original private IP address before being passed to the firewall rules for further processing.
For networks that have large numbers of internal systems or multiple subnets, the process of funneling every private IP address into a single public IP address becomes a resource problem. Two methods are available to relieve this issue.
The first method is to assign a range of ports to use as source ports. By adding the portmap keyword, NAT can be directed to only use source ports in the specified range:
map dc0 192.168.1.0/24 -> 0/32 portmap tcp/udp 20000:60000
Alternately, use the auto keyword which tells NAT to determine the ports that are available for use:
map dc0 192.168.1.0/24 -> 0/32 portmap tcp/udp auto
The second method is to use a pool of public addresses. This is useful when there are too many LAN addresses to fit into a single public address and a block of public IP addresses is available. These public addresses can be used as a pool from which NAT selects an IP address as a packet’s address is mapped on its way out.
The range of public IP addresses can be specified using a netmask or CIDR notation. These two rules are equivalent:
map dc0 192.168.1.0/24 -> 204.134.75.0/255.255.255.0 map dc0 192.168.1.0/24 -> 204.134.75.0/24
A common practice is to have a publically accessible web server or mail server segregated to an internal network segment. The traffic from these servers still has to undergo NAT, but port redirection is needed to direct inbound traffic to the correct server. For example, to map a web server using the internal address 10.0.10.25 to its public IP address of 20.20.20.5, use this rule:
rdr dc0 20.20.20.5/32 port 80 -> 10.0.10.25 port 80
If it is the only web server, this rule would also work as it redirects all external HTTP requests to 10.0.10.25:
rdr dc0 0.0.0.0/0 port 80 -> 10.0.10.25 port 80
IPF has a built in FTP proxy which can be used with NAT. It monitors all outbound traffic for active or passive FTP connection requests and dynamically creates temporary filter rules containing the port number used by the FTP data channel. This eliminates the need to open large ranges of high order ports for FTP connections.
In this example, the first rule calls the proxy for outbound FTP traffic from the internal LAN. The second rule passes the FTP traffic from the firewall to the Internet, and the third rule handles all non-FTP traffic from the internal LAN:
map dc0 10.0.10.0/29 -> 0/32 proxy port 21 ftp/tcp map dc0 0.0.0.0/0 -> 0/32 proxy port 21 ftp/tcp map dc0 10.0.10.0/29 -> 0/32
The FTP map rules go before the NAT rule so that when a packet matches an FTP rule, the FTP proxy creates temporary filter rules to let the FTP session packets pass and undergo NAT. All LAN packets that are not FTP will not match the FTP rules but will undergo NAT if they match the third rule.
Without the FTP proxy, the following firewall rules would instead be needed. Note that without the proxy, all ports above 1024 need to be allowed:
# Allow out LAN PC client FTP to public Internet # Active and passive modes pass out quick on rl0 proto tcp from any to any port = 21 flags S keep state # Allow out passive mode data channel high order port numbers pass out quick on rl0 proto tcp from any to any port > 1024 flags S keep state # Active mode let data channel in from FTP server pass in quick on rl0 proto tcp from any to any port = 20 flags S keep state
Whenever the file containing the NAT rules is edited, run ipnat with -CF to delete the current NAT rules and flush the contents of the dynamic translation table. Include -f and specify the name of the NAT ruleset to load:
# ipnat -CF -f /etc/ipnat.rulesTo display the NAT statistics:
# ipnat -sTo list the NAT table’s current mappings:
# ipnat -lTo turn verbose mode on and display information relating to rule processing and active rules and table entries:
# ipnat -vIPF includes ipfstat(8) which can be used to retrieve and display statistics which are gathered as packets match rules as they go through the firewall. Statistics are accumulated since the firewall was last started or since the last time they were reset to zero using ipf -Z.
The default ipfstat output looks like this:
input packets: blocked 99286 passed 1255609 nomatch 14686 counted 0
output packets: blocked 4200 passed 1284345 nomatch 14687 counted 0
input packets logged: blocked 99286 passed 0
output packets logged: blocked 0 passed 0
packets logged: input 0 output 0
log failures: input 3898 output 0
fragment state(in): kept 0 lost 0
fragment state(out): kept 0 lost 0
packet state(in): kept 169364 lost 0
packet state(out): kept 431395 lost 0
ICMP replies: 0 TCP RSTs sent: 0
Result cache hits(in): 1215208 (out): 1098963
IN Pullups succeeded: 2 failed: 0
OUT Pullups succeeded: 0 failed: 0
Fastroute successes: 0 failures: 0
TCP cksum fails(in): 0 (out): 0
Packet log flags set: (0)Several options are available. When supplied with either -i for inbound or -o for outbound, the command will retrieve and display the appropriate list of filter rules currently installed and in use by the kernel. To also see the rule numbers, include -n. For example, ipfstat -on displays the outbound rules table with rule numbers:
@1 pass out on xl0 from any to any
@2 block out on dc0 from any to any
@3 pass out quick on dc0 proto tcp/udp from any to any keep stateInclude -h to prefix each rule with a count of how many times the rule was matched. For example, ipfstat -oh displays the outbound internal rules table, prefixing each rule with its usage count:
2451423 pass out on xl0 from any to any
354727 block out on dc0 from any to any
430918 pass out quick on dc0 proto tcp/udp from any to any keep stateTo display the state table in a format similar to top(1), use ipfstat -t. When the firewall is under attack, this option provides the ability to identify and see the attacking packets. The optional sub-flags give the ability to select the destination or source IP, port, or protocol to be monitored in real time. Refer to ipfstat(8) for details.
IPF provides ipmon, which can be used to write the firewall’s logging information in a human readable format. It requires that options IPFILTER_LOG be first added to a custom kernel using the instructions in Configuring the FreeBSD Kernel.
This command is typically run in daemon mode in order to provide a continuous system log file so that logging of past events may be reviewed. Since FreeBSD has a built in syslogd(8) facility to automatically rotate system logs, the default rc.confipmon_flags statement uses -Ds:
ipmon_flags="-Ds" # D = start as daemon
# s = log to syslog
# v = log tcp window, ack, seq
# n = map IP & port to namesLogging provides the ability to review, after the fact, information such as which packets were dropped, what addresses they came from, and where they were going. This information is useful in tracking down attackers.
Once the logging facility is enabled in rc.conf and started with service ipmon start, IPF will only log the rules which contain the log keyword. The firewall administrator decides which rules in the ruleset should be logged and normally only deny rules are logged. It is customary to include the log keyword in the last rule in the ruleset. This makes it possible to see all the packets that did not match any of the rules in the ruleset.
By default, ipmon -Ds mode uses local0 as the logging facility. The following logging levels can be used to further segregate the logged data:
LOG_INFO - packets logged using the "log" keyword as the action rather than pass or block.
LOG_NOTICE - packets logged which are also passed
LOG_WARNING - packets logged which are also blocked
LOG_ERR - packets which have been logged and which can be considered short due to an incomplete headerIn order to setup IPF to log all data to /var/log/ipfilter.log, first create the empty file:
# touch /var/log/ipfilter.logThen, to write all logged messages to the specified file, add the following statement to /etc/syslog.conf:
local0.* /var/log/ipfilter.log
To activate the changes and instruct syslogd(8) to read the modified /etc/syslog.conf, run service syslogd reload.
Do not forget to edit /etc/newsyslog.conf to rotate the new log file.
Messages generated by ipmon consist of data fields separated by white space. Fields common to all messages are:
The date of packet receipt.
The time of packet receipt. This is in the form HH:MM:SS.F, for hours, minutes, seconds, and fractions of a second.
The name of the interface that processed the packet.
The group and rule number of the rule in the format @0:17.
The action: p for passed, b for blocked, S for a short packet, n did not match any rules, and L for a log rule.
The addresses written as three fields: the source address and port separated by a comma, the → symbol, and the destination address and port. For example: 209.53.17.22,80 → 198.73.220.17,1722.
PR followed by the protocol name or number: for example, PR tcp.
len followed by the header length and total length of the packet: for example, len 20 40.
If the packet is a TCP packet, there will be an additional field starting with a hyphen followed by letters corresponding to any flags that were set. Refer to ipf(5) for a list of letters and their flags.
If the packet is an ICMP packet, there will be two fields at the end: the first always being "icmp" and the next being the ICMP message and sub-message type, separated by a slash. For example: icmp 3/3 for a port unreachable message.
Blacklistd is a daemon listening to sockets to receive notifications from other daemons about connection attempts that failed or were successful. It is most widely used in blocking too many connection attempts on open ports. A prime example is SSH running on the internet getting a lot of requests from bots or scripts trying to guess passwords and gain access. Using blacklistd, the daemon can notify the firewall to create a filter rule to block excessive connection attempts from a single source after a number of tries. Blacklistd was first developed on NetBSD and appeared there in version 7. FreeBSD 11 imported blacklistd from NetBSD.
This chapter describes how to set up blacklistd, configure it, and provides examples on how to use it. Readers should be familiar with basic firewall concepts like rules. For details, refer to the firewall chapter. PF is used in the examples, but other firewalls available on FreeBSD should be able to work with blacklistd, too.
The main configuration for blacklistd is stored in blacklistd.conf(5). Various command line options are also available to change blacklistd’s run-time behavior. Persistent configuration across reboots should be stored in /etc/blacklistd.conf. To enable the daemon during system boot, add a blacklistd_enable line to /etc/rc.conf like this:
# sysrc blacklistd_enable=yesTo start the service manually, run this command:
# service blacklistd startRules for blacklistd are configured in blacklistd.conf(5) with one entry per line. Each rule contains a tuple separated by spaces or tabs. Rules either belong to a local or a remote, which applies to the machine where blacklistd is running or an outside source, respectively.
An example blacklistd.conf entry for a local rule looks like this:
[local] ssh stream * * * 3 24h
All rules that follow the [local] section are treated as local rules (which is the default), applying to the local machine. When a [remote] section is encountered, all rules that follow it are handled as remote machine rules.
Seven fields define a rule separated by either tabs or spaces. The first four fields identify the traffic that should be blacklisted. The three fields that follow define backlistd’s behavior. Wildcards are denoted as asterisks (*), matching anything in this field. The first field defines the location. In local rules, these are the network ports. The syntax for the location field is as follows:
[address|interface][/mask][:port]
Adressses can be specified as IPv4 in numeric format or IPv6 in square brackets. An interface name like em0 can also be used.
The socket type is defined by the second field. TCP sockets are of type stream, whereas UDP is denoted as dgram. The example above uses TCP, since SSH is using that protocol.
A protocol can be used in the third field of a blacklistd rule. The following protocols can be used: tcp, udp, tcp6, udp6, or numeric. A wildcard, like in the example, is typically used to match all protocols unless there is a reason to distinguish traffic by a certain protocol.
In the fourth field, the effective user or owner of the daemon process that is reporting the event is defined. The username or UID can be used here, as well as a wildcard (see example rule above).
The packet filter rule name is declared by the fifth field, which starts the behavior part of the rule. By default, blacklistd puts all blocks under a pf anchor called blacklistd in pf.conf like this:
anchor "blacklistd/*" in on $ext_if block in pass out
For separate blacklists, an anchor name can be used in this field. In other cases, the wildcard will suffice. When a name starts with a hyphen (-) it means that an anchor with the default rule name prepended should be used. A modified example from the above using the hyphen would look like this:
ssh stream * * -ssh 3 24h
With such a rule, any new blacklist rules are added to an anchor called blacklistd-ssh.
To block whole subnets for a single rule violation, a / in the rule name can be used. This causes the remaining portion of the name to be interpreted as the mask to be applied to the address specified in the rule. For example, this rule would block every address adjoining /24.
22 stream tcp * */24 3 24h
It is important to specify the proper protocol here. IPv4 and IPv6 treat /24 differently, that is the reason why |
This rule defines that if any one host in that network is misbehaving, everything else on that network will be blocked, too.
The sixth field, called nfail, sets the number of login failures required to blacklist the remote IP in question. When a wildcard is used at this position, it means that blocks will never happen. In the example rule above, a limit of three is defined meaning that after three attempts to log into SSH on one connection, the IP is blocked.
The last field in a blacklistd rule definition specifies how long a host is blacklisted. The default unit is seconds, but suffixes like m, h, and d can also be specified for minutes, hours, and days, respectively.
The example rule in its entirety means that after three times authenticating to SSH will result in a new PF block rule for that host. Rule matches are performed by first checking local rules one after another, from most specific to least specific. When a match occurs, the remote rules are applied and the name, nfail, and disable fields are changed by the remote rule that matched.
Remote rules are used to specify how blacklistd changes its behavior depending on the remote host currently being evaluated. Each field in a remote rule is the same as in a local rule. The only difference is in the way blacklistd is using them. To explain it, this example rule is used:
[remote] 203.0.113.128/25 * * * =/25 = 48h
The address field can be an IP address (either v4 or v6), a port or both. This allows setting special rules for a specific remote address range like in this example. The fields for type, protocol and owner are identically interpreted as in the local rule.
The name fields is different though: the equal sign (=) in a remote rule tells blacklistd to use the value from the matching local rule. It means that the firewall rule entry is taken and the /25 prefix (a netmask of 255.255.255.128) is added. When a connection from that address range is blacklisted, the entire subnet is affected. A PF anchor name can also be used here, in which case blacklistd will add rules for this address block to the anchor of that name. The default table is used when a wildcard is specified.
A custom number of failures in the nfail column can be defined for an address. This is useful for exceptions to a specific rule, to maybe allow someone a less strict application of rules or a bit more leniency in login tries. Blocking is disabled when an asterisk is used in this sixth field.
Remote rules allow a stricter enforcement of limits on attempts to log in compared to attempts coming from a local network like an office.
There are a few software packages in FreeBSD that can utilize blacklistd’s functionality. The two most prominent ones are ftpd(8) and sshd(8) to block excessive connection attempts. To activate blacklistd in the SSH daemon, add the following line to /etc/ssh/sshd_config:
UseBlacklist yes
Restart sshd afterwards to make these changes take effect.
Blacklisting for ftpd(8) is enabled using -B, either in /etc/inetd.conf or as a flag in /etc/rc.conf like this:
ftpd_flags="-B"
That is all that is needed to make these programs talk to blacklistd.
Blacklistd provides the user with a management utility called blacklistctl(8). It displays blocked addresses and networks that are blacklisted by the rules defined in blacklistd.conf(5). To see the list of currently blocked hosts, use dump combined with -b like this.
# blacklistctl dump -b
address/ma:port id nfail last access
213.0.123.128/25:22 OK 6/3 2019/06/08 14:30:19This example shows that there were 6 out of three permitted attempts on port 22 coming from the address range 213.0.123.128/25. There are more attempts listed than are allowed because SSH allows a client to try multiple logins on a single TCP connection. A connection that is currently going on is not stopped by blacklistd. The last connection attempt is listed in the last access column of the output.
To see the remaining time that this host will be on the blacklist, add -r to the previous command.
# blacklistctl dump -br
address/ma:port id nfail remaining time
213.0.123.128/25:22 OK 6/3 36sIn this example, there are 36s seconds left until this host will not be blocked any more.
Sometimes it is necessary to remove a host from the block list before the remaining time expires. Unfortunately, there is no functionality in blacklistd to do that. However, it is possible to remove the address from the PF table using pfctl. For each blocked port, there is a child anchor inside the blacklistd anchor defined in /etc/pf.conf. For example, if there is a child anchor for blocking port 22 it is called blacklistd/22. There is a table inside that child anchor that contains the blocked addresses. This table is called port followed by the port number. In this example, it would be called port22. With that information at hand, it is now possible to use pfctl(8) to display all addresses listed like this:
# pfctl -a blacklistd/22 -t port22 -T show
...
213.0.123.128/25
...After identifying the address to be unblocked from the list, the following command removes it from the list:
# pfctl -a blacklistd/22 -t port22 -T delete 213.0.123.128/25The address is now removed from PF, but will still show up in the blacklistctl list, since it does not know about any changes made in PF. The entry in blacklistd’s database will eventually expire and be removed from its output eventually. The entry will be added again if the host is matching one of the block rules in blacklistd again.
This chapter covers a number of advanced networking topics.
After reading this chapter, you will know:
The basics of gateways and routes.
How to set up USB tethering.
How to set up IEEE® 802.11 and Bluetooth® devices.
How to make FreeBSD act as a bridge.
How to set up network PXE booting.
How to set up IPv6 on a FreeBSD machine.
How to enable and utilize the features of the Common Address Redundancy Protocol (CARP) in FreeBSD.
How to configure multiple VLANs on FreeBSD.
Configure bluetooth headset.
Before reading this chapter, you should:
Understand the basics of the /etc/rc scripts.
Be familiar with basic network terminology.
Know how to configure and install a new FreeBSD kernel (Configuring the FreeBSD Kernel).
Know how to install additional third-party software (Installing Applications: Packages and Ports).
Routing is the mechanism that allows a system to find the network path to another system. A route is a defined pair of addresses which represent the "destination" and a "gateway". The route indicates that when trying to get to the specified destination, send the packets through the specified gateway. There are three types of destinations: individual hosts, subnets, and "default". The "default route" is used if no other routes apply. There are also three types of gateways: individual hosts, interfaces, also called links, and Ethernet hardware (MAC) addresses. Known routes are stored in a routing table.
This section provides an overview of routing basics. It then demonstrates how to configure a FreeBSD system as a router and offers some troubleshooting tips.
To view the routing table of a FreeBSD system, use netstat(1):
% netstat -r
Routing tables
Internet:
Destination Gateway Flags Refs Use Netif Expire
default outside-gw UGS 37 418 em0
localhost localhost UH 0 181 lo0
test0 0:e0:b5:36:cf:4f UHLW 5 63288 re0 77
10.20.30.255 link#1 UHLW 1 2421
example.com link#1 UC 0 0
host1 0:e0:a8:37:8:1e UHLW 3 4601 lo0
host2 0:e0:a8:37:8:1e UHLW 0 5 lo0 =>
host2.example.com link#1 UC 0 0
224 link#1 UC 0 0The entries in this example are as follows:
The first route in this table specifies the default route. When the local system needs to make a connection to a remote host, it checks the routing table to determine if a known path exists. If the remote host matches an entry in the table, the system checks to see if it can connect using the interface specified in that entry.
If the destination does not match an entry, or if all known paths fail, the system uses the entry for the default route. For hosts on a local area network, the Gateway field in the default route is set to the system which has a direct connection to the Internet. When reading this entry, verify that the Flags column indicates that the gateway is usable (UG).
The default route for a machine which itself is functioning as the gateway to the outside world will be the gateway machine at the Internet Service Provider (ISP).
The second route is the localhost route. The interface specified in the Netif column for localhost is lo0, also known as the loopback device. This indicates that all traffic for this destination should be internal, rather than sending it out over the network.
The addresses beginning with 0:e0: are MAC addresses. FreeBSD will automatically identify any hosts, test0 in the example, on the local Ethernet and add a route for that host over the Ethernet interface, re0. This type of route has a timeout, seen in the Expire column, which is used if the host does not respond in a specific amount of time. When this happens, the route to this host will be automatically deleted. These hosts are identified using the Routing Information Protocol (RIP), which calculates routes to local hosts based upon a shortest path determination.
FreeBSD will automatically add subnet routes for the local subnet. In this example, 10.20.30.255 is the broadcast address for the subnet 10.20.30 and example.com is the domain name associated with that subnet. The designation link#1 refers to the first Ethernet card in the machine.
Local network hosts and local subnets have their routes automatically configured by a daemon called routed(8). If it is not running, only routes which are statically defined by the administrator will exist.
The host1 line refers to the host by its Ethernet address. Since it is the sending host, FreeBSD knows to use the loopback interface (lo0) rather than the Ethernet interface.
The two host2 lines represent aliases which were created using ifconfig(8). The ⇒ symbol after the lo0 interface says that an alias has been set in addition to the loopback address. Such routes only show up on the host that supports the alias and all other hosts on the local network will have a link#1 line for such routes.
The final line (destination subnet 224) deals with multicasting.
Various attributes of each route can be seen in the Flags column. Commonly Seen Routing Table Flags summarizes some of these flags and their meanings:
| Command | Purpose |
|---|---|
U | The route is active (up). |
H | The route destination is a single host. |
G | Send anything for this destination on to this gateway, which will figure out from there where to send it. |
S | This route was statically configured. |
C | Clones a new route based upon this route for machines to connect to. This type of route is normally used for local networks. |
W | The route was auto-configured based upon a local area network (clone) route. |
L | Route involves references to Ethernet (link) hardware. |
On a FreeBSD system, the default route can defined in /etc/rc.conf by specifying the IP address of the default gateway:
defaultrouter="10.20.30.1"
It is also possible to manually add the route using route:
# route add default 10.20.30.1Note that manually added routes will not survive a reboot. For more information on manual manipulation of network routing tables, refer to route(8).
A FreeBSD system can be configured as the default gateway, or router, for a network if it is a dual-homed system. A dual-homed system is a host which resides on at least two different networks. Typically, each network is connected to a separate network interface, though IP aliasing can be used to bind multiple addresses, each on a different subnet, to one physical interface.
In order for the system to forward packets between interfaces, FreeBSD must be configured as a router. Internet standards and good engineering practice prevent the FreeBSD Project from enabling this feature by default, but it can be configured to start at boot by adding this line to /etc/rc.conf:
gateway_enable="YES" # Set to YES if this host will be a gateway
To enable routing now, set the sysctl(8) variable net.inet.ip.forwarding to 1. To stop routing, reset this variable to 0.
The routing table of a router needs additional routes so it knows how to reach other networks. Routes can be either added manually using static routes or routes can be automatically learned using a routing protocol. Static routes are appropriate for small networks and this section describes how to add a static routing entry for a small network.
Consider the following network:
In this scenario, RouterA is a FreeBSD machine that is acting as a router to the rest of the Internet. It has a default route set to 10.0.0.1 which allows it to connect with the outside world. RouterB is already configured to use 192.168.1.1 as its default gateway.
Before adding any static routes, the routing table on RouterA looks like this:
% netstat -nr
Routing tables
Internet:
Destination Gateway Flags Refs Use Netif Expire
default 10.0.0.1 UGS 0 49378 xl0
127.0.0.1 127.0.0.1 UH 0 6 lo0
10.0.0.0/24 link#1 UC 0 0 xl0
192.168.1.0/24 link#2 UC 0 0 xl1With the current routing table, RouterA does not have a route to the 192.168.2.0/24 network. The following command adds the Internal Net 2 network to RouterA's routing table using 192.168.1.2 as the next hop:
# route add -net 192.168.2.0/24 192.168.1.2Now, RouterA can reach any host on the 192.168.2.0/24 network. However, the routing information will not persist if the FreeBSD system reboots. If a static route needs to be persistent, add it to /etc/rc.conf:
# Add Internal Net 2 as a persistent static route static_routes="internalnet2" route_internalnet2="-net 192.168.2.0/24 192.168.1.2"
The static_routes configuration variable is a list of strings separated by a space, where each string references a route name. The variable route_internalnet2 contains the static route for that route name.
Using more than one string in static_routes creates multiple static routes. The following shows an example of adding static routes for the 192.168.0.0/24 and 192.168.1.0/24 networks:
static_routes="net1 net2" route_net1="-net 192.168.0.0/24 192.168.0.1" route_net2="-net 192.168.1.0/24 192.168.1.1"
When an address space is assigned to a network, the service provider configures their routing tables so that all traffic for the network will be sent to the link for the site. But how do external sites know to send their packets to the network’s ISP?
There is a system that keeps track of all assigned address spaces and defines their point of connection to the Internet backbone, or the main trunk lines that carry Internet traffic across the country and around the world. Each backbone machine has a copy of a master set of tables, which direct traffic for a particular network to a specific backbone carrier, and from there down the chain of service providers until it reaches a particular network.
It is the task of the service provider to advertise to the backbone sites that they are the point of connection, and thus the path inward, for a site. This is known as route propagation.
Sometimes, there is a problem with route propagation and some sites are unable to connect. Perhaps the most useful command for trying to figure out where routing is breaking down is traceroute. It is useful when ping fails.
When using traceroute, include the address of the remote host to connect to. The output will show the gateway hosts along the path of the attempt, eventually either reaching the target host, or terminating because of a lack of connection. For more information, refer to traceroute(8).
FreeBSD natively supports both multicast applications and multicast routing. Multicast applications do not require any special configuration in order to run on FreeBSD. Support for multicast routing requires that the following option be compiled into a custom kernel:
options MROUTING
The multicast routing daemon, mrouted can be installed using the net/mrouted package or port. This daemon implements the DVMRP multicast routing protocol and is configured by editing /usr/local/etc/mrouted.conf in order to set up the tunnels and DVMRP. The installation of mrouted also installs map-mbone and mrinfo, as well as their associated man pages. Refer to these for configuration examples.
DVMRP has largely been replaced by the PIM protocol in many multicast installations. Refer to pim(4) for more information. |
Most wireless networks are based on the IEEE® 802.11 standards. A basic wireless network consists of multiple stations communicating with radios that broadcast in either the 2.4GHz or 5GHz band, though this varies according to the locale and is also changing to enable communication in the 2.3GHz and 4.9GHz ranges.
802.11 networks are organized in two ways. In infrastructure mode, one station acts as a master with all the other stations associating to it, the network is known as a BSS, and the master station is termed an access point (AP). In a BSS, all communication passes through the AP; even when one station wants to communicate with another wireless station, messages must go through the AP. In the second form of network, there is no master and stations communicate directly. This form of network is termed an IBSS and is commonly known as an ad-hoc network.
802.11 networks were first deployed in the 2.4GHz band using protocols defined by the IEEE® 802.11 and 802.11b standard. These specifications include the operating frequencies and the MAC layer characteristics, including framing and transmission rates, as communication can occur at various rates. Later, the 802.11a standard defined operation in the 5GHz band, including different signaling mechanisms and higher transmission rates. Still later, the 802.11g standard defined the use of 802.11a signaling and transmission mechanisms in the 2.4GHz band in such a way as to be backwards compatible with 802.11b networks.
Separate from the underlying transmission techniques, 802.11 networks have a variety of security mechanisms. The original 802.11 specifications defined a simple security protocol called WEP. This protocol uses a fixed pre-shared key and the RC4 cryptographic cipher to encode data transmitted on a network. Stations must all agree on the fixed key in order to communicate. This scheme was shown to be easily broken and is now rarely used except to discourage transient users from joining networks. Current security practice is given by the IEEE® 802.11i specification that defines new cryptographic ciphers and an additional protocol to authenticate stations to an access point and exchange keys for data communication. Cryptographic keys are periodically refreshed and there are mechanisms for detecting and countering intrusion attempts. Another security protocol specification commonly used in wireless networks is termed WPA, which was a precursor to 802.11i. WPA specifies a subset of the requirements found in 802.11i and is designed for implementation on legacy hardware. Specifically, WPA requires only the TKIP cipher that is derived from the original WEP cipher. 802.11i permits use of TKIP but also requires support for a stronger cipher, AES-CCM, for encrypting data. The AES cipher was not required in WPA because it was deemed too computationally costly to be implemented on legacy hardware.
The other standard to be aware of is 802.11e. It defines protocols for deploying multimedia applications, such as streaming video and voice over IP (VoIP), in an 802.11 network. Like 802.11i, 802.11e also has a precursor specification termed WME (later renamed WMM) that has been defined by an industry group as a subset of 802.11e that can be deployed now to enable multimedia applications while waiting for the final ratification of 802.11e. The most important thing to know about 802.11e and WME/WMM is that it enables prioritized traffic over a wireless network through Quality of Service (QoS) protocols and enhanced media access protocols. Proper implementation of these protocols enables high speed bursting of data and prioritized traffic flow.
FreeBSD supports networks that operate using 802.11a, 802.11b, and 802.11g. The WPA and 802.11i security protocols are likewise supported (in conjunction with any of 11a, 11b, and 11g) and QoS and traffic prioritization required by the WME/WMM protocols are supported for a limited set of wireless devices.
Connecting a computer to an existing wireless network is a very common situation. This procedure shows the steps required.
Obtain the SSID (Service Set Identifier) and PSK (Pre-Shared Key) for the wireless network from the network administrator.
Identify the wireless adapter. The FreeBSD GENERIC kernel includes drivers for many common wireless adapters. If the wireless adapter is one of those models, it will be shown in the output from ifconfig(8):
% ifconfig | grep -B3 -i wirelessOn FreeBSD 11 or higher, use this command instead:
% sysctl net.wlan.devicesIf a wireless adapter is not listed, an additional kernel module might be required, or it might be a model not supported by FreeBSD.
This example shows the Atheros ath0 wireless adapter.
Add an entry for this network to /etc/wpa_supplicant.conf. If the file does not exist, create it. Replace myssid and mypsk with the SSID and PSK provided by the network administrator.
network={
ssid="myssid"
psk="mypsk"
}Add entries to /etc/rc.conf to configure the network on startup:
wlans_ath0="wlan0" ifconfig_wlan0="WPA SYNCDHCP"
Restart the computer, or restart the network service to connect to the network:
# service netif restartTo use wireless networking, a wireless networking card is needed and the kernel needs to be configured with the appropriate wireless networking support. The kernel is separated into multiple modules so that only the required support needs to be configured.
The most commonly used wireless devices are those that use parts made by Atheros. These devices are supported by ath(4) and require the following line to be added to /boot/loader.conf:
if_ath_load="YES"
The Atheros driver is split up into three separate pieces: the driver (ath(4)), the hardware support layer that handles chip-specific functions (ath_hal(4)), and an algorithm for selecting the rate for transmitting frames. When this support is loaded as kernel modules, any dependencies are automatically handled. To load support for a different type of wireless device, specify the module for that device. This example is for devices based on the Intersil Prism parts (wi(4)) driver:
if_wi_load="YES"
The examples in this section use an ath(4) device and the device name in the examples must be changed according to the configuration. A list of available wireless drivers and supported adapters can be found in the FreeBSD Hardware Notes, available on the Release Information page of the FreeBSD website. If a native FreeBSD driver for the wireless device does not exist, it may be possible to use the Windows® driver with the help of the NDIS driver wrapper. |
In addition, the modules that implement cryptographic support for the security protocols to use must be loaded. These are intended to be dynamically loaded on demand by the wlan(4) module, but for now they must be manually configured. The following modules are available: wlan_wep(4), wlan_ccmp(4), and wlan_tkip(4). The wlan_ccmp(4) and wlan_tkip(4) drivers are only needed when using the WPA or 802.11i security protocols. If the network does not use encryption, wlan_wep(4) support is not needed. To load these modules at boot time, add the following lines to /boot/loader.conf:
wlan_wep_load="YES" wlan_ccmp_load="YES" wlan_tkip_load="YES"
Once this information has been added to /boot/loader.conf, reboot the FreeBSD box. Alternately, load the modules by hand using kldload(8).
For users who do not want to use modules, it is possible to compile these drivers into the kernel by adding the following lines to a custom kernel configuration file: device wlan # 802.11 support device wlan_wep # 802.11 WEP support device wlan_ccmp # 802.11 CCMP support device wlan_tkip # 802.11 TKIP support device wlan_amrr # AMRR transmit rate control algorithm device ath # Atheros pci/cardbus NIC's device ath_hal # pci/cardbus chip support options AH_SUPPORT_AR5416 # enable AR5416 tx/rx descriptors device ath_rate_sample # SampleRate tx rate control for ath With this information in the kernel configuration file, recompile the kernel and reboot the FreeBSD machine. |
Information about the wireless device should appear in the boot messages, like this:
ath0: <Atheros 5212> mem 0x88000000-0x8800ffff irq 11 at device 0.0 on cardbus1
ath0: [ITHREAD]
ath0: AR2413 mac 7.9 RF2413 phy 4.5Since the regulatory situation is different in various parts of the world, it is necessary to correctly set the domains that apply to your location to have the correct information about what channels can be used.
The available region definitions can be found in /etc/regdomain.xml. To set the data at runtime, use ifconfig:
# ifconfig wlan0 regdomain ETSI country ATTo persist the settings, add it to /etc/rc.conf:
# sysrc create_args_wlan0="country AT regdomain ETSI"Infrastructure (BSS) mode is the mode that is typically used. In this mode, a number of wireless access points are connected to a wired network. Each wireless network has its own name, called the SSID. Wireless clients connect to the wireless access points.
To scan for available networks, use ifconfig(8). This request may take a few moments to complete as it requires the system to switch to each available wireless frequency and probe for available access points. Only the superuser can initiate a scan:
# ifconfig wlan0 create wlandev ath0
# ifconfig wlan0 up scan
SSID/MESH ID BSSID CHAN RATE S:N INT CAPS
dlinkap 00:13:46:49:41:76 11 54M -90:96 100 EPS WPA WME
freebsdap 00:11:95:c3:0d:ac 1 54M -83:96 100 EPS WPAThe interface must be |
The output of a scan request lists each BSS/IBSS network found. Besides listing the name of the network, the SSID, the output also shows the BSSID, which is the MAC address of the access point. The CAPS field identifies the type of each network and the capabilities of the stations operating there:
| Capability Code | Meaning |
|---|---|
| Extended Service Set (ESS). Indicates that the station is part of an infrastructure network rather than an IBSS/ad-hoc network. |
| IBSS/ad-hoc network. Indicates that the station is part of an ad-hoc network rather than an ESS network. |
| Privacy. Encryption is required for all data frames exchanged within the BSS using cryptographic means such as WEP, TKIP or AES-CCMP. |
| Short Preamble. Indicates that the network is using short preambles, defined in 802.11b High Rate/DSSS PHY, and utilizes a 56 bit sync field rather than the 128 bit field used in long preamble mode. |
| Short slot time. Indicates that the 802.11g network is using a short slot time because there are no legacy (802.11b) stations present. |
One can also display the current list of known networks with:
# ifconfig wlan0 list scanThis information may be updated automatically by the adapter or manually with a scan request. Old data is automatically removed from the cache, so over time this list may shrink unless more scans are done.
This section provides a simple example of how to make the wireless network adapter work in FreeBSD without encryption. Once familiar with these concepts, it is strongly recommend to use WPA to set up the wireless network.
There are three basic steps to configure a wireless network: select an access point, authenticate the station, and configure an IP address. The following sections discuss each step.
Most of the time, it is sufficient to let the system choose an access point using the builtin heuristics. This is the default behavior when an interface is marked as up or it is listed in /etc/rc.conf:
wlans_ath0="wlan0" ifconfig_wlan0="DHCP"
If there are multiple access points, a specific one can be selected by its SSID:
wlans_ath0="wlan0" ifconfig_wlan0="ssid your_ssid_here DHCP"
In an environment where there are multiple access points with the same SSID, which is often done to simplify roaming, it may be necessary to associate to one specific device. In this case, the BSSID of the access point can be specified, with or without the SSID:
wlans_ath0="wlan0" ifconfig_wlan0="ssid your_ssid_here bssid xx:xx:xx:xx:xx:xx DHCP"
There are other ways to constrain the choice of an access point, such as limiting the set of frequencies the system will scan on. This may be useful for a multi-band wireless card as scanning all the possible channels can be time-consuming. To limit operation to a specific band, use the mode parameter:
wlans_ath0="wlan0" ifconfig_wlan0="mode 11g ssid your_ssid_here DHCP"
This example will force the card to operate in 802.11g, which is defined only for 2.4GHz frequencies so any 5GHz channels will not be considered. This can also be achieved with the channel parameter, which locks operation to one specific frequency, and the chanlist parameter, to specify a list of channels for scanning. More information about these parameters can be found in ifconfig(8).
Once an access point is selected, the station needs to authenticate before it can pass data. Authentication can happen in several ways. The most common scheme, open authentication, allows any station to join the network and communicate. This is the authentication to use for test purposes the first time a wireless network is setup. Other schemes require cryptographic handshakes to be completed before data traffic can flow, either using pre-shared keys or secrets, or more complex schemes that involve backend services such as RADIUS. Open authentication is the default setting. The next most common setup is WPA-PSK, also known as WPA Personal, which is described in WPA-PSK.
If using an Apple® AirPort® Extreme base station for an access point, shared-key authentication together with a WEP key needs to be configured. This can be configured in /etc/rc.conf or by using wpa_supplicant(8). For a single AirPort® base station, access can be configured with: wlans_ath0="wlan0" ifconfig_wlan0="authmode shared wepmode on weptxkey 1 wepkey 01234567 DHCP" In general, shared key authentication should be avoided because it uses the WEP key material in a highly-constrained manner, making it even easier to crack the key. If WEP must be used for compatibility with legacy devices, it is better to use WEP with |
Once an access point is selected and the authentication parameters are set, an IP address must be obtained in order to communicate. Most of the time, the IP address is obtained via DHCP. To achieve that, edit /etc/rc.conf and add DHCP to the configuration for the device:
wlans_ath0="wlan0" ifconfig_wlan0="DHCP"
The wireless interface is now ready to bring up:
# service netif startOnce the interface is running, use ifconfig(8) to see the status of the interface ath0:
# ifconfig wlan0
wlan0: flags=8843<UP,BROADCAST,RUNNING,SIMPLEX,MULTICAST> mtu 1500
ether 00:11:95:d5:43:62
inet 192.168.1.100 netmask 0xffffff00 broadcast 192.168.1.255
media: IEEE 802.11 Wireless Ethernet OFDM/54Mbps mode 11g
status: associated
ssid dlinkap channel 11 (2462 Mhz 11g) bssid 00:13:46:49:41:76
country US ecm authmode OPEN privacy OFF txpower 21.5 bmiss 7
scanvalid 60 bgscan bgscanintvl 300 bgscanidle 250 roam:rssi 7
roam:rate 5 protmode CTS wme burstThe status: associated line means that it is connected to the wireless network. The bssid 00:13:46:49:41:76 is the MAC address of the access point and authmode OPEN indicates that the communication is not encrypted.
If an IP address cannot be obtained from a DHCP server, set a fixed IP address. Replace the DHCP keyword shown above with the address information. Be sure to retain any other parameters for selecting the access point:
wlans_ath0="wlan0" ifconfig_wlan0="inet 192.168.1.100 netmask 255.255.255.0 ssid your_ssid_here"
Wi-Fi Protected Access (WPA) is a security protocol used together with 802.11 networks to address the lack of proper authentication and the weakness of WEP. WPA leverages the 802.1X authentication protocol and uses one of several ciphers instead of WEP for data integrity. The only cipher required by WPA is the Temporary Key Integrity Protocol (TKIP). TKIP is a cipher that extends the basic RC4 cipher used by WEP by adding integrity checking, tamper detection, and measures for responding to detected intrusions. TKIP is designed to work on legacy hardware with only software modification. It represents a compromise that improves security but is still not entirely immune to attack. WPA also specifies the AES-CCMP cipher as an alternative to TKIP, and that is preferred when possible. For this specification, the term WPA2 or RSN is commonly used.
WPA defines authentication and encryption protocols. Authentication is most commonly done using one of two techniques: by 802.1X and a backend authentication service such as RADIUS, or by a minimal handshake between the station and the access point using a pre-shared secret. The former is commonly termed WPA Enterprise and the latter is known as WPA Personal. Since most people will not set up a RADIUS backend server for their wireless network, WPA-PSK is by far the most commonly encountered configuration for WPA.
The control of the wireless connection and the key negotiation or authentication with a server is done using wpa_supplicant(8). This program requires a configuration file, /etc/wpa_supplicant.conf, to run. More information regarding this file can be found in wpa_supplicant.conf(5).
WPA-PSK, also known as WPA Personal, is based on a pre-shared key (PSK) which is generated from a given password and used as the master key in the wireless network. This means every wireless user will share the same key. WPA-PSK is intended for small networks where the use of an authentication server is not possible or desired.
Always use strong passwords that are sufficiently long and made from a rich alphabet so that they will not be easily guessed or attacked. |
The first step is the configuration of /etc/wpa_supplicant.conf with the SSID and the pre-shared key of the network:
network={
ssid="freebsdap"
psk="freebsdmall"
}Then, in /etc/rc.conf, indicate that the wireless device configuration will be done with WPA and the IP address will be obtained with DHCP:
wlans_ath0="wlan0" ifconfig_wlan0="WPA DHCP"
Then, bring up the interface:
# service netif start
Starting wpa_supplicant.
DHCPDISCOVER on wlan0 to 255.255.255.255 port 67 interval 5
DHCPDISCOVER on wlan0 to 255.255.255.255 port 67 interval 6
DHCPOFFER from 192.168.0.1
DHCPREQUEST on wlan0 to 255.255.255.255 port 67
DHCPACK from 192.168.0.1
bound to 192.168.0.254 -- renewal in 300 seconds.
wlan0: flags=8843<UP,BROADCAST,RUNNING,SIMPLEX,MULTICAST> mtu 1500
ether 00:11:95:d5:43:62
inet 192.168.0.254 netmask 0xffffff00 broadcast 192.168.0.255
media: IEEE 802.11 Wireless Ethernet OFDM/36Mbps mode 11g
status: associated
ssid freebsdap channel 1 (2412 Mhz 11g) bssid 00:11:95:c3:0d:ac
country US ecm authmode WPA2/802.11i privacy ON deftxkey UNDEF
AES-CCM 3:128-bit txpower 21.5 bmiss 7 scanvalid 450 bgscan
bgscanintvl 300 bgscanidle 250 roam:rssi 7 roam:rate 5 protmode CTS
wme burst roaming MANUALOr, try to configure the interface manually using the information in /etc/wpa_supplicant.conf:
# wpa_supplicant -i wlan0 -c /etc/wpa_supplicant.conf
Trying to associate with 00:11:95:c3:0d:ac (SSID='freebsdap' freq=2412 MHz)
Associated with 00:11:95:c3:0d:ac
WPA: Key negotiation completed with 00:11:95:c3:0d:ac [PTK=CCMP GTK=CCMP]
CTRL-EVENT-CONNECTED - Connection to 00:11:95:c3:0d:ac completed (auth) [id=0 id_str=]The next operation is to launch dhclient(8) to get the IP address from the DHCP server:
# dhclient wlan0
DHCPREQUEST on wlan0 to 255.255.255.255 port 67
DHCPACK from 192.168.0.1
bound to 192.168.0.254 -- renewal in 300 seconds.
# ifconfig wlan0
wlan0: flags=8843<UP,BROADCAST,RUNNING,SIMPLEX,MULTICAST> mtu 1500
ether 00:11:95:d5:43:62
inet 192.168.0.254 netmask 0xffffff00 broadcast 192.168.0.255
media: IEEE 802.11 Wireless Ethernet OFDM/36Mbps mode 11g
status: associated
ssid freebsdap channel 1 (2412 Mhz 11g) bssid 00:11:95:c3:0d:ac
country US ecm authmode WPA2/802.11i privacy ON deftxkey UNDEF
AES-CCM 3:128-bit txpower 21.5 bmiss 7 scanvalid 450 bgscan
bgscanintvl 300 bgscanidle 250 roam:rssi 7 roam:rate 5 protmode CTS
wme burst roaming MANUALIf /etc/rc.conf has an |
If DHCP is not possible or desired, set a static IP address after wpa_supplicant(8) has authenticated the station:
# ifconfig wlan0 inet 192.168.0.100 netmask 255.255.255.0
# ifconfig wlan0
wlan0: flags=8843<UP,BROADCAST,RUNNING,SIMPLEX,MULTICAST> mtu 1500
ether 00:11:95:d5:43:62
inet 192.168.0.100 netmask 0xffffff00 broadcast 192.168.0.255
media: IEEE 802.11 Wireless Ethernet OFDM/36Mbps mode 11g
status: associated
ssid freebsdap channel 1 (2412 Mhz 11g) bssid 00:11:95:c3:0d:ac
country US ecm authmode WPA2/802.11i privacy ON deftxkey UNDEF
AES-CCM 3:128-bit txpower 21.5 bmiss 7 scanvalid 450 bgscan
bgscanintvl 300 bgscanidle 250 roam:rssi 7 roam:rate 5 protmode CTS
wme burst roaming MANUALWhen DHCP is not used, the default gateway and the nameserver also have to be manually set:
# route add default your_default_router
# echo "nameserver your_DNS_server" >> /etc/resolv.confThe second way to use WPA is with an 802.1X backend authentication server. In this case, WPA is called WPA Enterprise to differentiate it from the less secure WPA Personal. Authentication in WPA Enterprise is based on the Extensible Authentication Protocol (EAP).
EAP does not come with an encryption method. Instead, EAP is embedded inside an encrypted tunnel. There are many EAP authentication methods, but EAP-TLS, EAP-TTLS, and EAP-PEAP are the most common.
EAP with Transport Layer Security (EAP-TLS) is a well-supported wireless authentication protocol since it was the first EAP method to be certified by the Wi-Fi Alliance. EAP-TLS requires three certificates to run: the certificate of the Certificate Authority (CA) installed on all machines, the server certificate for the authentication server, and one client certificate for each wireless client. In this EAP method, both the authentication server and wireless client authenticate each other by presenting their respective certificates, and then verify that these certificates were signed by the organization’s CA.
As previously, the configuration is done via /etc/wpa_supplicant.conf:
network={
ssid="freebsdap" (1)
proto=RSN (2)
key_mgmt=WPA-EAP (3)
eap=TLS (4)
identity="loader" (5)
ca_cert="/etc/certs/cacert.pem" (6)
client_cert="/etc/certs/clientcert.pem" (7)
private_key="/etc/certs/clientkey.pem" (8)
private_key_passwd="freebsdmallclient" (9)
}| 1 | This field indicates the network name (SSID). |
| 2 | This example uses the RSN IEEE® 802.11i protocol, also known as WPA2. |
| 3 | The key_mgmt line refers to the key management protocol to use. In this example, it is WPA using EAP authentication. |
| 4 | This field indicates the EAP method for the connection. |
| 5 | The identity field contains the identity string for EAP. |
| 6 | The ca_cert field indicates the pathname of the CA certificate file. This file is needed to verify the server certificate. |
| 7 | The client_cert line gives the pathname to the client certificate file. This certificate is unique to each wireless client of the network. |
| 8 | The private_key field is the pathname to the client certificate private key file. |
| 9 | The private_key_passwd field contains the passphrase for the private key. |
Then, add the following lines to /etc/rc.conf:
wlans_ath0="wlan0" ifconfig_wlan0="WPA DHCP"
The next step is to bring up the interface:
# service netif start
Starting wpa_supplicant.
DHCPREQUEST on wlan0 to 255.255.255.255 port 67 interval 7
DHCPREQUEST on wlan0 to 255.255.255.255 port 67 interval 15
DHCPACK from 192.168.0.20
bound to 192.168.0.254 -- renewal in 300 seconds.
wlan0: flags=8843<UP,BROADCAST,RUNNING,SIMPLEX,MULTICAST> mtu 1500
ether 00:11:95:d5:43:62
inet 192.168.0.254 netmask 0xffffff00 broadcast 192.168.0.255
media: IEEE 802.11 Wireless Ethernet DS/11Mbps mode 11g
status: associated
ssid freebsdap channel 1 (2412 Mhz 11g) bssid 00:11:95:c3:0d:ac
country US ecm authmode WPA2/802.11i privacy ON deftxkey UNDEF
AES-CCM 3:128-bit txpower 21.5 bmiss 7 scanvalid 450 bgscan
bgscanintvl 300 bgscanidle 250 roam:rssi 7 roam:rate 5 protmode CTS
wme burst roaming MANUALIt is also possible to bring up the interface manually using wpa_supplicant(8) and ifconfig(8).
With EAP-TLS, both the authentication server and the client need a certificate. With EAP-TTLS, a client certificate is optional. This method is similar to a web server which creates a secure SSL tunnel even if visitors do not have client-side certificates. EAP-TTLS uses an encrypted TLS tunnel for safe transport of the authentication data.
The required configuration can be added to /etc/wpa_supplicant.conf:
network={
ssid="freebsdap"
proto=RSN
key_mgmt=WPA-EAP
eap=TTLS (1)
identity="test" (2)
password="test" (3)
ca_cert="/etc/certs/cacert.pem" (4)
phase2="auth=MD5" (5)
}| 1 | This field specifies the EAP method for the connection. |
| 2 | The identity field contains the identity string for EAP authentication inside the encrypted TLS tunnel. |
| 3 | The password field contains the passphrase for the EAP authentication. |
| 4 | The ca_cert field indicates the pathname of the CA certificate file. This file is needed to verify the server certificate. |
| 5 | This field specifies the authentication method used in the encrypted TLS tunnel. In this example, EAP with MD5-Challenge is used. The "inner authentication" phase is often called "phase2". |
Next, add the following lines to /etc/rc.conf:
wlans_ath0="wlan0" ifconfig_wlan0="WPA DHCP"
The next step is to bring up the interface:
# service netif start
Starting wpa_supplicant.
DHCPREQUEST on wlan0 to 255.255.255.255 port 67 interval 7
DHCPREQUEST on wlan0 to 255.255.255.255 port 67 interval 15
DHCPREQUEST on wlan0 to 255.255.255.255 port 67 interval 21
DHCPACK from 192.168.0.20
bound to 192.168.0.254 -- renewal in 300 seconds.
wlan0: flags=8843<UP,BROADCAST,RUNNING,SIMPLEX,MULTICAST> mtu 1500
ether 00:11:95:d5:43:62
inet 192.168.0.254 netmask 0xffffff00 broadcast 192.168.0.255
media: IEEE 802.11 Wireless Ethernet DS/11Mbps mode 11g
status: associated
ssid freebsdap channel 1 (2412 Mhz 11g) bssid 00:11:95:c3:0d:ac
country US ecm authmode WPA2/802.11i privacy ON deftxkey UNDEF
AES-CCM 3:128-bit txpower 21.5 bmiss 7 scanvalid 450 bgscan
bgscanintvl 300 bgscanidle 250 roam:rssi 7 roam:rate 5 protmode CTS
wme burst roaming MANUALPEAPv0/EAP-MSCHAPv2 is the most common PEAP method. In this chapter, the term PEAP is used to refer to that method. |
Protected EAP (PEAP) is designed as an alternative to EAP-TTLS and is the most used EAP standard after EAP-TLS. In a network with mixed operating systems, PEAP should be the most supported standard after EAP-TLS.
PEAP is similar to EAP-TTLS as it uses a server-side certificate to authenticate clients by creating an encrypted TLS tunnel between the client and the authentication server, which protects the ensuing exchange of authentication information. PEAP authentication differs from EAP-TTLS as it broadcasts the username in the clear and only the password is sent in the encrypted TLS tunnel. EAP-TTLS will use the TLS tunnel for both the username and password.
Add the following lines to /etc/wpa_supplicant.conf to configure the EAP-PEAP related settings:
network={
ssid="freebsdap"
proto=RSN
key_mgmt=WPA-EAP
eap=PEAP (1)
identity="test" (2)
password="test" (3)
ca_cert="/etc/certs/cacert.pem" (4)
phase1="peaplabel=0" (5)
phase2="auth=MSCHAPV2" (6)
}| 1 | This field specifies the EAP method for the connection. |
| 2 | The identity field contains the identity string for EAP authentication inside the encrypted TLS tunnel. |
| 3 | The password field contains the passphrase for the EAP authentication. |
| 4 | The ca_cert field indicates the pathname of the CA certificate file. This file is needed to verify the server certificate. |
| 5 | This field contains the parameters for the first phase of authentication, the TLS tunnel. According to the authentication server used, specify a specific label for authentication. Most of the time, the label will be "client EAP encryption" which is set by using peaplabel=0. More information can be found in wpa_supplicant.conf(5). |
| 6 | This field specifies the authentication protocol used in the encrypted TLS tunnel. In the case of PEAP, it is auth=MSCHAPV2. |
Add the following to /etc/rc.conf:
wlans_ath0="wlan0" ifconfig_wlan0="WPA DHCP"
Then, bring up the interface:
# service netif start
Starting wpa_supplicant.
DHCPREQUEST on wlan0 to 255.255.255.255 port 67 interval 7
DHCPREQUEST on wlan0 to 255.255.255.255 port 67 interval 15
DHCPREQUEST on wlan0 to 255.255.255.255 port 67 interval 21
DHCPACK from 192.168.0.20
bound to 192.168.0.254 -- renewal in 300 seconds.
wlan0: flags=8843<UP,BROADCAST,RUNNING,SIMPLEX,MULTICAST> mtu 1500
ether 00:11:95:d5:43:62
inet 192.168.0.254 netmask 0xffffff00 broadcast 192.168.0.255
media: IEEE 802.11 Wireless Ethernet DS/11Mbps mode 11g
status: associated
ssid freebsdap channel 1 (2412 Mhz 11g) bssid 00:11:95:c3:0d:ac
country US ecm authmode WPA2/802.11i privacy ON deftxkey UNDEF
AES-CCM 3:128-bit txpower 21.5 bmiss 7 scanvalid 450 bgscan
bgscanintvl 300 bgscanidle 250 roam:rssi 7 roam:rate 5 protmode CTS
wme burst roaming MANUALWired Equivalent Privacy (WEP) is part of the original 802.11 standard. There is no authentication mechanism, only a weak form of access control which is easily cracked.
WEP can be set up using ifconfig(8):
# ifconfig wlan0 create wlandev ath0
# ifconfig wlan0 inet 192.168.1.100 netmask 255.255.255.0 \
ssid my_net wepmode on weptxkey 3 wepkey 3:0x3456789012The weptxkey specifies which WEP key will be used in the transmission. This example uses the third key. This must match the setting on the access point. When unsure which key is used by the access point, try 1 (the first key) for this value.
The wepkey selects one of the WEP keys. It should be in the format index:key. Key 1 is used by default; the index only needs to be set when using a key other than the first key.
Replace the |
Refer to ifconfig(8) for further information.
The wpa_supplicant(8) facility can be used to configure a wireless interface with WEP. The example above can be set up by adding the following lines to /etc/wpa_supplicant.conf:
network={
ssid="my_net"
key_mgmt=NONE
wep_key3=3456789012
wep_tx_keyidx=3
}Then:
# wpa_supplicant -i wlan0 -c /etc/wpa_supplicant.conf
Trying to associate with 00:13:46:49:41:76 (SSID='dlinkap' freq=2437 MHz)
Associated with 00:13:46:49:41:76IBSS mode, also called ad-hoc mode, is designed for point to point connections. For example, to establish an ad-hoc network between the machines A and B, choose two IP addresses and a SSID.
On A:
# ifconfig wlan0 create wlandev ath0 wlanmode adhoc
# ifconfig wlan0 inet 192.168.0.1 netmask 255.255.255.0 ssid freebsdap
# ifconfig wlan0
wlan0: flags=8843<UP,BROADCAST,RUNNING,SIMPLEX,MULTICAST> metric 0 mtu 1500
ether 00:11:95:c3:0d:ac
inet 192.168.0.1 netmask 0xffffff00 broadcast 192.168.0.255
media: IEEE 802.11 Wireless Ethernet autoselect mode 11g <adhoc>
status: running
ssid freebsdap channel 2 (2417 Mhz 11g) bssid 02:11:95:c3:0d:ac
country US ecm authmode OPEN privacy OFF txpower 21.5 scanvalid 60
protmode CTS wme burstThe adhoc parameter indicates that the interface is running in IBSS mode.
B should now be able to detect A:
# ifconfig wlan0 create wlandev ath0 wlanmode adhoc
# ifconfig wlan0 up scan
SSID/MESH ID BSSID CHAN RATE S:N INT CAPS
freebsdap 02:11:95:c3:0d:ac 2 54M -64:-96 100 IS WMEThe I in the output confirms that A is in ad-hoc mode. Now, configure B with a different IP address:
# ifconfig wlan0 inet 192.168.0.2 netmask 255.255.255.0 ssid freebsdap
# ifconfig wlan0
wlan0: flags=8843<UP,BROADCAST,RUNNING,SIMPLEX,MULTICAST> metric 0 mtu 1500
ether 00:11:95:d5:43:62
inet 192.168.0.2 netmask 0xffffff00 broadcast 192.168.0.255
media: IEEE 802.11 Wireless Ethernet autoselect mode 11g <adhoc>
status: running
ssid freebsdap channel 2 (2417 Mhz 11g) bssid 02:11:95:c3:0d:ac
country US ecm authmode OPEN privacy OFF txpower 21.5 scanvalid 60
protmode CTS wme burstBoth A and B are now ready to exchange information.
FreeBSD can act as an Access Point (AP) which eliminates the need to buy a hardware AP or run an ad-hoc network. This can be particularly useful when a FreeBSD machine is acting as a gateway to another network such as the Internet.
Before configuring a FreeBSD machine as an AP, the kernel must be configured with the appropriate networking support for the wireless card as well as the security protocols being used. For more details, see Basic Setup.
The NDIS driver wrapper for Windows® drivers does not currently support AP operation. Only native FreeBSD wireless drivers support AP mode. |
Once wireless networking support is loaded, check if the wireless device supports the host-based access point mode, also known as hostap mode:
# ifconfig wlan0 create wlandev ath0
# ifconfig wlan0 list caps
drivercaps=6f85edc1<STA,FF,TURBOP,IBSS,HOSTAP,AHDEMO,TXPMGT,SHSLOT,SHPREAMBLE,MONITOR,MBSS,WPA1,WPA2,BURST,WME,WDS,BGSCAN,TXFRAG>
cryptocaps=1f<WEP,TKIP,AES,AES_CCM,TKIPMIC>This output displays the card’s capabilities. The HOSTAP word confirms that this wireless card can act as an AP. Various supported ciphers are also listed: WEP, TKIP, and AES. This information indicates which security protocols can be used on the AP.
The wireless device can only be put into hostap mode during the creation of the network pseudo-device, so a previously created device must be destroyed first:
# ifconfig wlan0 destroythen regenerated with the correct option before setting the other parameters:
# ifconfig wlan0 create wlandev ath0 wlanmode hostap
# ifconfig wlan0 inet 192.168.0.1 netmask 255.255.255.0 ssid freebsdap mode 11g channel 1Use ifconfig(8) again to see the status of the wlan0 interface:
# ifconfig wlan0
wlan0: flags=8843<UP,BROADCAST,RUNNING,SIMPLEX,MULTICAST> metric 0 mtu 1500
ether 00:11:95:c3:0d:ac
inet 192.168.0.1 netmask 0xffffff00 broadcast 192.168.0.255
media: IEEE 802.11 Wireless Ethernet autoselect mode 11g <hostap>
status: running
ssid freebsdap channel 1 (2412 Mhz 11g) bssid 00:11:95:c3:0d:ac
country US ecm authmode OPEN privacy OFF txpower 21.5 scanvalid 60
protmode CTS wme burst dtimperiod 1 -dfsThe hostap parameter indicates the interface is running in the host-based access point mode.
The interface configuration can be done automatically at boot time by adding the following lines to /etc/rc.conf:
wlans_ath0="wlan0" create_args_wlan0="wlanmode hostap" ifconfig_wlan0="inet 192.168.0.1 netmask 255.255.255.0 ssid freebsdap mode 11g channel 1"
Although it is not recommended to run an AP without any authentication or encryption, this is a simple way to check if the AP is working. This configuration is also important for debugging client issues.
Once the AP is configured, initiate a scan from another wireless machine to find the AP:
# ifconfig wlan0 create wlandev ath0
# ifconfig wlan0 up scan
SSID/MESH ID BSSID CHAN RATE S:N INT CAPS
freebsdap 00:11:95:c3:0d:ac 1 54M -66:-96 100 ES WMEThe client machine found the AP and can be associated with it:
# ifconfig wlan0 inet 192.168.0.2 netmask 255.255.255.0 ssid freebsdap
# ifconfig wlan0
wlan0: flags=8843<UP,BROADCAST,RUNNING,SIMPLEX,MULTICAST> metric 0 mtu 1500
ether 00:11:95:d5:43:62
inet 192.168.0.2 netmask 0xffffff00 broadcast 192.168.0.255
media: IEEE 802.11 Wireless Ethernet OFDM/54Mbps mode 11g
status: associated
ssid freebsdap channel 1 (2412 Mhz 11g) bssid 00:11:95:c3:0d:ac
country US ecm authmode OPEN privacy OFF txpower 21.5 bmiss 7
scanvalid 60 bgscan bgscanintvl 300 bgscanidle 250 roam:rssi 7
roam:rate 5 protmode CTS wme burstThis section focuses on setting up a FreeBSD access point using the WPA2 security protocol. More details regarding WPA and the configuration of WPA-based wireless clients can be found in WPA.
The hostapd(8) daemon is used to deal with client authentication and key management on the WPA2-enabled AP.
The following configuration operations are performed on the FreeBSD machine acting as the AP. Once the AP is correctly working, hostapd(8) can be automatically started at boot with this line in /etc/rc.conf:
hostapd_enable="YES"
Before trying to configure hostapd(8), first configure the basic settings introduced in Basic Settings.
WPA2-PSK is intended for small networks where the use of a backend authentication server is not possible or desired.
The configuration is done in /etc/hostapd.conf:
interface=wlan0 (1) debug=1 (2) ctrl_interface=/var/run/hostapd (3) ctrl_interface_group=wheel (4) ssid=freebsdap (5) wpa=2 (6) wpa_passphrase=freebsdmall (7) wpa_key_mgmt=WPA-PSK (8) wpa_pairwise=CCMP (9)
| 1 | Wireless interface used for the access point. |
| 2 | Level of verbosity used during the execution of hostapd(8). A value of 1 represents the minimal level. |
| 3 | Pathname of the directory used by hostapd(8) to store domain socket files for communication with external programs such as hostapd_cli(8). The default value is used in this example. |
| 4 | The group allowed to access the control interface files. |
| 5 | The wireless network name, or SSID, that will appear in wireless scans. |
| 6 | Enable WPA and specify which WPA authentication protocol will be required. A value of 2 configures the AP for WPA2 and is recommended. Set to 1 only if the obsolete WPA is required. |
| 7 | ASCII passphrase for WPA authentication. |
| 8 | The key management protocol to use. This example sets WPA-PSK. |
| 9 | Encryption algorithms accepted by the access point. In this example, only the CCMP (AES) cipher is accepted. CCMP is an alternative to TKIP and is strongly preferred when possible. TKIP should be allowed only when there are stations incapable of using CCMP. |
The next step is to start hostapd(8):
# service hostapd forcestart# ifconfig wlan0
wlan0: flags=8943<UP,BROADCAST,RUNNING,PROMISC,SIMPLEX,MULTICAST> metric 0 mtu 1500
ether 04:f0:21:16:8e:10
inet6 fe80::6f0:21ff:fe16:8e10%wlan0 prefixlen 64 scopeid 0x9
nd6 options=21<PERFORMNUD,AUTO_LINKLOCAL>
media: IEEE 802.11 Wireless Ethernet autoselect mode 11na <hostap>
status: running
ssid No5ignal channel 36 (5180 MHz 11a ht/40+) bssid 04:f0:21:16:8e:10
country US ecm authmode WPA2/802.11i privacy MIXED deftxkey 2
AES-CCM 2:128-bit AES-CCM 3:128-bit txpower 17 mcastrate 6 mgmtrate 6
scanvalid 60 ampdulimit 64k ampdudensity 8 shortgi wme burst
dtimperiod 1 -dfs
groups: wlanOnce the AP is running, the clients can associate with it. See WPA for more details. It is possible to see the stations associated with the AP using ifconfig wlan0 list sta.
It is not recommended to use WEP for setting up an AP since there is no authentication mechanism and the encryption is easily cracked. Some legacy wireless cards only support WEP and these cards will only support an AP without authentication or encryption.
The wireless device can now be put into hostap mode and configured with the correct SSID and IP address:
# ifconfig wlan0 create wlandev ath0 wlanmode hostap
# ifconfig wlan0 inet 192.168.0.1 netmask 255.255.255.0 \
ssid freebsdap wepmode on weptxkey 3 wepkey 3:0x3456789012 mode 11gThe weptxkey indicates which WEP key will be used in the transmission. This example uses the third key as key numbering starts with 1. This parameter must be specified in order to encrypt the data.
The wepkey sets the selected WEP key. It should be in the format index:key. If the index is not given, key 1 is set. The index needs to be set when using keys other than the first key.
Use ifconfig(8) to see the status of the wlan0 interface:
# ifconfig wlan0
wlan0: flags=8843<UP,BROADCAST,RUNNING,SIMPLEX,MULTICAST> metric 0 mtu 1500
ether 00:11:95:c3:0d:ac
inet 192.168.0.1 netmask 0xffffff00 broadcast 192.168.0.255
media: IEEE 802.11 Wireless Ethernet autoselect mode 11g <hostap>
status: running
ssid freebsdap channel 4 (2427 Mhz 11g) bssid 00:11:95:c3:0d:ac
country US ecm authmode OPEN privacy ON deftxkey 3 wepkey 3:40-bit
txpower 21.5 scanvalid 60 protmode CTS wme burst dtimperiod 1 -dfsFrom another wireless machine, it is now possible to initiate a scan to find the AP:
# ifconfig wlan0 create wlandev ath0
# ifconfig wlan0 up scan
SSID BSSID CHAN RATE S:N INT CAPS
freebsdap 00:11:95:c3:0d:ac 1 54M 22:1 100 EPSIn this example, the client machine found the AP and can associate with it using the correct parameters. See WEP for more details.
A wired connection provides better performance and reliability, while a wireless connection provides flexibility and mobility. Laptop users typically want to roam seamlessly between the two types of connections.
On FreeBSD, it is possible to combine two or even more network interfaces together in a "failover" fashion. This type of configuration uses the most preferred and available connection from a group of network interfaces, and the operating system switches automatically when the link state changes.
Link aggregation and failover is covered in Link Aggregation and Failover and an example for using both wired and wireless connections is provided at Failover Mode Between Ethernet and Wireless Interfaces.
This section describes a number of steps to help troubleshoot common wireless networking problems.
If the access point is not listed when scanning, check that the configuration has not limited the wireless device to a limited set of channels.
If the device cannot associate with an access point, verify that the configuration matches the settings on the access point. This includes the authentication scheme and any security protocols. Simplify the configuration as much as possible. If using a security protocol such as WPA or WEP, configure the access point for open authentication and no security to see if traffic will pass.
Debugging support is provided by wpa_supplicant(8). Try running this utility manually with -dd and look at the system logs.
Once the system can associate with the access point, diagnose the network configuration using tools like ping(8).
There are many lower-level debugging tools. Debugging messages can be enabled in the 802.11 protocol support layer using wlandebug(8). For example, to enable console messages related to scanning for access points and the 802.11 protocol handshakes required to arrange communication:
# wlandebug -i wlan0 +scan+auth+debug+assoc
net.wlan.0.debug: 0 => 0xc80000<assoc,auth,scan>Many useful statistics are maintained by the 802.11 layer and wlanstats, found in /usr/src/tools/tools/net80211, will dump this information. These statistics should display all errors identified by the 802.11 layer. However, some errors are identified in the device drivers that lie below the 802.11 layer so they may not show up. To diagnose device-specific problems, refer to the drivers' documentation.
If the above information does not help to clarify the problem, submit a problem report and include output from the above tools.
Many cellphones provide the option to share their data connection over USB (often called "tethering"). This feature uses one of RNDIS, CDC, or a custom Apple® iPhone®/iPad® protocol.
Before attaching a device, load the appropriate driver into the kernel:
# kldload if_urndis
# kldload if_cdce
# kldload if_iphethOnce the device is attached ue0 will be available for use like a normal network device. Be sure that the "USB tethering" option is enabled on the device.
To make this change permanent and load the driver as a module at boot time, place the appropriate line of the following in /boot/loader.conf:
if_urndis_load="YES"
if_cdce_load="YES"
if_ipheth_load="YES"Bluetooth is a wireless technology for creating personal networks operating in the 2.4 GHz unlicensed band, with a range of 10 meters. Networks are usually formed ad-hoc from portable devices such as cellular phones, handhelds, and laptops. Unlike Wi-Fi wireless technology, Bluetooth offers higher level service profiles, such as FTP-like file servers, file pushing, voice transport, serial line emulation, and more.
This section describes the use of a USB Bluetooth dongle on a FreeBSD system. It then describes the various Bluetooth protocols and utilities.
The Bluetooth stack in FreeBSD is implemented using the netgraph(4) framework. A broad variety of Bluetooth USB dongles is supported by ng_ubt(4). Broadcom BCM2033 based Bluetooth devices are supported by the ubtbcmfw(4) and ng_ubt(4) drivers. The 3Com Bluetooth PC Card 3CRWB60-A is supported by the ng_bt3c(4) driver. Serial and UART based Bluetooth devices are supported by sio(4), ng_h4(4), and hcseriald(8).
Before attaching a device, determine which of the above drivers it uses, then load the driver. For example, if the device uses the ng_ubt(4) driver:
# kldload ng_ubtIf the Bluetooth device will be attached to the system during system startup, the system can be configured to load the module at boot time by adding the driver to /boot/loader.conf:
ng_ubt_load="YES"
Once the driver is loaded, plug in the USB dongle. If the driver load was successful, output similar to the following should appear on the console and in /var/log/messages:
ubt0: vendor 0x0a12 product 0x0001, rev 1.10/5.25, addr 2
ubt0: Interface 0 endpoints: interrupt=0x81, bulk-in=0x82, bulk-out=0x2
ubt0: Interface 1 (alt.config 5) endpoints: isoc-in=0x83, isoc-out=0x3,
wMaxPacketSize=49, nframes=6, buffer size=294To start and stop the Bluetooth stack, use its startup script. It is a good idea to stop the stack before unplugging the device. Starting the bluetooth stack might require hcsecd(8) to be started. When starting the stack, the output should be similar to the following:
# service bluetooth start ubt0
BD_ADDR: 00:02:72:00:d4:1a
Features: 0xff 0xff 0xf 00 00 00 00 00
<3-Slot> <5-Slot> <Encryption> <Slot offset>
<Timing accuracy> <Switch> <Hold mode> <Sniff mode>
<Park mode> <RSSI> <Channel quality> <SCO link>
<HV2 packets> <HV3 packets> <u-law log> <A-law log> <CVSD>
<Paging scheme> <Power control> <Transparent SCO data>
Max. ACL packet size: 192 bytes
Number of ACL packets: 8
Max. SCO packet size: 64 bytes
Number of SCO packets: 8The Host Controller Interface (HCI) provides a uniform method for accessing Bluetooth baseband capabilities. In FreeBSD, a netgraph HCI node is created for each Bluetooth device. For more details, refer to ng_hci(4).
One of the most common tasks is discovery of Bluetooth devices within RF proximity. This operation is called inquiry. Inquiry and other HCI related operations are done using hccontrol(8). The example below shows how to find out which Bluetooth devices are in range. The list of devices should be displayed in a few seconds. Note that a remote device will only answer the inquiry if it is set to discoverable mode.
% hccontrol -n ubt0hci inquiry
Inquiry result, num_responses=1
Inquiry result #0
BD_ADDR: 00:80:37:29:19:a4
Page Scan Rep. Mode: 0x1
Page Scan Period Mode: 00
Page Scan Mode: 00
Class: 52:02:04
Clock offset: 0x78ef
Inquiry complete. Status: No error [00]The BD_ADDR is the unique address of a Bluetooth device, similar to the MAC address of a network card. This address is needed for further communication with a device and it is possible to assign a human readable name to a BD_ADDR. Information regarding the known Bluetooth hosts is contained in /etc/bluetooth/hosts. The following example shows how to obtain the human readable name that was assigned to the remote device:
% hccontrol -n ubt0hci remote_name_request 00:80:37:29:19:a4
BD_ADDR: 00:80:37:29:19:a4
Name: Pav's T39If an inquiry is performed on a remote Bluetooth device, it will find the computer as "your.host.name (ubt0)". The name assigned to the local device can be changed at any time.
Remote devices can be assigned aliases in /etc/bluetooth/hosts. More information about /etc/bluetooth/hosts file might be found in bluetooth.hosts(5).
The Bluetooth system provides a point-to-point connection between two Bluetooth units, or a point-to-multipoint connection which is shared among several Bluetooth devices. The following example shows how to create a connection to a remote device:
% hccontrol -n ubt0hci create_connection BT_ADDRcreate_connection accepts BT_ADDR as well as host aliases in /etc/bluetooth/hosts.
The following example shows how to obtain the list of active baseband connections for the local device:
% hccontrol -n ubt0hci read_connection_list
Remote BD_ADDR Handle Type Mode Role Encrypt Pending Queue State
00:80:37:29:19:a4 41 ACL 0 MAST NONE 0 0 OPENA connection handle is useful when termination of the baseband connection is required, though it is normally not required to do this by hand. The stack will automatically terminate inactive baseband connections.
# hccontrol -n ubt0hci disconnect 41
Connection handle: 41
Reason: Connection terminated by local host [0x16]Type hccontrol help for a complete listing of available HCI commands. Most of the HCI commands do not require superuser privileges.
By default, Bluetooth communication is not authenticated, and any device can talk to any other device. A Bluetooth device, such as a cellular phone, may choose to require authentication to provide a particular service. Bluetooth authentication is normally done with a PIN code, an ASCII string up to 16 characters in length. The user is required to enter the same PIN code on both devices. Once the user has entered the PIN code, both devices will generate a link key. After that, the link key can be stored either in the devices or in a persistent storage. Next time, both devices will use the previously generated link key. This procedure is called pairing. Note that if the link key is lost by either device, the pairing must be repeated.
The hcsecd(8) daemon is responsible for handling Bluetooth authentication requests. The default configuration file is /etc/bluetooth/hcsecd.conf. An example section for a cellular phone with the PIN code set to 1234 is shown below:
device {
bdaddr 00:80:37:29:19:a4;
name "Pav's T39";
key nokey;
pin "1234";
}The only limitation on PIN codes is length. Some devices, such as Bluetooth headsets, may have a fixed PIN code built in. The -d switch forces hcsecd(8) to stay in the foreground, so it is easy to see what is happening. Set the remote device to receive pairing and initiate the Bluetooth connection to the remote device. The remote device should indicate that pairing was accepted and request the PIN code. Enter the same PIN code listed in hcsecd.conf. Now the computer and the remote device are paired. Alternatively, pairing can be initiated on the remote device.
The following line can be added to /etc/rc.conf to configure hcsecd(8) to start automatically on system start:
hcsecd_enable="YES"
The following is a sample of the hcsecd(8) daemon output:
hcsecd[16484]: Got Link_Key_Request event from 'ubt0hci', remote bdaddr 0:80:37:29:19:a4 hcsecd[16484]: Found matching entry, remote bdaddr 0:80:37:29:19:a4, name 'Pav's T39', link key doesn't exist hcsecd[16484]: Sending Link_Key_Negative_Reply to 'ubt0hci' for remote bdaddr 0:80:37:29:19:a4 hcsecd[16484]: Got PIN_Code_Request event from 'ubt0hci', remote bdaddr 0:80:37:29:19:a4 hcsecd[16484]: Found matching entry, remote bdaddr 0:80:37:29:19:a4, name 'Pav's T39', PIN code exists hcsecd[16484]: Sending PIN_Code_Reply to 'ubt0hci' for remote bdaddr 0:80:37:29:19:a4
A Dial-Up Networking (DUN) profile can be used to configure a cellular phone as a wireless modem for connecting to a dial-up Internet access server. It can also be used to configure a computer to receive data calls from a cellular phone.
Network access with a PPP profile can be used to provide LAN access for a single Bluetooth device or multiple Bluetooth devices. It can also provide PC to PC connection using PPP networking over serial cable emulation.
In FreeBSD, these profiles are implemented with ppp(8) and the rfcomm_pppd(8) wrapper which converts a Bluetooth connection into something PPP can use. Before a profile can be used, a new PPP label must be created in /etc/ppp/ppp.conf. Consult rfcomm_pppd(8) for examples.
In this example, rfcomm_pppd(8) is used to open a connection to a remote device with a BD_ADDR of 00:80:37:29:19:a4 on a DUNRFCOMM channel:
# rfcomm_pppd -a 00:80:37:29:19:a4 -c -C dun -l rfcomm-dialupThe actual channel number will be obtained from the remote device using the SDP protocol. It is possible to specify the RFCOMM channel by hand, and in this case rfcomm_pppd(8) will not perform the SDP query. Use sdpcontrol(8) to find out the RFCOMM channel on the remote device.
In order to provide network access with the PPPLAN service, sdpd(8) must be running and a new entry for LAN clients must be created in /etc/ppp/ppp.conf. Consult rfcomm_pppd(8) for examples. Finally, start the RFCOMMPPP server on a valid RFCOMM channel number. The RFCOMMPPP server will automatically register the Bluetooth LAN service with the local SDP daemon. The example below shows how to start the RFCOMMPPP server.
# rfcomm_pppd -s -C 7 -l rfcomm-serverThis section provides an overview of the various Bluetooth protocols, their function, and associated utilities.
The Logical Link Control and Adaptation Protocol (L2CAP) provides connection-oriented and connectionless data services to upper layer protocols. L2CAP permits higher level protocols and applications to transmit and receive L2CAP data packets up to 64 kilobytes in length.
L2CAP is based around the concept of channels. A channel is a logical connection on top of a baseband connection, where each channel is bound to a single protocol in a many-to-one fashion. Multiple channels can be bound to the same protocol, but a channel cannot be bound to multiple protocols. Each L2CAP packet received on a channel is directed to the appropriate higher level protocol. Multiple channels can share the same baseband connection.
In FreeBSD, a netgraph L2CAP node is created for each Bluetooth device. This node is normally connected to the downstream Bluetooth HCI node and upstream Bluetooth socket nodes. The default name for the L2CAP node is "devicel2cap". For more details refer to ng_l2cap(4).
A useful command is l2ping(8), which can be used to ping other devices. Some Bluetooth implementations might not return all of the data sent to them, so 0 bytes in the following example is normal.
# l2ping -a 00:80:37:29:19:a4
0 bytes from 0:80:37:29:19:a4 seq_no=0 time=48.633 ms result=0
0 bytes from 0:80:37:29:19:a4 seq_no=1 time=37.551 ms result=0
0 bytes from 0:80:37:29:19:a4 seq_no=2 time=28.324 ms result=0
0 bytes from 0:80:37:29:19:a4 seq_no=3 time=46.150 ms result=0The l2control(8) utility is used to perform various operations on L2CAP nodes. This example shows how to obtain the list of logical connections (channels) and the list of baseband connections for the local device:
% l2control -a 00:02:72:00:d4:1a read_channel_list
L2CAP channels:
Remote BD_ADDR SCID/ DCID PSM IMTU/ OMTU State
00:07:e0:00:0b:ca 66/ 64 3 132/ 672 OPEN
% l2control -a 00:02:72:00:d4:1a read_connection_list
L2CAP connections:
Remote BD_ADDR Handle Flags Pending State
00:07:e0:00:0b:ca 41 O 0 OPENAnother diagnostic tool is btsockstat(1). It is similar to netstat(1), but for Bluetooth network-related data structures. The example below shows the same logical connection as l2control(8) above.
% btsockstat
Active L2CAP sockets
PCB Recv-Q Send-Q Local address/PSM Foreign address CID State
c2afe900 0 0 00:02:72:00:d4:1a/3 00:07:e0:00:0b:ca 66 OPEN
Active RFCOMM sessions
L2PCB PCB Flag MTU Out-Q DLCs State
c2afe900 c2b53380 1 127 0 Yes OPEN
Active RFCOMM sockets
PCB Recv-Q Send-Q Local address Foreign address Chan DLCI State
c2e8bc80 0 250 00:02:72:00:d4:1a 00:07:e0:00:0b:ca 3 6 OPENThe RFCOMM protocol provides emulation of serial ports over the L2CAP protocol. RFCOMM is a simple transport protocol, with additional provisions for emulating the 9 circuits of RS-232 (EIATIA-232-E) serial ports. It supports up to 60 simultaneous connections (RFCOMM channels) between two Bluetooth devices.
For the purposes of RFCOMM, a complete communication path involves two applications running on the communication endpoints with a communication segment between them. RFCOMM is intended to cover applications that make use of the serial ports of the devices in which they reside. The communication segment is a direct connect Bluetooth link from one device to another.
RFCOMM is only concerned with the connection between the devices in the direct connect case, or between the device and a modem in the network case. RFCOMM can support other configurations, such as modules that communicate via Bluetooth wireless technology on one side and provide a wired interface on the other side.
In FreeBSD, RFCOMM is implemented at the Bluetooth sockets layer.
The Service Discovery Protocol (SDP) provides the means for client applications to discover the existence of services provided by server applications as well as the attributes of those services. The attributes of a service include the type or class of service offered and the mechanism or protocol information needed to utilize the service.
SDP involves communication between a SDP server and a SDP client. The server maintains a list of service records that describe the characteristics of services associated with the server. Each service record contains information about a single service. A client may retrieve information from a service record maintained by the SDP server by issuing a SDP request. If the client, or an application associated with the client, decides to use a service, it must open a separate connection to the service provider in order to utilize the service. SDP provides a mechanism for discovering services and their attributes, but it does not provide a mechanism for utilizing those services.
Normally, a SDP client searches for services based on some desired characteristics of the services. However, there are times when it is desirable to discover which types of services are described by an SDP server’s service records without any prior information about the services. This process of looking for any offered services is called browsing.
The Bluetooth SDP server, sdpd(8), and command line client, sdpcontrol(8), are included in the standard FreeBSD installation. The following example shows how to perform a SDP browse query.
% sdpcontrol -a 00:01:03:fc:6e:ec browse
Record Handle: 00000000
Service Class ID List:
Service Discovery Server (0x1000)
Protocol Descriptor List:
L2CAP (0x0100)
Protocol specific parameter #1: u/int/uuid16 1
Protocol specific parameter #2: u/int/uuid16 1
Record Handle: 0x00000001
Service Class ID List:
Browse Group Descriptor (0x1001)
Record Handle: 0x00000002
Service Class ID List:
LAN Access Using PPP (0x1102)
Protocol Descriptor List:
L2CAP (0x0100)
RFCOMM (0x0003)
Protocol specific parameter #1: u/int8/bool 1
Bluetooth Profile Descriptor List:
LAN Access Using PPP (0x1102) ver. 1.0Note that each service has a list of attributes, such as the RFCOMM channel. Depending on the service, the user might need to make note of some of the attributes. Some Bluetooth implementations do not support service browsing and may return an empty list. In this case, it is possible to search for the specific service. The example below shows how to search for the OBEX Object Push (OPUSH) service:
% sdpcontrol -a 00:01:03:fc:6e:ec search OPUSHOffering services on FreeBSD to Bluetooth clients is done with the sdpd(8) server. The following line can be added to /etc/rc.conf:
sdpd_enable="YES"
Then the sdpd(8) daemon can be started with:
# service sdpd startThe local server application that wants to provide a Bluetooth service to remote clients will register the service with the local SDP daemon. An example of such an application is rfcomm_pppd(8). Once started, it will register the Bluetooth LAN service with the local SDP daemon.
The list of services registered with the local SDP server can be obtained by issuing a SDP browse query via the local control channel:
# sdpcontrol -l browseObject Exchange (OBEX) is a widely used protocol for simple file transfers between mobile devices. Its main use is in infrared communication, where it is used for generic file transfers between notebooks or PDAs, and for sending business cards or calendar entries between cellular phones and other devices with Personal Information Manager (PIM) applications.
The OBEX server and client are implemented by obexapp, which can be installed using the comms/obexapp package or port.
The OBEX client is used to push and/or pull objects from the OBEX server. An example object is a business card or an appointment. The OBEX client can obtain the RFCOMM channel number from the remote device via SDP. This can be done by specifying the service name instead of the RFCOMM channel number. Supported service names are: IrMC, FTRN, and OPUSH. It is also possible to specify the RFCOMM channel as a number. Below is an example of an OBEX session where the device information object is pulled from the cellular phone, and a new object, the business card, is pushed into the phone’s directory.
% obexapp -a 00:80:37:29:19:a4 -C IrMC
obex> get telecom/devinfo.txt devinfo-t39.txt
Success, response: OK, Success (0x20)
obex> put new.vcf
Success, response: OK, Success (0x20)
obex> di
Success, response: OK, Success (0x20)In order to provide the OPUSH service, sdpd(8) must be running and a root folder, where all incoming objects will be stored, must be created. The default path to the root folder is /var/spool/obex. Finally, start the OBEX server on a valid RFCOMM channel number. The OBEX server will automatically register the OPUSH service with the local SDP daemon. The example below shows how to start the OBEX server.
# obexapp -s -C 10The Serial Port Profile (SPP) allows Bluetooth devices to perform serial cable emulation. This profile allows legacy applications to use Bluetooth as a cable replacement, through a virtual serial port abstraction.
In FreeBSD, rfcomm_sppd(1) implements SPP and a pseudo tty is used as a virtual serial port abstraction. The example below shows how to connect to a remote device’s serial port service. A RFCOMM channel does not have to be specified as rfcomm_sppd(1) can obtain it from the remote device via SDP. To override this, specify a RFCOMM channel on the command line.
# rfcomm_sppd -a 00:07:E0:00:0B:CA -t
rfcomm_sppd[94692]: Starting on /dev/pts/6...
/dev/pts/6Once connected, the pseudo tty can be used as serial port:
# cu -l /dev/pts/6The pseudo tty is printed on stdout and can be read by wrapper scripts:
PTS=`rfcomm_sppd -a 00:07:E0:00:0B:CA -t` cu -l $PTS
By default, when FreeBSD is accepting a new connection, it tries to perform a role switch and become master. Some older Bluetooth devices which do not support role switching will not be able to connect. Since role switching is performed when a new connection is being established, it is not possible to ask the remote device if it supports role switching. However, there is a HCI option to disable role switching on the local side:
# hccontrol -n ubt0hci write_node_role_switch 0To display Bluetooth packets, use the third-party package hcidump, which can be installed using the comms/hcidump package or port. This utility is similar to tcpdump(1) and can be used to display the contents of Bluetooth packets on the terminal and to dump the Bluetooth packets to a file.
It is sometimes useful to divide a network, such as an Ethernet segment, into network segments without having to create IP subnets and use a router to connect the segments together. A device that connects two networks together in this fashion is called a "bridge".
A bridge works by learning the MAC addresses of the devices on each of its network interfaces. It forwards traffic between networks only when the source and destination MAC addresses are on different networks. In many respects, a bridge is like an Ethernet switch with very few ports. A FreeBSD system with multiple network interfaces can be configured to act as a bridge.
Bridging can be useful in the following situations:
The basic operation of a bridge is to join two or more network segments. There are many reasons to use a host-based bridge instead of networking equipment, such as cabling constraints or firewalling. A bridge can also connect a wireless interface running in hostap mode to a wired network and act as an access point.
A bridge can be used when firewall functionality is needed without routing or Network Address Translation (NAT).
An example is a small company that is connected via DSL or ISDN to an ISP. There are thirteen public IP addresses from the ISP and ten computers on the network. In this situation, using a router-based firewall is difficult because of subnetting issues. A bridge-based firewall can be configured without any IP addressing issues.
A bridge can join two network segments in order to inspect all Ethernet frames that pass between them using bpf(4) and tcpdump(1) on the bridge interface or by sending a copy of all frames out an additional interface known as a span port.
Two Ethernet networks can be joined across an IP link by bridging the networks to an EtherIP tunnel or a tap(4) based solution such as OpenVPN.
A network can be connected together with multiple links and use the Spanning Tree Protocol (STP) to block redundant paths.
This section describes how to configure a FreeBSD system as a bridge using if_bridge(4). A netgraph bridging driver is also available, and is described in ng_bridge(4).
Packet filtering can be used with any firewall package that hooks into the pfil(9) framework. The bridge can be used as a traffic shaper with altq(4) or dummynet(4). |
In FreeBSD, if_bridge(4) is a kernel module which is automatically loaded by ifconfig(8) when creating a bridge interface. It is also possible to compile bridge support into a custom kernel by adding device if_bridge to the custom kernel configuration file.
The bridge is created using interface cloning. To create the bridge interface:
# ifconfig bridge create
bridge0
# ifconfig bridge0
bridge0: flags=8802<BROADCAST,SIMPLEX,MULTICAST> metric 0 mtu 1500
ether 96:3d:4b:f1:79:7a
id 00:00:00:00:00:00 priority 32768 hellotime 2 fwddelay 15
maxage 20 holdcnt 6 proto rstp maxaddr 100 timeout 1200
root id 00:00:00:00:00:00 priority 0 ifcost 0 port 0When a bridge interface is created, it is automatically assigned a randomly generated Ethernet address. The maxaddr and timeout parameters control how many MAC addresses the bridge will keep in its forwarding table and how many seconds before each entry is removed after it is last seen. The other parameters control how STP operates.
Next, specify which network interfaces to add as members of the bridge. For the bridge to forward packets, all member interfaces and the bridge need to be up:
# ifconfig bridge0 addm fxp0 addm fxp1 up
# ifconfig fxp0 up
# ifconfig fxp1 upThe bridge can now forward Ethernet frames between fxp0 and fxp1. Add the following lines to /etc/rc.conf so the bridge is created at startup:
cloned_interfaces="bridge0" ifconfig_bridge0="addm fxp0 addm fxp1 up" ifconfig_fxp0="up" ifconfig_fxp1="up"
If the bridge host needs an IP address, set it on the bridge interface, not on the member interfaces. The address can be set statically or via DHCP. This example sets a static IP address:
# ifconfig bridge0 inet 192.168.0.1/24It is also possible to assign an IPv6 address to a bridge interface. To make the changes permanent, add the addressing information to /etc/rc.conf.
When packet filtering is enabled, bridged packets will pass through the filter inbound on the originating interface on the bridge interface, and outbound on the appropriate interfaces. Either stage can be disabled. When direction of the packet flow is important, it is best to firewall on the member interfaces rather than the bridge itself. The bridge has several configurable settings for passing non-IP and IP packets, and layer2 firewalling with ipfw(8). See if_bridge(4) for more information. |
For an Ethernet network to function properly, only one active path can exist between two devices. The STP protocol detects loops and puts redundant links into a blocked state. Should one of the active links fail, STP calculates a different tree and enables one of the blocked paths to restore connectivity to all points in the network.
The Rapid Spanning Tree Protocol (RSTP or 802.1w) provides backwards compatibility with legacy STP. RSTP provides faster convergence and exchanges information with neighboring switches to quickly transition to forwarding mode without creating loops. FreeBSD supports RSTP and STP as operating modes, with RSTP being the default mode.
STP can be enabled on member interfaces using ifconfig(8). For a bridge with fxp0 and fxp1 as the current interfaces, enable STP with:
# ifconfig bridge0 stp fxp0 stp fxp1
bridge0: flags=8843<UP,BROADCAST,RUNNING,SIMPLEX,MULTICAST> metric 0 mtu 1500
ether d6:cf:d5:a0:94:6d
id 00:01:02:4b:d4:50 priority 32768 hellotime 2 fwddelay 15
maxage 20 holdcnt 6 proto rstp maxaddr 100 timeout 1200
root id 00:01:02:4b:d4:50 priority 32768 ifcost 0 port 0
member: fxp0 flags=1c7<LEARNING,DISCOVER,STP,AUTOEDGE,PTP,AUTOPTP>
port 3 priority 128 path cost 200000 proto rstp
role designated state forwarding
member: fxp1 flags=1c7<LEARNING,DISCOVER,STP,AUTOEDGE,PTP,AUTOPTP>
port 4 priority 128 path cost 200000 proto rstp
role designated state forwardingThis bridge has a spanning tree ID of 00:01:02:4b:d4:50 and a priority of 32768. As the root id is the same, it indicates that this is the root bridge for the tree.
Another bridge on the network also has STP enabled:
bridge0: flags=8843<UP,BROADCAST,RUNNING,SIMPLEX,MULTICAST> metric 0 mtu 1500
ether 96:3d:4b:f1:79:7a
id 00:13:d4:9a:06:7a priority 32768 hellotime 2 fwddelay 15
maxage 20 holdcnt 6 proto rstp maxaddr 100 timeout 1200
root id 00:01:02:4b:d4:50 priority 32768 ifcost 400000 port 4
member: fxp0 flags=1c7<LEARNING,DISCOVER,STP,AUTOEDGE,PTP,AUTOPTP>
port 4 priority 128 path cost 200000 proto rstp
role root state forwarding
member: fxp1 flags=1c7<LEARNING,DISCOVER,STP,AUTOEDGE,PTP,AUTOPTP>
port 5 priority 128 path cost 200000 proto rstp
role designated state forwardingThe line root id 00:01:02:4b:d4:50 priority 32768 ifcost 400000 port 4 shows that the root bridge is 00:01:02:4b:d4:50 and has a path cost of 400000 from this bridge. The path to the root bridge is via port 4 which is fxp0.
Several ifconfig parameters are unique to bridge interfaces. This section summarizes some common uses for these parameters. The complete list of available parameters is described in ifconfig(8).
A private interface does not forward any traffic to any other port that is also designated as a private interface. The traffic is blocked unconditionally so no Ethernet frames will be forwarded, including ARP packets. If traffic needs to be selectively blocked, a firewall should be used instead.
A span port transmits a copy of every Ethernet frame received by the bridge. The number of span ports configured on a bridge is unlimited, but if an interface is designated as a span port, it cannot also be used as a regular bridge port. This is most useful for snooping a bridged network passively on another host connected to one of the span ports of the bridge. For example, to send a copy of all frames out the interface named fxp4:
# ifconfig bridge0 span fxp4If a bridge member interface is marked as sticky, dynamically learned address entries are treated as static entries in the forwarding cache. Sticky entries are never aged out of the cache or replaced, even if the address is seen on a different interface. This gives the benefit of static address entries without the need to pre-populate the forwarding table. Clients learned on a particular segment of the bridge cannot roam to another segment.
An example of using sticky addresses is to combine the bridge with VLANs in order to isolate customer networks without wasting IP address space. Consider that CustomerA is on vlan100, CustomerB is on vlan101, and the bridge has the address 192.168.0.1:
# ifconfig bridge0 addm vlan100 sticky vlan100 addm vlan101 sticky vlan101
# ifconfig bridge0 inet 192.168.0.1/24In this example, both clients see 192.168.0.1 as their default gateway. Since the bridge cache is sticky, one host cannot spoof the MAC address of the other customer in order to intercept their traffic.
Any communication between the VLANs can be blocked using a firewall or, as seen in this example, private interfaces:
# ifconfig bridge0 private vlan100 private vlan101The customers are completely isolated from each other and the full /24 address range can be allocated without subnetting.
The number of unique source MAC addresses behind an interface can be limited. Once the limit is reached, packets with unknown source addresses are dropped until an existing host cache entry expires or is removed.
The following example sets the maximum number of Ethernet devices for CustomerA on vlan100 to 10:
# ifconfig bridge0 ifmaxaddr vlan100 10Bridge interfaces also support monitor mode, where the packets are discarded after bpf(4) processing and are not processed or forwarded further. This can be used to multiplex the input of two or more interfaces into a single bpf(4) stream. This is useful for reconstructing the traffic for network taps that transmit the RX/TX signals out through two separate interfaces. For example, to read the input from four network interfaces as one stream:
# ifconfig bridge0 addm fxp0 addm fxp1 addm fxp2 addm fxp3 monitor up
# tcpdump -i bridge0The bridge interface and STP parameters can be monitored via bsnmpd(1) which is included in the FreeBSD base system. The exported bridge MIBs conform to IETF standards so any SNMP client or monitoring package can be used to retrieve the data.
To enable monitoring on the bridge, uncomment this line in /etc/snmpd.config by removing the beginning # symbol:
begemotSnmpdModulePath."bridge" = "/usr/lib/snmp_bridge.so"
Other configuration settings, such as community names and access lists, may need to be modified in this file. See bsnmpd(1) and snmp_bridge(3) for more information. Once these edits are saved, add this line to /etc/rc.conf:
bsnmpd_enable="YES"
Then, start bsnmpd(1):
# service bsnmpd startThe following examples use the Net-SNMP software (net-mgmt/net-snmp) to query a bridge from a client system. The net-mgmt/bsnmptools port can also be used. From the SNMP client which is running Net-SNMP, add the following lines to $HOME/.snmp/snmp.conf in order to import the bridge MIB definitions:
mibdirs +/usr/shared/snmp/mibs mibs +BRIDGE-MIB:RSTP-MIB:BEGEMOT-MIB:BEGEMOT-BRIDGE-MIB
To monitor a single bridge using the IETF BRIDGE-MIB (RFC4188):
% snmpwalk -v 2c -c public bridge1.example.com mib-2.dot1dBridge
BRIDGE-MIB::dot1dBaseBridgeAddress.0 = STRING: 66:fb:9b:6e:5c:44
BRIDGE-MIB::dot1dBaseNumPorts.0 = INTEGER: 1 ports
BRIDGE-MIB::dot1dStpTimeSinceTopologyChange.0 = Timeticks: (189959) 0:31:39.59 centi-seconds
BRIDGE-MIB::dot1dStpTopChanges.0 = Counter32: 2
BRIDGE-MIB::dot1dStpDesignatedRoot.0 = Hex-STRING: 80 00 00 01 02 4B D4 50
...
BRIDGE-MIB::dot1dStpPortState.3 = INTEGER: forwarding(5)
BRIDGE-MIB::dot1dStpPortEnable.3 = INTEGER: enabled(1)
BRIDGE-MIB::dot1dStpPortPathCost.3 = INTEGER: 200000
BRIDGE-MIB::dot1dStpPortDesignatedRoot.3 = Hex-STRING: 80 00 00 01 02 4B D4 50
BRIDGE-MIB::dot1dStpPortDesignatedCost.3 = INTEGER: 0
BRIDGE-MIB::dot1dStpPortDesignatedBridge.3 = Hex-STRING: 80 00 00 01 02 4B D4 50
BRIDGE-MIB::dot1dStpPortDesignatedPort.3 = Hex-STRING: 03 80
BRIDGE-MIB::dot1dStpPortForwardTransitions.3 = Counter32: 1
RSTP-MIB::dot1dStpVersion.0 = INTEGER: rstp(2)The dot1dStpTopChanges.0 value is two, indicating that the STP bridge topology has changed twice. A topology change means that one or more links in the network have changed or failed and a new tree has been calculated. The dot1dStpTimeSinceTopologyChange.0 value will show when this happened.
To monitor multiple bridge interfaces, the private BEGEMOT-BRIDGE-MIB can be used:
% snmpwalk -v 2c -c public bridge1.example.com
enterprises.fokus.begemot.begemotBridge
BEGEMOT-BRIDGE-MIB::begemotBridgeBaseName."bridge0" = STRING: bridge0
BEGEMOT-BRIDGE-MIB::begemotBridgeBaseName."bridge2" = STRING: bridge2
BEGEMOT-BRIDGE-MIB::begemotBridgeBaseAddress."bridge0" = STRING: e:ce:3b:5a:9e:13
BEGEMOT-BRIDGE-MIB::begemotBridgeBaseAddress."bridge2" = STRING: 12:5e:4d:74:d:fc
BEGEMOT-BRIDGE-MIB::begemotBridgeBaseNumPorts."bridge0" = INTEGER: 1
BEGEMOT-BRIDGE-MIB::begemotBridgeBaseNumPorts."bridge2" = INTEGER: 1
...
BEGEMOT-BRIDGE-MIB::begemotBridgeStpTimeSinceTopologyChange."bridge0" = Timeticks: (116927) 0:19:29.27 centi-seconds
BEGEMOT-BRIDGE-MIB::begemotBridgeStpTimeSinceTopologyChange."bridge2" = Timeticks: (82773) 0:13:47.73 centi-seconds
BEGEMOT-BRIDGE-MIB::begemotBridgeStpTopChanges."bridge0" = Counter32: 1
BEGEMOT-BRIDGE-MIB::begemotBridgeStpTopChanges."bridge2" = Counter32: 1
BEGEMOT-BRIDGE-MIB::begemotBridgeStpDesignatedRoot."bridge0" = Hex-STRING: 80 00 00 40 95 30 5E 31
BEGEMOT-BRIDGE-MIB::begemotBridgeStpDesignatedRoot."bridge2" = Hex-STRING: 80 00 00 50 8B B8 C6 A9To change the bridge interface being monitored via the mib-2.dot1dBridge subtree:
% snmpset -v 2c -c private bridge1.example.com
BEGEMOT-BRIDGE-MIB::begemotBridgeDefaultBridgeIf.0 s bridge2FreeBSD provides the lagg(4) interface which can be used to aggregate multiple network interfaces into one virtual interface in order to provide failover and link aggregation. Failover allows traffic to continue to flow as long as at least one aggregated network interface has an established link. Link aggregation works best on switches which support LACP, as this protocol distributes traffic bi-directionally while responding to the failure of individual links.
The aggregation protocols supported by the lagg interface determine which ports are used for outgoing traffic and whether or not a specific port accepts incoming traffic. The following protocols are supported by lagg(4):
This mode sends and receives traffic only through the master port. If the master port becomes unavailable, the next active port is used. The first interface added to the virtual interface is the master port and all subsequently added interfaces are used as failover devices. If failover to a non-master port occurs, the original port becomes master once it becomes available again.
Cisco® Fast EtherChannel® (FEC) is found on older Cisco® switches. It provides a static setup and does not negotiate aggregation with the peer or exchange frames to monitor the link. If the switch supports LACP, that should be used instead.
The IEEE® 802.3ad Link Aggregation Control Protocol (LACP) negotiates a set of aggregable links with the peer into one or more Link Aggregated Groups (LAGs). Each LAG is composed of ports of the same speed, set to full-duplex operation, and traffic is balanced across the ports in the LAG with the greatest total speed. Typically, there is only one LAG which contains all the ports. In the event of changes in physical connectivity, LACP will quickly converge to a new configuration.
LACP balances outgoing traffic across the active ports based on hashed protocol header information and accepts incoming traffic from any active port. The hash includes the Ethernet source and destination address and, if available, the VLAN tag, and the IPv4 or IPv6 source and destination address.
This mode distributes outgoing traffic using a round-robin scheduler through all active ports and accepts incoming traffic from any active port. Since this mode violates Ethernet frame ordering, it should be used with caution.
This section demonstrates how to configure a Cisco® switch and a FreeBSD system for LACP load balancing. It then shows how to configure two Ethernet interfaces in failover mode as well as how to configure failover mode between an Ethernet and a wireless interface.
This example connects two fxp(4) Ethernet interfaces on a FreeBSD machine to the first two Ethernet ports on a Cisco® switch as a single load balanced and fault tolerant link. More interfaces can be added to increase throughput and fault tolerance. Replace the names of the Cisco® ports, Ethernet devices, channel group number, and IP address shown in the example to match the local configuration.
Frame ordering is mandatory on Ethernet links and any traffic between two stations always flows over the same physical link, limiting the maximum speed to that of one interface. The transmit algorithm attempts to use as much information as it can to distinguish different traffic flows and balance the flows across the available interfaces.
On the Cisco® switch, add the FastEthernet0/1 and FastEthernet0/2 interfaces to channel group 1:
interface FastEthernet0/1
channel-group 1 mode active
channel-protocol lacp
!
interface FastEthernet0/2
channel-group 1 mode active
channel-protocol lacpOn the FreeBSD system, create the lagg(4) interface using the physical interfaces fxp0 and fxp1 and bring the interfaces up with an IP address of 10.0.0.3/24:
# ifconfig fxp0 up
# ifconfig fxp1 up
# ifconfig lagg0 create
# ifconfig lagg0 up laggproto lacp laggport fxp0 laggport fxp1 10.0.0.3/24Next, verify the status of the virtual interface:
# ifconfig lagg0
lagg0: flags=8843<UP,BROADCAST,RUNNING,SIMPLEX,MULTICAST> metric 0 mtu 1500
options=8<VLAN_MTU>
ether 00:05:5d:71:8d:b8
inet 10.0.0.3 netmask 0xffffff00 broadcast 10.0.0.255
media: Ethernet autoselect
status: active
laggproto lacp
laggport: fxp1 flags=1c<ACTIVE,COLLECTING,DISTRIBUTING>
laggport: fxp0 flags=1c<ACTIVE,COLLECTING,DISTRIBUTING>Ports marked as ACTIVE are part of the LAG that has been negotiated with the remote switch. Traffic will be transmitted and received through these active ports. Add -v to the above command to view the LAG identifiers.
To see the port status on the Cisco® switch:
switch# show lacp neighbor
Flags: S - Device is requesting Slow LACPDUs
F - Device is requesting Fast LACPDUs
A - Device is in Active mode P - Device is in Passive mode
Channel group 1 neighbors
Partner's information:
LACP port Oper Port Port
Port Flags Priority Dev ID Age Key Number State
Fa0/1 SA 32768 0005.5d71.8db8 29s 0x146 0x3 0x3D
Fa0/2 SA 32768 0005.5d71.8db8 29s 0x146 0x4 0x3DFor more detail, type show lacp neighbor detail.
To retain this configuration across reboots, add the following entries to /etc/rc.conf on the FreeBSD system:
ifconfig_fxp0="up" ifconfig_fxp1="up" cloned_interfaces="lagg0" ifconfig_lagg0="laggproto lacp laggport fxp0 laggport fxp1 10.0.0.3/24"
Failover mode can be used to switch over to a secondary interface if the link is lost on the master interface. To configure failover, make sure that the underlying physical interfaces are up, then create the lagg(4) interface. In this example, fxp0 is the master interface, fxp1 is the secondary interface, and the virtual interface is assigned an IP address of 10.0.0.15/24:
# ifconfig fxp0 up
# ifconfig fxp1 up
# ifconfig lagg0 create
# ifconfig lagg0 up laggproto failover laggport fxp0 laggport fxp1 10.0.0.15/24The virtual interface should look something like this:
# ifconfig lagg0
lagg0: flags=8843<UP,BROADCAST,RUNNING,SIMPLEX,MULTICAST> metric 0 mtu 1500
options=8<VLAN_MTU>
ether 00:05:5d:71:8d:b8
inet 10.0.0.15 netmask 0xffffff00 broadcast 10.0.0.255
media: Ethernet autoselect
status: active
laggproto failover
laggport: fxp1 flags=0<>
laggport: fxp0 flags=5<MASTER,ACTIVE>Traffic will be transmitted and received on fxp0. If the link is lost on fxp0, fxp1 will become the active link. If the link is restored on the master interface, it will once again become the active link.
To retain this configuration across reboots, add the following entries to /etc/rc.conf:
ifconfig_fxp0="up" ifconfig_fxp1="up" cloned_interfaces="lagg0" ifconfig_lagg0="laggproto failover laggport fxp0 laggport fxp1 10.0.0.15/24"
For laptop users, it is usually desirable to configure the wireless device as a secondary which is only used when the Ethernet connection is not available. With lagg(4), it is possible to configure a failover which prefers the Ethernet connection for both performance and security reasons, while maintaining the ability to transfer data over the wireless connection.
This is achieved by overriding the Ethernet interface’s MAC address with that of the wireless interface.
In this example, the Ethernet interface, re0, is the master and the wireless interface, wlan0, is the failover. The wlan0 interface was created from the ath0 physical wireless interface, and the Ethernet interface will be configured with the MAC address of the wireless interface. First, determine the MAC address of the wireless interface:
# ifconfig wlan0
wlan0: flags=8843<UP,BROADCAST,RUNNING,SIMPLEX,MULTICAST> metric 0 mtu 1500
ether b8:ee:65:5b:32:59
groups: wlan
ssid Bbox-A3BD2403 channel 6 (2437 MHz 11g ht/20) bssid 00:37:b7:56:4b:60
regdomain ETSI country FR indoor ecm authmode WPA2/802.11i privacy ON
deftxkey UNDEF AES-CCM 2:128-bit txpower 30 bmiss 7 scanvalid 60
protmode CTS ampdulimit 64k ampdudensity 8 shortgi -stbctx stbcrx
-ldpc wme burst roaming MANUAL
media: IEEE 802.11 Wireless Ethernet MCS mode 11ng
status: associated
nd6 options=29<PERFORMNUD,IFDISABLED,AUTO_LINKLOCAL>Replace wlan0 to match the system’s wireless interface name. The ether line will contain the MAC address of the specified interface. Now, change the MAC address of the Ethernet interface:
# ifconfig re0 ether b8:ee:65:5b:32:59Bring the wireless interface up (replacing FR with your own 2-letter country code), but do not set an IP address:
# ifconfig wlan0 create wlandev ath0 country FR ssid my_router upMake sure the re0 interface is up, then create the lagg(4) interface with re0 as master with failover to wlan0:
# ifconfig re0 up
# ifconfig lagg0 create
# ifconfig lagg0 up laggproto failover laggport re0 laggport wlan0The virtual interface should look something like this:
# ifconfig lagg0
lagg0: flags=8843<UP,BROADCAST,RUNNING,SIMPLEX,MULTICAST> metric 0 mtu 1500
options=8<VLAN_MTU>
ether b8:ee:65:5b:32:59
laggproto failover lagghash l2,l3,l4
laggport: re0 flags=5<MASTER,ACTIVE>
laggport: wlan0 flags=0<>
groups: lagg
media: Ethernet autoselect
status: activeThen, start the DHCP client to obtain an IP address:
# dhclient lagg0To retain this configuration across reboots, add the following entries to /etc/rc.conf:
ifconfig_re0="ether b8:ee:65:5b:32:59" wlans_ath0="wlan0" ifconfig_wlan0="WPA" create_args_wlan0="country FR" cloned_interfaces="lagg0" ifconfig_lagg0="up laggproto failover laggport re0 laggport wlan0 DHCP"
The Intel® Preboot eXecution Environment (PXE) allows an operating system to boot over the network. For example, a FreeBSD system can boot over the network and operate without a local disk, using file systems mounted from an NFS server. PXE support is usually available in the BIOS. To use PXE when the machine starts, select the Boot from network option in the BIOS setup or type a function key during system initialization.
In order to provide the files needed for an operating system to boot over the network, a PXE setup also requires properly configured DHCP, TFTP, and NFS servers, where:
Initial parameters, such as an IP address, executable boot filename and location, server name, and root path are obtained from the DHCP server.
The operating system loader file is booted using TFTP.
The file systems are loaded using NFS.
When a computer PXE boots, it receives information over DHCP about where to obtain the initial boot loader file. After the host computer receives this information, it downloads the boot loader via TFTP and then executes the boot loader. In FreeBSD, the boot loader file is /boot/pxeboot. After /boot/pxeboot executes, the FreeBSD kernel is loaded and the rest of the FreeBSD bootup sequence proceeds, as described in The FreeBSD Booting Process.
This section describes how to configure these services on a FreeBSD system so that other systems can PXE boot into FreeBSD. Refer to diskless(8) for more information.
As described, the system providing these services is insecure. It should live in a protected area of a network and be untrusted by other hosts. |
The steps shown in this section configure the built-in NFS and TFTP servers. The next section demonstrates how to install and configure the DHCP server. In this example, the directory which will contain the files used by PXE users is /b/tftpboot/FreeBSD/install. It is important that this directory exists and that the same directory name is set in both /etc/inetd.conf and /usr/local/etc/dhcpd.conf.
Create the root directory which will contain a FreeBSD installation to be NFS mounted:
# export NFSROOTDIR=/b/tftpboot/FreeBSD/install
# mkdir -p ${NFSROOTDIR}Enable the NFS server by adding this line to /etc/rc.conf:
nfs_server_enable="YES"
Export the diskless root directory via NFS by adding the following to /etc/exports:
/b -ro -alldirs -maproot=root
Start the NFS server:
# service nfsd startEnable inetd(8) by adding the following line to /etc/rc.conf:
inetd_enable="YES"
Uncomment the following line in /etc/inetd.conf by making sure it does not start with a # symbol:
tftp dgram udp wait root /usr/libexec/tftpd tftpd -l -s /b/tftpboot
Some PXE versions require the TCP version of TFTP. In this case, uncomment the second |
Start inetd(8):
# service inetd startInstall the base system into ${NFSROOTDIR}, either by decompressing the official archives or by rebuilding the FreeBSD kernel and userland (refer to “Updating FreeBSD from Source” for more detailed instructions, but do not forget to add DESTDIR=${NFSROOTDIR} when running the make installkernel and make installworld commands.
Test that the TFTP server works and can download the boot loader which will be obtained via PXE:
# tftp localhost
tftp> get FreeBSD/install/boot/pxeboot
Received 264951 bytes in 0.1 secondsEdit ${NFSROOTDIR}/etc/fstab and create an entry to mount the root file system over NFS:
# Device Mountpoint FSType Options Dump Pass myhost.example.com:/b/tftpboot/FreeBSD/install / nfs ro 0 0
Replace myhost.example.com with the hostname or IP address of the NFS server. In this example, the root file system is mounted read-only in order to prevent NFS clients from potentially deleting the contents of the root file system.
Set the root password in the PXE environment for client machines which are PXE booting :
# chroot ${NFSROOTDIR}
# passwdIf needed, enable ssh(1) root logins for client machines which are PXE booting by editing ${NFSROOTDIR}/etc/ssh/sshd_config and enabling PermitRootLogin. This option is documented in sshd_config(5).
Perform any other needed customizations of the PXE environment in ${NFSROOTDIR}. These customizations could include things like installing packages or editing the password file with vipw(8).
When booting from an NFS root volume, /etc/rc detects the NFS boot and runs /etc/rc.initdiskless. In this case, /etc and /var need to be memory backed file systems so that these directories are writable but the NFS root directory is read-only:
# chroot ${NFSROOTDIR}
# mkdir -p conf/base
# tar -c -v -f conf/base/etc.cpio.gz --format cpio --gzip etc
# tar -c -v -f conf/base/var.cpio.gz --format cpio --gzip varWhen the system boots, memory file systems for /etc and /var will be created and mounted and the contents of the cpio.gz files will be copied into them. By default, these file systems have a maximum capacity of 5 megabytes. If your archives do not fit, which is usually the case for /var when binary packages have been installed, request a larger size by putting the number of 512 byte sectors needed (e.g., 5 megabytes is 10240 sectors) in ${NFSROOTDIR}/conf/base/etc/md_size and ${NFSROOTDIR}/conf/base/var/md_size files for /etc and /var file systems respectively.
The DHCP server does not need to be the same machine as the TFTP and NFS server, but it needs to be accessible in the network.
DHCP is not part of the FreeBSD base system but can be installed using the net/isc-dhcp44-server port or package.
Once installed, edit the configuration file, /usr/local/etc/dhcpd.conf. Configure the next-server, filename, and root-path settings as seen in this example:
subnet 192.168.0.0 netmask 255.255.255.0 {
range 192.168.0.2 192.168.0.3 ;
option subnet-mask 255.255.255.0 ;
option routers 192.168.0.1 ;
option broadcast-address 192.168.0.255 ;
option domain-name-servers 192.168.35.35, 192.168.35.36 ;
option domain-name "example.com";
# IP address of TFTP server
next-server 192.168.0.1 ;
# path of boot loader obtained via tftp
filename "FreeBSD/install/boot/pxeboot" ;
# pxeboot boot loader will try to NFS mount this directory for root FS
option root-path "192.168.0.1:/b/tftpboot/FreeBSD/install/" ;
}The next-server directive is used to specify the IP address of the TFTP server.
The filename directive defines the path to /boot/pxeboot. A relative filename is used, meaning that /b/tftpboot is not included in the path.
The root-path option defines the path to the NFS root file system.
Once the edits are saved, enable DHCP at boot time by adding the following line to /etc/rc.conf:
dhcpd_enable="YES"
Then start the DHCP service:
# service isc-dhcpd startOnce all of the services are configured and started, PXE clients should be able to automatically load FreeBSD over the network. If a particular client is unable to connect, when that client machine boots up, enter the BIOS configuration menu and confirm that it is set to boot from the network.
This section describes some troubleshooting tips for isolating the source of the configuration problem should no clients be able to PXE boot.
Use the net/wireshark package or port to debug the network traffic involved during the PXE booting process, which is illustrated in the diagram below.
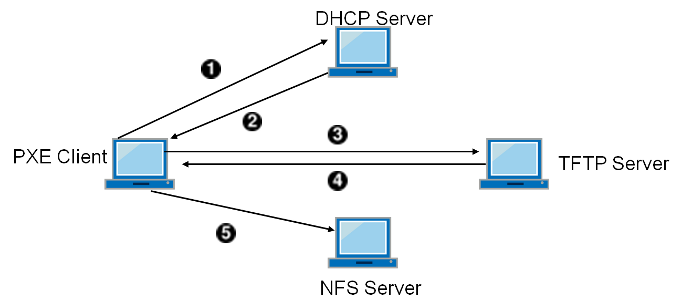
Client broadcasts a DHCPDISCOVER message.
The DHCP server responds with the IP address, next-server, filename, and root-path values.
The client sends a TFTP request to next-server, asking to retrieve filename.
The TFTP server responds and sends filename to client.
The client executes filename, which is pxeboot(8), which then loads the kernel. When the kernel executes, the root file system specified by root-path is mounted over NFS.
On the TFTP server, read /var/log/xferlog to ensure that pxeboot is being retrieved from the correct location. To test this example configuration:
# tftp 192.168.0.1
tftp> get FreeBSD/install/boot/pxeboot
Received 264951 bytes in 0.1 secondsMake sure that the root file system can be mounted via NFS. To test this example configuration:
# mount -t nfs 192.168.0.1:/b/tftpboot/FreeBSD/install /mntIPv6 is the new version of the well known IP protocol, also known as IPv4. IPv6 provides several advantages over IPv4 as well as many new features:
Its 128-bit address space allows for 340,282,366,920,938,463,463,374,607,431,768,211,456 addresses. This addresses the IPv4 address shortage and eventual IPv4 address exhaustion.
Routers only store network aggregation addresses in their routing tables, thus reducing the average space of a routing table to 8192 entries. This addresses the scalability issues associated with IPv4, which required every allocated block of IPv4 addresses to be exchanged between Internet routers, causing their routing tables to become too large to allow efficient routing.
Address autoconfiguration (RFC2462).
Mandatory multicast addresses.
Built-in IPsec (IP security).
Simplified header structure.
Support for mobile IP.
IPv6-to-IPv4 transition mechanisms.
FreeBSD includes the http://www.kame.net/ IPv6 reference implementation and comes with everything needed to use IPv6. This section focuses on getting IPv6 configured and running.
There are three different types of IPv6 addresses:
A packet sent to a unicast address arrives at the interface belonging to the address.
These addresses are syntactically indistinguishable from unicast addresses but they address a group of interfaces. The packet destined for an anycast address will arrive at the nearest router interface. Anycast addresses are only used by routers.
These addresses identify a group of interfaces. A packet destined for a multicast address will arrive at all interfaces belonging to the multicast group. The IPv4 broadcast address, usually xxx.xxx.xxx.255, is expressed by multicast addresses in IPv6.
When reading an IPv6 address, the canonical form is represented as x:x:x:x:x:x:x:x, where each x represents a 16 bit hex value. An example is FEBC:A574:382B:23C1:AA49:4592:4EFE:9982.
Often, an address will have long substrings of all zeros. A :: (double colon) can be used to replace one substring per address. Also, up to three leading 0s per hex value can be omitted. For example, fe80::1 corresponds to the canonical form fe80:0000:0000:0000:0000:0000:0000:0001.
A third form is to write the last 32 bits using the well known IPv4 notation. For example, 2002::10.0.0.1 corresponds to the hexadecimal canonical representation 2002:0000:0000:0000:0000:0000:0a00:0001, which in turn is equivalent to 2002::a00:1.
To view a FreeBSD system’s IPv6 address, use ifconfig(8):
# ifconfigrl0: flags=8943<UP,BROADCAST,RUNNING,PROMISC,SIMPLEX,MULTICAST> mtu 1500
inet 10.0.0.10 netmask 0xffffff00 broadcast 10.0.0.255
inet6 fe80::200:21ff:fe03:8e1%rl0 prefixlen 64 scopeid 0x1
ether 00:00:21:03:08:e1
media: Ethernet autoselect (100baseTX )
status: activeIn this example, the rl0 interface is using fe80::200:21ff:fe03:8e1%rl0, an auto-configured link-local address which was automatically generated from the MAC address.
Some IPv6 addresses are reserved. A summary of these reserved addresses is seen in Reserved IPv6 Addresses:
| IPv6 address | Prefixlength (Bits) | Description | Notes |
|---|---|---|---|
| 128 bits | unspecified | Equivalent to |
| 128 bits | loopback address | Equivalent to |
| 96 bits | embedded IPv4 | The lower 32 bits are the compatible IPv4 address. |
| 96 bits | IPv4 mapped IPv6 address | The lower 32 bits are the IPv4 address for hosts which do not support IPv6. |
| 10 bits | link-local | Equivalent to 169.254.0.0/16 in IPv4. |
| 7 bits | unique-local | Unique local addresses are intended for local communication and are only routable within a set of cooperating sites. |
| 8 bits | multicast | |
| 3 bits | global unicast | All global unicast addresses are assigned from this pool. The first 3 bits are |
For further information on the structure of IPv6 addresses, refer to RFC3513.
To configure a FreeBSD system as an IPv6 client, add these two lines to rc.conf:
ifconfig_rl0_ipv6="inet6 accept_rtadv" rtsold_enable="YES"
The first line enables the specified interface to receive router advertisement messages. The second line enables the router solicitation daemon, rtsol(8).
If the interface needs a statically assigned IPv6 address, add an entry to specify the static address and associated prefix length:
ifconfig_rl0_ipv6="inet6 2001:db8:4672:6565:2026:5043:2d42:5344 prefixlen 64"
To assign a default router, specify its address:
ipv6_defaultrouter="2001:db8:4672:6565::1"
In order to connect to other IPv6 networks, one must have a provider or a tunnel that supports IPv6:
Contact an Internet Service Provider to see if they offer IPv6.
Hurricane Electric offers tunnels with end-points all around the globe.
Install the net/freenet6 package or port for a dial-up connection. |
This section demonstrates how to take the directions from a tunnel provider and convert them into /etc/rc.conf settings that will persist through reboots.
The first /etc/rc.conf entry creates the generic tunneling interface gif0:
cloned_interfaces="gif0"
Next, configure that interface with the IPv4 addresses of the local and remote endpoints. Replace MY_IPv4_ADDR and REMOTE_IPv4_ADDR with the actual IPv4 addresses:
create_args_gif0="tunnel MY_IPv4_ADDR REMOTE_IPv4_ADDR"
To apply the IPv6 address that has been assigned for use as the IPv6 tunnel endpoint, add this line, replacing MY_ASSIGNED_IPv6_TUNNEL_ENDPOINT_ADDR with the assigned address:
ifconfig_gif0_ipv6="inet6 MY_ASSIGNED_IPv6_TUNNEL_ENDPOINT_ADDR"
Then, set the default route for the other side of the IPv6 tunnel. Replace MY_IPv6_REMOTE_TUNNEL_ENDPOINT_ADDR with the default gateway address assigned by the provider:
ipv6_defaultrouter="MY_IPv6_REMOTE_TUNNEL_ENDPOINT_ADDR"
If the FreeBSD system will route IPv6 packets between the rest of the network and the world, enable the gateway using this line:
ipv6_gateway_enable="YES"
This section demonstrates how to setup rtadvd(8) to advertise the IPv6 default route.
To enable rtadvd(8), add the following to /etc/rc.conf:
rtadvd_enable="YES"
It is important to specify the interface on which to do IPv6 router advertisement. For example, to tell rtadvd(8) to use rl0:
rtadvd_interfaces="rl0"
Next, create the configuration file, /etc/rtadvd.conf as seen in this example:
rl0:\ :addrs#1:addr="2001:db8:1f11:246::":prefixlen#64:tc=ether:
Replace rl0 with the interface to be used and 2001:db8:1f11:246:: with the prefix of the allocation.
For a dedicated /64 subnet, nothing else needs to be changed. Otherwise, change the prefixlen# to the correct value.
When IPv6 is enabled on a server, there may be a need to enable IPv4 mapped IPv6 address communication. This compatibility option allows for IPv4 addresses to be represented as IPv6 addresses. Permitting IPv6 applications to communicate with IPv4 and vice versa may be a security issue.
This option may not be required in most cases and is available only for compatibility. This option will allow IPv6-only applications to work with IPv4 in a dual stack environment. This is most useful for third party applications which may not support an IPv6-only environment. To enable this feature, add the following to /etc/rc.conf:
ipv6_ipv4mapping="YES"
Reviewing the information in RFC 3493, section 3.6 and 3.7 as well as RFC 4038 section 4.2 may be useful to some administrators.
The Common Address Redundancy Protocol (CARP) allows multiple hosts to share the same IP address and Virtual Host ID (VHID) in order to provide high availability for one or more services. This means that one or more hosts can fail, and the other hosts will transparently take over so that users do not see a service failure.
In addition to the shared IP address, each host has its own IP address for management and configuration. All of the machines that share an IP address have the same VHID. The VHID for each virtual IP address must be unique across the broadcast domain of the network interface.
High availability using CARP is built into FreeBSD, though the steps to configure it vary slightly depending upon the FreeBSD version. This section provides the same example configuration for versions before and equal to or after FreeBSD 10.
This example configures failover support with three hosts, all with unique IP addresses, but providing the same web content. It has two different masters named hosta.example.org and hostb.example.org, with a shared backup named hostc.example.org.
These machines are load balanced with a Round Robin DNS configuration. The master and backup machines are configured identically except for their hostnames and management IP addresses. These servers must have the same configuration and run the same services. When the failover occurs, requests to the service on the shared IP address can only be answered correctly if the backup server has access to the same content. The backup machine has two additional CARP interfaces, one for each of the master content server’s IP addresses. When a failure occurs, the backup server will pick up the failed master machine’s IP address.
Enable boot-time support for CARP by adding an entry for the carp.ko kernel module in /boot/loader.conf:
carp_load="YES"
To load the module now without rebooting:
# kldload carpFor users who prefer to use a custom kernel, include the following line in the custom kernel configuration file and compile the kernel as described in Configuring the FreeBSD Kernel:
device carp
The hostname, management IP address and subnet mask, shared IP address, and VHID are all set by adding entries to /etc/rc.conf. This example is for hosta.example.org:
hostname="hosta.example.org" ifconfig_em0="inet 192.168.1.3 netmask 255.255.255.0" ifconfig_em0_alias0="inet vhid 1 pass testpass alias 192.168.1.50/32"
The next set of entries are for hostb.example.org. Since it represents a second master, it uses a different shared IP address and VHID. However, the passwords specified with pass must be identical as CARP will only listen to and accept advertisements from machines with the correct password.
hostname="hostb.example.org" ifconfig_em0="inet 192.168.1.4 netmask 255.255.255.0" ifconfig_em0_alias0="inet vhid 2 pass testpass alias 192.168.1.51/32"
The third machine, hostc.example.org, is configured to handle failover from either master. This machine is configured with two CARPVHIDs, one to handle the virtual IP address for each of the master hosts. The CARP advertising skew, advskew, is set to ensure that the backup host advertises later than the master, since advskew controls the order of precedence when there are multiple backup servers.
hostname="hostc.example.org" ifconfig_em0="inet 192.168.1.5 netmask 255.255.255.0" ifconfig_em0_alias0="inet vhid 1 advskew 100 pass testpass alias 192.168.1.50/32" ifconfig_em0_alias1="inet vhid 2 advskew 100 pass testpass alias 192.168.1.51/32"
Having two CARPVHIDs configured means that hostc.example.org will notice if either of the master servers becomes unavailable. If a master fails to advertise before the backup server, the backup server will pick up the shared IP address until the master becomes available again.
If the original master server becomes available again, |
Once the configuration is complete, either restart networking or reboot each system. High availability is now enabled.
The configuration for these versions of FreeBSD is similar to the one described in the previous section, except that a CARP device must first be created and referred to in the configuration.
Enable boot-time support for CARP by loading the if_carp.ko kernel module in /boot/loader.conf:
if_carp_load="YES"
To load the module now without rebooting:
# kldload carpFor users who prefer to use a custom kernel, include the following line in the custom kernel configuration file and compile the kernel as described in Configuring the FreeBSD Kernel:
device carp
Next, on each host, create a CARP device:
# ifconfig carp0 createSet the hostname, management IP address, the shared IP address, and VHID by adding the required lines to /etc/rc.conf. Since a virtual CARP device is used instead of an alias, the actual subnet mask of /24 is used instead of /32. Here are the entries for hosta.example.org:
hostname="hosta.example.org" ifconfig_fxp0="inet 192.168.1.3 netmask 255.255.255.0" cloned_interfaces="carp0" ifconfig_carp0="vhid 1 pass testpass 192.168.1.50/24"
On hostb.example.org:
hostname="hostb.example.org" ifconfig_fxp0="inet 192.168.1.4 netmask 255.255.255.0" cloned_interfaces="carp0" ifconfig_carp0="vhid 2 pass testpass 192.168.1.51/24"
The third machine, hostc.example.org, is configured to handle failover from either of the master hosts:
hostname="hostc.example.org" ifconfig_fxp0="inet 192.168.1.5 netmask 255.255.255.0" cloned_interfaces="carp0 carp1" ifconfig_carp0="vhid 1 advskew 100 pass testpass 192.168.1.50/24" ifconfig_carp1="vhid 2 advskew 100 pass testpass 192.168.1.51/24"
Preemption is disabled in the GENERIC FreeBSD kernel. If preemption has been enabled with a custom kernel, This should be done on the carp interface which corresponds to the correct host. |
Once the configuration is complete, either restart networking or reboot each system. High availability is now enabled.
VLANs are a way of virtually dividing up a network into many different subnetworks, also referred to as segmenting. Each segment will have its own broadcast domain and be isolated from other VLANs.
On FreeBSD, VLANs must be supported by the network card driver. To see which drivers support vlans, refer to the vlan(4) manual page.
When configuring a VLAN, a couple pieces of information must be known. First, which network interface? Second, what is the VLAN tag?
To configure VLANs at run time, with a NIC of em0 and a VLAN tag of 5 the command would look like this:
# ifconfig em0.5 create vlan 5 vlandev em0 inet 192.168.20.20/24See how the interface name includes the NIC driver name and the VLAN tag, separated by a period? This is a best practice to make maintaining the VLAN configuration easy when many VLANs are present on a machine. |
To configure VLANs at boot time, /etc/rc.conf must be updated. To duplicate the configuration above, the following will need to be added:
vlans_em0="5" ifconfig_em0_5="inet 192.168.20.20/24"
Additional VLANs may be added, by simply adding the tag to the vlans_em0 field and adding an additional line configuring the network on that VLAN tag’s interface.
It is useful to assign a symbolic name to an interface so that when the associated hardware is changed, only a few configuration variables need to be updated. For example, security cameras need to be run over VLAN 1 on em0. Later, if the em0 card is replaced with a card that uses the ixgb(4) driver, all references to em0.1 will not have to change to ixgb0.1.
To configure VLAN 5, on the NIC em0, assign the interface name cameras, and assign the interface an IP address of 192.168.20.20 with a 24-bit prefix, use this command:
# ifconfig em0.5 create vlan 5 vlandev em0 name cameras inet 192.168.20.20/24For an interface named video, use the following:
# ifconfig video.5 create vlan 5 vlandev video name cameras inet 192.168.20.20/24To apply the changes at boot time, add the following lines to /etc/rc.conf:
vlans_video="cameras" create_args_cameras="vlan 5" ifconfig_cameras="inet 192.168.20.20/24"
FreeBSD CD and DVD sets are available from several online retailers:
FreeBSD Mall, Inc.
2420 Sand Creek Rd C-1 #347
Brentwood, CA
94513
USA
Phone: +1 925 240-6652
Fax: +1 925 674-0821
Email: <info@freebsdmall.com>
WWW: https://www.freebsdmall.com
Getlinux
78 Rue de la Croix Rochopt
Épinay-sous-Sénart
91860
France
Email: <contact@getlinux.fr>
WWW: http://www.getlinux.fr/
Dr. Hinner EDV
Kochelseestr. 11
D-81371 München
Germany
Phone: (0177) 428 419 0
Email: <infow@hinner.de>
WWW: http://www.hinner.de/linux/freebsd.html
Linux Center
Galernaya Street, 55
Saint-Petersburg
190000
Russia
Phone: +7-812-309-06-86
Email: <info@linuxcenter.ru>
WWW: http://linuxcenter.ru/shop/freebsd
The official sources for FreeBSD are available via anonymous FTP from a worldwide set of mirror sites. The site ftp://ftp.FreeBSD.org/pub/FreeBSD/ is available via HTTP and FTP. It is made up of many machines operated by the project cluster administrators and behind GeoDNS to direct users to the closest available mirror.
Additionally, FreeBSD is available via anonymous FTP from the following mirror sites. When obtaining FreeBSD via anonymous FTP, please try to use a nearby site. The mirror sites listed as "Primary Mirror Sites" typically have the entire FreeBSD archive (all the currently available versions for each of the architectures) but faster download speeds are probably available from a site that is in your country or region. The regional sites carry the most recent versions for the most popular architecture(s) but might not carry the entire FreeBSD archive. All sites provide access via anonymous FTP but some sites also provide access via other methods. The access methods available for each site are provided in parentheses after the hostname.
Central Servers, Primary Mirror Sites, Armenia, Australia, Austria, Brazil, Czech Republic, Denmark, Estonia, Finland, France, Germany, Greece, Hong Kong, Ireland, Japan, Korea, Latvia, Lithuania, Netherlands, New Zealand, Norway, Poland, Russia, Saudi Arabia, Slovenia, South Africa, Spain, Sweden, Switzerland, Taiwan, Ukraine, United Kingdom, United States of America.
(as of UTC)
Central Servers
ftp://ftp.FreeBSD.org/pub/FreeBSD/ (ftp / ftpv6 / http://ftp.FreeBSD.org/pub/FreeBSD/ / http://ftp.FreeBSD.org/pub/FreeBSD/)
Primary Mirror Sites
In case of problems, please contact the hostmaster <mirror-admin@FreeBSD.org> for this domain.
ftp://ftp4.FreeBSD.org/pub/FreeBSD/ (ftp / ftpv6 / http://ftp4.FreeBSD.org/pub/FreeBSD/ / http://ftp4.FreeBSD.org/pub/FreeBSD/)
ftp://ftp10.FreeBSD.org/pub/FreeBSD/ (ftp / ftpv6 / http://ftp10.FreeBSD.org/pub/FreeBSD/ / http://ftp10.FreeBSD.org/pub/FreeBSD/)
ftp://ftp14.FreeBSD.org/pub/FreeBSD/ (ftp / http://ftp14.FreeBSD.org/pub/FreeBSD/)
Armenia
In case of problems, please contact the hostmaster <hostmaster@am.FreeBSD.org> for this domain.
Australia
In case of problems, please contact the hostmaster <hostmaster@au.FreeBSD.org> for this domain.
Austria
In case of problems, please contact the hostmaster <hostmaster@at.FreeBSD.org> for this domain.
Brazil
In case of problems, please contact the hostmaster <hostmaster@br.FreeBSD.org> for this domain.
Czech Republic
In case of problems, please contact the hostmaster <hostmaster@cz.FreeBSD.org> for this domain.
Denmark
In case of problems, please contact the hostmaster <staff@dotsrc.org> for this domain.
Estonia
In case of problems, please contact the hostmaster <hostmaster@ee.FreeBSD.org> for this domain.
Finland
In case of problems, please contact the hostmaster <hostmaster@fi.FreeBSD.org> for this domain.
France
In case of problems, please contact the hostmaster <hostmaster@fr.FreeBSD.org> for this domain.
ftp://ftp1.fr.FreeBSD.org/pub/FreeBSD/ (ftp / http://ftp1.fr.FreeBSD.org/pub/FreeBSD/ / rsync)
ftp://ftp6.fr.FreeBSD.org/pub/FreeBSD/ (ftp / rsync)
Germany
In case of problems, please contact the hostmaster <de-bsd-hubs@de.FreeBSD.org> for this domain.
ftp://ftp1.de.FreeBSD.org/freebsd/ (ftp / http://www1.de.FreeBSD.org/freebsd/ / rsync://rsync3.de.FreeBSD.org/freebsd/)
ftp://ftp2.de.FreeBSD.org/pub/FreeBSD/ (ftp / http://ftp2.de.FreeBSD.org/pub/FreeBSD/ / rsync)
ftp://ftp4.de.FreeBSD.org/FreeBSD/ (ftp / http://ftp4.de.FreeBSD.org/pub/FreeBSD/)
ftp://ftp7.de.FreeBSD.org/pub/FreeBSD/ (ftp / http://ftp7.de.FreeBSD.org/pub/FreeBSD/)
Greece
In case of problems, please contact the hostmaster <hostmaster@gr.FreeBSD.org> for this domain.
Hong Kong
Ireland
In case of problems, please contact the hostmaster <hostmaster@ie.FreeBSD.org> for this domain.
ftp://ftp3.ie.FreeBSD.org/pub/FreeBSD/ (ftp / rsync)
Japan
In case of problems, please contact the hostmaster <hostmaster@jp.FreeBSD.org> for this domain.
Korea
In case of problems, please contact the hostmaster <hostmaster@kr.FreeBSD.org> for this domain.
Latvia
In case of problems, please contact the hostmaster <hostmaster@lv.FreeBSD.org> for this domain.
Lithuania
In case of problems, please contact the hostmaster <hostmaster@lt.FreeBSD.org> for this domain.
Netherlands
In case of problems, please contact the hostmaster <hostmaster@nl.FreeBSD.org> for this domain.
New Zealand
Norway
In case of problems, please contact the hostmaster <hostmaster@no.FreeBSD.org> for this domain.
ftp://ftp.no.FreeBSD.org/pub/FreeBSD/ (ftp / rsync)
Poland
In case of problems, please contact the hostmaster <hostmaster@pl.FreeBSD.org> for this domain.
ftp2.pl.FreeBSD.org
Russia
In case of problems, please contact the hostmaster <hostmaster@ru.FreeBSD.org> for this domain.
Saudi Arabia
In case of problems, please contact the hostmaster <ftpadmin@isu.net.sa> for this domain.
Slovenia
In case of problems, please contact the hostmaster <hostmaster@si.FreeBSD.org> for this domain.
South Africa
In case of problems, please contact the hostmaster <hostmaster@za.FreeBSD.org> for this domain.
{mirrors-south-africa-ftp} (ftp)
Spain
In case of problems, please contact the hostmaster <hostmaster@es.FreeBSD.org> for this domain.
Sweden
In case of problems, please contact the hostmaster <hostmaster@se.FreeBSD.org> for this domain.
ftp://ftp2.se.FreeBSD.org/pub/FreeBSD/ (ftp / rsync://ftp2.se.FreeBSD.org/)
ftp://ftp4.se.FreeBSD.org/pub/FreeBSD/ (ftp / ftp://ftp4.se.FreeBSD.org/pub/FreeBSD/ / http://ftp4.se.FreeBSD.org/pub/FreeBSD/ / http://ftp4.se.FreeBSD.org/pub/FreeBSD/ / rsync://ftp4.se.FreeBSD.org/pub/FreeBSD/ / rsync://ftp4.se.FreeBSD.org/pub/FreeBSD/)
ftp://ftp6.se.FreeBSD.org/pub/FreeBSD/ (ftp / http://ftp6.se.FreeBSD.org/pub/FreeBSD/)
Switzerland
In case of problems, please contact the hostmaster <hostmaster@ch.FreeBSD.org> for this domain.
Taiwan
In case of problems, please contact the hostmaster <hostmaster@tw.FreeBSD.org> for this domain.
ftp://ftp.ch.FreeBSD.org/pub/FreeBSD/ (ftp / ftp://ftp.tw.FreeBSD.org/pub/FreeBSD/ / rsync / rsyncv6)
ftp://ftp2.tw.FreeBSD.org/pub/FreeBSD/ (ftp / ftp://ftp2.tw.FreeBSD.org/pub/FreeBSD/ / http://ftp2.tw.FreeBSD.org/pub/FreeBSD/ / http://ftp2.tw.FreeBSD.org/pub/FreeBSD/ / rsync / rsyncv6)
ftp://ftp6.tw.FreeBSD.org/pub/FreeBSD/ (ftp / http://ftp6.tw.FreeBSD.org/ / rsync)
ftp://ftp11.tw.FreeBSD.org/pub/FreeBSD/ (ftp / http://ftp11.tw.FreeBSD.org/FreeBSD/)
Ukraine
ftp://ftp.ua.FreeBSD.org/pub/FreeBSD/ (ftp / http://ftp.ua.FreeBSD.org/pub/FreeBSD/)
ftp://ftp6.ua.FreeBSD.org/pub/FreeBSD/ (ftp / http://ftp6.ua.FreeBSD.org/pub/FreeBSD / rsync://ftp6.ua.FreeBSD.org/FreeBSD/)
United Kingdom
In case of problems, please contact the hostmaster <hostmaster@uk.FreeBSD.org> for this domain.
ftp://ftp2.uk.FreeBSD.org/pub/FreeBSD/ (ftp / rsync://ftp2.uk.FreeBSD.org/ftp.freebsd.org/pub/FreeBSD/)
United States of America
In case of problems, please contact the hostmaster <hostmaster@us.FreeBSD.org> for this domain.
ftp://ftp4.us.FreeBSD.org/pub/FreeBSD/ (ftp / ftpv6 / http://ftp4.us.FreeBSD.org/pub/FreeBSD/ / http://ftp4.us.FreeBSD.org/pub/FreeBSD/)
ftp://ftp13.us.FreeBSD.org/pub/FreeBSD/ (ftp / http://ftp13.us.FreeBSD.org/pub/FreeBSD/ / rsync)
ftp://ftp14.us.FreeBSD.org/pub/FreeBSD/ (ftp / http://ftp14.us.FreeBSD.org/pub/FreeBSD/)
As of July 2012, FreeBSD uses Subversion as the only version control system for storing all of FreeBSD’s source code, documentation, and the Ports Collection.
Subversion is generally a developer tool. Users may prefer to use |
This section demonstrates how to install Subversion on a FreeBSD system and use it to create a local copy of a FreeBSD repository. Additional information on the use of Subversion is included.
Installing security/ca_root_nss allows Subversion to verify the identity of HTTPS repository servers. The root SSL certificates can be installed from a port:
# cd /usr/ports/security/ca_root_nss
# make install cleanor as a package:
# pkg install ca_root_nssA lightweight version of Subversion is already installed on FreeBSD as svnlite. The port or package version of Subversion is only needed if the Python or Perl API is needed, or if a later version of Subversion is desired.
The only difference from normal Subversion use is that the command name is svnlite.
If svnlite is unavailable or the full version of Subversion is needed, then it must be installed.
Subversion can be installed from the Ports Collection:
# cd /usr/ports/devel/subversion
# make install cleanSubversion can also be installed as a package:
# pkg install subversionTo fetch a clean copy of the sources into a local directory, use svn. The files in this directory are called a local working copy.
Move or delete an existing destination directory before using Checkout over an existing non- |
Subversion uses URLs to designate a repository, taking the form of protocol://hostname/path. The first component of the path is the FreeBSD repository to access. There are three different repositories, base for the FreeBSD base system source code, ports for the Ports Collection, and doc for documentation. For example, the URL https://svn.FreeBSD.org/ports/head/ specifies the main branch of the ports repository, using the https protocol.
A checkout from a given repository is performed with a command like this:
# svn checkout https://svn.FreeBSD.org/repository/branch lwcdirwhere:
repository is one of the Project repositories: base, ports, or doc.
branch depends on the repository used. ports and doc are mostly updated in the head branch, while base maintains the latest version of -CURRENT under head and the respective latest versions of the -STABLE branches under stable/9 (9.x) and stable/10 (10.x).
lwcdir is the target directory where the contents of the specified branch should be placed. This is usually /usr/ports for ports, /usr/src for base, and /usr/doc for doc.
This example checks out the Ports Collection from the FreeBSD repository using the HTTPS protocol, placing the local working copy in /usr/ports. If /usr/ports is already present but was not created by svn, remember to rename or delete it before the checkout.
# svn checkout https://svn.FreeBSD.org/ports/head /usr/portsBecause the initial checkout must download the full branch of the remote repository, it can take a while. Please be patient.
After the initial checkout, the local working copy can be updated by running:
# svn update lwcdirTo update /usr/ports created in the example above, use:
# svn update /usr/portsThe update is much quicker than a checkout, only transferring files that have changed.
An alternate way of updating the local working copy after checkout is provided by the Makefile in the /usr/ports, /usr/src, and /usr/doc directories. Set SVN_UPDATE and use the update target. For example, to update /usr/src:
# cd /usr/src
# make update SVN_UPDATE=yesThe FreeBSD Subversion repository is:
svn.FreeBSD.org
This is a publicly accessible mirror network that uses GeoDNS to select an appropriate back end server. To view the FreeBSD Subversion repositories through a browser, use https://svnweb.FreeBSD.org/.
HTTPS is the preferred protocol, but the security/ca_root_nss package will need to be installed in order to automatically validate certificates.
For other information about using Subversion, please see the "Subversion Book", titled Version Control with Subversion, or the Subversion Documentation.
These sites make FreeBSD available through the rsync protocol. The rsync utility transfers only the differences between two sets of files. This is useful for mirror sites of the FreeBSD FTP server. The rsync suite is available for many operating systems, on FreeBSD, see the net/rsync port or use the package.
rsync://ftp.cz.FreeBSD.org/
Available collections:
ftp: A partial mirror of the FreeBSD FTP server.
FreeBSD: A full mirror of the FreeBSD FTP server.
rsync://ftp.nl.FreeBSD.org/
Available collections:
FreeBSD: A full mirror of the FreeBSD FTP server.
rsync://ftp.mtu.ru/
Available collections:
FreeBSD: A full mirror of the FreeBSD FTP server.
FreeBSD-Archive: The mirror of FreeBSD Archive FTP server.
rsync://ftp4.se.freebsd.org/
Available collections:
FreeBSD: A full mirror of the FreeBSD FTP server.
rsync://ftp.tw.FreeBSD.org/
rsync://ftp2.tw.FreeBSD.org/
rsync://ftp6.tw.FreeBSD.org/
Available collections:
FreeBSD: A full mirror of the FreeBSD FTP server.
rsync://rsync.mirrorservice.org/
Available collections:
ftp.freebsd.org: A full mirror of the FreeBSD FTP server.
rsync://ftp-master.FreeBSD.org/
This server may only be used by FreeBSD primary mirror sites.
Available collections:
FreeBSD: The master archive of the FreeBSD FTP server.
acl: The FreeBSD master ACL list.
rsync://ftp13.FreeBSD.org/
Available collections:
FreeBSD: A full mirror of the FreeBSD FTP server.
Podczas gdy strony podręcznika systemowego dostarczają szczegółowych informacji odnośnie każdego z elementów systemu operacyjnego FreeBSD, bardzo często nie przedstawiają one jak złożyć wszystkie te elementy razem tak, by usprawnić pracę całego systemu. Z tego właśnie powodu nie istnieje żaden substytut dobrej książki o administracji systemami UNIX® i dobrego podręcznika ich użytkowania.
Międzynarodowe książki i czasopisma:
Using FreeBSD (po chińsku).
FreeBSD Unleashed (chiński przekład), wydany przez China Machine Press. ISBN 7-111-10201-0.
FreeBSD From Scratch First Edition (po chińsku), wydany przez China Machine Press. ISBN 7-111-07482-3.
FreeBSD From Scratch Second Edition (po chińsku), wydany przez China Machine Press. ISBN 7-111-10286-X.
FreeBSD Handbook (chiński przekład), wydany przez Posts & Telecom Press. ISBN 7-115-10541-3.
FreeBSD 3.x Internet (po chińsku), wydany przez Tsinghua University Press. ISBN 7-900625-66-6.
FreeBSD & Windows (po chińsku), ISBN 7-113-03845-X
FreeBSD Internet Services HOWTO (po chińsku), ISBN 7-113-03423-3
FreeBSD for PC 98’ers (po japońsku), wydany przez SHUWA System Co, LTD. ISBN 4-87966-468-5 C3055 P2900E.
FreeBSD (po japońsku), wydany przez CUTT. ISBN 4-906391-22-2 C3055 P2400E.
Complete Introduction to FreeBSD (po japońsku), wydany przez Shoeisha Co., Ltd. ISBN 4-88135-473-6 P3600E.
Personal UNIX Starter Kit FreeBSD (po japońsku), wydany przez ASCII. ISBN 4-7561-1733-3 P3000E.
FreeBSD Handbook (japoński przekład), wydany przez ASCII. ISBN 4-7561-1580-2 P3800E.
FreeBSD mit Methode (po niemiecku), wydany przez Computer und Literatur Verlag/Vertrieb Hanser, 1998. ISBN 3-932311-31-0.
FreeBSD 4 - Installieren, Konfigurieren, Administrieren (po niemiecku), wydany przez Computer und Literatur Verlag, 2001. ISBN 3-932311-88-4.
FreeBSD 5 - Installieren, Konfigurieren, Administrieren (po niemiecku), wydany przez Computer und Literatur Verlag, 2003. ISBN 3-936546-06-1.
FreeBSD de Luxe (po niemiecku), wydany przez Verlag Modere Industrie, 2003. ISBN 3-8266-1343-0.
FreeBSD Install and Utilization Manual (po japońsku), wydany przez Mainichi Communications Inc..
Onno W Purbo, Dodi Maryanto, Syahrial Hubbany, Widjil Widodo Building Internet Server with FreeBSD (w języku indonezyjskim), wydany przez Elex Media Komputindo.
Książki i czasopisma w języku angielskim:
Absolute BSD: The Ultimate Guide to FreeBSD, wydany przez No Starch Press, 2002. ISBN: 1886411743
The Complete FreeBSD, wydany przez O’Reilly, 2003. ISBN: 0596005164
The FreeBSD Corporate Networker’s Guide, wydany przez Addison-Wesley, 2000. ISBN: 0201704811
FreeBSD: An Open-Source Operating System for Your Personal Computer, wydany przez The Bit Tree Press, 2001. ISBN: 0971204500
Teach Yourself FreeBSD in 24 Hours, wydany przez Sams, 2002. ISBN: 0672324245
FreeBSD unleashed, wydany przez Sams, 2002. ISBN: 0672324563
FreeBSD: The Complete Reference, wydany przez McGrawHill, 2003. ISBN: 0072224096
The rapid pace of FreeBSD progress makes print media impractical as a means of following the latest developments. Electronic resources are the best, if not often the only, way to stay informed of the latest advances. Since FreeBSD is a volunteer effort, the user community itself also generally serves as a "technical support department" of sorts, with electronic mail, web forums, and USENET news being the most effective way of reaching that community.
The most important points of contact with the FreeBSD user community are outlined below. Please send other resources not mentioned here to the FreeBSD documentation project mailing list so that they may also be included.
The FreeBSD Forums provide a web based discussion forum for FreeBSD questions and technical discussion.
The BSDConferences YouTube Channel provides a collection of high quality videos from BSD conferences around the world. This is a great way to watch key developers give presentations about new work in FreeBSD.
The mailing lists are the most direct way of addressing questions or opening a technical discussion to a concentrated FreeBSD audience. There are a wide variety of lists on a number of different FreeBSD topics. Sending questions to the most appropriate mailing list will invariably assure a faster and more accurate response.
The charters for the various lists are given at the bottom of this document. Please read the charter before joining or sending mail to any list. Most list subscribers receive many hundreds of FreeBSD related messages every day, and the charters and rules for use are meant to keep the signal-to-noise ratio of the lists high. To do less would see the mailing lists ultimately fail as an effective communications medium for the Project.
To test the ability to send email to FreeBSD lists, send a test message to FreeBSD test mailing list. Please do not send test messages to any other list. |
When in doubt about what list to post a question to, see How to get best results from the FreeBSD-questions mailing list.
Before posting to any list, please learn about how to best use the mailing lists, such as how to help avoid frequently-repeated discussions, by reading the Mailing List Frequently Asked Questions (FAQ) document.
Archives are kept for all of the mailing lists and can be searched using the FreeBSD World Wide Web server. The keyword searchable archive offers an excellent way of finding answers to frequently asked questions and should be consulted before posting a question. Note that this also means that messages sent to FreeBSD mailing lists are archived in perpetuity. When protecting privacy is a concern, consider using a disposable secondary email address and posting only public information.
General lists: The following are general lists which anyone is free (and encouraged) to join:
| List | Purpose |
|---|---|
FreeBSD Evangelism | |
Important events and Project milestones (moderated) | |
Architecture and design discussions | |
Discussions pertaining to the maintenance of the FreeBSD problem report database and related tools | |
Bug reports | |
Non-technical items related to the FreeBSD community | |
FreeBSD-specific Chromium issues | |
Discussion concerning the use of FreeBSD-CURRENT | |
Issues for Internet Service Providers using FreeBSD | |
FreeBSD employment and consulting opportunities | |
Calls for quarterly status reports (moderated) | |
User questions and technical support | |
Security notifications (moderated) | |
Discussion concerning the use of FreeBSD-STABLE | |
Where to send test messages instead of to one of the actual lists | |
FreeBSD advocacy for women |
Technical lists: The following lists are for technical discussion. Read the charter for each list carefully before joining or sending mail to one as there are firm guidelines for their use and content.
| List | Purpose |
|---|---|
ACPI and power management development | |
Porting FreeBSD to AMD64 systems (moderated) | |
Discussion about Apache related ports | |
Porting FreeBSD to ARM® processors | |
Using ATM networking with FreeBSD | |
Using Bluetooth® technology in FreeBSD | |
FreeBSD on cloud platforms (EC2, GCE, Azure, etc.) | |
Using FreeBSD in a clustered environment | |
Discussing database use and development under FreeBSD | |
Using and improving FreeBSD on the desktop | |
Build and test reports from the Continuous Integration servers | |
Notifications of the FreeBSD review system | |
Creating FreeBSD related documents | |
Writing device drivers for FreeBSD | |
Using and working on DTrace in FreeBSD | |
FreeBSD users of Eclipse IDE, tools, rich client applications and ports. | |
FreeBSD-specific ElasticSearch discussions | |
Using FreeBSD in embedded applications | |
Peer support of FreeBSD-related software that is no longer supported by the FreeBSD Project. | |
Emulation of other systems such as Linux/MS-DOS®/Windows® | |
Porting Enlightenment and Enlightenment applications | |
FreeBSD-specific Erlang discussions | |
FreeBSD FireWire® (iLink, IEEE 1394) technical discussion | |
Fortran on FreeBSD | |
File systems | |
Support for Games on FreeBSD | |
Gecko Rendering Engine issues | |
GEOM-specific discussions and implementations | |
Discussion of git use in the FreeBSD project | |
Porting GNOME and GNOME applications | |
General technical discussion | |
FreeBSD-specific Haskell issues and discussions | |
General discussion of hardware for running FreeBSD | |
FreeBSD Internationalization | |
Infiniband on FreeBSD | |
Technical discussion concerning the redesign of the IP firewall code | |
ISDN developers | |
Discussion about the jail(8) facility | |
Java™ developers and people porting JDK™s to FreeBSD | |
Porting KDE and KDE applications | |
Porting LFS to FreeBSD | |
Porting FreeBSD to MIPS® | |
Mono and C# applications on FreeBSD | |
Multimedia applications | |
Technical discussions about bus architecture | |
Networking discussion and TCP/IP source code | |
Discussions of high quality implementation of libm functions | |
FreeBSD-specific OCaml discussions | |
Office applications on FreeBSD | |
Performance tuning questions for high performance/load installations | |
Maintenance of a number of Perl-related ports | |
Discussion and questions about the packet filter firewall system | |
Binary package management and package tools discussion | |
Fallout logs from package building | |
Packaging the FreeBSD base system | |
Concerning ports to non Intel® architecture platforms | |
Discussion of the Ports Collection | |
Important news and instructions about the Ports Collection (moderated) | |
Discussion of the ports bugs/PRs | |
Porting FreeBSD to the PowerPC® | |
Technical discussion of FreeBSD on HP ProLiant server platforms | |
FreeBSD-specific Python issues | |
Discussion related to the rc.d system and its development | |
Development of realtime extensions to FreeBSD | |
FreeBSD-specific Ruby discussions | |
The SCSI subsystem | |
Security issues affecting FreeBSD | |
FreeBSD Development Snapshot Announcements | |
Porting FreeBSD to SPARC® based systems | |
FreeBSD’s conformance to the C99 and the POSIX® standards | |
sysinstall(8) development | |
FreeBSD-specific Tcl/Tk discussions | |
Testing on FreeBSD | |
Porting TeX and its applications to FreeBSD | |
Threading in FreeBSD | |
Porting FreeBSD to the Tilera family of CPUs | |
Support Token Ring in FreeBSD | |
Maintenance of FreeBSD’s integrated toolchain | |
Translating FreeBSD documents and programs | |
Discussions of transport level network protocols in FreeBSD | |
Discussing FreeBSD support for USB | |
Discussion of various virtualization techniques supported by FreeBSD | |
Discussion on VuXML infrastructure | |
Maintenance and support of X11 on FreeBSD | |
Discussion of the FreeBSD port to Xen™ - implementation and usage | |
XFCE for FreeBSD - porting and maintaining | |
Zope for FreeBSD - porting and maintaining |
Limited lists: The following lists are for more specialized (and demanding) audiences and are probably not of interest to the general public. It is also a good idea to establish a presence in the technical lists before joining one of these limited lists in order to understand the communications etiquette involved.
| List | Purpose |
|---|---|
People running mirror sites (infrastructural support) | |
User group coordination | |
FreeBSD Work-In-Progress Status | |
Discussions of 802.11 stack, tools, device driver development |
Digest lists: All of the above lists are available in a digest format. Once subscribed to a list, the digest options can be changed in the account options section.
SVN lists: The following lists are for people interested in seeing the log messages for changes to various areas of the source tree. They are Read-Only lists and should not have mail sent to them.
| List | Source area | Area Description (source for) |
|---|---|---|
/usr/doc | All changes to the doc Subversion repository (except for user, projects and translations) | |
/usr/doc | All changes to the "head" branch of the doc Subversion repository | |
/usr/doc/projects | All changes to the projects area of the doc Subversion repository | |
/usr/doc | All changes to the administrative scripts, hooks, and other configuration data of the doc Subversion repository | |
/usr/ports | All changes to the ports Subversion repository | |
/usr/ports | All changes to the "head" branch of the ports Subversion repository | |
/usr/ports | All changes to the administrative scripts, hooks, and other configuration data of the ports Subversion repository | |
/usr/src | All changes to the src Subversion repository (except for user and projects) | |
/usr/src | All changes to the "head" branch of the src Subversion repository (the FreeBSD-CURRENT branch) | |
/usr/projects | All changes to the projects area of the src Subversion repository | |
/usr/src | All changes to the releases area of the src Subversion repository | |
/usr/src | All changes to the releng branches of the src Subversion repository (the security / release engineering branches) | |
/usr/src | All changes to the all stable branches of the src Subversion repository | |
/usr/src | All changes to the stable/6 branch of the src Subversion repository | |
/usr/src | All changes to the stable/7 branch of the src Subversion repository | |
/usr/src | All changes to the stable/8 branch of the src Subversion repository | |
/usr/src | All changes to the stable/9 branch of the src Subversion repository | |
/usr/src | All changes to the stable/10 branch of the src Subversion repository | |
/usr/src | All changes to the stable/11 branch of the src Subversion repository | |
/usr/src | All changes to the stable/12 branch of the src Subversion repository | |
/usr/src | All changes to the older stable branches of the src Subversion repository | |
/usr/src | All changes to the administrative scripts, hooks, and other configuration data of the src Subversion repository | |
/usr/src | All changes to the experimental user area of the src Subversion repository | |
/usr/src | All changes to the vendor work area of the src Subversion repository |
To subscribe to a list, click the list name at https://lists.freebsd.org. The page that is displayed should contain all of the necessary subscription instructions for that list.
To actually post to a given list, send mail to listname@FreeBSD.org. It will then be redistributed to mailing list members world-wide.
To unsubscribe from a list, click on the URL found at the bottom of every email received from the list. It is also possible to send an email to listname-unsubscribe@FreeBSD.org to unsubscribe.
It is important to keep discussion in the technical mailing lists on a technical track. To only receive important announcements, instead join the FreeBSD announcements mailing list, which is intended for infrequent traffic.
All FreeBSD mailing lists have certain basic rules which must be adhered to by anyone using them. Failure to comply with these guidelines will result in two (2) written warnings from the FreeBSD Postmaster postmaster@FreeBSD.org, after which, on a third offense, the poster will removed from all FreeBSD mailing lists and filtered from further posting to them. We regret that such rules and measures are necessary at all, but today’s Internet is a pretty harsh environment, it would seem, and many fail to appreciate just how fragile some of its mechanisms are.
Rules of the road:
The topic of any posting should adhere to the basic charter of the list it is posted to. If the list is about technical issues, the posting should contain technical discussion. Ongoing irrelevant chatter or flaming only detracts from the value of the mailing list for everyone on it and will not be tolerated. For free-form discussion on no particular topic, the FreeBSD chat mailing list is freely available and should be used instead.
No posting should be made to more than 2 mailing lists, and only to 2 when a clear and obvious need to post to both lists exists. For most lists, there is already a great deal of subscriber overlap and except for the most esoteric mixes (say "-stable & -scsi"), there really is no reason to post to more than one list at a time. If a message is received with multiple mailing lists on the Cc line, trim the Cc line before replying. The person who replies is still responsible for cross-posting, no matter who the originator might have been.
Personal attacks and profanity (in the context of an argument) are not allowed, and that includes users and developers alike. Gross breaches of netiquette, like excerpting or reposting private mail when permission to do so was not and would not be forthcoming, are frowned upon but not specifically enforced. However, there are also very few cases where such content would fit within the charter of a list and it would therefore probably rate a warning (or ban) on that basis alone.
Advertising of non-FreeBSD related products or services is strictly prohibited and will result in an immediate ban if it is clear that the offender is advertising by spam.
Individual list charters:
ACPI and power management development
Important events / milestones
This is the mailing list for people interested only in occasional announcements of significant FreeBSD events. This includes announcements about snapshots and other releases. It contains announcements of new FreeBSD capabilities. It may contain calls for volunteers etc. This is a low volume, strictly moderated mailing list.
Architecture and design discussions
This list is for discussion of the FreeBSD architecture. Messages will mostly be kept strictly technical in nature. Examples of suitable topics are:
How to re-vamp the build system to have several customized builds running at the same time.
What needs to be fixed with VFS to make Heidemann layers work.
How do we change the device driver interface to be able to use the same drivers cleanly on many buses and architectures.
How to write a network driver.
Bluetooth® in FreeBSD
This is the forum where FreeBSD’s Bluetooth® users congregate. Design issues, implementation details, patches, bug reports, status reports, feature requests, and all matters related to Bluetooth® are fair game.
Coordination of the Problem Report handling effort
The purpose of this list is to serve as a coordination and discussion forum for the Bugmeister, his Bugbusters, and any other parties who have a genuine interest in the PR database. This list is not for discussions about specific bugs, patches or PRs.
Bug reports
This is the mailing list for reporting bugs in FreeBSD. Whenever possible, bugs should be submitted using the web interface to it.
Non technical items related to the FreeBSD community
This list contains the overflow from the other lists about non-technical, social information. It includes discussion about whether Jordan looks like a toon ferret or not, whether or not to type in capitals, who is drinking too much coffee, where the best beer is brewed, who is brewing beer in their basement, and so on. Occasional announcements of important events (such as upcoming parties, weddings, births, new jobs, etc) can be made to the technical lists, but the follow ups should be directed to this -chat list.
FreeBSD-specific Chromium issues
This is a list for the discussion of Chromium support for FreeBSD. This is a technical list to discuss development and installation of Chromium.
Running FreeBSD on various cloud platforms
This list discusses running FreeBSD on Amazon EC2, Google Compute Engine, Microsoft Azure, and other cloud computing platforms.
This is an internal mailing list for use by the core members. Messages can be sent to it when a serious FreeBSD-related matter requires arbitration or high-level scrutiny.
Discussions about the use of FreeBSD-CURRENT
This is the mailing list for users of FreeBSD-CURRENT. It includes warnings about new features coming out in -CURRENT that will affect the users, and instructions on steps that must be taken to remain -CURRENT. Anyone running "CURRENT" must subscribe to this list. This is a technical mailing list for which strictly technical content is expected.
Using and improving FreeBSD on the desktop
This is a forum for discussion of FreeBSD on the desktop. It is primarily a place for desktop porters and users to discuss issues and improve FreeBSD’s desktop support.
Continuous Integration reports of build and test results
All Continuous Integration reports of build and test results
Notifications of work in progress in FreeBSD’s review tool
Automated notifications of work in progress for review in FreeBSD’s review tools, including patches.
Documentation Project
This mailing list is for the discussion of issues and projects related to the creation of documentation for FreeBSD. The members of this mailing list are collectively referred to as "The FreeBSD Documentation Project". It is an open list; feel free to join and contribute!
Writing device drivers for FreeBSD
This is a forum for technical discussions related to device drivers on FreeBSD. It is primarily a place for device driver writers to ask questions about how to write device drivers using the APIs in the FreeBSD kernel.
Using and working on DTrace in FreeBSD
DTrace is an integrated component of FreeBSD that provides a framework for understanding the kernel as well as user space programs at run time. The mailing list is an archived discussion for developers of the code as well as those using it.
FreeBSD users of Eclipse IDE, tools, rich client applications and ports.
The intention of this list is to provide mutual support for everything to do with choosing, installing, using, developing and maintaining the Eclipse IDE, tools, rich client applications on the FreeBSD platform and assisting with the porting of Eclipse IDE and plugins to the FreeBSD environment.
The intention is also to facilitate exchange of information between the Eclipse community and the FreeBSD community to the mutual benefit of both.
Although this list is focused primarily on the needs of Eclipse users it will also provide a forum for those who would like to develop FreeBSD specific applications using the Eclipse framework.
Using FreeBSD in embedded applications
This list discusses topics related to using FreeBSD in embedded systems. This is a technical mailing list for which strictly technical content is expected. For the purpose of this list, embedded systems are those computing devices which are not desktops and which usually serve a single purpose as opposed to being general computing environments. Examples include, but are not limited to, all kinds of phone handsets, network equipment such as routers, switches and PBXs, remote measuring equipment, PDAs, Point Of Sale systems, and so on.
Emulation of other systems such as Linux/MS-DOS®/Windows®
This is a forum for technical discussions related to running programs written for other operating systems on FreeBSD.
Enlightenment
Discussions concerning the Enlightenment Desktop Environment for FreeBSD systems. This is a technical mailing list for which strictly technical content is expected.
Peer support of FreeBSD-related software that is no longer supported by the FreeBSD Project.
This list is for those interested in providing or making use of peer support of FreeBSD-related software for which the FreeBSD Project no longer provides official support in the form of security advisories and patches.
FireWire® (iLink, IEEE 1394)
This is a mailing list for discussion of the design and implementation of a FireWire® (aka IEEE 1394 aka iLink) subsystem for FreeBSD. Relevant topics specifically include the standards, bus devices and their protocols, adapter boards/cards/chips sets, and the architecture and implementation of code for their proper support.
Fortran on FreeBSD
This is the mailing list for discussion of Fortran related ports on FreeBSD: compilers, libraries, scientific and engineering applications from laptops to HPC clusters.
File systems
Discussions concerning FreeBSD filesystems. This is a technical mailing list for which strictly technical content is expected.
Games on FreeBSD
This is a technical list for discussions related to bringing games to FreeBSD. It is for individuals actively working on porting games to FreeBSD, to bring up problems or discuss alternative solutions. Individuals interested in following the technical discussion are also welcome.
Gecko Rendering Engine
This is a forum about Gecko applications using FreeBSD.
Discussion centers around Gecko Ports applications, their installation, their development and their support within FreeBSD.
GEOM
Discussions specific to GEOM and related implementations. This is a technical mailing list for which strictly technical content is expected.
Use of git in the FreeBSD project
Discussions of how to use git in FreeBSD infrastructure including the github mirror and other uses of git for project collaboration. Discussion area for people using git against the FreeBSD github mirror. People wanting to get started with the mirror or git in general on FreeBSD can ask here.
GNOME
Discussions concerning The GNOME Desktop Environment for FreeBSD systems. This is a technical mailing list for which strictly technical content is expected.
Infiniband on FreeBSD
Technical mailing list discussing Infiniband, OFED, and OpenSM on FreeBSD.
IP Firewall
This is the forum for technical discussions concerning the redesign of the IP firewall code in FreeBSD. This is a technical mailing list for which strictly technical content is expected.
ISDN Communications
This is the mailing list for people discussing the development of ISDN support for FreeBSD.
Java™ Development
This is the mailing list for people discussing the development of significant Java™ applications for FreeBSD and the porting and maintenance of JDK™s.
Jobs offered and sought
This is a forum for posting employment notices specifically related to FreeBSD and resumes from those seeking FreeBSD-related employment. This is not a mailing list for general employment issues since adequate forums for that already exist elsewhere.
Note that this list, like other FreeBSD.org mailing lists, is distributed worldwide. Be clear about the geographic location and the extent to which telecommuting or assistance with relocation is available.
Email should use open formats only - preferably plain text, but basic Portable Document Format (PDF), HTML, and a few others are acceptable to many readers. Closed formats such as Microsoft® Word (.doc) will be rejected by the mailing list server.
KDE
Discussions concerning KDE on FreeBSD systems. This is a technical mailing list for which strictly technical content is expected.
Technical discussions
This is a forum for technical discussions related to FreeBSD. This is the primary technical mailing list. It is for individuals actively working on FreeBSD, to bring up problems or discuss alternative solutions. Individuals interested in following the technical discussion are also welcome. This is a technical mailing list for which strictly technical content is expected.
General discussion of FreeBSD hardware
General discussion about the types of hardware that FreeBSD runs on, various problems and suggestions concerning what to buy or avoid.
Mirror sites
Announcements and discussion for people who run FreeBSD mirror sites.
Issues for Internet Service Providers
This mailing list is for discussing topics relevant to Internet Service Providers (ISPs) using FreeBSD. This is a technical mailing list for which strictly technical content is expected.
Mono and C# applications on FreeBSD
This is a list for discussions related to the Mono development framework on FreeBSD. This is a technical mailing list. It is for individuals actively working on porting Mono or C# applications to FreeBSD, to bring up problems or discuss alternative solutions. Individuals interested in following the technical discussion are also welcome.
FreeBSD-specific OCaml discussions
This is a list for discussions related to the OCaml support on FreeBSD. This is a technical mailing list. It is for individuals working on OCaml ports, 3rd party libraries and frameworks. Individuals interested in the technical discussion are also welcome.
Office applications on FreeBSD
Discussion centers around office applications, their installation, their development and their support within FreeBSD.
Project Infrastructure Announcements
This is the mailing list for people interested in changes and issues related to the FreeBSD.org Project infrastructure.
This moderated list is strictly for announcements: no replies, requests, discussions, or opinions.
Discussions about tuning or speeding up FreeBSD
This mailing list exists to provide a place for hackers, administrators, and/or concerned parties to discuss performance related topics pertaining to FreeBSD. Acceptable topics includes talking about FreeBSD installations that are either under high load, are experiencing performance problems, or are pushing the limits of FreeBSD. Concerned parties that are willing to work toward improving the performance of FreeBSD are highly encouraged to subscribe to this list. This is a highly technical list ideally suited for experienced FreeBSD users, hackers, or administrators interested in keeping FreeBSD fast, robust, and scalable. This list is not a question-and-answer list that replaces reading through documentation, but it is a place to make contributions or inquire about unanswered performance related topics.
Discussion and questions about the packet filter firewall system
Discussion concerning the packet filter (pf) firewall system in terms of FreeBSD. Technical discussion and user questions are both welcome. This list is also a place to discuss the ALTQ QoS framework.
Binary package management and package tools discussion
Discussion of all aspects of managing FreeBSD systems by using binary packages to install software, including binary package toolkits and formats, their development and support within FreeBSD, package repository management, and third party packages.
Note that discussion of ports which fail to generate packages correctly should generally be considered as ports problems, and so inappropriate for this list.
Fallout logs from package building
All packages building failures logs from the package building clusters
Packaging the FreeBSD base system.
Discussions surrounding implementation and issues regarding packaging the FreeBSD base system.
Porting to Non Intel® platforms
Cross-platform FreeBSD issues, general discussion and proposals for non Intel® FreeBSD ports. This is a technical mailing list for which strictly technical content is expected.
Discussion of "ports"
Discussions concerning FreeBSD’s "ports collection" (/usr/ports), ports infrastructure, and general ports coordination efforts. This is a technical mailing list for which strictly technical content is expected.
Important news and instructions about the FreeBSD "Ports Collection"
Important news for developers, porters, and users of the "Ports Collection" (/usr/ports), including architecture/infrastructure changes, new capabilities, critical upgrade instructions, and release engineering information. This is a low-volume mailing list, intended for announcements.
Discussion of "ports" bugs
Discussions concerning problem reports for FreeBSD’s "ports collection" (/usr/ports), proposed ports, or modifications to ports. This is a technical mailing list for which strictly technical content is expected.
Technical discussion of FreeBSD on HP ProLiant server platforms
This mailing list is to be used for the technical discussion of the usage of FreeBSD on HP ProLiant servers, including the discussion of ProLiant-specific drivers, management software, configuration tools, and BIOS updates. As such, this is the primary place to discuss the hpasmd, hpasmcli, and hpacucli modules.
Python on FreeBSD
This is a list for discussions related to improving Python-support on FreeBSD. This is a technical mailing list. It is for individuals working on porting Python, its third party modules and Zope stuff to FreeBSD. Individuals interested in following the technical discussion are also welcome.
User questions
This is the mailing list for questions about FreeBSD. Do not send "how to" questions to the technical lists unless the question is quite technical.
FreeBSD-specific Ruby discussions
This is a list for discussions related to the Ruby support on FreeBSD. This is a technical mailing list. It is for individuals working on Ruby ports, third party libraries and frameworks.
Individuals interested in the technical discussion are also welcome.
SCSI subsystem
This is the mailing list for people working on the SCSI subsystem for FreeBSD. This is a technical mailing list for which strictly technical content is expected.
Security issues
FreeBSD computer security issues (DES, Kerberos, known security holes and fixes, etc). This is a technical mailing list for which strictly technical discussion is expected. Note that this is not a question-and-answer list, but that contributions (BOTH question AND answer) to the FAQ are welcome.
Security Notifications
Notifications of FreeBSD security problems and fixes. This is not a discussion list. The discussion list is FreeBSD-security.
FreeBSD Development Snapshot Announcements
This list provides notifications about the availability of new FreeBSD development snapshots for the head/ and stable/ branches.
Discussions about the use of FreeBSD-STABLE
This is the mailing list for users of FreeBSD-STABLE. "STABLE" is the branch where development continues after a RELEASE, including bug fixes and new features. The ABI is kept stable for binary compatibility. It includes warnings about new features coming out in -STABLE that will affect the users, and instructions on steps that must be taken to remain -STABLE. Anyone running "STABLE" should subscribe to this list. This is a technical mailing list for which strictly technical content is expected.
C99 POSIX Conformance
This is a forum for technical discussions related to FreeBSD Conformance to the C99 and the POSIX standards.
Teaching with FreeBSD
Non technical mailing list discussing teaching with FreeBSD.
Testing on FreeBSD
Technical mailing list discussing testing on FreeBSD, including ATF/Kyua, test build infrastructure, port tests to FreeBSD from other operating systems (NetBSD, …), etc.
Porting TeX and its applications to FreeBSD
This is a technical mailing list for discussions related to TeX and its applications on FreeBSD. It is for individuals actively working on porting TeX to FreeBSD, to bring up problems or discuss alternative solutions. Individuals interested in following the technical discussion are also welcome.
Maintenance of FreeBSD’s integrated toolchain
This is the mailing list for discussions related to the maintenance of the toolchain shipped with FreeBSD. This could include the state of Clang and GCC, but also pieces of software such as assemblers, linkers and debuggers.
Discussions of transport level network protocols in FreeBSD
The transport mailing list exists for the discussion of issues and designs around the transport level protocols in the FreeBSD network stack, including TCP, SCTP and UDP. Other networking topics, including driver specific and network protocol issues should be discussed on the FreeBSD networking mailing list.
Translating FreeBSD documents and programs
A discussion list where translators of FreeBSD documents from English into other languages can talk about translation methods and tools. New members are asked to introduce themselves and mention the languages they are interested in translating.
Discussing FreeBSD support for USB
This is a mailing list for technical discussions related to FreeBSD support for USB.
User Group Coordination List
This is the mailing list for the coordinators from each of the local area Users Groups to discuss matters with each other and a designated individual from the Core Team. This mail list should be limited to meeting synopsis and coordination of projects that span User Groups.
Discussion of various virtualization techniques supported by FreeBSD
A list to discuss the various virtualization techniques supported by FreeBSD. On one hand the focus will be on the implementation of the basic functionality as well as adding new features. On the other hand users will have a forum to ask for help in case of problems or to discuss their use cases.
FreeBSD Work-In-Progress Status
This mailing list can be used by developers to announce the creation and progress of FreeBSD related work. Messages will be moderated. It is suggested to send the message "To:" a more topical FreeBSD list and only "BCC:" this list. This way the WIP can also be discussed on the topical list, as no discussion is allowed on this list.
Look inside the archives for examples of suitable messages.
An editorial digest of the messages to this list might be posted to the FreeBSD website every few months as part of the Status Reports [2]. Past reports are archived.
Discussions of 802.11 stack, tools device driver development
The FreeBSD-wireless list focuses on 802.11 stack (sys/net80211), device driver and tools development. This includes bugs, new features and maintenance.
Discussion of the FreeBSD port to Xen™ - implementation and usage
A list that focuses on the FreeBSD Xen™ port. The anticipated traffic level is small enough that it is intended as a forum for both technical discussions of the implementation and design details as well as administrative deployment issues.
XFCE
This is a forum for discussions related to bring the XFCE environment to FreeBSD. This is a technical mailing list. It is for individuals actively working on porting XFCE to FreeBSD, to bring up problems or discuss alternative solutions. Individuals interested in following the technical discussion are also welcome.
Zope
This is a forum for discussions related to bring the Zope environment to FreeBSD. This is a technical mailing list. It is for individuals actively working on porting Zope to FreeBSD, to bring up problems or discuss alternative solutions. Individuals interested in following the technical discussion are also welcome.
The FreeBSD mailing lists are filtered in multiple ways to avoid the distribution of spam, viruses, and other unwanted emails. The filtering actions described in this section do not include all those used to protect the mailing lists.
Only certain types of attachments are allowed on the mailing lists. All attachments with a MIME content type not found in the list below will be stripped before an email is distributed on the mailing lists.
application/octet-stream
application/pdf
application/pgp-signature
application/x-pkcs7-signature
message/rfc822
multipart/alternative
multipart/related
multipart/signed
text/html
text/plain
text/x-diff
text/x-patch
Some of the mailing lists might allow attachments of other MIME content types, but the above list should be applicable for most of the mailing lists. |
If an email contains both an HTML and a plain text version, the HTML version will be removed. If an email contains only an HTML version, it will be converted to plain text.
In addition to two FreeBSD specific newsgroups, there are many others in which FreeBSD is discussed or are otherwise relevant to FreeBSD users.
Central Servers, Armenia, Australia, Austria, Czech Republic, Denmark, Finland, France, Germany, Hong Kong, Ireland, Japan, Latvia, Lithuania, Netherlands, Norway, Russia, Slovenia, South Africa, Spain, Sweden, Switzerland, Taiwan, United Kingdom, United States of America.
(as of UTC)
Central Servers
Armenia
http://www.at.FreeBSD.org/ (IPv6)
Australia
Austria
http://www.at.FreeBSD.org/ (IPv6)
Czech Republic
http://www.cz.FreeBSD.org/ (IPv6)
Denmark
http://www.dk.FreeBSD.org/ (IPv6)
Finland
France
Germany
Hong Kong
Ireland
Japan
Latvia
Lithuania
Netherlands
Norway
Russia
http://www.ru.FreeBSD.org/ (IPv6)
Slovenia
South Africa
Spain
Sweden
Switzerland
http://www.ch.FreeBSD.org/ (IPv6)
http://www2.ch.FreeBSD.org/ (IPv6)
Taiwan
United Kingdom
United States of America
http://www5.us.FreeBSD.org/ (IPv6)
W tym rozdziale zostało zebranych, dla naszej wygody, wiele kluczy oficerów czy twórców FreeBSD, gdybyśmy musieli zweryfikować podpis bądź wysłać do jednego z nich zaszyfrowaną wiadomość. Kompletna baza kluczy użytkowników FreeBSD.org dostępna jest pod adresem pgpkeyring.txt.
<security-officer@FreeBSD.org>pub rsa4096/D9AD2A18057474CB 2022-12-11 [C] [expires: 2026-01-24]
Key fingerprint = 0BE3 3275 D74C 953C 79F8 1107 D9AD 2A18 0574 74CB
uid FreeBSD Security Officer <security-officer@freebsd.org>
sub rsa4096/6E58DE901F001AEF 2022-12-11 [S] [expires: 2026-01-15]
sub rsa4096/46DB26D62F6039B7 2022-12-11 [E] [expires: 2026-01-15]-----BEGIN PGP PUBLIC KEY BLOCK----- mQINBGOVdeUBEADHF5VGg1iPbACB+7lomX6aDytUf0k2k2Yc/Kp6lfYv7JKU+1nr TcNF7Gt1YkajPSeWRKNZw/X94g4w5TEOHbJ6QQWx9g+N7RjEq75actQ/r2N5zY4S ujfFTepbvgR55mLTxlxGKFBmNrfNbpHRyh4GwFRgPlxf5Jy9SB+0m54yFS4QlSd0 pIzO0CLkjHUFy/8S93oSK2zUkgok5gLWruBXom+8VC3OtBElkWswPkE1pKZvMQCv VyM+7BS+MCFXSdZczDZZoEzpQJGhUYFsdg0KqlLv6z1rP+HsgUYKTkRpcrumDQV0 MMuCE4ECU6nFDDTnbR8Wn3LF5oTt0GtwS0nWf+nZ1SFTDURcSPR4Lp/PKjuDAkOS P8BaruCNx1ItHSwcnXw0gS4+h8FjtWNZpsawtzjjgApcl+m9KP6dkBcbN+i1DHm6 NG6YQVtVWyN8aOKmoC/FEm1CWh1bv+ri9XOkF2EqT/ktbjbT1hFoFGBkS9/35y1G 3KKyWtwKcyF4OXcArl6sQwGgiYnZEG3sUMaGrwQovRtMf7le3cAYsMkXyiAnEufa deuabYLD8qp9L/eNo+9aZmhJqQg4EQb+ePH7bGPNDZ+M5oGUwReX857FoWaPhs4L dAKQ1YwASxdKKh8wnaamjIeZSGP5TCjurH7pADAIaB3/D+ZNl2a7od+C1wARAQAB tDdGcmVlQlNEIFNlY3VyaXR5IE9mZmljZXIgPHNlY3VyaXR5LW9mZmljZXJAZnJl ZWJzZC5vcmc+iQJSBBMBCgA8AhsBBAsJCAcEFQoJCAUWAgMBAAIeBQIXgBYhBAvj MnXXTJU8efgRB9mtKhgFdHTLBQJjlXeQBQkF3u+rAAoJENmtKhgFdHTLOVoQALS3 cj7rqYkHiV4zDYrgPEp9O1kAyGI8VdfGAMkDVTqr+wP4v/o7LIUrgwZl5qxesVFB VknFr0Wp5g9h0iAjasoI5sDd6tH2SmumhBHXFVdftzDQhrugxH6fWRhHs0SaFYCk Qt5nFbcpUfWgtQ35XTbsL8iENdYpjKXsSFQrJneGSwxIjWYTFn6ps/AI3gwR8+Bn OffEFdYugJ049O6Vu6YBFJHrnMO7NbF4v95dVYuLtpMIaXWM+V9KITmhaBzFz5fM Q7UOzcLlbxOYKNIWcp8QQk429mayKW5VUeUExUD1ZzBHn+P6ZG7QTMDu/RmBqiHo ewCMVz4n9uXT5BiOngE4CvS0WQwHzK+k9MLpG2u/Bo9+LT0Ceh9Ou1rfU5+0tRwl GyOFFjf3INS7I7gkcAwxQ7dzDItN/UQPZpg8y9mABU2x4enz0AvTnb61d/1dnTEr tdNgU433he0ZnD1HurZCjBEWC656wv6iMdWcD8gjhMbmEpPmjvXcYlTO6zhEygSM DiwdQCWK2W4++YJerA6ULBi3niNWBpofOFH8XylV56ruhjtHCo7+/3carcMoPOJv lVZ1zCKxLro3TRBT15JTFBGqblRyTopFK3PuxW//GTnZOtpQEOV6yL4RAXcWeC1d 1hb5k/YxUmRF6XsDNEH4b08T8ZO8dV3dAV43Wh1oiQEzBBABCAAdFiEEuyjUCzYO 7pNq7RVv5fe8y6O93fgFAmObXVYACgkQ5fe8y6O93fiBlwf/W8y1XXJIx1ZA3n6u f7aS70rbP9KFPr4U0dixwKE/gbtIQ9ckeNXrDDWz0v0NCz4qS+33IPiJg1WcY3vR W90e7QgAueCo5TdZPImPbCs42vadpa5byMXS4Pw+xyT+d/yp2oLKYbj3En4bg1GM w71DezIjvV+e01UR++u1t9yZ8LOWM5Kumz1zyQLZDZ8qIKt1bBfpa+E0cEqtNQWu iGhQE3AHI8eWV+jBkg5y2zHRIevbWb1UPsj43lgkFtAGHk9rrM8Rmgr4AXr531iD srBwauKZ/MElcF3MINuLH+gkPPaFHw/YIpLRLaZXZVsw3Xi1RNXI2n2ea29dvs/C Lcf1vYkCMwQQAQgAHRYhBPwOh4rlr+eIAo1jVdOXkvSep+XCBQJjm14FAAoJENOX kvSep+XC0DcP/1ZB7k9p1T+9QbbZZE1PJiHby3815ccH3XKexbNmmakHIn3L6Cet F891Kqt9ssbhFRMNtyZ/k/8y8Hv5bKxVep5/HMyK+8aqfDFN0WMrqZh0/CiR6DJh gnAmPNw/hAVHMHaYGII9kCrFfPFJ02FKoc81g9F08odb7TV+UlvRjkErhRxF+dGS wQoO0RCbf0Z1cs7nd0Vb2z4IJh4XMxBjWc/uQ2Q9dH/0uRzwpAnR4YX+MG5YrX7Z zBvDyR0r76iQwRSDKgioNgkr6R3rq1NZGdaj+8b0LzdOqtzKJ/eupDe3+H67e/EN qymtreGjrubpiU9bKvYArisUqhE5KtguryvR6Qz9bj87nPg33DT3WWGVrwFRxBox dbWzjQFv0wug8m4GAwVF7fPR5/eW7IHw8zvgn0vSPcZz7MZ4e6Y5jN4kA5/xWJYZ Sps54qQWB+FA30unIXN68KqdIzONIbtaY3W4/JjJUCm4T+wEjKaH+wJX8w1DMjlg mkTmGh/UrTyC1vXbPgk9Sy3cRTICR1T9z7W8UlmTtnKrUklrjlFR7SXzrEXzLGOX Fm+NEHpHNXqzcm6c3QfzY/yQ9HSAQ/t7SUQ9caRePbDz3/msyPxtGFor9roQv6VN wRXCyRgkH4Y5tPhJAQ8G/FxX+VXFb93QL0lfelb23/BBu6cUwW63SRn5iHUEExYI AB0WIQQeB2Johg/5/ikUnJwDU9SVF1S13AUCZISO3wAKCRADU9SVF1S13NnqAP95 LA1Om9XSAKl76VtV+L3JPDdAwIdbNa0OsRT4Wm7U3wD/YoFrdHXVHHQFKwYeUUhj XZcxnZLe9Ixo0/JP+RVFVw65Ag0EY5V2yQEQAOqjzPpMUCGu8eElXnAd2PruC6hi +lc/yC90KqizxIuW6qLQBaAkTCWq7suYpDqoygn7YM3rL50S285WAECAXrcst/cV Aqr0UH/e6p4iJCUIiXcfjd/wq20RnN/+VuvLhjpCFLY5czfVS31D7Uh9MbC+zUTz 8nVTiNCsAao0qSdfJDIzB4nSO+9xIsme/dLsI5QlU5PdxOBV6HdEhCUXOoratJCb KAOlLxtPwyMKxmv4oZ7Mqlt10peKjhpBb97qcIzJhHxujQZD0OmzIA6xoQ2eSCGd xCEDsZ09kr3Esw1AwKnQ51xmWpFWNFk6627M1bo8+hzOz81CrTZhYrgE+1JXv6V1 L2A9lMsimdE1BHNycDS+dBOpIB9qxXCwAab4ykfvNxox/ZPDUrTy7v7mDI5uDNTN CYYsKCj1UidycOKzSziB9Oa2uvmMJ5XstgNBf7Z8Cky1dtVd4ol6bU9L5nos9tbY eSXFi4bmcWB7AJiVCMq6N+LBbUKWGLglB4TU1qhttpqv31X9V6ges5gARY/RuRTK sVyhwsn7SDcqmNKRy0im2AYakwEp7hT07ulahOSLxjP+5hCf+nSJlwbxJ8ozwjjb zeN2yLlJSI00klkIFBNUDt3wzFRW/n6qlf+/lepgzekfNrYMtfPB8AT07Z2A3U4x lgiV346dZymbY/EjABEBAAGJBHIEGAEKACYWIQQL4zJ110yVPHn4EQfZrSoYBXR0 ywUCY5V2yQIbAgUJAgIpAAJACRDZrSoYBXR0y8F0IAQZAQoAHRYhBLYVJ36BCH33 XIGDO25Y3pAfABrvBQJjlXbJAAoJEG5Y3pAfABrvuBsQAOlQFPXhx6whO4yw5Ziz IS02YHhSVMVYKS2T9jPIKi1qxnEiEw9eKH0bW0Oj0TEhZPyM2NJID7DRWK5r8+Ks Mu8jwm1fUmIrefAx6fCVfCWRECT1MlbL3jhh6AcX/nK2e3Bn8vgExhzczO3JlvD6 wPCc0FkpiY7yDB9ihu1+gbE5Hg6dvftttRXDrbEdAifbNp9KYxDigxdlOb0S14hj CBysLWH5Su/khcIlkeuqZcI8TmDldnUb2OqTCVpFhaNwsPSrHBzmb0s2sXo4FL03 pLsOdwhi31W6kjk4KvW5FKrOpoEwUMKVNMf50DHdvonUoUHRSIc/cV5NqUWHwvc0 T5031qk0CCRRa/+/iij/p2RG7c1mx7ZECj+jZfmvjSqT+WHJ1BFlNJMWyK4fdVRZ WyCaoAecdbukwzDwUCUqHJFIWeFtbut7SOPxcwg7sbnKNApAKdi491dvH75s/U/O wRYO/2P+ymHlqtyix2jq0ReSVYcQPXswQ8i2ifX41F+xTSl4RWCBBeXB1Nxk3+Hs V4Jnnp1zAJZ0KlKW/oJxbNFdI1TImkpr2p8ioFf+aiePLvDkgeaG8vABgjoihPXW HVAMR8Z+GvBY/A6OdexpibkTvC/zDr0/Exs4lsylZKDwvvFbctcpHVXBeCBQLX5v fLrsTkaCLWF/SV9OdMykvYKU7ZAP+gKEwhp+HPFuOHZbOBhqFUdkfeCkdzX/QGdz Tuz349roRhgz2vRfN7MtbtuzA6NWWhEWt5DcUgX/Y5I3Q4Z2bt3JiXQ6WJMgMMOX Ar+XxtxyRRykc1HV3DQ/cq8OWYubNnIbgebPNIFr2OIWKsR9yDaucZzpmLfzaMZU Au5hWmU9fIw5SIKGnQABBnNMhilfD+CkETp6baTvjTK4rpaobjJdeCTrsWgfXRNC 8x3hDvcrjPD70MylOGVQdx8GYChWJnCKXsLTGX7KwdfxkjclTyzWvdcCemp0eLha mLGb9y1dtWdNIDcVCvZJy0lipHVUdFYYxb4iLZJANL631tlPM6AA8sO1/L4mqEGn AIHVrUQd+2QkSiOl9mKlpgaR/fJz683BR5Qen9ywX0JPtBupqPW3t9VbO/uNxUql HCeAhPi9NLOpujpYLfgW5QAfS3u0nkp5nrbkCoQUua2q0Oj7J0mFmtWtcE1c9+TH mFJVb8j2G9yQw3ADe3Qp9ALazP5nVDVri8NZBhHK1/KuBmRYZtcyfqXUnKoiiWAl m5rHaRiztW7e3wqm2oJu/RkEAagybutEuBWh2Ej2+gDxjEKKtIKGu54lif4kqTww jKTcN1ekGihwwgCMUkBSBeNXk1ClkzLFHwESJCcFwdEgpVYQTKFsu0emYISyco3I pUajGzfUiQRyBBgBCgAmAhsCFiEEC+MydddMlTx5+BEH2a0qGAV0dMsFAmWFy28F CQPyfaYCQMF0IAQZAQoAHRYhBLYVJ36BCH33XIGDO25Y3pAfABrvBQJjlXbJAAoJ EG5Y3pAfABrvuBsQAOlQFPXhx6whO4yw5ZizIS02YHhSVMVYKS2T9jPIKi1qxnEi Ew9eKH0bW0Oj0TEhZPyM2NJID7DRWK5r8+KsMu8jwm1fUmIrefAx6fCVfCWRECT1 MlbL3jhh6AcX/nK2e3Bn8vgExhzczO3JlvD6wPCc0FkpiY7yDB9ihu1+gbE5Hg6d vftttRXDrbEdAifbNp9KYxDigxdlOb0S14hjCBysLWH5Su/khcIlkeuqZcI8TmDl dnUb2OqTCVpFhaNwsPSrHBzmb0s2sXo4FL03pLsOdwhi31W6kjk4KvW5FKrOpoEw UMKVNMf50DHdvonUoUHRSIc/cV5NqUWHwvc0T5031qk0CCRRa/+/iij/p2RG7c1m x7ZECj+jZfmvjSqT+WHJ1BFlNJMWyK4fdVRZWyCaoAecdbukwzDwUCUqHJFIWeFt but7SOPxcwg7sbnKNApAKdi491dvH75s/U/OwRYO/2P+ymHlqtyix2jq0ReSVYcQ PXswQ8i2ifX41F+xTSl4RWCBBeXB1Nxk3+HsV4Jnnp1zAJZ0KlKW/oJxbNFdI1TI mkpr2p8ioFf+aiePLvDkgeaG8vABgjoihPXWHVAMR8Z+GvBY/A6OdexpibkTvC/z Dr0/Exs4lsylZKDwvvFbctcpHVXBeCBQLX5vfLrsTkaCLWF/SV9OdMykvYKUCRDZ rSoYBXR0yyOqEACitDvbkbfjaton6izr4T8QU2yvhJHkf4B6KeVDbKY1J4784OxX p2bJgPeF53SYBe8gm3YHjp8ULh4A/19U4hswyE8ymcm5nIs8OLyBdxkuBZJGEnzx H3woiyYqWH7991kzhEjUkuMgKLuTI1HiO0oLMuPQNhUHOnWafSVPC0XO/tIL12Om oUuc7ligY9Z9AceFjTZOuHamixHAAc6hpxdIW+yhC/qTpc2VK0niWeuQfq3453iR Tf9MnR5Beztl3ZYRWcx7UiFuKGwZwBibNnNmUs6GyQcJ5UTa1oeJcLqHi0Lf/r0j Xo3wgJq7EZjjVyU+GI2ZVoDOaS6c4/OvLm62XoeSlnn/dQxUcjUki+x8lb69IxSF 1xAgsC/oNtFZYd5rHdlnqIBUYK0lLtSCXBkzVeivSiQa0hL5on8LDu1nw2bXyW61 yt/YxVb4FanMxAqdYVBhOfU0RaPNifH01rbb4TwC9bTZN1LQ1KI/Swb/SruUE0Ry T28fhYRtsReS2PnUODghJSFDJbwFbBZf6RKI16q1xqKRRvxIWPm+lMOi1NLOKR9P +OKy9HmChMw0UJUcVl1cJ2xtRl3wi5t6AA6HoNv/TrLeYVgMR9wYmKlpvjTQ5jTd rbHD1XP5jGsp8QsJMGja1m/7cryReCpcVxvImeReaOdgz+zDmQqq3O5zuIkEcgQY AQoAJgIbAhYhBAvjMnXXTJU8efgRB9mtKhgFdHTLBQJnhEEJBQkF0/JAAkDBdCAE GQEKAB0WIQS2FSd+gQh991yBgztuWN6QHwAa7wUCY5V2yQAKCRBuWN6QHwAa77gb EADpUBT14cesITuMsOWYsyEtNmB4UlTFWCktk/YzyCotasZxIhMPXih9G1tDo9Ex IWT8jNjSSA+w0Viua/PirDLvI8JtX1JiK3nwMenwlXwlkRAk9TJWy944YegHF/5y tntwZ/L4BMYc3MztyZbw+sDwnNBZKYmO8gwfYobtfoGxOR4Onb37bbUVw62xHQIn 2zafSmMQ4oMXZTm9EteIYwgcrC1h+Urv5IXCJZHrqmXCPE5g5XZ1G9jqkwlaRYWj cLD0qxwc5m9LNrF6OBS9N6S7DncIYt9VupI5OCr1uRSqzqaBMFDClTTH+dAx3b6J 1KFB0UiHP3FeTalFh8L3NE+dN9apNAgkUWv/v4oo/6dkRu3NZse2RAo/o2X5r40q k/lhydQRZTSTFsiuH3VUWVsgmqAHnHW7pMMw8FAlKhyRSFnhbW7re0jj8XMIO7G5 yjQKQCnYuPdXbx++bP1PzsEWDv9j/sph5arcosdo6tEXklWHED17MEPIton1+NRf sU0peEVggQXlwdTcZN/h7FeCZ56dcwCWdCpSlv6CcWzRXSNUyJpKa9qfIqBX/mon jy7w5IHmhvLwAYI6IoT11h1QDEfGfhrwWPwOjnXsaYm5E7wv8w69PxMbOJbMpWSg 8L7xW3LXKR1VwXggUC1+b3y67E5Ggi1hf0lfTnTMpL2ClAkQ2a0qGAV0dMsNxRAA suW1aLh+hgydW+iH6DmdQRMESsB1kE02kO1462TAQaziIAvNoxw5h48xvyEnrDA8 d+9IDMyxdrLmAbndUlSveMa9+EPiGHwr6VTyFL8nA5F7DcFi4mjEyGKe18JcaAlY UtvHgWH6EjiX2iSXpsrJFEhtfFNolZ5sp9LFI6hOBihSJxZK4sbMR7Q6IkDuAVpT FLiejBRlsXpFvTGL6040CtxbL5cqkVMYP38rFMTuc3pGGJA4wb5EC1dGjUi6XjbY H7kuCAFyXqV9eQQP61x7K9W8qnXW+weCIMKfSX7AcCtH1jXBAM6lqpPrh6amc+/r bg2eNA7DmgJnEY4apIcDB/b4khRMga2ozeGWWyIvOaVvR2R7ALQ+Rgut85cM+4+V l2PHmOzW/yYdHVb5REQItFR5COb/mGUqYhkCtiV3nXo/K0uOQKu5SBbNzLuNvuwd n+Eimxjl18VnrGG7sjtUa0MLmtr62GiEVrhrDqa/biHp8LdWkAQjLZ4aTRh2XZig gaVFZHmkw3ILPyKKM21UXdM0YRk3TGVK8ODQy58ebPS4v9yYT9gUA9UDkDYeGcF2 qjoDPVNvcG6H8jCSsPRl1KZwtqqITCOSAIAPI4Nu97kO6nbOyQpYlwjd1MhvVXnP 66mHSvmqaxbNGX1mF9B/yERkBkooNZrKuJSvBTC2J1q5Ag0EY5V3BwEQAMpFVczZ o9ZPNsgW791UW5o6wnrnd1nIO+S4rc37q2TEz8KGHCuxo5NwffZ2t6Ln04BI54pb apg17b7a0hPka37HFkL28n4VyMdx0CsAm3QEfUsdK6xwKV2SucYeVcrV1upcN4Pd XD7su1I7/A4CWXFJG047zJ0Z89lJZiQEiAq7ghvEoinC0sm+0a6ao/ocqCgWCKM1 yCPOyzJXleRrv29SRnYziMR+q2U0x9xg9Xl6GMwUmFwbJc9nORVvLH7fbU6/du8E goAYrglFOFZG/TSolSGWRSMiavz0JSD/i+rEN4aIT4WfBe+L9Wy1AmrNxiAO+zKm zHQu3JSxDncr+y+hcd+W0gqw10FoI9jWLcL7kR+6a0iOjuJSXSopq2l3DafiPxtC Fmr4CGQhzBHM6e4/v/NNd3F0XpVbJ6RQph7lkfvfz8q2lvUlHhezJ0p1xXmhff9C HjdVMhmAmz5+imBAXk2mottNfKb0pFEen1xY3K/UPA4g+oPsSj495MsvIg9eIMCc C3/z0SEUMWH/styyJzPqfpyfGwZeTcIj9vg2o+RnGvmcLVYA/EGToPk905kv/cK7 3oy8bZyOB0zMg7T9PaWgLUO0sqjqo0Mw3knFySg3oRXlcilPQvfPdX0JvwLpc9DW lr1+1GkCXJ08lWugJc96CJQupKRb1IbC0oUXABEBAAGJAjwEGAEKACYWIQQL4zJ1 10yVPHn4EQfZrSoYBXR0ywUCY5V3BwIbDAUJAgIpAAAKCRDZrSoYBXR0ywwtD/wI DmEcHdFlyFRTomUBjbeK2uzcZIhkkgL58lc63UPle5iJ2FBvmYS+0rQS53sVEscc n5KfkOwTryKllvWbl0IzuiqfawxALcfWpfZJHzTMSnDHfgXvOOyFMQruqRDAHAr7 PNC0CnbT0sEF2ZFzad8M9fLqtkXUx4mgECNGJ4CVqg75KY8uUzv/BmRwEf587FT5 /iAIed5MjFB2VFDX9GABcvTTbHxCZIxnxl3cs15SxT0lAofZ2ueU6kWYWZSXFeaE M/4ymPJws2mmV0AkbJghLXCn9Mx3nX6NTZZ9Harbru+RzW3/Hg3DZd0J9vko8Paf P0l1NWtgyX74CqvTgjzTxXTnqrRXzcczK7fhcC2u4i0prPtXXcyyi7SwpoLikaZC LFFhUmOx+mS5TjtgFyFZBNxnO7iAwkzfcTcC9sPoWaFmiQf6q5EIYzG+WQpncj80 mxl3HWOP6oFj/hZJRYseKeMkvJzLTo87rFdM6CsMrLwETR6e+aWM0btPFil1rXVA CNOjsy0bxTV8OJEfyxnYmyjvnBvB0kdiaVEDdVhxgSqzLAX4mgXa49/V6M/uzMr+ n3/A1Jdk4V6fVm8S5cFIXxoUat3cB4xGaT9OWD3o1NPr6eS9Vo0EsJlRl81SG68f S+Qtk2fX27T68YG4Aa3zMfZxUsVuFLtTuQbRC+fJpIkCPAQYAQoAJgIbDBYhBAvj MnXXTJU8efgRB9mtKhgFdHTLBQJlhcuqBQkD8n1oAAoJENmtKhgFdHTLoO0QAJsT E9fkleb7YzPEuP9GJ3jx8PGdWm7n+8UNdr24kS6gOXVUfPZrWa5So21hcIwZb4PZ DqHSVSQnRciKhSnG7gplYPNGZ4+FWbLr/mBRYarjkVFLUuCPexSIjxV1KSGJnWs9 YTVAKZAz75GpCML6jD6biCOQCQ86wqOdWvZIZR8YvurrxR64ABB0rjbsaG8cNOUX 1cwAfdLwthf64dS+2m3lqNGDHkP5eNL0RIxC5gXYEp0lvmlMH3ZuO5WrfH73PTDg 89bxXeuhrFmSEwf4xWm603oi8/2qQvR9/7jb0o+t71NQuWrWIFONZWWgZBUGso+u yT3XgY4YqKGR3z2QzKHYnJ6M7SvSYpqS7RtcxcCXF0HGNfES8cAgtKVpFtbtSwXX p8O8oLyjmVIO/NjUpbLOGdFIsarsezLFV9f2fqZ63J34hyUSg8LrYVV1fA5DJUpe bbX4hLpdk0MMtgG43BwKIGlJTpL5RkQ/uQU3YW2kairy7o+1imDD0TRzQxtdjVOI 5vnlTNcfJZIIfLx4drABA12OvpX3dfPV62R+8BAlJFT430CG6AISJIBqJRFvuikm nZGUvEHmOUs/FLbbaXTPkKc7tR2WIwljRvMV+Qk84cWcX6YchMslMuiDM1mtlQZi g34WHGSE+zCWnXAslIHlSwox7qfdO0Kz2XncSbIAiQI8BBgBCgAmAhsMFiEEC+My dddMlTx5+BEH2a0qGAV0dMsFAmeEQS4FCQXT8gIACgkQ2a0qGAV0dMsm1Q//V09x OutSbWU44KRurdnGKsk56DFlqXtjGYJqDPrODpX3M8IDf2MuTIN2yfPMv984bAbO A9RL7EaGVlQUW9QWPURMsZKEFQljhfxRJO9JoGDYI7uRDnSEi6WjVvgUk5OiIh0K EI4jEcaLCzveIEcswrVDSAn+7nGvewP8Rrx7qMUNvLAltxiMyfGXneavRs3sfusz db9LTTY8lCU0xrslaXrrvfCkaRbskFi3S31I+1ZB/ewuAhHqfc13eRBjPwQOanJF epAzP4GF41fVQN9GtssATCD+dV6OFhYjfWJbOIcPv277wCvGIFucM9XRjbkCIYFQ E5W+1O/act3Obj1sB90C+cVOgCng37YqfObYLF19RE4+a7NUAh/GxHj+8TxUyvvr aWWyfNqTMDjHMShNDjG0qSzFX7vfyUpmfAfz+6ad78aks9LMf+86iGkvBhXFs7cz Vv4PWWYV1+WShNU2Y9yMaH3zpWUaREdB07HKbLva4Y1icqWVx+z6xs3PvsqbTei/ moXiZk7ohpbBm0htJlki22ARYrGXSK6w5RQtCZoBW0DEj5JNBjkK6XbAW3VFuAA1 J5wLS2z0eIR5adP+/SxQUbTq+ZFiOGdBP1g/783e7zEdyA0YfA2KU9OdLzupUix/ x+JYcxmrZXndSMObd0IiWOhwXlgarbJJMReOORg= =cYaK -----END PGP PUBLIC KEY BLOCK-----
<core-secretary@FreeBSD.org>pub rsa4096/4D632518C3546B05 2024-02-17 [SC] [expires: 2028-02-08]
Key fingerprint = 1A23 6A92 528D 00DD 7965 76FE 4D63 2518 C354 6B05
uid FreeBSD Core Team Secretary <core-secretary@FreeBSD.org>
sub rsa4096/CABFDE12CA516ED2 2024-02-17 [E] [expires: 2028-02-08]-----BEGIN PGP PUBLIC KEY BLOCK----- mQINBGXQ1o8BEAC+Rcg8cmVxuP17Vu+q5KgCx/XiulQuqKXAqqBlYCH2jqk6DINP yFrREGBhzd/qNmlAYEahQ4Zgl0bUZNTrZVDyzicOvPP0jH+KSTQwRs7NOawEdlVO cyHrwDCPEqf5ZzD4NhfTriEOw+j0pEH/onitUGvoQRtx15xWyaJQxDEBMTYMLewE 86D1bltwnTNczE3UZb7oQLJXkAX5hcLtou70XJGgZITvJkK+kp/xot2eFjnqRz/u WeXnKhYAmC07EKwZ1uw047eHKwMMRBYqzApLwoQtfE430Kxf2q8de64x8zDbi6YM 1J4r8OAxOtHVyfJ0j7Q23DEZz0VVb4b1Tx5OG2Re/KSNvqI0awJO4TcRmOR88OyY dzyXgnX6Sa7GVQY1FXvn7vtFuDAt7egZOzeomSHL9bdX07LTQ4UtM88EV9wm3q4q smoatV9jsvPQ1zxCU3aQD/5eWTJH2/kz1LIuBL/Qi5XQpJn91lBtUWJrCgkHWPGu f//rnnXmsG7DAChW+yZ7cFO8lfNa8sFhPqSxCYphWmJTrvadyQtDngB8JakWdnmK pfGS6y5lel+181vw38ZZKt04AKM+nDY8051lBM7Q9Q6kTLI33UZeImndx5xYukVD kV6aQ31HYfEark15c7iEz+OAcwFnM2ntXMt7kKGd40CqzusiPcQkPqPbAQARAQAB tDhGcmVlQlNEIENvcmUgVGVhbSBTZWNyZXRhcnkgPGNvcmUtc2VjcmV0YXJ5QEZy ZWVCU0Qub3JnPokCVwQTAQoAQQIbAwgLCQ0IDAcLAwUVCgkICwUWAwIBAAIeBQIX gBYhBBojapJSjQDdeWV2/k1jJRjDVGsFBQJnp8PiBQkHeofTAAoJEE1jJRjDVGsF GMIQALhj+mNpH8OmTFeihQ6t9P8un3llz6Wmqe/Q+ULWeqJvV/uC1J5T9fnoGhwF MgECuguXYJtoYQ16KXnsSOs1tcqMOK9GtEtFJTGe2DtfLiBednwUvu9j3HmTlwLN M+7rqkiC0HCg2qSjcMjxbVbA5BSgNkgfyTSO2YdjfaZ+ceiHwo/qa5xWE6i2dMR1 PLGMMHTeELdtdSH6VR9/3h0qt3qzwdMBRCVAQHbim7CqwjUH9jg+IOySXl81jNoB xuVZR3pKshyY4Oxo1dK+W86Uiff/+c4jCAxokGWIR7C4MkZZWUQqV7920gkZFC/5 qzpT1A1/sFUg8HfFTr0vCoPSVFWn2+Tto3vr78DICVaAf02aYAFlyKK18BMCoHkS hDDO+/JQZmvHOIgEYK+T2WN1c9gm9IDJzGZuH0X2C/vkREnJKkccJfB4pXuN10wt fqyP9fn8h6+/t+sv3qNLm4d8fkmLXofulG3WB4i/F+Hip2rjPvvBCF7zl4xy6cJ2 xVY5HUOBTqmIwVhYwUpXaqNoWa/qJBLTuot3z7ciKmKX6Lq+Dze5dzhrPNl/CalC HBf3miHRK3TZbYLooG3bcEWgxU2BnBi3vl5NpCoUOKkPYRlALXi2TyHmPxO7oT4e mIzS6BgnXOqO+AXvbKKfayuSePdBqkNMK/SMC4Dylkf6Xj25iQIzBBABCgAdFiEE EBpxaxYrAOVb7eoFrbv4YQo3ibcFAmbu7x4ACgkQrbv4YQo3ibcr5A//TIcbD/EW YJz0zrUQdc9xG3UNfU6uHmQzAuUy5ginevyqv0TSso5qvSkOHvdxbi41rfMiB2RJ V3q0n0PSvHFld89fOTZUMZXaPvozCiBYWScrt+KA/2pq3K8mUumHS+IFtpHLL2Tu +gI8XCHUFxO9HUThM/rFlIyEdzoctgmqQ7IG4uZG+o2J3w09llhDAUe0vraJK1On p9yFACnRrhqvl41JeUWcv9MH9JcwHUqtUo9WLTCIb+hkByTOyRfHBYpYw//bdXdf 6rkCwKVWpyMDbk61zq2VsS1kqbP9IH/A8CsBnA6mg+zPq2i7HIFw8Swj4OGJcIvG a9ubUYJRjDhX/vBpNrtncANZ88FQmA+Maq0vu0LS5IIGyIKkvd1fKIsyvBDDa9kE nfCW0XMkJA0Gf+kxdB+elXQHBwKO2sr5BiKnJT5lJq3Yu9fxxGBnf93yiN4E9bmF gG7cZxpyb1Bp76TJhLcANyybOTjCtiNRrgqeaSx9/6hSPfPigGXIne0H2lmJO6oq jUrsYmFiWvU9sc7AcPVw/eHG8FgW35TuwKX71z8w994iaahUPNcSVyXOUD+QNROv HhGUXrc81t613rivh22N0NZpNubVatq43KV7+/bnPyWBIi1Awh3vIFsNNSQSrYxF lUuQaAHQXTeZMZ/7npE4t86seMt0T7BGn765Ag0EZdDWjwEQAL3VwFifpnRCYzQ4 VZ1dAjp8w542iRprqeA+C3tvNbk2OvKpN3DIc49l2bgNZ/VI7/T58lEKrFsgLK4w AWtv18OV7xuh0AuOblmq5MvcPrUelkPj5HA7M6Ng/rAubuHfwdP/IjIrzzY6+XDh fP9N5KIv9VRJYT23BbvLPeit4J4tQEB/NpxL3L6zI75qq4R3T/EkHP6Y9Buup9Lr isJlcxkSK+CyORCgTpEz6fWsXiTDgS7cTaQ969XCygBpj4wRQzwkBdokxo1wsiFt 4zLt07/PrPYjeHltTDkrF9XDNhLNJ5GliHnd01oHg1j5/n+9Osvh1maoFwuBxXTN nTZ2P+7RKLBaVQVSkUa5KJbXoM3v7bMbXM5aLs2XjglrAzrZOV+Y7zOu5UYQdpXd 7x8XAEtEozRJzt7dosQIhKx9h4LlltFFulDUpf5VCvcUEoAzMbiX0aju9n5Rwsql DHatU9Mm3W8OdFXj1foIXZD+VX2Jp9DgxPLoAJ0CWhPXJ8f+WFSJZCjWoPJEJKWY 0EOxiXyAuvAyniAZAC/eKZkfGckXmu7edRgYbRTTwPmZ/axa/k9aHsHLwmbxuZo/ xxQXzqU70EleHZ31A3mOqsC1epjN6dn4AFKgvVesP/K/fbvSsfsfiABS2A/68ne4 zJG73Tnk4L6J79vrXc2iMJbmdg3ZABEBAAGJAjwEGAEKACYCGwwWIQQaI2qSUo0A 3Xlldv5NYyUYw1RrBQUCZ6fEFQUJB3qIBgAKCRBNYyUYw1RrBQd9EACMVckxzy4w aUGlERguJ+kslS8MkMjNqnfDPLRDVxbUxNvbbhw7/u9blM65DCGCeNLc2n4oiu5C E3I095AKmvq/0dOa81mEEdZkC1CVc64bXWbEyz5AtSHUpgdxRso6C+YopndSiz1T WcIagQRXfWaw3FBWPooA87gmibmSmCegCtqx+uyc5QxX2eFI8mRK7vlfnGpYKHs0 D1/yUSGQOwoNRJ5FYm+ynfDE3FzHEQL7lv1vpv1k3xNKfBziMMg4IMEBKNHV4VKN qJpa8UCodeTGSWQdNnCeCWPsxz5oQjCcVH9Z3e8sMpWLHhRcBZzSwXUOws2GbRMH xHwrfrpHJcrBhe64pgfGOvZLUJ9BDs+8egTHsqRFacipbtTR+hhVhuJEHDaQQWuM 8IRHj9HIuTAczET8JTDHTMIoo8DZdOtiW/YgqCDwYghkI77d12oNQqYoeJ2HiqbK cGzwCpsR0A+p/iOAxJG13tsxqZV8TQ8iTokWG6ACtZ7sfeWEhxqMbUKUMgogZn0I 3n1kV+tUZC6BQrIYI7TiKg95wLZsIydeoIsQoNZwvyKAXfVmQ62YjIX8njZwN+07 8/ipUPJxCYa8zL8BZyDmoFJqa3y9z+11+vtiZ9t+aTwGvjpHDwyeCJco7go9cU3m GRFZYciqIoG4n3tl8Pob15vFlVqk47rRqg== =8TzT -----END PGP PUBLIC KEY BLOCK-----
<portmgr-secretary@FreeBSD.org>pub ed25519/E3C401F60D709D59 2023-03-06 [SC] [expires: 2027-03-05]
Key fingerprint = BED4 A1D3 6555 B681 2E9F ABDA E3C4 01F6 0D70 9D59
uid FreeBSD Ports Management Team Secretary <portmgr-secretary@FreeBSD.org>
sub cv25519/2C92B55E27A641C3 2023-03-06 [E] [expires: 2027-03-05]-----BEGIN PGP PUBLIC KEY BLOCK----- mDMEZAXJvxYJKwYBBAHaRw8BAQdASFAC20WL3R1T6uNyGMZbfJCxDkcP4C5vi3Op tcZ2fbq0R0ZyZWVCU0QgUG9ydHMgTWFuYWdlbWVudCBUZWFtIFNlY3JldGFyeSA8 cG9ydG1nci1zZWNyZXRhcnlARnJlZUJTRC5vcmc+iJYEExYKAD4WIQS+1KHTZVW2 gS6fq9rjxAH2DXCdWQUCZAXJvwIbAwUJB4TOAAULCQgHAwUVCgkICwUWAwIBAAIe BQIXgAAKCRDjxAH2DXCdWYN1AP43TjyfZtZ3DLYT++g0+SuPsoO/3yWVybA+UmFL zb8MngEA+LLNUfvEwCuXS/soh+ww5bpfmi3UUmeGiQEAXug3iA+JATMEEAEKAB0W IQT7N0XIbxXo7ayBMvzYKU7Du8TX1QUCZAXLkwAKCRDYKU7Du8TX1XHMB/9R1MX4 6zMgpKqPPt76GOI+eGEdBK6bY8aJZjQGdqTh9f6VtXVoTGIG7cvhc9X8tDBoB0PT 2KZWheF51AV1+NHU4HwLAQ1BMebrFvWSfkw4xg4fBGwDhz9/GN85No+Js772V5ey 8lRiL6meRVWxMlLyWcxGd8JjcC5yX/iAUQ3SBGCLqW7unWjjg7CTd+AMBwcqPGrv ax8q6eFVguJcHJAjMnKf6HAy4cpK3s+uMoUBCGnszSN12B3ysKfyC4pNO/pix5tA Q5v8aRqTeFPh5zmNhWo0KGPzplTPqRQSHDl7GDQC8Ru3MhzFkeWzHsexjZVwS6W2 DPcYpuuAsA0XOZIZiQIzBBABCgAdFiEEEBpxaxYrAOVb7eoFrbv4YQo3ibcFAmQF 0u0ACgkQrbv4YQo3ibccwg/9F2Xuic3nhKxRbB3mJeDo6SYQETa/Gh1qQ34+8zlt 8UMazOx67gnYQfy+pXjro6eQ2up0a4eUYezcNOudqAQD21nRz3HA6EQVNcE/TzEA xl5CJntTaLOt7S+EDXFW5BuQIvhhoMGgm8+WNVgA0EJ7tfL0OcYBSvr19fqwChEn 9c14cSk6mgHSsleP5NvskYN053pxHwy0LTSb8YBBv52th37t/CRFC1363rS5q+D7 JixFopd1O5pKpA5ipvE4gGgRjPtwjx0SjjepwK/3fuhEJQQyKzTIKlMfu2Dj/iR2 Li1Sfccau5LQXOj9fUITU3u1YG7yrm8VGzT7ao4d+KRwgMLjd2pLqiGIbbJwGBiP FRmtilWQoeIlmSlFX4obAA517DOK0pW1mH8+eEn4EJd3SekT3yzFyKTASv0J48Z8 3F928xg+eZvHxVC0t1J+J5IG0gt3EEncuWKIPQGR7PiQbti6R3FQVTz6WfMWOebP Qi0E9F/Aqakr6Vj2sKGrDq+ebpaF5G8Yw1YrUl2IDiPzkCegp3ZbI0wh11Xvzhi8 LXPQGK4jBQas4G8cegfitzmtdGRHYrbMv0R9I4mvaL+WlOuD2AvyVG28lguqVhnN AZP+ohdquYyX2CNCVvbKWAtXo6Ur0vWG8BL8m6defAtEkIwVBALaOHQOSI3aNUz4 lwy4OARkBcm/EgorBgEEAZdVAQUBAQdAsefmSfxEOdOr02+K/6noYCuJ1FeAWVz6 jFYQ+9w6jggDAQgHiH4EGBYKACYWIQS+1KHTZVW2gS6fq9rjxAH2DXCdWQUCZAXJ vwIbDAUJB4TOAAAKCRDjxAH2DXCdWRl4AP9h5ot212BK29S6ZcMBhHvmtF5PG1oD c7LnZycSRmbFiwEAndCMpAGOhDW8iVgDd0wLQq/ZMPe+xccfG1b3zFH2EgE= =iiAT -----END PGP PUBLIC KEY BLOCK-----
<doceng-secretary@FreeBSD.org>pub rsa2048/E1C03580AEB45E58 2019-10-31 [SC] [expires: 2022-10-30]
Key fingerprint = F24D 7B32 B864 625E 5541 A0E4 E1C0 3580 AEB4 5E58
uid FreeBSD Doceng Team Secretary <doceng-secretary@freebsd.org>
sub rsa2048/9EA8D713509472FC 2019-10-31 [E] [expires: 2022-10-30]-----BEGIN PGP PUBLIC KEY BLOCK----- mQENBF27FFcBCADeoSsIgyQUY8vREwkTikwFFlNg31MVy5s/Nq1cNK1PRfRMnprS yfB62KqbYuz16bmQKaA9zHN4FGfiTvR6tl66LVHm1s/5HPiLv8sP14GsruLro9zN v72dO7a9i68bMw+jarPOnu9dGiDFEI0dACOkdCGEYKEUapQeNpmWRrQ46BeXyFwF JcNx76bJJUkwk6fWC0W63D762e6lCEX6ndoaPjjLBnFvtx13heNGUc8RukBwe2mA U5pSGHj47J05bdWiRSwZaXa8PcW+20zTWaP755w7zWe4h60GANY7OsT9nuOqsioJ QonxTrJuZweKRV8fNQ1EfDws3HZr7/7iXvO3ABEBAAG0PEZyZWVCU0QgRG9jZW5n IFRlYW0gU2VjcmV0YXJ5IDxkb2Nlbmctc2VjcmV0YXJ5QGZyZWVic2Qub3JnPokB VAQTAQoAPhYhBPJNezK4ZGJeVUGg5OHANYCutF5YBQJduxRXAhsDBQkFo5qABQsJ CAcDBRUKCQgLBRYDAgEAAh4BAheAAAoJEOHANYCutF5YB2IIALw+EPYmOz9qlqIn oTFmk/5MrcdzC5iLEfxubbF6TopDWsWPiOh5mAuvfEmROSGf6ctvdYe9UtQV3VNY KeeyskeFrIBOFo2KG/dFqKPAWef6IfhbW3HWDWo5uOBg01jHzQ/pB1n6SMKiXfsM idL9wN+UQKxF3Y7S/bVrZTV0isRUolO9+8kQeSYT/NMojVM0H2fWrTP/TaNEW4fY JBDAl5hsktzdl8sdbNqdC0GiX3xb4GvgVzGGQELagsxjfuXk6PfOyn6Wx2d+yRcI FrKojmhihBp5VGFQkntBIXQkaW0xhW+WBGxwXdaAl0drQlZ3W+edgdOl705x73kf Uw3Fh2a5AQ0EXbsUVwEIANEPAsltM4vFj2pi5xEuHEcZIrIX/ZJhoaBtZkqvkB+H 4pu3/eQHK5hg0Dw12ugffPMz8mi57iGNI9TXd8ZYMJxAdvEZSDHCKZTX9G+FcxWa /AzKNiG25uSISzz7rMB/lV1gofCdGtpHFRFTiNxFcoacugTdlYDiscgJZMJSg/hC GXBdEKXR5WRAgAGandcL8llCToOt1lZEOkd5vJM861w6evgDhAZ2HGhRuG8/NDxG r4UtlnYGUCFof/Q4oPNbDJzmZXF+8OQyTNcEpVD3leEOWG1Uv5XWS2XKVHcHZZ++ ISo/B5Q6Oi3SJFCVV9f+g09YF+PgfP/mVMBgif2fT20AEQEAAYkBPAQYAQoAJhYh BPJNezK4ZGJeVUGg5OHANYCutF5YBQJduxRXAhsMBQkFo5qAAAoJEOHANYCutF5Y kecIAMTh2VHQqjXHTszQMsy3NjiTVVITI3z+pzY0u2EYmLytXQ2pZMzLHMcklmub 5po0X4EvL6bZiJcLMI2mSrOs0Gp8P3hyMI40IkqoLMp7VA2LFlPgIJ7K5W4oVwf8 khY6lw7qg2l69APm/MM3xAyiL4p6MU8tpvWg5AncZ6lxyy27rxVflzEtCrKQuG/a oVaOlMjH3uxvOK6IIxlhvWD0nKs/e2h2HIAZ+ILE6ytS5ZEg2GXuigoQZdEnv71L xyvE9JANwGZLkDxnS5pgN2ikfkQYlFpJEkrNTQleCOHIIIp8vgJngEaP51xOIbQM CiG/y3cmKQ/ZfH7BBvlZVtZKQsI= =MQKT -----END PGP PUBLIC KEY BLOCK-----
Last modified on: 11 grudnia 2021 by Sergio Carlavilla Delgado